mmWave for XIAO to Home Assistant via Bluetooth

Introduction
24GHz mmWave Sensor for XIAO - Human Static Presence is a expansion board for Seeed Studio XIAO series. It is an antenna-integrated, high-sensitivity mmwave sensor that is based on the FMCW principle. Combined with sensor signal processing and accurate human body sensing algorithms, it can identify human bodies in motion and stationary states.
This chapter primarily introduces how the 24GHz mmWave Sensor for XIAO connects to the HA via Bluetooth. For detailed functional features of the 24GHz mmWave Sensor for XIAO, you can refer to here.
All contents of this Wiki apply only to 24GHz mmWave for XIAO and may not be used on other millimetre wave sensors.
Getting Started
Hardware Preparations
In this article, we will use mmWave for XIAO in conjunction with the XIAO ESP32C3 to plug it into Home Assistant for the sake of aesthetics and ease of wiring. if you want to follow this tutorial to the letter, then you will need to prepare the following modules.
| Seeed Studio XIAO ESP32C3 | 24GHz mmWave for XIAO |
|---|---|
 | 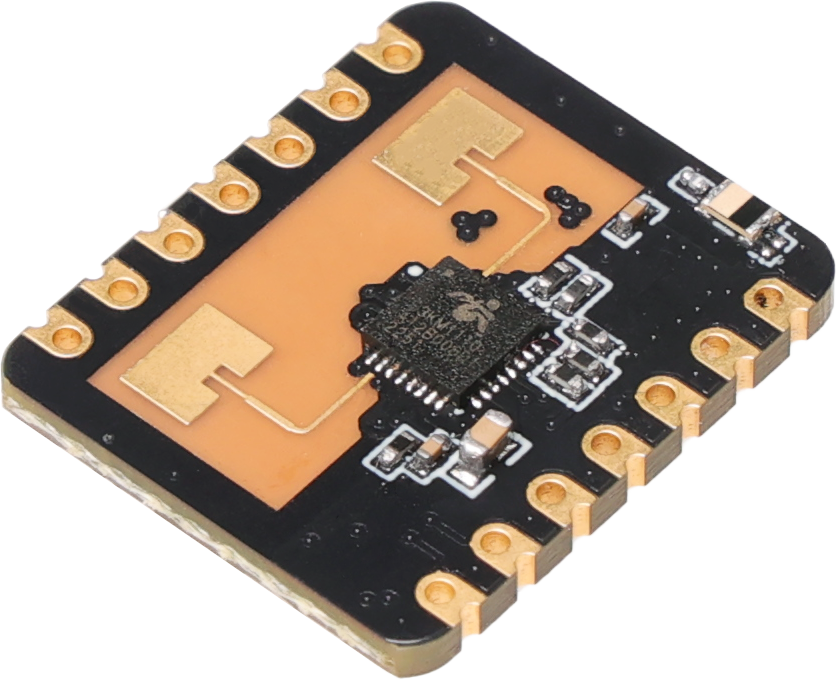 |
The sensor is designed for XIAO compatibility, so in general, if you want to use this sensor, you need to prepare an XIAO and install the female header row pin for the sensor. When connecting to the XIAO, please pay special attention to the installation direction of the sensor, please do not plug it in backwards, otherwise it is likely to burn the sensor or the XIAO.
The correct direction to follow is that the antenna of the sensor should face outwards.

After confirming that the connection direction is correct, you can connect the USB-C type cable to the computer or 3.3V power supply, and the sensor will start to work.
If you don't have an XIAO on hand at the moment, then you have the option of powering the mmwave for XIAO separately by connecting TTL to its 3.3V pin and GND pin, which can also be done using the content of this tutorial. For this tutorial, there is no need to use the RX and TX pins.

Software Preparations
If you haven't installed HomeAssistant yet, you can refer to the official HomeAssistant tutorial by clicking here.
Procedures
Step 1. Discovery Device
In Home Assistant, click the setting in the lower left corner, select Devices&Services in the center.

In the Discovered zone, there will be a sensor icon, click configure.

A popup window will appear, click submit.

You will see a successful configuration popup, click finish.

Step 2. Configurate Device
In the configured zone, click ld2410_ble.

Once you are in the sensor settings page, click 1 device.

Add the sensor's return value to the dashboard.

Select ADD TO DASHBOARD in the popup window.

Finally, click overview in the upper left corner, you will see the mmwave-for-xiao sensor data successfully displayed on the dashboard. So far the mmwave for xiao sensor has been successfully connected to the Home Assistant.
Next, you can get creative with your automation!
mmWave for XIAO to Home Assistant via Wifi using ESPHome
The following yaml file connects a Seeed XIAO ESP32-C3 with Radar module to Home Assistant, using the ESPHome firmware:
# Configuration for ESPHome
substitutions:
  name: "xiao-24ghz-mmwave"
  friendly_name: "XIAO 24GHz mmwave"

esphome:
  name: "${name}"
  friendly_name: "${friendly_name}"
  name_add_mac_suffix: True

esp32:
  board: esp32-c3-devkitm-1
  framework:
    type: arduino

# Enable logging
logger:

# Enable Home Assistant API
api:

ota:
  - platform: esphome

wifi:
  ssid: !secret wifi_ssid
  password: !secret wifi_password

  # Enable fallback hotspot (captive portal) in case wifi connection fails
  ap:
    ssid: "${friendly_name}"

captive_portal:

uart:
  id: mmWave_uart
  tx_pin: GPIO5  # D3
  rx_pin: GPIO4  # D2
  baud_rate: 9600
  parity: NONE
  stop_bits: 1

ld2410:
  id: ld2410_radar
  uart_id: mmWave_uart

number:
  - platform: ld2410
    timeout:
      name: Radar Timeout
    max_move_distance_gate:
      name: Radar Max Move Distance
    max_still_distance_gate:
      name: Radar Max Still Distance
    g0:
      move_threshold:
        name: g0 move threshold
      still_threshold:
        name: g0 still threshold
    g1:
      move_threshold:
        name: g1 move threshold
      still_threshold:
        name: g1 still threshold
    g2:
      move_threshold:
        name: g2 move threshold
      still_threshold:
        name: g2 still threshold
    g3:
      move_threshold:
        name: g3 move threshold
      still_threshold:
        name: g3 still threshold
    g4:
      move_threshold:
        name: g4 move threshold
      still_threshold:
        name: g4 still threshold
    g5:
      move_threshold:
        name: g5 move threshold
      still_threshold:
        name: g5 still threshold
    g6:
      move_threshold:
        name: g6 move threshold
      still_threshold:
        name: g6 still threshold
    g7:
      move_threshold:
        name: g7 move threshold
      still_threshold:
        name: g7 still threshold
    g8:
      move_threshold:
        name: g8 move threshold
      still_threshold:
        name: g8 still threshold

binary_sensor:
  - platform: ld2410
    has_target:
      name: Radar Target
      id: radar_has_target
    has_moving_target:
      name: Radar Moving Target
    has_still_target:
      name: Radar Still Target

sensor:
  - platform: ld2410
    moving_distance:
      name: Radar Moving Distance
      id: moving_distance
    still_distance:
      name: Radar Still Distance
      id: still_distance
    moving_energy:
      name: Radar Move Energy
    still_energy:
      name: Radar Still Energy
    detection_distance:
      name: Radar Detection Distance
      id: radar_detection_distance
    g0:
      move_energy:
        name: g0 move energy
      still_energy:
        name: g0 still energy
    g1:
      move_energy:
        name: g1 move energy
      still_energy:
        name: g1 still energy
    g2:
      move_energy:
        name: g2 move energy
      still_energy:
        name: g2 still energy
    g3:
      move_energy:
        name: g3 move energy
      still_energy:
        name: g3 still energy
    g4:
      move_energy:
        name: g4 move energy
      still_energy:
        name: g4 still energy
    g5:
      move_energy:
        name: g5 move energy
      still_energy:
        name: g5 still energy
    g6:
      move_energy:
        name: g6 move energy
      still_energy:
        name: g6 still energy
    g7:
      move_energy:
        name: g7 move energy
      still_energy:
        name: g7 still energy
    g8:
      move_energy:
        name: g8 move energy
      still_energy:
        name: g8 still energy
Tech Support & Product Discussion
Thank you for choosing our products! We are here to provide you with different support to ensure that your experience with our products is as smooth as possible. We offer several communication channels to cater to different preferences and needs.