MR24HPC1 mmWave Human Detection Sensor Kit
Introduction
Powered by Seeed Studio's XIAO ESP32C3, it supports WiFi/BLE connectivity and offers precise human detection via mmWave sensors. Seamlessly connect grove modules for added features. Achieve easy setup for Home Assistant within 1-2 minutes, coupled with convenient wireless Over-The-Air (OTA) updates. Enable extensive versatility with replaceable mmWave sensors. Ideal for customize smart home automation, detect intrusions, and monitor the well-being of the elderly.
Features
- Precision Human Detection: The onboard mmWave sensor, based on FMCW principle, offers accurate privacy-focused human detection.
- Flexible Customization: Onboard Human Presence sensor is replaceable with other Seeed's mmWave series for heartbeat detection, fall detection, etc; Enable additional functionality with 400+ optional Grove sensors.
- Easy Setup, Wireless Updates: No-Code setup for Home Assistant in 1-2 minutes, with wireless Over-The-Air (OTA) updates.
- Seamless Connectivity: Powered by XIAO ESP32C3, supporting WiFi/BLE and compatible with smart home systems
- Scalable Solution: Tailor to your needs with available OEM/ODM services for scalability.
Application
- Smart Home Automation: Enhance lighting, HVAC, and security systems based on human presence.
- Building Security: Detect intrusions and trigger alerts for heightened security.
- Healthcare Monitoring: Monitor patient movement and aid in fall detection.
- Automatic Doors: Enable doors to open as people approach.
- Elderly Care: Monitor the well-being of the elderly and provide timely assistance.
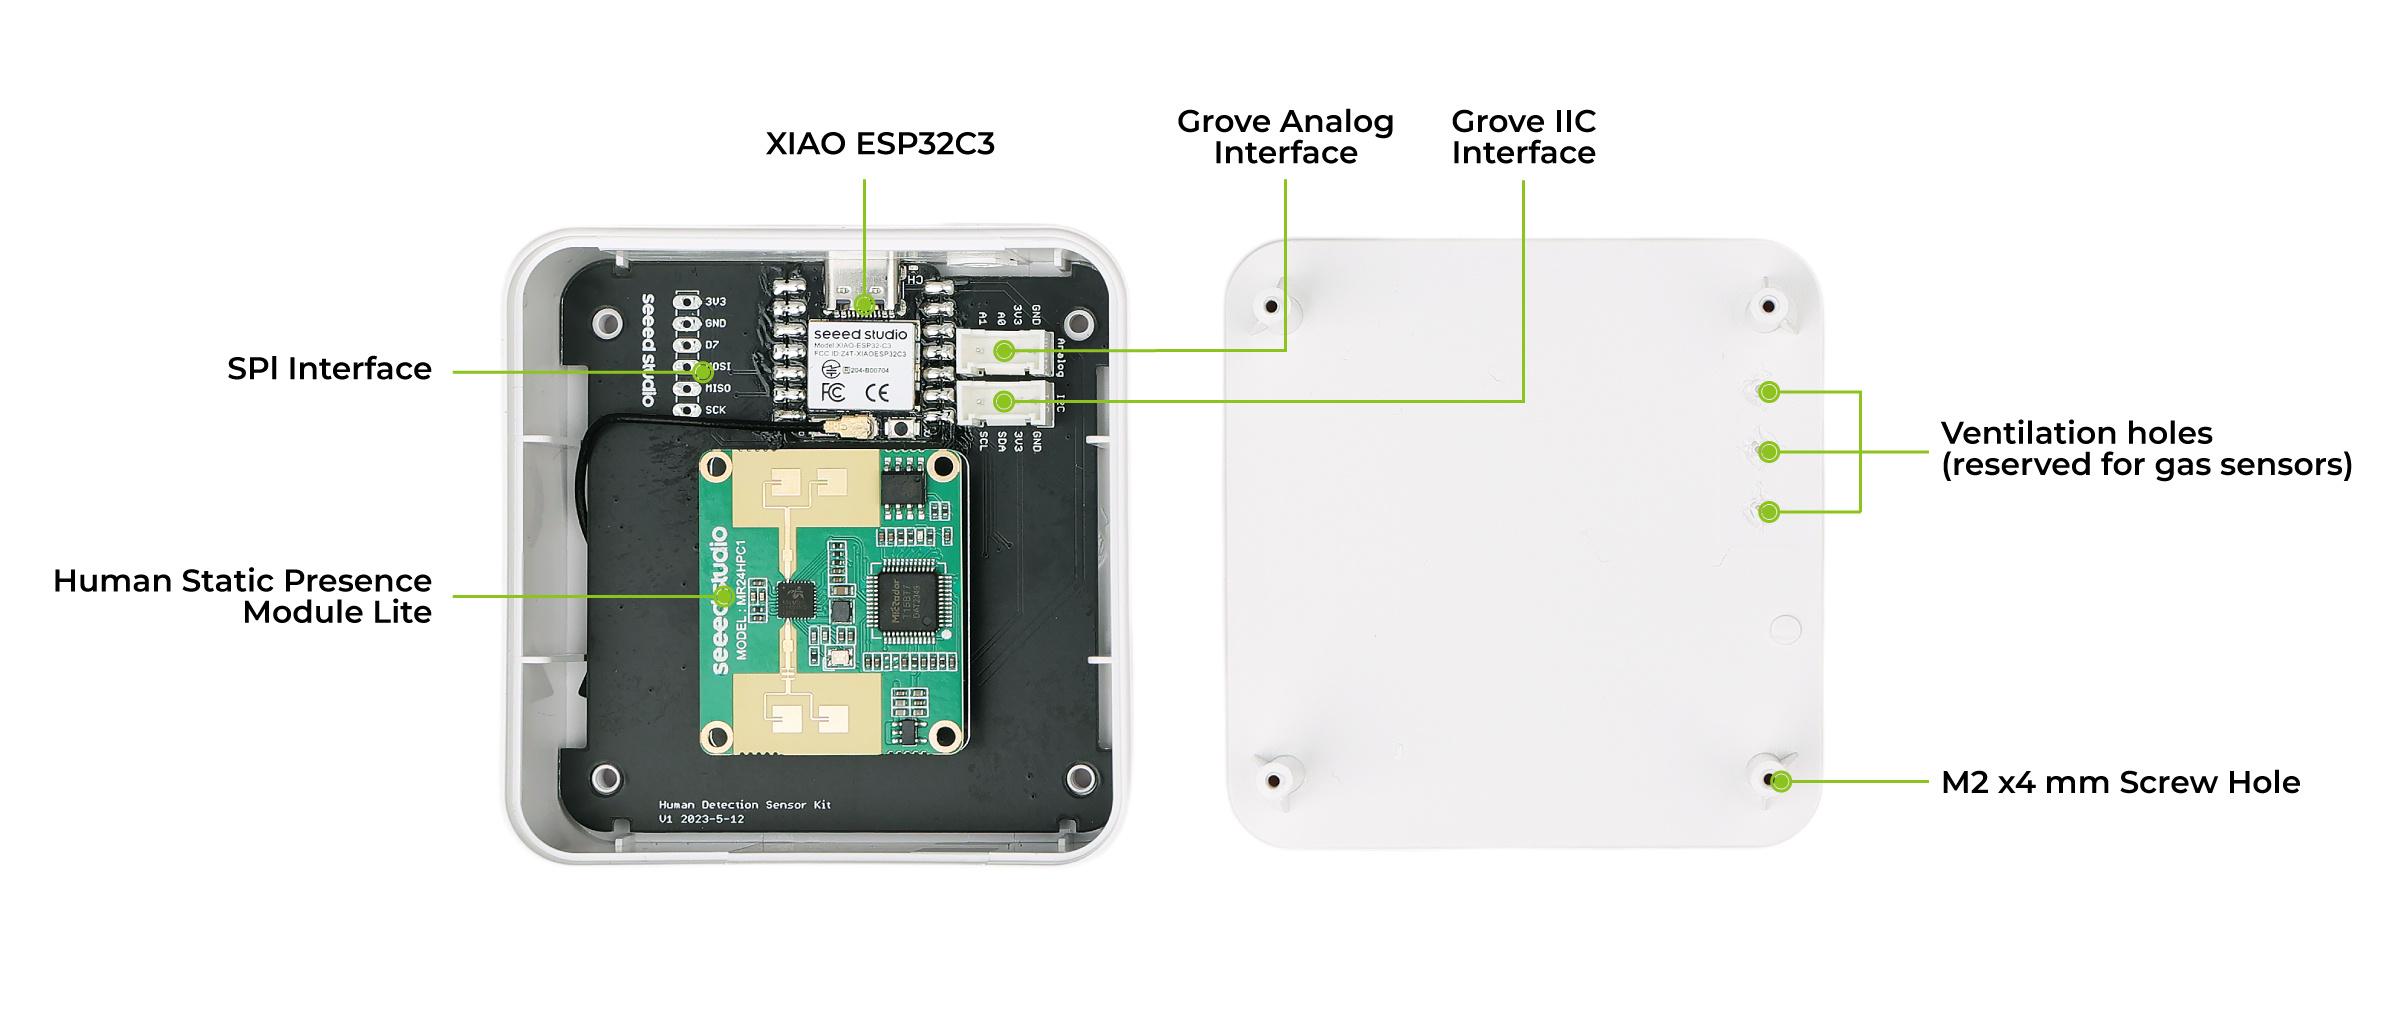
Hardware Overview
Before everything starts, it is quite essential to have some basic parameters of the product. The following table provides information about the characteristics of mmWave Human Detection Sensor Kit.
There are some things to keep in mind when using this kit.
-
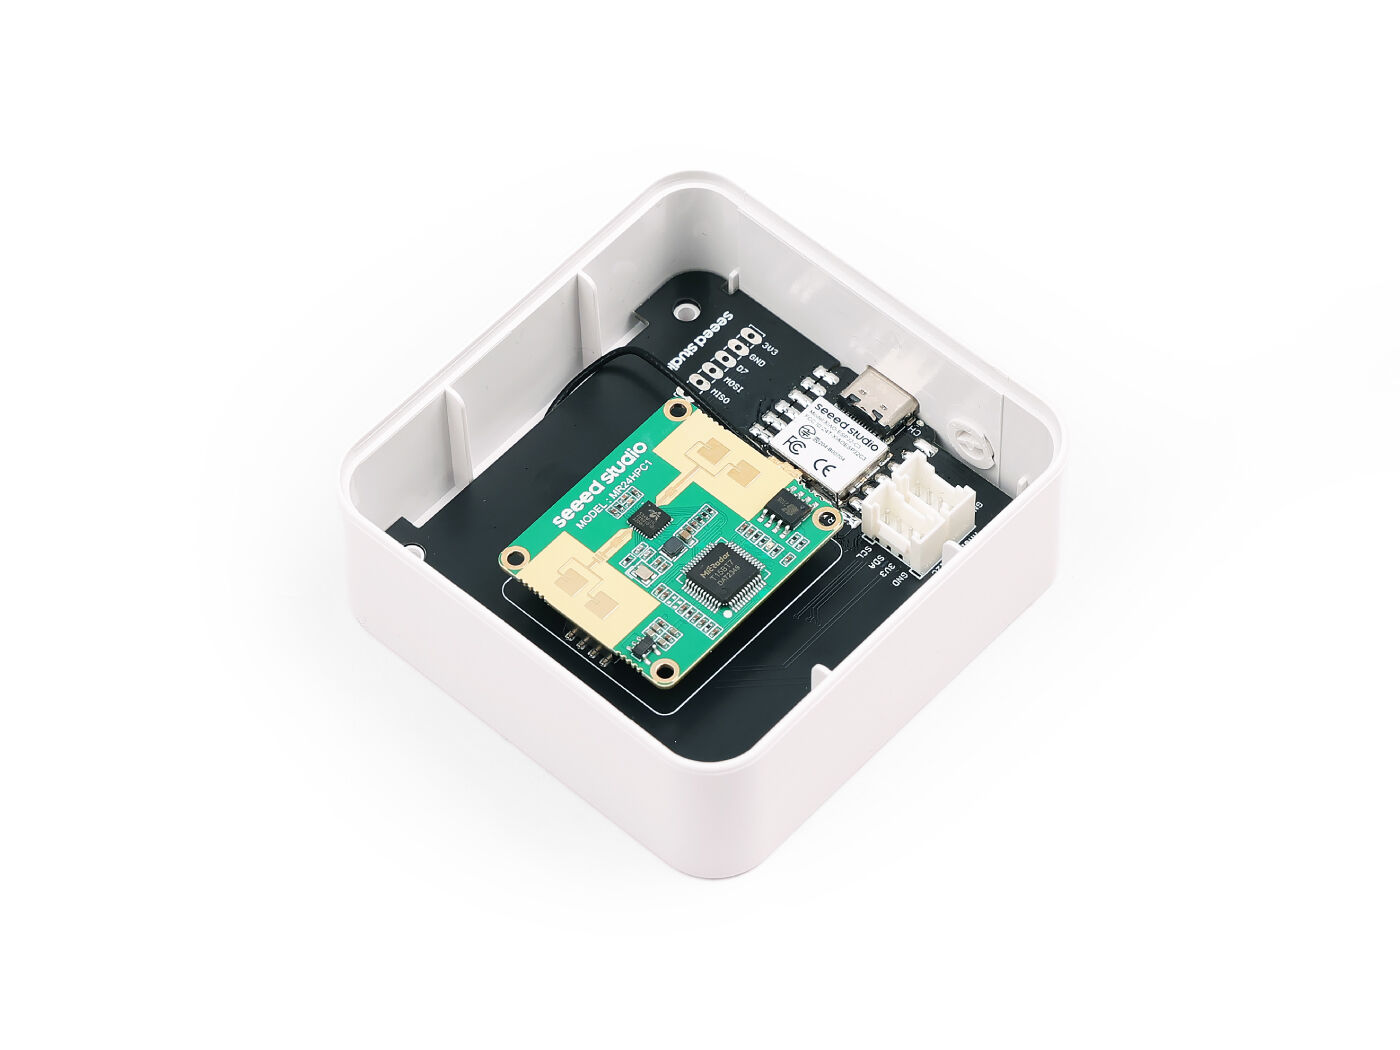
The network function of the XIAO ESP32C3 requires the use of an antenna. If you want to install a Grove module, try not to change the position of the antenna. The antenna is placed on the back of the baseboard by default, which ensures a good signal and does not interfere with the radar work.
-
The holes reserved in the kit shell are ventilation holes, which are reserved in consideration of the fact that users may use the sensor module for some gases, they are not used as a criterion to judge whether there are people or not, so please don't worry about the privacy issue.
The following table shows the hardware connection between the millimeter wave radar and the XIAO ESP32C3. If necessary, you can do your own subsequent development based on the connections in the table below.
| XIAO ESP32C3 | MR24HPC1 |
|---|---|
| 5V | VCC |
| GND | GND |
| GPIO4 (D2) | RX |
| GPIO5 (D3) | TX |
Getting Started
All of this tutorial focuses on the quick application of the kit in Home Assistant & ESPHome, if you want to use the kit for secondary development, please refer to the Customized secondary development section of the tutorial.
Software Preparation
In this routine, we will not expand on how to install the Home Assistant environment, we will assume that you already have a working Home Assistant device.
If you wish to learn how to install Home Assistant, then you can refer to the official tutorial. We strongly recommend that you install Home Assistant using an x86 device as this is the most user friendly way for you to install Home Assistant with Supervised.
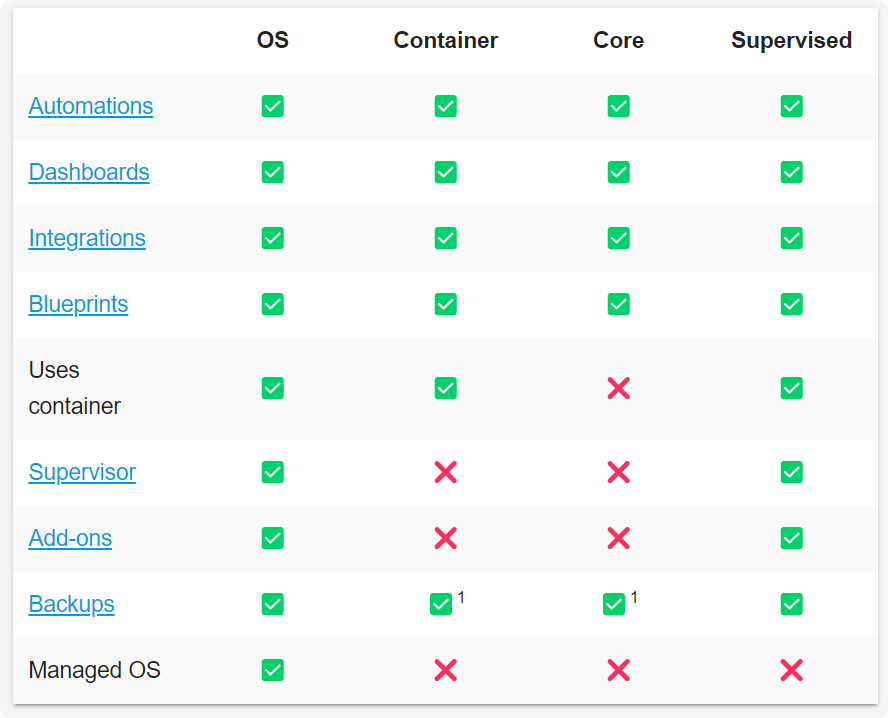
According to the table above, it is most appropriate to install Home Assistant OS and Home Assistant Supervised, which will take a lot of hassle off your hands.
We have also written how to install Home Assistant for some of Seeed Studio products, please refer to them.
- Getting Started with Home Assistant on ODYSSEY-X86
- Getting Started with Home Assistant on reTerminal
- Getting Started with Home Assistant on LinkStar H68K/reRouter CM4
In addition to this, the XIAO ESP32C3 relies on the open source project ESPHome to access Home Assistant, so you also need to have the ESPHome service installed in the Add-Ons.
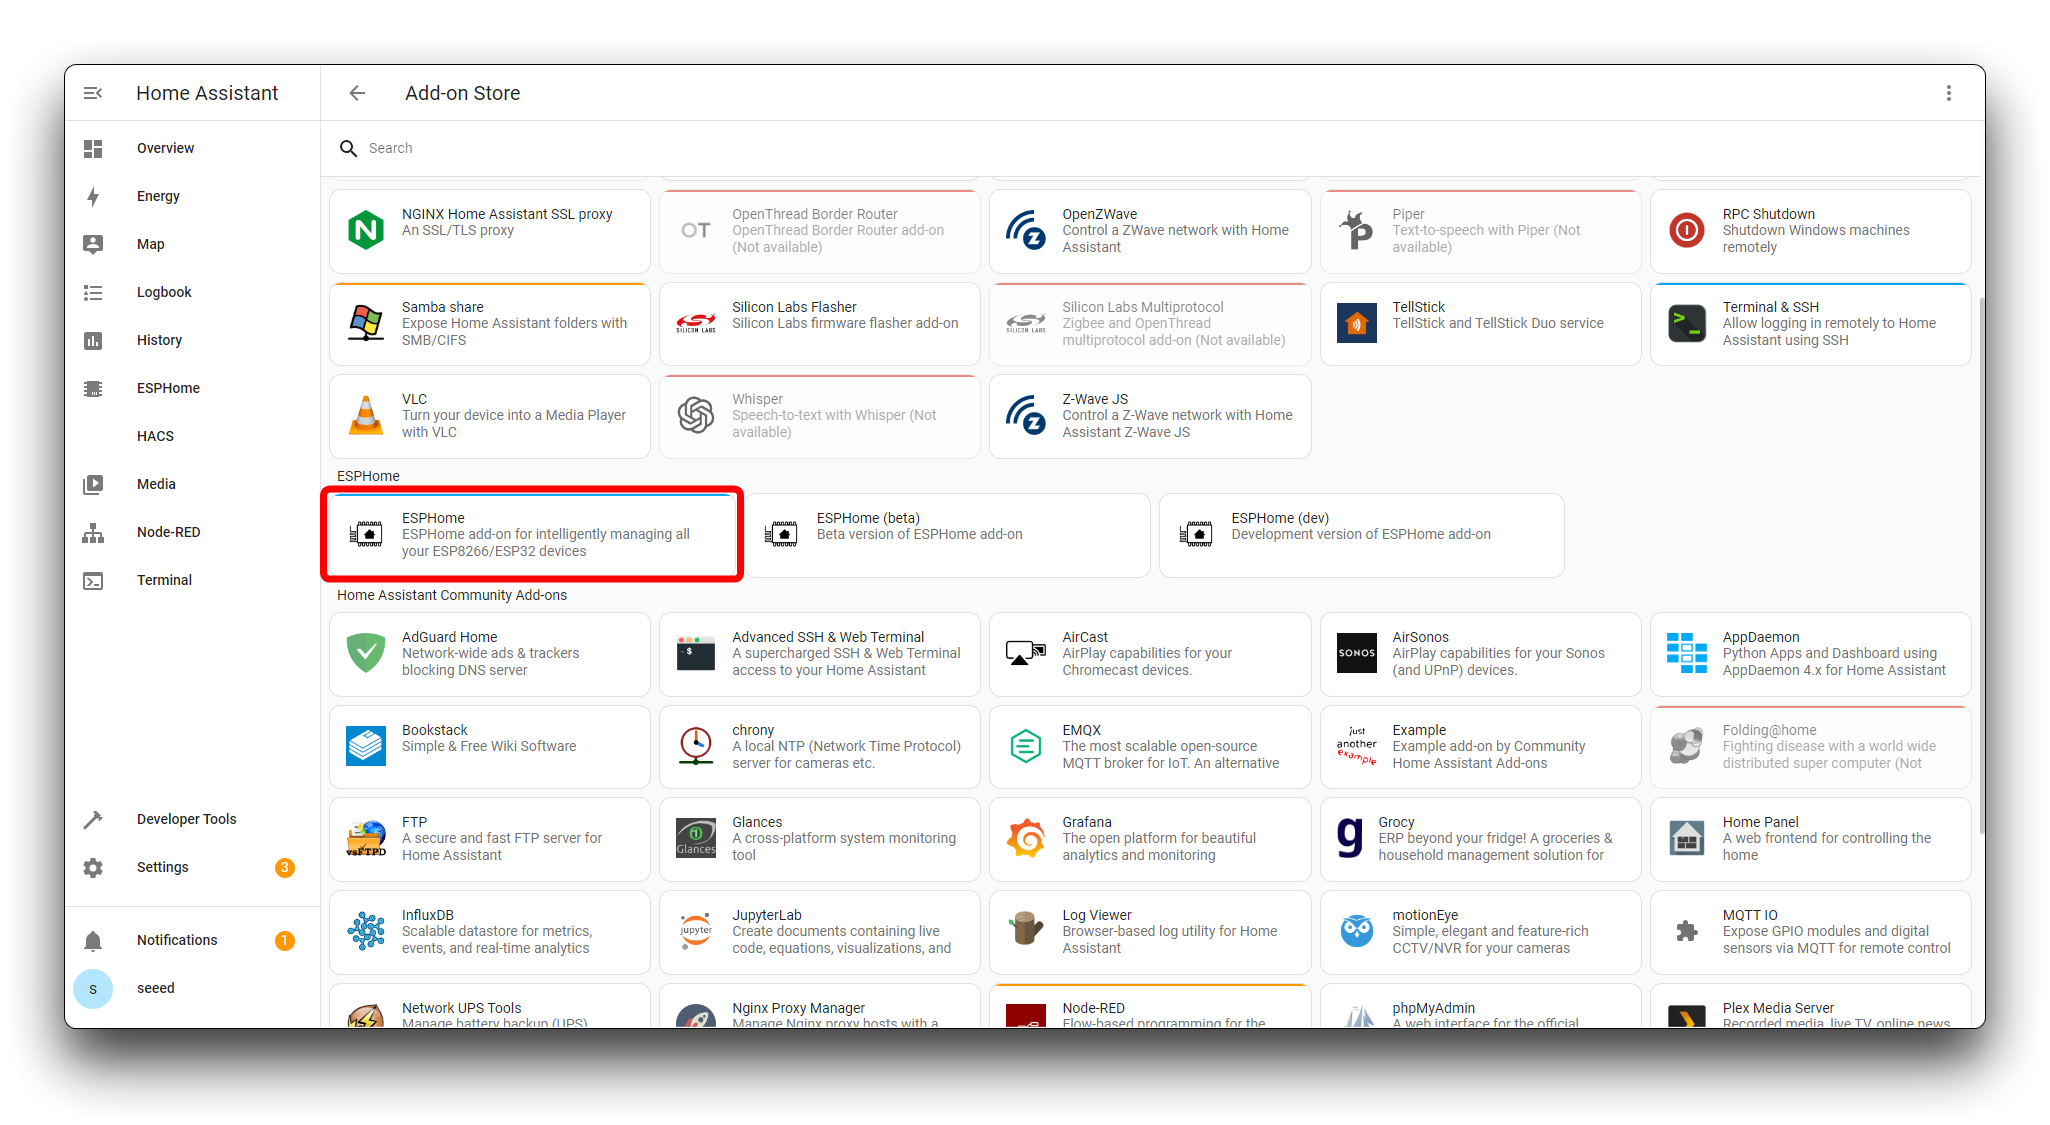
Getting Started with ESPHome
Out of the factory kit, the XIAO ESP32C3 has been flashed with firmware that is ready to power up, and we were able to get the kit working on Home Assistant in a very short time. The video below will show you the exact steps to get started quickly.
Below are the graphic step-by-step details, please refer to the following to complete the quick start.
Step 1. Powering the kit
Please supply power to the kit via a USB-C type cable. Be careful that the power input does not exceed 5V/1A, otherwise the product may be damaged.
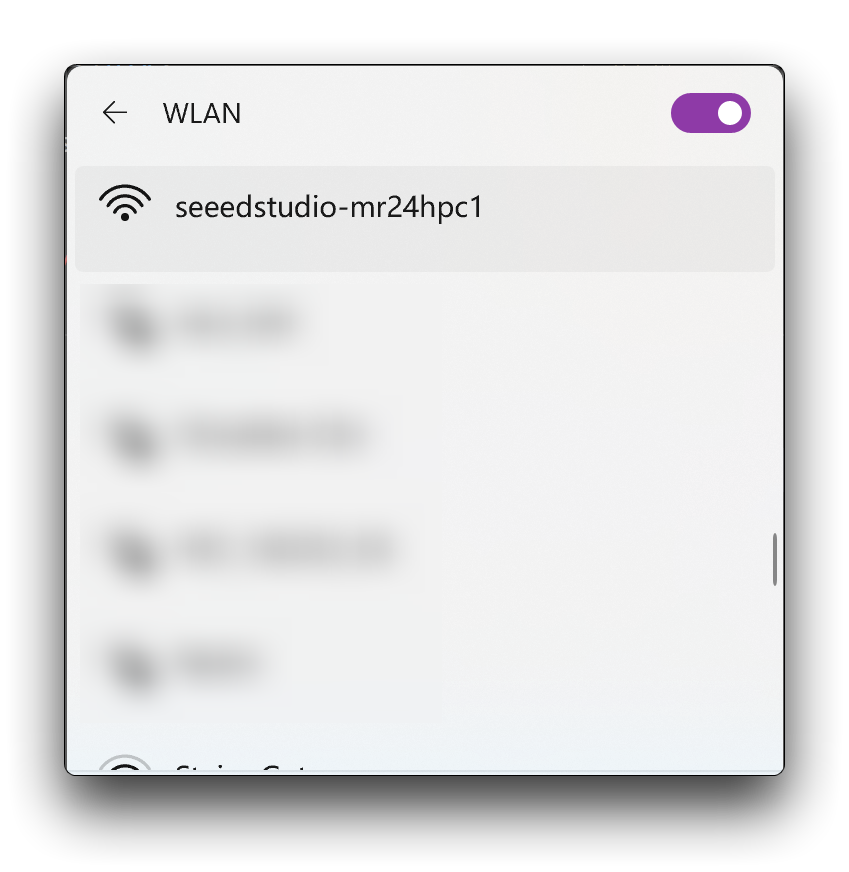
Step 2. Connect to the kit's hotspot "seedstudio-mr24hpc1"
After the kit is powered on, a hotspot named seedstudio-mr24hpc1 will be opened automatically, please search and connect to the hotspot. You can use your cell phone to connect to this network so you don't have to switch networks on your computer as often.
If you are using an older version of firmware, then this may require you to enter your WiFi password in order to connect to mmwave-kit. we recommend updating your firmware. If you want to continue, the network password is seeedstudio.
Then use your browser to go to the backend administration address: 192.168.4.1. This is where we will configure the network and password that the kit needs to connect to.
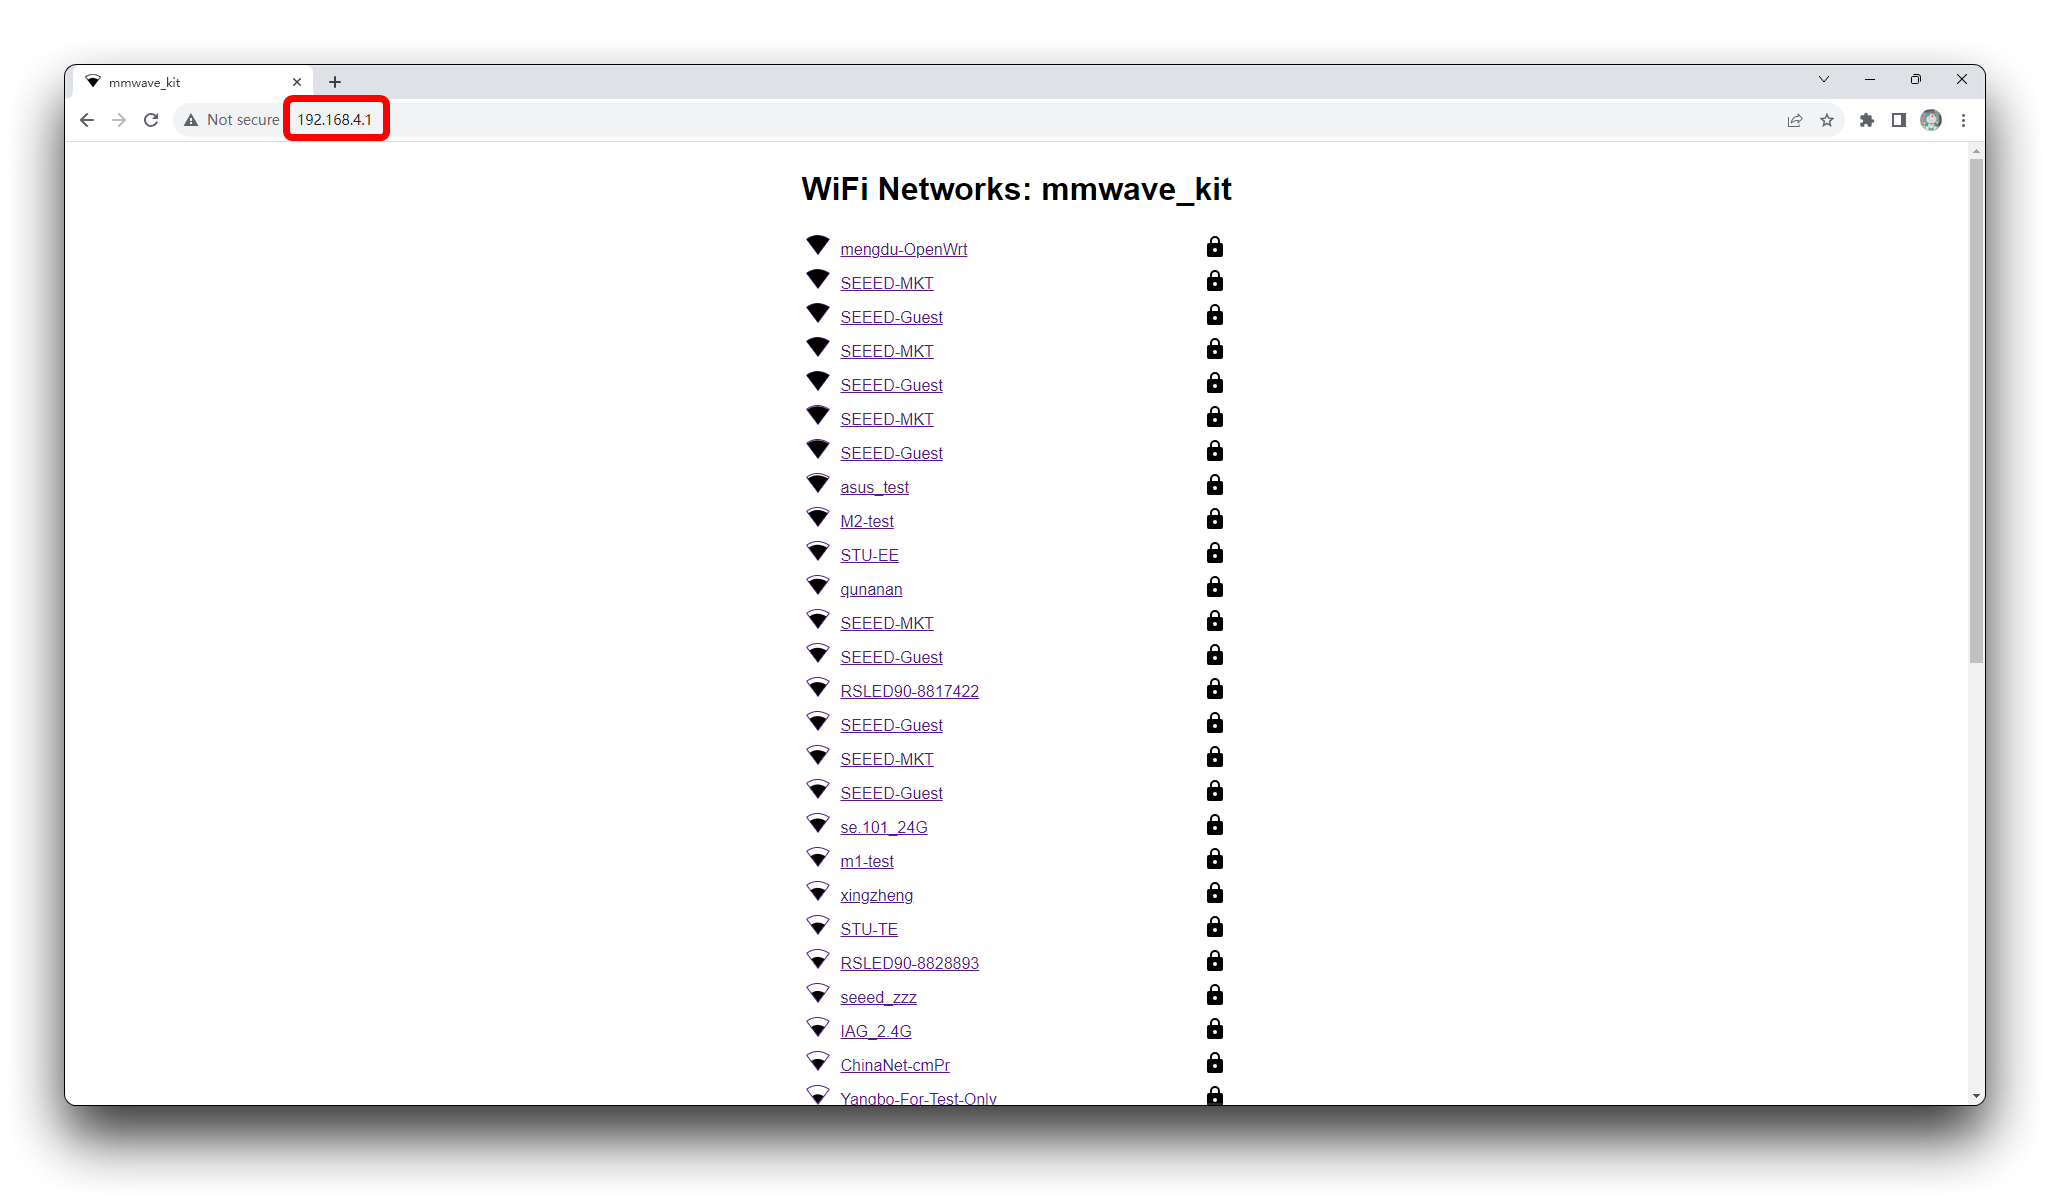
Then, select the name of the network you want the kit to connect to. Please note that the network you select needs to be on the same LAN as Home Assitant, otherwise your kit will not be recognized by Home Assitant searches.
If you can't find the network you want to connect to on the page, it's likely that the XIAO ESP32C3 doesn't support your network. Please adjust your router yourself to enable maximum compatibility and make sure the network is on the 2.4GHz band.XIAO does not support networks on the 5GHz band.
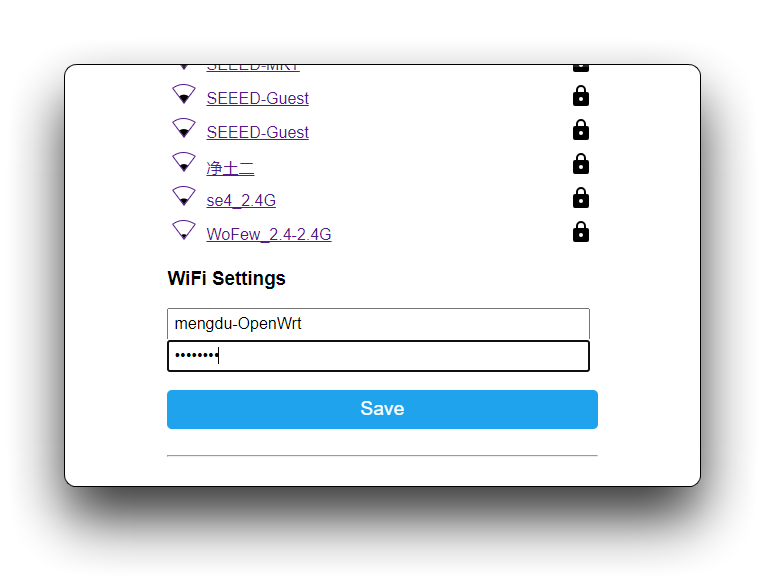
Enter the correct WiFi password and click Save. The device will automatically reboot and try to connect to the network you configured. You don't need to stay on this page, you can close it now.
Step 3. Adding your device to Home Assistant
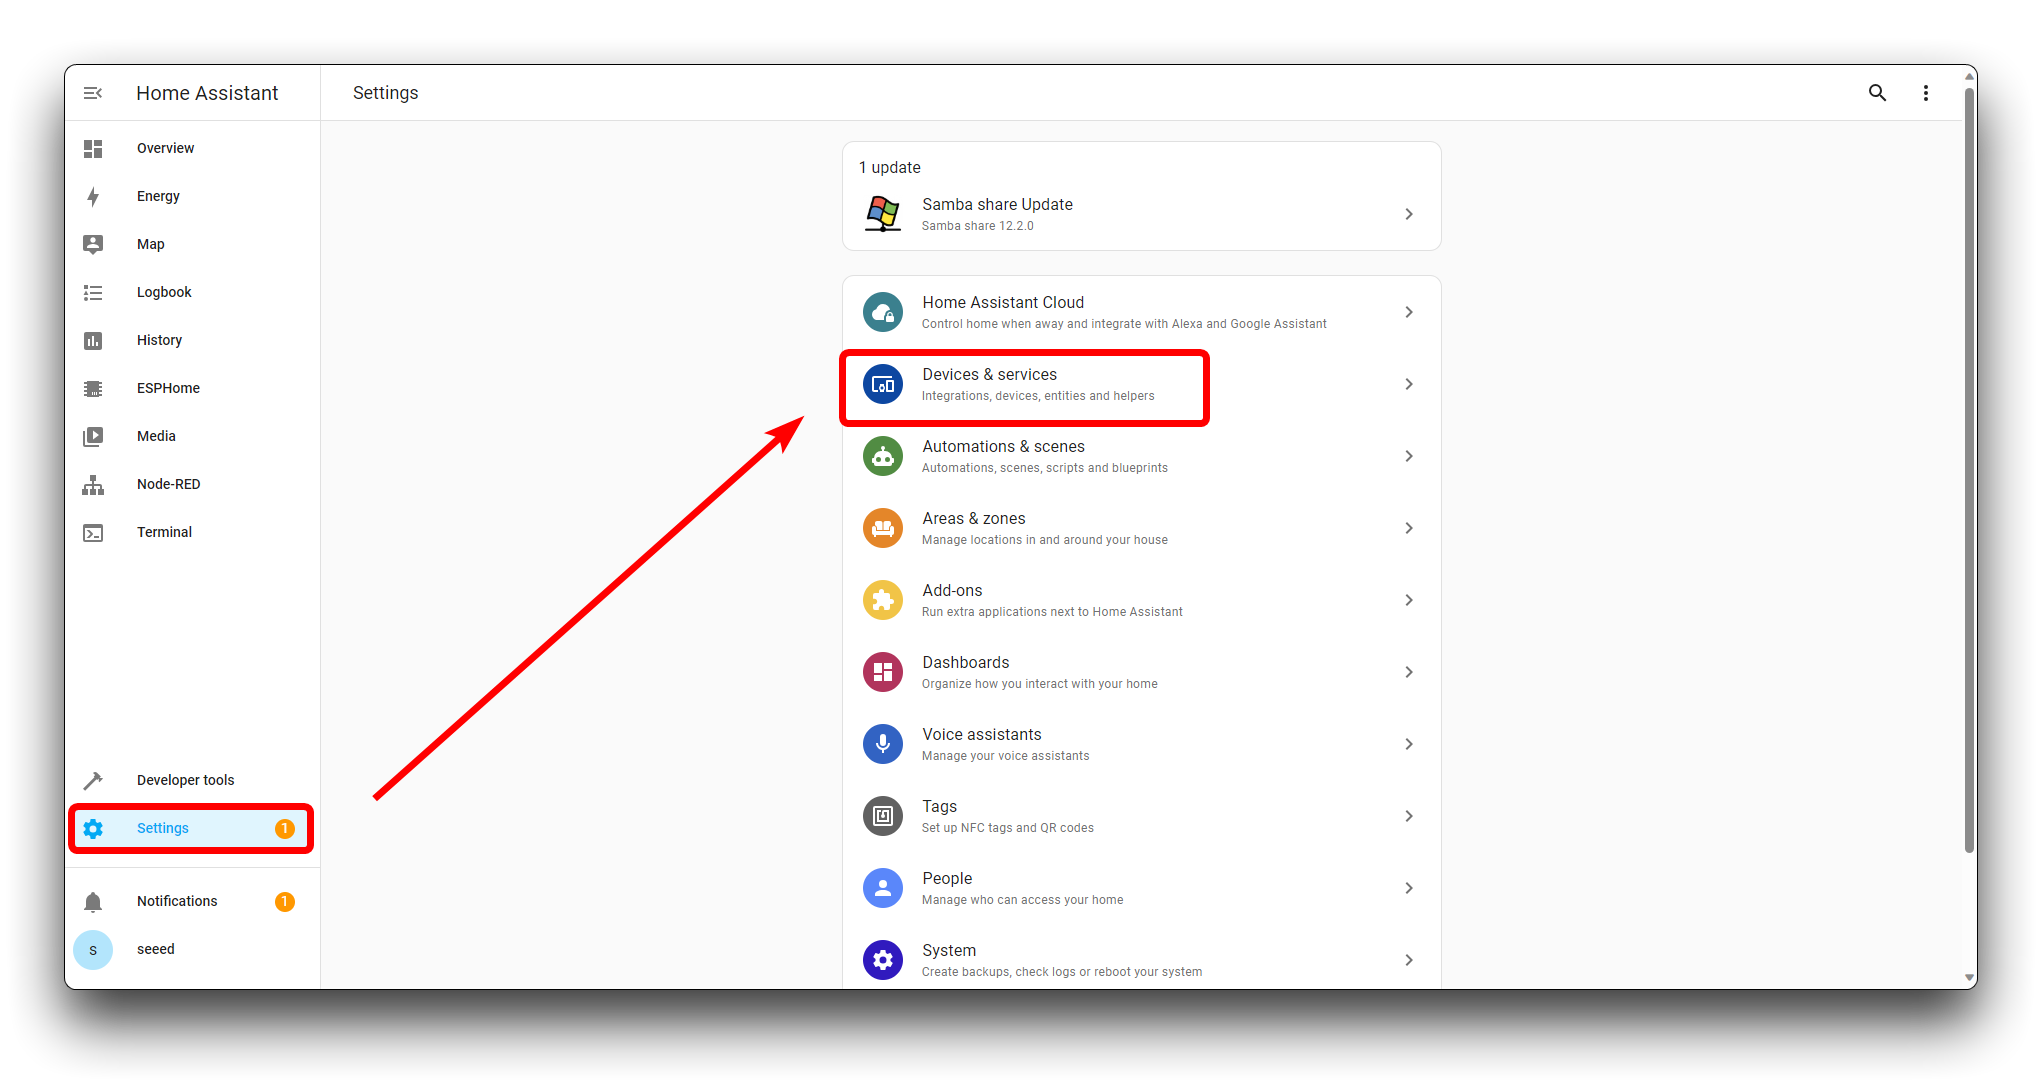
If the networking goes well, you'll be able to find your device on Home Assistant. Please follow the path below to add your device.

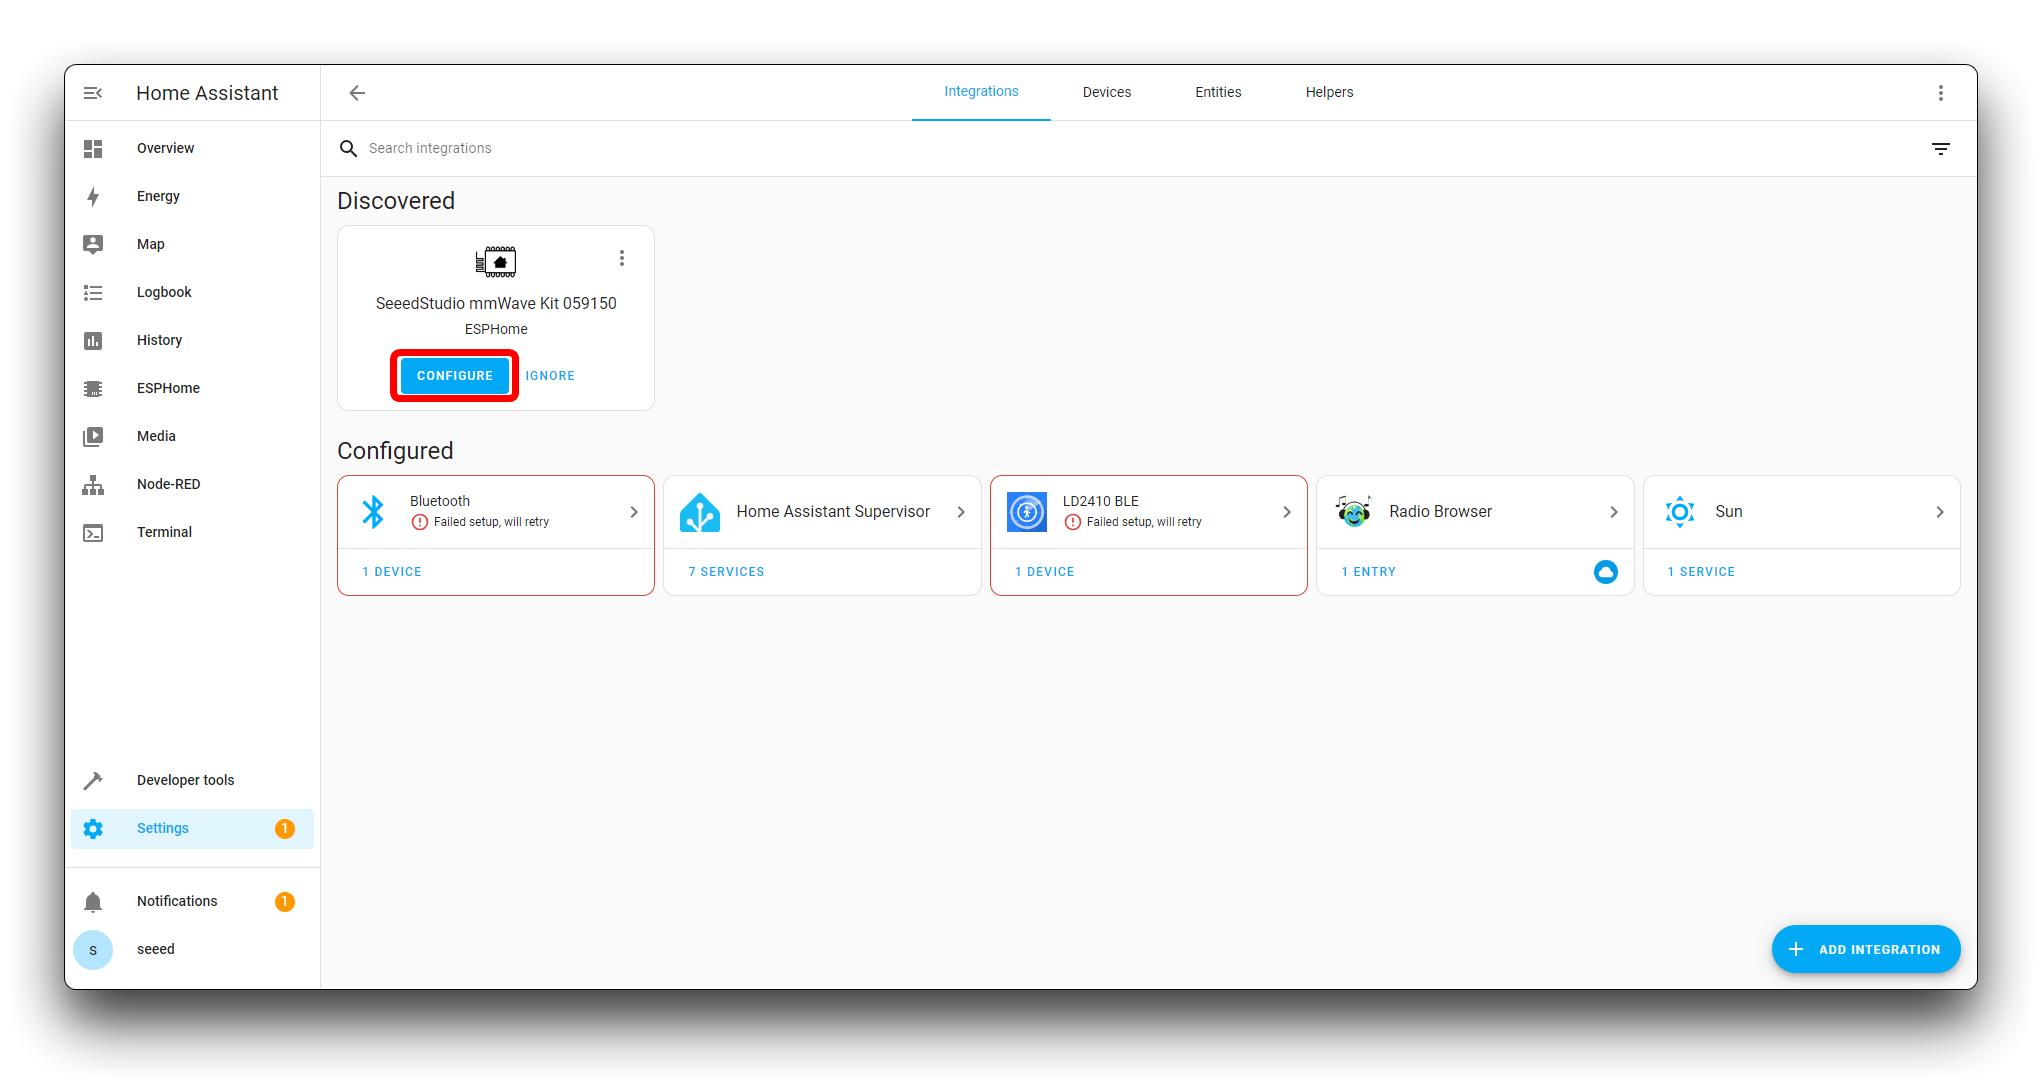
Click Settings in the menu bar and select Devices & services.
You should see the device appear in the Discovered section, click the CONFIGURE button. Select SUBMIT in the window that pops up afterwards and configure the region to use the device normally.
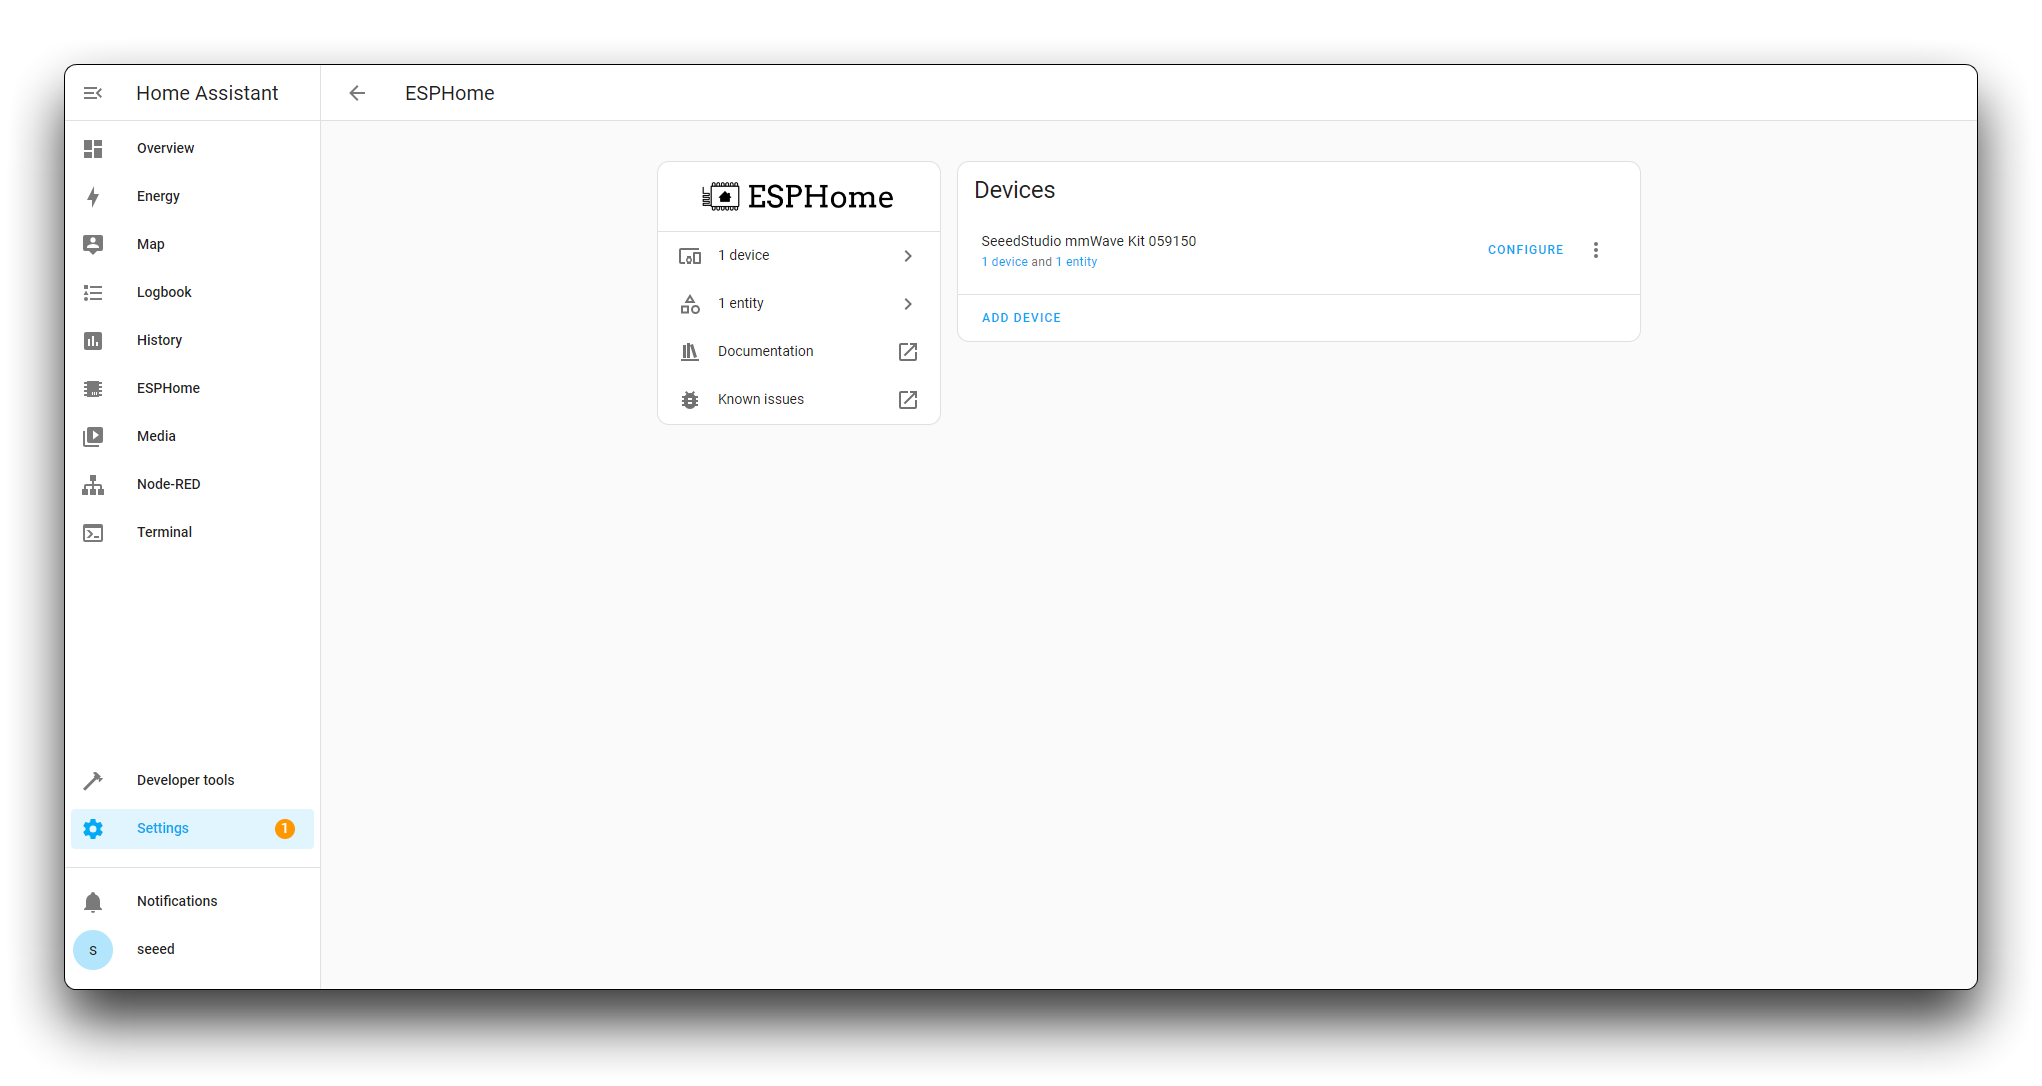
The kit was then successfully added to Home Assistant.
If you have too many devices in your home, there is a certain probability that your device will not be found in Discovered. Then, please get the IP address of the kit from your router's console, click the Add Integration button at the bottom right corner, and manually enter the IP address to add the device.
Step 4. Adding components to the dashboard
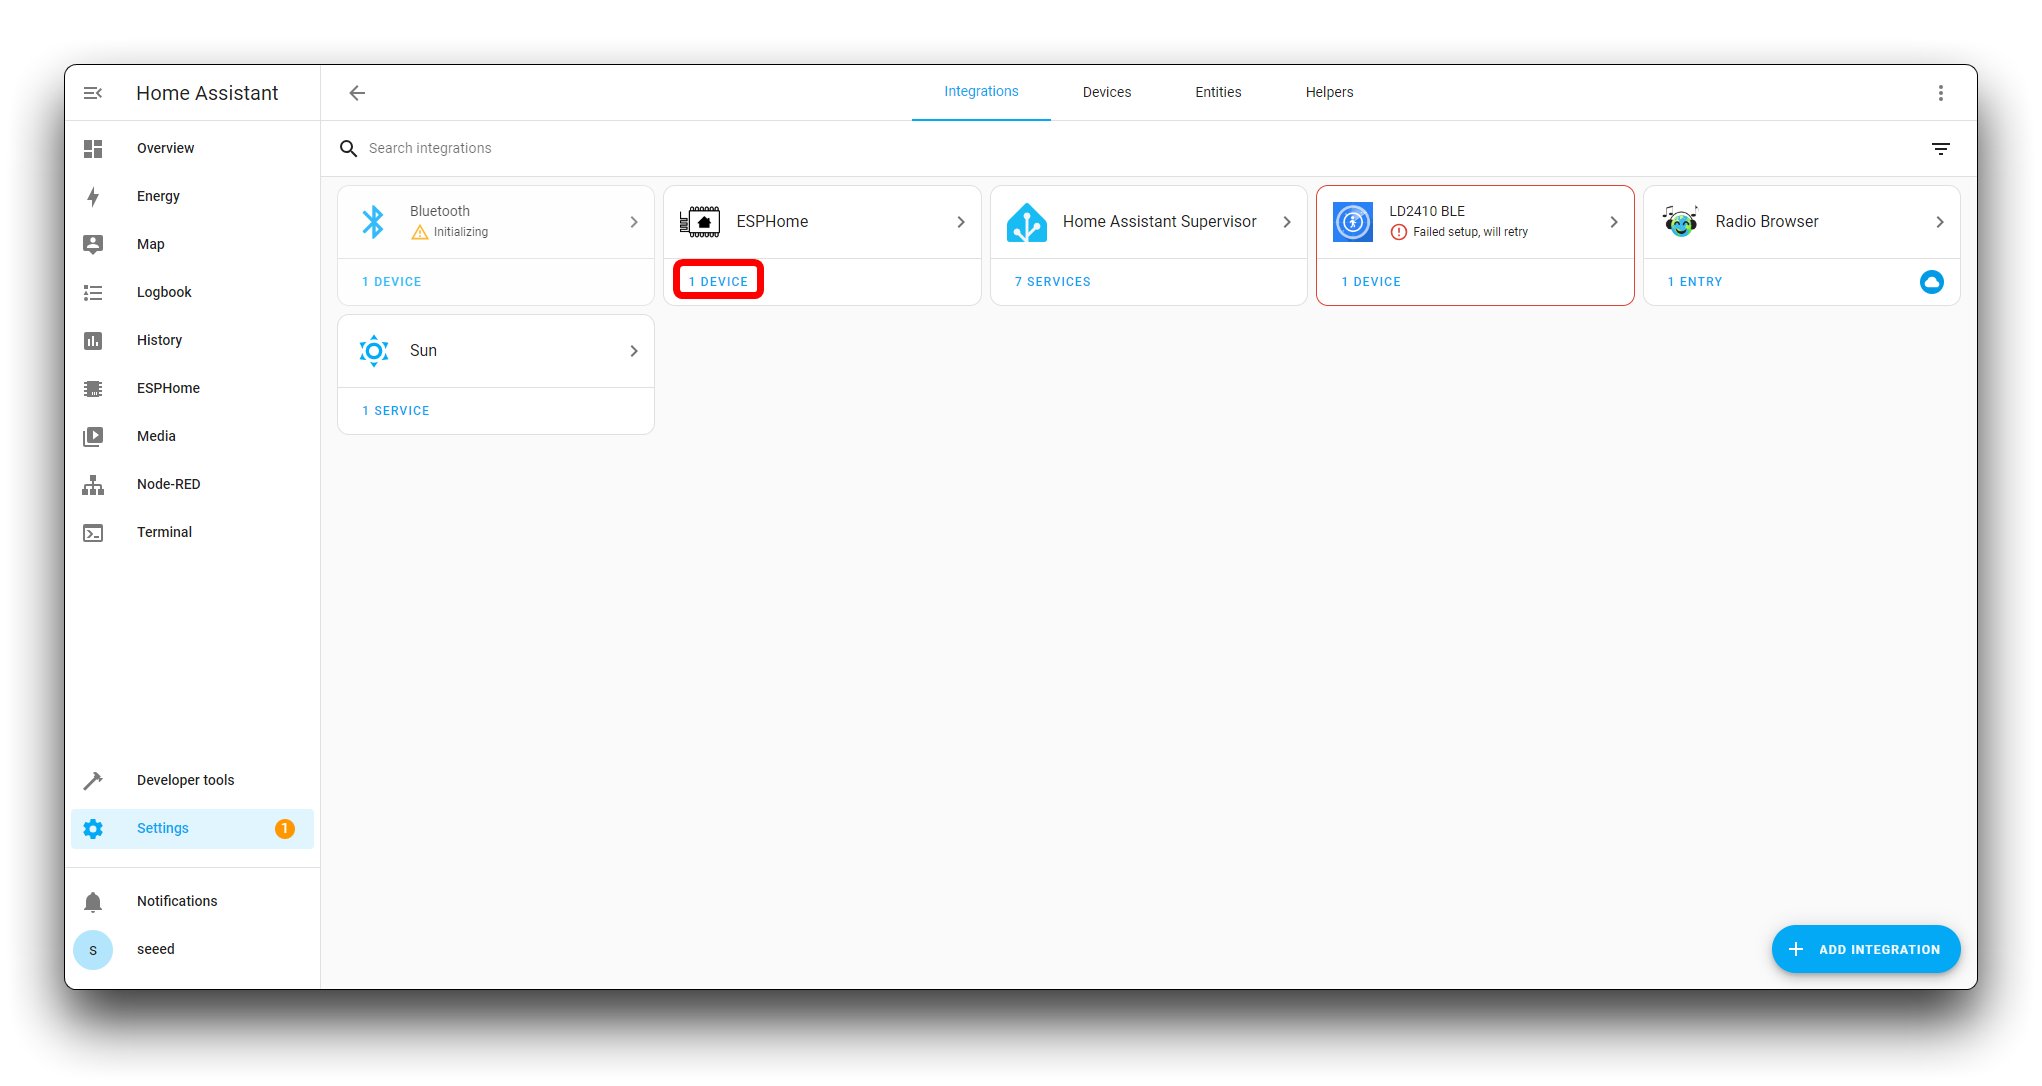
Then, we click on the added ESPHome card, 1 device here.
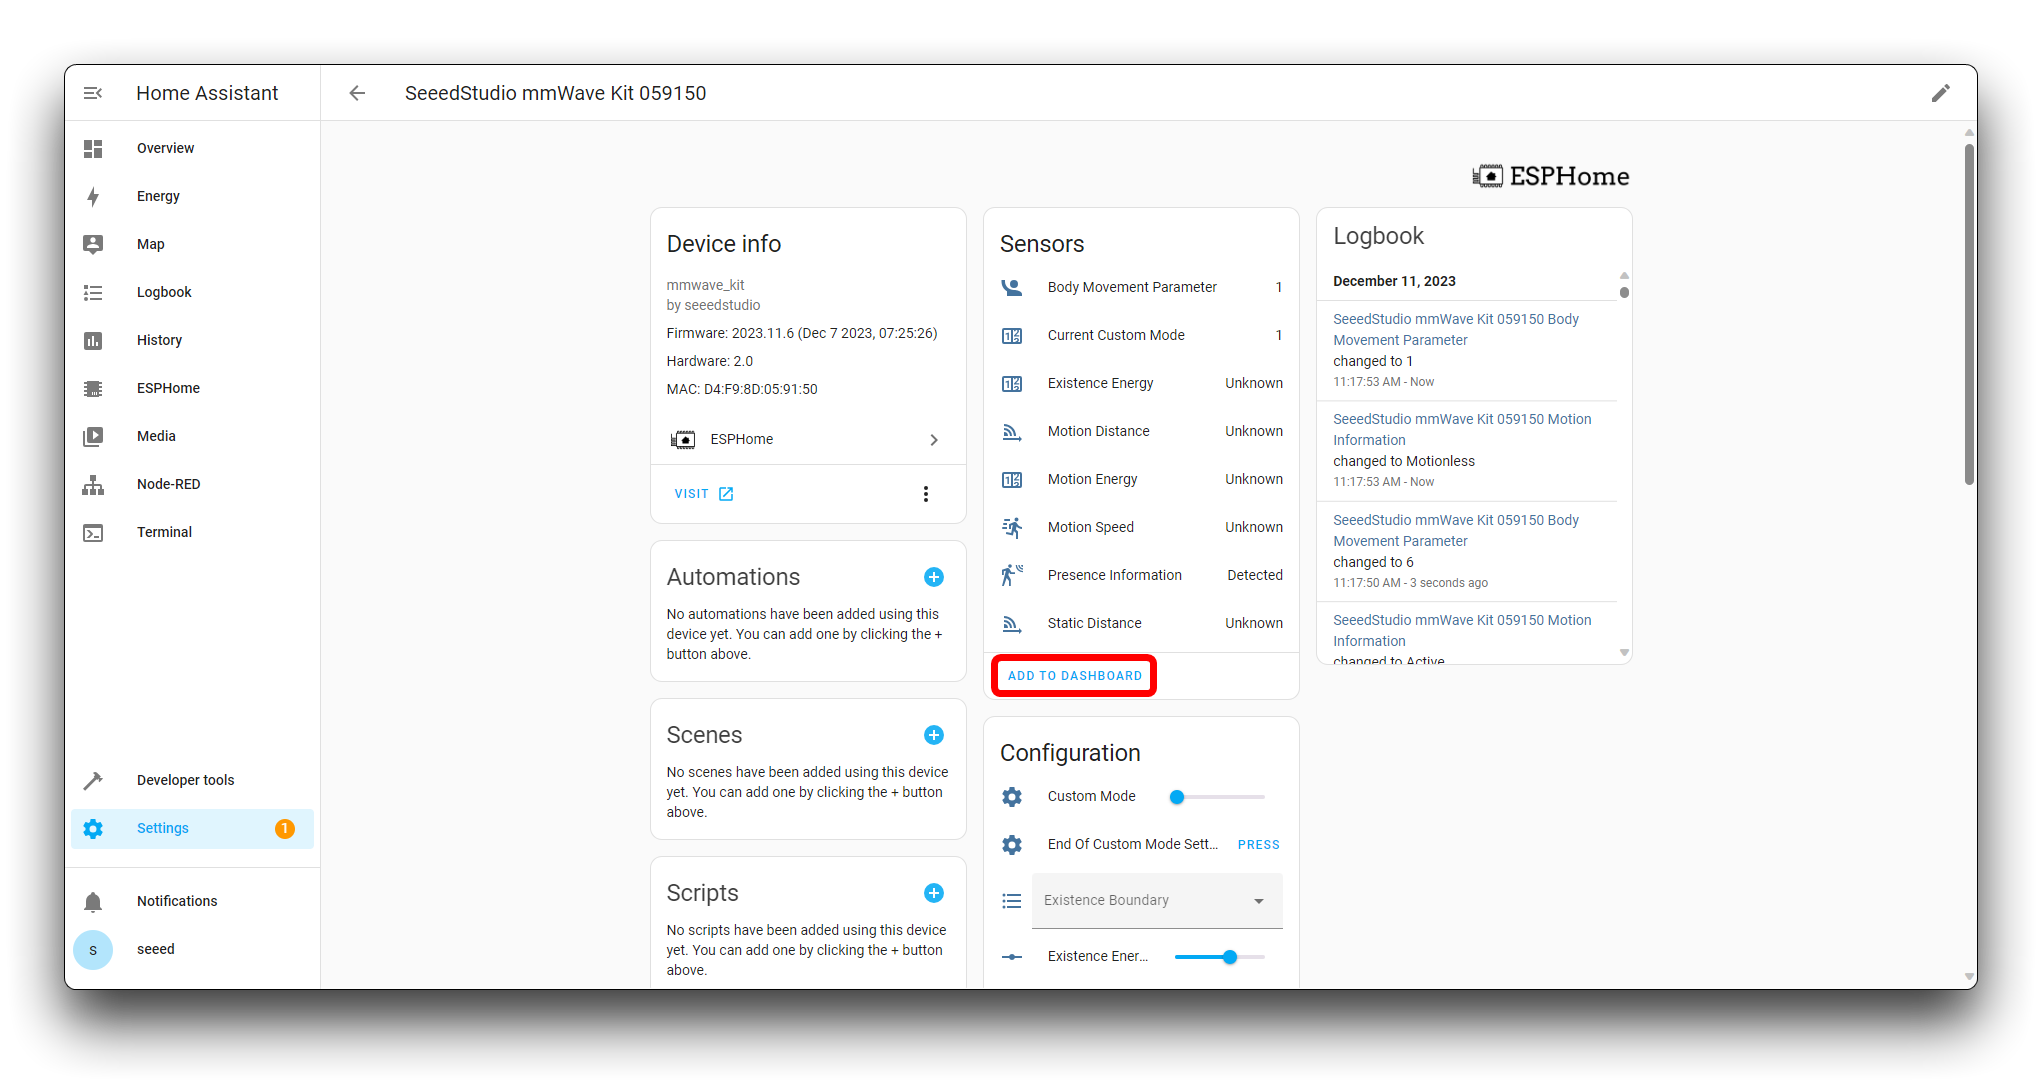
This will show all the component content we have written for the kit. Let's scroll down the display area slightly to add all of these components to the dashboard.
If you don't find the components shown under this page, check the kit's power supply and logs. If you are using the computer function, some computers may not have USB ports that provide enough power support. If you make sure there is no problem with the power supply, please open the logs and send the detailed logs back to Seeed Studio's technical support.
We can then see all the information and content in Overview.
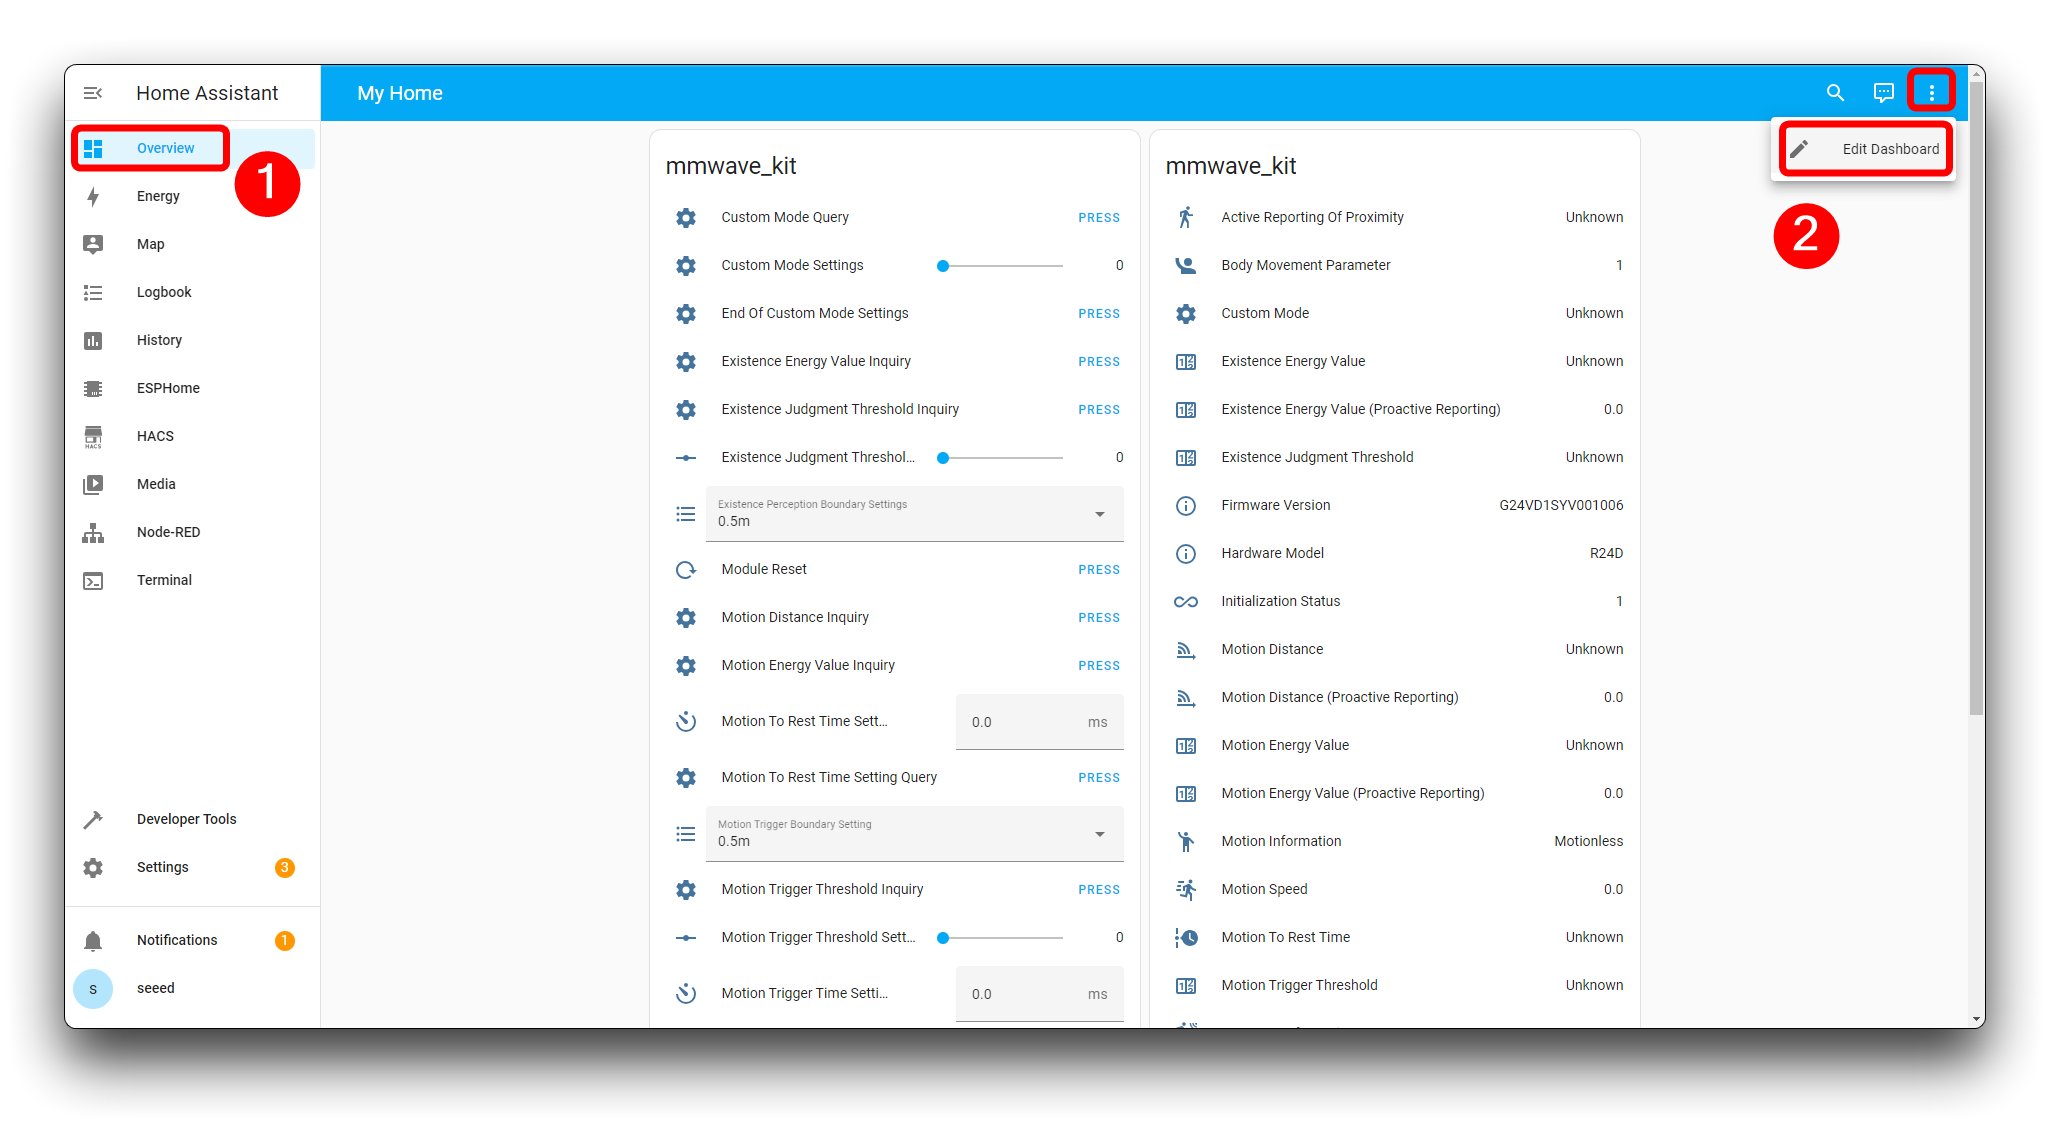
Step 5. Edit Dashboard
Currently, the display order of the dashboard component is automatic, which may not be conducive to observing and performing setup operations, so next we need to edit the dashboard to make its display more in line with its function.
In Overviw, click on the three dots with the triangles and then click on Edit Dashboard.
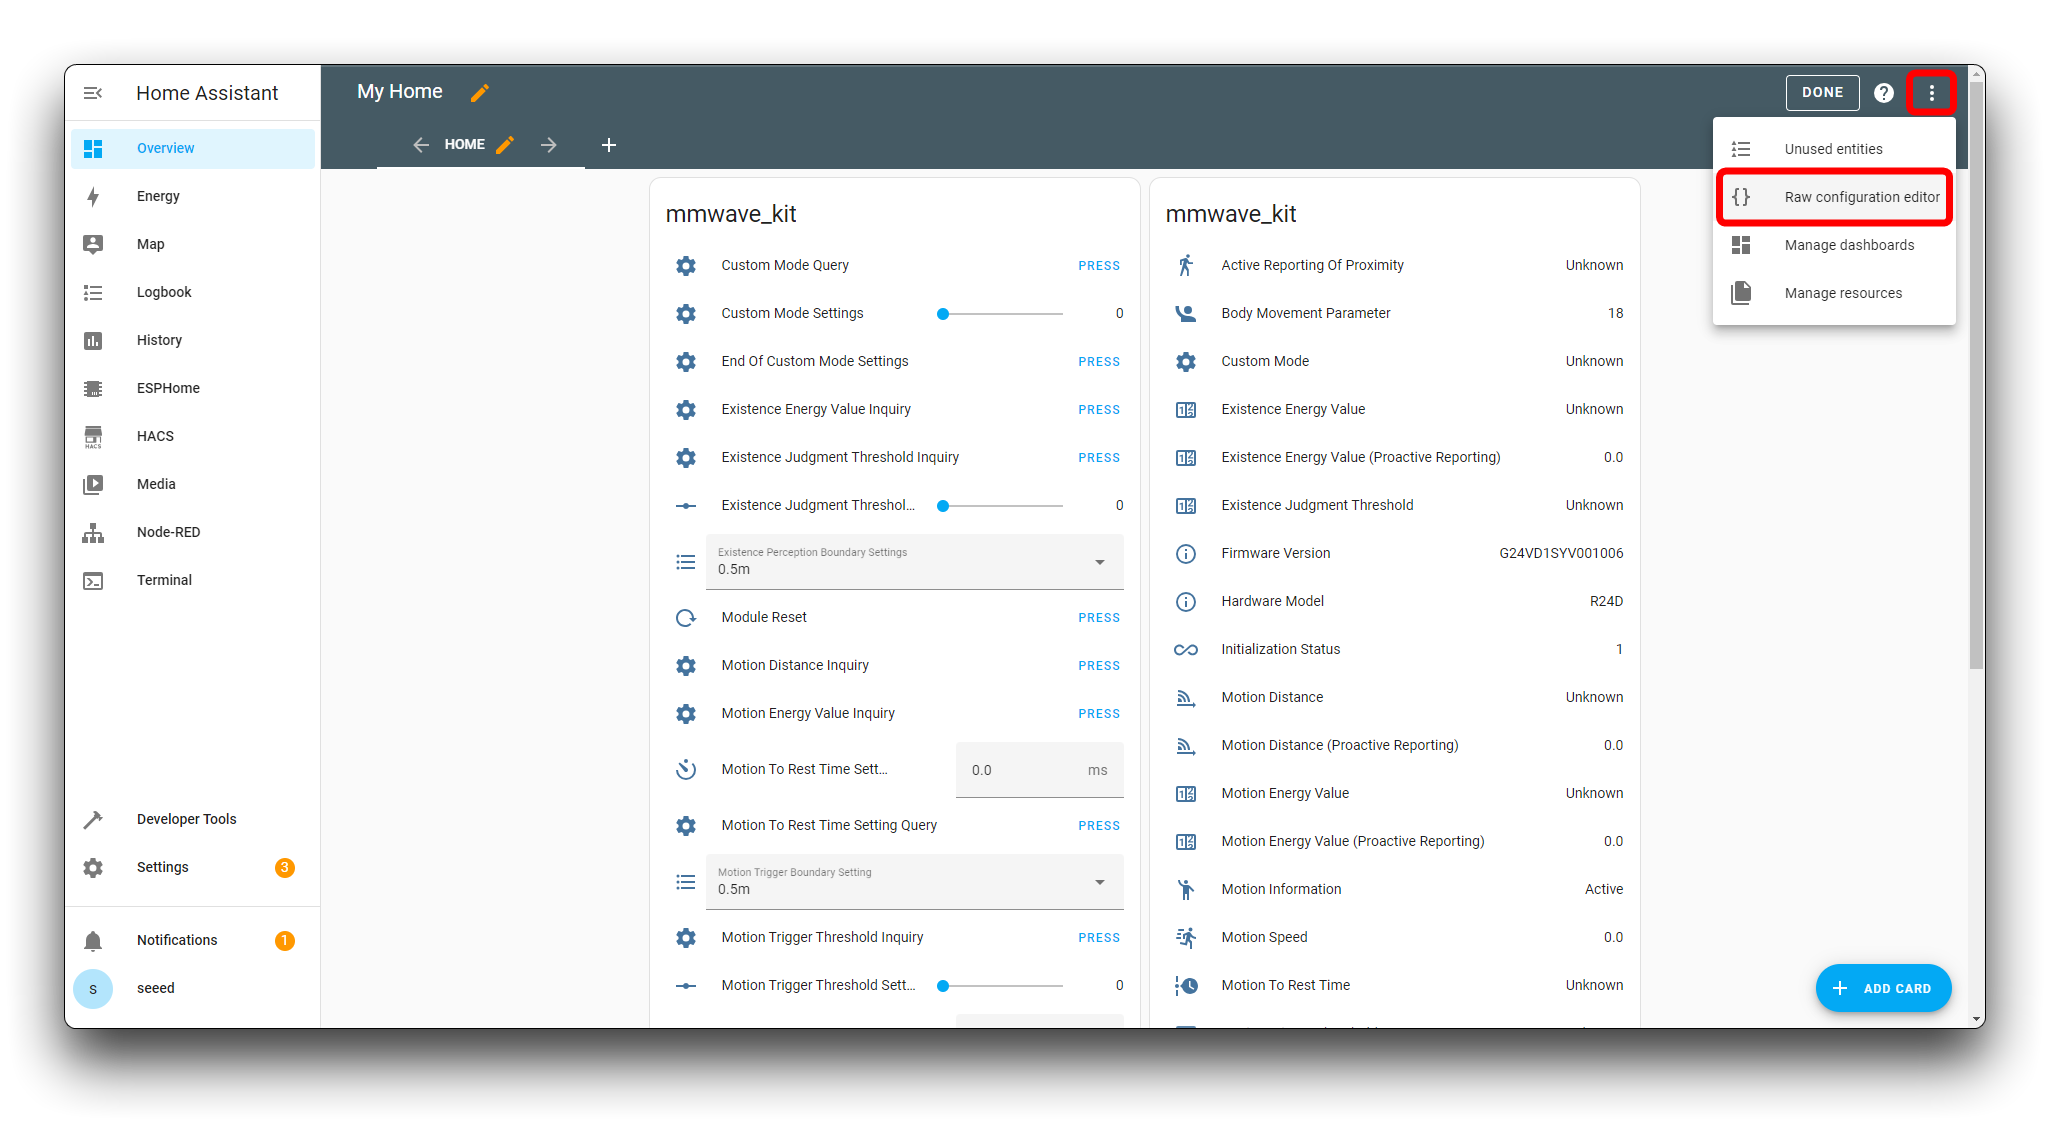
On the Edit page, click the three dots in the upper right corner again to select the Raw Configuration Editor.
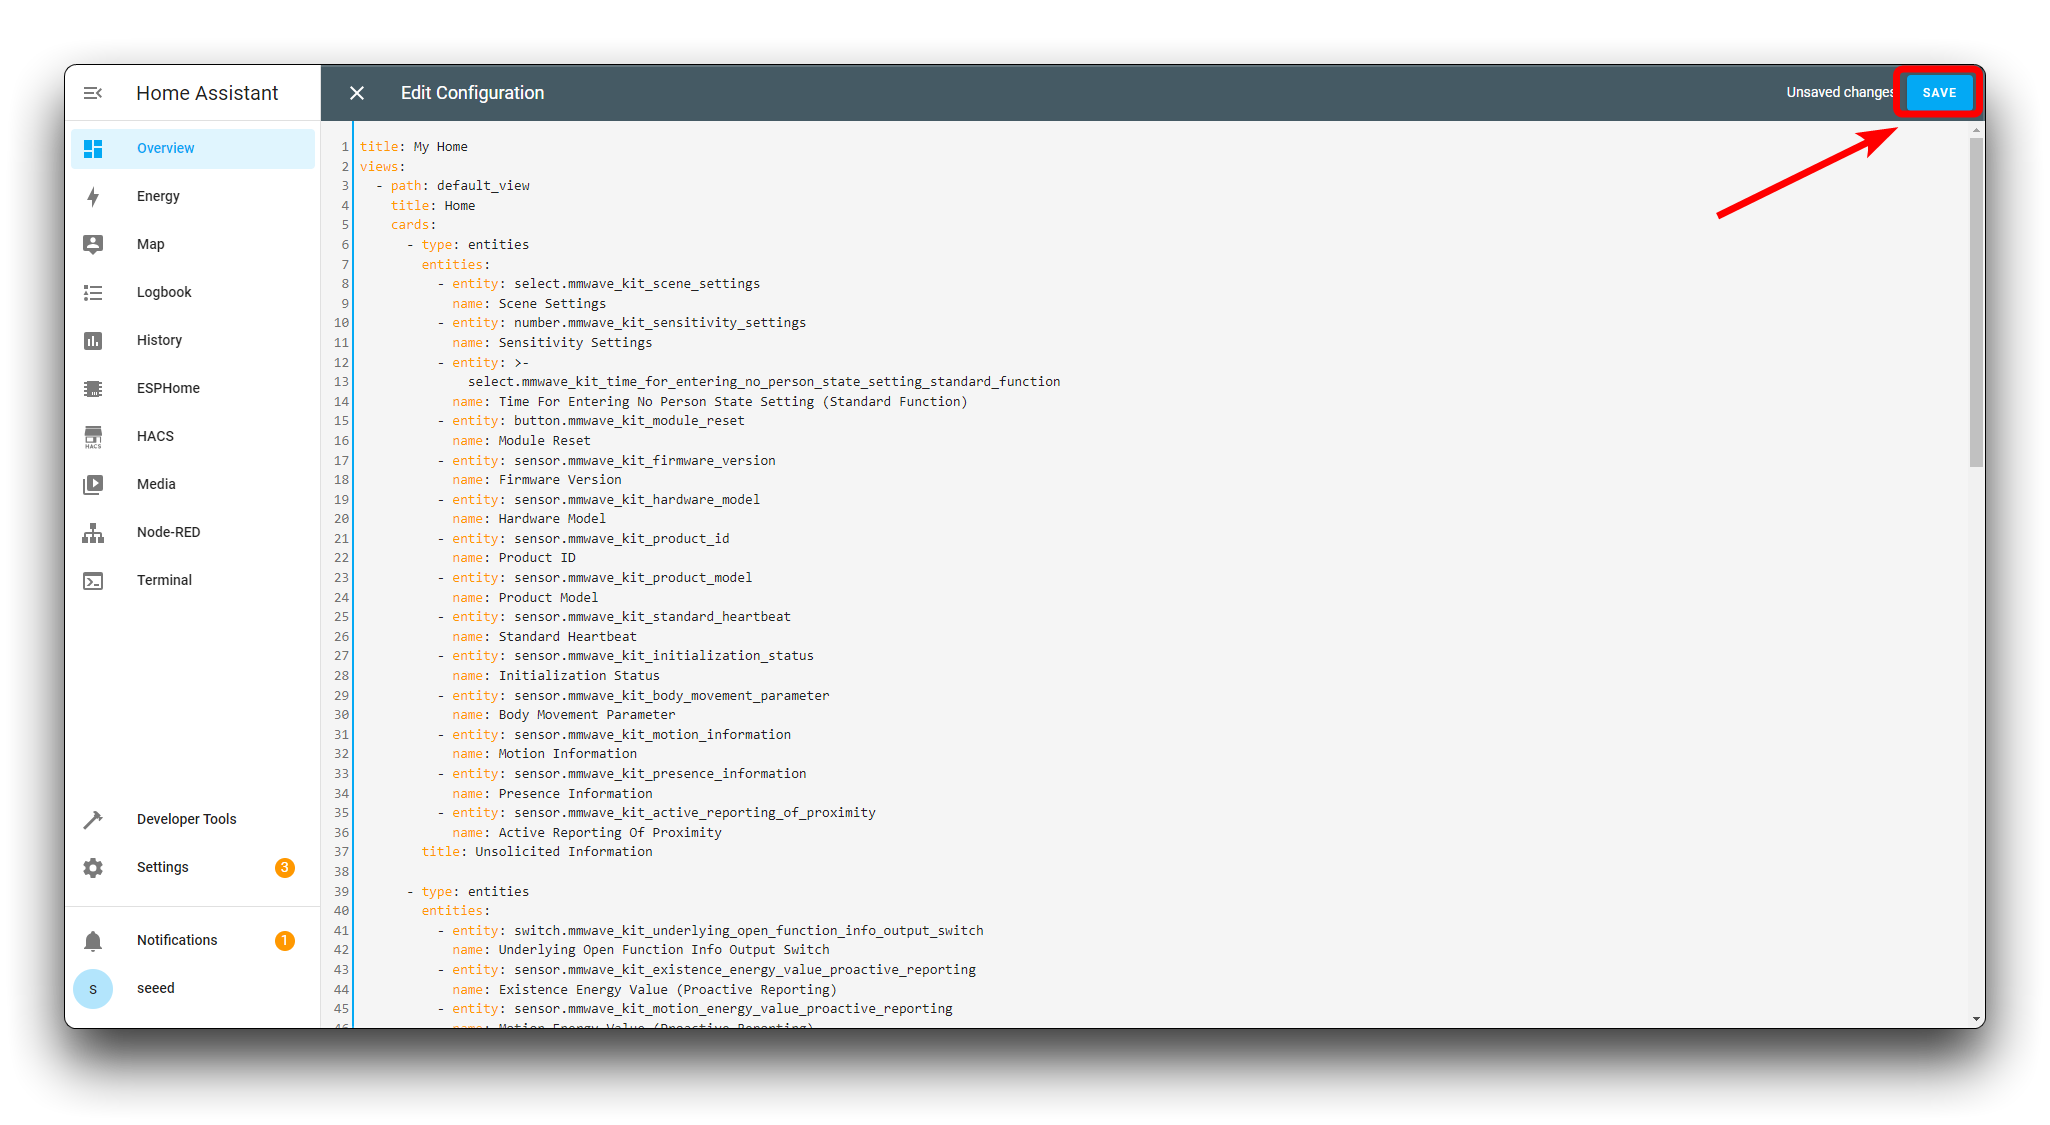
Then please clear the code in the original editor, copy the code below and save it.
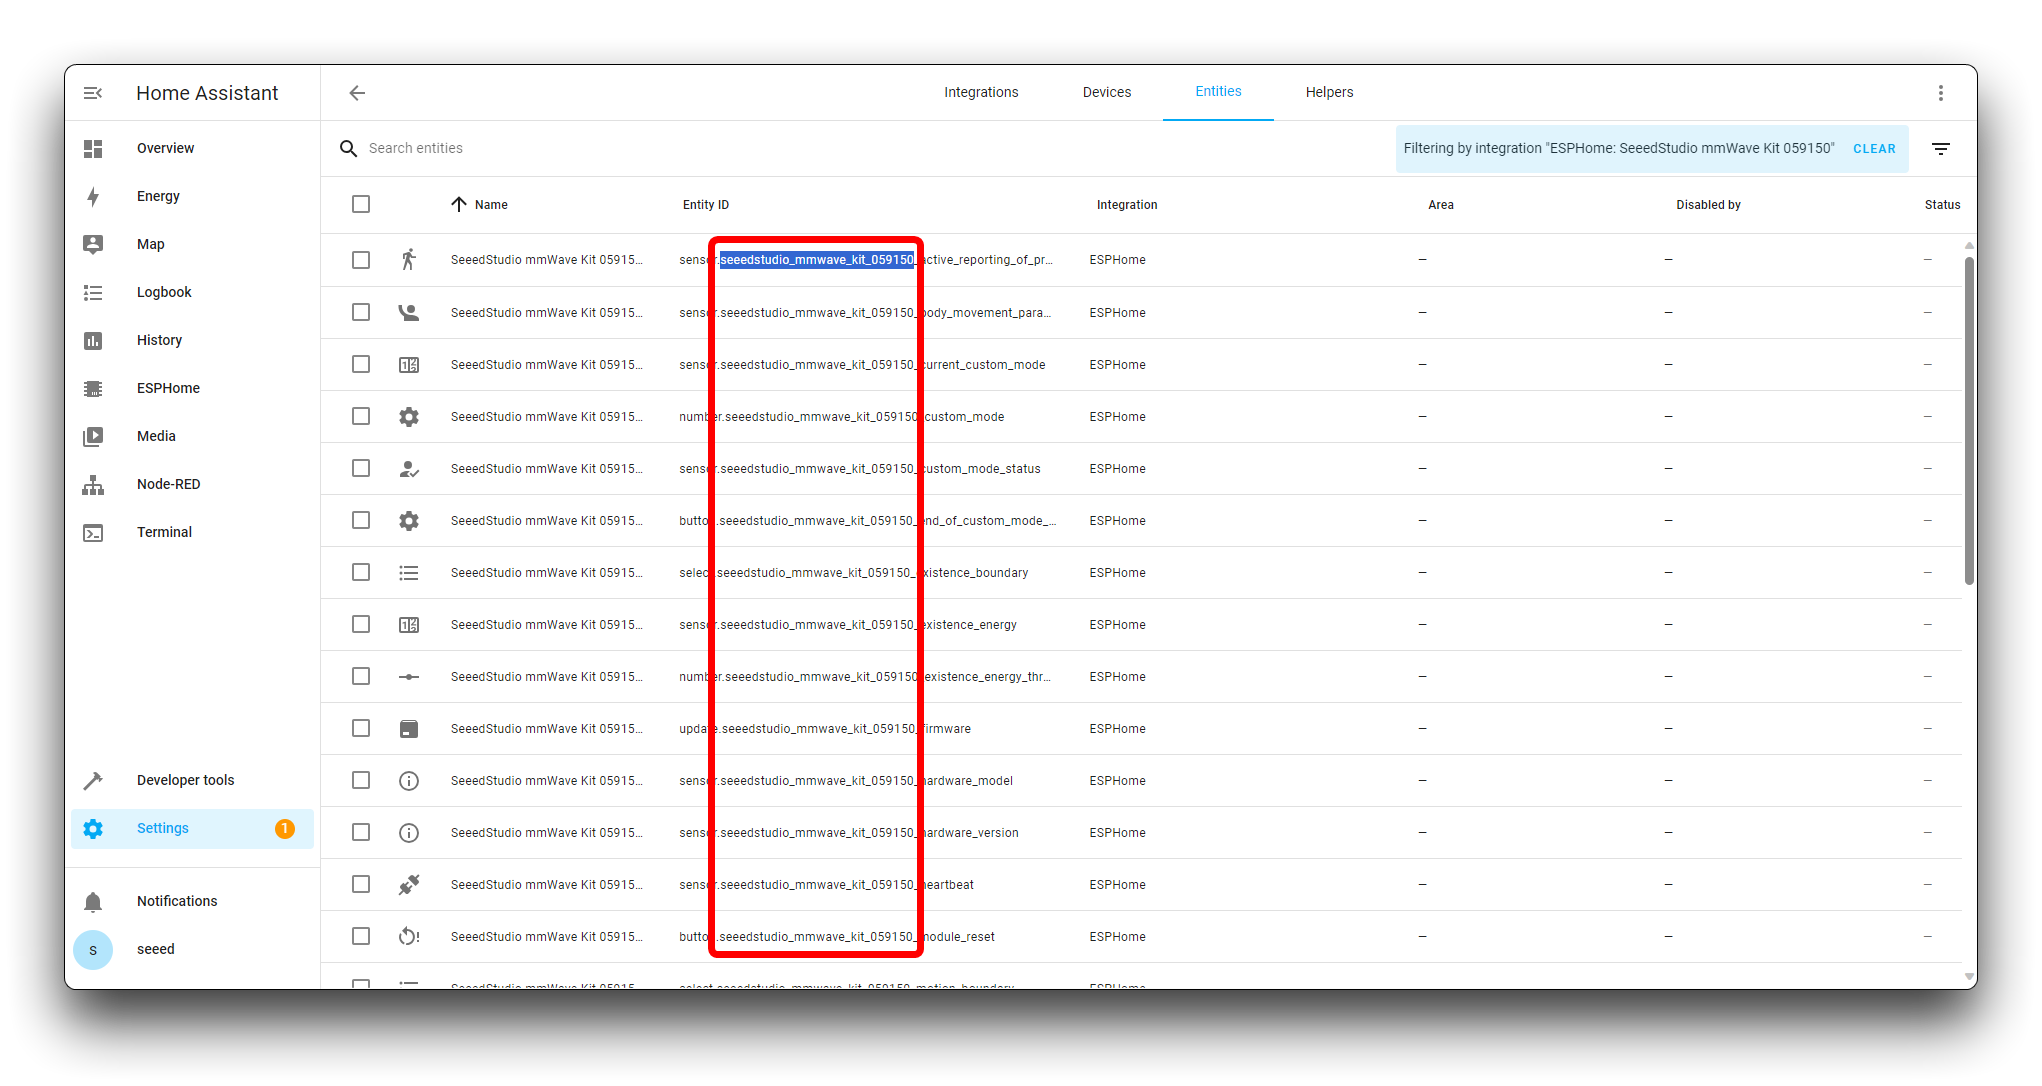
The new firmware has been revised according to the documentation provided by ESPHome and each device has a unique MAC name. So the component names will not be the same. If you want to use the code below, please replace all the {$DEVICE} in the code with the name of your device. Your device name can be seen in the device entity in ESPHome.
Click here to preview the full code
title: My Home
views:
  - path: default_view
    title: Home
    cards:
      - type: horizontal-stack
        cards:
          - type: entities
            entities:
              - entity: button.{$DEVICE}_module_restart
                name: Module Restart
              - entity: sensor.{$DEVICE}_hardware_model
                name: Hardware Model
              - entity: sensor.{$DEVICE}_hardware_version
                name: Hardware Version
              - entity: sensor.{$DEVICE}_heartbeat
                name: Heartbeat
              - entity: sensor.{$DEVICE}_product_id
                name: Product ID
              - entity: sensor.{$DEVICE}_product_model
                name: Product Model
            title: DEVICE Information
      - type: vertical-stack
        cards:
          - type: entities
            entities:
              - entity: select.{$DEVICE}_scene
                name: Scene
              - entity: number.{$DEVICE}_sensitivity
                name: Sensitivity
              - entity: select.{$DEVICE}_time_for_entering_no_person_state_standard_function
                name: Time For Entering No Person State Setting (Standard Function)
              - entity: binary_sensor.{$DEVICE}_presence_information
                name: Presence Information
              - entity: sensor.{$DEVICE}_motion_information
                name: Motion Information
              - entity: sensor.{$DEVICE}_body_movement_parameter
                name: Body Movement Parameter
              - entity: sensor.{$DEVICE}_active_reporting_of_proximity
                name: Active Reporting Of Proximity
            title: Unsolicited Information
      - type: horizontal-stack
        cards:
          - type: entities
            entities:
              - entity: switch.{$DEVICE}_underlying_open_function_info_output_switch
                name: Underlying Open Function Info Output Switch
              - entity: sensor.{$DEVICE}_existence_energy
                name: Existence Energy
              - entity: sensor.{$DEVICE}_motion_energy
                name: Motion Energy
              - entity: sensor.{$DEVICE}_static_distance
                name: Static Distance
              - entity: sensor.{$DEVICE}_motion_distance
                name: Motion Distance
              - entity: sensor.{$DEVICE}_motion_speed
                name: Motion Speed
            title: Underlying Open Function
      - type: horizontal-stack
        cards:
          - type: entities
            entities:
              - entity: sensor.{$DEVICE}_custom_mode_status
                name: Custom Mode Status
              - entity: number.{$DEVICE}_custom_mode
                name: Custom Mode
              - entity: sensor.{$DEVICE}_current_custom_mode
                name: Current Custom Mode
              - entity: button.{$DEVICE}_end_of_custom_mode_settings
                name: End Of Custom Mode Settings
              - entity: select.{$DEVICE}_existence_boundary
                name: Existence Boundary
              - entity: select.{$DEVICE}_motion_boundary
                name: Motion Boundary
              - entity: number.{$DEVICE}_existence_energy_threshold
                name: Existence Energy Threshold
              - entity: number.{$DEVICE}_motion_energy_threshold
                name: Motion Energy Threshold
              - entity: number.{$DEVICE}_motion_trigger_time
                name: Motion Trigger Time
              - entity: number.{$DEVICE}_motion_to_rest_time
                name: Motion To Rest Time
              - entity: number.{$DEVICE}_time_for_entering_no_person_state_underlying_open_function
                name: Time For Entering No Person State (Underlying Open Function)
            title: Custom Settings
Then click DONE.
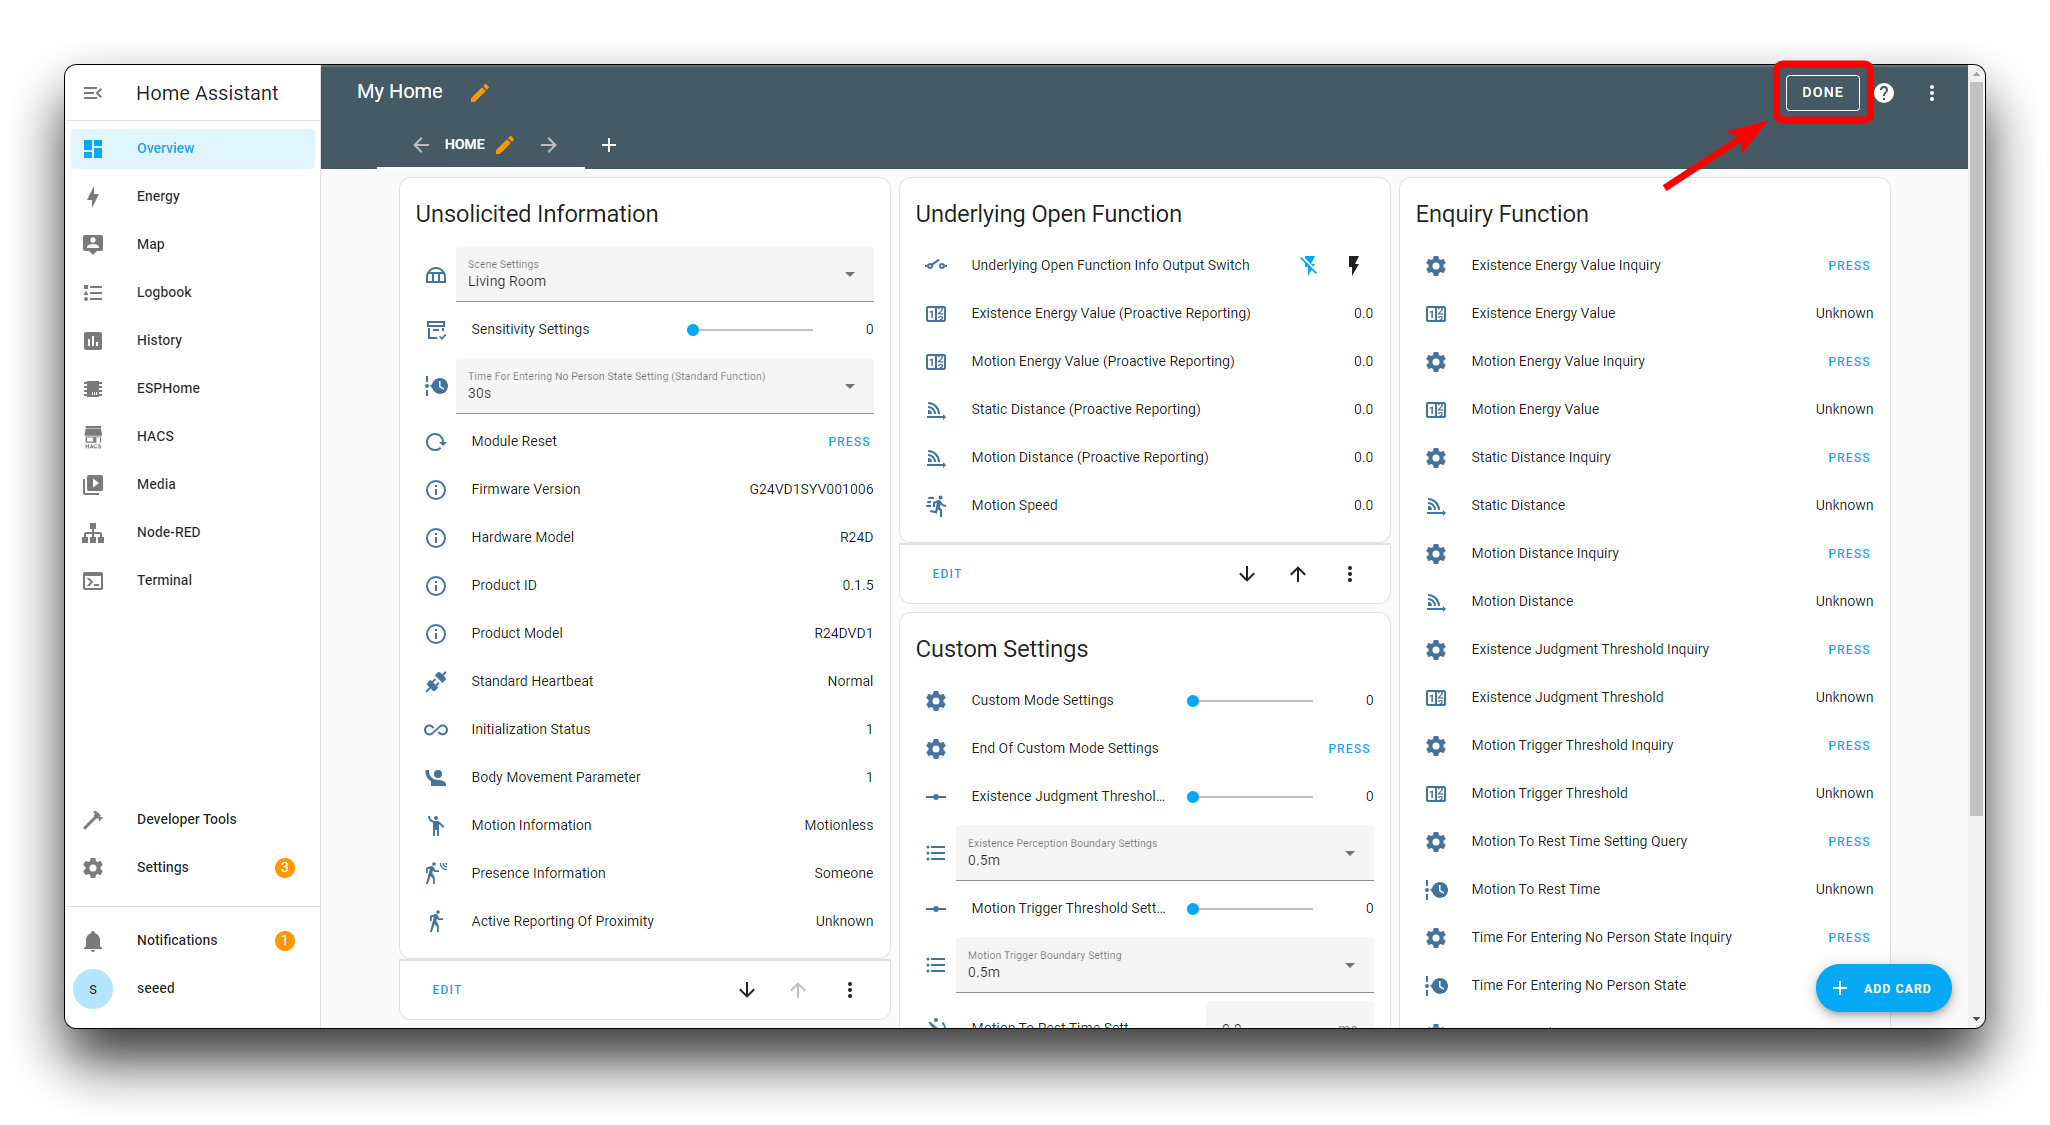
A brand new dashboard interface is configured.

Congratulations, by this point you've completed all of the kit's access to Home Assistant!
Dashboard Operation Details
To help you quickly understand the full capabilities of the suite and the use of these features, you need to read this section carefully. If you want more detailed information, we recommend that you take the time to read the product's user manual.
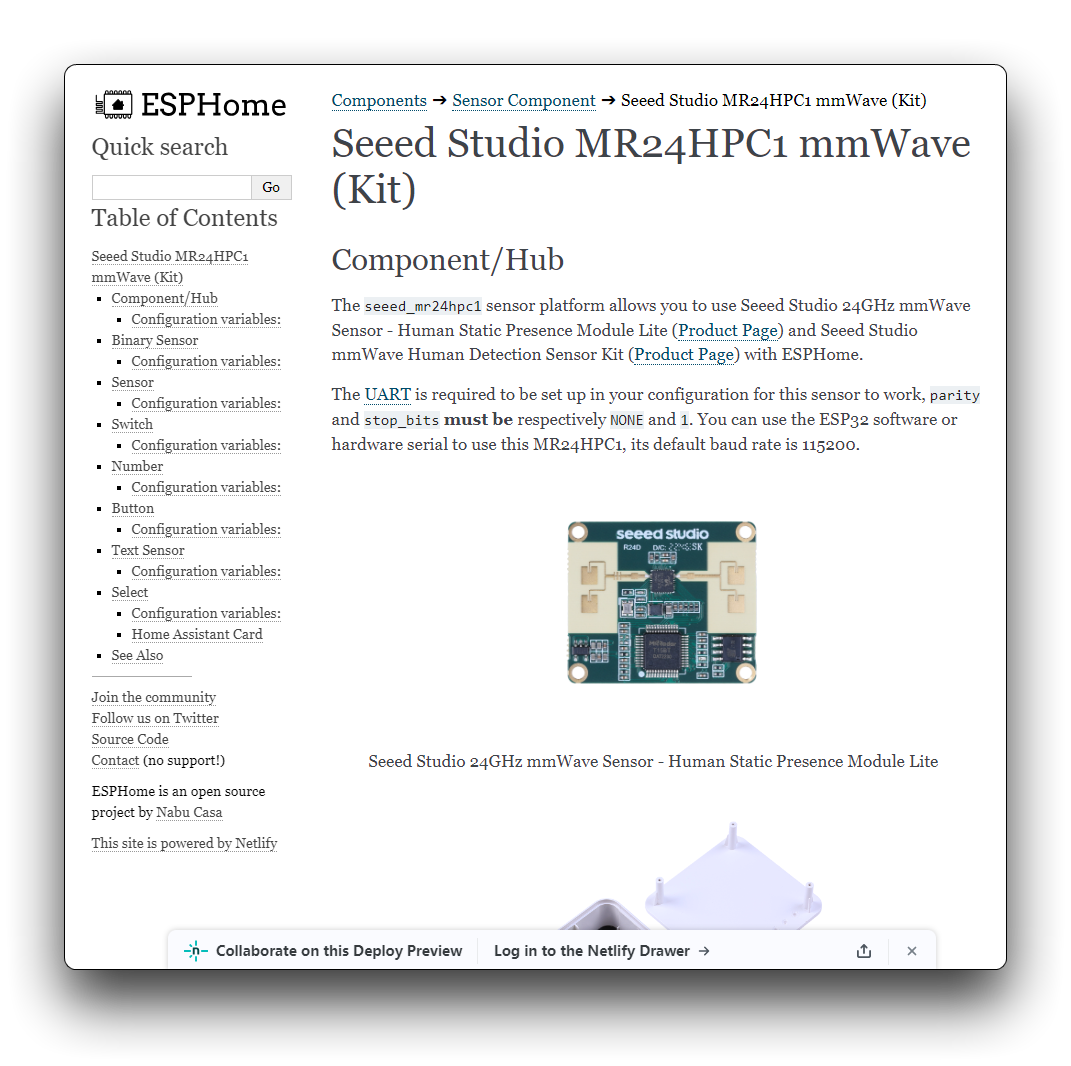
For details on the configuration and parameters of the dashboard, we've compiled a detailed write-up in the ESPHome Docs, so please move over to read the full write-up and details.
Customized secondary development
If you need to replace the radar or install the Grove module, you can refer to the moving pictures below to do so. The four screws for the housing are on the back of the product, remove them and then tap gently to remove the front cover.
If you want to install the Grove module, you can refer to the image below to install it. We recommend that the Grove connector faces outward and the Grove cable is hidden underneath the Grove module.
In addition to the installation of modules, the installation of kits requires special attention. The installation position of the kit will directly affect the accuracy of the monitoring, please refer to the relevant instructions in the Datasheet for installation.
This kit is mainly oriented to the direction of the smart home, the secondary development of the content we will not go into too much detail, but we will provide the secondary development of the information and content you may need, please refer to.
-
Wiki about the built-in MR24HPC1 module: 24GHz mmWave Sensor - Human Static Presence Module Lite (MR24HPC1)
-
Built-in XIAO ESP32C3 development materials and hands-on Wiki: Getting Started with Seeed Studio XIAO ESP32C3
Secondary development for ESPHome
All of the kit's code is currently open source. If you have a need to develop ESPHome, you can use the code of external components.
For the use of this code framework, you can refer to the mr24hpc1.yaml file under the examples folder in the project. This file is an example yaml file for ESPHome.
If you don't have any experience with ESPHome before this, you can read this Wiki to learn to use it.
Software Upgrades with ESPHome OTA
When the product was designed, we wanted it to be a continuously powered and fixed in one location monitoring device. At the same time, we will continue to update and maintain its software, and we envisioned a situation where we don't need to change its location, and you can implement OTA updates over the LAN.
Please click on the main screen of ESPHome.
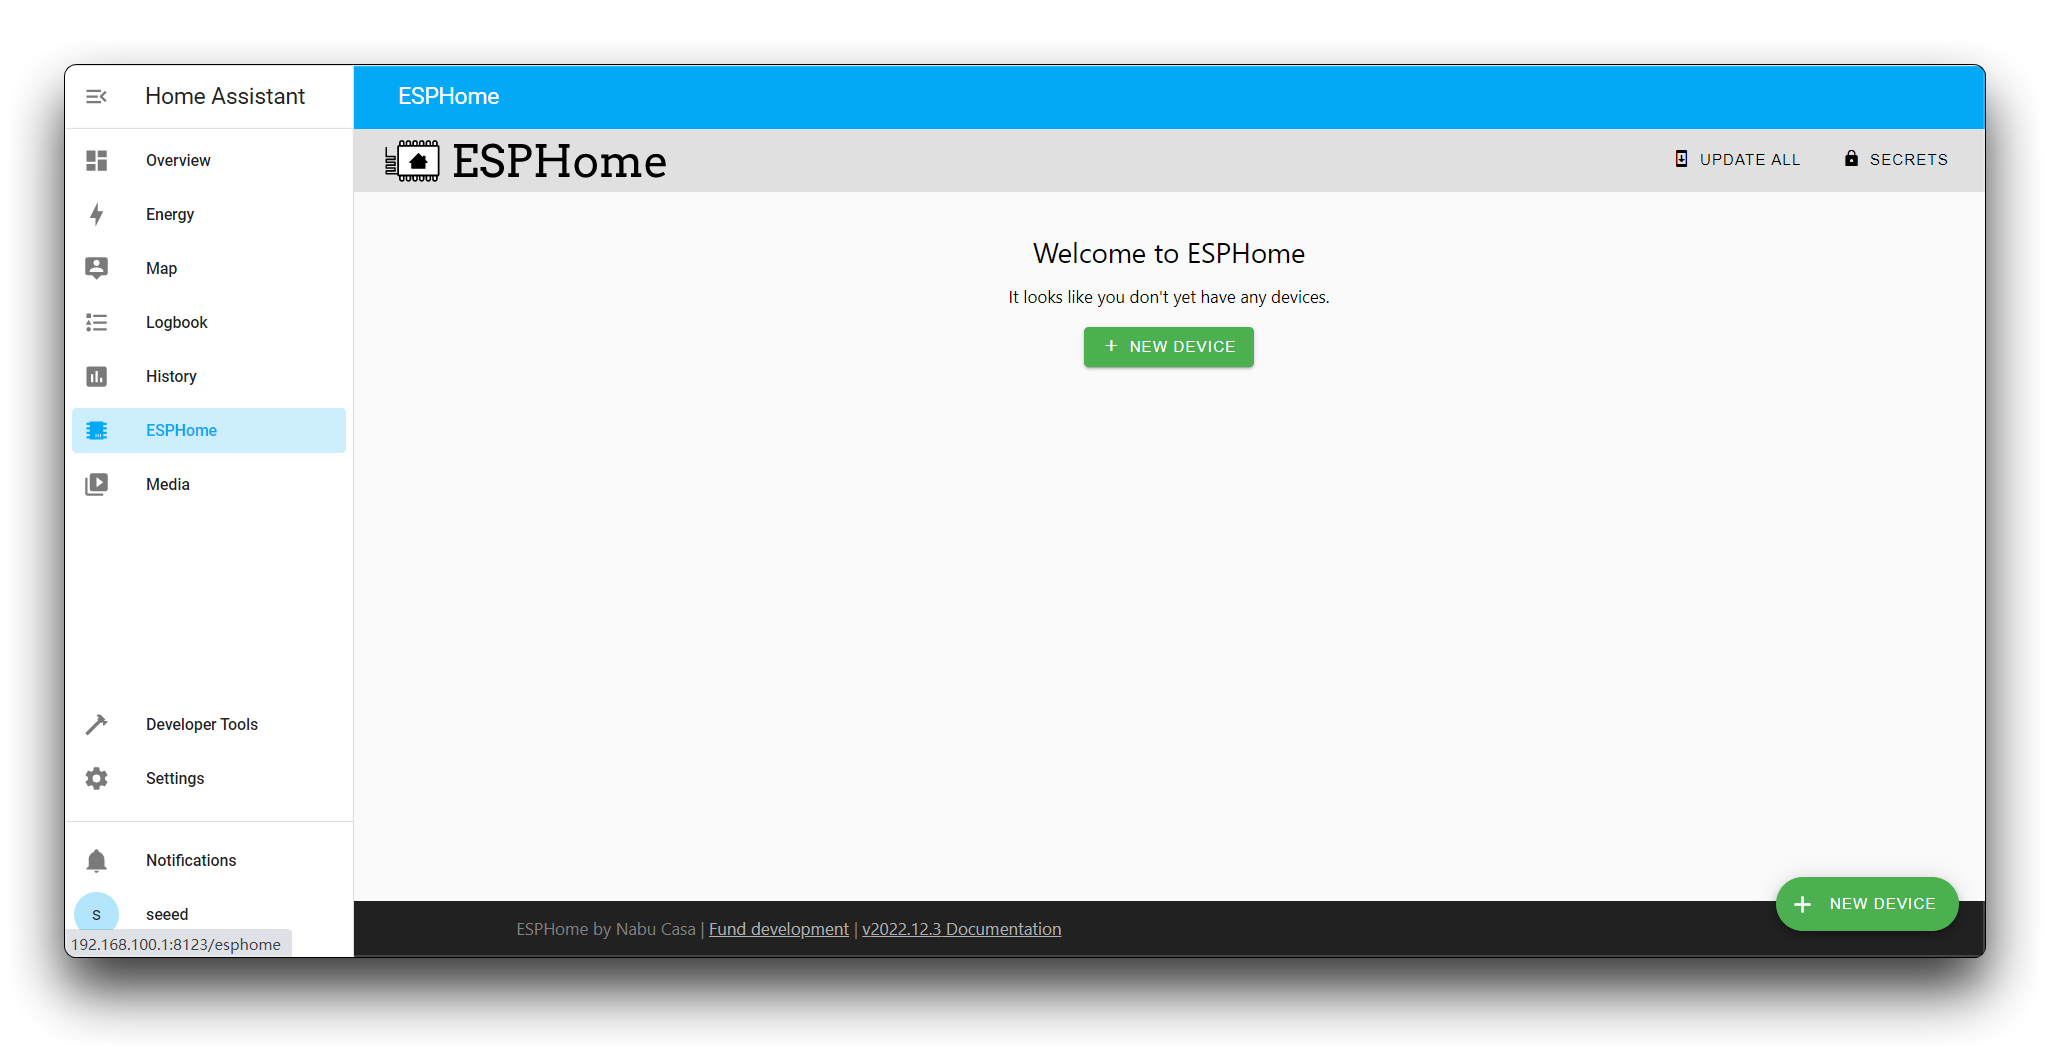
Click on the NEW DEVICE. Then click on Continue.
Under the new pop-up window, please enter the name of the application you wish to set up, as well as the name and password of the WiFi. Make sure that the kit and Home Assistant on the same LAN.
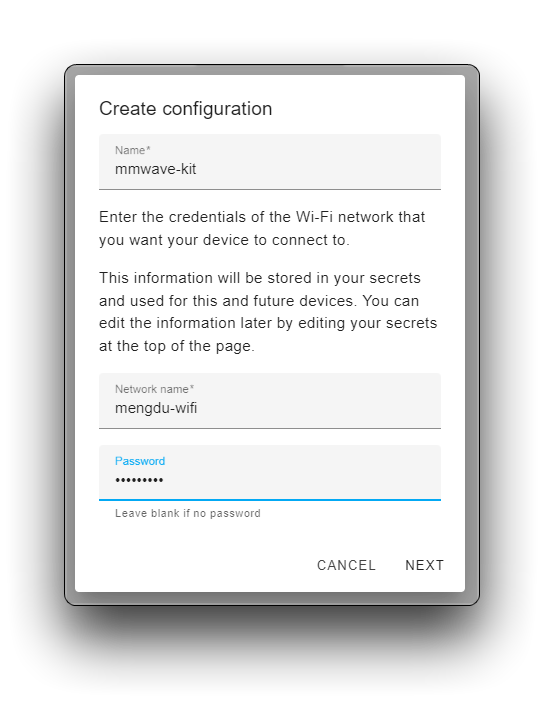
Then click Next. In the device type, please select ESP32-C3.
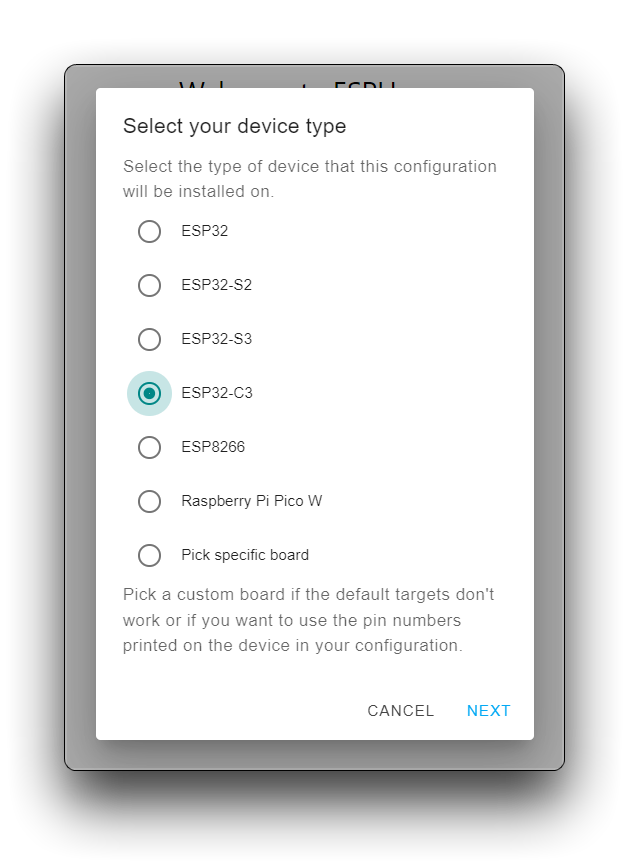
Then click Next. Then click SKIP.
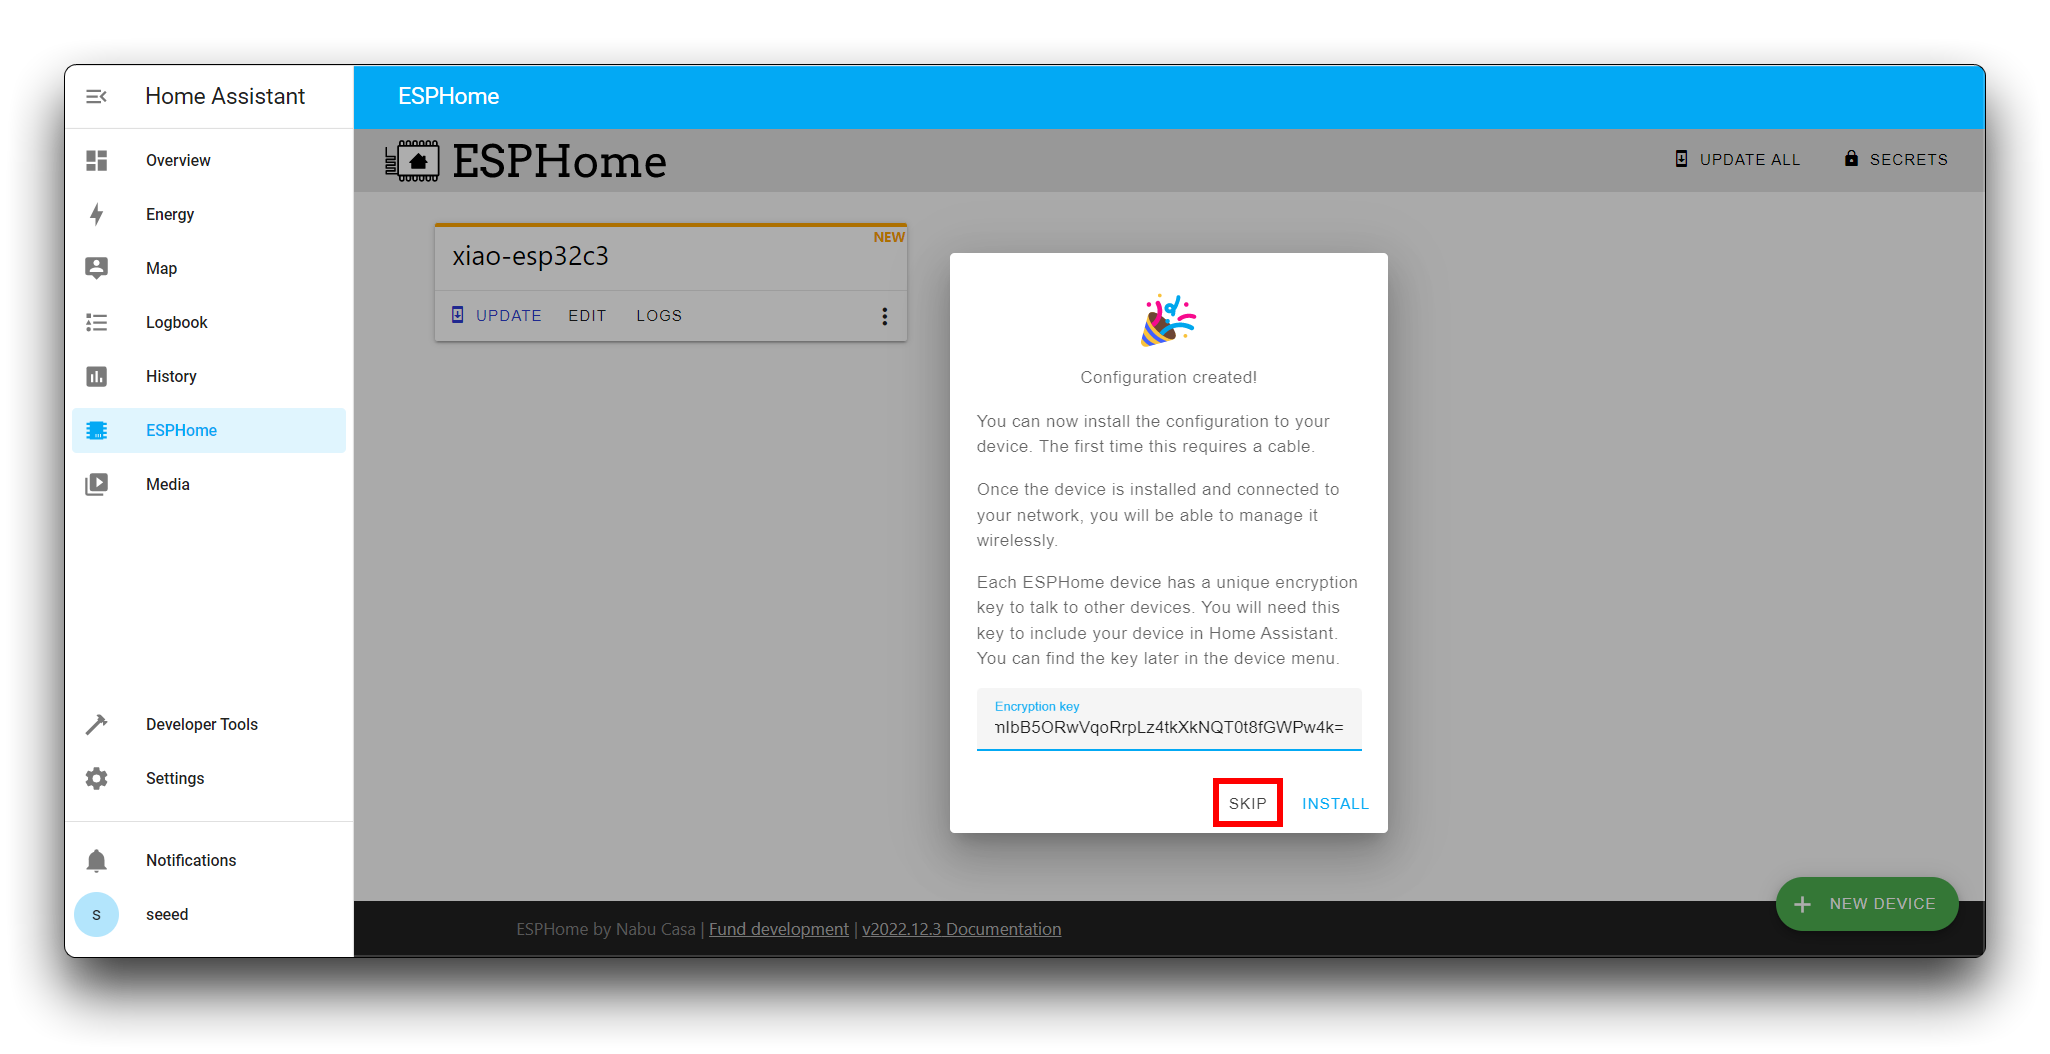
We will update our program in the Github project, once the program is updated, you can just copy everything inside and overwrite the generated yaml file. Changes can also be made to this.
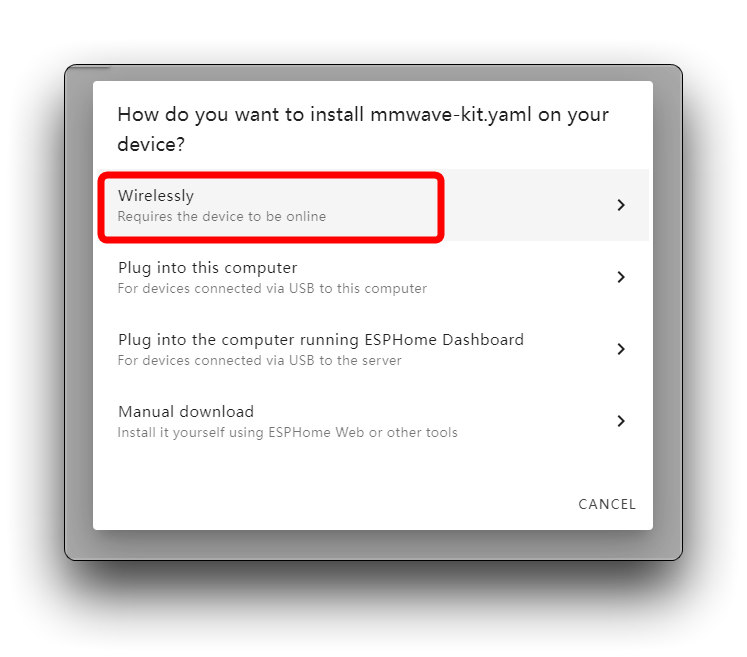
Finally, just select Wireless to upload the program.
Restore Factory Firmware
Method 1: Quick flash the latest firmware
If you are using the kit and find inconsistencies with the steps and content above, please update the kit's firmware on the following page to restore the factory settings.
Step 1. Click the button below to go to the Flash Firmware page. Then connect the kit to your computer via a USB-C type cable.
Step 2. Click the Connect button and select the port number device that has a JTAG name.

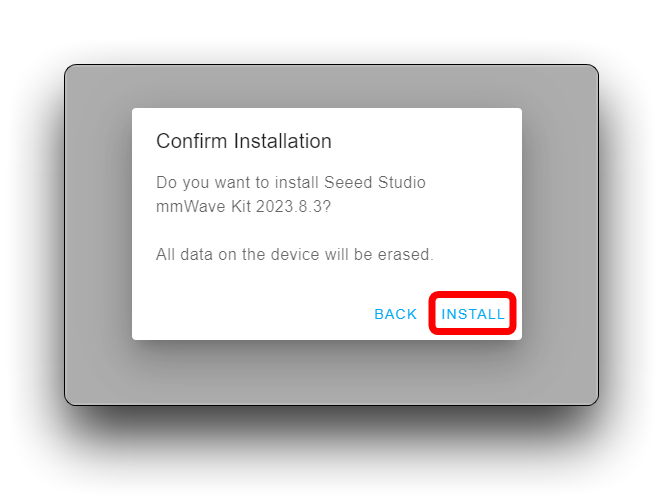
Step 3. Flash Firmware.
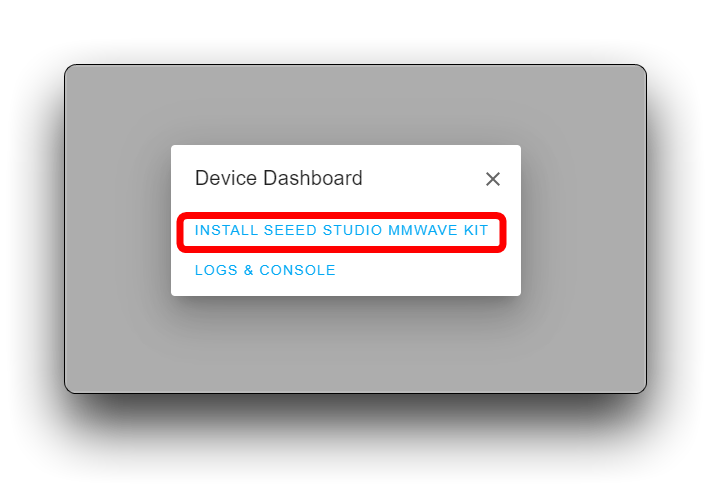
Simply click on INSTALL SEEED STUDIO MMWAVE KIT.
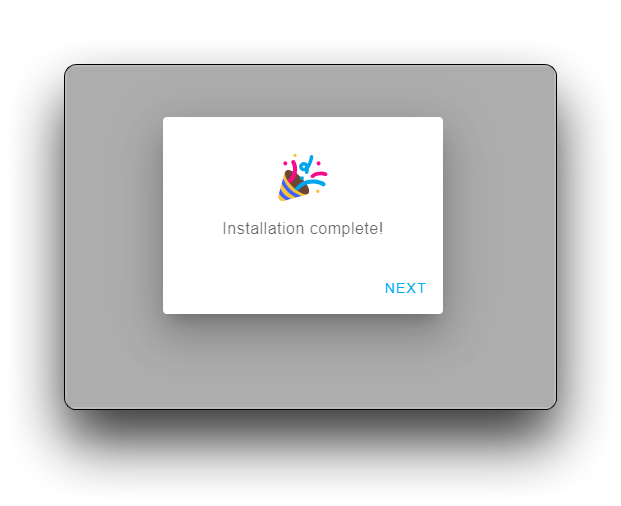
If you see the display below, then the firmware flash is complete. At this point you may need to re-power up to get the programme up and running. After completing the firmware burn, you will need to configure the network from scratch.
Method 2: Flash firmware with the help of ESPHome Tool
If you're experiencing issues with your device not working properly, try restoring the factory firmware and re-adding the device to Home Assistant.
- Option 1: using the ESPhome Web tool to upload.
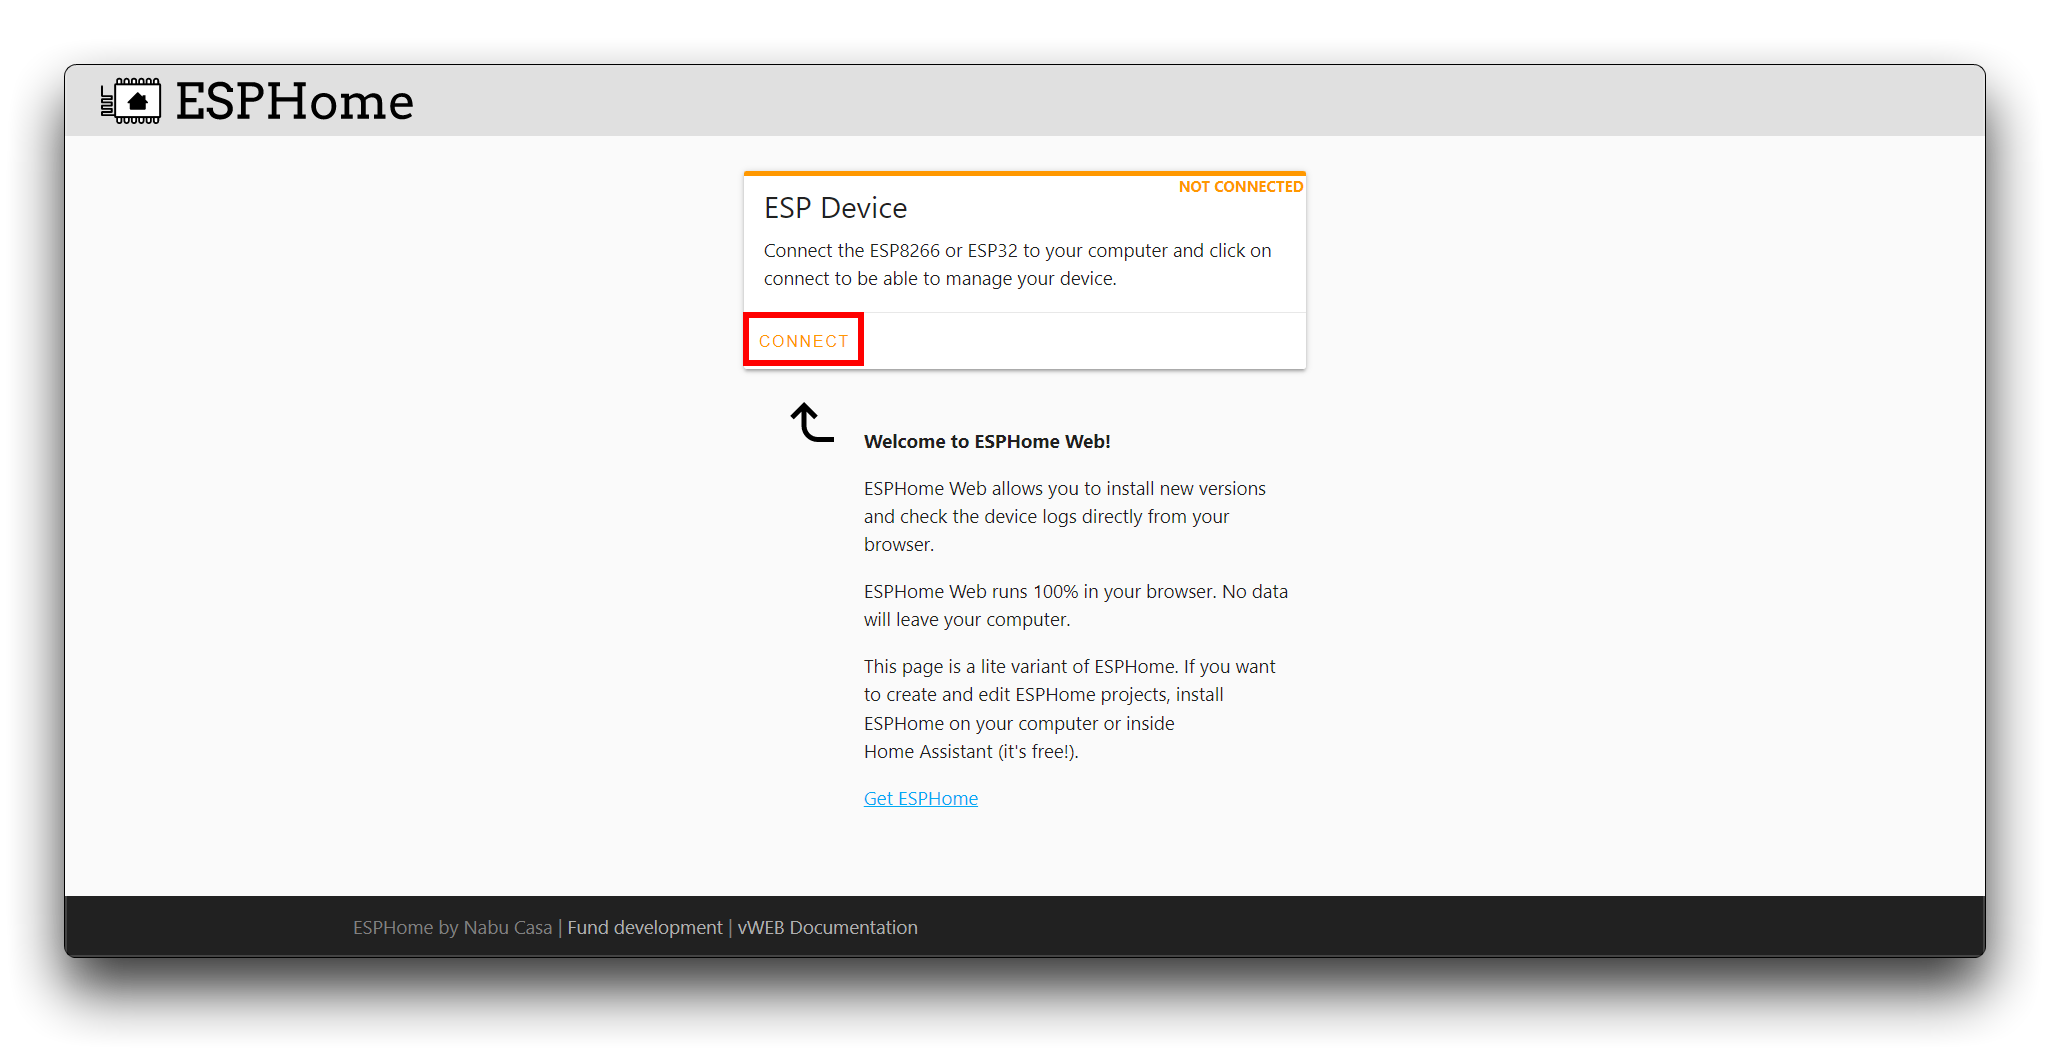
Open the ESPhome Web tool with Chrome or Edge web browser.
Click CONNECT.
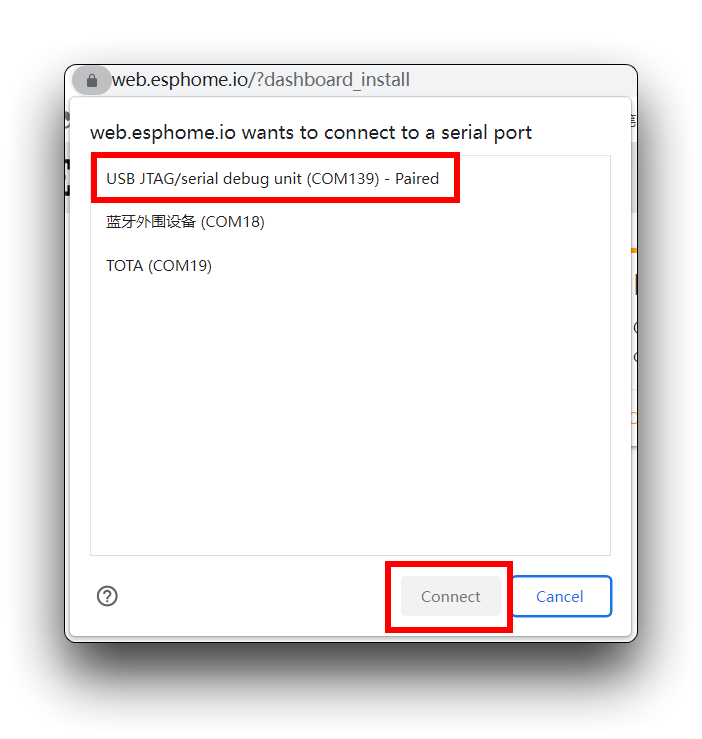
select the XIAO ESP32 serial port in the popup window.
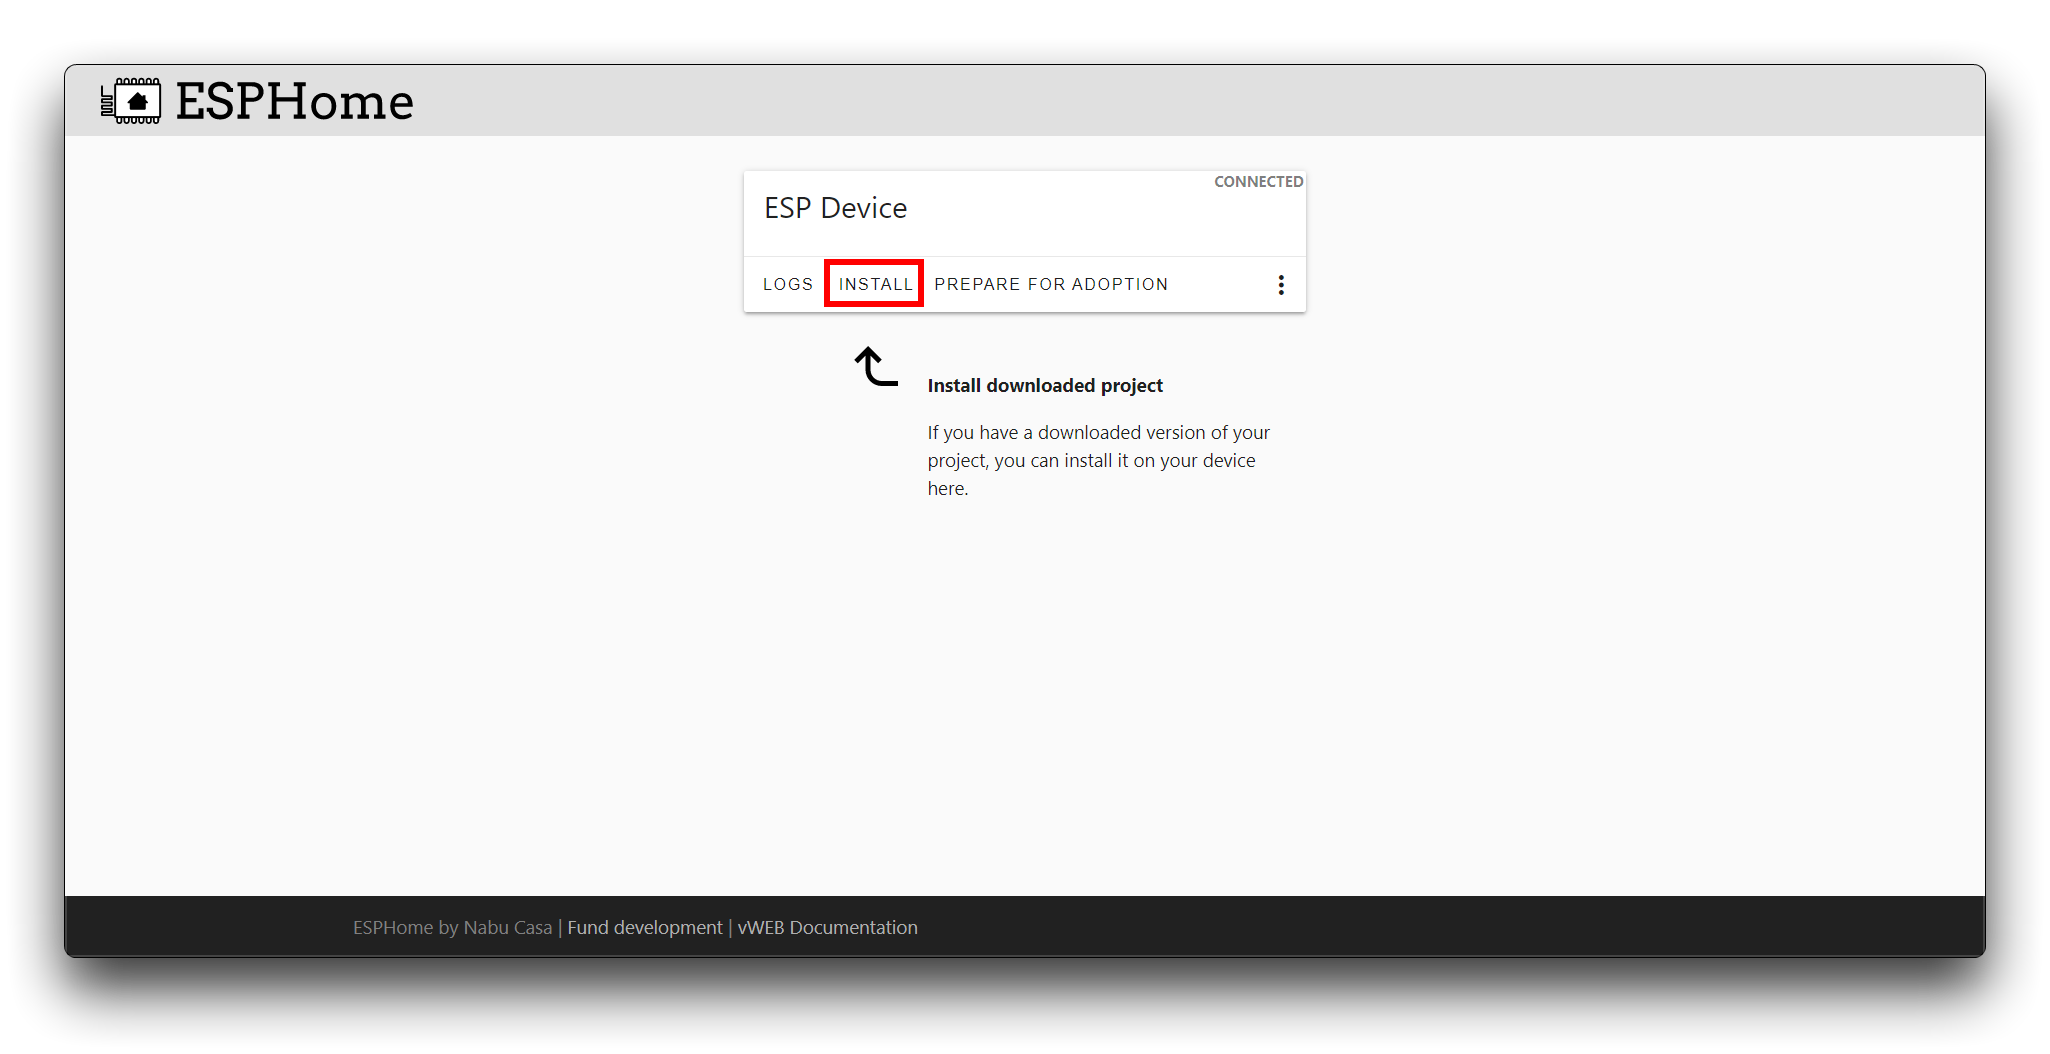
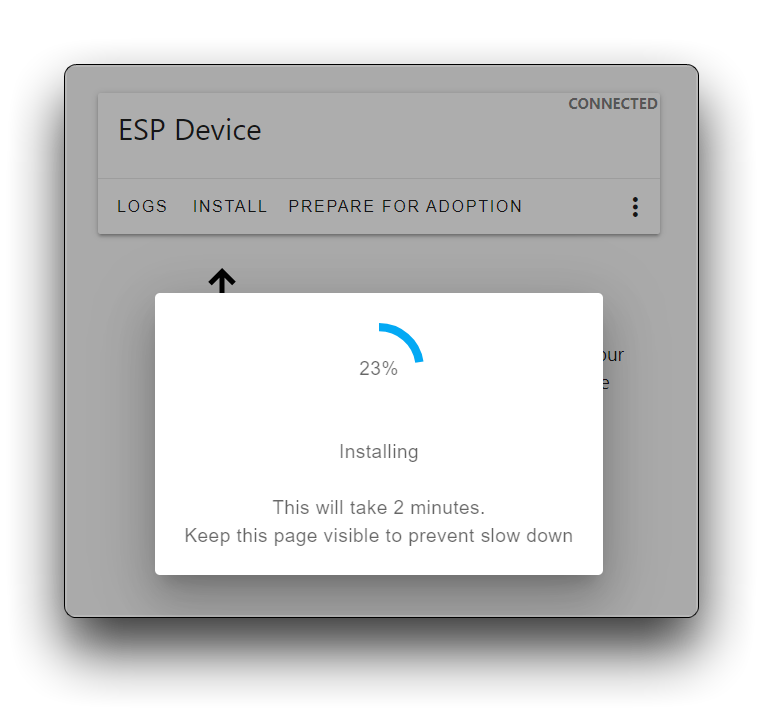
Click INSTALL and then select the .bin file downloaded from above steps.
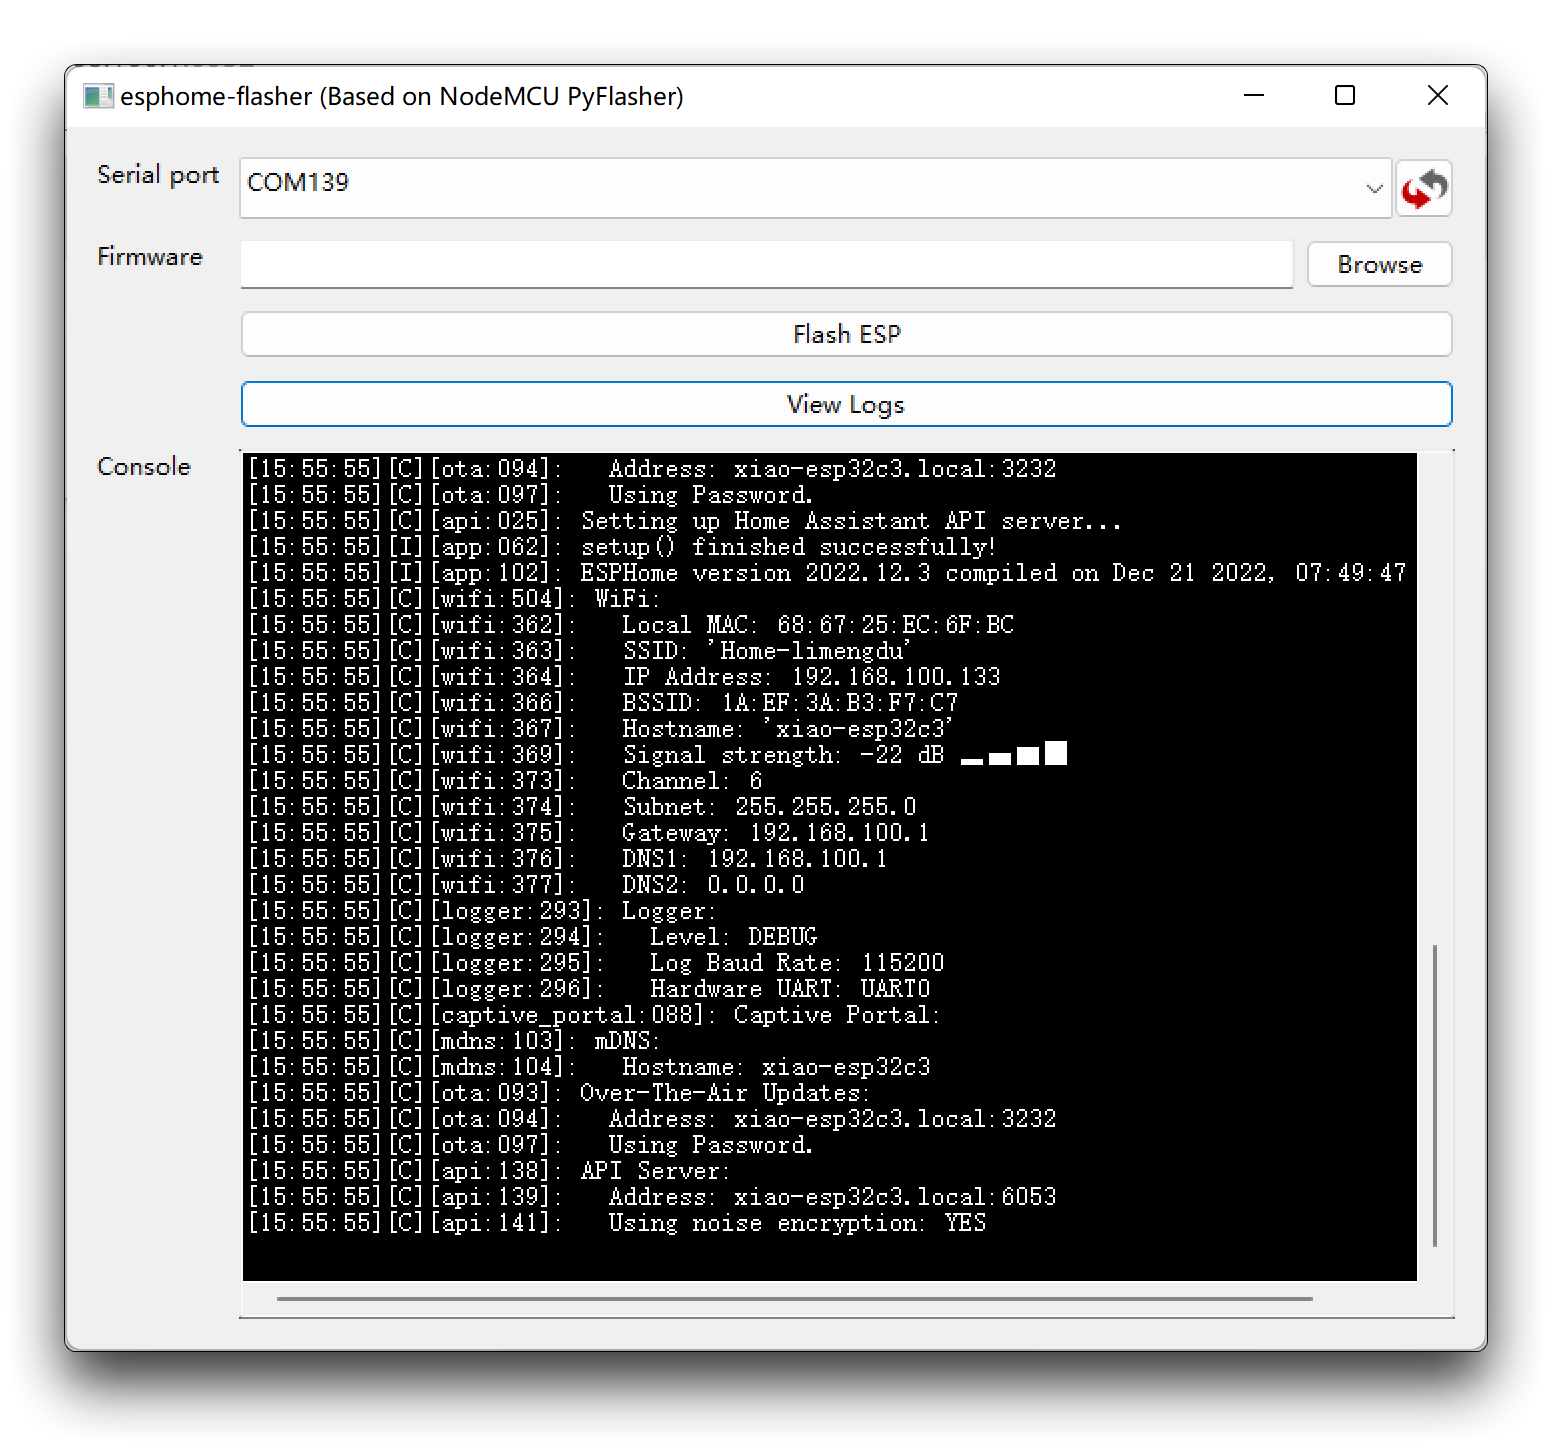
- Option 2: Using the esphome-flasher tool.
If you are still unable to upload firmware using method one after installing the driver and changing browsers, then you can try using method two. Please refer to the official tutorial for specific installation methods and instructions.
If you wish to observe the log messages of the XIAO ESP32C3, you can also view them through the View Logs button of this software.
Once the firmware has been uploaded successfully, you will be able to see the network called seeedstudio-mr24hpc1. Please refer to the Three minutes to get started ESPHome content to reconfigure the device.
Resources
- [GITHUB] Project open source
- [PDF] Quick Setup Template
- [PDF] Datasheet
- [PDF] User Manual
Version 1
- [ZIP] PCB&SCH EAGLE files
- [PDF] SCH
Version 2
- [ZIP] PCB&SCH EAGLE files
- [PDF] SCH
Tech Support & Product Discussion
Thank you for choosing our products! We are here to provide you with different support to ensure that your experience with our products is as smooth as possible. We offer several communication channels to cater to different preferences and needs.