Development of 24GHz mmWave Sensor in XIAO and Arduino
This section describes how to use the library and secondary development of mmWave for XIAO.
All contents of this Wiki apply only to 24GHz mmWave for XIAO and may not be used on other millimetre wave sensors.
Getting Started
Hardware Preparations
Before we begin the tutorial content of this article, we recommend that you purchase any of the XIAOs we currently have for sale in order to use the millimetre wave sensor.
| Seeed Studio XIAO SAMD21 | Seeed Studio XIAO RP2040 | Seeed Studio XIAO nRF52840 (Sense) | Seeed Studio XIAO ESP32C3 | Seeed Studio XIAO ESP32S3 |
|---|---|---|---|---|
 |  |  |  |  |
In the tutorials in this article, we will use the XIAO ESP32C3 and the mmWave Sensor as examples of use to guide you on how to use the sensor's Arduino libraries and related features.
| Seeed Studio XIAO ESP32C3 | 24GHz mmWave for XIAO |
|---|---|
| 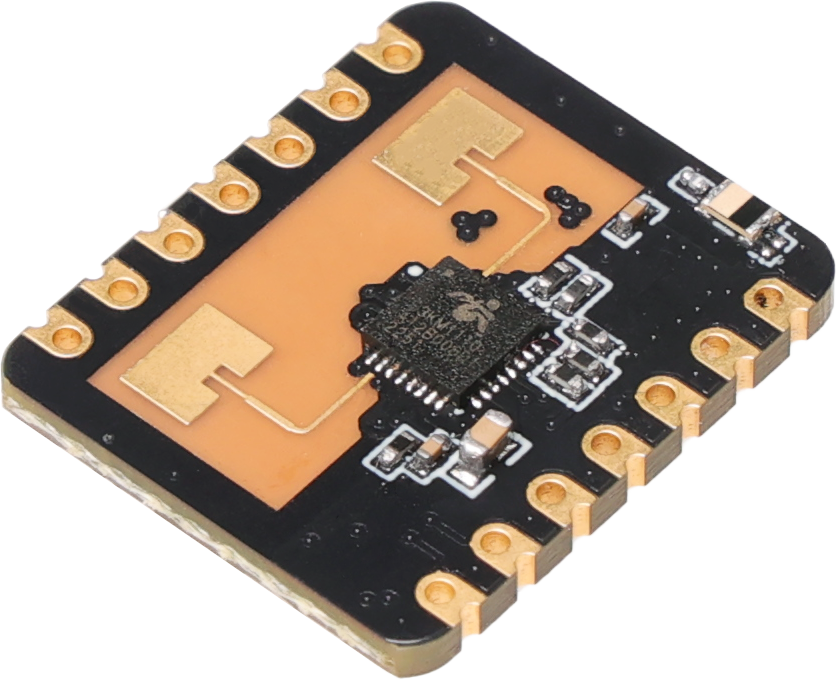 |
The sensor is designed for XIAO compatibility, so in general, if you want to use this sensor, you need to prepare an XIAO and install the female header row pin for the sensor. When connecting to the XIAO, please pay special attention to the installation direction of the sensor, please do not plug it in backwards, otherwise it is likely to burn the sensor or the XIAO.
The correct direction to follow is that the antenna of the sensor should face outwards.

After confirming that the connection direction is correct, you can connect the USB-C type cable to the computer or power supply, and the sensor will start to work.
Software Preparations
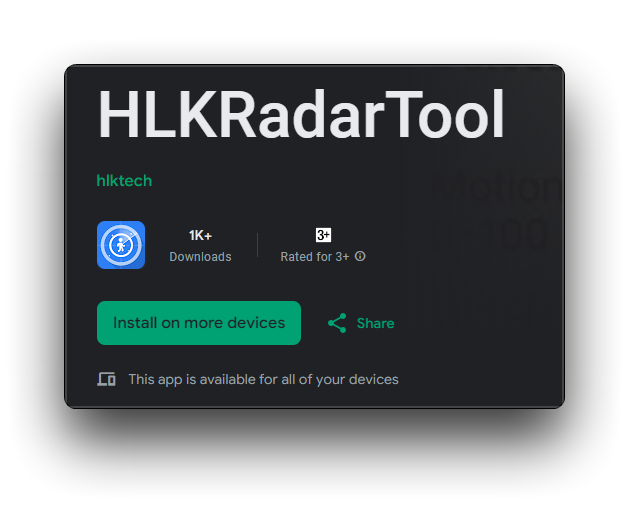
Since the default baud rate used by the sensor is 256000, and the baud rate of the soft serial port designed by XIAO may not be able to satisfy such a high speed baud rate data transmission, we need to use software to adjust the baud rate of the sensor before using the sensor. Then, please download the corresponding APP according to the mobile phone system you are using.
The APP cannot read the baud rate. Even after modification, the APP still displays the default baud rate.
Arduino Library Overview
If this is your first time using Arduino, we highly recommend you to refer to Getting Started with Arduino.
Function
Before we get started developing a sketch, let's look at the available functions of the library.
-
Seeed_HSP24(Stream &serial)—— Used to pass in the serial port that the sensor is connected to and start initialising the sensor.-
Input Parameters:
- serial: The serial port to which the sensor is connected.
-
-
Seeed_HSP24(Stream &serial, Stream &debugSerial)—— Used to pass in the serial port that the sensor is connected to, add the debug serial port and start initialising the sensor.-
Input Parameters:
- serial: The serial port to which the sensor is connected.
- debugSerial: Enable serial debugging and output in the incoming serial port.
-
-
String getVersion()—— Get the software version number of the sensor.- Return: The software version number of the sensor.
-
RadarStatus getStatus()—— Get the status information of the sensor, all the information reported by the sensor will be parsed by this function.- Return:
- radarStatus.radarMode: Engineering Mode or Base Mode. 1 corresponds to Engineering Mode and 2 corresponds to Base Mode.
- radarStatus.targetStatus: Indicates the current situation of the monitoring object. There are four situations in total (NoTarget), the first is no person detected (MovingTarget), the second is someone detected as stationary (StaticTarget), the third is detected at the same time (BothTargets), and the fourth is an anomaly (ErrorFrame). Where BothTarget refers to someone's movement. Because the sensor monitors the current environment, the motion energy and stationary energy both exceed the set threshold, so we named "BothTarget", if only the motion energy exceeds the threshold, then it will output "MovingTarget".
- radarStatus.distance: This value refers to the distance that the sensor detects from the detected object.
- radarStatus.radarMovePower.moveGate (Effective in engineering mode): This array stores the moving energy values for different distance gates.
- radarStatus.radarStaticPower.staticGate (Effective in engineering mode): This array stores the static energy values for different distance gates.
- radarStatus.photosensitive (Effective in engineering mode): This value refers to the sensor photosensitivity value, range 0-255.
- Return:
-
DataResult sendCommand(const byte* sendData, int sendDataLength)—— Commands are sent to the sensor through this function.-
Input Parameters:
- sendData: The array of command frames sent.
- sendDataLength: The length of the command frame sent.
-
Return:
- resultBuffer: Points to a dynamically allocated array.
- length: Length of the array.
-
-
AskStatus setDetectionDistance(int distance,int times)—— Configure the maximum distance gate and unoccupied duration with this function.-
Input Parameters:
- distance: Configure the maximum distance gate.
- times: Unoccupied duration time.
-
Return:
- Success 0x00 or Error 0x01.
-
-
AskStatus setGatePower(int gate,int movePower, int staticPower)—— Different distance gates as well as sensitivities are configured with this function.-
Input Parameters:
- gate: Distance to door, range 0-8 m.
- movePower: The energy value that triggers the motion threshold.
- staticPower: The energy value that triggers the resting threshold.
-
Ruturn:
- Success 0x00 or Error 0x01.
-
-
RadarStatus getConfig()—— Reads the parameter values of the setting sensor.- Return:
- radarStatus.detectionDistance: Number of motion detection distance gates for radar.
- radarStatus.moveSetDistance: Number of stationary detection distance gates for radar.
- radarStatus.staticSetDistance: Radar's longest detection range gate.
- radarStatus.noTargrtduration: Unmanned duration.
- Return:
-
AskStatus setResolution(int resolution)—— Set the distance to the door resolution, 1 is 0.25M, 0 is 0.75M. Default 0.75M.-
Input Parameters:
- resolution: 1 is 0.25M, 0 is 0.75M. Default 0.75M.
-
Ruturn:
- Success 0x00 or Error 0x01.
-
-
RadarStatus getResolution()—— Get distance to door resolution, 1 is 0.25M, 0 is 0.75M. Default 0.75M.- Ruturn:
- radarStatus.resolution: 1 is 0.25M, 0 is 0.75M. Default 0.75M.
- Ruturn:
-
AskStatus rebootRadar()—— Reboot radar command.- Ruturn:
- Success 0x00 or Error 0x01.
- Ruturn:
-
AskStatus refactoryRadar()—— Restore the radar to factory settings.- Ruturn:
- Success 0x00 or Error 0x01.
- Ruturn:
-
AskStatus enableEngineeringModel()—— Enables sensor engineering mode output.- Ruturn:
- Success 0x00 or Error 0x01.
- Ruturn:
-
AskStatus disableEngineeringModel()—— Exit engineering mode output.- Ruturn:
- Success 0x00 or Error 0x01.
- Ruturn:
Default Variables
#define BUFFER_SIZE 256     // Serial Buffer Size

class Seeed_HSP24
{
    public:
        static const int FRAME_START_SIZE = 4;
        static const int FRAME_END_SIZE = 4;

        static const byte frameStart[FRAME_START_SIZE];
        static const byte frameEnd[FRAME_END_SIZE];
        static const byte frameAskStart[FRAME_START_SIZE];
        static const byte frameAskEnd[FRAME_END_SIZE];

        struct RadarMovePower // Energy value per movement distance gate
        {
            int moveGate[9] = {-1, -1, -1, -1, -1, -1, -1, -1, -1};
        };

        struct RadarStaticPower // Energy value per stationary distance gate
        {
            int staticGate[9] = {-1, -1, -1, -1, -1, -1, -1, -1, -1};
        };

        //  Define the TargetStatus enum class
        enum class AskStatus : byte
        {
            Success = 0x00, // Success
            Error = 0x01,   // Failed
        };

        //  定义TargetStatus枚举类
        enum class TargetStatus : byte
        {
            NoTarget = 0x00,     // No target
            MovingTarget = 0x01, // Moving target
            StaticTarget = 0x02, // Static target
            BothTargets = 0x03,  // It can be interpreted as motion, meaning that both the set motion and stationary thresholds are above the set value
            ErrorFrame = 0x04    // Failed to get status
        };

        // Define the RadarStatus structure
        struct RadarStatus
        {
            TargetStatus targetStatus = TargetStatus::ErrorFrame; // Target status of the radar
            int distance = -1;                                    // Target distance of the radar in mm
            int moveSetDistance = -1;                             // The number of motion detection distance gates of the radar, which generally do not have to be configured
            int staticSetDistance = -1;                           // Number of static detection distance gates of the radar, which generally do not have to be configured
            int detectionDistance = -1;                           // Radar's longest detection range gate
            int resolution = -1;                                  // Distance gate resolution of radar
            int noTargrtduration = -1;                            // Unmanned duration
            int radarMode = -1;                                   // Used to distinguish whether the module is in basic reporting mode (2) or engineering reporting mode (1)
            RadarMovePower radarMovePower;                        // Exercise Energy Value
            RadarStaticPower radarStaticPower;                    // Stationary energy value
            int photosensitive = -1;                              // Photosensitive 0-255
        };

        // Used to return the result of an issued command
        struct DataResult
        {
            byte *resultBuffer; // Points to a dynamically allocated array
            int length;         // Length of the array
        };
};
Installation
Since you have downloaded the zip Library, open your Arduino IDE, click on Sketch > Include Library > Add .ZIP Library. Choose the zip file you just downloaded,and if the library install correct, you will see Library added to your libraries in the notice window. Which means the library is installed successfully.

XIAO Example
Now that we have our library installed and we understand the basic functions, let's run some examples for our 24GHz mmWave Sensor to see how it behaves.
Step 1. Launch the Arduino application.
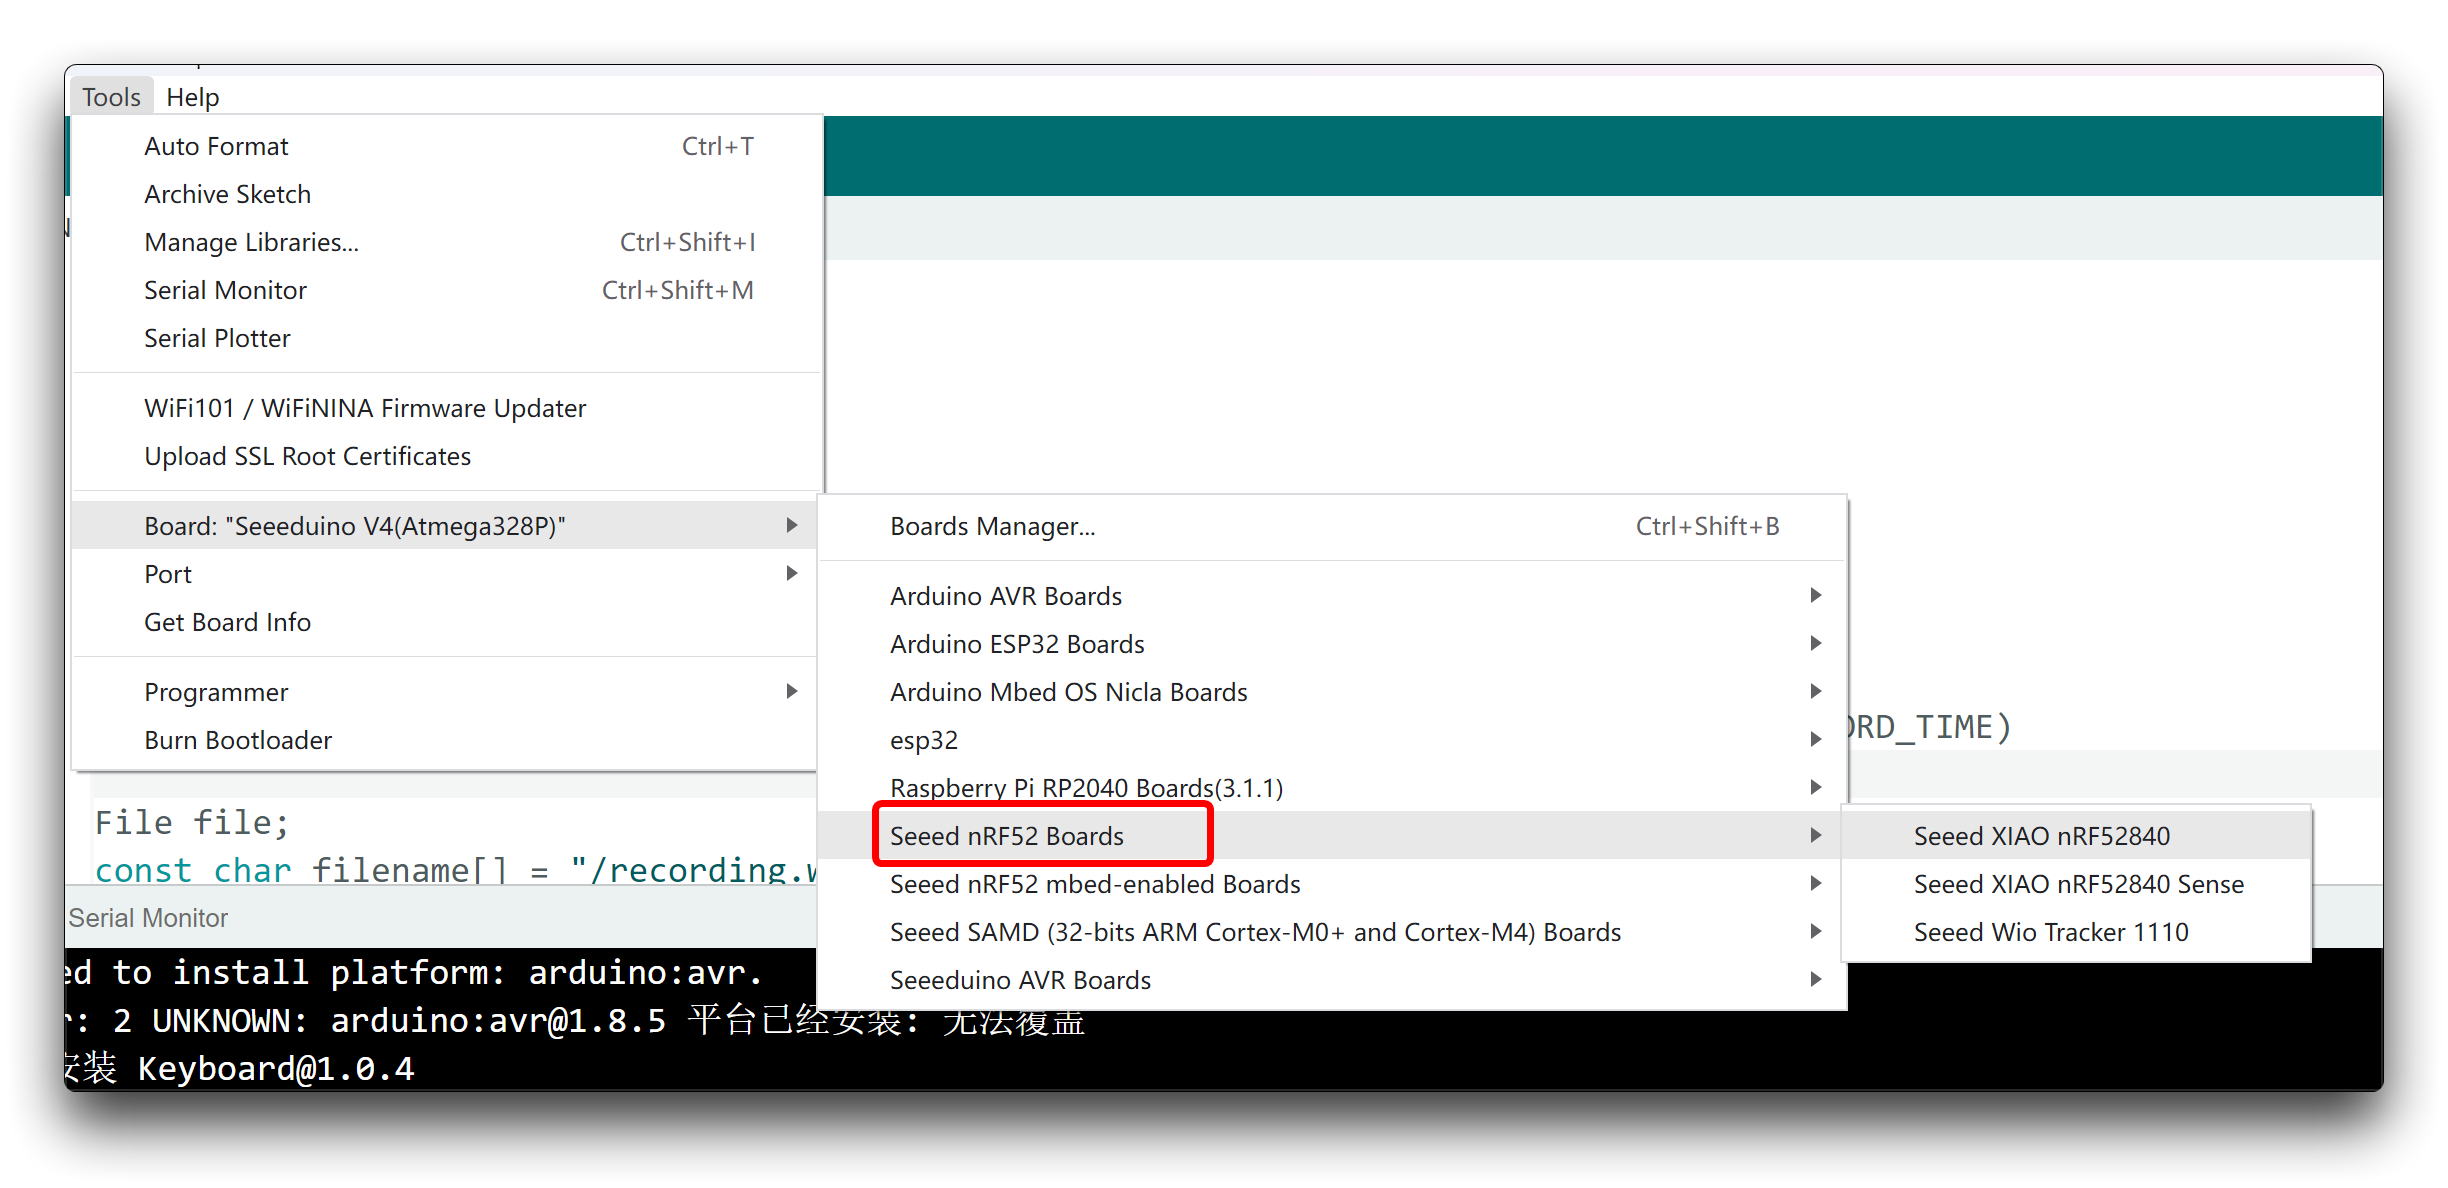
Step 2. Select your development board model and add it to the Arduino IDE.
-
If you want to use Seeed Studio XIAO SAMD21 for the later routines, please refer to this tutorial to finish adding.
-
If you want to use Seeed Studio XIAO RP2040 for the later routines, please refer to this tutorial to finish adding.
-
If you want to use Seeed Studio XIAO nRF52840 for the later routines, please refer to this tutorial to finish adding.
-
If you want to use Seeed Studio XIAO ESP32C3 for the later routines, please refer to this tutorial to finish adding.
-
If you want to use Seeed Studio XIAO ESP32S3 for the later routines, please refer to this tutorial to finish adding.
This tutorial will use the XIAO ESP32C3 as an example.
Step 3. Connect the sensor to the XIAO and connect the XIAO to the PC via a USB-C type cable.
Step 4. Open the downloaded HLKRadarTool APP and configure the appropriate baud rate for the sensor.
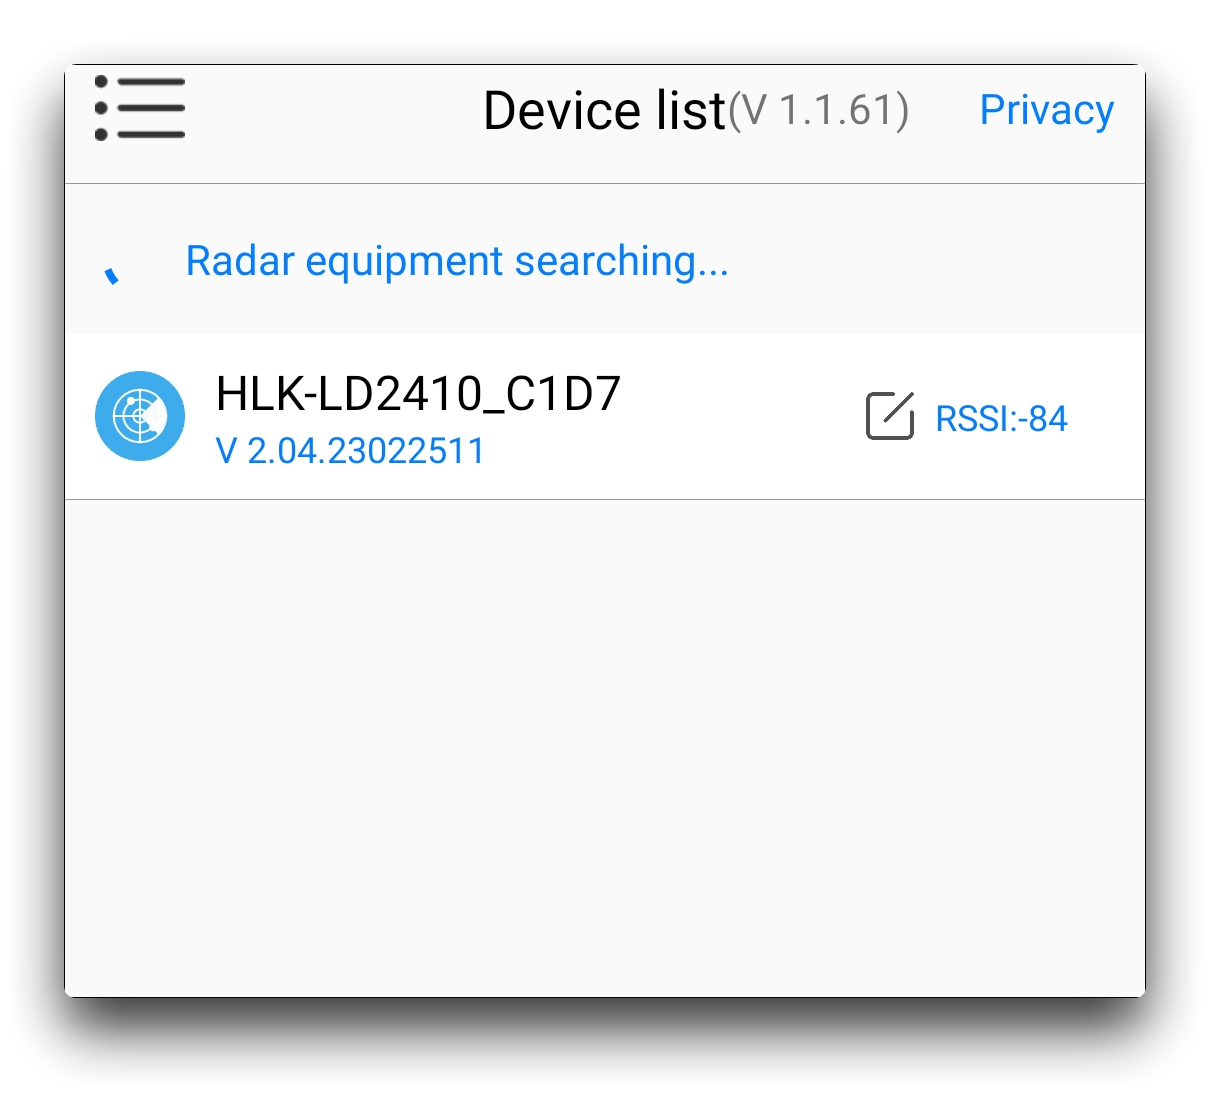
Open the app, and the app searches for nearby radar devices. The broadcast name of the device is HLK-LD2410_xxxx (xxxx is the last four digits of the mac address).
In the More option in the top right corner of the software, you can access the settings menu to set custom parameters and features for the sensor. Please set the baud rate of the sensor to 9600 and save it.
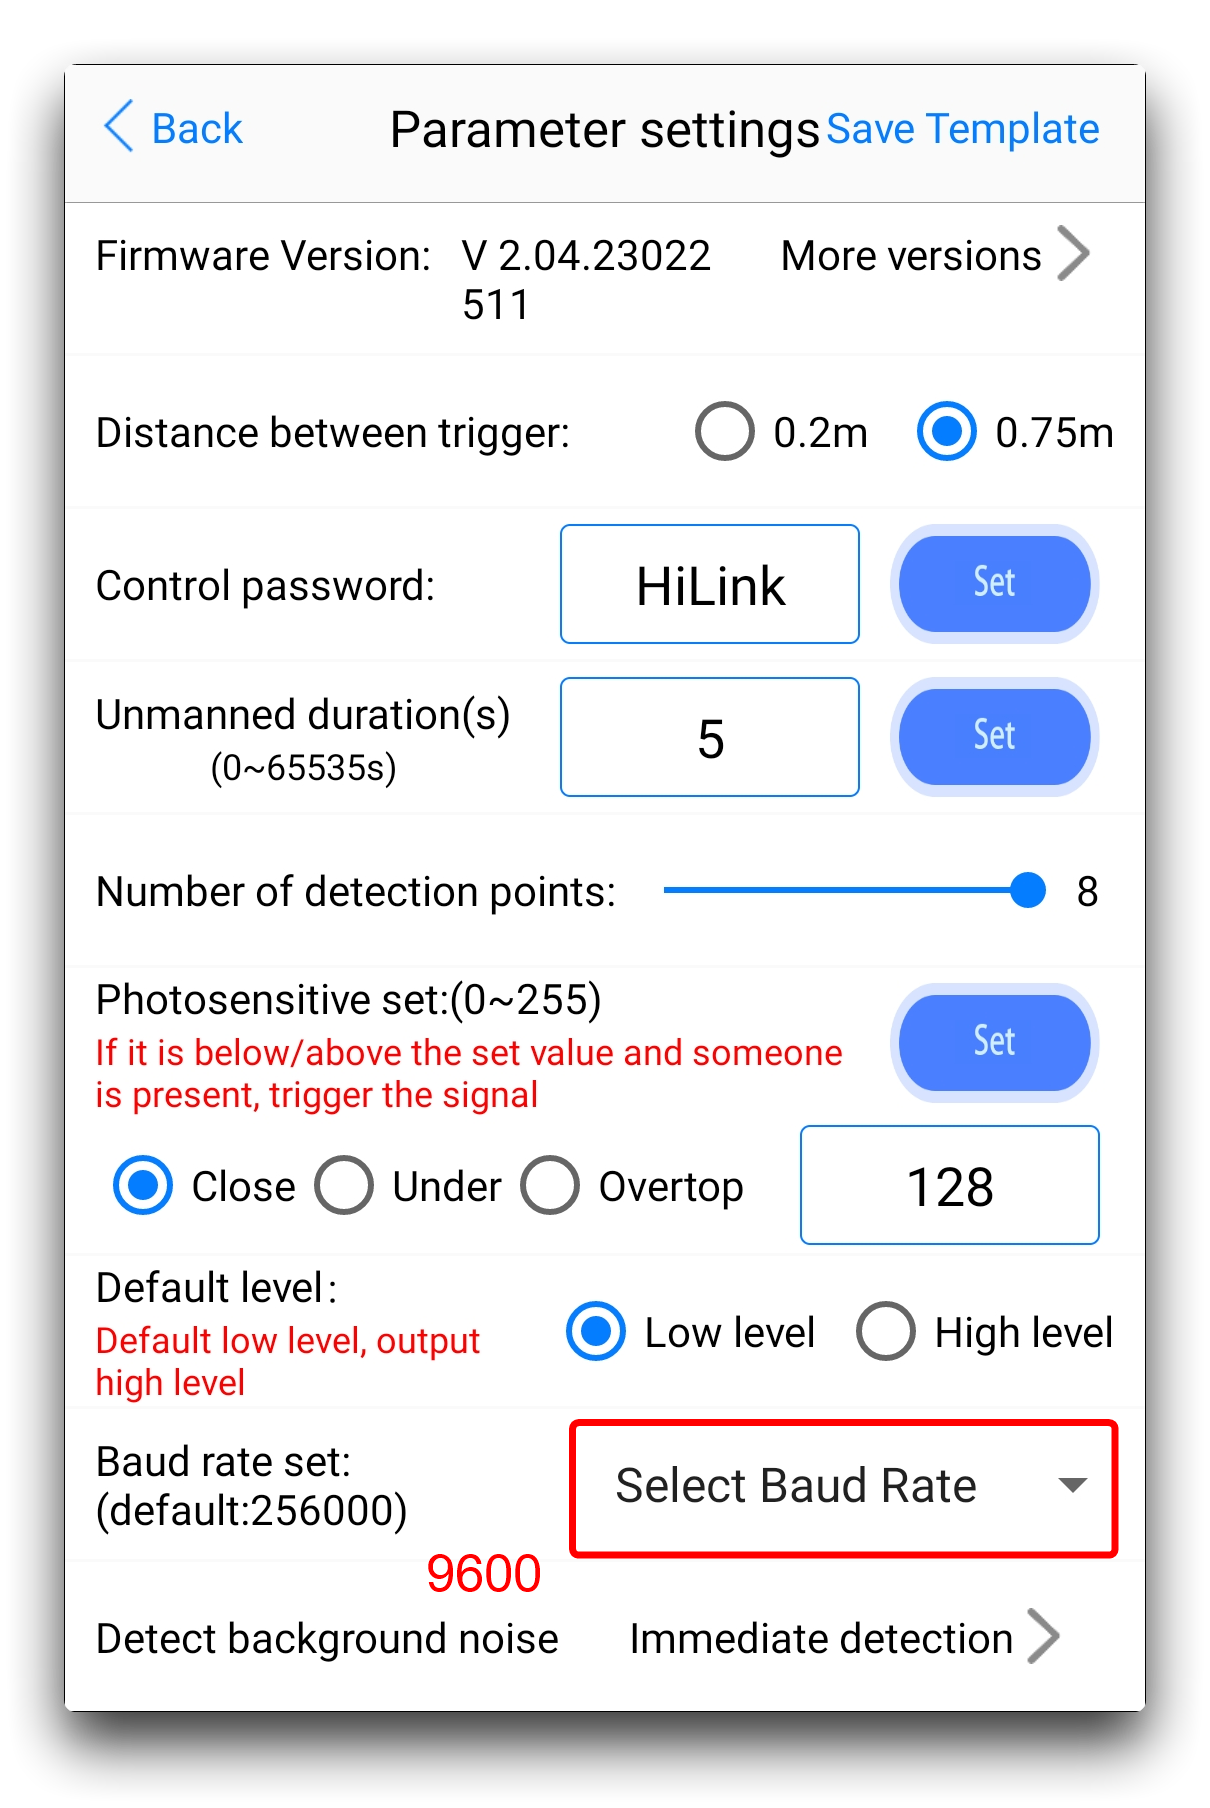
Afterwards, wait for the sensor to reboot.
Step 5. Add the necessary libraries.
In addition to the libraries for the sensors that you need to add to your Arduino environment, if you are using an ESP32 series XIAO then you may need to install the libraries for the soft-serial ports separately to be able to use the examples provided.
Demo 1. Basic mode output
For the first program example, we will parse the general information reported by the sensor. This will represent the main functional information output for this product. For example, data on human presence, motion, distance, etc.
#if defined(ARDUINO_SEEED_XIAO_NRF52840_SENSE) || defined(ARDUINO_SEEED_XIAO_NRF52840)
#error "XIAO nRF52840 please use the non-mbed-enable version."
#endif

#include <SoftwareSerial.h>
#include <mmwave_for_xiao.h>

// Define the SoftwareSerial object, D2 as RX, D3 as TX, connect to the serial port of the mmwave sensor
SoftwareSerial COMSerial(D2, D3);

// Creates a global Serial object for printing debugging information
#define ShowSerial Serial

// Initialising the radar configuration
// Seeed_HSP24 xiao_config(COMSerial, ShowSerial);
Seeed_HSP24 xiao_config(COMSerial);

Seeed_HSP24::RadarStatus radarStatus;

void setup() {
  COMSerial.begin(9600);
  ShowSerial.begin(9600);
  delay(500);

  ShowSerial.println("Programme Starting!");

  xiao_config.disableEngineeringModel();
}

void loop() {
  int retryCount = 0;
  const int MAX_RETRIES = 10;  // Maximum number of retries to prevent infinite loops

  //Get radar status
  do {
    radarStatus = xiao_config.getStatus();
    retryCount++;
  } while (radarStatus.targetStatus == Seeed_HSP24::TargetStatus::ErrorFrame && retryCount < MAX_RETRIES);

  //Parses radar status and prints results from debug serial port
  if (radarStatus.targetStatus != Seeed_HSP24::TargetStatus::ErrorFrame) {
    ShowSerial.print("Status: " + String(targetStatusToString(radarStatus.targetStatus)) + " ---- ");
    ShowSerial.println("Distance: " + String(radarStatus.distance) + "  Mode: " + String(radarStatus.radarMode));
  }
  delay(200);
}

// Parsing the acquired radar status
const char* targetStatusToString(Seeed_HSP24::TargetStatus status) {
  switch (status) {
    case Seeed_HSP24::TargetStatus::NoTarget:
      return "NoTarget";
    case Seeed_HSP24::TargetStatus::MovingTarget:
      return "MovingTarget";
    case Seeed_HSP24::TargetStatus::StaticTarget:
      return "StaticTarget";
    case Seeed_HSP24::TargetStatus::BothTargets:
      return "BothTargets";
    default:
      return "Unknown";
  }
}
After compiling and uploading the program, open the serial monitor and set the baud rate to 9600. if all goes well, you should see the following result output.

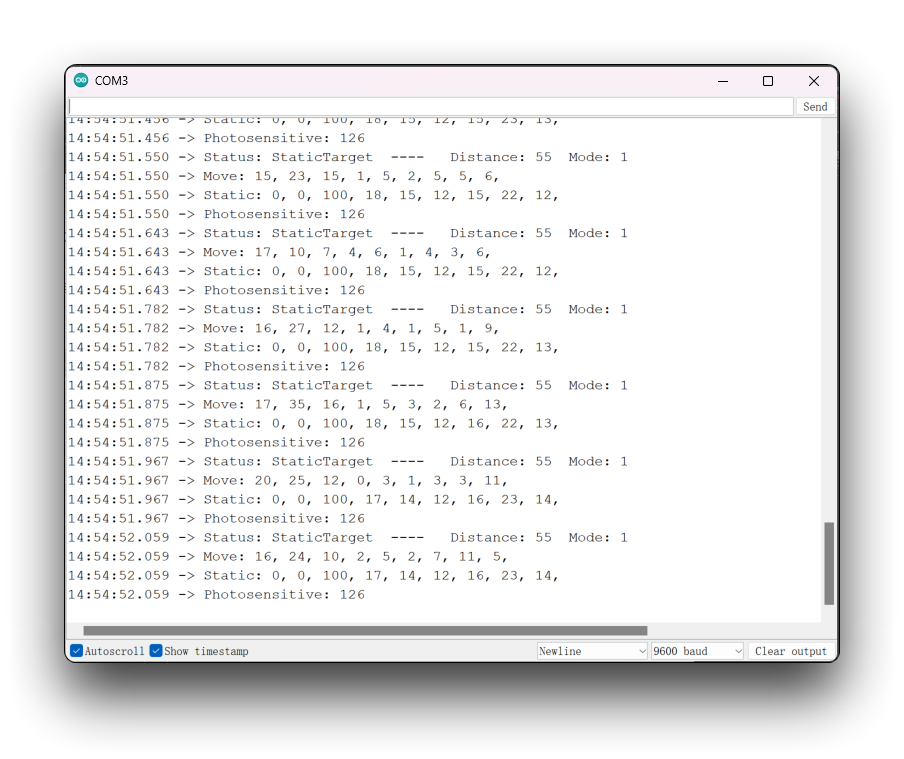
Demo 2. Engineering mode output
For the second example program, we will turn on the engineering data upload for the sensor and parse this engineering information. Compared to the base mode, the engineering information has more motion energy values and static energy values for different distance gates. The display of these values allows you to visualise the dynamic and static energy changes in the current environment, making it easier for you to adjust the triggers for the sensors to determine if someone is present, stationary, or in motion according to the actual situation.
#if defined(ARDUINO_SEEED_XIAO_NRF52840_SENSE) || defined(ARDUINO_SEEED_XIAO_NRF52840)
#error "XIAO nRF52840 please use the non-mbed-enable version."
#endif

#include <SoftwareSerial.h>
#include <mmwave_for_xiao.h>

// Define the SoftwareSerial object, D2 as RX, D3 as TX, connect to the serial port of the mmwave sensor
SoftwareSerial COMSerial(D2, D3);

// Creates a global Serial object for printing debugging information
#define ShowSerial Serial

// Initialising the radar configuration
// Seeed_HSP24 xiao_config(COMSerial, ShowSerial);
Seeed_HSP24 xiao_config(COMSerial);

Seeed_HSP24::RadarStatus radarStatus;

void setup() {
  COMSerial.begin(9600);
  ShowSerial.begin(9600);
  delay(500);

  ShowSerial.println("Programme Starting!");

  xiao_config.enableEngineeringModel();
}

void loop() {
  int retryCount = 0;
  const int MAX_RETRIES = 10;  // Maximum number of retries to prevent infinite loops

  //Get radar status
  do {
    radarStatus = xiao_config.getStatus();
    retryCount++;
  } while (radarStatus.targetStatus == Seeed_HSP24::TargetStatus::ErrorFrame && retryCount < MAX_RETRIES);

  //Parses radar status and prints results from debug serial port
  if (radarStatus.targetStatus != Seeed_HSP24::TargetStatus::ErrorFrame) {
    ShowSerial.print("Status: " + String(targetStatusToString(radarStatus.targetStatus)) + "  ----   ");
    ShowSerial.println("Distance: " + String(radarStatus.distance) + "  Mode: " + String(radarStatus.radarMode));

    if (radarStatus.radarMode == 1) {
      ShowSerial.print("Move:");
      for (int i = 0; i < 9; i++) {
        ShowSerial.print(" " + String(radarStatus.radarMovePower.moveGate[i]) + ",");
      }
      ShowSerial.println("");
      ShowSerial.print("Static:");
      for (int i = 0; i < 9; i++) {
        ShowSerial.print(" " + String(radarStatus.radarStaticPower.staticGate[i]) + ",");
      }
      ShowSerial.println("");
      ShowSerial.println("Photosensitive: " + String(radarStatus.photosensitive));
    }
  }
  delay(100);
}

// Parsing the acquired radar status
const char* targetStatusToString(Seeed_HSP24::TargetStatus status) {
  switch (status) {
    case Seeed_HSP24::TargetStatus::NoTarget:
      return "NoTarget";
    case Seeed_HSP24::TargetStatus::MovingTarget:
      return "MovingTarget";
    case Seeed_HSP24::TargetStatus::StaticTarget:
      return "StaticTarget";
    case Seeed_HSP24::TargetStatus::BothTargets:
      return "BothTargets";
    default:
      return "Unknown";
  }
}
After compiling and uploading the program, open the serial monitor and set the baud rate to 9600. if all goes well, you should see the following result output.
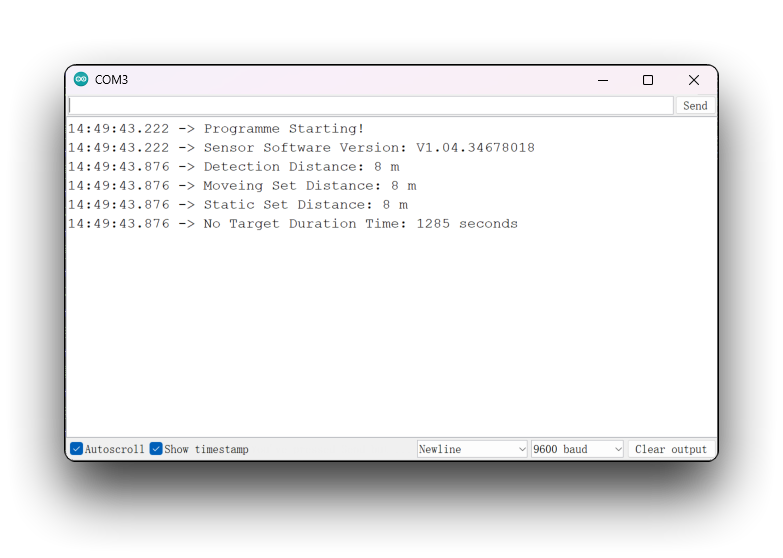
Demo 3. Other configuration inquiry and restore factory settings
In the third example, we provide a method for restoring the sensor settings and some other examples of the use of parameter query functions.
Special attention should be paid to the fact that when the sensor is restored to the factory settings, it also means that the baud rate of the sensor will be restored to 256000. You need to follow the previous steps to reset the baud rate to 9600 on your mobile phone APP before you can use other XIAO programmes.
#if defined(ARDUINO_SEEED_XIAO_NRF52840_SENSE) || defined(ARDUINO_SEEED_XIAO_NRF52840)
#error "XIAO nRF52840 please use the non-mbed-enable version."
#endif

#include <SoftwareSerial.h>
#include <mmwave_for_xiao.h>

// Define the SoftwareSerial object, D2 as RX, D3 as TX, connect to the serial port of the mmwave sensor
SoftwareSerial COMSerial(D2, D3);

// Creates a global Serial object for printing debugging information
#define ShowSerial Serial

// Initialising the radar configuration
// Seeed_HSP24 xiao_config(COMSerial, ShowSerial);
Seeed_HSP24 xiao_config(COMSerial);

Seeed_HSP24::RadarStatus radarStatus;

void setup() {
  COMSerial.begin(9600);
  ShowSerial.begin(9600);
  while(!ShowSerial);                   // Turn on the serial monitor and start executing
  delay(500);

  ShowSerial.println("Programme Starting!");

  ShowSerial.print("Sensor Software Version: ");
  ShowSerial.println(xiao_config.getVersion());

  radarStatus = xiao_config.getConfig();
  if (radarStatus.detectionDistance != -1) {
    ShowSerial.println("Detection Distance: " + String(radarStatus.detectionDistance) + " m ");
    ShowSerial.println("Moveing Set Distance: " + String(radarStatus.moveSetDistance) + " m ");
    ShowSerial.println("Static Set Distance: " + String(radarStatus.staticSetDistance) + " m ");
    ShowSerial.println("No Target Duration Time: " + String(radarStatus.noTargrtduration) + " seconds ");
  }
  else ShowSerial.println("Failed to get configuration information, please retry.");

  /*** Restore or reset the radar settings, please operate with caution.
   * * After restoring or resetting the factory settings, please re-modify
   * * the baud rate to 9600 before using XIAO!
   * */
  xiao_config.refactoryRadar();
//   xiao_config.rebootRadar();                // Reboot the Sensor
}

void loop() {}
This program will perform a reset after you turn on the serial monitor.
Troubleshooting
Q1: I am using XIAO nRF52840 (Sense), which development board version should I choose?
You should use the non-mbed version of the XIAO nRF52840 development board package as it contains the soft serial port libraries necessary for the programme.
Q2: Why am I getting dropped frames and garbled sensor data streams?
This is most likely because you did not modify the baud rate of the sensor. The default baud rate of the factory firmware of this product is 256000. XIAO's soft serial port may not be able to handle such a high speed data stream, then the programme may be abnormally stuck and unable to parse the data frames correctly, so please adjust the baud rate down and then use the programme again. We recommend using a baud rate of 9600.
Q3: Why does the data stream lag for 1~2 seconds when using Demo2?
This may be a normal phenomenon, the data flow in engineering mode is large, the soft serial port occupies the CPU to process the data is limited, so it will pause for a while every now and then.
Tech Support & Product Discussion
Thank you for choosing our products! We are here to provide you with different support to ensure that your experience with our products is as smooth as possible. We offer several communication channels to cater to different preferences and needs.