Getting Started with reServer J2032

reServer J2032 is the new powerful Edge AI compute device that we proudly introduced to our reThings family, it adopted the sleek reServer form-factor case design which packed the powerful unit in an extremely compact shape. This smart tiny server is not only able to work easily and efficiently from the edge to the cloud but also adding AI processing power into the formula.
reServer J2032 is equipped with the cutting edge Nvidia Jetson™ Xavier NX 16GB Module (Optinal Jetson™ Xavier NX 8GB Module) which can deliver up to 21 TOPS for processing common AI tasks, the extensive amount of GPU RAM allows parallel multi neural network process, It has dual Ethernet ports with consist of one high-speed 2.5 Gigabit Ethernet port and a 1 Gigabit and also supports hybrid connectivity including 5G, LoRa® and BLE. reServer 2032 alsoHaving dual SATA III 6.0Gbps data connectors, is able to equip up to two 3.5"/2.5" SATA internal hard disk drives to acquire more storage.
Meanwhile, reServer is of compact design to work efficiently in almost any server scenario. The neat structure of reServer also makes it simple to access to the hard drives, and extensive communication module extension slots which allows easy installation, upgrades and maintenance.
Having dual SATA III 6.0Gbps data connectors, reServer is able to equip up to two 3.5"/2.5" SATA internal hard disk drives to acquire more storage.
Features
- Compact design for a desktop server with an overall dimension of 132mm x124mm x233mm
- Powered by the Nvidia Jetson™ Xavier NX 16Gb Module.
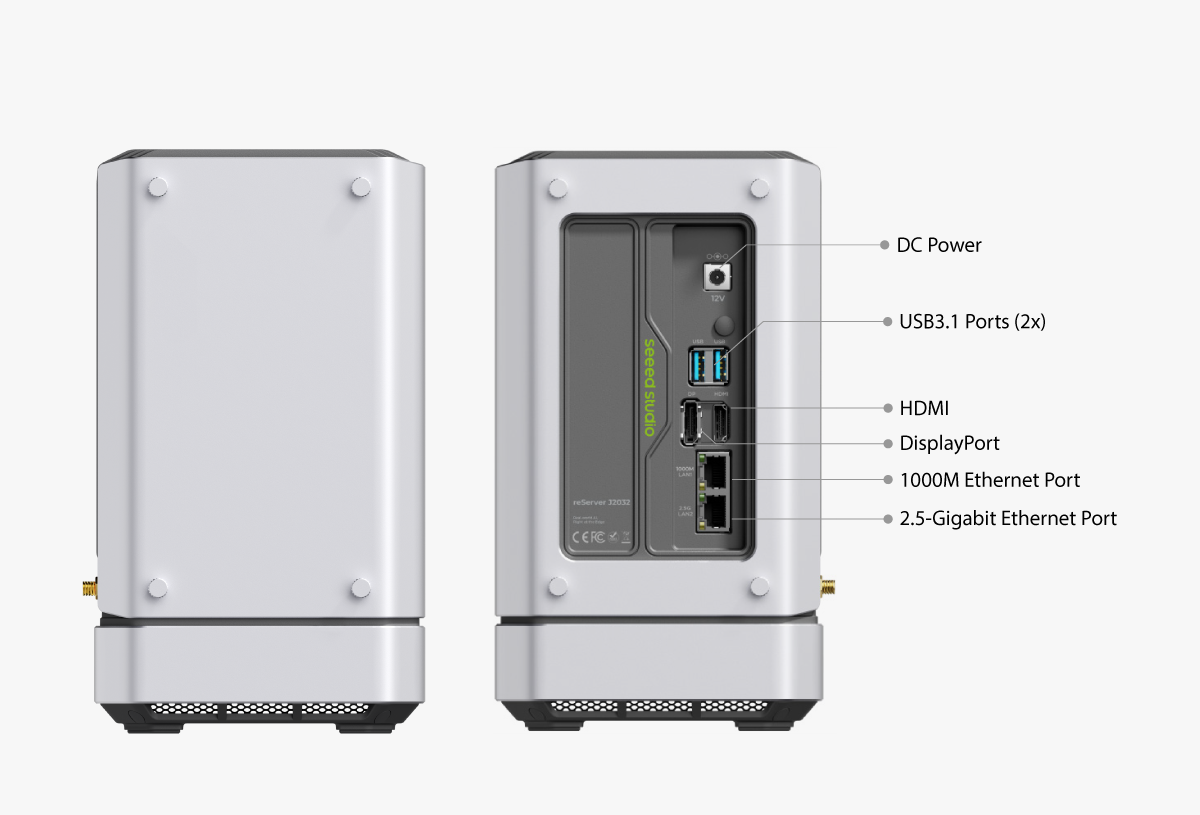
- Rich peripherals including dual LAN port(1 x 2.5Gigabit port and 1 x 1 Gigabit port) , 2 x USB 3.2 gen 2 Type-A, HDMI port and DP port, 1 x M.2 Key B, 1 x Mini-PCIe port.
- Support hybrid connectivity including 5G, LoRa® and BLE (5G and LoRa® need additional modules)
- Dual SATA III 6.0 Gbps data connectors for 3.5"/2.5" SATA hard disk drives with enough space inside the enclosure to store them both
- M.2 B-Key for expandability such as 4G/5G modules.
- Mini-PCIe port for expandability such as 4G/5G modules and LoRaWAN® module(WM1302-USB-XXXX)
- Quiet cooling fan with a large VC heat sink for excellent heat dissipation
- Easy to install, upgrade and maintain with ease of access to the internal components after opening the enclosure
- Pre-installed with NVIDIA Jetpack 4.6.1 (Jetson™ Linux R32.7.1)
LoRaWAN® is a mark used under license from the LoRa Alliance®. The LoRa® Mark is a trademark of Semtech Corporation or its subsidiaries.
Specifications
Processor |
Module |
NVIDIA® Jetson Xavier™ NX 16GB |
AI Perf |
21 TOPS | |
GPU |
NVIDIA Volta architecture with 384 NVIDIA CUDA® cores and 48 Tensor cores | |
CPU |
6-core NVIDIA Carmel ARM®v8.2 64-bit CPU 6 MB L2 + 4 MB L3 | |
DL Accelerator |
2x NVDLA Engines | |
Vision Accelerator |
7-Way VLIW Vision Processor | |
Memory |
8 GB 128-bit LPDDR4x @ 51.2GB/s | |
Storage |
16 GB eMMC 5.1 | |
Video Encoder |
2x 4K60 | 4x 4K30 | 10x 1080p60 | 22x 1080p30 (H.265) 2x 4K60 | 4x 4K30 | 10x 1080p60 | 20x 1080p30 (H.264) | |
Video Decoder |
2x 8K30 | 6x 4K60 | 12x 4K30 | 22x 1080p60 | 44x 1080p30 (H.265) 2x 4K60 | 6x 4K30 | 10x 1080p60 | 22x 1080p30 (H.264) | |
Storage |
Support 2 x 2.5''/3.5" SATA (HDD/SSD),up to SATA3 ( 2.5 inch 256GB SSD x1,up to SATA3 already installed) | |
Co-processor |
Raspberry Pi® RP2040 32-Bit Dual ARM Cortex-M0+ @ 133MHz | |
External I/O |
2.5G Ethernet Port |
Converted from PCIe RX: 2.35 Gbits/sec TX: 1.4 ~ 1.6 Gbits/sec |
1000M Ethernet Port |
Native Ethernet interface of Jetson Xavier NX | |
HDMI Interface |
Support up to HDMI2.0 | |
DisplayPort Interface |
Support up to DP1.4 | |
USB3.1 GNE2 Interface x2 |
Support up to 10Gbit | |
DC Jack Power Interface |
DC 12V @5A, 2.5mm center pin | |
Internal I/O |
M.2 KEY B Connector |
With USB3.2 GEN2, Support 5G/4G wireless module |
MiNi-PCIe Connector |
Support LoRa®/Series wireless module | |
SIM Card Slot |
Top layer for MiNi-PCIe | |
Bottom layer for M.2 | ||
SATA Power Connector x2 |
Support 2.5inch or 3.5inch HDD/SSD, up to SATA3 | |
SATA Data Connector x2 | ||
Main Fan Connector |
For enclosure fan, only supports 12V fans, the bottom fan is already installed | |
Jetson Xavier NX Fan Connector |
Only supports 5V fans, aluminium heatsink cooling fan already installed | |
RTC Battery Connector |
RTC battery already installed | |
260Pin SODIMM Connector |
For Jetson Xavier NX | |
USB TYPE-C Connector for NX |
For NX programming | |
USB TYPE-C Connector for Coprocessor |
For coprocessor firmware upgrade | |
AutoPower on Header |
Short-circuit to enter key-on mode, float into the auto power-on mode | |
2x5Pin Debug Header |
Debug | |
Power Button |
With green LED | |
Active Buzzer | ||
Network |
Giga Ethernet |
2.5G Ethernet Port
|
1000M Ethernet Port | ||
Wireless Connection |
M.2 KEY B connector, support 5G/4G wireless module | |
MiNi-PCIe connector, support LoRa®/Series wireless module | ||
Display |
LED1: SATA0 statusLED |
Sleep mode or no SSD/HDD inserted-----LED OFF SSD/HDD inserted and PHY ready ----- LED ON Data transfer status ----- LED blinks |
LED2: SATA1 statusLED | ||
LED3 |
M.2 wireless module status LED | |
Power |
DC Jack Power interface |
DC 12V @5A, 2.5mm center pin |
Power Button |
Power on | |
Restart Button |
Restart | |
Pre-installed |
2.5 inch 256GB SSD x1,up to SATA3 | |
Aluminum Heatsink Cooling Fan | ||
RTC battery | ||
Bottom Fan | ||
Dimensions |
132mm124mm233mm | |
Hardware Overview


Dimensions

Flash JetPack
reServer J2032 already comes pre-flashed with JetPack out-of-the-box. But if you want to reflash the device, please follow this wiki.
Quick Start with reServer Peripheral and Module Assembly
!!! Note: reServer J2032 will come with Jetpack 4.6.1 preinstalled on the EMMC of the Jetson Xavier NX module which means you could directly start to develop your own application with it.
Hardware Required
You need to prepare the following hardware before getting started with reServer。
- reServer
- Power Adapter(provided)
- External monitor
- HDMI/DP cable
- Keyboard and Mouse
Peripheral and Module Assembly
For this part, we will introduce how to install or replace some supported hardware/module inside reServer. please skip it if the following step does not apply to your use case. You might follow the Assembly Guide Manual attached at the end of this page to access to the main board of reServer before reading this part.
LoRaWAN® Module Mini-PCIe Port Installation
!!! Note: The following setup guide of install the LoRaWAN® Module in the Mini-PCIe port only tested with following modules WM1302-USB-US915 or WM1302-USB-868. the LoRaWAN® Module does not include.
- Step 1. Spot the Mini-PCIe slot on the back of the carrier board and install LoRaWAN® Module.

- Step 2. Connect the antenna cable and locate the antenna mounting slot on the back of the reServer J2032 case which should have a rubber insert blocking the hole.
!!! Note: reServer J2032 does not shipped with Antenna Adapters and Antenna.

- Step 3. mod reServer J2032 to be used with LoRaWAN® module by type following command into the
Terminal:
sudo -i
cd /sys/class/gpio/
echo 268 > export; echo out > gpio268/direction; echo 1 > gpio268/value
echo 495 > export; echo out > gpio495/direction; echo 0 > gpio495/value

- Step 4. check if the LoRaWAN® module is connected properly,open
Terminaland type following command:
!!! Note: The following steps on enabling the LoRaWAN® module only tested and applied on the Factory Default Jetpack 4.6.1
ls /dev/ttyACM*
You should see following output as following:

OR
lsusb -t
You should see following output as following:

- Step 5. To use the LoRaWAN® Module please download the source code:
Now let's install git and download sx1302_hal(library and programs for SX1302 LoRa® Gateway) from github:
sudo apt update
sudo apt install -y git
git clone https://github.com/Lora-net/sx1302_hal
Move to sx1302_hal folder and build the program:
cd ~/sx1302_hal
make
Start to run the LoRaWAN® gateway application, here is an example of using the WM1302-USB-868 module, where the config file global_conf.json.sx1250.EU868.USB has been choosen:
cd packet_forwarder/
sudo ./lora_pkt_fwd -c global_conf.json.sx1250.EU868.USB
You should see similar output like this:

4G/5G Module Mini-PCIe Installation
!!! Note: QC25-EUX 4G module is used with the following setup guide and the module does not included.
- Step 1. Locate the Mini-PCIe slot on the back of the carrier board and install LoRaWAN® Module.
!!! Note: You need to insert a standard SIM card into the reServer J2032 SIM card slot to enable 4G/5G network. If you look closely, the SIM card Tray has two Layers, the Mini-PCIe port is utilisting the SIM Slot 2 as indicated in the picture below.

- Step 2. Connect the antenna cable and locate the antenna mounting slot on the back of the reServer J2032 case which should have a rubber insert blocking the hole.
!!! Note: reServer J2032 does not shipped with Antenna Adapters and Antenna.
- Step 3. mod reServer J2032 to be used with QC25-EUX 4G module by type following command into the
Terminal:
sudo -i
cd /sys/class/gpio/
echo 436 > export; echo in > gpio436/direction;
export; echo in > gpio268/direction;
export; echo out > gpio393/direction; echo 1 > gpio393/value
echo 495 > export; echo out > gpio495/direction;
echo 1 > gpio495/value
echo 0 > gpio495/value
- Step 4. check if the QC25-EUX 4G module is connected properly by power up and boot into the system, then open
Terminaland type following command:
!!! Note: The following steps on enabling the QC25-EUX 4G module only tested and applied on the Factory Default Jetpack OS Version 4.6.1
lsusb -t
You should see following output as following:

- Step 5. Enable QC25-EUX 4G module to connect to 4G network, please open
Terminaland type:
Open minicom serial moniter with the 4G module plugged in
sudo apt install -y minicom
sudo minicom -D /dev/ttyUSB2 -b 115200m1
once the serial connection opened, Type in AT and press 'Enter', and you should see OK.
At the same minicom serial window please type:
AT+QCFG="usbnet"
It will return something like +QCFG: "usbnet",0, but we need that to be set to 1 (ECM mode), so enter the following command:
AT+QCFG="usbnet",1
Then enter the following command to force the modem to reboot:
AT+CFUN=1,1
Then you could reboot or wait for a while for the moudel to get internet from your sim card carrier.
Now if you type ifconfig in Terminal you should see the similar output as image shown below which you have assigned an ip address from your SIM Card mobile carrier:

4G/5G Module M.2 B-key Port Installation
!!! Note: The M.2 B-Key on reServer J2032 support 3042/3052(USB3.2 GEN2) format supports 4G/5G Wireless Module (4G/5G Module is not included in reServer). The SIM8202G-M2 5G module is used in the following steps.
- Step 1. Install SIM8202G-M2 Module to M.2 B-Key.

- Step 2. Connect the antenna cable to the Module.
!!! Note: reServer J2032 does not shipped with Antenna Adapters and Antenna, For using the SIM8202G-M2 5G Module to connect network you need to have Antennas attached to the module.
- Step 3. Mod reServer J2032 to be used with SIM8202G-M2 5G module on the M.2 B-Key port by type following command into the
Terminal:
sudo -i
cd /sys/class/gpio/
echo 419 > export; echo out > gpio419/direction; echo 0 > gpio419/valueexport; echo in > gpio268/direction;
echo 417 > export; echo out > gpio417/direction; echo 1 > gpio417/value
echo 266 > export; echo out > gpio266/direction; echo 1 > gpio266/value
- Step 4. check if the SIM8202G-M2 5G module is connected properly by power up and boot into the system, then open
Terminaland type following command:
!!! Note: The following steps on enabling the SIM8202G-M2 5G module only tested and applied on the Factory Default Jetpack OS Version 4.6.1
lsusb -t
You should see similar outputs as shown below:

Step 5. Enable SIM8202G-M2 5G Module to connect to 5G network
!!! Note: You need to insert a standard SIM card into the reServer J2032 SIM card slot to enable 4G/5G network. If you look closely, the SIM card Tray has top and bottom two slots, the M.2 B-key port is utilisting the Bottom Slot.

Open minicom serial moniter with the SIM8202G-M2 5G module plugged in
sudo apt install -y minicom
sudo minicom -D /dev/ttyUSB2 -b 115200m1
Once the serial connection opened, Type in AT and press 'Enter' you should see OK in the next line.
Now, to be able to connect to 4G/5G network, please follow the command to install the required driver for SIM8202G-M2 5G module to enable the network connection:
cd ~
wget https://files.seeedstudio.com/wiki/reServerJ2032/SIM8200.tar.gz
tar xvf SIM8200.tar.gz
sudo chmod 777 -R SIM8200/
cd SIM8200/
sudo ./install.sh
cd Goonline
make
sudo ./simcom-cm -i wwan0
Now if you type ifconfig in Terminal you should see the similar output as image shown below which you have assigned an ip address from your SIM Card mobile carrier:

HDD Installation
reServer supports installing two 3.5"/2.5" internal hard disk drives to acquire more storage. Please follow the steps to install the HDDs.
-
Step 1. Remove the screws and pull out the brackets
-
Step 2. Attach the HHDs to the brackets with screws
-
Step 3. Push the HDD brackets down to connect the HHDs with the SATA ports.
-
Step 4. Fix the HDD brackets with screws

Hardware Interface
For this part, we will introduce the interface connection of reServer.
Power Connection
Simply connect AC-DC power adapter(included in the product box) with AC power cord(Out of the product box but still in the package), then connect it to 12V DC Jack of reServer.

Dual USB 3.1 Port
You can connect USB devices such as keyboard and mouse through the dual USB 3.1 port.

Display Connection
There are two methods for reServer to connect to a display.
Method 1. HDMI Port Method 2. DP Port

Ethernet Connection
reServer J2032 comes with two ethernet ports which the connection speed are 1000BASE-T and 2.5GBASE-T respectively,

Resources
- [PDF] reServer Assembly Guide
- Seeed Jetson Serials Catalog
- Seeed Studio Edge AI Success Stories
- Seeed Jetson Serials Comparision
- Seeed Jetson Devices One Page
Tech Support & Product Discussion
Thank you for choosing our products! We are here to provide you with different support to ensure that your experience with our products is as smooth as possible. We offer several communication channels to cater to different preferences and needs.