Grove - Water Level Sensor
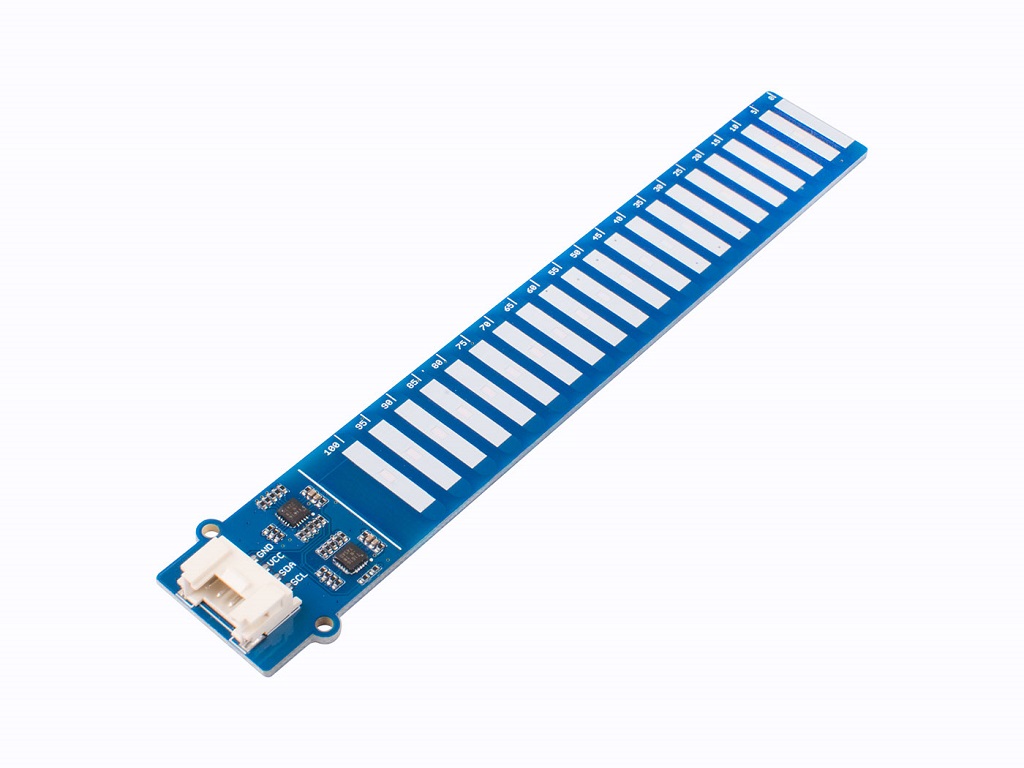
The Grove Water Level Sensor is a very accurate sensor that can be helpful in water level sensing applications. It is completely waterproof and uses capacitive pads to detect water levels up to 10cm.
We used capacitive pads on the PCB of the module and did conformal coating over the PCB to make the sensor protect against moisture, dust, chemicals and high temperatures. We believe that this technique will allow you to make accurate water level measurements (±5mm accuracy) easily.

Feature
- Easy to use (Use Grove Connector without soldering)
- Based on capacitive sensing
- Waterproof
- Conformal Coating
- Corrosion Resistant
- Detect up to 10cm water levels
- I2C Interface
Specification
| Parameter | Value |
|---|---|
| Input voltage | 3.3V / 5V |
| Measurement Accuracy | ±5mm |
| Working Temperature Range | -40°C to 105°C |
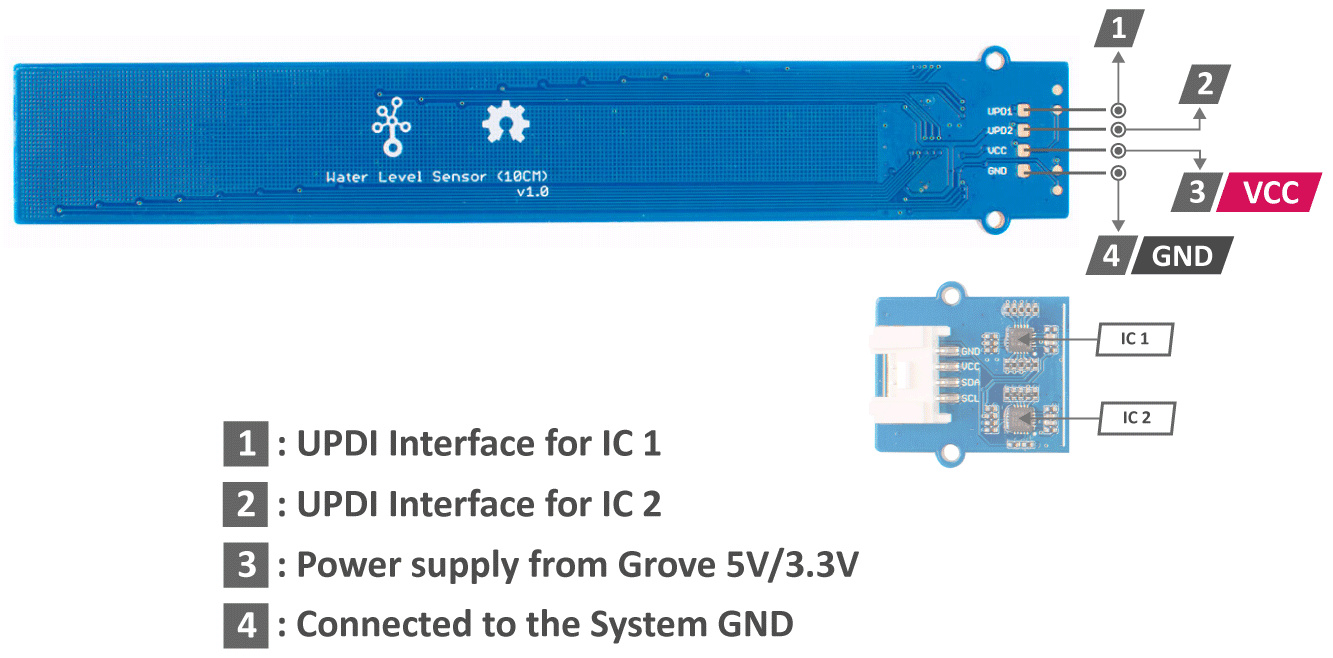
| I2C Addresses | 0x78 and 0x77 |
| Interface | I2C |
| Dimensions | 20mm x 133mm |
Hardware Overview

Platforms Supported
| Arduino | Raspberry Pi |
|---|---|
|
|
Getting Started
Play With Arduino
Materials required
| Seeeduino V4.2 | Base Shield | Grove - Water Level Sensor |
|---|---|---|
|
|
|
| Get ONE Now | Get ONE Now | Get ONE Now |


In addition, you can consider our new Seeeduino Lotus M0+, which is equivalent to the combination of Seeeduino V4.2 and Baseshield.
Hardware Connection
-
Step 1. Plug Grove - Water Level Sensor to I2C port of Grove - Base Shield.
-
Step 2. Plug Grove - Base Shield into Seeeduino.
-
Step 3. Connect Seeeduino to a PC via a USB cable.

Software
If this is the first time you work with Arduino, we strongly recommend you to see Getting Started with Arduino before the start.
- Step 1. Open the Arduino IDE and create a new file, then copy the following code into the new file.
#include <Wire.h>
#ifdef ARDUINO_SAMD_VARIANT_COMPLIANCE
#define SERIAL SerialUSB
#else
#define SERIAL Serial
#endif
unsigned char low_data[8] = {0};
unsigned char high_data[12] = {0};
#define NO_TOUCH 0xFE
#define THRESHOLD 100
#define ATTINY1_HIGH_ADDR 0x78
#define ATTINY2_LOW_ADDR 0x77
void getHigh12SectionValue(void)
{
memset(high_data, 0, sizeof(high_data));
Wire.requestFrom(ATTINY1_HIGH_ADDR, 12);
while (12 != Wire.available());
for (int i = 0; i < 12; i++) {
high_data[i] = Wire.read();
}
delay(10);
}
void getLow8SectionValue(void)
{
memset(low_data, 0, sizeof(low_data));
Wire.requestFrom(ATTINY2_LOW_ADDR, 8);
while (8 != Wire.available());
for (int i = 0; i < 8 ; i++) {
low_data[i] = Wire.read(); // receive a byte as character
}
delay(10);
}
void check()
{
int sensorvalue_min = 250;
int sensorvalue_max = 255;
int low_count = 0;
int high_count = 0;
while (1)
{
uint32_t touch_val = 0;
uint8_t trig_section = 0;
low_count = 0;
high_count = 0;
getLow8SectionValue();
getHigh12SectionValue();
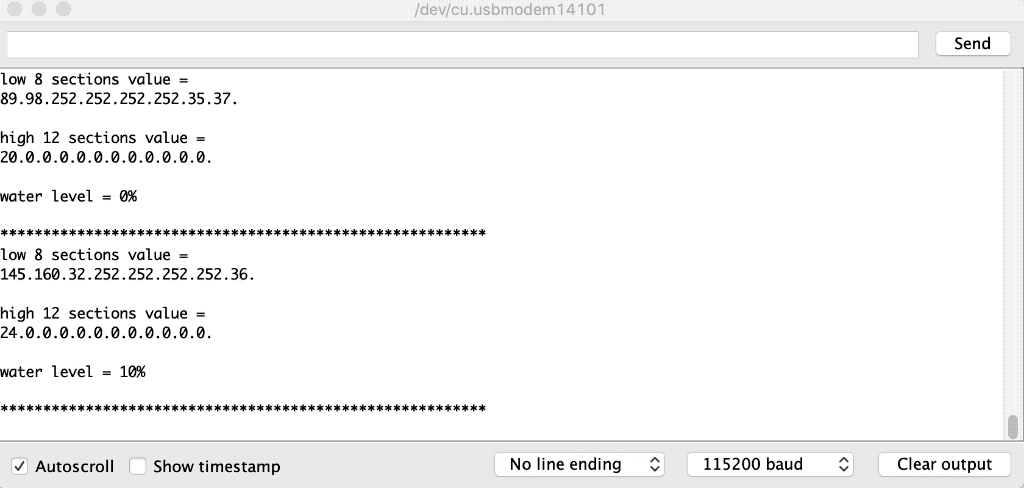
Serial.println("low 8 sections value = ");
for (int i = 0; i < 8; i++)
{
Serial.print(low_data[i]);
Serial.print(".");
if (low_data[i] >= sensorvalue_min && low_data[i] <= sensorvalue_max)
{
low_count++;
}
if (low_count == 8)
{
Serial.print(" ");
Serial.print("PASS");
}
}
Serial.println(" ");
Serial.println(" ");
Serial.println("high 12 sections value = ");
for (int i = 0; i < 12; i++)
{
Serial.print(high_data[i]);
Serial.print(".");
if (high_data[i] >= sensorvalue_min && high_data[i] <= sensorvalue_max)
{
high_count++;
}
if (high_count == 12)
{
Serial.print(" ");
Serial.print("PASS");
}
}
Serial.println(" ");
Serial.println(" ");
for (int i = 0 ; i < 8; i++) {
if (low_data[i] > THRESHOLD) {
touch_val |= 1 << i;
}
}
for (int i = 0 ; i < 12; i++) {
if (high_data[i] > THRESHOLD) {
touch_val |= (uint32_t)1 << (8 + i);
}
}
while (touch_val & 0x01)
{
trig_section++;
touch_val >>= 1;
}
SERIAL.print("water level = ");
SERIAL.print(trig_section * 5);
SERIAL.println("% ");
SERIAL.println(" ");
SERIAL.println("*********************************************************");
delay(1000);
}
}
void setup() {
SERIAL.begin(115200);
Wire.begin();
}
void loop()
{
check();
}
-
Step 3. Upload the demo. If you do not know how to upload the code, please check How to upload code.
-
Step 4. Open the Serial Monitor of Arduino IDE by click Tool-> Serial Monitor. Or tap the
ctrl+shift+mkey at the same time. Set the baud rate to 115200. -
Step 5. The result should be like this when the sensor is in water:
FAQ
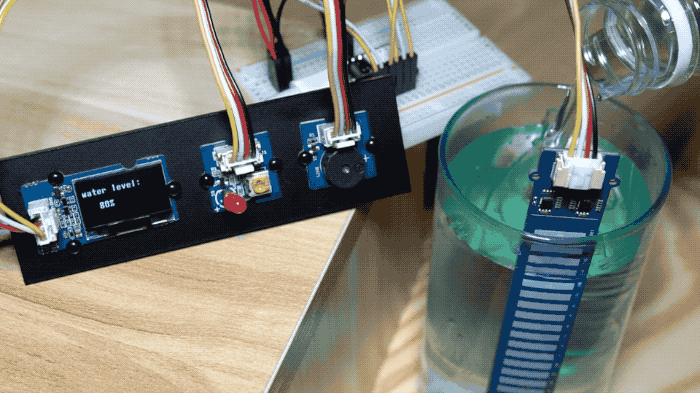
Q1# Useful Applications?
A1: Here provides a simple application using the Grove - Water Level Sensor with Buzzer and LED module for water level detecting. Please check the full code here.
Schematic Online Viewer
Resources
Tech Support & Product Discussion
Upgradable to Industrial Sensors
With the SenseCAP S2110 controller and S2100 data logger, you can easily turn the Grove into a LoRaWAN® sensor. Seeed not only helps you with prototyping but also offers you the possibility to expand your project with the SenseCAP series of robust industrial sensors.
The IP66 housing, Bluetooth configuration, compatibility with the global LoRaWAN® network, built-in 19 Ah battery, and powerful support from APP make the SenseCAP S210x the best choice for industrial applications. The series includes sensors for soil moisture, air temperature and humidity, light intensity, CO2, EC, and an 8-in-1 weather station. Try the latest SenseCAP S210x for your next successful industrial project.
