Grove Vision AI Module
As part of our commitment to continuous improvement, we've evolved our product line, and support for this version has now concluded. We encourage you to explore and purchase the Grove Vison AI V2 for an enhanced experience. If you're currently using V1 and experiencing any difficulties, please don't hesitate to reach out to our after-sales support team. We're committed to providing you with our best assistance.
Introduction
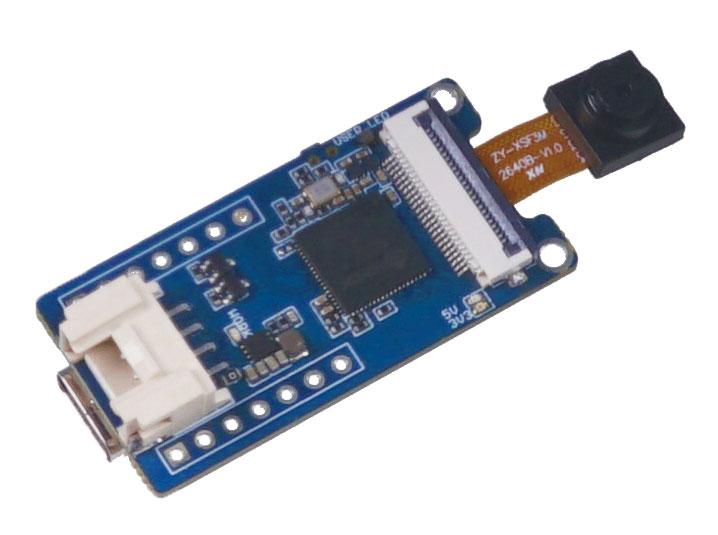
Grove Vision AI Module Sensor represents a thumb-sized AI camera, customized sensor which has been already installed ML algorithm for people detection, and other customized models. Being easily deployed and displayed within minutes, it works under ultra-low power model, and provides two ways of singal transmission and multiple onboard modules, all of which make it perfect for getting started with AI-powered camera.
In this wiki, we will show you how to utilize the Grove Vision AI module Sensor connecting seeed studio XIAO Series and Arduino, to detect people, panda, and then display it on the website.
Specification
| Parameters | Description | Note |
|---|---|---|
| Connector | Grove (Grove base for Arduino) | 5V Charge and Data Transmission |
| Double row 7pin socket (seeed duino XIAO) | 5V Charge and Data Transmission | |
| USB Type-C | 5V Charge and Firmware burn | |
| Communication Mode | IIC | |
| Processor | Himax HX6537-A | 400Mhz DSP (ultra low power consumption) |
| Camera Sensor | OV2640 chip | Resolution Ratio 1600*1200 |
| Microphone | MSM261D3526H1CPM chip | -26dBFs sensitivity |
| Accelerometer Sensor | STLSM6DS3TR-C Sensor | 3D accelerometer and 3D gyroscope |
Feature
- Easy-to-use AI Camera: Apply Edge Machine Learning algorithm in the camera sensor perfectly for detecting obejcts
- Plug and Play: Make toilless effort to perform full function and display within minutes
- Ultra-low Power consumption: Activate while detected objects moving for power saving
- Compact AI-powered Camera Sensor: The device itself is thumb-sized, vision-based, and suitable for Edge Intelligence
- Customized Sensor Design: Support custom ML models by users define
- Two Signal Transmission Supported: Refer to seeed studio XIAO elegant connecting and Grove base for Arduino simple connection
- Onboard Camera Sensor: Corporate OV2640 chip with 1600*1200 resolution ratio
- Onboard Microphone: Corporate MSM261D3526H1CPM chip with -26dBFs sensitivity
- Onboard Accelerometer Sensor: Corporate STLSM6DS3TR-C sensor for 3D accelerometer and 3D gyroscope detected
- Onboard 32 MB SPI Ultra Low Power Flash
- One wire for all data output: Represent Grove family simplified connection for only one Grove cable required between the sensor and the single board
Hardware Overview
We assume you might want to be aware of some basic parameters of the product. The following tables present information about the characteristics and pinout of Grove Vision AI Module Sensor.
| Characteristic | Value | Unit |
|---|---|---|
| Operating Voltage | 5 | V |
| Rate | 115200 | |
| I2C Interface | seeed studio XIAO & Arduino | - |
| Power Supply | dual 7-pin connector & Type-C | - |
| Downloading & Firmware Burn Interface | Type-C | - |
| Dimensions | 402013 | mm |
Pinout Overview
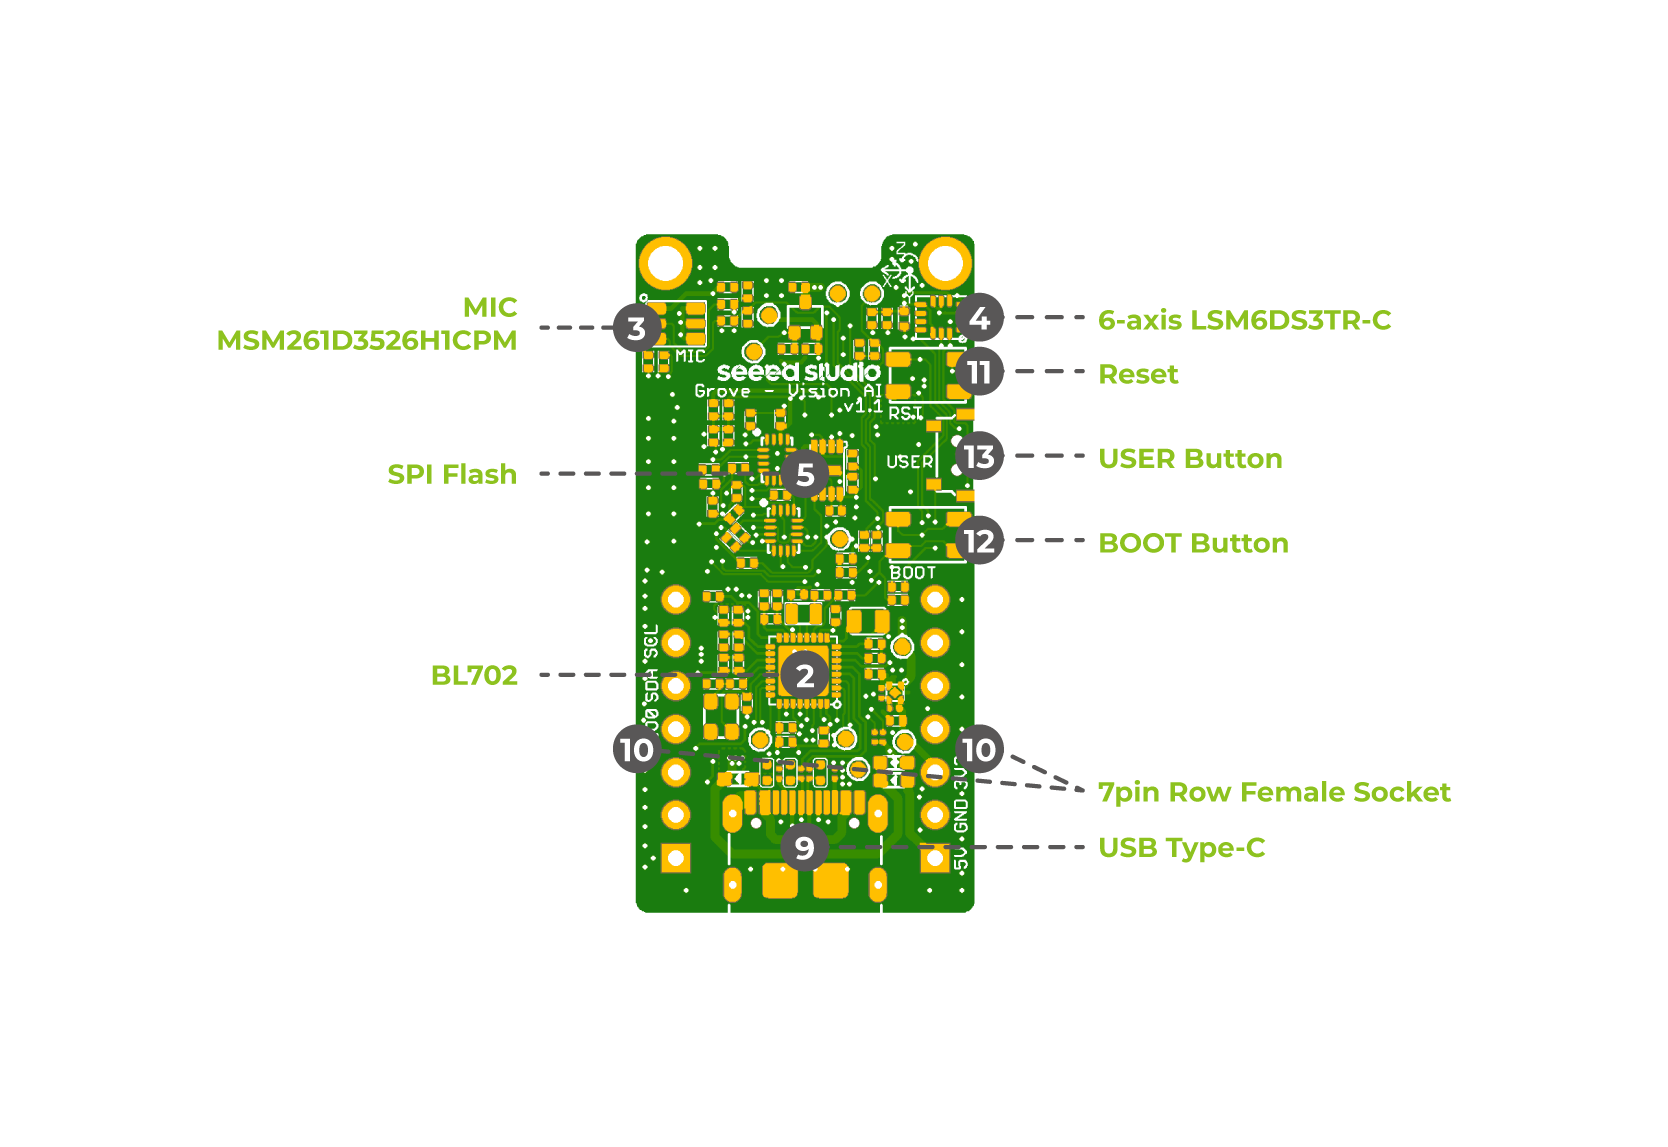
- 2 —— BL702
- 3 —— MIC MSM261D3526H1CPM
- 4 —— 6-axis LSM6DS3TR-C
- 5 —— SPI Flash
- 9 —— USB type C
- 10 —— Dual 7-pin female socket
- 11 —— Reset button
- 12 —— BOOT button
- 13 —— USER button
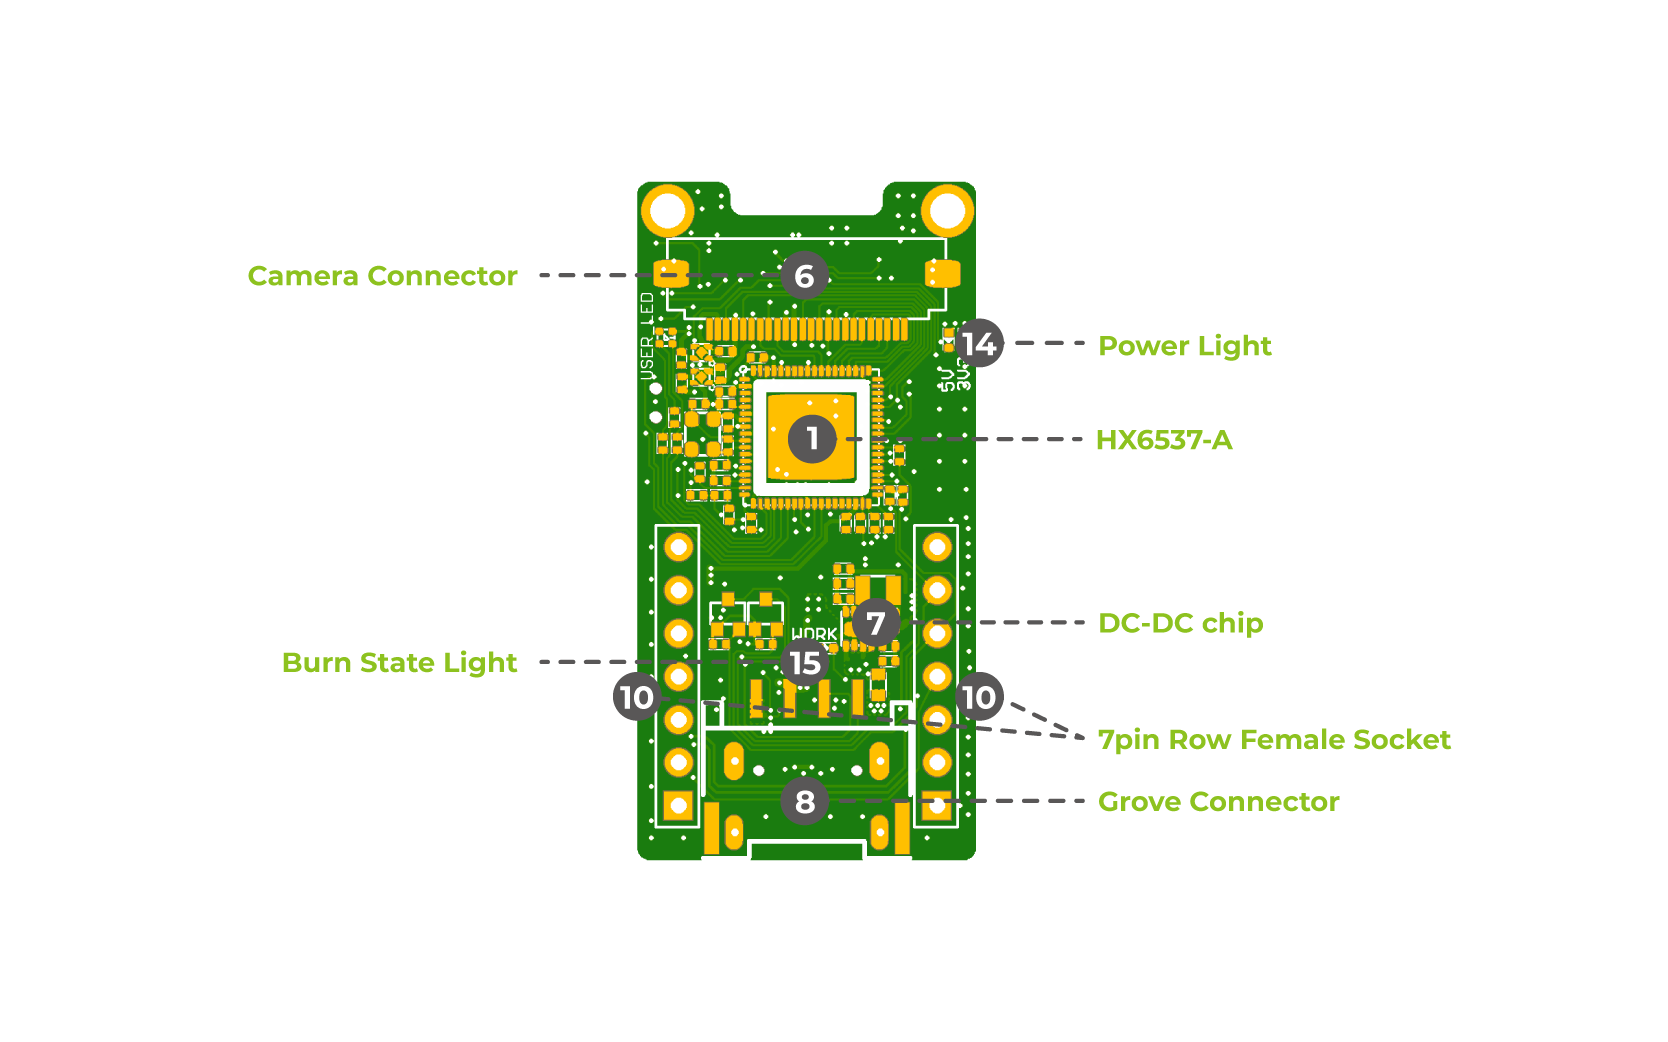
- 1 —— HX6537-A
- 6 —— Camera Connector
- 7 —— DC-DC Chip
- 8 —— Grove Connector
- 14 —— Power Light
- 15 —— Burning indicator light
Getting Started
We will show you the basic function about the module, and then introduce you the customized way that you can build the ML model of your own. But before we fully apply the module to our projects, it will take us serval steps to get the module ready.
Preparation
Hardware
- Grove Vision AI Module Sensor
- Windows host PC (Win10 tested)
- Type-C cable
Arduino Library Overview
If this is your first time using Arduino, we highly recommend you to refer to Getting Started with Arduino.
The code we use here provides serval methods of classification and selectable models, including customized models. The default we select here is object detection method and pre-trained model.
Seeed Studio will develop more methods and models for the foreseeable future, stay tuned with us.
Function
Before we get started developing a sketch, let's look at the available functions of the library.
if (ai.begin(ALGO_OBJECT_DETECTION, MODEL_EXT_INDEX_1))- This is where we can select our methods of classification and the models.
You can change ALGO_OBJECT_DETECTION to ALGO_OBJECT_COUNT or ALGO_IMAGE_CLASSIFICATION.
Meanwhile, if you also burn your customized model(firmware) into the module, you can change MODEL_EXT_INDEX_1 to MODEL_EXT_INDEX_2 or 3, 4, as you named it.
object_detection_t data- This is the struct dataset where the result output.
If you change the classification method, you need to change object_detection_t correspondingly to image_classification_t or object_count_t.
-
uint8_t len = ai.get_result_len()- The "len" here means how many human face it detects. -
object_detection_t data- The data here represent a struct format and the tpye is "object_detection_t" that is pre-defined.
Meanwhile, if you choose other methods of classification, you need to change it to image_classification_t data or object_count_t data.
Serial.print(data.confidence)- The struct format can not be directly used to print, it should point to the specific type which is defined in the head file.
typedef struct
{
    uint16_t x;
    uint16_t y;
    uint16_t w;
    uint16_t h;
    uint8_t confidence;
    uint8_t target;
} object_detection_t;
The "confidence" we want to print here shows how much "confidence" the camera has to detect the object.
Library Installation
Since we have downloaded the zip Library, open your Arduino IDE, click on Sketch > Include Library > Add .ZIP Library. Choose the zip file you just downloaded,and if the library install correct, you will see Library added to your libraries in the notice window. Which means the library is installed successfully.

Library Upgrading
In the foreseeable future, we will optimize and upgrade the product library for more interesting function. According to the library installation methods provided above, we here introduce you the way to upgrade.
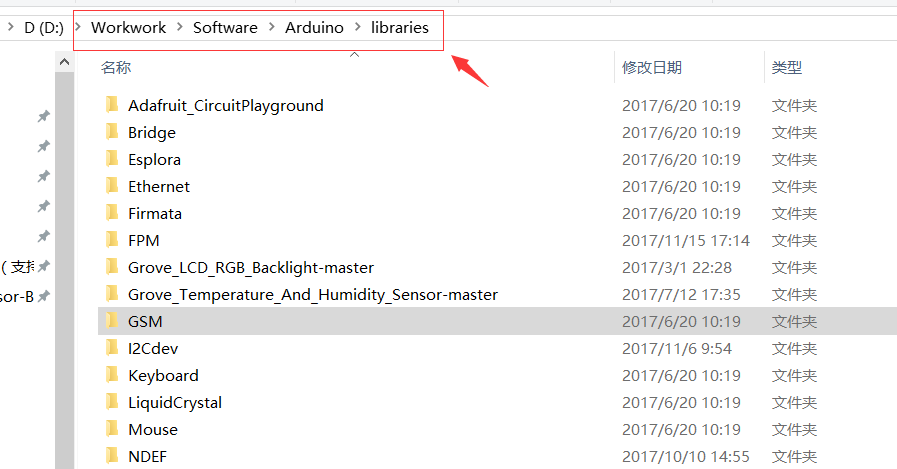
We will update the link when the library is optimized. You can delete the original library folder in your computer's folder, then download the latest version, unzip it and put it in the Arduino IDE library directory. (...\Arduino\libraries. .... is the path you setup Arduino)
Seeed Studio XIAO / Seeeduino / Arduino Example
Now that we have our library installed and the firmware burned. we can now run some examples with Grove AI module sensor on Seeed Studio XIAO nRF52840 and Seeeduino V4.2 to see how it behaves.
Step 1. Launch the Arduino application.
Step 2. Select your development board model and add it to the Arduino IDE.
-
If you want to use Seeeduino for the later routines, please refer to this tutorial to finish adding.
-
If you want to use Seeed Studio XIAO SAMD21 for the later routines, please refer to this tutorial to finish adding.
-
If you want to use Seeed Studio XIAO RP2040 for the later routines, please refer to this tutorial to finish adding.
-
If you want to use Seeed Studio XIAO nRF52840 for the later routines, please refer to this tutorial to finish adding.
Demo 1 Human Detection with Seeed Studio XIAO nRF52840 / Seeeduino / Arduino
In this demo, we will detect human face and count how many people the module detects on both Seeed Studio XIAO nRF52840 Sense and Seeeduino V4.2 (Arduino UNO). Meanwhile, Seeed Studio provives a website to display what the module sees.
Materials Required
- For seeed studio XIAO BLE Sense
| Seeed Studio XIAO nRF52840 Sense | Grove AI Camera |
|---|---|
 | |
- For Seeeduino V4.2
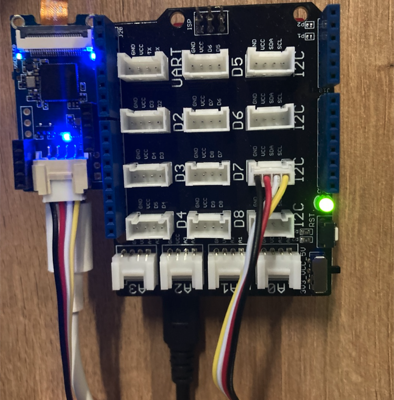
| Seeeduino V4.2 | Base Shield | Grove AI Camera |
|---|---|---|
 |  | |
Operation Steps
-
Step 3 (Seeed Studio XIAO). Parpare a Type-C cable and connect it to one seeed studio XIAO Series board. Plug it pin by pin into the Grove AI Module and use another Type-C cable to connect the module.
Both Type-C cable should be connected with the PC. In the end, the direction of the Type-C connector on the module should be the same as Type-C connector on the seeed studio XIAO samd21. For instance:

- Step 3 (Arduino). Parpare a Grove cable and connect it to one Arduino board. Use another Type-C cable to connect the module.
- Step 4. Upload the program.
#include "Seeed_Arduino_GroveAI.h"
#include <Wire.h>

GroveAI ai(Wire);
uint8_t state = 0;
void setup()
{
  Wire.begin();
  Serial.begin(115200);

   Serial.println("begin");
  if (ai.begin(ALGO_OBJECT_DETECTION, (MODEL_INDEX_T)0x11)) // Object detection and pre-trained model 1
  {
    Serial.print("Version: ");
    Serial.println(ai.version());
    Serial.print("ID: ");
    Serial.println( ai.id());
    Serial.print("Algo: ");
    Serial.println( ai.algo());
    Serial.print("Model: ");
    Serial.println(ai.model());
    Serial.print("Confidence: ");
    Serial.println(ai.confidence());
    state = 1;
  }
  else
  {
    Serial.println("Algo begin failed.");
  }
}

void loop()
{
  if (state == 1)
  {
    uint32_t tick = millis();
    if (ai.invoke()) // begin invoke
    {
      while (1) // wait for invoking finished
      {
        CMD_STATE_T ret = ai.state();
        if (ret == CMD_STATE_IDLE)
        {
          break;
        }
        delay(20);
      }

     uint8_t len = ai.get_result_len(); // receive how many people detect
     if(len)
     {
       int time1 = millis() - tick;
       Serial.print("Time consuming: ");
       Serial.println(time1);
       Serial.print("Number of people: ");
       Serial.println(len);
       object_detection_t data;       //get data

       for (int i = 0; i < len; i++)
       {
          Serial.println("result:detected");
          Serial.print("Detecting and calculating: ");
          Serial.println(i+1);
          ai.get_result(i, (uint8_t*)&data, sizeof(object_detection_t)); //get result

          Serial.print("confidence:");
          Serial.print(data.confidence);
          Serial.println();
        }
     }
     else
     {
       Serial.println("No identification");
     }
    }
    else
    {
      delay(1000);
      Serial.println("Invoke Failed.");
    }
  }
  else
  {
    state == 0;
  }
}
Open the serial monitor and set baud rate as 115200 and the result of people detection should be showed continuously. Meanwhile, the image that is captured by the module also will display on the website. The successful ongong output should be like:
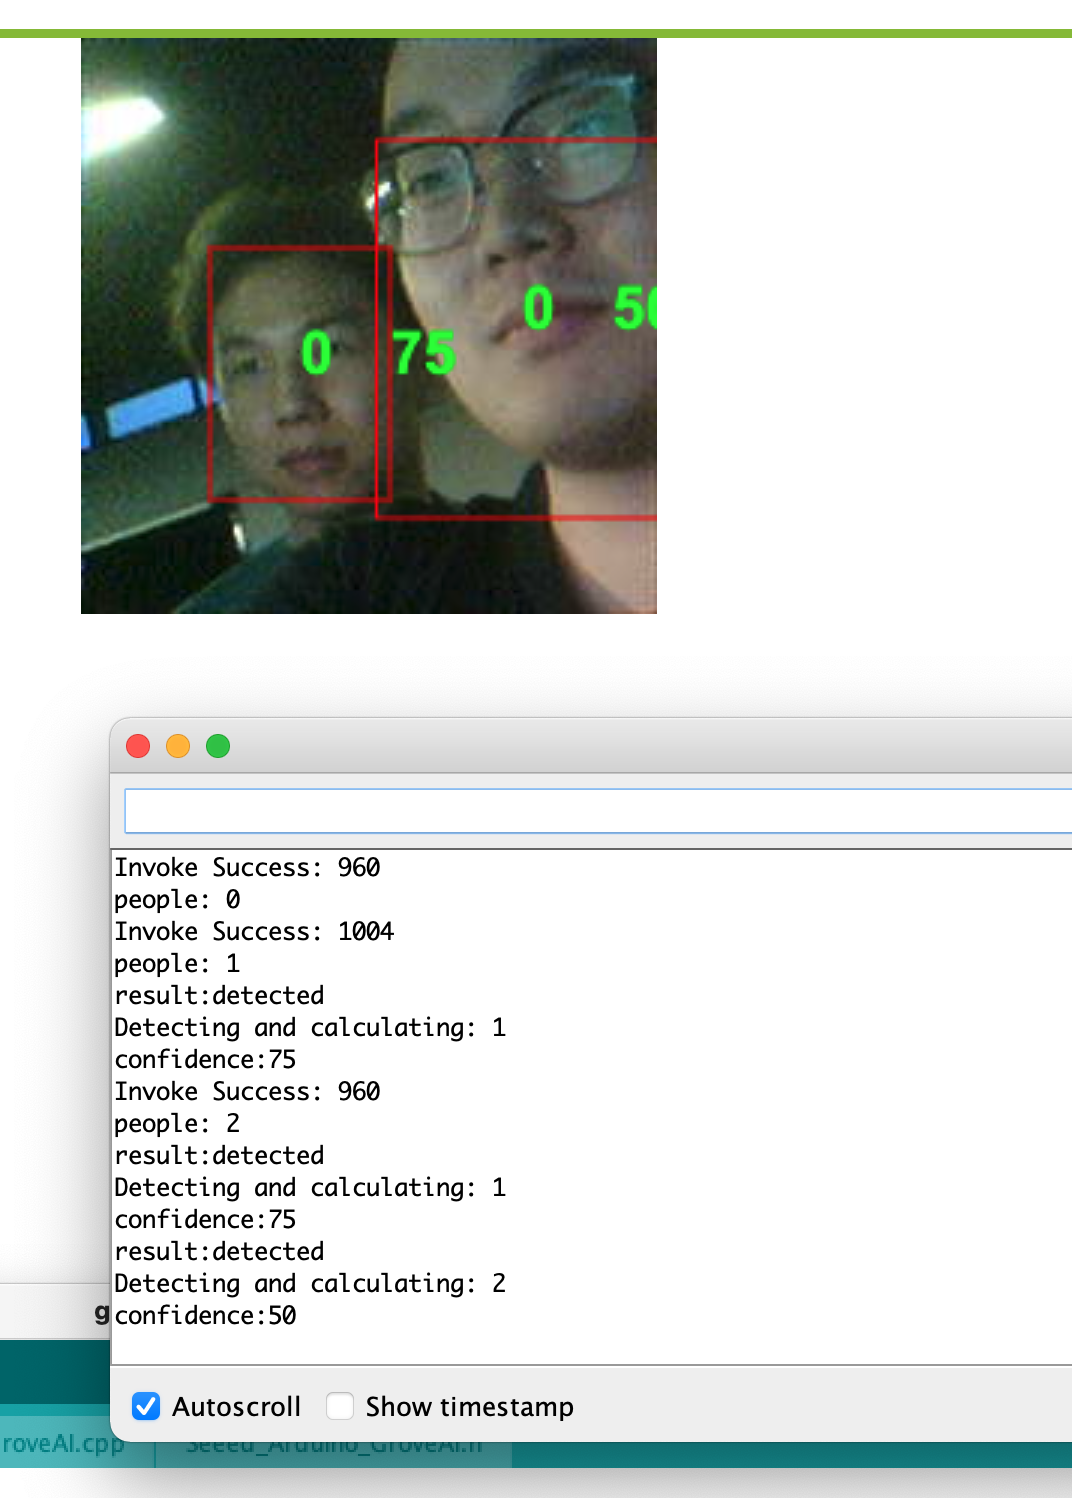
On the display website, you can see that two faces are framed with dual number. Number 0 means the human face that module detected, and the other number means the confidence.
Not all browsers support the display of Vision AI results. Please refer to the table below for the support of each major browser.
| Chrome | Edge | Firefox | Opera | Safari |
|---|---|---|---|---|
| Support | Support | Not support | Support | Not support |
About Models
The Seeed Studio has provided pre-trained people detected model and will provide more models in the foreseeable future. You can directly use them to quickly get to know AI camera.
You can find our firmware and models for Grove Vision AI at the following locations.
Default Firmware: People Detected Model
More Models
We are continuously maintaining and updating more useful models, so you can keep an eye on this repository.
Typically, model files are in UF2 format and have a suffix in the format pre_num.
Custom Models
If you want to customize your own model, you can refer to here which is powered by YOLOV5.
Or refer to the tutorial here and train your own model to suit your needs.
Replacement of new models
The training models are all represented as ".uf2" file, which is what we need.
Typically, model files are in UF2 format and have a suffix in the format pre_num.
- Step 1. Connect module to the host PC with a Type-C cable and double click BOOT button on the module.
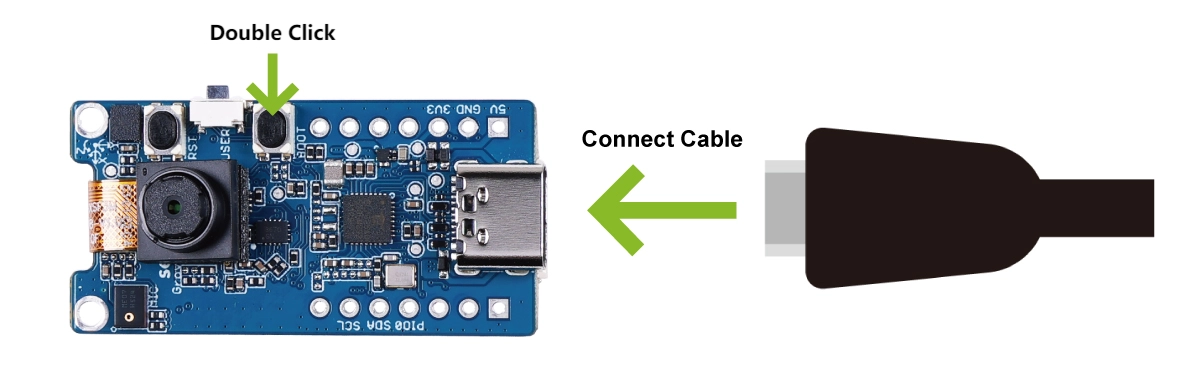
There will be a "GROVEAI" disk pop up.
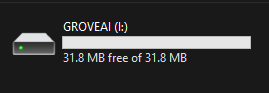
- Step 2. Please copy the Model
.uf2file to the GROVEAI disk to complete the firmware flash.
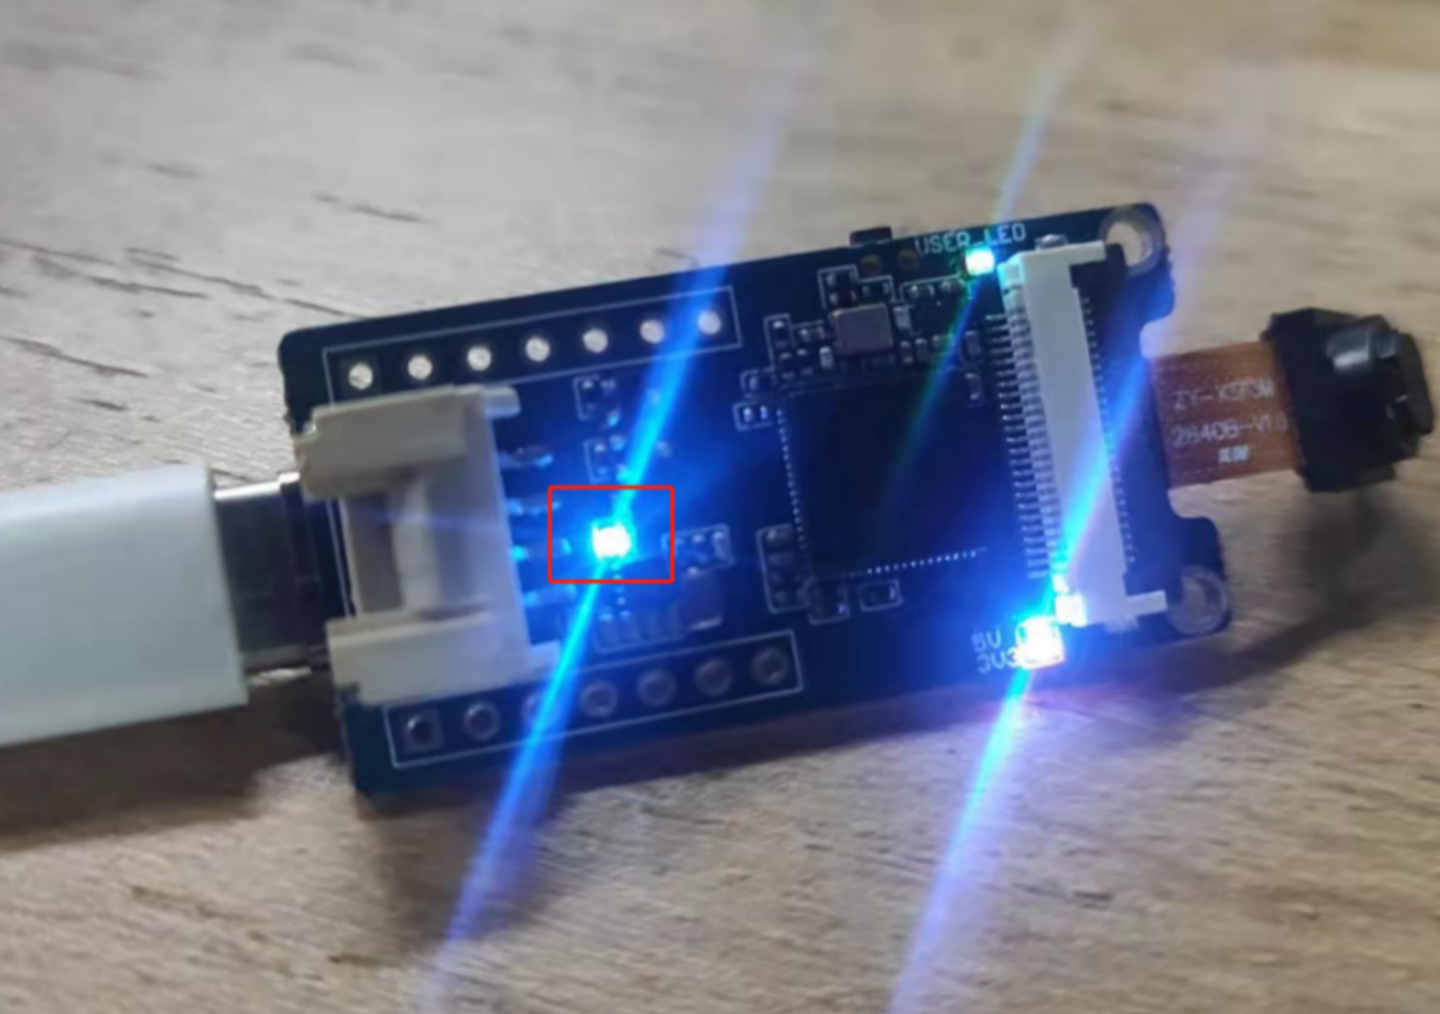
We can see that Work LED on the module flash in speed, that means the process is ongoing. After the disk disapper, the process of burnning firmware is finished.
- Step 3. Please modify the program according to the model you are using.
In the demo we provided, inside the setup() function is initializing the model by calling ai.begin().
if (ai.begin(ALGO_OBJECT_DETECTION, (MODEL_INDEX_T)0x11))
ai.begin() has two arguments, the type of model and the model number. The numbering is generally different for different models. That is to say, the model number of the sample program only applies to the People Detected Model, if you use other models, then the number is no longer 0x11.
If you encounter the error message "Algo begin failed." when using the demo, you should first check if the model number is wrong.
So how do you determine the model number? Our R&D engineers have provided a detailed introductory document for developers to read.
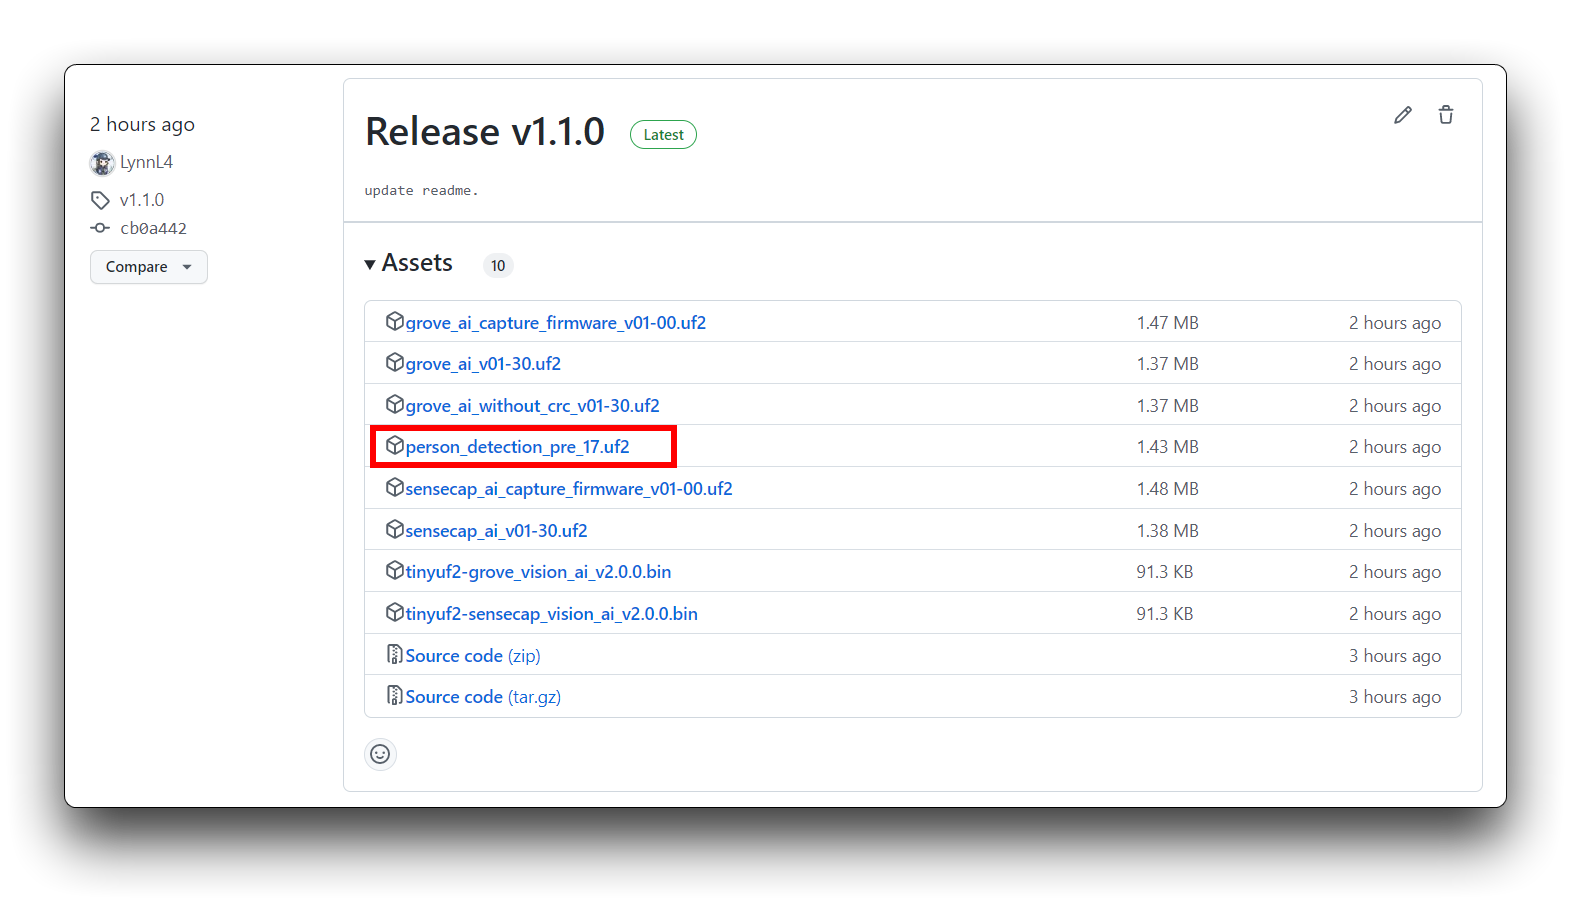
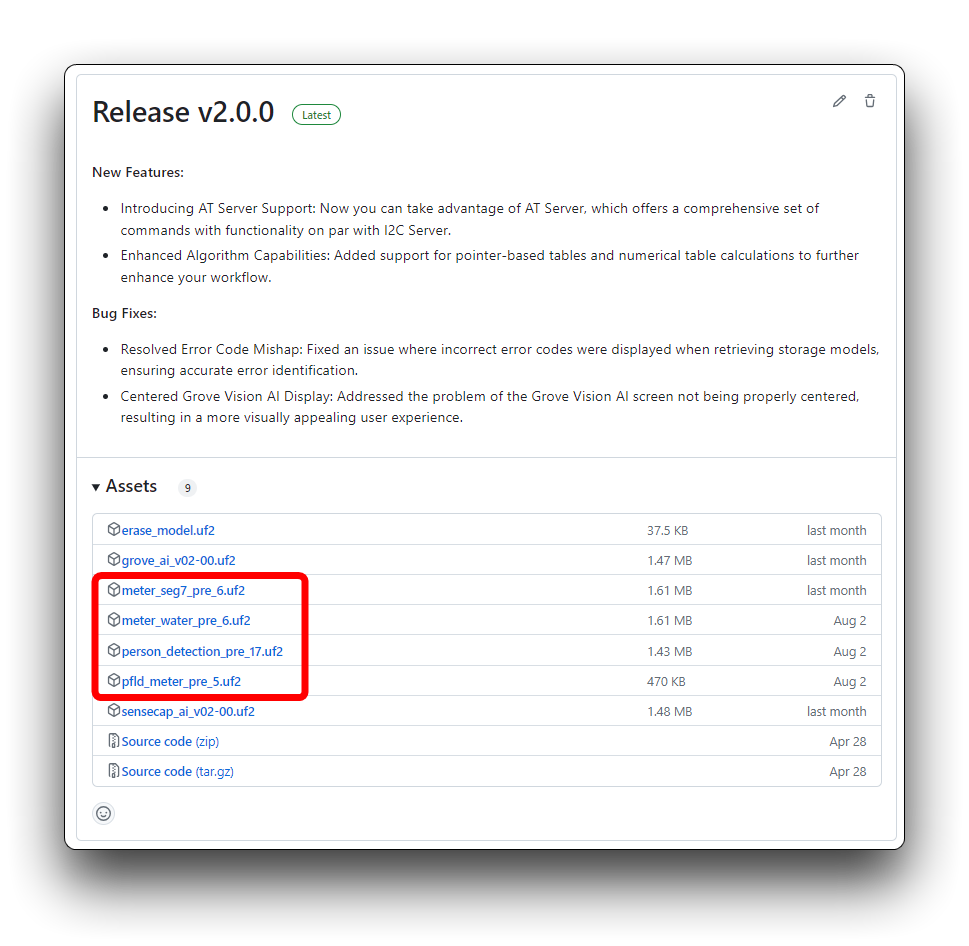
But if you don't want to read such a long article, a simple way to determine this is to keep an eye out for the last number of the model in Release, which is the number we need.
For example, for the model pfld_meter_pre_5.uf2, the last digit is 5, which means the model number is 5. You can use
ai.begin(ALGO_OBJECT_DETECTION, (MODEL_INDEX_T)5)
directly, or rewrite it as hexadecimal
ai.begin(ALGO_ OBJECT_DETECTION, (MODEL_INDEX_T)0x05)
Exception Processing
If you have encountered an unforeseen situation in actual use, or if you have used it incorrectly and have experienced an outcome other than medical treatment. Please refer to the following steps to troubleshoot and attempt to repair the module.
Part 1. Check BootLoader Version
You may need to detect if the BootLoader version needs to be updated to decide if the update should be done. The method to check the version number is as follows.
Connect the Grove Vision AI to your computer via the USB-C port. Then double-click the Boot button until the computer comes up with a USB flash drive named GROVEAI.
Open this disk drive and open the INFO_UF2.TXT file.
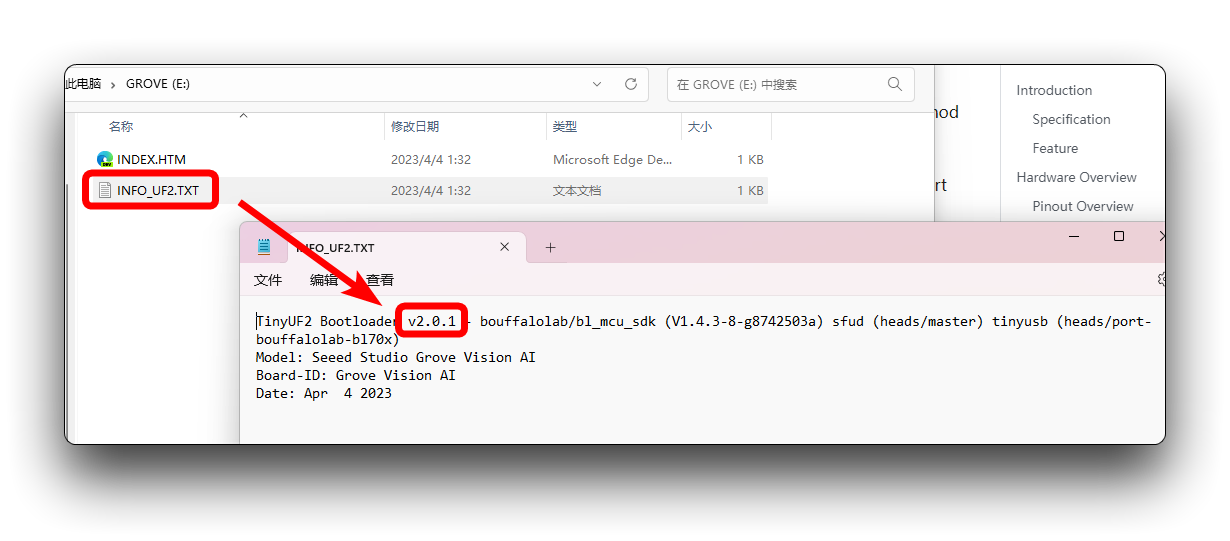
As shown in the figure, you can see the Bootloader version number on the first line. As of September 2023, the latest BootLoader version number should be v2.0.1. If you also check the same version number, then in principle you don't need to do the next second step.
Part 2. Update BootLoader
If your Grove Vision AI is not recognized by your computer and behaves as no port number, then you may need to update the BootLoader.
- Step 1. Download the BootLoader
.binfile on the windows PC.
Please download the latest version of the BootLoader file in the link below. The name of the BootLoader is usually tinyuf2-grove_vision_ai_vx.x.x.bin.
This is the firmware that controls the BL702 chip that builds the connection between the computer and the Himax chip. The latest version of the BootLoader has now fixed the problem of Vision AI not being able to be recognised by Mac and Linux.
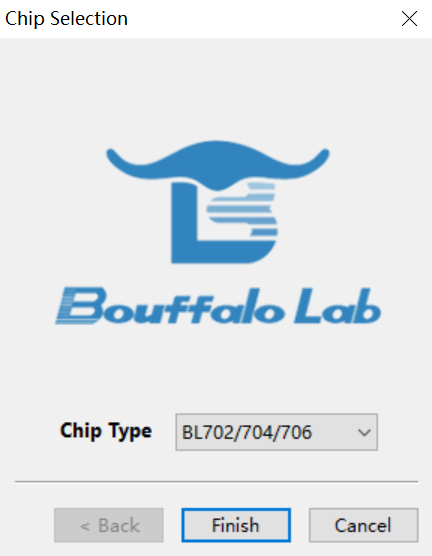
- Step 2. Download and open BLDevCube.exe software, select BL702/704/706, and then click Finish.
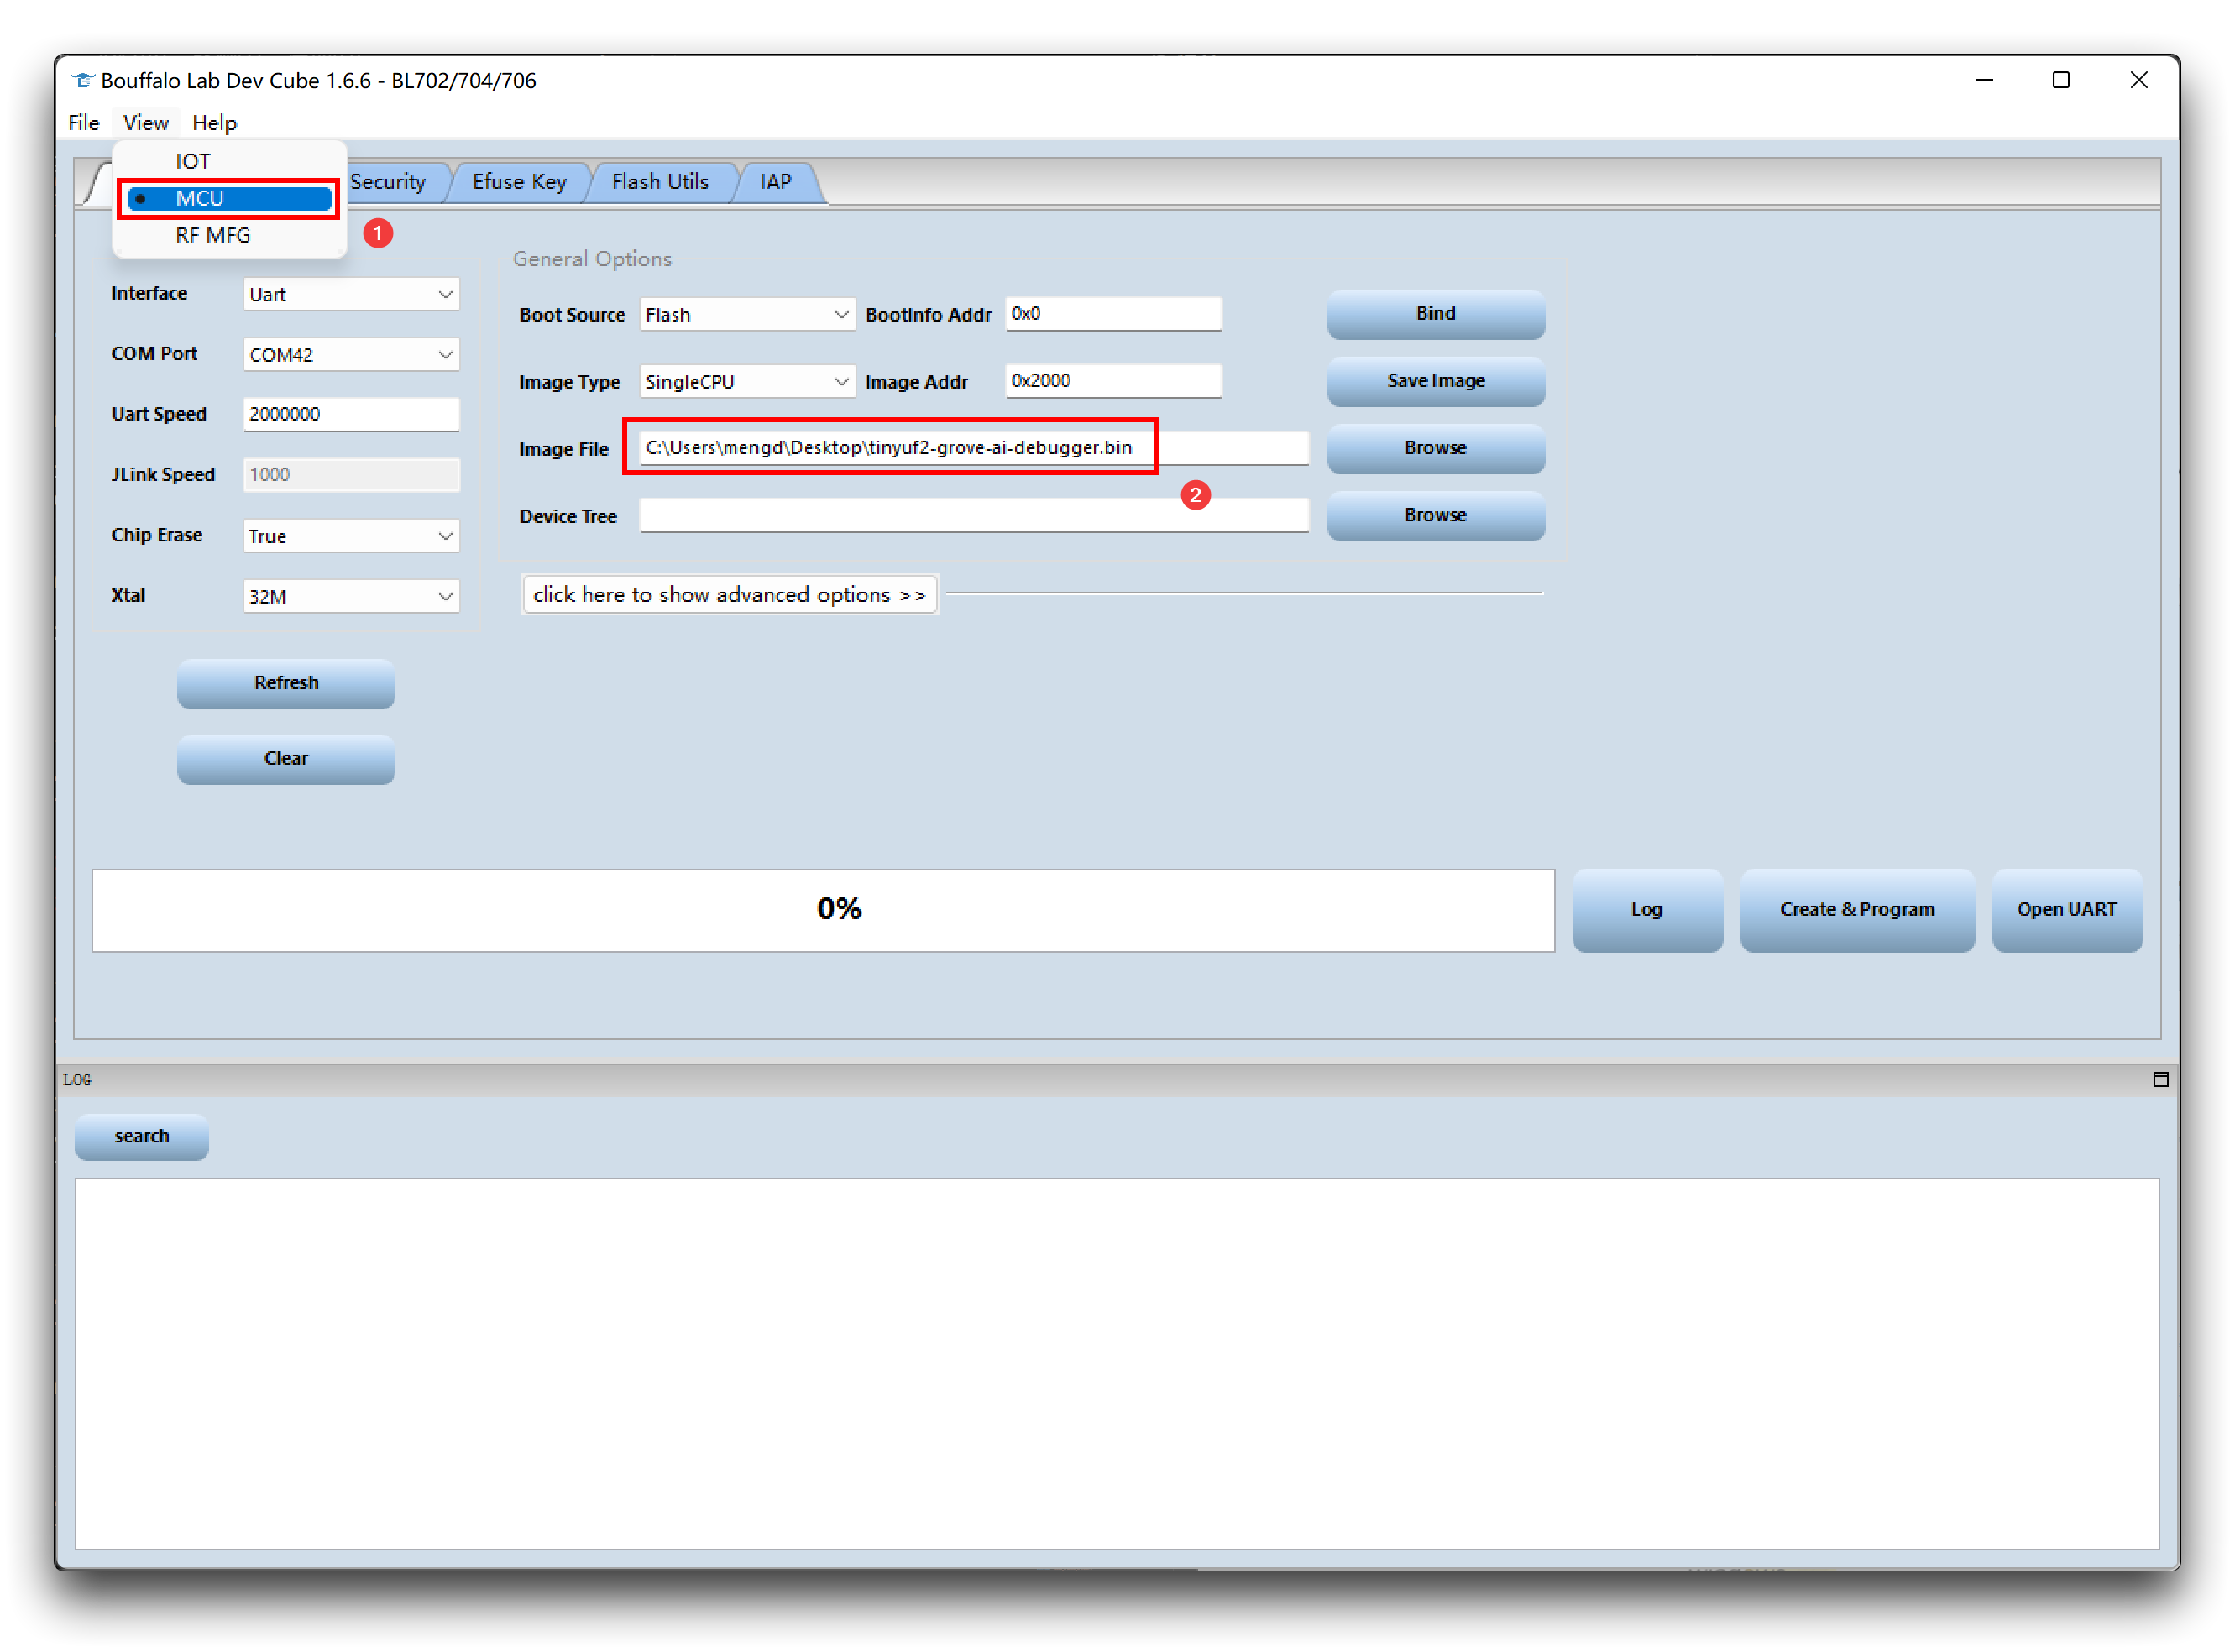
- Step 3. Click View, choose MCU first. Move to Image file, click Browse and select the firmware you just downloaded.
-
Step 4. Make sure there are no other devices connect to the PC. Then hold the Boot button on the module, connect it to the PC.

We can see 5V light and 3.3V LED light are lighting on the back of the module, then loose the Boot button.

-
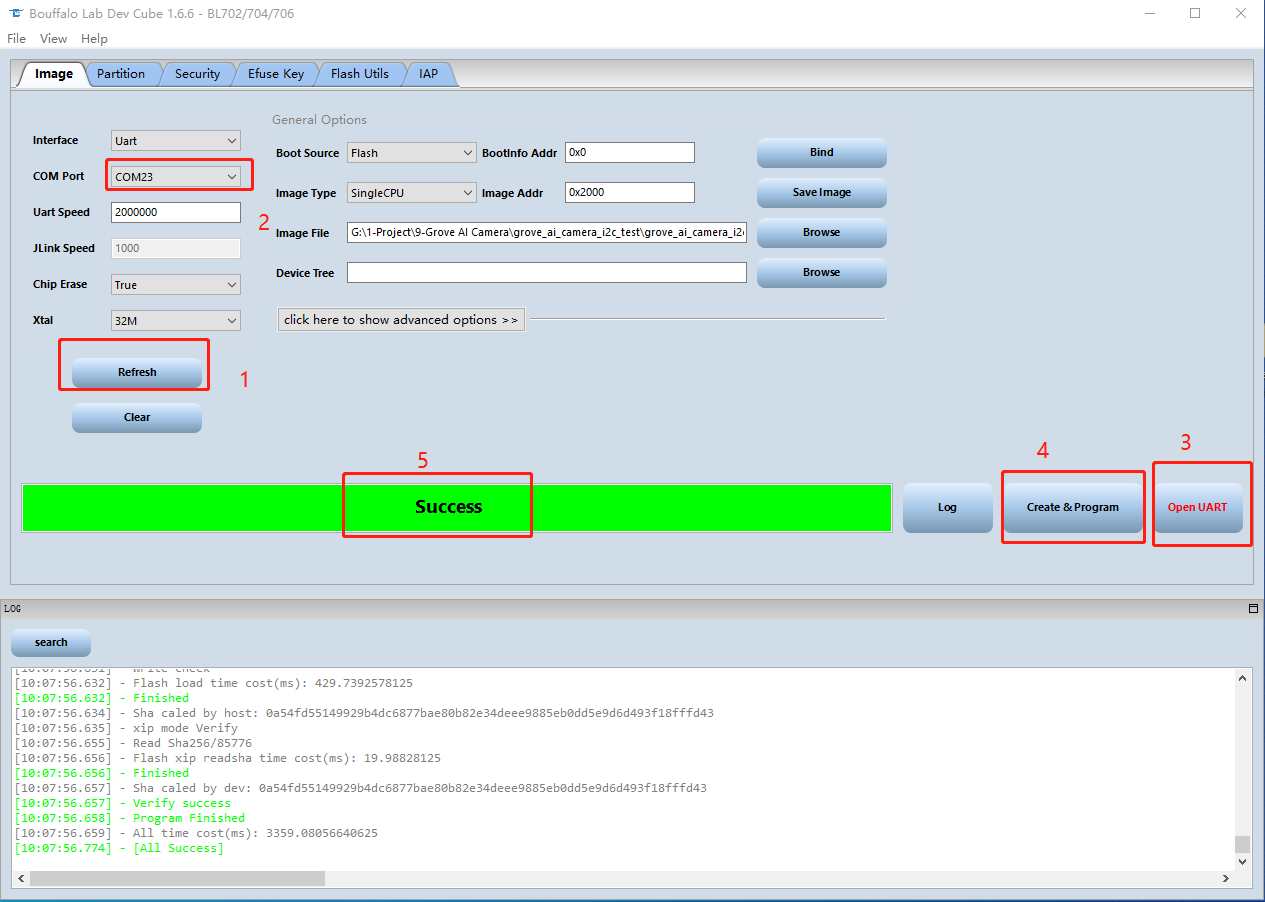
Step 5. Back to the BLDevCube software on the PC, click Refresh and choose a proper port. Then click Open UART and set Chip Erase to True, then click Create&Program, wait for the process done.
- Step 6. It is recommended to check the Vision AI version number again to ensure that the latest BootLoader is being used.
Part 3. Restore Factory Firmware
If ever uploading firmware on the latest version of Windows 11 has rendered the device unusable, you may need to refer to the section on Update BootLoader.
- Step 1. Erase firmware
You can try to skip this step and copy the firmware directly to the Vision AI, if it works, then you don't have to erase the original firmware. If it fails, you may need to erase the firmware.
Please use the Arduino motherboard you have, the Seeed Studio XIAO series, Wio Terminal or Seeeduino are recommended. Connect the Grove Vision AI to the motherboard via the IIC interface.
Open the Arduino IDE and upload the program to erase the firmware.
#include "Seeed_Arduino_GroveAI.h"
#include <Wire.h>
WEI wei(Wire);

void setup()
{
    Wire.begin();
    Serial.begin(115200);
    while (!Serial)
    {
        /* code */
    }
    delay(1000);
    Serial.println("Press any key to start erase");
}

void loop()
{
    if (Serial.available())
    {
        while (Serial.available())
        {
            Serial.read();
        }
        uint32_t id = wei.ID();
        Serial.print("ID: 0x");
        Serial.println(id, HEX);
        wei.enter_bootloader();
        Serial.println("Erase");
        wei.erase();
        Serial.println("Erase done");
    }
}
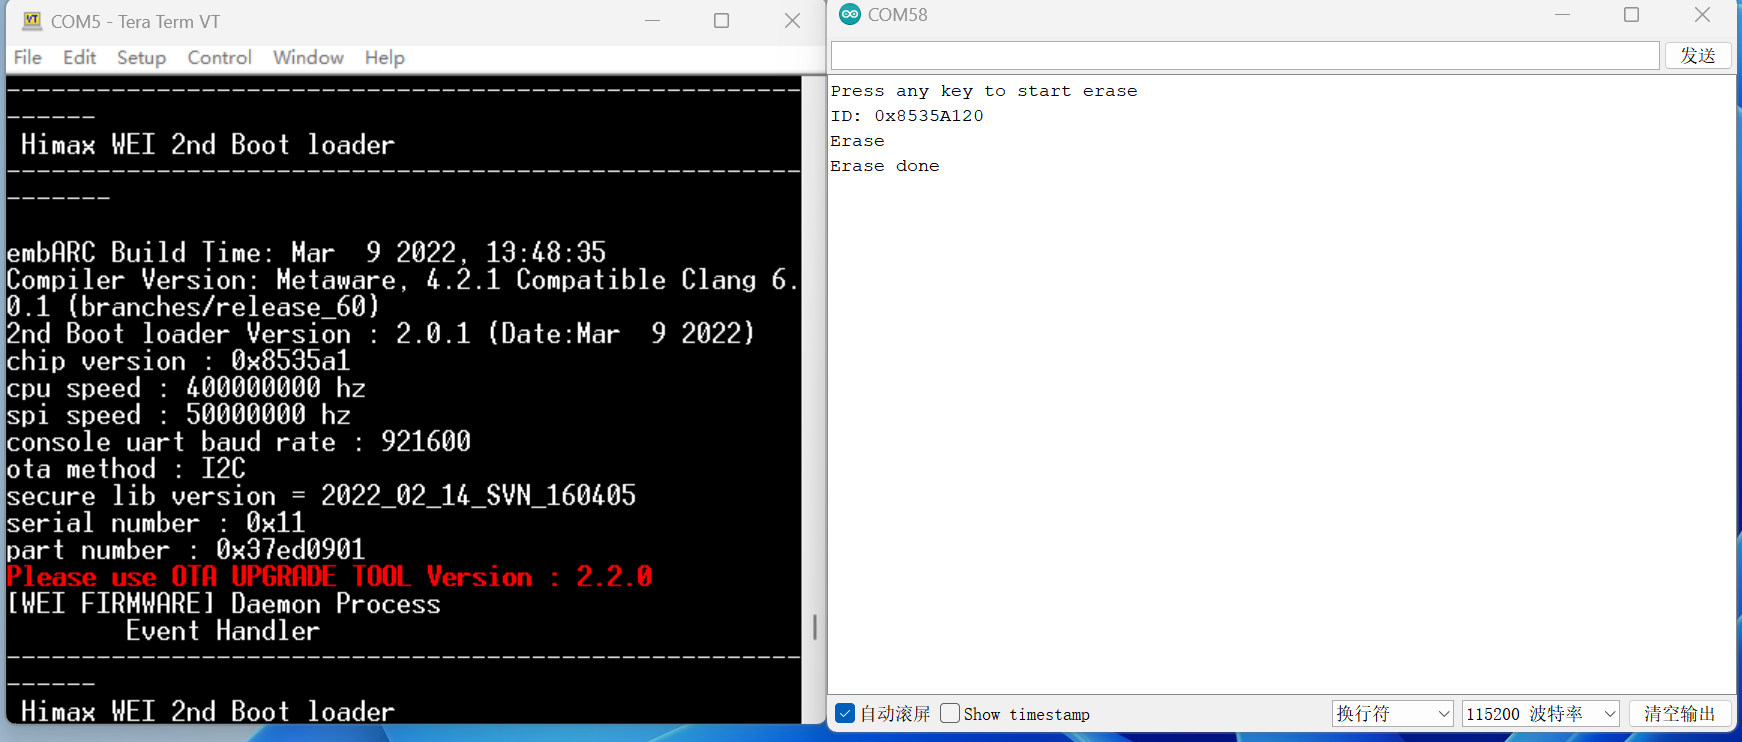
Open the serial monitor, enter some random characters, such as "a", click send, then the erase operation will start to execute. If you see the following message, then it proves that the firmware erase was successful. We can go to the next step.
- Step 2. Connect module to the host PC with a Type-C cable and double click BOOT button on the module.
There will be a "GROVEAI" disk pop up.
- Step 3. Download the factory firmware.
Please download the latest version of the factory firmware in the link below. The name of the factory firmware is usually grove_ai_without_crc_vxx.uf2 or grove_ai_vxx.uf2.
As of September 2023, the latest firmware version is grove_ai_v02-00.uf2.
- Step 4. Flash the factory firmware.
Copy the grove_ai_without_crc_vxx.uf2 or grove_ai_vxx.uf2 file to the GROVEAI disk to complete the firmware flash.
The above three parts need to be judged and executed in turn, when the above steps are executed, you can do your operation again, if there are still problems, please contact our technical support team.
Trouble Shooting
Q1: What is the main method of connection?
- a. Link the microcontroller and the module first.
- b. Connect the microcontroller with host PC second.
- c. Connect the module with host PC at last.
Q2: Why can't I see the image display on the website? Nor the detecting?
- a. Is the module heated? Connect the module only will cost heat problem and let the module not functioning for a moment.
- b. Is connecting after the correct method?
Q3: Why does Grove Vision AI suddenly get an "Algo begin failed." error one day while in use?
In the demo we provided, inside the setup() function is initializing the model by calling ai.begin().
if (ai.begin(ALGO_OBJECT_DETECTION, (MODEL_INDEX_T)0x11))
ai.begin() has two arguments, the type of model and the model number. The numbering is generally different for different models. That is to say, the model number of the sample program only applies to the People Detected Model, if you use other models, then the number is no longer 0x11.
If you encounter the error message "Algo begin failed." when using the demo, you should first check if the model number is wrong.
So how do you determine the model number? Our R&D engineers have provided a detailed introductory document for developers to read.
But if you don't want to read such a long article, a simple way to determine this is to keep an eye out for the last number of the model in Release, which is the number we need.
For example, for the model pfld_meter_pre_5.uf2, the last digit is 5, which means the model number is 5. You can use
ai.begin(ALGO_OBJECT_DETECTION, (MODEL_INDEX_T)5)
directly, or rewrite it as hexadecimal
ai.begin(ALGO_ OBJECT_DETECTION, (MODEL_INDEX_T)0x05)
Resources
- [PDF] Circuit Diagram
- [Zip] Layout Diagram
Tech Support & Product Discussion
Thank you for choosing our products! We are here to provide you with different support to ensure that your experience with our products is as smooth as possible. We offer several communication channels to cater to different preferences and needs.