Grove - ADC for Load Cell (HX711)
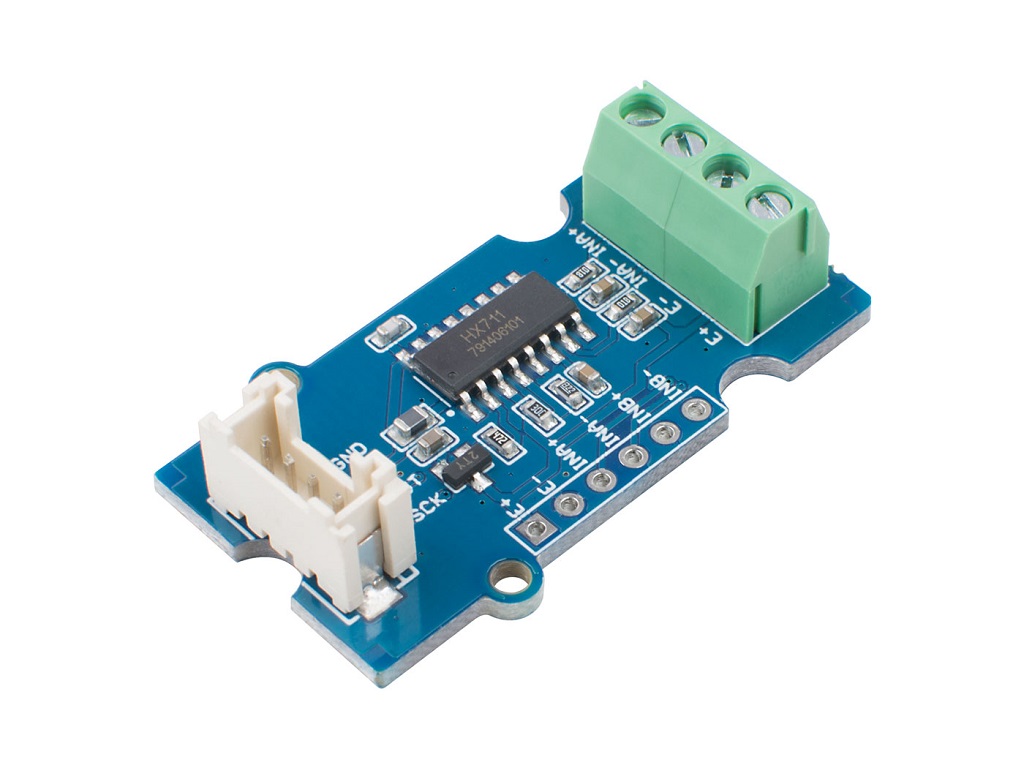
The Grove - ADC for Load Cell (HX711) is a 24-bit A/D converter designed specifically for the load cell. It contains an on-chip low noise programmable amplifier with an optional gain of 32, 64 and 128. The HX711 chip integrates a regulated power supply, an on-chip clock oscillator, and other peripheral circuits, which have the advantages of high integration, fast response, and strong anti-interference.
With the Grove connector and 4-pin screw terminal, it becomes quite easy to connect the load cell and microcontroller, no soldering required. You can build your own Arduino weigh sensor system in just a few simple steps.
Specifications
| Item | Value |
|---|---|
| Battery | Exclude |
| Working voltage | 2.6V--5.5V |
| Working current | Less than 1.5A |
| Detection accuracy | 24 bits |
| Output date rate | 10SPS or 80SPS |
| Optional gain | 32 for Channel B/ 64 and 128 for Channel A |
Application
- Electronic scales
- Price computing scales
- Electronic platform scales
- Digital scales
- Parcel post scales
Hardware Overview
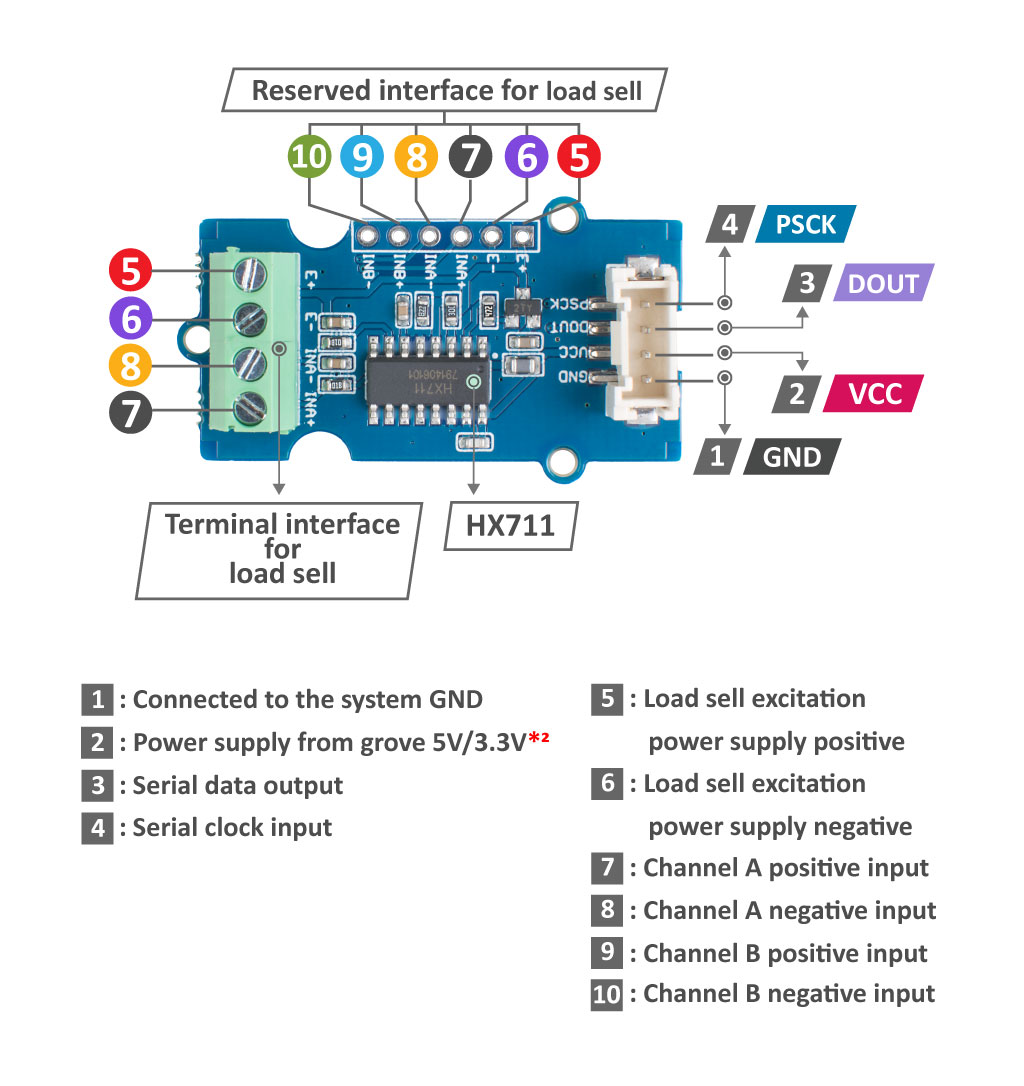
Platforms Supported
| Arduino | Raspberry Pi | |||
|---|---|---|---|---|
The platforms mentioned above as supported is/are an indication of the module's software or theoritical compatibility. We only provide software library or code examples for Arduino platform in most cases. It is not possible to provide software library / demo code for all possible MCU platforms. Hence, users have to write their own software library.
Getting Started
In this part, we will use a Arduino UNO R4 WiFi as a controller,show how to use a Grove - ADC for Load Cell (HX711) and a Weight Sensor (Load Cell) 0-500g make a weight measuring module.
Hardaware Preparation
Step 1. Material preparation
| Arduino UNO R4 WIFi | Grove - ADC for Load Cell (HX711) | Weight Sensor (Load Cell) 0-500g |
|---|---|---|
 | |  |
- Weight sensor output 0V when the load less than 150g, it not directly measure the load .So it suggests using a 200g local avoid measure blind spot.Read the analog data of 200g weight as no-load(0g),read the analog data of 700g weight as full load(500g).
- ADC for Load Cell (HX711) uses channel A by default, if you want to use other channels, it will require you to weld it yourself.
And the Grove - ADC for Load Cell (HX711) is also suitable for our XIAO development board.
| Seeed Studio XIAO SAMD21 | Seeed Studio XIAO RP2040 | Seeed Studio XIAO nRF52840 (Sense) | Seeed Studio XIAO ESP32C3 | Seeed Studio XIAO ESP32S3 (Sense) |
|---|---|---|---|---|
 |  |  |  |  |
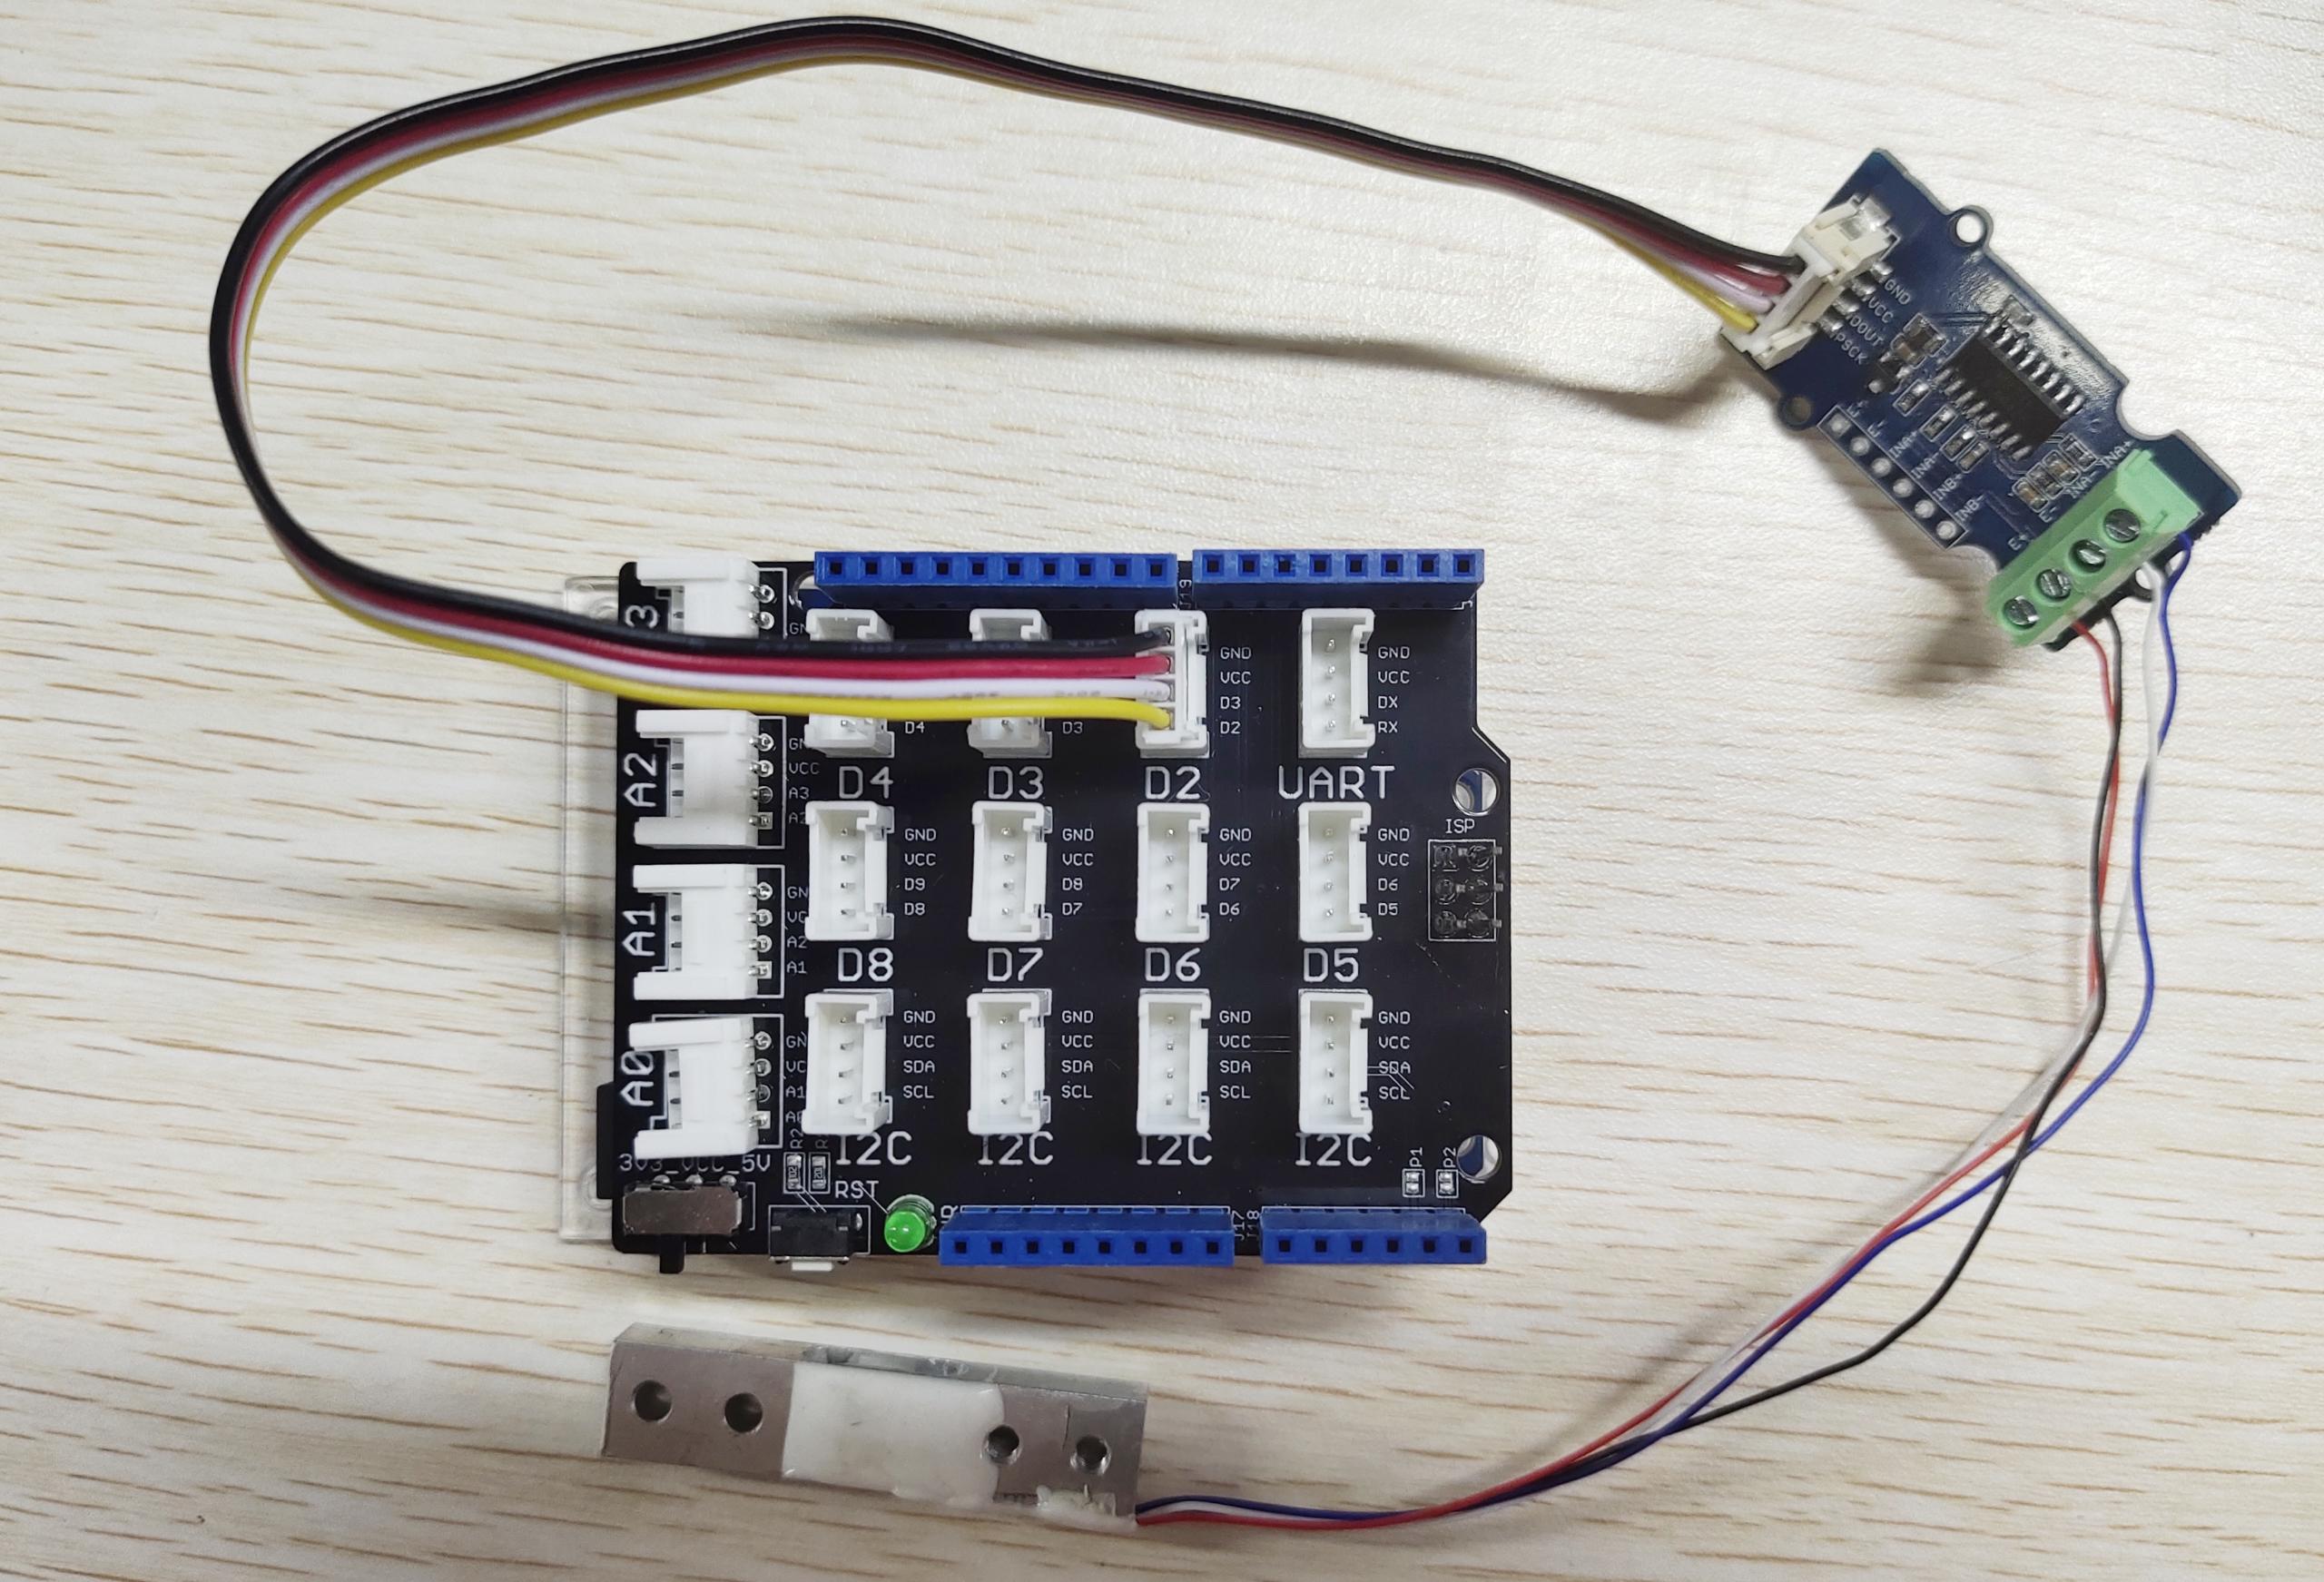
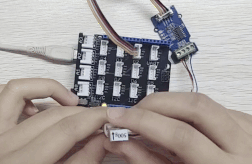
Step 2. Hardware Connection
Connect the Grove Gesture Sensor to the IIC port of Arduino UNO R4 WiFi, connect the Arduino to PC via a USB cable, and the connection bettewn Grove - ADC for Load Cell (HX711) and Weight Sensor (Load Cell) 0-500g is show below:
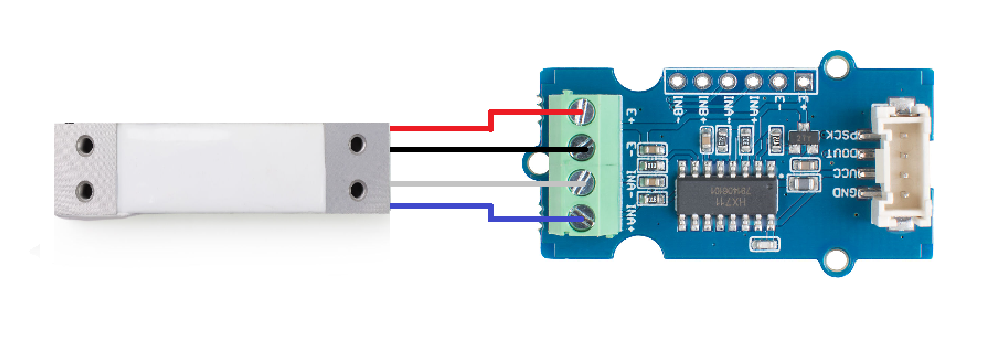
| Grove - ADC for Load Cell (HX711) | Weight Sensor (Load Cell) 0-500 |
|---|---|
| E+ | Red |
| E- | Black |
| INA- | White |
| INA+ | Green/Blue |
Using Grove Base Shield, you can directly connect HX711 module to Arduino UNO R4 WiFi as below.
Software Preparation
The recommended programming tool is the Arduino IDE, and you need to configure the Arduino environment for the XIAO and add the on-board package.
If this is your first time using Arduino, we highly recommend you to refer to Getting Started with Arduino.
Step 1. Launch the Arduino application.
Step 2. Select your development board model and add it to the Arduino IDE.
-
If you want to use Seeed Studio XIAO SAMD21 for the later routines, please refer to this tutorial to finish adding.
-
If you want to use Seeed Studio XIAO RP2040 for the later routines, please refer to this tutorial to finish adding.
-
If you want to use Seeed Studio XIAO nRF52840 for the later routines, please refer to this tutorial to finish adding.
-
If you want to use Seeed Studio XIAO ESP32C3 for the later routines, please refer to this tutorial to finish adding.
-
If you want to use Seeed Studio XIAO ESP32S3 for the later routines, please refer to this tutorial to finish adding.
-
If you want to use Seeeduino V4.3 for the later routines, please refer to this tutorial to finish adding.
-
If you want to use Arduino UNO R4 WiFi for the later routines, please click Tools-> Board-> Boards Manager..., print keyword "UNO R4 WiFi" in the searching blank and install the latest version (or the version you want to use).
HX711 Arduino Library Overview
Function
Before we get started developing a sketch, let's look at the available functions.
-
void begin(byte dout, byte pd_sck, byte gain )—— Initialize library with data output pin, clock input pin and gain factor.Channel selection is made by passing the appropriate gain, the library default is "128" (Channel A).- Input Parameters:
- byte dout: Passed as dout (converted to byte) HX711 circuit wiring.
- byte pd_sck: Passed as pd_sck (converted to byte) HX711 circuit wiring.
- byte gain = 128:
- With a gain factor of 64 or 128, channel A is selected.
- With a gain factor of 32, channel B is selected.
- Input Parameters:
-
bool is_ready()—— Check if HX711 is ready. From the datasheet: When output data is not ready for retrieval, digital output pin DOUT is high. Serial clock input PD_SCK should be low. When DOUT goes to low, it indicates data is ready for retrieva. -
void wait_ready(unsigned long delay_ms = 0);—— Wait for the chip to become ready. -
bool wait_ready_retry(int retries = 3, unsigned long delay_ms = 0)—— Wait for the chip to become ready by retrying for a specified amount of attempts. -
bool wait_ready_timeout(unsigned long timeout = 1000, unsigned long delay_ms = 0)—— Wait for the chip to become ready until timeout. -
void set_gain(byte gain = 128)—— set the gain factor; takes effect only after a call to read().- Input Parameters:
- byte gain = 128: Channel A can be set for a 128 or 64 gain; channel B has a fixed 32 gain.
- Input Parameters:
-
long read()—— waits for the chip to be ready and returns a reading -
long read_average(byte times = 10)—— returns an average reading.- Input Parameters:
- byte times = 10: times = how many times to read.
- Input Parameters:
-
double get_value(byte times = 1)—— returns (read_average() - OFFSET), that is the current value without the tare weight.- Input Parameters:
- byte times = 1: times = how many readings to do.
- Input Parameters:
-
float get_units(byte times = 1)—— returns get_value() divided by SCALE, that is the raw value divided by a value obtained via calibration.- Input Parameters:
- byte times = 1: times = how many readings to do.
- Input Parameters:
-
void tare(byte times = 10)—— set the OFFSET value for tare weight.- Input Parameters:
- byte times = 10: times = how many times to read the tare value.
- Input Parameters:
-
void set_scale(float scale = 1.f)—— set the SCALE value; this value is used to convert the raw data to "human readable" data (measure units) -
float get_scale()—— get the current SCALE -
void set_offset(long offset = 0)—— set OFFSET, the value that's subtracted from the actual reading (tare weight) -
long get_offset()—— get the current OFFSET -
void power_down()—— puts the chip into power down mode -
void power_up()—— wakes up the chip after power down mode
Installation
Since you have downloaded the zip Library, open your Arduino IDE, click on Sketch > Include Library > Add .ZIP Library. Choose the zip file you just downloaded,and if the library install correct, you will see Library added to your libraries in the notice window. Which means the library is installed successfull.

Example Demo
Step 1. Before the Grove - ADC for Load Cell (HX711) measuring, the PD_SCK should be pulled down to make it ready for work and the load cell should be calibrated.The Grove_ADC_for_Load_Cell_(HX711) example code is as follow:
#include "HX711.h"

// HX711 circuit wiring
const int LOADCELL_DOUT_PIN = 3;  //Set your I2C pin
const int LOADCELL_SCK_PIN = 2;


HX711 scale;

void setup() {
  Serial.begin(9600);
  Serial.println("HX711 Demo");

  Serial.println("Initializing the scale");

  // Initialize library with data output pin, clock input pin and gain factor.
  // Channel selection is made by passing the appropriate gain:
  // - With a gain factor of 64 or 128, channel A is selected
  // - With a gain factor of 32, channel B is selected
  // By omitting the gain factor parameter, the library
  // default "128" (Channel A) is used here.

  scale.begin(LOADCELL_DOUT_PIN, LOADCELL_SCK_PIN);

  Serial.println("Before setting up the scale:");
    if (scale.wait_ready_timeout(1000)) {
    long reading = scale.read();
    Serial.print("HX711 reading: ");
    Serial.println(reading);
  } else {
    Serial.println("HX711 not found.");
  }   // print a raw reading from the ADC

  Serial.print("read average: \t\t");
  Serial.println(scale.read_average(20));   // print the average of 20 readings from the ADC

  Serial.print("get value: \t\t");
  Serial.println(scale.get_value(5));  // print the average of 5 readings from the ADC minus the tare weight (not set yet)

  Serial.print("get units: \t\t");
  Serial.println(scale.get_units(5), 1); // print the average of 5 readings from the ADC minus tare weight (not set) divided
      // by the SCALE parameter (not set yet)

  scale.set_scale(2280.f);                      // this value is obtained by calibrating the scale with known weights; see the README for details
  scale.tare();            // reset the scale to 0

  Serial.println("After setting up the scale:");

  Serial.print("read: \t\t");
  Serial.println(scale.read());                 // print a raw reading from the ADC

  Serial.print("read average: \t\t");
  Serial.println(scale.read_average(20));       // print the average of 20 readings from the ADC

  Serial.print("get value: \t\t");
  Serial.println(scale.get_value(5));  // print the average of 5 readings from the ADC minus the tare weight, set with tare()

  Serial.print("get units: \t\t");
  Serial.println(scale.get_units(5), 1);        // print the average of 5 readings from the ADC minus tare weight, divided
      // by the SCALE parameter set with set_scale

  Serial.println("Readings:");
}

void loop() {
  Serial.print("one reading:\t");
  Serial.print(scale.get_units(), 1);
  Serial.print("\t| average:\t");
  Serial.println(scale.get_units(10), 1);

  scale.power_down();           // put the ADC in sleep mode
  delay(5000);
  scale.power_up();
}
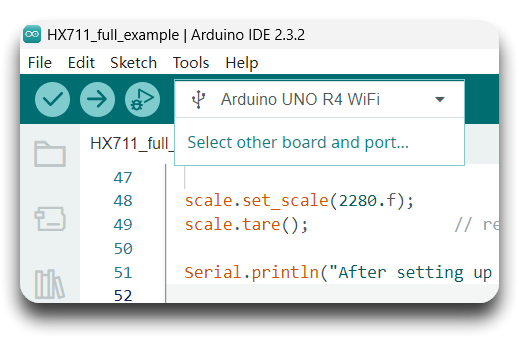
Step 2. Please click the Board selection dropdown menu, and then click on "Select other board and port...".
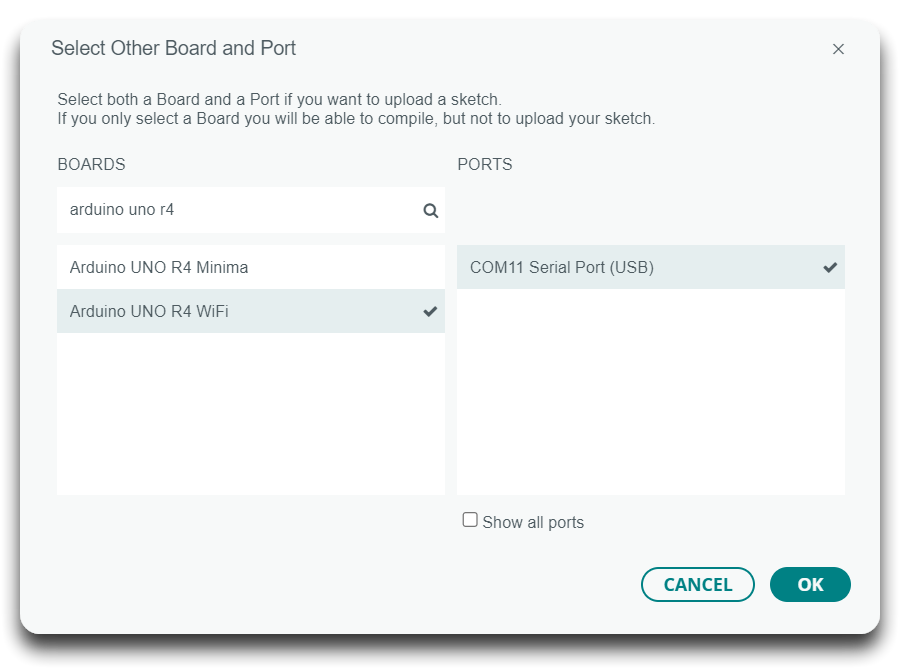
Step 3. And then search and select "Arduino UNO R4 WiFi".
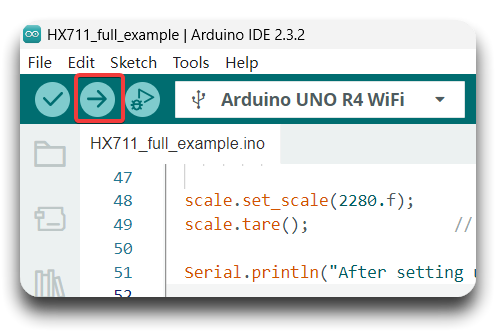
Step 4. Please click "upload" to flash the firmware on to Arduino.
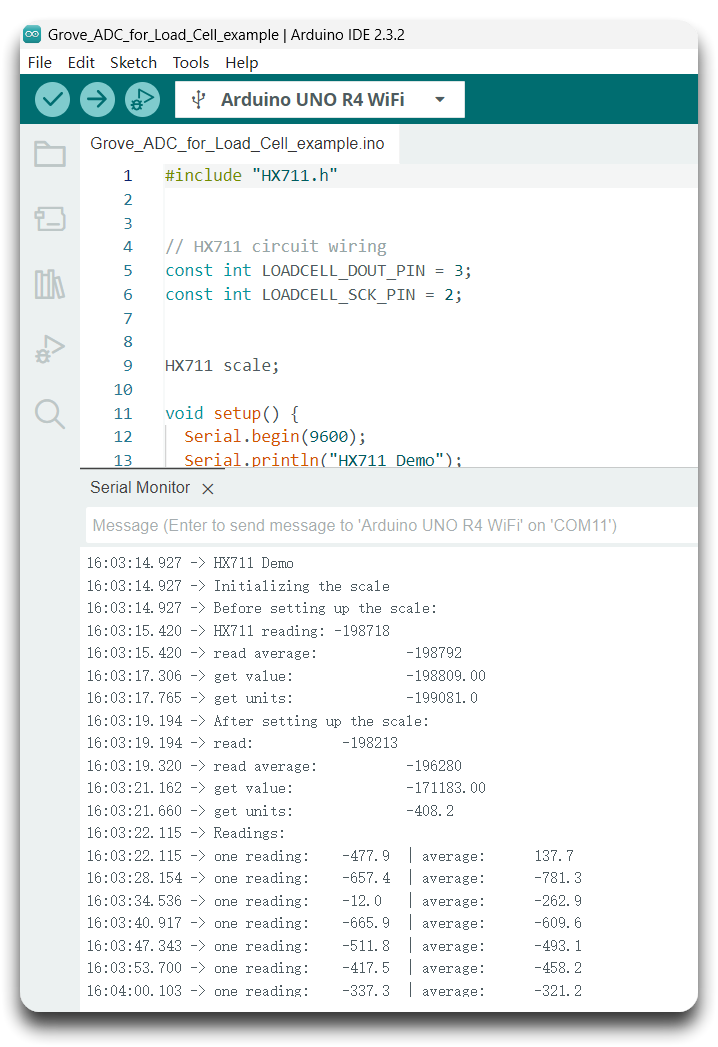
Step 5. Open the Serial Monitor of Arduino IDE by click Tool-> Serial Monitor. When you see serial print "After setting up the scale:", wait a few seconds and apply force to Weight Sensor (Load Cell) 0-500g.
Step 6. The result should look like below.
Resource
[PDF]INA125 datasheet
[PDF]HX711-datacheet
[ZIP]Grove - ADC for load cell (HX711)-Schematic File
Tech Support & Product Discussion
Thank you for choosing our products! We are here to provide you with different support to ensure that your experience with our products is as smooth as possible. We offer several communication channels to cater to different preferences and needs.