Wio Terminal Chassis Battery(650mAh)

The Wio Terminal Battery Chassis is a must-have extension board for Wio-Terminal Dev Board as it provides an external power source for Wio Terminal to enhance its portability and compactness. It has a 650mAH rechargeable lithium polymer battery, battery charging/discharging status LED, 4 Grove Analog/Digital Ports, 1 Grove I2C Port, and 1 Grove UART Port, as well as the ABS enclosure for aesthetic and protection. There is also the same Raspberry Pi 40-pin compatible GPIO at the back of the Wio Terminal Battery Chassis for more add-ons!
The new version of the Wio Terminal Battery Chassis has added the Texas Instrument's BQ27441-G1A - self-calibrating, I2C-based fuel gauge for lithium polymer (LiPo) batteries which can be used to measures your battery's voltage to estimate its charge percentage and remaining capacity!
Feature
- Built-in 650mAh Rechargeable Lithium Polymer Battery
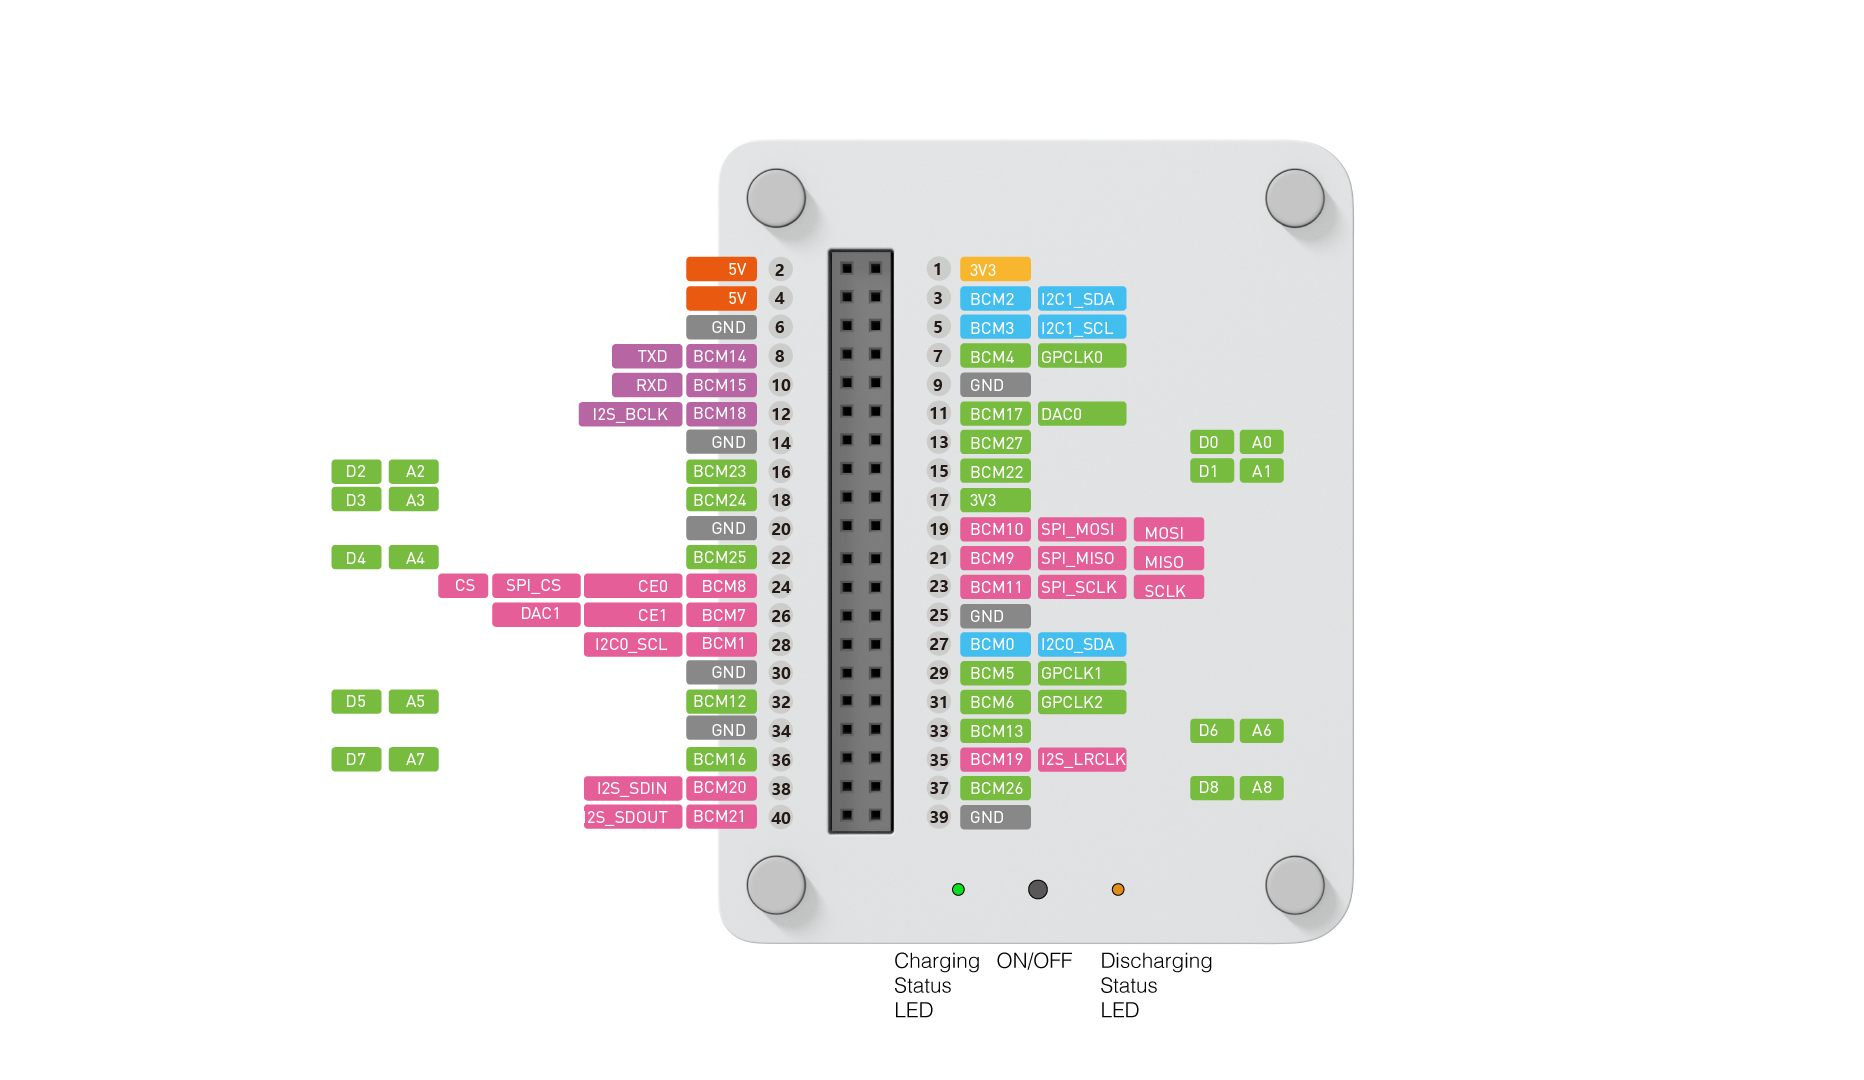
- Battery charging/discharging status LED
- Battery On/OFF Button
- Built-in BQ27441-G1A fuel gauge for LiPo batteries
- USB Type-C Charging
- Overcurrent protection
- Hiccup mode/Hiccup Protection
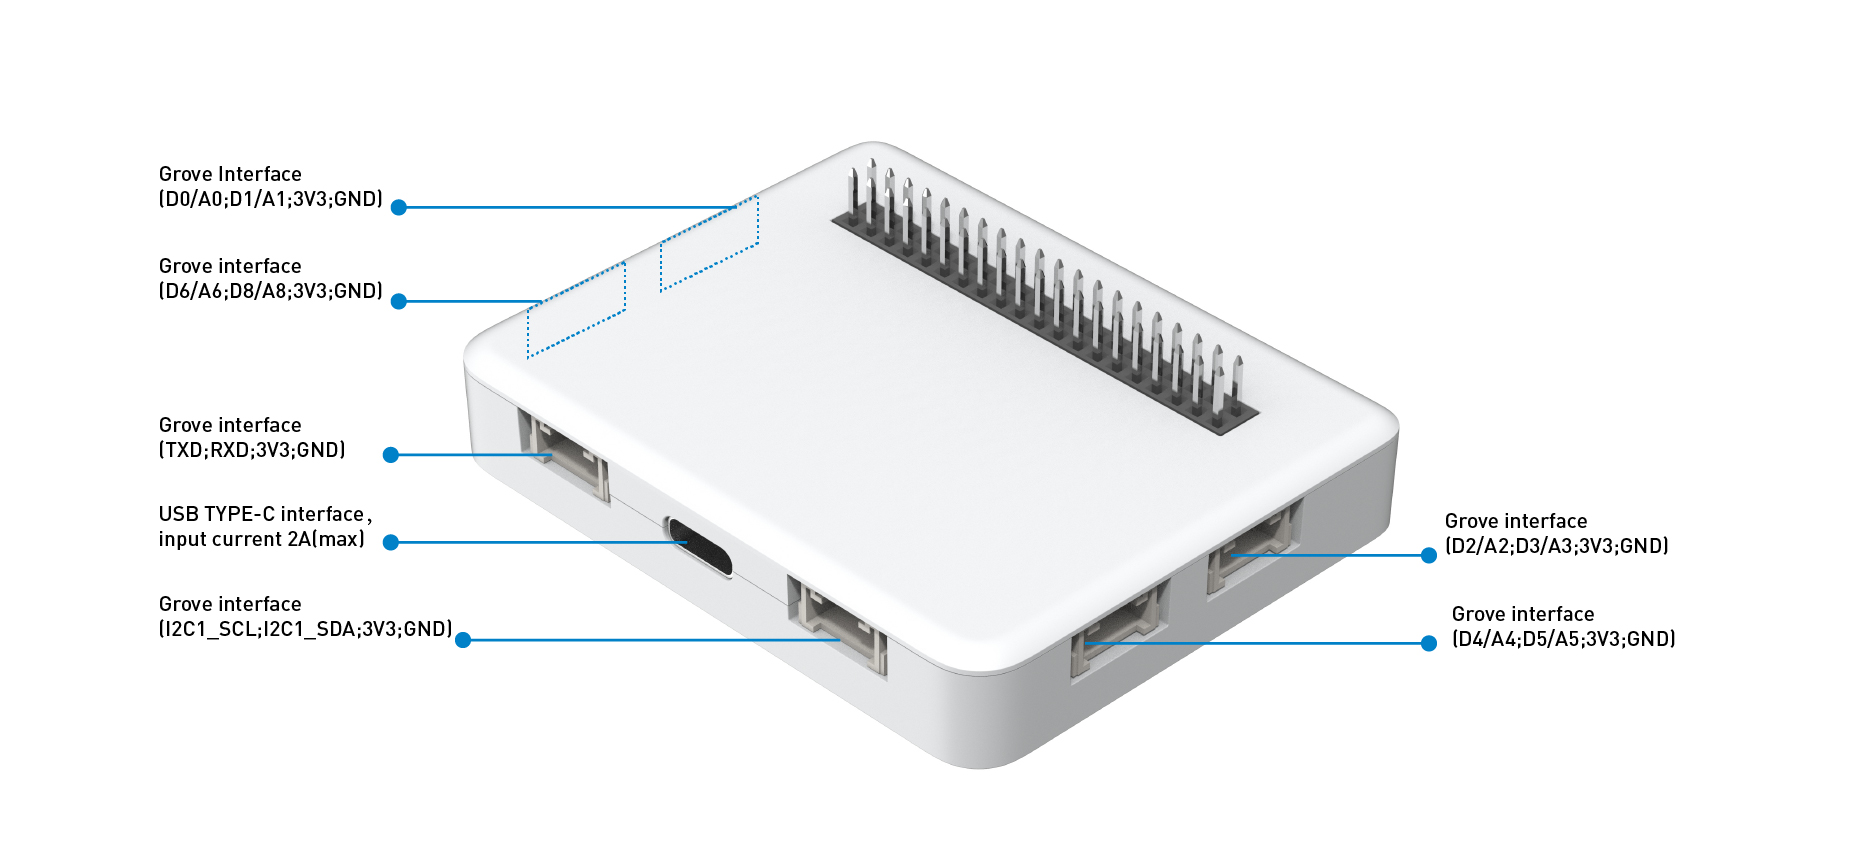
- 4 x Grove Analog/Digital Port
- 1 x Grove I2C Port
- 1 x Grove UART Port
- Magnets are hidden inside the enclosure so that it can be stuck on the Whiteboard!
Specification
| Item | Detail |
|---|---|
| Power Supply | 4.75V - 5.25V |
| Built-in battery | 650mAh |
| Charging current | Max: 660mA |
| battery board mode | Green LED: Light On is mean the board charing. Red LED: Light on is mean the OTG(battery discharge) enable. Yellow LED: Light on is mean the male interface output/input 5V. |
| GPIO output | Max voltage: 5.15V Max current: 380mA |
| Trickle charge current | 30mA |
| Grove Interface | Grove Analog/Digital 4, Grove I2C 1, Grove UART * 1 |
Hardware Overview
Precautions
-
If the battery is removed while the board is in charge mode, the board will switch to failure mode and the green light blink at a frequency of 1Hz.
-
When the battery board is not in use, please press the button to enter sleep mode and all the LED will off.
Detecting LiPo Battery Status
-
Visit the SparkFun_BQ27441_Arduino_Library repositories and download the entire repo to your local drive.
-
Now, the library can be installed to the Arduino IDE. Open the Arduino IDE, and click
sketch->Include Library->Add .ZIP Library, and choose theSparkFun_BQ27441_Arduino_Libraryfile that you've have just downloaded.

Example Code
You may use the following code to read stats from your battery chassis.
#include <SparkFunBQ27441.h>
#include"TFT_eSPI.h"

TFT_eSPI tft;
TFT_eSprite spr = TFT_eSprite(&tft);  // Sprite
#define FF17 &FreeSans9pt7b

const unsigned int BATTERY_CAPACITY = 650; // Set Wio Terminal Battery's Capacity

void setupBQ27441(void)
{
  // Use lipo.begin() to initialize the BQ27441-G1A and confirm that it's
  // connected and communicating.
  if (!lipo.begin()) // begin() will return true if communication is successful
  {
  // If communication fails, print an error message and loop forever.
    Serial.println("Error: Unable to communicate with BQ27441.");
    Serial.println("  Check wiring and try again.");
    Serial.println("  (Battery must be plugged into Battery Babysitter!)");
    tft.setTextColor(TFT_RED);
    tft.setCursor((320 - tft.textWidth("Battery Not Initialised!"))/2, 120);
    tft.print("Battery Not Initialised!");
    while (1) ;
  }
  Serial.println("Connected to BQ27441!");

  // Uset lipo.setCapacity(BATTERY_CAPACITY) to set the design capacity
  // of your battery.
  lipo.setCapacity(BATTERY_CAPACITY);
}

void printBatteryStats()
{
  // Read battery stats from the BQ27441-G1A
  unsigned int soc = lipo.soc();  // Read state-of-charge (%)
  unsigned int volts = lipo.voltage(); // Read battery voltage (mV)
  int current = lipo.current(AVG); // Read average current (mA)
  unsigned int fullCapacity = lipo.capacity(FULL); // Read full capacity (mAh)
  unsigned int capacity = lipo.capacity(REMAIN); // Read remaining capacity (mAh)
  int power = lipo.power(); // Read average power draw (mW)
  int health = lipo.soh(); // Read state-of-health (%)

  // Now print out those values:
  String toPrint = String(soc) + "% | ";
  toPrint += String(volts) + " mV | ";
  toPrint += String(current) + " mA | ";
  toPrint += String(capacity) + " / ";
  toPrint += String(fullCapacity) + " mAh | ";
  toPrint += String(power) + " mW | ";
  toPrint += String(health) + "%";

  Serial.println(toPrint);

  // LCD Graphics
  tft.setTextColor(TFT_BLUE);
  tft.drawRoundRect(10, 10, 300, 220, 10, TFT_BLUE);
  tft.setTextColor(TFT_MAGENTA);
  tft.drawString("State of Chage:", 20, 30);
  tft.drawString("Battery Voltage:", 20, 55);
  tft.drawString("Average Current:", 20, 80);
  tft.drawString("Remain Capacity:", 20, 105);
  tft.drawString("Full Capacity:", 20, 130);
  tft.drawString("Average Power:", 20, 155);
  tft.drawString("State of Health:", 20, 180);

  // Data
  spr.createSprite(80, 170);
  spr.fillSprite(TFT_BLACK);
  spr.setFreeFont(FF17);
  spr.setTextColor(TFT_WHITE);
  spr.drawString(String(soc)+" % ", 0, 0);
  spr.drawString(String(volts)+" mV ", 0, 25);
  spr.drawString(String(current)+" mA ", 0, 50);
  spr.drawString(String(capacity)+" mAh ", 0, 75);
  spr.drawString(String(fullCapacity)+" mAh ", 0, 100);
  spr.drawString(String(power)+" mW ", 0, 125);
  spr.drawString(String(health)+" % ", 0, 150);
  spr.pushSprite(170, 30);
  spr.deleteSprite();
}

void setup()
{
  Serial.begin(115200);
  tft.begin();
  tft.setRotation(3);
  tft.fillScreen(TFT_BLACK);
  tft.setFreeFont(FF17);
  setupBQ27441();
  tft.setTextColor(TFT_GREEN);
  tft.setCursor((320 - tft.textWidth("Battery Initialised!"))/2, 120);
  tft.print("Battery Initialised!");
  delay(1000);
  tft.fillScreen(TFT_BLACK);
}

void loop()
{
  printBatteryStats();
  delay(1000);
}
Schematic Online Viewer
Resources
Tech Support
Thank you for choosing our products! We are here to provide you with different support to ensure that your experience with our products is as smooth as possible. We offer several communication channels to cater to different preferences and needs.