reTerminal DM SenseCraft Edge OS Getting Started

SenseCraft Edge OS is a cutting-edge operating system meticulously designed for reTerminal DM's 10.1" Human Machine Interface (HMI) device, featuring an array of integrated functionalities that elevate user experience to new heights. This groundbreaking OS boasts an intuitive interface with built-in setting and control functions, empowering users to effortlessly configure and manage their devices. Furthermore, it seamlessly integrates with Node-RED editor and Node-RED Dashboard, enabling users to unlock unparalleled customization and automation capabilities. Harnessing the power of Node-RED's visual programming and automation tools, this operating system empowers users to create intricate workflows and deploy sophisticated control systems with ease. With its unmatched fusion of intuitive HMI controls and the versatility of Node-RED, SenseCraft Edge OS sets a new standard for enhanced functionality and unparalleled user-friendliness in the realm of HMI devices in all kinds of use case scenarios. The built-in OSTree versioned file system provides a robust framework for managing and deploying Linux-based operating systems in a scalable and reliable manner, with a focus on atomicity, immutability, and efficient storage usage.
reTerminal DM will be Shipped with Raspberry pi OS as default Operating System from next product release batch.
This OS is currently developed based on reTerminal DM and only works with Production version reTerminal DM, you can download Sensecraft Edge OS
Feature
- Touch-friendly UI design specifically tailored for Human Machine Interface (HMI) devices, ensuring an intuitive and seamless user experience.
- Seamlessly integrates with the widely popular "no code & low code" development environment Node-RED, along with its companion component Node-RED Dashboard. This integration provides users with powerful visual programming capabilities and a versatile dashboard framework for building customized applications without the need for extensive coding knowledge.
- Built-in system setting and control functions, offering a comprehensive and intuitive interface to configure and manage various aspects of reTerminal DM.
- Built-in App Center for future use case expansion, it serves as a hub for accessing and installing a diverse range of applications and extensions, allowing users to customize and extend the functionality of their operating system.
- Built-in Configurable service such as MQTT, MySQL and ChirpStack, providing users with enhanced functionality and flexibility in building data visualization dashboard applications.
- OSTree versioned file system allows for atomic upgrades of the entire operating system, and allowing you to track and manage different versions of the operating system and its components. This makes it easier to roll back to a previous version if needed.
- Built-in System Health Check feature that allows users to monitor the overall health and performance of the reTerminal DM. This feature provides valuable insights into the system's status, ensuring optimal functionality and identifying potential issues.
Layout Overview
Status Bar
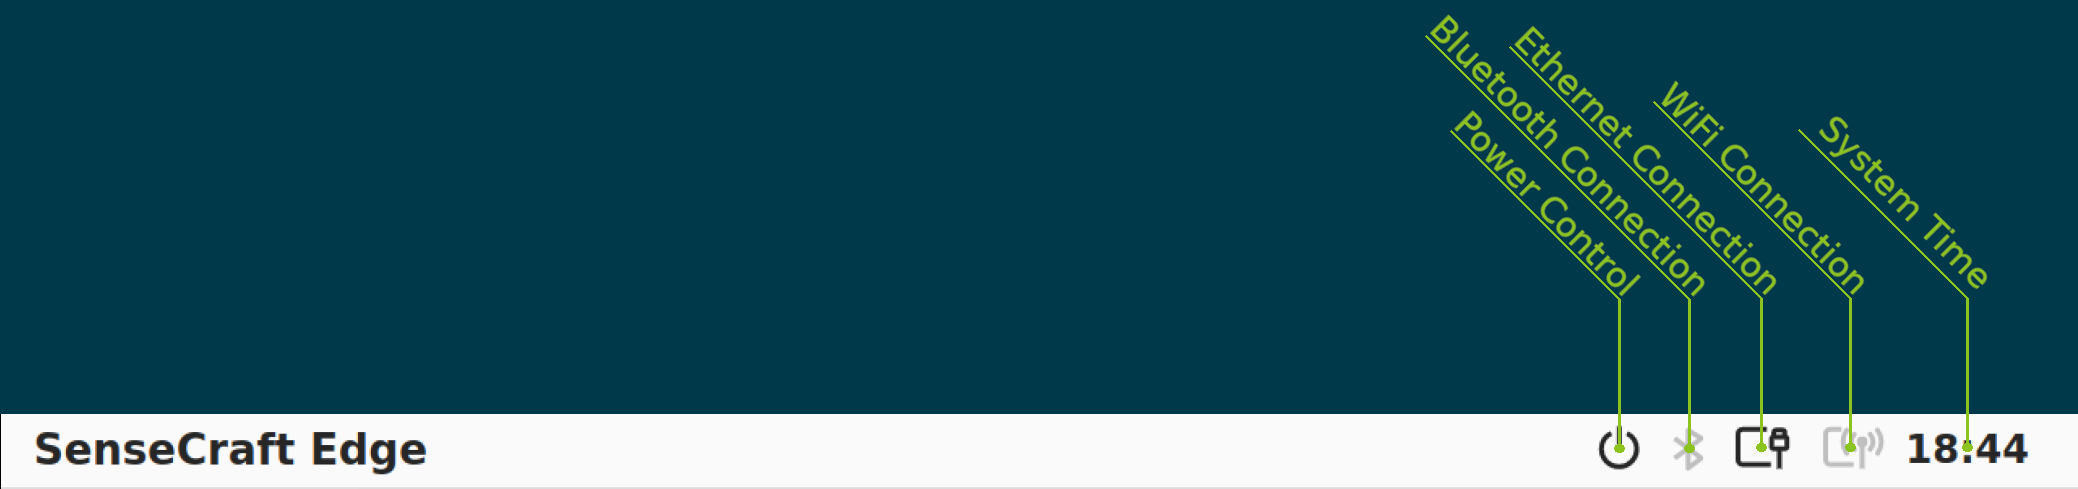
The click able items and functionality:
| Icon | function |
|---|---|
| Power Control | Open a drop down list for with option of "Restart", "Shut Down", "Sleep" |
| Bluetooth Connection | Brings you to the Bluetooth setting view |
| Ethernet Connection | Brings you to the Ethernet setting view |
| WiFi Connection | Brings you to the WiFi setting view |
Dashboard Tab
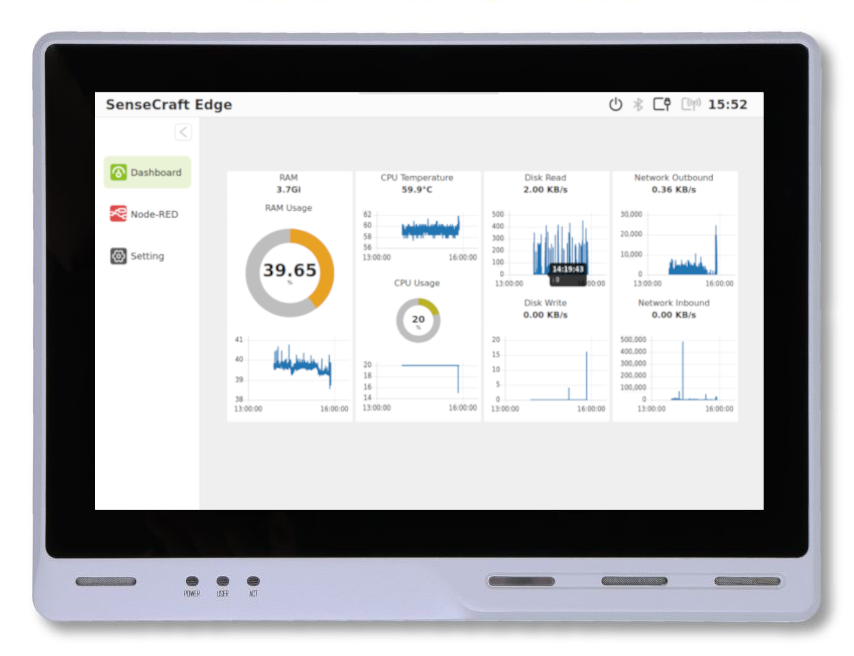
Dashboard Tab is rendering the "node-red-dashboard" view locally on reTerminal DM, here are some design considerations for reference:
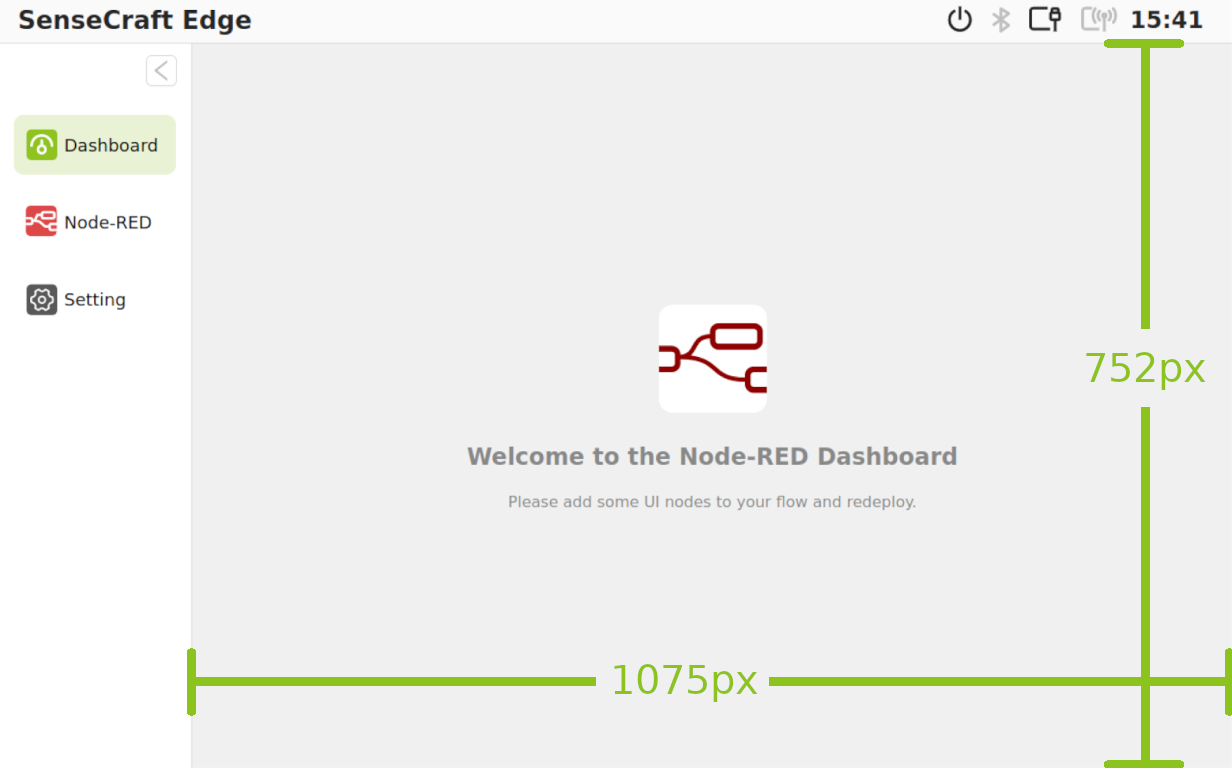
- Maximum width without scrolling: 1075px
- Maximum height without scrolling: 752px
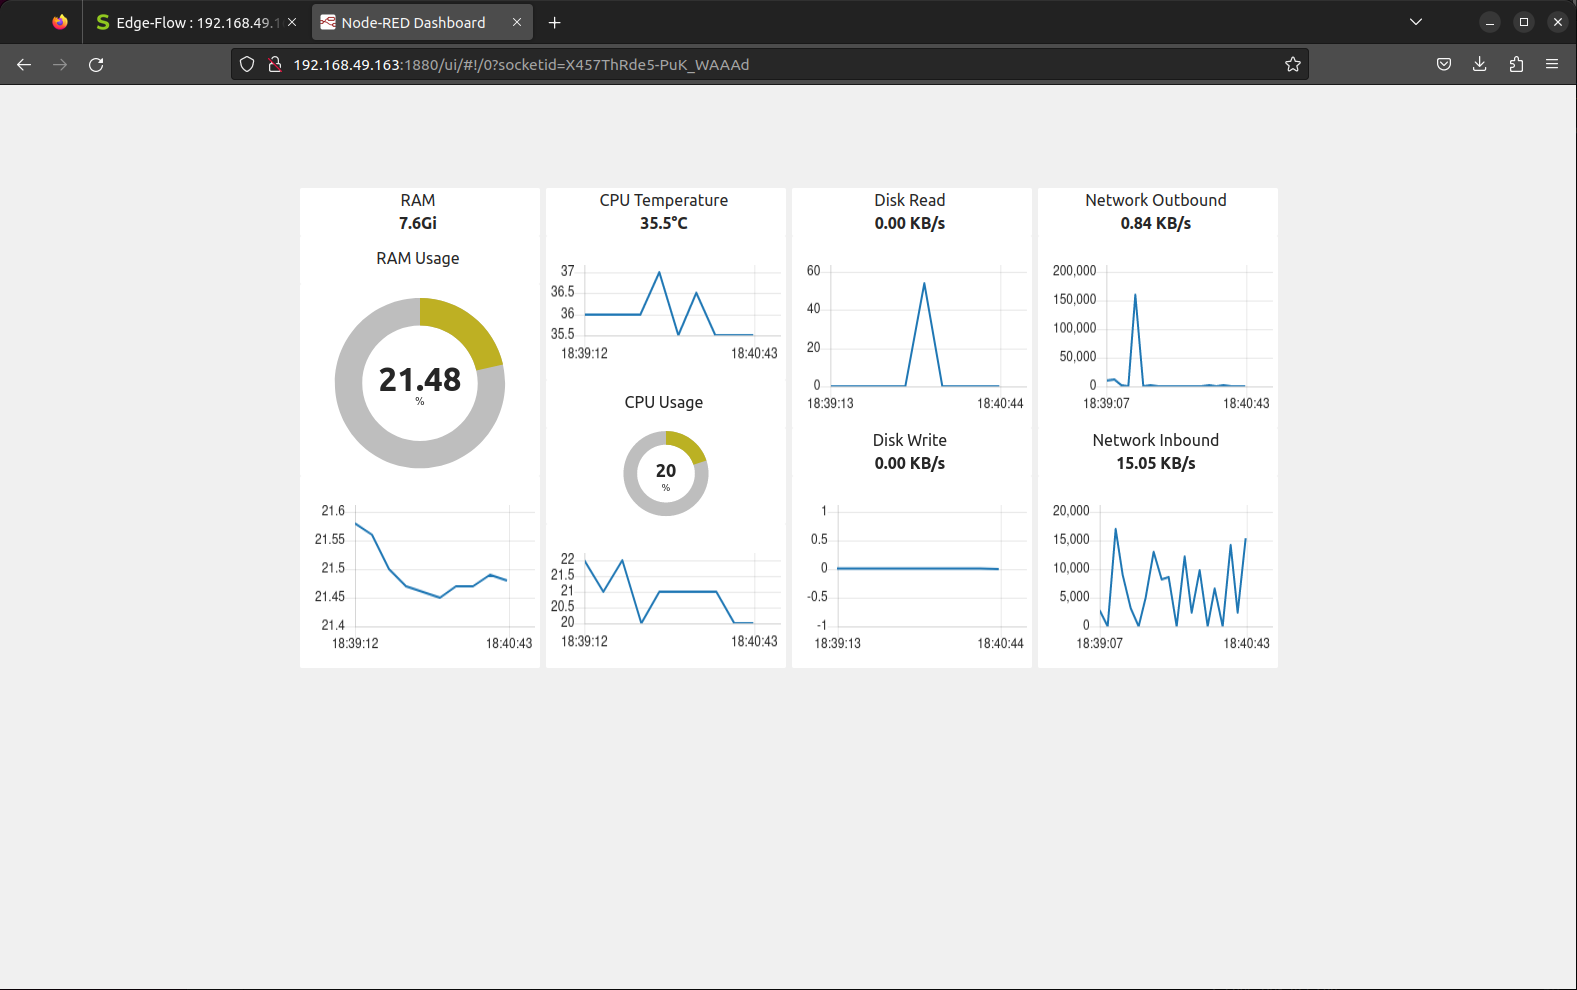
You could also access the dashboard view on the external machine which is on the same network with the reTerminal DM, where you could just open your favorite web browser on that external machine and type in the ip address of your reTerminal DM followed by the default Node-RED port 1880 then followed by '/ui/', which the url should looks like this: "ipaddress:1880/ui/"
For Example: In my case, the ip address of reTerminal DM is "192.168.49.163" then the url is: "192.168.49.163:1880/ui/"
Node-RED editor Tab
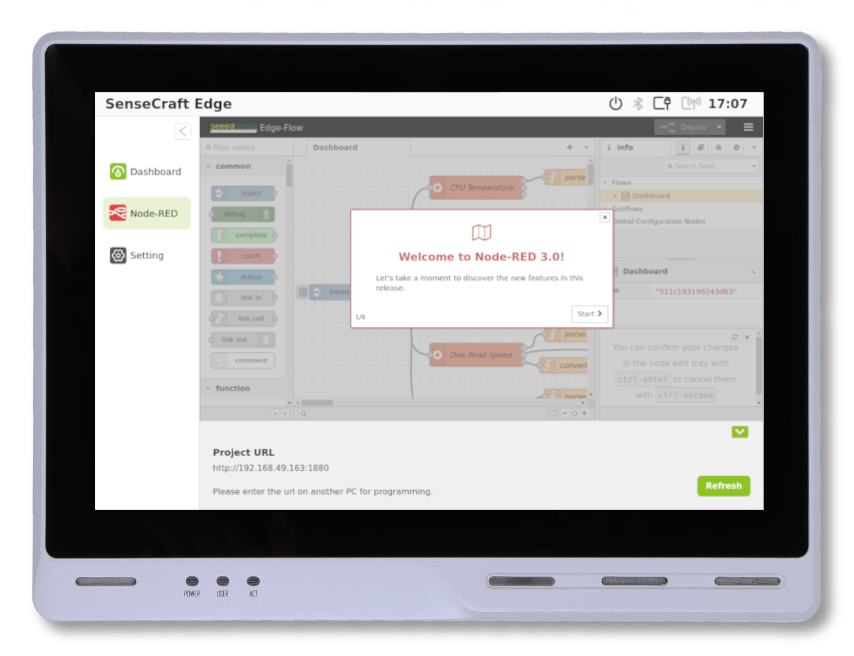
Please note that you could open the Node-RED editor on the an external machine which is on the same network with the reTerminal DM, where you could just open your favorite web browser on that external machine and type in the ip address of your reTerminal DM followed by the default Node-RED port 1880. To find the IP address of your reTerminal DM you could locate the IP Address as shown in the image below:
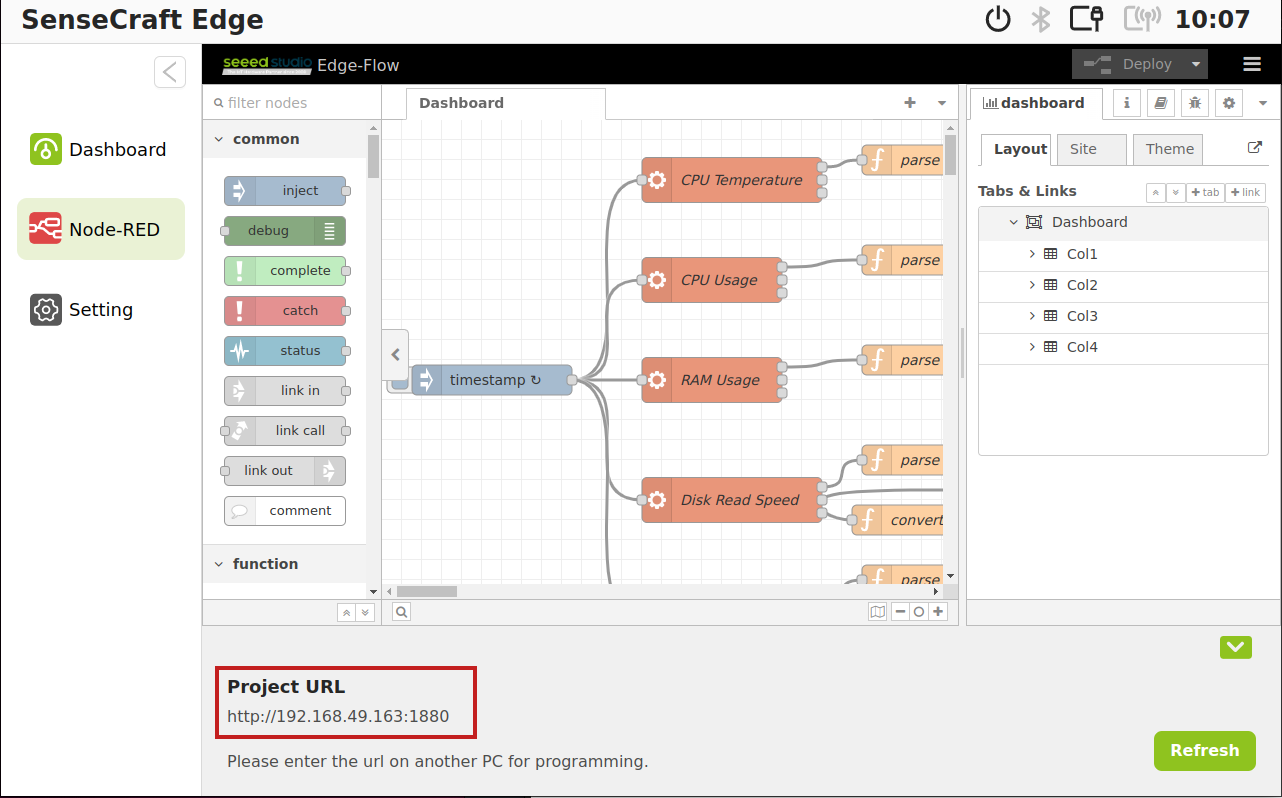
For Example: In my case, the ip address of reTerminal DM is "192.168.49.163" then the url is: "192.168.49.163:1880/"
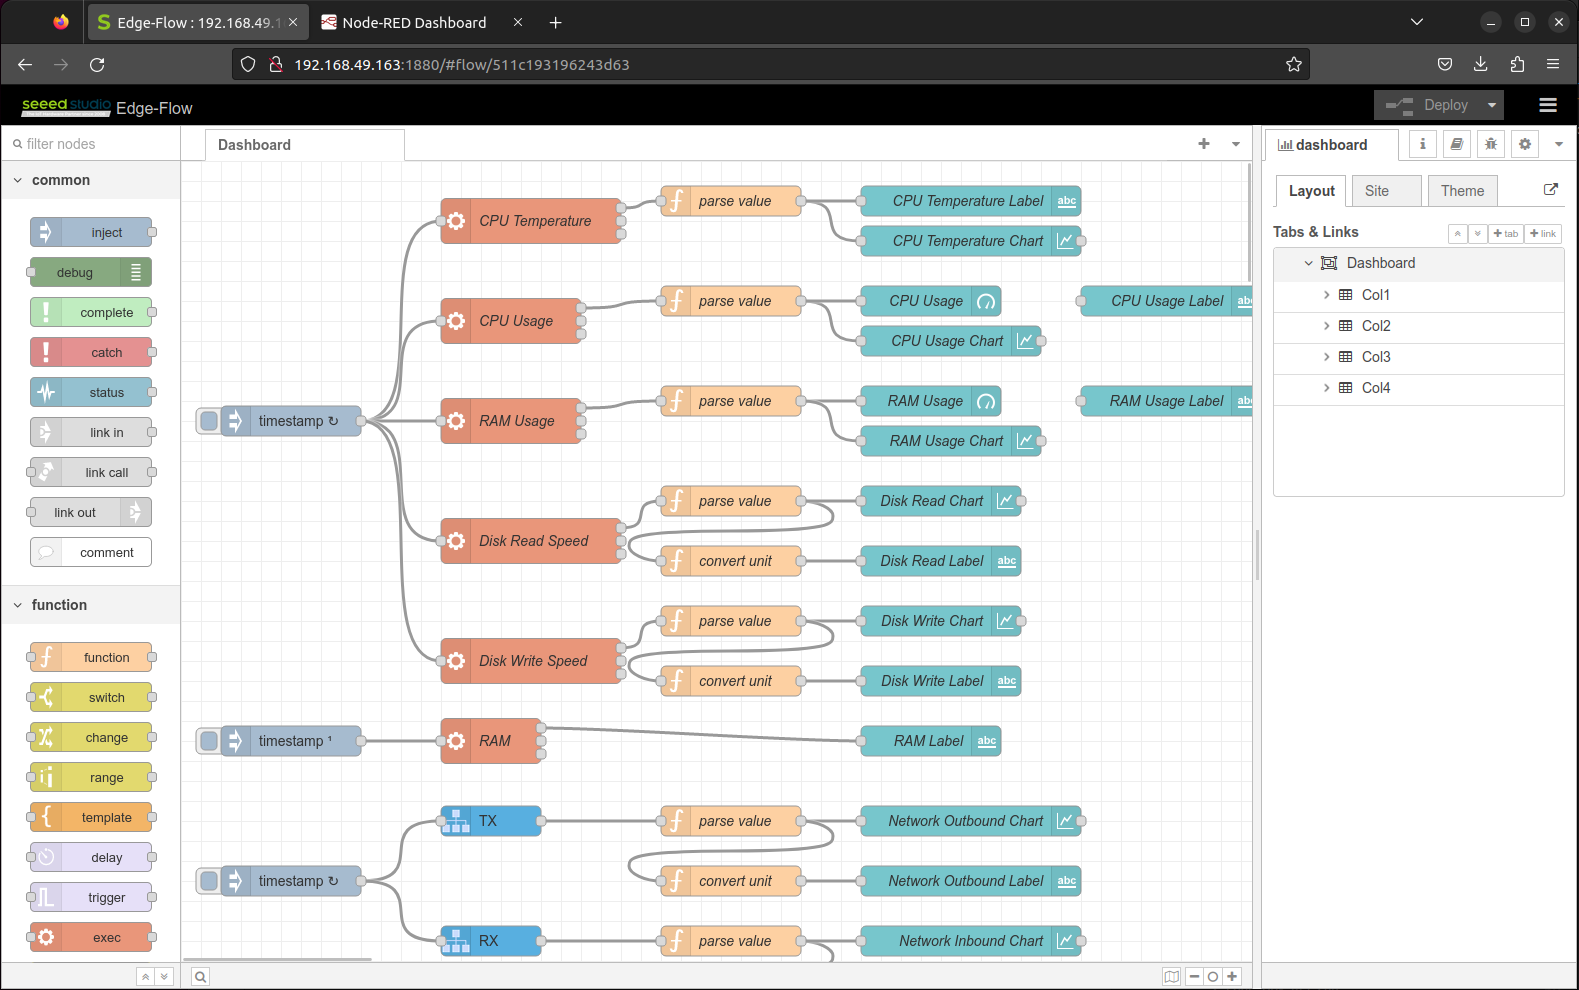
You could download the Default Flow for reference.
For more information about how to use Node-RED with reTerminal DM please visit the Node-RED Wiki pages:
- reTerminal DM RS485 Port with Node-RED
- reTerminal DM MQTT with Node-RED
- reTerminal DM CAN BUS with Node-RED
System Settings Tab
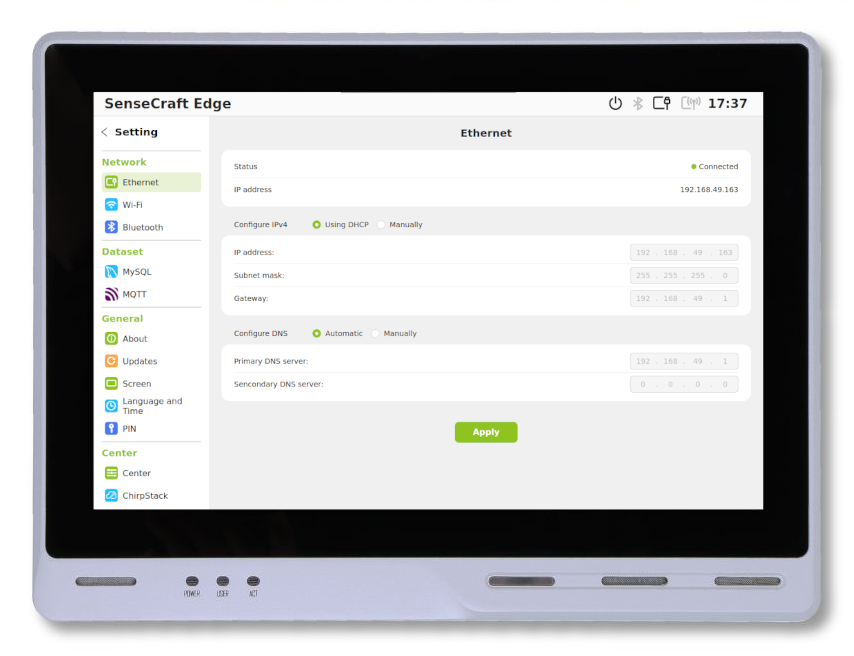
Network sub tab
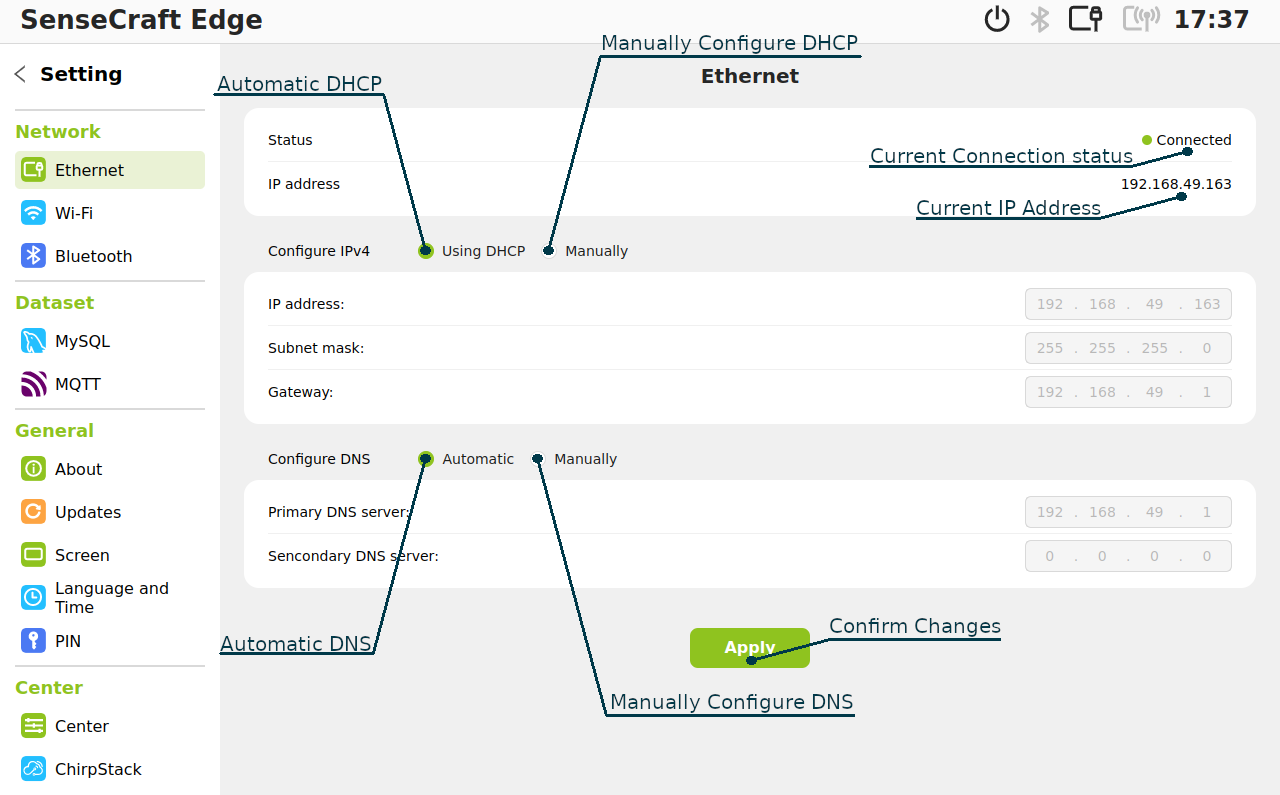
The Network section is used for viewing and setting up network functions for Ethernet, WiFi and Bluetooth.
Ethernet sub tab
WiFi sub tab
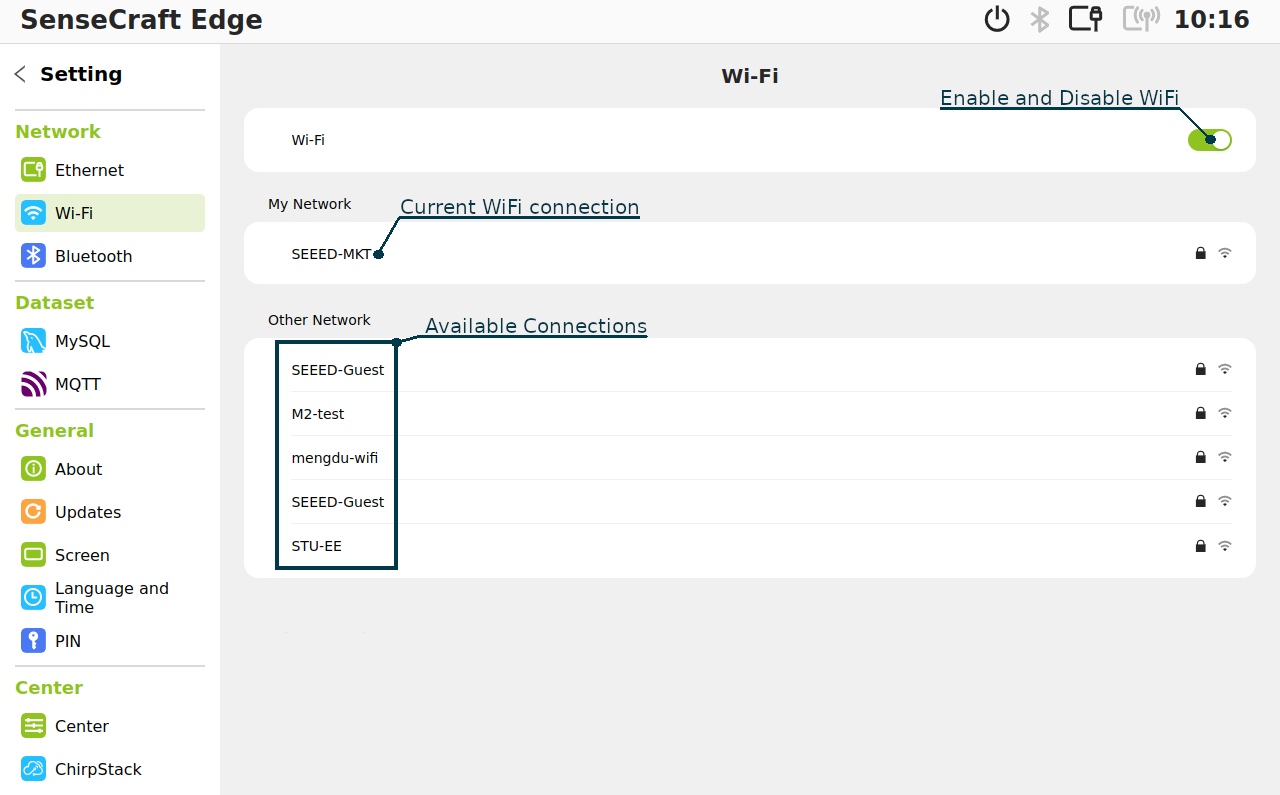
To connect wifi please click on the WiFi SSID you want to connect to and then you will see the following pop up window, please enter the WiFi credential, and then click Confirm to proceed.

Bluetooth sub tab

Dataset
The Dataset section is used for enable and disable the services related to dataset controls for now we have built-in MySQL server and MQTT server.
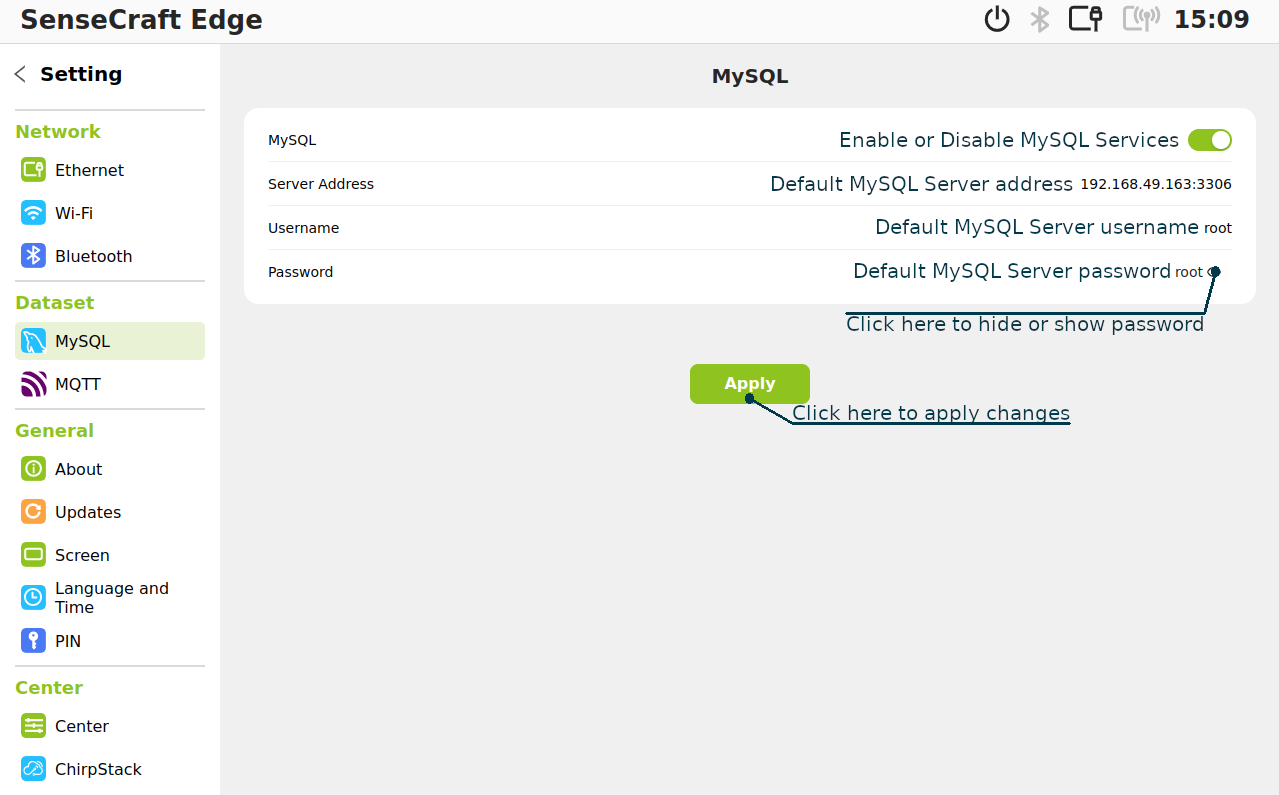
MySQL sub tab
You can enable or disable the MySQL service in this tab, also view the MySQL service information such as MySQL server address and server access credentials.
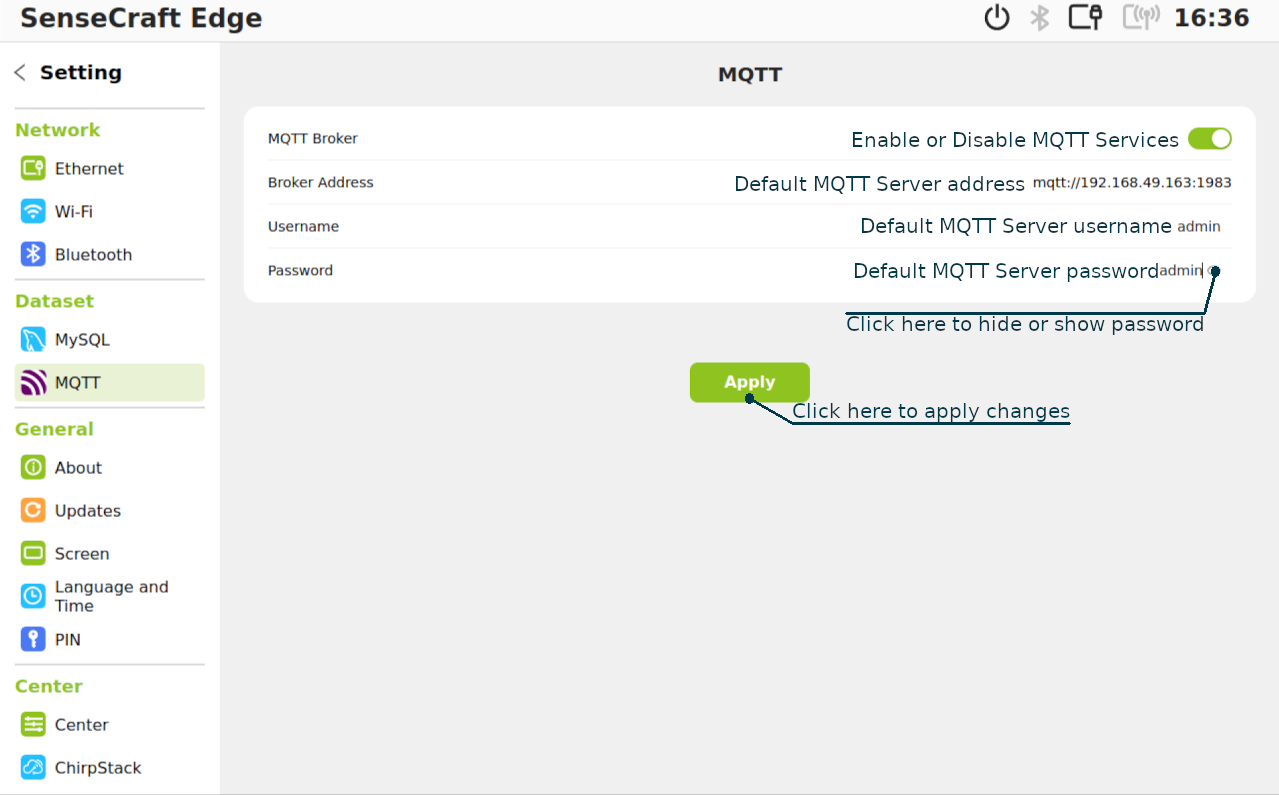
MQTT sub tab
You can enable or disable the MQTT service in this tab, also view the MQTT service information such as MQTT server address and service access credentials.
Gerneral
The Gerneral secstion is used for getting device information in the about tab, controlling device update in the update tab, adjust the screen setting in the screen tab, change the local setting in the Language and Time tab, setup screen lock pin from PIN tab for security reasons.
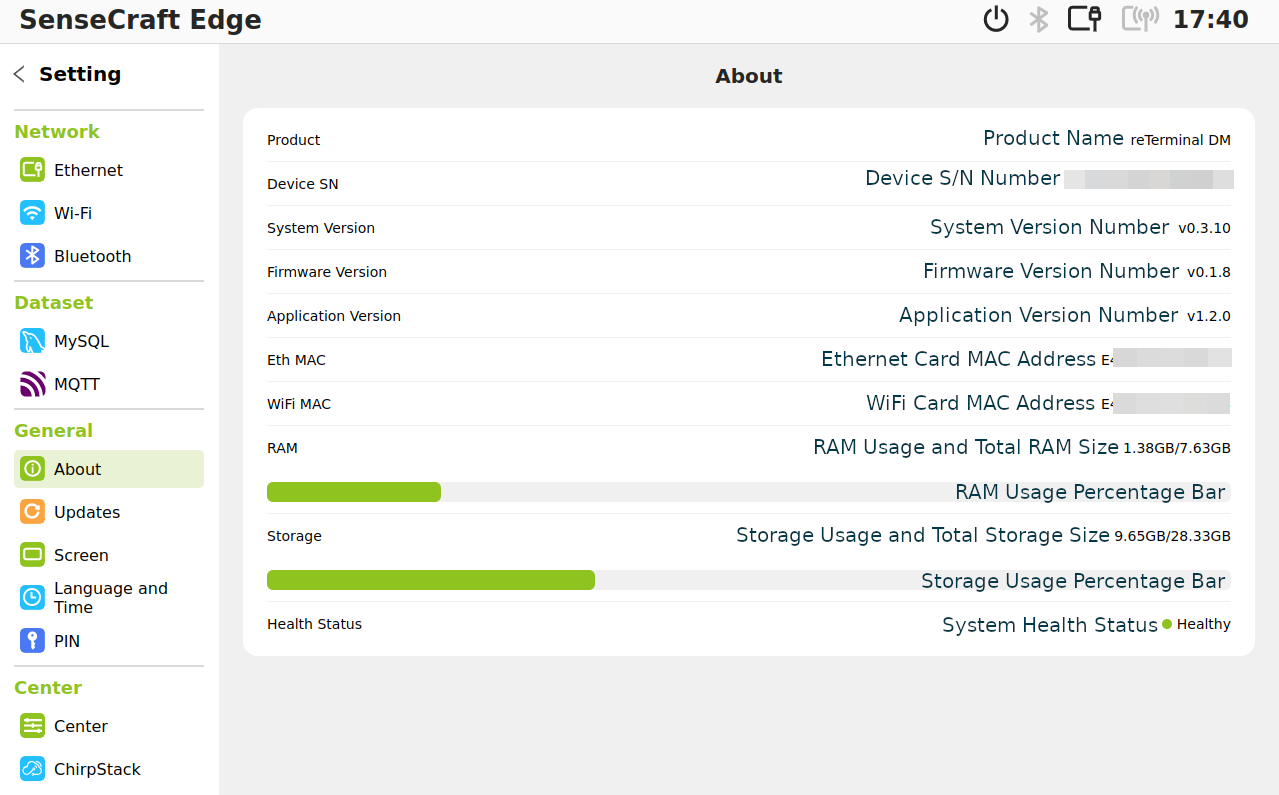
About
Updates
There are two thing you will need to update for SenseCraft Edge OS.
System Update:
- Taking care of the system Backend components
SenseCraft Edge Update:
- Backend and Frontend Component and Ui related to the SenseCraft application UI interface.
There are two ways to update them.
Local Update:
- Using a USB storage device contains update files.
Network Update:
- Update through network
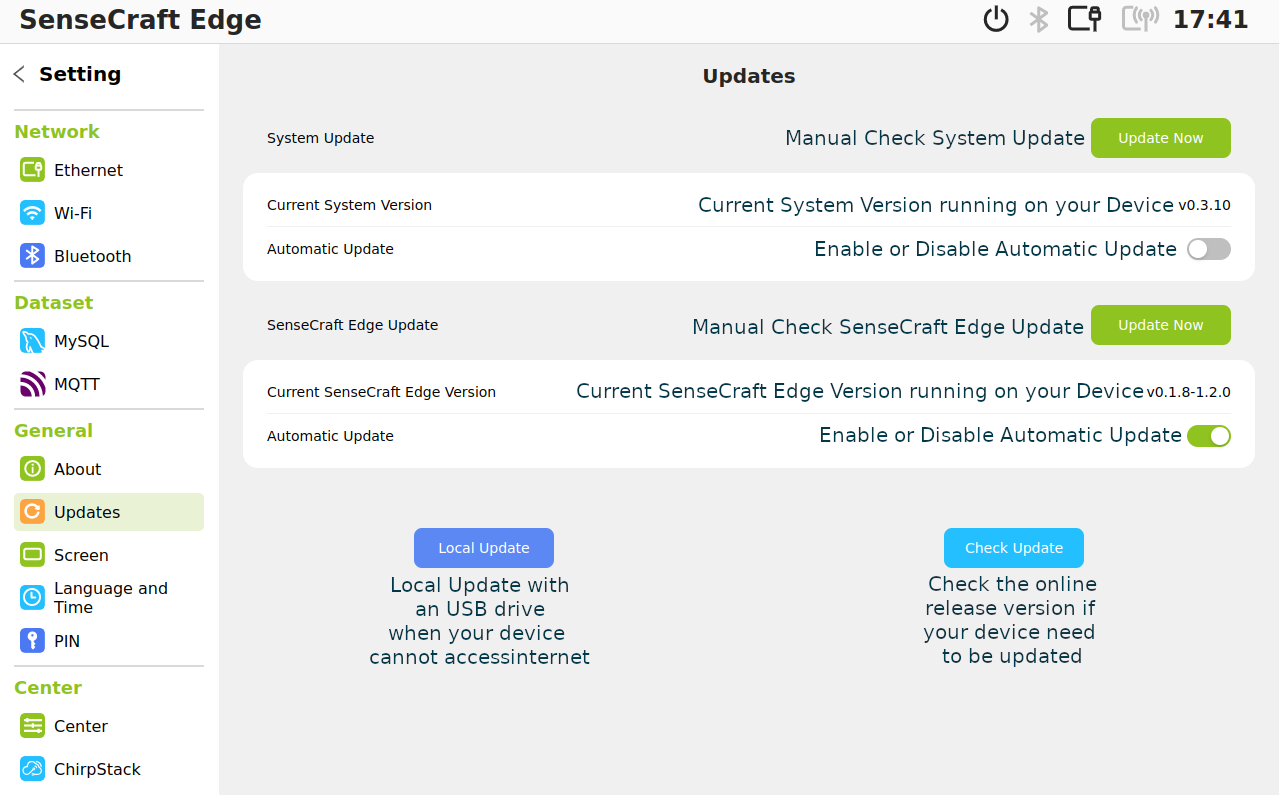
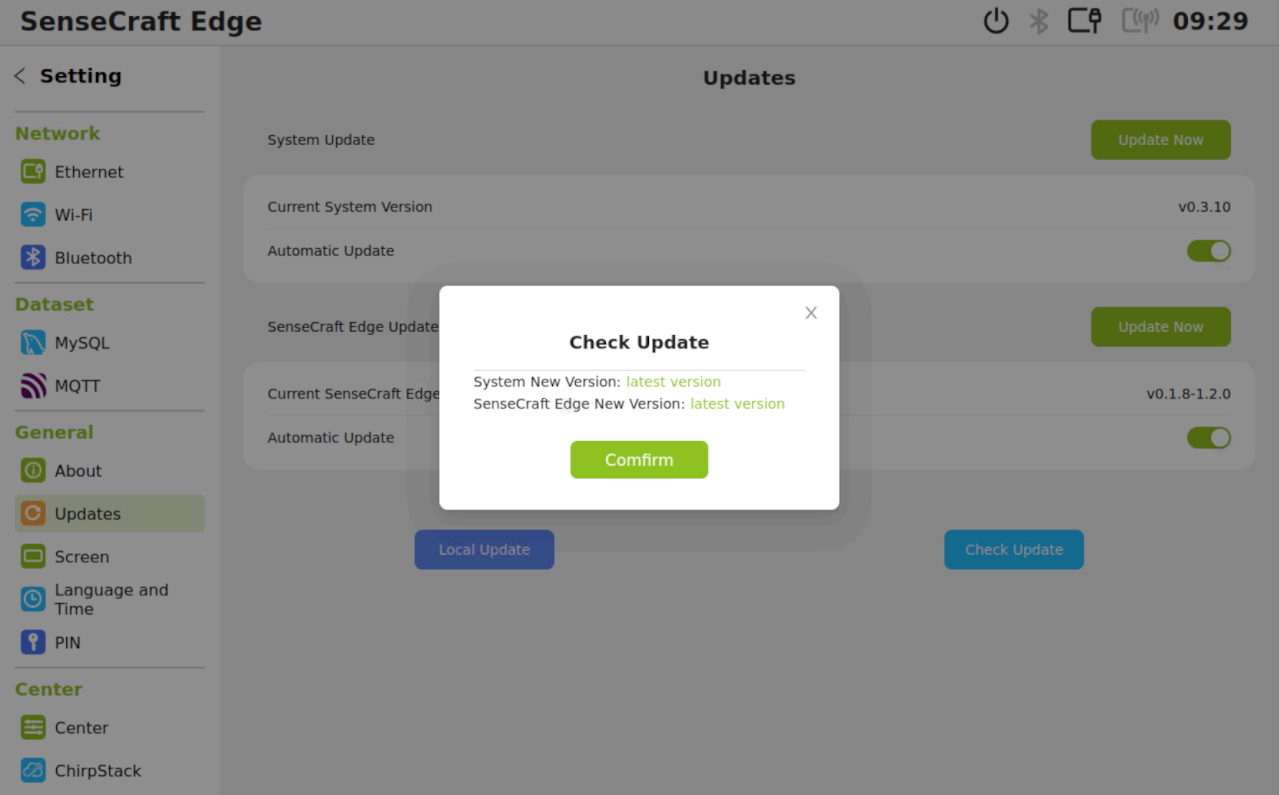
Check and Update
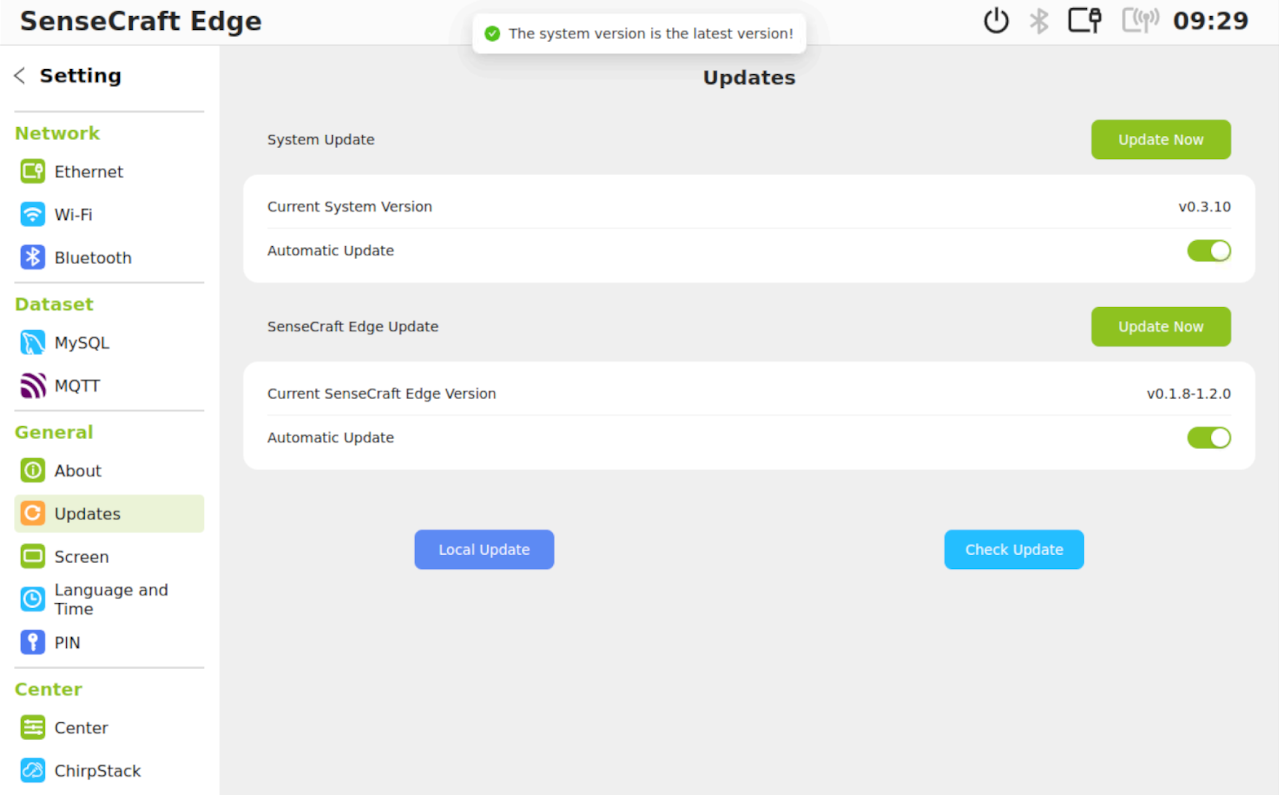
You can click the Update Now button separately to update the System or SenseCraft Edge application.
If your system is up-to-date you will be greeting with The System Version is latest version pop up notification.
For System Update:
For SenseCraft Edge Update:
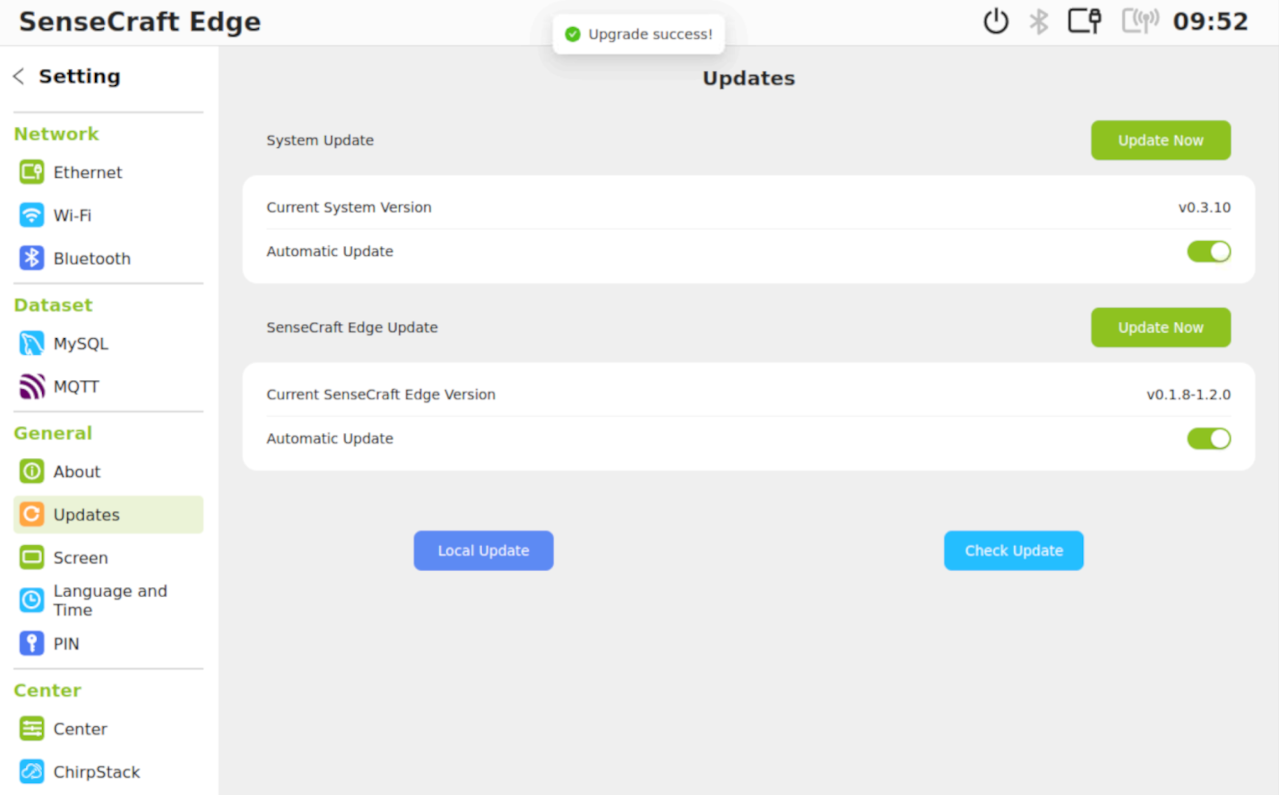
You can click the Check Update button to check the latest available update and confirm to Update.
Local Update
STEP 1: Please click on the Local Update button
You should see the following pop up window.
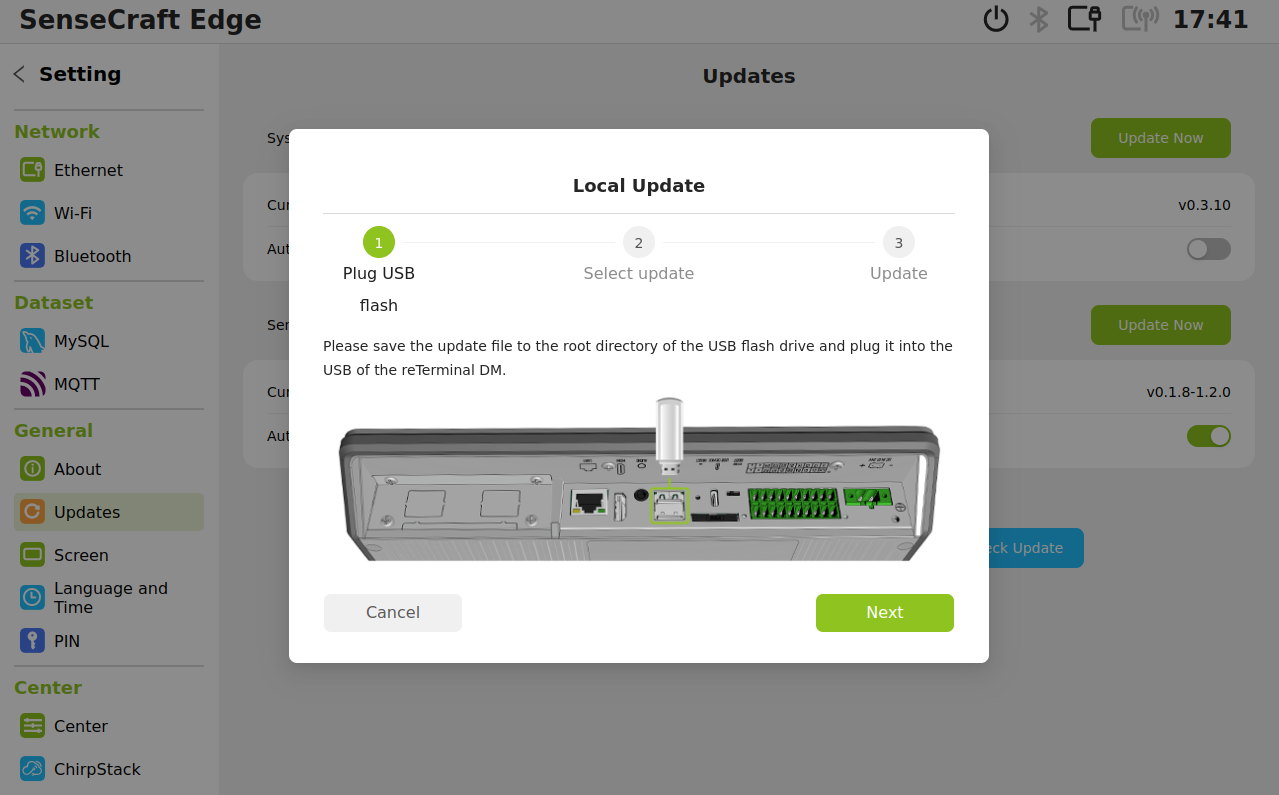
STEP 2: Please insert the USB storage device with the update files to reTerminal DM as indicated in the image above.
STEP 3: At the pop up window Click next, please be patient when you clicked next this will take sometime to load.
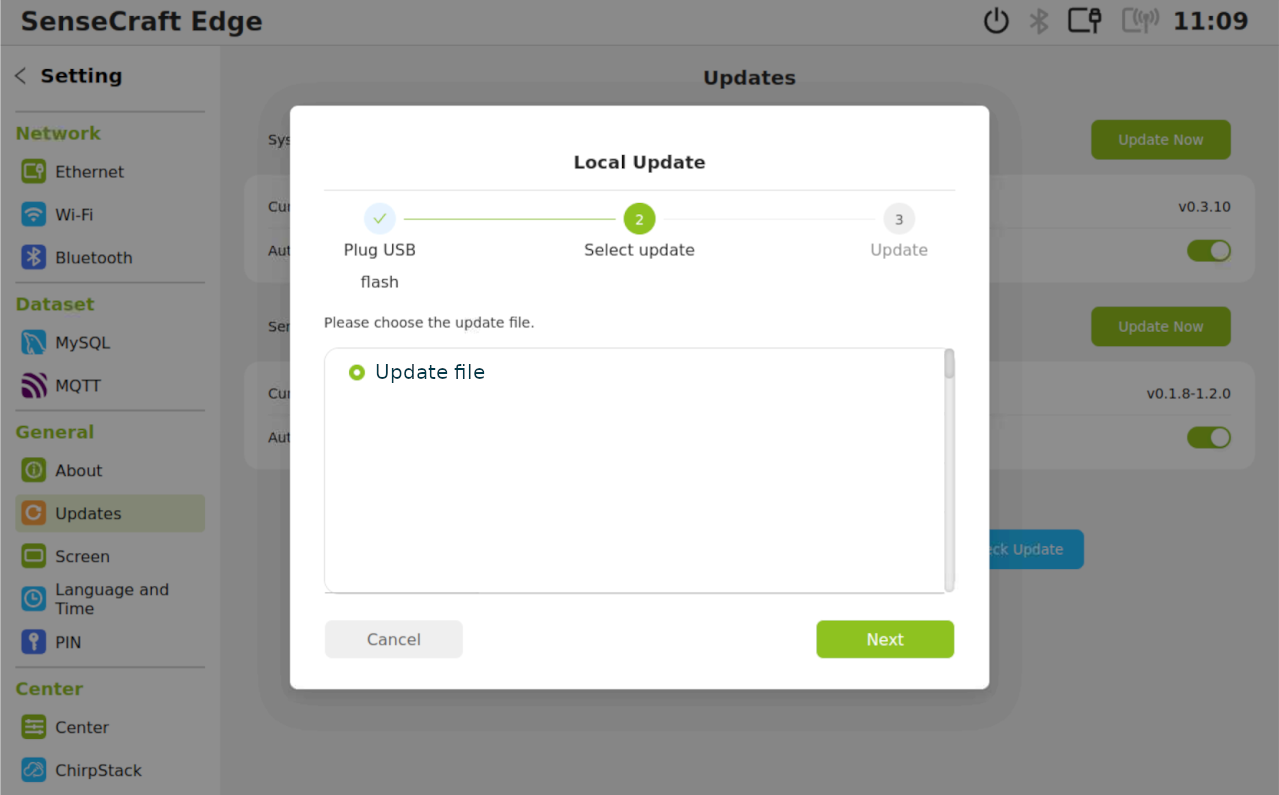
USB Error
If there are some error with the USB you will see the No USB flash drive detected,
To make things much easier for update the system please make sure you have a good USB storage Device and formated to FAT32 or EXT4, and the USB storage size is less or equal to 64Gb, then
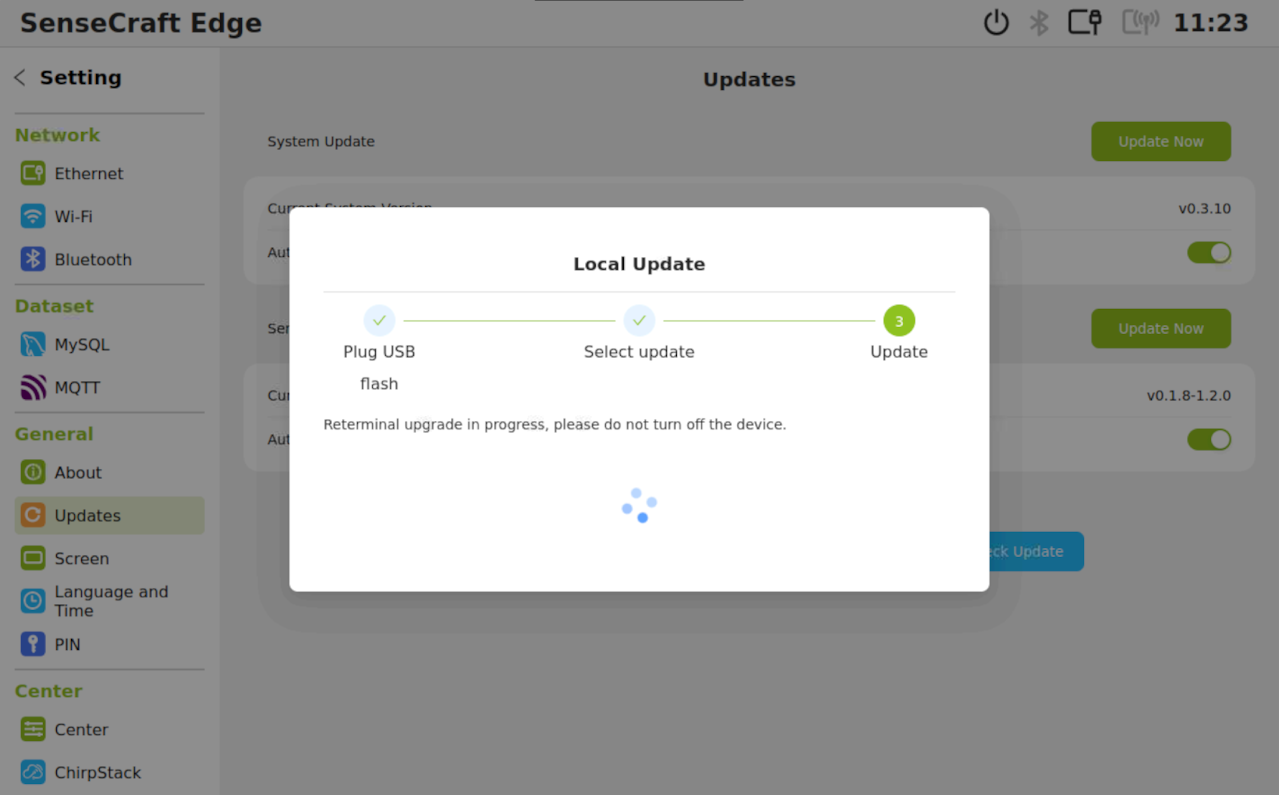
STEP 4: Click Next and wait for update process
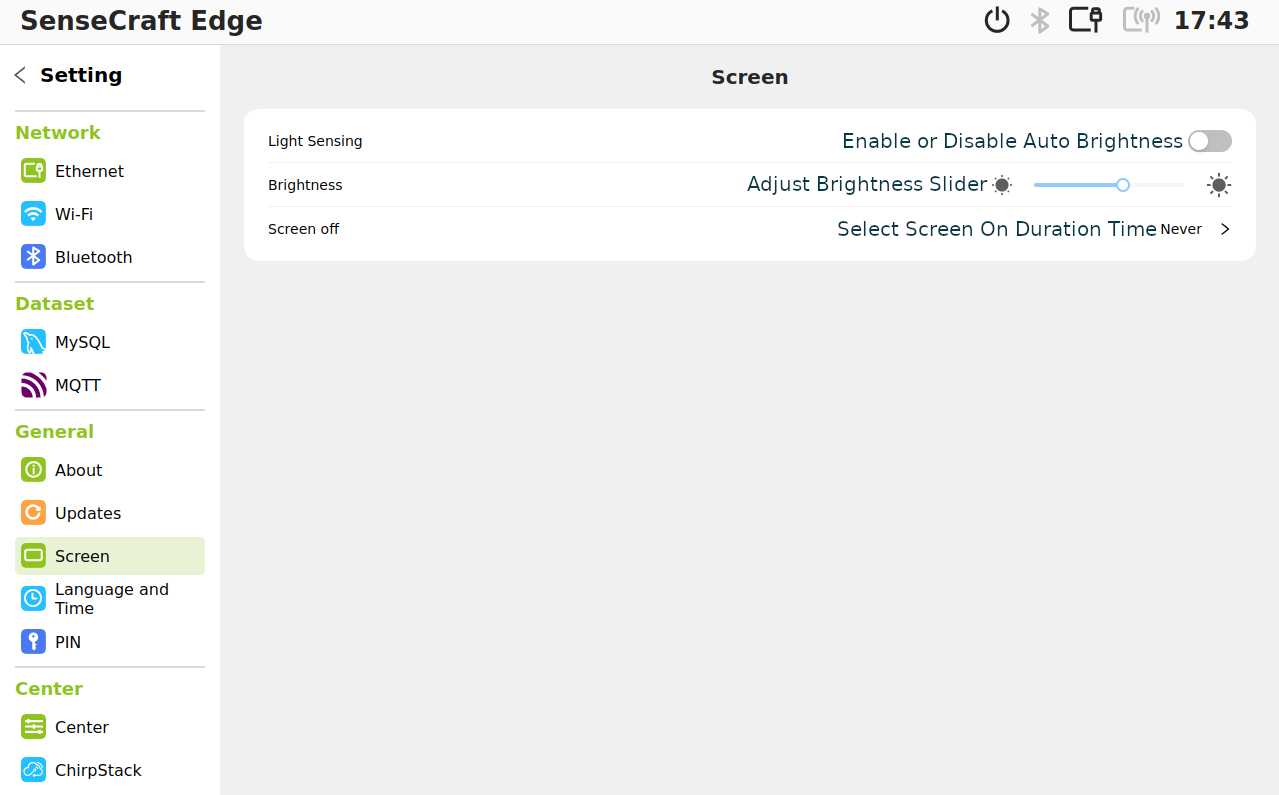
Screen
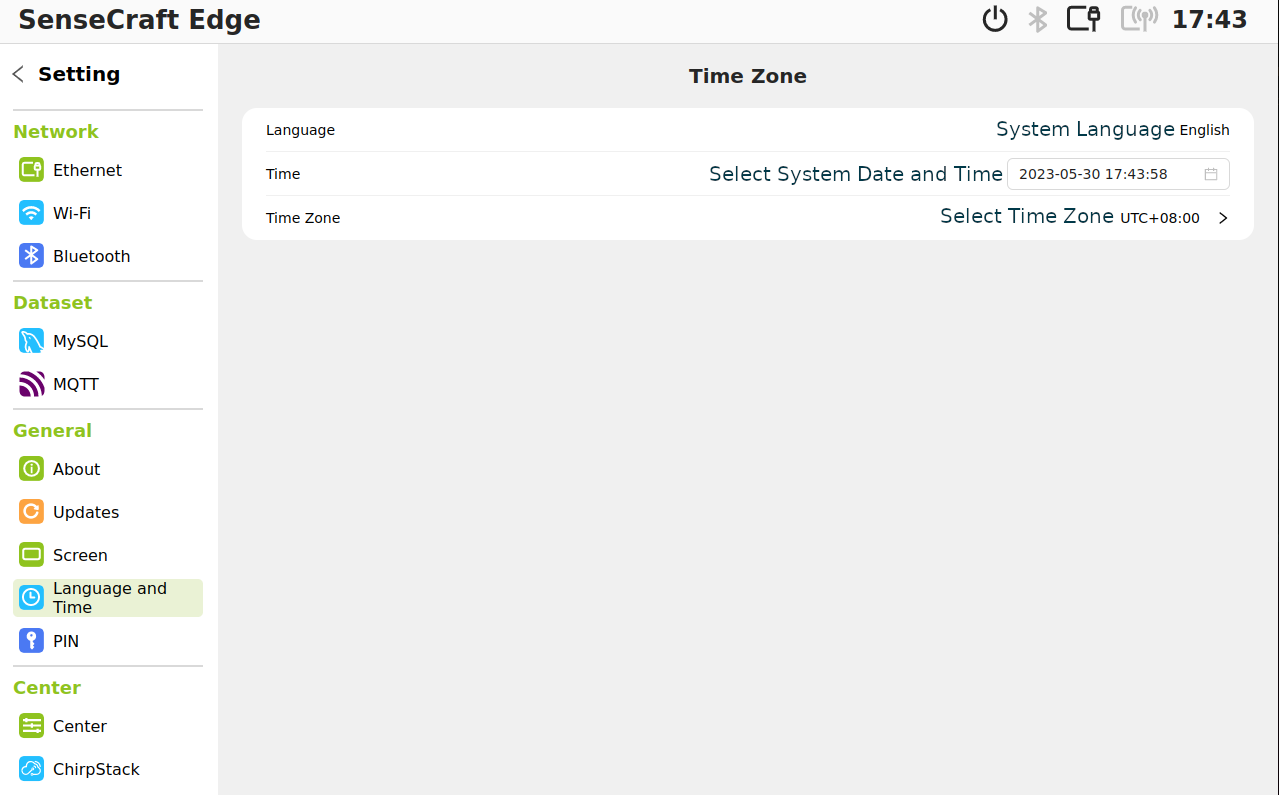
Language and Time
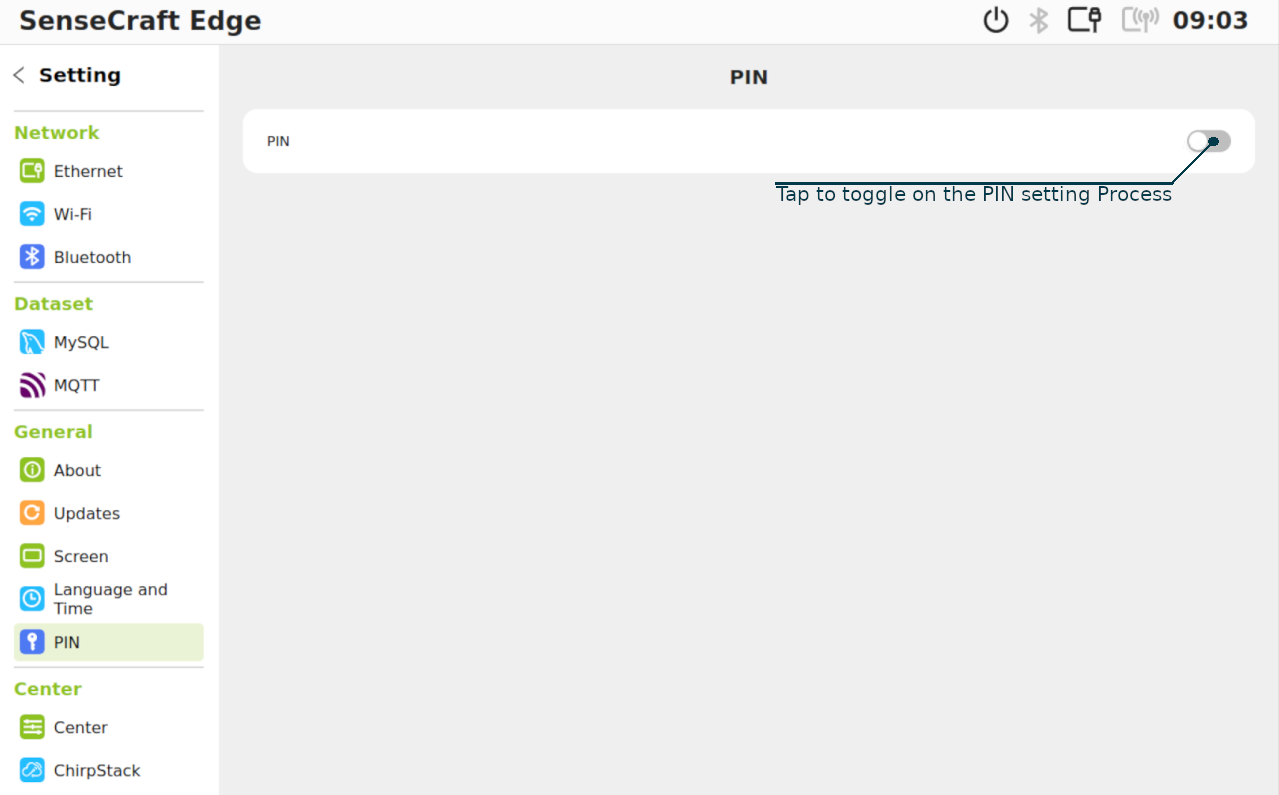
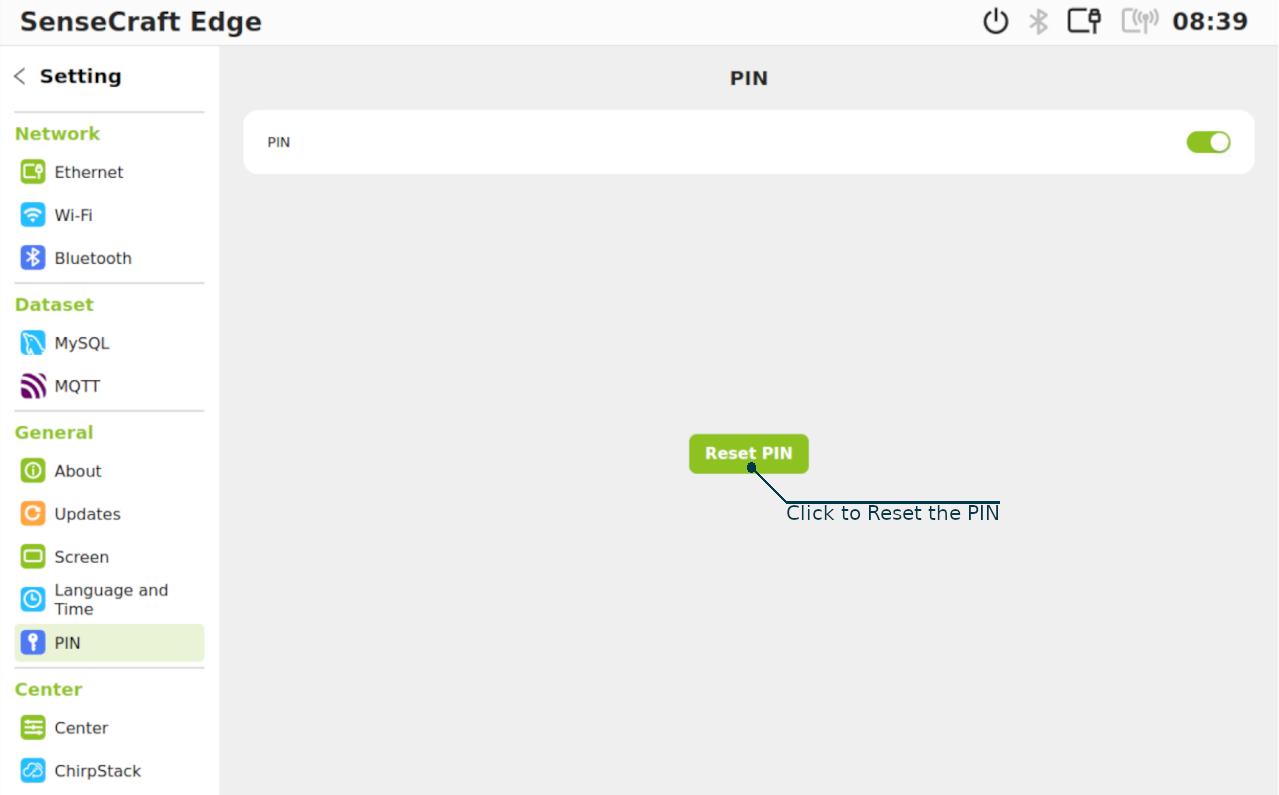
PIN
At default the PIN is unset, and this pin sets a passcode lock for Node-RED editor Tab and System Setting Tab
Setup PIN Code:
Steps for setting up the pins:
STEP 1: Click and toggle the Set PIN button to enter the pin setup process
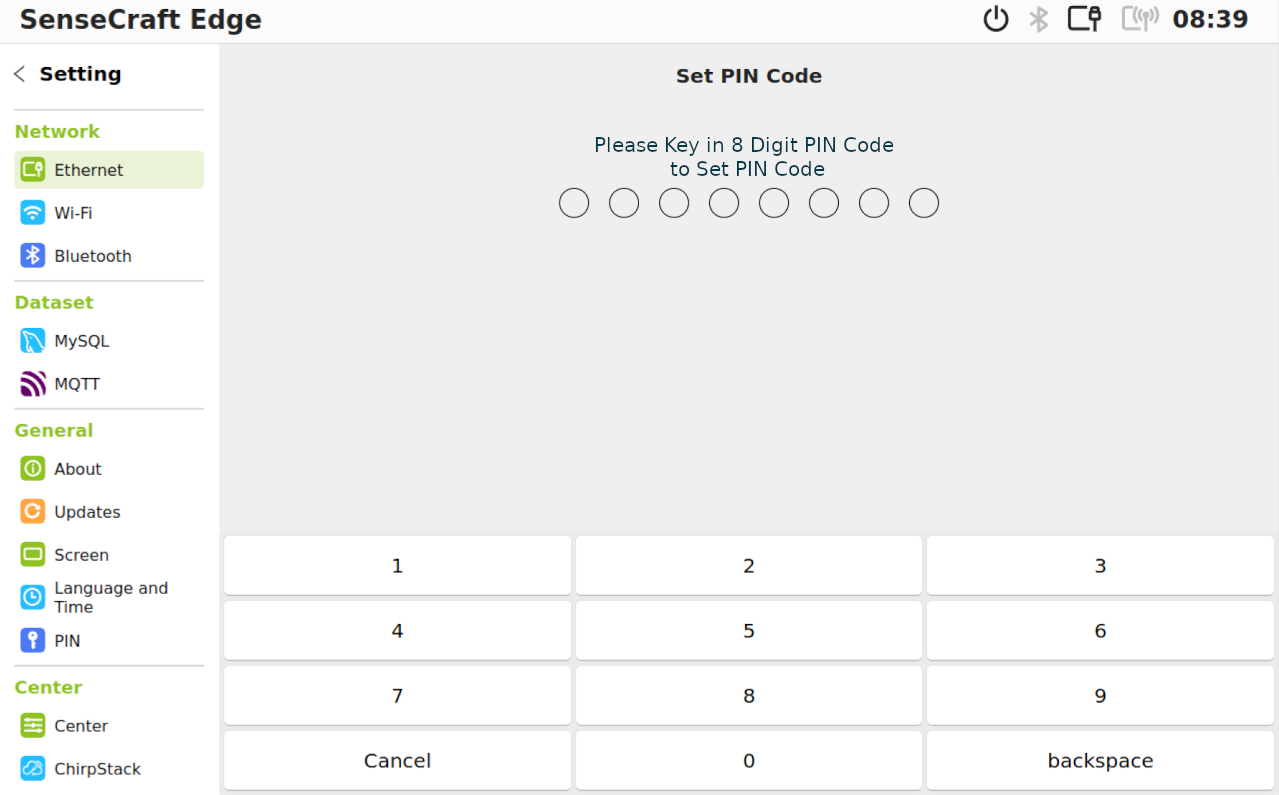
STEP 2: Please key in the 8 digit PIN code
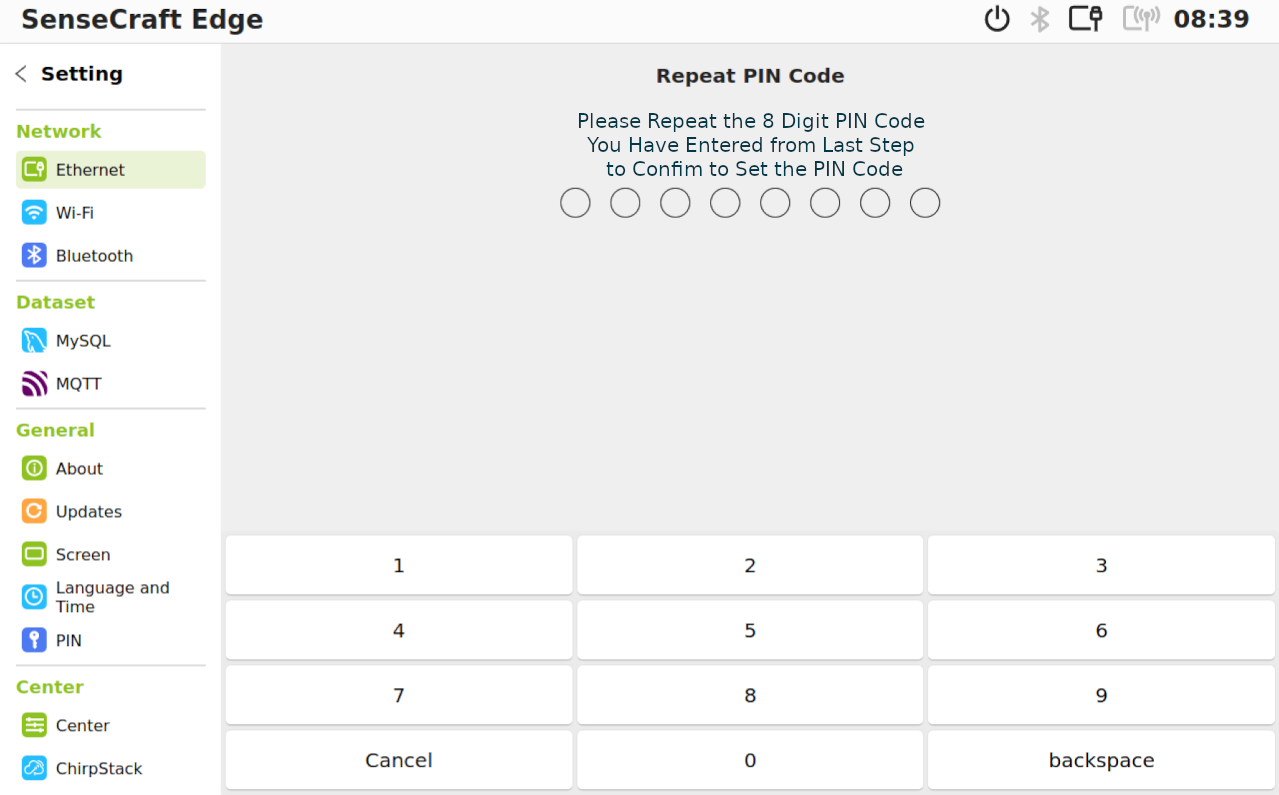
STEP 3: Please repeat the 8 digit PIN code to confirm
Reset the PIN Code:
This step is only validate when you have a PIN code setup already
STEP 1: Click on the RESET button
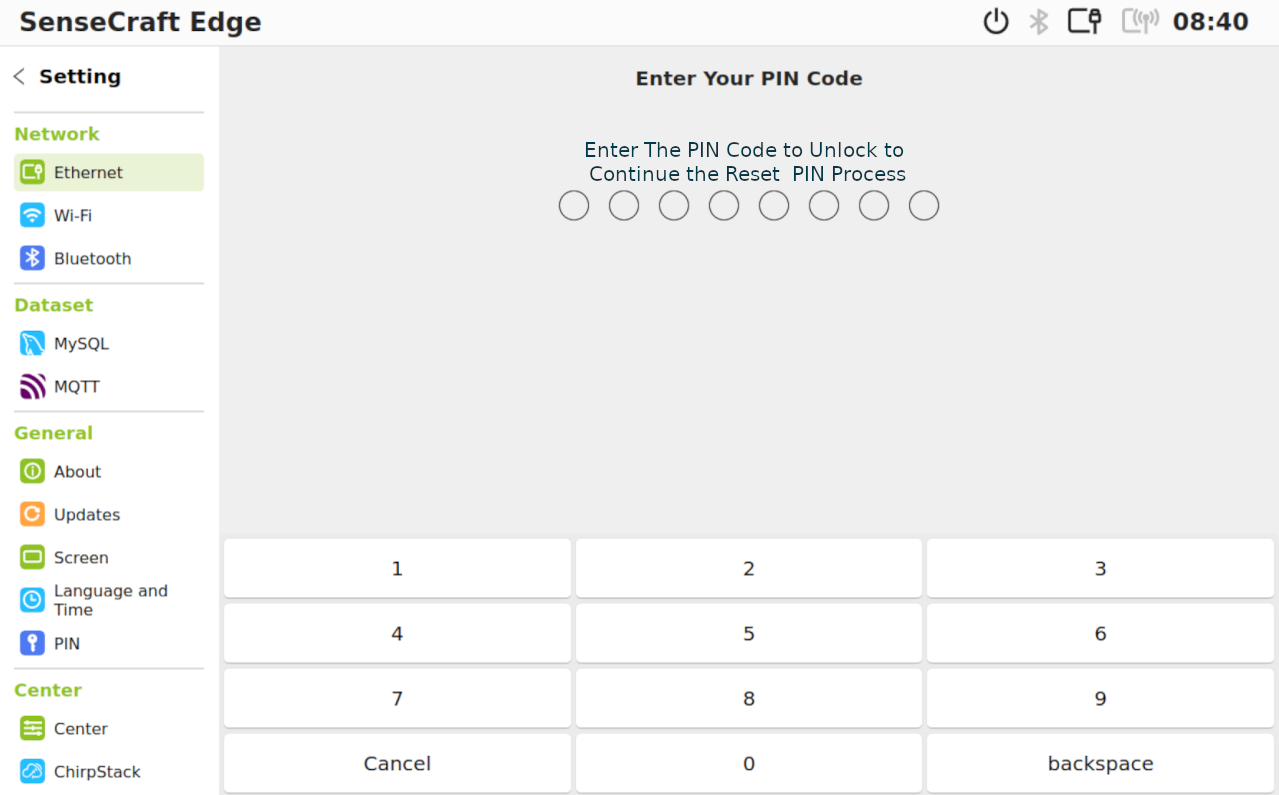
STEP 2: Please enter current pin code to confirm reset process
STEP 3: Please key in the new 8 digit PIN code
STEP 4: Please repeat the new 8 digit PIN code to confirm
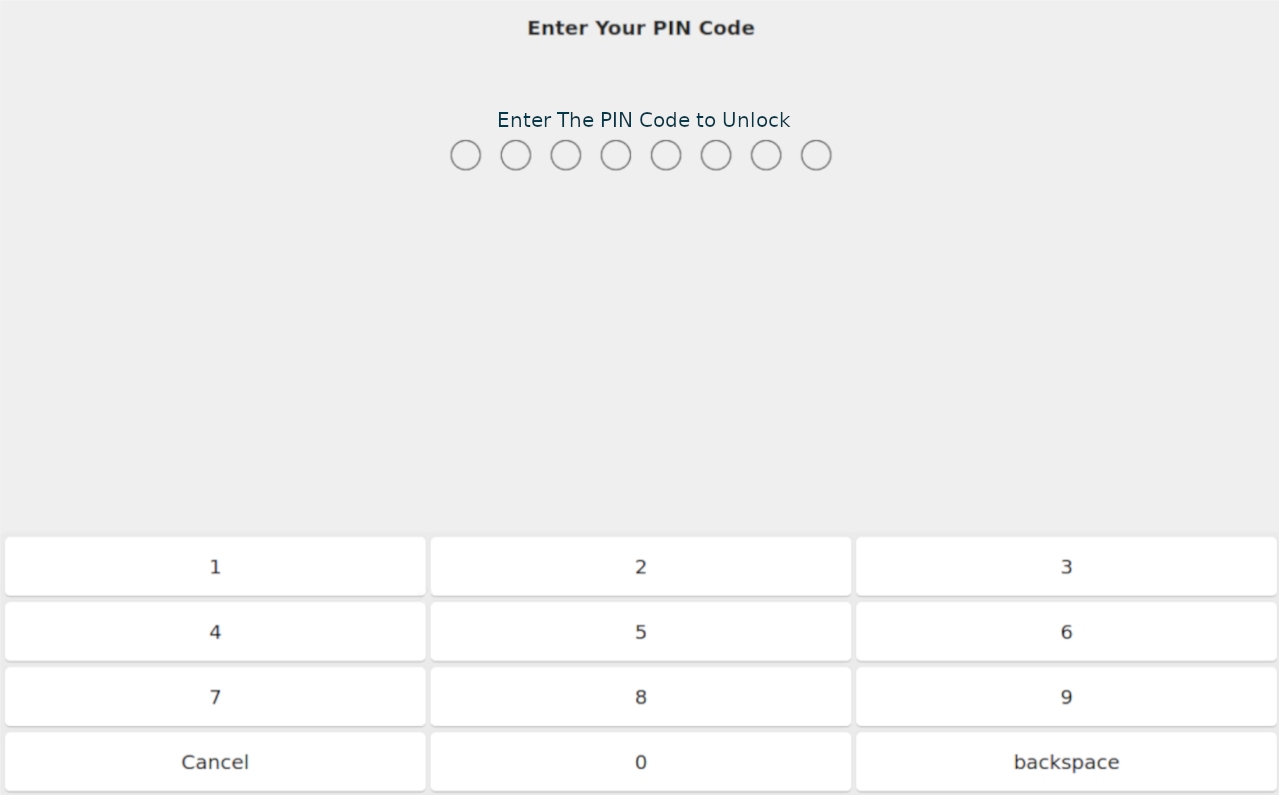
Unlock
Once you have setup the PIN Code when you tab into the Node-RED editor Tab or System Setting Tab, you will need to enter the PIN code to unlock
Center
The Center section is used for controlling installed Applications, where the center tab is act as a app store where you could install, open, disable and as well as host your own applications which is served similar as Google play store or apple app store. currently the function of this app center is limited the new features will be updated please stay tuned and be patient, also we would like your contributions to the app center once the community contribution function is implemented. The ChirpStack tab is shown as it is the application configuration view, which the ChirpStack application is installed from the App Center.
Center
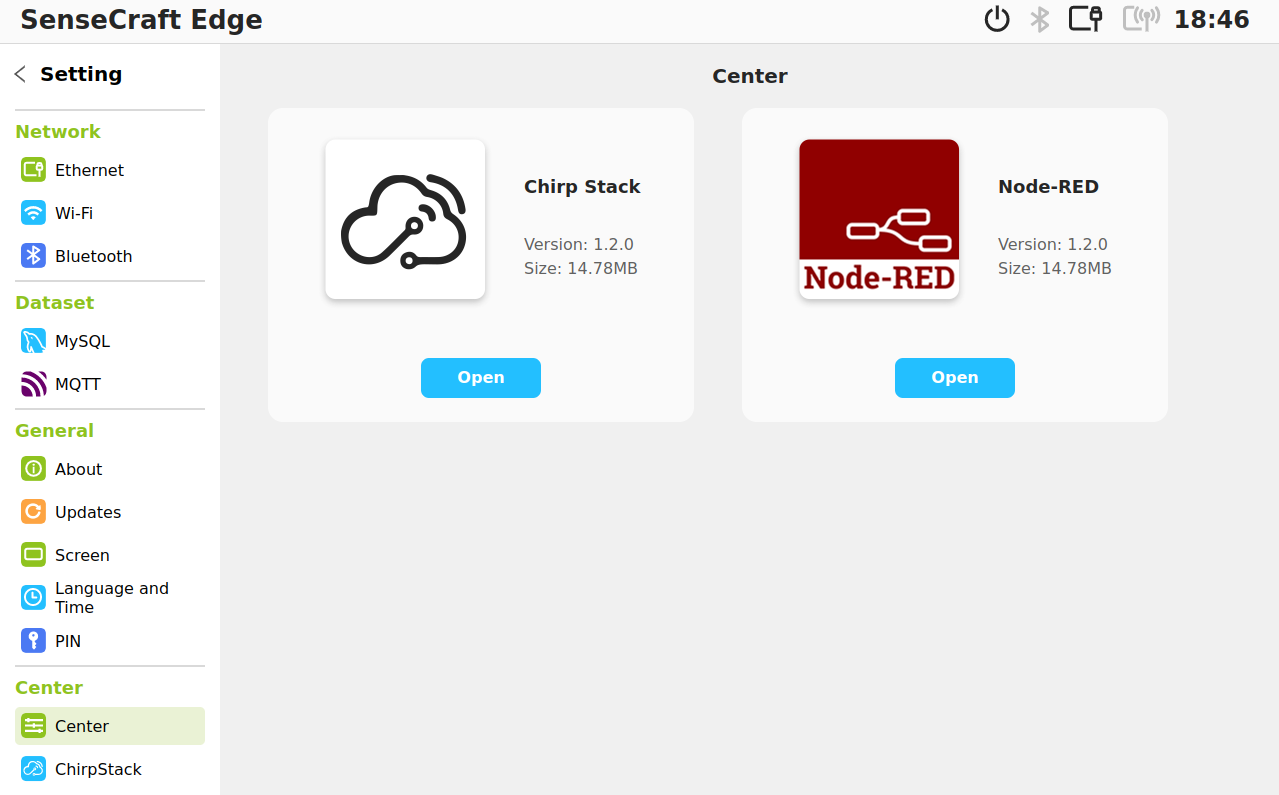
currently the function of this app center is limited the new features will be updated please stay tuned and be patient, also we would like your contributions to the app center once the community contribution function is implemented.
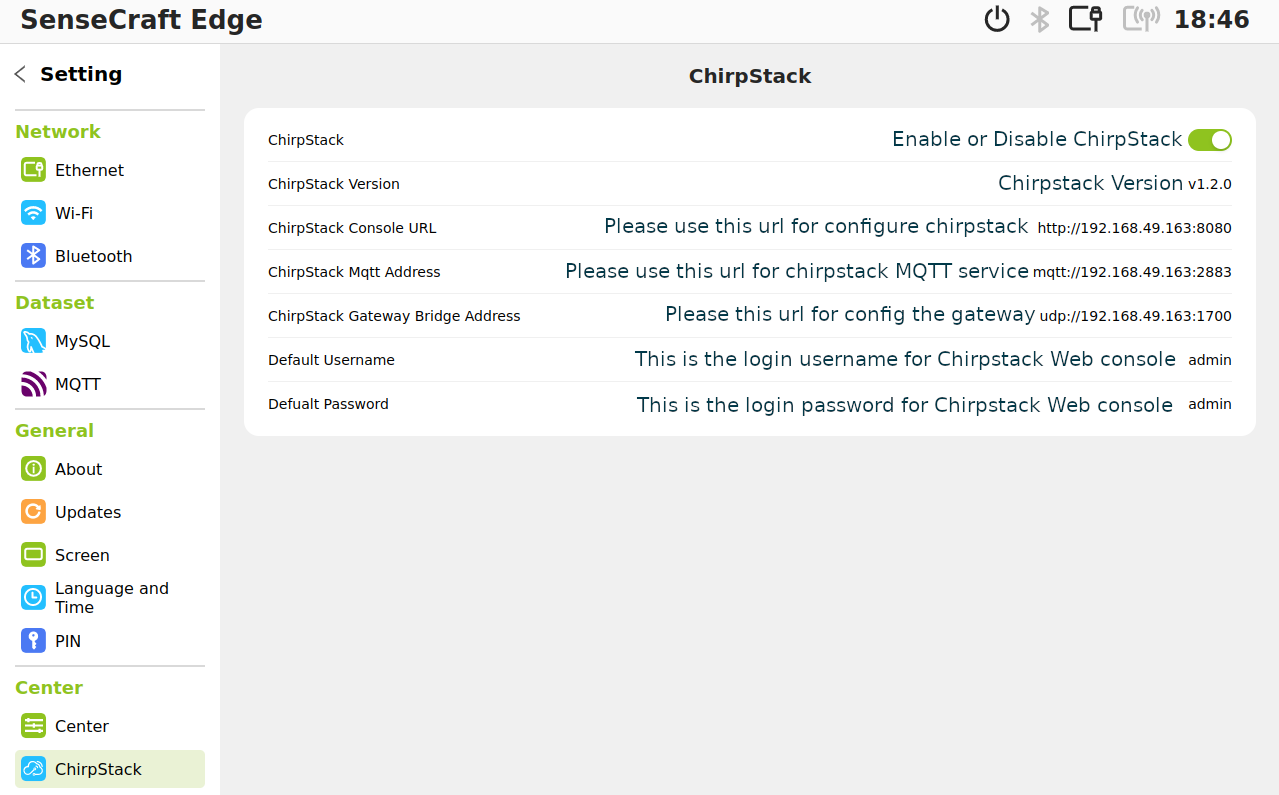
ChirpStack
Additional Resources
Tech Support & Product Discussion
Thank you for choosing our products! We are here to provide you with different support to ensure that your experience with our products is as smooth as possible. We offer several communication channels to cater to different preferences and needs.