reTerminal DM MQTT with Node-RED
Brief info about MQTT

MQTT & Node-RED
MQTT (Message Queuing Telemetry Transport) is a lightweight messaging protocol that is designed to enable communication between devices in a machine-to-machine (M2M) or Internet of Things (IoT) context. MQTT was developed by IBM in 1999 and later became an open standard. MQTT is designed to be a simple and efficient way of sending small packets of data between devices. It uses a publish/subscribe messaging pattern where messages are published to a broker and then delivered to all subscribers who have subscribed to a particular topic. This allows devices to communicate with each other without having to know each other's IP addresses or other network details. MQTT is particularly useful in situations where devices are connected over unreliable networks, such as low-bandwidth or high-latency networks, because it uses a small amount of bandwidth and has a low overhead. It also supports Quality of Service (QoS) levels, which allows for different levels of reliability in message delivery. MQTT has become a popular choice for IoT and M2M applications because of its simplicity and efficiency, and it is supported by a wide range of devices and platforms.
A MQTT broker is a server that acts as a central point for the exchange of MQTT messages between devices in an MQTT-based IoT or M2M network. It receives messages published by devices and distributes them to other devices that have subscribed to the same topics.
MQTT is one of the many protocols that Node-RED supports, making it a great tool for building MQTT-based IoT applications. Node-RED provides built-in nodes for MQTT, which allows users to connect to an MQTT broker and publish or subscribe to messages. The MQTT nodes can be easily configured using the Node-RED interface, and users can specify the broker address, port, client ID, username, and password. The nodes also support MQTT QoS levels, which can be set to ensure reliable message delivery. In Node-RED, users can create flows that handle incoming MQTT messages and perform various actions based on the message payload. For example, a flow could subscribe to a temperature sensor's MQTT topic, parse the temperature value, and then send an alert if the temperature exceeds a certain threshold. Node-RED also provides various nodes for integrating with other IoT services and devices, such as HTTP endpoints, databases, and cloud services. This allows users to easily build complex IoT applications that can communicate with a wide range of devices and services.
Overall, Node-RED provides a simple and intuitive way to build MQTT-based IoT applications, thanks to its built-in MQTT nodes and support for other IoT services and devices.
Getting start with MQTT Node on reTerminal DM
Since MQTT node is built-in with Node-RED you can use the MQTT node with any extra step for installing nodes, However you will need to have a mqtt broker to publish or subscribe message to a topic. Therefore, the following steps will include on how to install local MQTT Broker on reTerminal DM and then utilising the MQTT Broker for sending and receiving messages.
prerequisite
Hardware
- 1 x reTerminal DM
- 1 x Host Computer
The Host Comupter should be able to have internet connection to the reTerminal DM to perform the follow setup steps.
Software
- MQTT Broker Eclipse Mosquitto
Install MQTT Broker Eclipse Mosquitto
In this section we will install the Eclipse Mosquitto, which is an open-source MQTT broker that is widely used in IoT and M2M applications. It is developed by the Eclipse Foundation and is available under the Eclipse Public License. Mosquitto is designed to be lightweight and efficient, making it well-suited for use on low-power devices and in environments with limited network bandwidth. It supports the latest MQTT 5.0 protocol, as well as earlier versions such as MQTT 3.1.1.
First of all please go ahead and refreshing your knowledge with accessing reTerminal DM via SSH, please check the steps here
Once you have access the reTerminal DM with SSH you can proceed to the steps below:
STEP 1: Update the package list by running the following command:
sudo apt-get update
STEP 2: Install Mosquitto by running the following command:
sudo apt-get install mosquitto
STEP 3: Install the Mosquitto client tools by running the following command:
sudo apt-get install mosquitto-clients
STEP 4: Once the installation is complete, you can start the Mosquitto service by running the following command:
sudo systemctl start mosquitto
STEP 5: To check if Mosquitto is running, you can run the following command:
sudo systemctl status mosquitto
By default, Mosquitto is configured to listen on port 1883 for MQTT traffic. You can test the installation by subscribing to a topic using the Mosquitto client tools, like so:
Open a new SSH session and run the following command to subscribe to a topic:
mosquitto_sub -h localhost -t test
In another SSH session, run the following command to publish a message to the same topic:
mosquitto_pub -h localhost -t test -m "Hello, world!"
You should see the message "Hello, world!" appear in the first SSH session window where you ran the mosquitto_sub command.
And that's it! You have successfully installed Mosquitto on your reTerminal DM and tested it using the Mosquitto client tools. Now lets dig into the Node-RED way of MQTT communications
MQTT Node with reTerminal DM
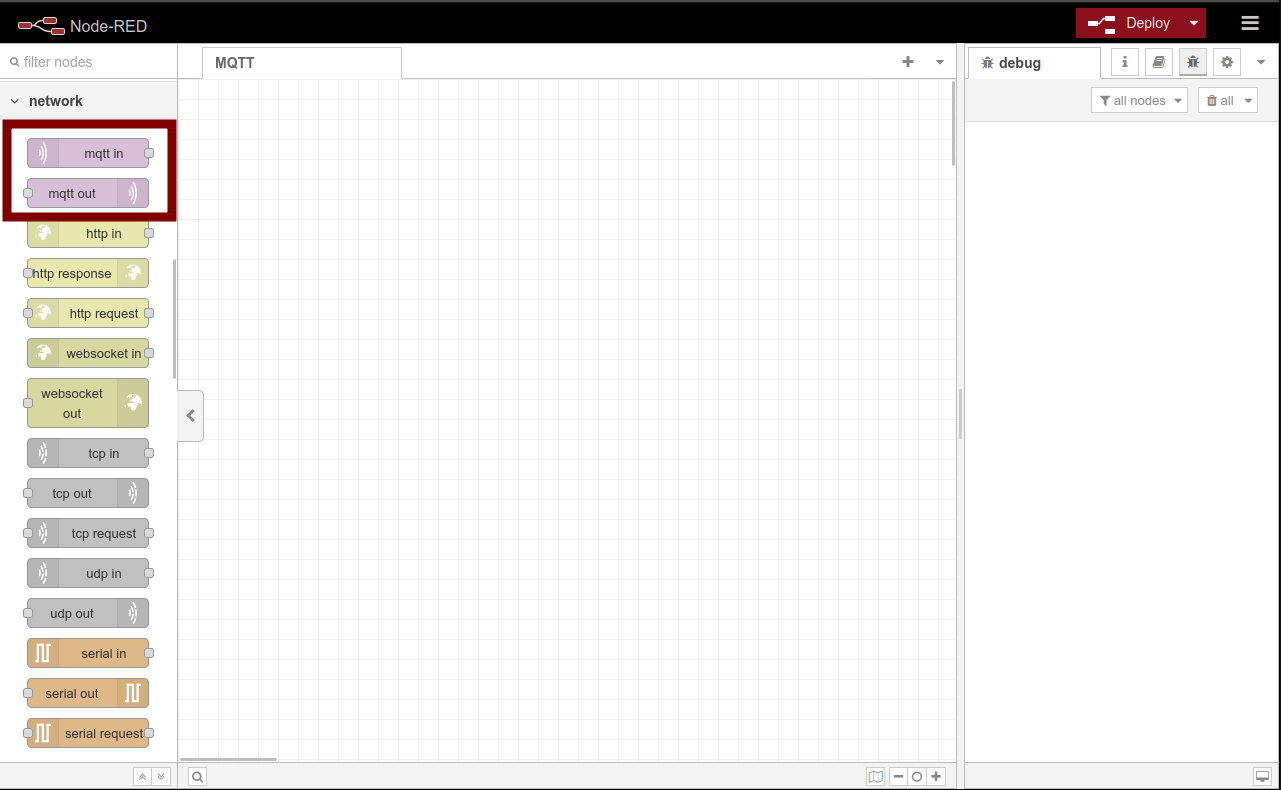
In Node-RED, there are MQTT in and MQTT out which represent Subscribe and Publish respectively.
Edit the Flows
The following steps just for tutorial purpose, where we will use mqtt-in to subscribe the message from the mqtt out published message to the same topic.
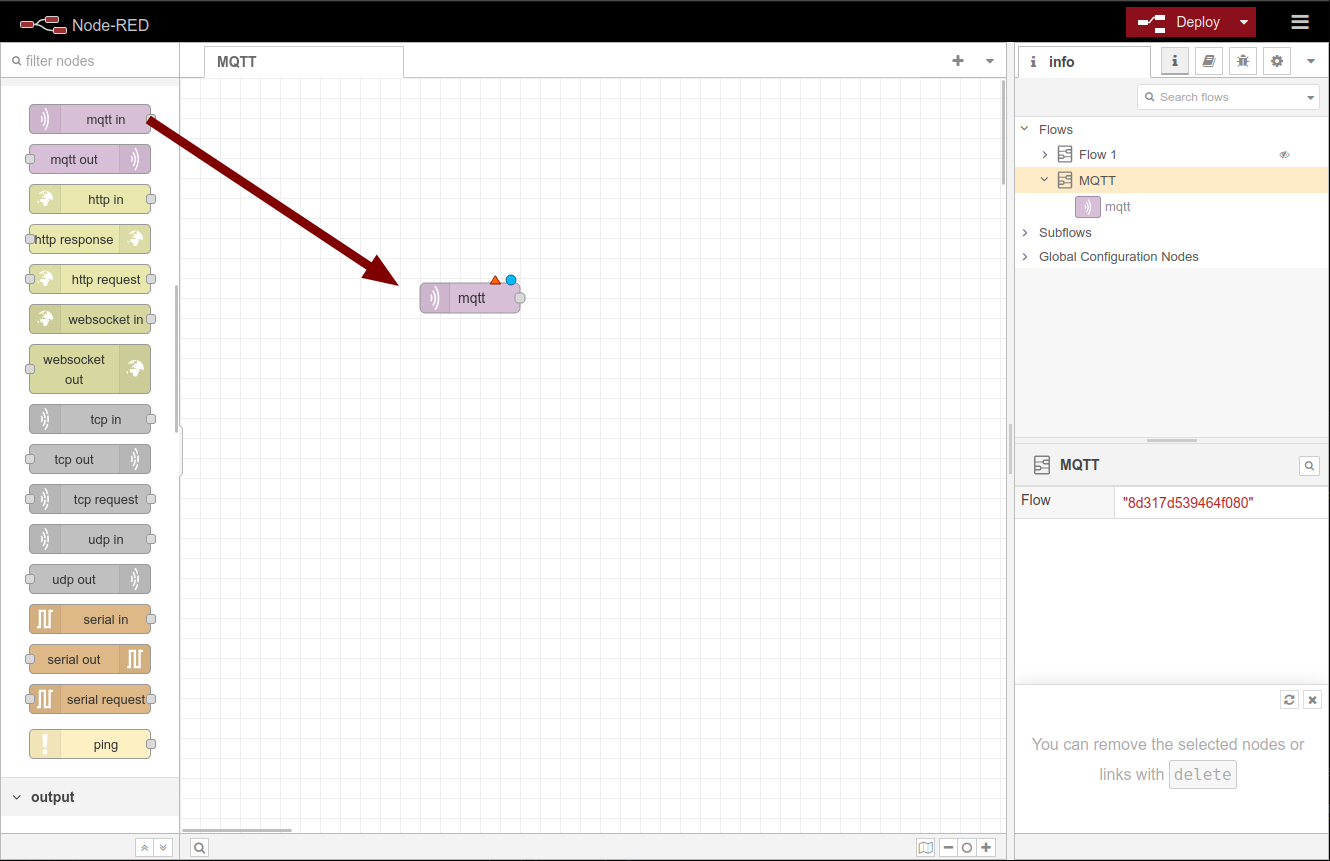
STEP 1: Drag mqtt in to the Flow Editor panel
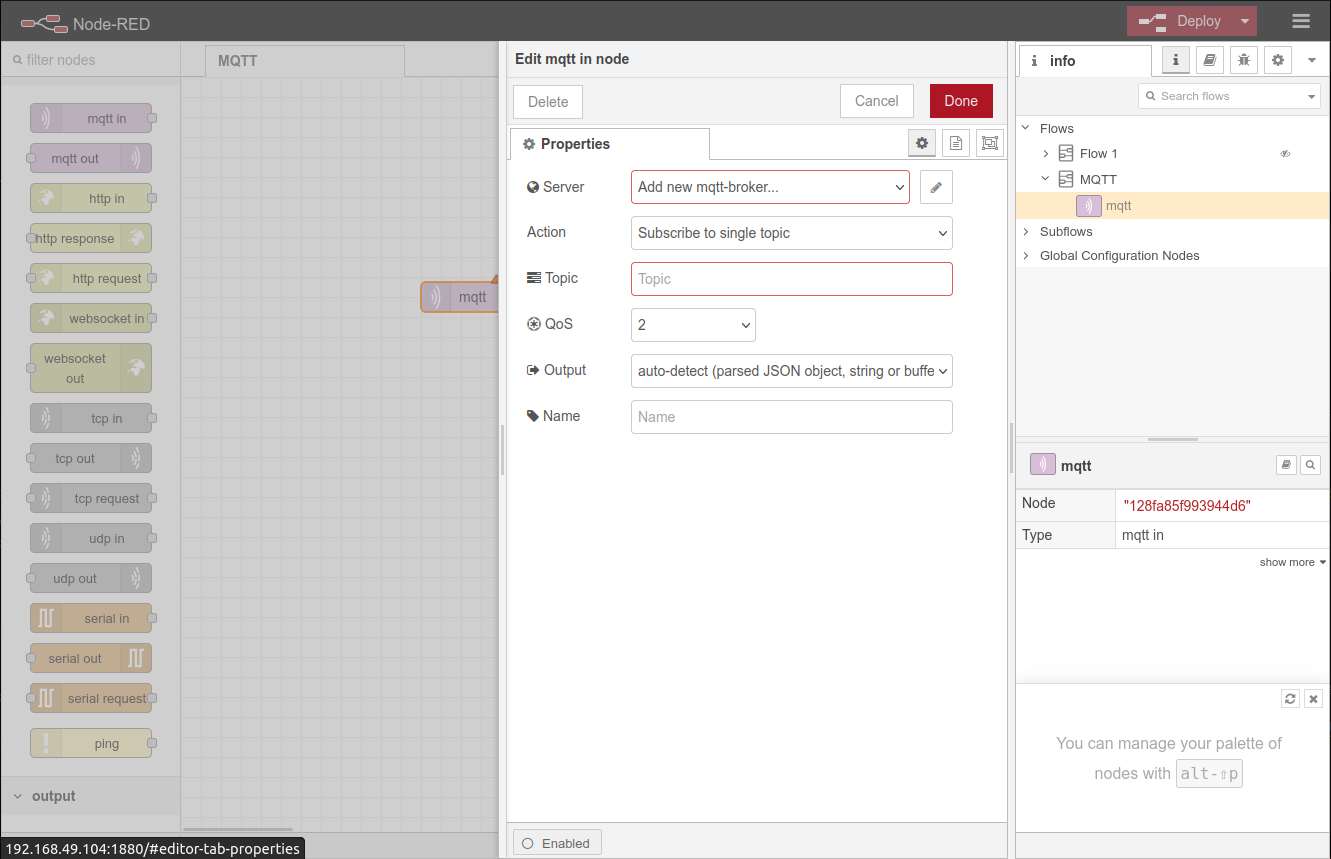
STEP 2: Config the Modbus Server and mqtt in node
STEP 2-1: Double click on the mqtt in to open the Node editor panel
STEP 2-2: Click on the pencil icon for the server configuration option
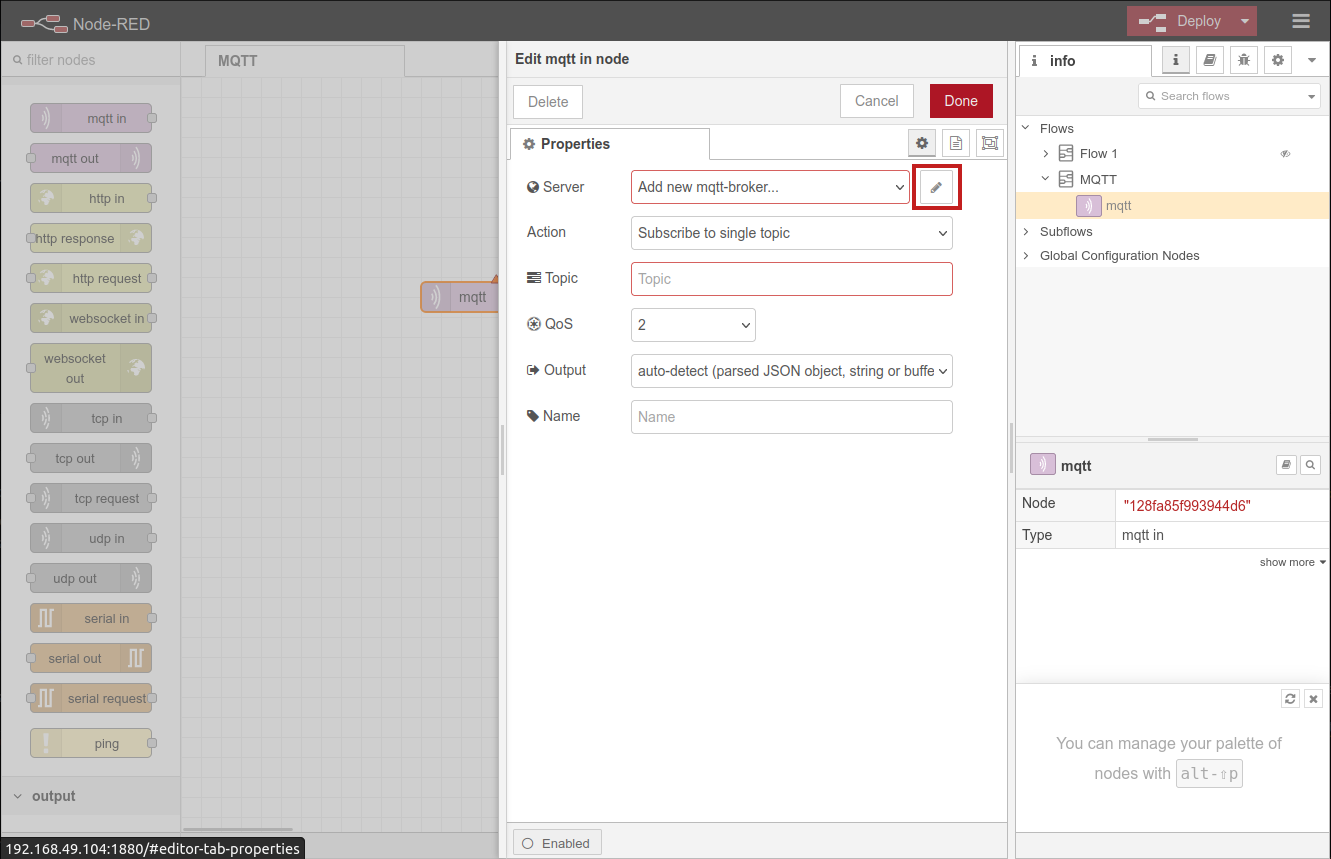
Once you clicked the pencil icon you should see the Add new mqtt-broker config node configuration panel
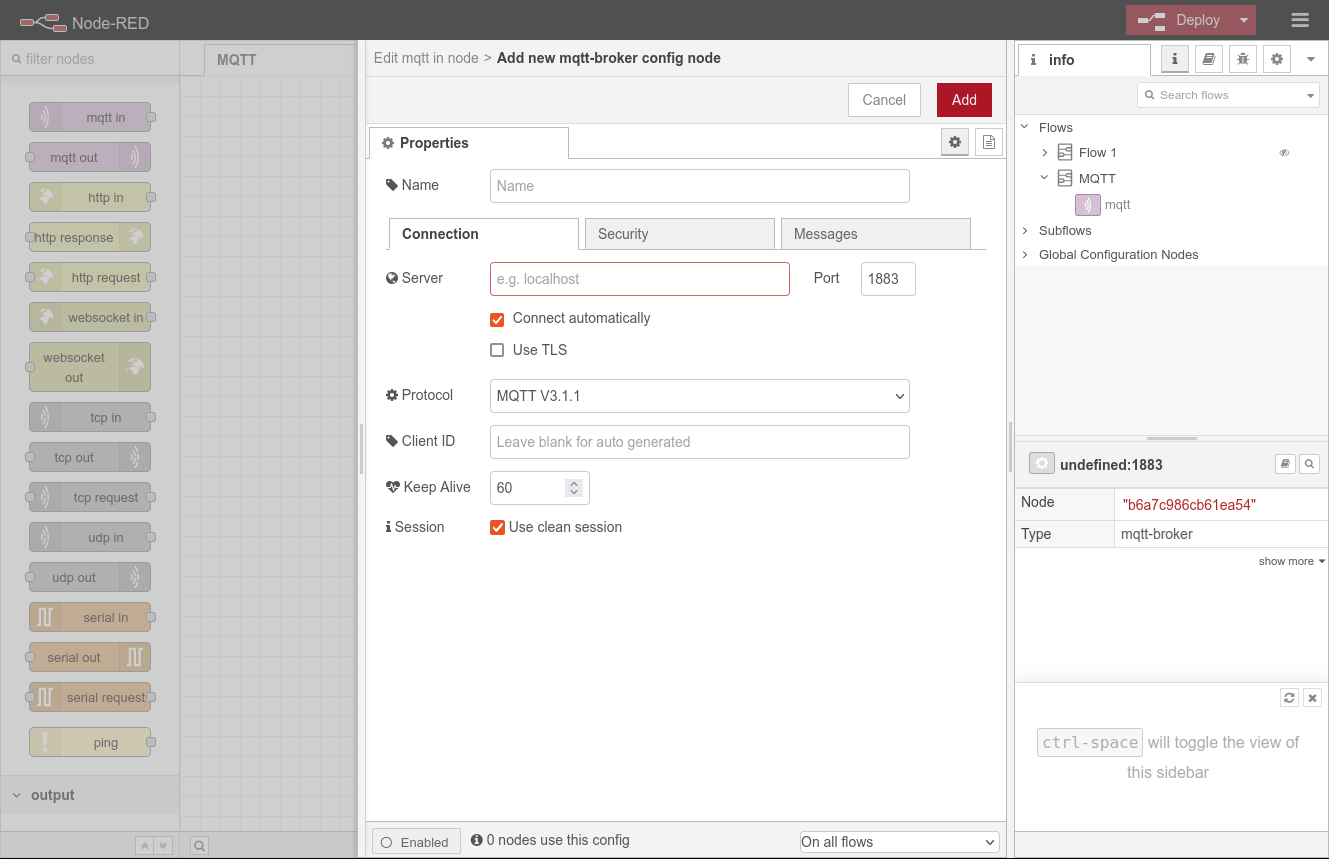
STEP 2-3: At the Connection tab please config the following field accordingly
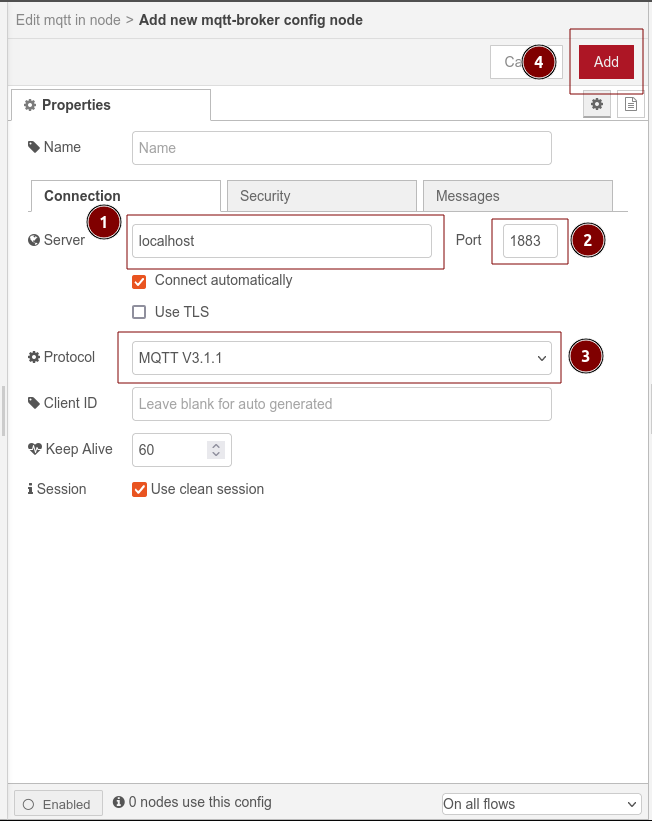
For now you can leave the Security and Messages tab untouched.
STEP 2-4: Setup the Topic to subscribe here we use test-mqtt, and leave everything else as default, then click Done button.

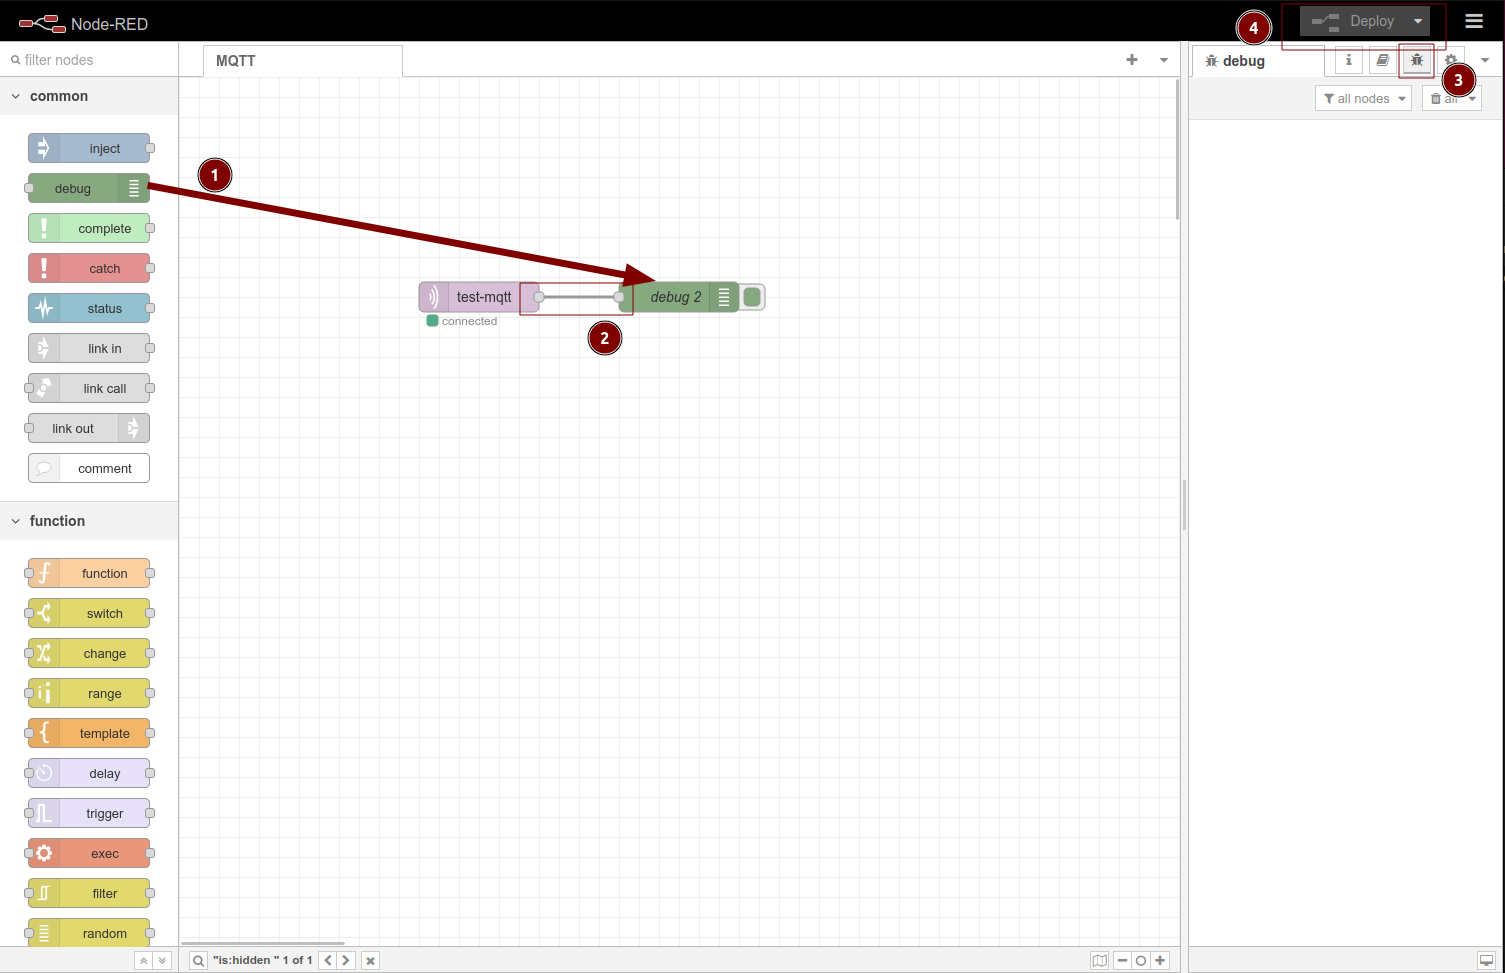
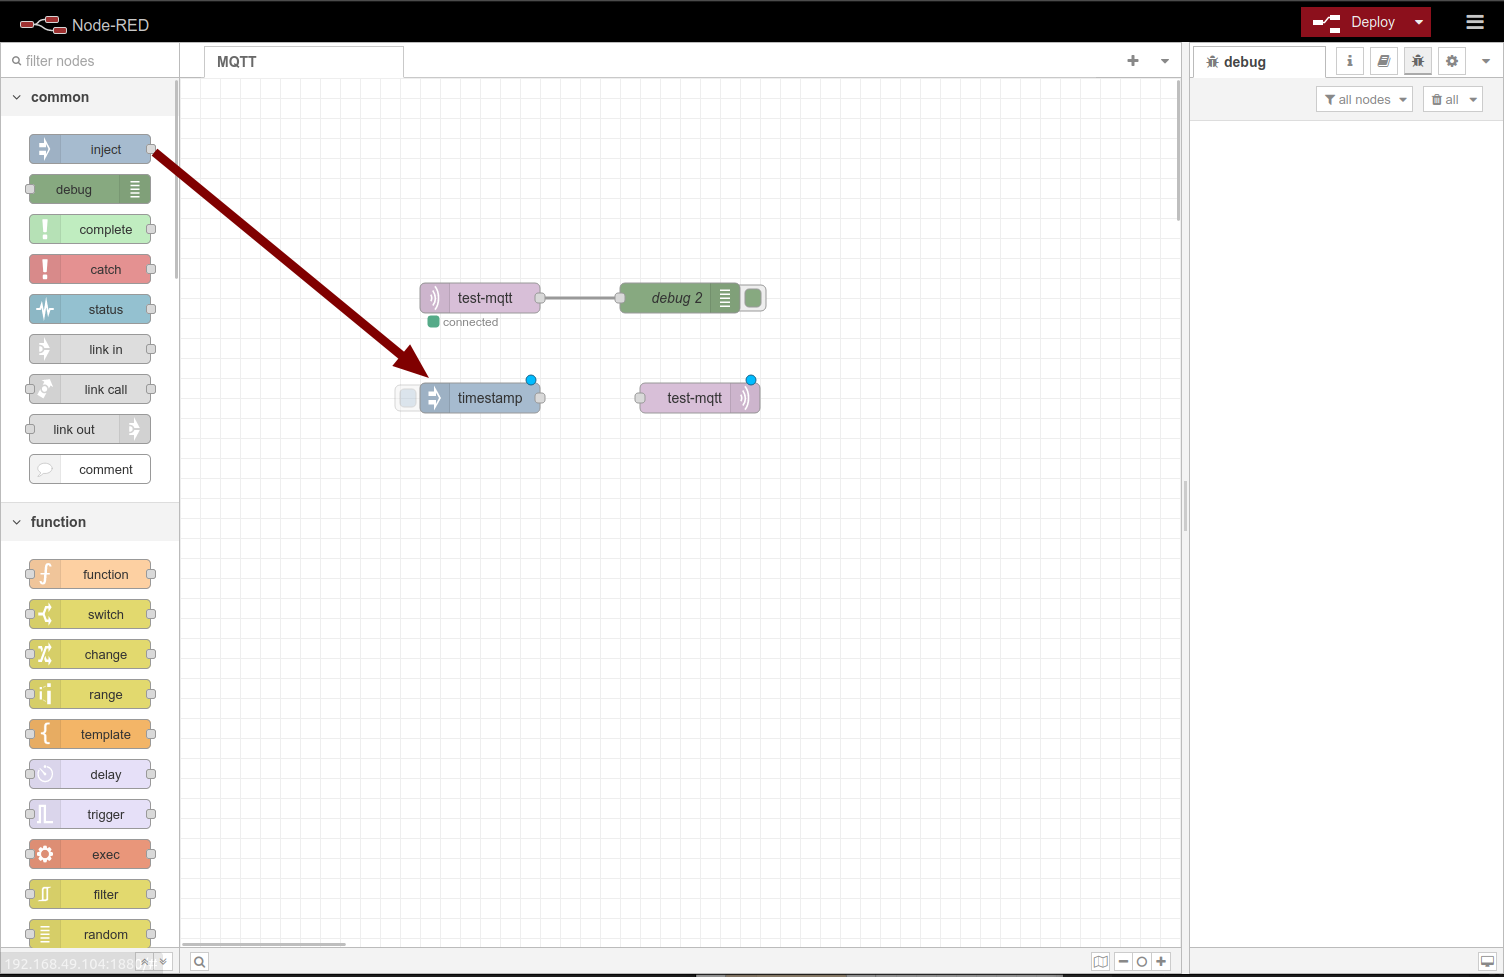
STEP 2-5: the following steps will introduce the debug node, which in this case it is used to view and debug the subscribed topic output from mqtt in, as shown in the image below
STEP 2-5-1: So please drag a debug node to the Flow Editor panel
STEP 2-5-2: Connect to the debug node with mqtt in node
STEP 2-5-3: Click the little bug button at the Option and Config panel to open the debug console at the Option and Config panel
STEP 2-5-4: Click the Deploy button to deploy the flow
Since we have not setup any mqtt topic publisher yet, so there will be no message displayed in the debug console
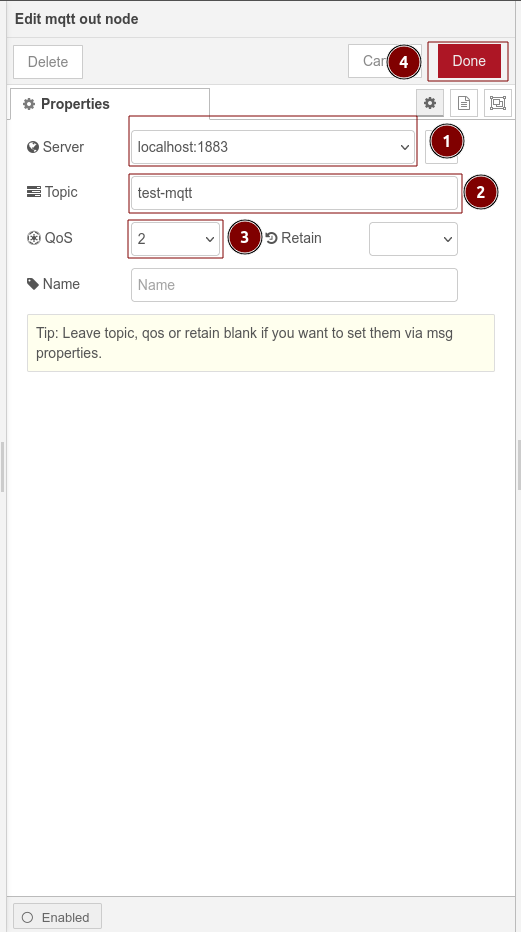
STEP 3: Setup the mqtt out node
STEP 3-1: Double click on the mqtt out node to open the Node editor panel
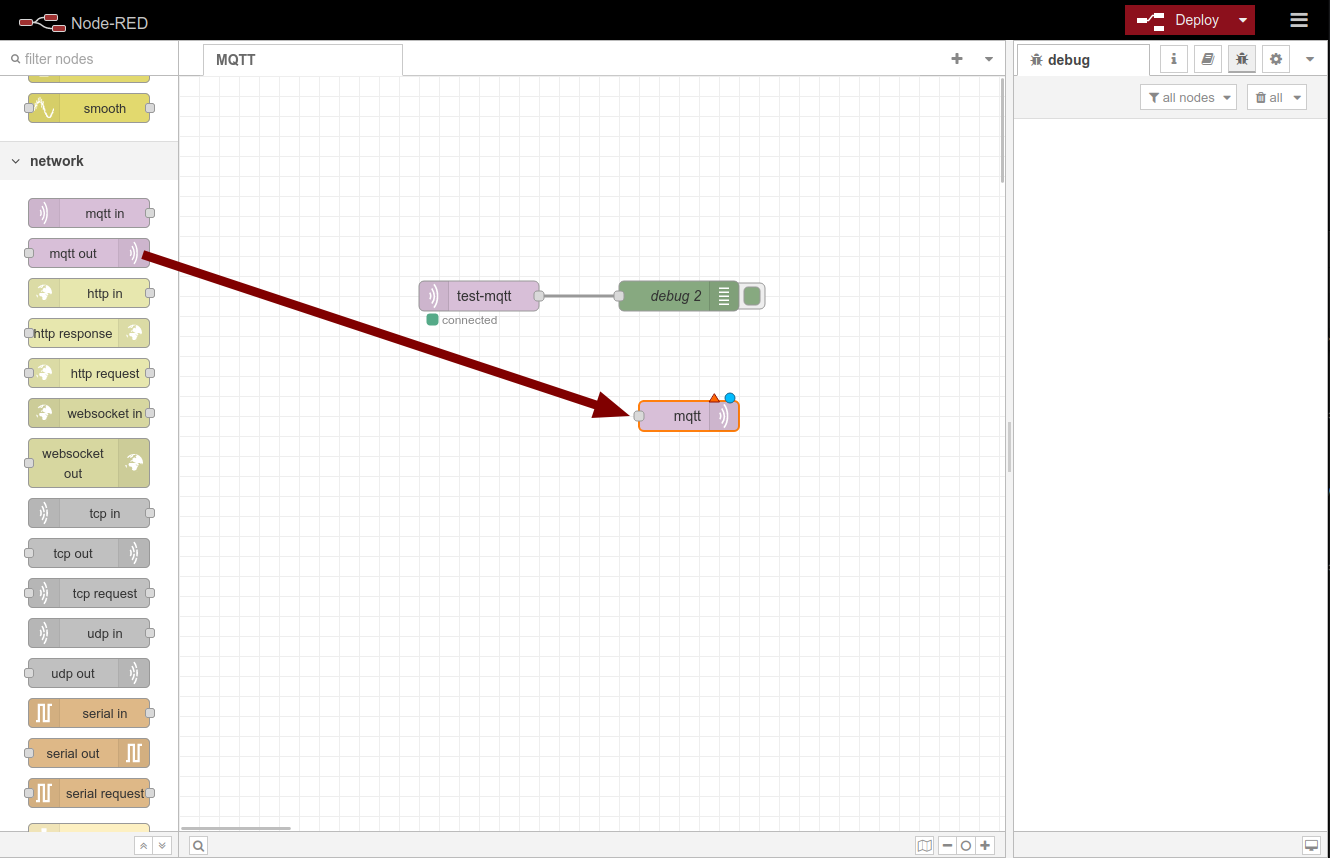
STEP 3-1: So please drag a mqtt out node to the Flow Editor panel as shown in the image below
STEP 3-1-1: You should select the same Server that we have setup in the STEP 2-3: which is localhost:1883
STEP 3-1-2: You must setup the same Topic name as the STEP 2-4: topic setting which is test-mqtt.
STEP 3-1-3: similarly the QoS should align as the mqtt in setting as 2
STEP 3-1-4: Click Done to complete the setup
STEP 4: Setup the inject node
STEP 4-1: Drag inject node to the Flow Editor panel
STEP 4-2: Double click on the inject node to open the Node editor panel, you should see the default setup of the inject node
STEP 4-2-1: click the x to at the msg.topic line to remove it
STEP 4-2-2: click the timestamp option to open a drop down list at the msg.payload line
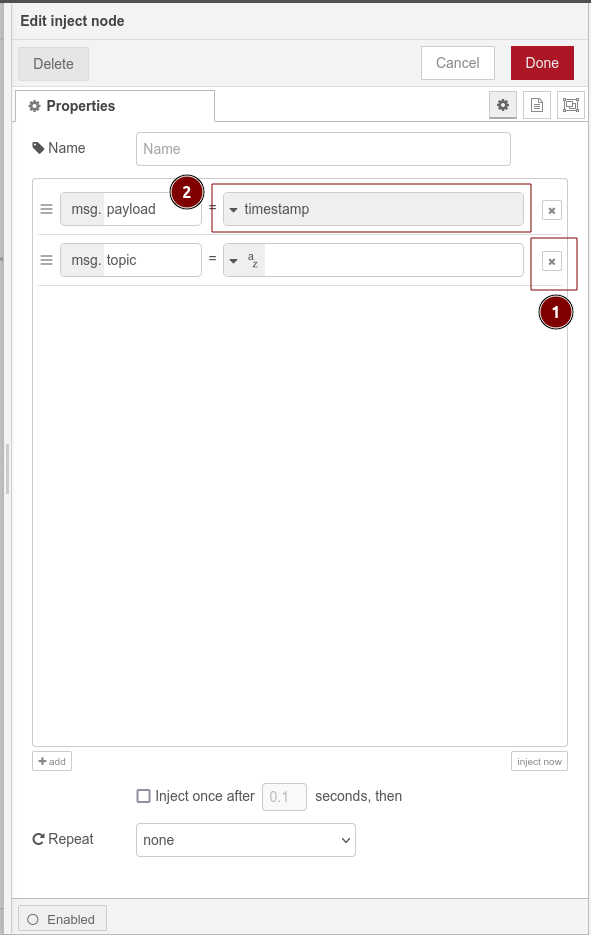
STEP 4-2-3: Select the string option at the drop down list

STEP 4-2-4: At the message box please enter this is the message as the message we are going to send to the test-mqtt topic, and then click Done
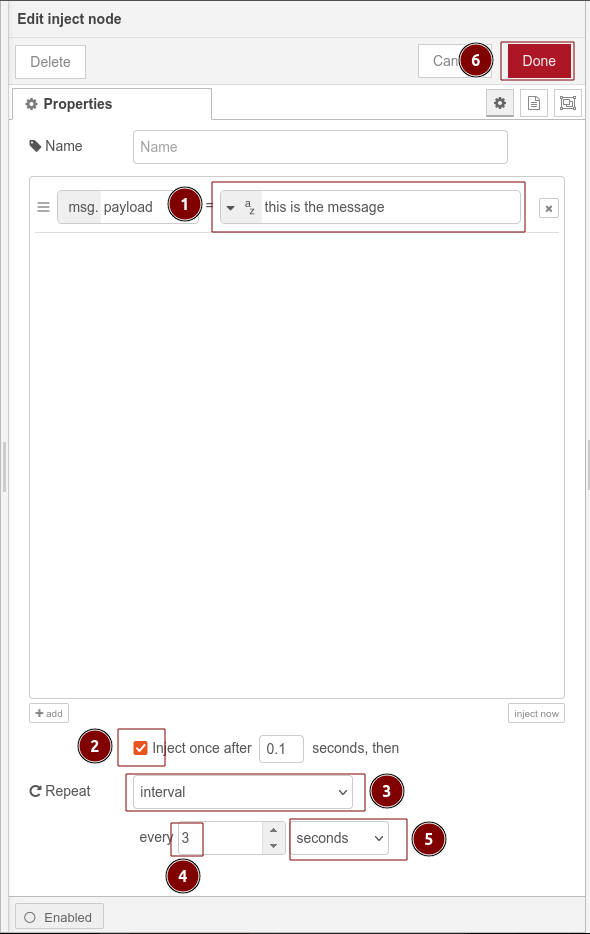
STEP 4-2-5: Connect to the inject node with mqtt out node and click Delpoy
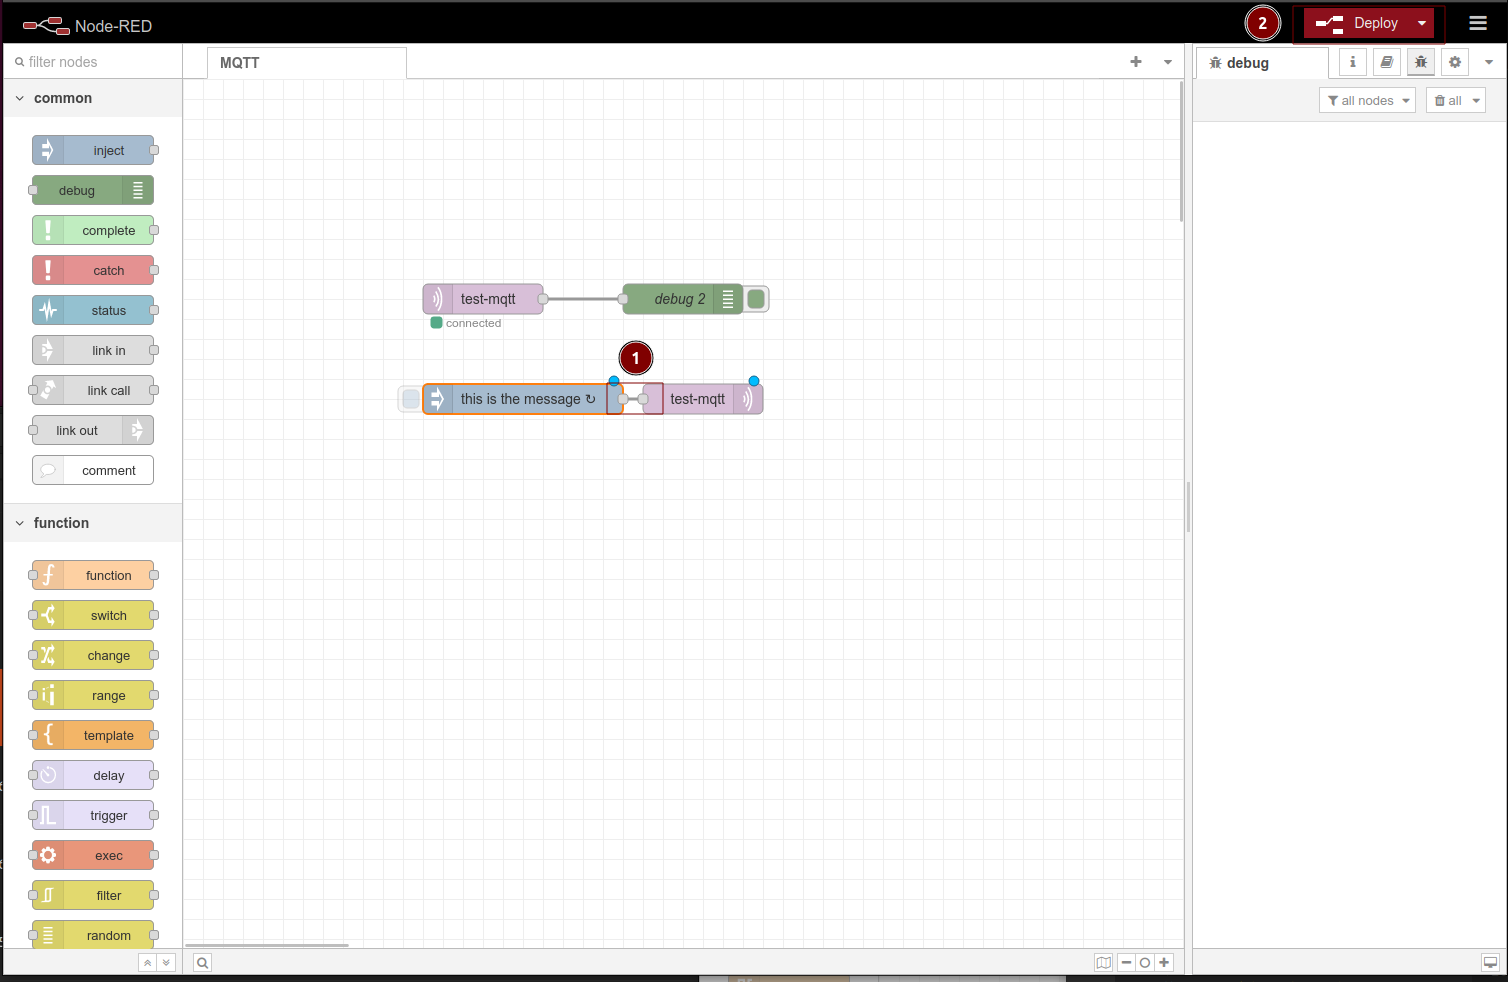
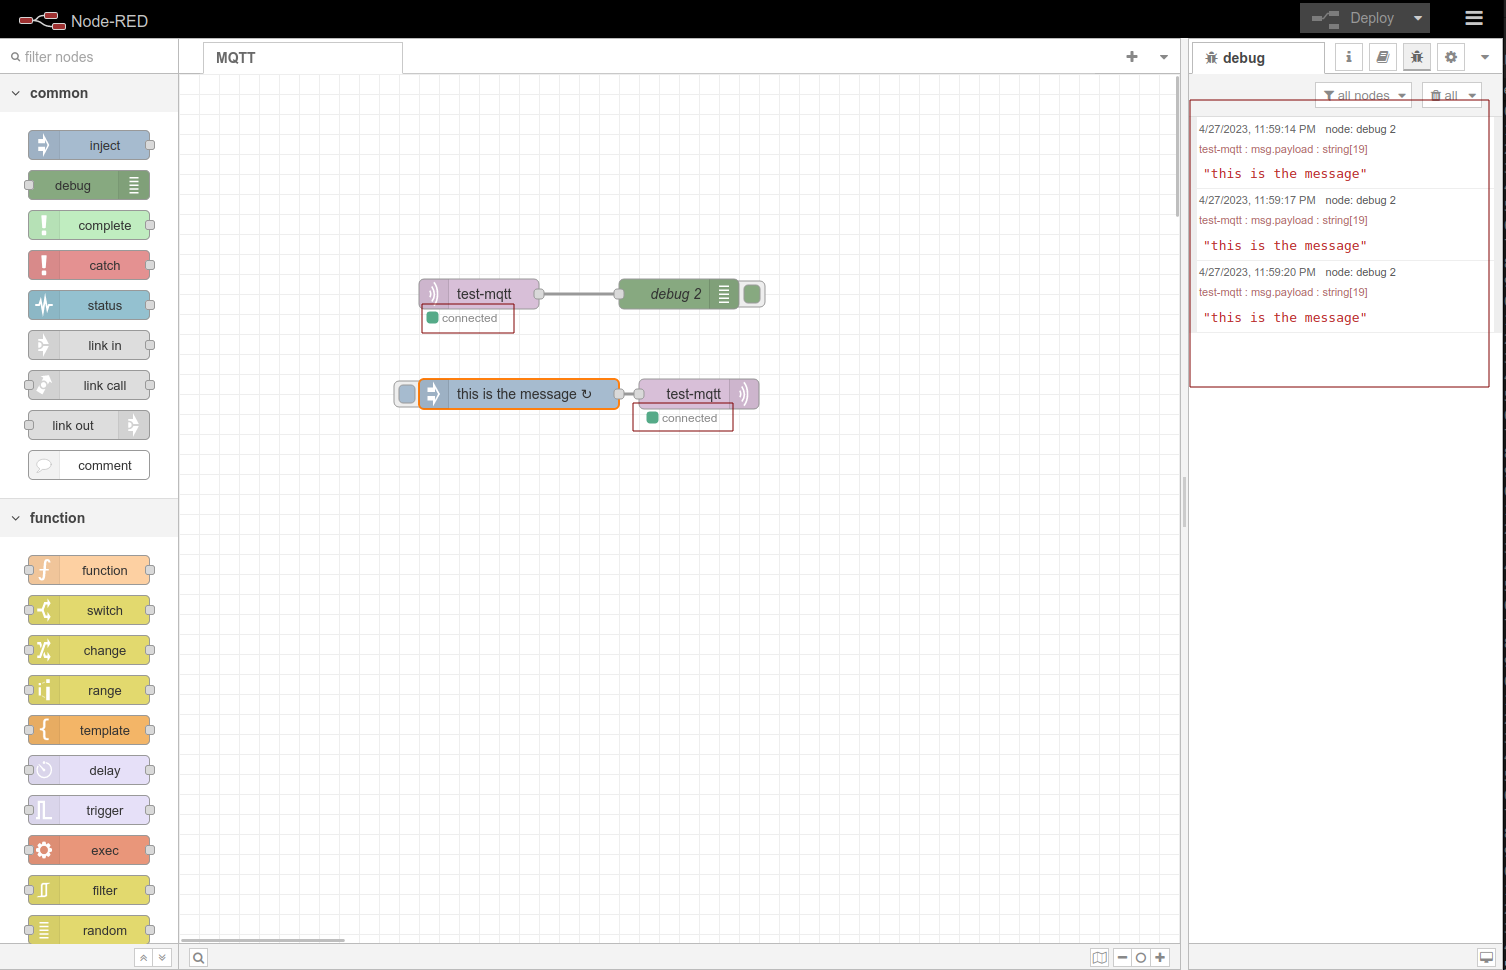
Final Result
Congratulations, you have successfully experienced and learned how to use MQTT protocol with reTerminal DM and node-RED now, your final results should be similar as the image shown below
You can copy the following JSON code to import the Nodes
[
    {
        "id": "8d317d539464f080",
        "type": "tab",
        "label": "MQTT",
        "disabled": false,
        "info": "",
        "env": []
    },
    {
        "id": "128fa85f993944d6",
        "type": "mqtt in",
        "z": "8d317d539464f080",
        "name": "",
        "topic": "test-mqtt",
        "qos": "2",
        "datatype": "auto-detect",
        "broker": "b6a7c986cb61ea54",
        "nl": false,
        "rap": true,
        "rh": 0,
        "inputs": 0,
        "x": 300,
        "y": 220,
        "wires": [
            [
                "a022e0bf3404fdd9"
            ]
        ]
    },
    {
        "id": "a022e0bf3404fdd9",
        "type": "debug",
        "z": "8d317d539464f080",
        "name": "debug 2",
        "active": true,
        "tosidebar": true,
        "console": false,
        "tostatus": false,
        "complete": "false",
        "statusVal": "",
        "statusType": "auto",
        "x": 500,
        "y": 220,
        "wires": []
    },
    {
        "id": "9d0098383c96ee8b",
        "type": "mqtt out",
        "z": "8d317d539464f080",
        "name": "",
        "topic": "test-mqtt",
        "qos": "2",
        "retain": "",
        "respTopic": "",
        "contentType": "",
        "userProps": "",
        "correl": "",
        "expiry": "",
        "broker": "b6a7c986cb61ea54",
        "x": 520,
        "y": 320,
        "wires": []
    },
    {
        "id": "3c967b7d5cc112fc",
        "type": "inject",
        "z": "8d317d539464f080",
        "name": "",
        "props": [
            {
                "p": "payload"
            }
        ],
        "repeat": "3",
        "crontab": "",
        "once": true,
        "onceDelay": 0.1,
        "topic": "",
        "payload": "this is the message",
        "payloadType": "str",
        "x": 340,
        "y": 320,
        "wires": [
            [
                "9d0098383c96ee8b"
            ]
        ]
    },
    {
        "id": "b6a7c986cb61ea54",
        "type": "mqtt-broker",
        "name": "",
        "broker": "localhost",
        "port": "1883",
        "clientid": "",
        "autoConnect": true,
        "usetls": false,
        "protocolVersion": "4",
        "keepalive": "60",
        "cleansession": true,
        "birthTopic": "",
        "birthQos": "0",
        "birthPayload": "",
        "birthMsg": {},
        "closeTopic": "",
        "closeQos": "0",
        "closePayload": "",
        "closeMsg": {},
        "willTopic": "",
        "willQos": "0",
        "willPayload": "",
        "willMsg": {},
        "userProps": "",
        "sessionExpiry": ""
    }
]
Explore more nodes on reTerminal DM with node-RED
Tech Support & Product Discussion
Thank you for choosing our products! We are here to provide you with different support to ensure that your experience with our products is as smooth as possible. We offer several communication channels to cater to different preferences and needs.