reTerminal DM RS485 Port with Node-RED
Brief info about RS485, Modbus, Modbus RTU and Modbus Node-RED Node

RS485
RS485 are serial communication protocols used to transmit data between devices. RS485 is a standard for serial communication transmission of data, which is commonly used in industrial applications. It uses a differential signal, meaning that there are two data lines (A and B) and a ground line (GND) for communication. This differential signal provides better noise immunity and allows for longer cable lengths of up to 4,000 feet. The maximum data rate for RS485 is typically higher than RS232, up to 10 Mbps. RS485 is designed for multi-point communication. This means that RS485 can transmit data between multiple devices on the same bus. In summary, RS485 is commonly used for longer-distance communication between multiple devices, such as in industrial control systems.
Modbus RTU
Modbus RTU is a popular industrial communication protocol used for data exchange between devices in a supervisory control and data acquisition (SCADA) system. It is a serial communication protocol that operates on top of RS485 or RS232 bus standards. Modbus RTU uses a master-slave architecture, where a master device initiates communication with one or more slave devices. The master sends a request message to a slave device, which then responds with a message containing the requested data. Modbus RTU messages consist of a header, data, and an error-checking field. The header contains information about the message, such as the slave address and function code. The data field contains the actual data being transmitted. The error-checking field is used to ensure the integrity of the message. Modbus RTU supports a variety of data types, including binary, integer, floating point, and string. It also supports a range of function codes that allow for different types of data access, such as read holding registers, write single coil, and read input registers. One of the advantages of Modbus RTU is its simplicity and ease of implementation. It is widely supported by a variety of devices and software, making it a popular choice for industrial automation and control systems. It is also well-suited for applications that require real-time data exchange and low-latency communication.
Modbus RTU is a popular communication protocol used in a variety of industrial applications, such as:
-
Building automation and control systems: Modbus RTU is commonly used for monitoring and controlling lighting, HVAC, and other building systems.
-
Energy management systems: Modbus RTU can be used to monitor and control energy consumption in commercial and industrial buildings.
-
Manufacturing and process control: Modbus RTU is often used to monitor and control manufacturing processes, such as assembly lines, conveyor systems, and packaging machines.
-
Water and wastewater treatment: Modbus RTU is used for monitoring and controlling the operation of pumps, valves, and other equipment in water and wastewater treatment facilities.
-
Oil and gas production: Modbus RTU is used in oil and gas production facilities to monitor and control pumps, compressors, and other equipment.
-
Renewable energy systems: Modbus RTU can be used to monitor and control solar panels, wind turbines, and other renewable energy systems.
-
Transportation systems: Modbus RTU is used for monitoring and controlling traffic signals, lighting, and other equipment in transportation systems.
In general, any application that requires real-time data exchange and low-latency communication in an industrial environment can benefit from the use of Modbus RTU.
Modbus node
Node-RED has a built-in Modbus node, which allows users to easily integrate Modbus devices into their Node-RED workflows. The Modbus node supports both Modbus TCP and Modbus RTU protocols, and can be used to read and write data from Modbus devices.
To use the Modbus node in Node-RED, you can simply drag and drop it onto the canvas and configure it with the appropriate Modbus settings, such as the device address, function code, and data type. Once configured, the Modbus node can be connected to other nodes in the workflow to process and display the data.
Node-RED also has a range of other nodes and plugins that can be used to extend its functionality and integrate with other systems and devices. For example, there are nodes for MQTT, HTTP, and other communication protocols, as well as nodes for data processing, visualization, and storage.
Overall, Node-RED provides a powerful and flexible platform for building IoT and industrial automation applications, and its built-in Modbus node makes it easy to integrate Modbus devices into these workflows.
Getting start with Modbus Node on reTerminal DM
You can find more information in the Modbus Node-RED page.
If you are using Senscraft Edge OS you can skip the modbus node installation steps and go to the how to use Modbus Node with reTerminal DM
Install Modbus Node
In this section we are going to install the node-red-contrib-modbus node, so please revise on how to install nodes.
Option 1: Command line
First of all please go ahead and refreshing your knowledge with accessing reTerminal DM via SSH, please check the steps here
Once you have access the reTerminal DM with SSH you can proceed to the steps below:
STEP 1: Please go to Node-RED folder

cd .node-red/
STEP 2: Install Modbus Node
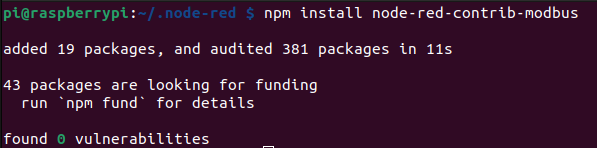
npm install node-red-contrib-modbus
STEP 3: Once the node gets install, Please restart the Node-RED service with:

node-red-restart
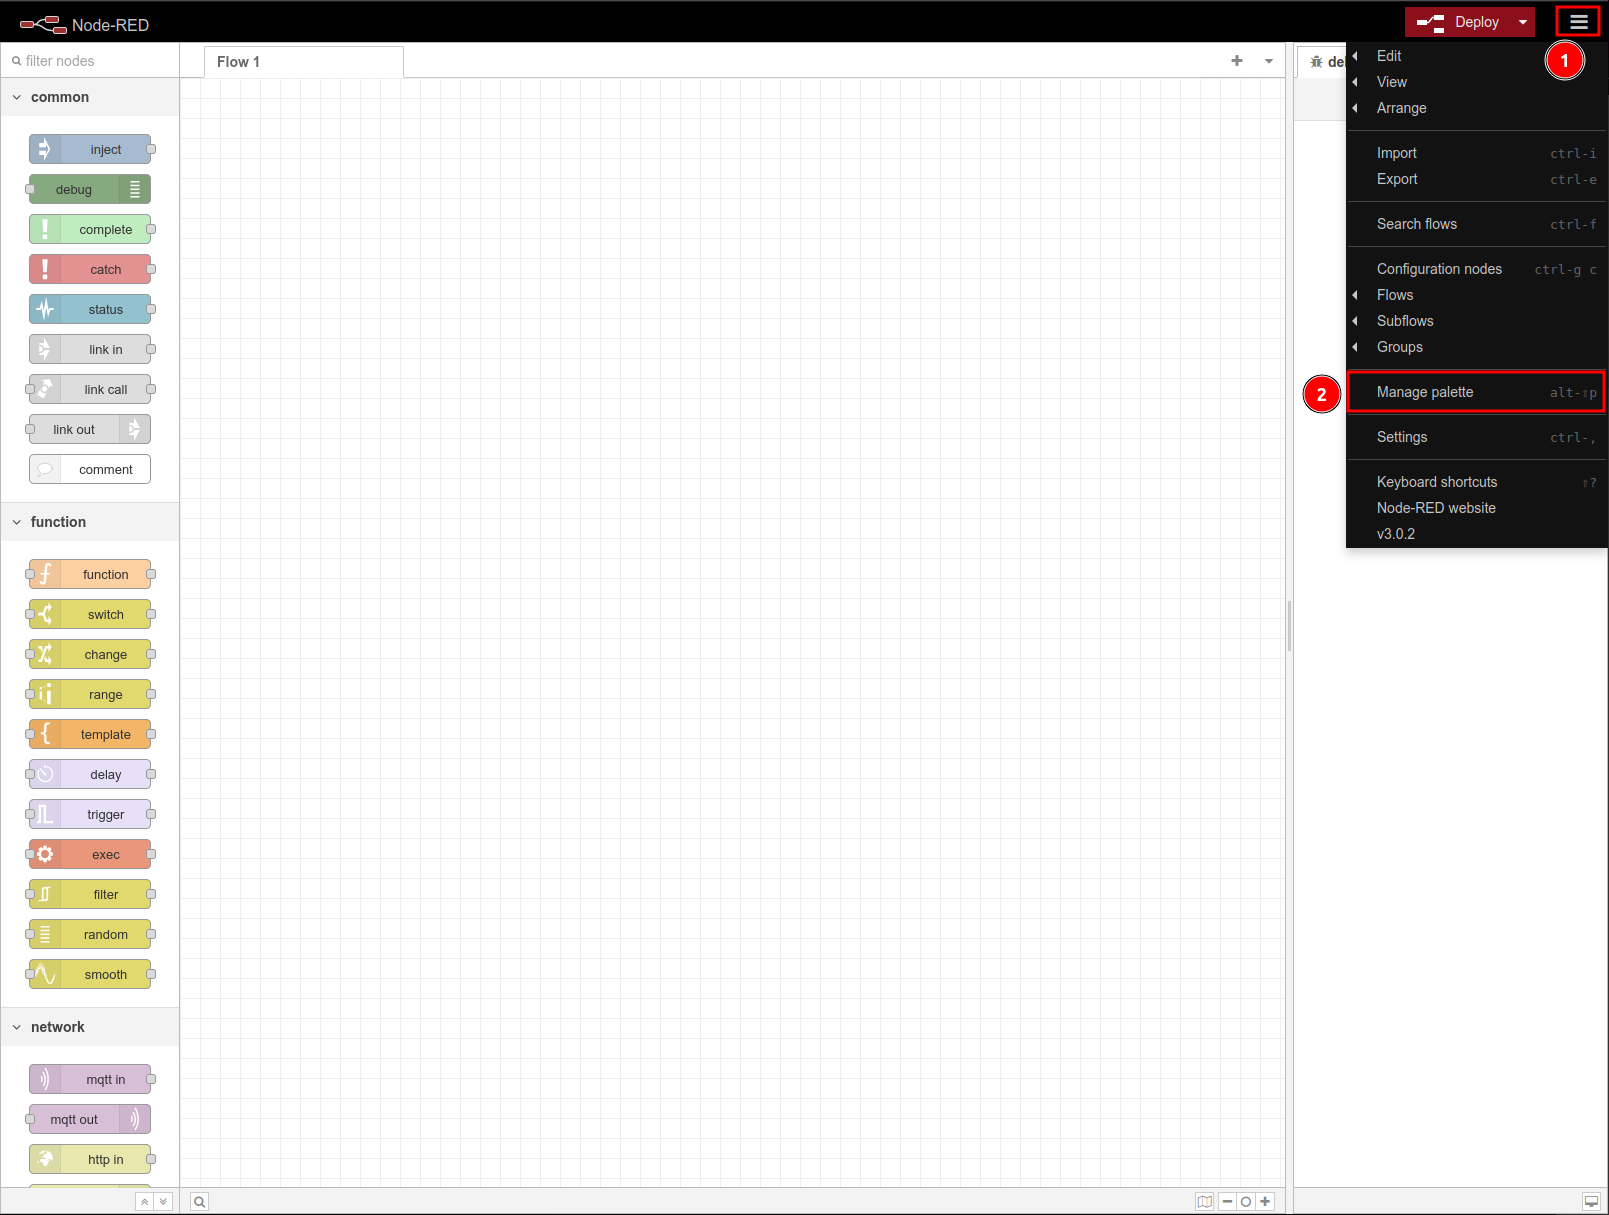
Option 2: Node-RED editor
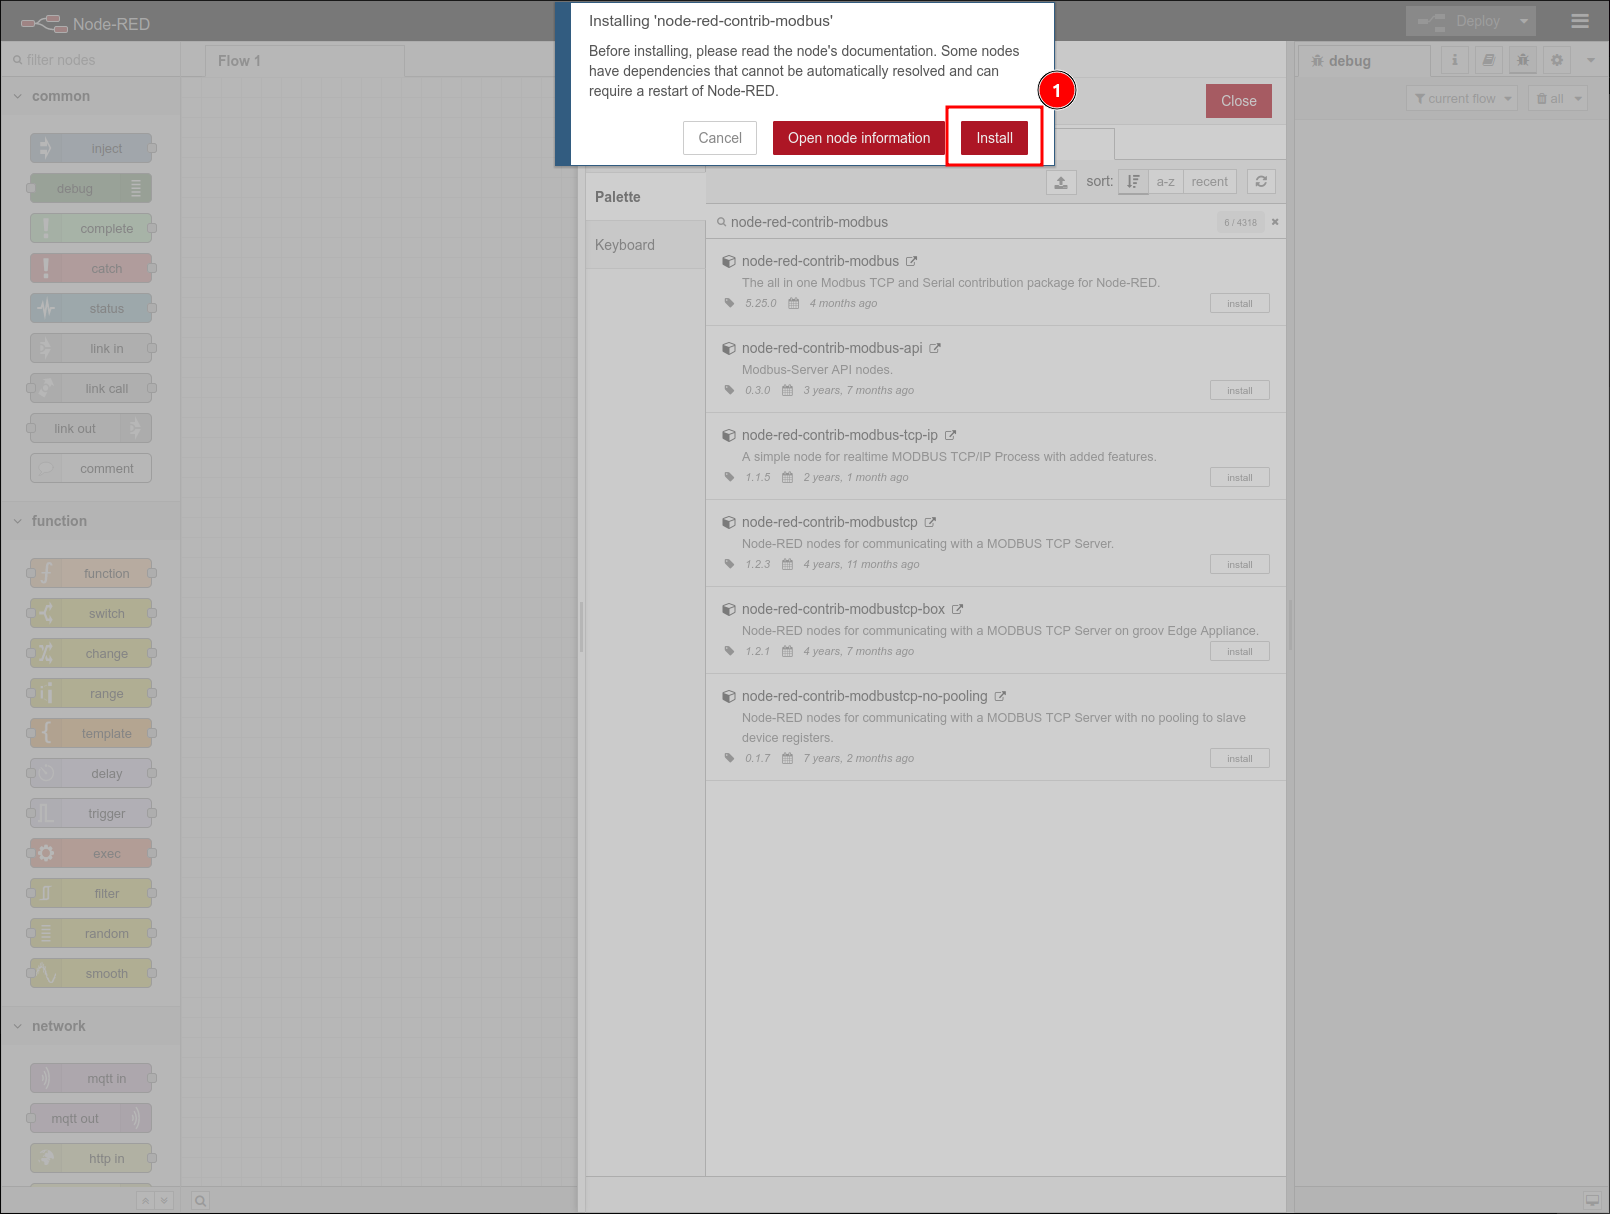
STEP 1: Click the Settings button with "three dash" icon located at the right corner and then select the Manage palette
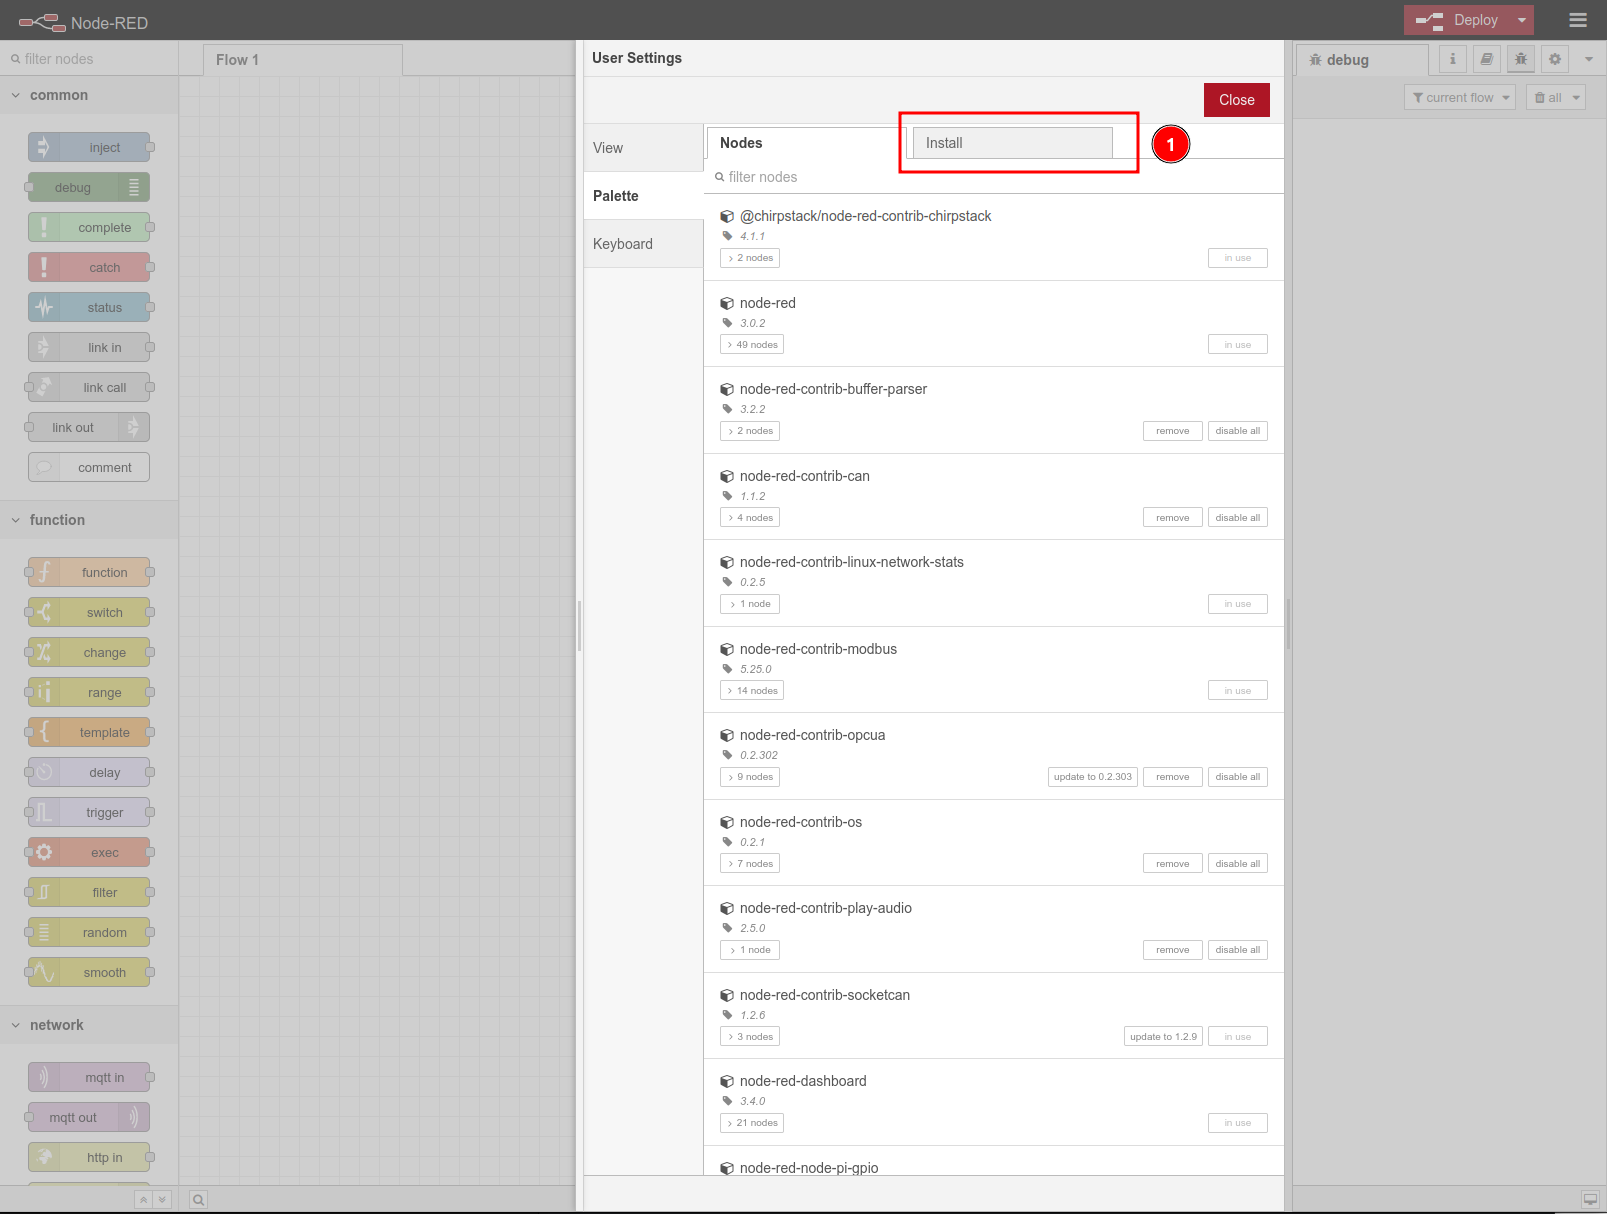
STEP 2: At the palette tab click Install tab
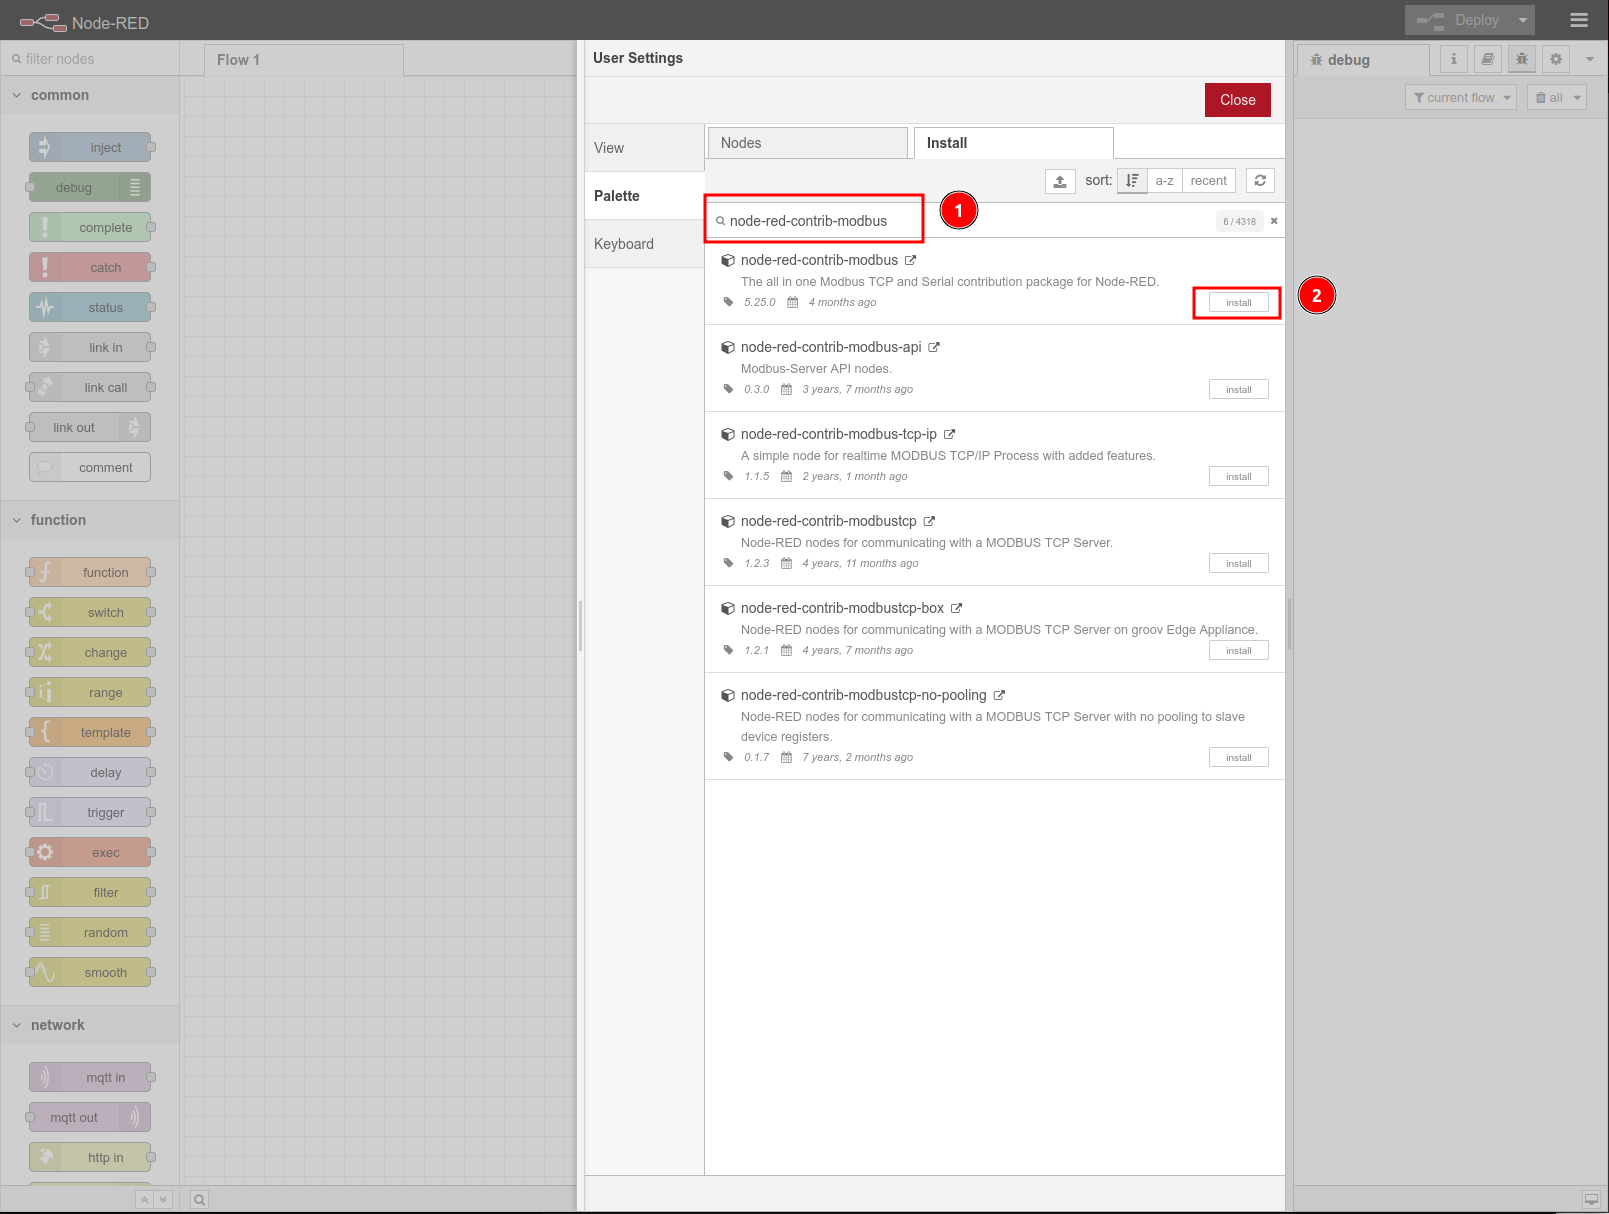
STEP 3: Search for the node in the node search bar and Click install button to install
STEP 4: click on 'Install` button from the dropdown warning window to confirm install
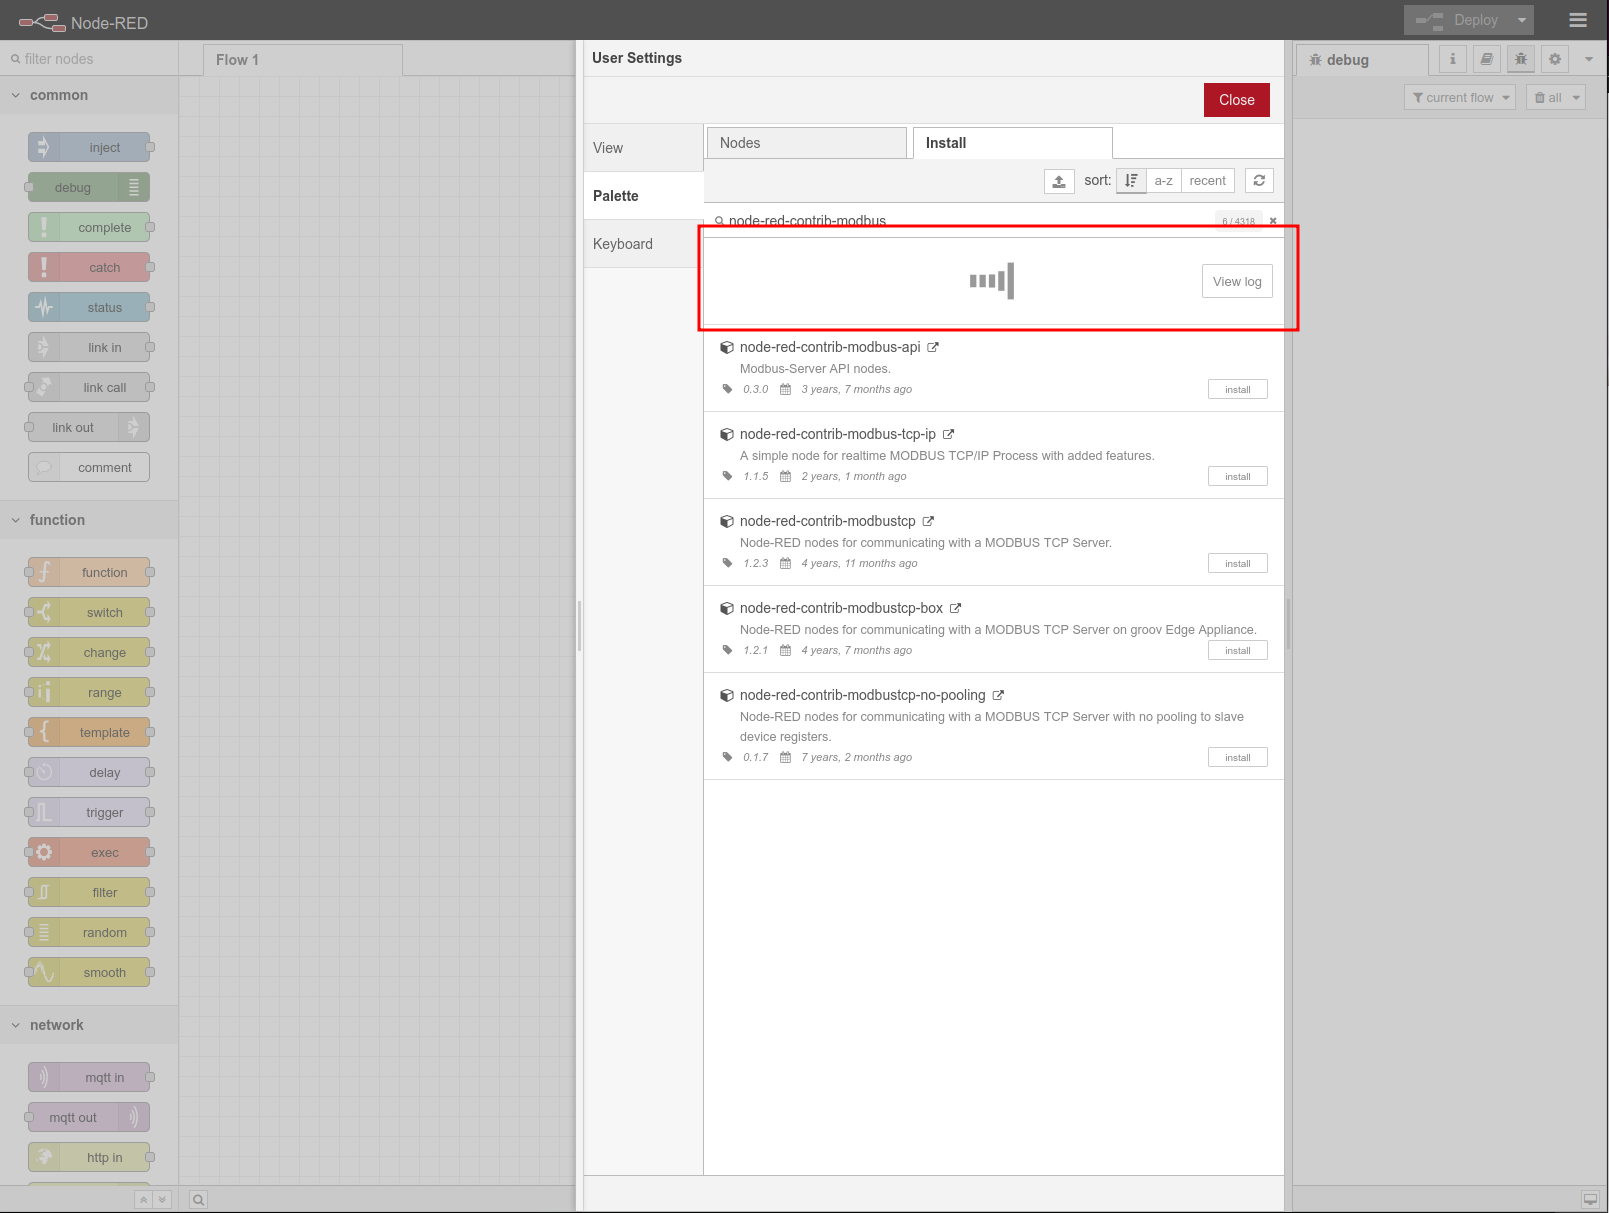
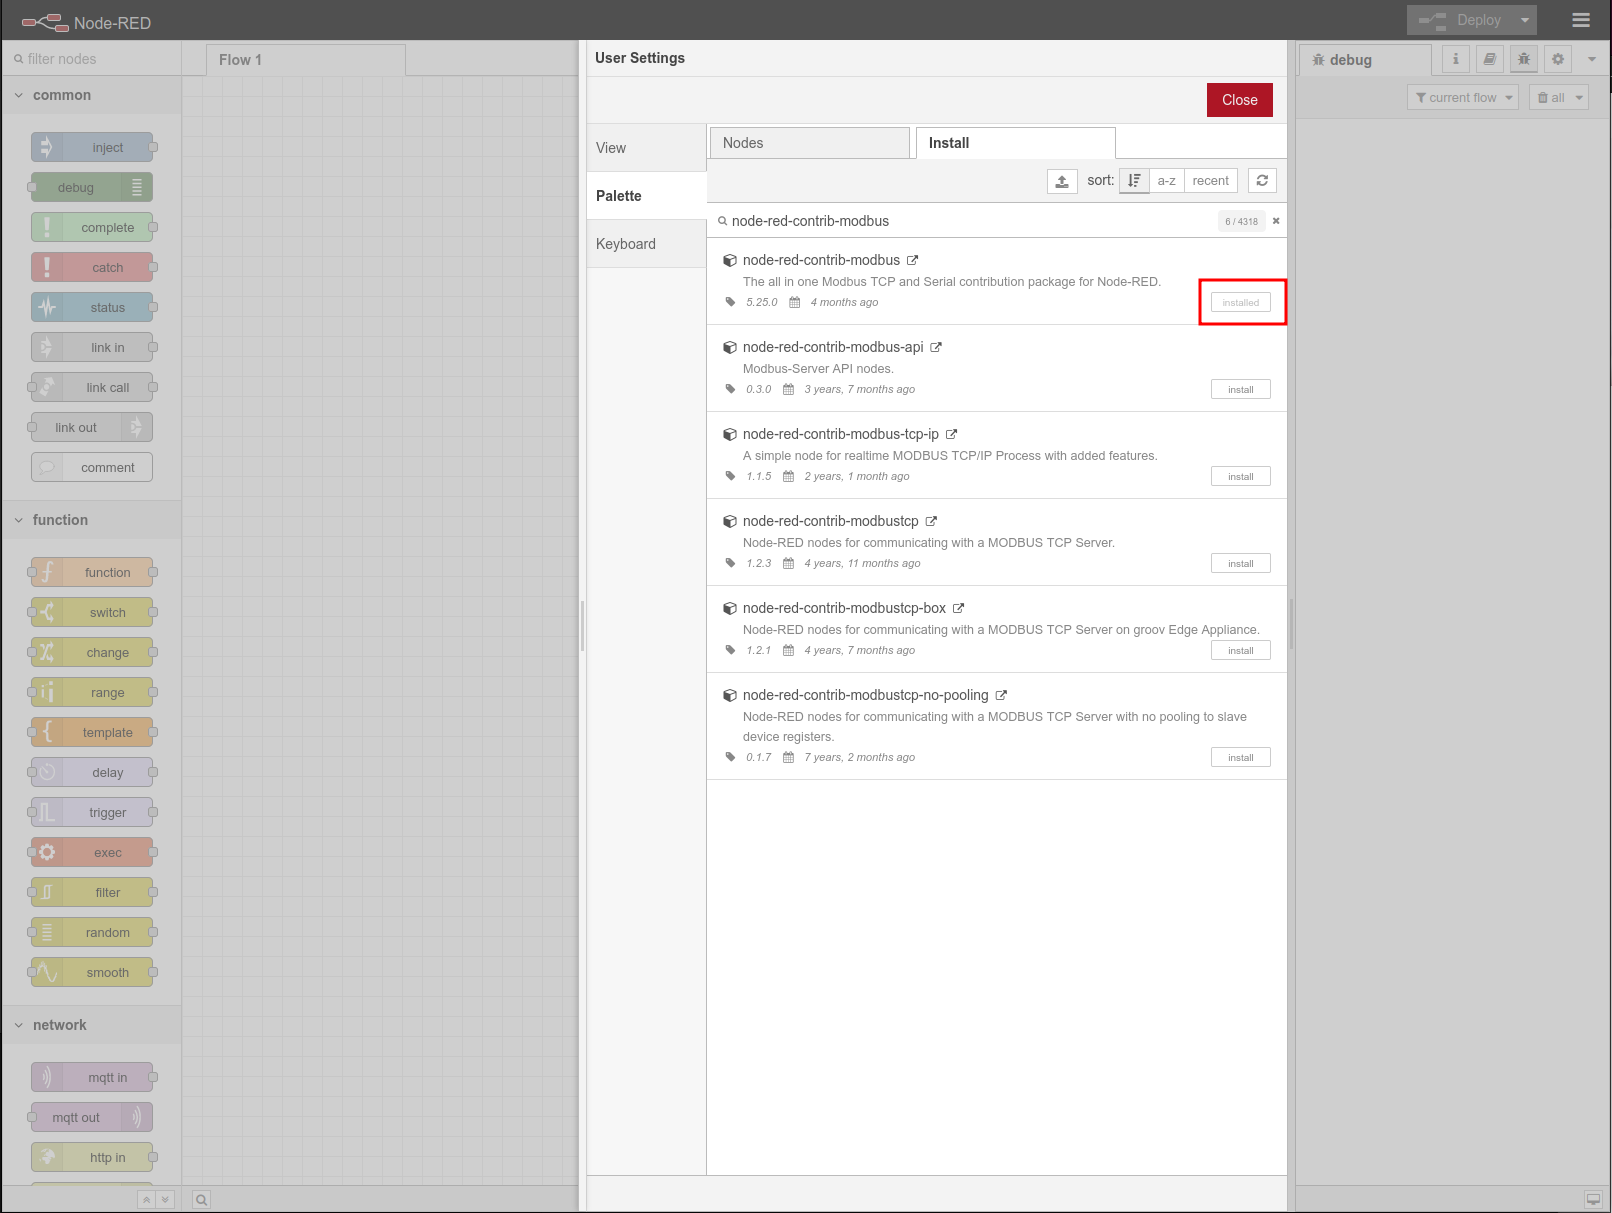
STEP 5: Wait for the installation to complete and you should see the install button changed to installed
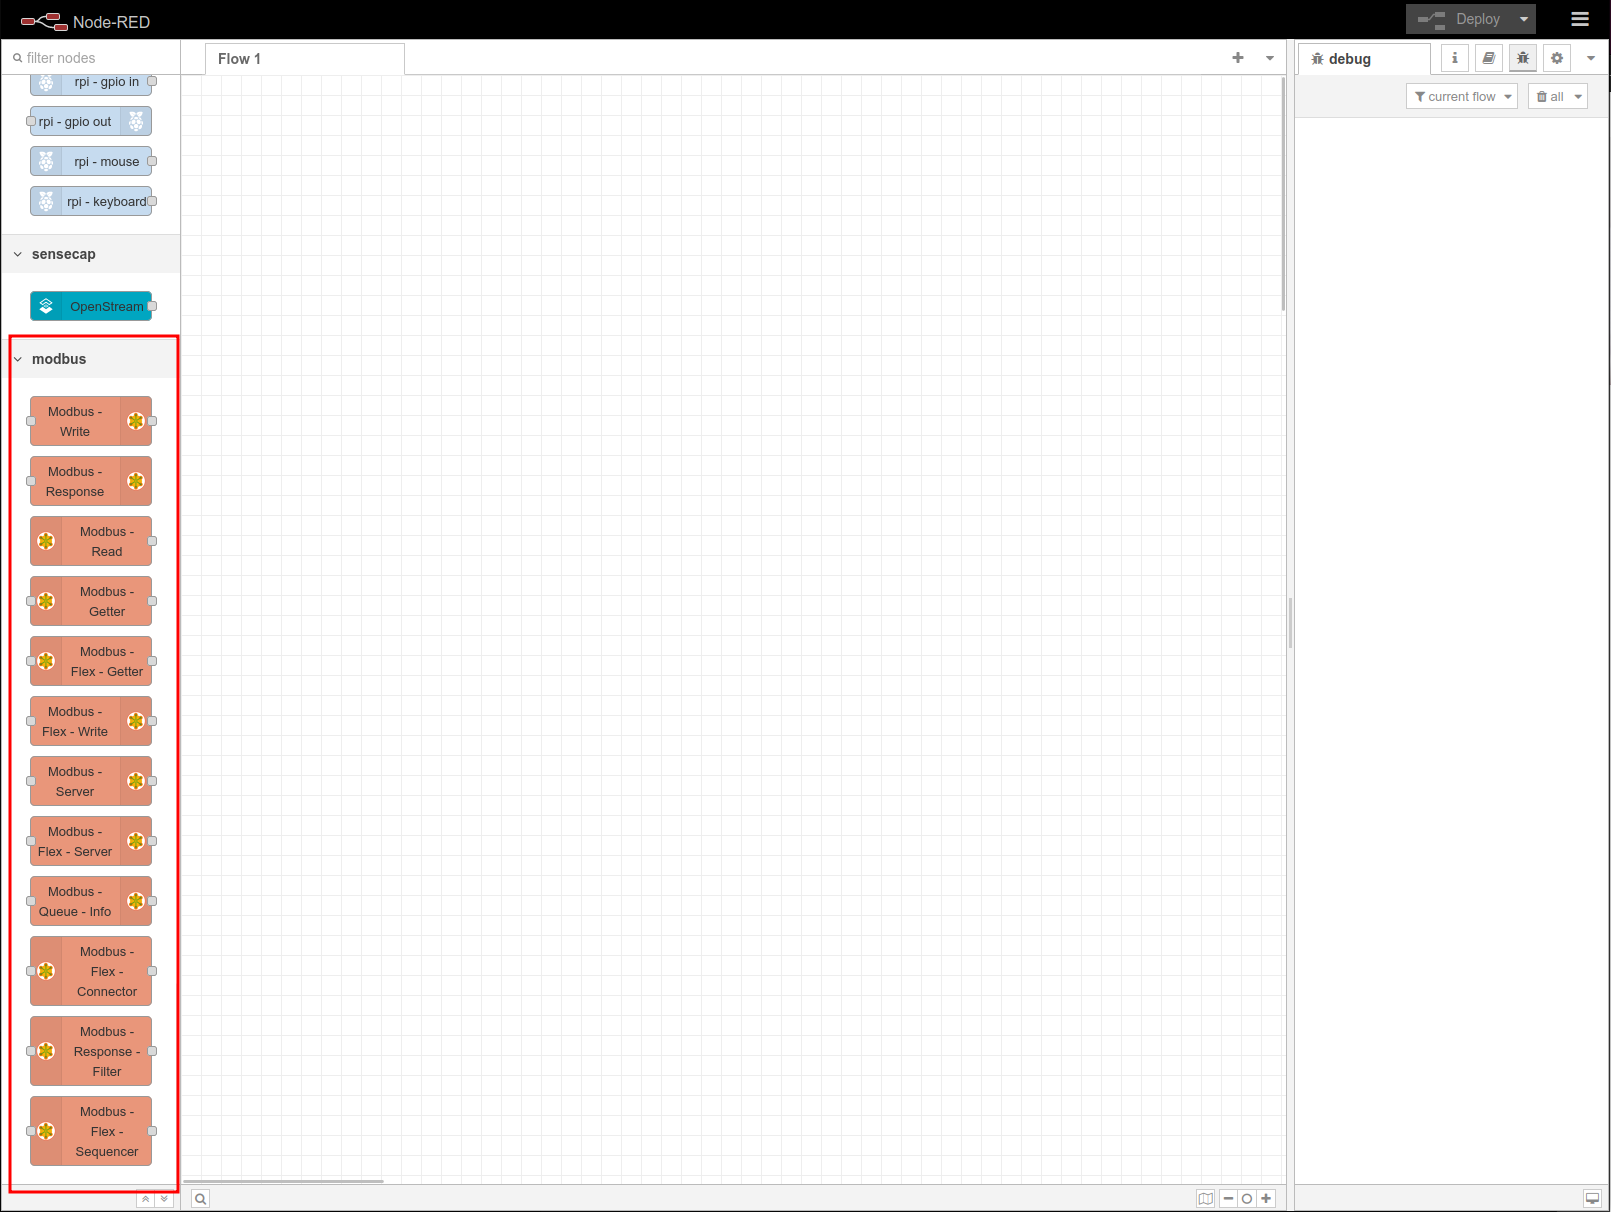
STEP 6: you should see the Modbus nodes in the side bar
How to use Modbus Node with reTermianl DM
prerequisite
Hardware
- 1 x USB to RS485/RS232 adoptor
- 6 x Cables
- 1 x reTerminal DM
- 1 x Host Computer
Software
- MODBUS communication GUI tool such as
ModbusMechanicinstalled on your host machine
Preparation
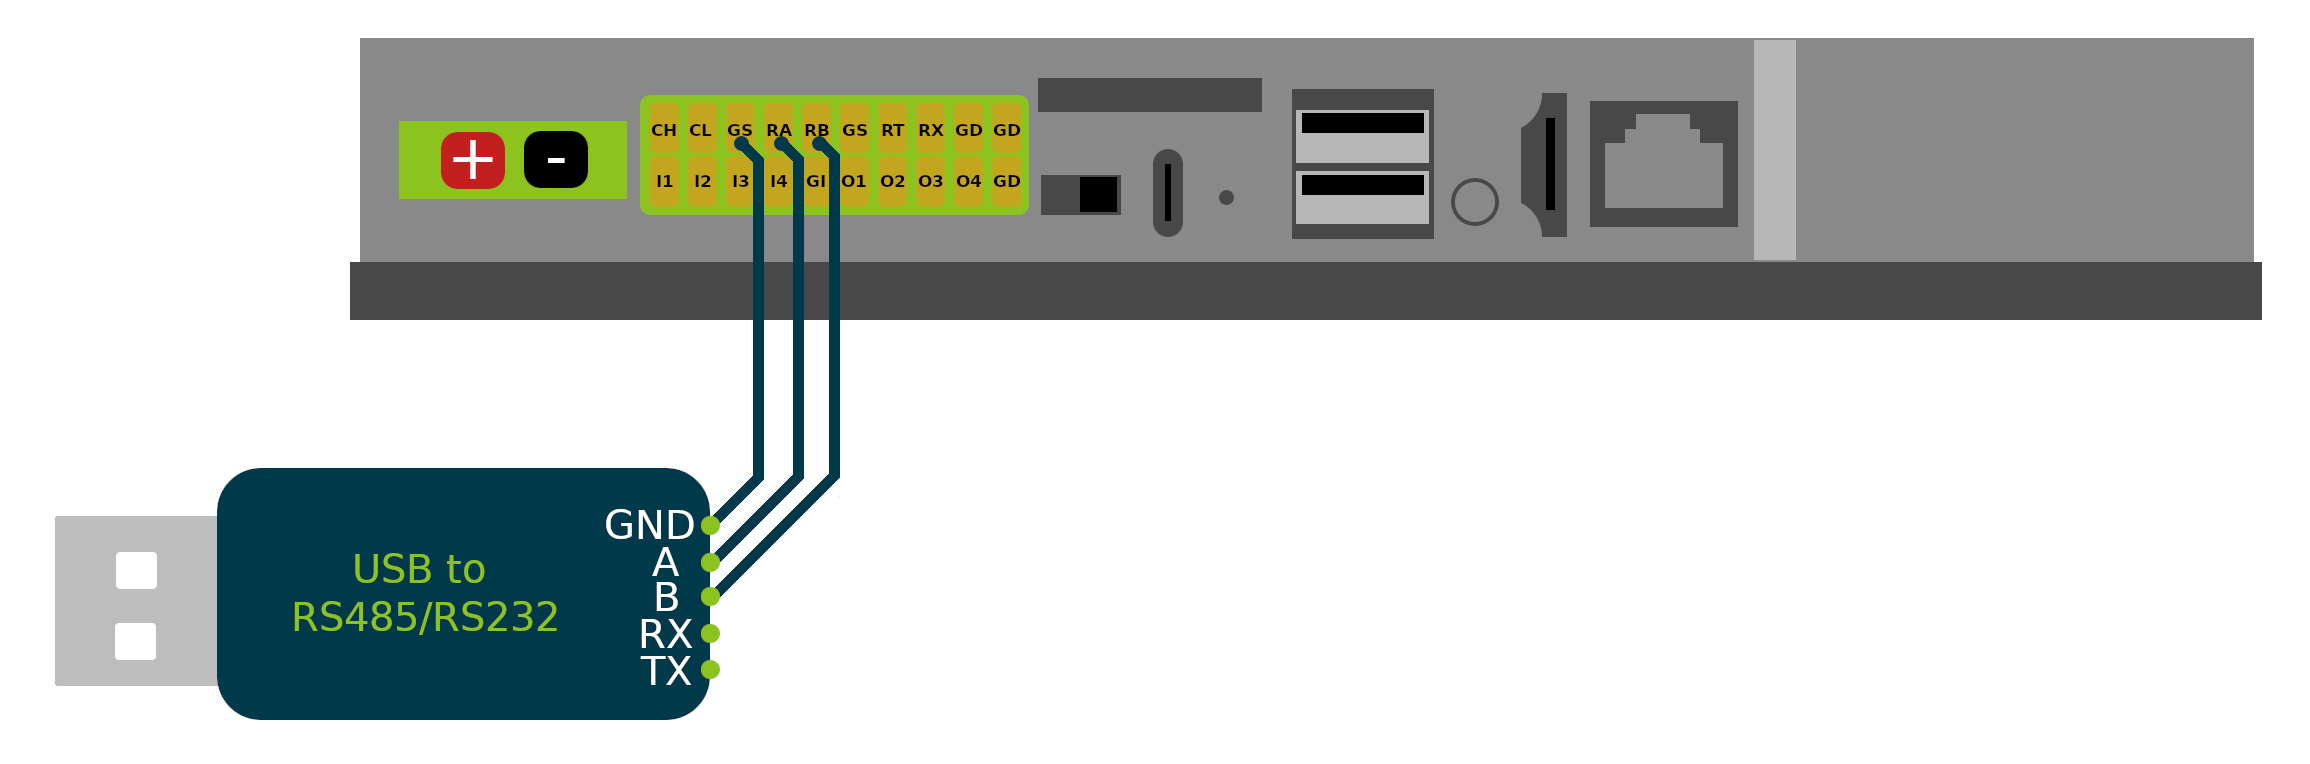
STEP 1: Please connect the Hardware as shown below
STEP 2: Install the ModbusMechanic if you wanna follow the exact steps below.
STEP 2-1: Download the release file of ModbusMechanic release
AT the time when we prepare this wiki the latest release version of ModbusMechanic is v2.7.
STEP 2-2: unzip the release file and run the java executable file ModbusMechanic.jar by use the following command in linux:
java -jar ModbusMechanic.jar
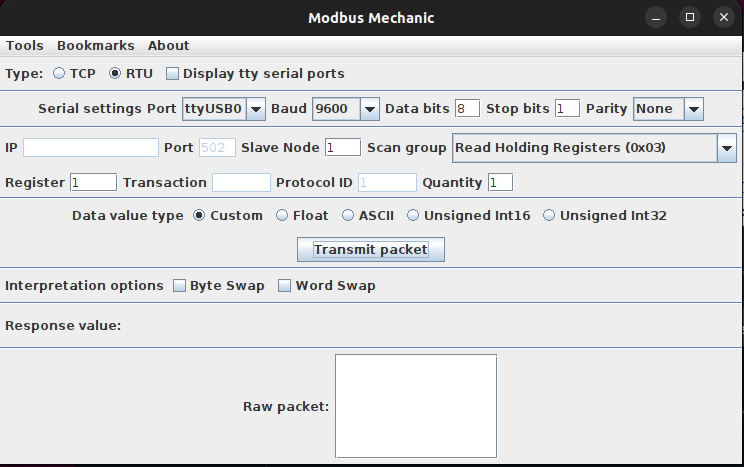
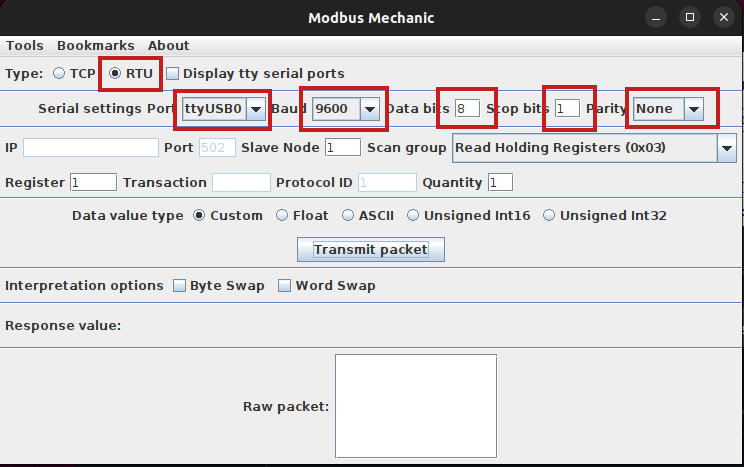
STEP 2-3: Please configure the Serial Settings Port for ModbusMechanic as the same as shown below
STEP 3: Setup Slave Simulator
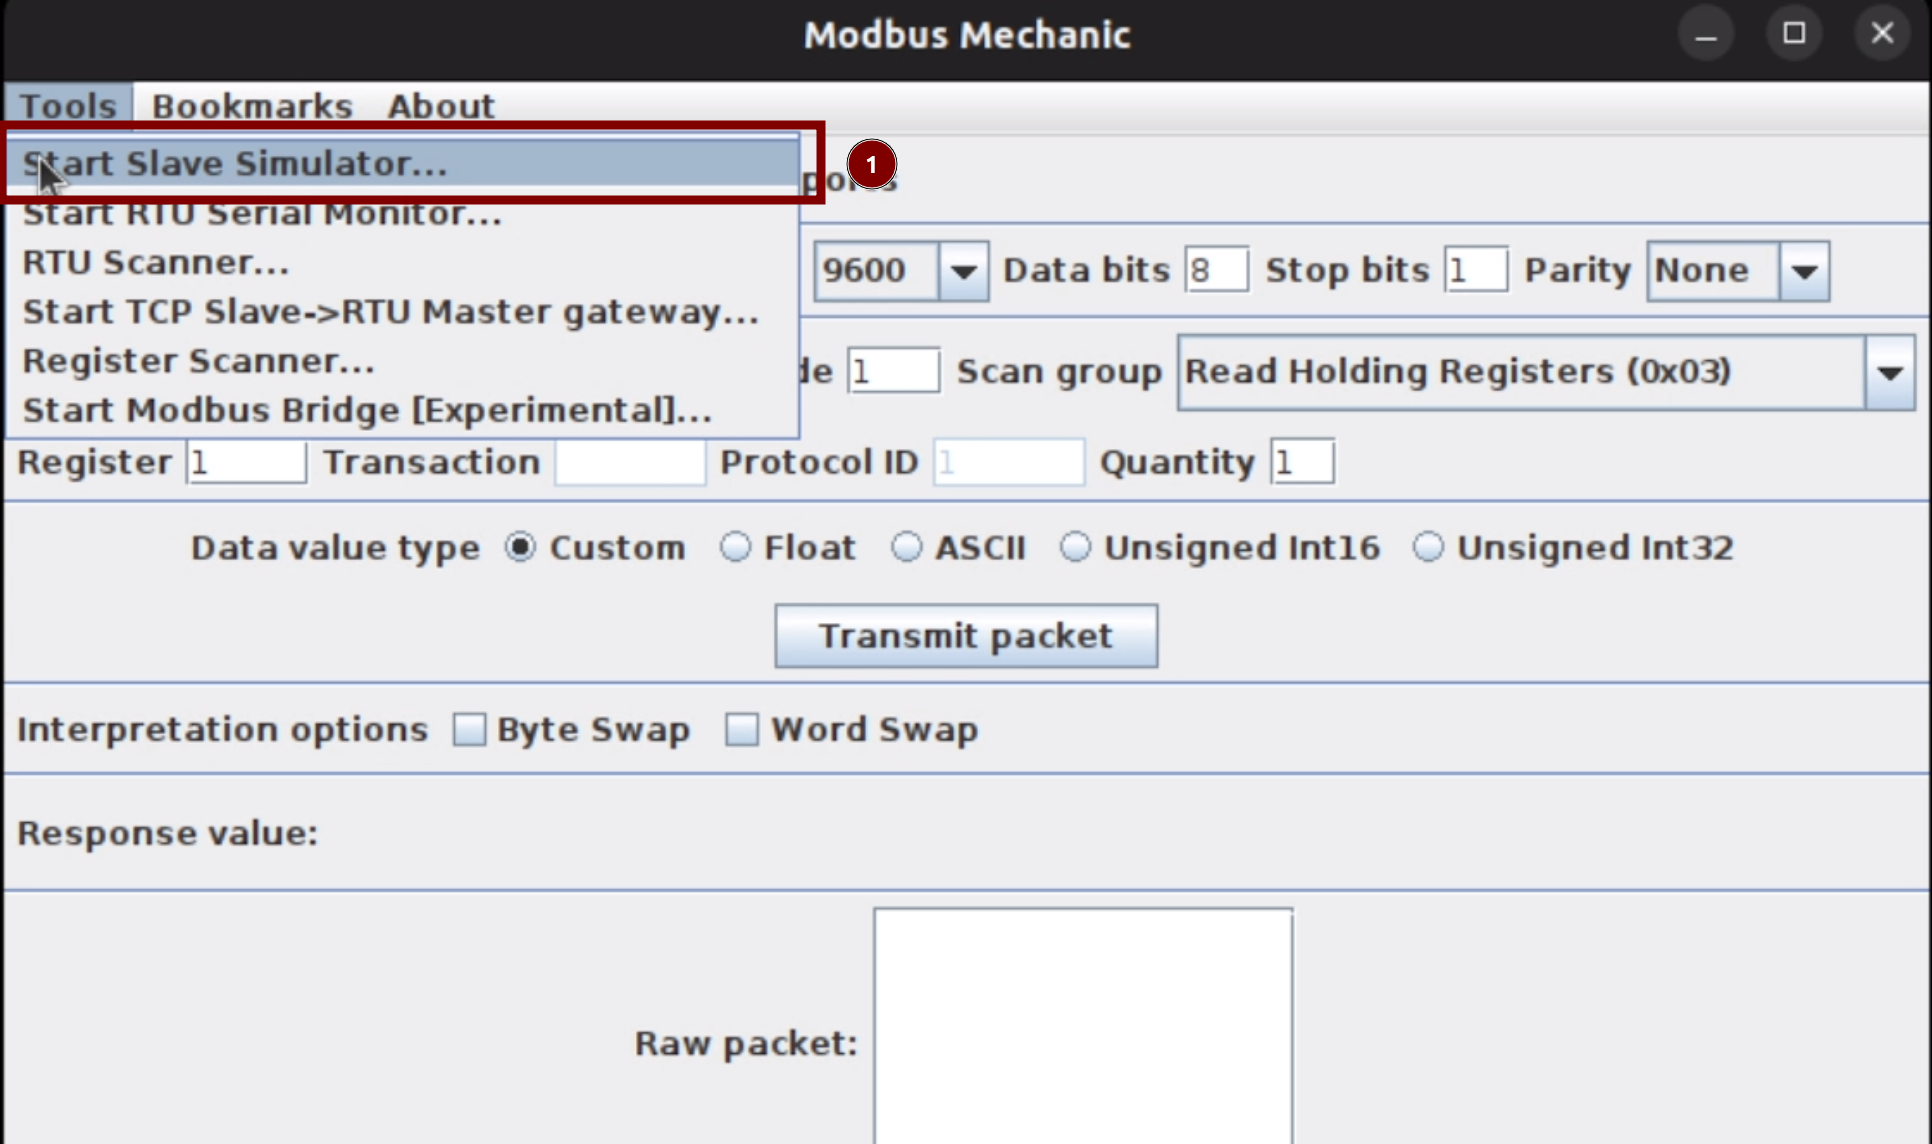
STEP 3-1: Open the Slave Simulator from ModbusMechanic Tools
STEP 3-2: Then select RTU from the popup1 Mbit
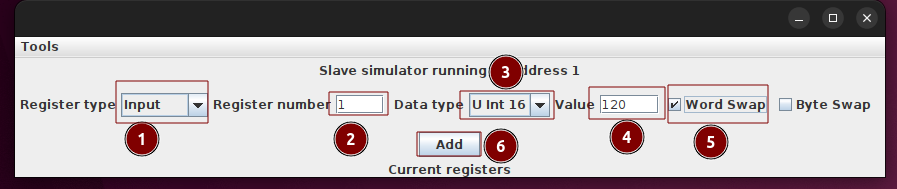
STEP 3-4-2: Enter 1 as the Register number
STEP 3-4-3: Select U int 16 as the Data type
STEP 3-4-4: Enter 120 as the Value
STEP 3-4-5: check the Word Swap
STEP 3-4-6: click Add to confirm
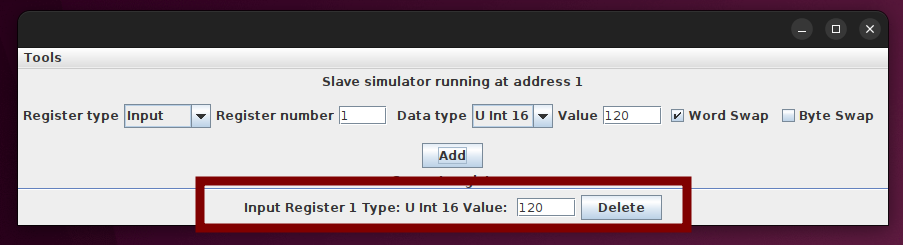
STEP 3-5: you should have the similar settings as the image below
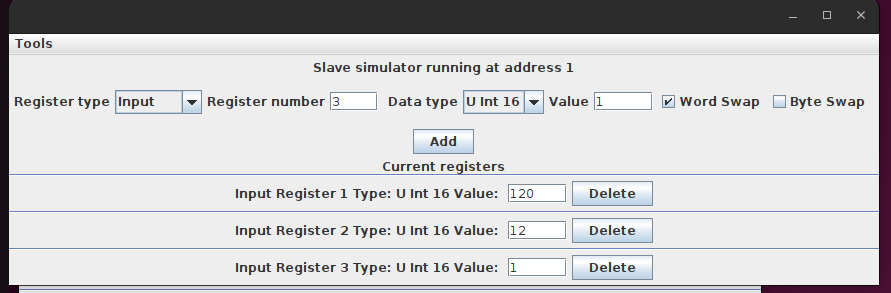
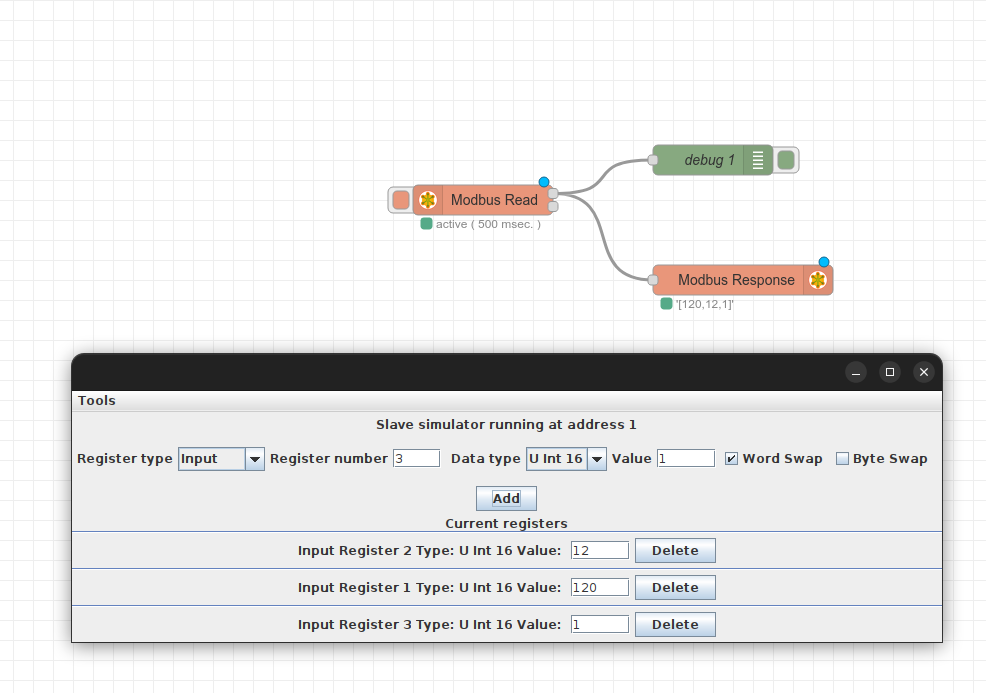
STEP 3-6: repeat the STEPS 4-4 to add two more Registers as shown below, where Register 2 with Vale of 12 and Register 3 with Value of 1
Edit the Flows
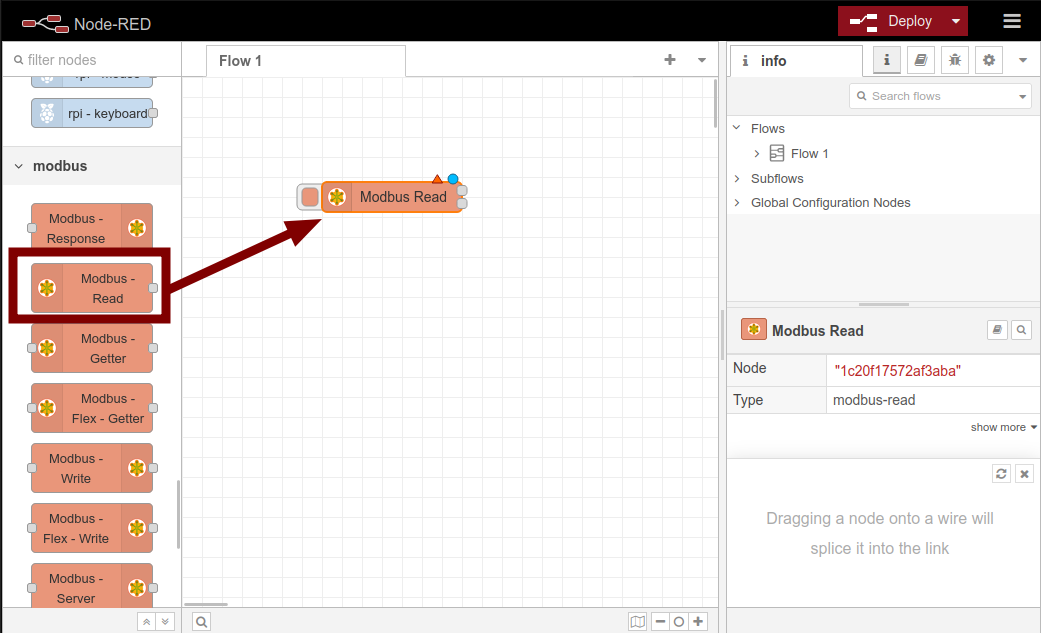
STEP 1: Drag Modbus Read to the Flow Editor panel
STEP 2: Config the Modbus Server
STEP 2-1: Double click on the Modbus Read to open the Node editor panel
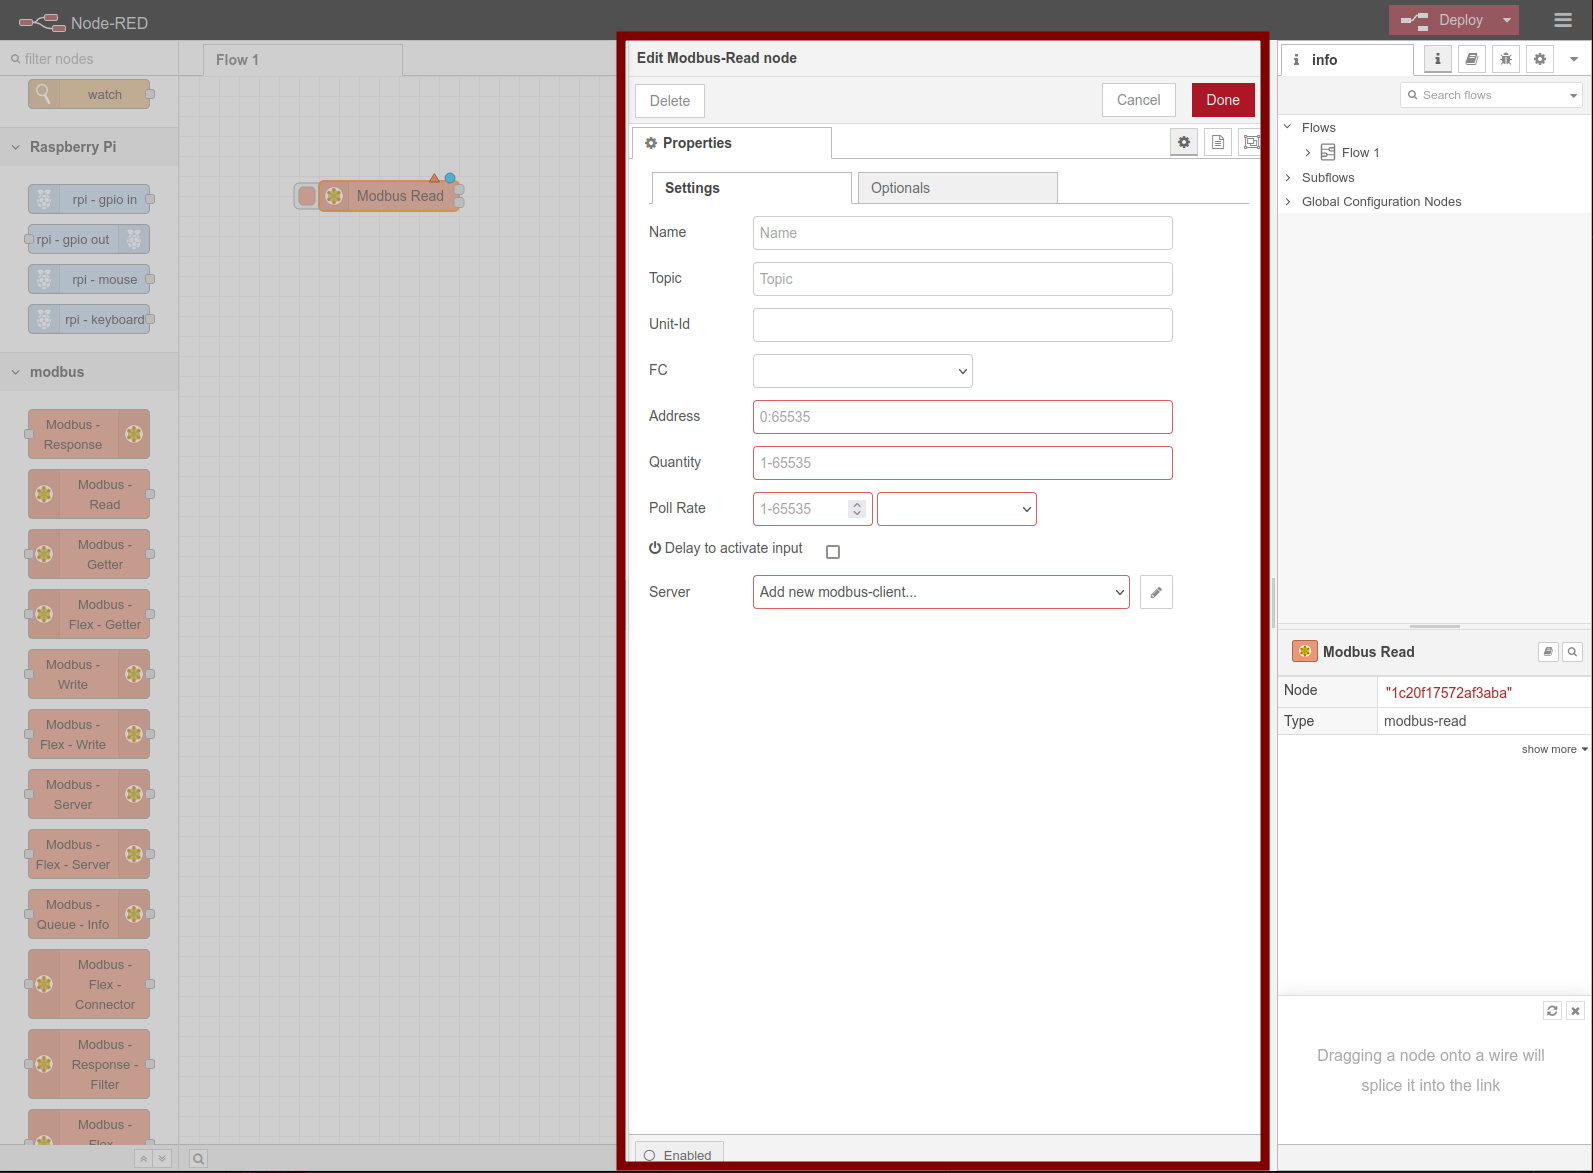
STEP 2-2: Click on the pencil icon for the server configuration option
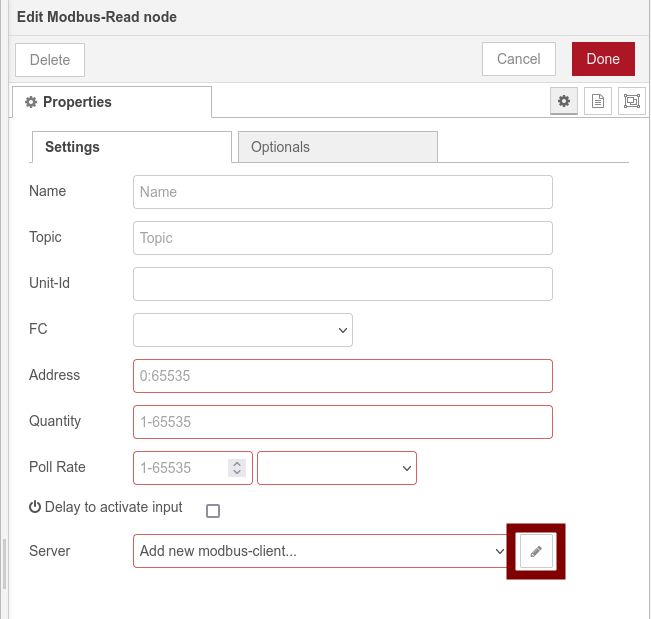
Once you clicked the pencil icon you should see the Add new modbus-client config node configuration panel
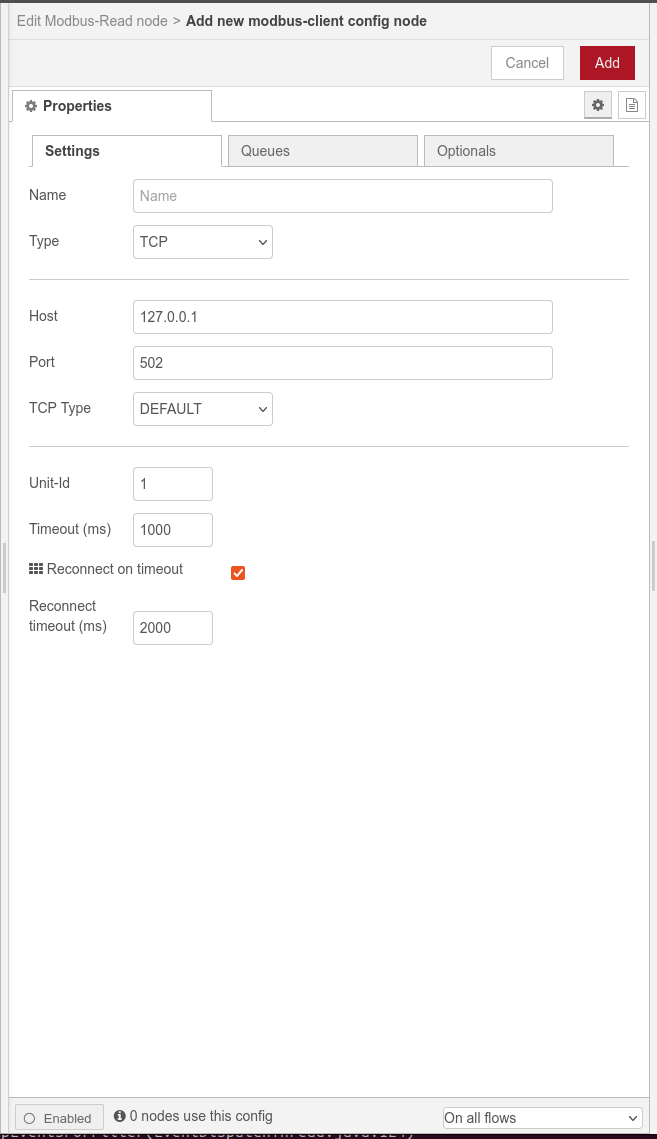
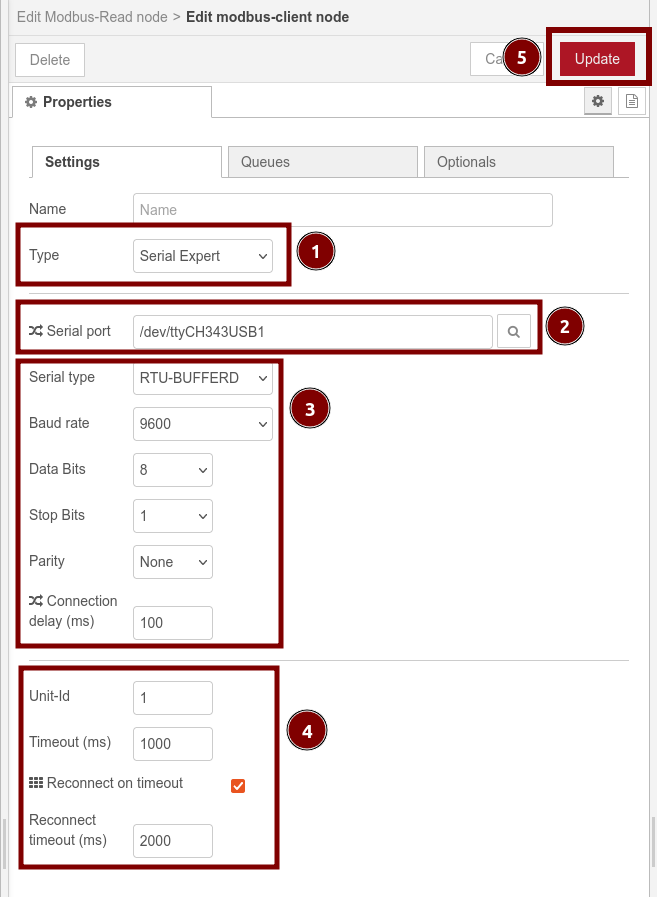
STEP 2-3: Please carefully following the steps below for configure the Modbus port as shown in the image below.
STEP 2-3-1: set the type to Serial Expert from the dropdown list
STEP 2-3-2: select the Serial port /dev/ttyCH343USB1
STEP 2-3-3: configue the serial port options as shown in the image below
STEP 2-3-4: configue the extra Modbus server port option as shown in the image below
STEP 2-3-5: Click Add or Update to apply changes.
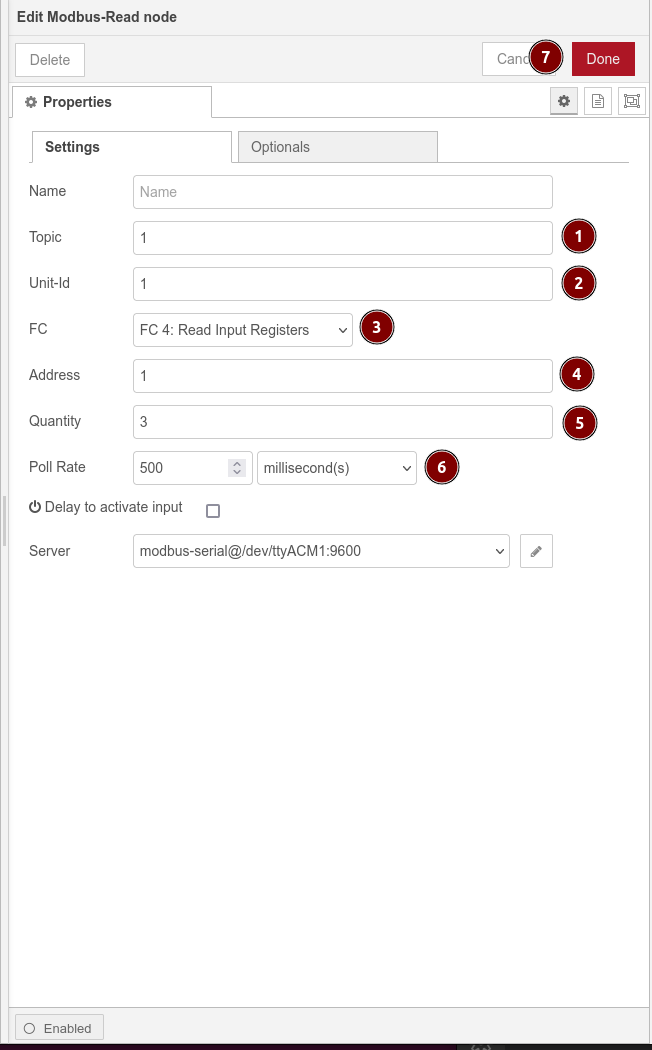
STEP 3: Config Modbus-Read Node at shown in the image below and click Done
The following steps are just example steps you can change the configuration according to your own situation
STEP 4: Find and Drag out debug node and Modbus Response node and connect the nodes together like shown below

Final Result
Congratulations, you have successfully experienced and learnt how to use Modbus with reTerminal DM with node-RED now, your final results should be similar as the image shown below
You can copy the following JSON code to import the Nodes
[
    {
        "id": "0692ee641d6fffbc",
        "type": "tab",
        "label": "Flow 1",
        "disabled": false,
        "info": "",
        "env": []
    },
    {
        "id": "d16d0d962267f762",
        "type": "modbus-client",
        "name": "",
        "clienttype": "serial",
        "bufferCommands": true,
        "stateLogEnabled": false,
        "queueLogEnabled": false,
        "failureLogEnabled": true,
        "tcpHost": "127.0.0.1",
        "tcpPort": "502",
        "tcpType": "DEFAULT",
        "serialPort": "/dev/ttyACM1",
        "serialType": "RTU",
        "serialBaudrate": "9600",
        "serialDatabits": "8",
        "serialStopbits": "1",
        "serialParity": "none",
        "serialConnectionDelay": "100",
        "serialAsciiResponseStartDelimiter": "0x3A",
        "unit_id": "1",
        "commandDelay": "1",
        "clientTimeout": "1000",
        "reconnectOnTimeout": true,
        "reconnectTimeout": "2000",
        "parallelUnitIdsAllowed": true,
        "showWarnings": true,
        "showLogs": true
    },
    {
        "id": "aef2687aed916539",
        "type": "modbus-read",
        "z": "0692ee641d6fffbc",
        "name": "",
        "topic": "1",
        "showStatusActivities": true,
        "logIOActivities": false,
        "showErrors": true,
        "showWarnings": true,
        "unitid": "1",
        "dataType": "InputRegister",
        "adr": "1",
        "quantity": "3",
        "rate": "500",
        "rateUnit": "ms",
        "delayOnStart": false,
        "startDelayTime": "",
        "server": "d16d0d962267f762",
        "useIOFile": false,
        "ioFile": "",
        "useIOForPayload": false,
        "emptyMsgOnFail": true,
        "x": 250,
        "y": 300,
        "wires": [
            [
                "c17ac94368fd6df1"
            ],
            [
                "409e4a77818587d8"
            ]
        ]
    },
    {
        "id": "c17ac94368fd6df1",
        "type": "debug",
        "z": "0692ee641d6fffbc",
        "name": "debug 1",
        "active": true,
        "tosidebar": true,
        "console": false,
        "tostatus": false,
        "complete": "false",
        "statusVal": "",
        "statusType": "auto",
        "x": 560,
        "y": 240,
        "wires": []
    },
    {
        "id": "409e4a77818587d8",
        "type": "modbus-response",
        "z": "0692ee641d6fffbc",
        "name": "",
        "registerShowMax": 20,
        "x": 530,
        "y": 380,
        "wires": []
    }
]
Explore more nodes on reTerminal DM with node-RED
Tech Support & Product Discussion
Thank you for choosing our products! We are here to provide you with different support to ensure that your experience with our products is as smooth as possible. We offer several communication channels to cater to different preferences and needs.