reTerminal DM CAN BUS with Node-RED
Brief info about CAN BUS

CAN BUS & Node-RED
CAN bus (Controller Area Network bus) is a type of network used to connect multiple electronic control units (ECUs) within a vehicle or industrial system. It was originally developed by Bosch in the 1980s and has become an international standard (ISO 11898) for serial communication in vehicles and other applications.
The CAN bus enables high-speed data exchange between ECUs, allowing them to share information and coordinate their activities. It uses a two-wire system, with one wire for transmitting data and the other for receiving data, and it supports multiple nodes, making it ideal for use in complex systems where many devices need to communicate with each other.
CAN bus technology is widely used in the automotive industry for a variety of applications, including engine control, transmission control, ABS (anti-lock braking system), airbag control, and many others. It is also used in other industries, such as industrial automation, medical equipment, and aerospace, where reliable and efficient communication between devices is essential.
CAN bus has many advantages, including high reliability, low cost, and the ability to operate in harsh environments. It is easy to install and maintain, and it is highly resistant to electromagnetic interference. These features make it an ideal choice for many different applications where reliable and efficient communication is required.
Getting start with CAN BUS Node on reTerminal DM
To use Node-RED with CAN bus, you will need a CAN bus interface device that connects to the reTerminal DM CAN BUS port, and a Node-RED CAN bus node that allows you to send and receive messages on the network, in this case we will explore the node-red-contrib-socketcan nodes together. Once you have installed the CAN bus node in Node-RED, you can start building flows that read data from the CAN bus network, process it, and send it to other systems or devices. For example, you can read the engine RPM from a vehicle's CAN bus, process the data to calculate fuel consumption, and send the result to a dashboard for display.
You can find more information in the node-red-contrib-socketcan page.
If you are using Senscraft Edge OS you can skip the Socketcan node installation steps.
Prerequisite
Hardware
- 1 x reTerminal DM
- 1 x Host Computer
- 1 x USB-CAN Analyzer
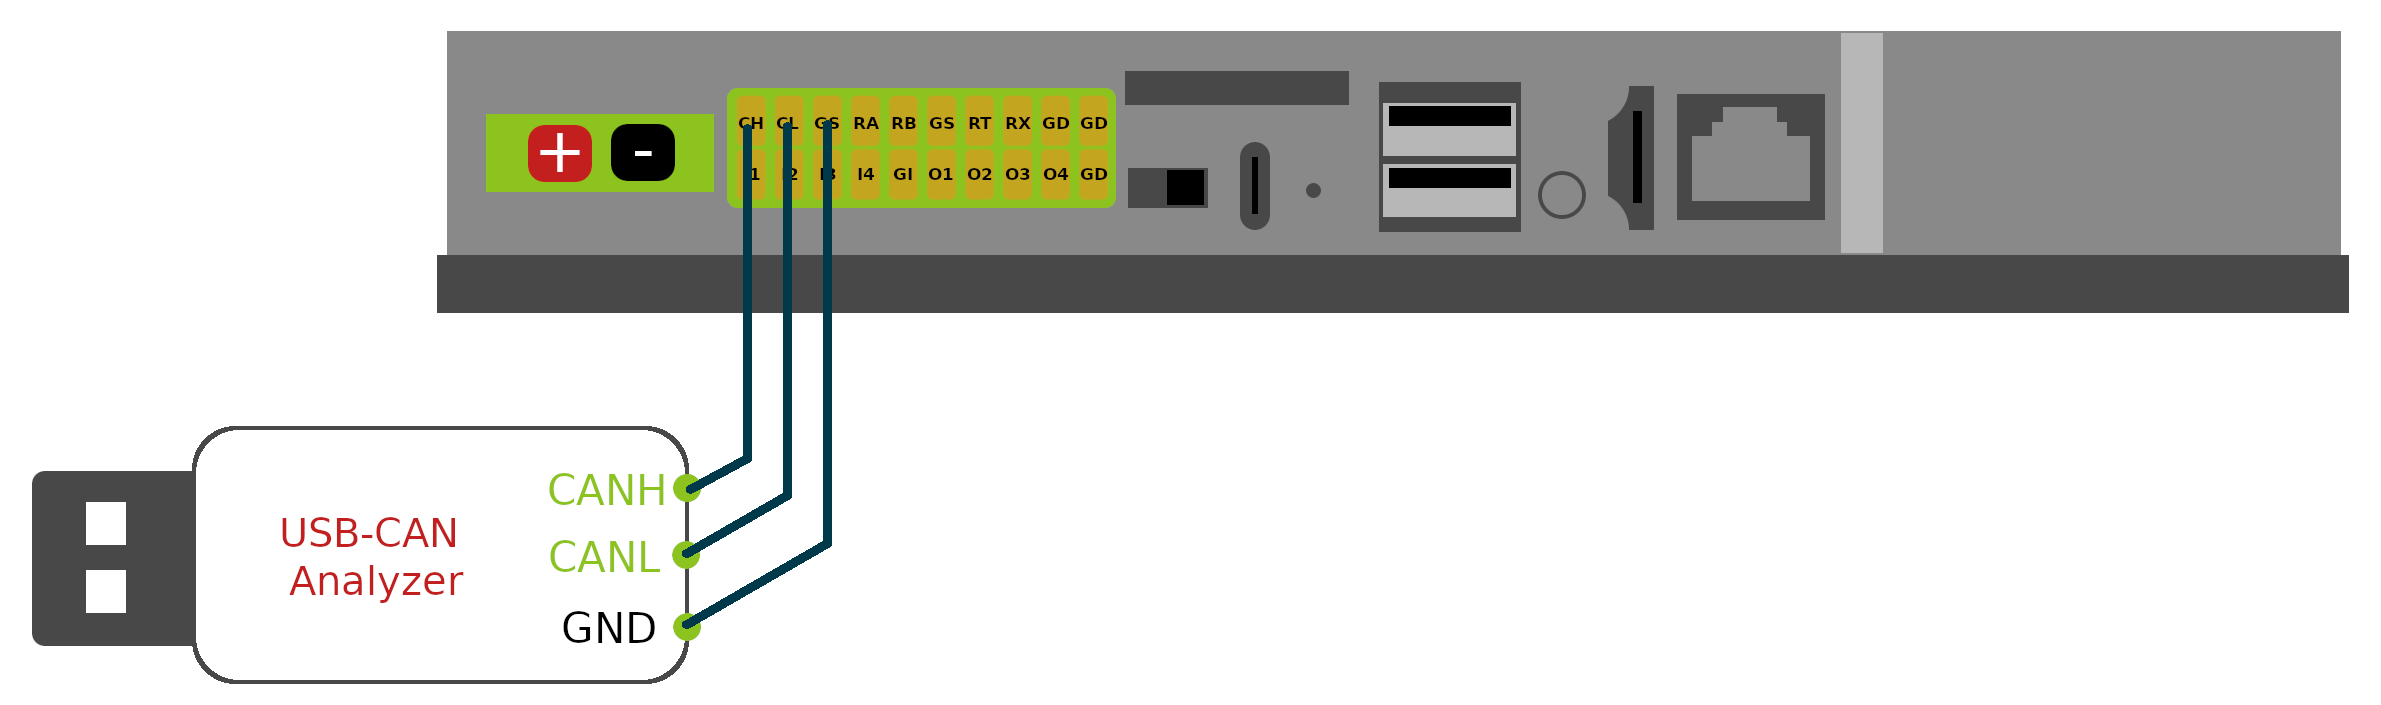
Hardware preparation
Please connect the Hardware as shown below
Software
The Host Computer should be able to have internet connection to the reTerminal DM to perform the follow setup steps.
Install Socketcan Node
In this Wiki tutorial we are going to use the node-red-contrib-socketcan node, so please install the node-red-contrib-socketcan with the guide install nodes.
Configure CAN BUS on reTerminal DM
Assume you have access direct access of the Terminal app on reTerminal DM or access reTerminal DM via SSH, if not please follow the first step here to get yourself familiar on how to do it.
Please key in the following command one-by-one to enable a virtual can device called can0 with the CAN BUS port on reTerminal DM.
sudo apt install can-utils
sudo ip link set can0 up type can bitrate 250000
sudo ifconfig can0 txqueuelen 1000
sudo ip link set can0 up
After entering above commands you should see can0 device with ifconfig command as shown below:

Configure Host computer usb-can software and driver
If you are using the same USB-CAN Analyzer, you can follow the steps below to setup the software driver for using the analyzer.
Please visit the USB-CAN Analyzer driver github repo USB-CAN Analyzer system driver and follow the Readme section to install the driver according to you Operating System.
The example commands to send and receive CAN bus Traffic
# dump CAN bus traffic from CAN bus
$ ./canusb -t -d /dev/ttyUSB0 -s 250000 -t

# send the bytes 0x00112233 from ID 005 on at CAN bus
$ ./canusb -d /dev/ttyUSB0 -s 250000 -t -i 5 -j 00112233
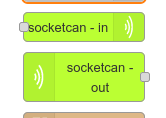
Socketcan Node with reTerminal DM
Import the Flows
The following steps just for tutorial purpose, in this section we will show you how to quickly import flow by copy the JSON format flow and paste to the input box of the import nodes pop-up menu.
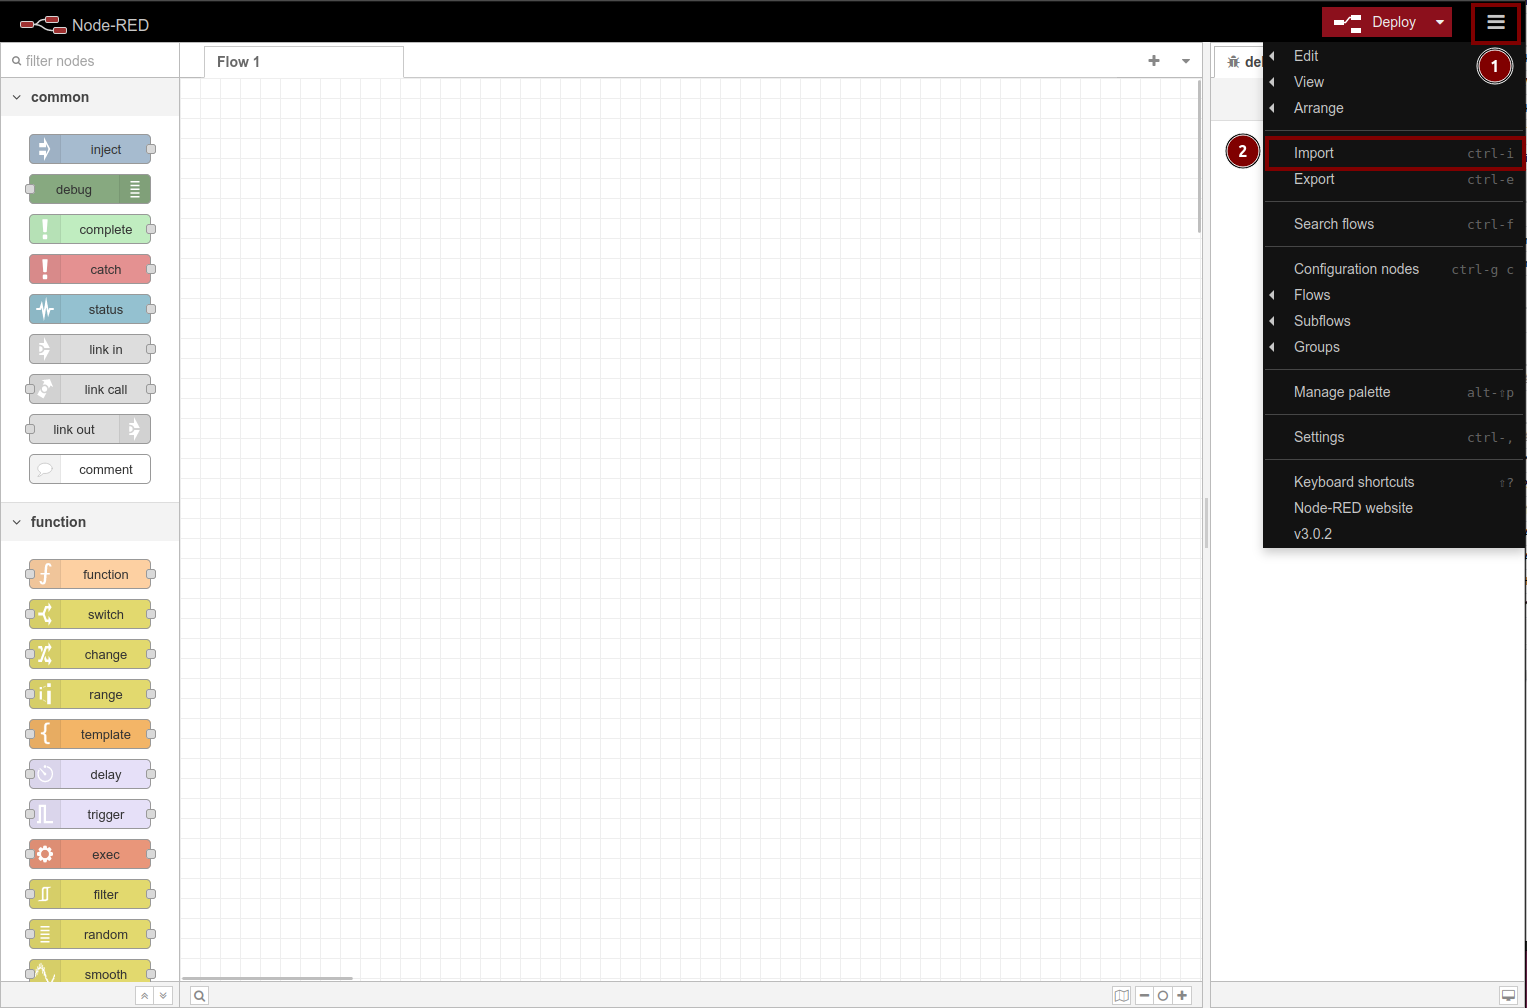
STEP 1: Open the Import nodes window by click the Setting Button and then click the Import button
STEP 2: copy the following flow JSON
[
    {
        "id": "829af3ee.a57c1",
        "type": "tab",
        "label": "CAN BUS",
        "disabled": false,
        "info": ""
    },
    {
        "id": "7b24a62e.8f5458",
        "type": "debug",
        "z": "829af3ee.a57c1",
        "name": "",
        "active": true,
        "tosidebar": true,
        "console": false,
        "tostatus": false,
        "complete": "false",
        "x": 350,
        "y": 360,
        "wires": []
    },
    {
        "id": "5f671b29.cd24bc",
        "type": "socketcan-out",
        "z": "829af3ee.a57c1",
        "name": "socketcan-out",
        "config": "d9bf56bb5f3e2f92",
        "x": 150,
        "y": 360,
        "wires": [
            [
                "7b24a62e.8f5458"
            ]
        ]
    },
    {
        "id": "caba412f.047b2",
        "type": "socketcan-in",
        "z": "829af3ee.a57c1",
        "name": "socketcan-in",
        "config": "d9bf56bb5f3e2f92",
        "x": 350,
        "y": 120,
        "wires": []
    },
    {
        "id": "a64240cb.3f0788",
        "type": "inject",
        "z": "829af3ee.a57c1",
        "name": "Send object - std",
        "props": [
            {
                "p": "payload"
            },
            {
                "p": "topic",
                "vt": "str"
            }
        ],
        "repeat": "",
        "crontab": "",
        "once": false,
        "onceDelay": 0.1,
        "topic": "",
        "payload": "{\"ext\":false,\"canid\":123,\"dlc\":5,\"data\":[1,2,3,4,5]}",
        "payloadType": "json",
        "x": 160,
        "y": 120,
        "wires": [
            [
                "caba412f.047b2"
            ]
        ]
    },
    {
        "id": "3ff96369.ef6f5c",
        "type": "inject",
        "z": "829af3ee.a57c1",
        "name": "Send string - std",
        "props": [
            {
                "p": "payload"
            },
            {
                "p": "topic",
                "vt": "str"
            }
        ],
        "repeat": "",
        "crontab": "",
        "once": false,
        "onceDelay": 0.1,
        "topic": "",
        "payload": "123#00112233",
        "payloadType": "str",
        "x": 160,
        "y": 200,
        "wires": [
            [
                "caba412f.047b2"
            ]
        ]
    },
    {
        "id": "6879c00a.5edb68",
        "type": "inject",
        "z": "829af3ee.a57c1",
        "name": "Send string - ext",
        "repeat": "",
        "crontab": "",
        "once": false,
        "onceDelay": 0.1,
        "topic": "",
        "payload": "1F334455#1122334455667788",
        "payloadType": "str",
        "x": 160,
        "y": 240,
        "wires": [
            [
                "caba412f.047b2"
            ]
        ]
    },
    {
        "id": "1ee3b274.4cb8fe",
        "type": "inject",
        "z": "829af3ee.a57c1",
        "name": "Send object - ext",
        "props": [
            {
                "p": "payload"
            },
            {
                "p": "topic",
                "vt": "str"
            }
        ],
        "repeat": "",
        "crontab": "",
        "once": false,
        "onceDelay": 0.1,
        "topic": "",
        "payload": "{\"ext\":true,\"canid\":32278,\"dlc\":5,\"data\":[1,2,3,4,5]}",
        "payloadType": "json",
        "x": 160,
        "y": 160,
        "wires": [
            [
                "caba412f.047b2"
            ]
        ]
    },
    {
        "id": "391a4c45.7acd8c",
        "type": "comment",
        "z": "829af3ee.a57c1",
        "name": "Send CAN frames in using different payloads on CAN0",
        "info": "",
        "x": 260,
        "y": 80,
        "wires": []
    },
    {
        "id": "912f9928.da2758",
        "type": "comment",
        "z": "829af3ee.a57c1",
        "name": "Receiove CAN data from interface CAN0",
        "info": "",
        "x": 220,
        "y": 320,
        "wires": []
    },
    {
        "id": "d9bf56bb5f3e2f92",
        "type": "socketcan-config",
        "interface": "can0"
    }
]
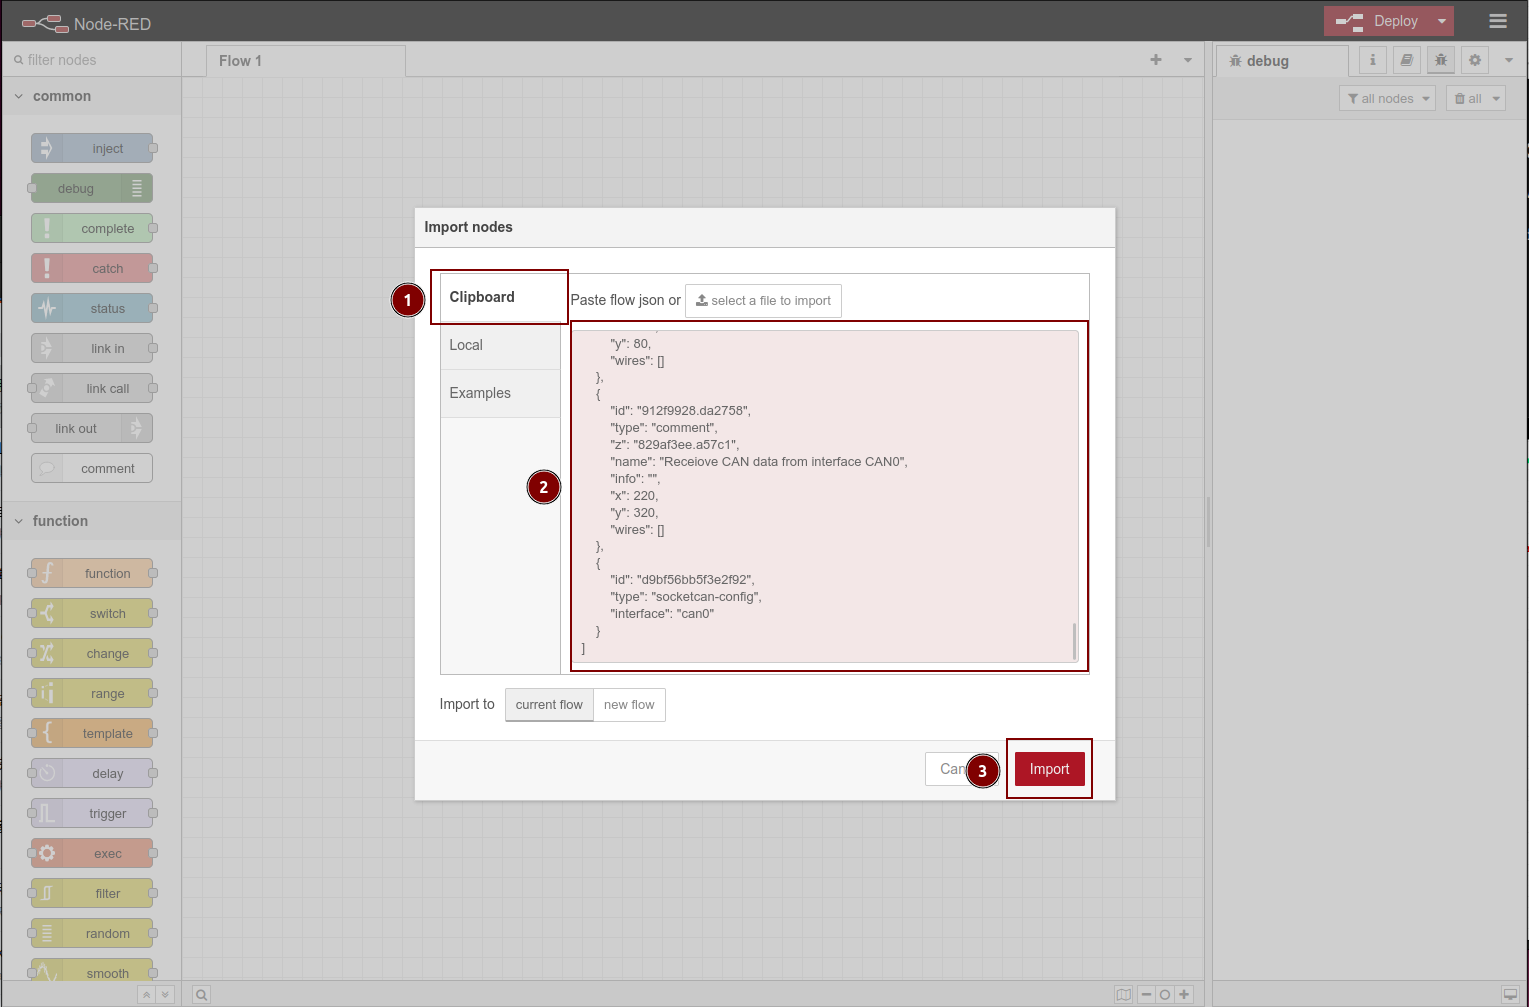
STEP 3: At the Import nodes window, please select the Clipboard tab and then paste the above json flow code to the red dialog box, then click the import button.
STEP 4: You should see a new flow tab called CAN BUS created after the above steps, and please check if the flow the same as the shown below
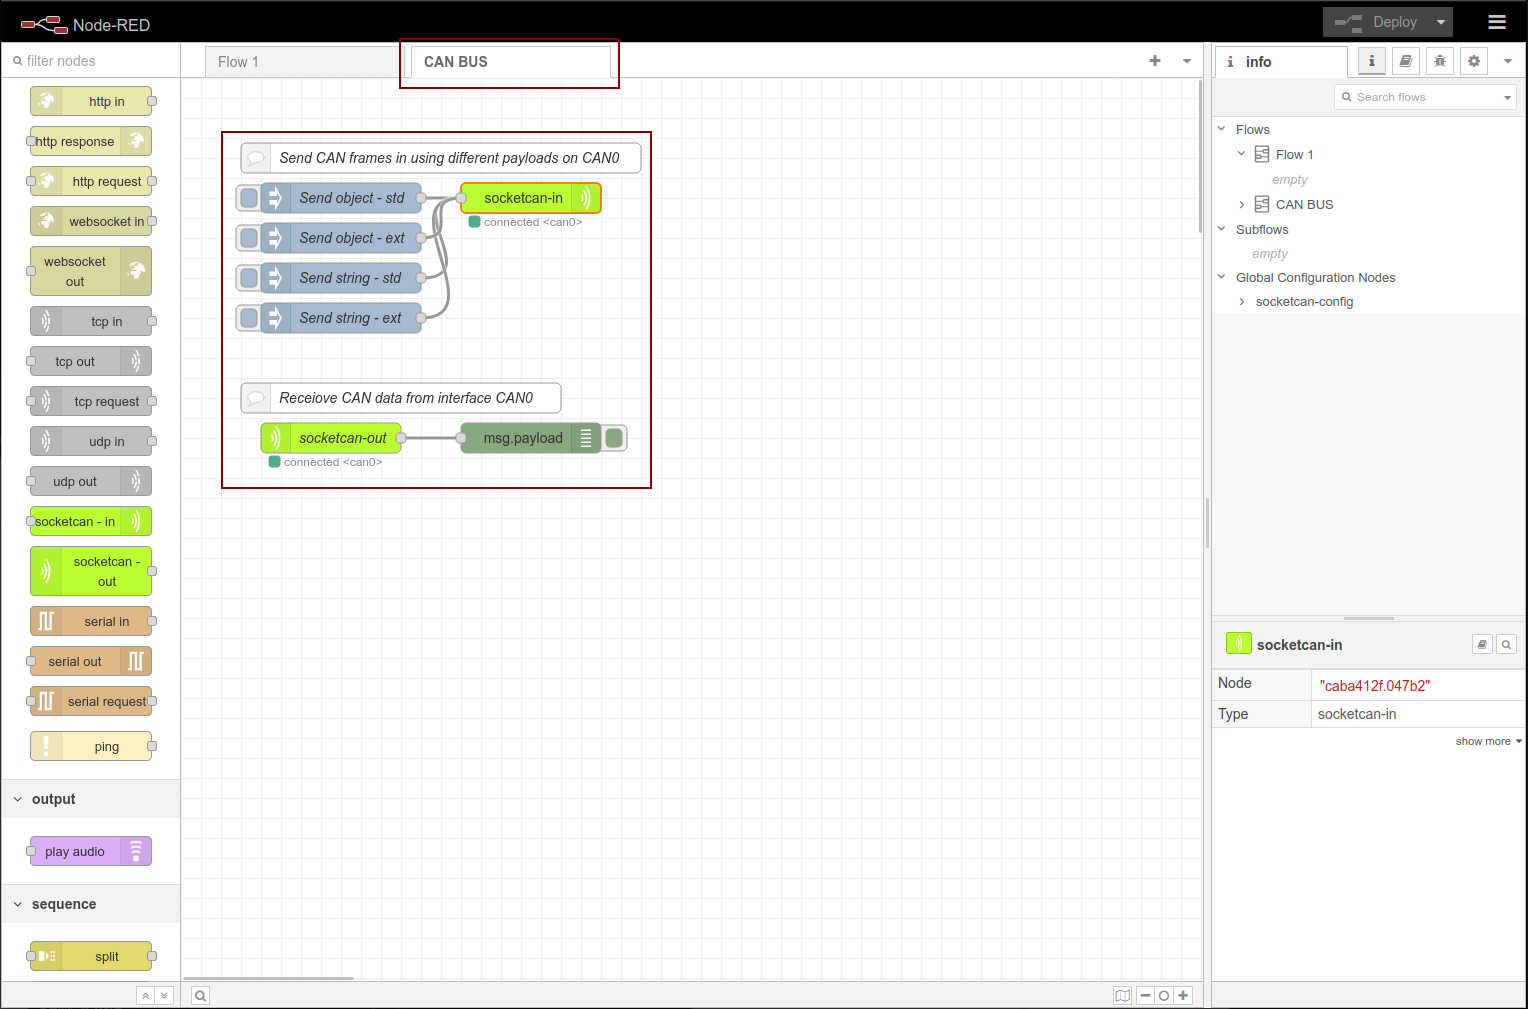
STEP 5: to setup the can interface, you will need to double click the socketcan-in node to open the edit node window.

Make sure you have complete the step in the Configure CAN BUS on reTerminal DM setion to create a can0 interface device on the the reTerminal DM
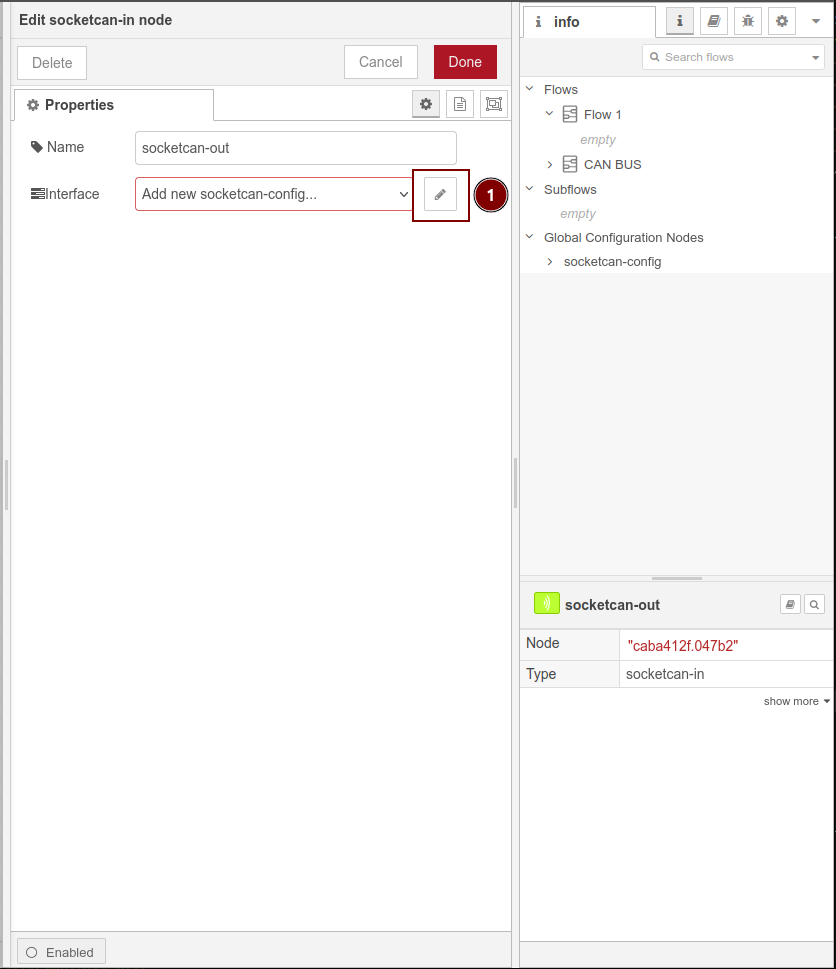
STEP 6: At the Edit socketcan-in node window click the pencil icon at the interface option to open the Add new socketcan-config config node window
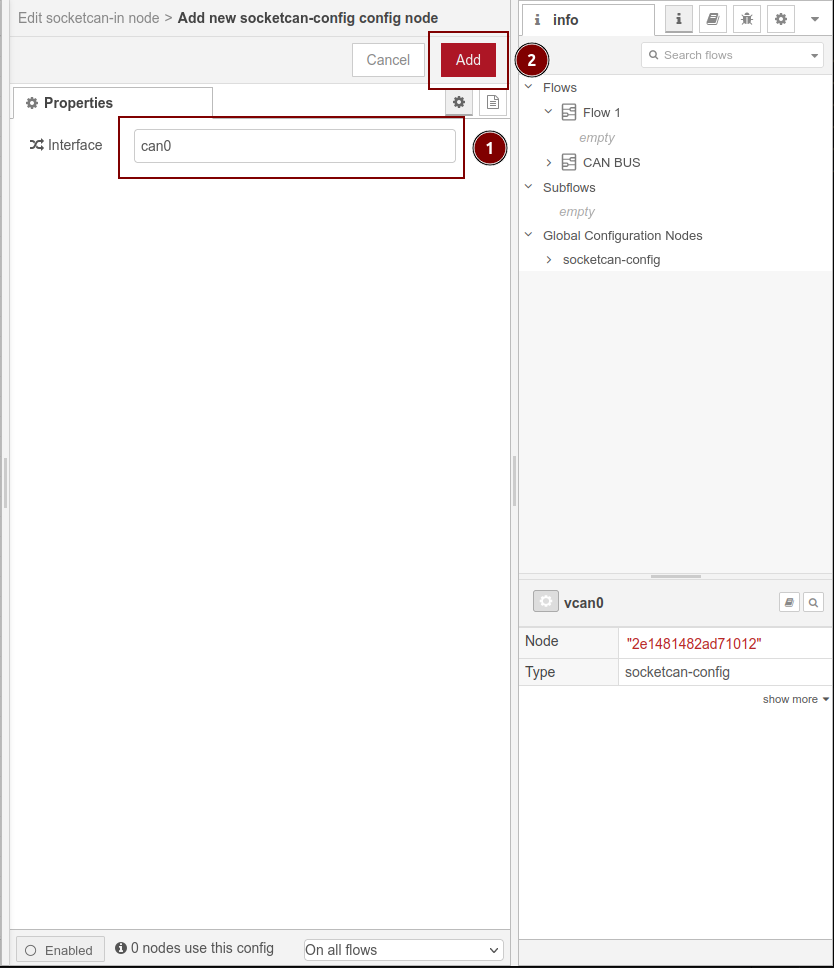
STEP 7: At the Add new socketcan-config config node window please enter can0 at the interface dialog box
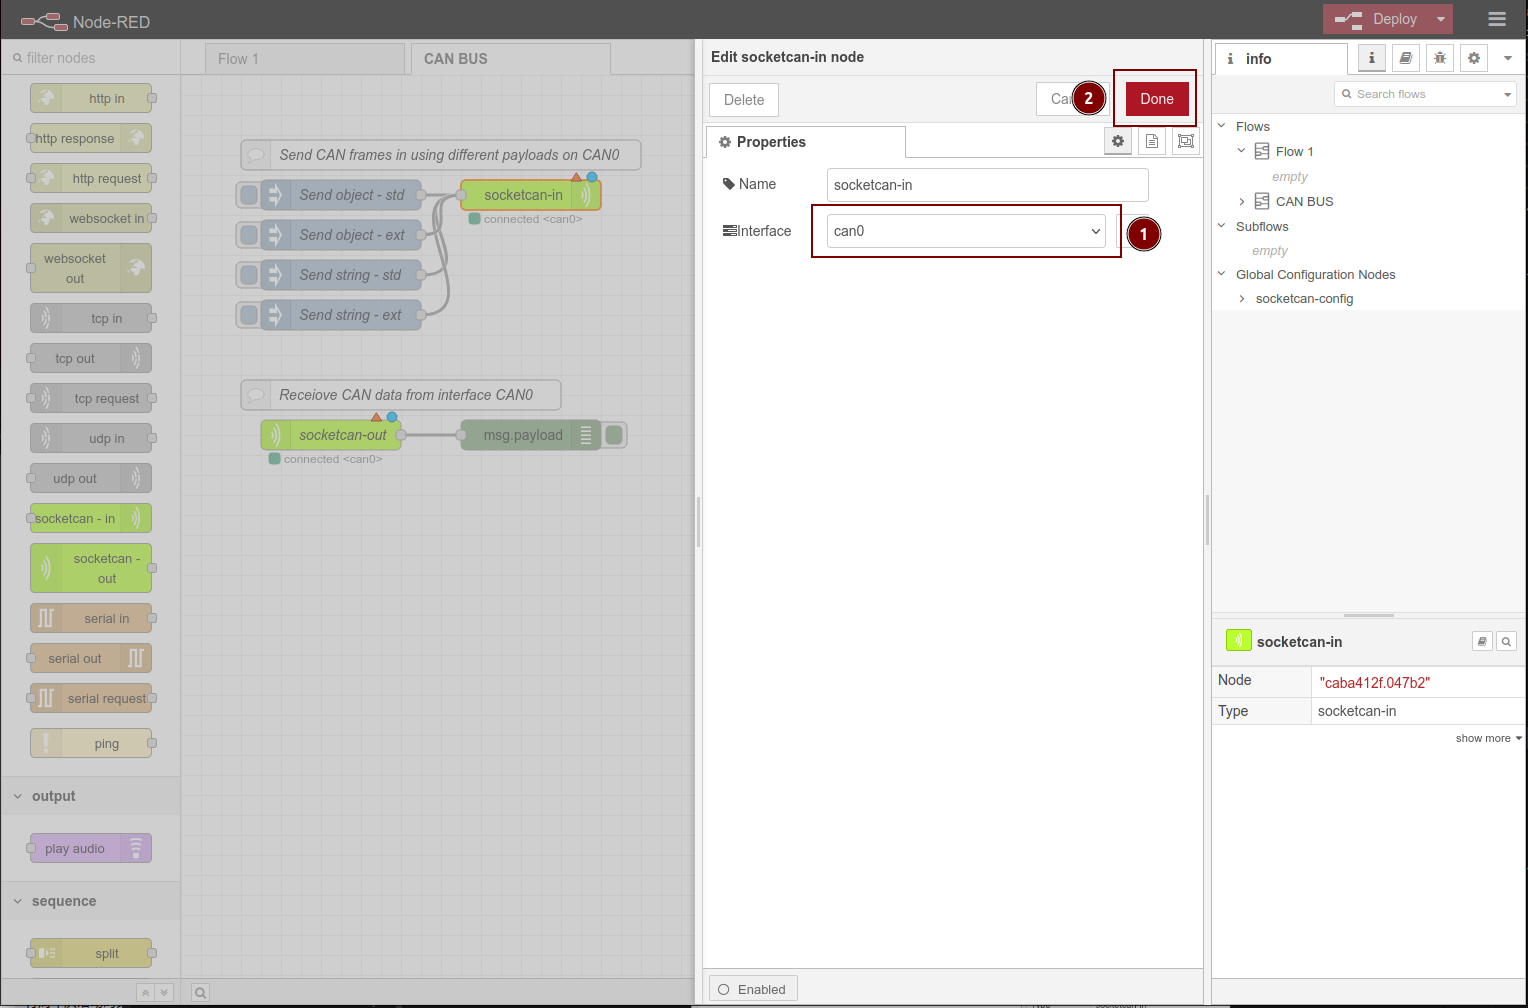
STEP 8: once you clicked the Add button from the above steps you should see the interface is set to can0 and then click Done to apply.
STEP 9: setup the CAN Bus interface for socketcan-out, which just need to double click the scoketcan-out node and select can0 for Config, then click Done
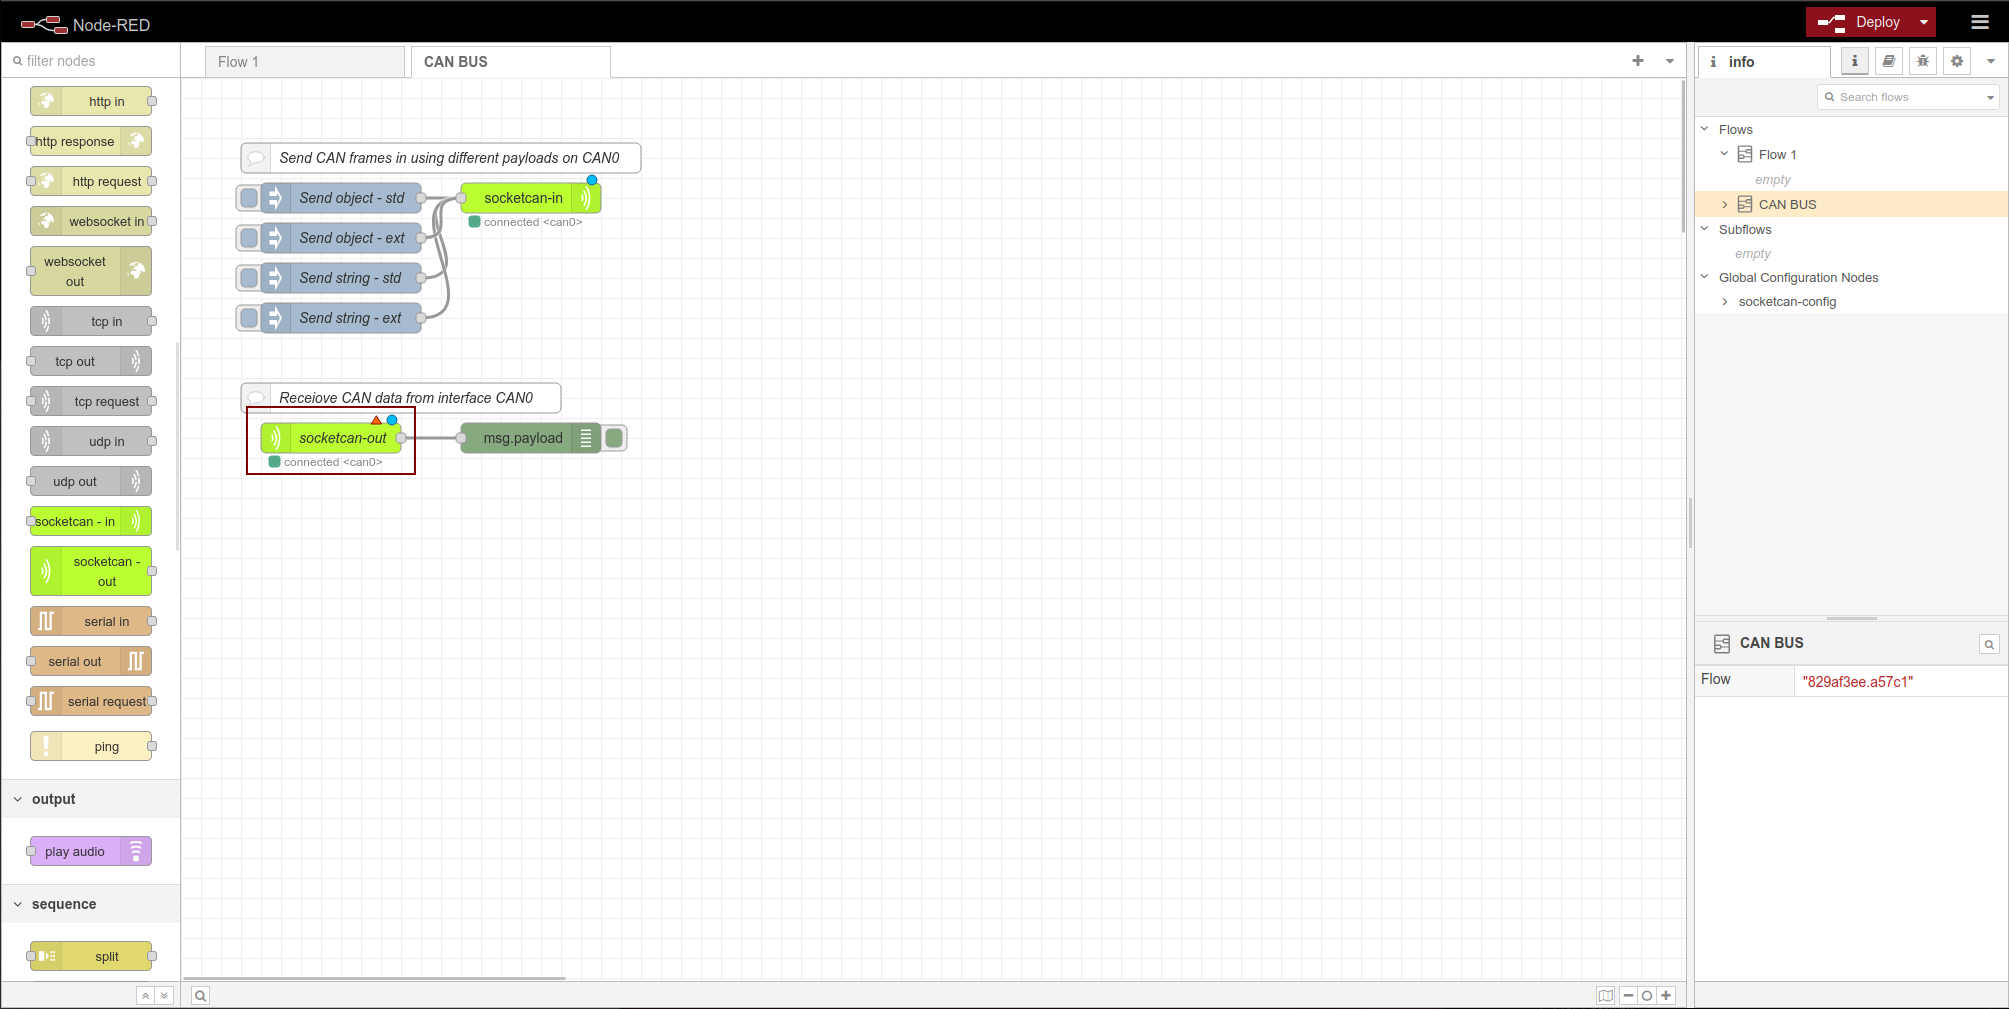
STEP 10: Please Click Deploy now
Final Test and Result
Congratulations, you have successfully experienced and learned how to use CAN Bus protocol with reTerminal DM and node-RED now, your final results should be similar as the image shown below
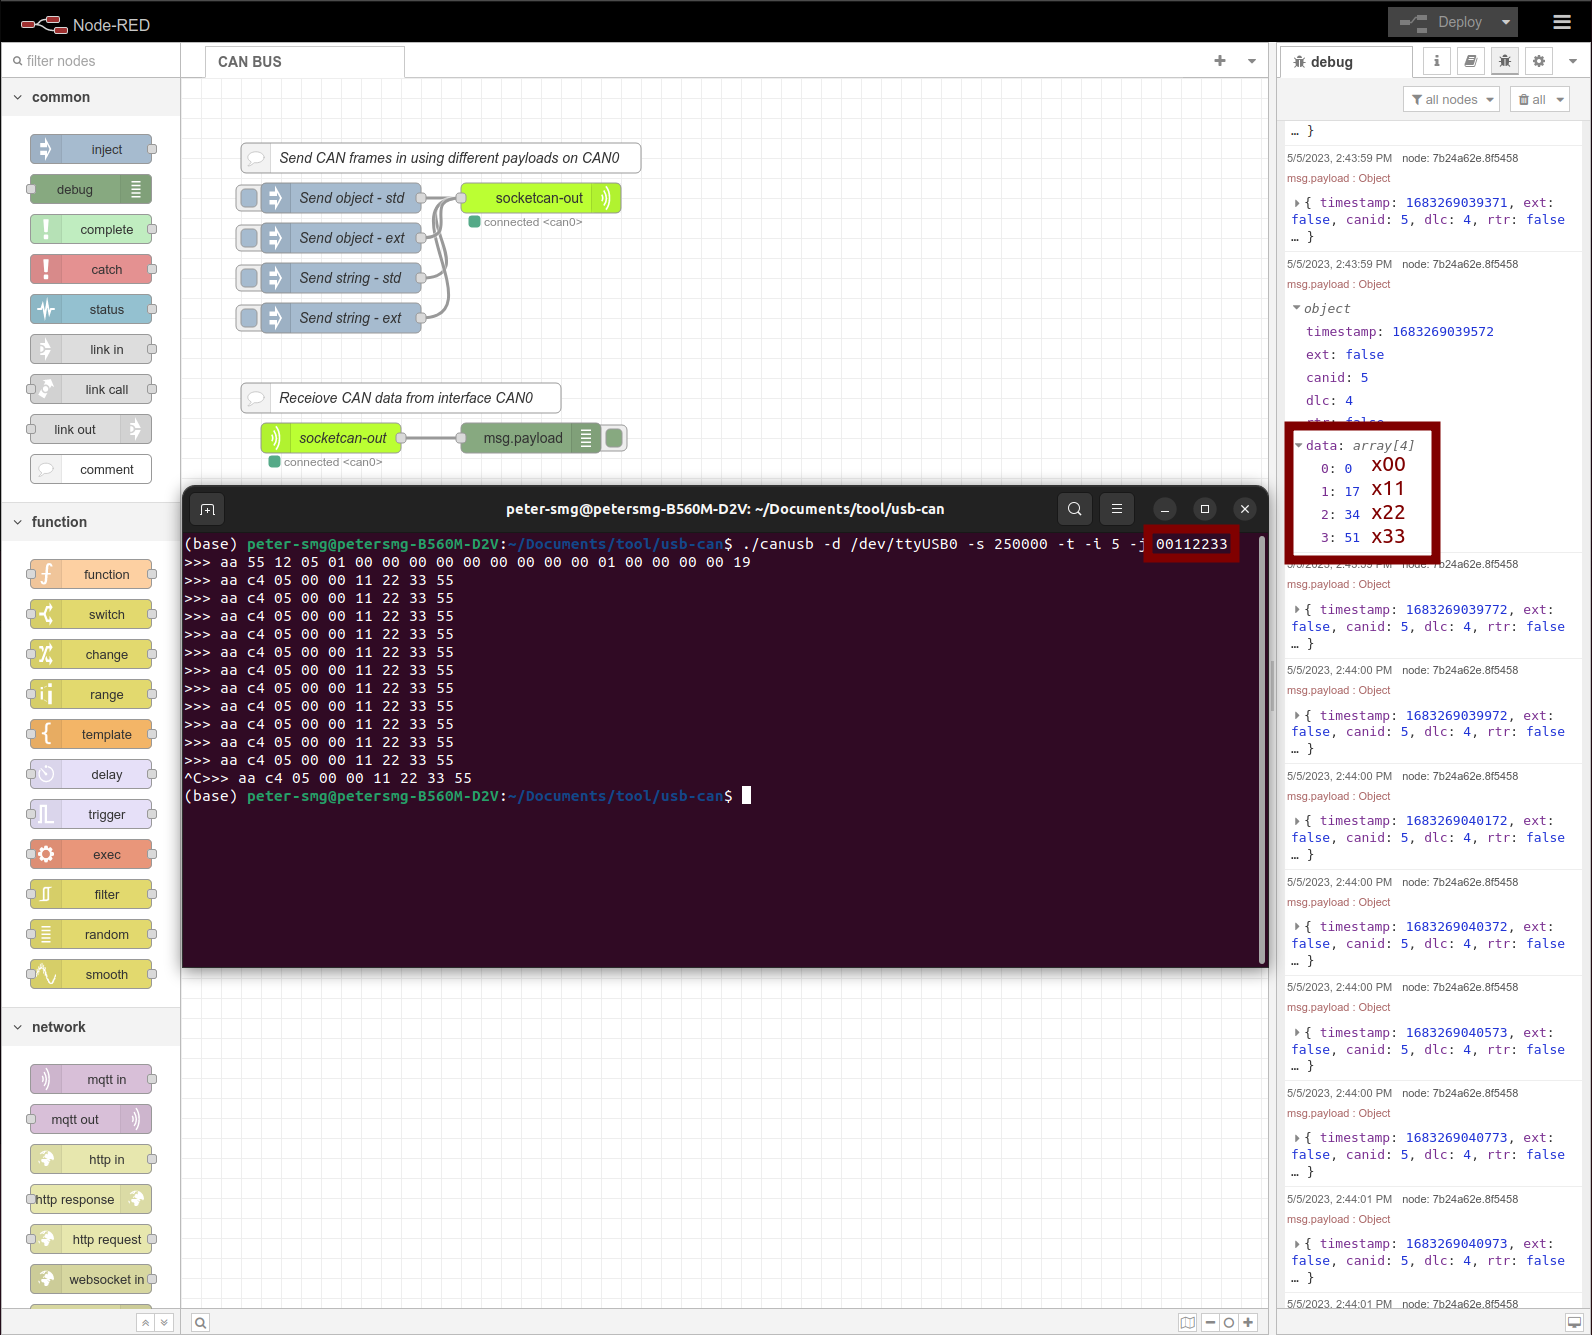
For Host Computer Send CAN Bus data and reTerminal DM Receive:
- So from the Host Computer terminal window you can execute
./canusb -d /dev/ttyUSB0 -s 250000 -t -i 5 -j 00112233command to send00112233(in hex) to the reTerminal DM, and from the reTerminal DM debug window you can see the data is
0: 0
1: 17
2: 34
3: 51
where its the binary represent of x00 x11 x22 x33 HEX data set.
For Host Computer Receive CAN Bus dta and reTerminal DM Send:
- You will need to click the
injectbutton in the reTerminal DM Node-Red as shown in the image below to send the data01 02 03 04 05to Host Computer, and as you can see in the host computer terminal window the command for receive is./canusb -t -d /dev/ttyUSB0 -s 250000 -t, the received data are05 04 03 02 01as its in the first in first out order:

Explore more nodes on reTerminal DM with node-RED
Tech Support & Product Discussion
Thank you for choosing our products! We are here to provide you with different support to ensure that your experience with our products is as smooth as possible. We offer several communication channels to cater to different preferences and needs.