Get Started with Wio Terminal and Wappsto IoT
Overview
The Wio Terminal is a SAMD51-based microcontroller with Wireless Connectivity powered by Realtek RTL8720DN that’s compatible with Arduino and MicroPython. Currently, wireless connectivity is only supported by Arduino. It runs at 120MHz (Boost up to 200MHz), 4MB External Flash and 192KB RAM. It supports both Bluetooth and Wi-Fi providing backbone for IoT projects. The Wio Terminal itself is equipped with a 2.4” LCD Screen, onboard IMU(LIS3DHTR), Microphone, Buzzer, microSD card slot, Light sensor, and Infrared Emitter(IR 940nm). On top of that, it also has two multifunctional Grove ports for Grove Ecosystem and 40 Raspberry pi compatible pin GPIO for more add-ons.
Wappsto is a powerful, intelligent application which easily can be set up to automatically draw data from various sources. It has an integrated standard dashboard for monitoring and analysing your data.
Wappsto also offers tools that allow developers to create IoT applications as web apps with integrations and automations. Integrated in Wappsto there is also a marketplace, where developers and users can share their Apps.
Wappsto by Seluxit is a powerful IoT platform featuring easily customizable Dashboards that makes visualizing live or historical data a breeze and many other features including cloud automations.
The Wappsto APP for IOS and Android, let’s you view and control devices on the fly as well.

Wappsto Features
You can operate the following function while you connecting the Wappsto. For further information, you can do more with your data here.
Dashboard features
Dashboard types
- Blank dashboard - Static clean canvas to mix and match widgets
- Fleet management - Dynamic clean canvas to mix and match widgets - easily switch between devices to get an overview of possible outliers.
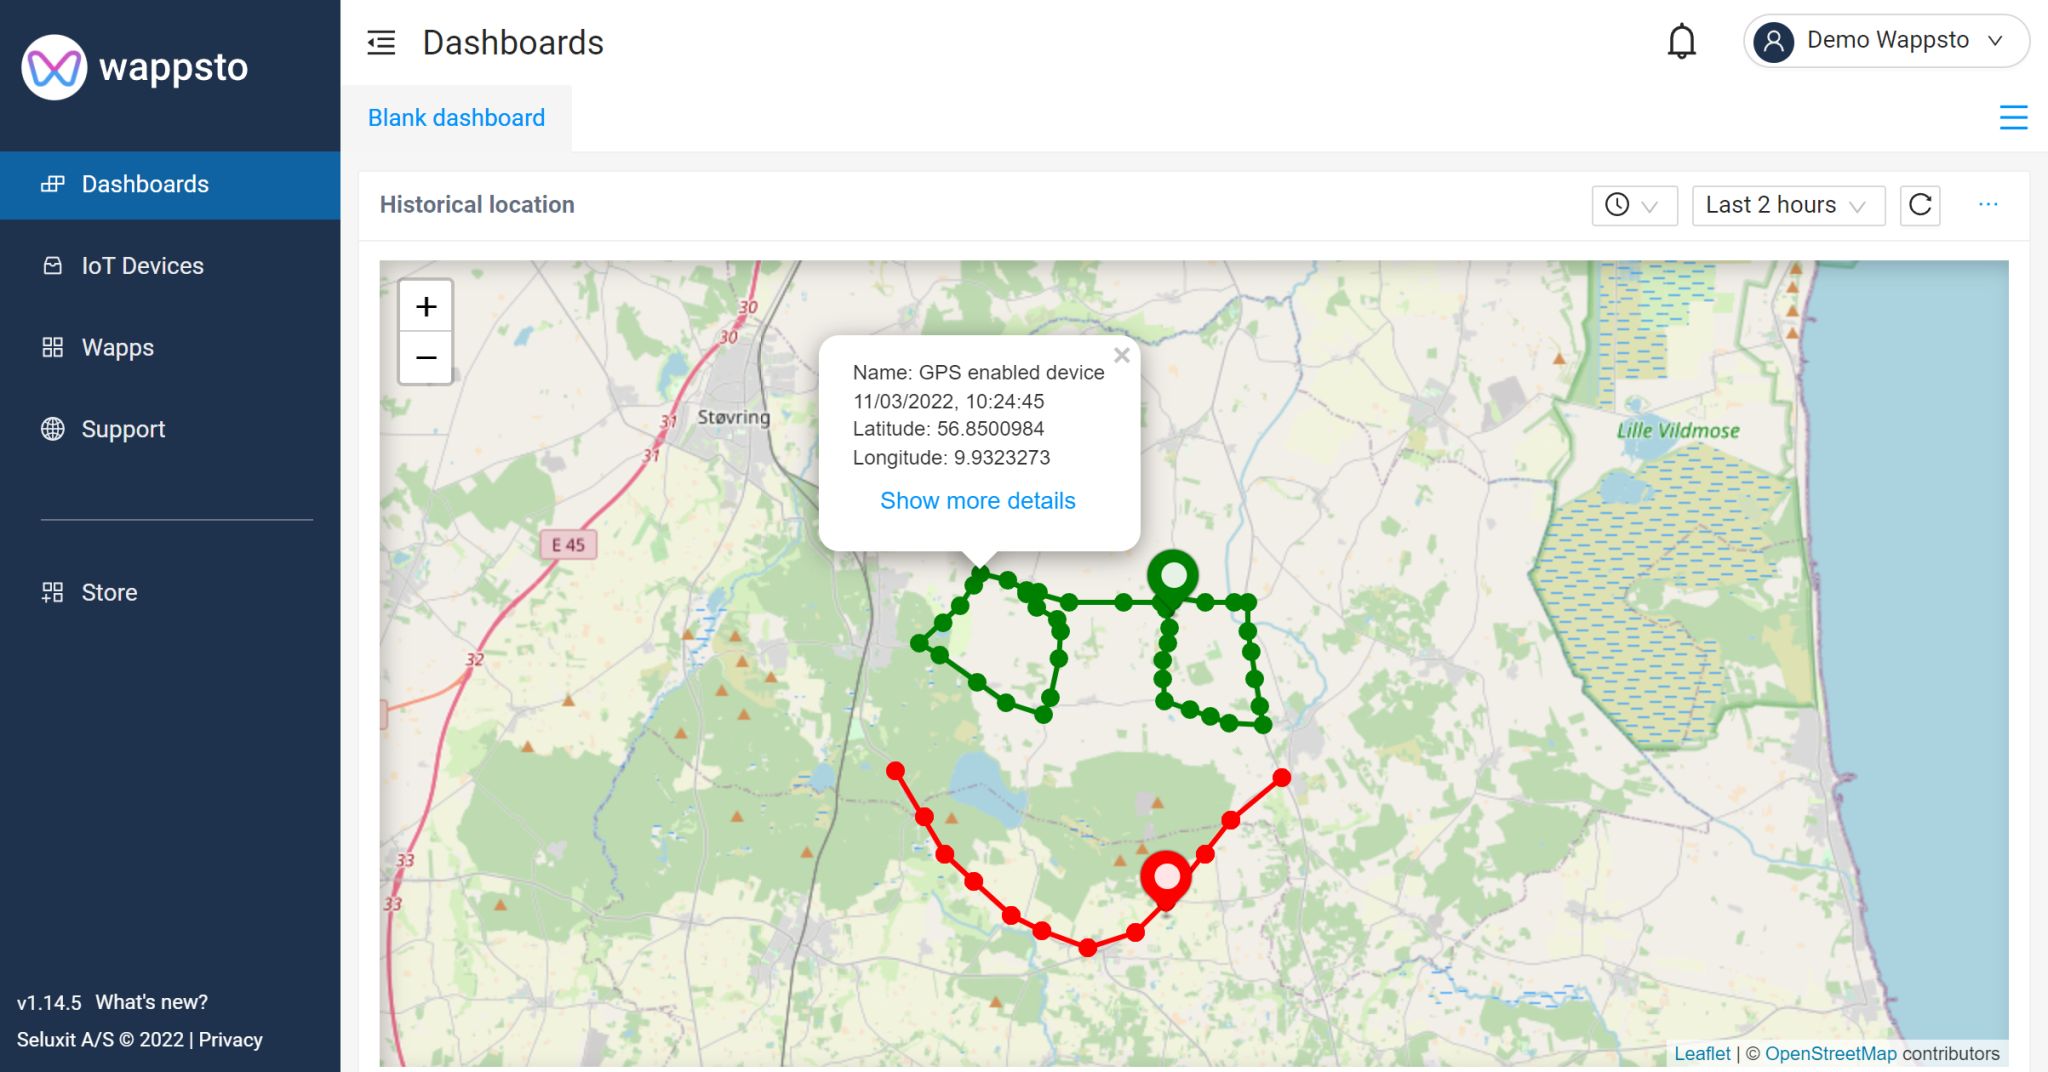
- Geolocation dashboard - Map overview of devices, possible to filter based on device alarms.

- Geolocation using filtered lists filter:

Blank and fleet management dashboard widgets
- Filtered list - configure device value limits that trigger alarms and visual cues in the geolocation dashboard.

-
Historical location widget - Draws on a map based on device locations within a configured timeframe. (maximum 1 mark per minute and minimum 50 meters between marks)
-
Chart widget - Choose and configure multiple data sources, timeframe, chart style and aggregation method. It can also be toggled to show live data.

- Live data example:

-
Value list widget - Show live data in a box together with control / desired state values.
-
Compass widget - Show the angle of a single device with live data.
-
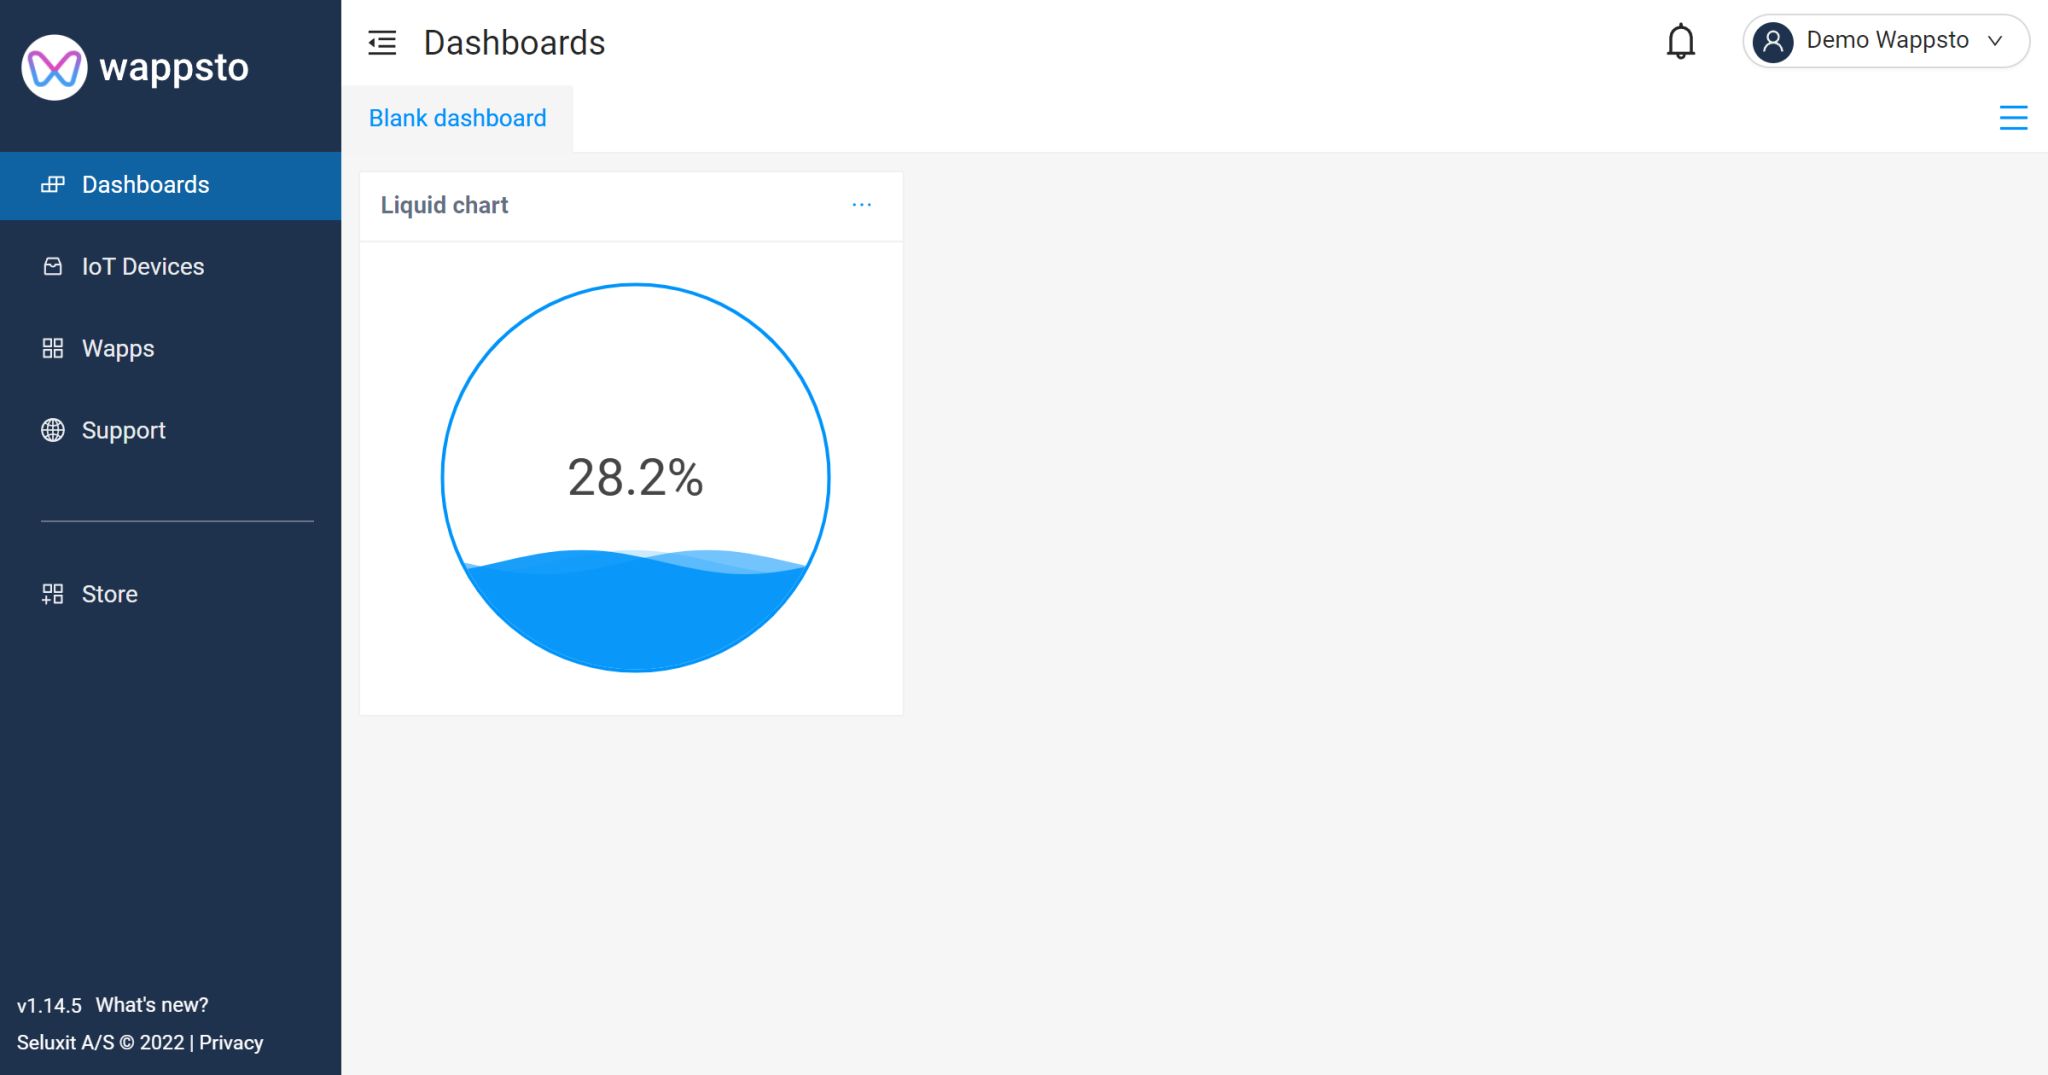
Liquid chart widget - Show the relative level of a single device with live data.
-
Gauge widget - Show live data from a single value in a gauge, with configurable color scheme and limits.
-
Current location widget - Show the current location of one or multiple devices alongside other widgets.


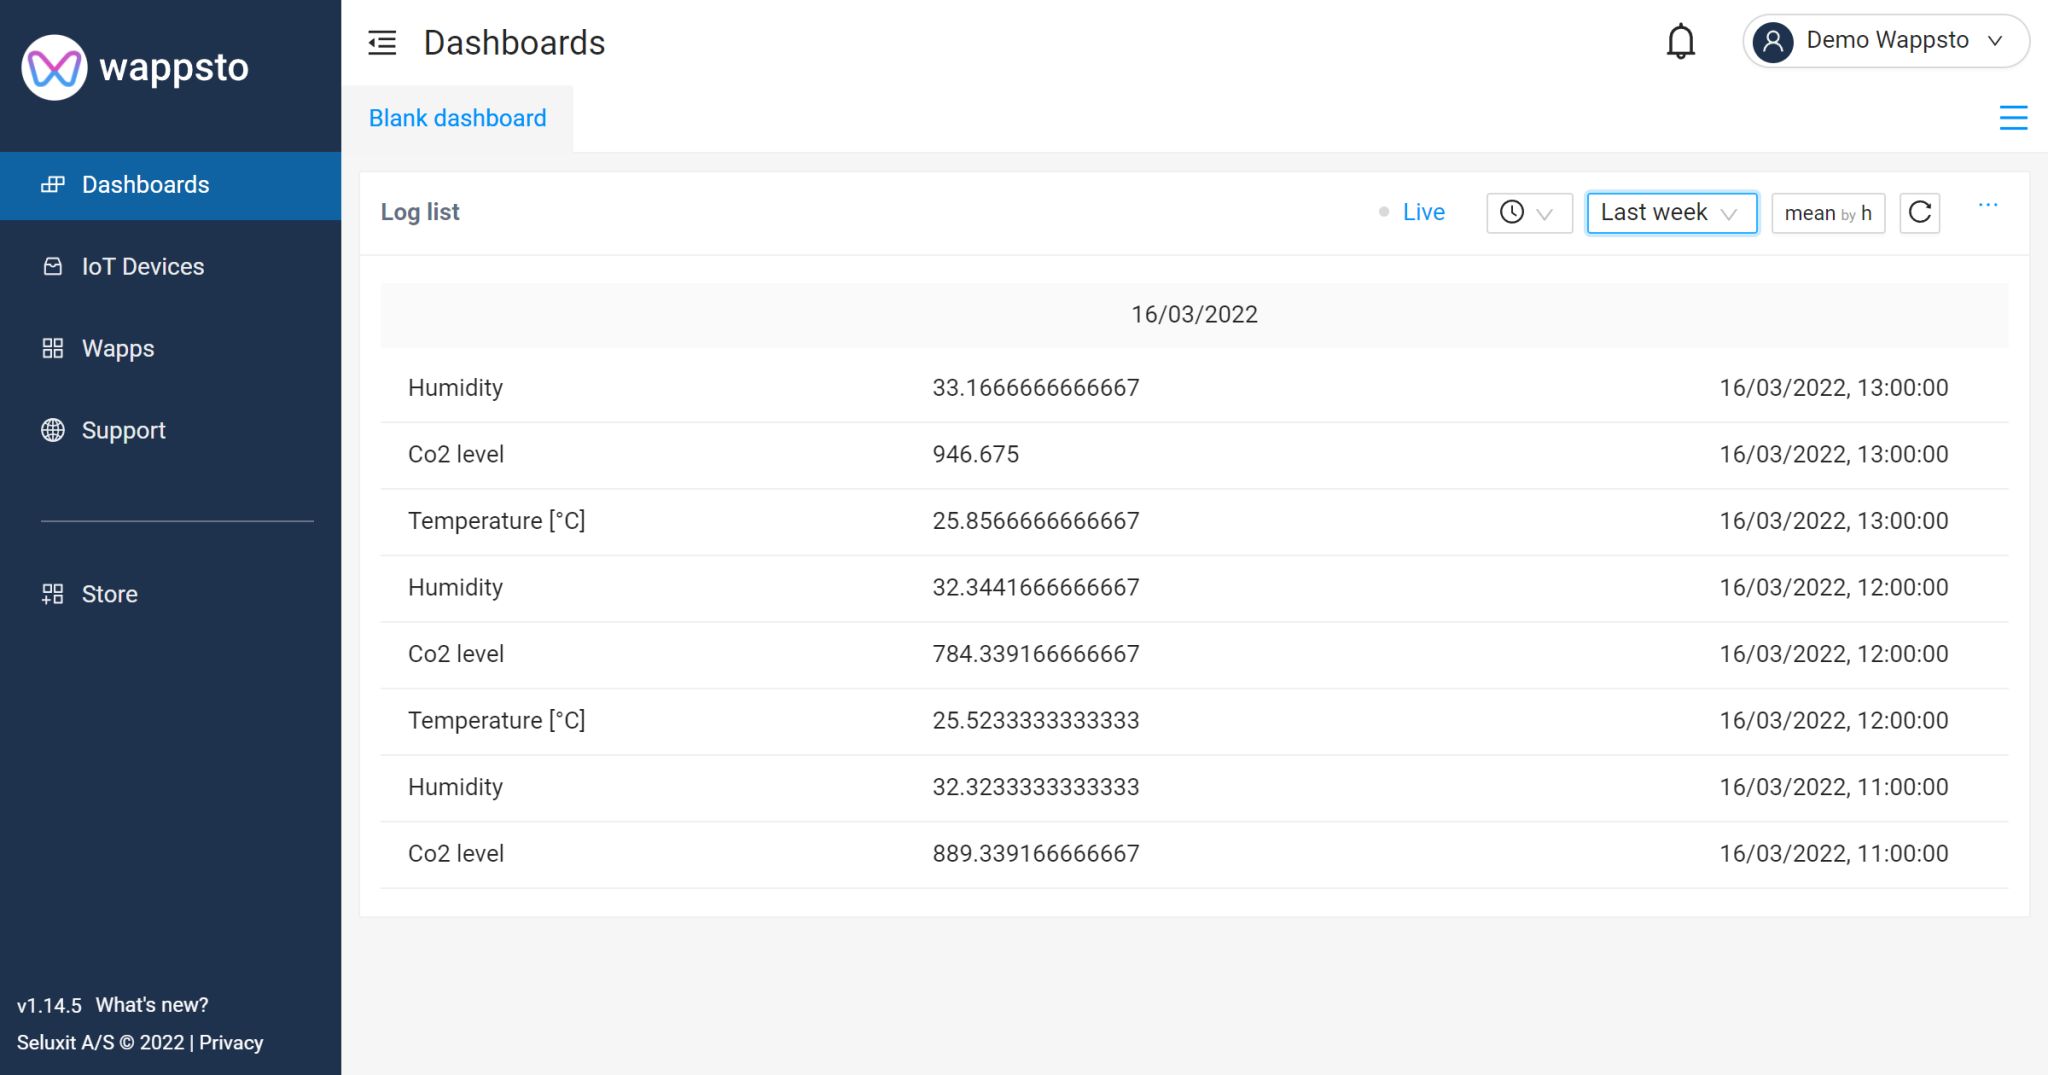
- Log list widget - Show logs of one or more devices or values, alongside other widgets.
Cloud automation and web APPS
- Twitter integration
- Hue integration
- Shelly integration
- Weather forecast integration (yr.no)
- Blocks - Cloud automations
- Blockly NoCode programming
- Blockly javascript programming
- Set up automations and interactions between all devices and services you have connected on Wappsto
- Twitter and Wappsto:bit cross-automation example: https://bit.wappsto.com/project/wappsto-blocks/
Sometimes overlooked features of Wappsto
- Distributed cloud service with multiple backups
- Device sharing
- End to end encryption (transport encryption)
- Device security (unique device and network keys)
- Data forwarding
- Data extraction (CSV)
- Smart login across platforms (email,google,facebook,apple login)
- Multi platform: Website + Smartphone APPs.
Getting Started
Hardware Requirement
- Wio Terminal x 1
- Computer x 1
- USB Type-C Cable x 1
Software Requirement
Please check this link.
Update Wio Terminal WiFi Firmware
Please check this link.
Wappsto Prerequisites
An account on Wappsto
It is also assumed you have created a account on Wappsto, if not please create one first.
Arduino IDE installed on your PC
If you do not have this, see https://www.arduino.cc/en/Guide
Install ArduinoJson library
From the library manager you need to install ArduinoJson library - see https://arduinojson.org/v6/doc/installation/ for more details.
Install this wappsto library
To install this library in Arduino Ide, download this project as a zip-file, click "Code" and choose "Download ZIP". Then choose "Sketch"->"Include Library"->"Add .Zip Library..." See https://docs.arduino.cc/software/ide-v1/tutorials/installing-libraries for details.
Generate certificates and id for a new device
For your physical device to identify itself towards Wappsto it needs a network id, the server CA certificate, and the client certificate/key - all these has to be generated on Wappsto.com and placed in (if matching the examples) called wappsto_config.h.
wappsto_config.h
As a help to generate this you can use the Python Script included in this repository in the folder generate_config_header. For a first time run, you may need to install the required libraries
cd <path to downloaded arduino_wappstoiot>
cd generate_config_header
pip install -r requirements.txt
To generate a header file:
- Go to the
generate_config_headerfolder:
cd generate_config_header
- Use the command:
python main.py --type arduino
-
Then you will be asked to login using email and password for your user on Wappsto.
-
Copy the newly generated file
wappsto_config.hto your Arduino sketch folder. Note if generated correctly it should have a valid UUID (a string similar, but different, to this"d7fafe76-b020-4594-8f2a-aae11c6b6589"defined for theconst char* network_uuid =line.
Note, if you have both pyhton2 and python3 installed you may need to use
pip3 install -r requirements.txt
python3 main.py --type arduino
If you get the error like belowing:
ImportError: cannot import name 'soft_unicode' from 'markupsafe'
Which it is due to a change in dependency for another library, it can be fixed using this command.
pip install -U MarkupSafe==0.20
Claiming and ownership - Not allowed to access values
If you get a "not allowed to access" values on the device you have created, it is because you either have not claimed it, or the ownership have been reset.
Since you would be the manfactorer you will still see the device on your list of networks, you can see it is online, but you will not be able to see values or control the device.
To claim a device, go to the "IoT Devices" tab on https://wappsto.com/devices click the "+ Add an IoT device" button in the top right corner, and enter the network UUID int the box.
If you click the delete button for a network, it will remove the ownership of the device, so it can be claimed by another user. Once a device have been claimed it can not be claimed by another.
This Wappsto library
Required structure
The network id is generated by Wappsto and is linked to the certificates.
├── "Network Name"
│   └── "Device 1 name"
│   |   └── "Value 1 name"
│   |   └── "Value 2 name"
|   |   ...
│   └── "Device 2 name"
│       └── "Value 1 name"
│       └── "Value 2 name"
...
Note that that "name" for device and value object have extra functionality, and rules.
- A network must not have have devices with identical names.
- A single device must not have values with identical names. (as the example above it is allowed to use the same name under a different device.)
The library will ask Wappsto if an device/value exists with that name before creating it, so it will link to the right value. If nothing have this name a new will be created. If a parent have multiple children with the same name the library will choose the first available.
If you change a name a new one will be created, but the old will not be delete. This you will have to do yourself, eg. using https://wappsto.com/devices
Initialize Wappsto
Wappsto needs a reference to WiFiClientSecure when created, example.
WiFiClientSecure client;
Wappsto wappsto(&client);
Set the config and connect
#include "wappsto_config.h"
...
wappsto.config(network_uuid, ca, client_crt, client_key);
if(wappsto.connect()) {
    // Connected
} else {
    // Failed to connect
}
Optional config parameters, log and ping
Besides the mandatory commands you can also set ping interval and log level:
wappsto.config(network_uuid, ca, client_crt, client_key, ping interval in minutes, log level);
- The ping interval will send a short package from the device to wappsto to keep the connection alive. If your device rarely sends data, it might be a good idea to add this to avoid timeout on the connection.
- The log level can print information from the wappsto library to the serial debug port - the following levels are possible:
   VERBOSE
   INFO
   WARNING
   ERROR
   NO_LOGS <- Default
Create your network
myNetwork = wappsto.createNetwork("Network Name");
Create a device
DeviceDescription_t myDeviceDescription = {
    .name = "Device name",
    .product = "Product name",
    .manufacturer = "Company name",
    .description = "Description of the product",
    .version = "1.0",
    .serial = "00001",
    .protocol = "Json-RPC",
    .communication = "WiFi",
};

myDevice = myNetwork->createDevice("Device Name", &myDeviceDescription);
Values
Values is probably what you are mostly interessted in, and can be one of these:
- Number - integers or decimals, these will be logged and shown as a graph.
- String - a human readable string (UTF-8)
- Blob - data, for example a base64 encoded image, hex values, etc.
- Xml - a complete xml document
Read and write data
Each value can have one or two data points:
- Report: Data read on the device and reported to the server [READ]
- Control: Data sent from the server to the device to control it [WRITE]
Your value may be one of them or both.
Value parameters
To explain the parameters, we will use an example for a temperature value placed in a living room.
- name: An name for the value, here "Living room"
- type: Is a help for the UI to find values of the right type, here "temperature"
- The PERMISSION_e parameter tells the library if it should create report and/or control for this value.
- READ -> report state
- WRITE -> control state
- READ_WRITE -> report and control state
- min: (Number only) lowest number (to be used by UI)
- max: For number highest numer, for string/blob maximum length
- step: (Number only) Step size for a number, for example 1 for integers, and 0.1 for decimals
- unit: (Numbers only) is there a unit for this number, in the temperature example it is °C
The first time a value is created a number will have the value NA, and the string/blob will be empty, for both control and report.
If the value exists, the data of the value will not change. If you want to value to update when the device reboots, you have to call report/control.
Create a number value
ValueNumber_t myNumberValueParameters = {   .name = "Living room",
                                            .type = "temperature", // value type
                                            .permission = READ_WRITE,
                                            .min = -20,
                                            .max = 100,
                                            .step = 0.1,
                                            .unit = "°C",
                                            .si_conversion = ""};

myNumberValue = myDevice->createValueNumber(&myNumberValueParameters);
Create a string value
ValueString_t myStringValueParameters = { .name = "Value String Name",
                                          .type = "value type",
                                          .permission = READ_WRITE,
                                          .max = 200,
                                          .encoding = ""};

myStringValue = myDevice->createValueString("Value String Name", "value type", READ_WRITE, &myStringValueParameters);
Create a blob value
ValueBlob_t myBlobValueParameters =  { .name = "Value Blob Name",
                                       .type = "value type",
                                       .permission = READ_WRITE,
                                       .max = 200,
                                       .encoding = ""};

myBlobValue = myDevice->createValueBlob(&myBlobValueParameters);
Create a xml value
ValueXml_t myXmlValueParameters =  { .name = "Value Xml Name",
                                     .type = "value type",
                                     .permission = READ_WRITE,
                                     .xsd = "test",
                                     .namespace = "test"};

myXmlValue = myDevice->createValueXml(&myXmlValueParameters);
Send a value report
int myInt = 123;
double myDouble = 42.7;

myNumberValue.report("987");    // You can send numbers as a string you format
myNumberValue.report(myInt);    // Report the number as an int
myNumberValue.report(myDouble); // Report the number as a double


myStringValue.report("Example string");

myBlobValue.report("A5FF2C");
Set a control value
Normally the control value will only be updated from wappsto.com, but you may need to set a current value when booting or in other situations. Setting this is similar to report:
int myInt = 123;
double myDouble = 42.7;

myNumberValue.control("987");    // You can send numbers as a string you format
myNumberValue.control(myInt);    // Set control as an int
myNumberValue.control(myDouble); // Set control as a double


myStringValue.control("Example string");

myBlobValue.control("A5FF2C");
Add wappsto in your loop function
For Wappsto to be able to receive data (control, refresh, and pings), it has to be included in your Arduino loop function - if not you will never receive any callbacks with data, and the connection may experience a timeout.
It is also recommended not to block the loop for extended periods of time.
wappsto.dataAvailable();
Receive a value control request
You can choose if you want the control data translated to a double, or if you want the string directly.
// Receive control with a number (double)
void controlNumberCallback(Value *value, double data, String timestamp)
{
    // handle control request
}

// Receive control with a string
void controlStringCallback(Value *value, String data, String timestamp)
{
    // handle control request
}

...
myNumberValue->onControl(&controlNumberCallback);
myStringValue->onControl(&controlStringCallback);
Receive a value refresh request (report value only)
void refreshNumberCallback(Value *value)
{
    // handle refresh request
}
...
myNumberValue->onRefresh(&refreshNumberCallback);
Getting last data and timestamp from value
You can access the last received/send data and timestamp by using these functions. For instance after a new boot, the last controlled state set in Wappsto.com will be retrieved, so your program and start with that state.
Note retriveing numberData from an empty value will return a 0;
String ctrlData = myNumberValue.getControlData();

double ctrlDataNumber = myNumberValue.getControlNumberData();

String ctrlTime = myNumberValue.getControlTimestamp();

String reportData = myNumberValue.getReportData();

double reportDataNumber = myNumberValue.getReportNumberData();

String reportTime = myNumberValue.getReportTimestamp();
For futher examples see the code in the example folder, or see 'File -> Examples -> Wappsto' in Arduino IDE.
Temperature Detecting Demo
Here we are going use prodived temperature example and display on the Wappsto as you see below:

- Step 1. After uploading the code, you can see it has shown connecting successfully at "IoT Devices" on the Wappsto website.

- Step 2. Click the "Dashboards" column at the left and select "Add widget"

- Step 3. These provided blocks can display data in serval ways, here we chose "Chart"

- Step 4. Select "Temperature Example" as we upload before and click "Next"

- Step 5. Configure the displayed data. Here we set the data displayed in "Line"

- Step 6. After all sets up, we are able to see the data output at the Dashboards
