Train and Deploy Your Own AI Model Into SenseCAP A1101
Overview
In this wiki, we will teach you how to train your own AI model for your specific application and then deploy it easily to the SenseCAP A1101 - LoRaWAN Vision AI Sensor. Let's get started!
Our current device firmware is compatible with EI. If you purchased the device after March 30, 2023, you need to flash the device back to the default firmware to follow this wiki.
Hardware introduction
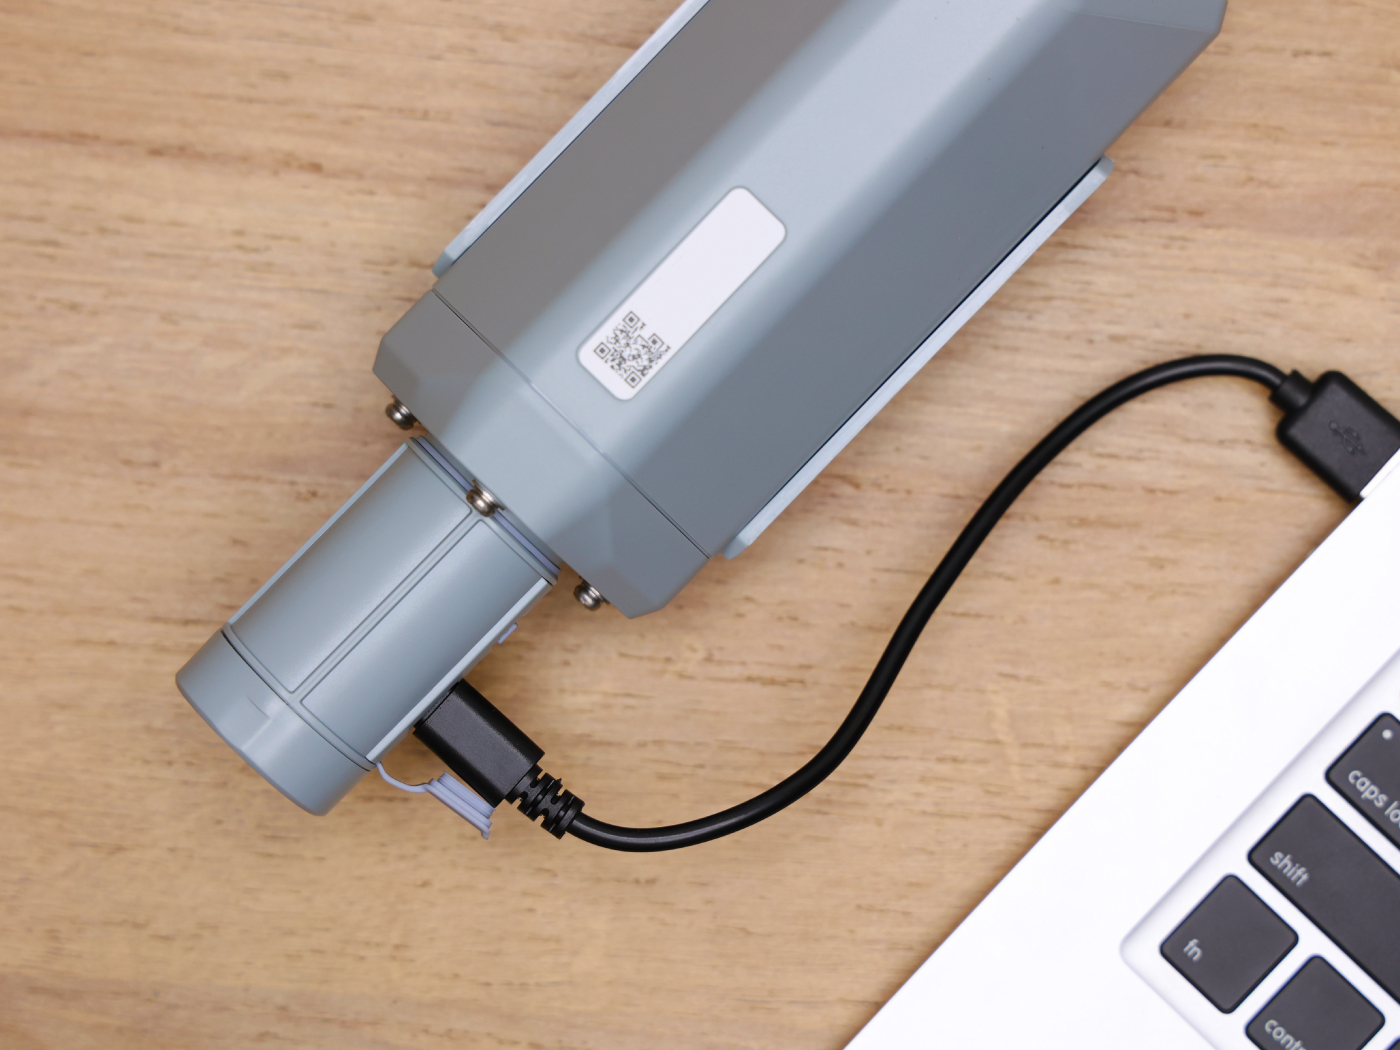
We will mainly use SenseCAP A1101 - LoRaWAN Vision AI Sensor throughout this wiki. So first, let's become familiar with this hardware.
SenseCAP A1101 - LoRaWAN Vision AI Sensor combines TinyML AI technology and LoRaWAN long-range transmission to enable a low-power, high-performance AI device solution for outdoor use. This sensor features Himax's high-performance, low-power AI vision solution which supports the Google TensorFlow Lite framework and multiple TinyML AI platforms. Different models can implement different AI functions, for example, pest detection, people counting, object recognition. Users can adopt models provided by Seeed, generate their own models through AI training tools, or procure deployable, commercial models from Seeed's partner model providers.
Software introduction
We will be using the following software technologies in this wiki
- Roboflow - for annotating
- YOLOv5 - for training
- TensorFlow Lite - for inferencing
What is Roboflow?
Roboflow is an annotation tool based online. This tool allows you to easily annotate all your images, add further processing to these images and export the labeled dataset into different formats such as YOLOV5 PyTorch, Pascal VOC, and more! Roboflow also has public datasets readily available to users.
What is YOLOv5?
YOLO is an abbreviation for the term ‘You Only Look Once’. It is an algorithm that detects and recognizes various objects in an image in real-time. Ultralytics YOLOv5 is the version of YOLO based on the PyTorch framework.
What is TensorFlow Lite?
TensorFlow Lite is an open-source, product ready, cross-platform deep learning framework that converts a pre-trained model in TensorFlow to a special format that can be optimized for speed or storage. The special format model can be deployed on edge devices like mobiles using Android or iOS or Linux based embedded devices like Raspberry Pi or Microcontrollers to make the inference at the Edge.
Wiki structure
This wiki will be divided into three main sections
- Train your own AI model with a public dataset
- Train your own AI model with your own dataset
- Deploy the trained AI model into SenseCAP A1101
The first section will be the fastest way to build your own AI model with the least number of steps. The second section will take some time and effort to build your own AI model, but it will be definitely worth the knowledge. The third section about deploying the AI model can be done either after first or second section.
So there are two ways to follow this wiki:
However, we encourage to follow the first way at first and then move onto the second way.
1. Train your own AI model with a public dataset
The very first step of an object detection project is to obtain data for training. You can either download datasets available publicly or create your own dataset!
But what is the fastest and easiest way to get started with object detection? Well...Using public datasets can save you a lot of time that you would otherwise spend on collecting data by yourself and annotating them. These public datasets are already annotated out-of-the-box, giving you more time to focus on your AI vision applications.
Hardware preparation
- SenseCAP A1101 - LoRaWAN Vision AI Sensor
- USB Type-C cable
- Windows/ Linux/ Mac with internet access
Software preparation
- No need to prepare additional software
Use publicly available annotated dataset
You can download a number of publically available datasets such as the COCO dataset, Pascal VOC dataset and much more. Roboflow Universe is a recommended platform which provides a wide-range of datasets and it has 90,000+ datasets with 66+ million images available for building computer vision models. Also, you can simply search open-source datasets on Google and choose from a variety of datasets available.
-
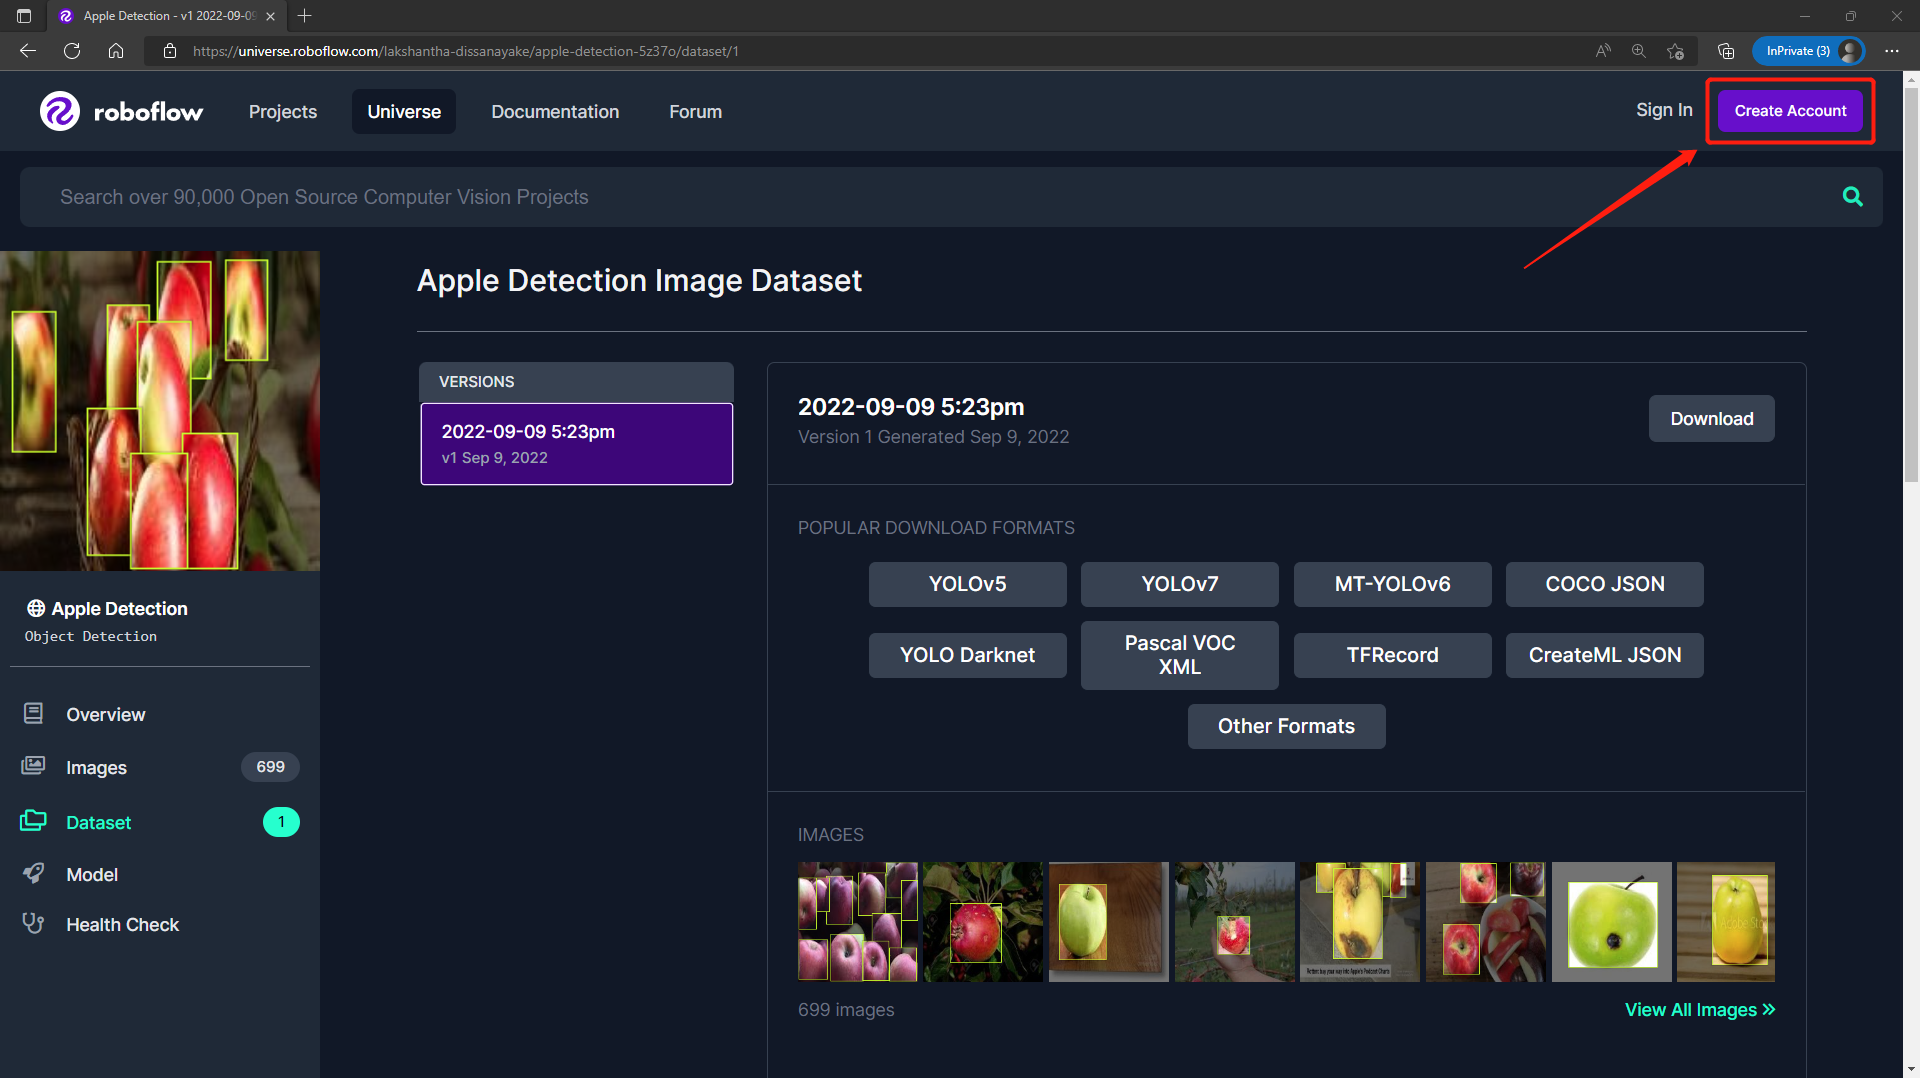
Step 1. Visit this URL to access an Apple Detection dataset available publicly on Roboflow Universe
-
Step 2. Click Create Account to create a Roboflow account
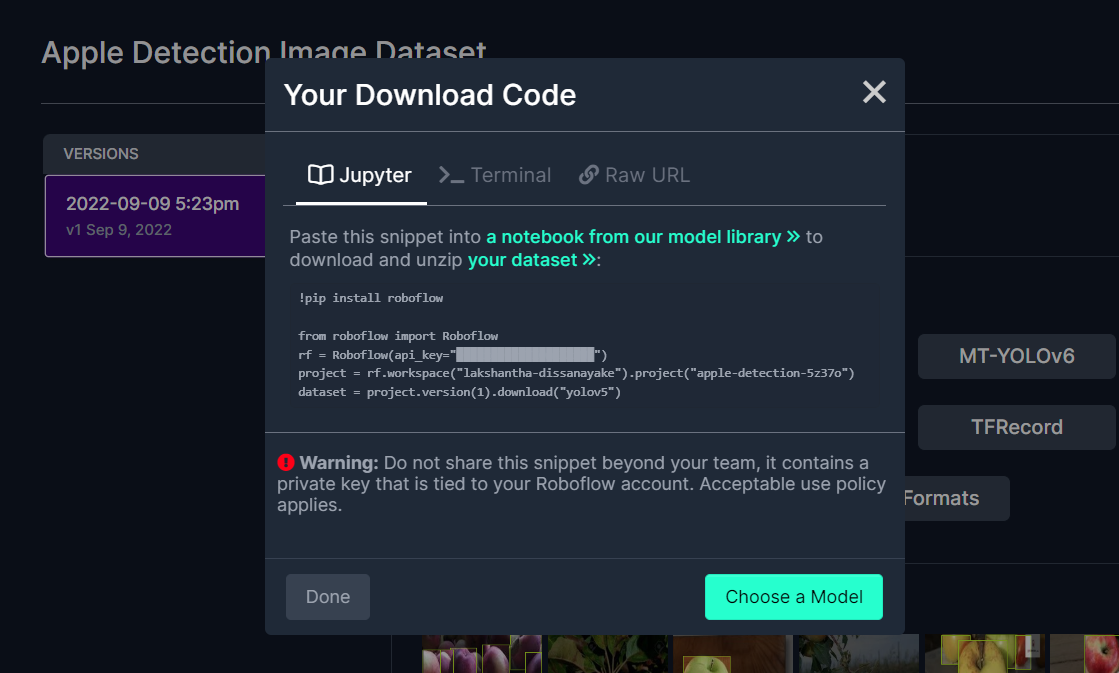
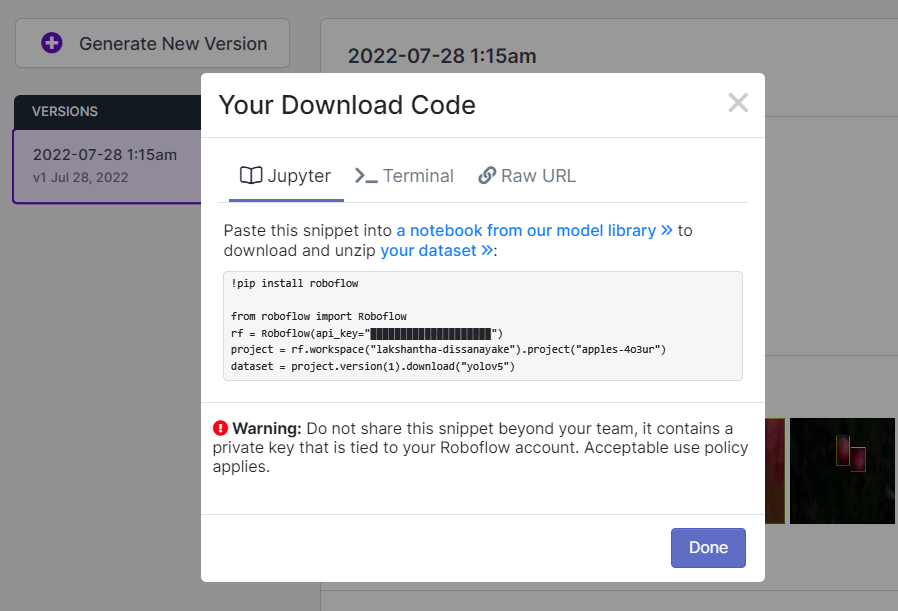
- Step 3. Click Download, select YOLO v5 PyTorch as the Format, click show download code and click Continue

This will generate a code snippet that we will use later inside Google Colab training. So please keep this window open in the background.
Train using YOLOv5 on Google Colab
After we have chosen a public dataset, we need to train the dataset. Here we use a Google Colaboratory environment to perform training on the cloud. Furthermore, we use Roboflow api within Colab to easily download our dataset.
Click here to open an already prepared Google Colab workspace, go through the steps mentioned in the workspace and run the code cells one by one.
Note: On Google Colab, in the code cell under Step 4, you can directly copy the code snippet from Roboflow as mentioned above
It will walkthrough the following:
- Setup an environment for training
- Download a dataset
- Perform the training
- Download the trained model

For an apple detection dataset with 699 images, it took around 7 minutes to finish the training process on Google Colab running on NVIDIA Tesla T4 GPU with 16GB GPU memory.
If you followed the above Colab project, you know that you can load 4 models to the device all at once. However, please note that only one model can be loaded at a time. This can be specified by the user and will be explained later in this wiki.
Deploy and inference
If you directly want to jump to section 3 which explains how to deploy the trained AI model into SenseCAP A1101 and perform inference, click here.
2. Train your own AI model with your own dataset
If you want to build specific object detection projects where the public datasets do not have the objects that you want to detect, you might want to build your own dataset. When you record data for your own dataset, you have to make sure that you cover all angles (360 degrees) of the object, place the object in different environments, different lighting and different weather conditions. After recording your own dataset, you also have to annotate the images in the datset. All these steps will be convered in this section.
Eventhough there are different methods of collecting data such as using a mobile phone camera, the best way to collect data is to use the in-built camera on the SenseCAP A1101. This is because the colors, image quality and other details will be similar when we perform inference on SenseCAP A1101 which makes the overall detection more accurate.
Hardware preparation
- SenseCAP A1101 - LoRaWAN Vision AI Sensor
- USB Type-C cable
- Windows/ Linux/ Mac with internet access
Software preparation
Now let's setup the software. The software setup for Windows, Linux and Intel Mac will be same whereas for M1/M2 Mac will be different.
Windows, Linux, Intel Mac
-
Step 1. Make sure Python is already installed on the computer. If not, visit this page to download and install latest version of Python
-
Step 2. Install the following dependency
pip3 install libusb1
M1/ M2 Mac
- Step 1. Install Homebrew
/bin/bash -c "$(curl -fsSL https://raw.githubusercontent.com/Homebrew/install/HEAD/install.sh)"
- Step 2. Install conda
brew install conda
- Step 3. Download libusb
wget https://conda.anaconda.org/conda-forge/osx-arm64/libusb-1.0.26-h1c322ee_100.tar.bz2
- Step 4. Install libusb
conda install libusb-1.0.26-h1c322ee_100.tar.bz2
You need to make sure your BootLoader version is greater than 2.0.0 before you can change the firmware to do the following. If you are not sure, please check the BootLoader version by following the steps mentioned in this section, and if the version is less than 2.0.0, please update the BootLoader by following the steps mentioned in this section
Collect dataset
- Step 1. Connect SenseCAP A1101 to PC by using USB Type-C cable
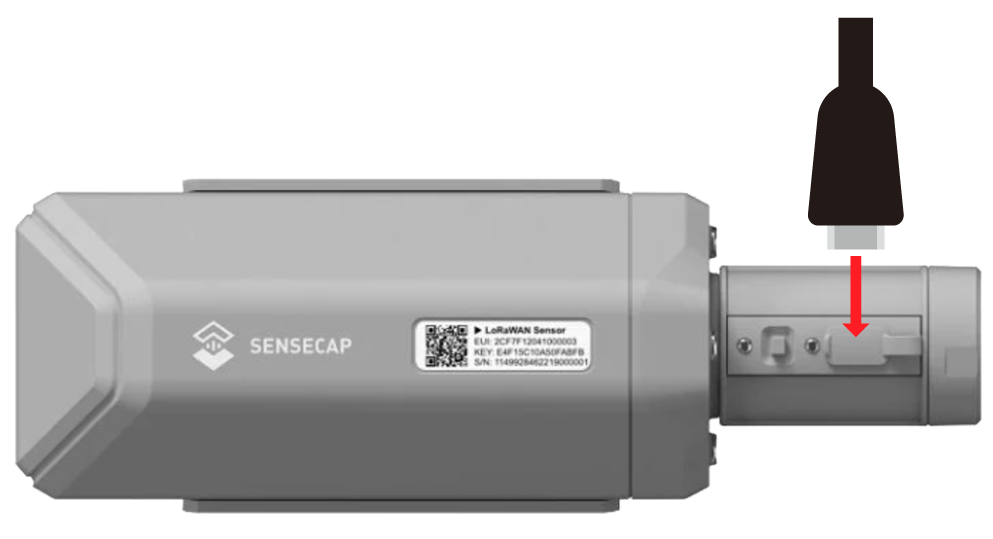
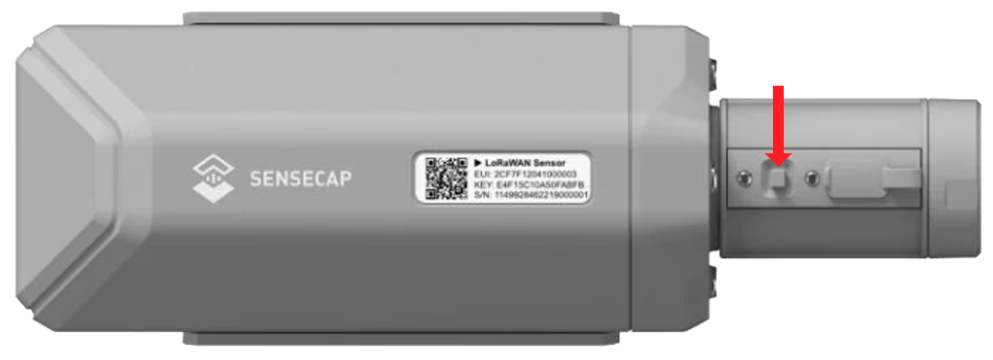
- Step 2. Double click the boot button to enter boot mode
After this you will see a new storage drive shown on your file explorer as SENSECAP

- Step 3. Drag and drop this .uf2 file to SENSECAP drive
As soon as the uf2 finishes copying into the drive, the drive will disappear. This means the uf2 has been successfully uploaded to the module.
-
Step 4. Copy and paste this Python script inside a newly-created file named capture_images_script.py on your PC
-
Step 5. Execute the Python script to start capturing images
python3 capture_images_script.py
By default, it will capture an image every 300ms. If you want to change this, you can run the script in this format
python3 capture_images_script.py --interval <time_in_ms>
For example, to capture an image every second
python3 capture_images_script.py --interval 1000
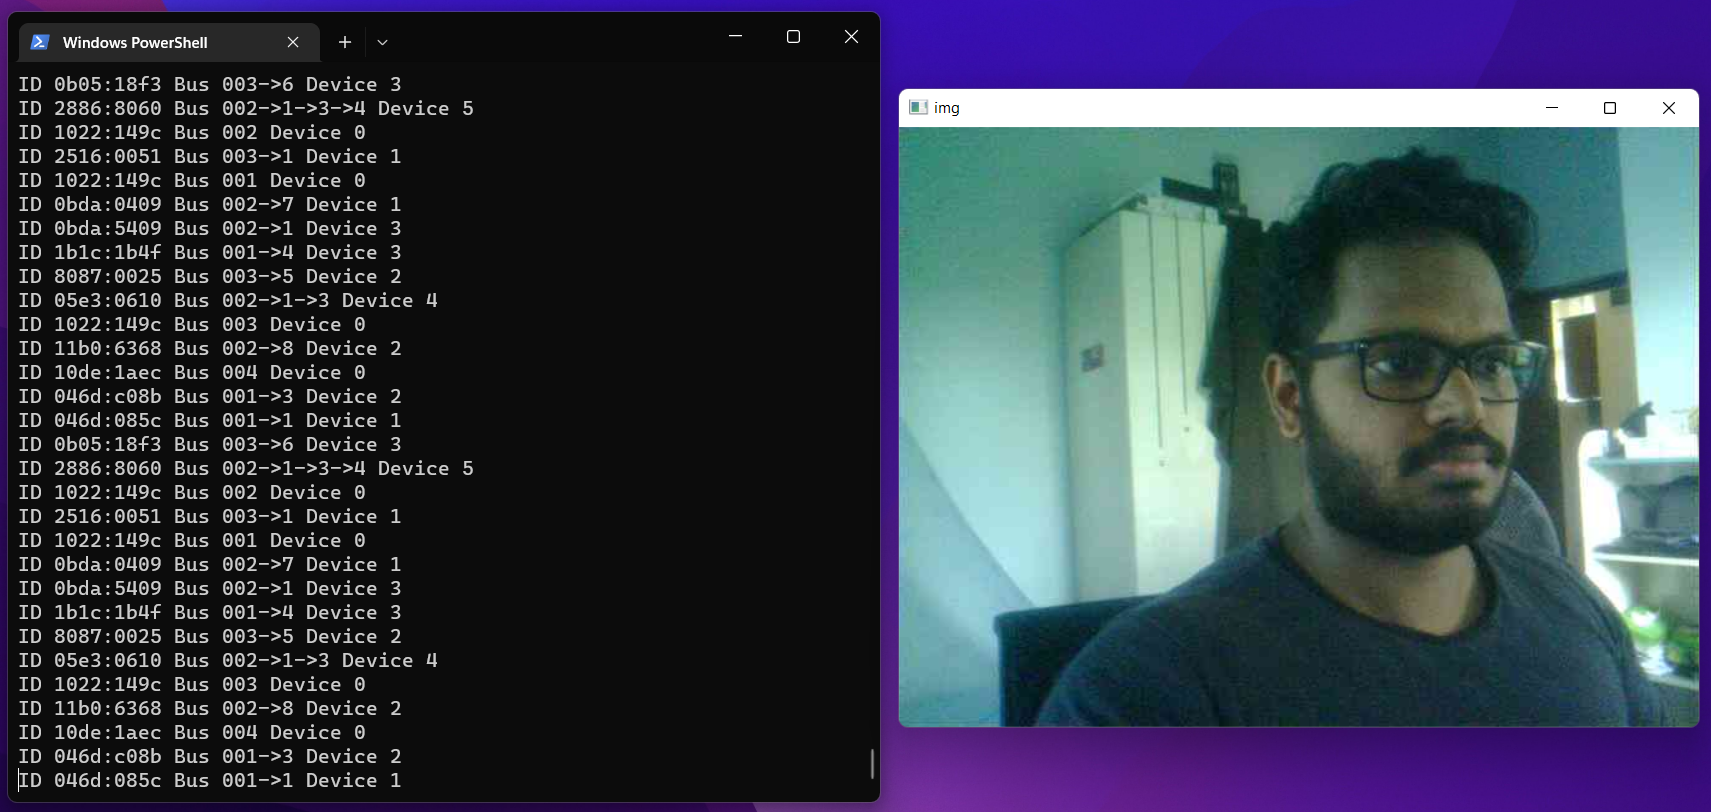
After the above script is executed, SenseCAP A1101 will start to capture images from the in-built cameras continuosly and save all of them inside a folder named save_img
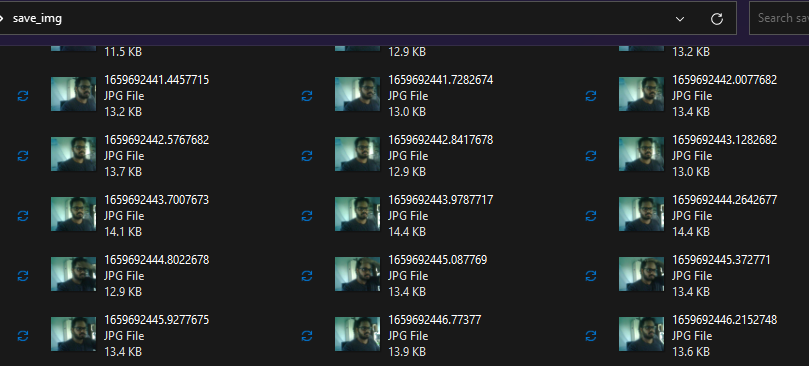
Also, it will open a preview window while it is recording
After you have enough images captured, click on the terminal window and press the following key combinations to stop the capturing process
- Windows: Ctrl + Break
- Linux: Ctrl + Shift + \
- Mac: CMD + Shift + \
Change device firmware after image collection
After you have finished recording images for the dataset, you need to make sure to change the firmware inside the SenseCAP A1101 back to original, so that you can again load object detection models for detection. Let's go through the steps now.
-
Step 1. Enter Boot mode on SenseCAP A1101 as explained before
-
Step 2. Drag and drop this .uf2 file to SENSECAP drive according to your device
As soon as the uf2 finishes copying into the drive, the drive will disappear. This means the uf2 has been successfully uploaded to the module.
Annotate dataset using Roboflow
If you use your own dataset, you will need to annotate all the images in your dataset. Annotating means simply drawing rectangular boxes around each object that we want to detect and assign them labels. We will explain how to do this using Roboflow.
Roboflow is an annotation tool based online. Here we can directly import the video footage that we have recorded into Roboflow and it will be exported into a series of images. This tool is very convenient because it will let us help distribute the dataset into "training, validation and testing". Also this tool will allow us to add further processing to these images after labelling them. Furthermore, it can easily export the labelled dataset into YOLOV5 PyTorch format which is what we exactly need!
For this wiki, we will use a dataset with images containing apples so that we can detect apples later on and do counting as well.
-
Step 1. Click here to sign up for a Roboflow account
-
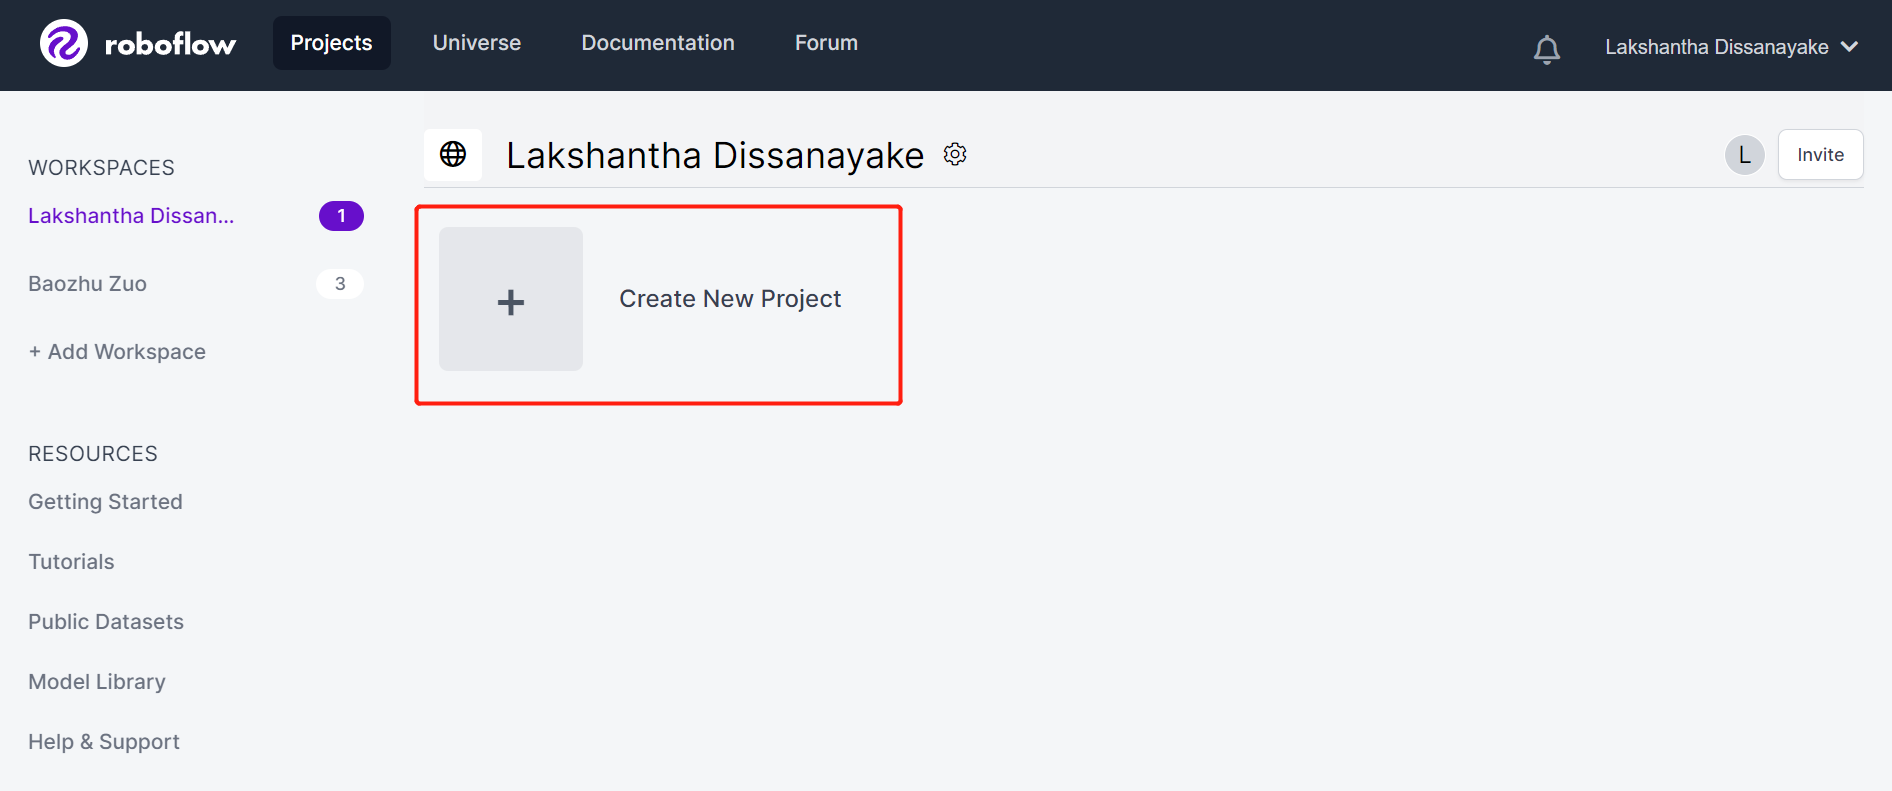
Step 2. Click Create New Project to start our project
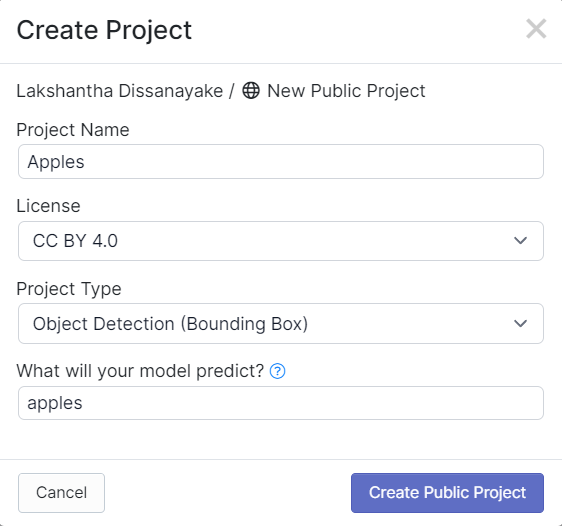
- Step 3. Fill in Project Name, keep the License (CC BY 4.0) and Project type (Object Detection (Bounding Box)) as default. Under What will your model predict? column, fill in an annotation group name. For example, in our case we choose apples. This name should highlight all of the classes of your dataset. Finally, click Create Public Project.
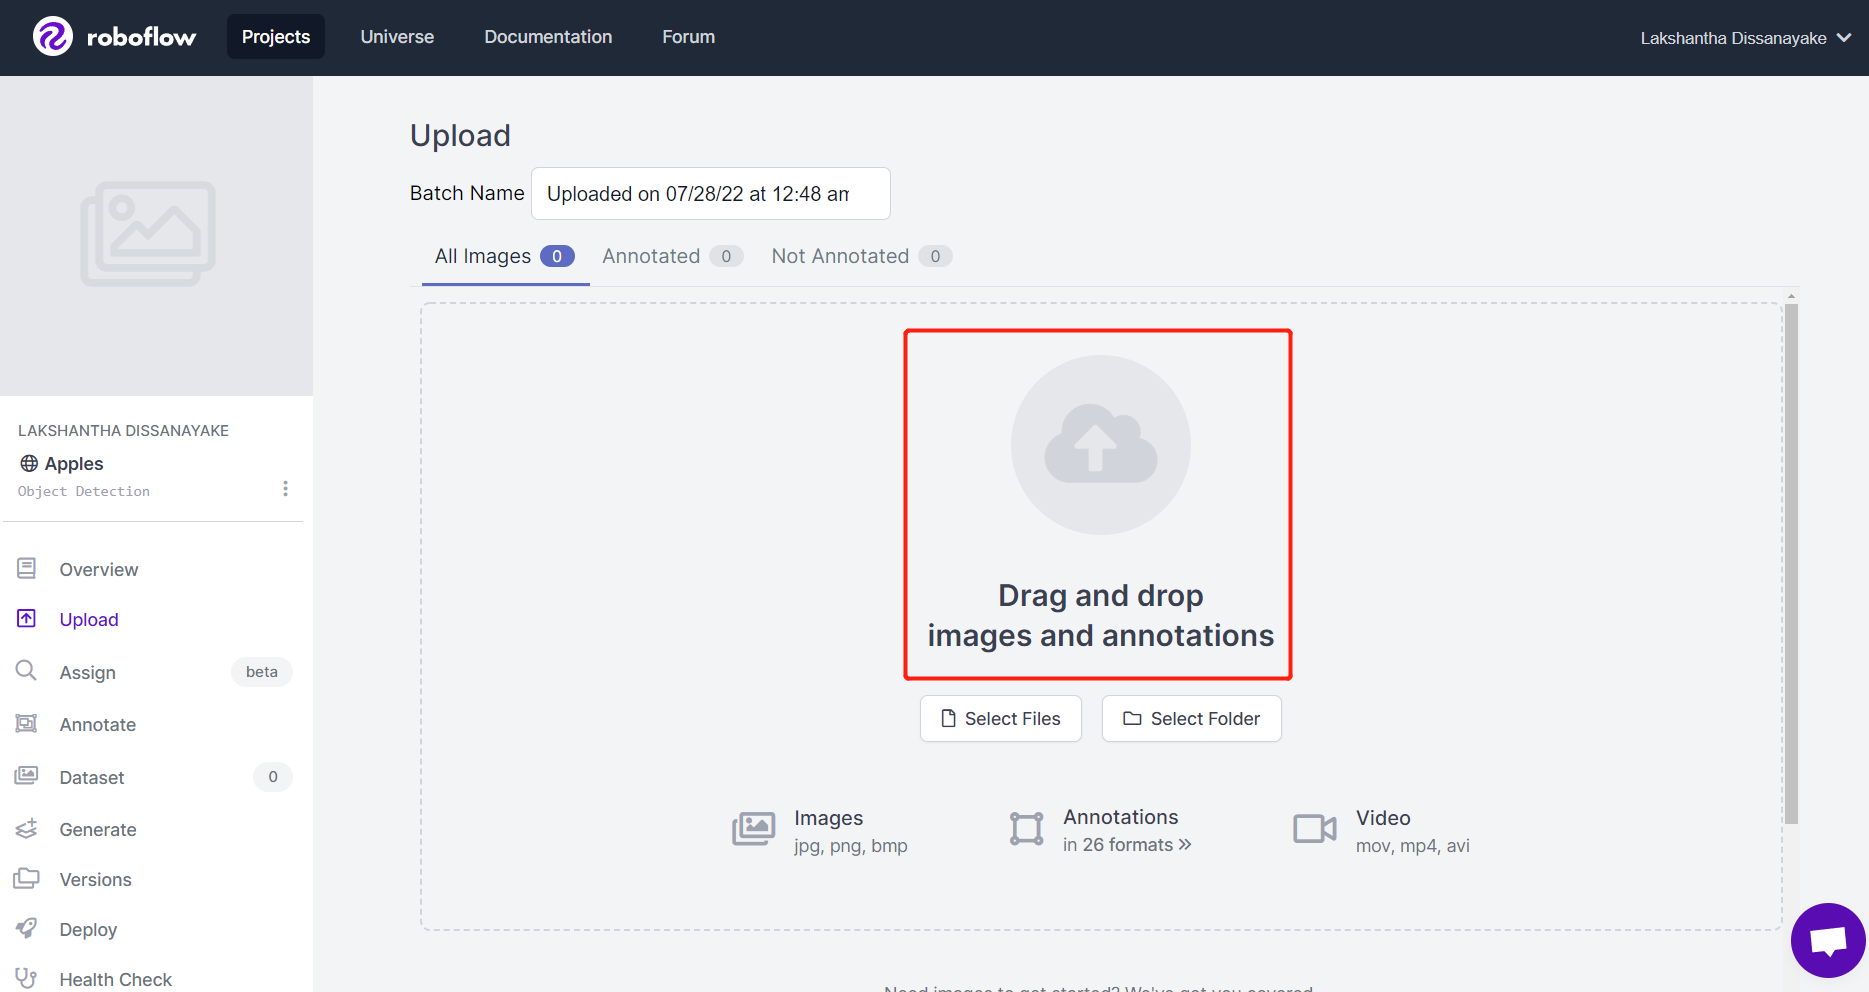
- Step 4. Drag and drop the images that you have captured using SenseCAP A1101
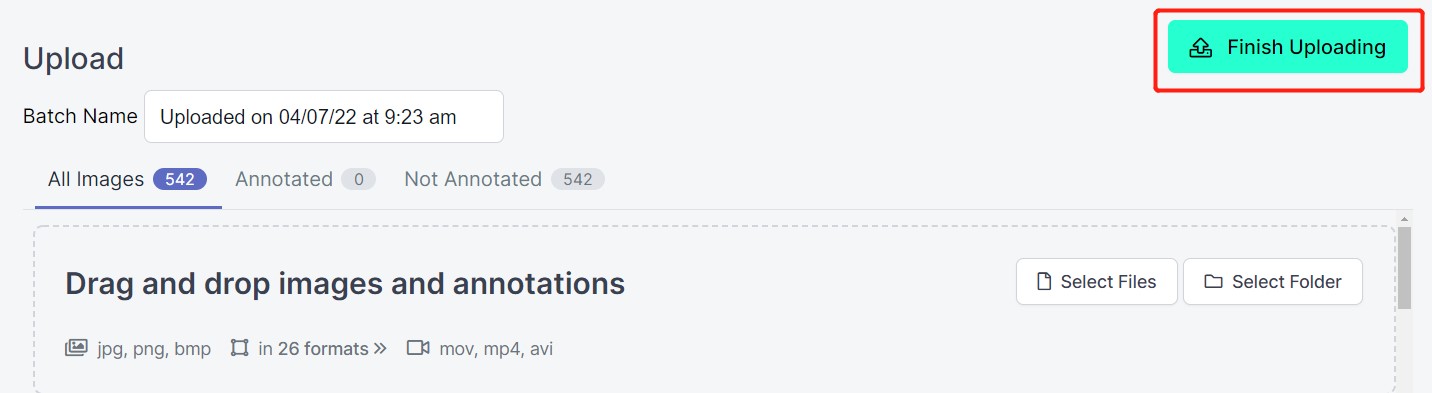
- Step 5. After the images are processed, click Finish Uploading. Wait patiently until the images are uploaded.
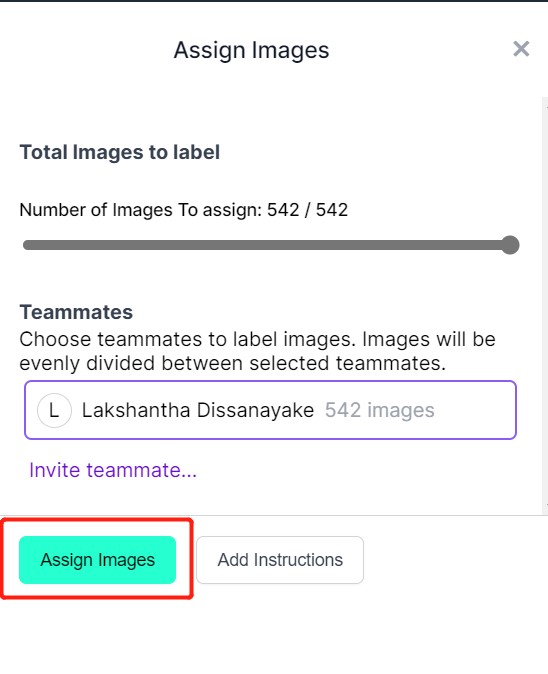
- Step 6. After the images are uploaded, click Assign Images
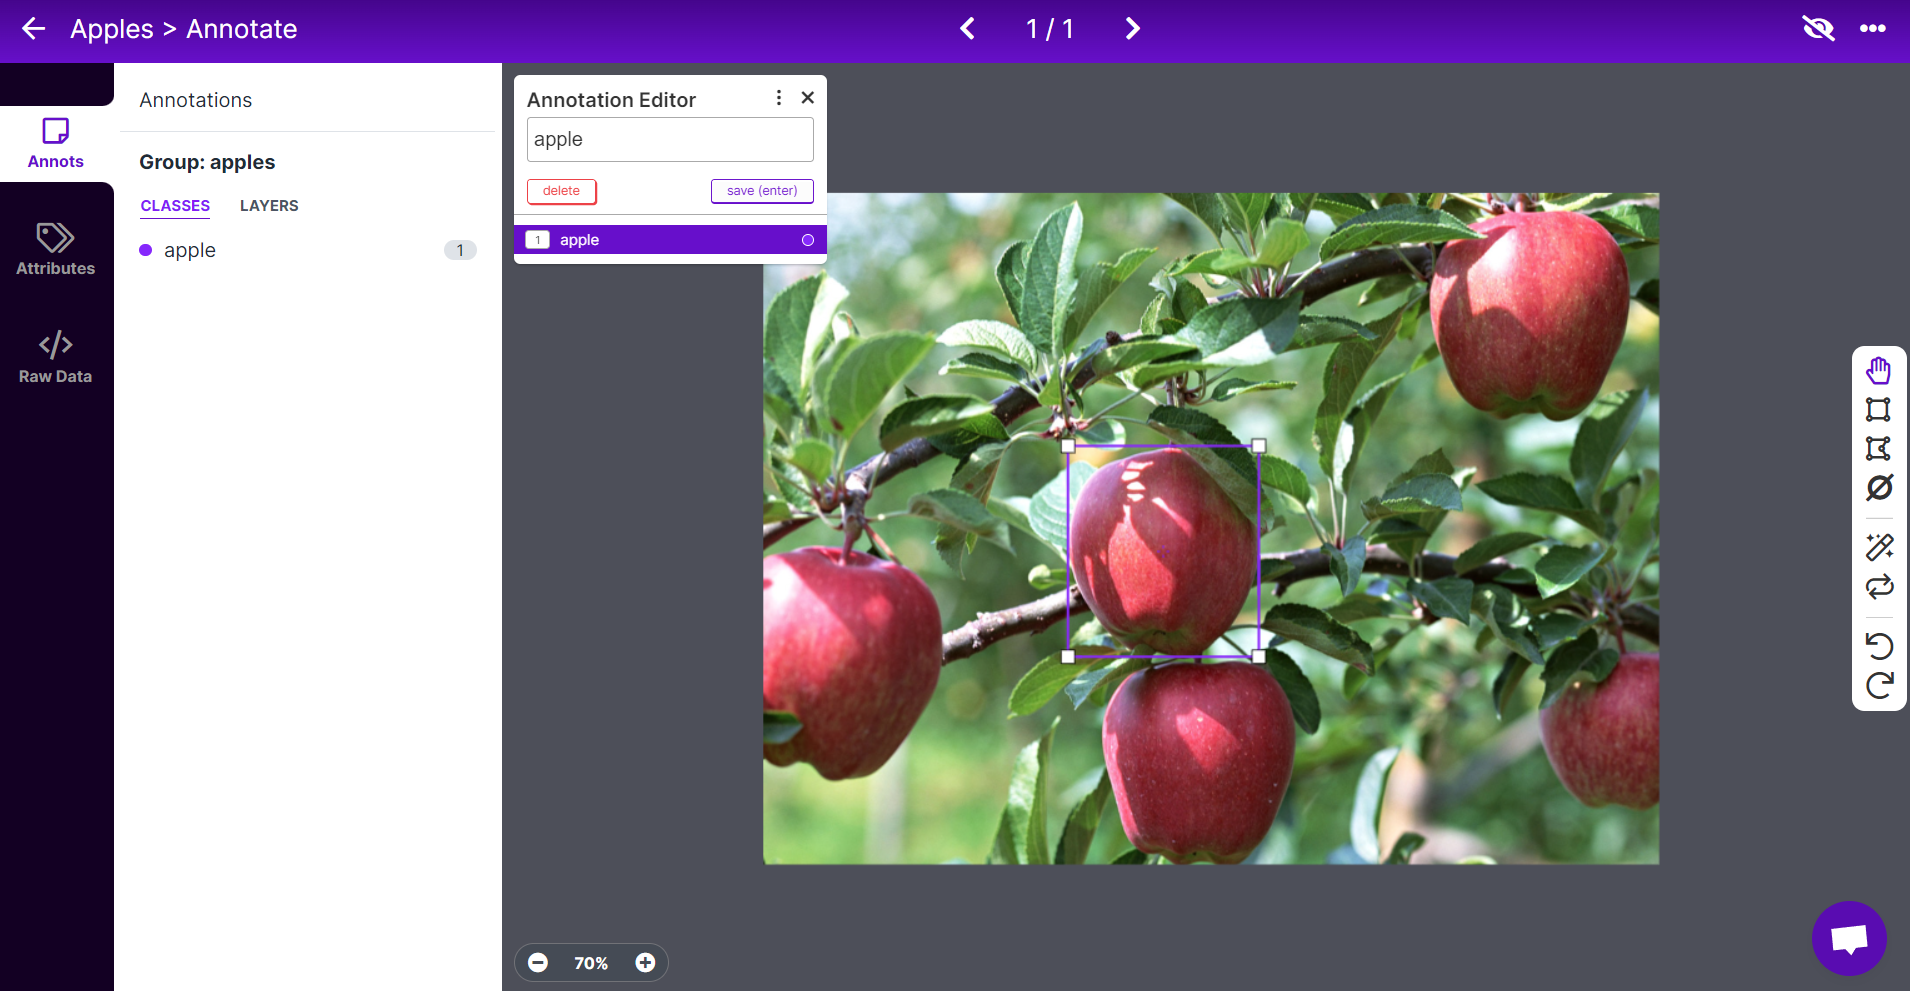
- Step 7. Select an image, draw a rectangular box around an apple, choose the label as apple and press ENTER
- Step 8. Repeat the same for the remaining apples
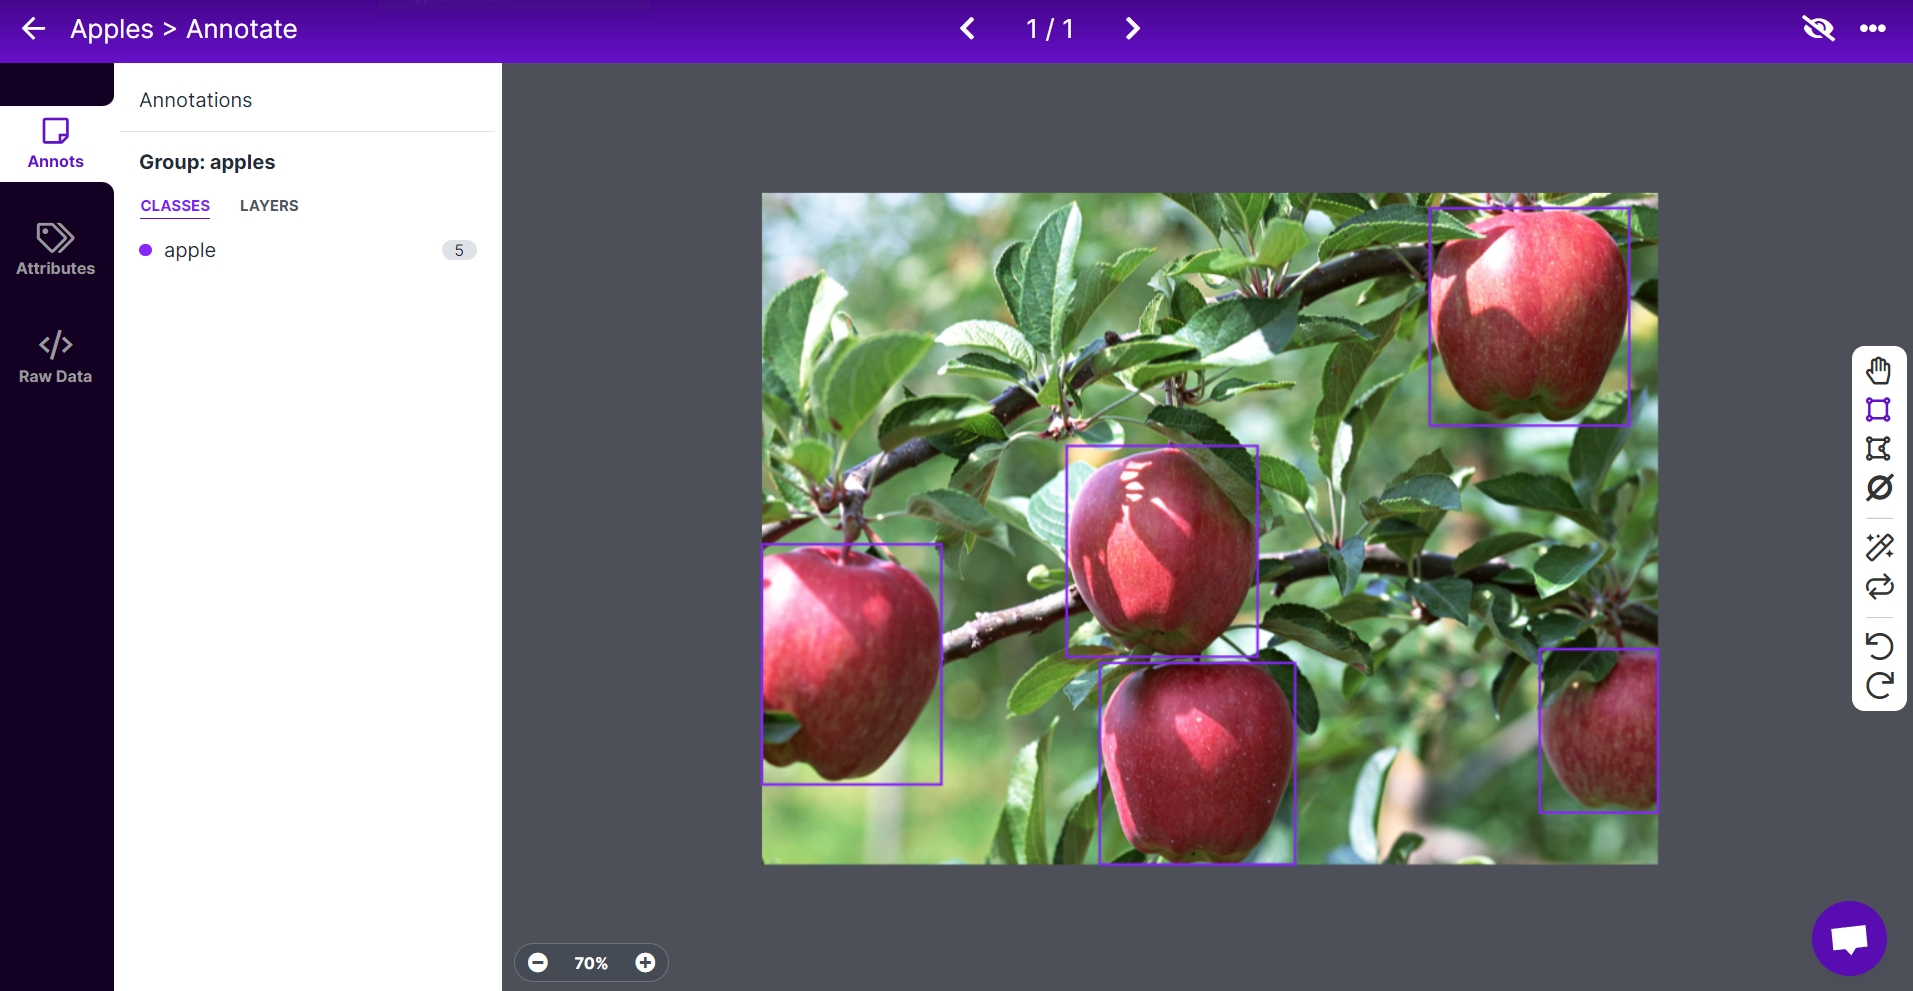
Note: Try to label all the apples that you see inside the image. If only a part of an apple is visible, try to label that too.
- Step 9. Continue to annotate all the images in the dataset
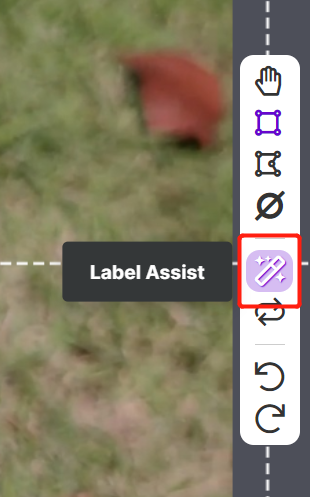
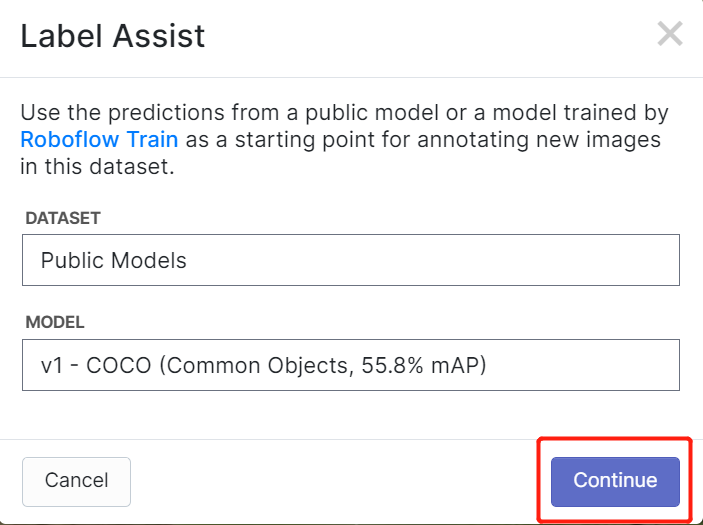
Roboflow has a feature called Label Assist where it can predict the labels beforehand so that your labelling will be much faster. However, it will not work with all object types, but rather a selected type of objects. To turn this feature on, you simply need to press the Label Assist button, select a model, select the classes and navigate through the images to see the predicted labels with bounding boxes
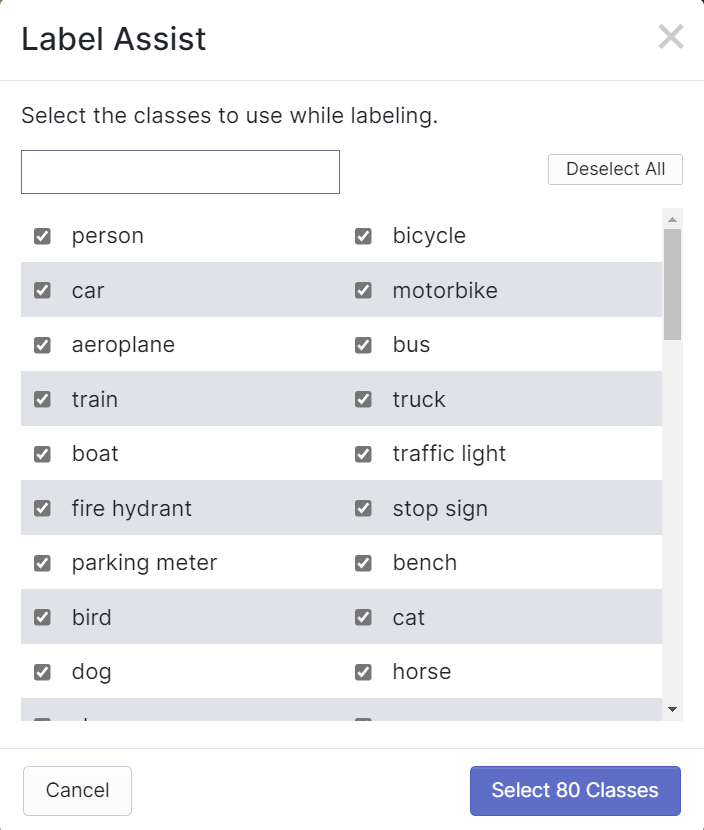
As you can see above, it can only help to predict annotations for the 80 classes mentioned. If your images do not contain the object classes from above, you cannot use the label assist feature.
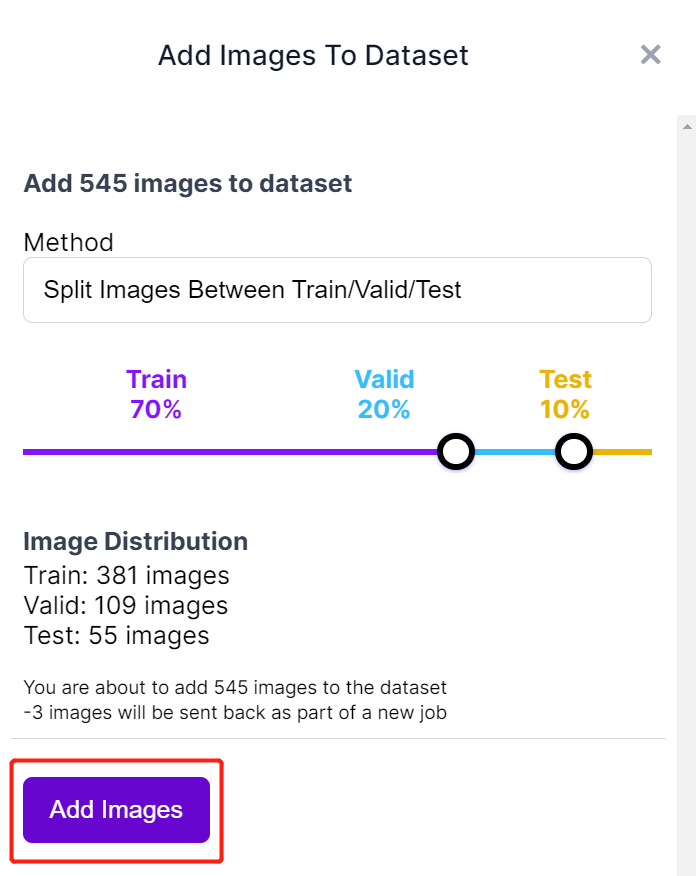
- Step 10. Once labelling is done, click Add images to Dataset

- Step 11. Next we will split the images between "Train, Valid and Test". Keep the default percentages for the distribution and click Add Images
- Step 12. Click Generate New Version

- Step 13. Now you can add Preprocessing and Augmentation if you prefer. Here we will change the Resize option to 192x192
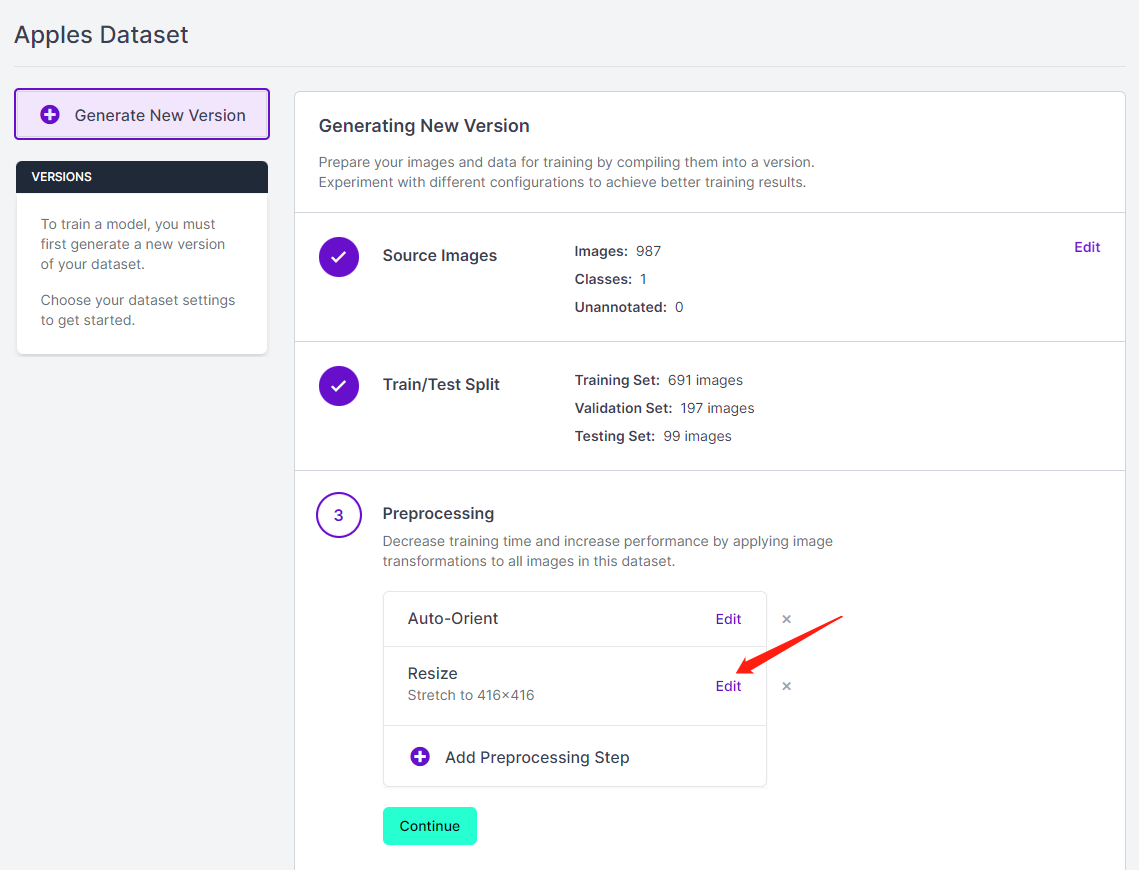
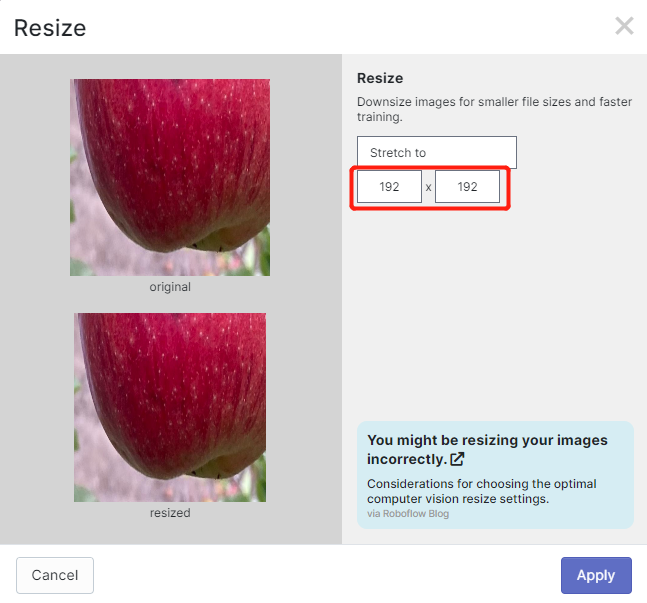
Here we change the image size to 192x192 because we will use that size for training and the training will be faster. Otherwise, it will have to convert all images to 192x192 during the training process which consumes more CPU resources and makes the training process slower.
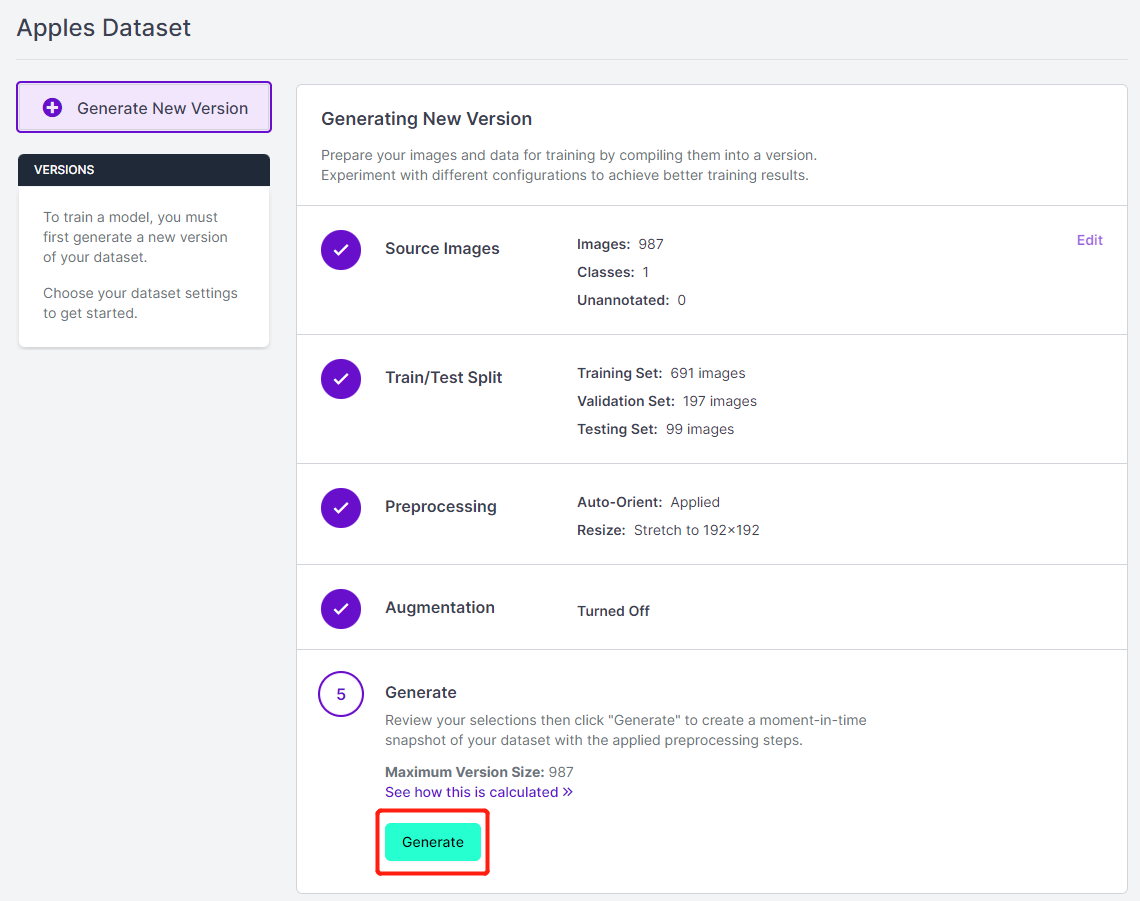
- Step 14. Next, proceed with the remaining defaults and click Generate
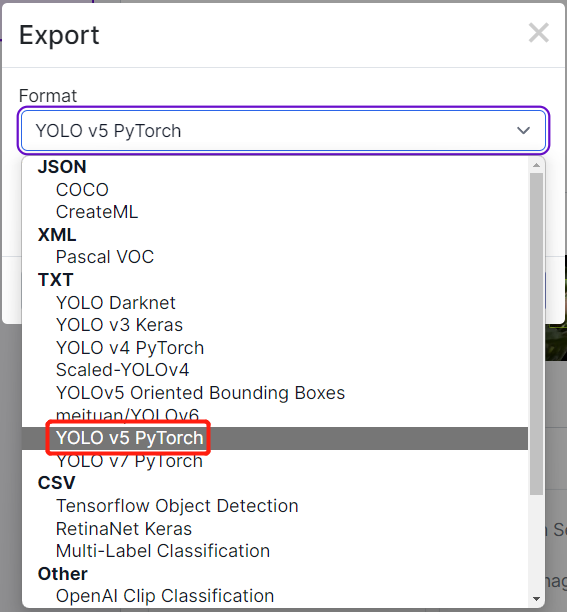
- Step 15. Click Export, select Format as YOLO v5 PyTorch, select show download code and click Continue
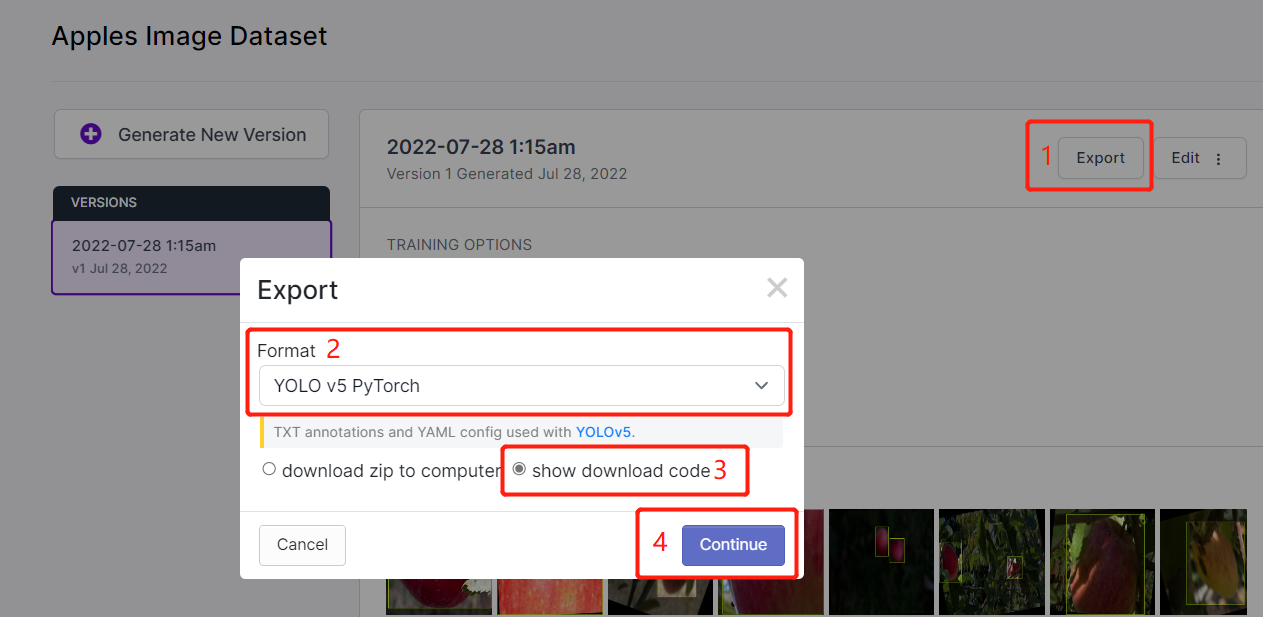
This will generate a code snippet that we will use later inside Google Colab training. So please keep this window open in the background.
Train using YOLOv5 on Google Colab
After we are done with annotating the dataset, we need to train the dataset. Jump to this part which explains how to train an AI model using YOLOv5 running on Google Colab.
3. Deploy the trained model and perform inference
Now we will move the model-1.uf2 that we obtained at the end of the training into SenseCAP A1101.
-
Step 1. Install the latest version of Google Chrome or Microsoft Edge browser and open it
-
Step 2. Connect SenseCAP A1101 into your PC via a USB Type-C cable
- Step 3. Double-click the boot button on SenseCAP A1101 to enter mass storage mode
After this, you will see a new storage drive shown on your file explorer as SENSECAP
- Step 4. Drag and drop the model-1.uf2 file to SENSECAP drive
As soon as the uf2 finishes copying into the drive, the drive will disappear. This means the uf2 has been successfully uploaded to the module.
Note: If you have 4 model files ready, you can drag and drop each model one-by-one. Drop first model, wait until it finishes copying, enter boot mode again, drop second model and so on. If you have only loaded one model (with index 1) into SenseCAP A1101, it will load that model.
-
Step 5. Open SenseCAP Mate App. If you do not have it, download and install it on your mobile phone according to your OS
-
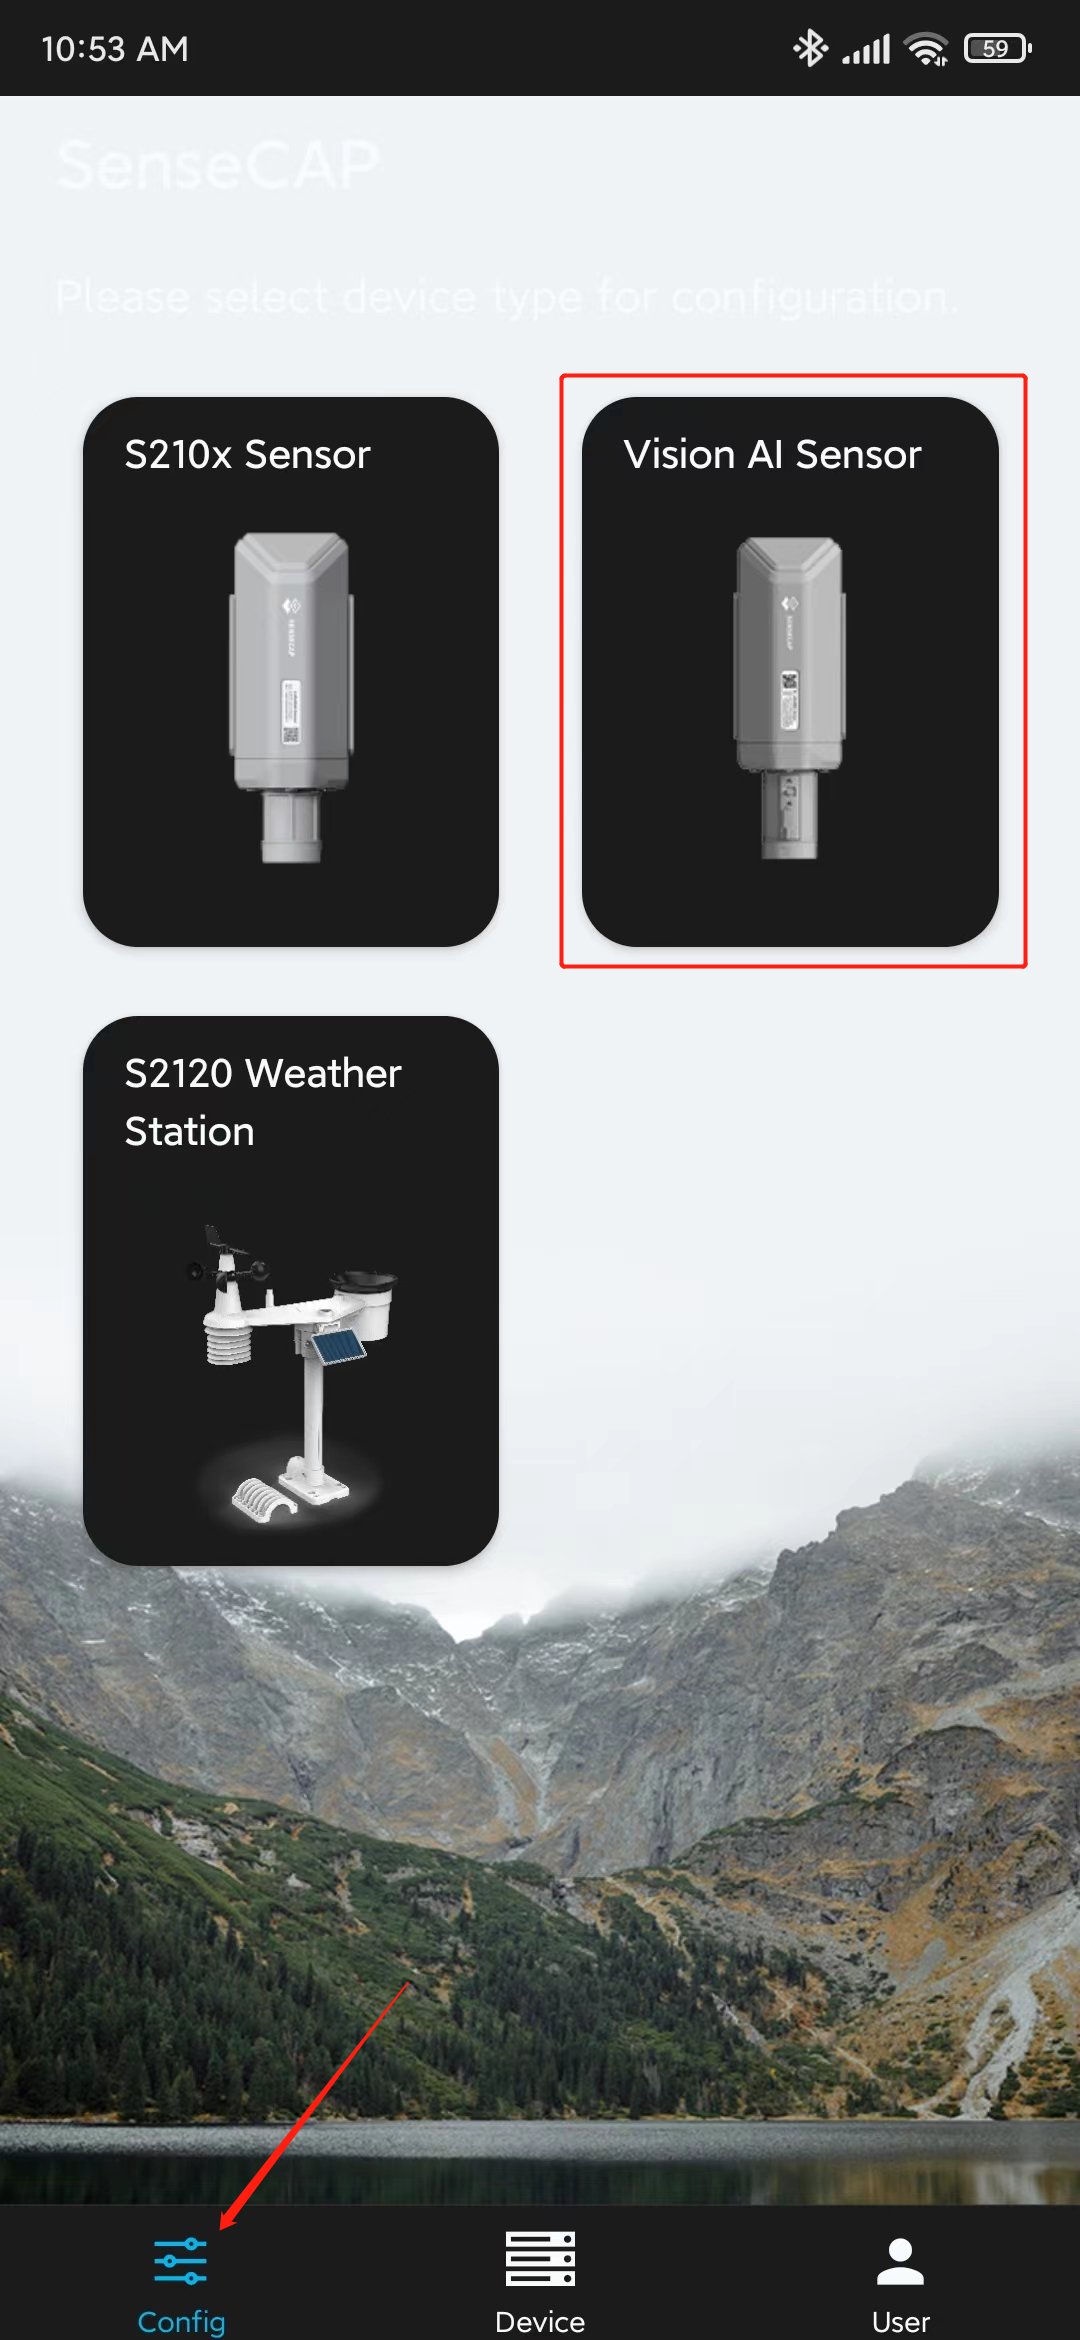
Step 6. Open the app, under Config screen, select Vision AI Sensor
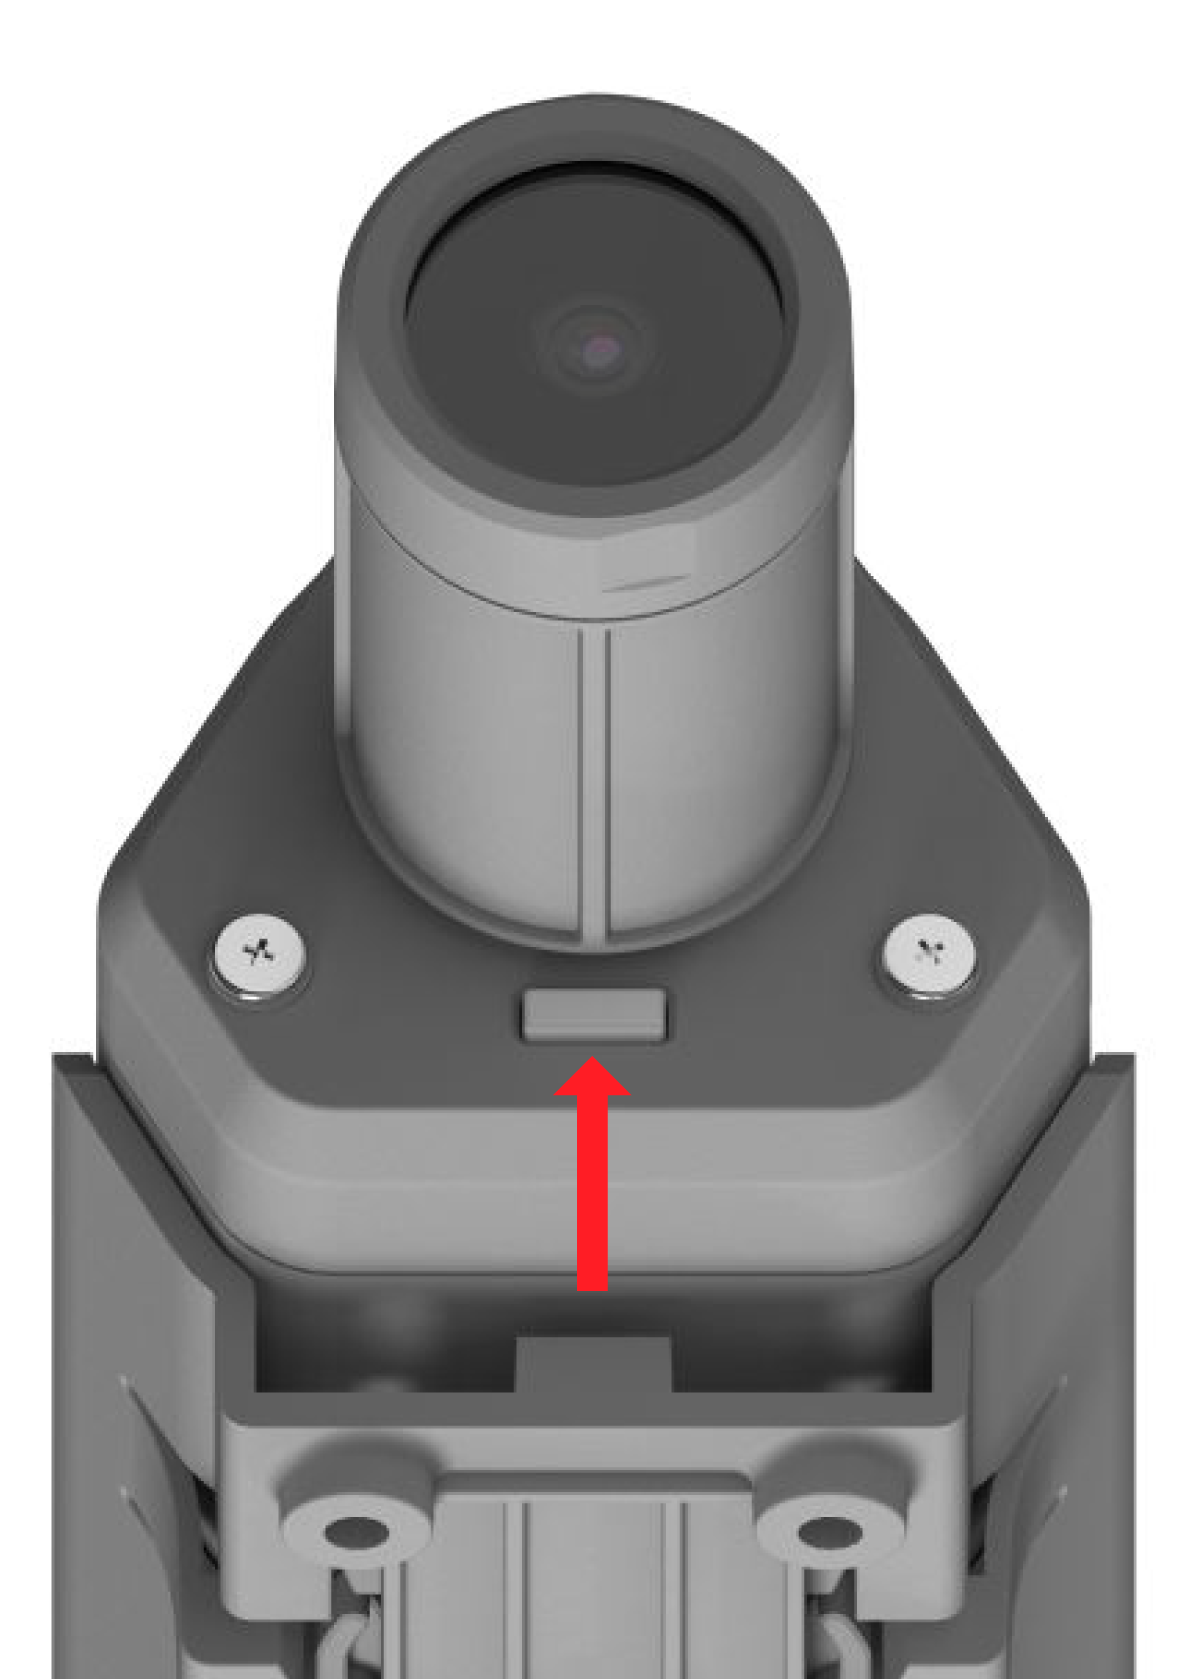
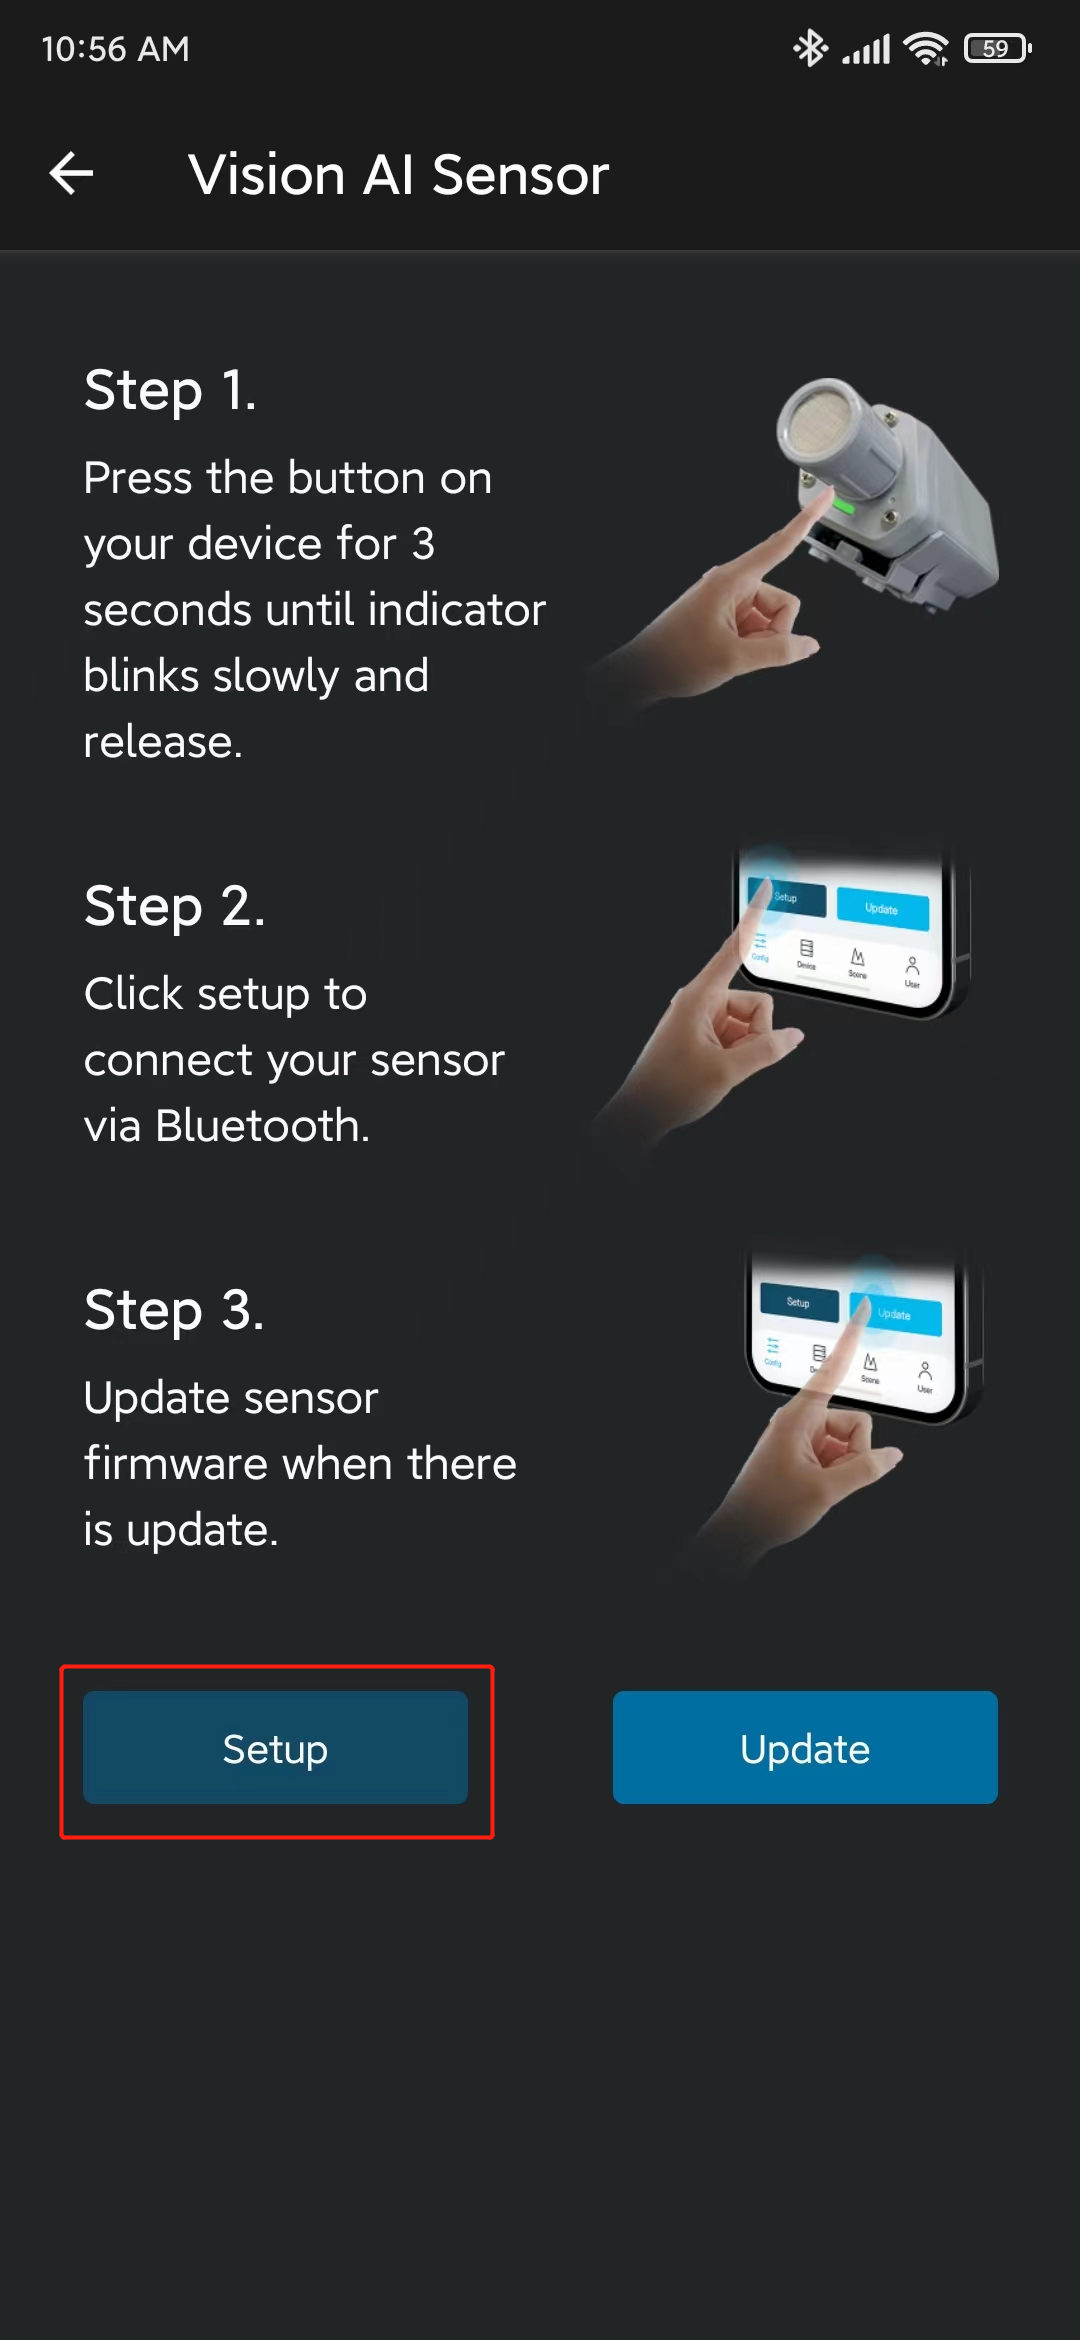
- Step 7. Press and hold the configuration button on the SenseCap A1101 for 3 seconds to enter bluetooth pairing mode
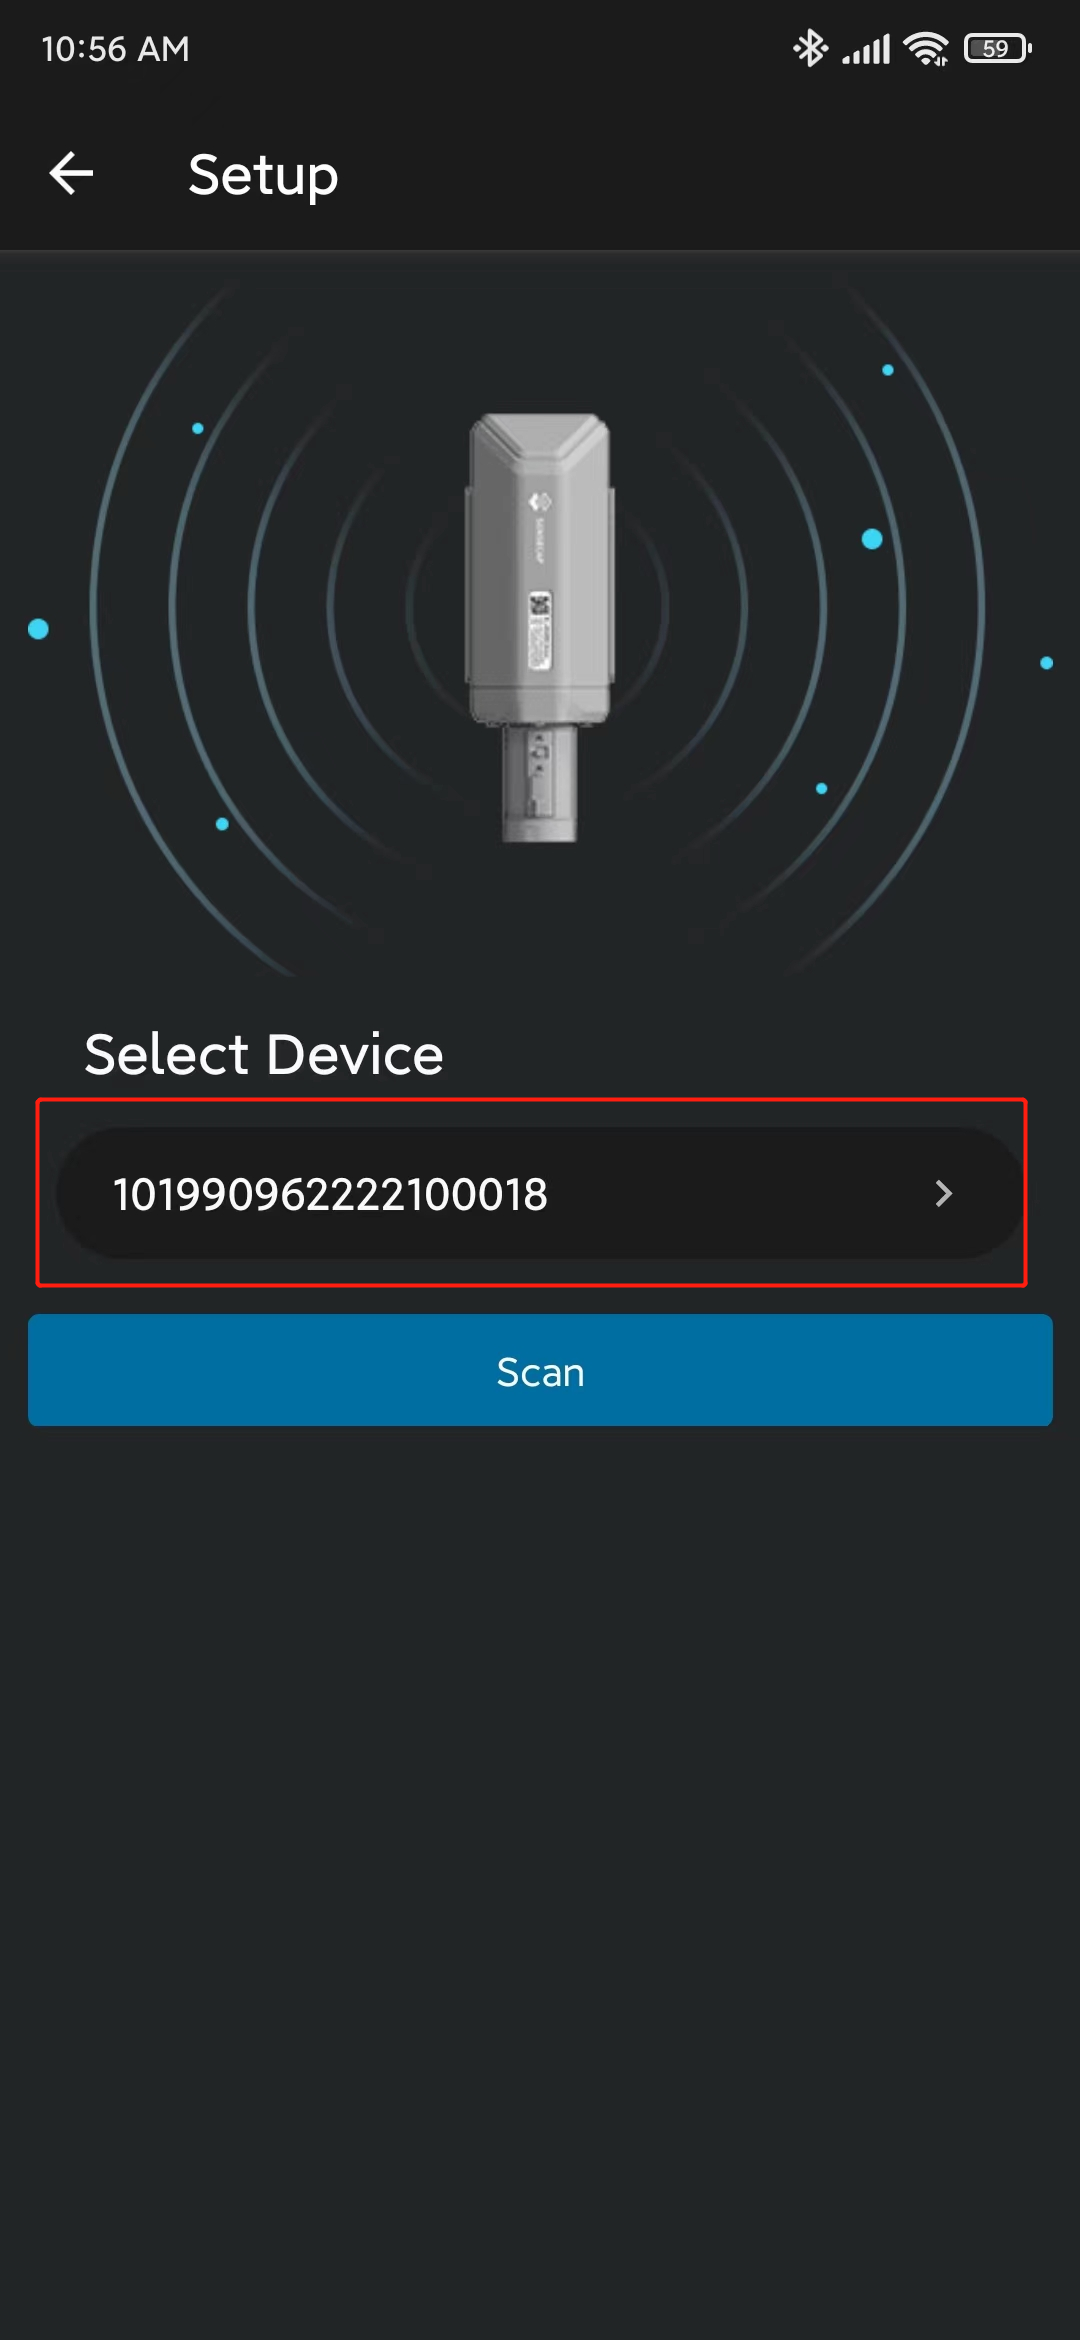
- Step 8. Click Setup and it will start scanning for nearby SenseCAP A1101 devices
- Step 9. Click on the device found
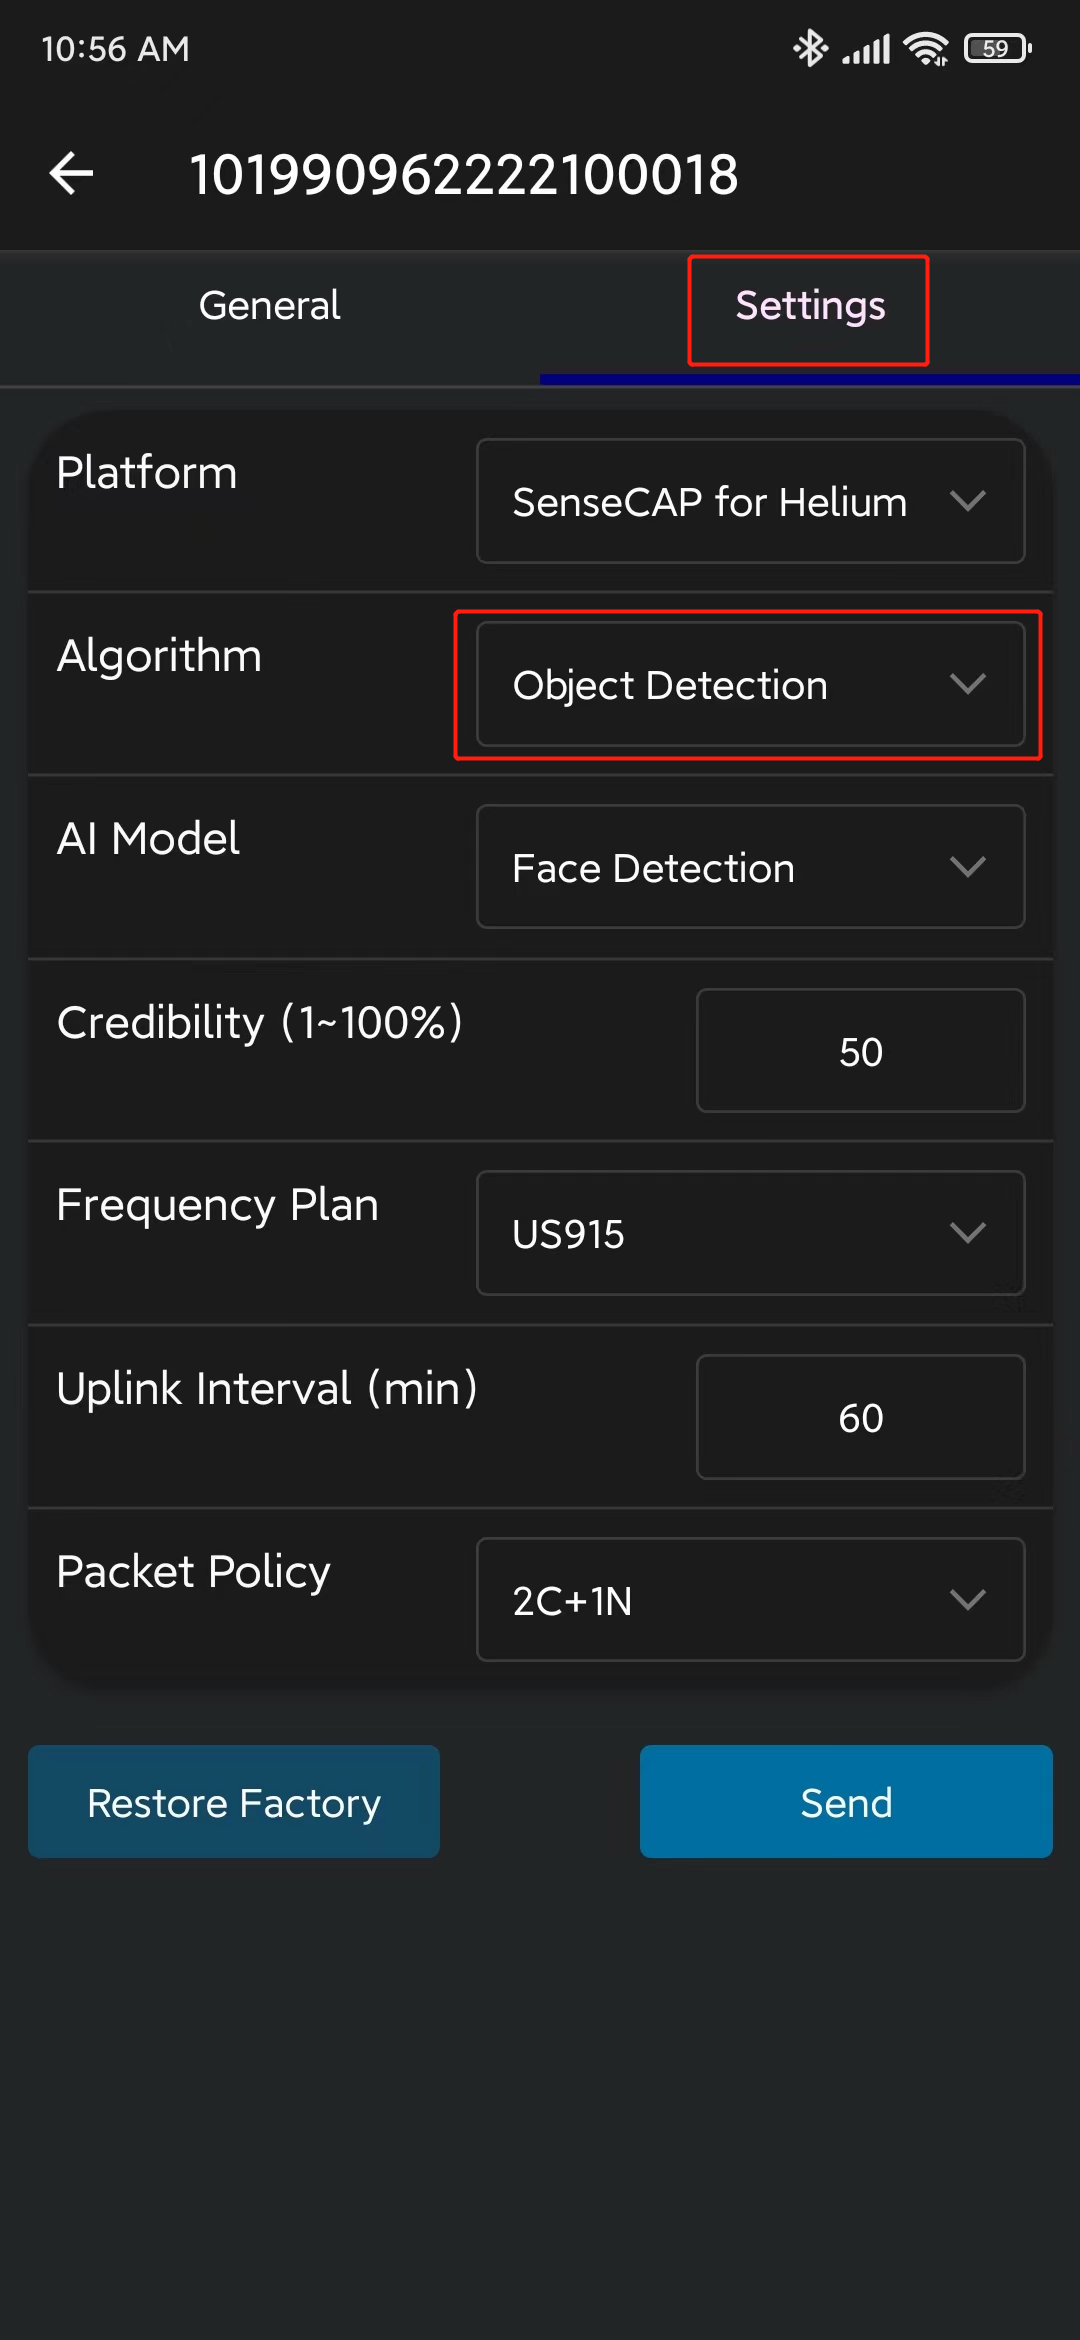
- Step 10. Go to Settings and make sure Object Detection is selected. If not, select it and click Send
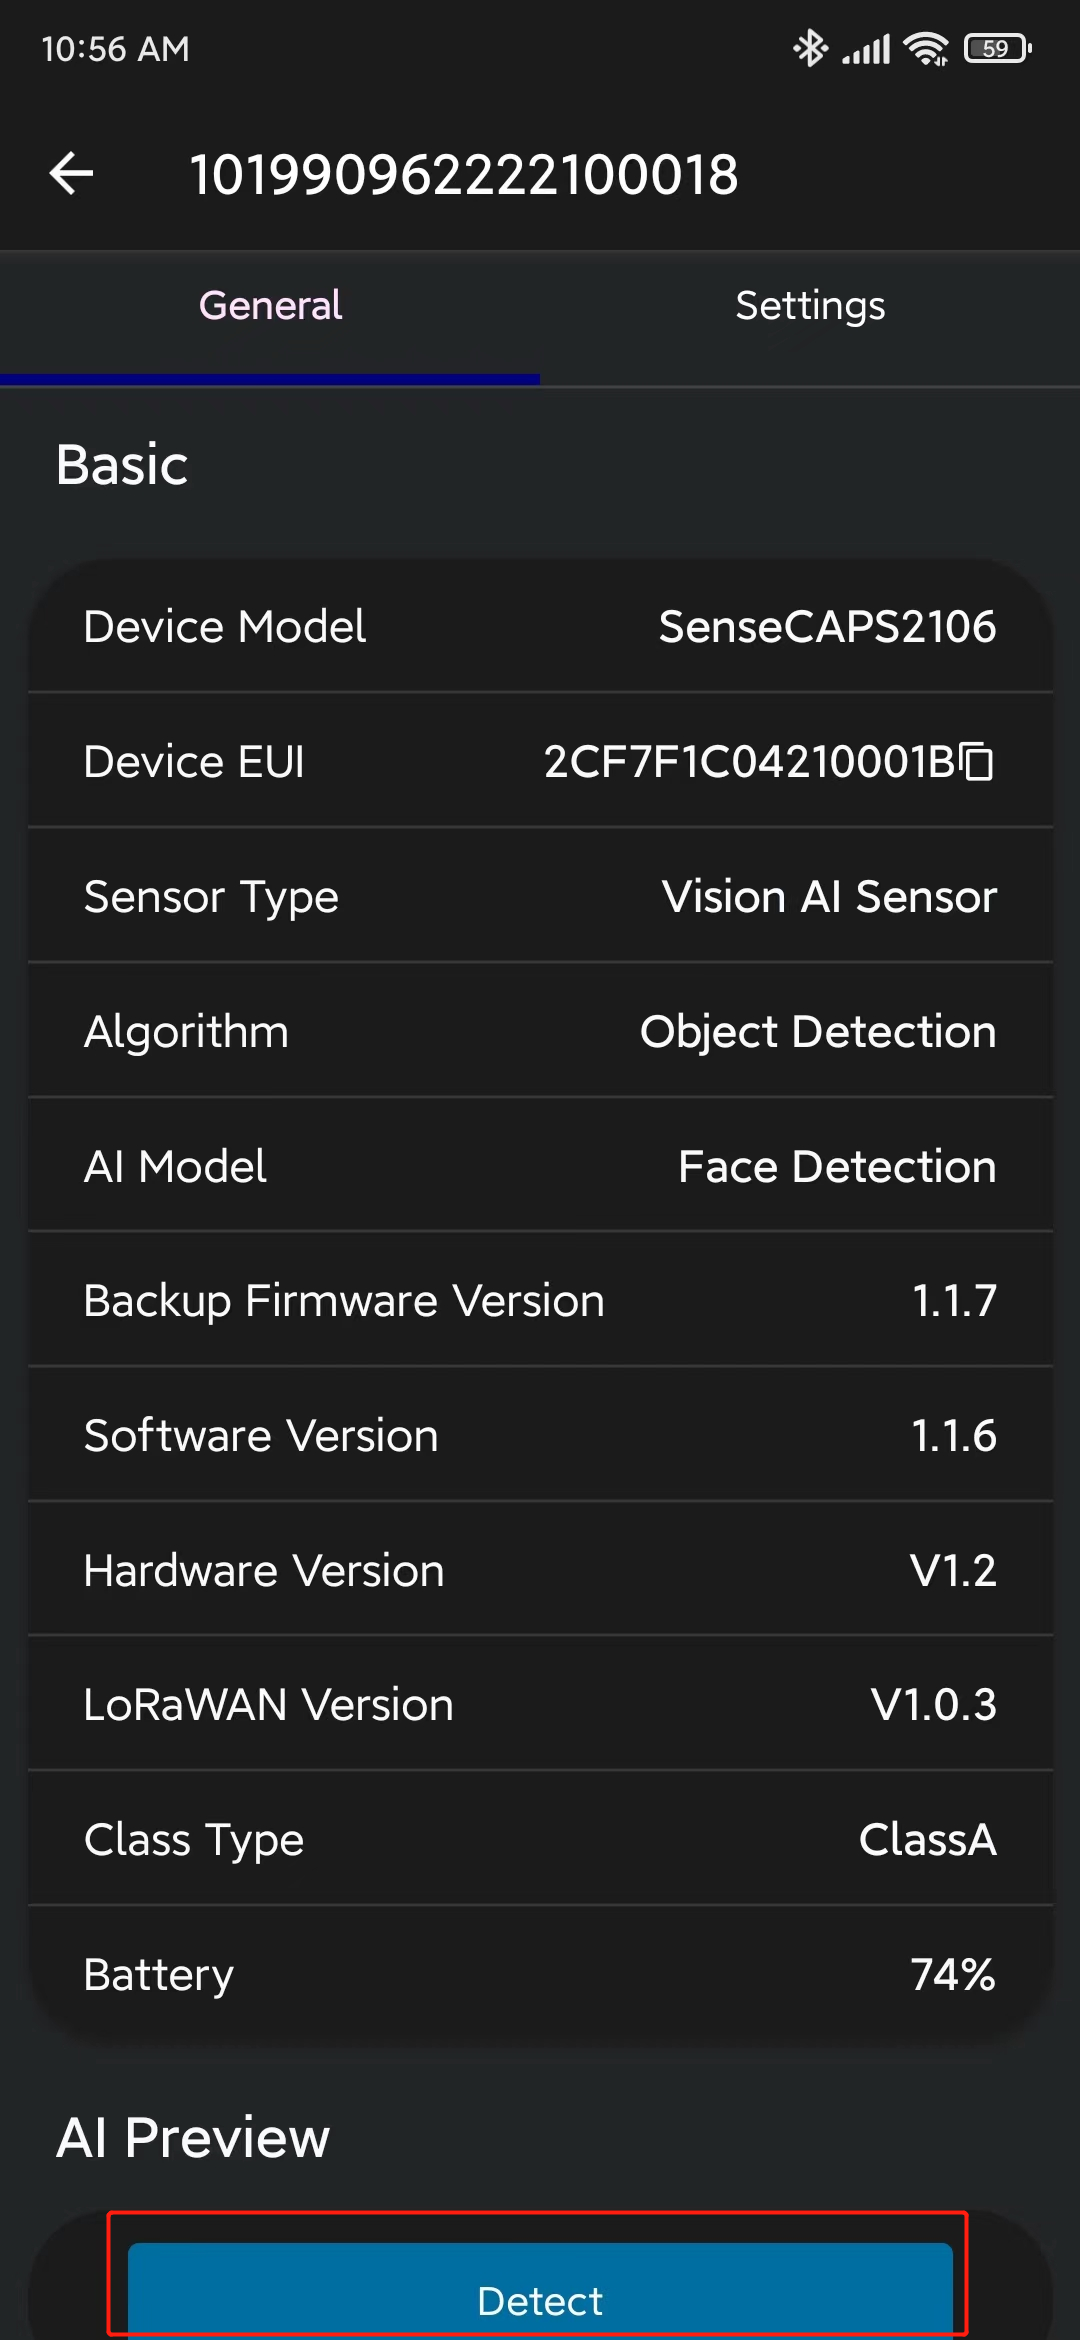
- Step 11. Go to General and click Detect
- Step 12. Click here to open a preview window of the camera stream
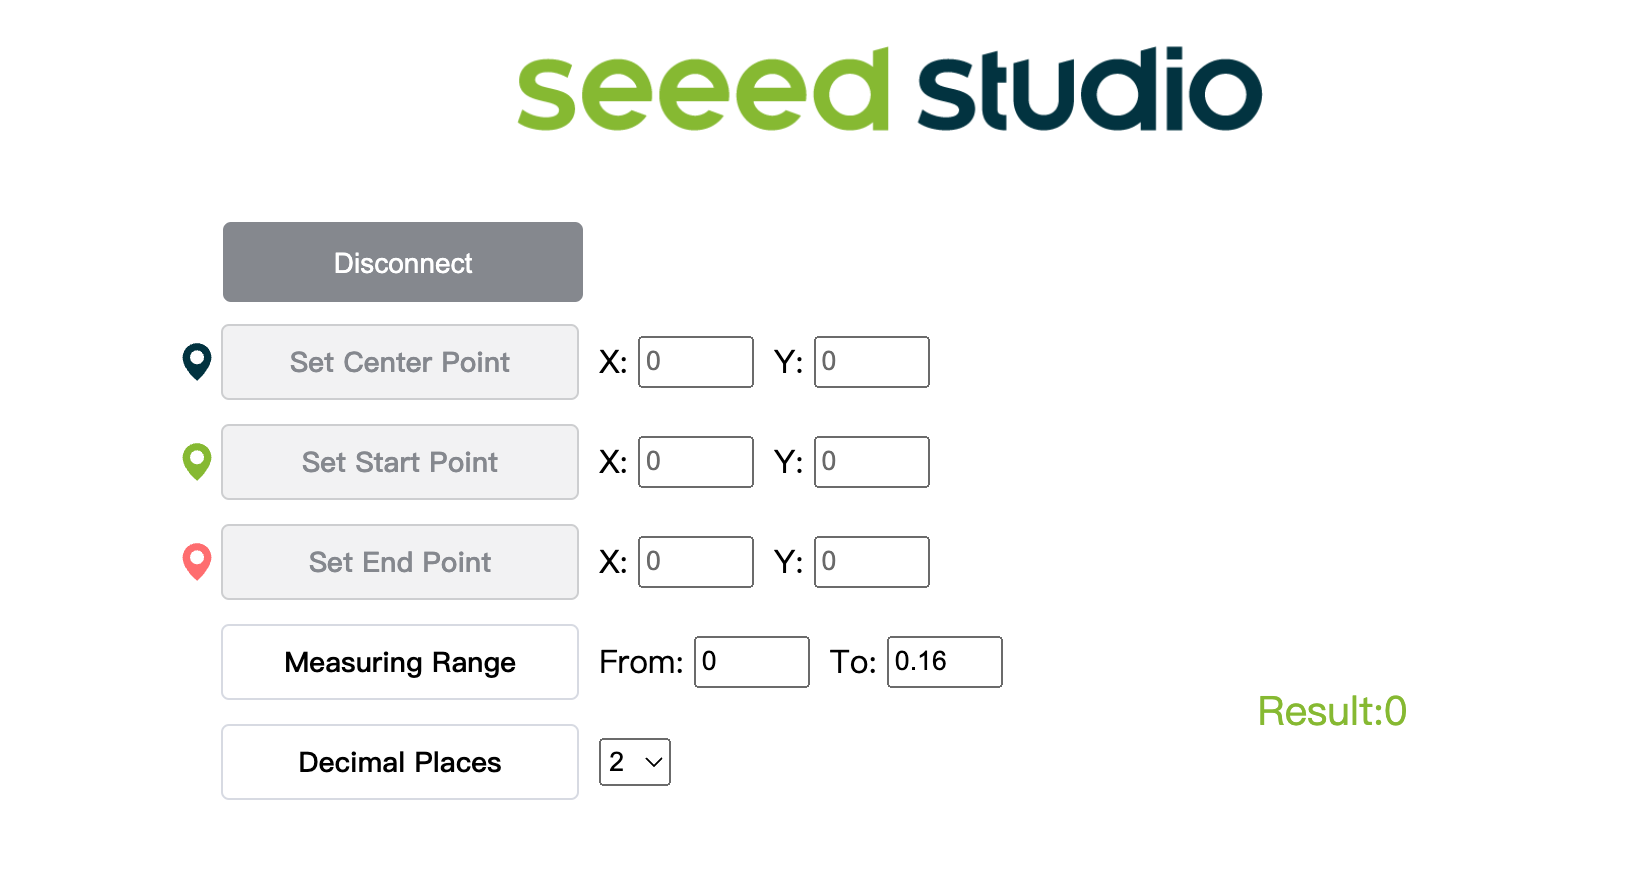
- Step 13. Click Connect button. Then you will see a pop up on the browser. Select SenseCAP Vision AI - Paired and click Connect
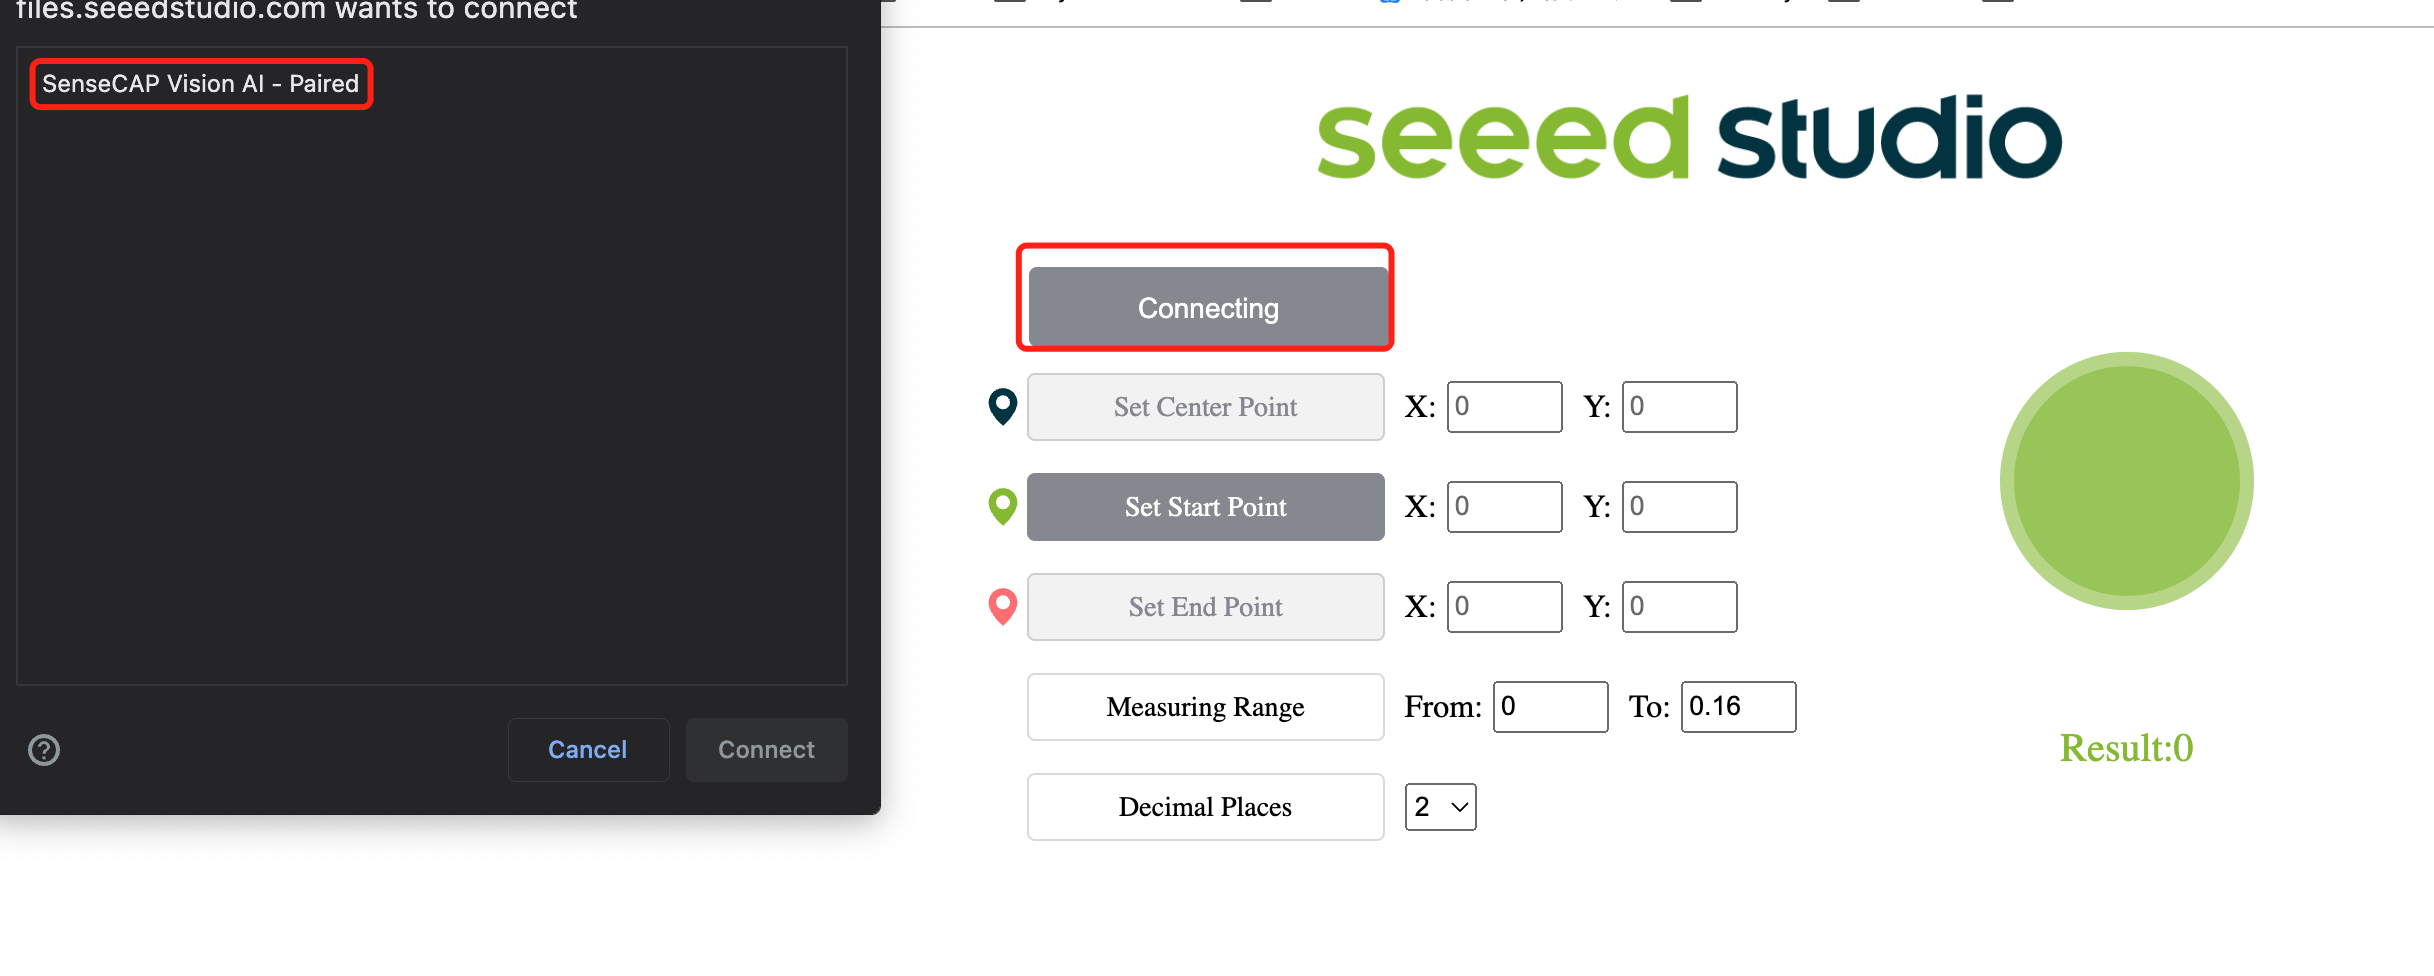
- Step 14. View real-time inference results using the preview window!
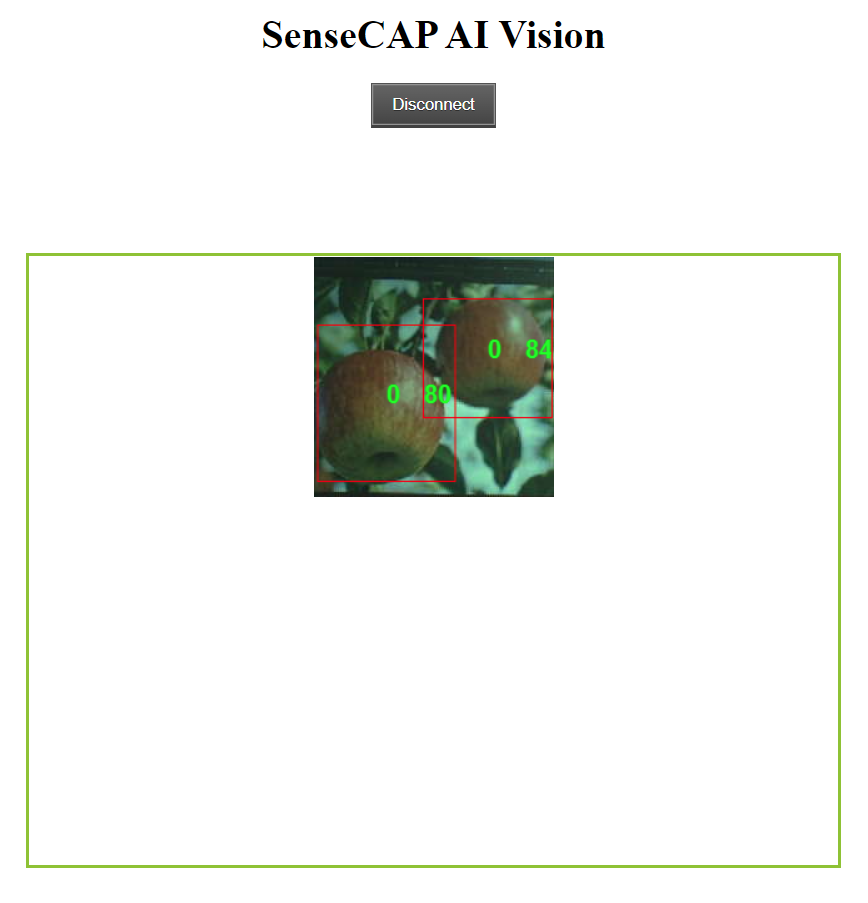
As you can see above, the apples are being detected with bounding boxes around them. Here "0" corresponds to each detection of the same class. If you have multiple classes, they will be named as 0,1,2,3,4 and so on. Also the confidence score for each detected apple (0.8 and 0.84 in above demo) is being displayed!
Bonus content
If you feel more adventurous, you can continue to follow the rest of the wiki!
Can I train an AI model on my PC?
You can also use your own PC to train an object detection model. However, the training preformance will depend on the hardware you have. You also need to have a PC with a Linux OS for training. We have used an Ubuntu 20.04 PC for this wiki.
- Step 1. Clone the yolov5-swift repo and install requirements.txt in a Python>=3.7.0 environment
git clone https://github.com/Seeed-Studio/yolov5-swift
cd yolov5-swift
pip install -r requirements.txt
- Step 2. If you followed the steps in this wiki before, you might remember that we exported the dataset after annotating in Robolflow. Also in Roboflow Universe, we downloaded the dataset. In both methods, there was a window like below where it asks what kind of format to download the dataset. So now, please select download zip to computer, under Format choose YOLO v5 PyTorch and click Continue
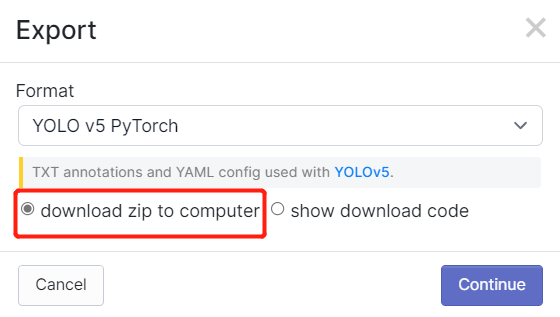
After that, a .zip file will be downloaded to your computer
- Step 3. Copy and paste the .zip file that we downloaded into yolov5-swift directory and extract it
# example
cp ~/Downloads/Apples.v1i.yolov5pytorch.zip ~/yolov5-swift
unzip Apples.v1i.yolov5pytorch.zip
- Step 4. Open data.yaml file and edit train and val directories as follows
train: train/images
val: valid/images
- Step 5. Download a pre-trained model suitable for our training
sudo apt install wget
wget https://github.com/Seeed-Studio/yolov5-swift/releases/download/v0.1.0-alpha/yolov5n6-xiao.pt
- Step 6. Execute the following to start training
Here, we are able to pass a number of arguments:
- img: define input image size
- batch: determine batch size
- epochs: define the number of training epochs
- data: set the path to our yaml file
- cfg: specify our model configuration
- weights: specify a custom path to weights
- name: result names
- nosave: only save the final checkpoint
- cache: cache images for faster training
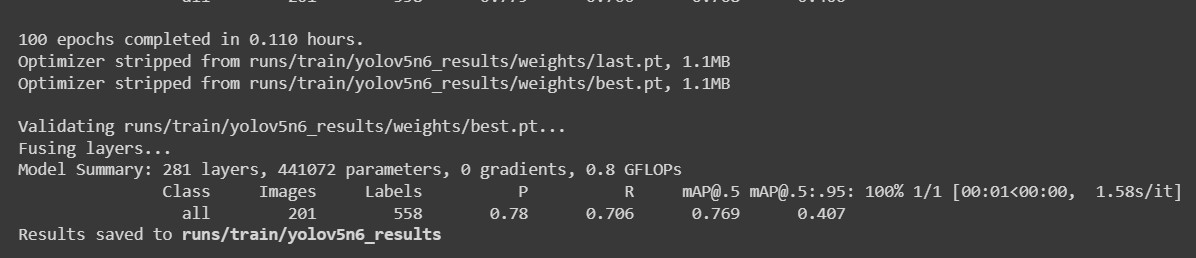
python3 train.py --img 192 --batch 64 --epochs 100 --data data.yaml --cfg yolov5n6-xiao.yaml --weights yolov5n6-xiao.pt --name yolov5n6_results --cache
For an apple detection dataset with 987 images, it took around 30 minutes to finish the training process on a Local PC running on NVIDIA GeForce GTX 1660 Super GPU with 6GB GPU memory.

If you followed the above Colab project, you know that you can load 4 models to the device all at once. However, please not that only one model can be loaded at a time. This can be specified by the user and will be explained later in this wiki.
- Step 7. If you navigate to
runs/train/exp/weights, you will see a file called best.pt. This is the generated model from training.

- Step 8. Export the trained model to TensorFlow Lite
python3 export.py --data {dataset.location}/data.yaml --weights runs/train/yolov5n6_results/weights/best.pt --imgsz 192 --int8 --include tflite
- Step 9. Convert TensorFlow Lite to a UF2 file
UF2 is a file format, developed by Microsoft. Seeed uses this format to convert .tflite to .uf2, allowing tflite files to be stored on the AIoT devices launched by Seeed. Currently Seeed's devices support up to 4 models, each model (.tflite) is less than 1M .
You can specify the model to be placed in the corresponding index with -t.
For example:
-t 1: index 1-t 2: index 2
# Place the model to index 1
python3 uf2conv.py -f GROVEAI -t 1 -c runs//train/yolov5n6_results//weights/best-int8.tflite -o model-1.uf2
Eventhough you can load 4 models to the device all at once, please not that only one model can be loaded at a time. This can be specified by the user and will be explained later in this wiki.
- Step 10. Now a file named model-1.uf2 will be generated. This is the file that we will load into the SenseCAP A1101 Module to perform the inference!
Check BootLoader Version
- Double click the BOOT button and wait for the removable drive to mount
- Open INFO_UF2.TXT in the removable drive

Update BootLoader
If your SenseCAP A1101 is not recognized by your computer and behaves as no port number, then you may need to update the BootLoader.
- Step 1. Download the BootLoader
.binfile on the windows PC.
Please download the latest version of the BootLoader file in the link below. The name of the BootLoader is usually tinyuf2-sensecap_vision_ai_vx.x.x.bin.
This is the firmware that controls the BL702 chip that builds the connection between the computer and the Himax chip. The latest version of the BootLoader has now fixed the problem of Vision AI not being able to be recognised by Mac and Linux.
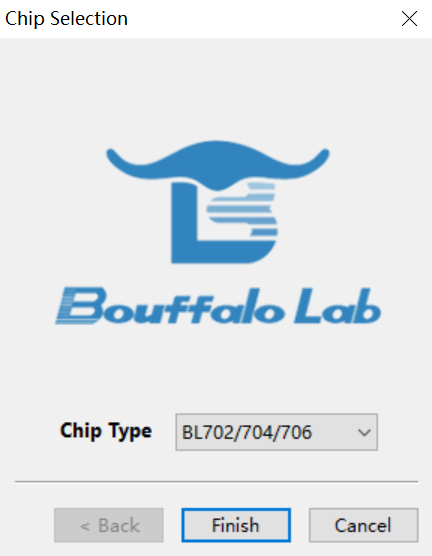
- Step 2. Download and open BLDevCube.exe software, select BL702/704/706, and then click Finish.
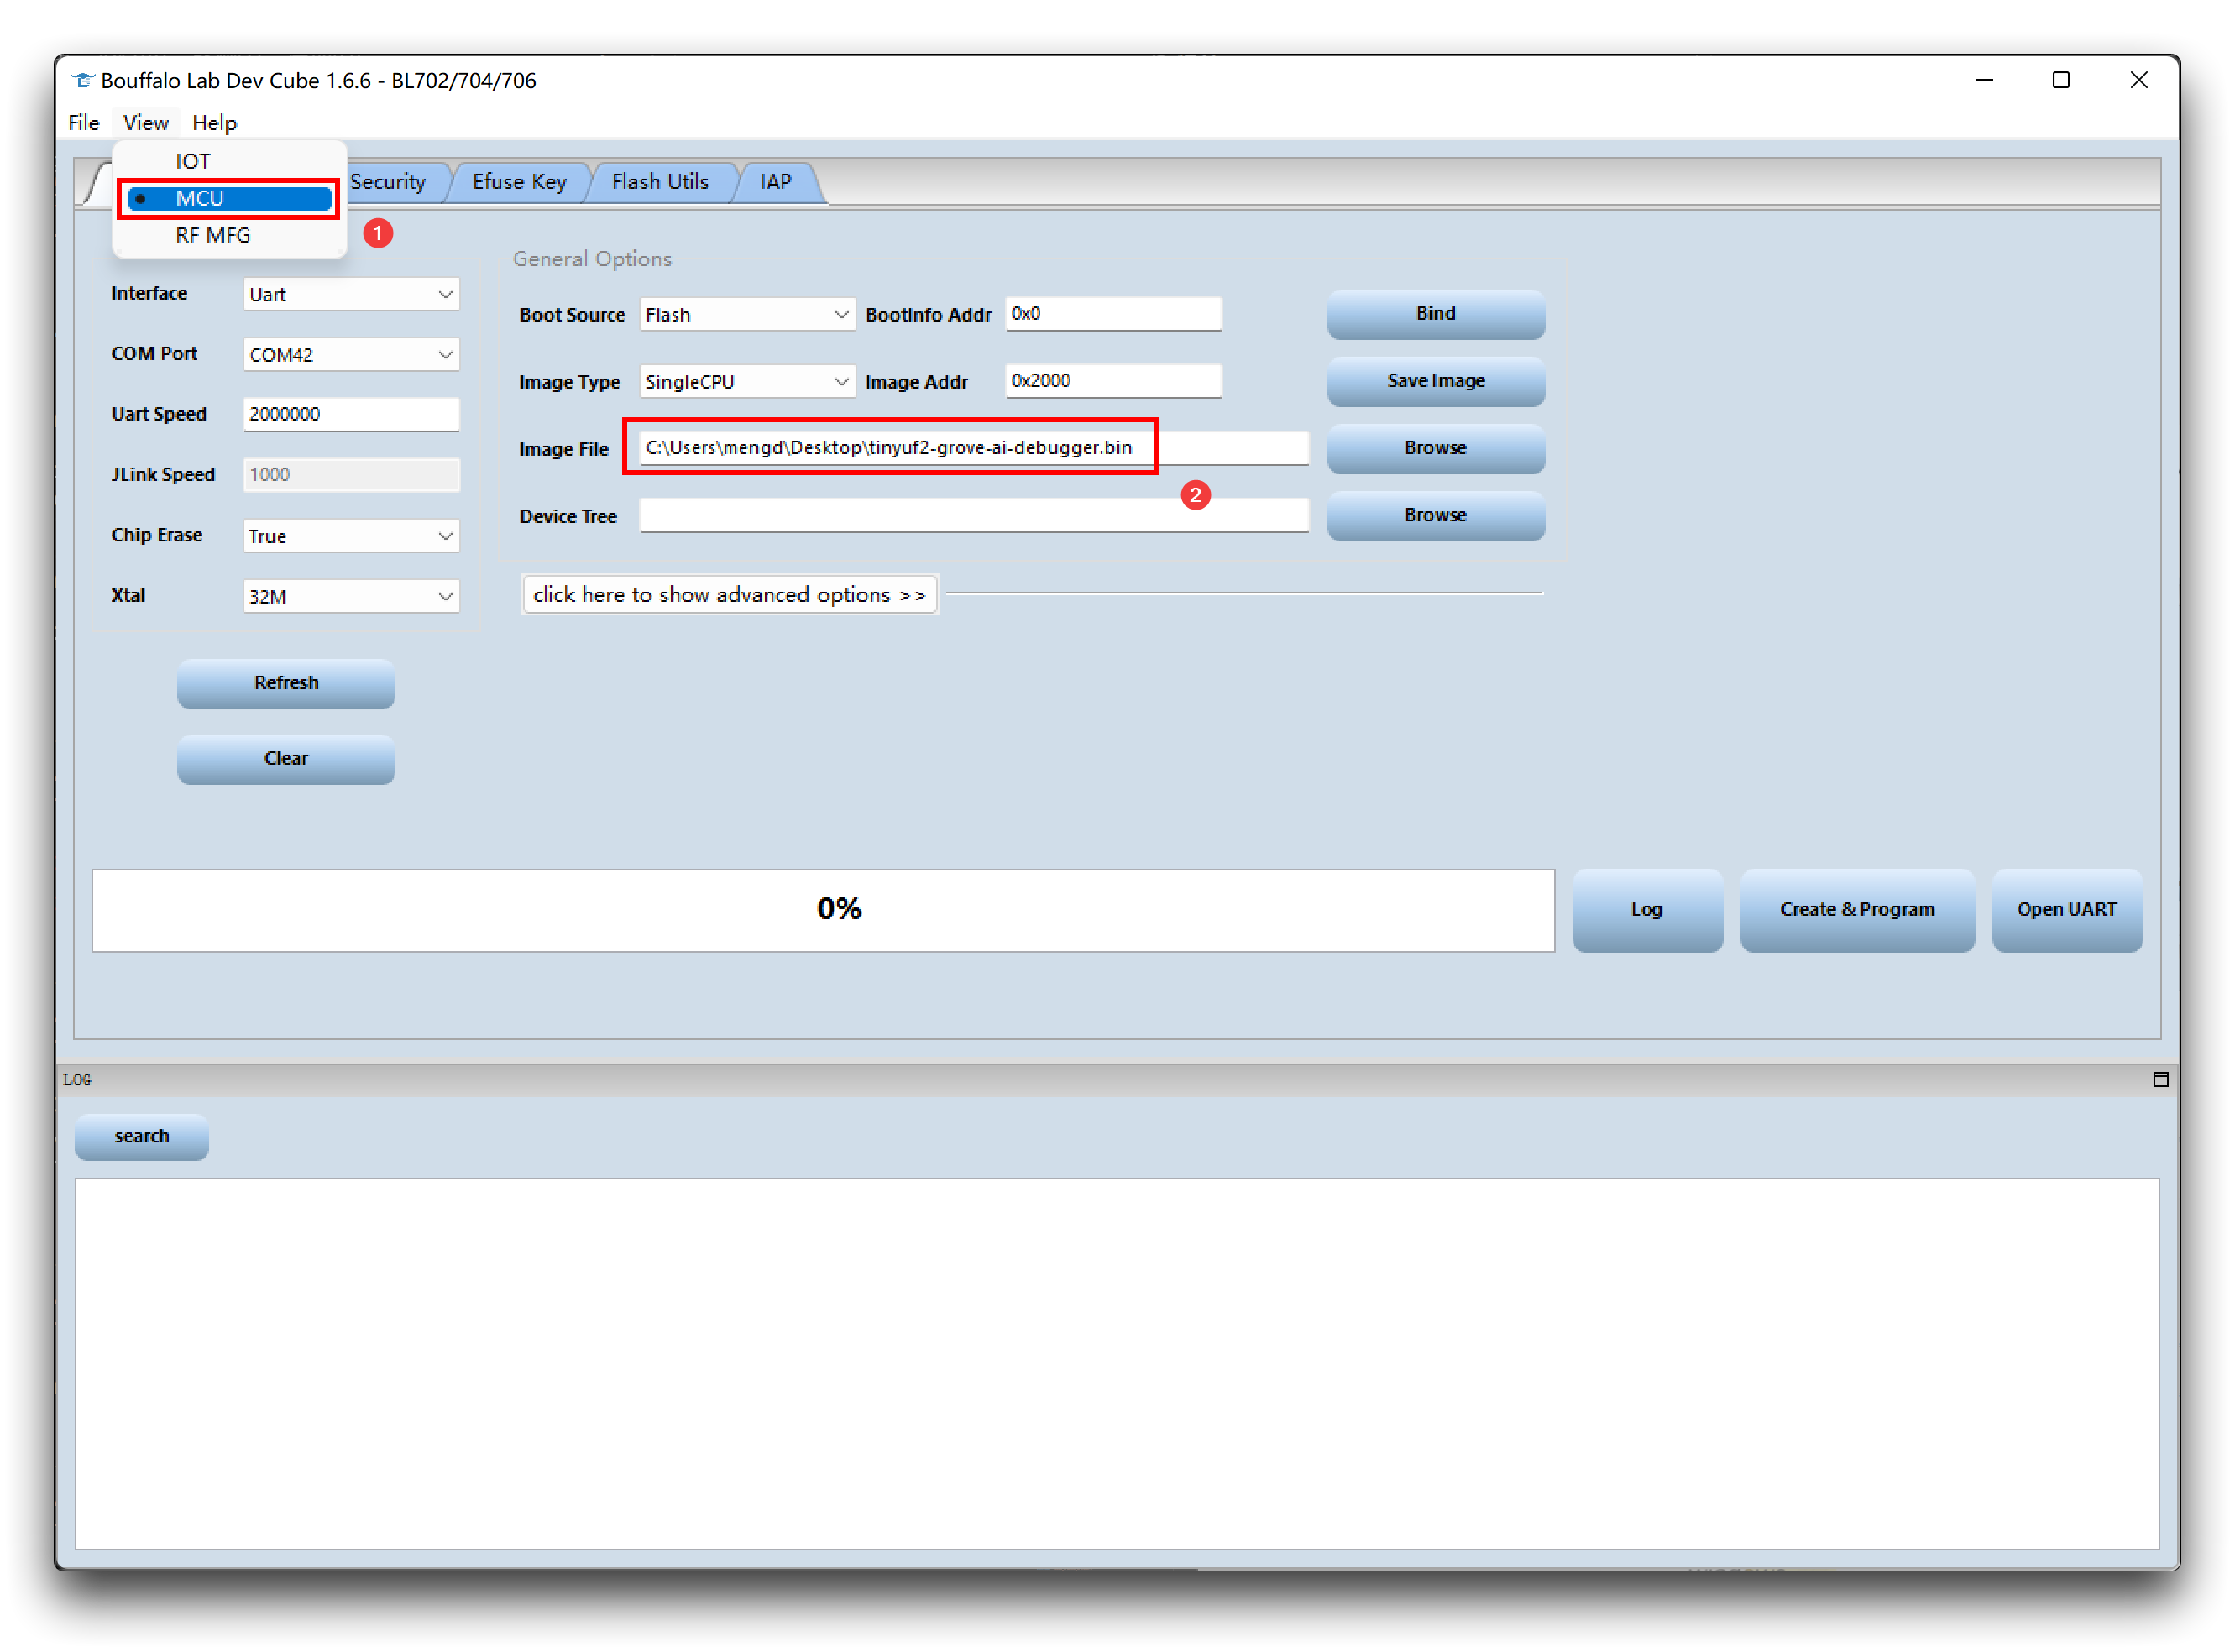
- Step 3. Click View, choose MCU first. Move to Image file, click Browse and select the firmware you just downloaded.
-
Step 4. Make sure there are no other devices connect to the PC. Then hold the Boot button on the module, connect it to the PC.
-
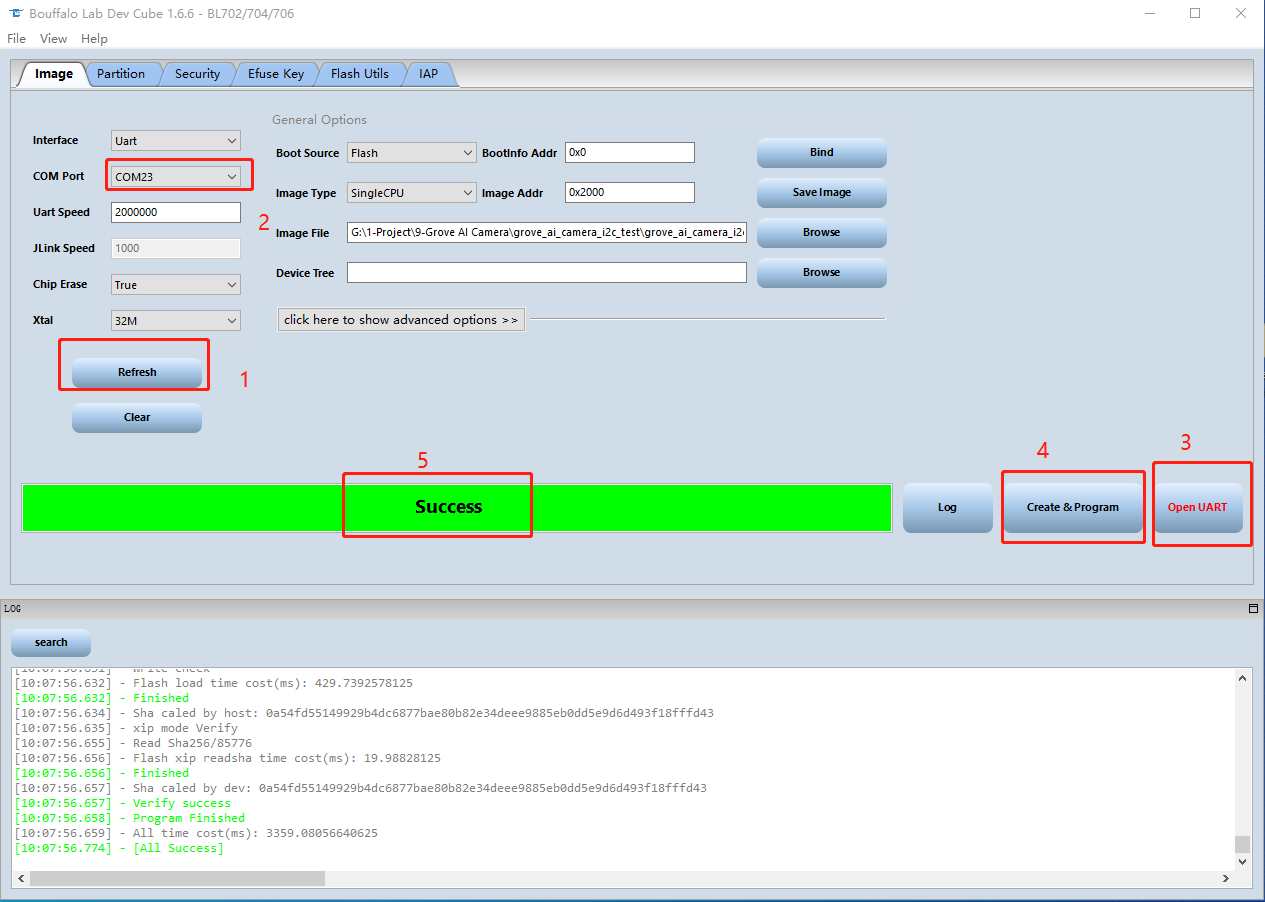
Step 5. Back to the BLDevCube software on the PC, click Refresh and choose a proper port. Then click Open UART and set Chip Erase to True, then click Create&Program, wait for the process done.
Resources
-
[Web Page] YOLOv5 Documentation
-
[Web Page] Ultralytics HUB
-
[Web Page] Roboflow Documentation
-
[Web Page] TensorFlow Lite Documentation
Tech Support & Product Discussion
Thank you for choosing our products! We are here to provide you with different support to ensure that your experience with our products is as smooth as possible. We offer several communication channels to cater to different preferences and needs.