Quick Start
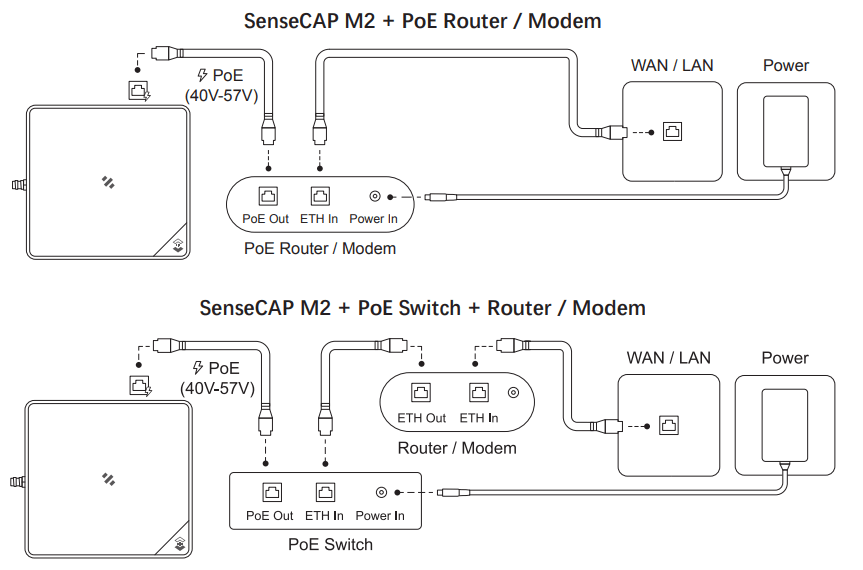
POE connection
SenseCAP M2 supports PoE (Power on Ethernet) and is compatible with IEEE 802.3 af standard.
You will need to have an extra PoE switch that provides 40V-57V DC power as a PSE (Power Sourcing Equipment) if your modem/router does not support PoE.
Gateway Network Configuration
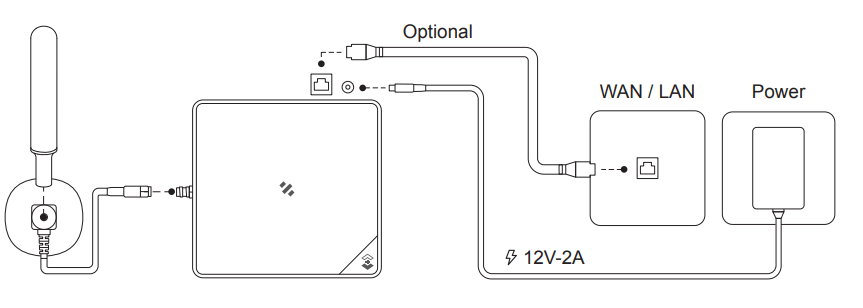
Connect the antenna and power adaptor to the gateway. The power LED will show in red, and in about 15s, the indicator on the top will flash green, indicating that the gateway is booting.
There are two ways to connect to the Internet. Choose the one that works for you.
Ethernet Connection
Connect the Ethernet cable to the Ethernet port, and the indicator on the top will show solid green if the gateway is successfully connected to the internet.
WIFI Connection
There are two ways for users to login Luci configuration page.
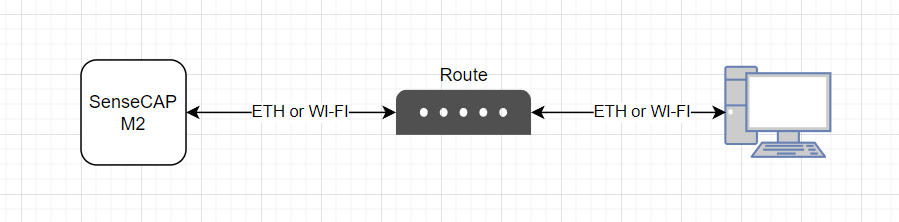
Access via router
- Step 1: Connect your device to a Ethernet cable, and connect your PC to the same router
Your PC and device should be connected to the same router/network.
- Step 2: Get IP Address of your device
Check the IP Address of your device on your router admin page.
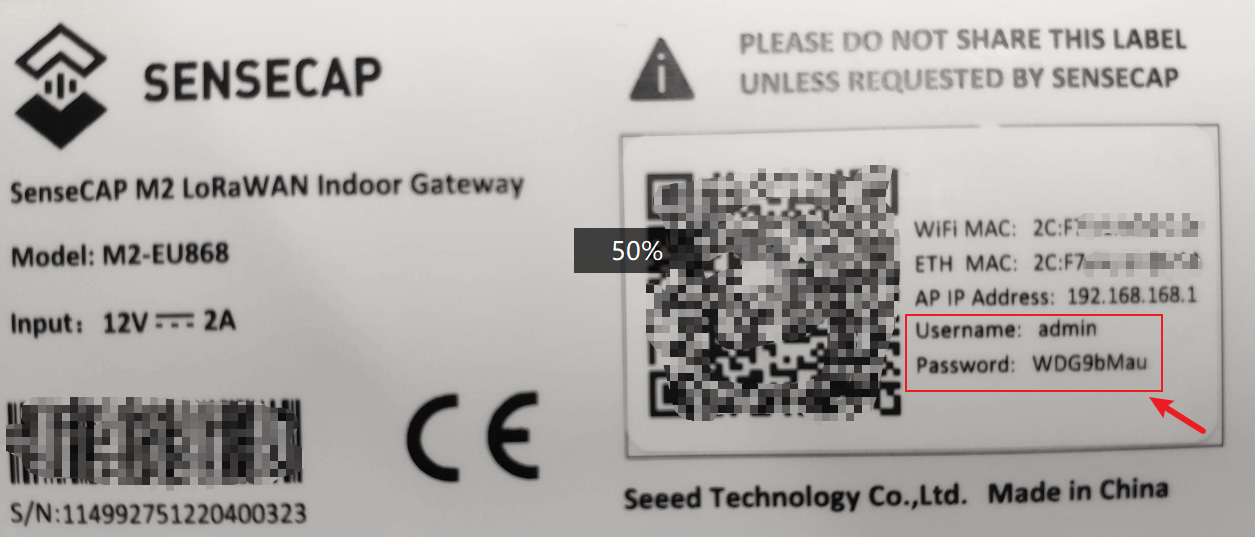
- Step 3: Get your device Username and Password
You can find the Username and Password on your device label.
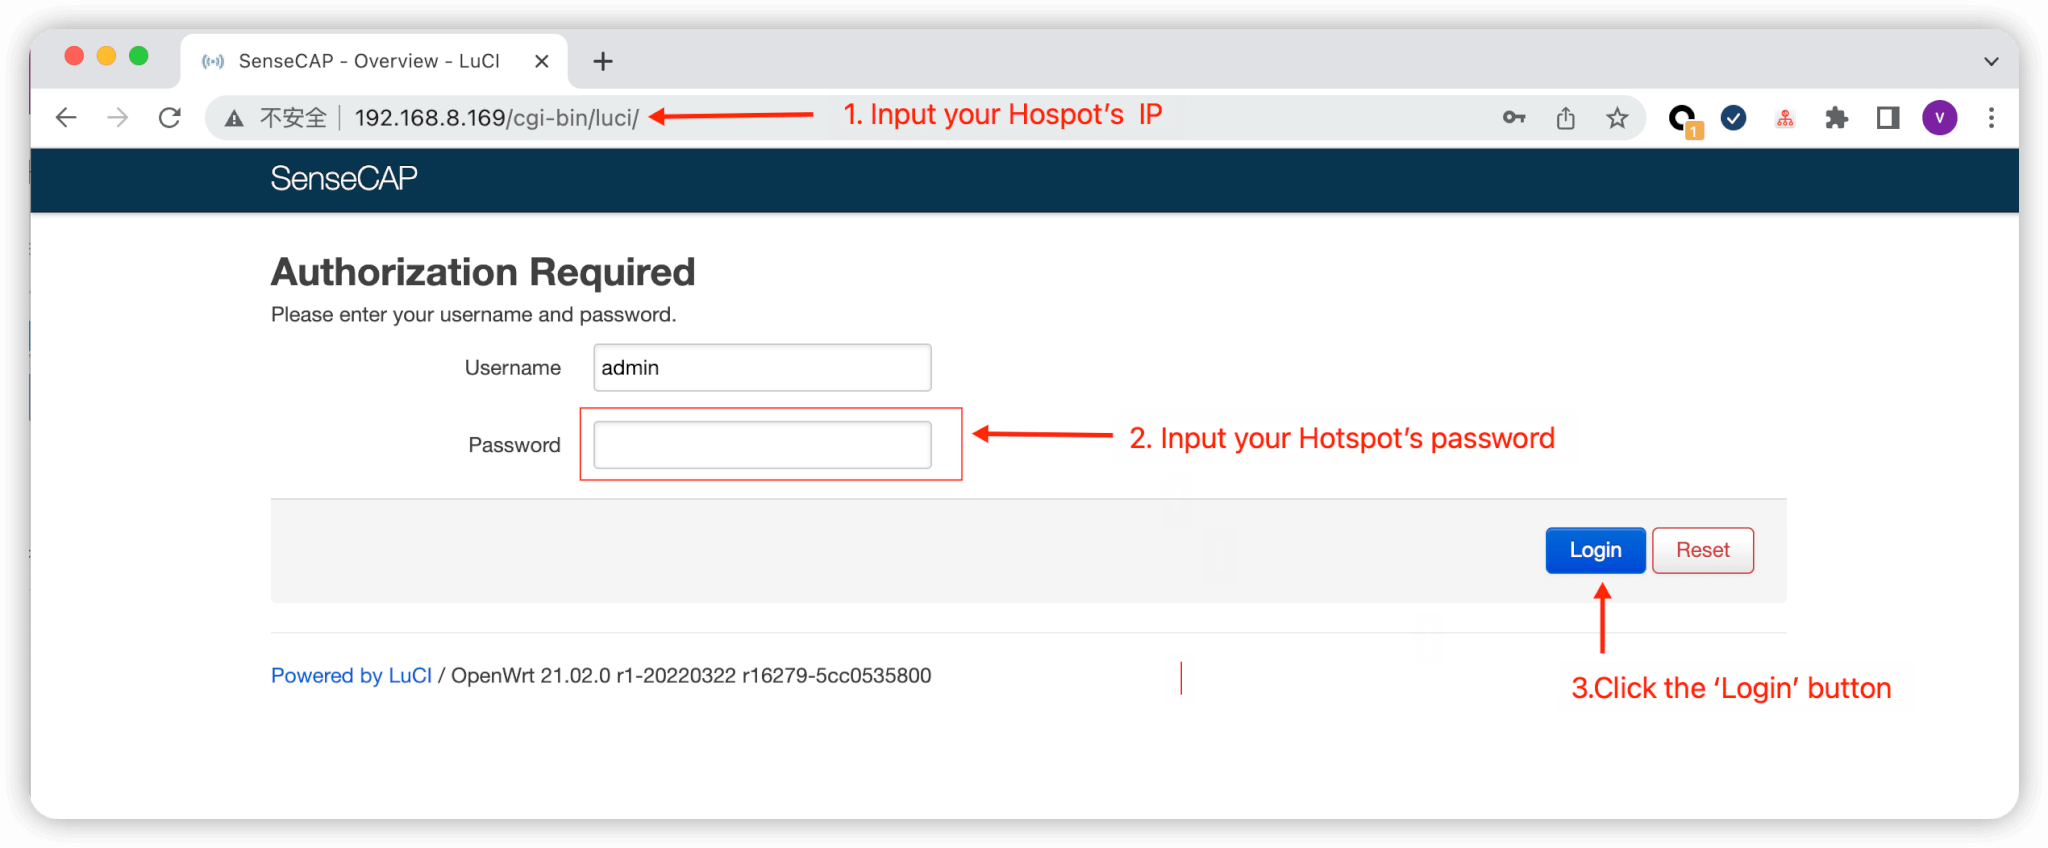
- Step 4: Login Luci
Input the IP Address of your device in a browser to enter the Luci page. Then input your device username and password to login.
Access via device AP hotspot
- Step 1: Turn on the device AP hotspot
Press the button for 5s until the blue indicator flashes slowly to enter the configuration mode.
- Step 2: Connect to the AP hotspot AP hotspot name is SenseCAP_XXXXXX (6-figure MAC address),default password is 12345678; connect your computer to this AP hotspot.

- Step 3: Get your device Username and Password
You can find the Username and Password on your device label.
- Step 4: Log in to the Local Console
Input the IP Address (192.168.168.1) in your browser to enter the Local Console. Then input your device username and password, and click the Login button.

Connect to a WIFI
- Step 1: Click on
Network-Wireless

- Step 2: Click on the
Scanbutton to scan the WIFI

- Step 3: Select your WI-FI to join the network

- Step 4: Submit the Wi-Fi password, and then click
Submitand Save

Then click Save and Apply to apply your settings
The indicator on the top will show solid green if the gateway is successfully connected to the WIFI
Cellular Connection (for 4G version)
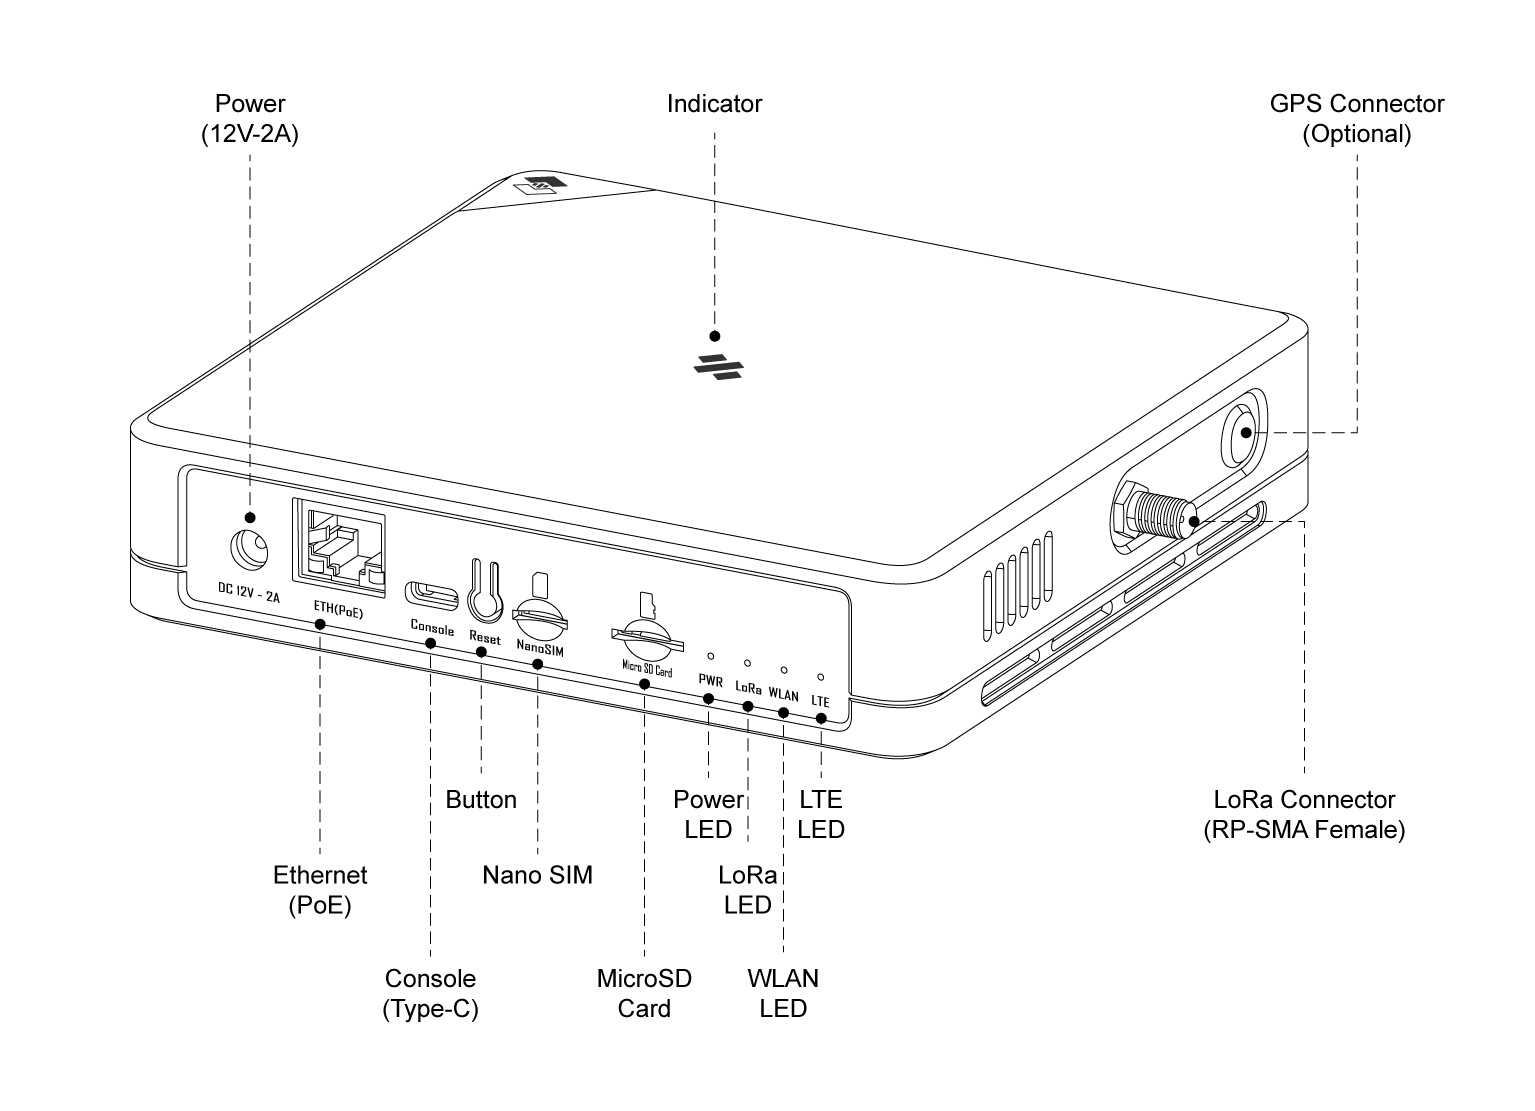
- Step 1: Plug your SIM card into the Nano-SIM card slot
- Step 2: Login the Luci page, and click on
Network-Cellular

- Step 3: Setup the APN info, and click
Save and Applyto apply your settings

To reduce data consumption, please check Low Data Consumption Mode Config.
Channel Plan Settings
Navigate to LoRa > Channel Plan

Select the Region and Frequency plan.

After setting, click Save&Apply.
Checking the Gateway Connection Status
After powering on the gateway, there are two ways for you to check the gateway working status:
LED Indicator
| Mode | Description | |
|---|---|---|
Green | Solid | Gateway is healthy and the internet is well connected. |
| Slow blinking | Gateway is booting, please wait. | |
Blue | Solid | The gateway is ready for internet connection. Further configuration is needed. |
| Slow blinking | Configuration mode, and will auto exit after 5 mins if no activity. | |
Fast blinking | Press the button for 30s until the indicator show fast flash will trigger the factory reset. | |
Orange | Slow blinking | Firmware is updating, and please do not power off the gateway or disconnect the internet. |
White | Solid | Gateway is only with a factory firmware, and will be updated to the latest firmware automatically when it is connected to the internet. |
Red | Solid | Hardware issue or internet connection failure. |
| Slow blinking | Gateway not connected to the LNS. | |
SenseCAP Mate APP
In the SenseCAP Mate App, Online status indicates Online when the gateway is connected to the network.
Please refer to the next chapter for obtaining the SenseCAP App.
Bind the gateway
SenseCAP Mate APP supports device configuration and remote management.
- Step 1: Download the SenseCAP Mate APP

- Step 2: Login the APP If it is your first time to use the SenseCAP platform, please register an account first.
Please select Global of Server Location.

- Step 3: Add device
Click the + in the upper right corner and select Add device
Then scan the QR code on your gateway label.

Set up your device name and location. Then confirm your settings. After successful binding, you will see your gateway in the Device directory.

Connect the SenseCAP Sensors
- Step 1: Add device
Click the + in the upper right corner and select Add device
Then scan the QR code on your gateway label.
- Step 2: Select the frequency plan
Click on Settings, set the platform and frequency, the frequency should match your gateway frequency.
eg: If your gateway is US915 version , then you need to set your sensor to US915 frequency.

SenseCAP M2 Multi-Platform Gateway can't connect to Helium network.
For more configurations about SenseCAP sensors, please refer to: SenseCAP Sensors
SenseCAP Portal and Mate APP
SenseCAP Mate APP and SenseCAP Portal can be used to check your device status and device management.
- SenseCAP Mate APP for iOS on App Store
- SenseCAP Mate APP for Android on the Google Play Store
- SenseCAP Portal
Gateway Info
Check the gateway info on the SenseCAP Portal and SenseCAP Mate APP

Sensor data
Check the sensor data on the SenseCAP Portal and SenseCAP Mate APP
