Jetson Mate Getting Started
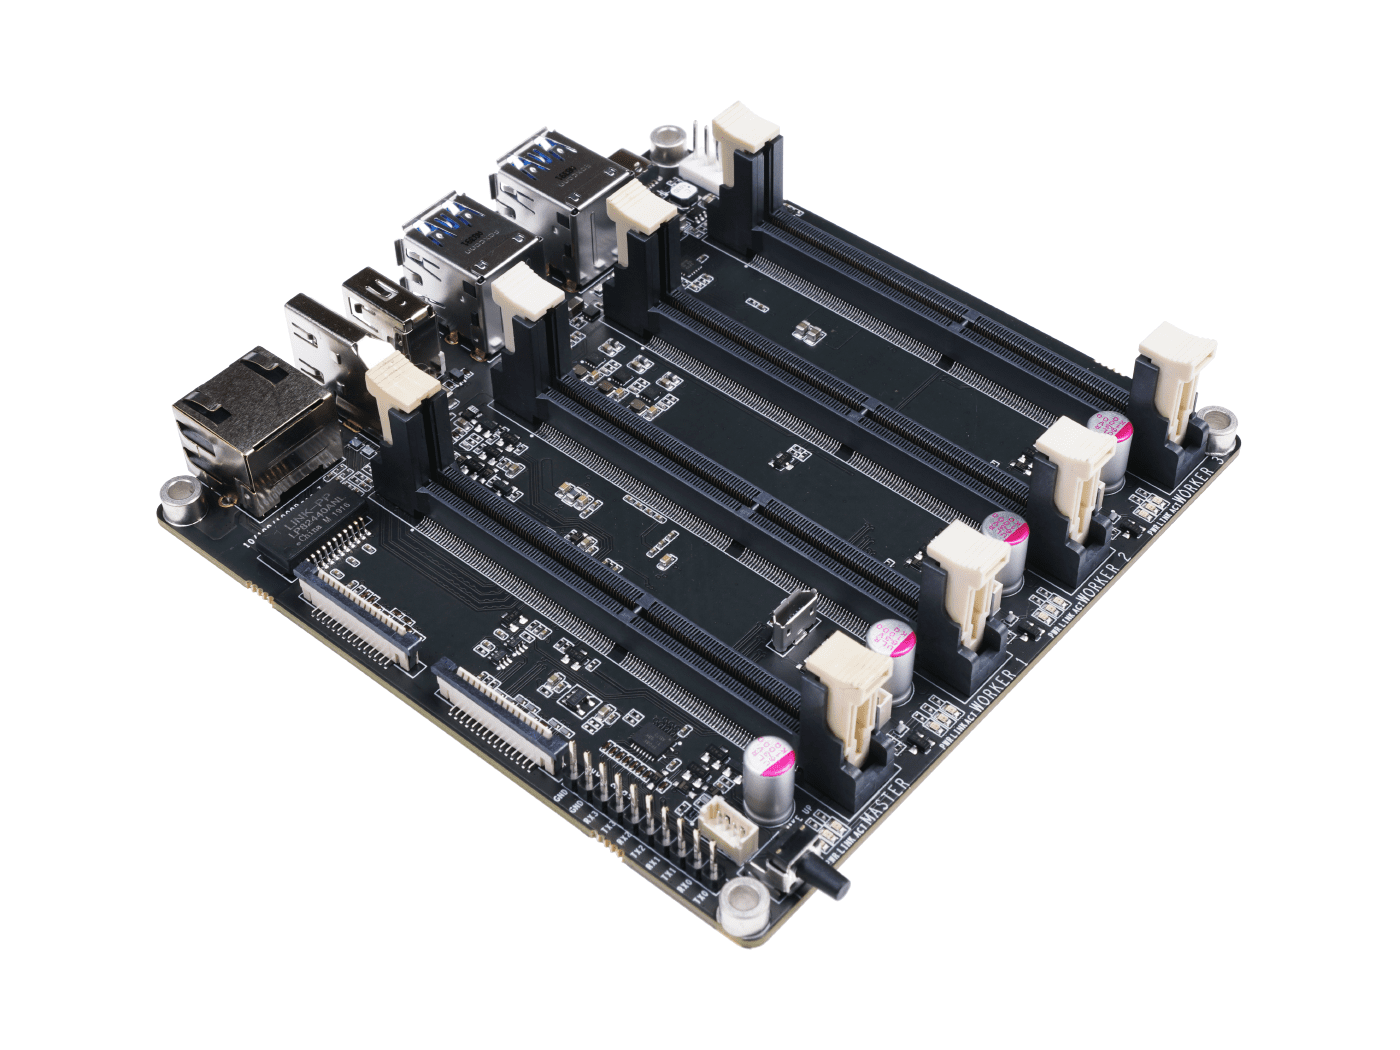
Jetson Mate is a carrier board which can install up to 4 Nvidia Jetson Nano/NX SoMs. There is an on board 5-port gigabit switch enabling the 4 SoMs to communicate with each other. All the 3 peripheral SoMs can be powered on or off separately. With a 65W 2-Port PD charger, for Jetson Nano SoMs or a 90W 2-Port PD charger for Jetson NX SoMs, and one ethernet cable, developers can easily build their own Jetson Cluster.
Feature
- Easy to build and config
- Powerful and Compact
- Comes with a dedicated case and fan
Specification
| Spec | -- |
|---|---|
| Power | 65w PD |
| Dimensions | 110mm x 110mm |
| Onboard Switch | Microchip KSZ9896CTXC |
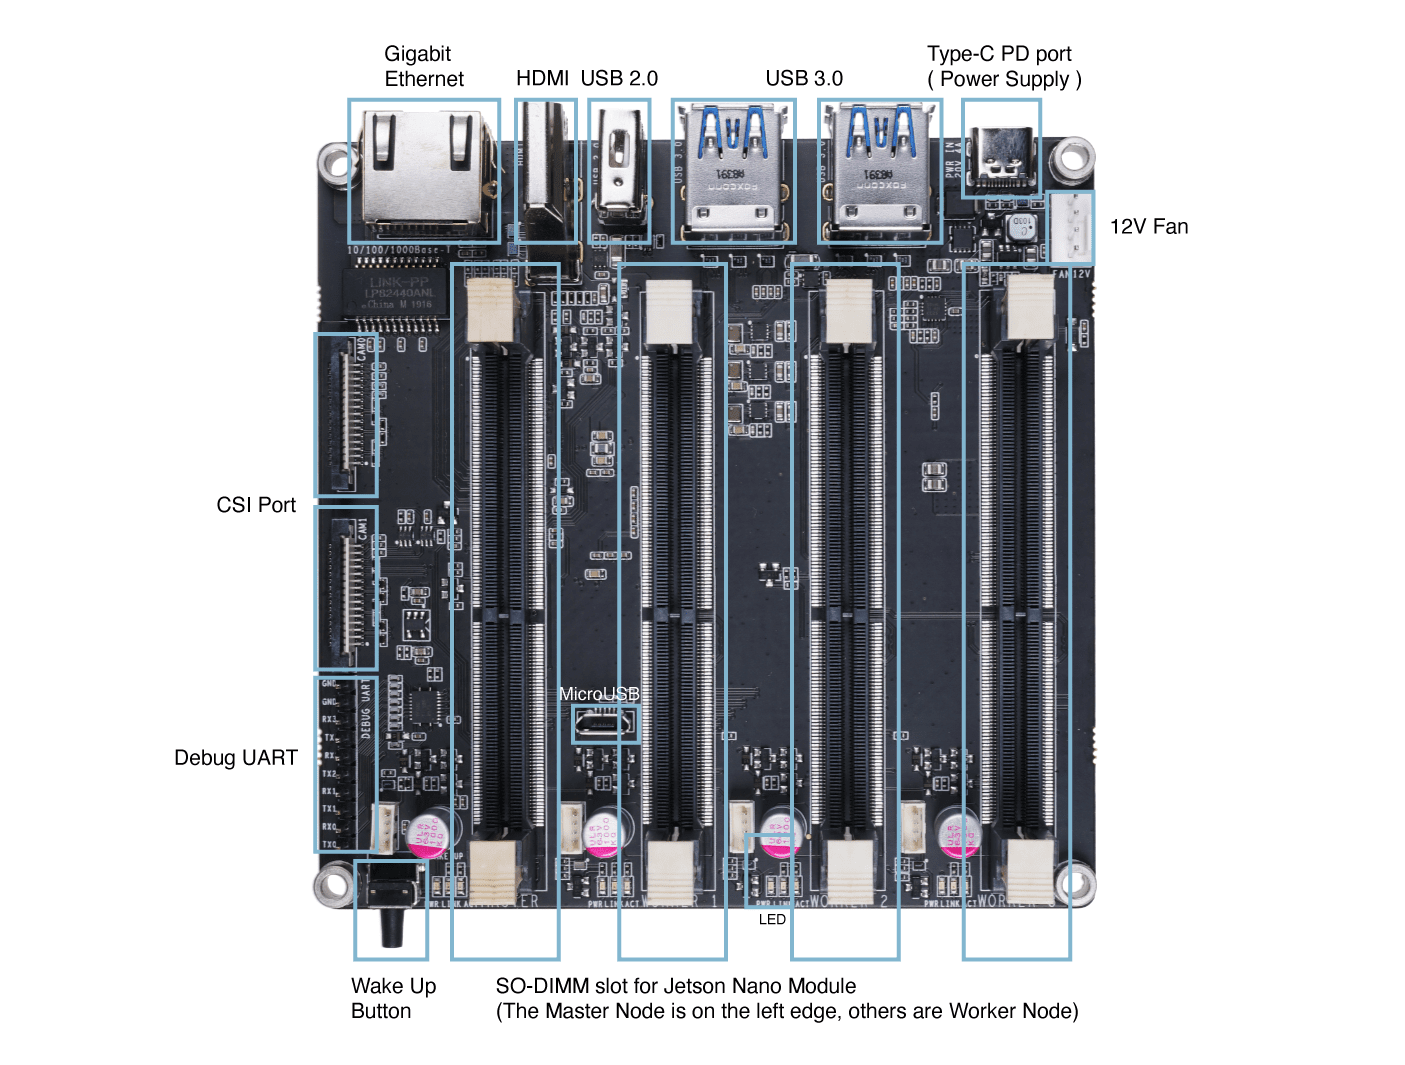
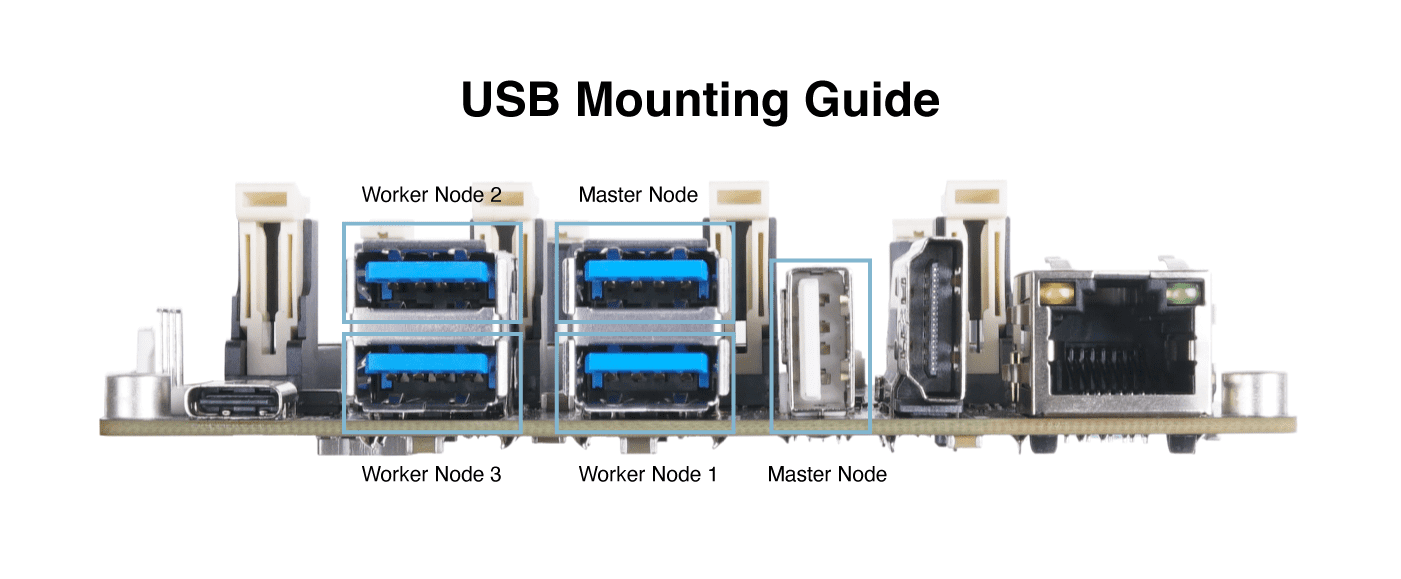
Hardware Overview
Getting Started
!!!Note In this guide, Ubuntu 18.04 LTS is installed on the host PC. Currently OS flashing using NVIDIA SDK Manager is not supported by Ubuntu 20.04. So make sure to use either Ubuntu 18.04 or 16.04. Also if you are running Ubuntu on a virtual machine, it is recommended to use VMware Workstation Player as we have tested this. It is not recommended to use Oracle VM VirtualBox, since it fails to flash the OS.
Hardware Needed
- Jetson Mate
- Jetson Nano/ NX Module(s)
- Micro - USB Cable
- 65W or 90W charging adapter with USB Type-C Cable
- Host PC with Ubuntu 18.04 or 16.04 installed
Hardware Set Up
- Step 1. Insert a Jetson Nano/ NX module to Master Node

- Step 2. Connect a micro-USB cable from Jetson Mate to PC

- Step 3. Connect a jumper between BOOT and GND pins for recovery mode

Step 4. Connect Jetson Mate to a power adapter and turn on Jetson Mate by pressing on the WAKE button
Step 5. Remove the jumper after Jetson Mate turns on
Step 6. Open a terminal window on host PC and execute the following
lsusb

If the output includes 0955:7f21 NVidia Corp., Jetson Mate has entered recovery mode
Software Set Up
If you are using modules with micro-SD card from Developer Kit, we suggest you install and configure the system by following this guide for Jetson Nano, this guide for Jetson Nano 2GB and this guide for Jetson Xavier NX
If you are using modules with eMMC storage, please use NVIDIA’s official SDK Manager and follow the steps below
- Step 1. Download NVIDIA SDK Manager by clicking here
Note: Choose the relavant version according to the host PC OS. We choose Ubuntu here because the host PC used in this guide is running Ubuntu 18.04

Step 2. Create an account or log in to NVIDIA Developer Program Membership
Step 3. Install NVIDIA SDK Manager
Note: Double click the downloaded file to install it
- Step 4. Open NVIDIA SDK Manager and you will notice it automatically detects the connected Jetson Nano/ NX module

Step 5. Select the connected module
Step 6. On the configuration window, uncheck Host Machine.

Note: Here DeepStream SDK is also unchecked. But if you plan to install it as well, you can check it. However, the 16GB on the eMMC module will not be enough to install this SDK.
Step 7. Click CONTINUE TO STEP 02
Step 8. Review the required components and check I accept the terms and conditions of the license agreements

Note: If you only want to install the Jetson OS, you can uncheck Jetson SDK Components
Step 9. Click CONTINUE TO STEP 03
Step 10. Once following error message pops up, click Create

- Step 11. Start downloading and flashing

- Step 12. After downloading and flashing the OS is finished, you will see the following output

Step 13. Turn off Jetson Mate
Step 14. Open a terminal window on host PC and install minicom which is a serial terminal application
sudo apt update
sudo apt install minicom
Note: We will use this application to establish a serial connection between the host PC and Jetson Mate
- Step 15. Turn on Jetson Mate while still connected to PC via micro - USB cable, enter the following to identify the connected serial port
dmesg | grep tty

Note: Here the port name is ttyACM0
- Step 16. Connect to Jetson Mate using minicom
sudo minicom -b 9600 -D /dev/ttyACM0
Note: -b is baud rate and -D is device
- Step 17. Go through the initial configuration for Jetson OS

- Step 18. After configuration is finished, come back to SDK Manager window, enter the username and password set for Jetson Mate and click Install

Note: Use the username and password set in the initial configuration
Now it will start downloading and installing the SDK components

You will see the following output when the SDK manager has sucessfully downloaded and installed the necessary components

- Step 19. Flash all the remaining Jetson Nano/ NX modules you have
Note: All the modules can only be flashed when installed on the master node. Therefore, you should flash and configure the modules one by one on the master node.
Launch the Cluster
- Step 1. Connect an Ethernet cable from router to Jetson Mate
Note: Make sure the PC and Jetson Mate are connected to the same router
- Step 2. Enter Jetson Mate using minicom as explained before, while micro-USB connected to host PC and type the following to obtain the IP addresses of the modules connected to Jetson Mate
ifconfig
- Step 3. Type the following on the host PC terminal to establish an SSH connection
Note: Replace user with your Jetson Nano/ NX username and 192.xxx.xx.xx with your Jetson Nano/ NX IP address
Note: You can also connect to the nodes by replacing the IP address by their hostname
Build a Kubernetes cluster with Jetson Mate
Kubernetes is an enterprise-grade container-orchestration system designed from the start to be cloud-native. It has grown to be the de-facto cloud container platform, continuing to expand as it has embraced new technologies, including container-native virtualization and serverless computing.
Kubernetes manages containers and more, from micro-scale at the edge to massive scale, in both public and private cloud environments. It is a perfect choice for a "private cloud at home" project, providing both robust container orchestration and the opportunity to learn about a technology in such demand and so thoroughly integrated into the cloud that its name is practically synonymous with "cloud computing."
In this tutorial, we use one master and three workers. In the following steps, We will indicate in bold whether ,The software running in master or in the worker, or in worker and master.
configure Docker
worker and master, We need configure the docker runtime use "nvidia" as default.
modify the file /etc/docker/daemon.json
{
 "default-runtime" : "nvidia",
    "runtimes": {
        "nvidia": {
            "path": "nvidia-container-runtime",
            "runtimeArgs": []
        }
    }
}
Restart the Docker daemon:
sudo systemctl daemon-reload && sudo systemctl restart docker
Validate the Docker default runtime as NVIDIA:
sudo docker info | grep -i runtime
Here’s the sample output:
Runtimes: nvidia runc
Default Runtime: nvidia
Installing Kubernetes
worker and master, Install kubelet, kubeadm, and kubectl:
sudo apt-get update && sudo apt-get install -y apt-transport-https curl
curl -s https://packages.cloud.google.com/apt/doc/apt-key.gpg | sudo apt-key add -

# Add the Kubernetes repo
cat <<EOF | sudo tee /etc/apt/sources.list.d/kubernetes.list
deb https://apt.kubernetes.io/ kubernetes-xenial main
EOF
sudo apt update && sudo apt install -y kubelet kubeadm kubectl
sudo apt-mark hold kubelet kubeadm kubectl
Disable the swap, You have to turn this off every time you reboot.
sudo swapoff -a
Compile deviceQuery, which we will use it in the following steps.
cd /usr/local/cuda/samples/1_Utilities/deviceQuery && sudo make
cd
Configure Kubernetes
master, Initialize the cluster:
sudo kubeadm init --pod-network-cidr=10.244.0.0/16
The output shows you commands to execute for deploying a pod network to the cluster, as well as commands to join the cluster. If everything is successful, you should see something similar to this at the end of the output:
Your Kubernetes control-plane has initialized successfully!

To start using your cluster, you need to run the following as a regular user:

  mkdir -p $HOME/.kube
  sudo cp -i /etc/kubernetes/admin.conf $HOME/.kube/config
  sudo chown $(id -u):$(id -g) $HOME/.kube/config

You should now deploy a pod network to the cluster.
Run "kubectl apply -f [podnetwork].yaml" with one of the options listed at:
  https://kubernetes.io/docs/concepts/cluster-administration/addons/

Then you can join any number of worker nodes by running the following on each as root:

kubeadm join 192.168.2.114:6443 --token zqqoy7.9oi8dpkfmqkop2p5 \
    --discovery-token-ca-cert-hash sha256:71270ea137214422221319c1bdb9ba6d4b76abfa2506753703ed654a90c4982b
Using the output instructions, run the following commands:
mkdir -p $HOME/.kube
sudo cp -i /etc/kubernetes/admin.conf $HOME/.kube/config
sudo chown $(id -u):$(id -g) $HOME/.kube/config
Install a pod-network add-on to the control plane node. Use calico as the pod-network add-on:
kubectl apply -f https://raw.githubusercontent.com/coreos/flannel/master/Documentation/kube-flannel.yml
If you are in China, follow this instead: kubectl apply -f https://gitee.com/wj204811/wj204811/raw/master/kube-flannel.yml
Make sure that all pods are up and running:
kubectl get pods --all-namespaces
Here’s the sample output:
NAMESPACE     NAME                                       READY   STATUS    RESTARTS   AGE
kube-system   kube-flannel-ds-arm64-gz28t                1/1     Running   0          2m8s
kube-system   coredns-5c98db65d4-d4kgh                   1/1     Running   0          9m8s
kube-system   coredns-5c98db65d4-h6x8m                   1/1     Running   0          9m8s
kube-system   etcd-#yourhost                             1/1     Running   0          8m25s
kube-system   kube-apiserver-#yourhost                   1/1     Running   0          8m7s
kube-system   kube-controller-manager-#yourhost          1/1     Running   0          8m3s
kube-system   kube-proxy-6sh42                           1/1     Running   0          9m7s
kube-system   kube-scheduler-#yourhost                   1/1     Running   0          8m26s
worker, Join the compute nodes to the cluster, it is now time to add compute nodes to the cluster. Joining the compute nodes is just a matter of running the kubeadm join command provided at the end of the kube init command run to initialize the Control Plane node. For the other Jetson nano you want to join your cluster, log into the host, and run the command:
 the cluster - your tokens and ca-cert-hash will vary
$ sudo kubeadm join 192.168.2.114:6443 --token zqqoy7.9oi8dpkfmqkop2p5 \
    --discovery-token-ca-cert-hash sha256:71270ea137214422221319c1bdb9ba6d4b76abfa2506753703ed654a90c4982b
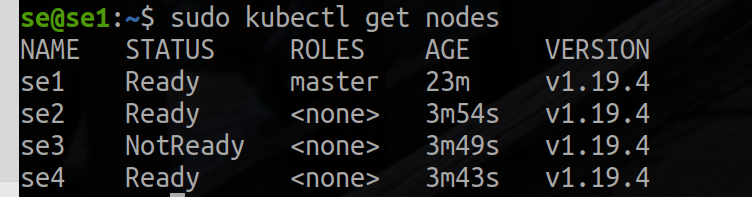
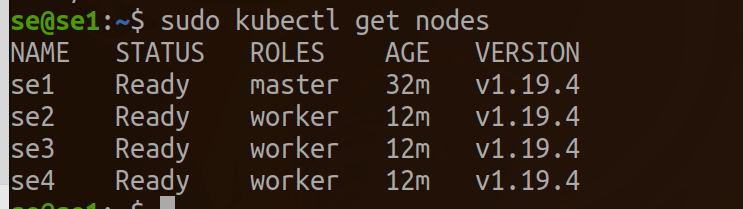
master,Once you have completed the join process on each node, you should be able to see the new nodes in the output of kubectl get nodes:
kubectl get nodes
Here’s the sample output:
tag as node for the worker.
kubectl label node se2 node-role.kubernetes.io/worker=worker
kubectl label node se3 node-role.kubernetes.io/worker=worker
kubectl label node se4 node-role.kubernetes.io/worker=worker
Validating a successful EGX 2.0 installation
worker and master, To validate that the EGX stack works as expected, follow these steps to create a pod yaml file. If the get pods command shows the pod status as completed, the installation has been successful. You can also verify the successful run of the cuda-samples.yaml file by verifying that the output shows Result=PASS. Create a pod yaml file, add the following contents to it, and save it as samples.yaml:
nano cuda-samples.yaml
Add the following content and save it as cuda-samples.yaml:
apiVersion: v1
kind: Pod
metadata:
  name: nvidia-l4t-base
spec:
  restartPolicy: OnFailure
  containers:
  - name: nvidia-l4t-base
    image: "nvcr.io/nvidia/l4t-base:r32.4.2"
    args:
       - /usr/local/cuda/samples/1_Utilities/deviceQuery/deviceQuery
Create a sample GPU pod:
sudo kubectl apply -f cuda-samples.yaml
Check whether the samples pod was created:
kubectl get pods
Validate the sample pod logs to support CUDA libraries:
kubectl logs nvidia-l4t-base
Here’s the sample output:
/usr/local/cuda/samples/1_Utilities/deviceQuery/deviceQuery Starting...
 CUDA Device Query (Runtime API) version (CUDART static linking)
Detected 1 CUDA Capable device(s)

Device 0: "Xavier"
  CUDA Driver Version / Runtime Version          10.2 / 10.2
  CUDA Capability Major/Minor version number:    7.2
  Total amount of global memory:                 7764 MBytes (8140709888 bytes)
  ( 6) Multiprocessors, ( 64) CUDA Cores/MP:     384 CUDA Cores
  GPU Max Clock rate:                            1109 MHz (1.11 GHz)
  Memory Clock rate:                             1109 Mhz
  Memory Bus Width:                              256-bit
  L2 Cache Size:                                 524288 bytes
  Maximum Texture Dimension Size (x,y,z)         1D=(131072), 2D=(131072, 65536), 3D=(16384, 16384, 16384)
  Maximum Layered 1D Texture Size, (num) layers  1D=(32768), 2048 layers
  Maximum Layered 2D Texture Size, (num) layers  2D=(32768, 32768), 2048 layers
  Total amount of constant memory:               65536 bytes
  Total amount of shared memory per block:       49152 bytes
  Total number of registers available per block: 65536
  Warp size:                                     32
  Maximum number of threads per multiprocessor:  2048
  Maximum number of threads per block:           1024
  Max dimension size of a thread block (x,y,z): (1024, 1024, 64)
  Max dimension size of a grid size    (x,y,z): (2147483647, 65535, 65535)
  Maximum memory pitch:                          2147483647 bytes
  Texture alignment:                             512 bytes
  Concurrent copy and kernel execution:          Yes with 1 copy engine(s)
  Run time limit on kernels:                     No
  Integrated GPU sharing Host Memory:            Yes
  Support host page-locked memory mapping:       Yes
  Alignment requirement for Surfaces:            Yes
  Device has ECC support:                        Disabled
  Device supports Unified Addressing (UVA):      Yes
  Device supports Compute Preemption:            Yes
  Supports Cooperative Kernel Launch:            Yes
  Supports MultiDevice Co-op Kernel Launch:      Yes
  Device PCI Domain ID / Bus ID / location ID:   0 / 0 / 0
  Compute Mode:
     < Default (multiple host threads can use ::cudaSetDevice() with device simultaneously) >

deviceQuery, CUDA Driver = CUDART, CUDA Driver Version = 10.2, CUDA Runtime Version = 10.2, NumDevs = 1
Result = PASS
Configure Jupyter on Kubernetes
worker and master,Add the following content and save it as jupyter.yaml:
nano jupyter.yaml
apiVersion: apps/v1 # for versions before 1.9.0 use apps/v1beta2
kind: Deployment
metadata:
  name: cluster-deployment
spec:
  selector:
    matchLabels:
      app: cluster
  replicas: 3 # tells deployment to run 3 pods matching the template
  template:
    metadata:
      labels:
        app: cluster
    spec:
      containers:
      - name: nginx
        image: helmuthva/jetson-nano-jupyter:latest
        ports:
        - containerPort: 8888
Create a jupyter GPU pod:
kubectl apply -f jupyter.yml
Check whether the jupyter pod was created and running:
kubectl get pod
Create an External Load Balancer
kubectl expose deployment cluster-deployment --port=8888 --type=LoadBalancer

Here you can see that the jupyter cluster has external access on port 31262. So we use http://se1.local:31262 to visit the jupyter.
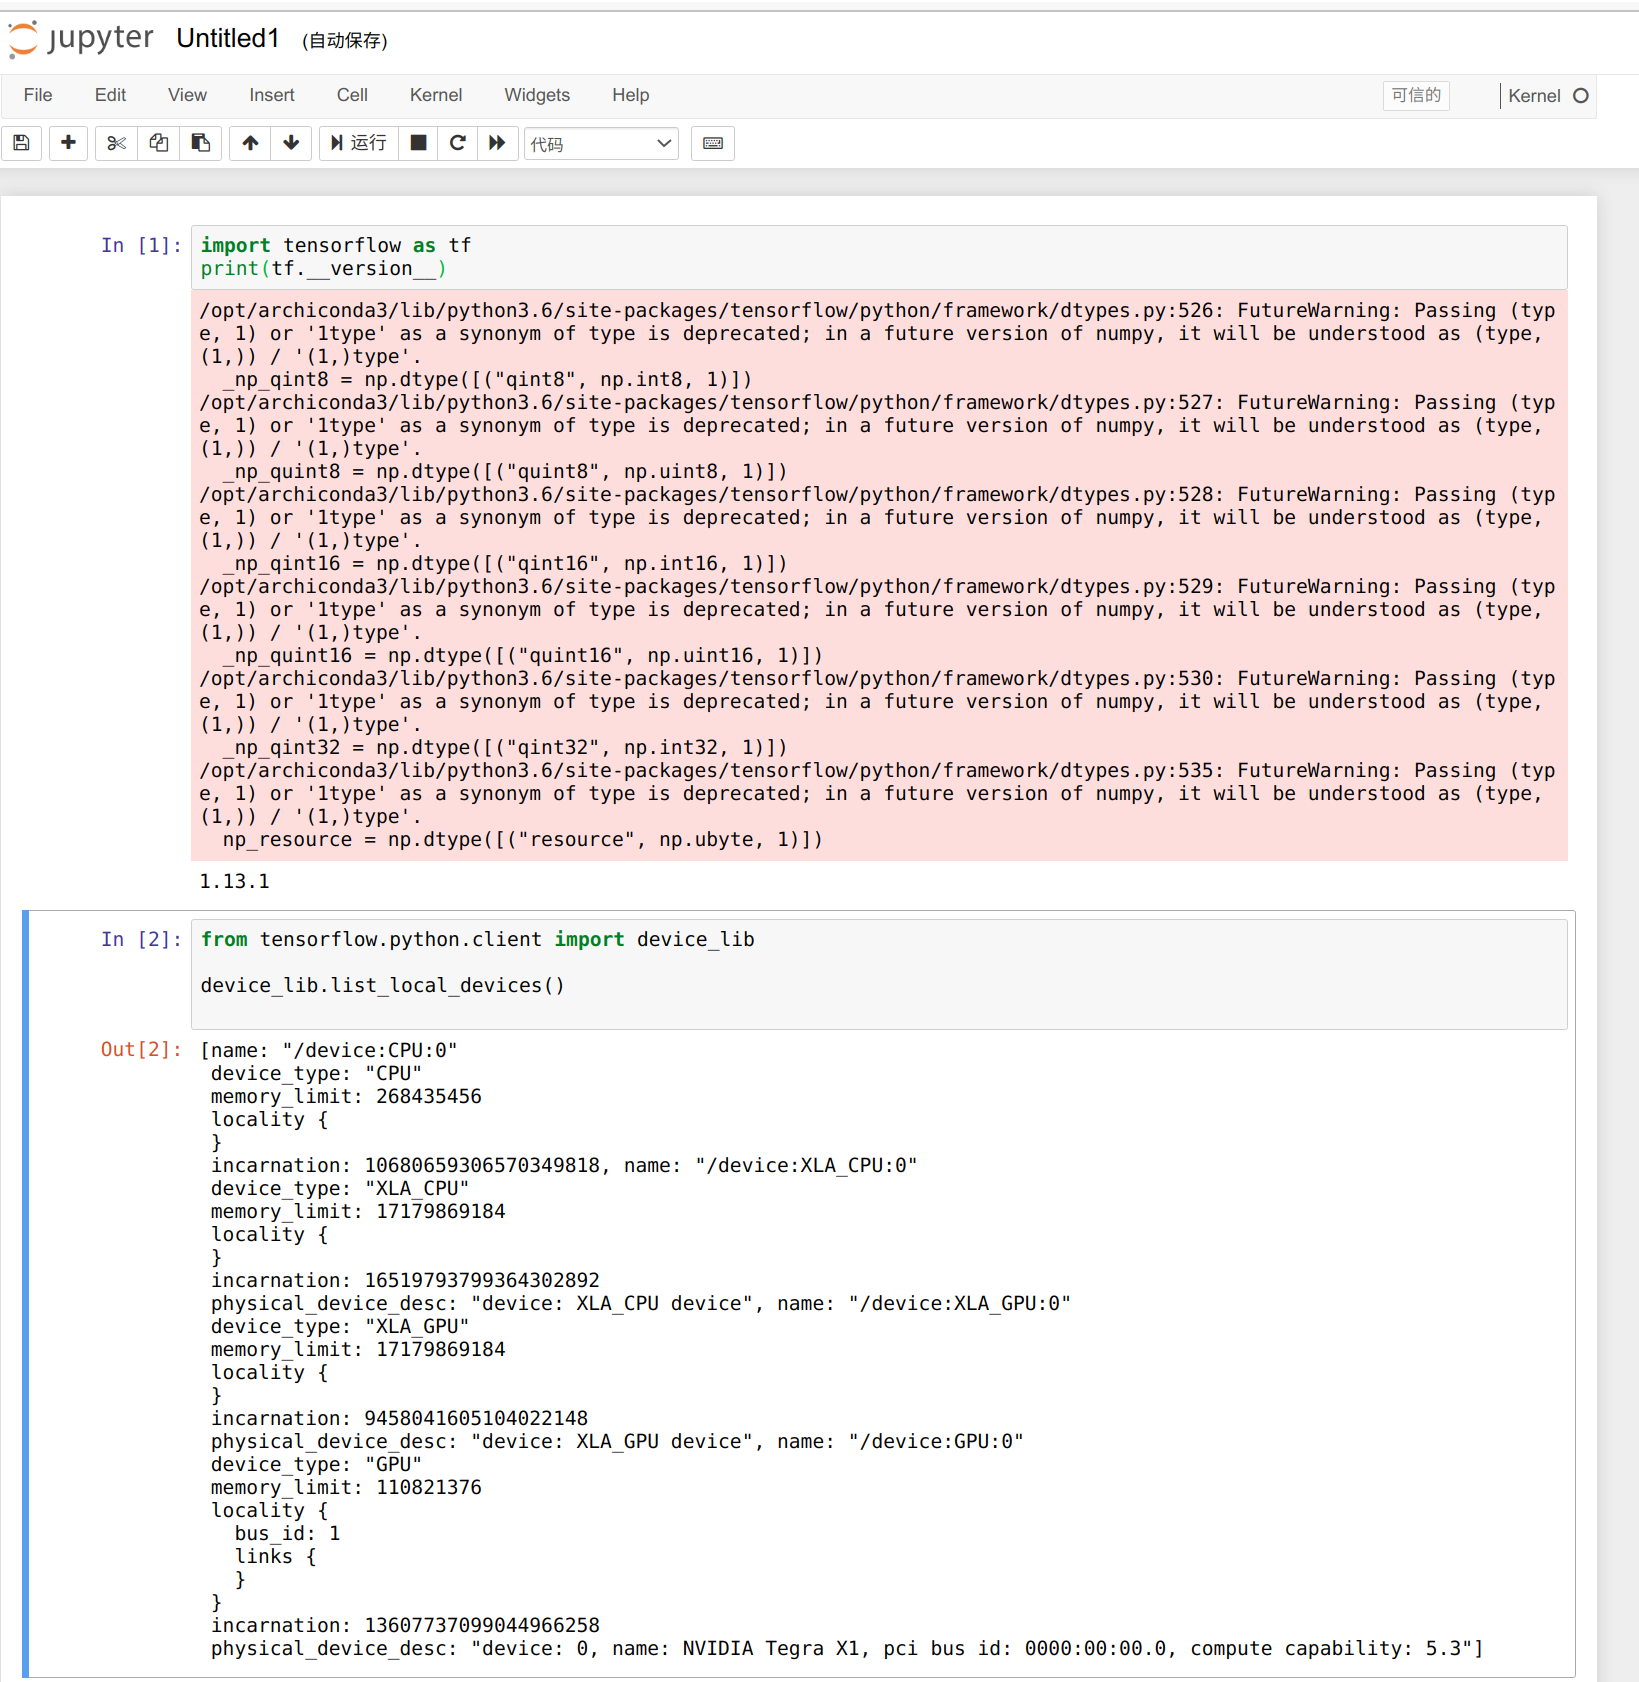
We can use the following code to check the number of GPUs available, we only have 3 workers, and the number of GPUs available is 3.
from tensorflow.python.client import device_lib

def get_available_gpus():
    local_device_protos = device_lib.list_local_devices()
    return [x.name for x in local_device_protos if x.device_type == 'GPU']

get_available_gpus()
All right, here's your show.
Resources
- [PDF] Jetson Mate Schematics
- [PDF] Jetson Mate PCB Top
- [PDF] Jetson Mate PCB Bottom
Tech Support & Product Discussion
Thank you for choosing our products! We are here to provide you with different support to ensure that your experience with our products is as smooth as possible. We offer several communication channels to cater to different preferences and needs.