Getting Started with Mini AI Computer T906

Mini AI Computer T906 built with the Jetson AGX Orin 32GB Module that delivers up to 200TOPS AI performance, ready for the most complex AI workloads at the edge. Pre-installed Jetpack 5.0.2, supported by NVIDIA JetPack and DeepStream SDKs, TensorRT, RIVA, Issac software libraries, and leading AI platform-tools from the Seeed Edge AI ecosystem, you can easily develop and deploy AI applications for manufacturing, delivery, retail, and smart cities, and more.
You can access a speed network access with ethernet ports of 10GbE and 1GbE at Mini AI Computer T906. You can enable up to 10 streams for video analytics.
The built-in carrier board also leaves interfaces for the GPS module, and M.2 Key M for extending SSD, M.2 Key B for the wifi module, M.2 Key E for 5G module,Mini PCIe for 4G module.
With 3x RS232 and protected by excellent heat dissipation and enclosure, T906 is ideal for building energy-efficient autonomous machines
With up to 10 Gigabit Ethernet and ultra-long MTBF stable operation, this supercomputer makes advanced analytics possible while providing the ability to handle multiple simultaneous streams from like dozens of IP cameras. It carries Wi-Fi wireless capabilities and supports Bluetooth, 4G & 5G modules configuration, as well as GPS navigation.
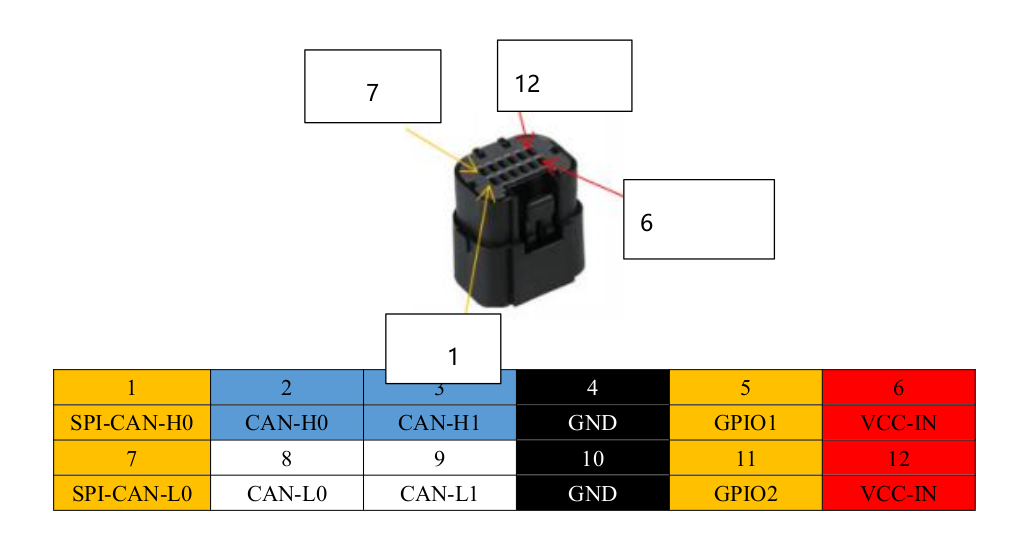
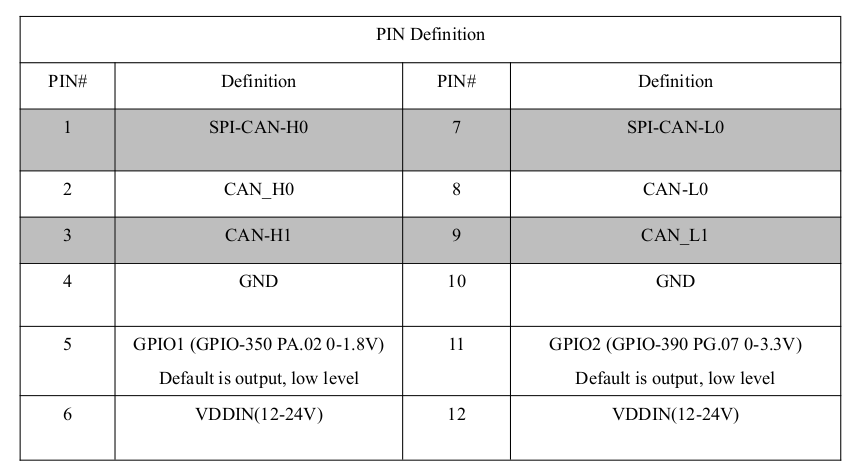
Equipped with a JEG vehicle-level connector where there are 3x CAN FD, and 2x GPIO, you can input multiple radar sensors. It has also mounted a GMSL camera connector which you can utilize to build a camera sensor hub, a control unit, or a video transcoding unit. This edge AI box can implement autonomous driving, autonomous mobile robots (AMR), or teleoperation of unmanned ground.
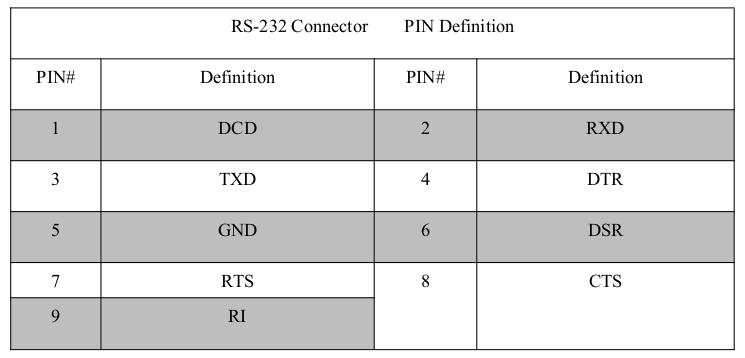
It comes with a rich set of industrial interfaces: 1x standard RS232, 1x RS232 for UART, and 1x RS232 for the Time SYNC trigger.
Covered by super strong and lightweight aluminum alloy, it is designed as IP55 for a high degree of protection and it is designed as passive heat dissipation with two onboard fans for a strong cooling function. With pre-installed Jetpack 5.0.2, this great computing platform is ready to deploy on unmanned cleaning cars, unmanned delivery cars, intelligent inspection, AGV, and other unmanned driving fields.
Features
- It is embedded with NVIDIA® JETSON AGX ORIN™
- It supports M.2 KEY M (PCIEX4 NVME 2280)
- It supports M.2 KEY E (PCIEX1 2230)
- It supports 8 GMSL2 cameras* (GMSL2 adaptor board need to be purchased separately)
- It supports multiple interfaces (e.g. CAN/USB/Ethernet/Synchronous Signal/Serial/GPIO, etc.)
- It supports dual-band WIFI/Bluetooth/4G/5G module
- Japan JAE automotive grade IO plug (1xPOWER, 3xCAN, 2xGPIO)
- Fan and passive cooling design
- It has built-in ubuntu 20.04 system and JETPACK SDKS
Specifications
Module | Jetson AGX Orin 32GB |
AI Performance | 200 TOPS |
CPU | 8-core Arm® Cortex®-A78AE v8.2 64-bit CPU 2MB L2 + 4MB L3 |
GPU | 1792-core NVIDIA Ampere architecture GPU with 56 Tensor Cores |
Memory | 32GB 256-bit LPDDR5 204.8GB/s |
Storage | 64GB eMMC 5.1 1 x m.2 key m nvme 2280 connector |
Display | 1*HDMI Type A |
Video Encode | 1x 4K60 (H.265) 3x 4K30 (H.265) 6x 1080p60 (H.265) 12x 1080p30 (H.265) |
Video decoder | 1x 8K30 (H.265) 2x 4K60 (H.265) 4x 4K30 (H.265) 9x 1080p60 (H.265) 18x 1080p30 (H.265) |
Gigabit Ethernet | 1x 10GbE 1x 1GbE |
Wifi/BlueTooth | 1x M.2 KEY B (2230) Support WiFi/Bluetooth 1x M.2 KEY E support 5G 1 mini PCIe for 4G (modules not included) |
GPS | Support GPS (modules not included) |
USB | 4x USB 3.0 Type A Connector; 1x USB 2.0 TYPE-C port for Device mode; 1x USB 2.0 TYPE-C port for Debug |
Industrial Interfaces | 3xCAN (with CAN chip) |
2xGPIO | |
2x RS-232 D-SUB9 1 xTIME SYNC(RS232) | |
Camera | GMSL 2 camera connector (compatible with GMSL1, adaptor board need to be purchased separately) |
RTC | RTC Connector with Rechargeable Battery |
FAN | 2* FAN |
LED | 2x Status Indicator LED |
Button | Power KEY Reset KEY Recovery KEY |
OS | JetPack 5.0.2 |
Power | 9-36v JAE(MX23A12SF1) Typical power 45W Maximum 75W |
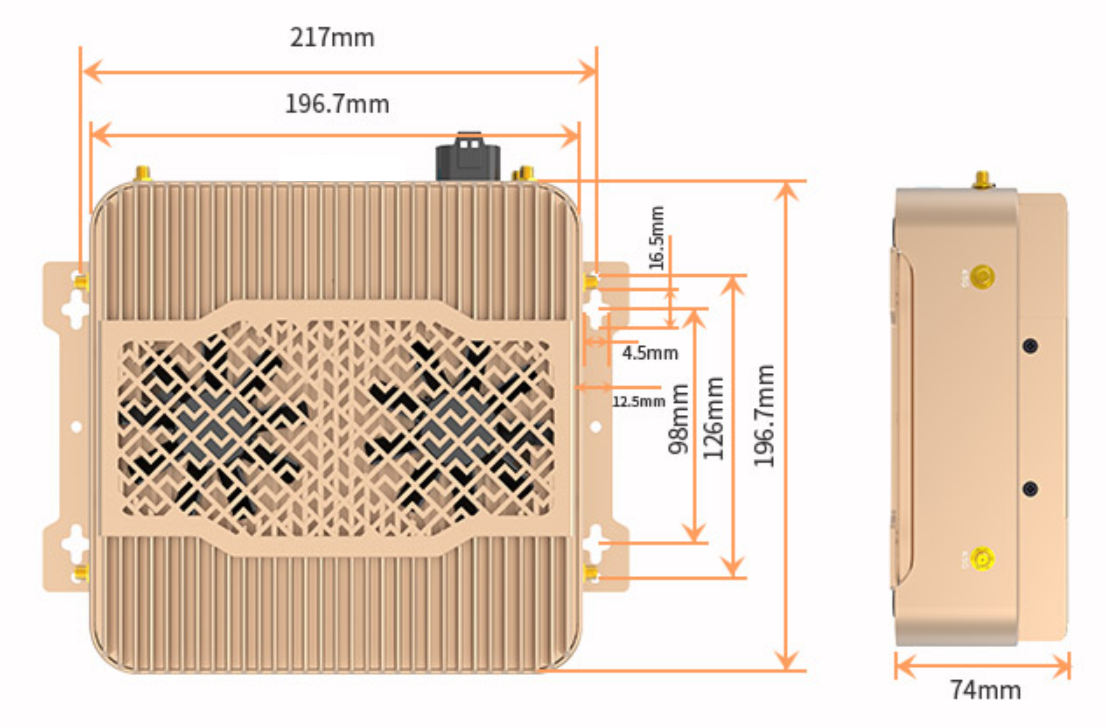
Mechanical | 196.719674mm 2.5kg -20℃-55℃ |
Hardware Overview


Dimensions
Hardware Description
Serial Port

Multifunctional Interface
Flash Operating System
!!! Note Mini AI Computer T906 will come with Jetpack 5.0.2 preinstalled on the EMMC of the Jetson AGX Orin module which means you could directly start to develop your own application with it. You can skip to next section. If you want to proceed to flash OS to this device, you need to be noted that the carrier board of this system is customize designed therefore the relevant drivers need to be downloaded and installed.
Hardware Required
You need to prepare the following hardware before getting started
- Linux Host Computer with Ubuntu 18.04 OS or Ubuntu 20.04 OS
- Mini AI Computer T906
- Power Adapter(provided)
- Keyboard and Mouse
- 1 x USB Type-C cable (provided)
Set Mini AI Computer T906 to Recovery Mode
-
Step 1. Connect the Mini AI Computer T906 to the system power supply;
-
Step 2. Connect the Mini AI Computer T906 to the ubuntu host using a usb type-c cable (one end is plugged into the OTG port of the ini AI Computer T906 and one end is plugged into the usb 3.0 socket of the ubuntu host).
-
Step 3. Power up the system using the power supply configured on the Mini AI Computer T906.
-
Step 4. Press recovery and then press and hold the reset button on the Mini AI Computer T906.
-
Step 5. Release the reset button after 2 seconds and finally release the recovery button, at this point the T906 enters recovery mode (you can check if there is an
Nvidia Corpdevice by running the command:lsusbon the Ubuntu Host.
!!! Note When entering usb recovery mode, the system will not boot and there will be no debug information output from the serial port.
Download and Flash OS to Mini AI Computer T906
-
Step 1. Download the system image files from our Source Forge Repo
-
Step 2. Execute the following command in your Ubuntu Host Computer
Terminal:
#extract archive
sudo tar -zxvf T906_JP5.0.2.tar.gz

#Enter the L4T folder
cd Linux_for_Tegra

#Start Flashing OS
sudo . /flash.sh jetson-agx-orin-devkit mmcblk0p1
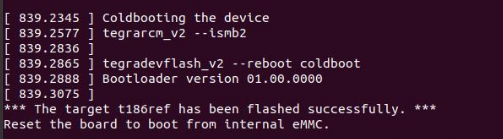
You should see similar message at Terminal ouput.
Peripherals
Wi-Fi Connection
!!! Note Mini AI Computer T906 does not come with WiFi module.
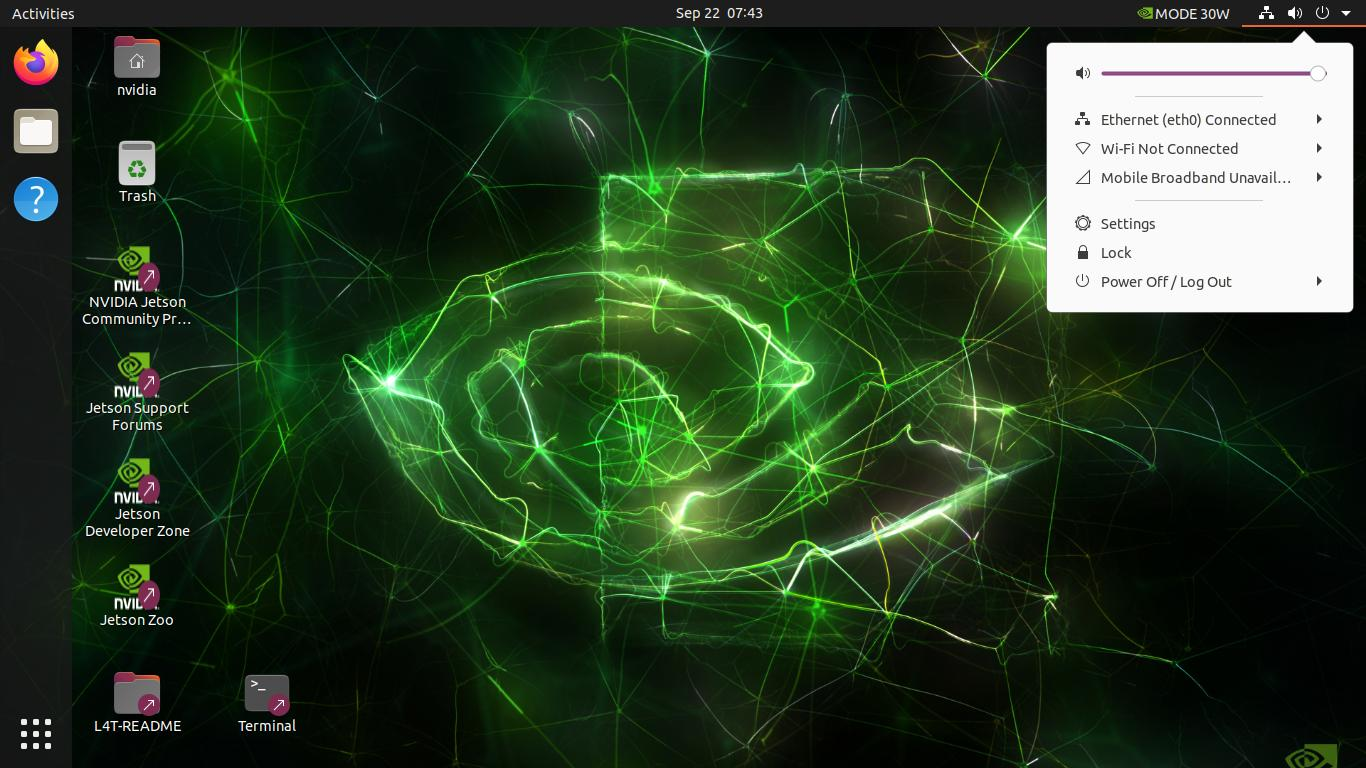
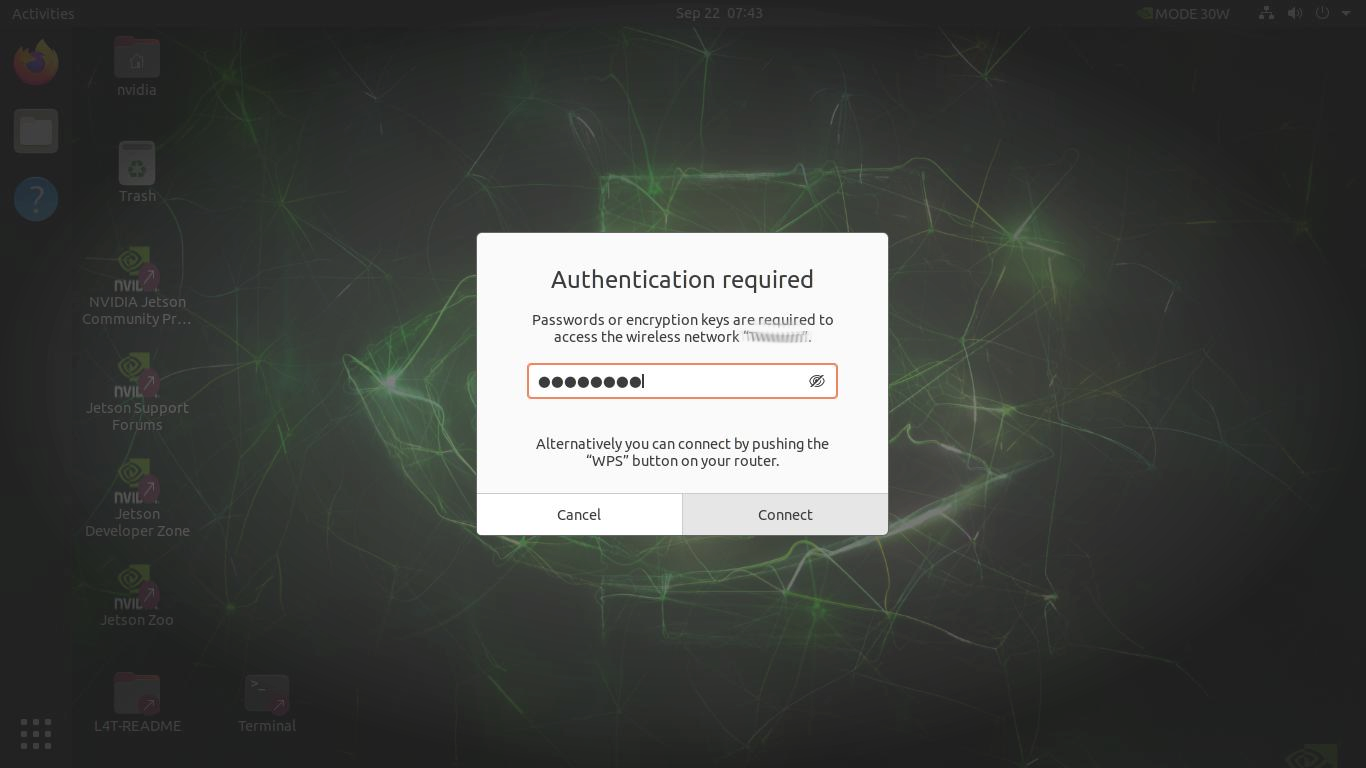
- Step 1. After Boot into the system, please n the network icon shown by the arrow, the network settings will appear.
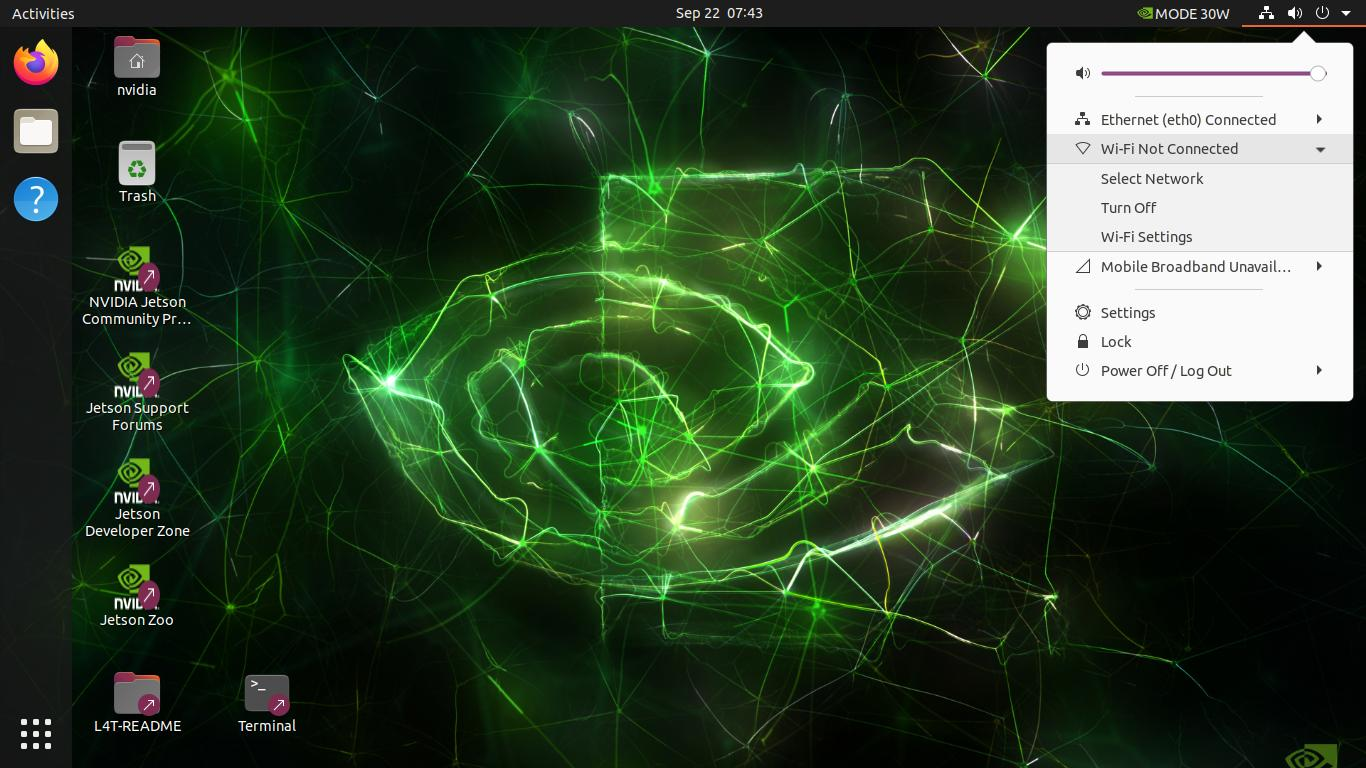
- Step 2. Under Wi-Fi section please select and click
Select Network.
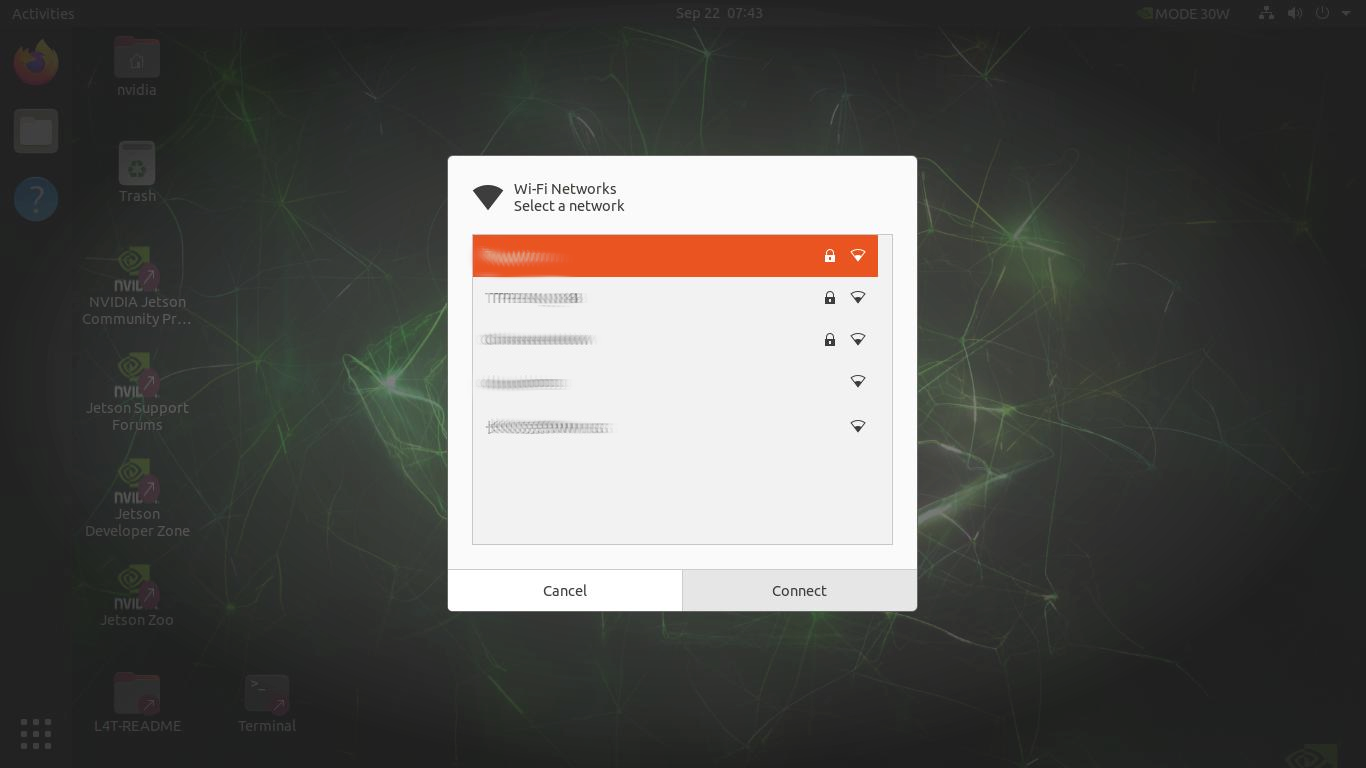
- Step 3. Select your Wi-Fi network at the prompt window and click
connect.
- Step 4. Please Enter the Wi-Fi Password at the
Authentication requiredwindow.
4G Dial-up Networking
!!! Note Mini AI Computer T906 does not come with 4G module, the following procedure are performed with Neoway N720 4G Module.
- Step 1. Please download the 4G Module drivers and unzip the package, then Copy the driver to
/etc/ppp/peersby using theTerminal:
wget -o- https://files.seeedstudio.com/wiki/AI_Computer_T906/4g_dail.zip

unzip 4g_dail.zip

sudo cp -f 4g_dail_script/* /etc/ppp/peers
- Step 2. Go to the /etc/ppp/peers directory and find the n720-ppp-dial.sh script. The first time you execute it, you will need to grant execute permissions, as follows.
cd /etc/ppp/peers

sudo chmod +x n720-ppp-dial.sh

sudo ./n720-ppp-dial.sh
If you need to turn off dial-up, you can run the ppp-kill.sh script to end it.
cd /etc/ppp/peers

#turn off dial-up
sudo ./ppp-kill.sh
-
Step 3. If you want to implement the 4G auto-connect feature, you need to set up the rc.local startup script to increase the number of applications on system boot.
-
Step 3-1. Add rc-local.service
#create a system service
sudo ln -fs /lib/systemd/system/rc-local.service /etc/systemd/system/rc-local.service

#edit the service file
sudo vi /etc/systemd/system/rc-local.service
At the vi editor, type i and then please type in following:
[Install]
WantedBy=multi-user.target
Alias=rc-local.service
and then type :wq to save and quit.
- Step 3-2. Write the rc.local script
sudo touch /etc/rc.local

sudo chmod 755 /etc/rc.local

sudo vi /etc/rc.local
At the vi editor, type i and then use control+shift+V or paste the following script:
#!/bin/bash

LOG_DIR=/var/log/4glog
mkdir -p $LOG_DIR

#4g auto dial if register on network. sleep 30s wait for 4g module prepared
TIME=`date +%Y%m%d%H%M`
echo $TIME >> $LOG_DIR/ppp-dial.log
echo "Auto dial" >>  $LOG_DIR/ppp-dial.log
nohup /etc/ppp/peers/n720-ppp-dial.sh >> $LOG_DIR/ppp-dial.log &

sleep 10
#Set default gateway
def_gw=`/sbin/ifconfig ppp0|grep destination|grep -v 127.0.0.1|grep -v inet6 | awk '{print $6}' | tr -d "addr:"`
#`route -n | grep ppp0 | grep UG | awk '{print $2}'`
echo $def_gw >> $LOG_DIR/ppp-dial.log
if [ -n "$def_gw" ]; then
    #Set default gateway using ppp0/4G
    sudo route add default gw $def_gw
else
    sleep 10
    def_gw=`/sbin/ifconfig ppp0|grep destination|grep -v 127.0.0.1|grep -v inet6 | awk '{print $6}' | tr -d "addr:"`
    if [ -n "$def_gw" ]; then
        sudo route add default gw $def_gw
    fi
fi
#Get ppp0 IP
fourg_ip=`/sbin/ifconfig ppp0|grep inet|grep -v 127.0.0.1|grep -v inet6 | awk '{print $2}' | tr -d "addr:"`
if [ -n "$fourg_ip" ]; then
    echo $fourg_ip >> $LOG_DIR/ppp-dial.log
else
    sleep 15
    if [ -n "$fourg_ip" ]; then
        echo $fourg_ip >> $LOG_DIR/ppp-dial.log
    else
        echo "4G no ip $fourg_ip" >> $LOG_DIR/ppp-dial.log
        echo $TIME"-Kill pppd and redial" >> $LOG_DIR/ppp-kill.log
        nohup /etc/ppp/peers/ppp-kill.sh >> $LOG_DIR/ppp-kill.log &
    fi
fi
#end 4g auto dial

#Running maxn mode
/usr/bin/jetson_clocks

exit 0
Now you can open a web page to test and see if the 4G network is connected.
GPIO Test
- Step 1. Install the gpio python library
git clone https://github.com/vitiral/gpio.git

cd gpio/

sudo python3 setup.py install
- Step 2. Write a testing python script
import time
import gpio

tst_gpio_pin = 326    #326 correspond to  T906's GPIO2
#tst_gpio_pin = 350   #350 correspond to  T906's GPIO1

gpio.setup(tst_gpio_pin, gpio.OUT)
gpio.set(tst_gpio_pin, 0)

print("Starting now! Press CTRL+C to exit")
try:
    while True:
        gpio.set(tst_gpio_pin, 1)
        print("TEST High.")
        time.sleep(5)
        gpio.set(tst_gpio_pin, 0)
        print("TEST Low")
        time.sleep(5)
finally:
    gpio.cleanup()
- Step 3. you could also check if the GPIO pin is at HI or LO by:
sudo cat /sys/kernel/debug/gpio| grep '326'
GPS Use
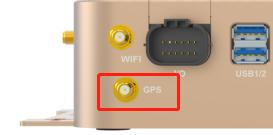
!!!Note This is the step for testing with the GPS module, The following procedure and software are for HX-26-GN series GPS module, Please note that the GPS Module is not included in the standard product, you need to supply on your own.
- Step 1. please Mount the GPS module and attach the GPS antenna to the GPS port.
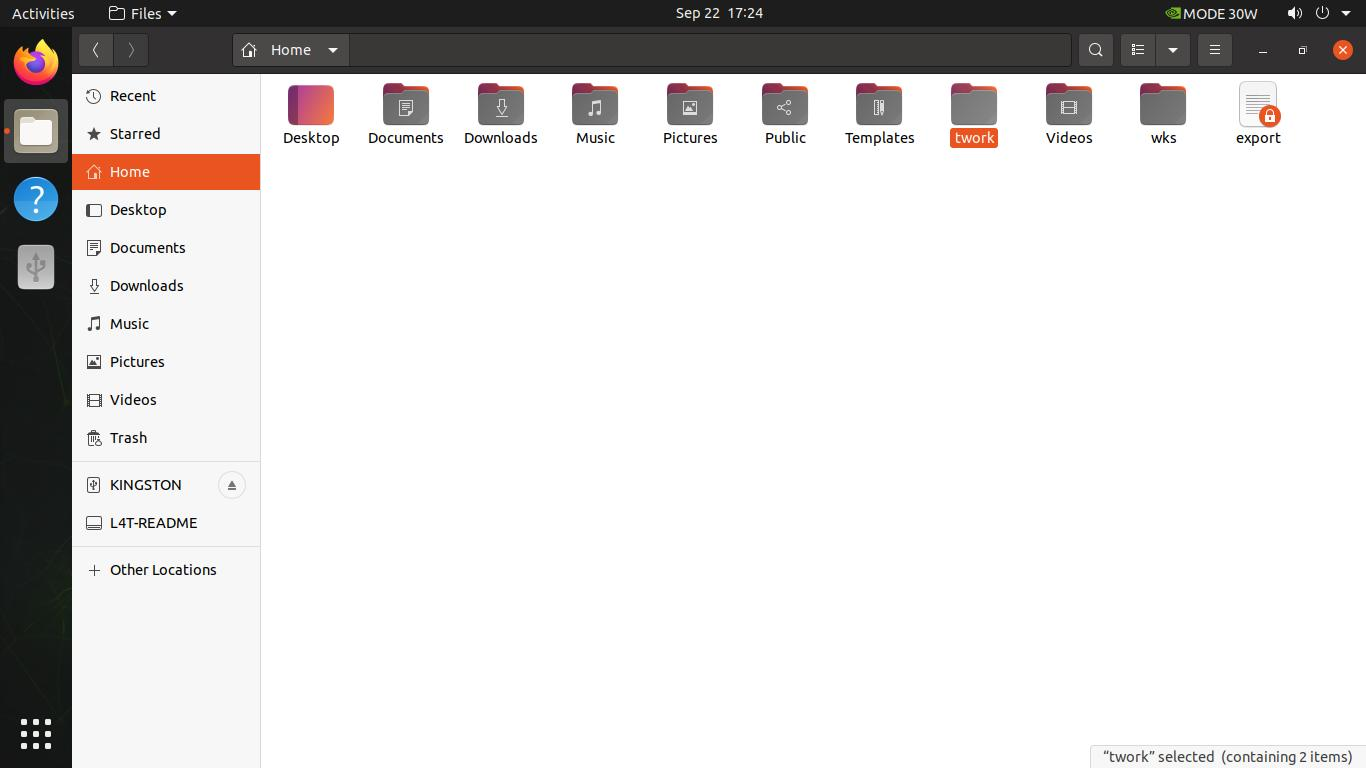
- Step 2. After bootup the system, you can find the twork folderat the home location, double click into it and right click mouse button and select
Open in Terminal.
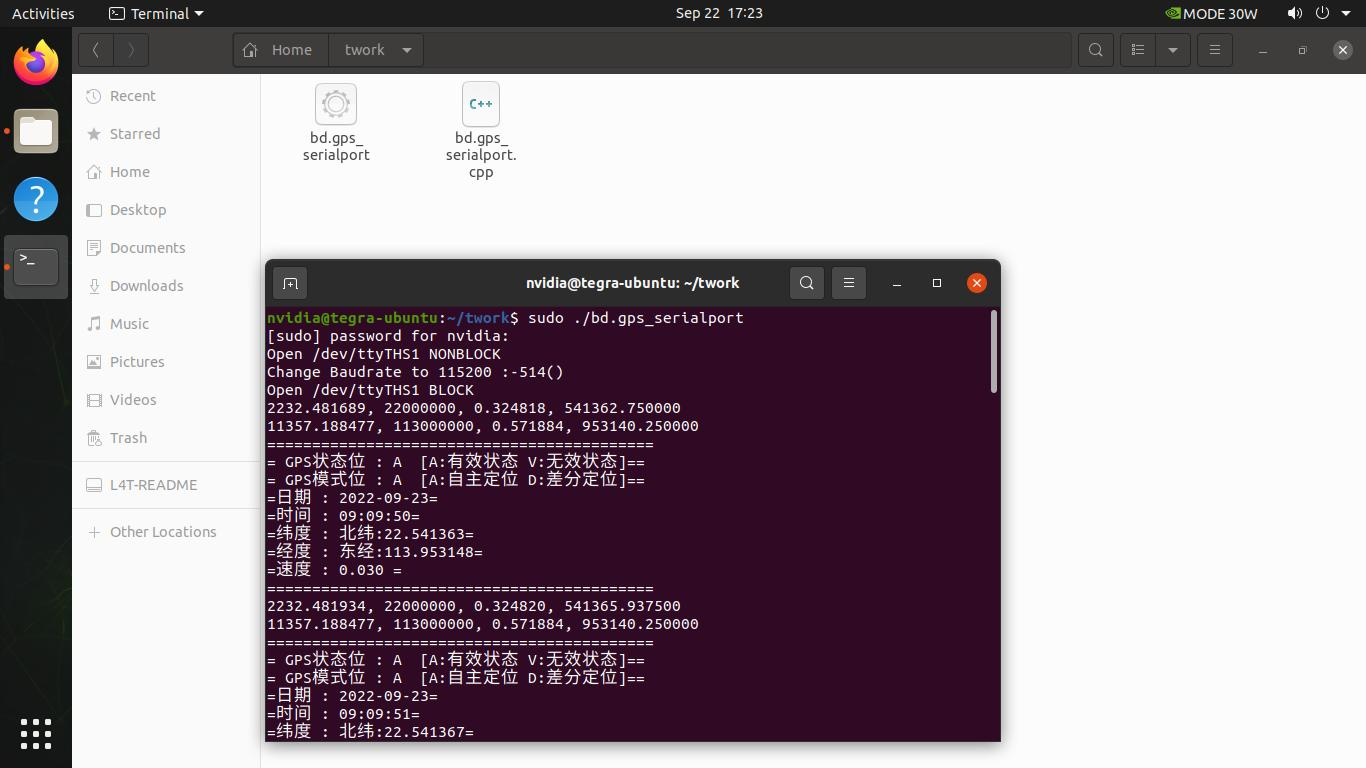
- Step 3. At the
Terminalwindow, please Enter following command:
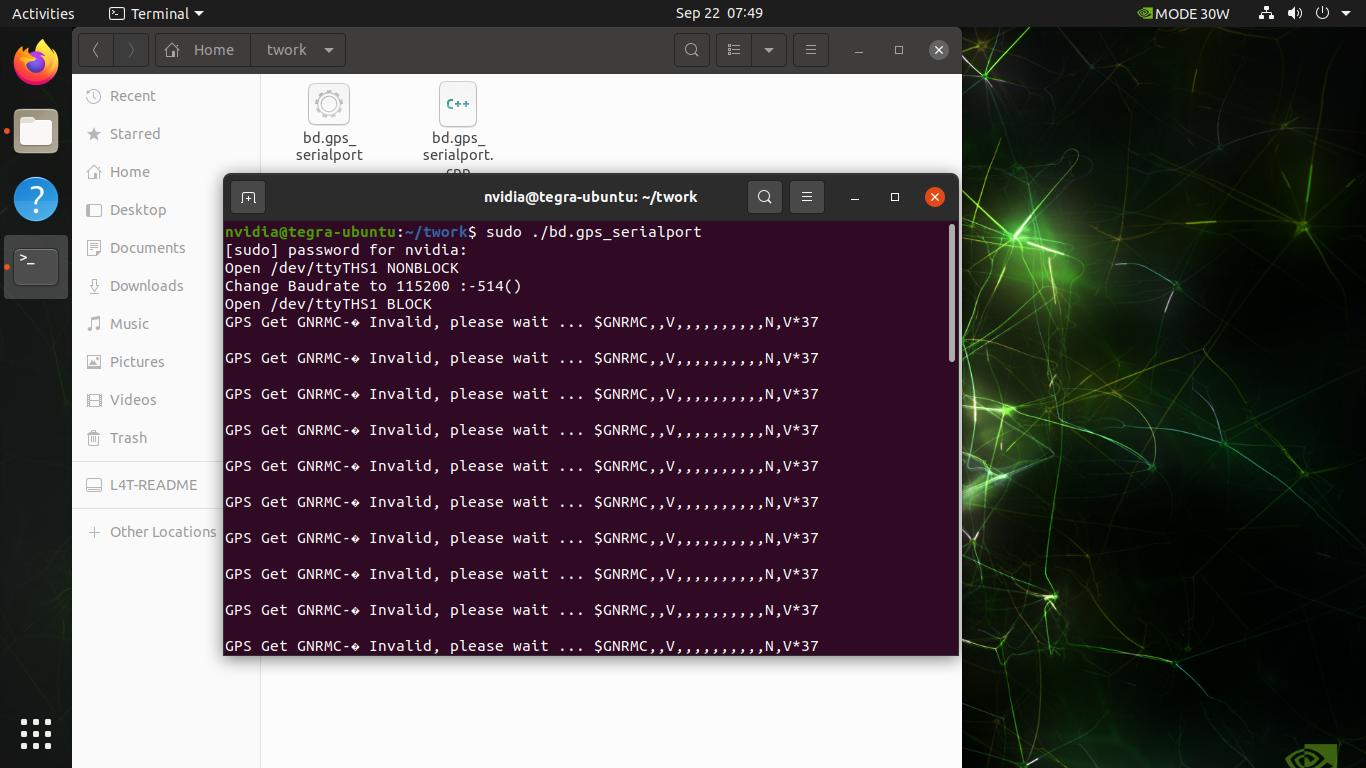
sudo ./bd.gps_serialport
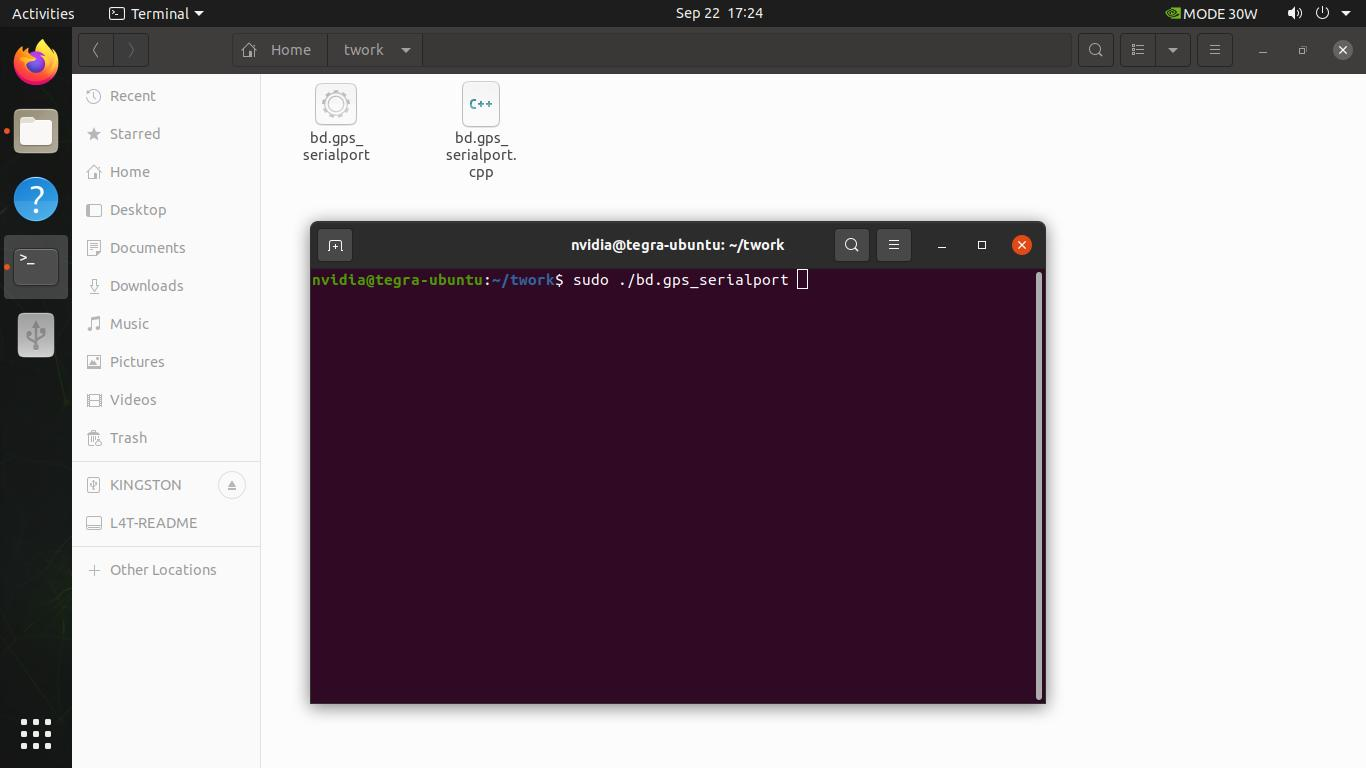
the correct result should be as similar:
if you see following output it means that the location is not successful, which might be the signal is weak to lock the location, please go to an open area to expose the unit to gain more signals to get posititon locked.
Using NVMe SSD as a System Rootfs Drive
!!!Note This is the step for setting NVMe SSD as the system disk to expand the storage size of the rootfs, along side the EMMC or SD Card as system boot partiton. Note the NVMe SSD is not included in the standard product, you need to supply on your own.
-
Step 1. Install the SSD
Follow the steps in the Hardware Instructions to install the SSD for reComputer.
-
Step 2. Prepare SSD
Use the shortcut
Ctrl+For click the Ubuntu icon in the upper left corner to search for Disks and open the Disks tool that comes with Ubuntu 18.04.
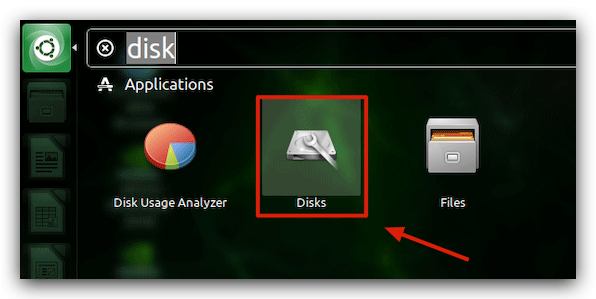
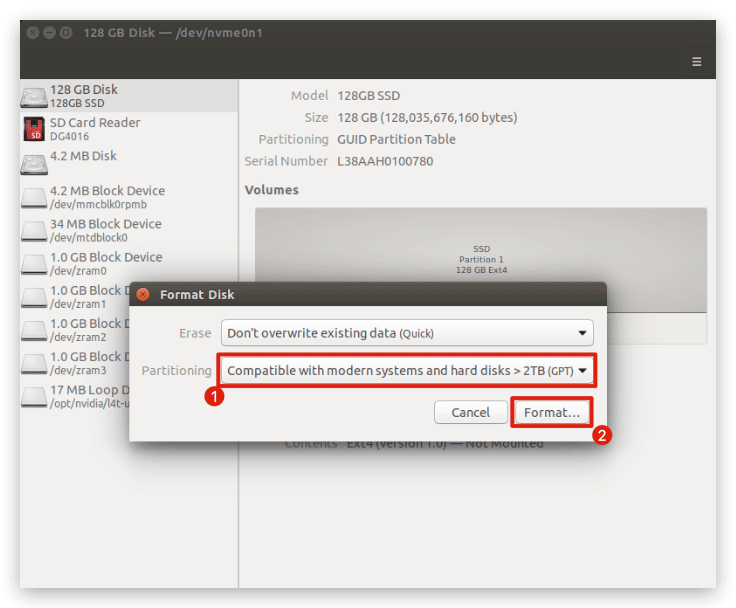
Select your SSD on the left side and then select Format Disk in the upper right corner under the menu bar.
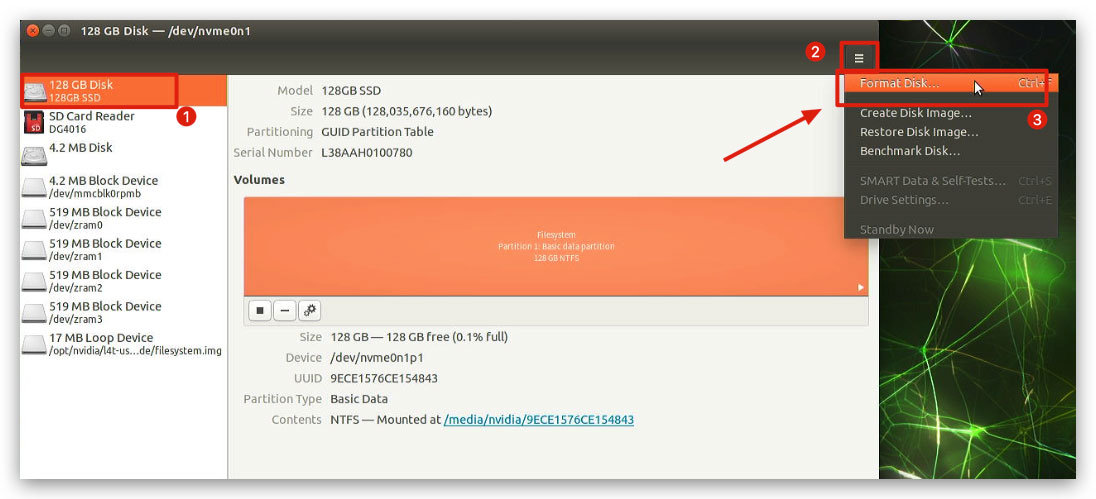
Format your SSD to GPT format. A pop-up window will appear asking you to confirm and enter your user password.
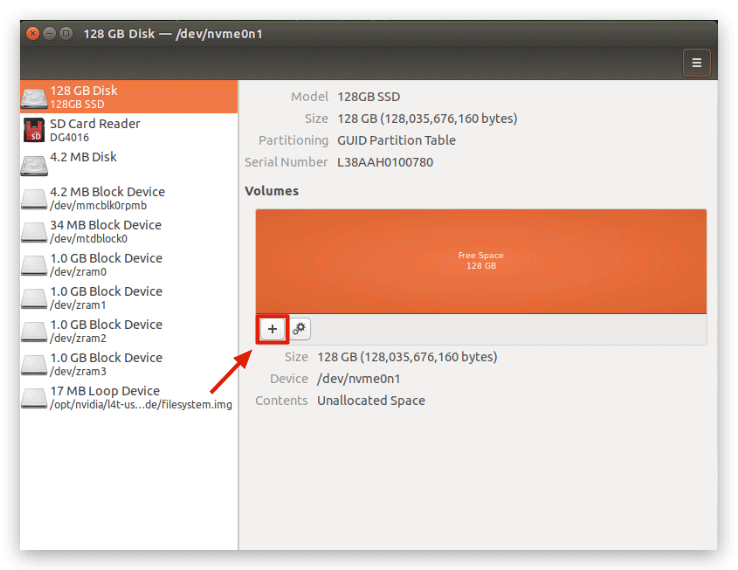
Then, we click on the middle + to add a disk character.
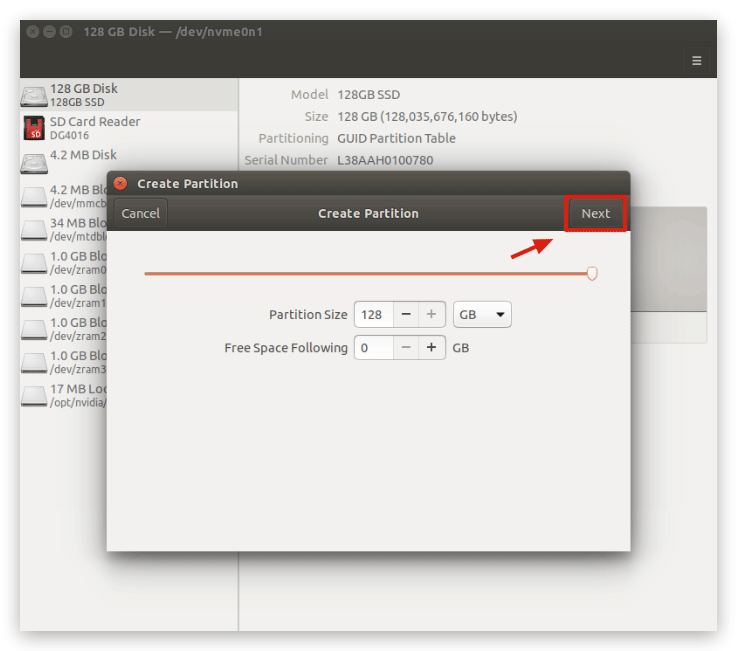
Click on "Next".
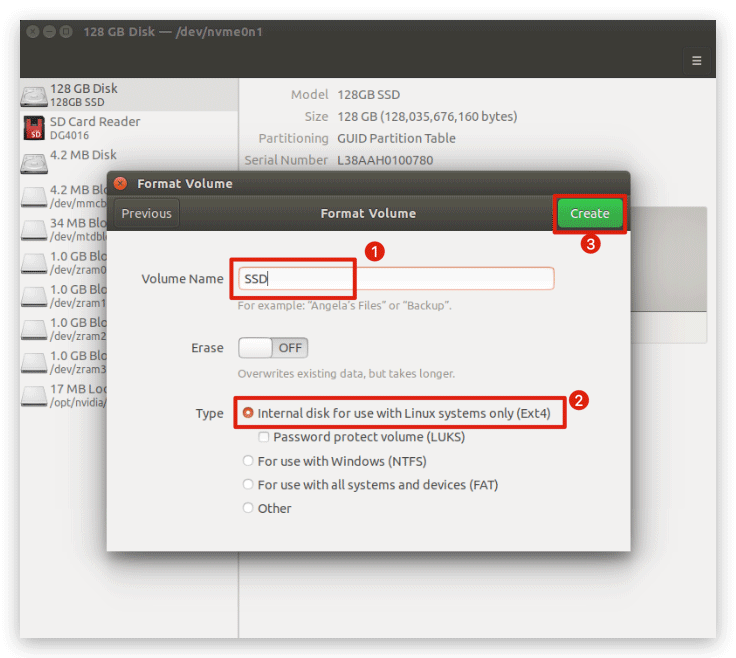
Please give your SSD a name and select Ext4 in the type and click "Create". At this point we have completed the SSD prep according to the expansion requirements.
-
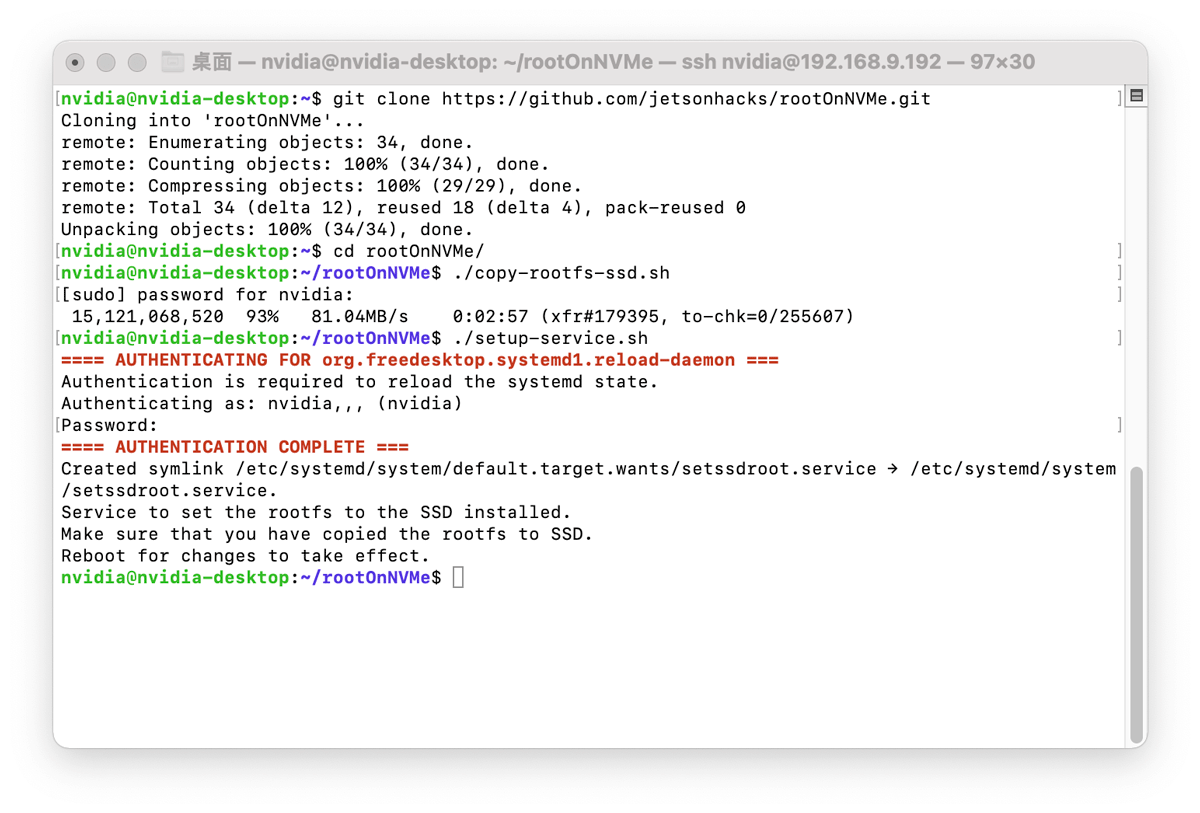
Step 3. Build the root directory to the SSD
Use the git command to download the script files we need to use to reComputer.
git clone https://github.com/limengdu/rootOnNVMe.git

cd rootOnNVMe/
Then execute the following command to build the files from the root directory in the eMMC to the SSD, the wait time for this step depends on the size of the root directory you are using.
./copy-rootfs-ssd.sh
-
Step 4. Configure the environment and complete the expansion
Execute the following command to complete the configuration of rootfs.
./setup-service.sh
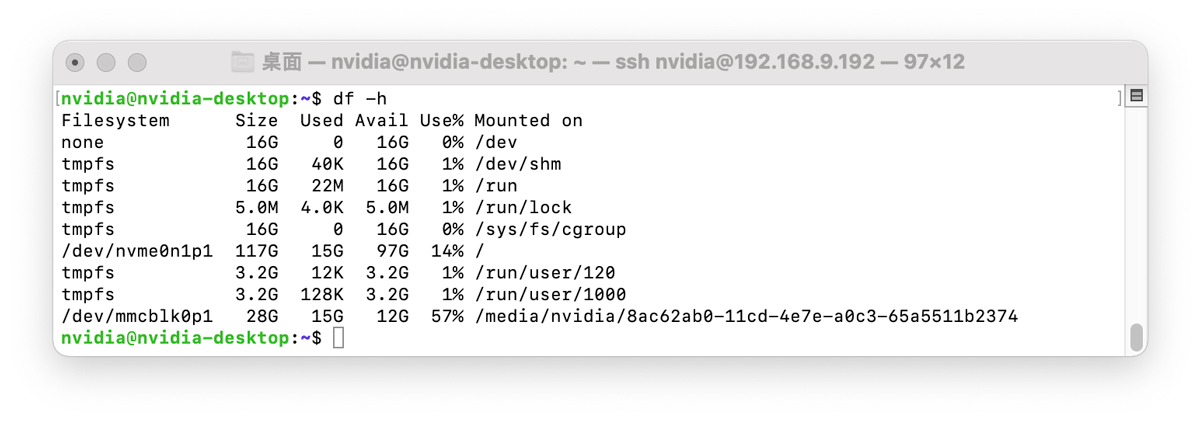
When you restart reComputer, you will see that the eMMC has become an external storage device on the main interface, and you will see that the system footprint has been reduced, so the expansion was successful.
!!!Attention
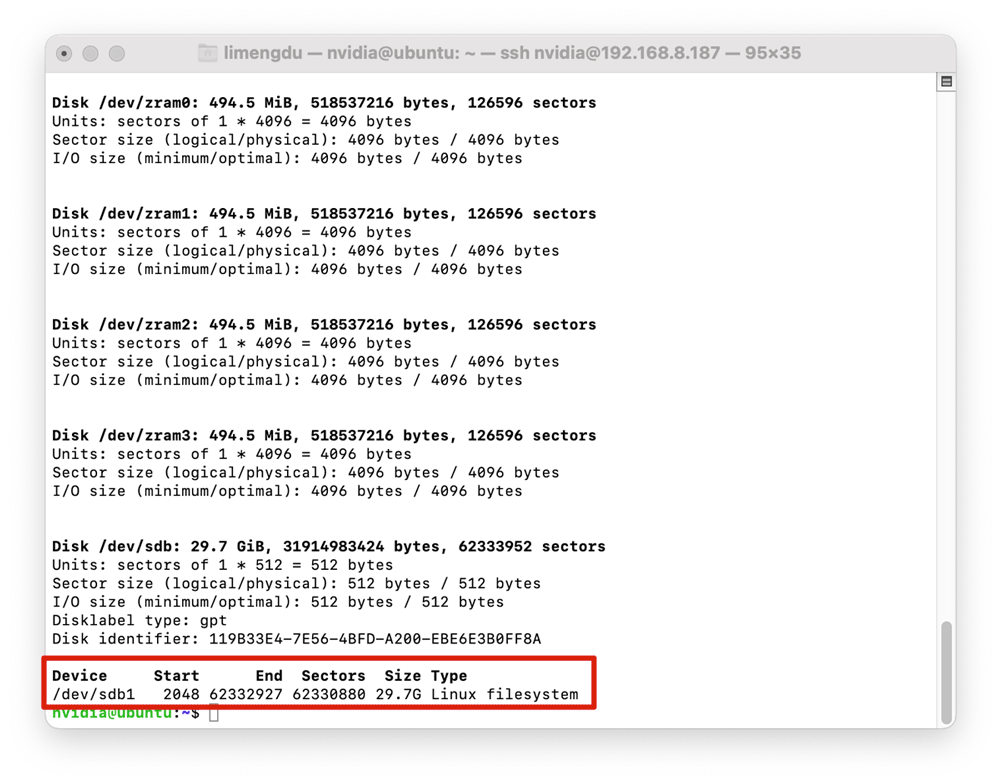
The default SSD path in the script file is /dev/nvme0n1p1, which is also the path assigned by default by reComputer. If you find that your SSD path does not match this with the command sudo fdisk -l, change the path of all /dev/nvme0n1p1 in the files copy-rootfs-ssd.sh, data/setssdroot.service, and data/setssdroot.sh in rootOnNVMe to the path where your SSD is located.
The above expansion will not remove the original root directory contents from the eMMC. If you do not want to boot from the SSD, you can remove the SSD and the system will still boot from the eMMC.
Resources
Tech Support & Product Discussion
Thank you for choosing our products! We are here to provide you with different support to ensure that your experience with our products is as smooth as possible. We offer several communication channels to cater to different preferences and needs.