SD Card shield V4.0

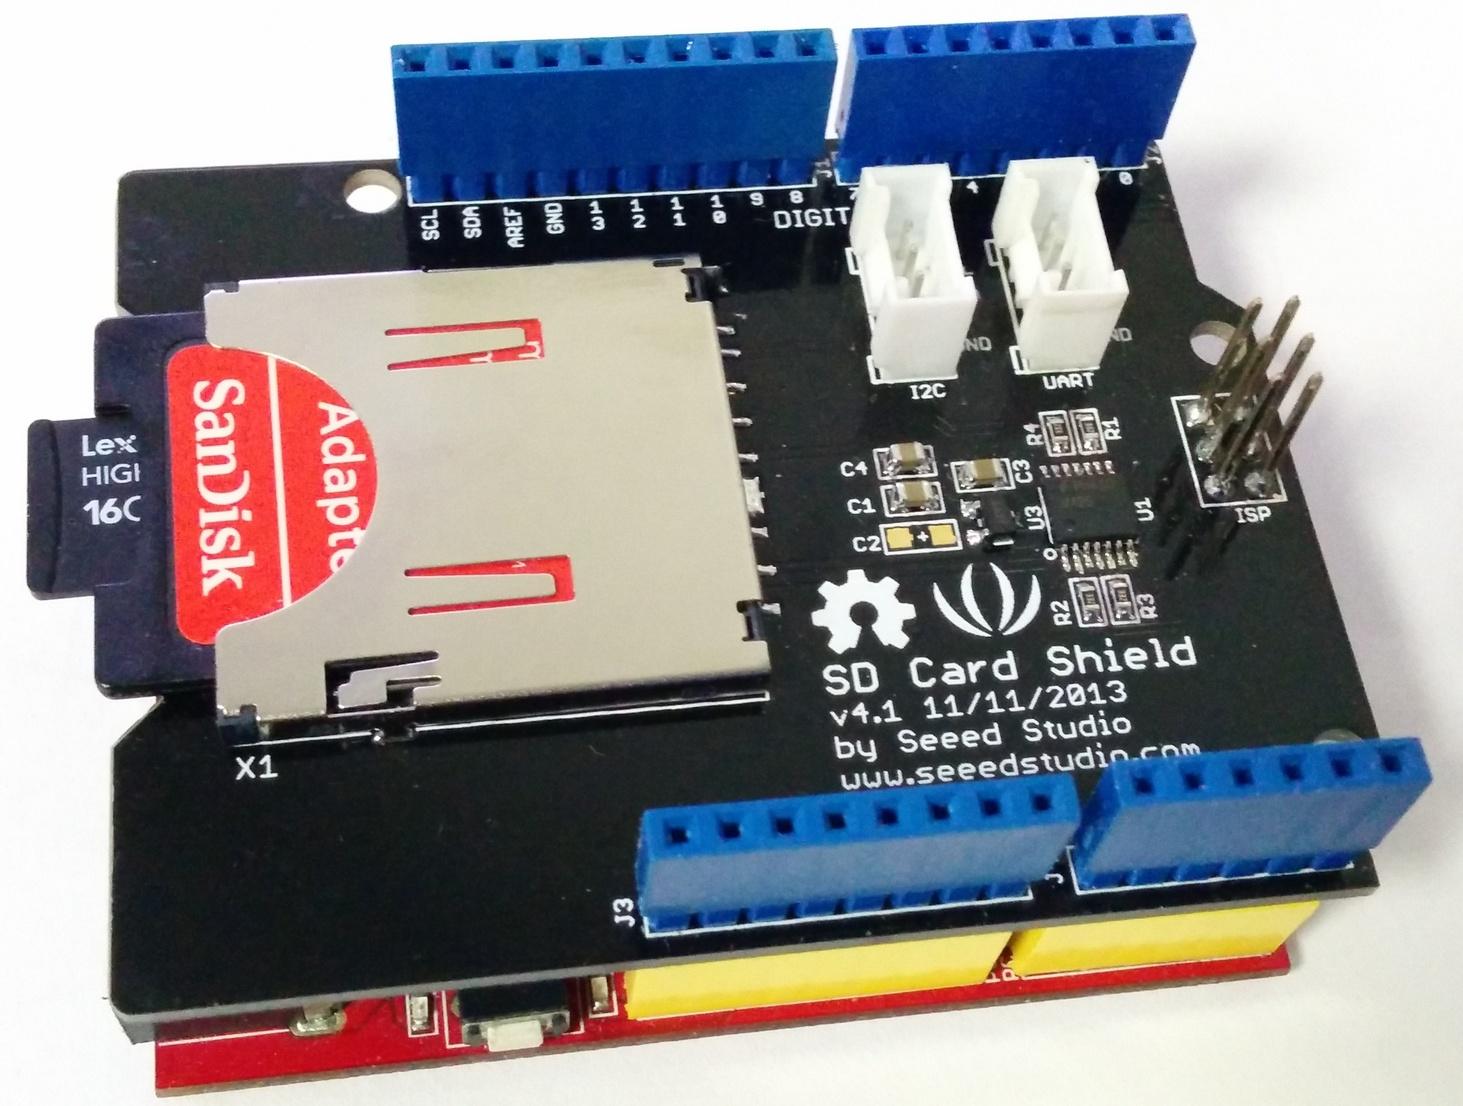
This is the newly released SD card V4.0 shield. It provides a storage space for your Arduino. Users can read/write SD card via Arduino’s built-in SD library. It supports SD, SDHC and Micro SD cards. It will only occupy the SPI port of your Arduino. Comparing to previous versions, it combines the standart SD slot and the Micro SD slot into a standard one, the included adaptor enables using of Micro SD cards . You can stack on other shields that work with the unused pins. Additionally, the preformed I2C and UART port facilitates your connection with Grove modules.

Application Ideas
If you want to make some awesome projects with SD Card Shield, here are some projects for your reference.
Here we introduce a project about LinkIt ONE using SD Card.
Music Player with LinkIt One

This project uses Grove - Water Sensor to create a simple but effective solution to watering plants.
More Awesome Projects by SD Card
Features
- Standard SD card, SDHC card and TF card compatible
- UART Grove & I2C connection compatible
- Fully supported SD Library
- Minimal number of SPI port
- Truly stackable
Specifications
Item | Min | Typical | Max | Unit |
Voltage | 3.5 | 5.0 | 5.5 | V |
Current | 0.159 | 100 | 200 | mA |
Supported Card Type | SD card(less than 32GB); Micro SD card(less than32GB); SDHC card(less than32GB) | / | ||
Dimension | 68.7x53.5x19.00 | mm | ||
Net Weight | 14.8 | g |
Hardware Overview
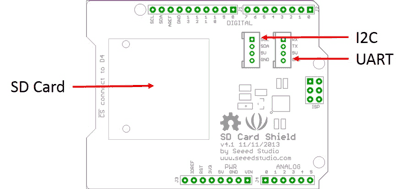
Pins usage on Arduino (with SD card)
D4: SD_CS;
D11: SD_DI;
D12: SD_DO;
D13: SD_CLK.
The SD card format can be FAT16 or FAT32.The size of SD card and the SDHC card more than 16GB is not supported.
Usage
The following is the installation of the SD card shield.
Hardware Installation
- Insert your SD card into the socket, Plug the SD Card Shield onto the Arduino .
- Connect the Arduino to PC using USB cable.
When you use a Micro SD card, please insert Micro SD card into the adopter, and then insert the Micro SD card Adopter into the socket as shown below.
When you complete the hardware installation, it should look like this

Upload the program
Restart the Arduino IDE. Open "CardInfo"example via the path: File --> Examples --> SD --> CardInfo.
This example shows how use the utility libraries on which the SD library is based in order to get info about your SD card.Very useful for testing a card when
You are not sure whether its working or not. There are also many other examples in this library, like “ReadWrite”. You can always try them out.

There is a brief description to above code:
First check if the card is working. If not, there will output some reasons that may lead to this result.
In the case of the SD card normal work, it will print the SD card type.Then print the type and size of the FAT-type volume.
Finally, get the files information such as name, date and size in bytes that found on the card.
Upload the code.
View Results. You can see the follow image after Click the serial monitor.

- If an error occurs, please recheck all the previous steps, and make sure the SD card is working. If none of that fixes the problem, try replacing the SD card.
Arduino default code returns SD size incorrectly if your SD is card more than 4G. The following code can solve this issue.
    /*
      SD card test

     This example shows how use the utility libraries on which the'
     SD library is based in order to get info about your SD card.
     Very useful for testing a card when you're not sure whether its working or not.

     The circuit:
      * SD card attached to SPI bus as follows:
     ** MOSI - pin 11 on Arduino Uno/Duemilanove/Diecimila
     ** MISO - pin 12 on Arduino Uno/Duemilanove/Diecimila
     ** CLK - pin 13 on Arduino Uno/Duemilanove/Diecimila
     ** CS - depends on your SD card shield or module.
     ** Pin 4 used here for consistency with other Arduino examples


     created  28 Mar 2011
     by Limor Fried
     modified 9 Apr 2012
     by Tom Igoe
     */
    // include the SD library:
    #include <SPI.h>
    #include <SD.h>

    // set up variables using the SD utility library functions:
    Sd2Card card;
    SdVolume volume;
    SdFile root;

    // change this to match your SD shield or module;
    // Arduino Ethernet shield: pin 4
    // Adafruit SD shields and modules: pin 10
    // Sparkfun SD shield: pin 8
    const int chipSelect = 4;

    void setup()
    {
      // Open serial communications and wait for port to open:
      Serial.begin(9600);
      while (!Serial) {
        ; // wait for serial port to connect. Needed for Leonardo only
      }


      Serial.print("\nInitializing SD card...");
      // On the Ethernet Shield, CS is pin 4. It's set as an output by default.
      // Note that even if it's not used as the CS pin, the hardware SS pin
      // (10 on most Arduino boards, 53 on the Mega) must be left as an output
      // or the SD library functions will not work.
      pinMode(10, OUTPUT);     // change this to 53 on a mega


      // we'll use the initialization code from the utility libraries
      // since we're just testing if the card is working!
      if (!card.init(SPI_HALF_SPEED, chipSelect)) {
        Serial.println("initialization failed. Things to check:");
        Serial.println("* is a card is inserted?");
        Serial.println("* Is your wiring correct?");
        Serial.println("* did you change the chipSelect pin to match your shield or module?");
        return;
      } else {
        Serial.println("Wiring is correct and a card is present.");
      }

      // print the type of card
      Serial.print("\nCard type: ");
      switch (card.type()) {
        case SD_CARD_TYPE_SD1:
          Serial.println("SD1");
          break;
        case SD_CARD_TYPE_SD2:
          Serial.println("SD2");
          break;
        case SD_CARD_TYPE_SDHC:
          Serial.println("SDHC");
          break;
        default:
          Serial.println("Unknown");
      }

      // Now we will try to open the 'volume'/'partition' - it should be FAT16 or FAT32
      if (!volume.init(card)) {
        Serial.println("Could not find FAT16/FAT32 partition.\nMake sure you've formatted the card");
        return;
      }


      // print the type and size of the first FAT-type volume

      uint64_t volumesize64;
      uint32_t volumesize32;
      Serial.print("\nVolume type is FAT");
      Serial.println(volume.fatType(), DEC);
      Serial.println();

      volumesize64 = volume.blocksPerCluster();    // clusters are collections of blocks
      volumesize64 *= volume.clusterCount();       // we'll have a lot of clusters
      volumesize64 *= 512;                            // SD card blocks are always 512 bytes

      Serial.print("Volume size (bytes): ");
      printLLNumber(volumesize64, DEC);
      Serial.println();

      Serial.print("Volume size (Kbytes): ");
      volumesize32 = volumesize64/1024;
      Serial.println(volumesize32);

      Serial.print("Volume size (Mbytes): ");
      volumesize32 /= 1024;
      Serial.println(volumesize32);
      /*uint64_t volumesize;
      Serial.print("\nVolume type is FAT");
      Serial.println(volume.fatType(), DEC);
      Serial.println();

      volumesize = volume.blocksPerCluster();    // clusters are collections of blocks
      volumesize *= volume.clusterCount();       // we'll have a lot of clusters
      volumesize *= 512;                            // SD card blocks are always 512 bytes
      Serial.print("Volume size (bytes): ");
      Serial.println(volumesize,DEC);
      Serial.print("Volume size (Kbytes): ");
      volumesize /= 1024;
      Serial.println(volumesize,DEC);
      Serial.print("Volume size (Mbytes): ");
      volumesize /= 1024;
      Serial.println(volumesize,DEC);
    */

      Serial.println("\nFiles found on the card (name, date and size in bytes): ");
      root.openRoot(volume);

      // list all files in the card with date and size
      root.ls(LS_R | LS_DATE | LS_SIZE);
    }


    void loop(void) {

    }
    void printLLNumber(uint64_t n, uint8_t base)
    {
      unsigned char buf[16 * sizeof(long)];
      unsigned int i = 0;

      if (n == 0)
      {
        Serial.print((char)'0');
        return;
      }

      while (n > 0)
      {
        buf[i++] = n % base;
        n /= base;
      }

      for (; i > 0; i--)
        Serial.print((char) (buf[i - 1] < 10 ?
          '0' + buf[i - 1] :
          'A' + buf[i - 1] - 10));
    }
SD Card Shield v4.0 Schematic Online Viewer
SD Card Shield v4.0a Schematic Online Viewer
SD Card Shield v4.3 Schematic Online Viewer
Resources
Tech Support & Product Discussion
Thank you for choosing our products! We are here to provide you with different support to ensure that your experience with our products is as smooth as possible. We offer several communication channels to cater to different preferences and needs.