Advanced Wi-Fi Usage
This wiki introduces some of the advanced library usage of the Wi-Fi such as HTTPClient, DNSServer and WebServer Libraries. With these libraries implemented, you are able to develop your IoT projects with simple APIs.
Please make sure you have followed the Network Overview to update the latest firmware and dependent libraries.

Make sure that the RTL8720 firmware version is >= v2.0.2
HTTPClient Usage
HTTPClient is used to make HTTP GET, POST and PUT requests to a web server very easy. Here are some examples for you to get started!
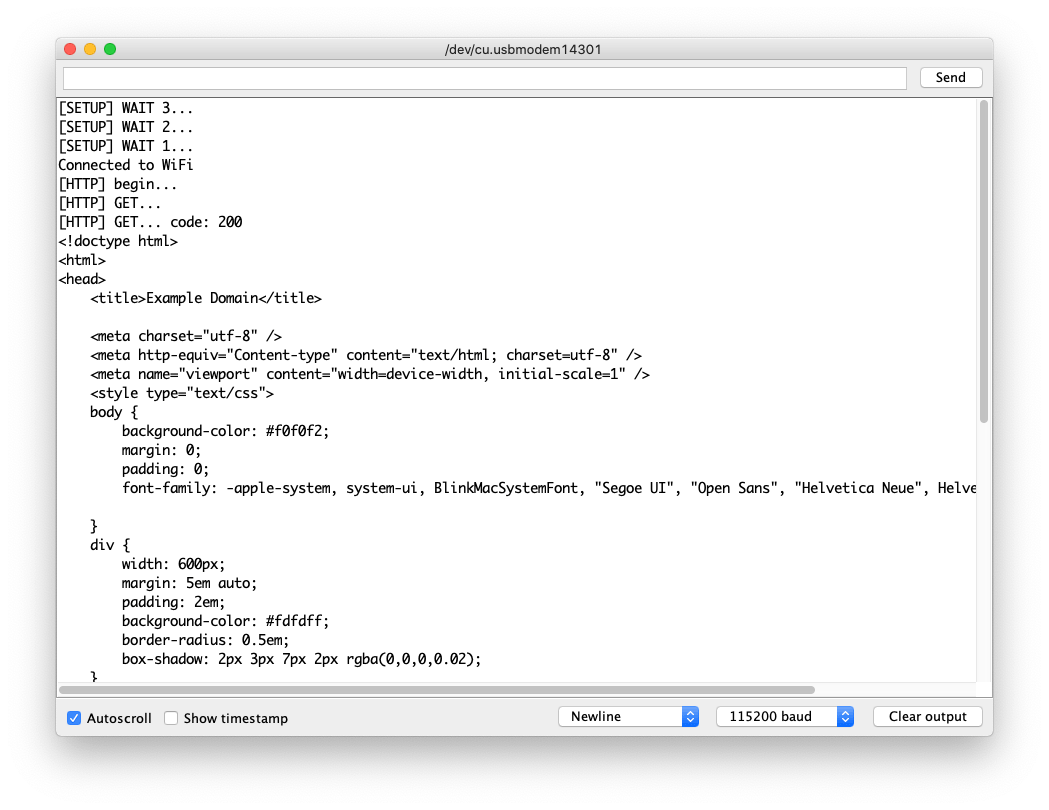
HTTP GET Example
This is an example of using HTTPClient for a simple HTTP connection and prints response back to the Serial Monitor.
-
Change the
yourNetworkandyourPasswordto your WiFi ssid and password. -
Upload the code to Wio Terminal.
#include <rpcWiFi.h>
#include <HTTPClient.h>

const char* ssid = "yourNetwork";
const char* password =  "yourPassword";

void setup() {

  Serial.begin(115200);
  WiFi.begin(ssid, password);

  while (WiFi.status() != WL_CONNECTED) { //Check for the connection
    delay(500);
    Serial.println("Connecting..");
  }
  Serial.print("Connected to the WiFi network with IP: ");
  Serial.println(WiFi.localIP());
}

void loop() {
    // wait for WiFi connection
    if((WiFi.status() == WL_CONNECTED)) {
        HTTPClient http;
        Serial.print("[HTTP] begin...\n");
        // configure traged server and url
        http.begin("http://www.example.com/index.html"); //HTTP
        Serial.print("[HTTP] GET...\n");
        // start connection and send HTTP header
        int httpCode = http.GET();
        // httpCode will be negative on error
        if(httpCode > 0) {
            // HTTP header has been send and Server response header has been handled
            Serial.printf("[HTTP] GET... code: %d\n", httpCode);
            // file found at server
            if(httpCode == HTTP_CODE_OK) {
                String payload = http.getString();
                Serial.println(payload);
            }
        } else {
            Serial.printf("[HTTP] GET... failed, error: %s\n", http.errorToString(httpCode).c_str());
        }
        http.end();
    }
    delay(5000);
}
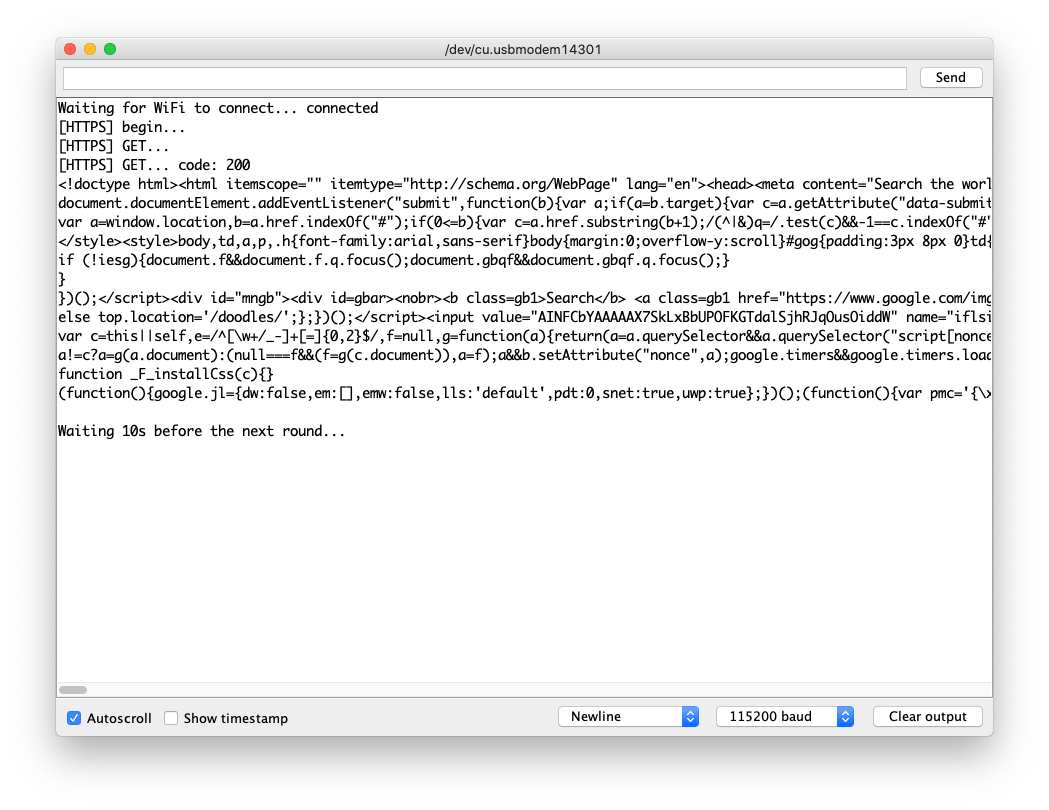
HTTPs GET Example
This is the HTTPs connection using HTTPClient library. You may refer this to send HTTPs GET request to websites that you want to visit!
You can find out website's root CA following this.
-
Change the
yourNetworkandyourPasswordto your WiFi ssid and password. -
Upload the code to Wio Terminal.
#include <rpcWiFi.h>
#include <HTTPClient.h>
#include <WiFiClientSecure.h>

const char* ssid = "yourNetwork";
const char* password =  "yourPassword";

const char* test_root_ca = \
                            "-----BEGIN CERTIFICATE-----\n"
                            "MIIESjCCAzKgAwIBAgINAeO0mqGNiqmBJWlQuDANBgkqhkiG9w0BAQsFADBMMSAw\n"
                            "HgYDVQQLExdHbG9iYWxTaWduIFJvb3QgQ0EgLSBSMjETMBEGA1UEChMKR2xvYmFs\n"
                            "U2lnbjETMBEGA1UEAxMKR2xvYmFsU2lnbjAeFw0xNzA2MTUwMDAwNDJaFw0yMTEy\n"
                            "MTUwMDAwNDJaMEIxCzAJBgNVBAYTAlVTMR4wHAYDVQQKExVHb29nbGUgVHJ1c3Qg\n"
                            "U2VydmljZXMxEzARBgNVBAMTCkdUUyBDQSAxTzEwggEiMA0GCSqGSIb3DQEBAQUA\n"
                            "A4IBDwAwggEKAoIBAQDQGM9F1IvN05zkQO9+tN1pIRvJzzyOTHW5DzEZhD2ePCnv\n"
                            "UA0Qk28FgICfKqC9EksC4T2fWBYk/jCfC3R3VZMdS/dN4ZKCEPZRrAzDsiKUDzRr\n"
                            "mBBJ5wudgzndIMYcLe/RGGFl5yODIKgjEv/SJH/UL+dEaltN11BmsK+eQmMF++Ac\n"
                            "xGNhr59qM/9il71I2dN8FGfcddwuaej4bXhp0LcQBbjxMcI7JP0aM3T4I+DsaxmK\n"
                            "FsbjzaTNC9uzpFlgOIg7rR25xoynUxv8vNmkq7zdPGHXkxWY7oG9j+JkRyBABk7X\n"
                            "rJfoucBZEqFJJSPk7XA0LKW0Y3z5oz2D0c1tJKwHAgMBAAGjggEzMIIBLzAOBgNV\n"
                            "HQ8BAf8EBAMCAYYwHQYDVR0lBBYwFAYIKwYBBQUHAwEGCCsGAQUFBwMCMBIGA1Ud\n"
                            "EwEB/wQIMAYBAf8CAQAwHQYDVR0OBBYEFJjR+G4Q68+b7GCfGJAboOt9Cf0rMB8G\n"
                            "A1UdIwQYMBaAFJviB1dnHB7AagbeWbSaLd/cGYYuMDUGCCsGAQUFBwEBBCkwJzAl\n"
                            "BggrBgEFBQcwAYYZaHR0cDovL29jc3AucGtpLmdvb2cvZ3NyMjAyBgNVHR8EKzAp\n"
                            "MCegJaAjhiFodHRwOi8vY3JsLnBraS5nb29nL2dzcjIvZ3NyMi5jcmwwPwYDVR0g\n"
                            "BDgwNjA0BgZngQwBAgIwKjAoBggrBgEFBQcCARYcaHR0cHM6Ly9wa2kuZ29vZy9y\n"
                            "ZXBvc2l0b3J5LzANBgkqhkiG9w0BAQsFAAOCAQEAGoA+Nnn78y6pRjd9XlQWNa7H\n"
                            "TgiZ/r3RNGkmUmYHPQq6Scti9PEajvwRT2iWTHQr02fesqOqBY2ETUwgZQ+lltoN\n"
                            "FvhsO9tvBCOIazpswWC9aJ9xju4tWDQH8NVU6YZZ/XteDSGU9YzJqPjY8q3MDxrz\n"
                            "mqepBCf5o8mw/wJ4a2G6xzUr6Fb6T8McDO22PLRL6u3M4Tzs3A2M1j6bykJYi8wW\n"
                            "IRdAvKLWZu/axBVbzYmqmwkm5zLSDW5nIAJbELCQCZwMH56t2Dvqofxs6BBcCFIZ\n"
                            "USpxu6x6td0V7SvJCCosirSmIatj/9dSSVDQibet8q/7UK4v4ZUN80atnZz1yg==\n"
                            "-----END CERTIFICATE-----\n";

WiFiClientSecure client;

void setup() {

  Serial.begin(115200);
  WiFi.begin(ssid, password);

  while (WiFi.status() != WL_CONNECTED) { //Check for the connection
    delay(500);
    Serial.println("Connecting..");
  }
  Serial.print("Connected to the WiFi network with IP: ");
  Serial.println(WiFi.localIP());
  client.setCACert(test_root_ca);
}

void loop() {
  if(&client) {
    {
      // Add a scoping block for HTTPClient https to make sure it is destroyed before WiFiClientSecure *client is
      HTTPClient https;
      Serial.print("[HTTPS] begin...\n");
      if (https.begin(client, "https://www.google.com/index.html")) {  // HTTPS
        Serial.print("[HTTPS] GET...\n");
        // start connection and send HTTP header
        int httpCode = https.GET();
        // httpCode will be negative on error
        if (httpCode > 0) {
          // HTTP header has been send and Server response header has been handled
          Serial.printf("[HTTPS] GET... code: %d\n", httpCode);
          // file found at server
          if (httpCode == HTTP_CODE_OK || httpCode == HTTP_CODE_MOVED_PERMANENTLY) {
            String payload = https.getString();
            Serial.println(payload);
          }
        } else {
          Serial.printf("[HTTPS] GET... failed, error: %s\n", https.errorToString(httpCode).c_str());
        }
        https.end();
      } else {
        Serial.printf("[HTTPS] Unable to connect\n");
      }
      // End extra scoping block
    }
  } else {
    Serial.println("Unable to create client");
  }
  Serial.println();
  Serial.println("Waiting 10s before the next round...");
  delay(10000);
}
HTTP POST Example
This is an example of sending HTTP POST request using the HTTPClient from Wio Terminal to a Web Server. For this demonstration, we are using python to set up a simple web server on our PC that can receive and response to HTTP requests.
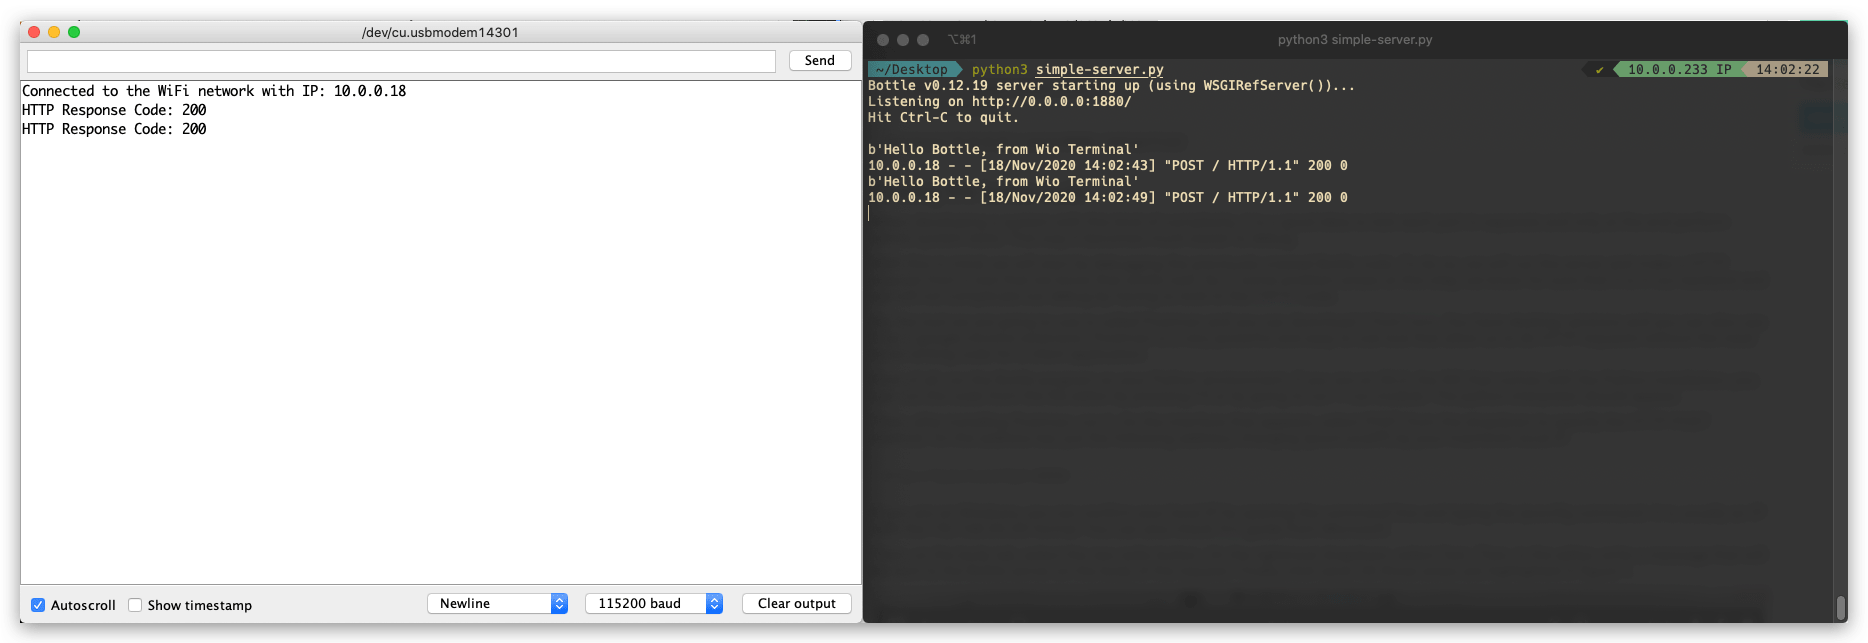
Python Server Code
First, we need to use pip to install the needed bottle library in Python. Run the following in terminal to install bottle:
pip install bottle
Once imported the bottle, copy the following code and save as simple-server.py. You may also change the port to something else you prefer but make this matches with the Arduino side.
from bottle import run, request, post

@post('/')
def index():
    data = request.body.read()
    print(data)

run(host='0.0.0.0', port=1880, debug=True)
Arduino Code
-
Change the
yourNetworkandyourPasswordto your WiFi ssid and password. -
Upload the code to Wio Terminal.
-
Check the Terminal and you can see the incoming HTTP request message from Wio Terminal.
#include <rpcWiFi.h>
#include <HTTPClient.h>

const char* ssid = "yourNetwork";
const char* password =  "yourPassword";

// Change the following IP to your computer's IP running the server, make sure the Port also match
const char* yourLocalIp =  "http://10.0.0.233:1880/";

void setup() {

  Serial.begin(115200);
  WiFi.begin(ssid, password);

  while (WiFi.status() != WL_CONNECTED) { //Check for the connection
    delay(500);
    Serial.println("Connecting..");
  }
  Serial.print("Connected to the WiFi network with IP: ");
  Serial.println(WiFi.localIP());
}

void loop() {

 if(WiFi.status()== WL_CONNECTED){   //Check WiFi connection status

   HTTPClient http;

   http.begin(yourLocalIp);  //Specify destination for HTTP request
   http.addHeader("Content-Type", "text/plain");             //Specify content-type header

   int httpResponseCode = http.POST("Hello Bottle, from Wio Terminal");   //Send the actual POST request

   if(httpResponseCode>0){
    Serial.print("HTTP Response Code: ");
    Serial.println(httpResponseCode);   //Print return code
   }else{
    Serial.print("Error on sending request: ");
    Serial.println(httpResponseCode);
   }

   http.end();  //Free resources

 }else{
    Serial.println("Error in WiFi connection");
 }
  delay(5000);  //Send a request every 5 seconds
}
WebServer Usage
With the help of WebServer library, you can set up Web Server running on the Wio Terminal. By accessing the server with a browser running on any computer connected to the same network as the Wio Terminal, you can control hardware from the webpage, read value of a sensor and much more!
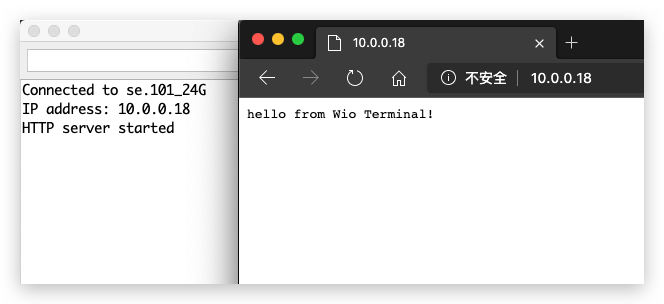
Simple HelloServer Example
This sets up a simple web server on the connected network using Wio Terminal.
-
Change the
yourNetworkandyourPasswordto your WiFi ssid and password. -
Upload the code to Wio Terminal.
-
Access the web server by entering Wio Terminal's IP from the same network using browser.
#include <rpcWiFi.h>
#include <WiFiClient.h>
#include <WebServer.h>

const char *ssid = "yourNetwork";
const char *password = "yourPassword";

WebServer server(80);

const int led = 13;

void handleRoot() {
  digitalWrite(led, 1);
  server.send(200, "text/plain", "hello from Wio Terminal!");
  digitalWrite(led, 0);
}

void handleNotFound() {
  digitalWrite(led, 1);
  String message = "File Not Found\n\n";
  message += "URI: ";
  message += server.uri();
  message += "\nMethod: ";
  message += (server.method() == HTTP_GET) ? "GET" : "POST";
  message += "\nArguments: ";
  message += server.args();
  message += "\n";
  for (uint8_t i = 0; i < server.args(); i++) {
    message += " " + server.argName(i) + ": " + server.arg(i) + "\n";
  }
  server.send(404, "text/plain", message);
  digitalWrite(led, 0);
}

void setup(void) {
  pinMode(led, OUTPUT);
  digitalWrite(led, 0);
  Serial.begin(115200);
  WiFi.mode(WIFI_STA);
  WiFi.begin(ssid, password);

  // Wait for connection
  while (WiFi.status() != WL_CONNECTED) {
    delay(500);
    Serial.print(".");
  }
  Serial.print("Connected to ");
  Serial.println(ssid);
  Serial.print("IP address: ");
  Serial.println(WiFi.localIP());

  server.on("/", handleRoot);

  server.on("/inline", []() {
    server.send(200, "text/plain", "this works as well");
  });

  server.onNotFound(handleNotFound);

  server.begin();
  Serial.println("HTTP server started");
}

void loop(void) {
  server.handleClient();
}
HTTP Authentication Web Server Example
This examples sets up a web server that requires Authentication process, which can be very useful in some cases for security purposes.
-
Change the
yourNetworkandyourPasswordto your WiFi ssid and password. -
Upload the code to Wio Terminal.
-
Access the web server by entering Wio Terminal's IP from the same network using browser, and enter pre-set username and password.
#include <rpcWiFi.h>
#include <WebServer.h>

const char *ssid = "yourNetwork";
const char *password = "yourPassword";

WebServer server(80);

const char* www_username = "admin";
const char* www_password = "password";

void setup() {
  Serial.begin(115200);
  WiFi.mode(WIFI_STA);
  WiFi.begin(ssid, password);
  if (WiFi.waitForConnectResult() != WL_CONNECTED) {
    Serial.println("WiFi Connect Failed! Rebooting...");
    delay(1000);
    NVIC_SystemReset(); // Reset Wio Terminal
  }

  server.on("/", []() {
    if (!server.authenticate(www_username, www_password)) {
      return server.requestAuthentication();
    }
    server.send(200, "text/plain", "Login OK");
  });
  server.begin();

  Serial.print("Open http://");
  Serial.print(WiFi.localIP());
  Serial.println("/ in your browser to see it working");
}

void loop() {
  server.handleClient();
}
DNSServer Usage
We talked about WebServer, that we use IP address to access it. But if you want to access it by typing in the domain name (such as www.google.com), then you need to use the DNSServer.
-
Using DNSServer must be under AP mode.
-
Introduce the corresponding library
#include <DNSServer.h>. -
Declare
DNSServerobjects. -
Start the DNS server using the
start()method. -
Process requests from clients using the
processNextRequest()method. -
Upload the Code to Wio Terminal and Connect your PC to the
DNSServer exampleWi-Fi. -
Type
www.wioterminal.comandwww.wioterminal.com/p1.
#include <rpcWiFi.h>
#include <DNSServer.h>
#include <WebServer.h>

IPAddress local_IP(192, 168, 1, 1);
IPAddress gateway(192, 168, 1, 1);
IPAddress subnet(255, 255, 255, 0);

const byte DNS_PORT = 53;

DNSServer dnsServer;
WebServer webserver(80);

void handleRoot()
{
  webserver.send(200, "text/plain", "Root page accessed via domain name");
}

void handleP1()
{
  webserver.send(200, "text/plain", "Page 1 accessed via domain name");
}

void setup()
{
  WiFi.mode(WIFI_AP);
  WiFi.softAPConfig(local_IP, gateway, subnet);
  WiFi.softAP("DNSServer example");

  webserver.on("/", handleRoot);
  webserver.on("/p1", handleP1);

  dnsServer.start(DNS_PORT, "www.wioterminal.com", local_IP); //Start the DNS service, example.com is the registered domain name.
  webserver.begin();
}

void loop()
{
  dnsServer.processNextRequest();
  webserver.handleClient();
}
mDNS Usage
What is Multicast DNS(mDNS)?
The multicast DNS (mDNS) protocol resolves hostnames to IP addresses within small networks that do not include a local name server. Multicast DNS is designed for small networks and is intended to increase their user-friendliness. The idea is that users can connect devices in secret LANs without any issues.
Install the Seeed_Arduino_rpcmDNS
-
Visit the Seeed_Arduino_rpcmDNS repositories and download the entire repo to your local drive.
-
Now, the Seeed_Arduino_rpcmDNS library can be installed to the Arduino IDE. Open the Arduino IDE, and click
sketch->Include Library->Add .ZIP Library, and choose theSeeed_Arduino_rpcmDNSfile that you've have just downloaded.
mDNS Web Server Example
This is an example that sets up a mDNS web server on the Wio Terminal so that other device connected in the same network can browse the webserver at a defined site.
-
Change the
yourNetworkandyourPasswordto your WiFi ssid and password. -
Upload the code to Wio Terminal.
-
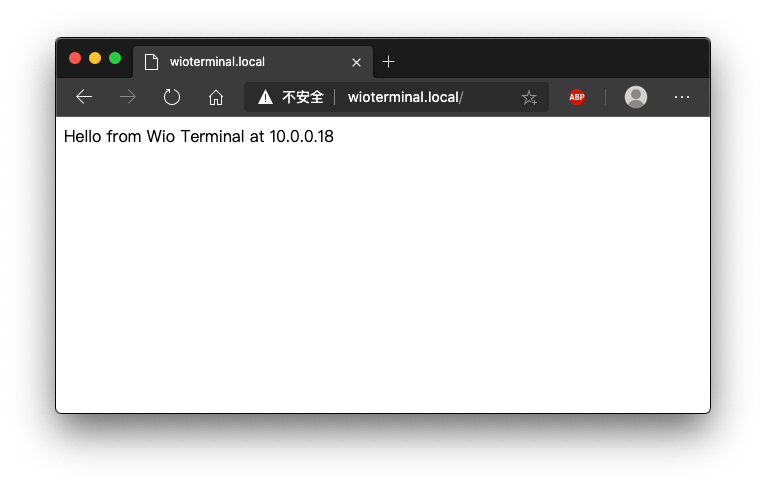
Access the web server by entering http://WioTerminal.local/ from the same network using browser, and enter pre-set username and password.
#include <rpcWiFi.h>
#include <RPCmDNS.h>
#include <WiFiClient.h>

const char* ssid     = "yourNetwork";
const char* password = "yourPassword";

// TCP server at port 80 will respond to HTTP requests
WiFiServer server(80);

void setup(void)
{
    Serial.begin(115200);
    while(!Serial){
        ;
    }
    Serial.printf("Setup Start \r\n");
    // Connect to WiFi network
    WiFi.begin(ssid, password);
    Serial.println("");

    // Wait for connection
    while (WiFi.status() != WL_CONNECTED) {
        delay(500);
        Serial.print(".");
    }
    Serial.println("");
    Serial.print("Connected to ");
    Serial.println(ssid);
    Serial.print("IP address: ");
    Serial.println(WiFi.localIP());

    // Set up mDNS responder:
    // - first argument is the domain name, in this example
    //   the fully-qualified domain name is "esp8266.local"
    // - second argument is the IP address to advertise
    //   we send our IP address on the WiFi network
    if (!MDNS.begin("WioTerminal")) {
        Serial.println("Error setting up MDNS responder!");
        while(1) {
            delay(1000);
        }
    }
    Serial.println("mDNS responder started");

    // Start TCP (HTTP) server
    server.begin();
    Serial.println("TCP server started");

    // Add service to MDNS-SD
    MDNS.addService("http", "tcp", 80);

    Serial.printf("Setup Done \r\n");
}

void loop(void)
{
    // Check if a client has connected
    WiFiClient client = server.available();
    if (!client) {
        return;
    }
    Serial.println("");
    Serial.println("New client");
    // Wait for data from client to become available
    while(client.connected() && !client.available()){
        delay(1);
    }
    // Read the first line of HTTP request
    String req = client.readStringUntil('\r');
    // First line of HTTP request looks like "GET /path HTTP/1.1"
    // Retrieve the "/path" part by finding the spaces
    int addr_start = req.indexOf(' ');
    int addr_end = req.indexOf(' ', addr_start + 1);
    if (addr_start == -1 || addr_end == -1) {
        Serial.print("Invalid request: ");
        Serial.println(req);
        return;
    }
    req = req.substring(addr_start + 1, addr_end);
    Serial.print("Request: ");
    Serial.println(req);

    String s;
    if (req == "/")
    {
        IPAddress ip = WiFi.localIP();
        String ipStr = String(ip[0]) + '.' + String(ip[1]) + '.' + String(ip[2]) + '.' + String(ip[3]);
        s = "HTTP/1.1 200 OK\r\nContent-Type: text/html\r\n\r\n<!DOCTYPE HTML>\r\n<html>Hello from Wio Terminal at ";
        s += ipStr;
        s += "</html>\r\n\r\n";
        Serial.println("Sending 200");
    }
    else
    {
        s = "HTTP/1.1 404 Not Found\r\n\r\n";
        Serial.println("Sending 404");
    }
    client.print(s);

    client.stop();
    Serial.println("Done with client");
}
mDNS-SD Example
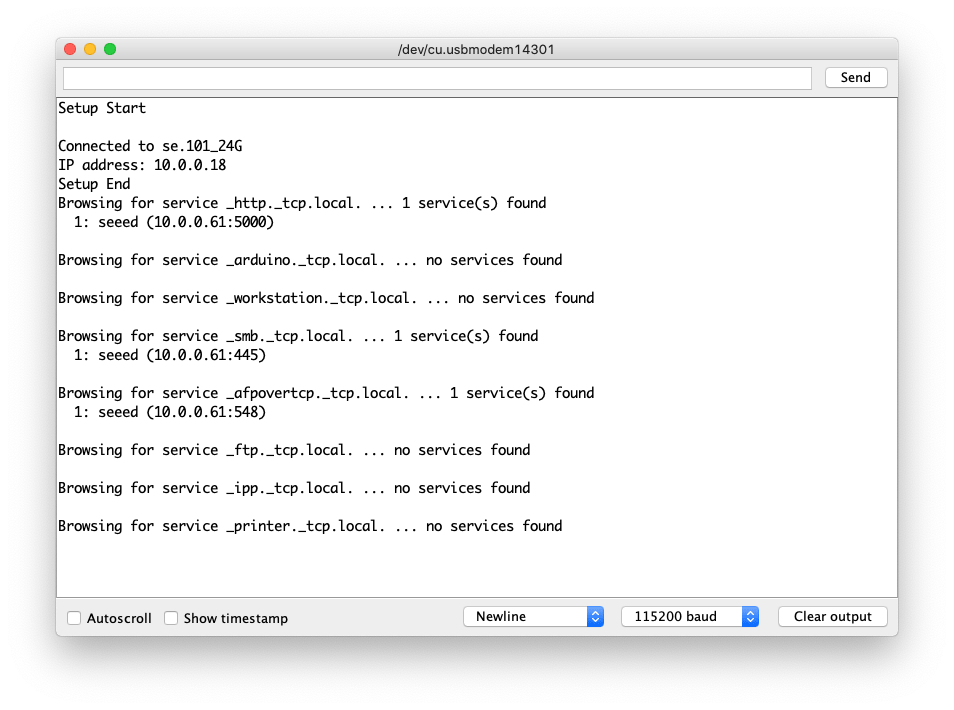
This is a mDNS-SD(Service Discovery) example which allows you to discover services in the same network.
About DNS-based service discovery
-
Change the
yourNetworkandyourPasswordto your WiFi ssid and password. -
Upload the code to Wio Terminal.
#include <rpcWiFi.h>
#include <RPCmDNS.h>
#include <WiFiClient.h>

const char* ssid     = "yourNetwork";
const char* password = "yourPassword";

// TCP server at port 80 will respond to HTTP requests
WiFiServer server(80);

void setup(void)
{
    Serial.begin(115200);
    while(!Serial){
        ;
    }
    Serial.printf("Setup Start \r\n");
    // Connect to WiFi network
    WiFi.begin(ssid, password);
    Serial.println("");

    // Wait for connection
    while (WiFi.status() != WL_CONNECTED) {
        delay(500);
        Serial.print(".");
    }
    Serial.println("");
    Serial.print("Connected to ");
    Serial.println(ssid);
    Serial.print("IP address: ");
    Serial.println(WiFi.localIP());

    // Set up mDNS responder:
    // - first argument is the domain name, in this example
    //   the fully-qualified domain name is "esp8266.local"
    // - second argument is the IP address to advertise
    //   we send our IP address on the WiFi network
    if (!MDNS.begin("WioTerminal")) {
        Serial.println("Error setting up MDNS responder!");
        while(1) {
            delay(1000);
        }
    }
    Serial.println("mDNS responder started");

    // Start TCP (HTTP) server
    server.begin();
    Serial.println("TCP server started");

    // Add service to MDNS-SD
    MDNS.addService("http", "tcp", 80);

    Serial.printf("Setup Done \r\n");
}

void loop(void)
{
    // Check if a client has connected
    WiFiClient client = server.available();
    if (!client) {
        return;
    }
    Serial.println("");
    Serial.println("New client");
    // Wait for data from client to become available
    while(client.connected() && !client.available()){
        delay(1);
    }
    // Read the first line of HTTP request
    String req = client.readStringUntil('\r');
    // First line of HTTP request looks like "GET /path HTTP/1.1"
    // Retrieve the "/path" part by finding the spaces
    int addr_start = req.indexOf(' ');
    int addr_end = req.indexOf(' ', addr_start + 1);
    if (addr_start == -1 || addr_end == -1) {
        Serial.print("Invalid request: ");
        Serial.println(req);
        return;
    }
    req = req.substring(addr_start + 1, addr_end);
    Serial.print("Request: ");
    Serial.println(req);

    String s;
    if (req == "/")
    {
        IPAddress ip = WiFi.localIP();
        String ipStr = String(ip[0]) + '.' + String(ip[1]) + '.' + String(ip[2]) + '.' + String(ip[3]);
        s = "HTTP/1.1 200 OK\r\nContent-Type: text/html\r\n\r\n<!DOCTYPE HTML>\r\n<html>Hello from Wio Terminal at ";
        s += ipStr;
        s += "</html>\r\n\r\n";
        Serial.println("Sending 200");
    }
    else
    {
        s = "HTTP/1.1 404 Not Found\r\n\r\n";
        Serial.println("Sending 404");
    }
    client.print(s);

    client.stop();
    Serial.println("Done with client");
}
WiFiManager Usage
We have ported the well known WiFi Manager to the Wio Terminal platform so that you may use your phone or other device to configure Wi-Fi settings for your Wio Terminal!
Install the Seeed_Arduino_rpcWiFiManager
-
Visit the Seeed_Arduino_rpcWiFiManager repositories and download the entire repo to your local drive.
-
Now, the Seeed_Arduino_rpcWiFiManager library can be installed to the Arduino IDE. Open the Arduino IDE, and click
sketch->Include Library->Add .ZIP Library, and choose theSeeed_Arduino_rpcWiFiManagerfile that you've have just downloaded.
WiFiManager Auto Connect Example
This example is the demonstration of the auto connect example. You can use the example to set the WiFi settings for Wio Terminal.
-
Upload the code to Wio Terminal.
-
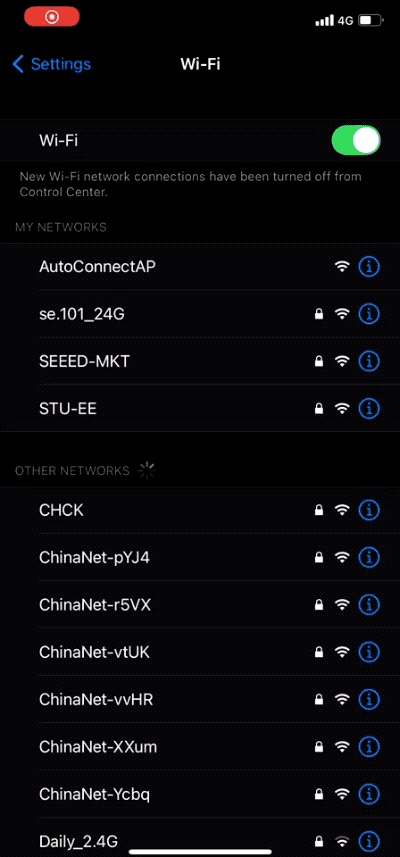
If Wio Terminal have connected to WiFi before, it will auto-connect to the same network. If it cannot connect to any WiFi it will go into AP mode and emit a WiFi. Use your phone to connect to this WiFi and input the WiFi settings.
#include <rpcWiFi.h>
#include <DNSServer.h>
#include <WebServer.h>
#include <WiFiManager.h>

void setup() {
    Serial.begin(115200);
    while(!Serial); // wait till Serial is opened

    WiFiManager wifiManager;
    // Uncomment the resetSettings() will wipe out the saved settings
    //wifiManager.resetSettings();

    //Fetches ssid and pass from RTL8720 and tries to connect
    //if it does not connect it starts an access point with the specified name
    //here  "AutoConnectAP"
    //and goes into a blocking loop awaiting configuration
    wifiManager.autoConnect("AutoConnectAP");
    //or use this for auto generated name ESP + ChipID
    //wifiManager.autoConnect();

    //if you get here you have connected to the WiFi
    Serial.println("connected...yeey :)");
    Serial.println(WiFi.localIP());
}

void loop() {
    // put your main code here, to run repeatedly:
}
Tech Support & Product Discussion
if you have any technical issue. submit the issue into our forum. Thank you for choosing our products! We are here to provide you with different support to ensure that your experience with our products is as smooth as possible. We offer several communication channels to cater to different preferences and needs.