Getting Started with LoRaWAN Using Wio-E5 and Arduino on PlatformIO
If you want to learn about Long Range and its features such as network architecture and applications, you can check out this article LoRapedia, which introduces Long Range and Long Range in detail, It explains what Long Range is, how it works, and its pros and cons.
Introduction
This guide details using the Wio-E5 LoRa Module with XIAO ESP32S3 on PlatformIO, applicable to any Arduino-compatible board.
Key Learnings:
- Arduino Library Programming for Wio-E5: Utilizing Arduino libraries for efficient programming of the Wio-E5, beyond basic AT command control.
- LoRaWAN Network Integration: Steps to connect the Wio-E5 to a LoRaWAN network.
- Uplink and Downlink Implementation: Managing data transmission to and from the network.
This application modifies the standard hardware setup, incorporating an OLED for direct data visualization and CircleLED for downlink indication, alongside DHT11 sensor data reporting, streamlining the learning process with practical implementations.
Prerequisites
Hardware
- XIAO ESP32S3: A versatile board that's compatible with Arduino, ideal for various IoT projects. You can substitute it with any Arduino compatible board as needed.
- Grove - DHT11: For environmental data collection, essential in many IoT applications.
- Grove - Circular LED: Used for light control. This is an example of a controllable device; feel free to replace it with a component of your choice.
- Grove - OLED Display: Enhances your project with visual data display capabilities. This component is optional but recommended for a more interactive user interface.
- Grove - Wio-E5 LoRa Module: Provides long-range, low-power wireless communication, making it an excellent choice for LoRaWAN applications.
- SenseCAP M2 Multi-Platform Gateway: A critical component for enabling communication between your Wio-E5 module and the LoRaWAN network.
Software
PlatofmrIO
For this project, we will leverage PlatformIO, which offers numerous advantages:
- Efficient Library Management: PlatformIO facilitates easy and effective management of libraries, ensuring your project is always aligned with the latest advancements.
- VSCode Integration: This integration significantly enhances the development experience, featuring code highlighting and IntelliSense, for a smoother and more efficient coding process.
- Simple Library Addition and Configuration: With PlatformIO, adding and configuring libraries is a straightforward process, allowing for rapid customization to fit your project's specific needs.
If you're new to PlatformIO or looking to deepen your understanding, you can start with these resources:
- How to Use PlatformIO IDE for Arduino Programming – A beginner-friendly guide to get you started.
- PlatformIO Official Website – For comprehensive and detailed instructions.
LoRaWAN Network Server (ChirpStack)
This section provides guidance on connecting to a local LoRaWAN network server, using the ChirpStack platform as our primary example. We'll specifically focus on using the SenseCAP M2 Multi-Platform LoRaWAN Indoor Gateway (EU868) for this purpose.
If you are unfamiliar with the following steps on ChirpStack, such as:
- Creating a Device Profile
- Adding an Application
- Registering a device under an application
You can learn more from these resources:
We'll do it together in the next section.
For those preferring alternative platforms like AWS IoT or TTN, refer to the following guides:
Preparatory work
Now, let's get started. We'll do following things.
LoRaWAN Network
To ensure successful communication with the LoRaWAN network via your Wio-E5 module, there are a couple of key aspects you need to verify:
-
LoRaWAN Coverage:
- Make sure that your device is within the coverage area of a LoRaWAN network. For instance, in my case, the device is covered by an M2 gateway operating in the EU868 frequency band. This is crucial as the device needs to communicate with a nearby LoRaWAN gateway that supports the same frequency band.
-
Gateway Link to LNS:
- It's also essential to confirm that one of these gateways is linked to the LoRaWAN Network Server (LNS) that you intend to use. This linkage is vital because the gateway not only acts as a bridge between your Wio-E5 device and the network server but also dictates the path your device's data will take to reach the server.
Get Joining Parameters
Assuming you have already configured the ChirpStack network server in the previous section, the next step is to gather the necessary network joining parameters. These parameters are vital to ensure your device can successfully join and access the network.
For a more detailed step-by-step tutorial, please refer to the Register the Device on LoRaWAN Network Server section.
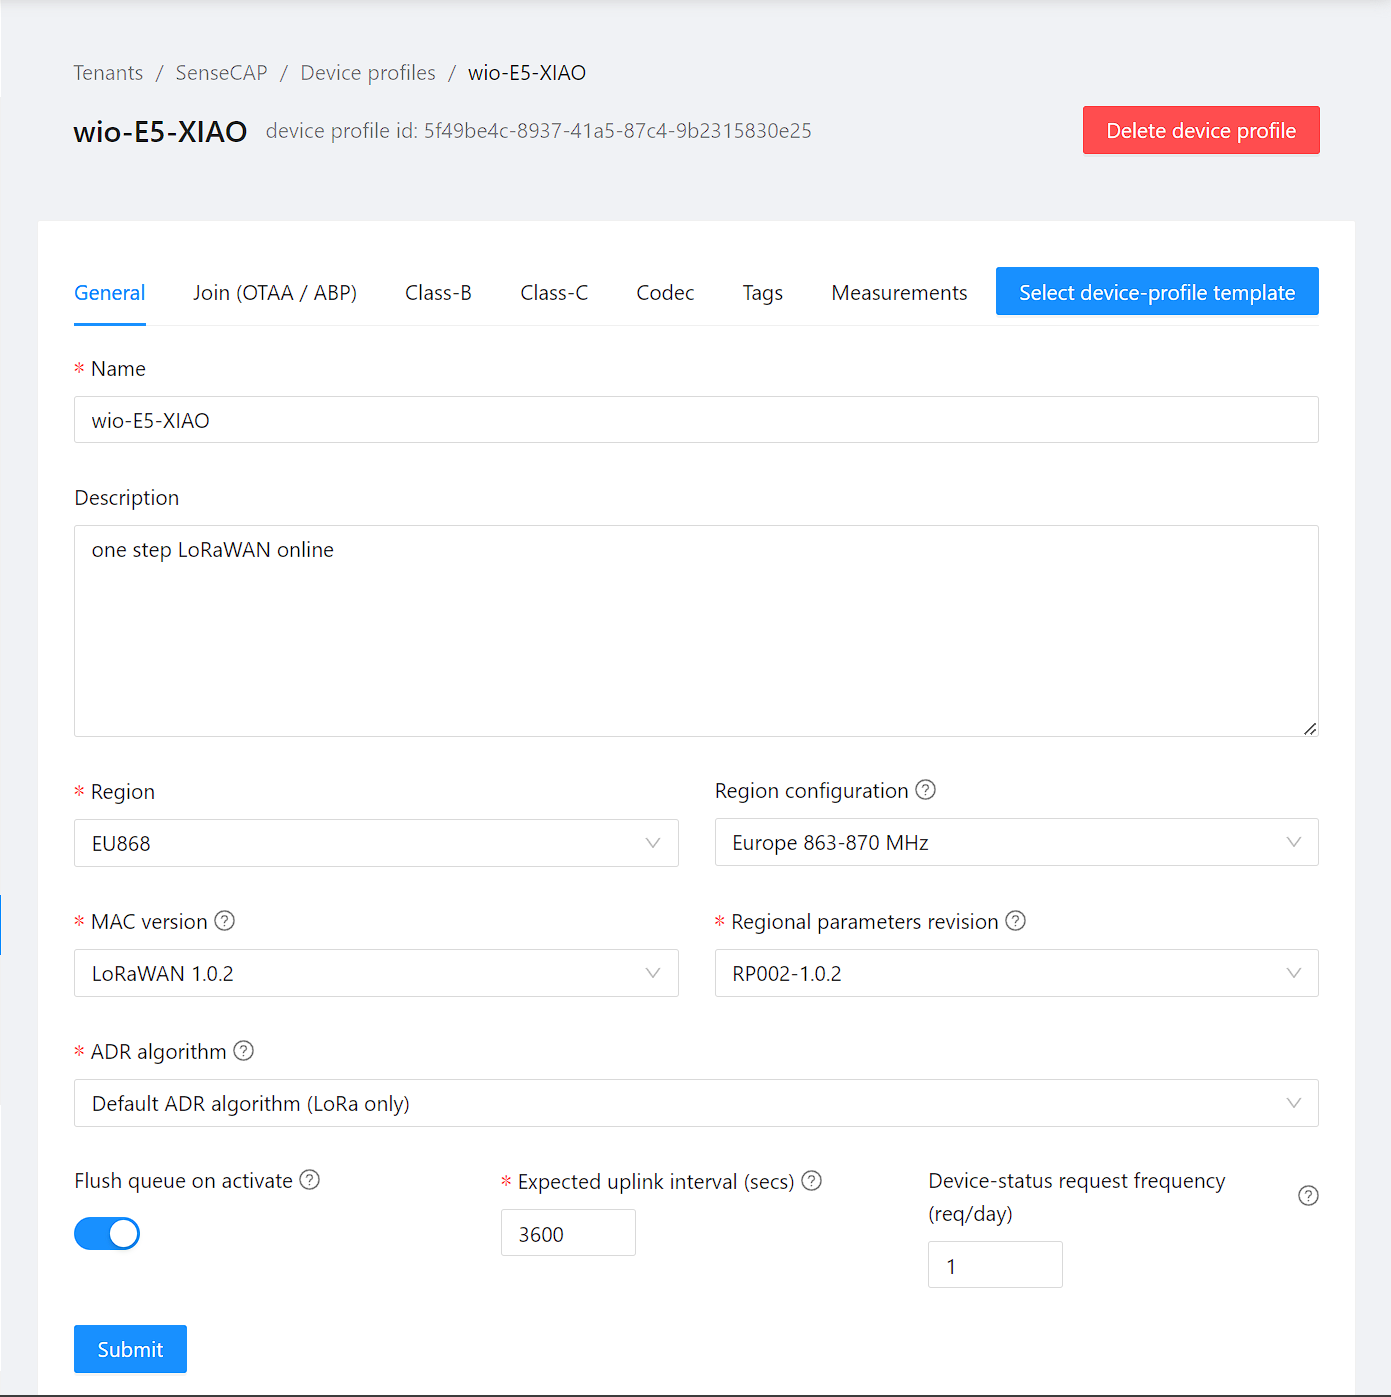
Add Device Profile
The Wio-E5 module is defaulted to use the Regional Parameter V102B. This information is according to the 4.28.13 VER section of the Wio-E5 AT Command Specification.
Consequently, we will select LoRaWAN 1.0.2 as the MAC version and RP002-1.0.2 for the Regional Parameter revision.
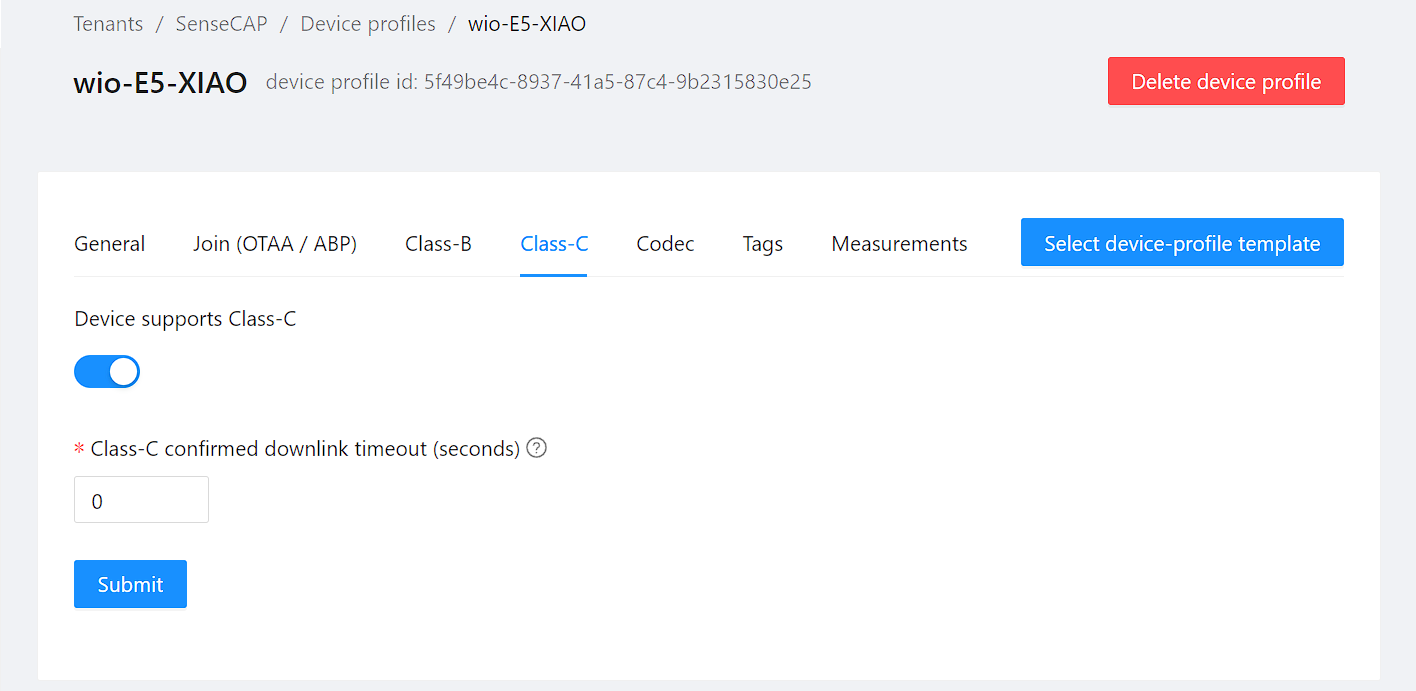
If you need to use Class C for your device, you can activate it by clicking the following button:
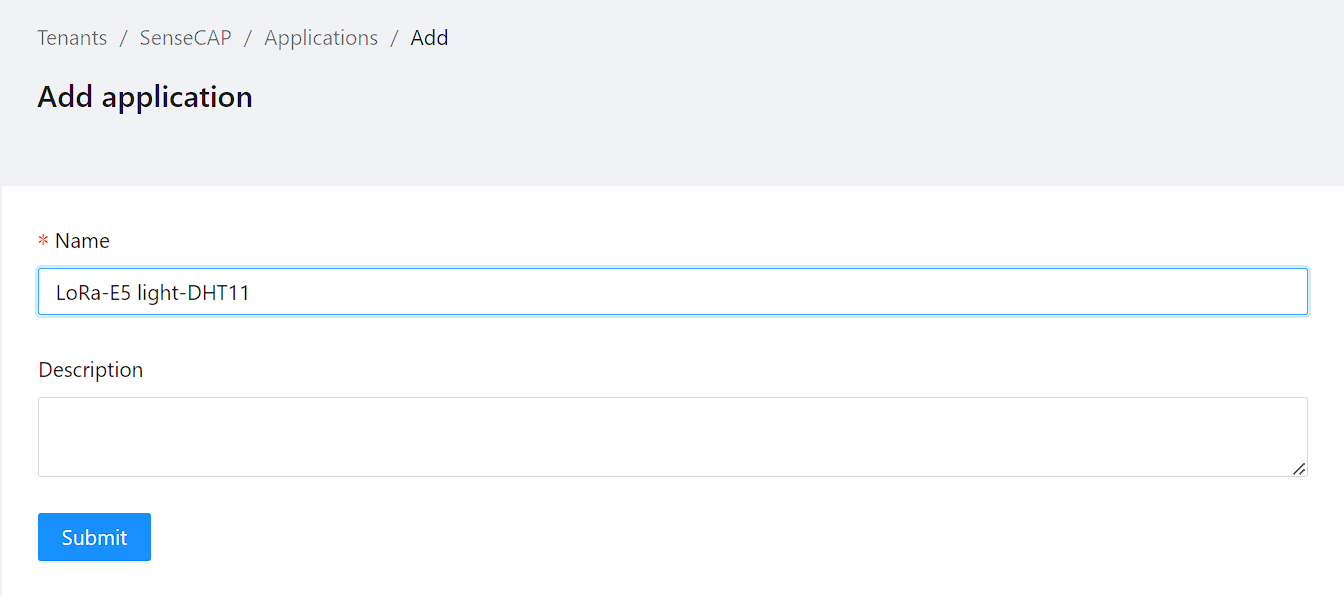
Add Application
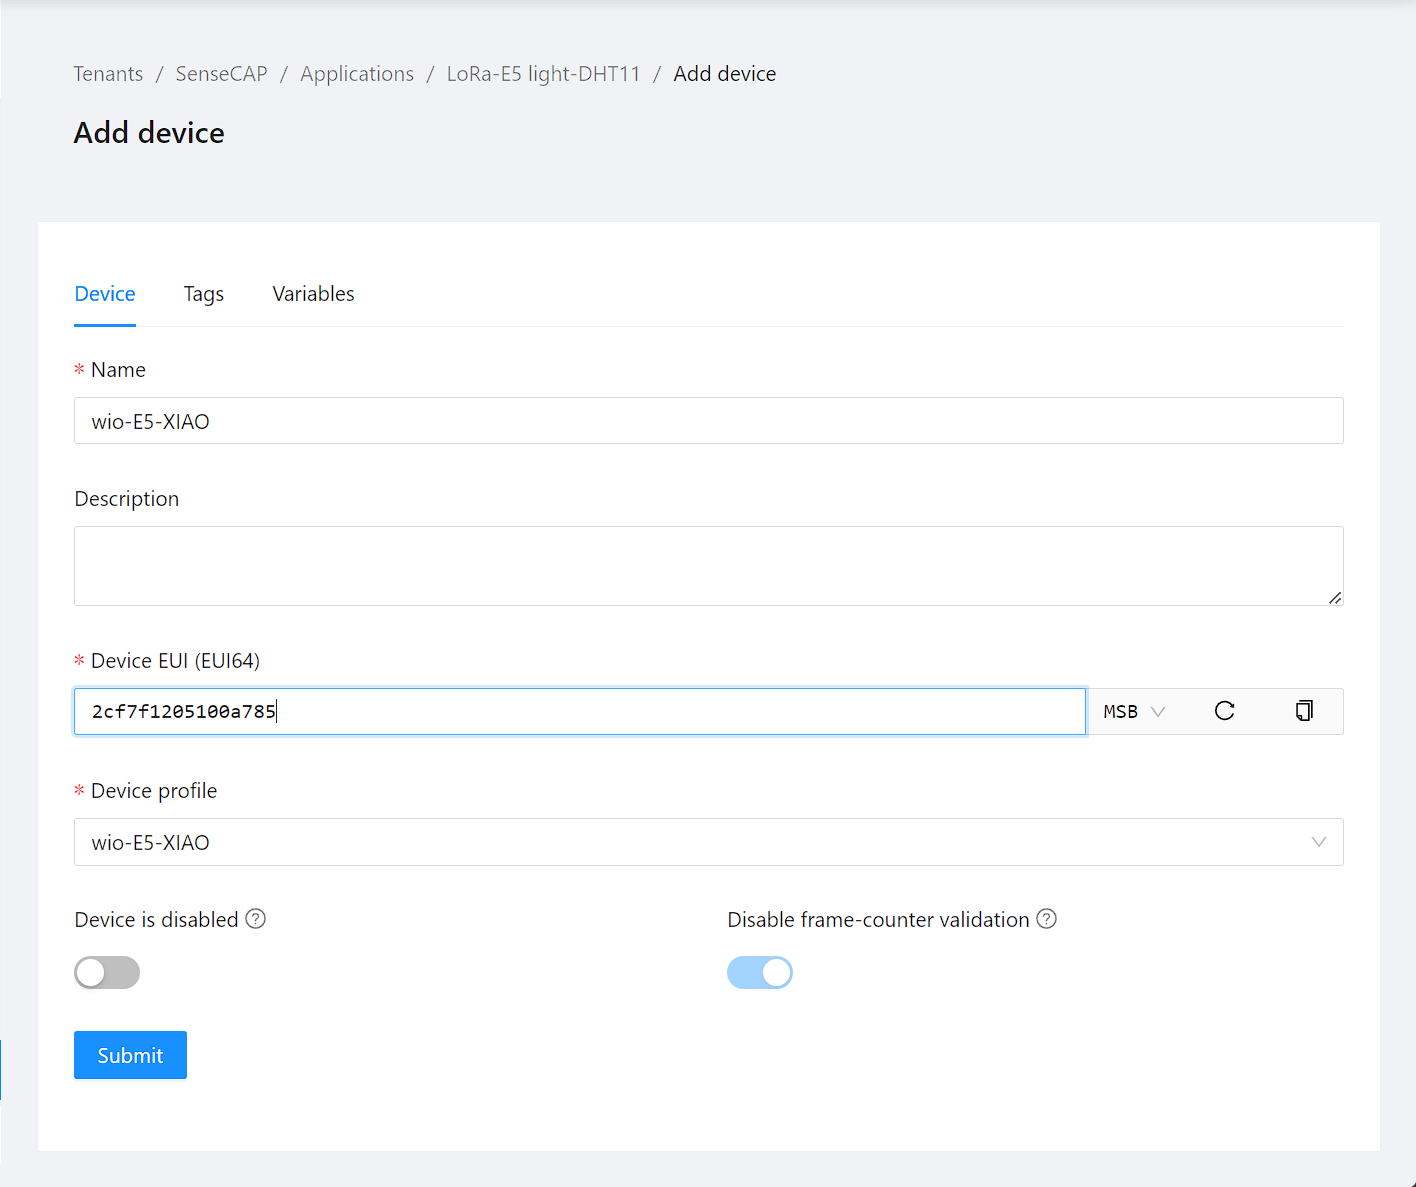
Add Device
You should fill in the Device EUI (EUI64) from your Device EUI (EUI64) information, this section is using it.
If you have changed it, navigate to this section to get the DevAddr, DevEui, AppEui.
Alternatively, if you prefer to use a new DevEUi, you can regenerate it and then submit.
And get the AppKey:
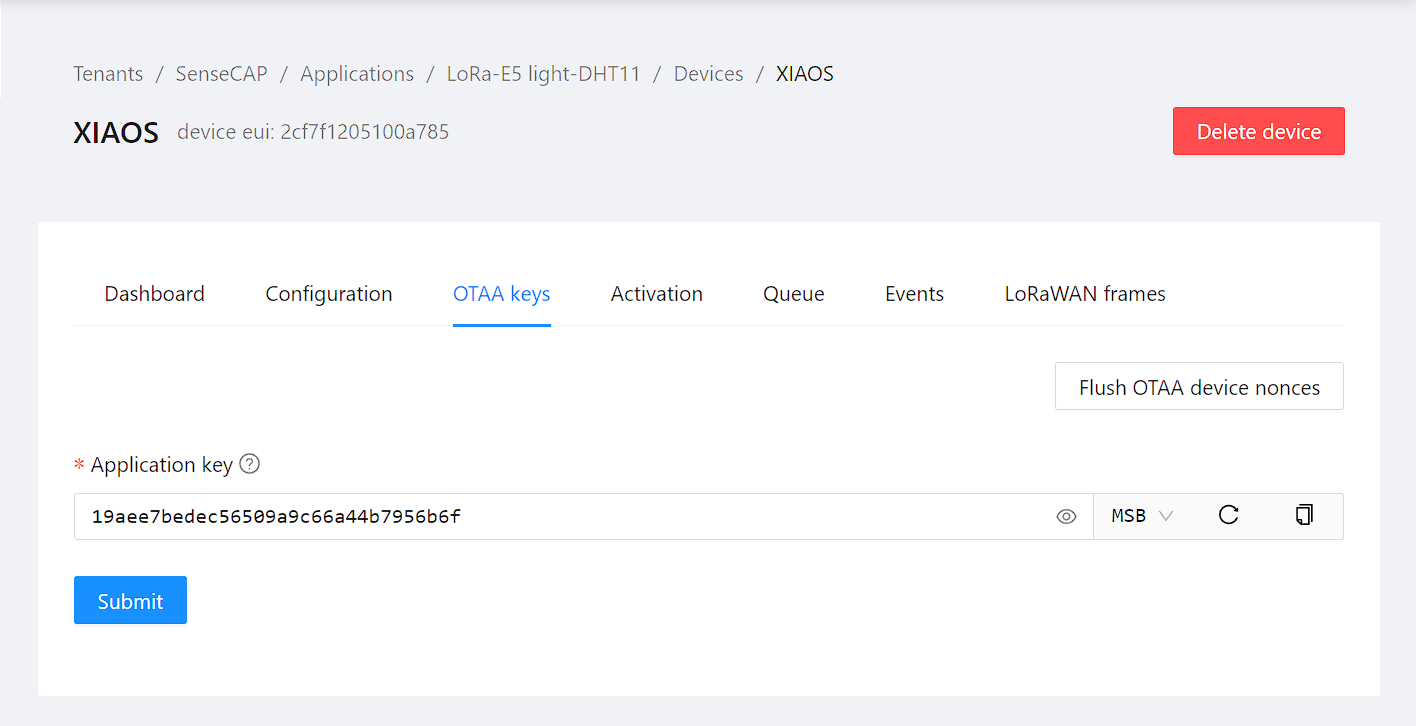
Up to this point, we have obtained the following credentials necessary for the join operation with the LoRaWAN network:
- DevEUI:
2cf7f1205100a785 - AppKey:
19aee7bedec56509a9c66a44b7956b6f
These credentials are essential for the secure registration and communication of your device with the LoRaWAN network.
In the context of LoRaWAN, DevEUI and AppKey play critical roles in device identification and secure communication. The AppEUI, also known as JoinEUI in LoRaWAN 1.1 and later versions, is typically used during the device joining process to identify the application server instance to which the device should connect. However, in some network configurations or with certain network server implementations, like The Things Network (TTN), the AppEUI may not be essential or is already predefined. This approach simplifies the device setup process by reducing the number of parameters that need to be configured. Therefore, based on the specificities of your network server and its configuration, the explicit use of an AppEUI might not be necessary for the joining process.
Hands-on
Starting a New PlatformIO Project
To begin, you'll create a PlatformIO project. Follow these steps:
-
Open PlatformIO: Start by opening the PlatformIO IDE on your computer.
-
Create a New Project: Go to the main menu and select New Project.
Here is an example image showing the new project creation in PlatformIO:
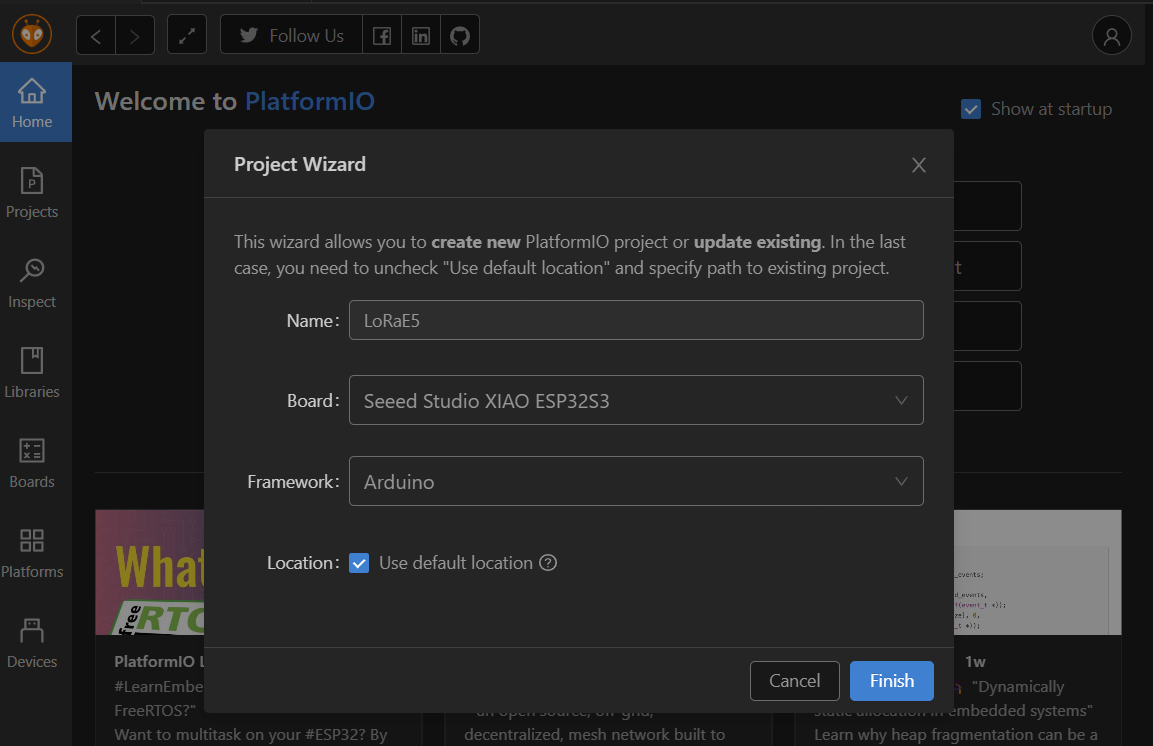
For this project, choose XIAO ESP32S3 as the development board.
Example of project creation for XIAO ESP32S3:
Add Necessary Libraries:
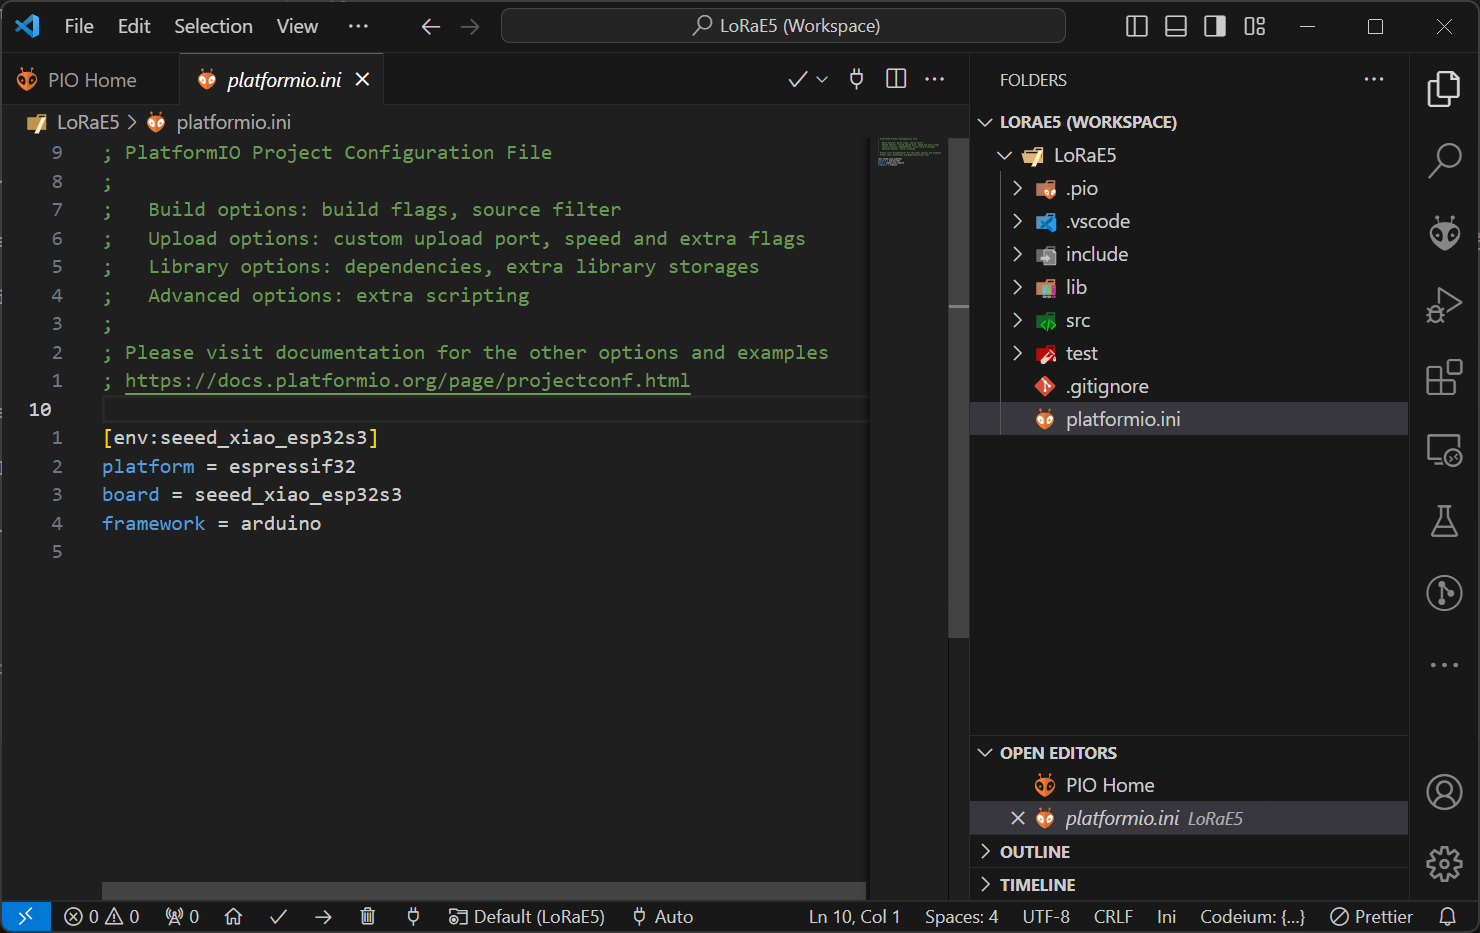
After creating your project, you need to include several libraries that are essential for your project. You can add these libraries to your platformio.ini file to let PlatformIO download them automatically:
[env:seeed_xiao_esp32s3]
platform = espressif32
board = seeed_xiao_esp32s3
framework = arduino
lib_deps =
    olikraus/U8g2@^2.35.9
    plerup/EspSoftwareSerial@^8.2.0
    https://github.com/dok-net/ghostl # Issue Fix: https://github.com/plerup/espsoftwareserial/issues/305#issuecomment-1880188894
    seeed-studio/Grove Temperature And Humidity Sensor@^2.0.2
    seeed-studio/Grove LED Bar@^1.0.0
    https://github.com/andresoliva/LoRa-E5
Once the PlatformIO Library Manager has finished processing your requests, you will be able to see all the libraries that have been added to your project. These libraries are stored in the .pio/libdeps/seeed_xiao_esp32s3 directory, specific to your selected board, which in this case is the Seeed XIAO ESP32S3.
Here's an image showing how your PlatformIO environment will look after the libraries have been successfully added:
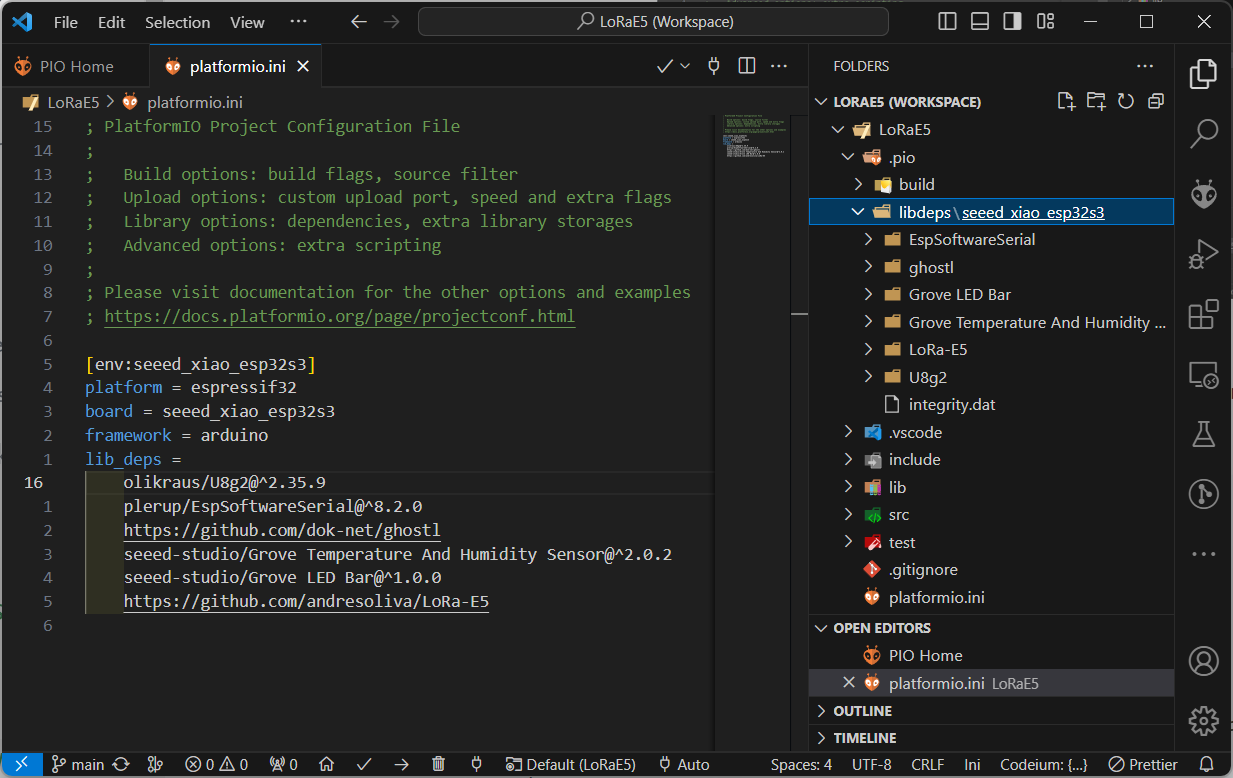
In this directory, you'll find folders for each library you specified in your platformio.ini file. These folders contain the necessary files for each library, such as source code, examples, and additional metadata.
This organization makes it easy to manage and update your libraries. PlatformIO automatically handles compatibility and dependency resolution, ensuring that your development process is smooth and efficient. You can also easily update or remove libraries using the PlatformIO Library Manager, keeping your development environment up-to-date with the latest library versions.
Join the LoRaWAN Network(Testing)
in this section, we will utilize andresoliva/LoRa-E5 to drive Wio-E5 to join the LoRaWAN network, instead of using AT command by hand.
#include <Arduino.h>
#include <LoRa-E5.h> //main LoRa

#ifdef U8X8_HAVE_HW_SPI
    #include <SPI.h>
#endif
#ifdef U8X8_HAVE_HW_I2C
    #include <Wire.h>
#endif

#if defined(ARDUINO_ARCH_AVR)
    #define serialLog Serial

#elif defined(ARDUINO_ARCH_SAMD) || defined(ARDUINO_ARCH_SAM)
    #define serialLog SerialUSB
#else
    #define serialLog Serial
#endif

const int RXPin = D7, TXPin = D6; // Replace with your Wio-E5 RX,TX pin number

/************************LORA SET UP*******************************************************************/
#define LoRa_APPKEY           "19aee7bedec56509a9c66a44b7956b6f" /*Custom key for this App*/
#define LoRa_FREQ_standard    EU868                              /*International frequency band. see*/
#define LoRa_DR               DR4                                /*DR5=5.2kbps //data rate. see at https://www.thethingsnetwork.org/docs/lorawan/regional-parameters/    */
#define LoRa_DEVICE_CLASS     CLASS_C                            /*CLASS_A for power restriction/low power nodes. Class C for other device applications */
#define LoRa_PORT_BYTES       8                                  /*node Port for binary values to send, allowing the app to know it is recieving bytes*/
#define LoRa_PORT_STRING      7                                  /*Node Port for string messages to send, allowing the app to know it is recieving characters/text */
#define LoRa_POWER            14                                 /*Node Tx (Transmition) power*/
#define LoRa_CHANNEL          0                                  /*Node selected Tx channel. Default is 0, we use 2 to show only to show how to set up*/
#define LoRa_ADR_FLAG         false                              /*ADR(Adaptative Dara Rate) status flag (True or False). Use False if your Node is moving*/
/*Time to wait for transmiting a packet again*/
#define Tx_delay_s            9.5 /*delay between transmitions expressed in seconds*/
/*Packet information*/
#define PAYLOAD_FIRST_TX      10   /*bytes to send into first packet*/
#define Tx_and_ACK_RX_timeout 6000 /*6000 for SF12,4000 for SF11,3000 for SF11, 2000 for SF9/8/, 1500 for SF7. All examples consering 50 bytes payload and BW125*/
/*Buffers used to send*/
unsigned char buffer_binary[128] = {0, 1, 2, 3, 4, 5, 6, 7, 8, 9, 10, 11, 12, 13, 14, 15, 16, 17, 18, 19, 20};
char          buffer_char[50]    = "I am sending this message to a LoRa Gateway."; /**/
/*******************************************************************/
/*Set up the LoRa module with the desired configuration */
void LoRa_setup(void) {
    lora.setDeviceMode(LWOTAA); /*LWOTAA or LWABP. We use LWOTAA in this example*/
    lora.setDataRate((_data_rate_t)LoRa_DR, (_physical_type_t)LoRa_FREQ_standard);
    lora.setKey(NULL, NULL, LoRa_APPKEY);                /*Only App key is seeted when using OOTA*/
    lora.setClassType((_class_type_t)LoRa_DEVICE_CLASS); /*set device class*/
    lora.setPort(LoRa_PORT_BYTES);                       /*set the default port for transmiting data*/
    lora.setPower(LoRa_POWER);                           /*sets the Tx power*/
    lora.setChannel(LoRa_CHANNEL);                       /*selects the channel*/
    lora.setAdaptiveDataRate(LoRa_ADR_FLAG);             /*Enables adaptative data rate*/
}

void setup() {
    serialLog.begin(9600);
    while (!serialLog)
        ; // Wait until Serial is ready
    lora.init(TXPin, RXPin);
    /*set up device. You must set up all your parameters BEFORE Joining.
     If you make any change (outside channel or port setup), you should join again the network for proper working*/
    LoRa_setup();
    /*Enters in a while Loop until the join process is completed*/
    serialLog.println("Waiting to join the network...");
    while (lora.setOTAAJoin(JOIN, 10000) == 0)
        ; // will attempt to join network until the ends of time. https://www.thethingsnetwork.org/docs/lorawan/message-types/
    /*POWER DOWN the LoRa module until next Tx (Transmition) cicle*/
    lora.setDeviceLowPower();
    serialLog.println("Joining network successful!");
}

void loop() {

    /*Wake Up the LoRa module*/
    lora.setDeviceWakeUp(); /*if the module is not in sleep state, this command does nothing*/

    /*-----------sending a string message*/
    lora.setPort(LoRa_PORT_STRING); /*set port configured in reception Gateway for expecting Strings*/
    lora.transferPacketWithConfirmed(buffer_char, Tx_and_ACK_RX_timeout);
    /*--------sending bytes message*/
    lora.setPort(LoRa_PORT_BYTES); /*set port configured in reception Gateway for expecting bytes*/
    lora.transferPacketWithConfirmed(buffer_binary, PAYLOAD_FIRST_TX, Tx_and_ACK_RX_timeout);

    /*POWER DOWN the LoRa module until next Tx Transmition (Tx) cicle*/
    lora.setDeviceLowPower();
    delay((unsigned int)(Tx_delay_s*1000));/*Convert the value in seconds to miliseconds*/
}
Let's build and flash it to the board.
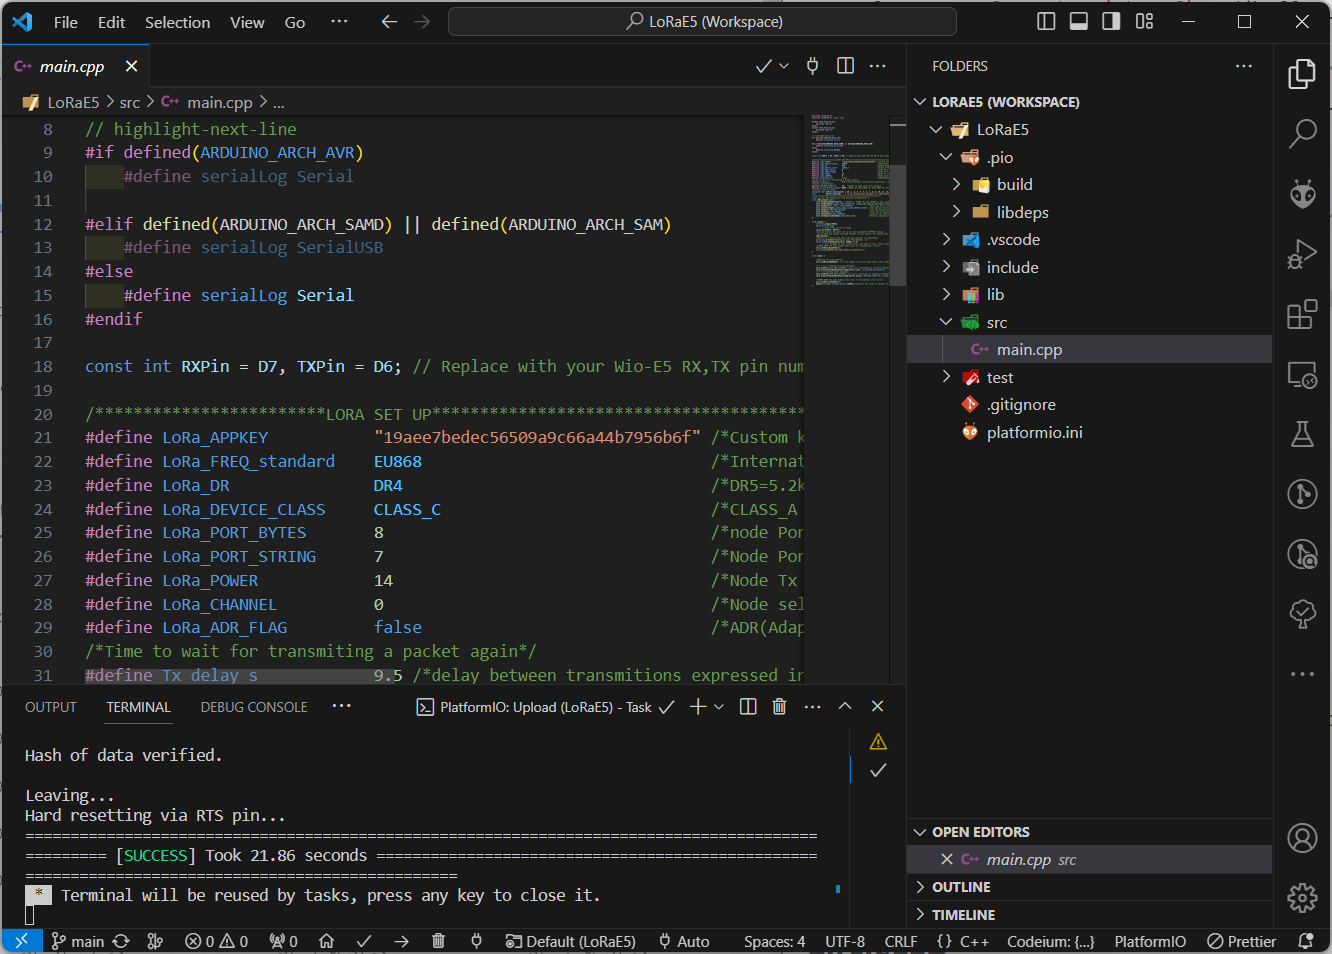
Now we can see there comes the message, and we can see the there is two message out there:
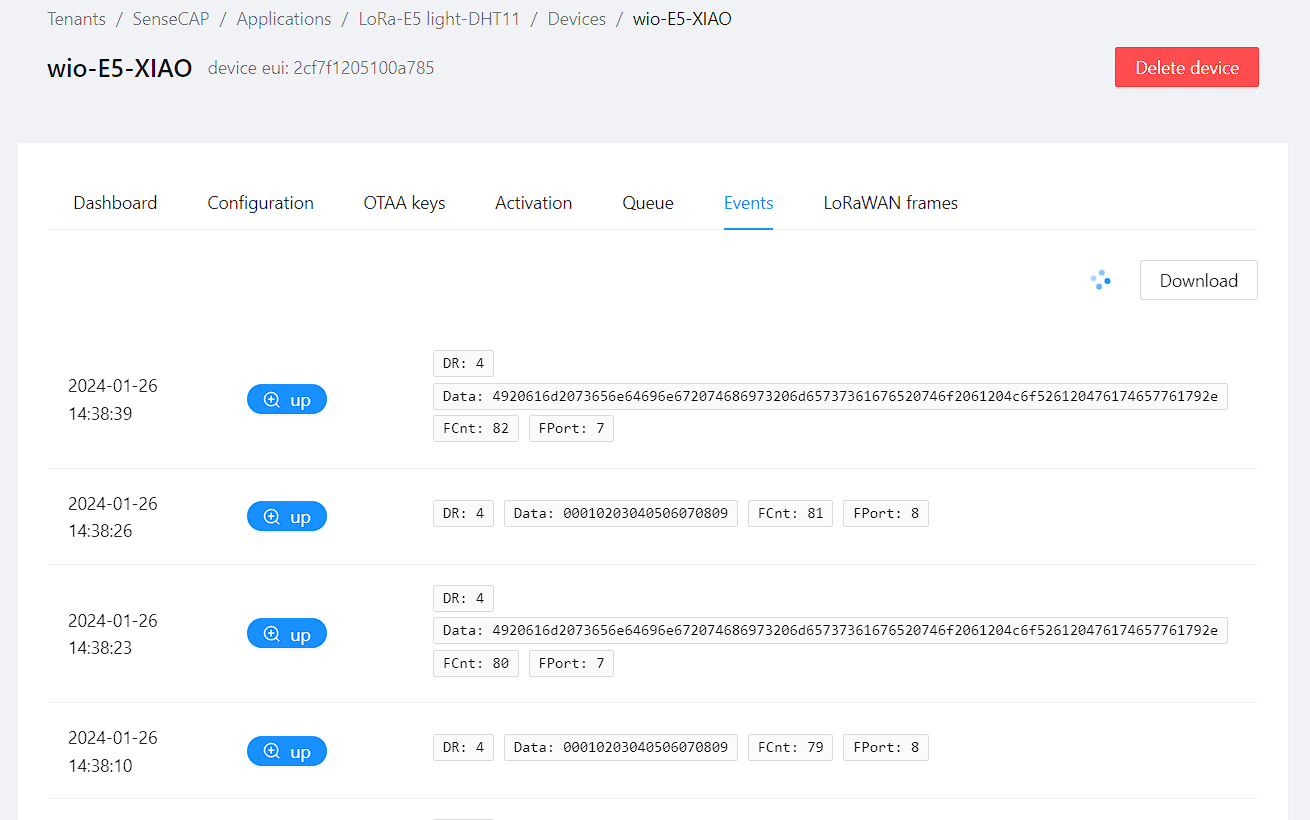
it is easy to understand data 00010203040506070809, which is from buffer_binary array.
there also comes data: SSBhbSBzZW5kaW5nIHRoaXMgbWVzc2FnZSB0byBhIExvUmEgR2F0ZXdheS4=, what is that mean? as the package is codeded in base64.
we can utilize the base64 Decode to see the string.

Yes, it's from buffer_char array: I am sending this message to a LoRa Gateway.
Troubleshooting
Q1: Issue with Grove_LED_Bar Library
If you're experiencing issues with the Grove_LED_Bar library, add the following macro definitions at the start of the Grove_LED_Bar.cpp file:
#include "Grove_LED_Bar.h"
// Add these macros to resolve conflicts
#define max(a, b) (((a) > (b)) ? (a) : (b))
#define min(a, b) (((a) < (b)) ? (a) : (b))
This code defines the max and min macros, which can help fix compilation errors related to these functions in the library.
Resources
LoRaE5 Library
There are serval libraries available for the Wio E5 module:
Tech Support & Product Discussion
Thank you for choosing our products! We are here to provide you with different support to ensure that your experience with our products is as smooth as possible. We offer several communication channels to cater to different preferences and needs.