Grove - Temperature&Humidity Sensor (DHT11)
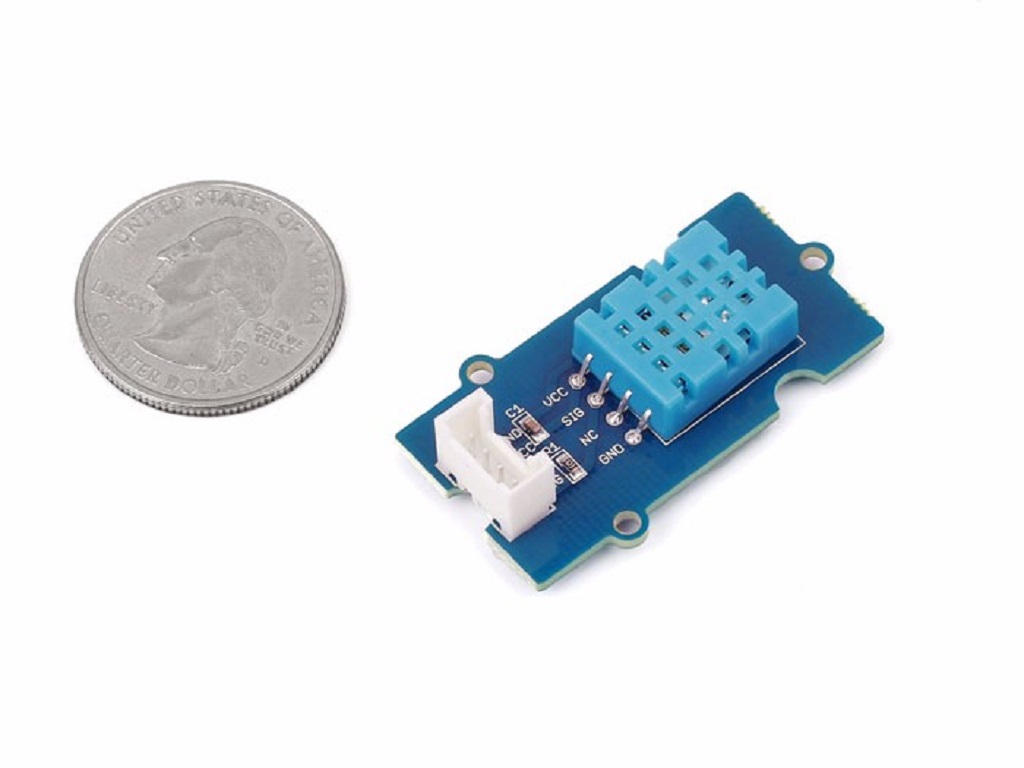
This Temperature&Humidity sensor provides a pre-calibrated digital output. A unique capacitive sensor element measures relative humidity and the temperature is measured by a negative temperature coefficient (NTC) thermistor. It has excellent reliability and long term stability. Please note that this sensor will not work for temperatures below 0 degree.
![]()
Upgradable to Industrial Sensors
With the SenseCAP S2110 controller and S2100 data logger, you can easily turn the Grove into a LoRaWAN® sensor. Seeed not only helps you with prototyping but also offers you the possibility to expand your project with the SenseCAP series of robust industrial sensors.
SenseCAP S210x series industrial sensors provide an out-of-box experience for environmental sensing. Please refer to the S2101 Wireless Temperature and Humidity Sensor with higher performance and robustness for air quality monitoring. The series includes sensors for soil moisture, air temperature and humidity, light intensity, CO2, EC, and an 8-in-1 weather station. Try the latest SenseCAP S210x for your next successful industrial project.
| SenseCAP Industrial Sensor |
 |
| S2101 Air Temp & Humidity |
Features
- Relative Humidity and temperature measurement
- Full range temperature compensation Calibrated
- Digital signal
- Long term stability
- Long transmission distance(>20m)
- Low power consumption
More details about Grove modules please refer to Grove System
Applications Ideas
- Consumption product
- Weather station
- Humidity regulator
- Air conditioner
Specifications
Key Specifications
| Items | Min |
|---|---|
| PCB Size | 2.0cm*4.0cm |
| Interface | 2.0mm pitch pin header |
| IO Structure | SIG,VCC,GND,NC |
| ROHS | YES |
Electronic Characterstics
Items | Conditions | Min | Norm | Max | Unit |
|---|---|---|---|---|---|
VCC | 3.3 | 5 | Volts | ||
Measuring Current Supply | 1.3 | 2.1 | mA | ||
Average Current Supply | 0.5 | 1.1 | mA | ||
Measuring Range | Humidity | 20% | 90% | RH | |
Temperature | 0 | 50 | °C | ||
Accuracy | Humidity | ±5% | RH | ||
Temperature | ±2 | °C | |||
Sensitivity | Humidity | 1% | RH | ||
Temperature | 1 | °C | |||
Repeatability | Humidity | ±1% | RH | ||
Temperature | ±1 | °C | |||
Long-term Stability | ±1% | RH/year | |||
Signal Collecting Period | 2 | S |
Platforms Supported
| Arduino | Raspberry Pi | |||
|---|---|---|---|---|
The platforms mentioned above as supported is/are an indication of the module's software or theoritical compatibility. We only provide software library or code examples for Arduino platform in most cases. It is not possible to provide software library / demo code for all possible MCU platforms. Hence, users have to write their own software library.
Getting Started
When MCU sends a trigger signal, sensor will change from low power consumption mode to active mode. After the trigger signal sensor will send a response signal back to MCU, then 40 bit collected data is sent out and a new signal collecting is trigged.(Note that the 40 bit collected data which is sent from sensor to MCU is already collected before the trigger signal comes.) One trigger signal receives one time 40 bit response data from sensor. Single-bus data is used for communication between MCU and sensor. The communication process is shown below:
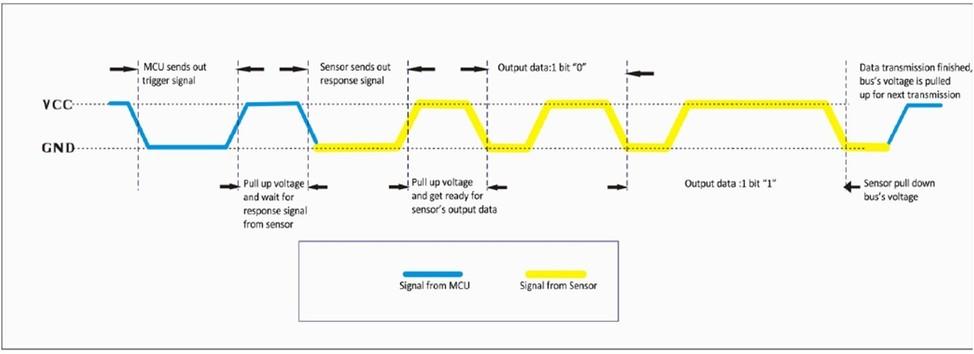
It costs 5ms for single time communication.The high-order bit of data sends out first. Signal Data is 40 bit, comprised of 16 bit humidity data, 16 bit temperature data and 8 bit checksum.The data format is:
8bits integer part of humidity+8bits decimal part of humidity +8bits integer part of temperature+8bits decimal part of temperature +8bits checksum.
If this is the first time you work with Arduino, we firmly recommend you to see Getting Started with Arduino before the start.
Play With Arduino
Hardware
- Step 1. Prepare the below stuffs:
| Seeeduino V4.2 | Base Shield | Temperature&Humidity Sensor |
|---|---|---|
 |  |  |
| Get One Now | Get One Now | Get One Now |
-
Step 2. Connect Grove - Temperature&Humidity Sensor to port D2 of Grove-Base Shield.
-
Step 3. Plug Grove - Base Shield into Seeeduino.
-
Step 4. Connect Seeeduino to PC via a USB cable.
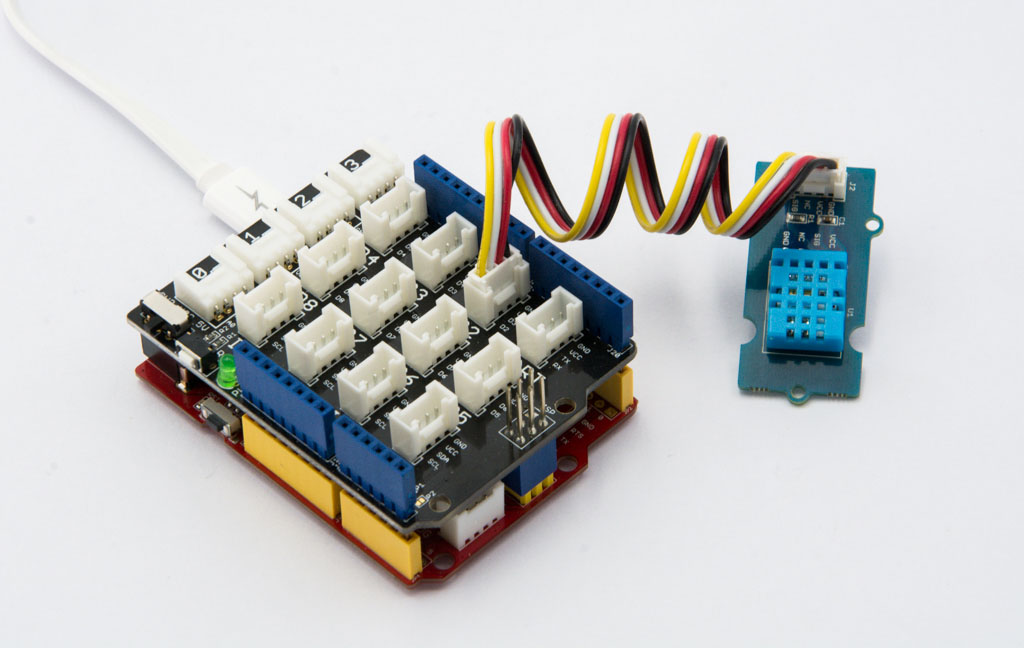
If we don't have Grove Base Shield, We also can directly connect Grove - Temperature and Humidity Sensor Pro to Seeeduino as below.
| Seeeduino | Temperature&Humidity Sensor |
|---|---|
| 5V | Red |
| GND | Black |
| Not Conencted | White |
| D2 | Yellow |
Software
-
Step 1. Download the Seeed DHT library from Github.
-
Step 2. Refer How to install library to install library for Arduino.
-
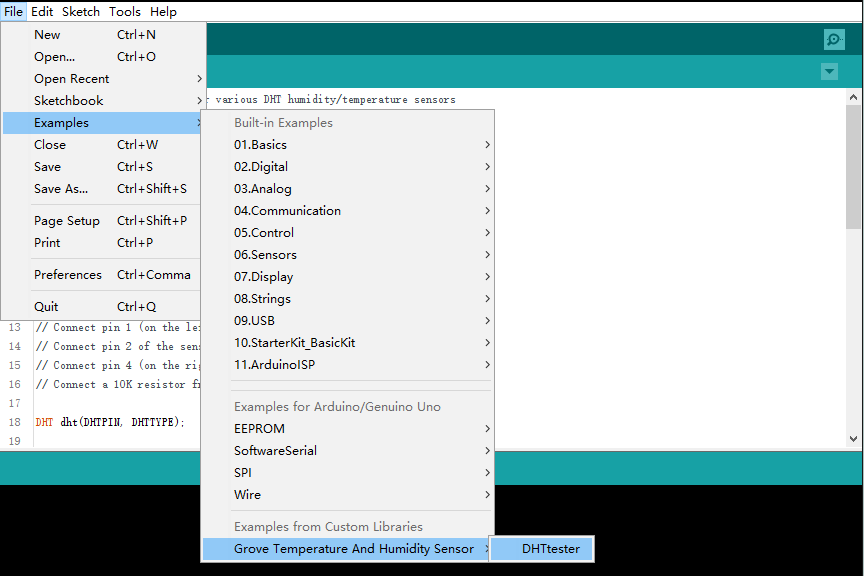
Step 3. Restart the Arduino IDE. Open “ DHTtester” example via the path: File --> Examples --> Grove_Humidity_Temperature_Sensor-master --> DHTtester. Through this demo, we can read the temperature and relative humidity information of the environment.
This Grove - Temperature&Humidity Sensor and our another product Grove-Temperature&Humidity Sensor pro are sharing this library. No matter which product you are using, make sure that you have made the definition line of the sensor of your board into effect and commented out the definition lines of other specs. For example, the sensor we used on Grove - Temperature&Humidity Sensor is DHT 11. So the definition part of the sensor spec should be:
#define DHTTYPE DHT11   // DHT 11
//#define DHTTYPE DHT22   // DHT 22  (AM2302)
//#define DHTTYPE DHT21   // DHT 21 (AM2301)
The default setting of the library is DHT 22, so you need to change it into DHT 11 manually.
-
Step 4. Upload the demo. If you do not know how to upload the code, please check how to upload code.
-
Step 5. Open the Serial Monitor of Arduino IDE by click Tool-> Serial Monitor. Or tap the ++ctrl+shift+m++ key at the same time. if every thing goes well, you will get the temperature.
The result should be like:
Play with Codecraft
Hardware
Step 1. Connect a Grove - Temperature&Humidity Sensor to port D2 a Base Shield.
Step 2. Plug the Base Shield to your Seeeduino/Arduino.
Step 3. Link Seeeduino/Arduino to your PC via an USB cable.
Software
Step 1. Open Codecraft, add Arduino support, and drag a main procedure to working area.
If this is your first time using Codecraft, see also Guide for Codecraft using Arduino.
Step 2. Drag blocks as picture below or open the cdc file which can be downloaded at the end of this page.
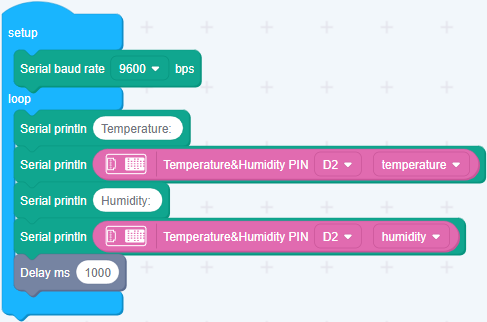
Upload the program to your Arduino/Seeeduino.
When the code finishes uploaded, you will see temperature and humidity displayed in the Serial Monitor.
Play With Raspberry Pi (With Grove Base Hat for Raspberry Pi)
Hardware
- Step 1. Things used in this project:
| Raspberry pi | Grove Base Hat for RasPi | Grove - Temp & Hum Sensor |
|---|---|---|
 |  | |
| Get ONE Now | Get ONE Now | Get ONE Now |
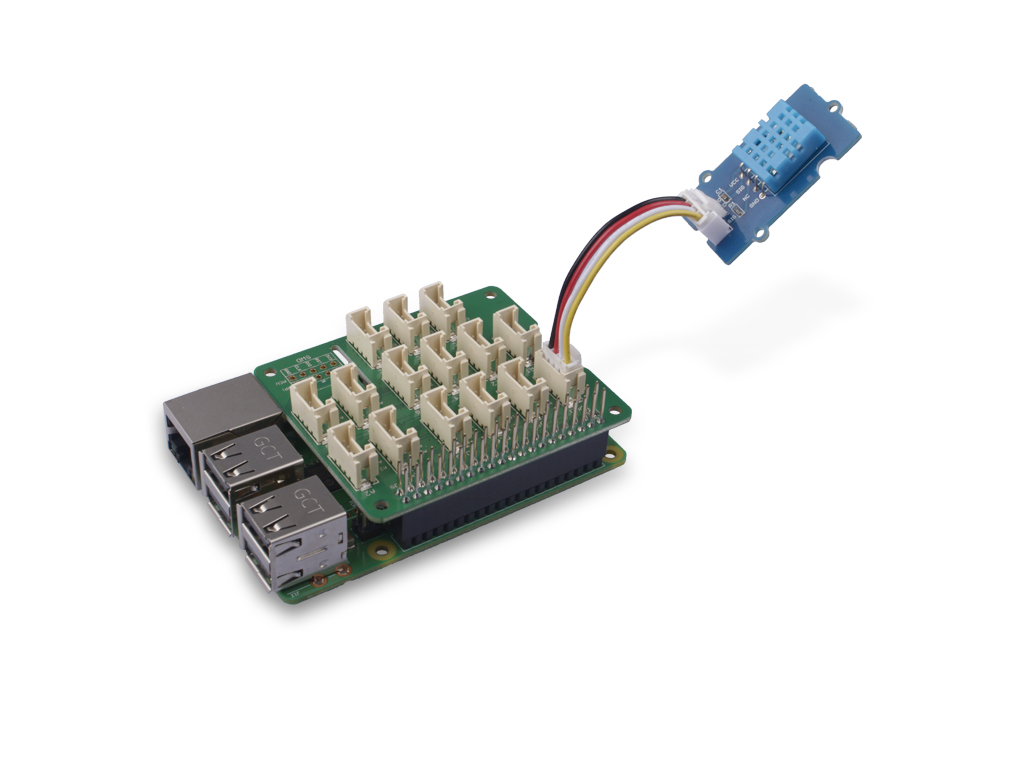
- Step 2. Plug the Grove Base Hat into Raspberry.
- Step 3. Connect the temperature and humidity sensor to Port 12 of the Base Hat.
- Step 4. Connect the Raspberry Pi to PC through USB cable.
For step 3 you are able to connect the temperature and humidity sensor to any GPIO Port but make sure you change the command with the corresponding port number.
Software
If you are using Raspberry Pi with Raspberrypi OS >= Bullseye, you have to use this command line only with Python3.
- Step 1. Follow Setting Software to configure the development environment.
One of the steps is to add the necessary DHT library, please make sure it is installed.
- Step 2.Enter the relevant virtual environment.
source ~/grove_env/env/bin/activate
cd ~/grove_env/grove.py/grove
- Step 3. Excute below commands to run the code.
nano ~/grove_env/dht11_demo.py
Copy the following code
import time
import seeed_dht

sensor = seeed_dht.DHT("11", 12)
print("DHT11 reading every second, Ctrl+C to quit")
try:
    while True:
        humi, temp = sensor.read()
        print(f"DHT11  Humidity {humi:.1f}%  Temperature {temp:.1f}°C")
        time.sleep(1)
except KeyboardInterrupt:
    print("\nBye")
Save and exit: Ctrl+O → Enter → Ctrl+X
If everything goes well, you will be able to see the following result
pi@raspberrypi:~/Seeed_Python_DHT/examples $ python ~/grove_env/dht11_demo.py
DHT11, humidity 39.2%, temperature 29.1*
DHT11, humidity 39.2%, temperature 29.1*
DHT11, humidity 39.2%, temperature 29.1*
DHT11, humidity 39.1%, temperature 29.1*
DHT11, humidity 40.0%, temperature 29.1*
DHT11, humidity 39.9%, temperature 29.1*
DHT11, humidity 40.3%, temperature 29.1*
DHT11, humidity 42.0%, temperature 29.1*
You can quit this program by simply press ++ctrl+c++.
Play With Raspberry Pi (with GrovePi_Plus)
Hardware
First, You need to prepare the below stuffs:
- Step 1. Prepare the below stuffs:
| Raspberry pi | GrovePi_Plus | Temperature&Humidity Sensor |
|---|---|---|
 |  | |
| Get One Now | Get One Now | Get One Now |
-
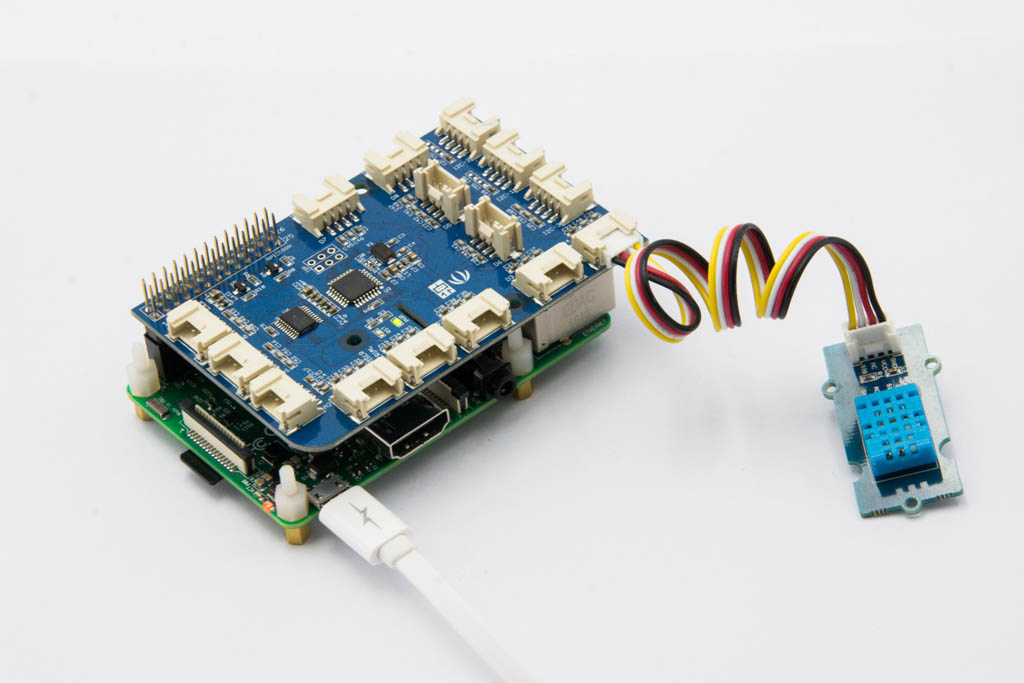
Step 2. Plug the GrovePi_Plus into Raspberry.
-
Step 3. Connect Grove - Temperature&Humidity Sensor to D4 port of GrovePi_Plus.
-
Step 4. Connect the Raspberry to PC via USB cable.
Software
-
Step 1. Follow Setting Software to configure the development environment.
-
Step 2. Follow Updating the Firmware to update the newest firmware of GrovePi.
In this wiki we use the path ~/GrovePi/ instead of /home/pi/Desktop/GrovePi, you need to make sure Step 2 and Step 3 use the same path.
We firmly suggest you to update the firmware, or for some sensors you may get errors.
If you are using Raspberry Pi with Raspberrypi OS >= Bullseye, you have to use this command line only with Python3.
- Step 3. Git clone the Github repository.
cd ~
git clone https://github.com/DexterInd/GrovePi.git
- Step 4. Check the code.
cd ~/GrovePi/Software/Python
sudo nano grove_dht_pro.py
The code should be like:
import grovepi
import math
# Connect the Grove Temperature & Humidity Sensor Pro to digital port D4
# This example uses the blue colored sensor.
# SIG,NC,VCC,GND
sensor = 4  # The Sensor goes on digital port 4.

# temp_humidity_sensor_type
# Grove Base Kit comes with the blue sensor.
blue = 0    # The Blue colored sensor.
white = 1   # The White colored sensor.

while True:
    try:
        # This example uses the blue colored sensor.
        # The first parameter is the port, the second parameter is the type of sensor.
        [temp,humidity] = grovepi.dht(sensor,blue)
        if math.isnan(temp) == False and math.isnan(humidity) == False:
            print("temp = %.02f C humidity =%.02f%%"%(temp, humidity))

    except IOError:
        print ("Error")
Then tap ++ctrl+x++ to quit nano.
The Grove - Temperature&Humidity Sensor and the Grove - Temperature&Humidity Sensor pro share the same python code which named grove_dht_pro.py.The only difference is that for the sentence[temp,humidity] = grovepi.dht(sensor,blue). We use the parameterblue for Grove - Temperature&Humidity Sensor while we use white for the Grove - Temperature&Humidity Sensor pro. The default value is blue, so for this sensor you do not need to change the code.
- Step 5. Excute below commands to get the value.
sudo python3 grove_dht_pro.py
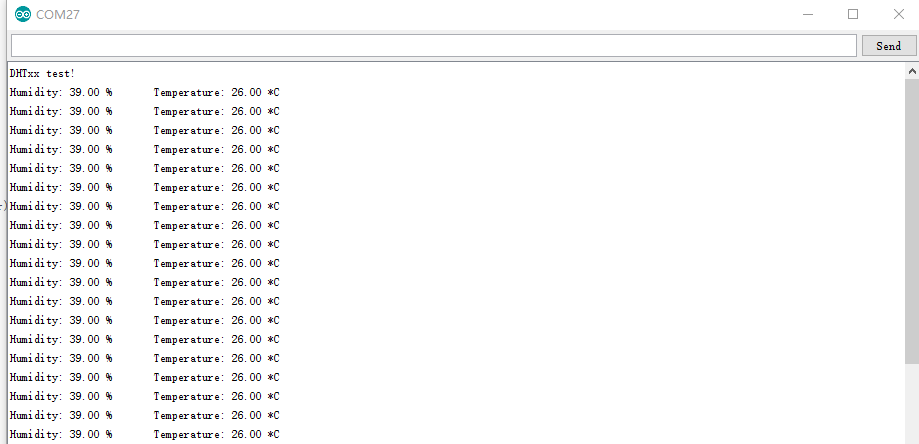
The result should be like:
pi@raspberrypi:~/GrovePi/Software/Python $ sudo python3 grove_dht_pro.py
temp = 26.00 C humidity =40.00%
temp = 26.00 C humidity =40.00%
temp = 26.00 C humidity =40.00%
temp = 26.00 C humidity =40.00%
temp = 26.00 C humidity =40.00%
temp = 26.00 C humidity =40.00%
temp = 26.00 C humidity =40.00%
temp = 26.00 C humidity =40.00%
temp = 26.00 C humidity =40.00%
temp = 26.00 C humidity =40.00%
temp = 26.00 C humidity =40.00%
temp = 26.00 C humidity =40.00%
Play With Wio Terminal (ArduPy)
Hardware
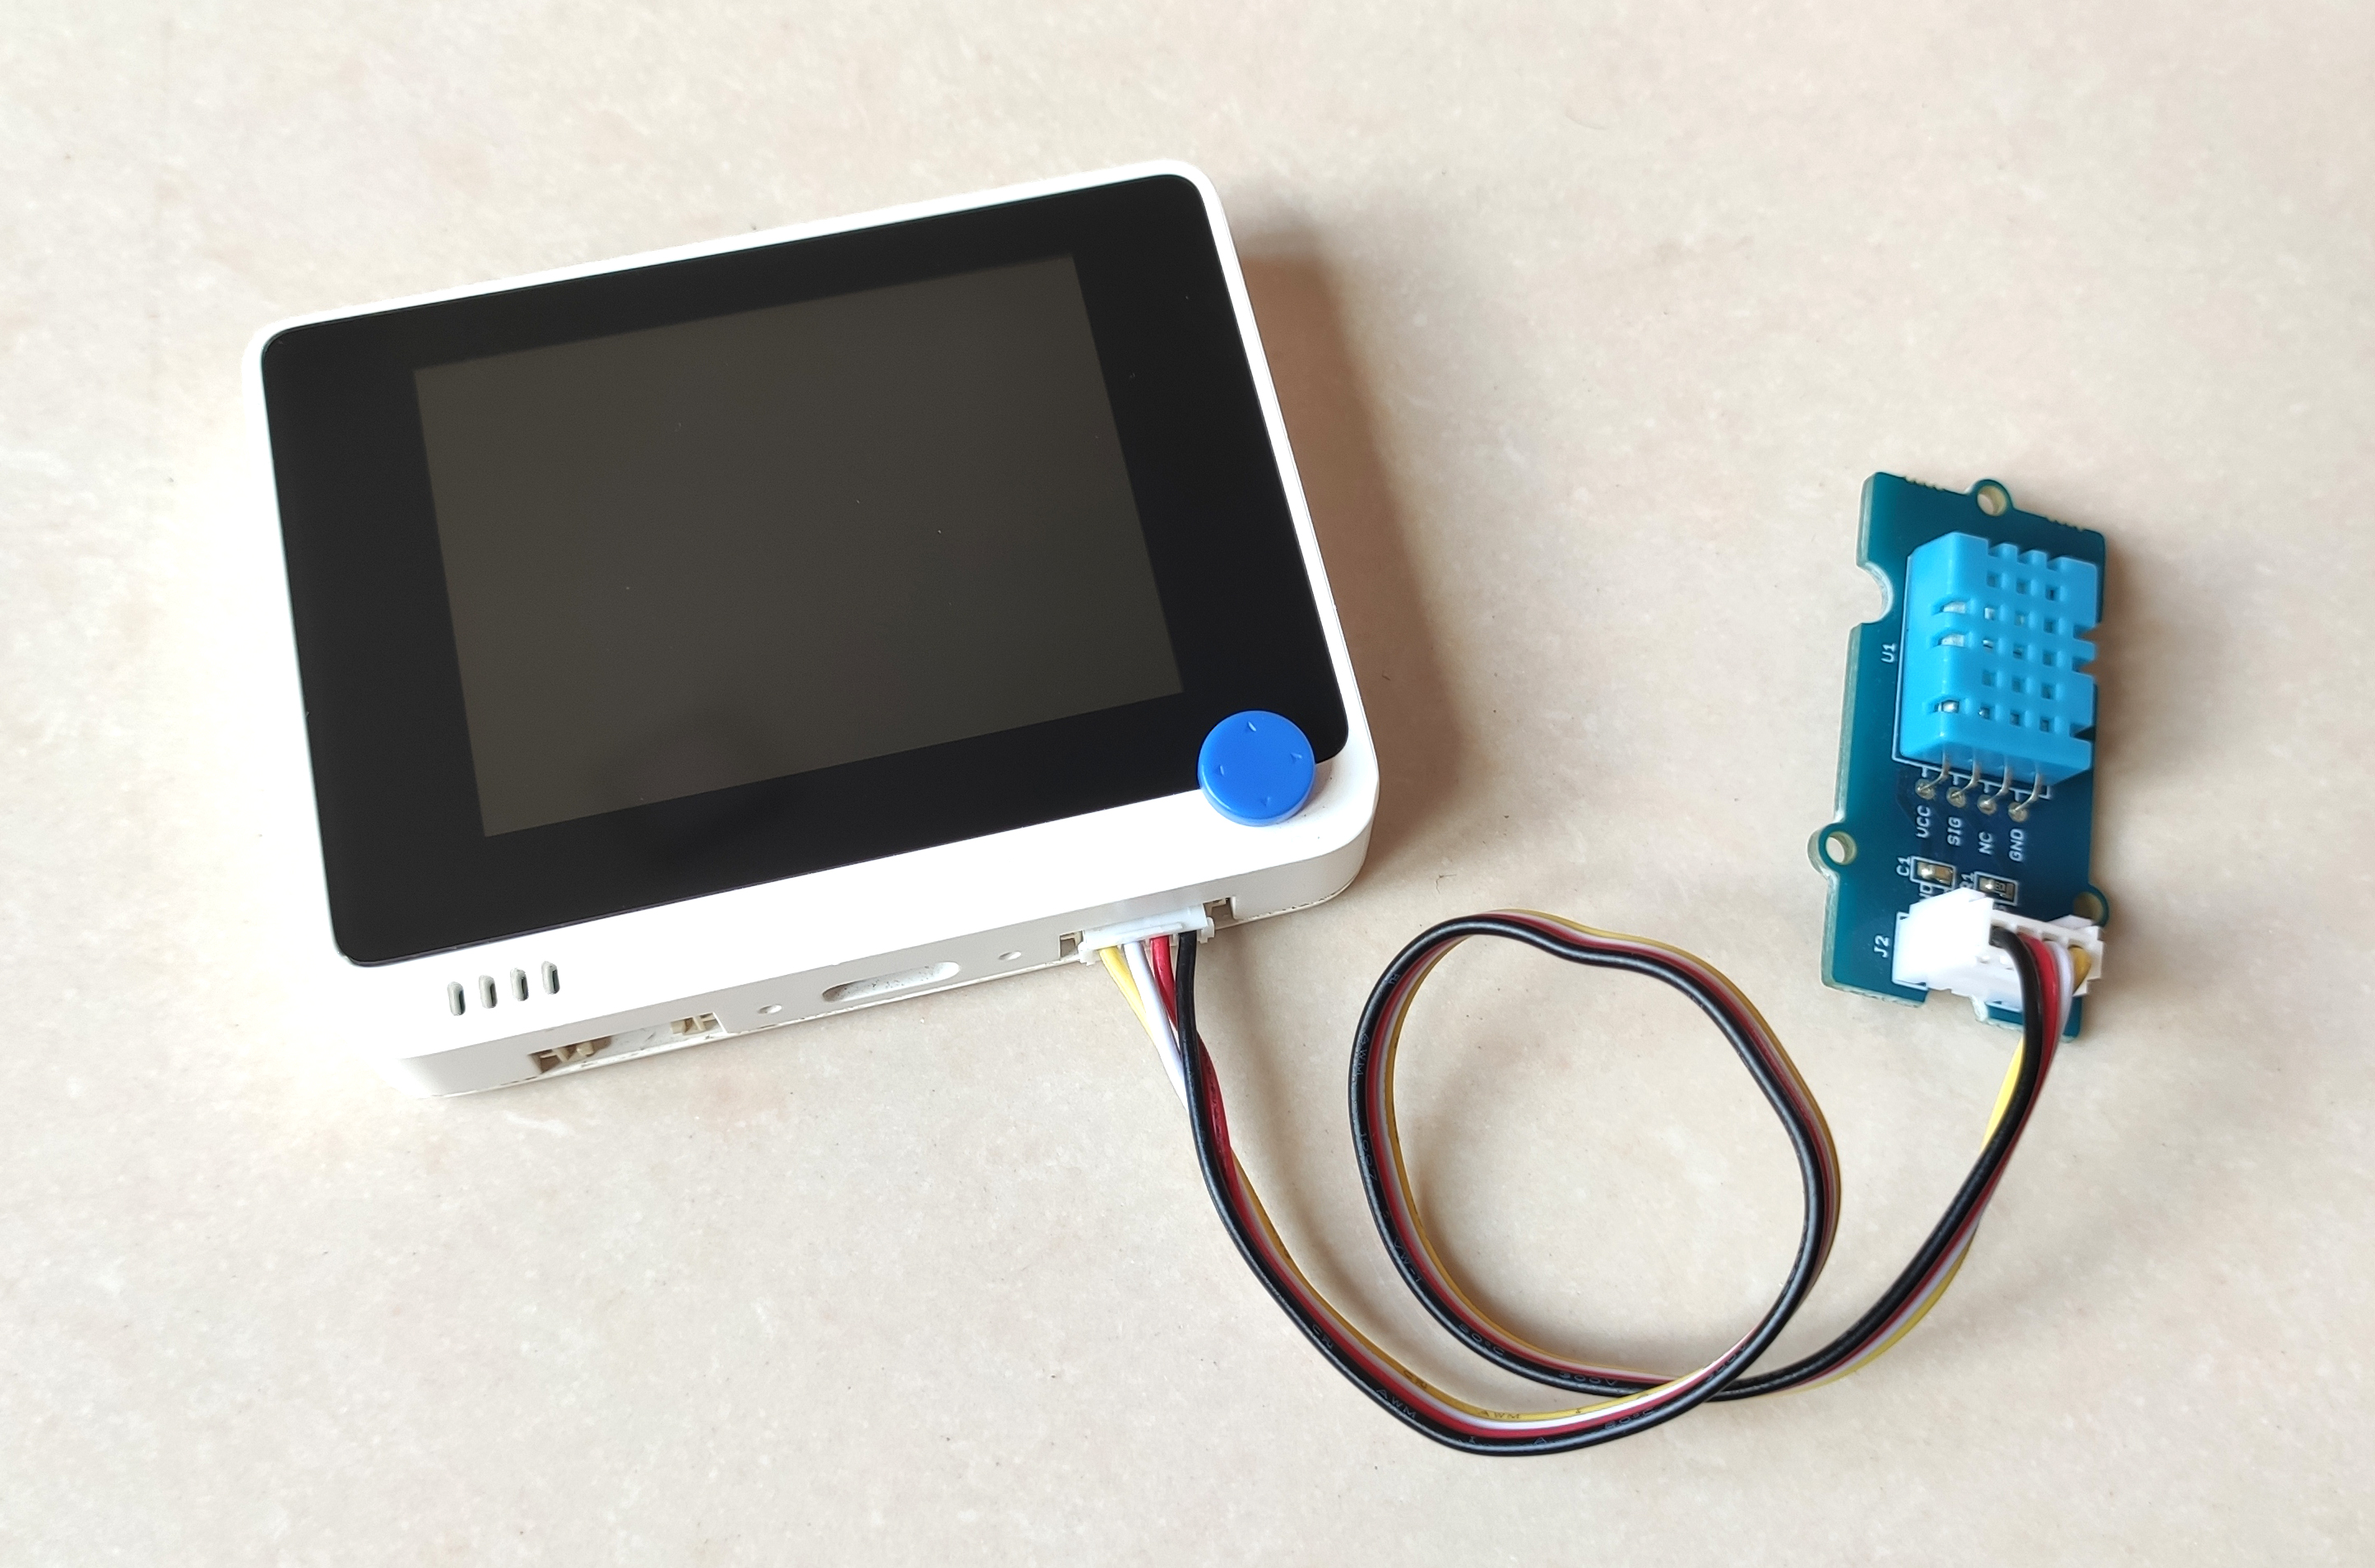
- Step 1. Prepare the following:
| Wio Terminal | Grove - Temperature & Humidity Sensor (DHT11) |
|---|---|
 |  |
| Get One Now | Get One Now |
-
Step 2. Connect Grove - Temperature & Humidity Sensor to D0 port of Wio Terminal.
-
Step 3. Connect Wio Terminal to PC through USB Type-C cable.
Software
-
Step 1. Follow ArduPy Getting Started to configure the ArduPy development environment on Wio Terminal.
-
Step 2. Make sure that the ArduPy firmware contains the DHT library using the following commands. For more information, please follow here.
aip install Seeed-Studio/seeed-ardupy-dht/archive/main.zip
aip build
aip flash
- Step 3. Copy the following code and save it as
ArduPy-DHT.py:
from arduino import grove_dht
from machine import LCD, Sprite
import time

dht = grove_dht(0,11)
lcd = LCD() # initialize TFT LCD
spr = Sprite(lcd) # initialize buffer

def main(): # main function
    spr.createSprite(320, 240) # create buffer
    while True: # while loop
        spr.fillSprite(spr.color.WHITE) # fill background

        # two fill rectangles
        spr.fillRect(0,0,160,240,spr.color.DARKGREEN) # fill rectangle in color
        spr.fillRect(160,0,160,240,spr.color.BLUE)

        # temp and humid text draw
        spr.setTextSize(2) # set text size
        spr.setTextColor(spr.color.WHITE,spr.color.DARKGREEN) # set text color
        spr.drawString("Temperature", 15, 65) # draw string
        spr.setTextColor(spr.color.WHITE,spr.color.BLUE)
        spr.drawString("Humidity", 190, 65)

        # obtain readings
        t = dht.temperature # store temperature readings in variable
        h = dht.humidity # store humidity readings in variable

        # display temp readings
        spr.setTextSize(4)
        spr.setTextColor(spr.color.WHITE,spr.color.DARKGREEN)
        spr.drawNumber(int(t),50,110) # display number
        spr.drawString("C", 100, 110)

        # display humi readings
        spr.setTextColor(spr.color.WHITE,spr.color.BLUE) # set text color
        spr.drawNumber(int(h),180,110)
        spr.drawString("%RH", 235, 110)

        spr.pushSprite(0,0) # push to LCD
        time.sleep_ms(100)

        print("temperature:",t,"C", end ="     ")
        print("humidity:",h,"%RH")

if __name__ == "__main__": # check whether this is run from main.py
    main() # execute function
- Step 4. Save the
ArduPy-DHT.pyin a location that you know. Run the following command and replace<YourPythonFilePath>with yourArduPy-DHT.pylocation.
aip shell -n -c "runfile <YourPythonFilePath>"
# Example:
# aip shell -n -c "runfile /Users/user/Desktop/ArduPy-DHT.py"
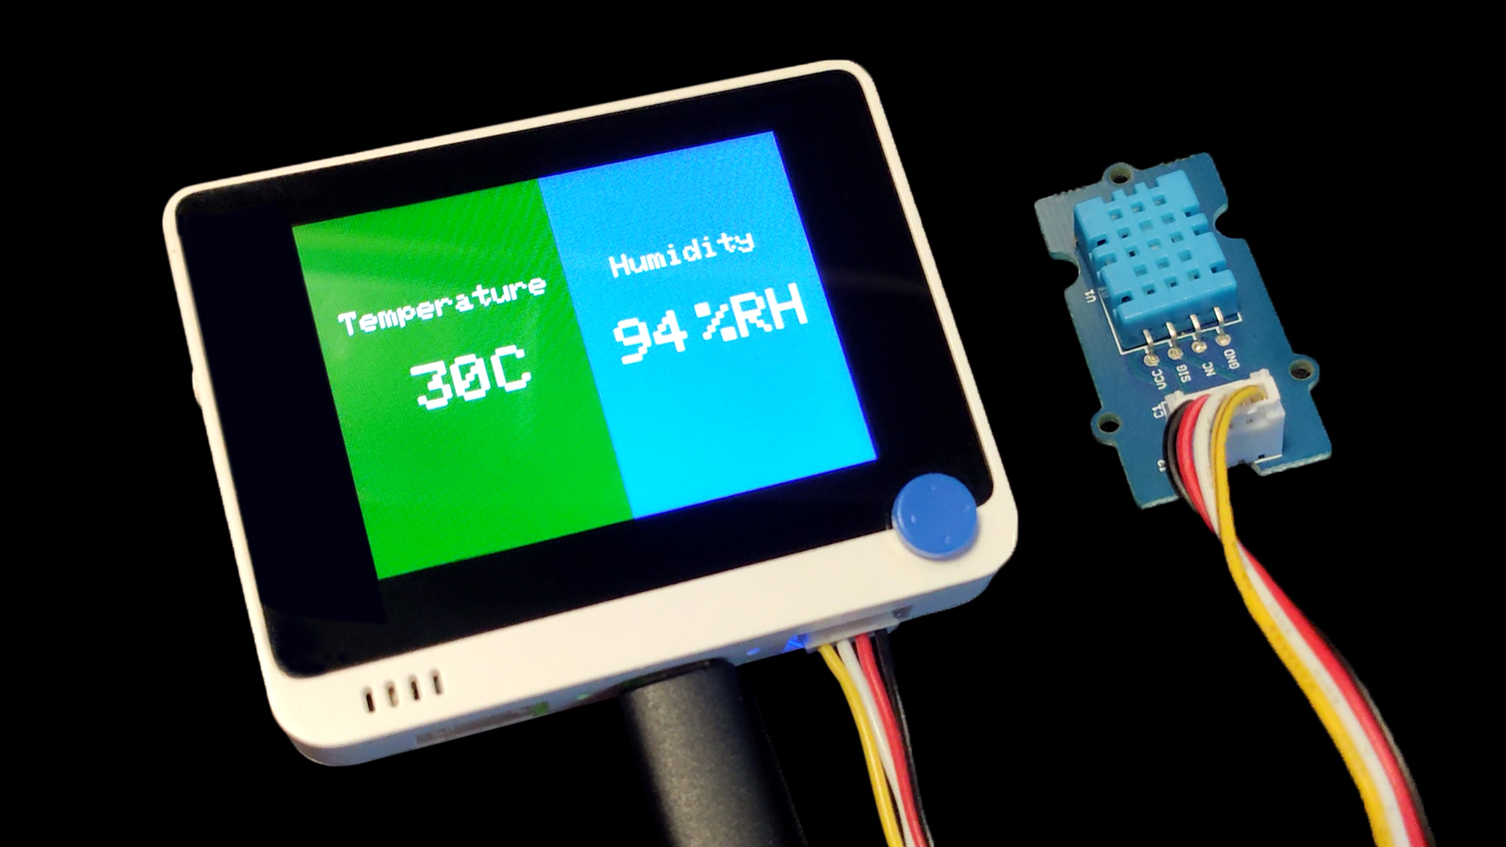
Now, the temperature and humidity information will be displayed on the command prompt/ terminal window and the Wio Terminal LCD as well.
C:\Users\user>aip shell -n -c "runfile /Users/user/Desktop/ArduPy-DHT.py"
Positional argument (COM4) takes precedence over --open.
Connected to ardupy
temperature: 31.0 C     humidity: 85.0 %RH
temperature: 31.0 C     humidity: 85.0 %RH
temperature: 31.0 C     humidity: 85.0 %RH
temperature: 31.0 C     humidity: 87.0 %RH
temperature: 31.0 C     humidity: 87.0 %RH
temperature: 31.0 C     humidity: 87.0 %RH
temperature: 31.0 C     humidity: 87.0 %RH
temperature: 31.0 C     humidity: 87.0 %RH
temperature: 31.0 C     humidity: 87.0 %RH
temperature: 31.0 C     humidity: 87.0 %RH
Schematic Online Viewer
Resources
-
[Codecraft] CDC File
Projects
Toilet Management System: Using the system multiple persons can share a single toilet efficiently.
Tech Support & Product Discussion
Thank you for choosing our products! We are here to provide you with different support to ensure that your experience with our products is as smooth as possible. We offer several communication channels to cater to different preferences and needs.