reComputer for Jetson Memory Expansion
The reComputer for Jetson is sold with 16 GB of eMMC and has ubuntu 18.04 LTS and NVIDIA JetPack 4.6 installed, so the remaining user space available is about 2 GB, which is a significant obstacle to using the reComputer for training and deployment in some projects. This tutorial will introduce the expansion process for different models of reComputer based on this situation, and help developers to expand their systems by transferring them to external storage devices.
Fundamentals Of Capacity Expansion
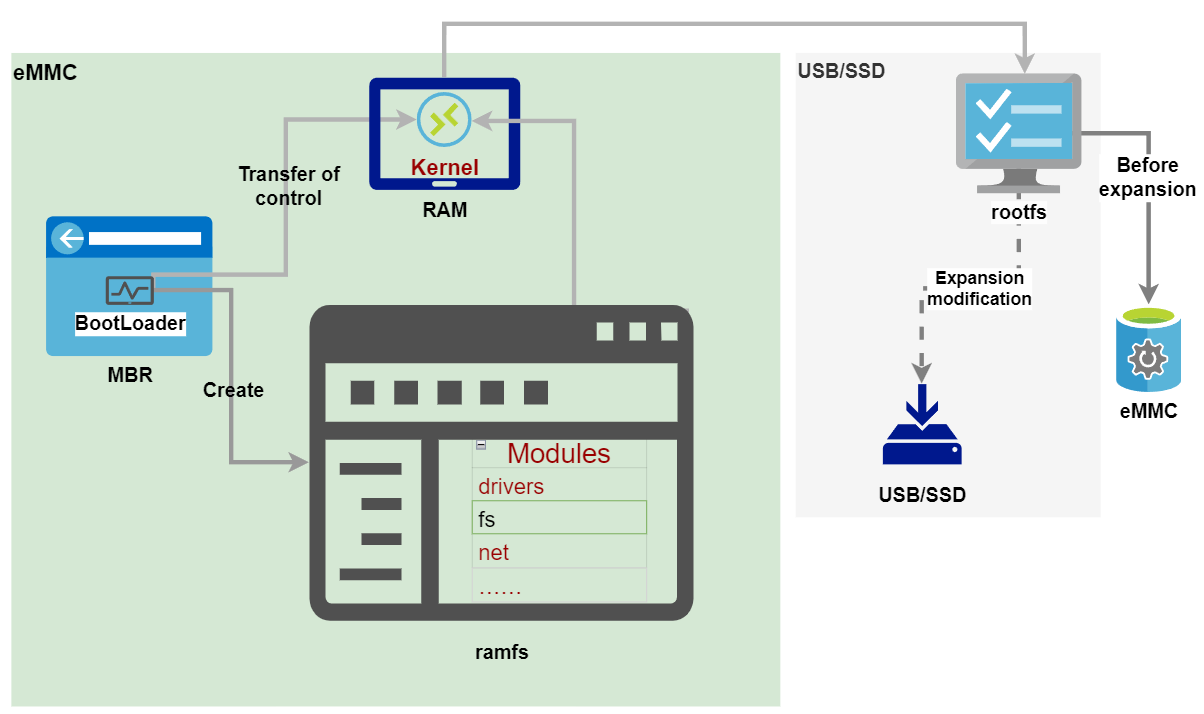
The first sector on the disk where the system is installed is called the Master Boot Record (MBR), which contains information about the BootLoader, the partition table, and the fixed identifier 55AA. During the boot process of Linux, the BootLoader and the kernel go through two important phases.
Phase 1: The BootLoader initializes (initrd) a temporary root file system (ramfs). The ramfs contains configuration programs for drivers, file systems (fs), networks (net), etc. that are necessary at boot time. After that, control of the BootLoader is transferred to the kernel so that the kernel can take out these programs, move them to memory (RAM) and run them to load the various functional modules.
Phase 2: After the kernel has loaded the necessary modules with the ramfs, it releases the system and configures the real root file system (rootfs) to mount to the real root directory.
- In the above two phases, we do not need to modify the part of the kernel that loads the functional modules with the ramfs (phase 1), so even if reComputer has been expanded, it will still need to use eMMC.
- What we need to modify is the second phase, which mounts the root filesystem to external memory, thus enabling the expansion.
Notes On Capacity Expansion
-
The main principle of scaling via external storage is to set the rootfs to be on an external storage device.
-
This expansion method will modify the Linux kernel level system files and you may encounter some problems that are not easy to solve. You should use a new reComputer and a new storage device when following this tutorial to complete the expansion, and do not try to store valuable files on the device. If everything does not work as expected, you may need to reformat the storage device or even the reComputer, and for the final retention option, we will offer to help you restore the backup via the serial port if possible, but you are responsible for any data loss.
-
This expansion process does not require recompiling the kernel and saves about 40 minutes of installation time compared to other earlier expansion methods available online.
Expansion Via M.2 Slot On Carrier Board And SSD
SSD, also known as Solid State Drives, is often used as the primary storage device for laptops, desktops, etc. With its high reliability and fast data read and write rates, it is the best choice for reComputer expansion. The following table lists the reComputer Series products that are currently available for SSD expansion solutions. The main reason why the reComputer J1010 does not support SSD expansion is because the carrier board is not equipped with a suitable M.2 slot.
| Product | reComputer J1020 | reComputer J2011 | reComputer J2012 | reComputer J2021 |
|---|---|---|---|---|
| SKU | 110061361 | 110061363 | 110061401 | 110061381 |
| Side View |  | | | |
| Equipped Module | Jetson Nano 4G | Jetson Xavier NX 8GB | Jetson Xavier NX 16GB | Jetson Xavier NX 8GB |
| Operating carrier Board | Jetson A206 | Jetson A206 | Jetson A206 | J202 |
Software And Hardware Requirements
The following conditions need to be met for the expansion solution using SSDs, which are the basic requirements for the expansion to be proven to be successful.
| software and hardware requirements | |
|---|---|
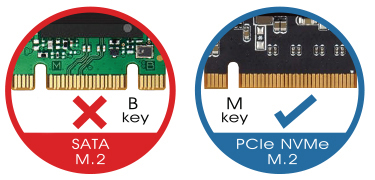
| reComputer for Jetson | JetPack versions 4.4 ~ 4.6 Carrier board must contain M.2 M-Key slot |
| SSD | SSD need to be fourth generation extended file system (Ext4) M.2 M-Key interface with NVMe protocol Recommended capacity ≤ 512 GB |
!!!Attention The updated JetPack version has not been tested for expansion, so the stability or success of the expansion cannot be guaranteed, please follow this tutorial carefully.
The SSD needs to be M.2 M-Key, otherwise it will not match the interface on the carrier board.
Storage devices with non-extended fourth generation file systems (Ext4) cannot complete expansion operations.
Expansion steps
Step 1. Install the SSD
Follow the steps in the Hardware Instructions to install the SSD for reComputer.
Step 2. Prepare SSD
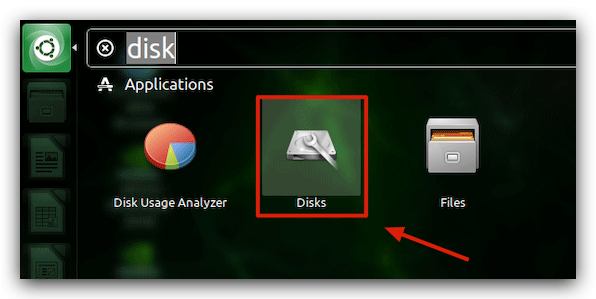
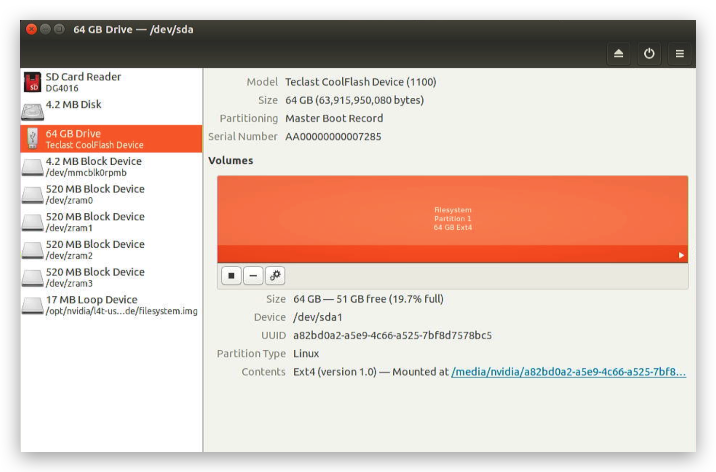
Use the shortcut Ctrl+F or click the Ubuntu icon in the upper left corner to search for Disks and open the Disks tool that comes with Ubuntu 18.04.
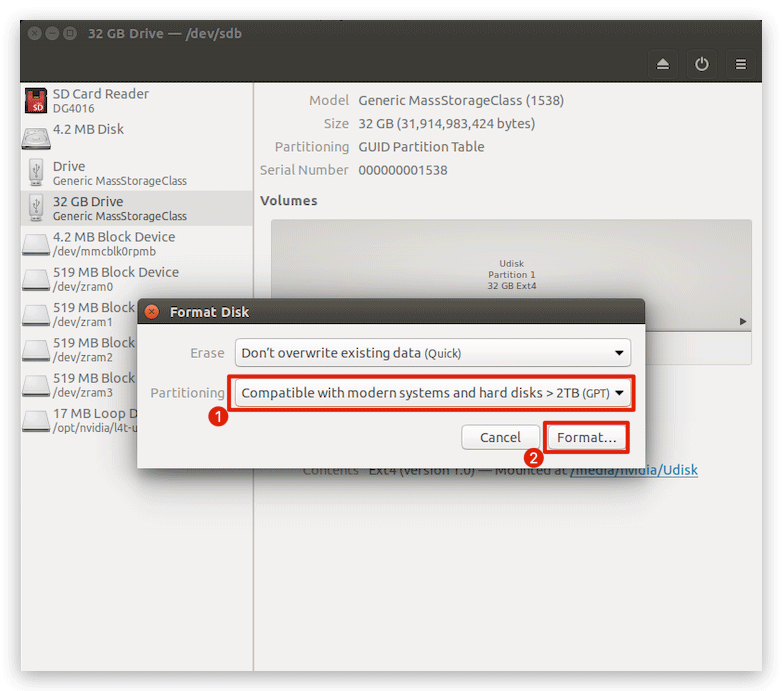
Select your SSD on the left side and then select Format Disk in the upper right corner under the menu bar.
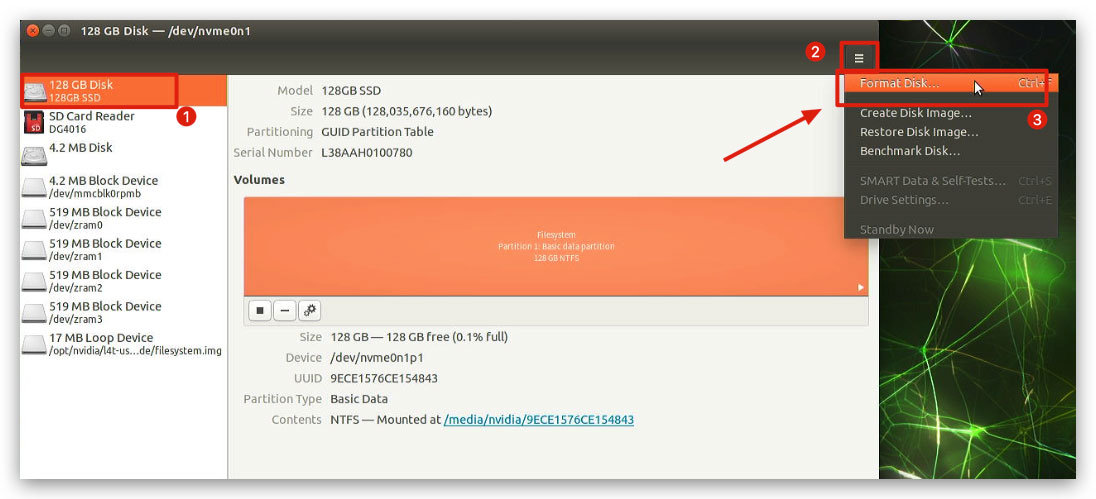
Format your SSD to GPT format. A pop-up window will appear asking you to confirm and enter your user password.
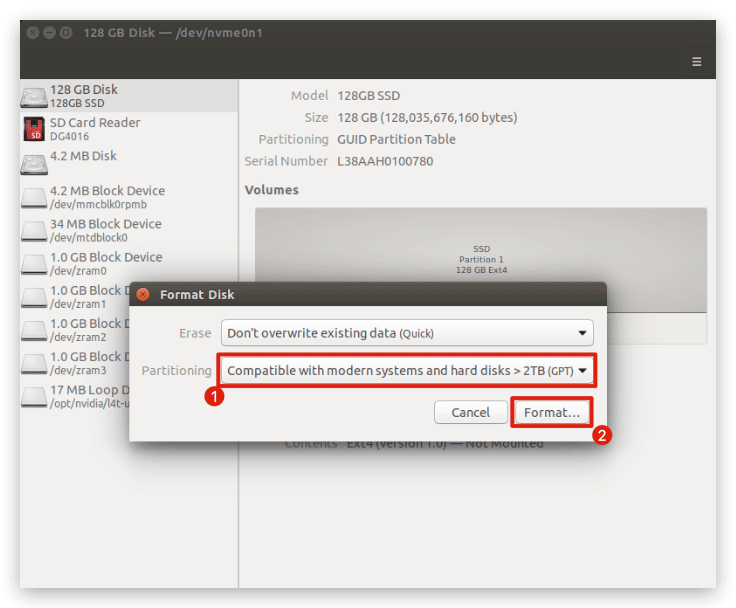
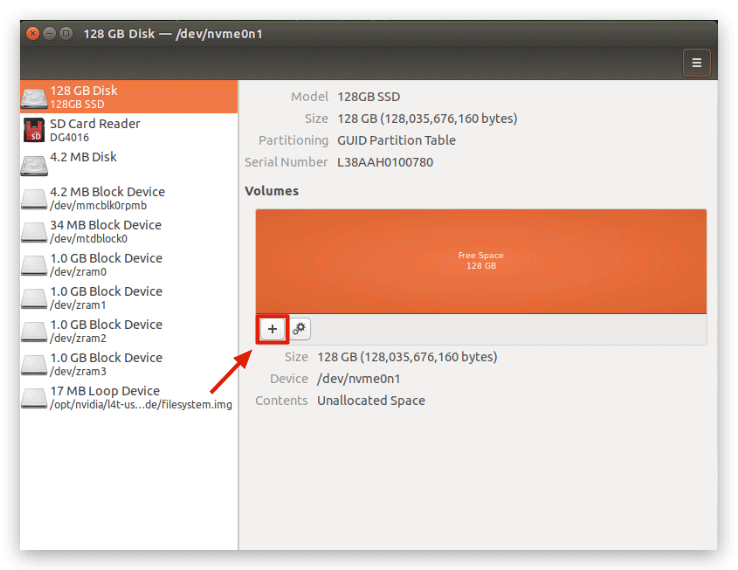
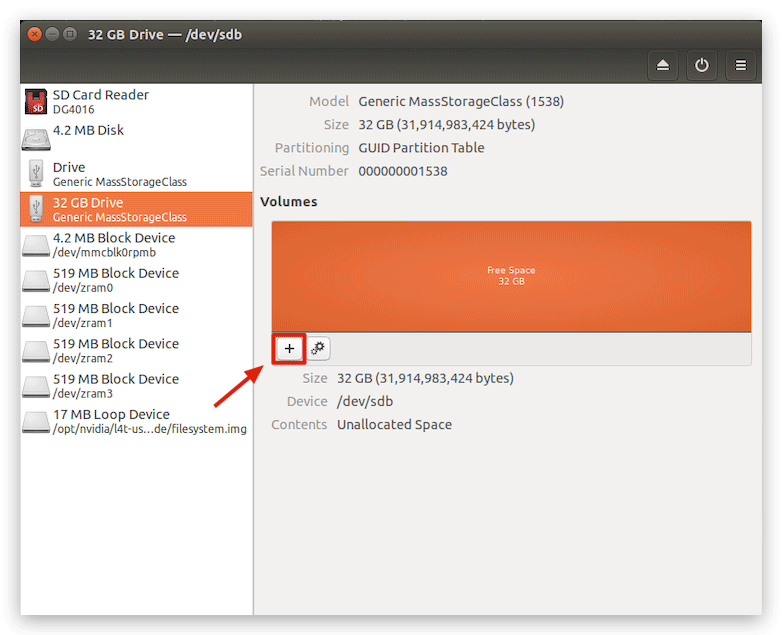
Then, we click on the middle + to add a disk character.
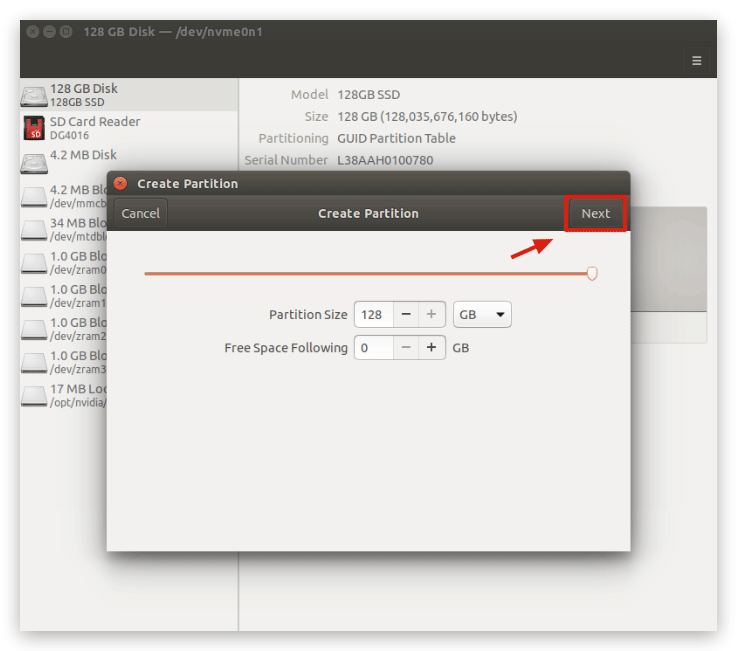
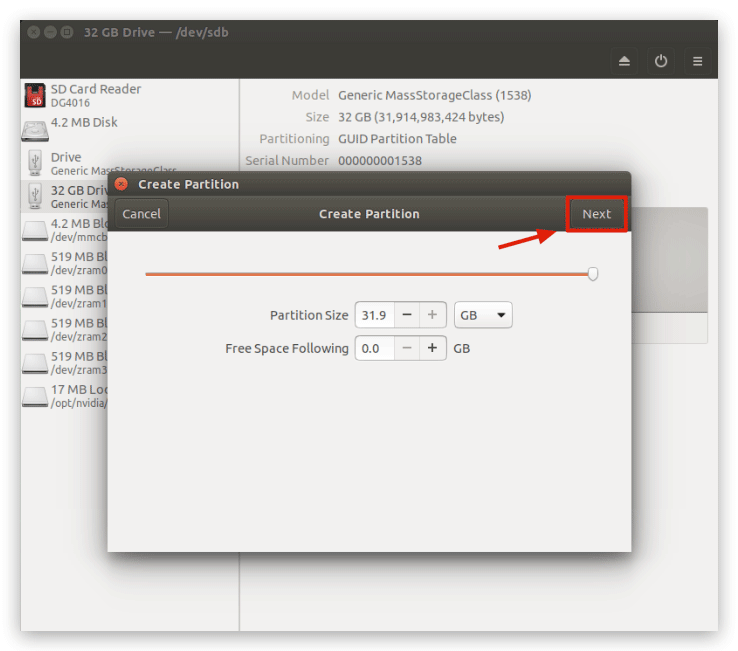
Click on "Next".
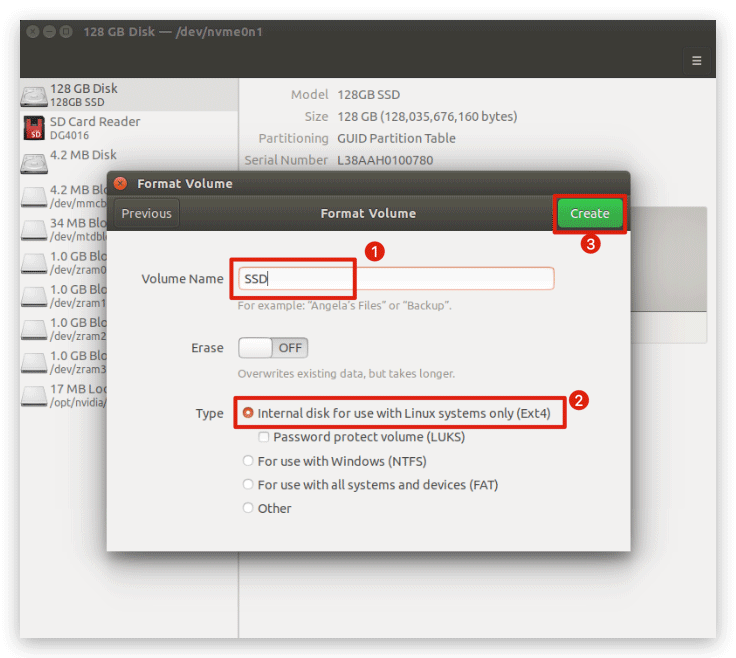
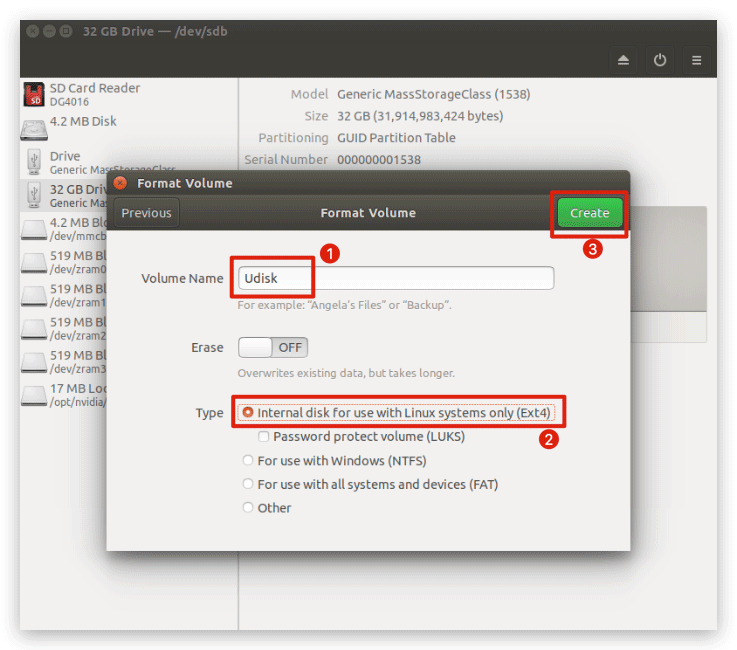
Please give your SSD a name and select Ext4 in the type and click "Create". At this point we have completed the SSD prep according to the expansion requirements.
Step 3. Build the root directory to the SSD
Use the git command to download the script files we need to use to reComputer.
git clone https://github.com/limengdu/rootOnNVMe.git
cd rootOnNVMe/
Then execute the following command to build the files from the root directory in the eMMC to the SSD, the wait time for this step depends on the size of the root directory you are using.
./copy-rootfs-ssd.sh
Step 4. Configure the environment and complete the expansion
Execute the following command to complete the configuration of rootfs.
./setup-service.sh
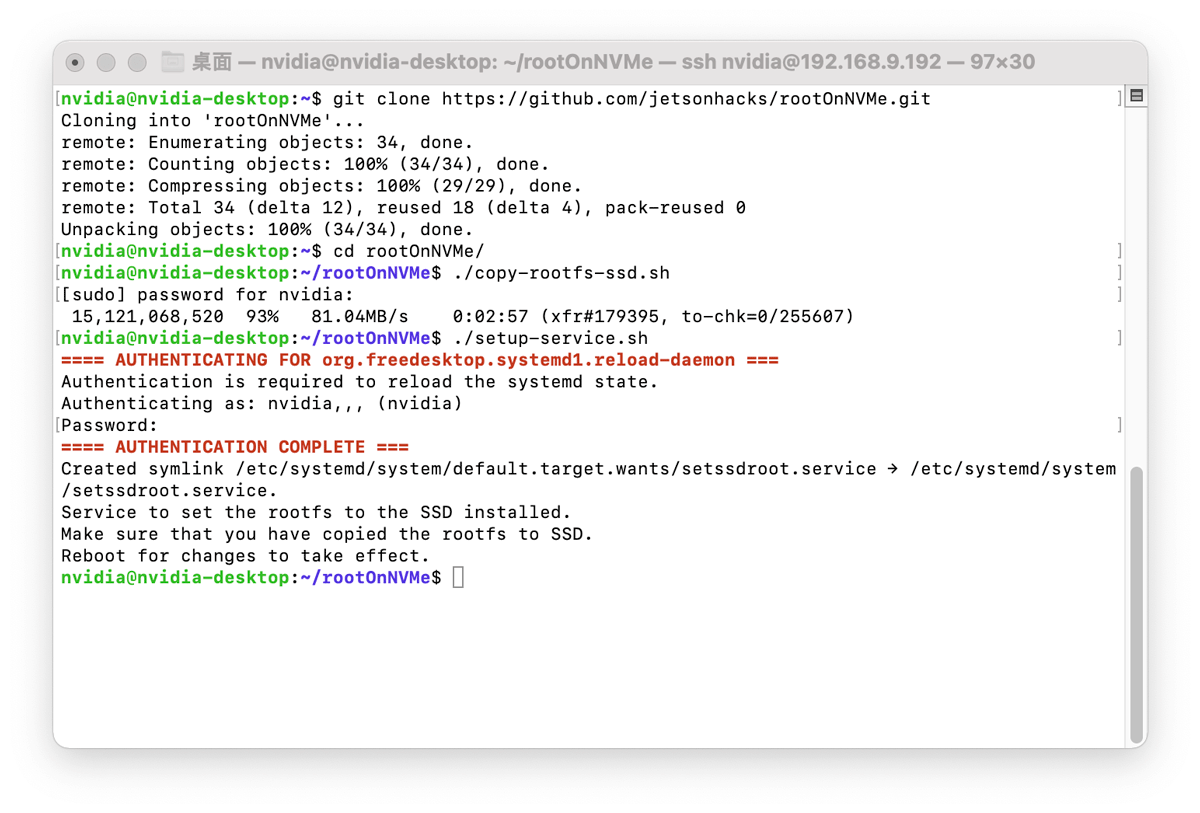
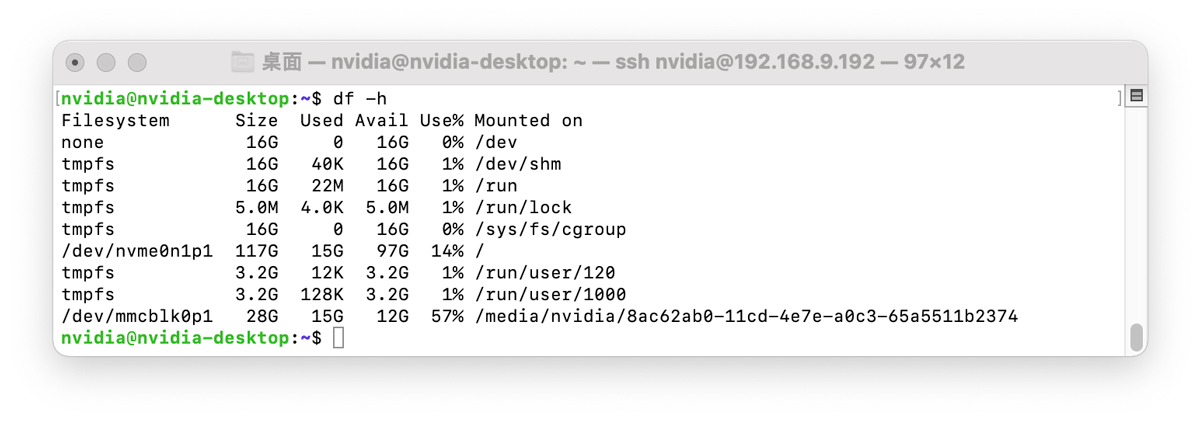
When you restart reComputer, you will see that the eMMC has become an external storage device on the main interface, and you will see that the system footprint has been reduced, so the expansion was successful.
!!!Attention
The default SSD path in the script file is /dev/nvme0n1p1, which is also the path assigned by default by reComputer. If you find that your SSD path does not match this with the command sudo fdisk -l, change the path of all /dev/nvme0n1p1 in the files copy-rootfs-ssd.sh, data/setssdroot.service, and data/setssdroot.sh in rootOnNVMe to the path where your SSD is located.
The above expansion will not remove the original root directory contents from the eMMC. If you do not want to boot from the SSD, you can remove the SSD and the system will still boot from the eMMC.
Capacity expansion via USB storage device
USB storage devices, such as USB flash drives and mobile hard drives, are widely used as external storage in various areas of life, and USB expansion is also applicable to reComputer. The following table lists the reComputer products that are currently available for USB expansion solutions.
| Product | reComputer J1010 |
|---|---|
| SKU | 110061362 |
| Side View |  |
| Equipped Module | Jetson Nano 4G |
| Operating carrier Board | J1010 carrier board |
The biggest advantage of scaling via USB storage devices over scaling via SSDs is the high degree of convenience of USB devices and the simplicity of removing them. However, even with the high-speed USB 3.2 interface, the data transfer rate is far less than that of the standard PCIe bus, so the SSD expansion method is superior in terms of stability, reliability and data transfer speed.
Software And Hardware Requirements
The following conditions need to be met for the expansion solution using USB, which is the basic requirement to verify that the expansion can be done successfully.
| software and hardware requirements | |
|---|---|
| reComputer for Jetson | JetPack versions 4.4 ~ 4.6 Equipped Module needs to be Jetson Nano |
| USB storage devices | USB storage devices need to be fourth generation extended file system (Ext4) USB storage device power supply current ≤ 0.5 A |
!!!Attention The updated JetPack version has not been tested for expansion, so the stability or success of the expansion cannot be guaranteed, please follow this tutorial carefully.
Large-capacity USB storage devices require that the reComputer be powered properly to maintain proper operation, and USB storage devices with capacities above 512 GB are not recommended. Insufficient power supply may cause reComputer to power down.
Equipped Module other than Jetson Nano do not support expansion using this method at this time.
Storage devices with non-extended fourth generation file systems (Ext4) cannot complete expansion operations.
Expansion steps
Step 1. Prepare the necessary documents
Use the git command to download the script files we need to use to reComputer.
git clone https://github.com/limengdu/bootFromUSB.git
cd bootFromUSB
Step 2. Preparing the USB storage device
Connect a USB storage device to reComputer and open the Disks tool that comes with Ubuntu 18.04 by using the shortcut Ctrl+F or by clicking the Ubuntu icon in the upper left corner and searching for Disks.
Select your USB storage device on the left side and then select Format Disk in the upper right corner under the menu bar.
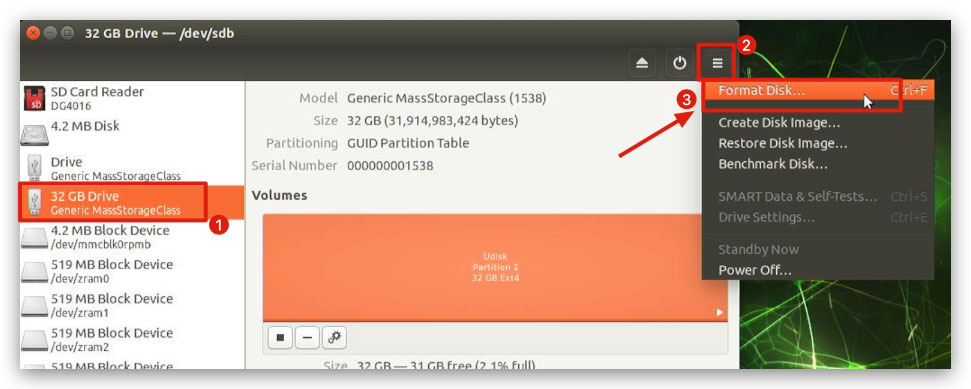
Format your USB storage device to GPT format. A pop-up window will appear asking you to confirm and enter your user password.
Then, we click on the middle + to add a disk character.
Click on "Next".
Please give your USB storage device a name and select Ext4 in the type and click "Create". At this point we have completed the USB storage device prep according to the expansion requirements.
Step 3. Mounting a USB storage device
The USB storage device prepared according to step 2 can be seen in the Disks software as unmounted.
!!!Note If you find that your USB device has been automatically mounted after formatting, skip this step.
We use the following command to mount the USB device.
mkdir /media/USB/
sudo mount <USB Device Path> /media/USB/
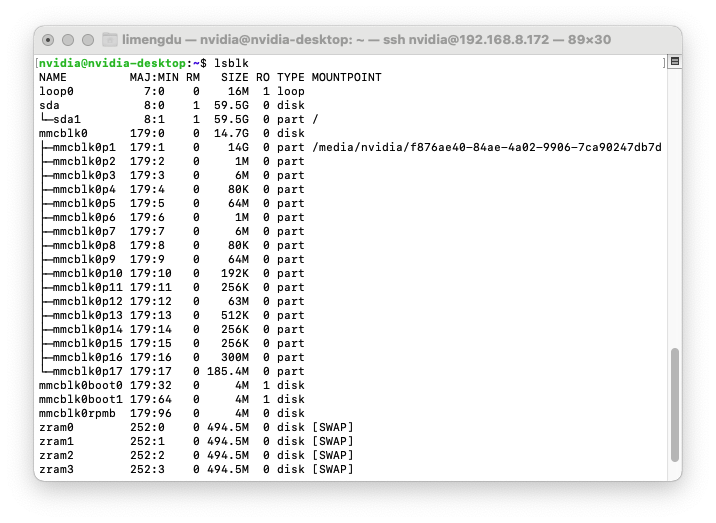
Where <USB Device Path> refers to the path of the USB storage device, this parameter can be seen in Device of the Disks software or can be queried with the command sudo fdisk -l. For example, for my USB device, I can mount /dev/sda1 to /media/USB/ with the following command.
sudo mount /dev/sda1 /media/USB/
Use the following command to check the mount location of the device.
sudo findmnt -rno TARGET <USB Device Path>
For my USB device, the commands I need to use are:
sudo findmnt -rno TARGET /dev/sda1
Step 4. Copy the system to a USB storage device
The copyRootToUSB.sh script copies the contents of the entire eMMC system to the USB storage device. Of course, the USB storage device should have more storage space than the eMMC.
The command used is as follows.
usage: ./copyRootToUSB.sh [OPTIONS]
-d | --directory     Directory path to parent of kernel

-v | --volume_label  Label of Volume to lookup

-p | --path          Device Path to USB drive (e.g. /dev/sda1)

-h | --help  This message
In general, for regular expansion needs, we can just select -p in the parameter [OPTIONS] and later we need to add the path of the USB device (e.g. /dev/sda1), which we got in step 3. For example, for my USB device, the full command I need to use is:
./copyRootToUSB.sh -p /dev/sda1
The length of time this command takes to execute depends on the size of the files stored on your eMMC.
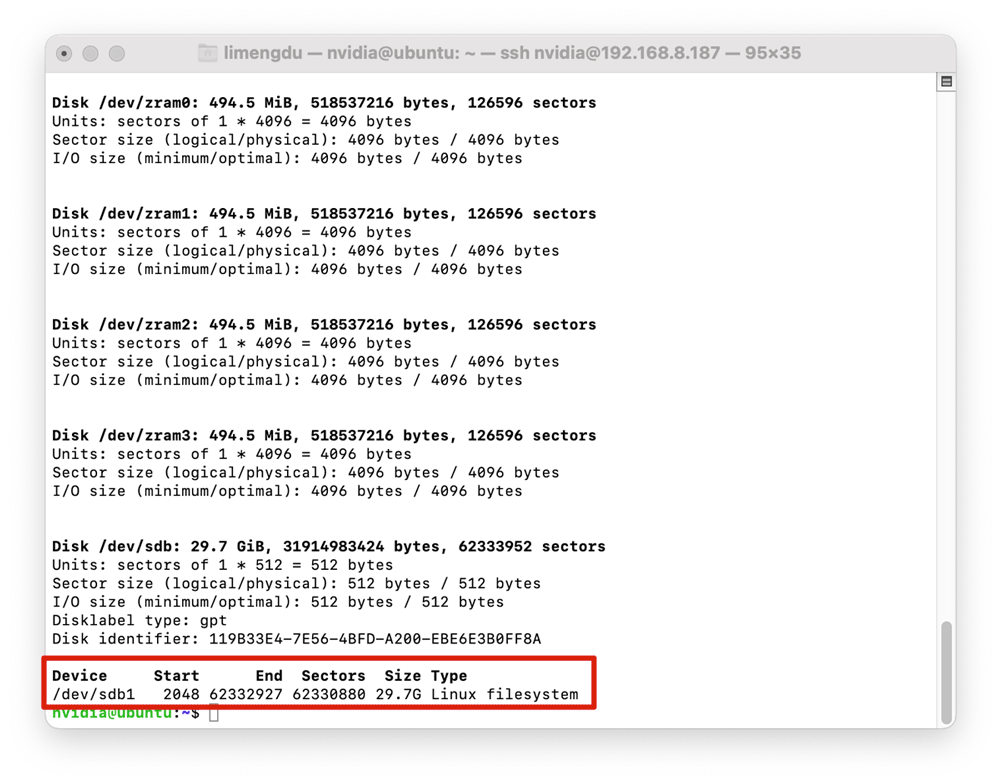
Step 5. Querying the UUID of USB devices
Just to be sure, we need to look up the UUID of the USB device.
./partUUID.sh
The default path for this command is sda1 (/dev/sda1), but you can also determine the UUID of other USB devices. specify /dev/ using the -d flag. For example, for my USB device it would be:
$ ./partUUID.sh -d sdb1

UUID of Disk: /dev/sdb1
e34d67bb-83bb-4fc5-b9a4-a1388d2b2be5
Sample for /boot/extlinux/extlinux.conf entry:
APPEND ${cbootargs} root=UUID=e34d67bb-83bb-4fc5-b9a4-a1388d2b2be5 rootwait rootfstype=ext4
!!!Attention If the returned UUID differs in format and length from the example above, then the device is probably not formatted as Ext4, start over from step 2!
Step 6. Modify the boot configuration to complete the expansion
We need to make a backup of the boot configuration file first.
sudo cp /boot/extlinux/extlinux.conf /boot/extlinux/extlinux.conf.bak
This step is the most important and dangerous step in the USB device expansion operation. Edit the /boot/extlinux/extlinux.conf file and /media/nvidia/boot/extlinux/extlinux.conf, then add an entry to point to the new rootfs, the location is the path of the USB device, fill it in the parameter <path> below. The path information is obtained in step 3.
$ sudo vi /boot/extlinux/extlinux.conf
$ sudo vi /media/nvidia/boot/extlinux/extlinux.conf

LABEL primary
      MENU LABEL primary kernel
      LINUX /boot/Image
      INITRD /boot/initrd
      APPEND ${cbootargs} quiet root=<path> rw rootwait rootfstype=ext4 console=ttyS0,115200n8 console=tty0 fbcon=map:0 net.ifnames=0 sdhci_tegra.en_boot_part_access=1
For the USB storage device I am using, the modified /boot/extlinux/extlinux.conf file and /media/nvidia/boot/extlinux/extlinux.conf reads as follows:
TIMEOUT 30
DEFAULT primary

MENU TITLE L4T boot options

LABEL primary
      MENU LABEL primary kernel
      LINUX /boot/Image
      INITRD /boot/initrd
      APPEND ${cbootargs} quiet root=/dev/sda1 rw rootwait rootfstype=ext4 console=ttyS0,115200n8 console=tty0 fbcon=map:0 net.ifnames=0 sdhci_tegra.en_boot_part_access=1
#      APPEND ${cbootargs} quiet root=/dev/mmcblk0p1 rw rootwait rootfstype=ext4 console=ttyS0,115200n8 console=tty0 fbcon=map:0 net.ifnames=0 sdhci_tegra.en_boot_part_access=1

# When testing a custom kernel, it is recommended that you create a backup of
# the original kernel and add a new entry to this file so that the device can
# fallback to the original kernel. To do this:
#
# 1, Make a backup of the original kernel
#      sudo cp /boot/Image /boot/Image.backup
#
# 2, Copy your custom kernel into /boot/Image
#
# 3, Uncomment below menu setting lines for the original kernel
#
# 4, Reboot

# LABEL backup
#    MENU LABEL backup kernel
#    LINUX /boot/Image.backup
#    INITRD /boot/initrd
#    APPEND ${cbootargs}
Save the file and restart reComputer, the system root will switch to the USB storage device and the expansion is complete.
Restore System Backup Via Serial Console
When your system does not boot properly due to an error, or for some other reason (a common scenario is that the Nvidia icon keeps recurring on boot), then the backup you made during the expansion will play an important role. We understand your anxiety at this moment, but please be patient and follow the steps below to get reComputer into the serial console and we will operate the U-boot to restore your backup.
Material Preparation
| Material Preparation | Description |
|---|---|
 | Ubuntu host x1 |
 | Unable to access the system reComputer Jetson x1 |
 | UART to USB module x1 |
 | Female to female DuPont wire x3 |
Steps to access the serial console
Step 1. Connecting the UART to USB module to the reComputer
Connect the reComputer to the UART to USB module according to the wiring instructions in the table below.
 | ||
| reComputer | UART to USB module | |
| GND | --> | GND |
| UART TXD | --> | RX |
| UART RXD | --> | TX |
!!!Tip The VCC interface between the reComputer and the UART to USB module does not need to be connected.
The reComputer does not need to be powered on for the time being after the cable is connected, so please set it aside for now.
Please disconnect the expanded external memory.
Step 2. Install and start minicom on the Ubuntu host
If your Ubuntu host does not have minicom installed, you can install minicom on your computer with the following command.
sudo apt-get install minicom
After waiting for the installation to complete, enter the command to start minicom.
sudo minicom

Step 3. Preparing to configure minicom
In the minicom menu bar, we open the serial port and configure it so that we can get the reComputer startup information through minicom. In the menu bar, press the keyboard o key to access the configuration screen. Use the keyboard up and down arrow keys to control the cursor to move to Serial port setup.

Step 4. Connecting reComputer to the Ubuntu host
At this moment, we create a new command line window and enter commands in the window to monitor the access of the new device.
dmesg --follow
At this point we will power up the reComputer and connect the UART to USB module with the reComputer connected to the Ubuntu host via the USB port. The command line window will show the name of the newly connected device, we need to find the fragment starting with tty and write it down.

Step 5. U-boot operation
Go back to minicom and fill in the device name obtained in step 4 into Serial Device. Also, check whether the baud rate is configured to 115200.

After modifying, enter to save. Select Save setup as dfl and exit the minicom interface.

Re-enter the command sudo minicom and after entering minicom, we will see the reComputer startup information in the window.

We can troubleshoot why reComputer fails to boot by using the information returned and by using the command help to see all the commands available under the U-boot system. Knowing how to use these commands is necessary to solve the problem, but of course it can be difficult.
Tegra210 (P3450-0000) # help
?         - alias for 'help'
base      - print or set address offset
bdinfo    - print Board Info structure
blkcache  - block cache diagnostics and control
boot      - boot default, i.e., run 'bootcmd'
bootd     - boot default, i.e., run 'bootcmd'
bootefi   - Boots an EFI payload from memory
bootelf   - Boot from an ELF image in memory
booti     - boot Linux kernel 'Image' format from memory
bootm     - boot application image from memory
bootp     - boot image via network using BOOTP/TFTP protocol
bootvx    - Boot vxWorks from an ELF image
cmp       - memory compare
coninfo   - print console devices and information
cp        - memory copy
crc32     - checksum calculation
dcache    - enable or disable data cache
dfu       - Device Firmware Upgrade
dhcp      - boot image via network using DHCP/TFTP protocol
dm        - Driver model low level access
echo      - echo args to console
editenv   - edit environment variable
enterrcm  - reset Tegra and enter USB Recovery Mode
env       - environment handling commands
exit      - exit script
ext2load  - load binary file from a Ext2 filesystem
ext2ls    - list files in a directory (default /)
ext4load  - load binary file from a Ext4 filesystem
ext4ls    - list files in a directory (default /)
ext4size  - determine a file's size
ext4write - create a file in the root directory
false     - do nothing, unsuccessfully
fatinfo   - print information about filesystem
fatload   - load binary file from a dos filesystem
fatls     - list files in a directory (default /)
fatmkdir  - create a directory
fatrm     - delete a file
fatsize   - determine a file's size
fatwrite  - write file into a dos filesystem
fdt       - flattened device tree utility commands
fstype    - Look up a filesystem type
go        - start application at address 'addr'
gpio      - query and control gpio pins
gzwrite   - unzip and write memory to block device
help      - print command description/usage
i2c       - I2C sub-system
icache    - enable or disable instruction cache
imxtract  - extract a part of a multi-image
itest     - return true/false on integer compare
ln        - Create a symbolic link
load      - load binary file from a filesystem
loadb     - load binary file over serial line (kermit mode)
loads     - load S-Record file over serial line
loadx     - load binary file over serial line (xmodem mode)
loady     - load binary file over serial line (ymodem mode)
loop      - infinite loop on address range
ls        - list files in a directory (default /)
lzmadec   - lzma uncompress a memory region
md        - memory display
mii       - MII utility commands
mm        - memory modify (auto-incrementing address)
mmc       - MMC sub system
mmcinfo   - display MMC info
mw        - memory write (fill)
nm        - memory modify (constant address)
nvme      - NVM Express sub-system
part      - disk partition related commands
pci       - list and access PCI Configuration Space
ping      - send ICMP ECHO_REQUEST to network host
printenv  - print environment variables
pxe       - commands to get and boot from pxe files
reset     - Perform RESET of the CPU
run       - run commands in an environment variable
save      - save file to a filesystem
saveenv   - save environment variables to persistent storage
setenv    - set environment variables
sf        - SPI flash sub-system
showvar   - print local hushshell variables
size      - determine a file's size
sleep     - delay execution for some time
source    - run script from memory
sspi      - SPI utility command
sysboot   - command to get and boot from syslinux files
test      - minimal test like /bin/sh
tftpboot  - boot image via network using TFTP protocol
true      - do nothing, successfully
ums       - Use the UMS [USB Mass Storage]
unzip     - unzip a memory region
usb       - USB sub-system
usbboot   - boot from USB device
version   - print monitor, compiler and linker version
Tech Support & Product Discussion
Thank you for choosing our products! We are here to provide you with different support to ensure that your experience with our products is as smooth as possible. We offer several communication channels to cater to different preferences and needs.