Empowering AI with AWS IoT Core for the XIAO ESP32C6
This Wiki serves as a comprehensive guide to deploying an advanced IoT system that harnesses the power of AWS services and the XIAO ESP32C6 microcontroller to monitor and analyze environmental data. Beginning with the seamless collection of sensor data, this documentation navigates through the intricacies of transmitting and storing this information on AWS IoT Core and AWS Analytics, respectively. It delves into the utilization of AWS Sagemaker to train machine learning models on normal environmental patterns, emphasizing the system's capability to learn and adapt to its operational context for enhanced efficiency.
Furthermore, the Wiki outlines the implementation of real-time anomaly detection using the XIAO ESP32C6, a critical component that actively scans for deviations from the norm and swiftly triggers alerts. It encapsulates the end-to-end process of setting up an alerting mechanism that notifies stakeholders of abnormal conditions, ensuring prompt attention and action.

- Capture sensor data to AWS IoT Core.
- Store the data using AWS Analytics.
- Use AWS Sagemaker to train data in normal environments.
- XIAO ESP32C6 for abnormal environment detection.
- Abnormal status message notification.
By exploring this Wiki, users will gain a detailed understanding of each component's role in creating a smart, responsive, and robust environmental monitoring system, complete with practical insights into configuration and maintenance.
Materials Required
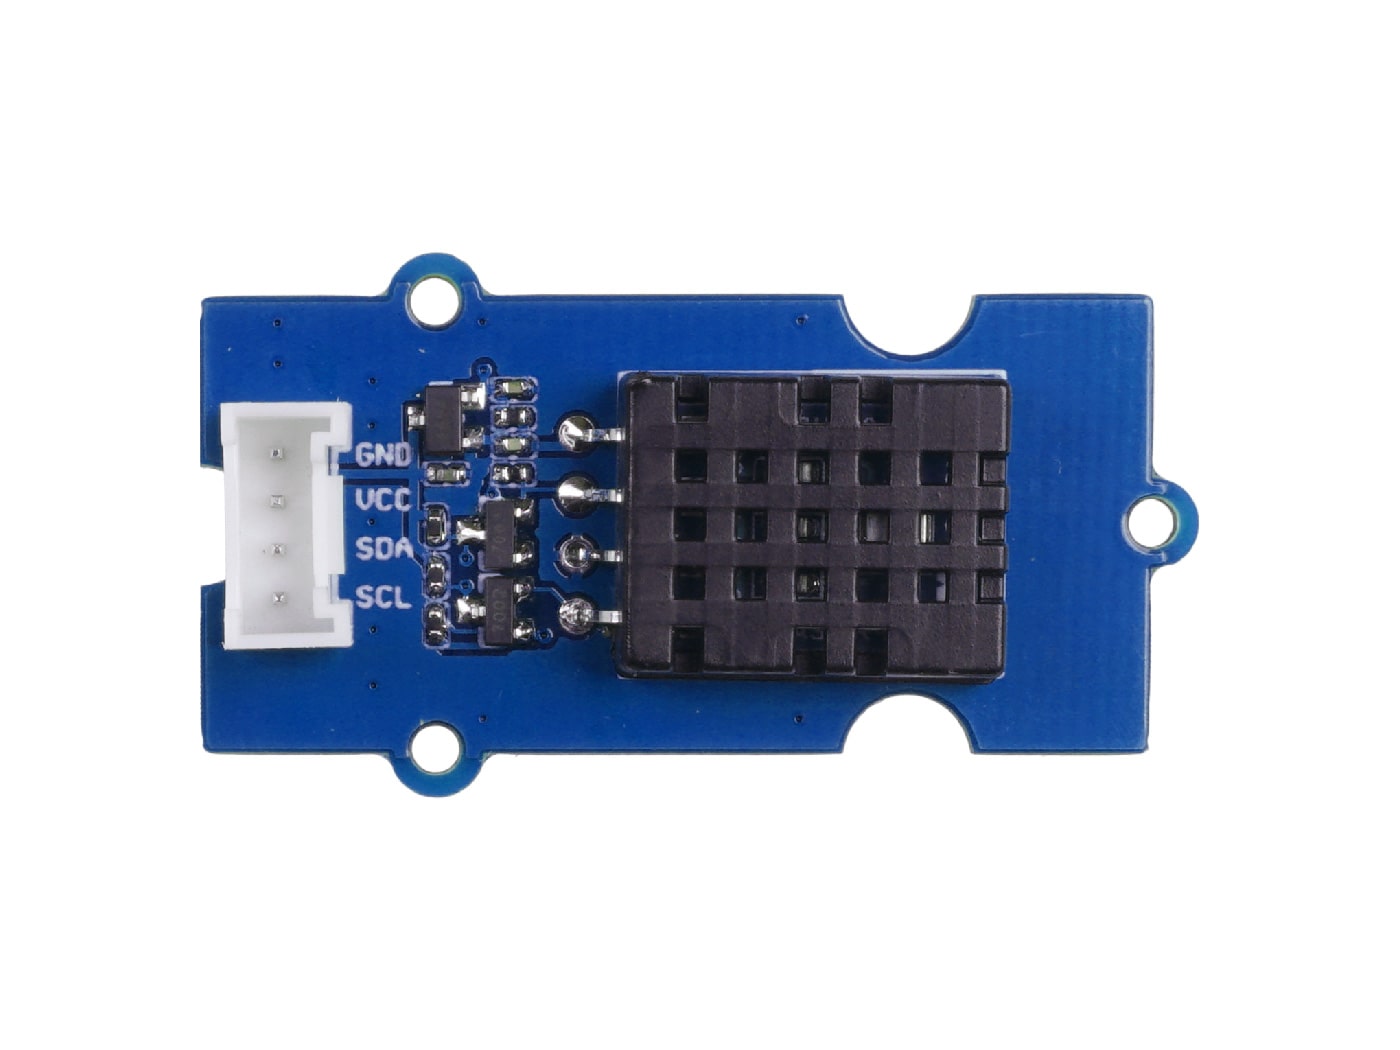
This example will introduce the use of XIAO ESP32C6 with Grove DHT20 temperature and humidity sensor to complete the SageMaker task of AWS IoT Core. Below are all the hardware devices needed to complete this routine.
| XIAO ESP32C6 | DHT20 | Extension Board |
|---|---|---|
 |  |  |
Capture sensor data to AWS IoT Core
We leverage a multitude of sensors interfaced with the XIAO ESP32C6 board to collect environmental data in real time and upload it to AWS IoT Core. This provides us with a reliable and secure method to handle the vast streams of data emerging from the various sensors.
To register for AWS IoT Core and create a Thing named "XIAO_ESP32C6", follow the steps below. Please note that this process assumes you already have an Amazon Web Services account. If you do not, you will need to create one before proceeding.
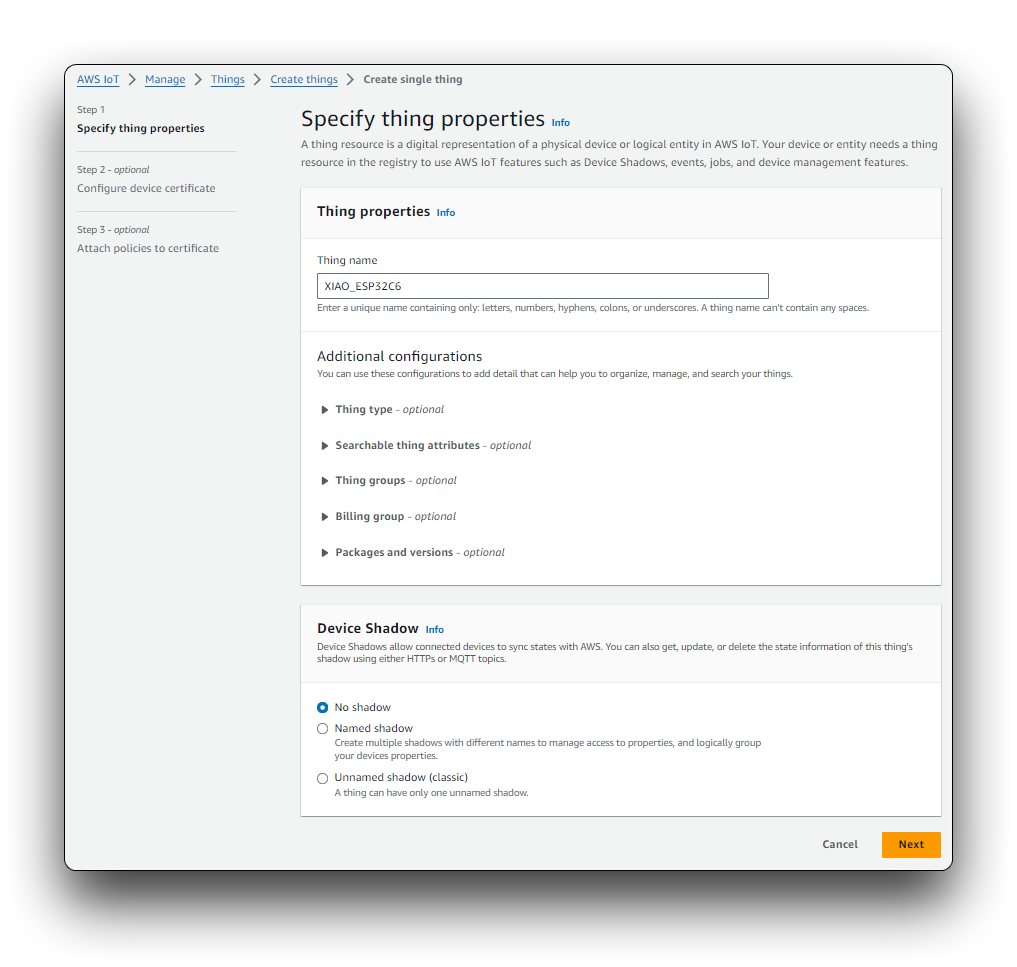
Step 1. Create a Thing
Open your web browser and navigate to AWS Management Console. Sign in using your AWS account credentials.
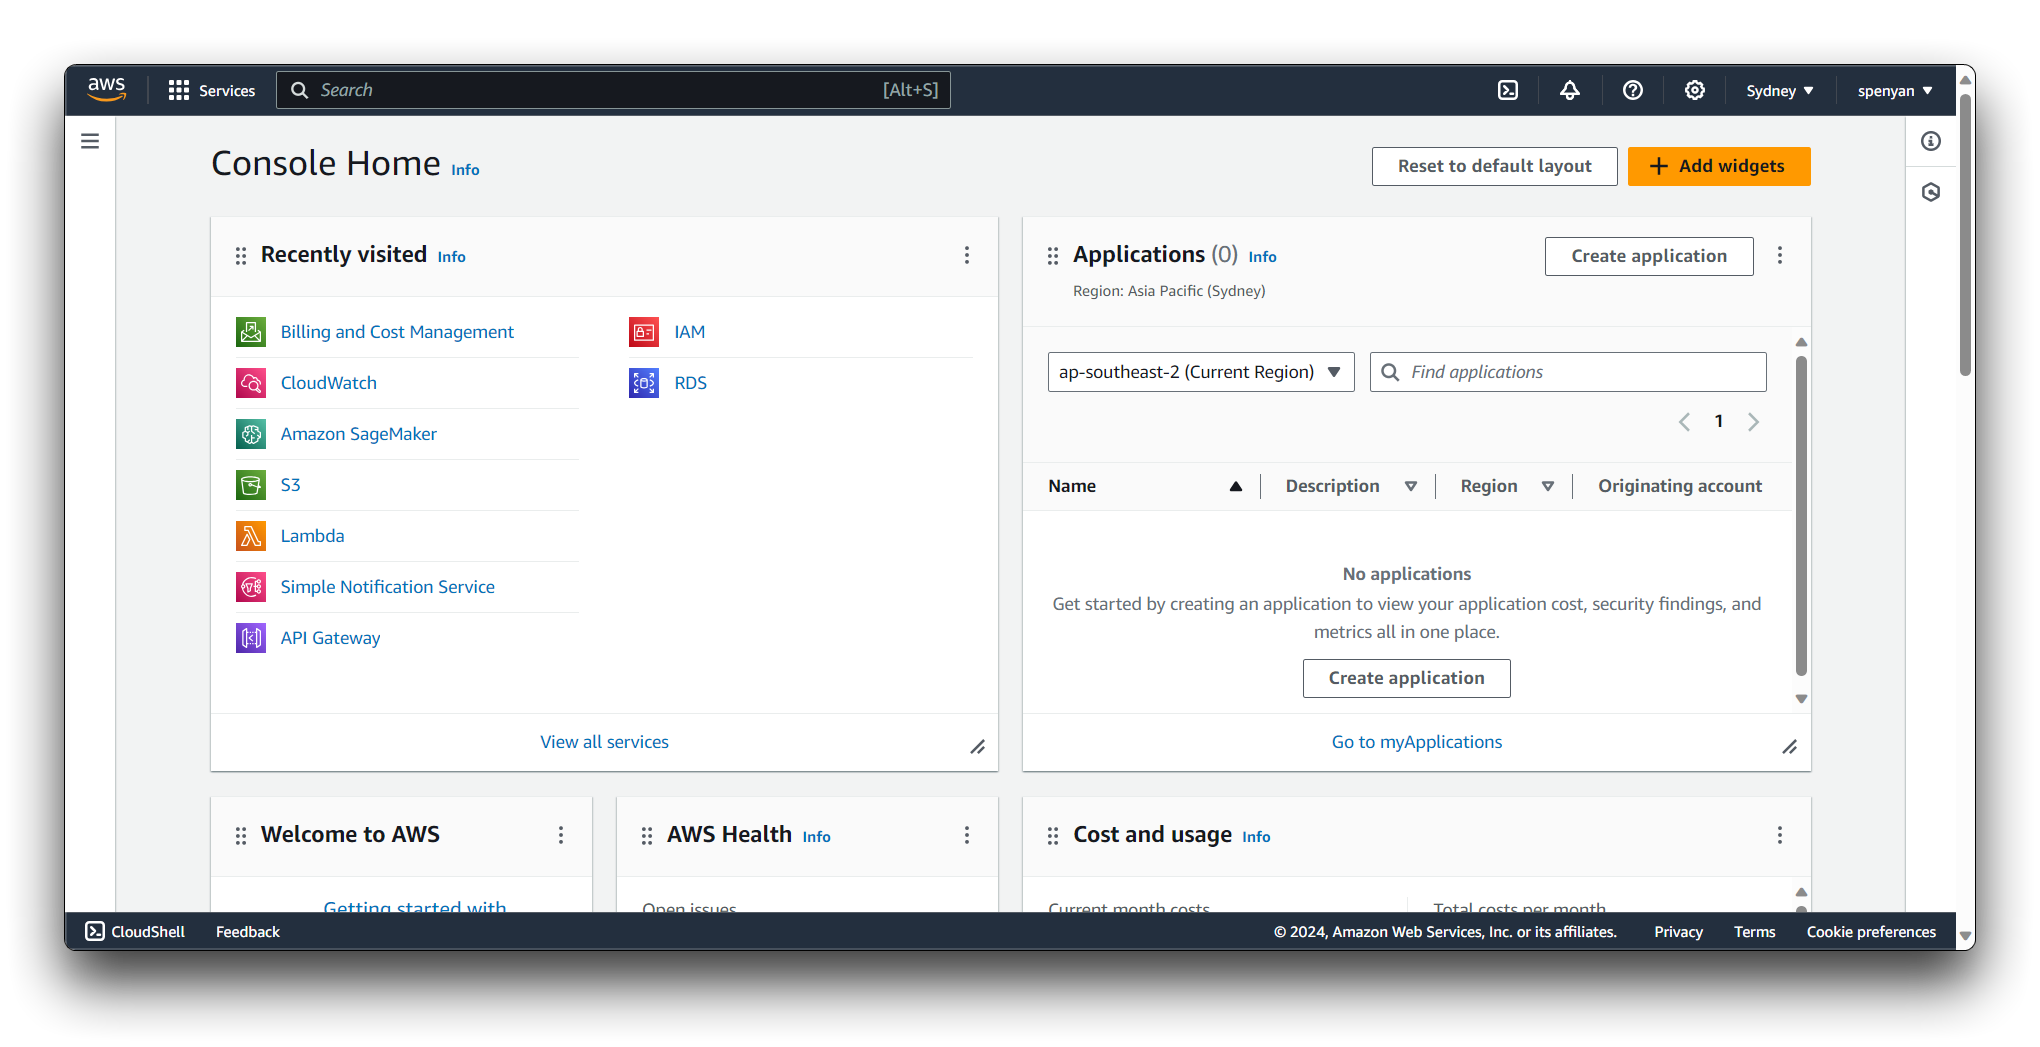
Once you are in the AWS Management Console, locate the Services dropdown menu at the top of the page. In the Services menu, click on IoT Core. If you cannot find it, use the search bar at the top to search for IoT Core.

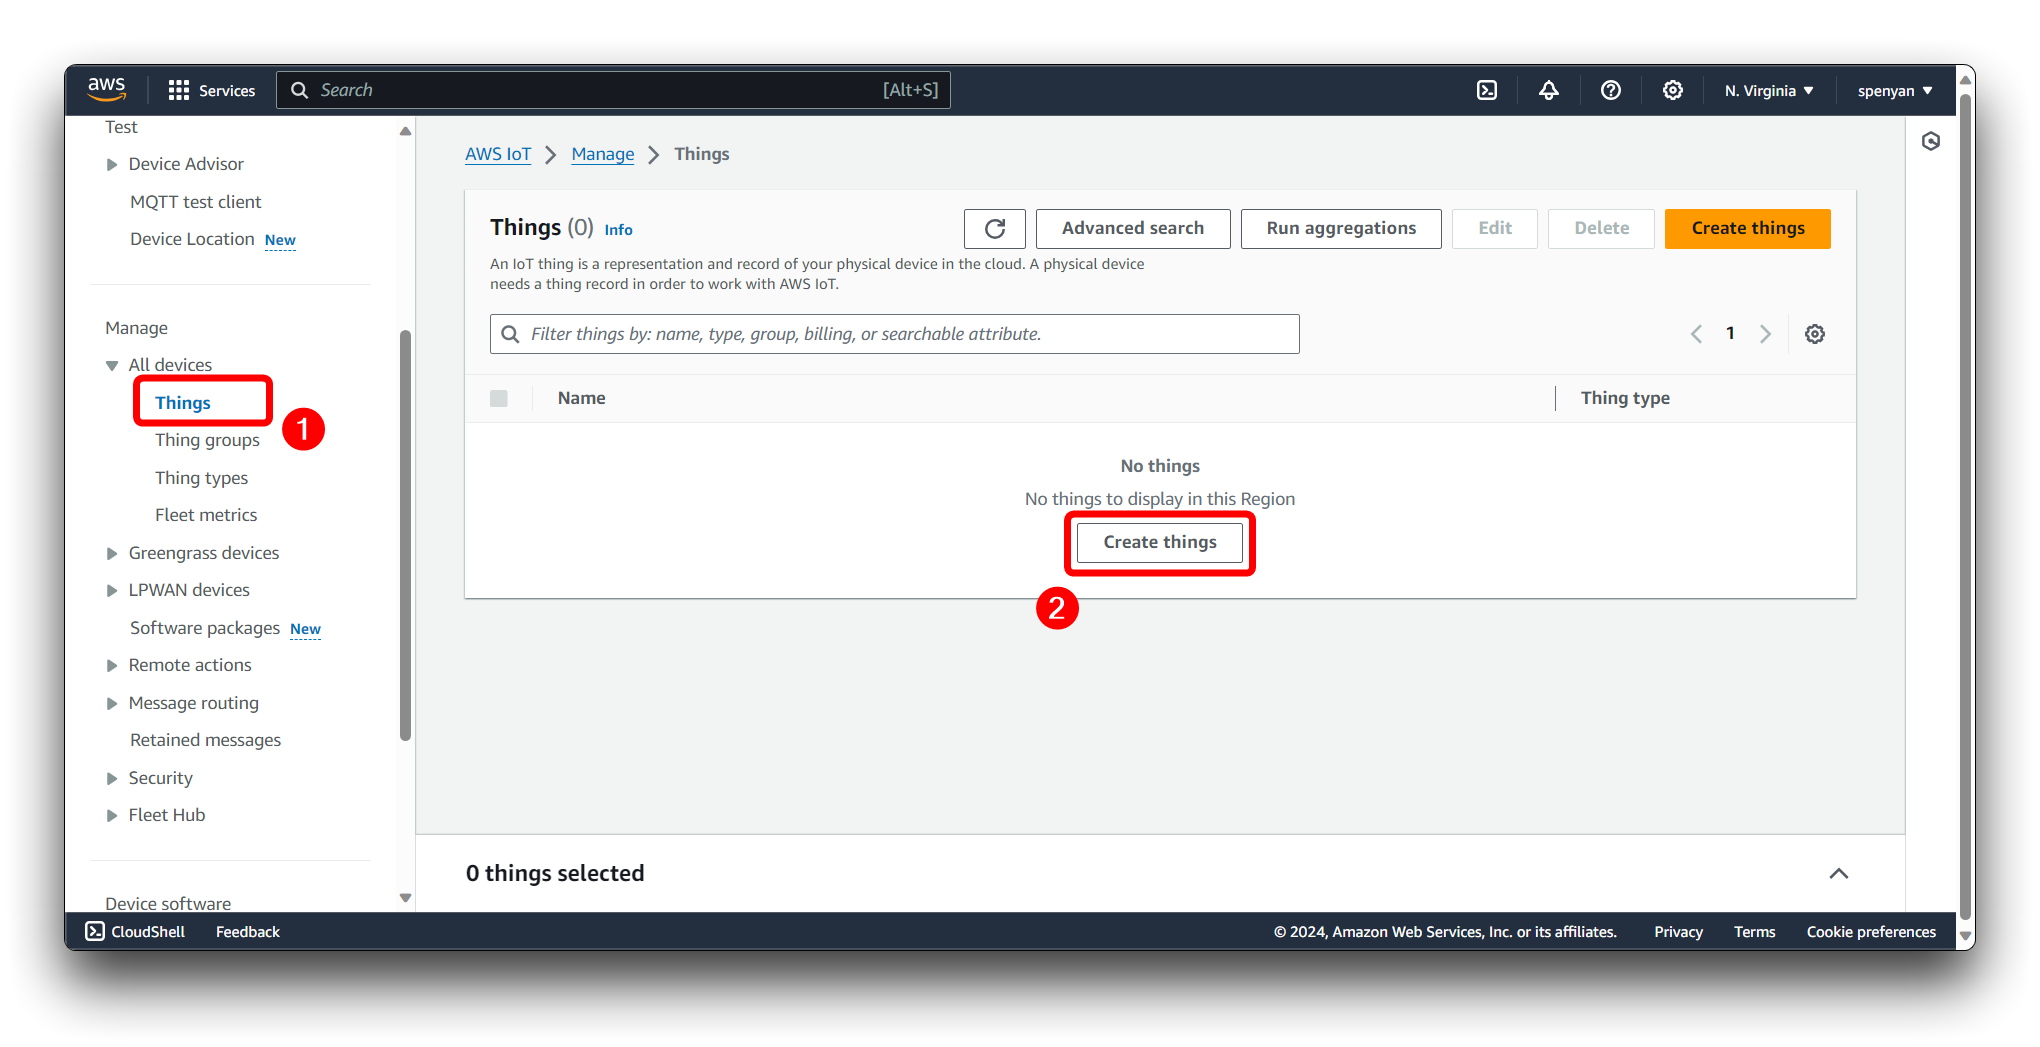
In the AWS IoT Core dashboard, click on All devices in the left-side navigation pane to expand the options. Click on Things. Click on the Create things button in the corner of the "Things" page.
Choose Create a single thing to proceed with registering one Thing.
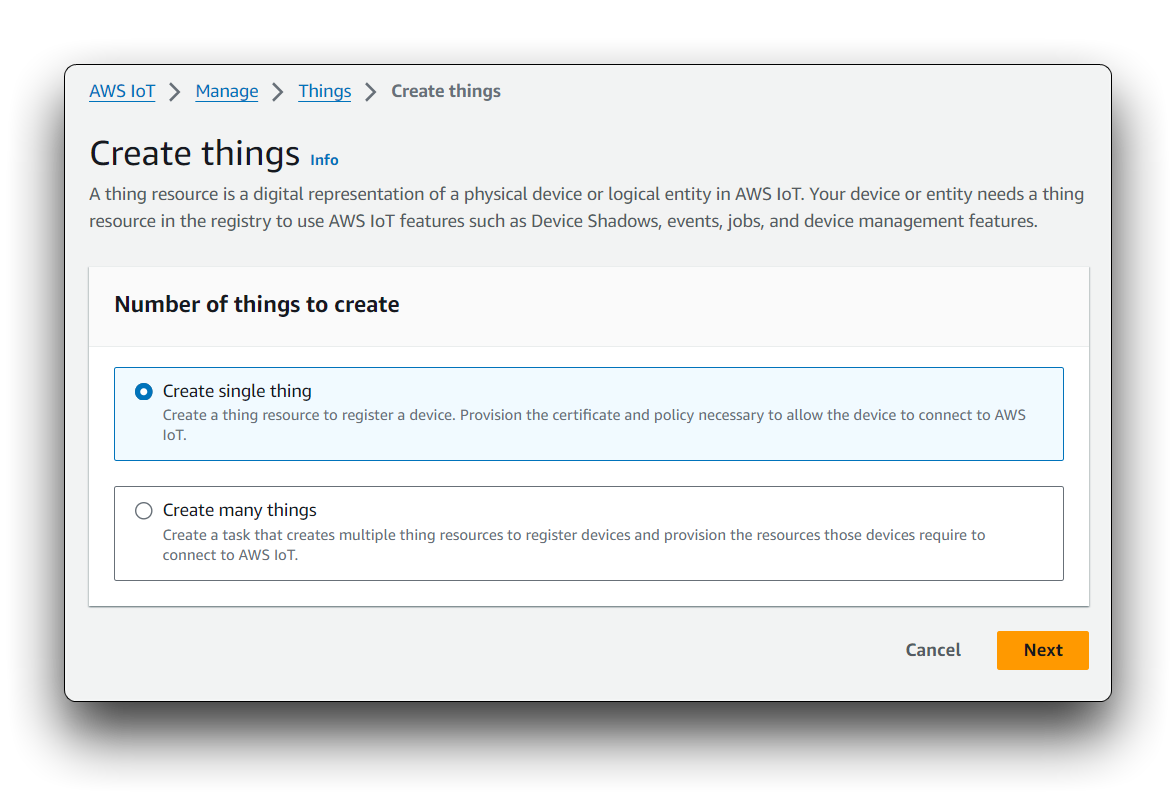
On the Create a thing page, enter XIAO_ESP32C6 as the name for your Thing. (Optional) You can also add types, groups, or attributes to your Thing if needed. For a simple setup, you can skip these options. Click "Next".
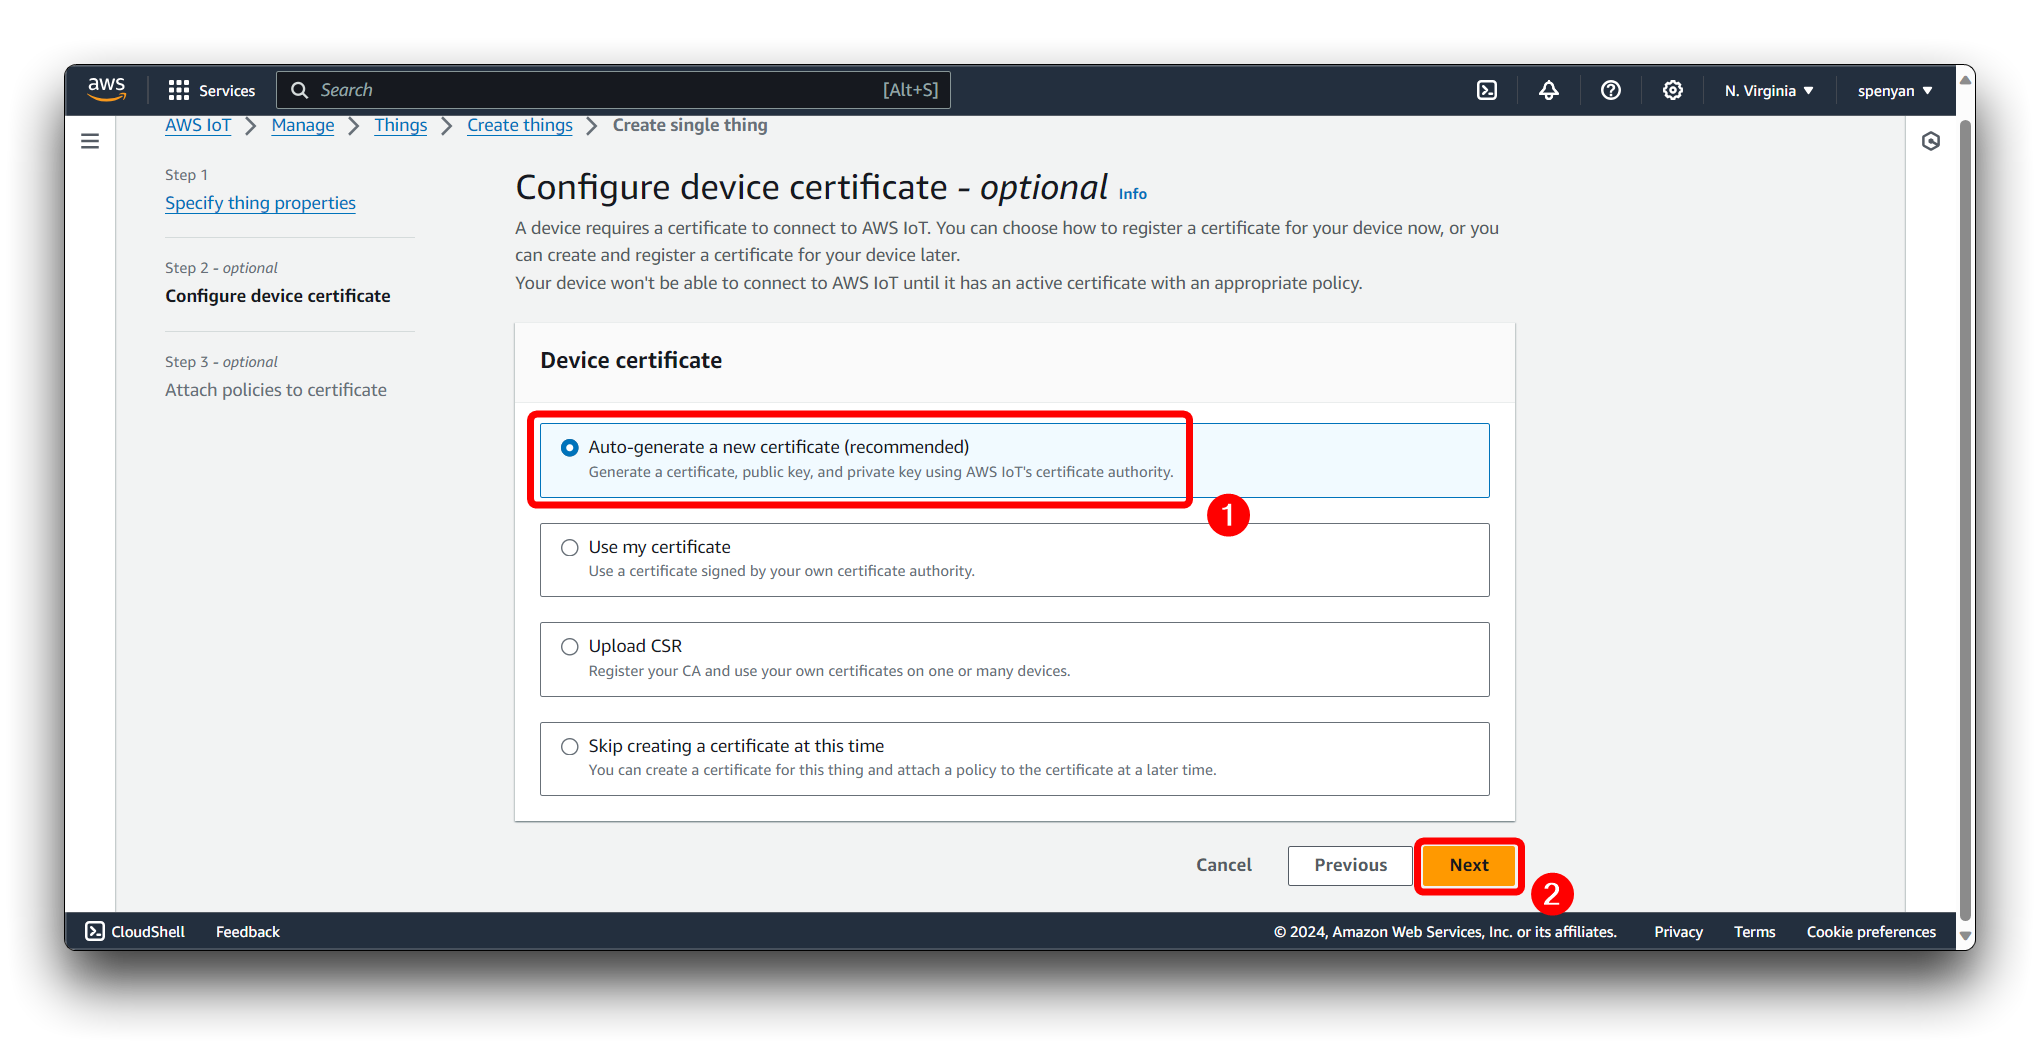
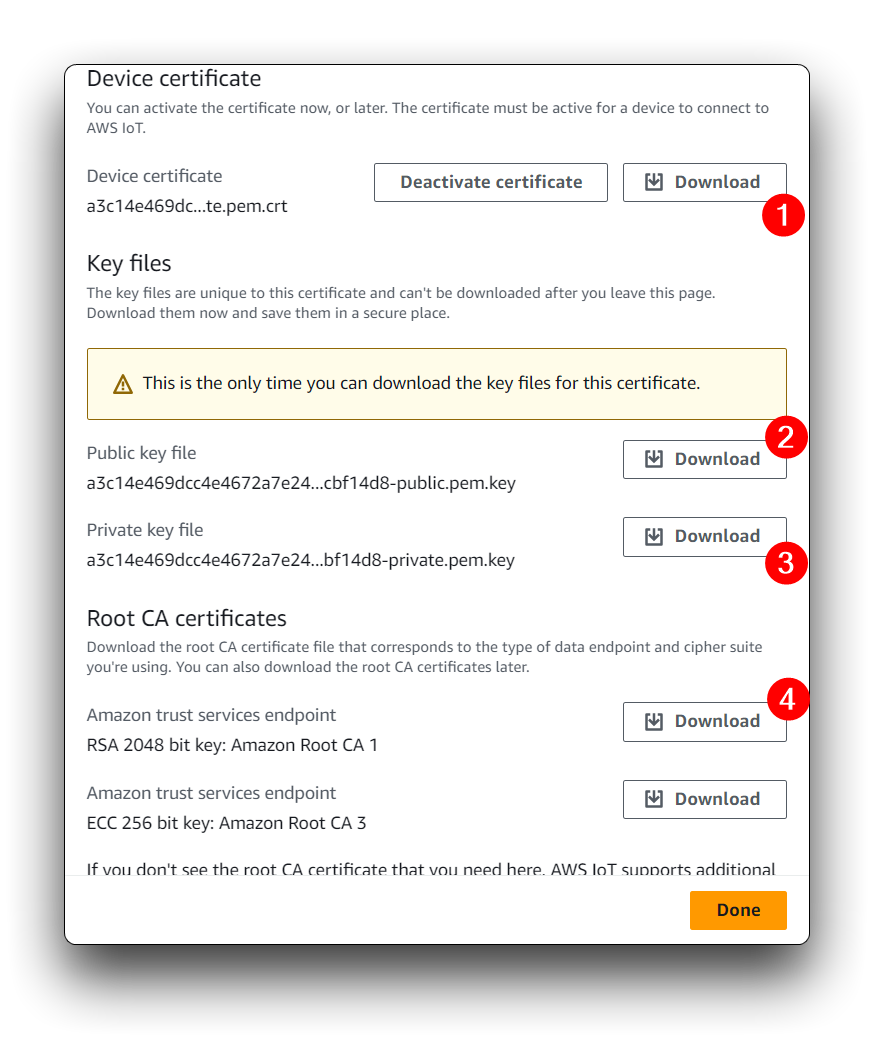
You will now be on the Configure device certificate page. AWS IoT Core requires devices to use certificates for secure communication. Please select Auto-generate a new certificate (recommended).
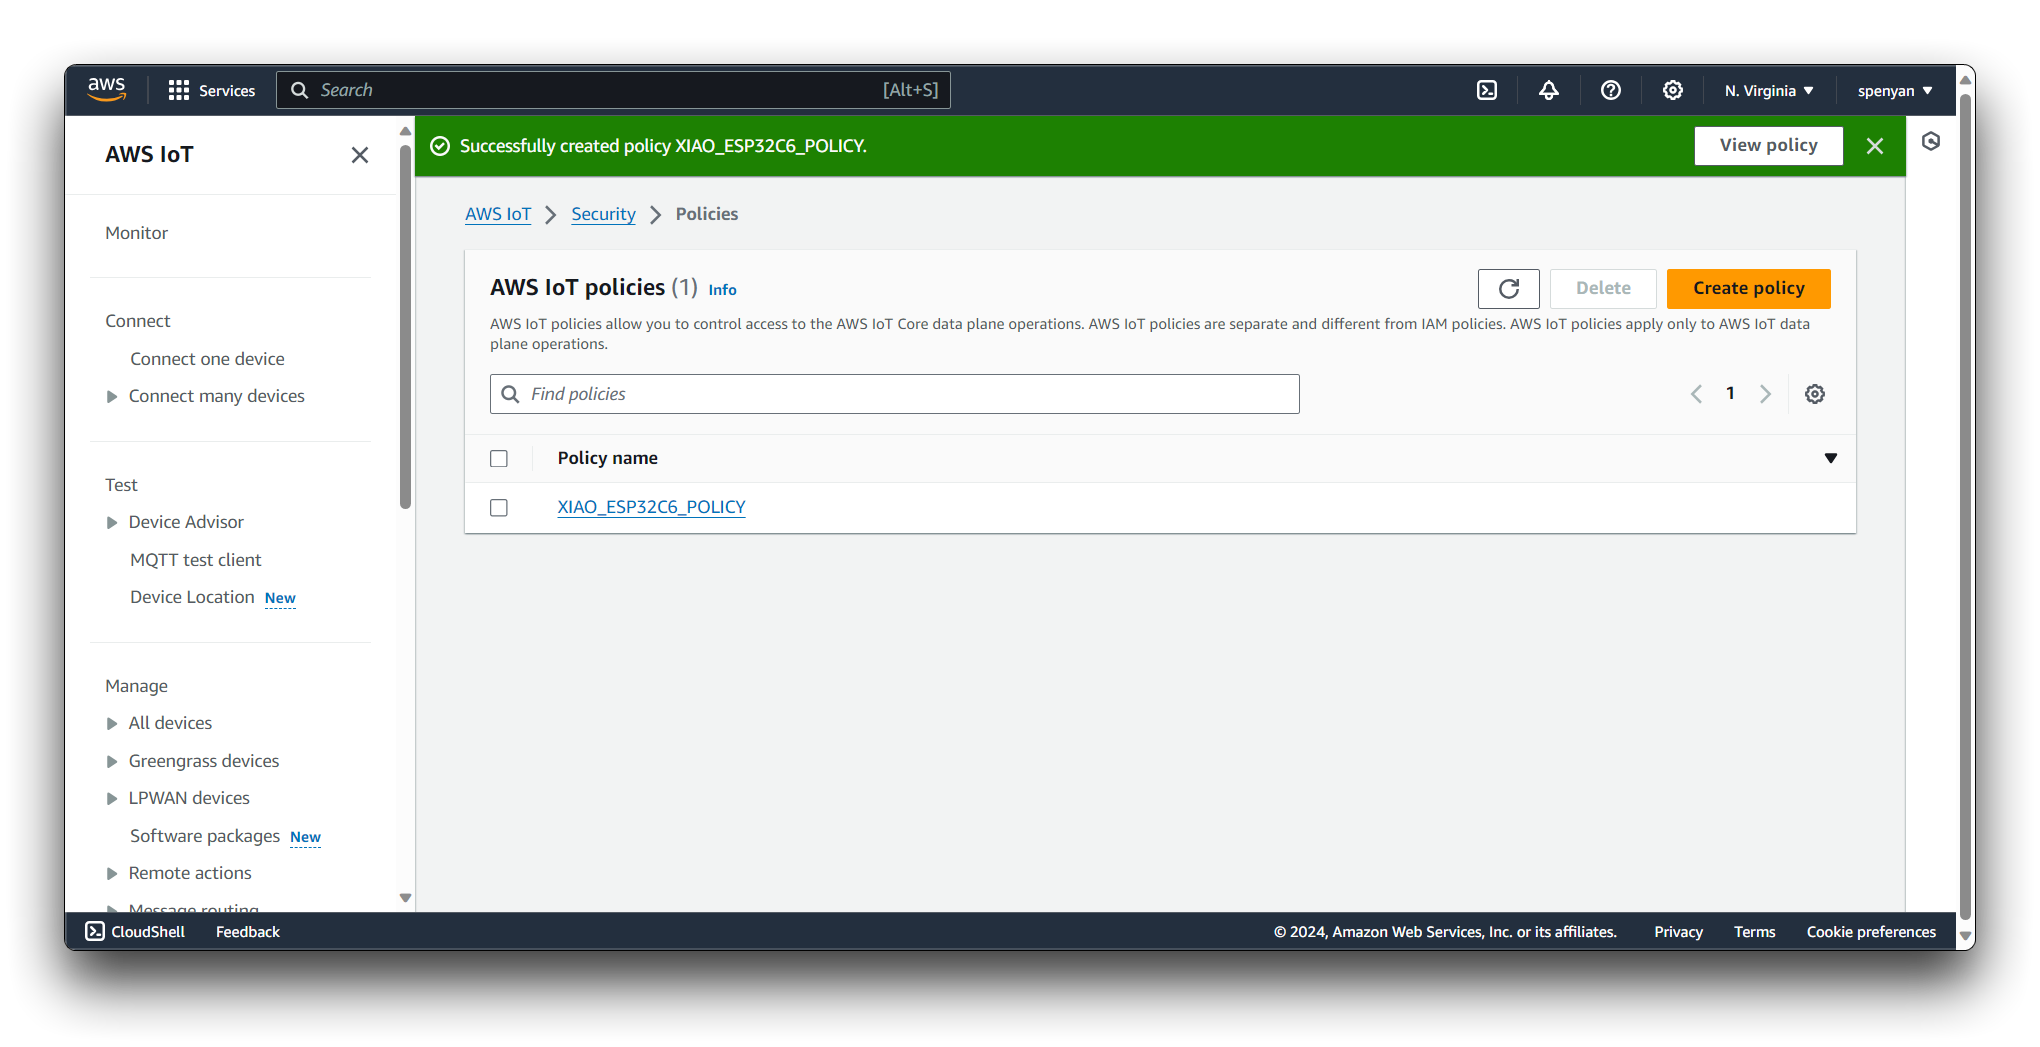
On the Attach policies to certificate page, if you do not have a policy, you need to create one by clicking on Create policy. You'll be taken to a new page where you can create a policy that defines the permissions for your Thing.
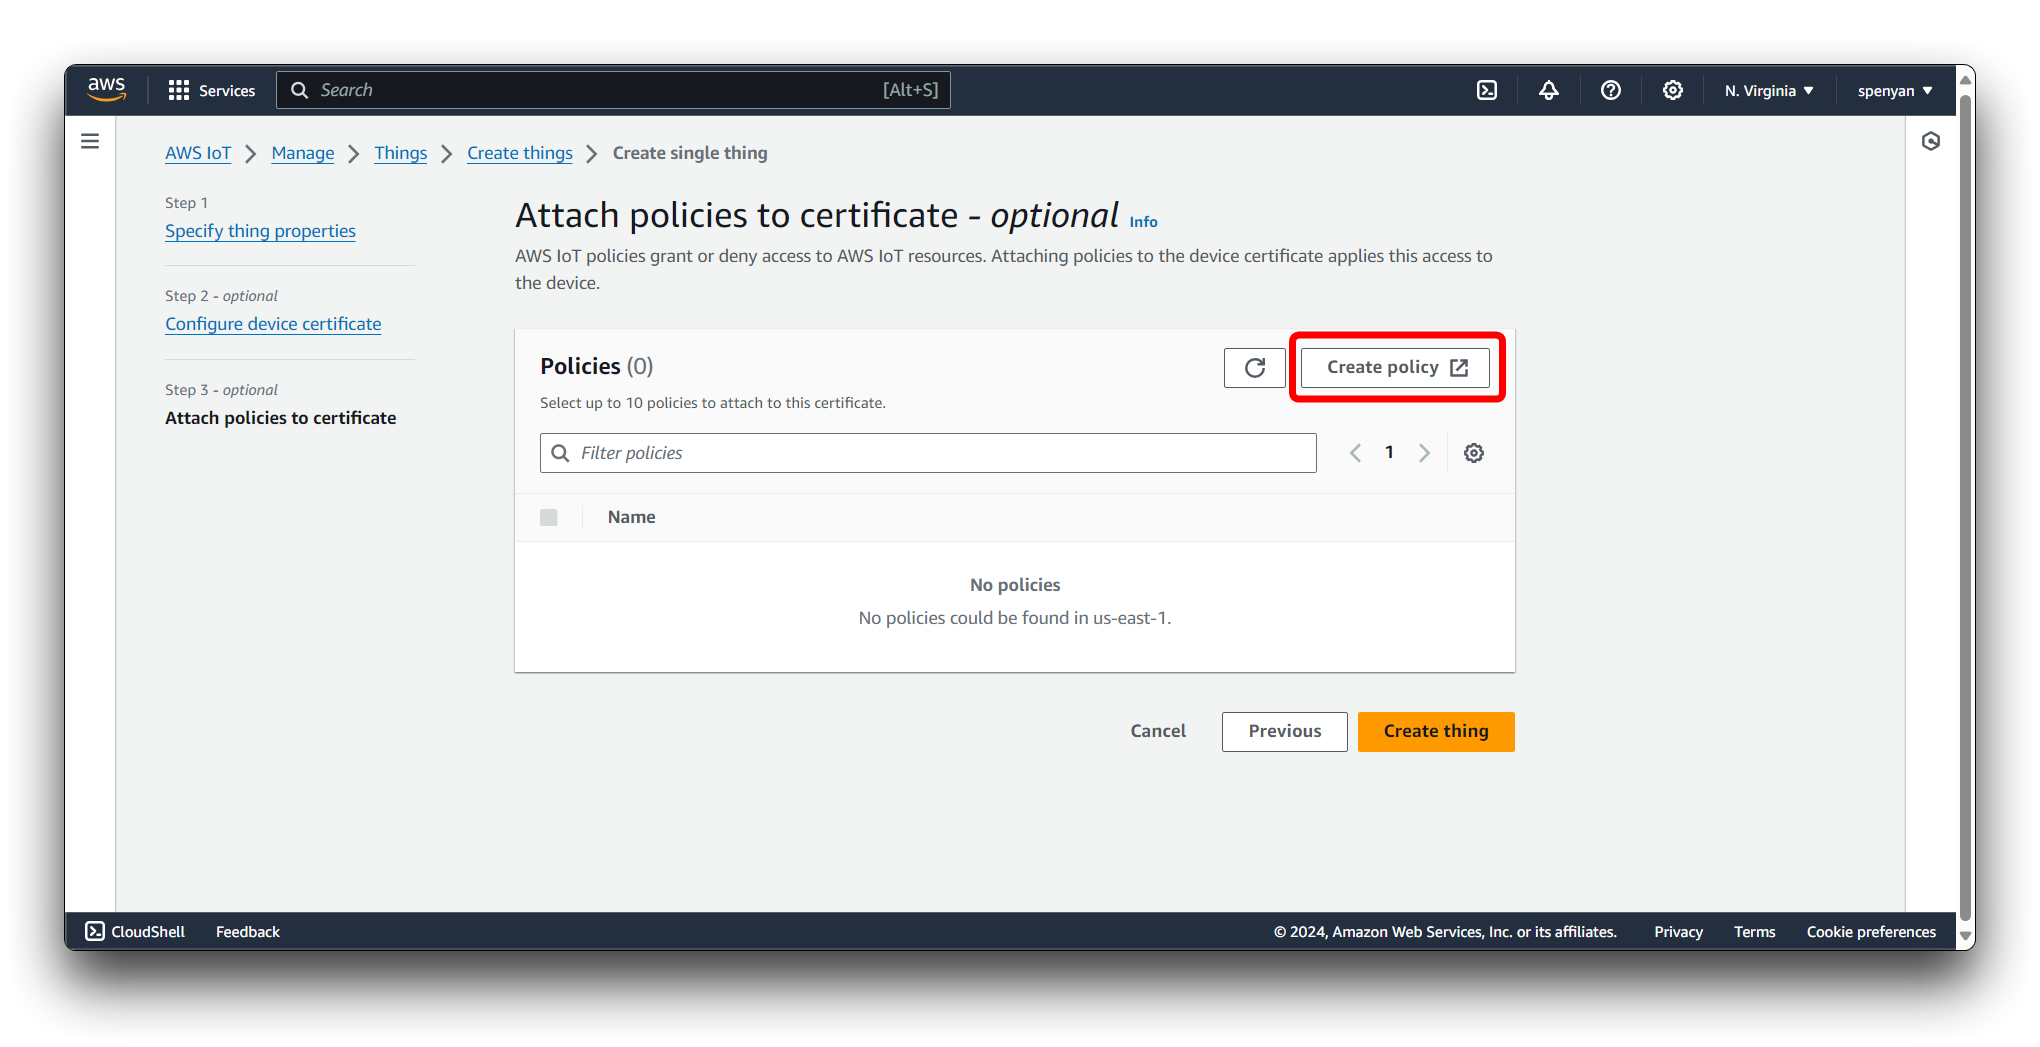
Once you have created and named your policy, attach it to your newly created certificate by checking the box next to the policy name and clicking Create.
We need the following permissions:
- iot:Publish
- iot:Connect
- iot:Receive
- iot:Subscribe

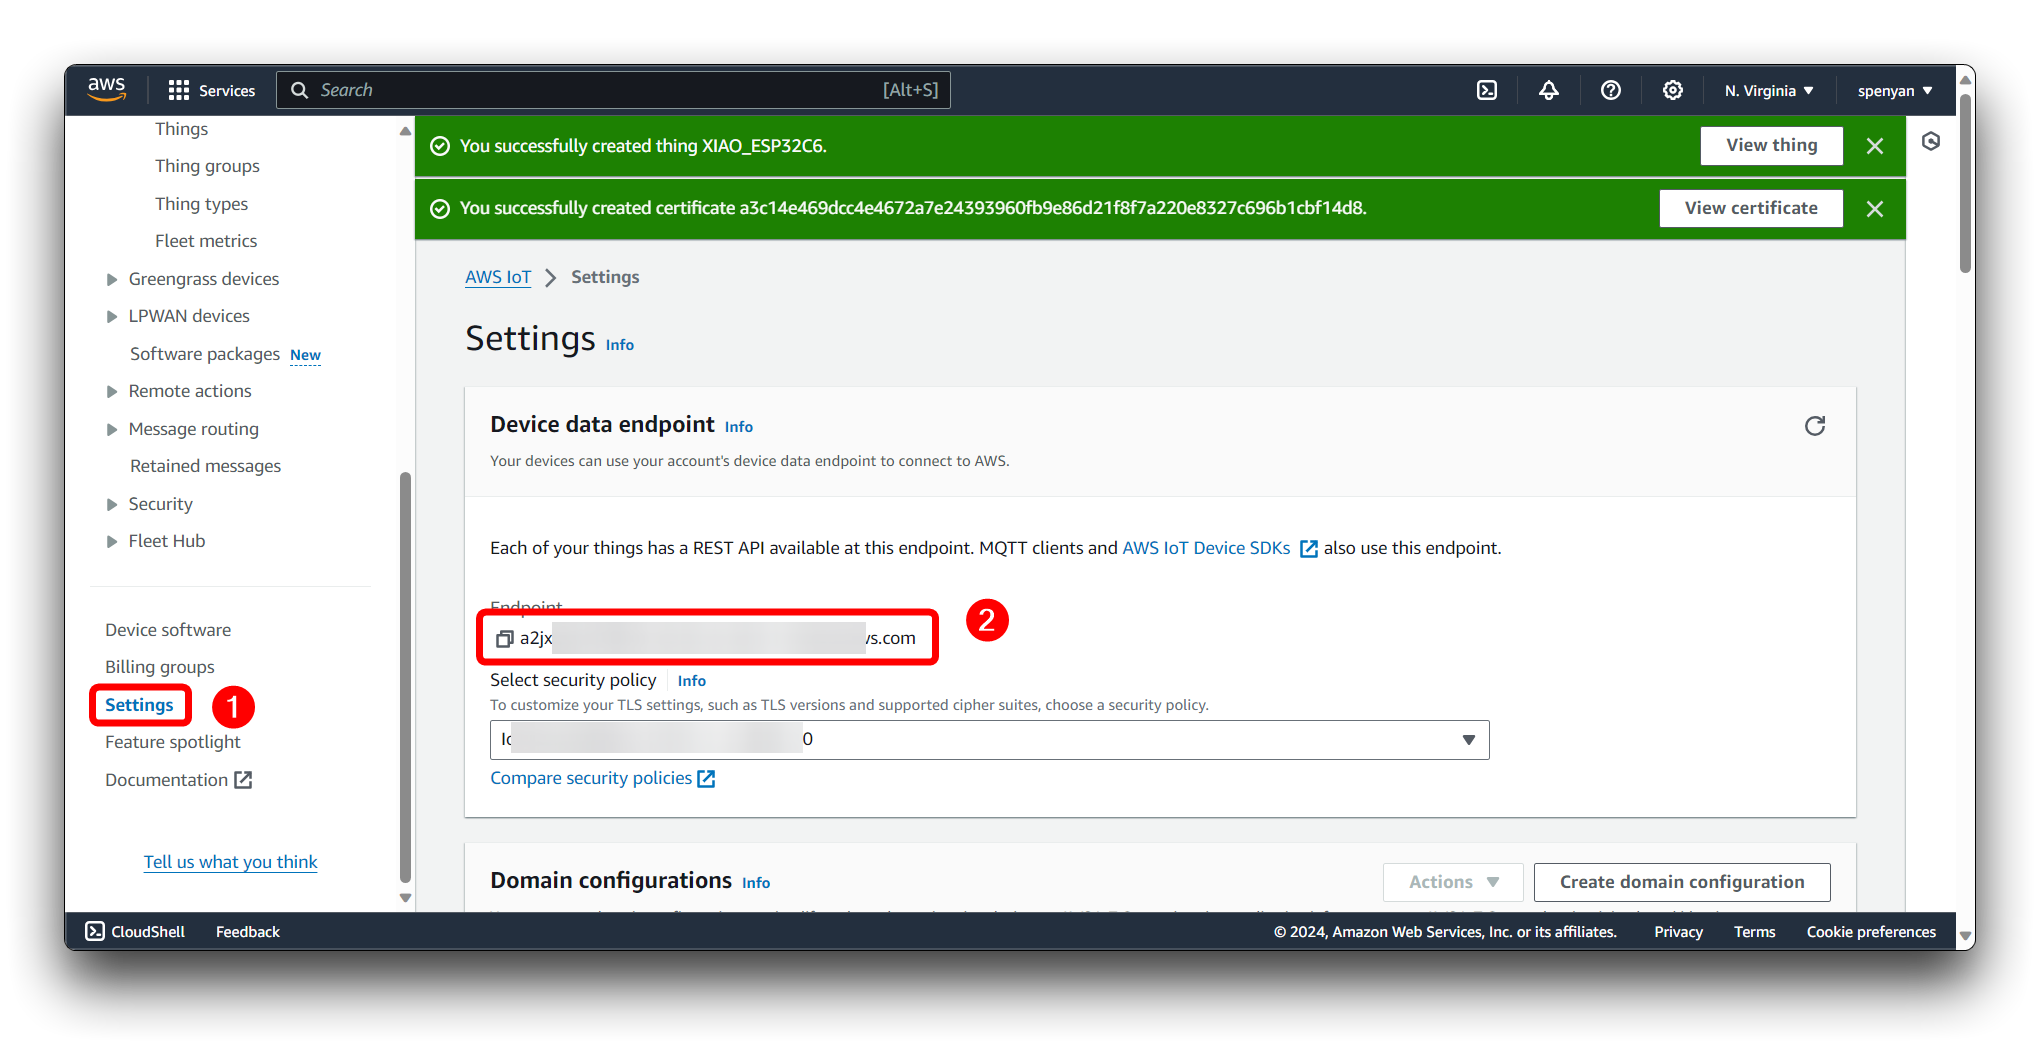
After your Thing is registered, you will be redirected to the Thing detail page where you can view your Thing's information.
Configure your device (in this case, XIAO_ESP32C6) to use the certificate and private key you downloaded when creating the Thing. You will need to follow the instructions for your specific device to set up the AWS IoT SDK and establish a secure connection to AWS IoT Core.
Once your Thing is set up and connected to AWS IoT Core, you can interact with it by subscribing to topics, publishing messages, and using the AWS IoT Core rules engine to process IoT data.
Remember to keep your certificates and keys confidential, and follow best practices for security. The AWS IoT Core documentation provides detailed guides and tutorials for setting up and managing IoT devices.
Step 2. Preparation of headers based on certificates
Create a new header file called secrets.h and paste the following code template into the header file.
#include <pgmspace.h>

#define SECRET
#define THINGNAME "DHTsensor"

const char WIFI_SSID[] = "YOUR_SSID";              //change this
const char WIFI_PASSWORD[] = "YOUR_PASSWORD";           //change this
const char AWS_IOT_ENDPOINT[] = "YOUR_AWS_IOT_ENDPOINT";       //change this

// Amazon Root CA 1
static const char AWS_CERT_CA[] PROGMEM = R"EOF(
-----BEGIN CERTIFICATE-----

-----END CERTIFICATE-----
)EOF";

// Device Certificate                                               //change this
static const char AWS_CERT_CRT[] PROGMEM = R"KEY(
-----BEGIN CERTIFICATE-----

-----END CERTIFICATE-----


)KEY";

// Device Private Key                                               //change this
static const char AWS_CERT_PRIVATE[] PROGMEM = R"KEY(
-----BEGIN RSA PRIVATE KEY-----

-----END RSA PRIVATE KEY-----


)KEY";
This C++ code template is designed for an IoT device that connects to a Wi-Fi network and communicates with the AWS IoT service. The template includes placeholders for various strings that you need to replace with your actual credentials and certificates. Here's how you should fill out each part:
-
Wi-Fi Credentials:
WIFI_SSID: Replace"YOUR_SSID"with the SSID (name) of your Wi-Fi network.WIFI_PASSWORD: Replace"YOUR_PASSWORD"with the password for your Wi-Fi network.
-
AWS IoT Endpoint:
AWS_IOT_ENDPOINT: Replace"YOUR_AWS_IOT_ENDPOINT"with your unique AWS IoT endpoint. This endpoint is specific to your AWS IoT account and region. You can find it in the settings of the AWS IoT console.
-
Amazon Root CA 1 (Certificate Authority):
AWS_CERT_CA: Between the-----BEGIN CERTIFICATE-----and-----END CERTIFICATE-----markers, paste the entire Amazon Root CA 1 certificate provided by AWS. This certificate allows your device to trust the server's identity.
-
Device Certificate:
AWS_CERT_CRT: Replace the placeholder between-----BEGIN CERTIFICATE-----and-----END CERTIFICATE-----with your device's certificate in PEM format. This certificate is unique to your device and is used to authenticate your device with AWS IoT.
-
Device Private Key:
AWS_CERT_PRIVATE: Between the-----BEGIN RSA PRIVATE KEY-----and-----END RSA PRIVATE KEY-----markers, paste your device's private key in PEM format. This key must be kept secret and should never be shared as it is used to prove your device's identity when communicating with AWS IoT.
Amazon Root CA 1 Corresponds to RSA 2048 bit key:Amazon Root CA 1 downloaded file information. Device Certificate Corresponds to the Device certificate downloaded file information. Device Private Key Corresponds to the Private key file downloaded file information.
Since this code contains sensitive information, such as Wi-Fi credentials and private keys, it is crucial to keep it secure. Do not share the modified code publicly or commit it to public repositories.
Step 3. Upload data acquisition programme for XIAO ESP32C6
Please connect the Grove DHT20 sensor to the IIC interface of the XIAO ESP32C6. If you want convenience, we recommend you to buy Grove Base for XIAO.
Then, please create a new project in Arduino and save it locally. Take the secrets.h file we created in Step 2 and copy it to the same directory as the .ino file. Then, please upload the code below to XIAO ESP32C6 and the data will be sent to the specified topic via MQTT based on the AWS credentials you provided.
Click here to preview the full code
#include "secrets.h"
#include <WiFiClientSecure.h>
#include <PubSubClient.h>
#include <ArduinoJson.h>
#include "WiFi.h"
#include "Wire.h"

//DHT setup
#include "DHT.h"
#define DHTTYPE DHT20   // DHT 20
/*Notice: The DHT10 and DHT20 is different from other DHT* sensor ,it uses i2c interface rather than one wire*/
/*So it doesn't require a pin.*/
DHT dht(DHTTYPE);         //   DHT10 DHT20 don't need to define Pin

//MQTT setup
#define AWS_IOT_PUBLISH_TOPIC   "xiao_esp32c6/pub"
#define AWS_IOT_SUBSCRIBE_TOPIC "xiao_esp32c6/sub"

//store temp and humi data
float h;
float t;

//network setup
WiFiClientSecure net = WiFiClientSecure();
PubSubClient client(net);

#if defined(ARDUINO_ARCH_AVR)
    #define debug  Serial

#elif defined(ARDUINO_ARCH_SAMD) ||  defined(ARDUINO_ARCH_SAM)
    #define debug  SerialUSB
#else
    #define debug  Serial
#endif

void connectAWS()
{
  WiFi.mode(WIFI_STA);
  WiFi.begin(WIFI_SSID, WIFI_PASSWORD);

  Serial.println("Connecting to Wi-Fi");

  while (WiFi.status() != WL_CONNECTED)
  {
    delay(500);
    Serial.print(".");
  }

  // Configure WiFiClientSecure to use the AWS IoT device credentials
  net.setCACert(AWS_CERT_CA);
  net.setCertificate(AWS_CERT_CRT);
  net.setPrivateKey(AWS_CERT_PRIVATE);

  // Connect to the MQTT broker on the AWS endpoint we defined earlier
  client.setServer(AWS_IOT_ENDPOINT, 8883);

  // Create a message handler
  client.setCallback(messageHandler);

  Serial.println("Connecting to AWS IOT");

  while (!client.connect(THINGNAME))
  {
    Serial.print(".");
    delay(100);
  }

  if (!client.connected())
  {
    Serial.println("AWS IoT Timeout!");
    return;
  }

  // Subscribe to a topic
  client.subscribe(AWS_IOT_SUBSCRIBE_TOPIC);

  Serial.println("AWS IoT Connected!");
}

void publishMessage()
{
  StaticJsonDocument<200> doc;
  doc["humidity"] = h;
  doc["temperature"] = t;
  char jsonBuffer[512];
  serializeJson(doc, jsonBuffer); // print to client

  client.publish(AWS_IOT_PUBLISH_TOPIC, jsonBuffer);
}

void messageHandler(char* topic, byte* payload, unsigned int length)
{
  Serial.print("incoming: ");
  Serial.println(topic);

  StaticJsonDocument<200> doc;
  deserializeJson(doc, payload);
  const char* message = doc["message"];
  Serial.println(message);
}

void setup() {

    debug.begin(115200);
    debug.println("DHTxx test!");
    Wire.begin();

    connectAWS();
    dht.begin();
}

void loop() {
    h = dht.readHumidity();
    t = dht.readTemperature();

    if (isnan(h) || isnan(t) )  // Check if any reads failed and exit early (to try again).
    {
      Serial.println(F("Failed to read from DHT sensor!"));
      return;
    }

    Serial.print(F("Humidity: "));
    Serial.print(h);
    Serial.print(F("%  Temperature: "));
    Serial.print(t);
    Serial.println(F("°C "));

    publishMessage();
    client.loop();
    delay(1000);
}
Step 4. MQTT test client
In AWS IoT Core, we need to subscribe to the XIAO ESP32C6 published topic in the MQTT test client in order to determine, if the sensor's data is successfully uploaded to the target AWS account.

If the programme is working properly, you should see a set of data messages for temperature and humidity every 1s.
{
    "humidity": 58,
    "temperature": 23.6
}
Store the data using AWS Analytics
The gathered data is then forwarded to the AWS Analytics service, which not only stores the raw data but also provides us with powerful data processing and analysis tools. These tools assist us in extracting valuable insights from the collected data.
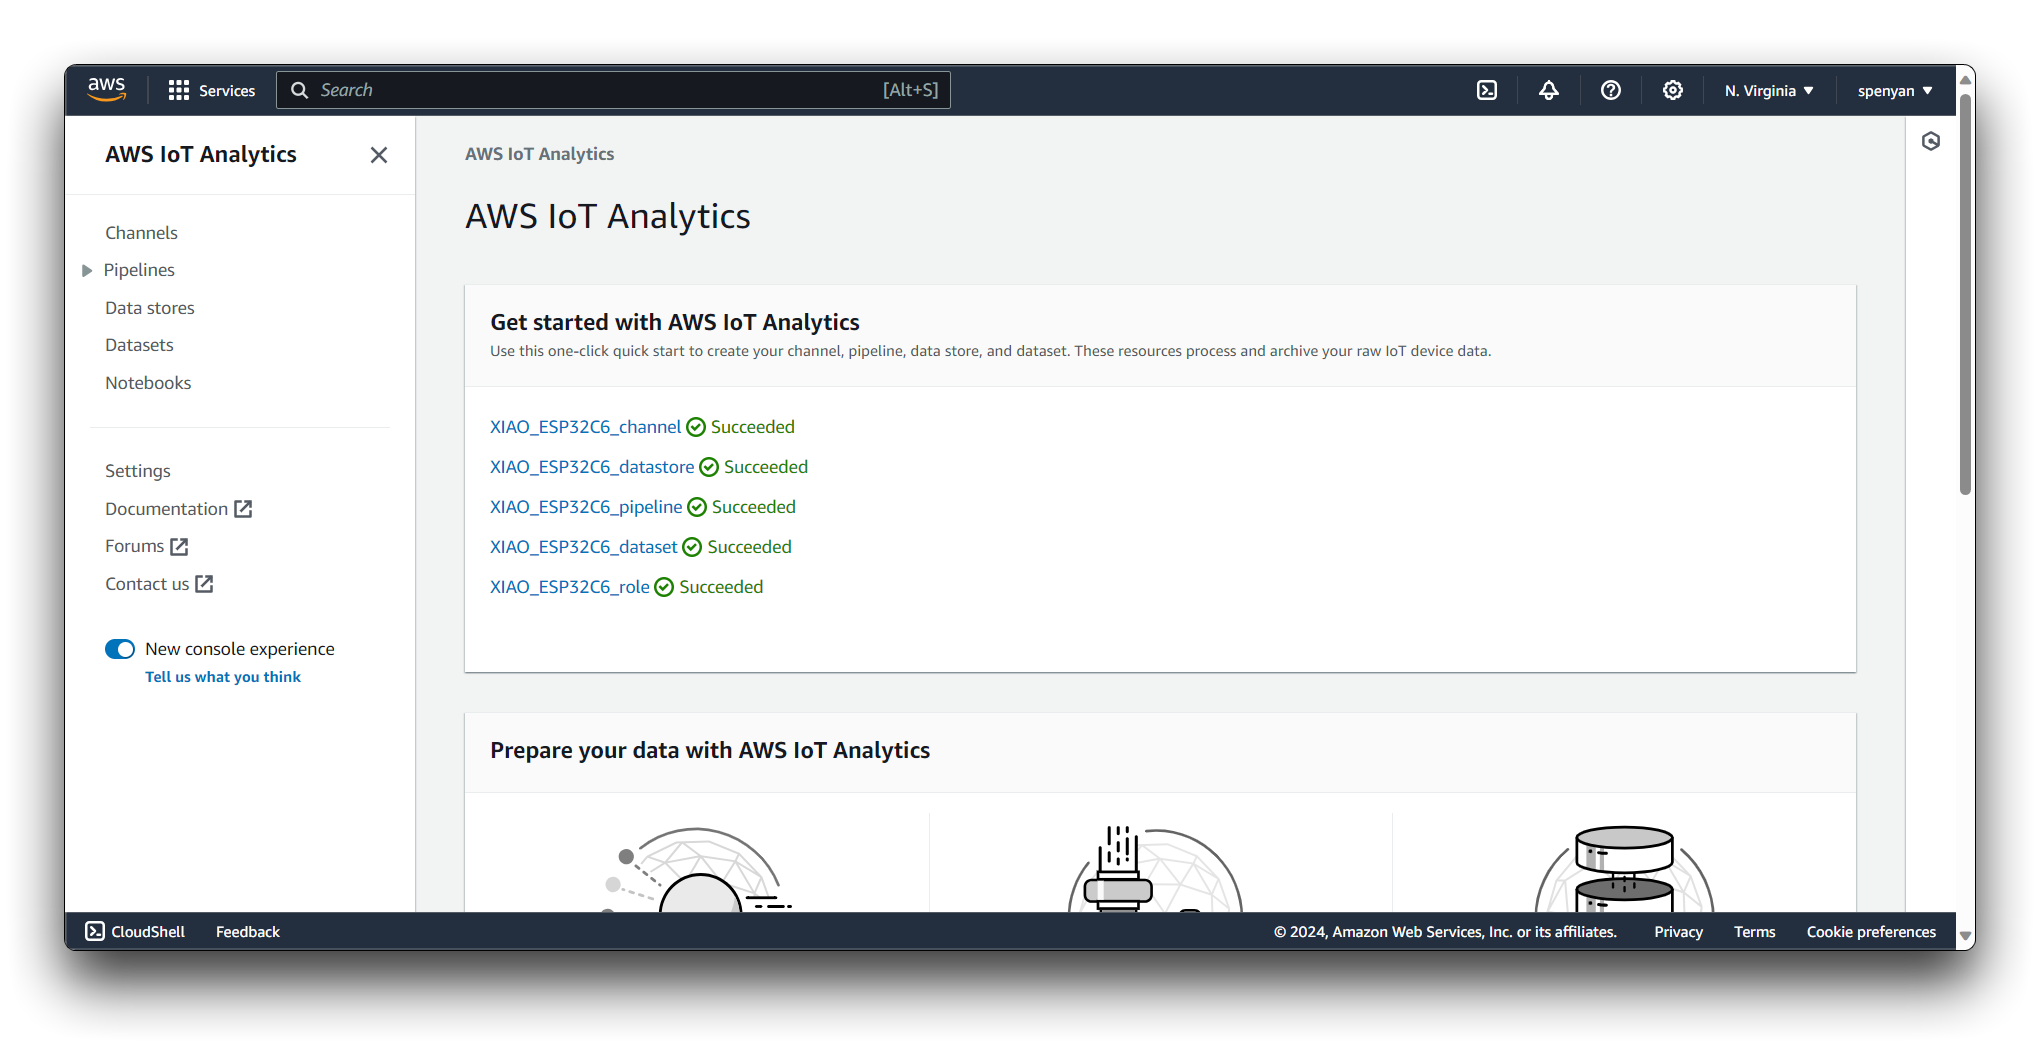
Step 5. Configure AWS IoT Analytics
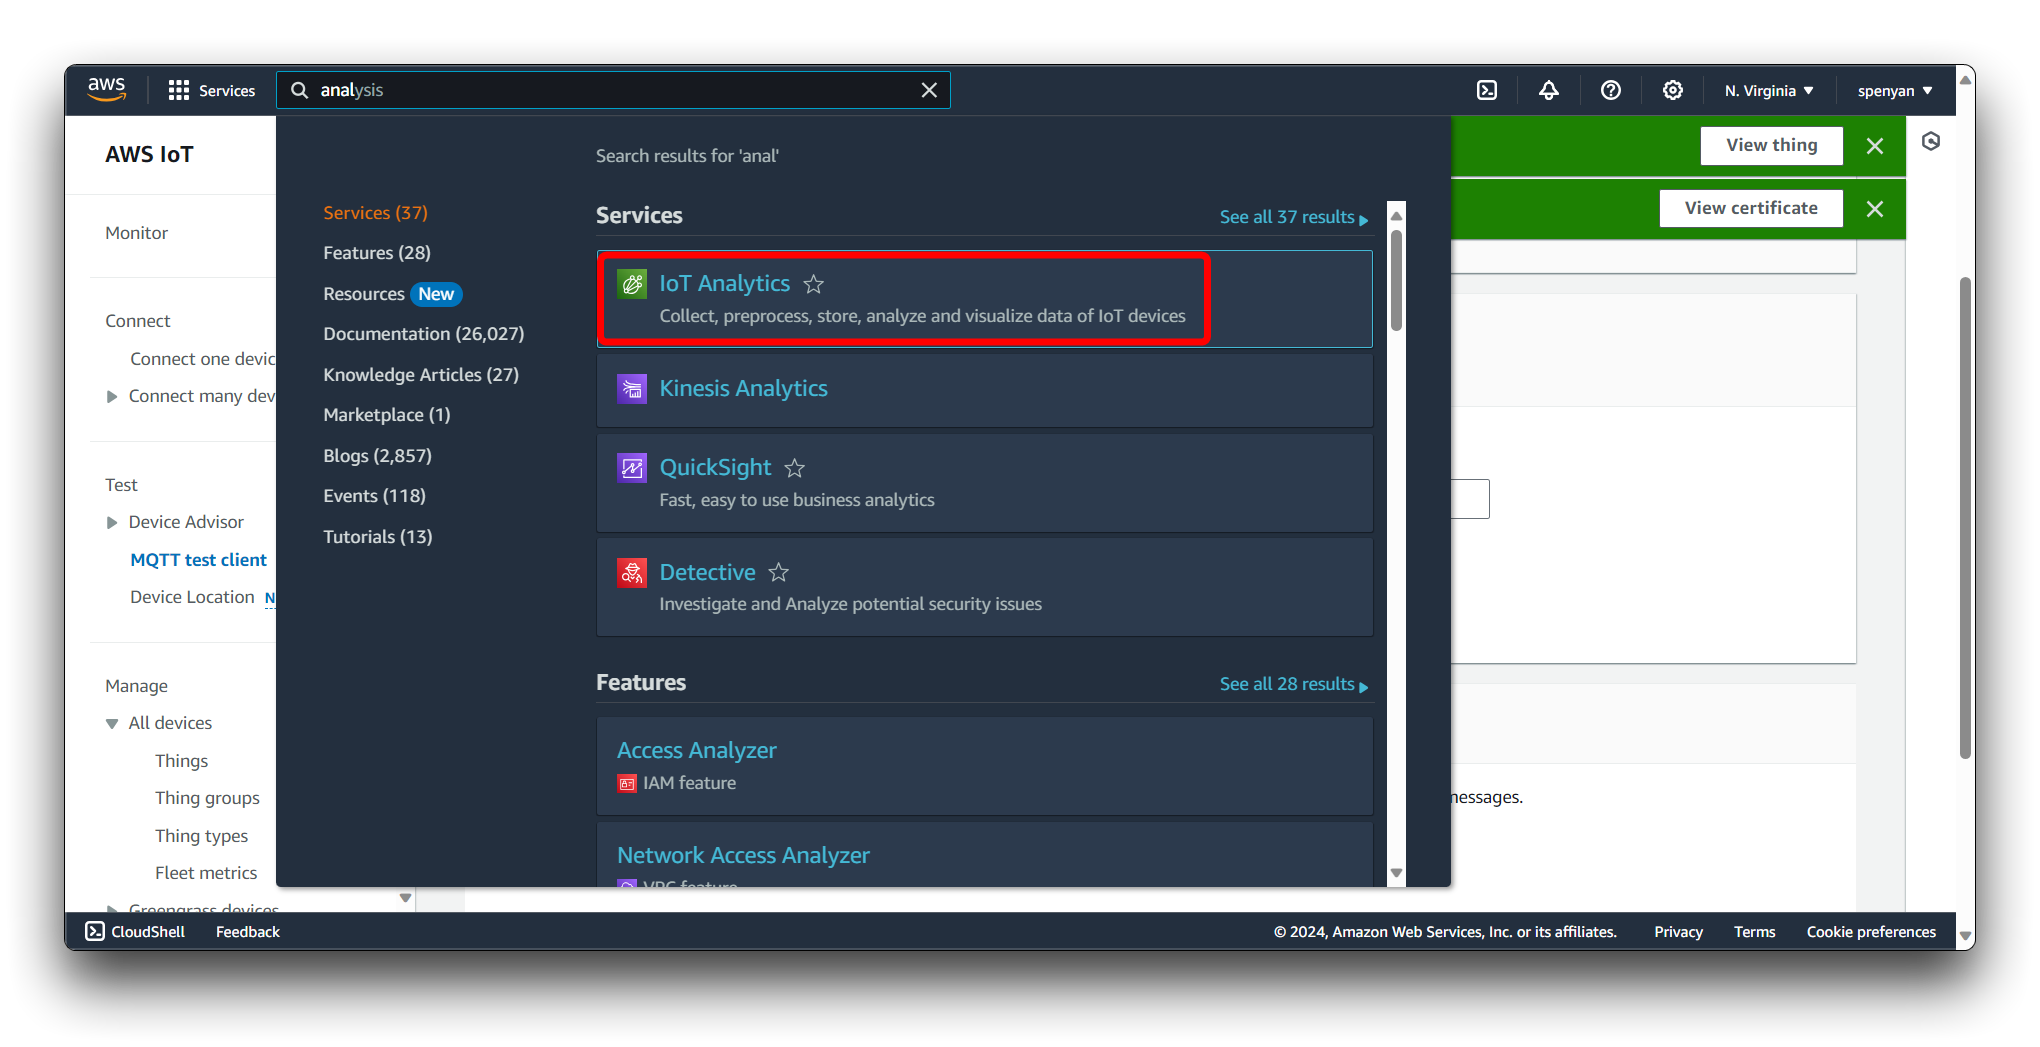
Navigate to AWS IoT Analytics in the AWS Console.
In Get started with AWS IoT Analytics, fill in the name of the newly created resource and enter your subscription subject.(e.g., xiao_esp32c6/pub).
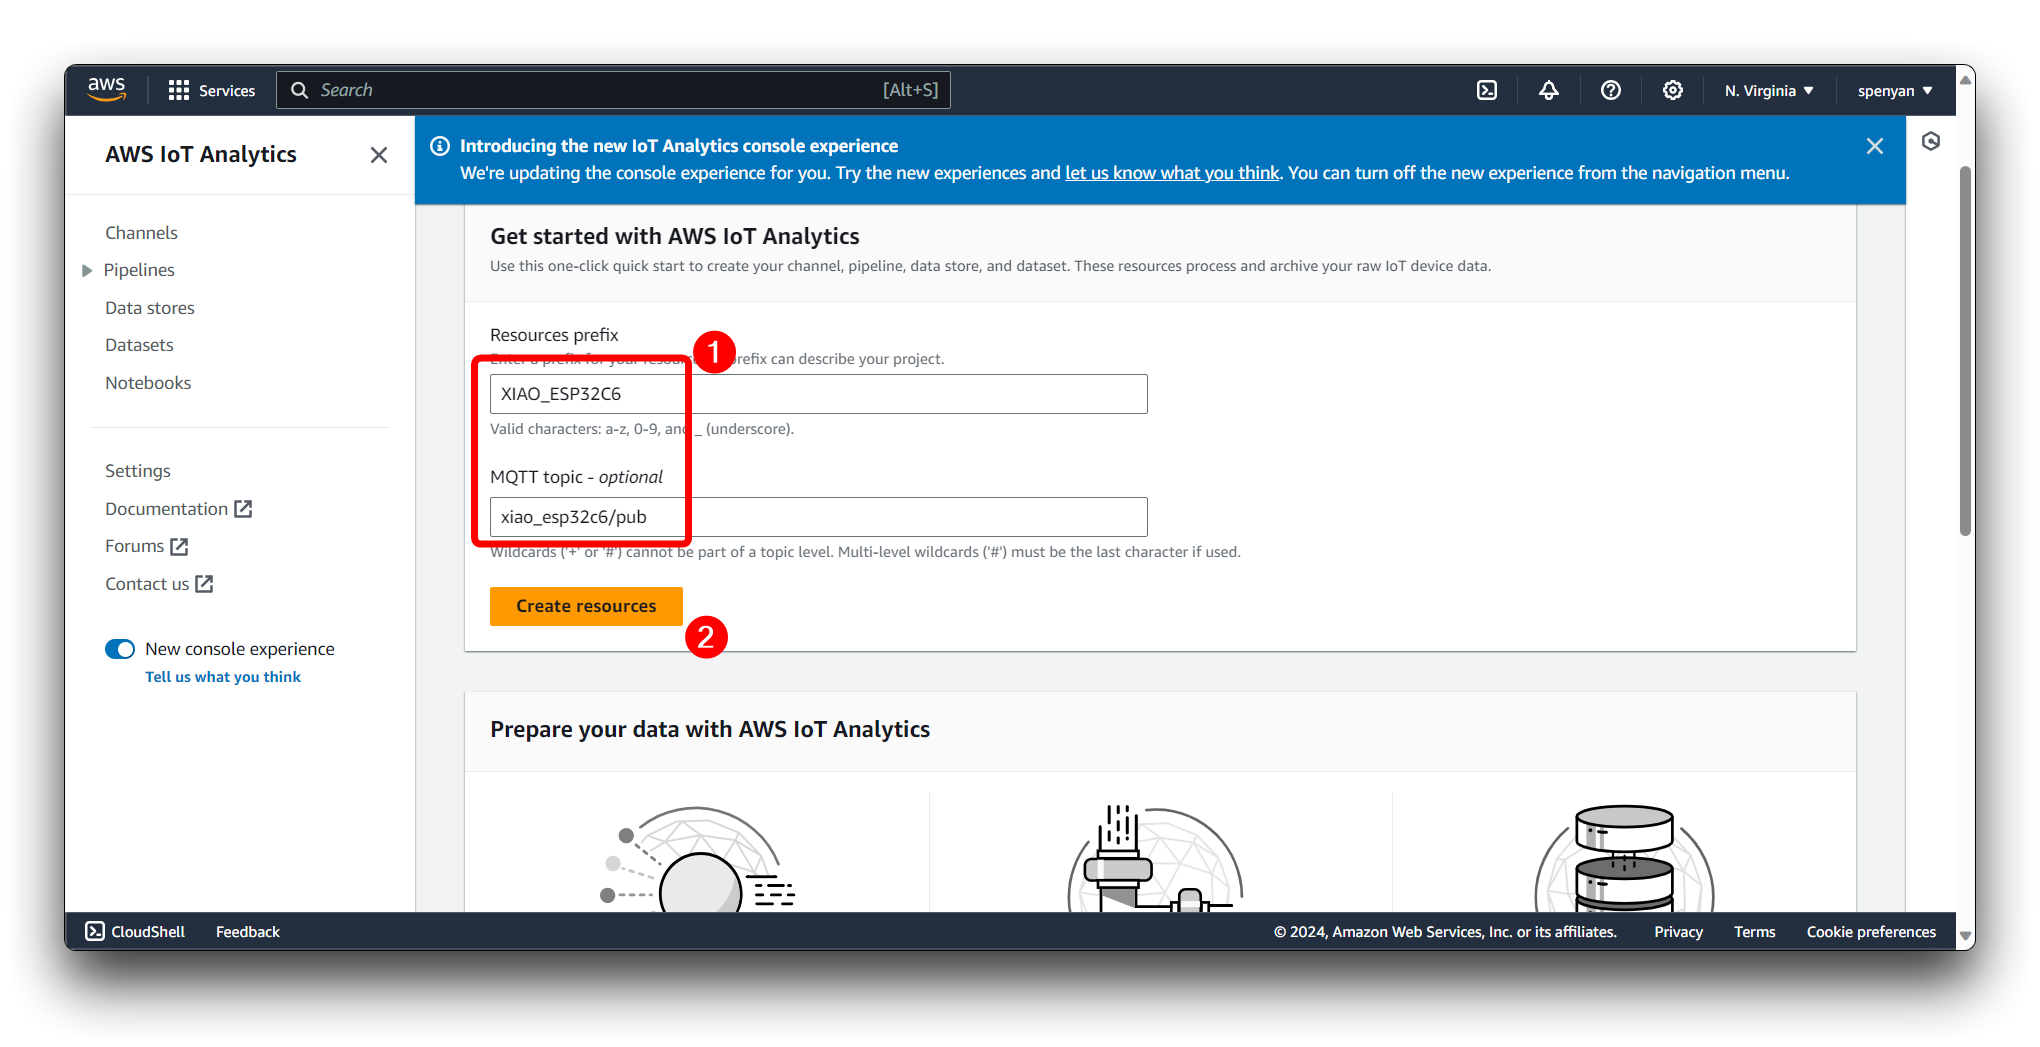
Wait a moment (ten minutes or so) for all resources to be created.
Step 6. Create a rule
Back in AWS IoT Core, click Rules under Message routing in the left menu bar. Click Create rule.
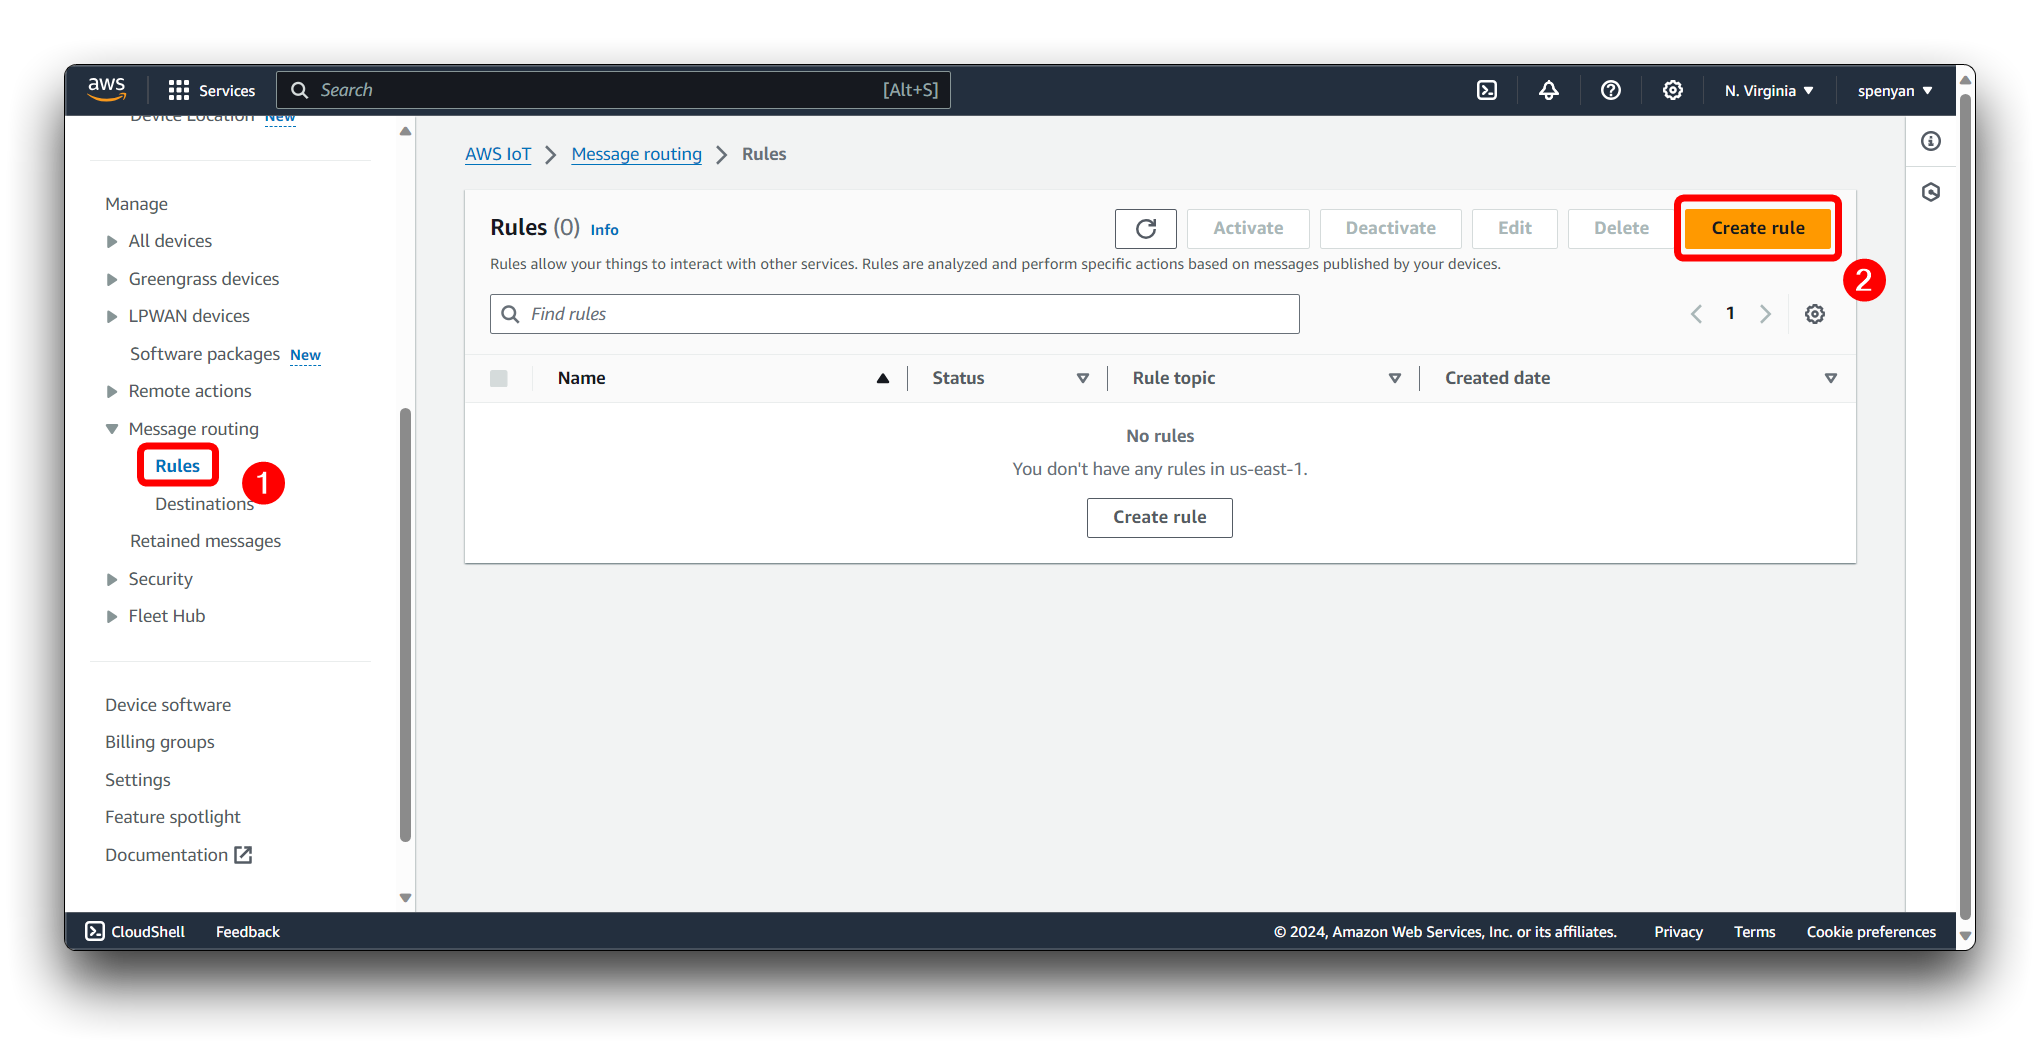
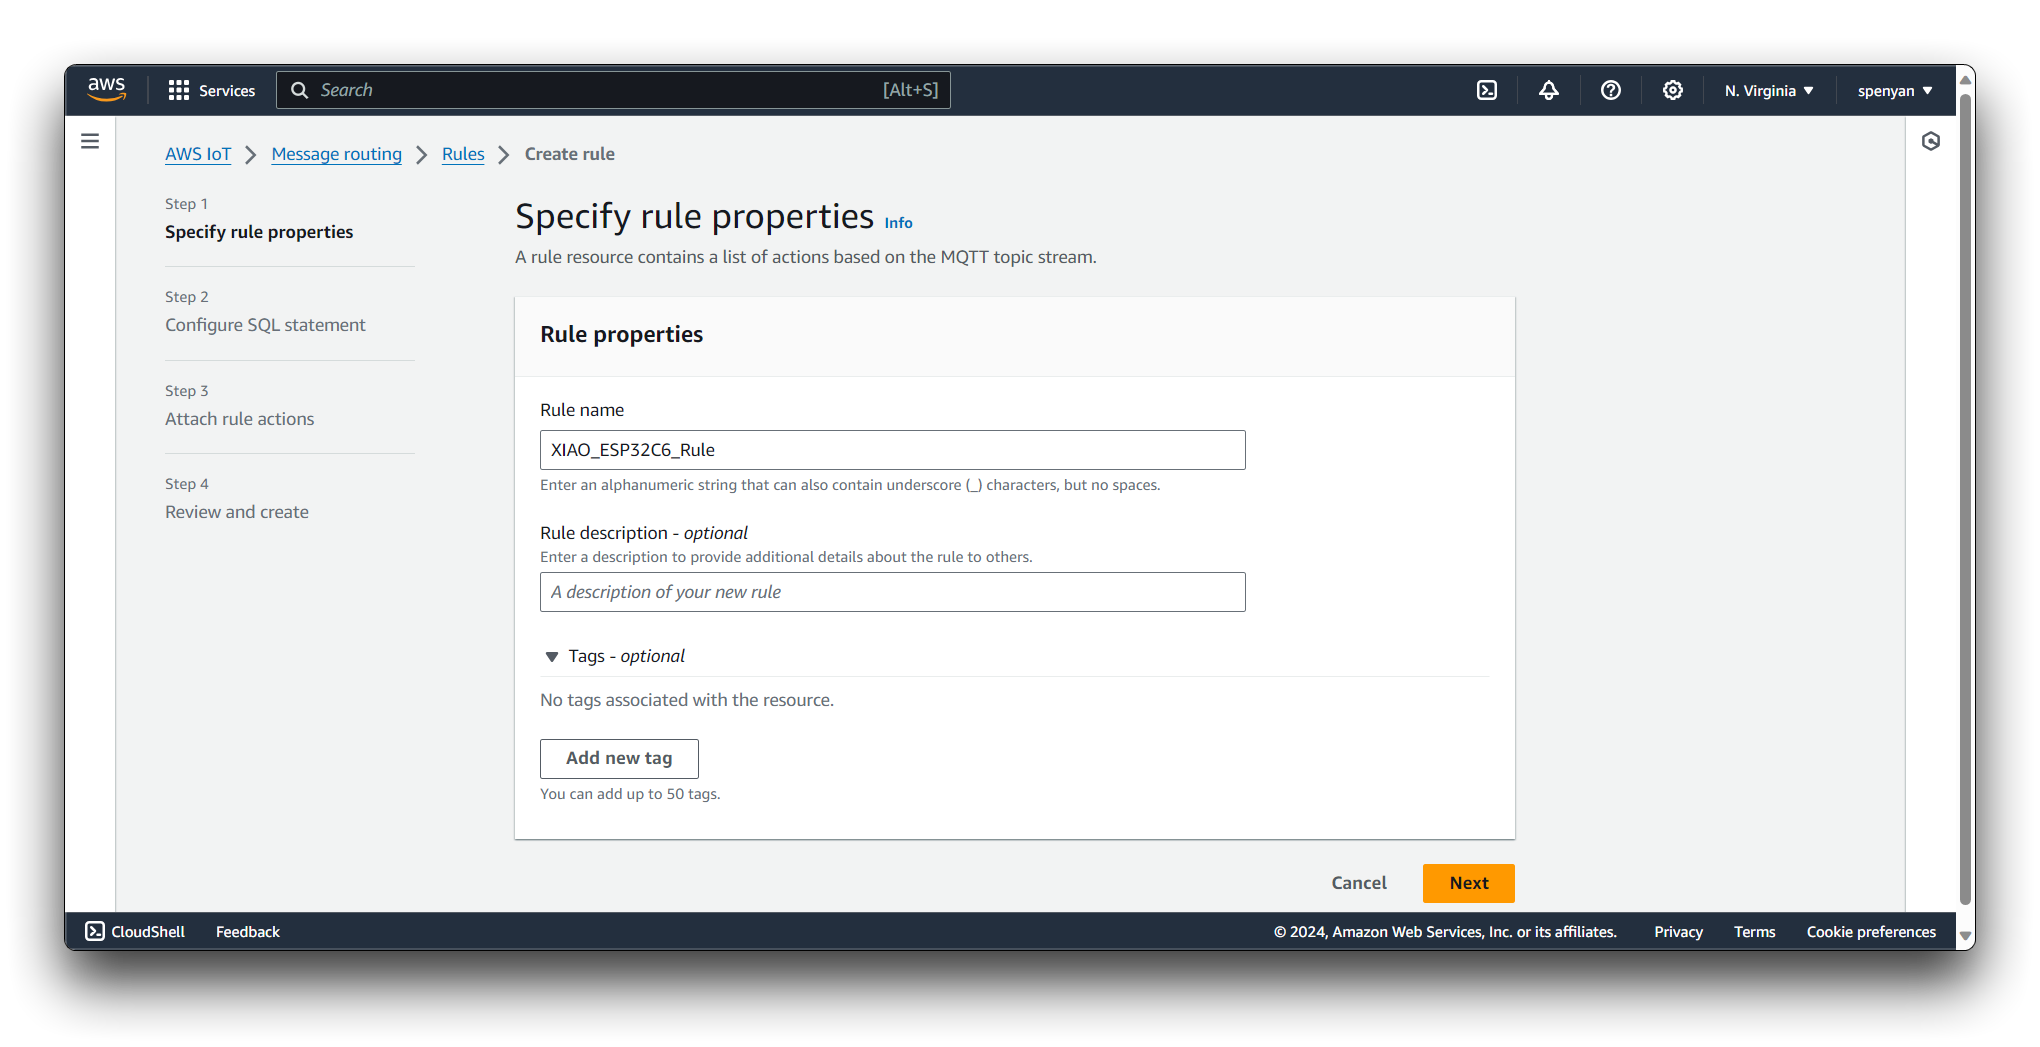
Provide a name for your Rule and an optional description to help identify its purpose.
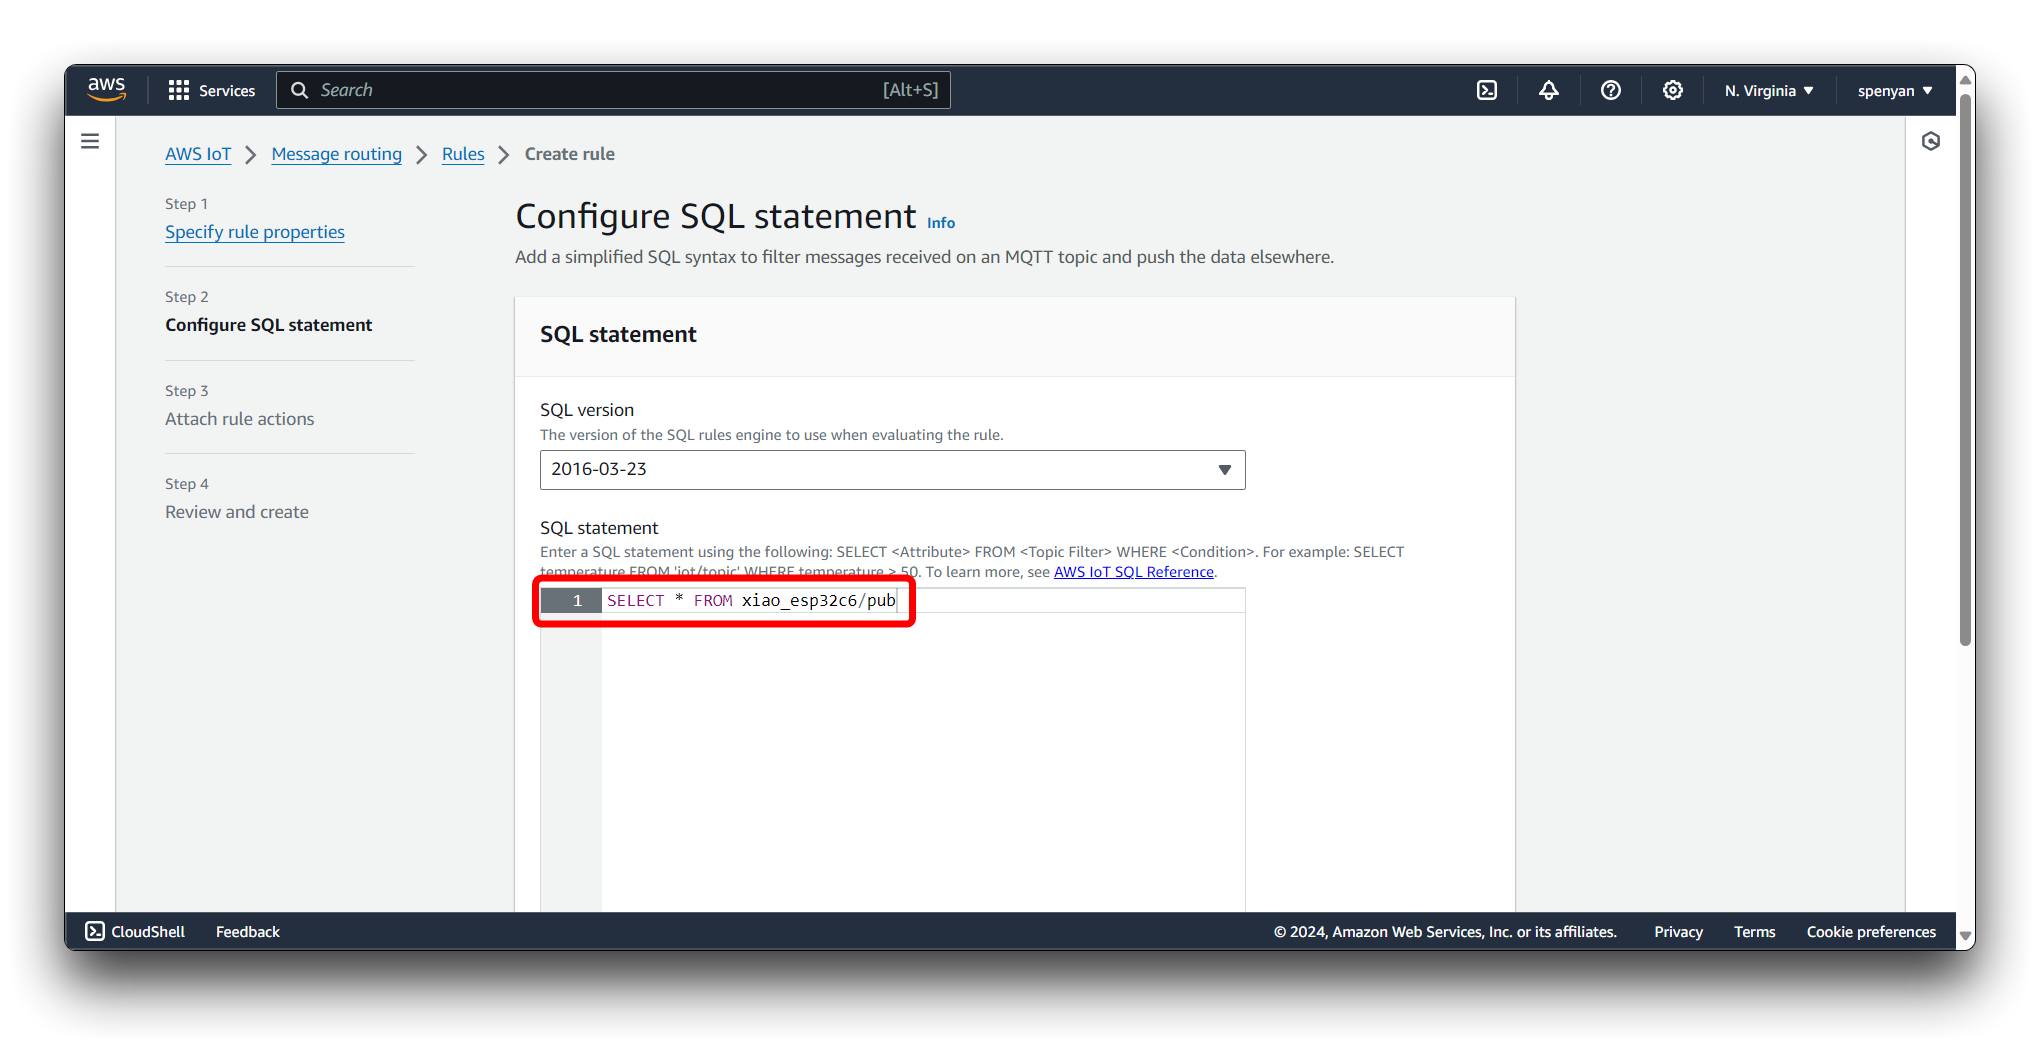
Define the Rule Query Statement using the AWS IoT SQL syntax. This statement specifies the criteria for filtering and processing the incoming MQTT messages. You can use wildcards, functions, and operators to match specific topics, extract data from the message payload, and apply transformations.
Select the IoT Analytics channel you created as the target for the Rule Action. Click on the Create Role button. In the console, provide a name for the role, such as XIAO_ESP32C6_Role.
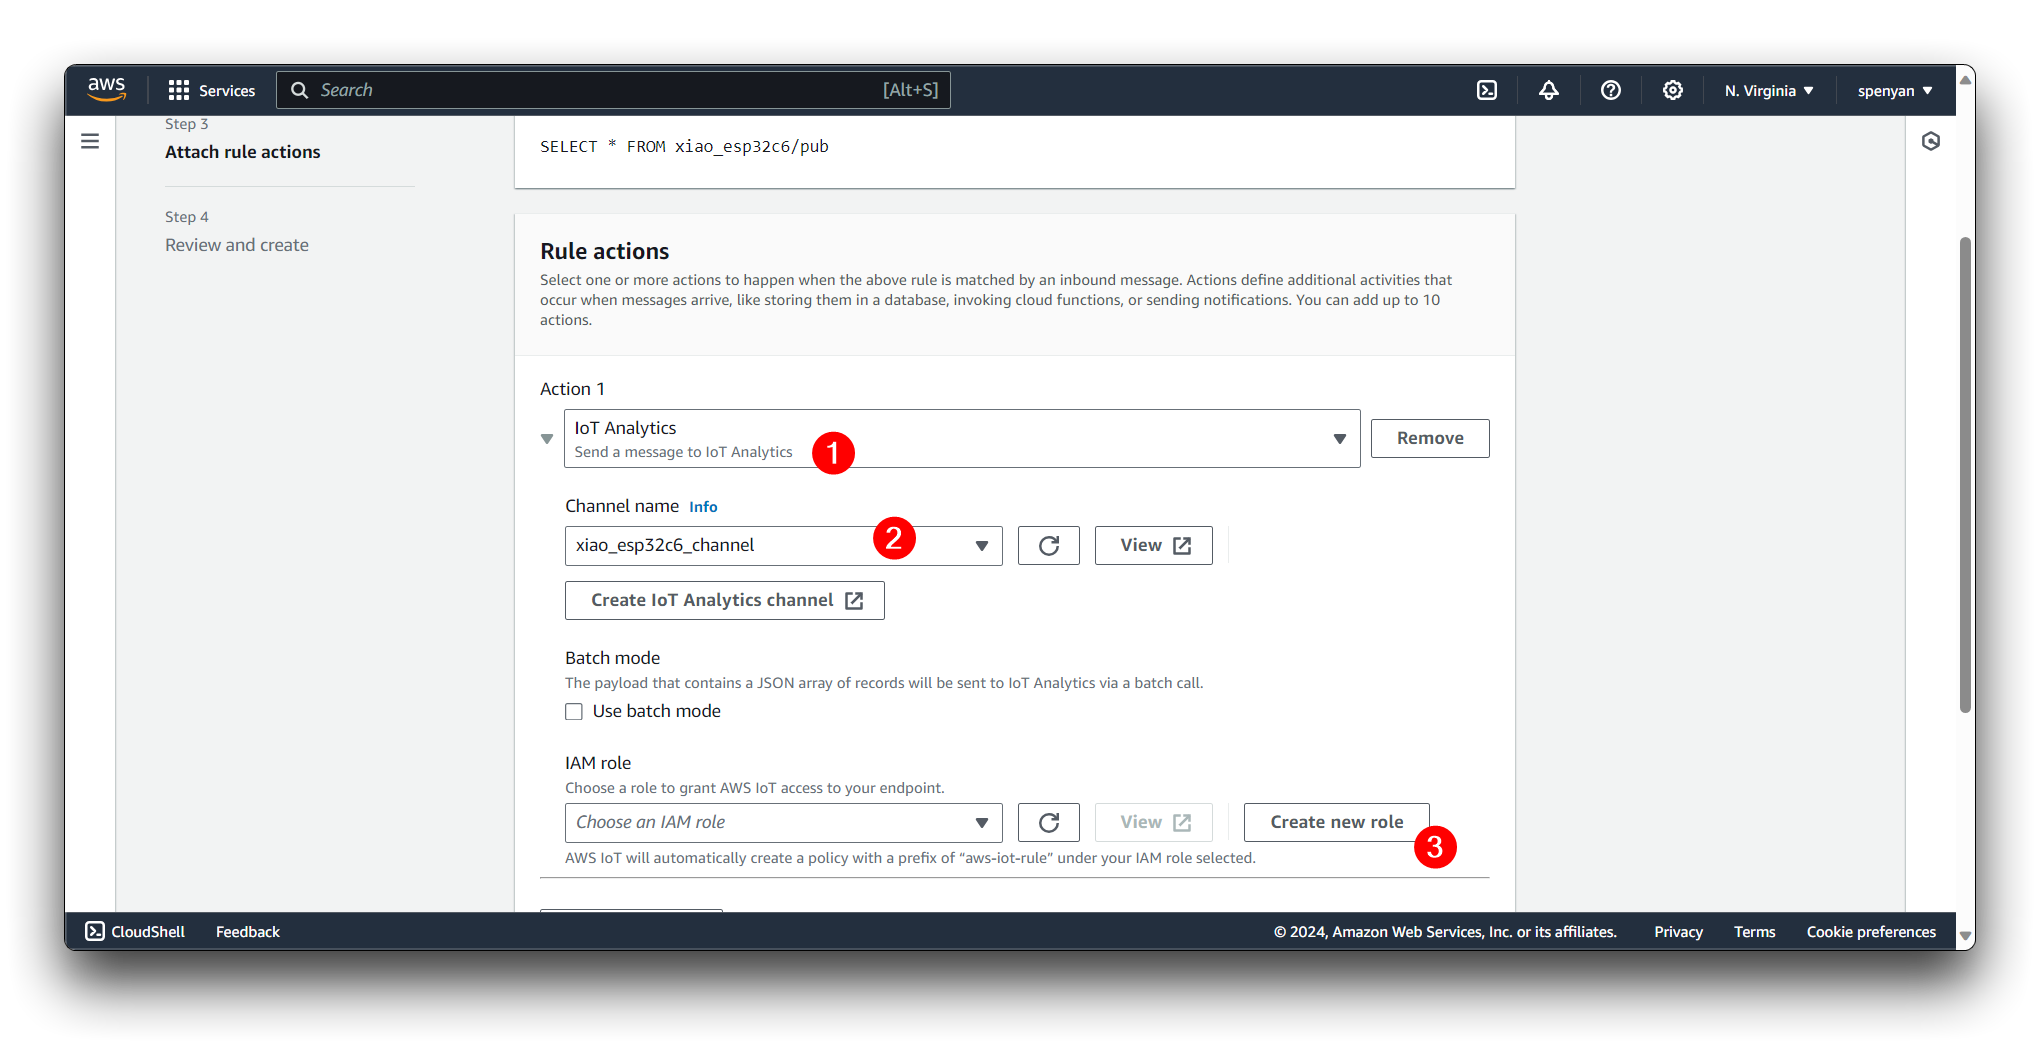
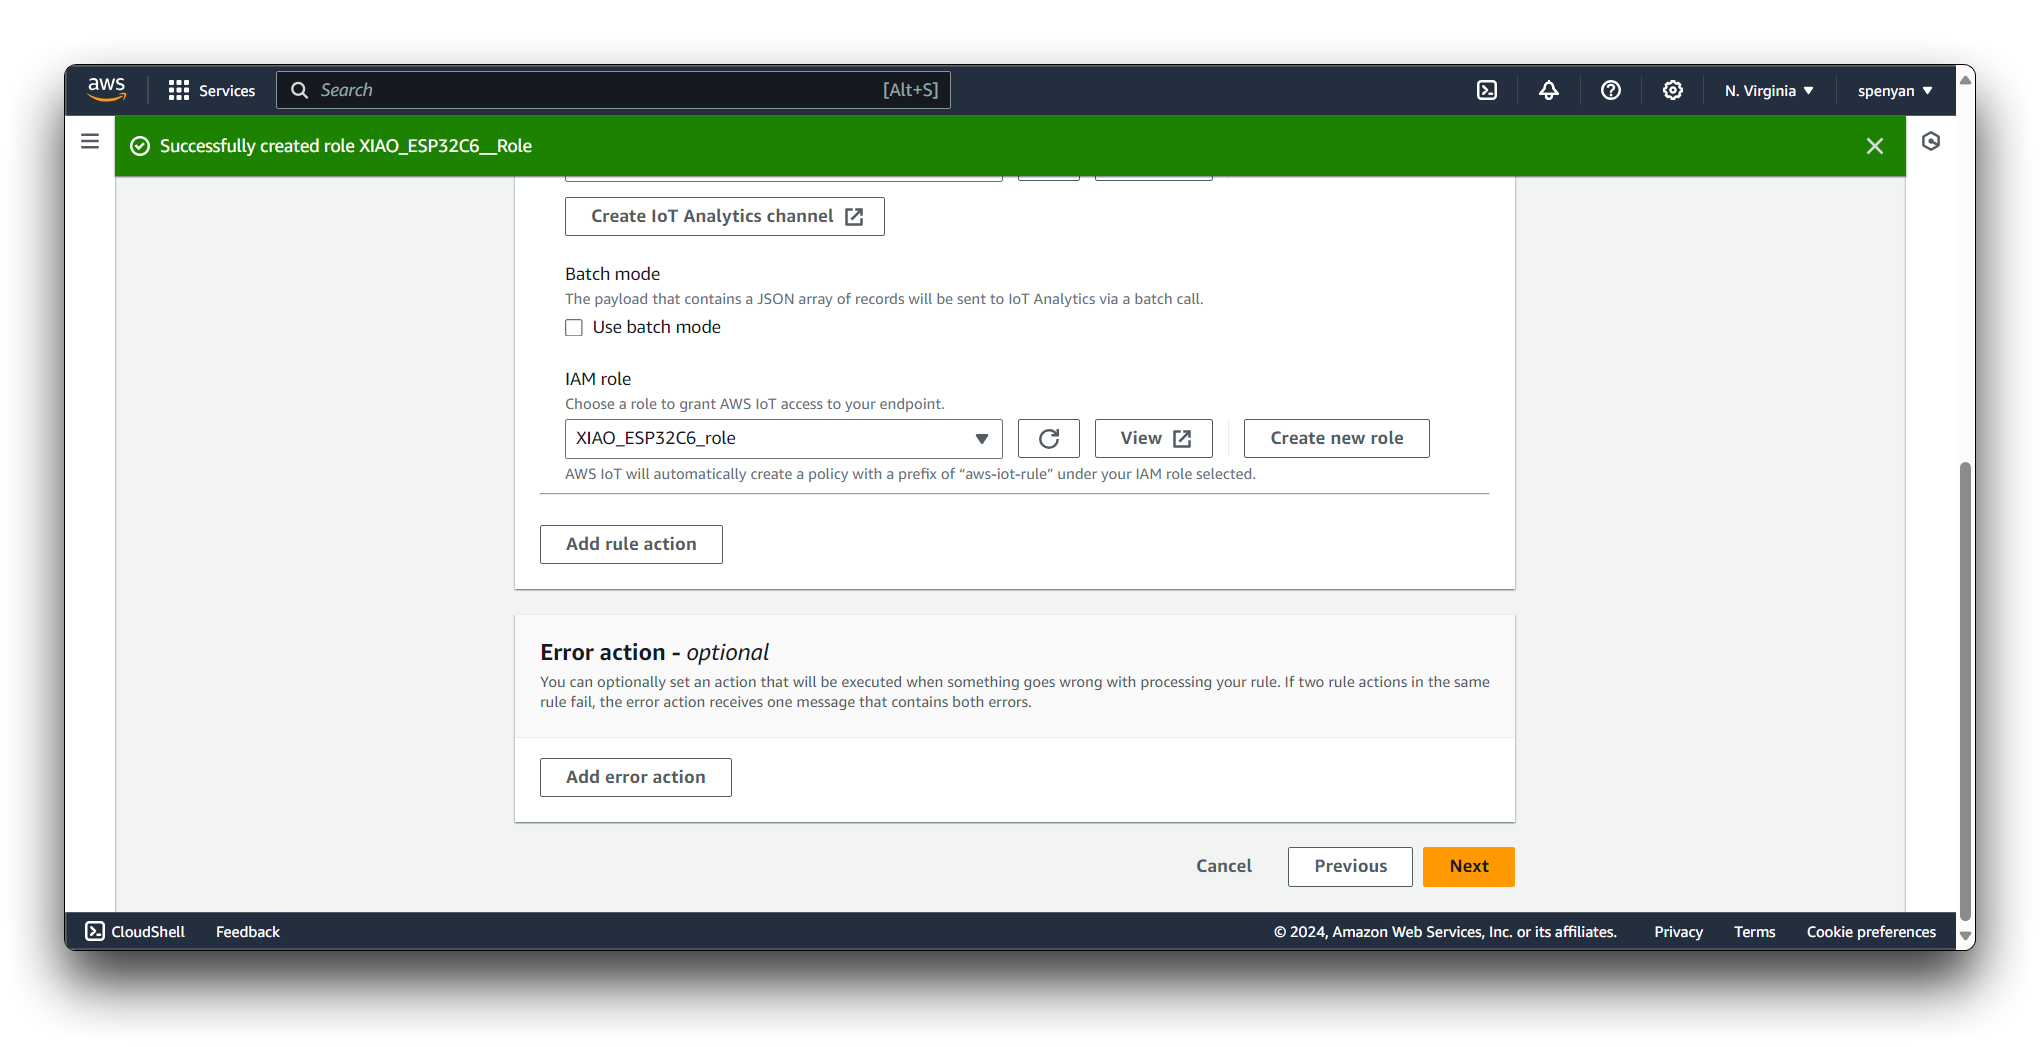
Review your Rule configuration and click on the "Create Rule" button to save and activate the Rule.
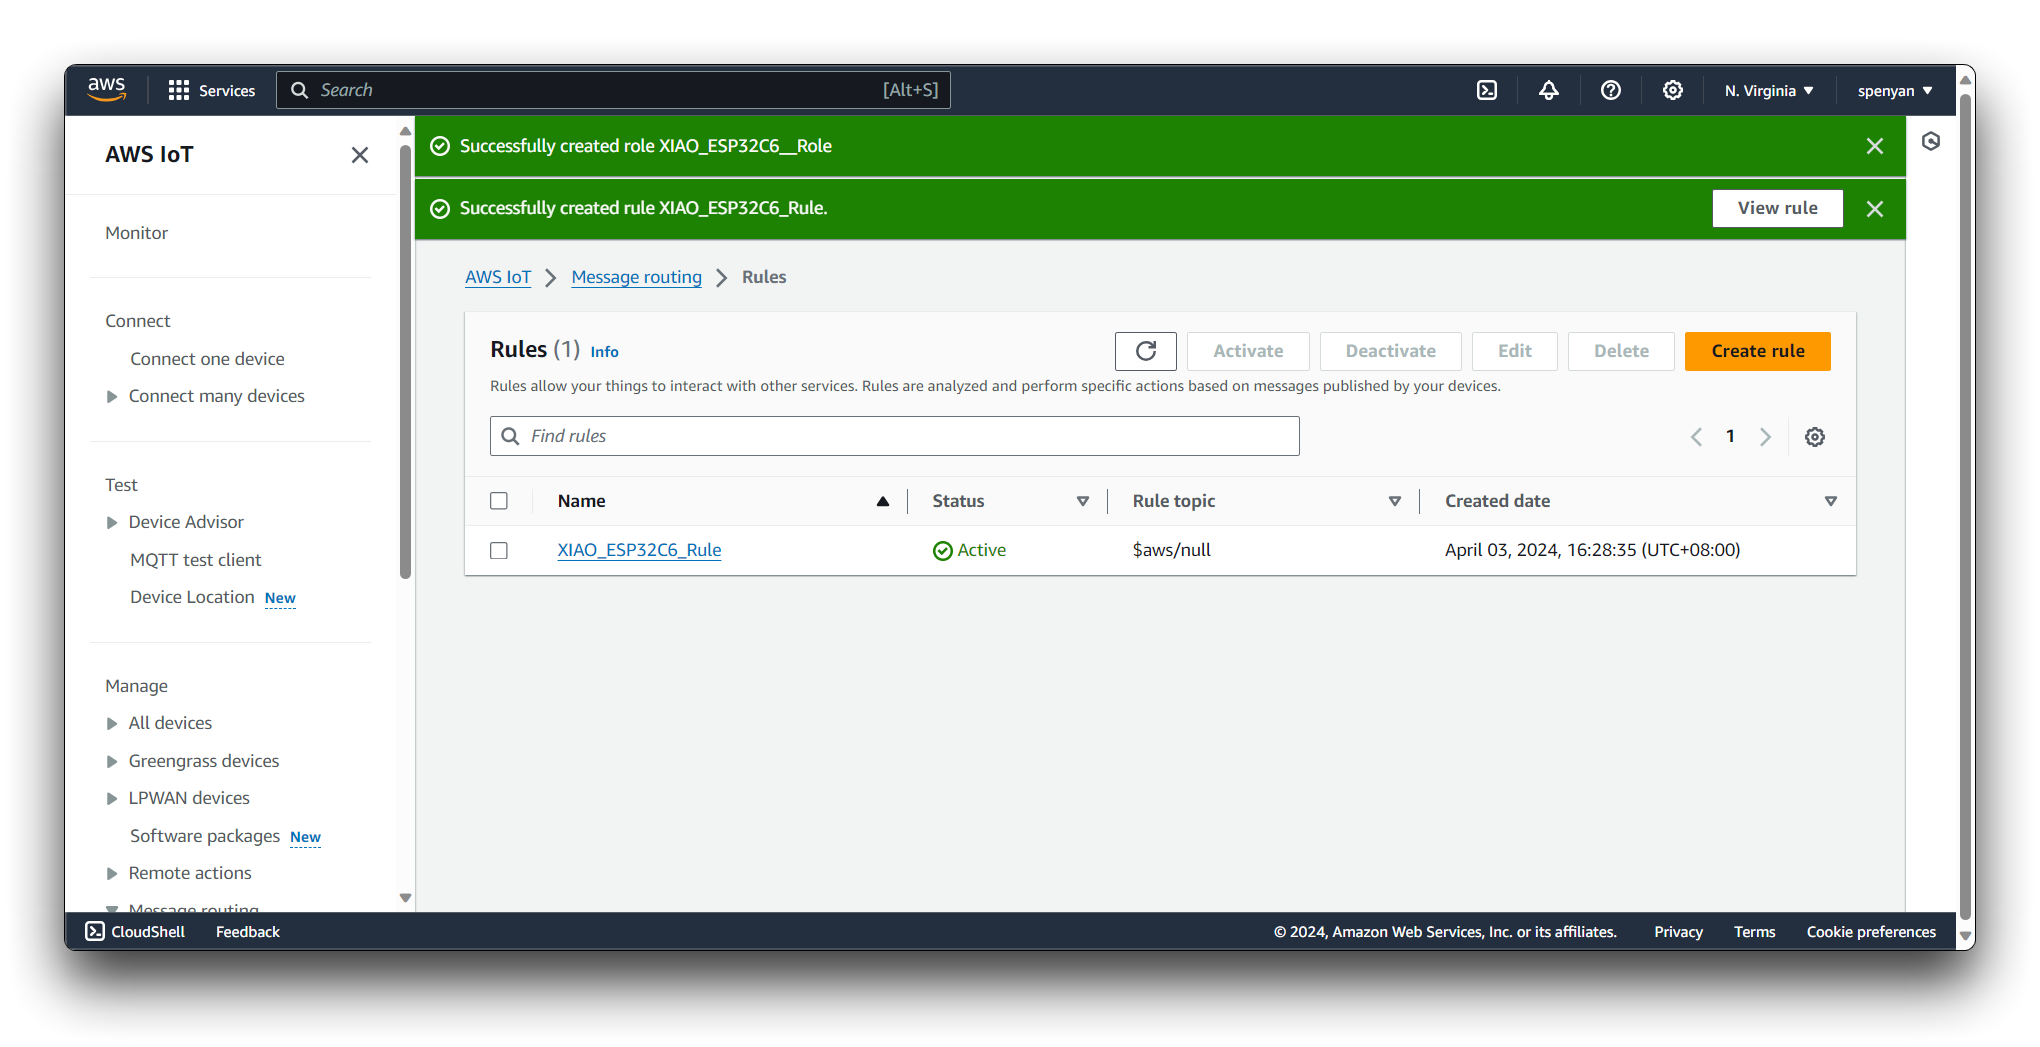
Once the Rule is created, it starts processing incoming MQTT messages that match the defined Rule Query Statement. The Rule Actions are executed whenever the Rule is triggered, allowing you to route and process the data according to your specific requirements.
You can create multiple Rules in AWS IoT to handle different scenarios and data processing needs. Rules provide a flexible and scalable way to integrate your IoT devices with various AWS services and build powerful IoT applications.
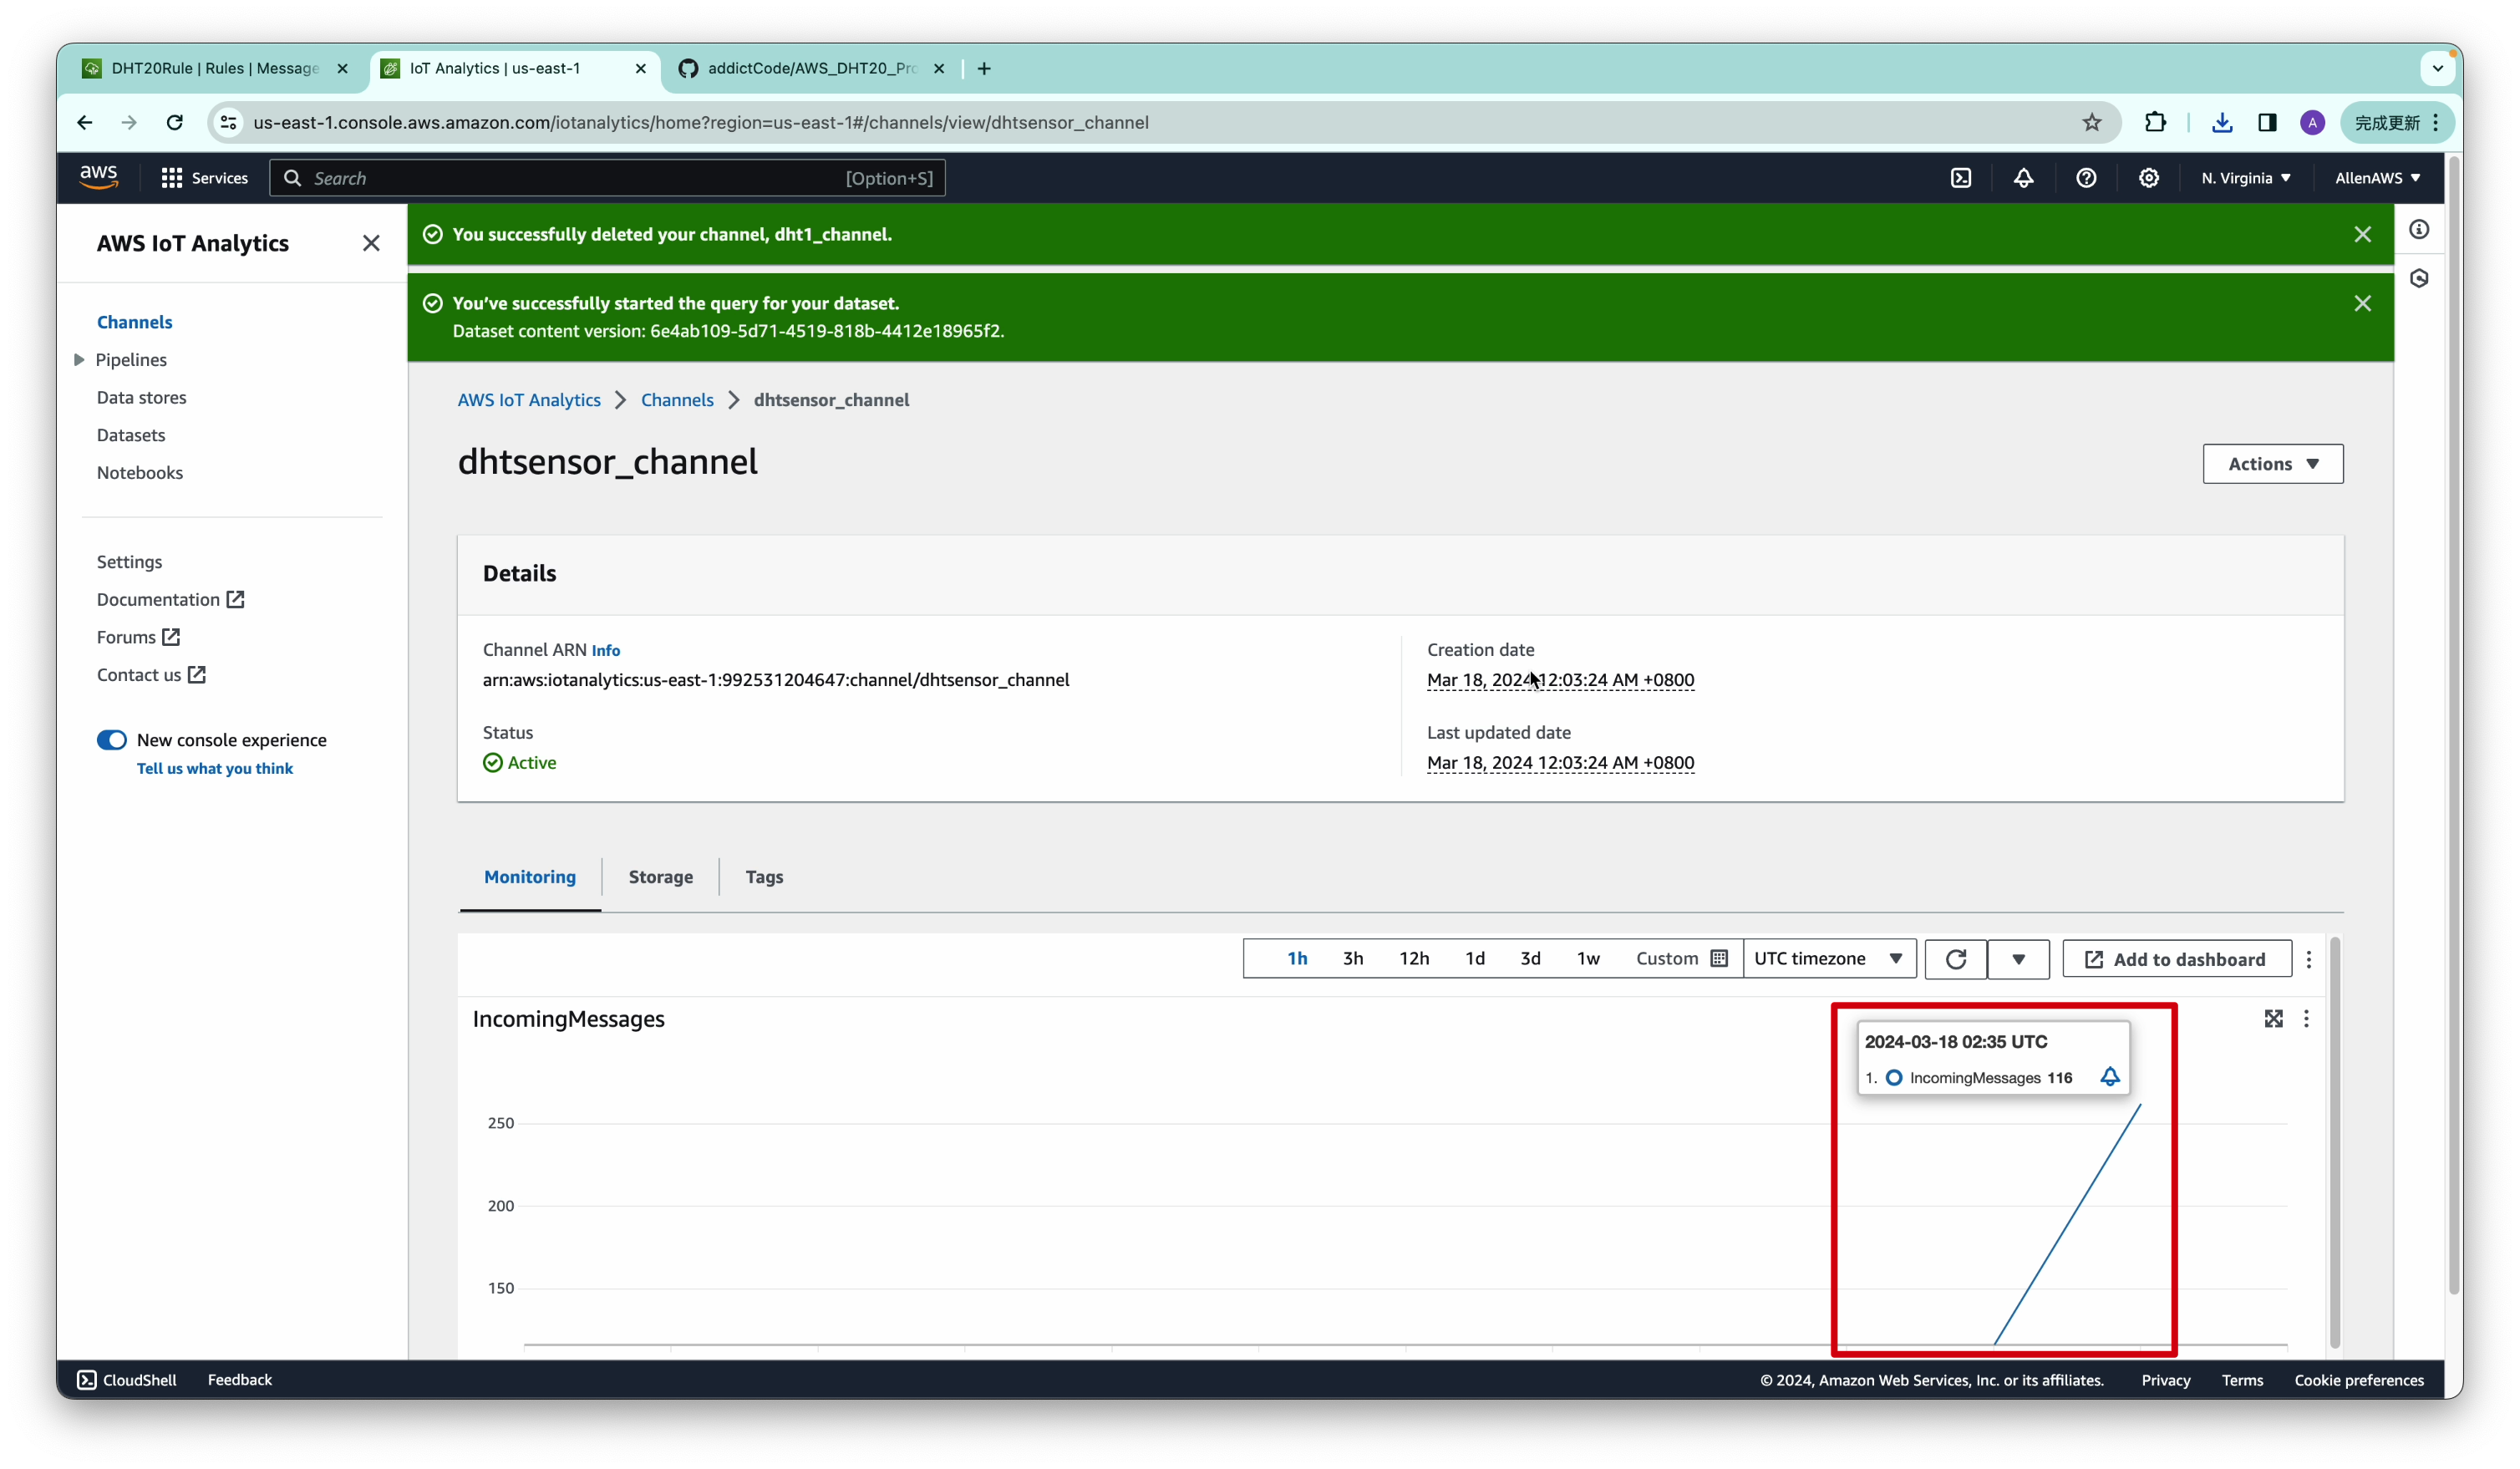
Step 7. Stores sensor data streams
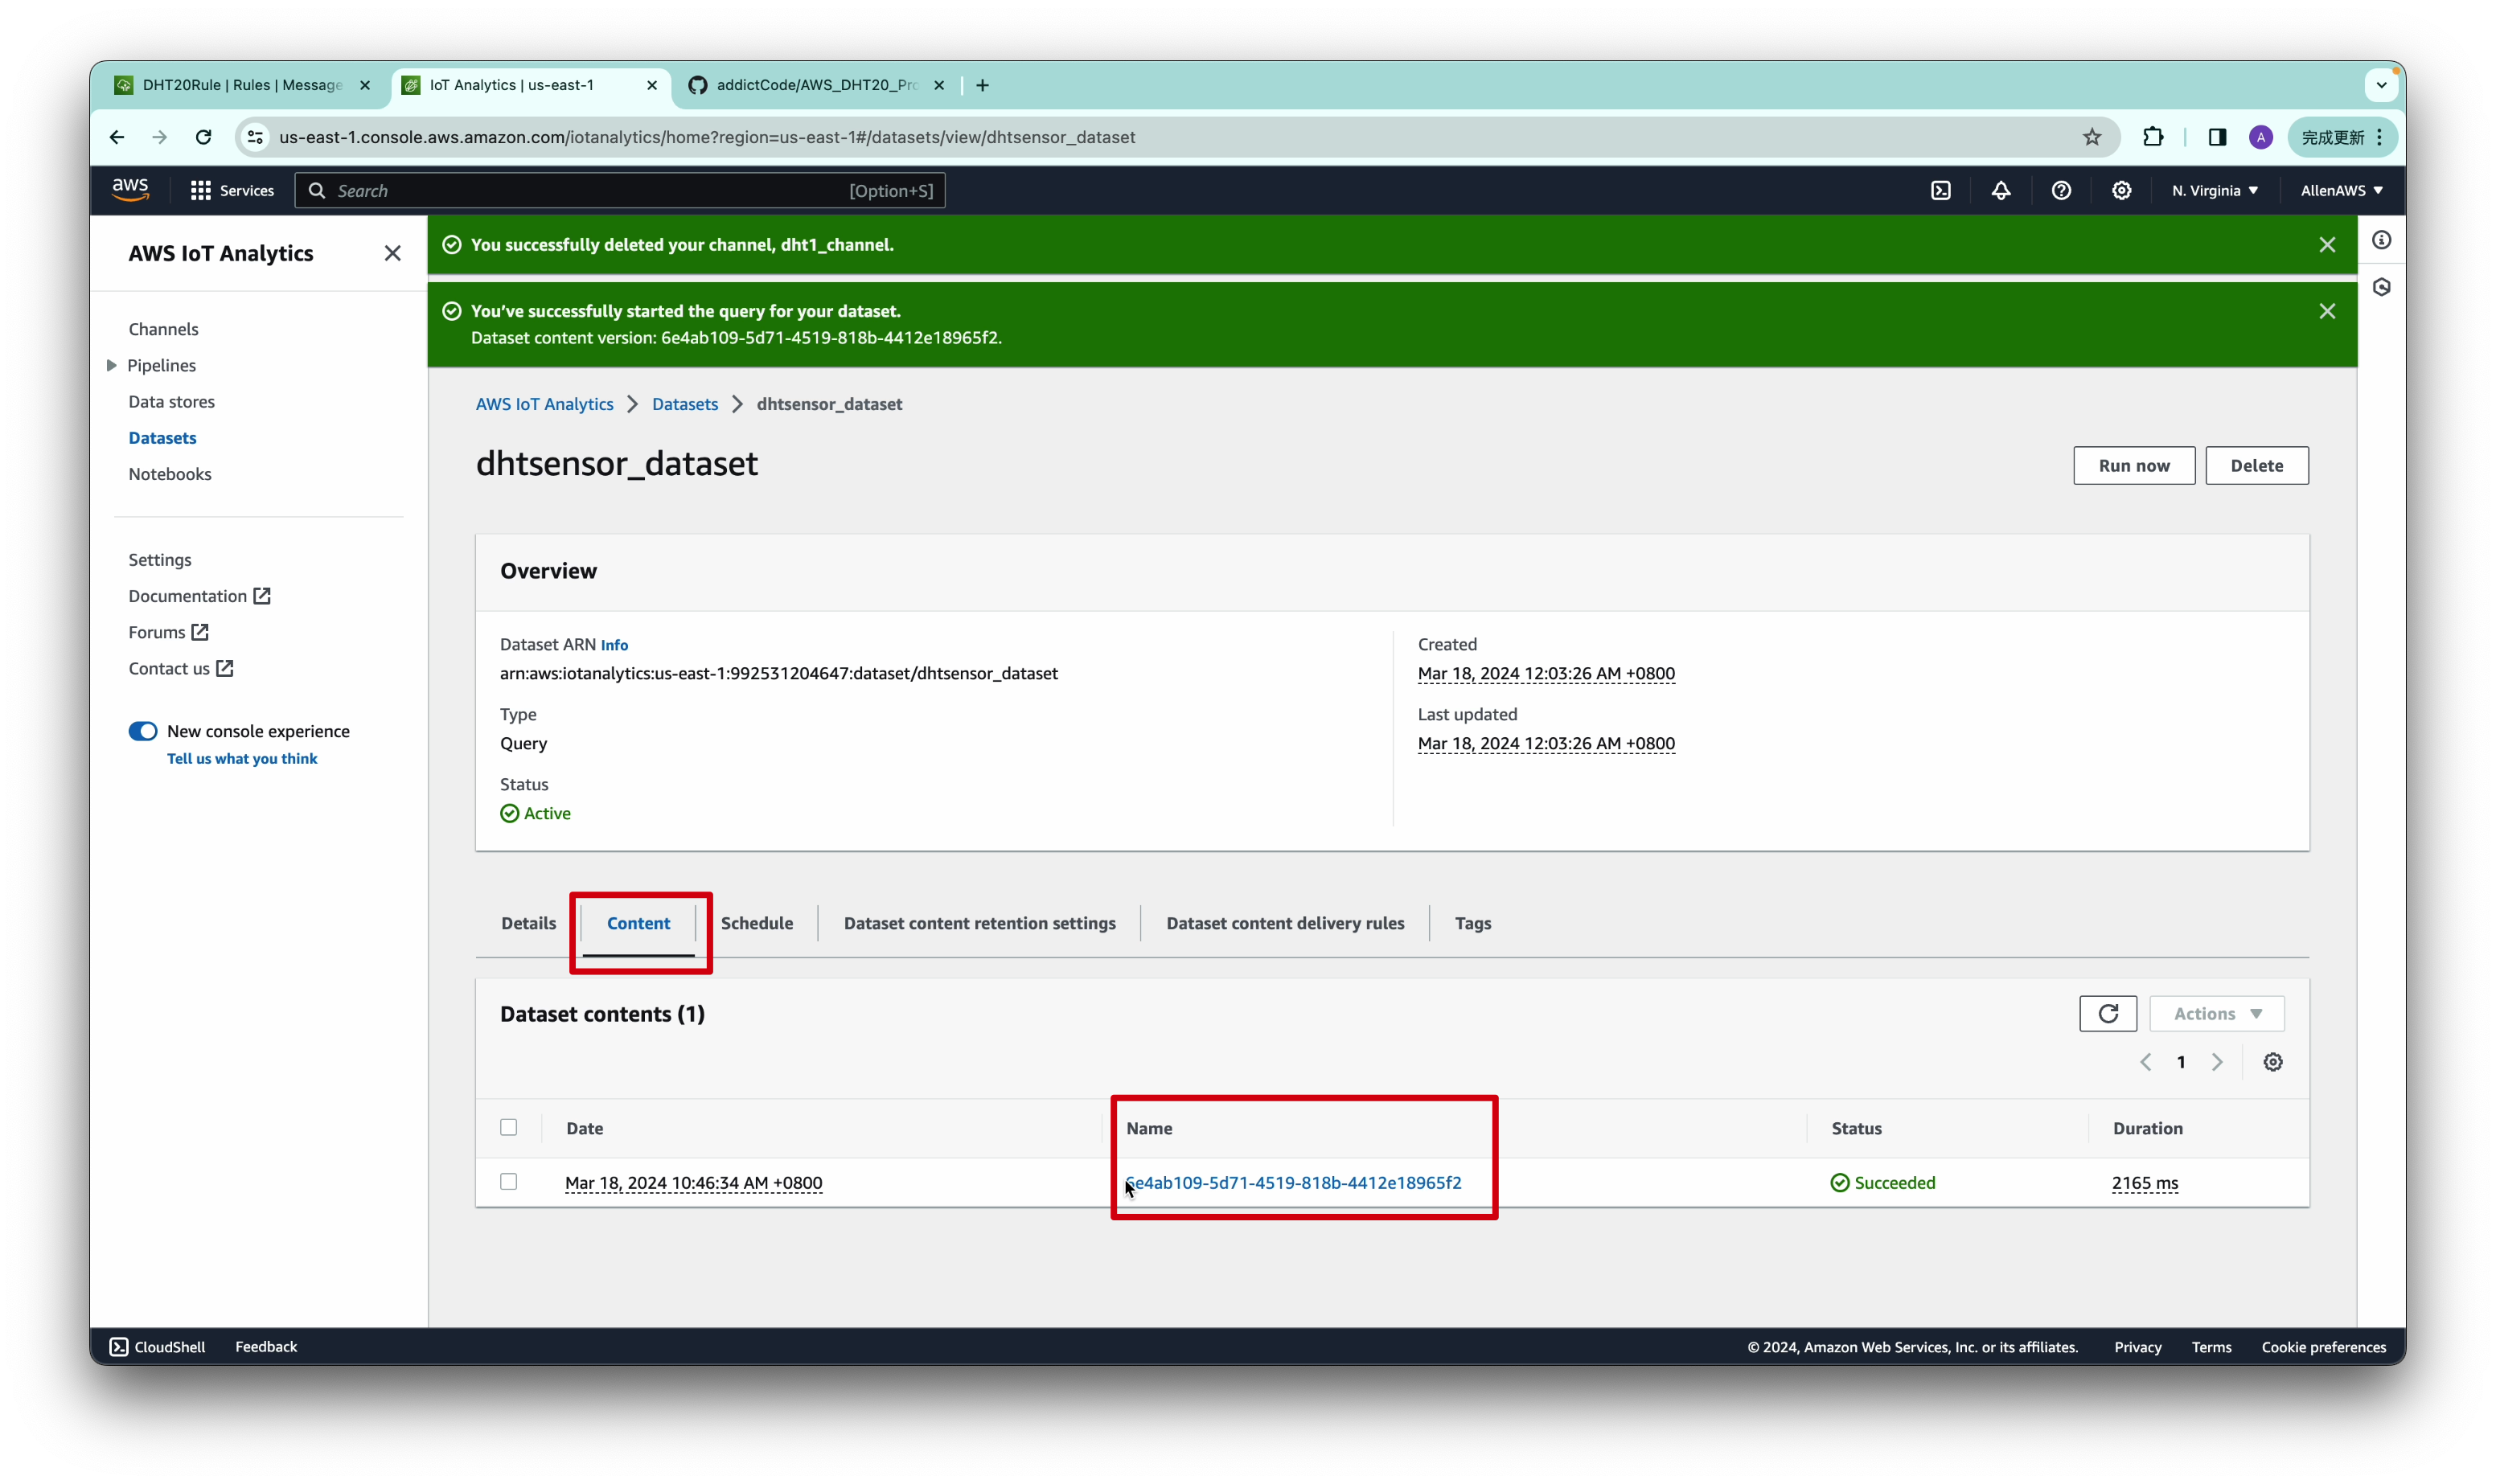
Navigate to the AWS IoT Analytics service. In the AWS IoT Analytics dashboard, click on the Datasets option in the left sidebar. Locate the dataset that contains the data you want to download and click on its name to open the dataset details page.
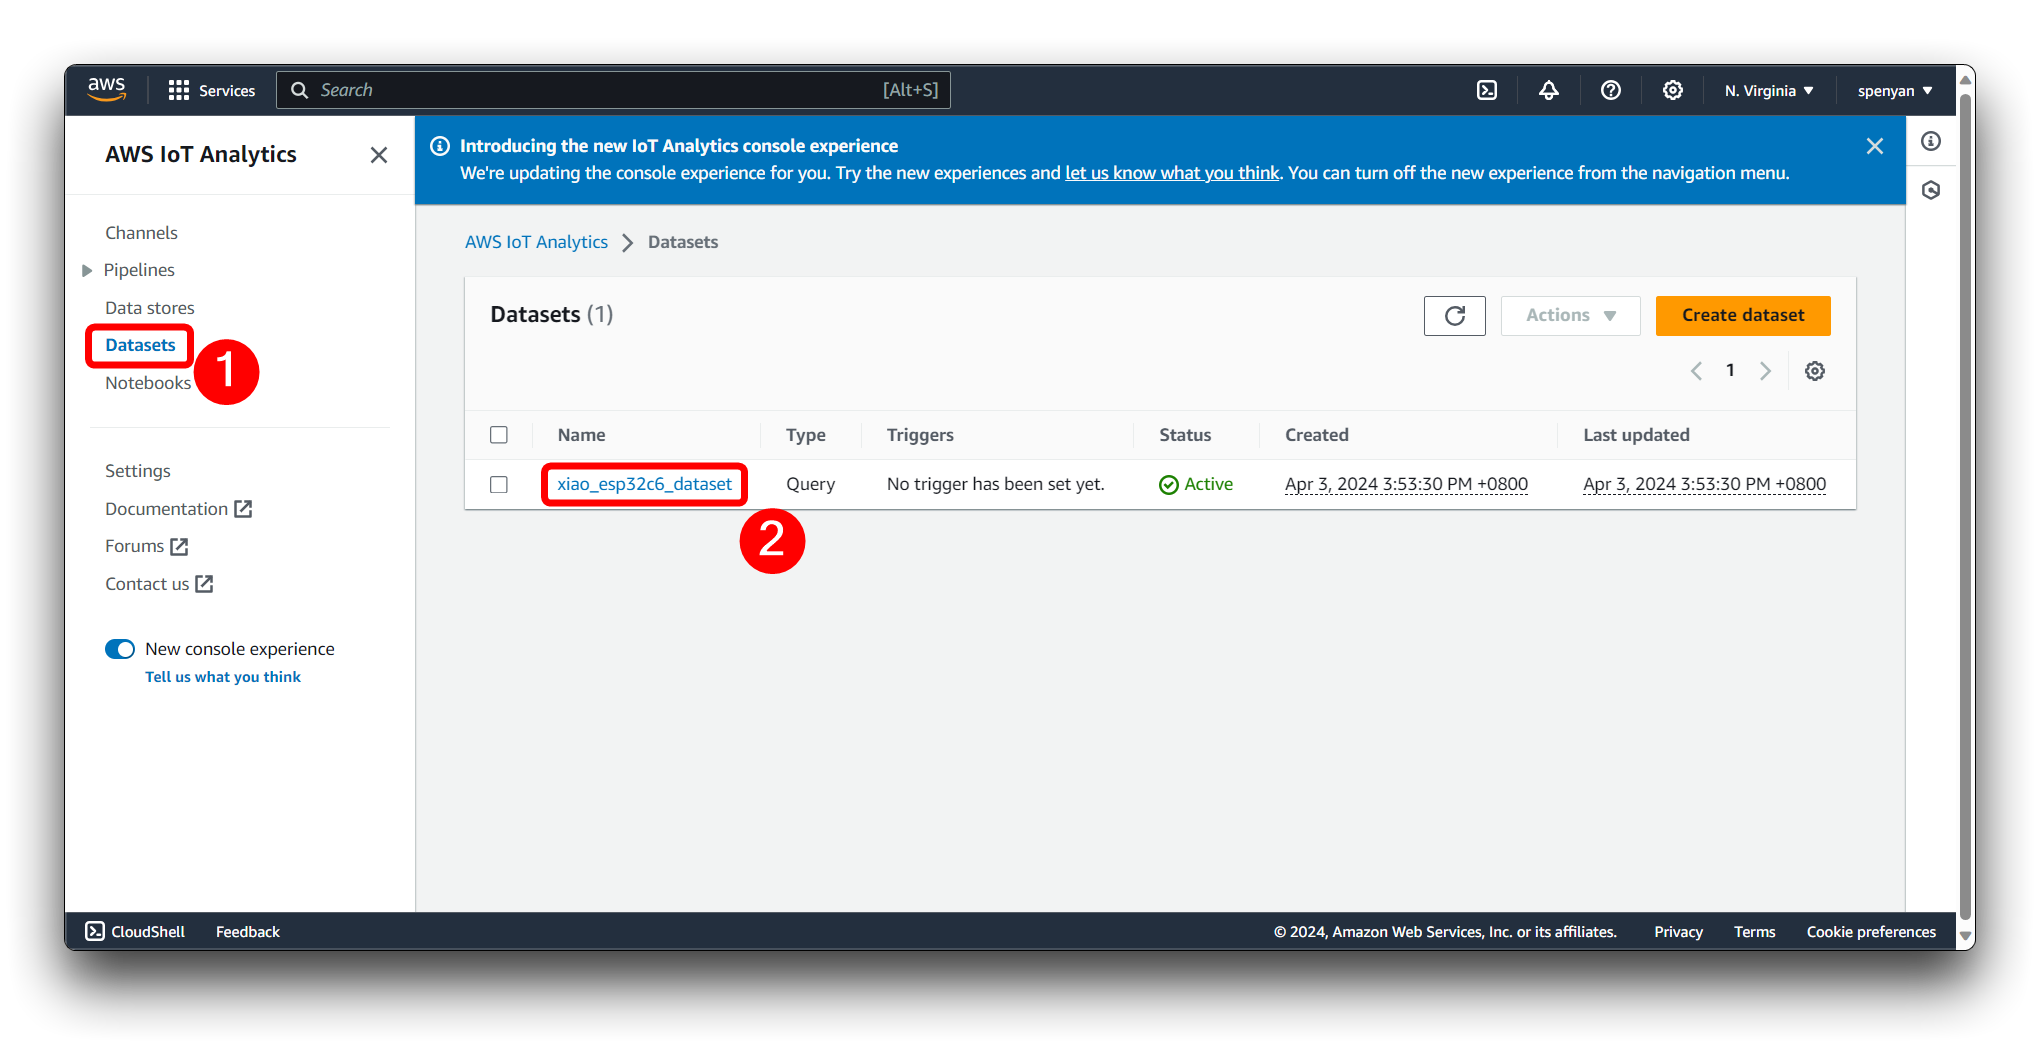
Before downloading the dataset content, you need to manually trigger the dataset generation. Select Run now.
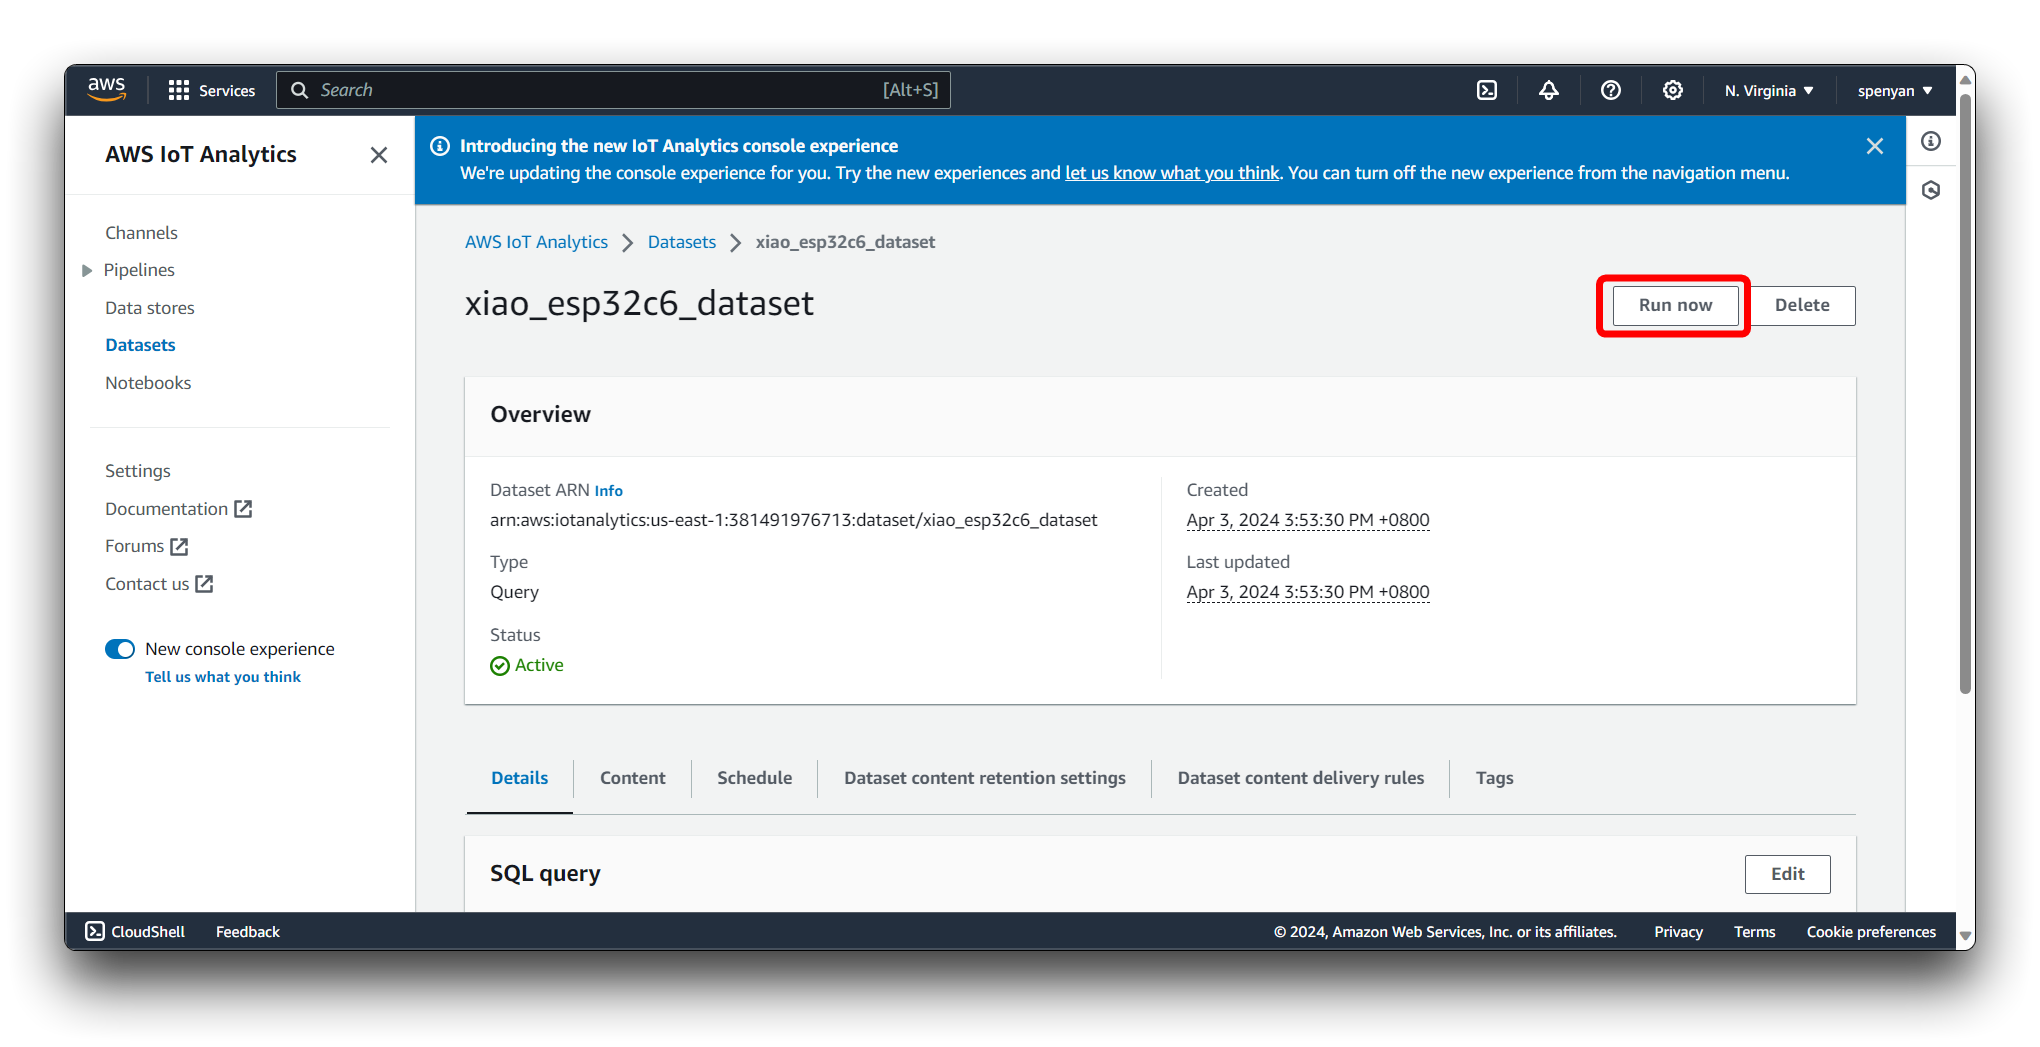
AWS IoT Analytics will process the data and prepare the dataset content based on the specified time range. Based on reporting sensor data once per second, we recommend a data collection time of at least greater than or equal to one hour in a normal environment. This ensures the accuracy of the data.
Wait for the dataset generation to complete. You can monitor the progress in the dataset details page. Once the status changes to "SUCCEEDED", the dataset content is ready for download.
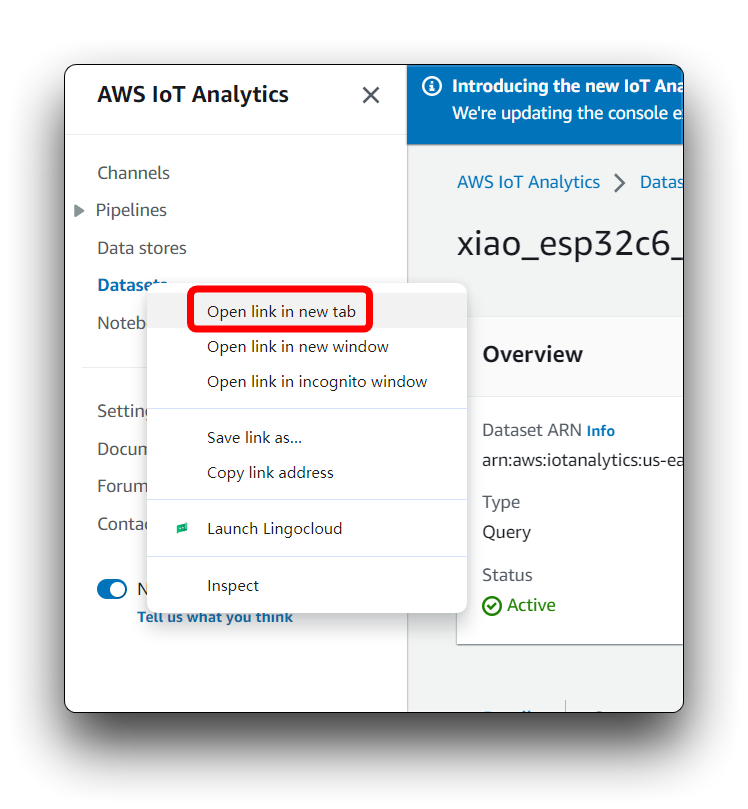
If XIAO's programme works fine, but you don't see any data information in Dataset, you can right mouse click on Dataset's tab and open it in a new browser page, this may solve your problem.
In the dataset details page, you will see information about the dataset, including its name, status, and the last update time.
Use AWS Sagemaker to train data in normal environments
With AWS Sagemaker, we train machine learning models to recognize patterns indicative of a normal environment. Sagemaker offers a comprehensive platform that facilitates the development, training, and deployment of machine learning models, enabling intelligent processing of environmental data.
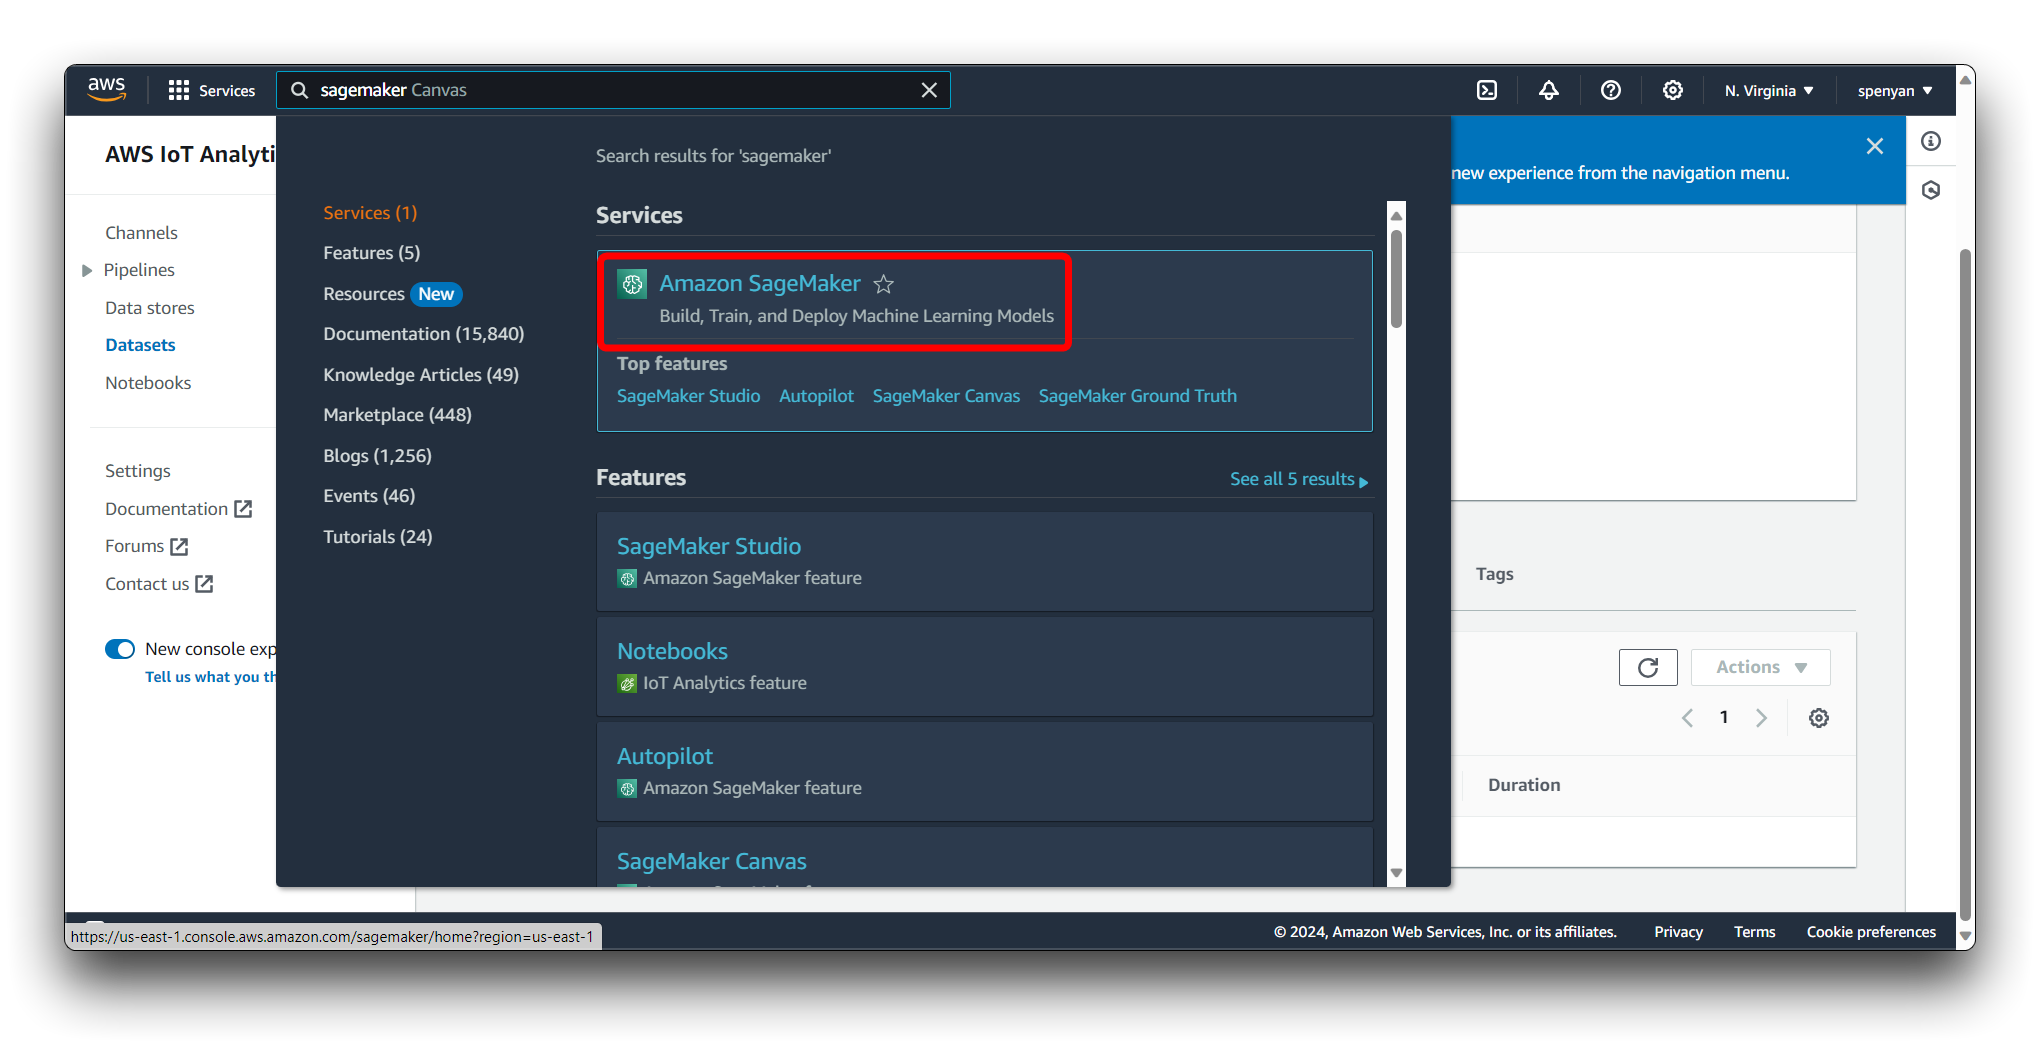
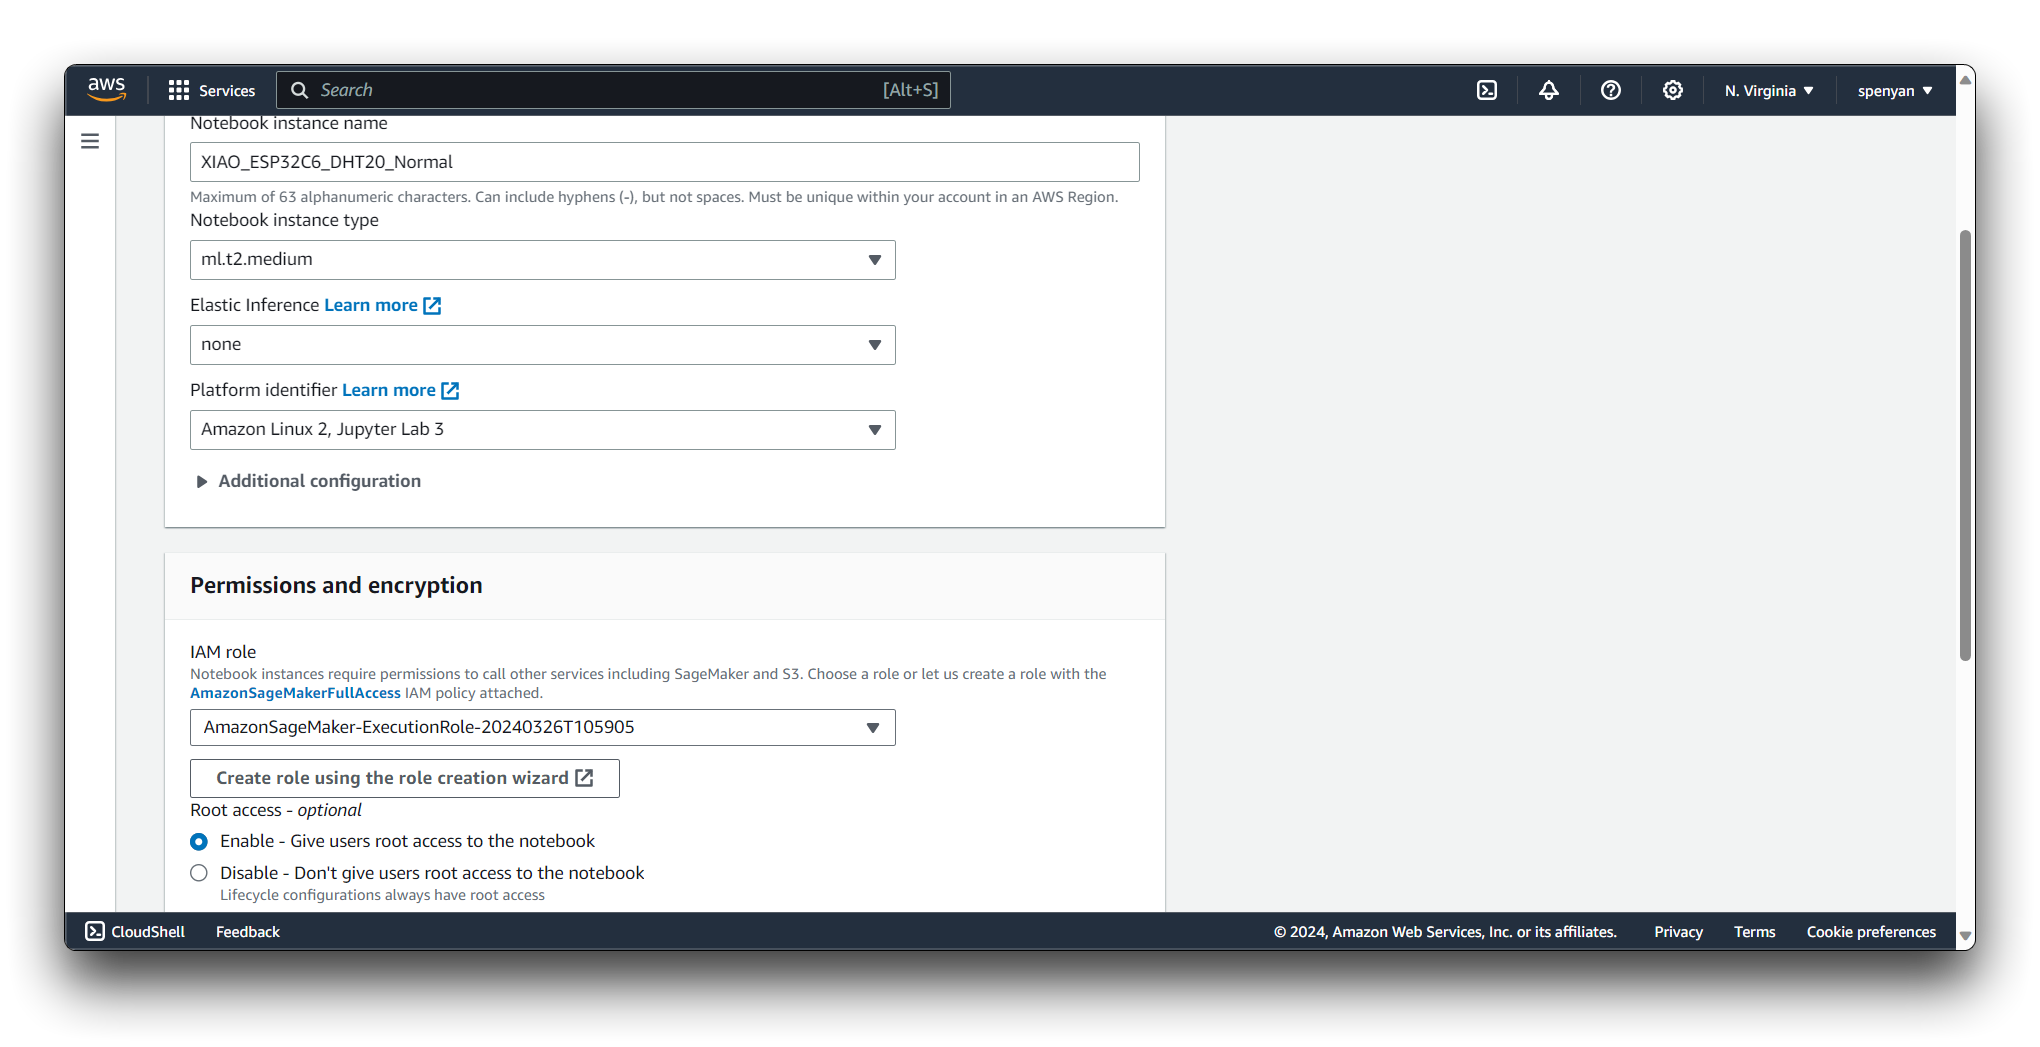
Step 8. Create a new notebook instance
Navigate to the Amazon SageMaker service in the AWS Management Console.
Click on Notebook instances in the SageMaker dashboard. Click the Create notebook instance button.
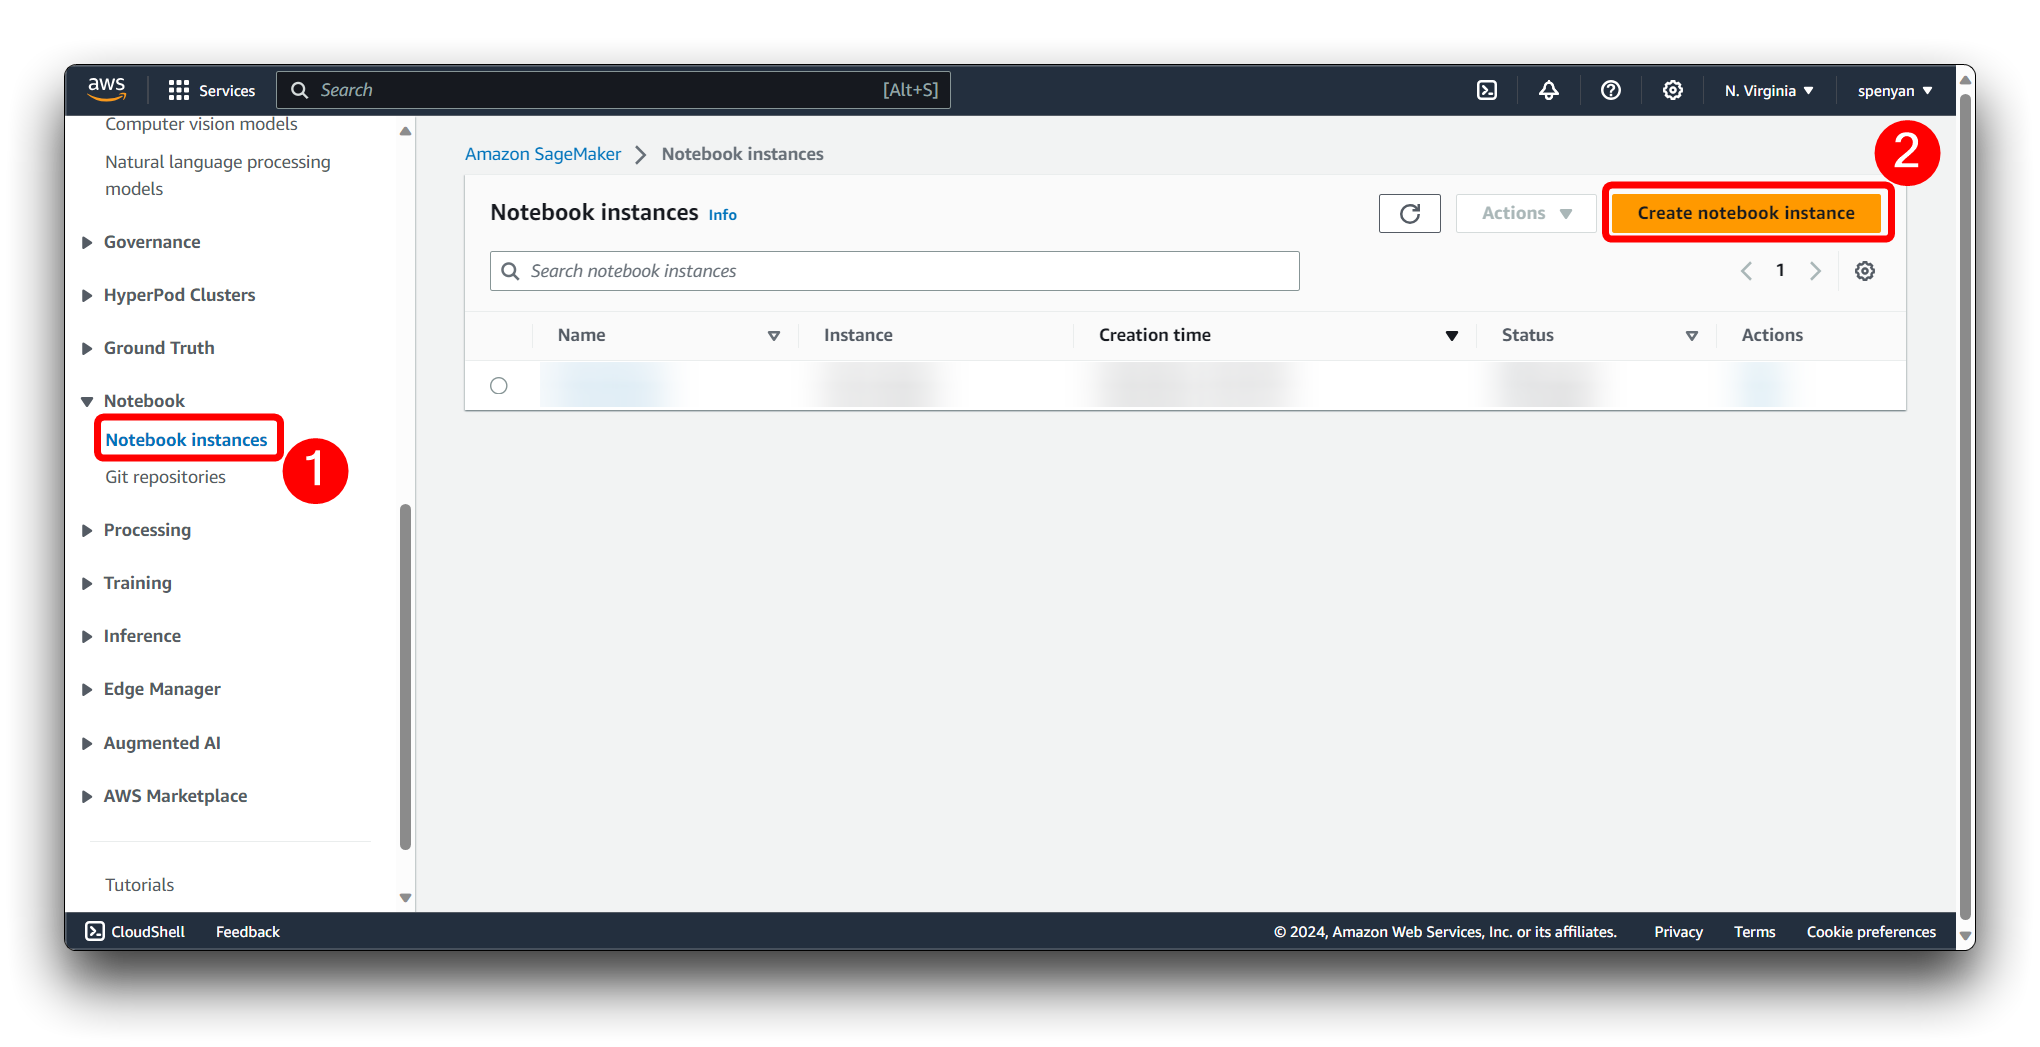
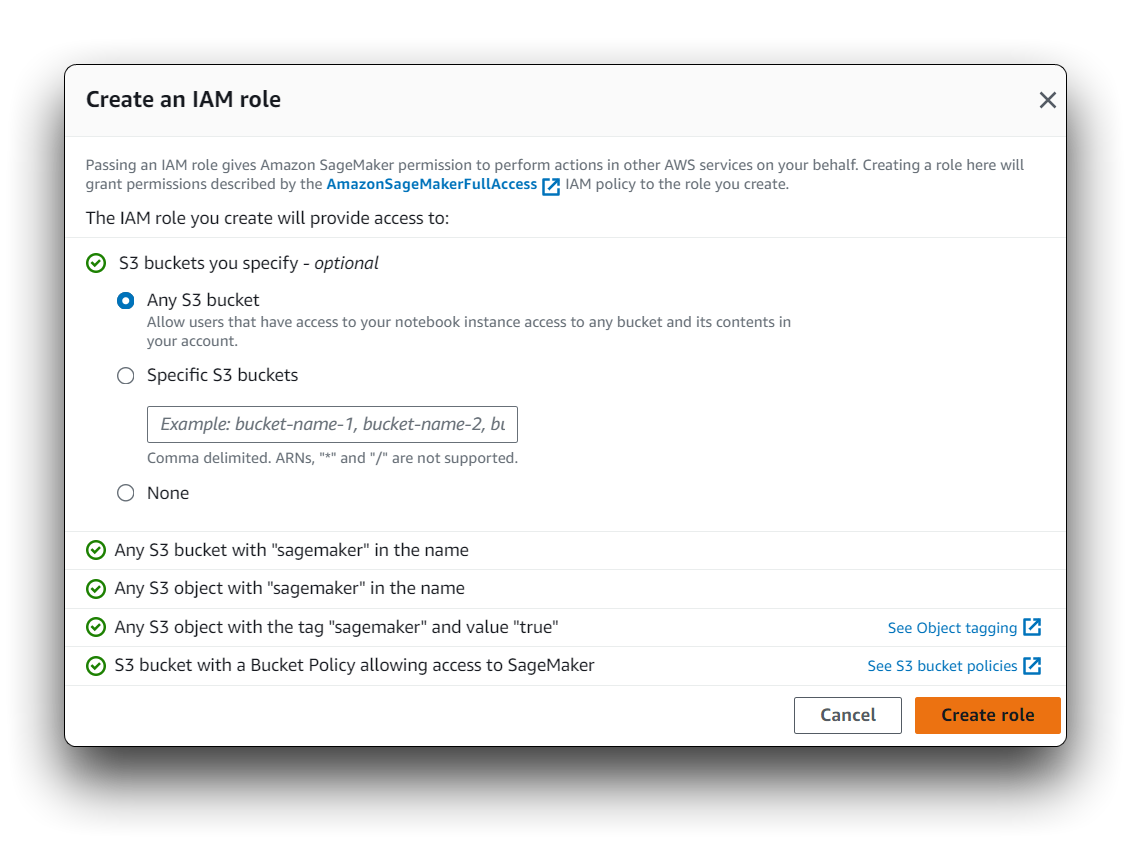
Fill in the necessary information such as instance type and IAM role. Make sure the IAM role has necessary permissions to access the S3 bucket where your data is stored.
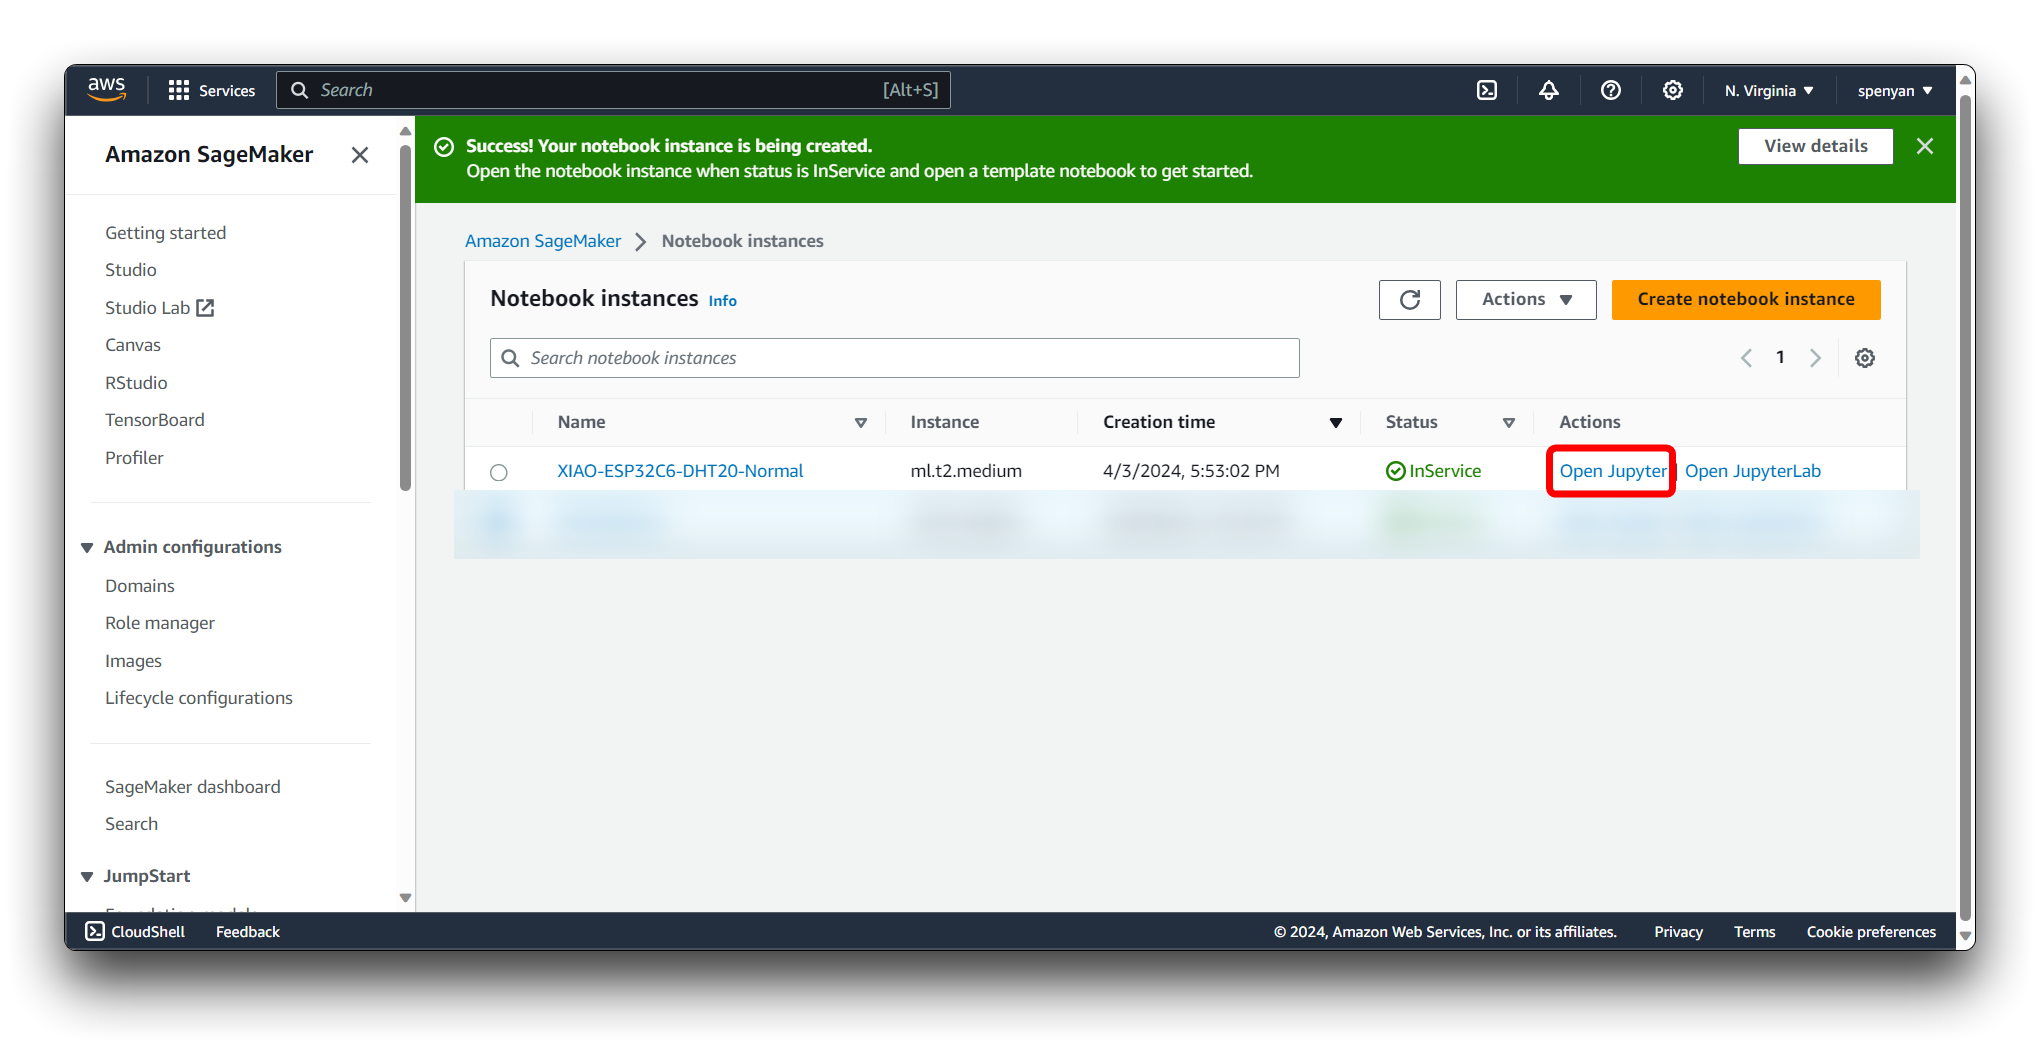
Once the instance status is InService, open the Jupyter notebook interface by clicking the Open Jupyter link.
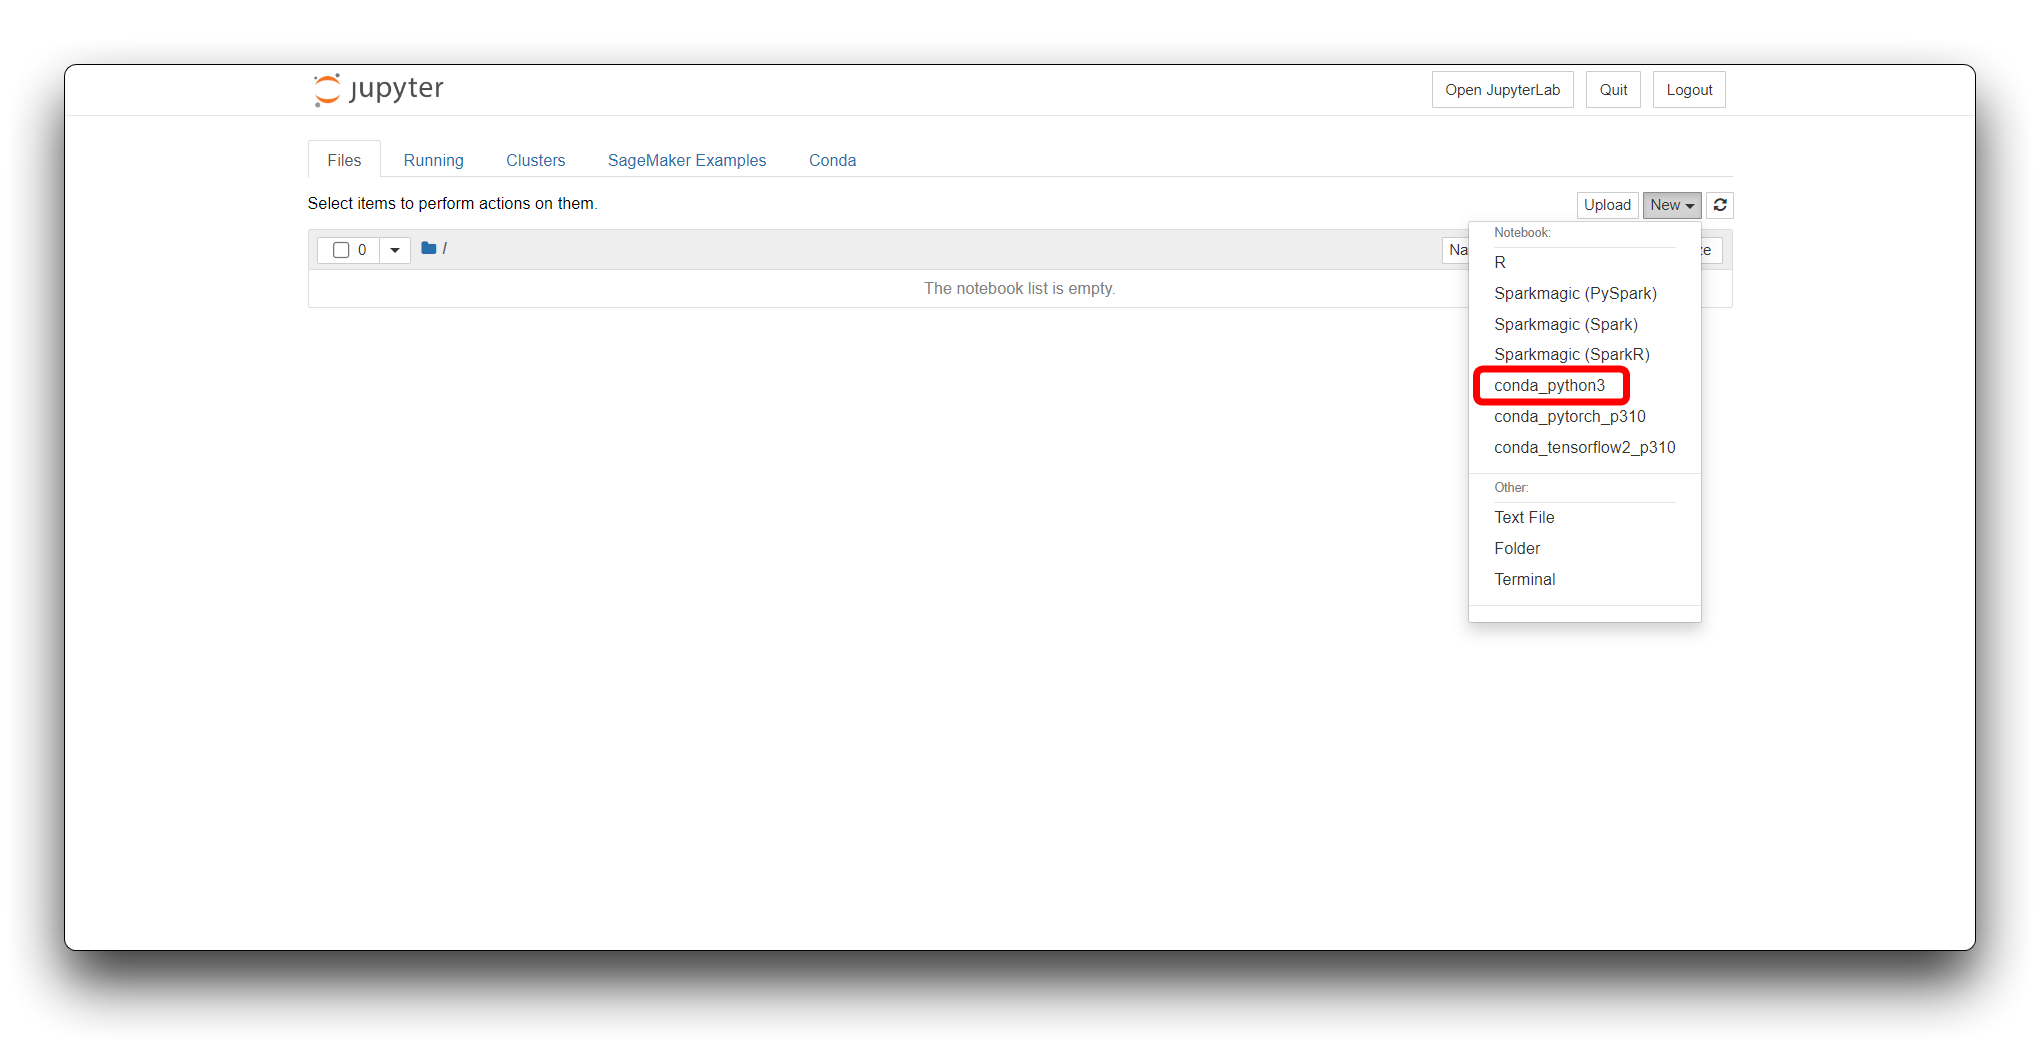
Once opened, we select conda_python3 as our code environment.
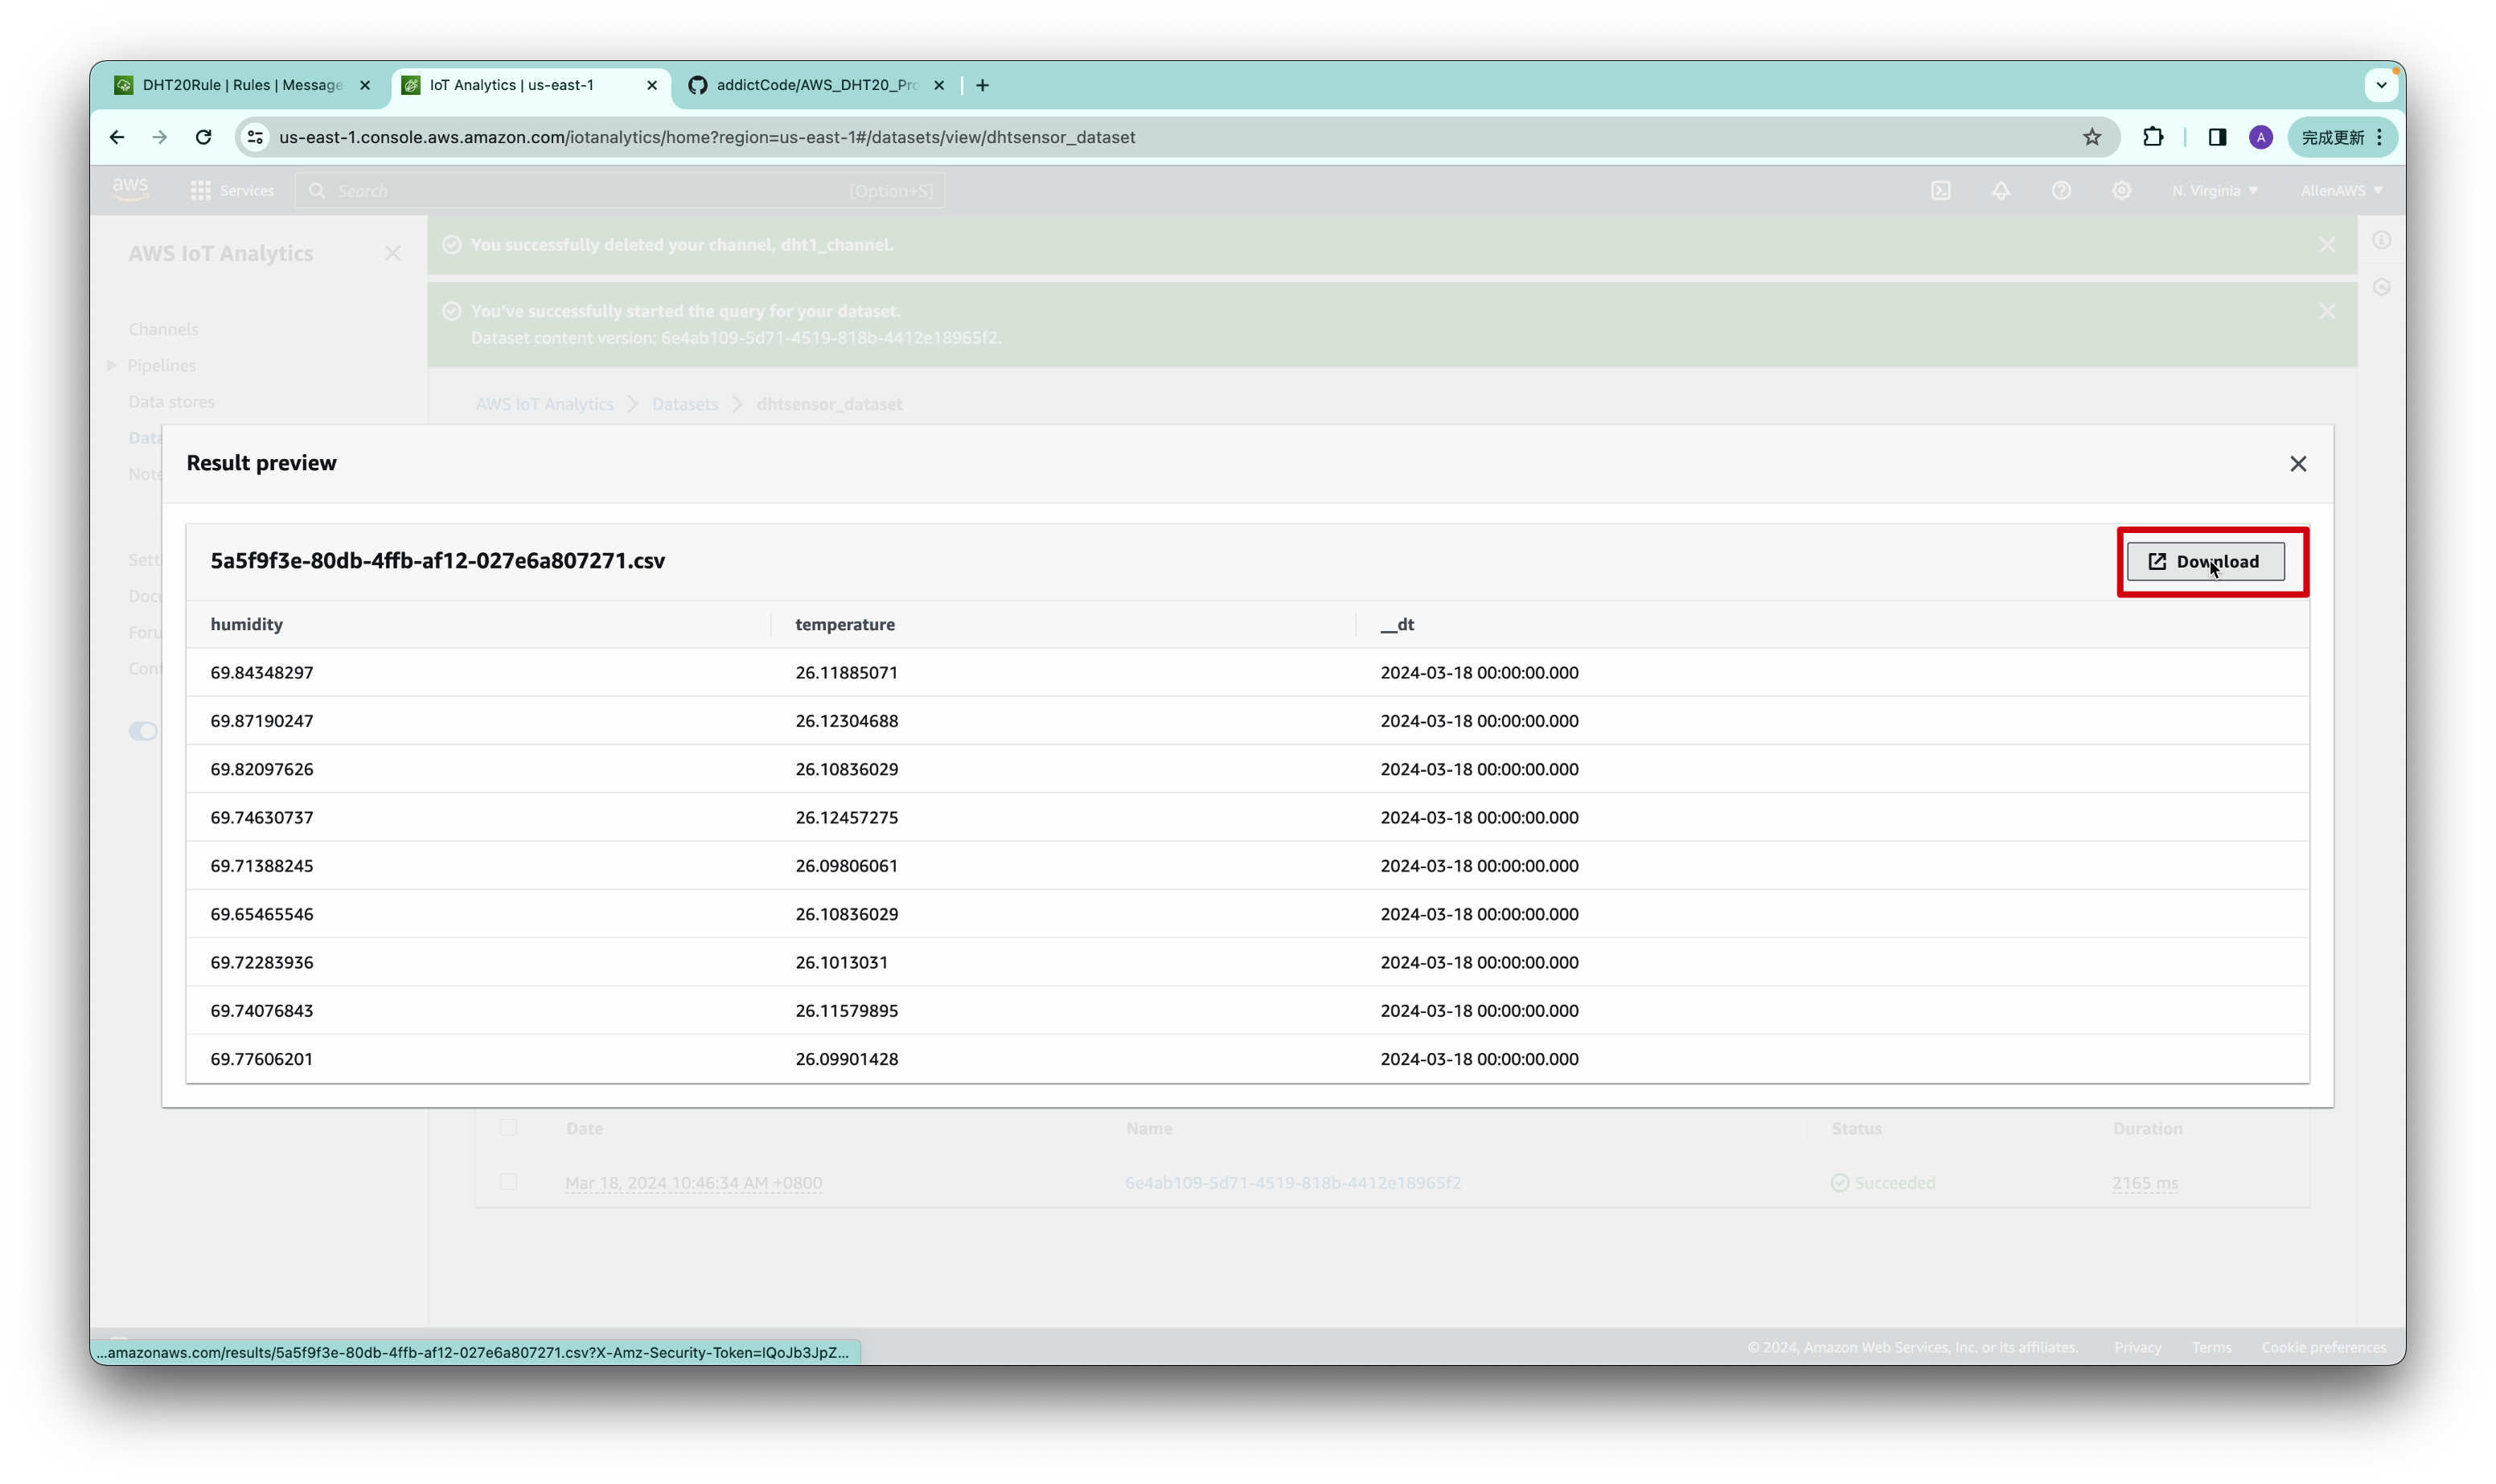
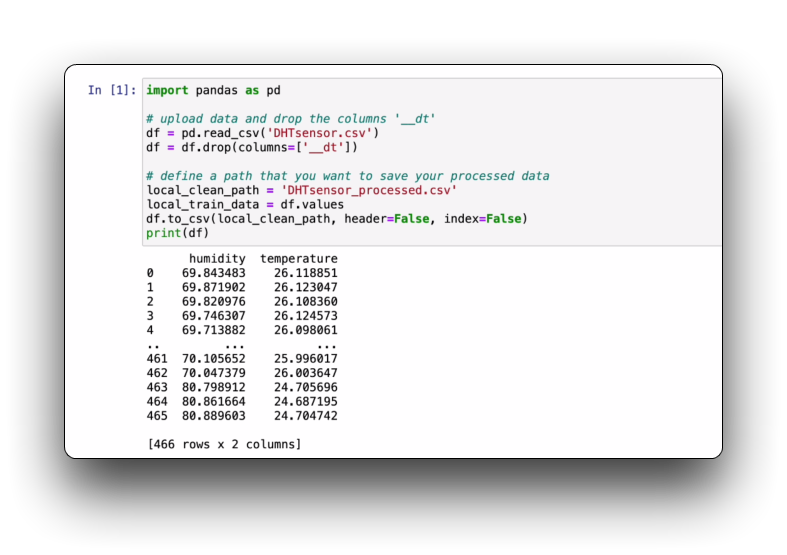
Then, we need to upload our collected dataset. This dataset we have downloaded locally to our computer in Step 7.
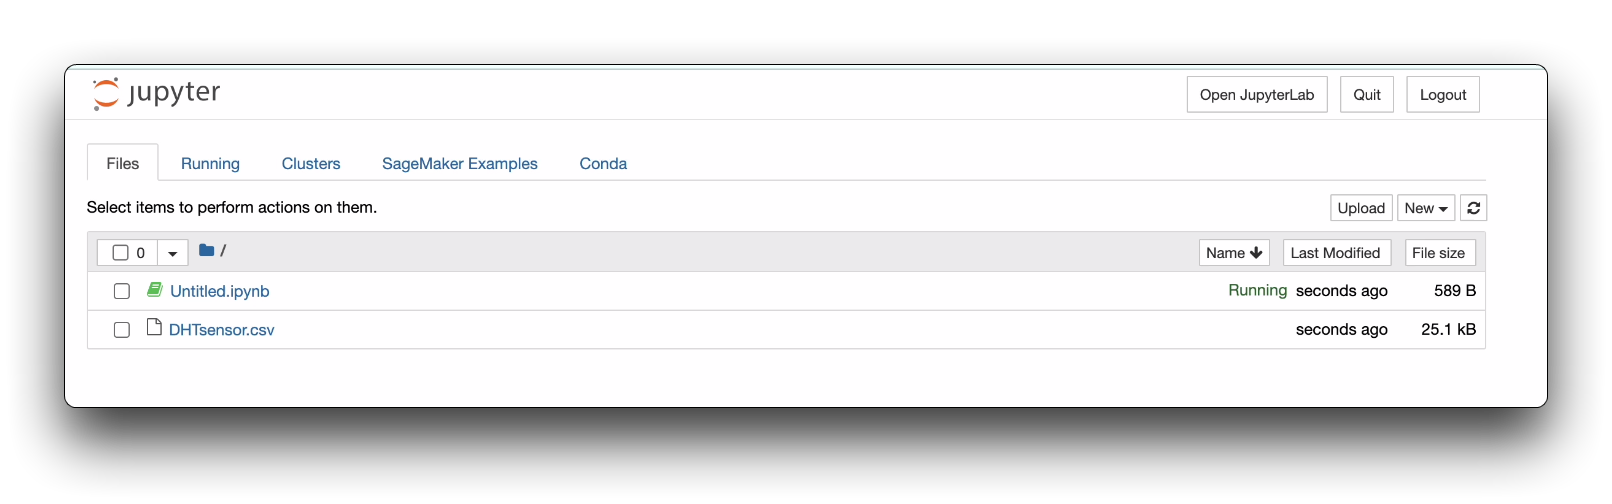
Then, we can enter our prepared program inside Jupyter Notebook. Or you can choose to directly upload the program we provided.
Run the first section of the programme to check that the collection data you have imported is OK. You may need to change the name of the file in the code to your filename.
Step 9: Run all Jupyter Notebook
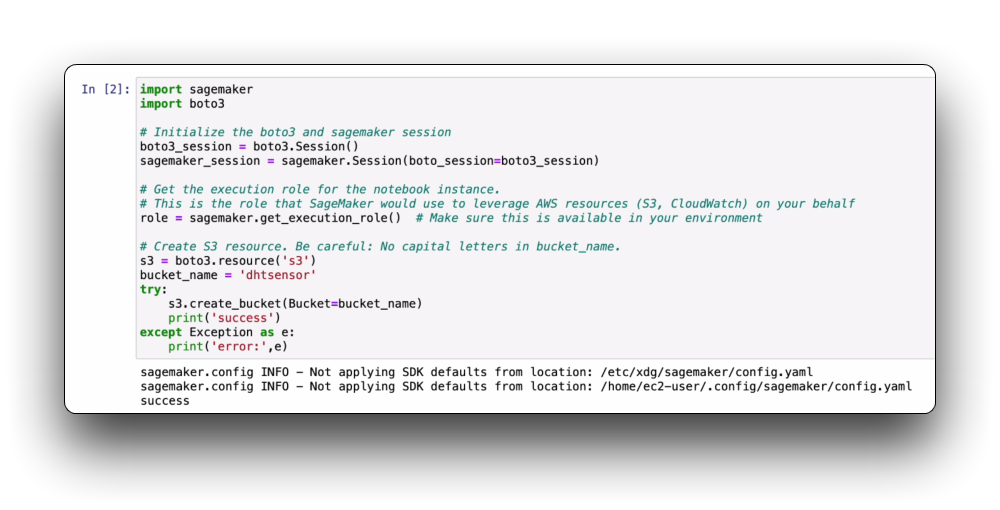
S3 is used to store training datasets, test datasets, model artifacts, etc. In SageMaker, data sources typically come from S3 buckets. Model saving: Trained models are also saved in S3 for subsequent deployment and inference.
Then, please copy the second code block and name the field bucket_name.
Then, just run the blocks in Jupyter Notebook one by one.
There are some paths or names in Jupyter Notebook that need to be modified as follows before they can be run.
- The value of ENDPOINT_NAME in the In[22] code block is the result after running the In[19] code block.
- Please set the bucket_name of In[3] and In[10] code blocks to the same name.
- API_ENDPOINT for the last code block, use your own values.
Step 10. Configure AWS Lambda
Lambda can be used as a trigger for SageMaker workflows. For example, when data is uploaded to S3, it can trigger a Lambda function to start a SageMaker training or processing job.
Sign in to the AWS Management Console and navigate to the AWS Lambda service.
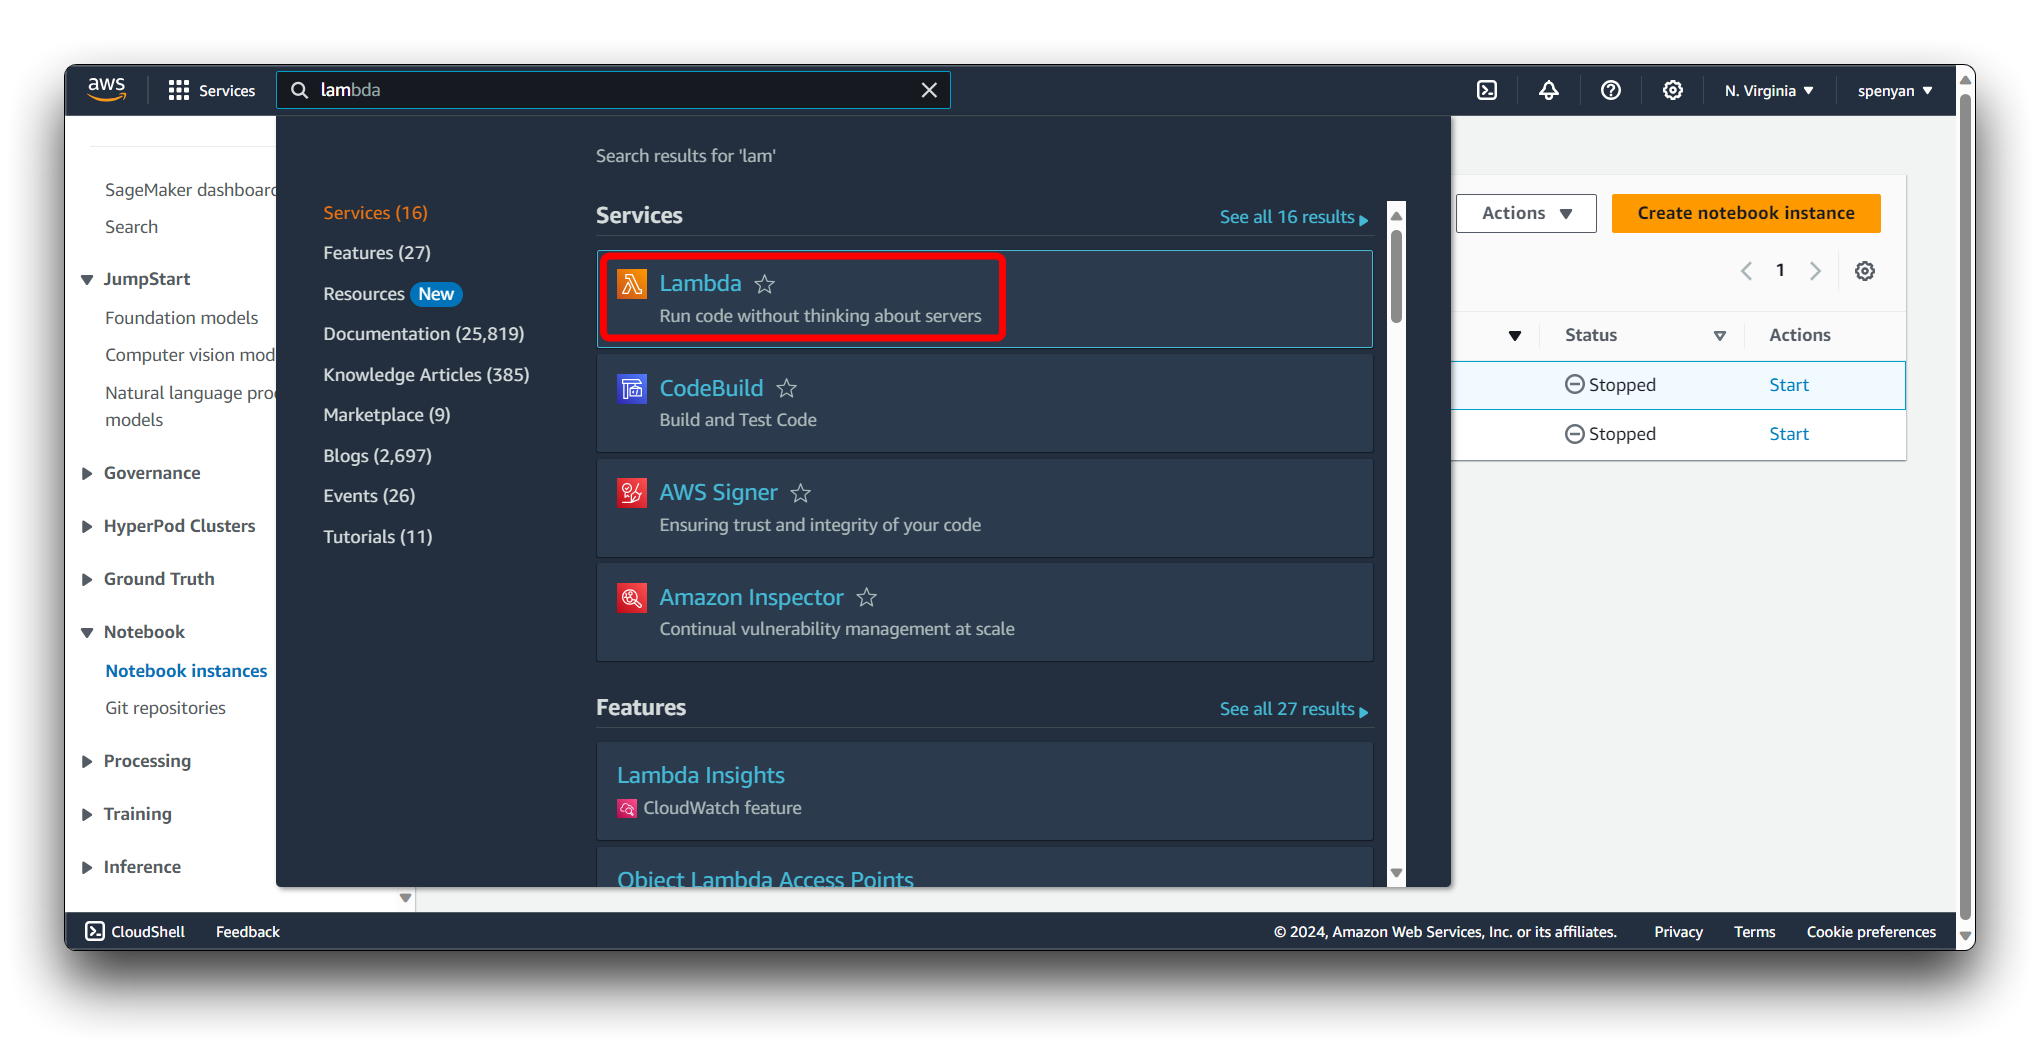
Click on the Create function button.
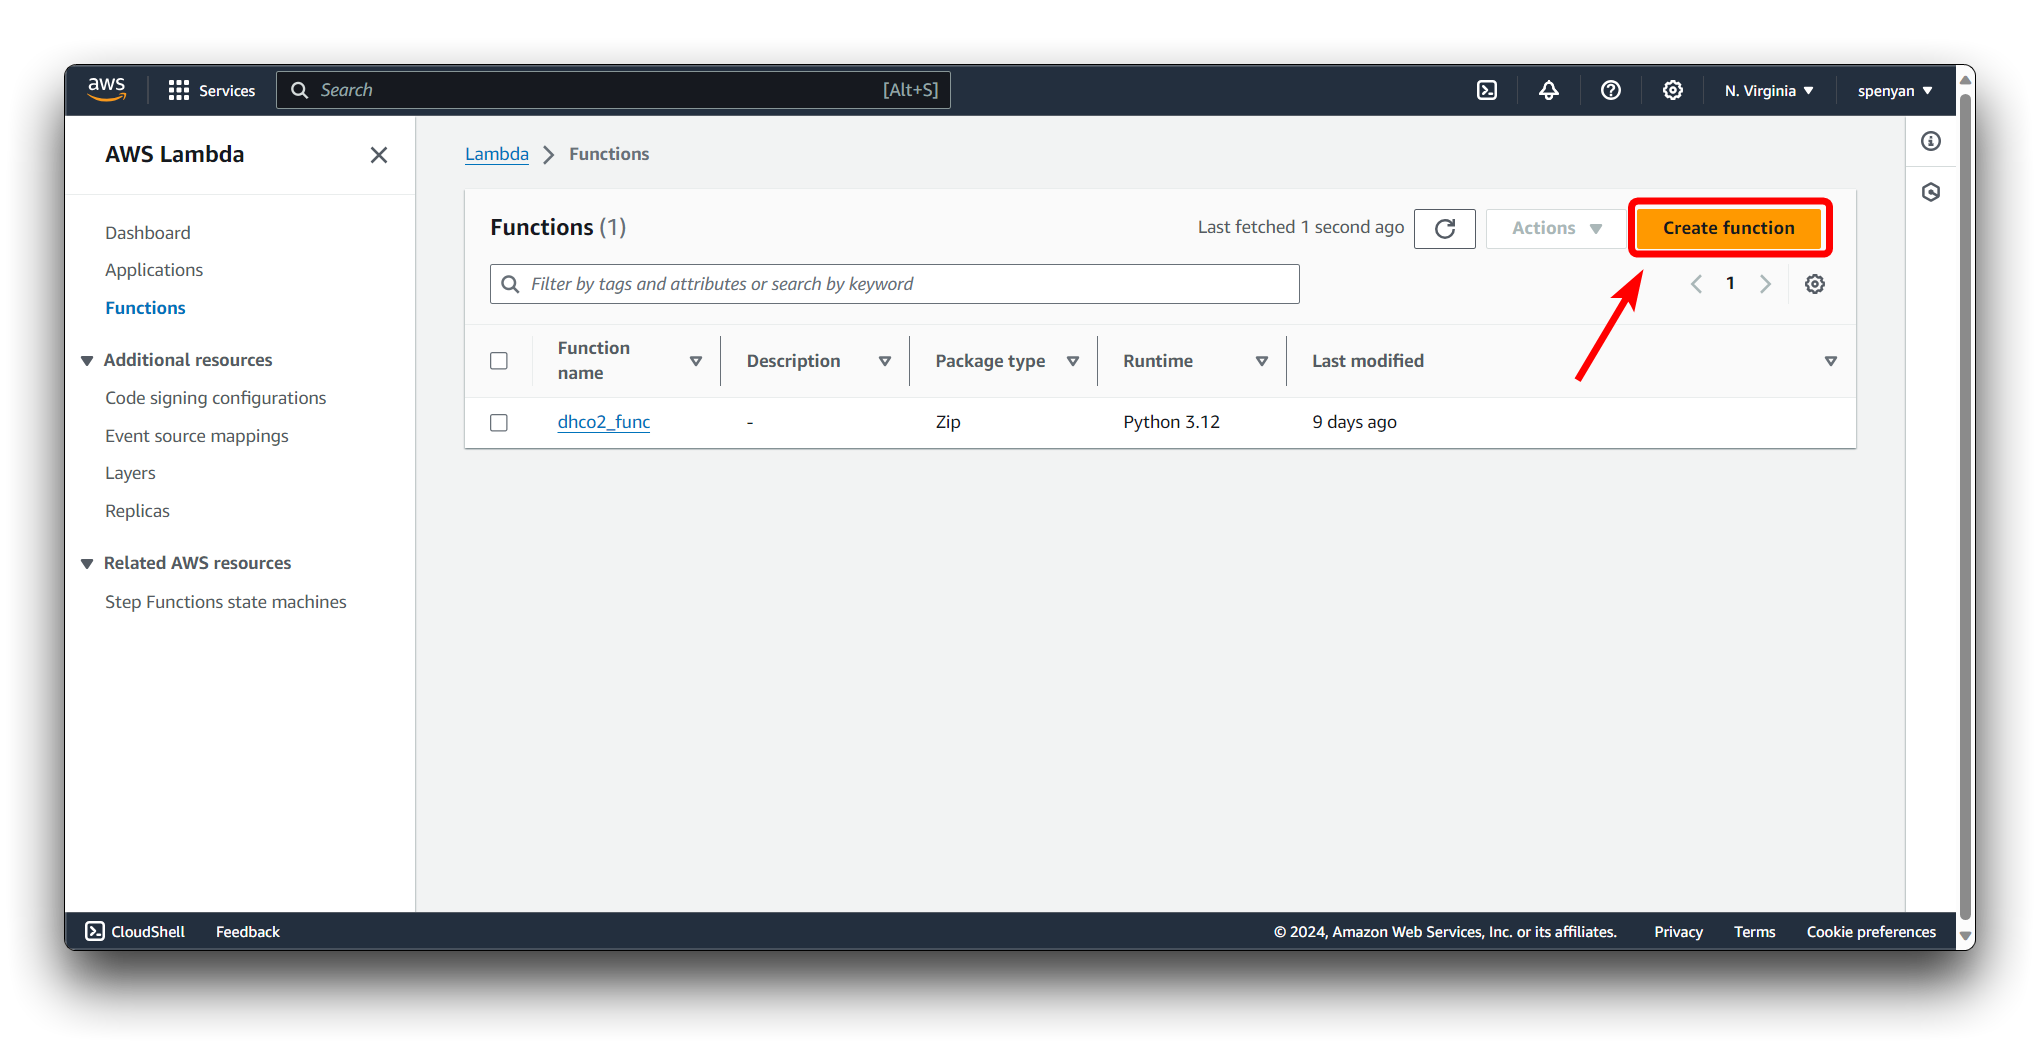
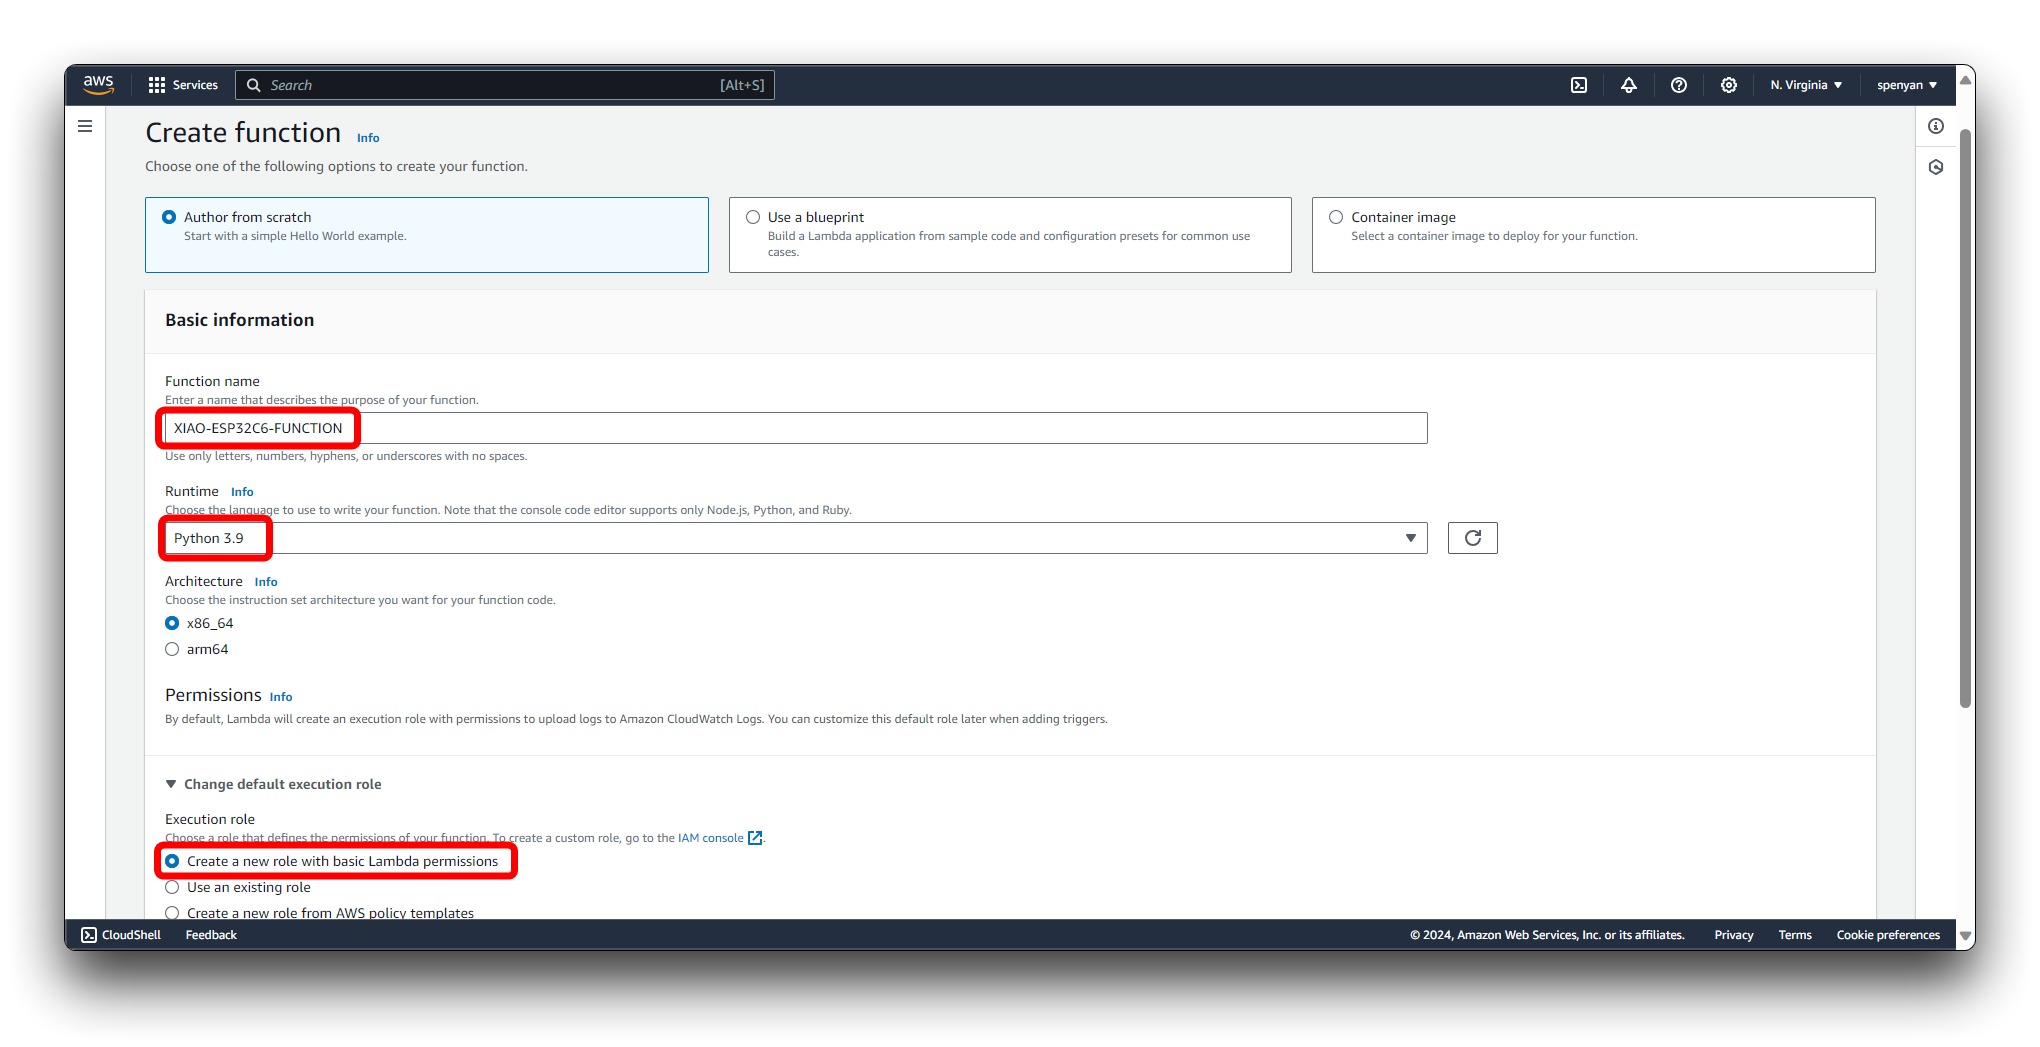
Choose the Author from scratch option. Provide a name for your Lambda function, e.g., XIAO-ESP32C6-FUNCTION. Select the desired runtime Python3.9. Choose an execution role for your Lambda function. You can either create a new role or use an existing one. If creating a new role, select Create a new role with basic Lambda permissions. Click on the Create function button to create your Lambda function.
Navigate to the IAM (Identity and Access Management) console.
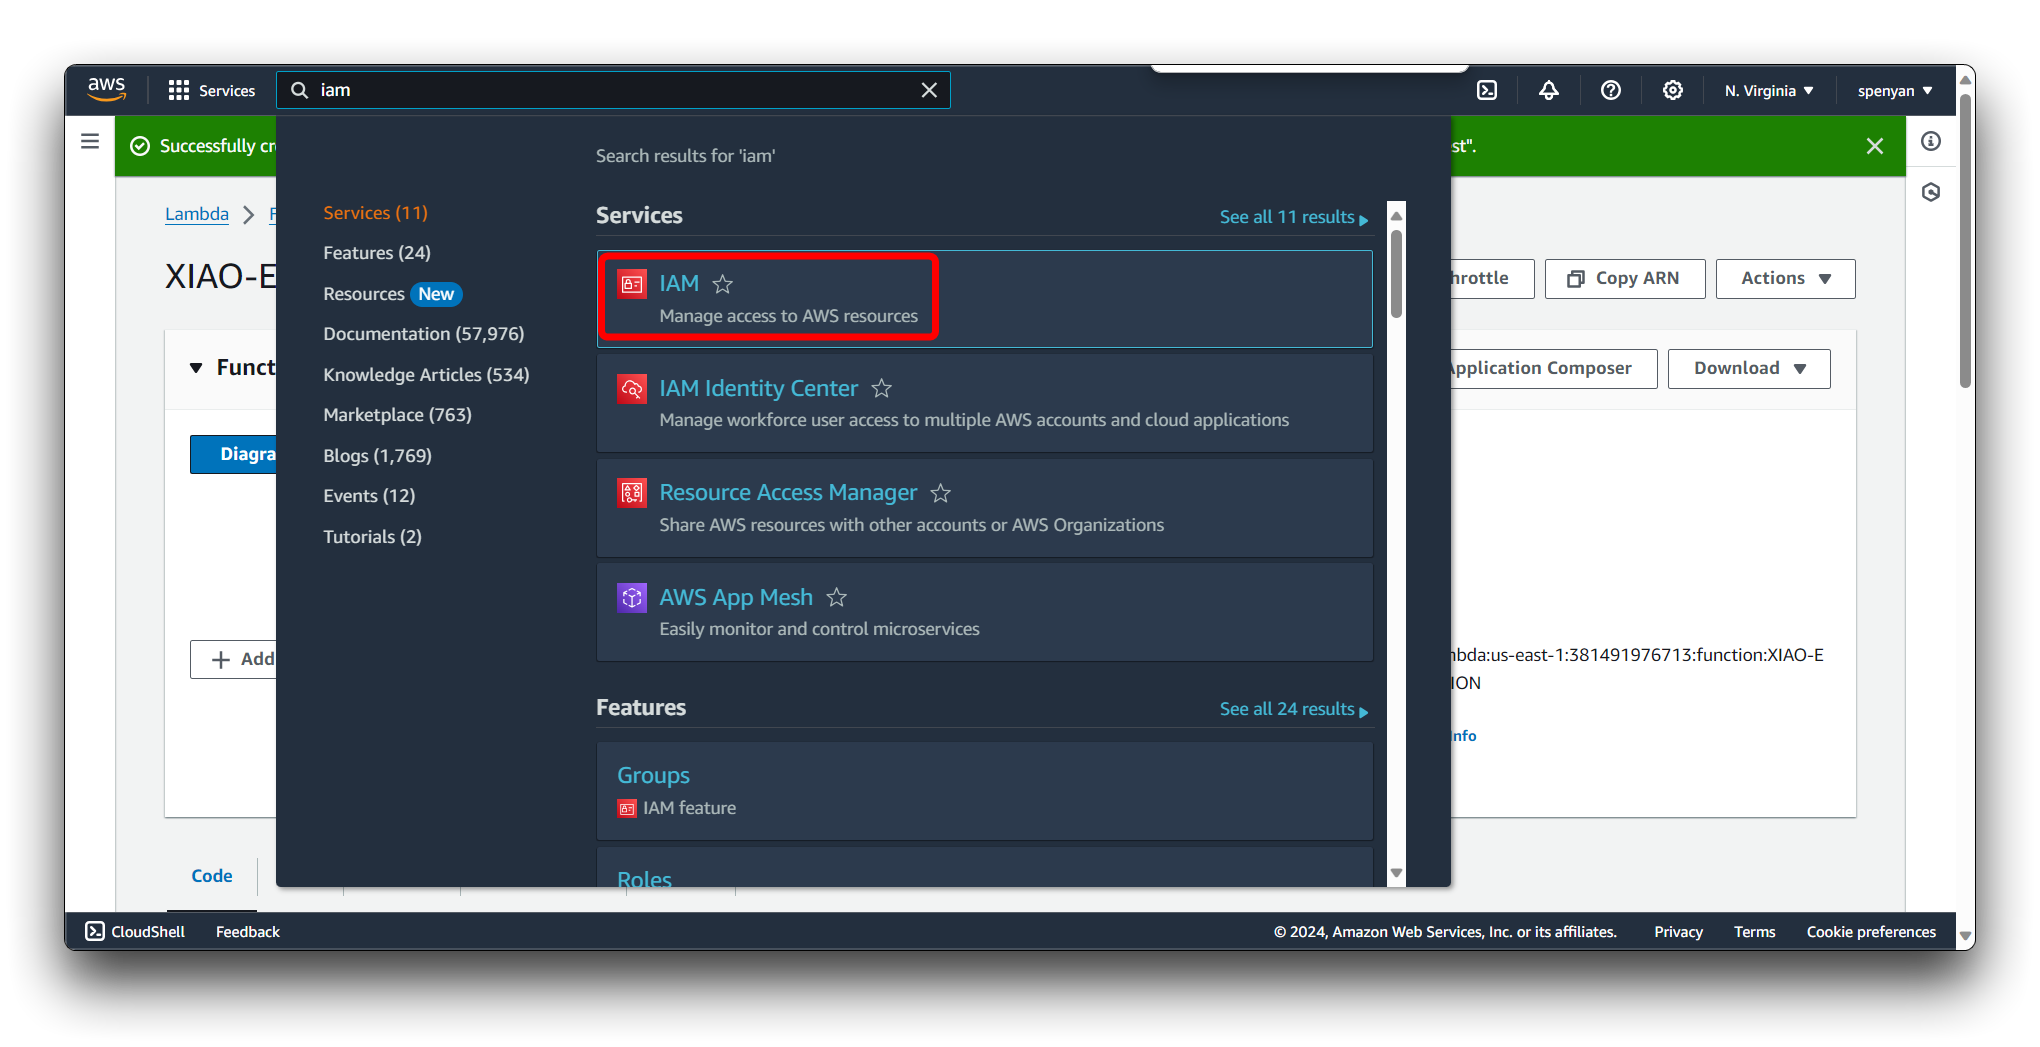
Then find the name of the Lambda Function we just created and click on it.
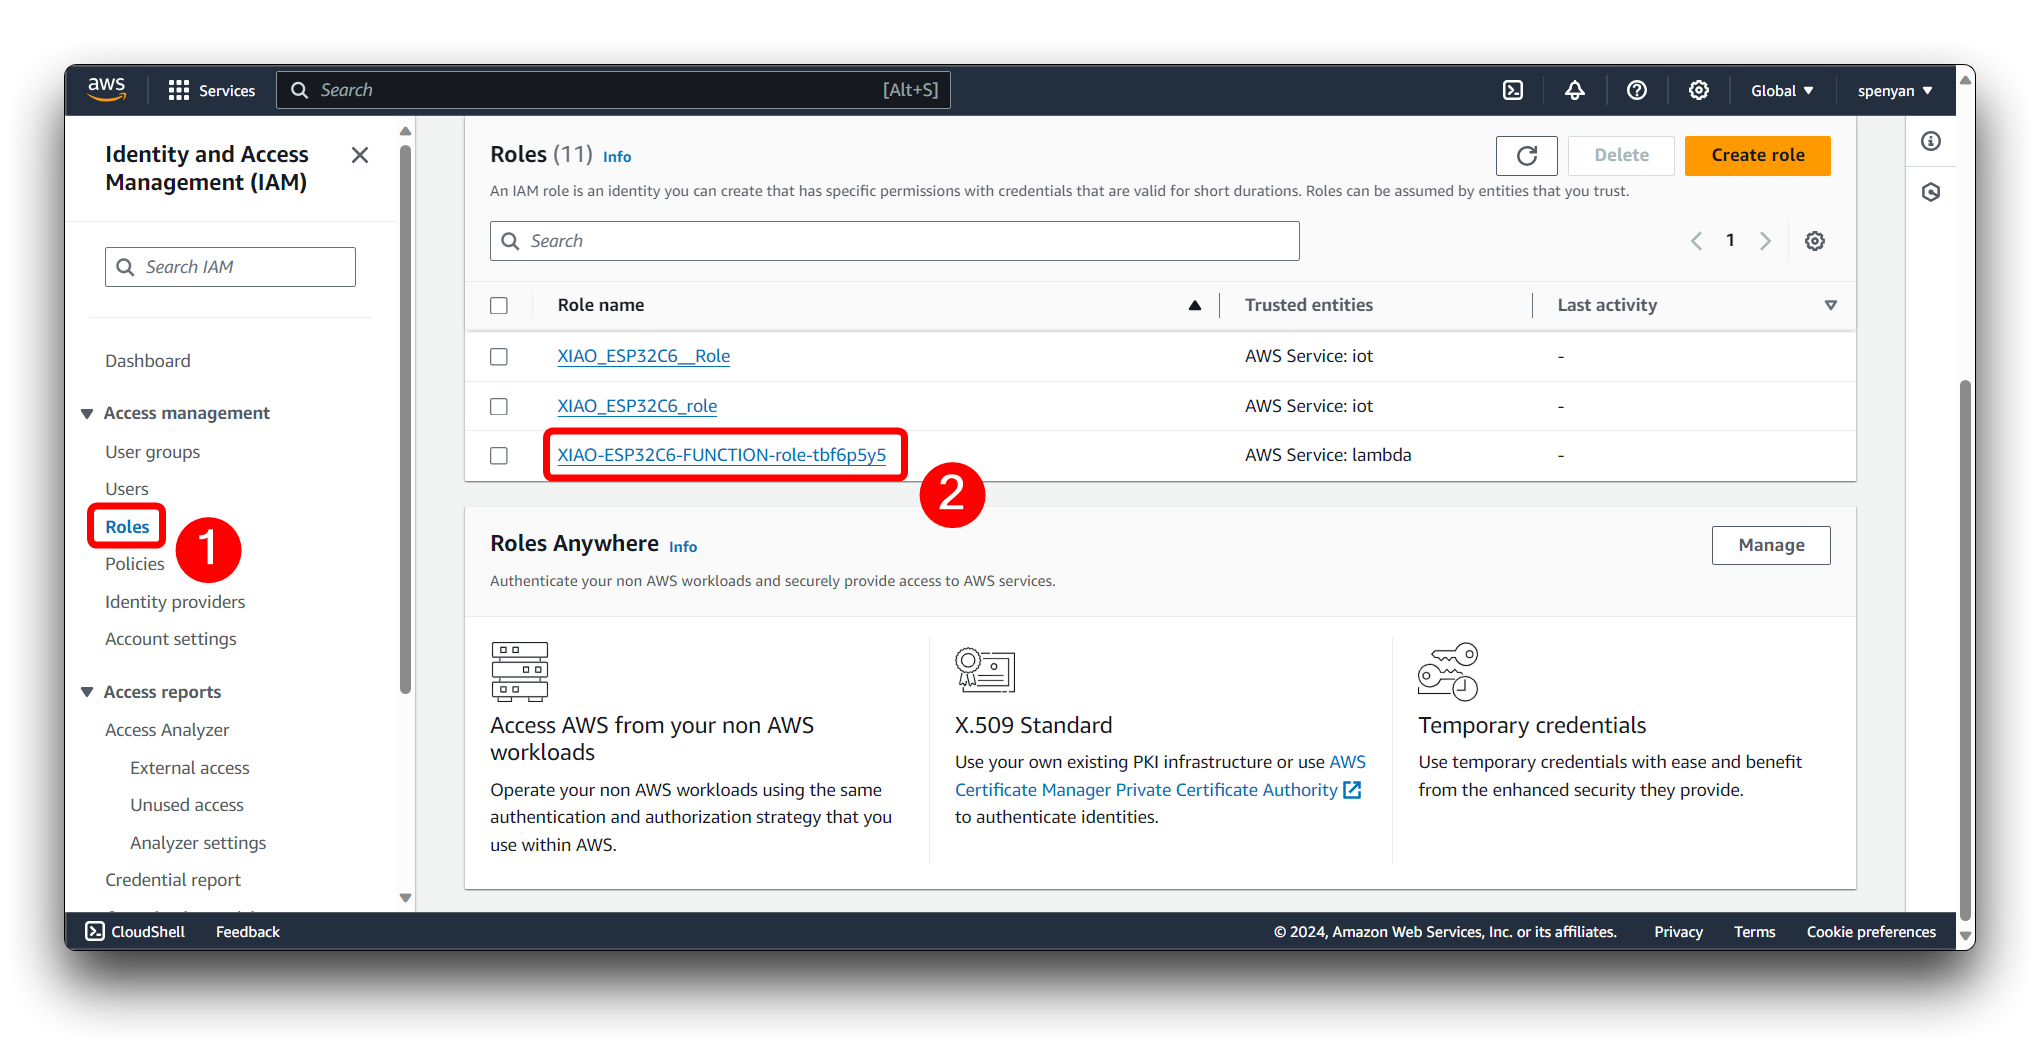
In the IAM role page, click on the Attach policies button.
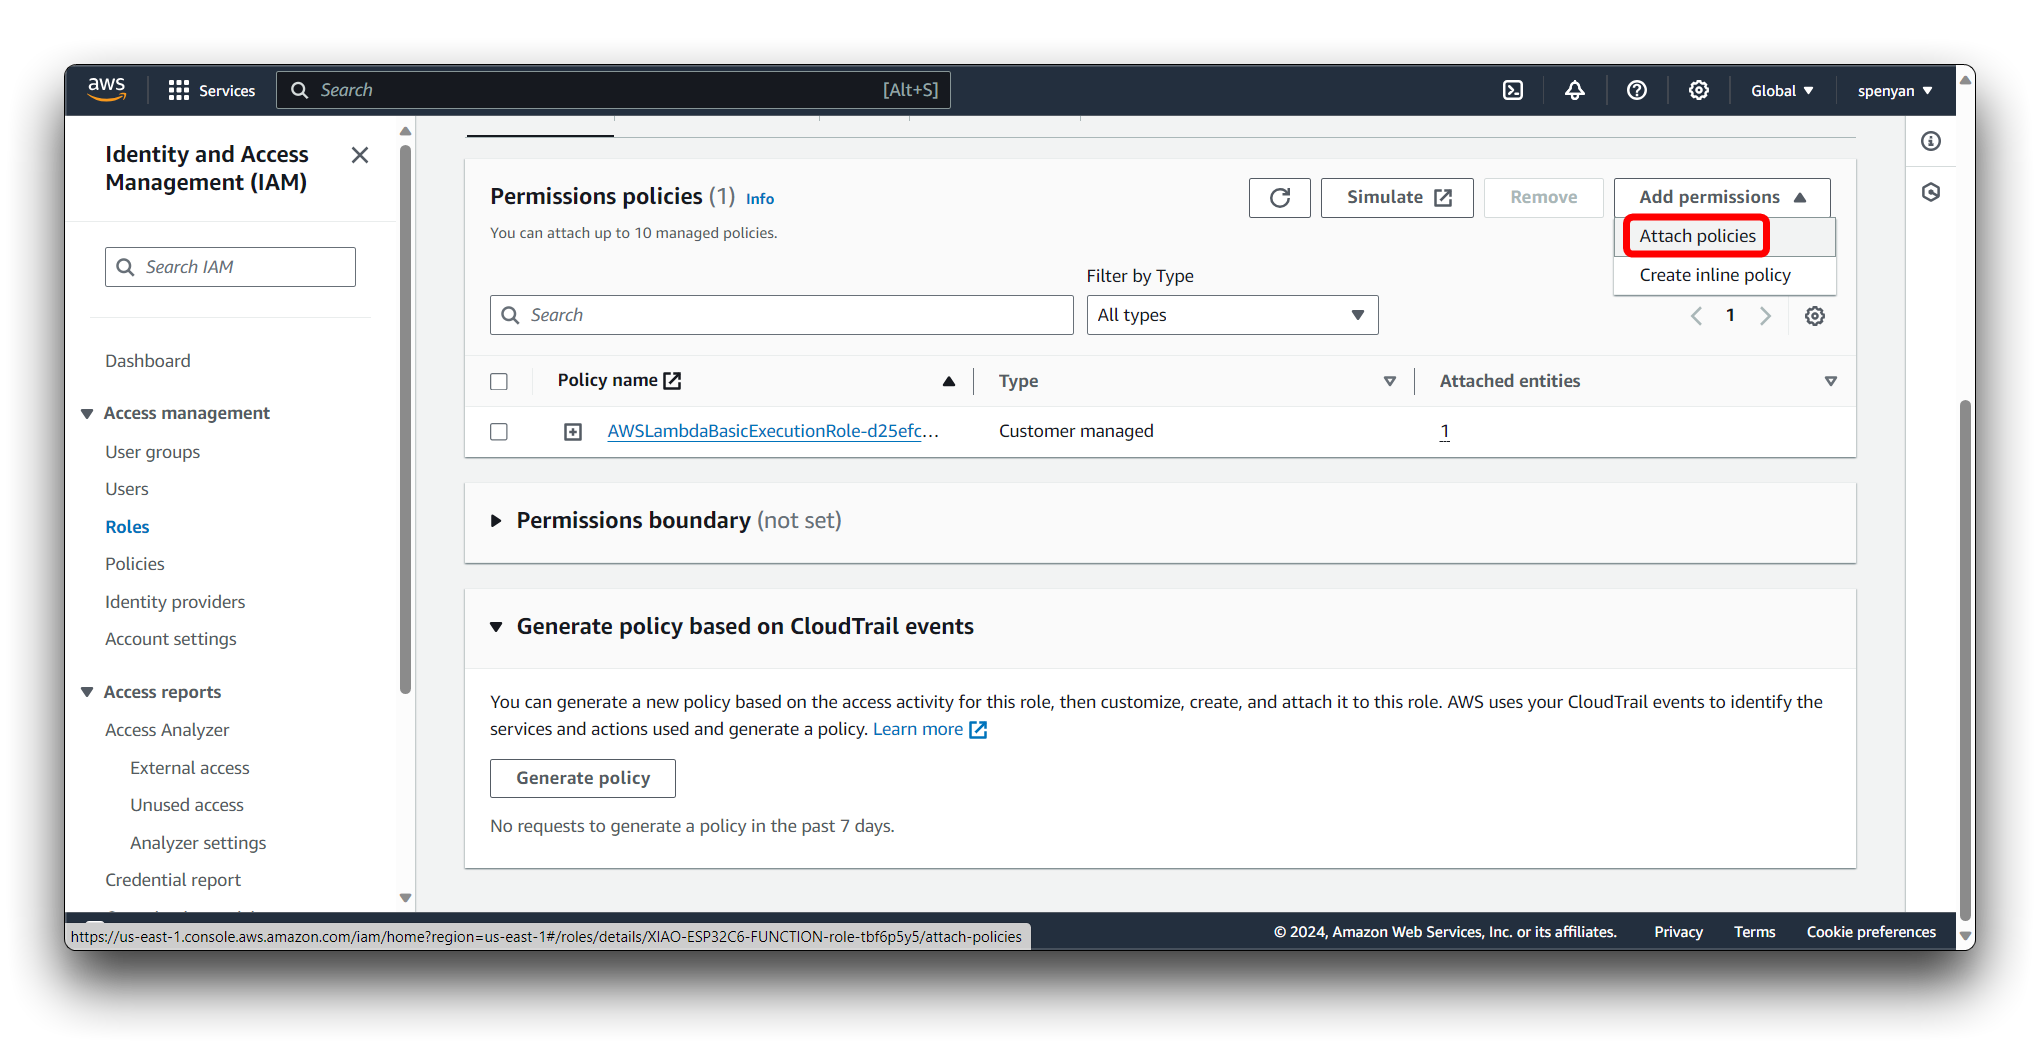
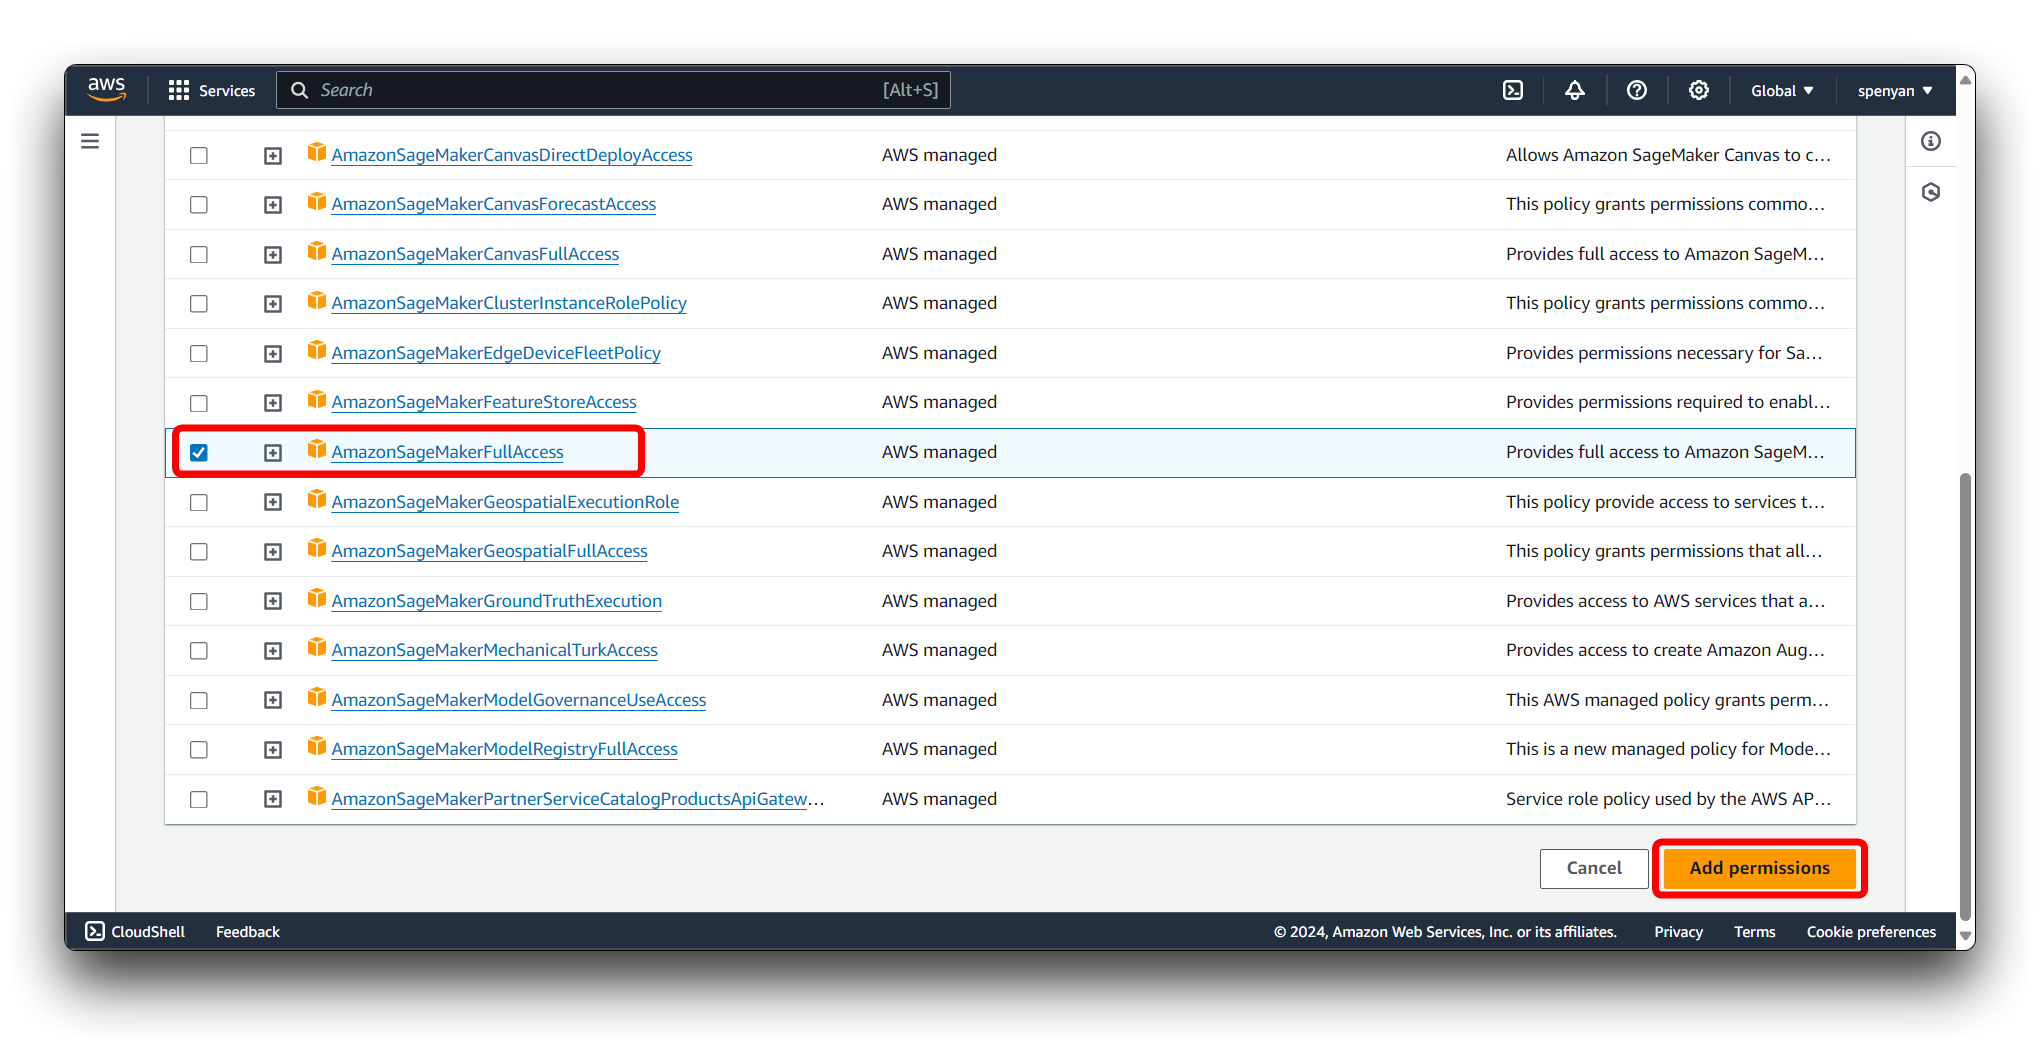
Provide a name for the policy, e.g., AmazonSageMakerFullAccess. Click on the Add perminassions button to add perminassions.
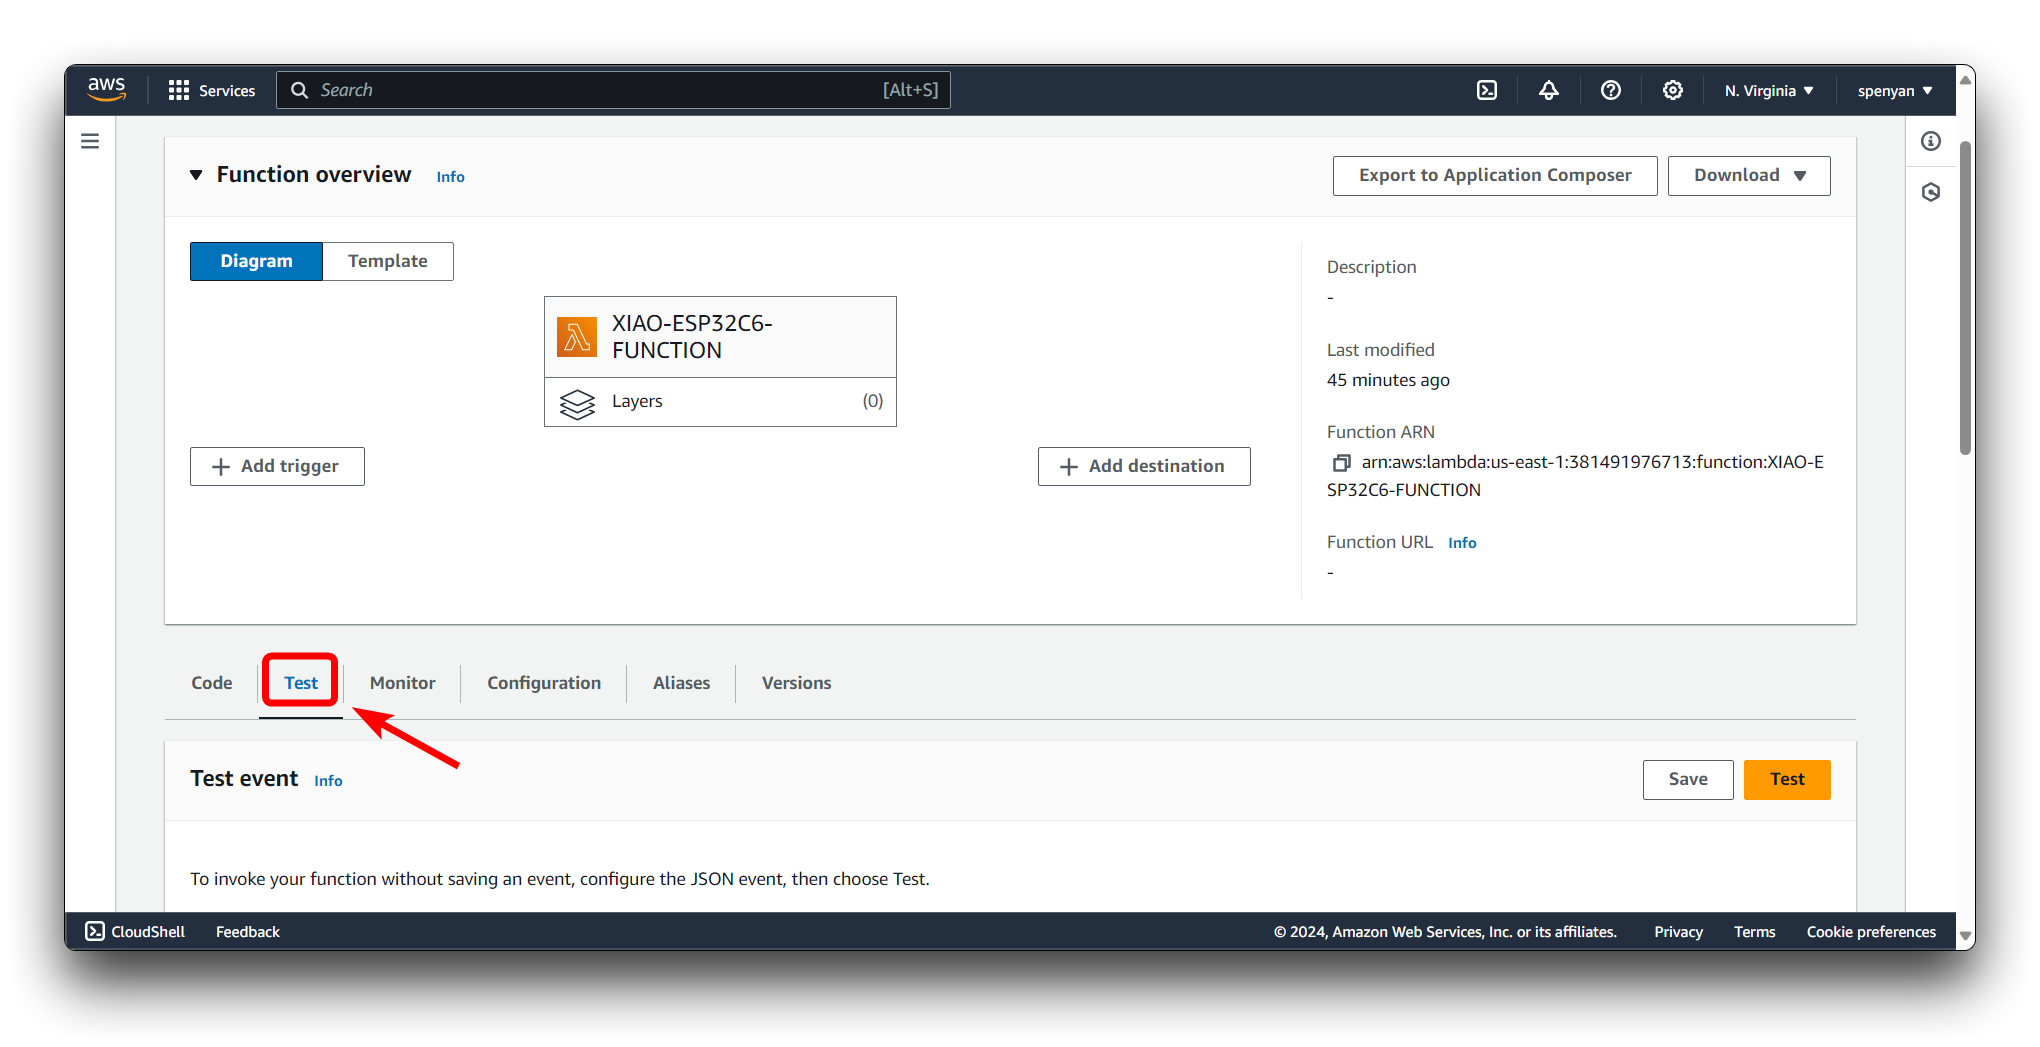
Go back to the Lambda function configuration page. Create a new test event or use an existing one. Invoke the Lambda function with the test event to ensure it runs successfully. Monitor the Lambda function's execution logs and outputs to verify its behavior.
{"data": [62.93016434, 24.31583405]}
Copy the following snippet into Code.
#lambda function with sns
import boto3
import json

ENDPOINT_NAME = 'randomcutforest-2024-03-18-10-47-37-165'# your endpoint past here
runtime = boto3.client('runtime.sagemaker')
email_client = boto3.client('sns')

def lambda_handler(event, context):
    input = event['data']

    serialized_input = ','.join(map(str, input))

    response = runtime.invoke_endpoint(EndpointName=ENDPOINT_NAME,
                                       ContentType='text/csv',
                                       Body=serialized_input)

    result_str = response['Body'].read().decode()
    result_json = json.loads(result_str)
    inference = result_json['scores'][0]['score']

    try:
        if(inference>3):
            response_sns = email_client.publish(
                TopicArn='arn:aws:sns:us-east-1:381491976713:dhco2Topic2',# your sns topic past here
                Message='Enviroment data is abnormal',
                Subject='Enviroment Status'
            )
    except Exception as e:
        print(f"error: {e}")

    return inference
Please take care to modify the content in the code to be your own.
Then click the Deploy button.
Additional Considerations
- Ensure that you have the correct IAM roles and policies in place for SageMaker to access the data in S3.
- Consider using SageMaker's Automatic Model Tuning to find the best version of your model.
- Keep track of costs, as training models and deploying endpoints on SageMaker can incur significant charges depending on the compute resources used.
Always consult the latest AWS documentation for detailed instructions and best practices, as the interface and functionalities of AWS services are frequently updated.
Abnormal status message notification
Upon detection of an abnormal state, the system immediately sends out an alert through a messaging notification mechanism to maintenance personnel, ensuring timely intervention and necessary action.
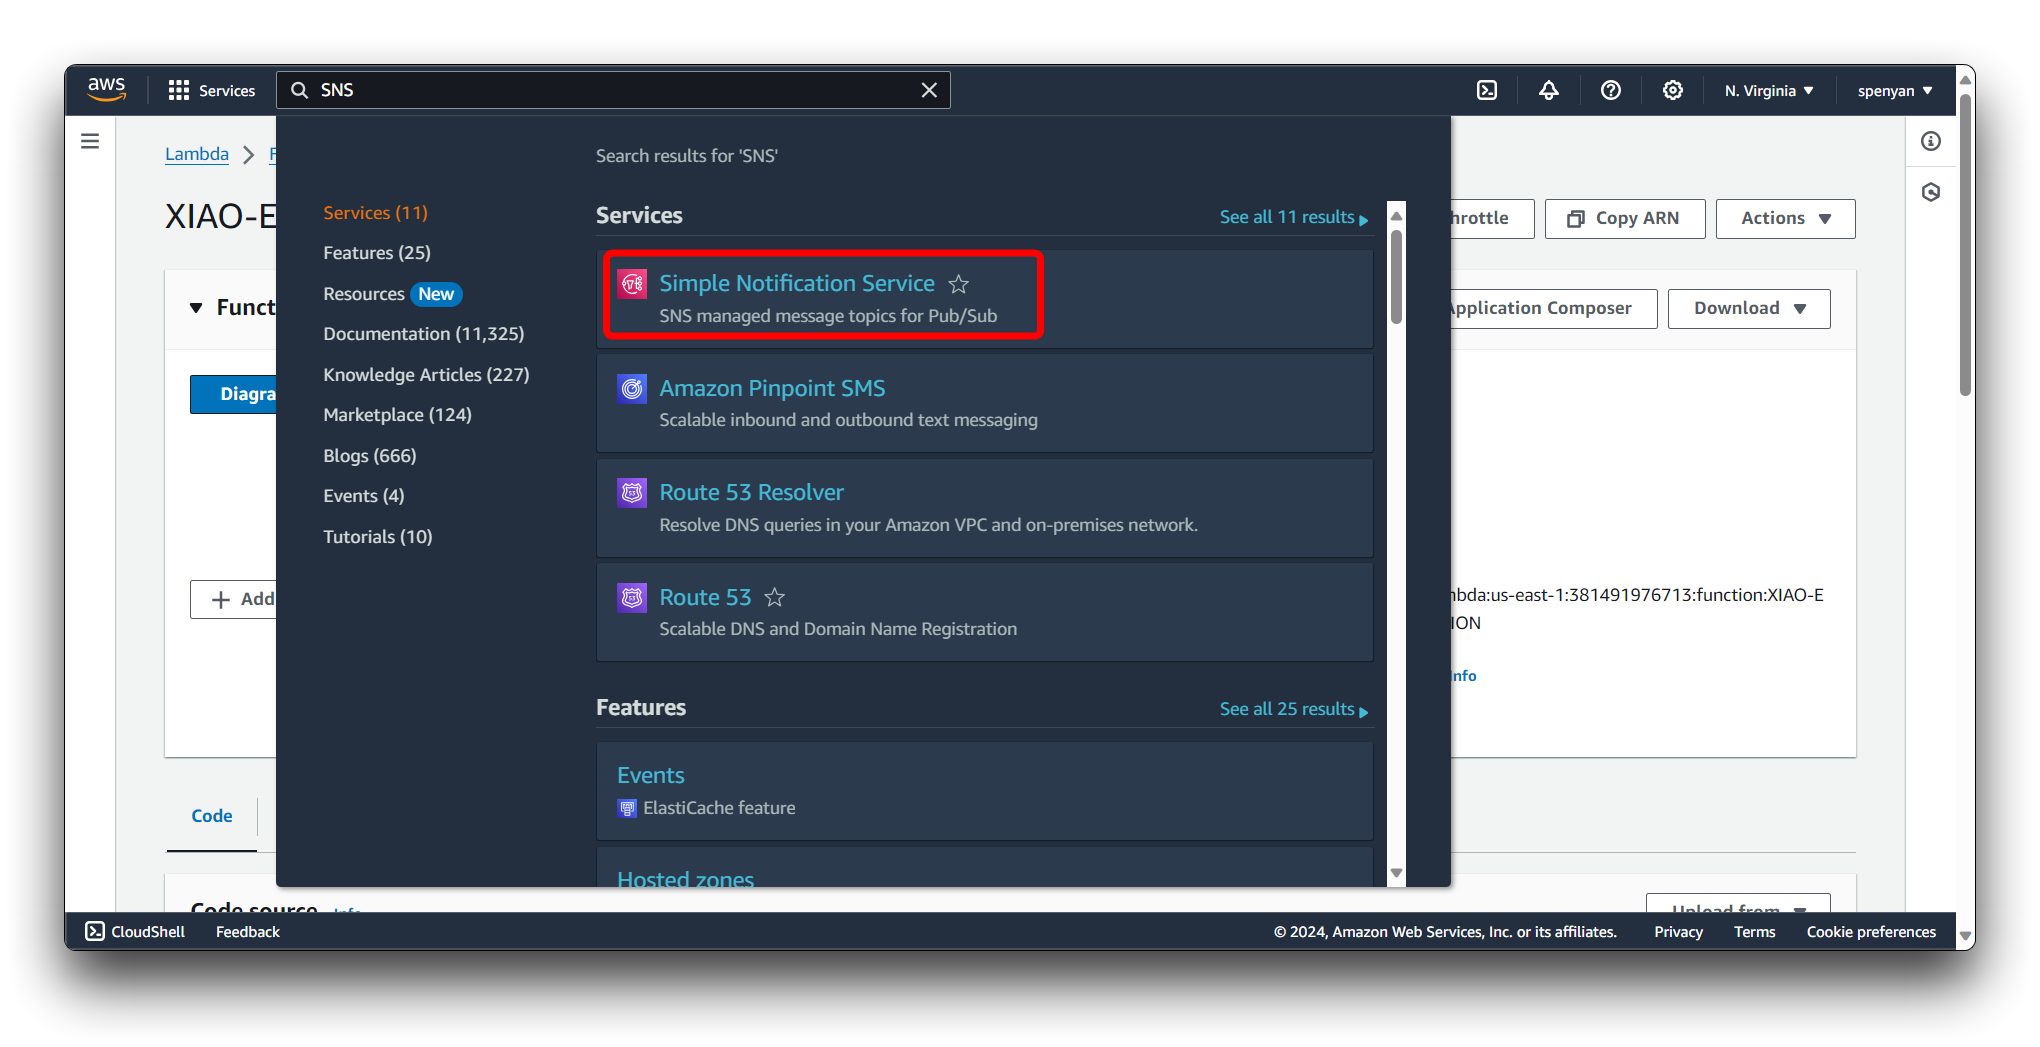
Step 11. Configuring Amazon SNS
Navigate to the Amazon SNS service.
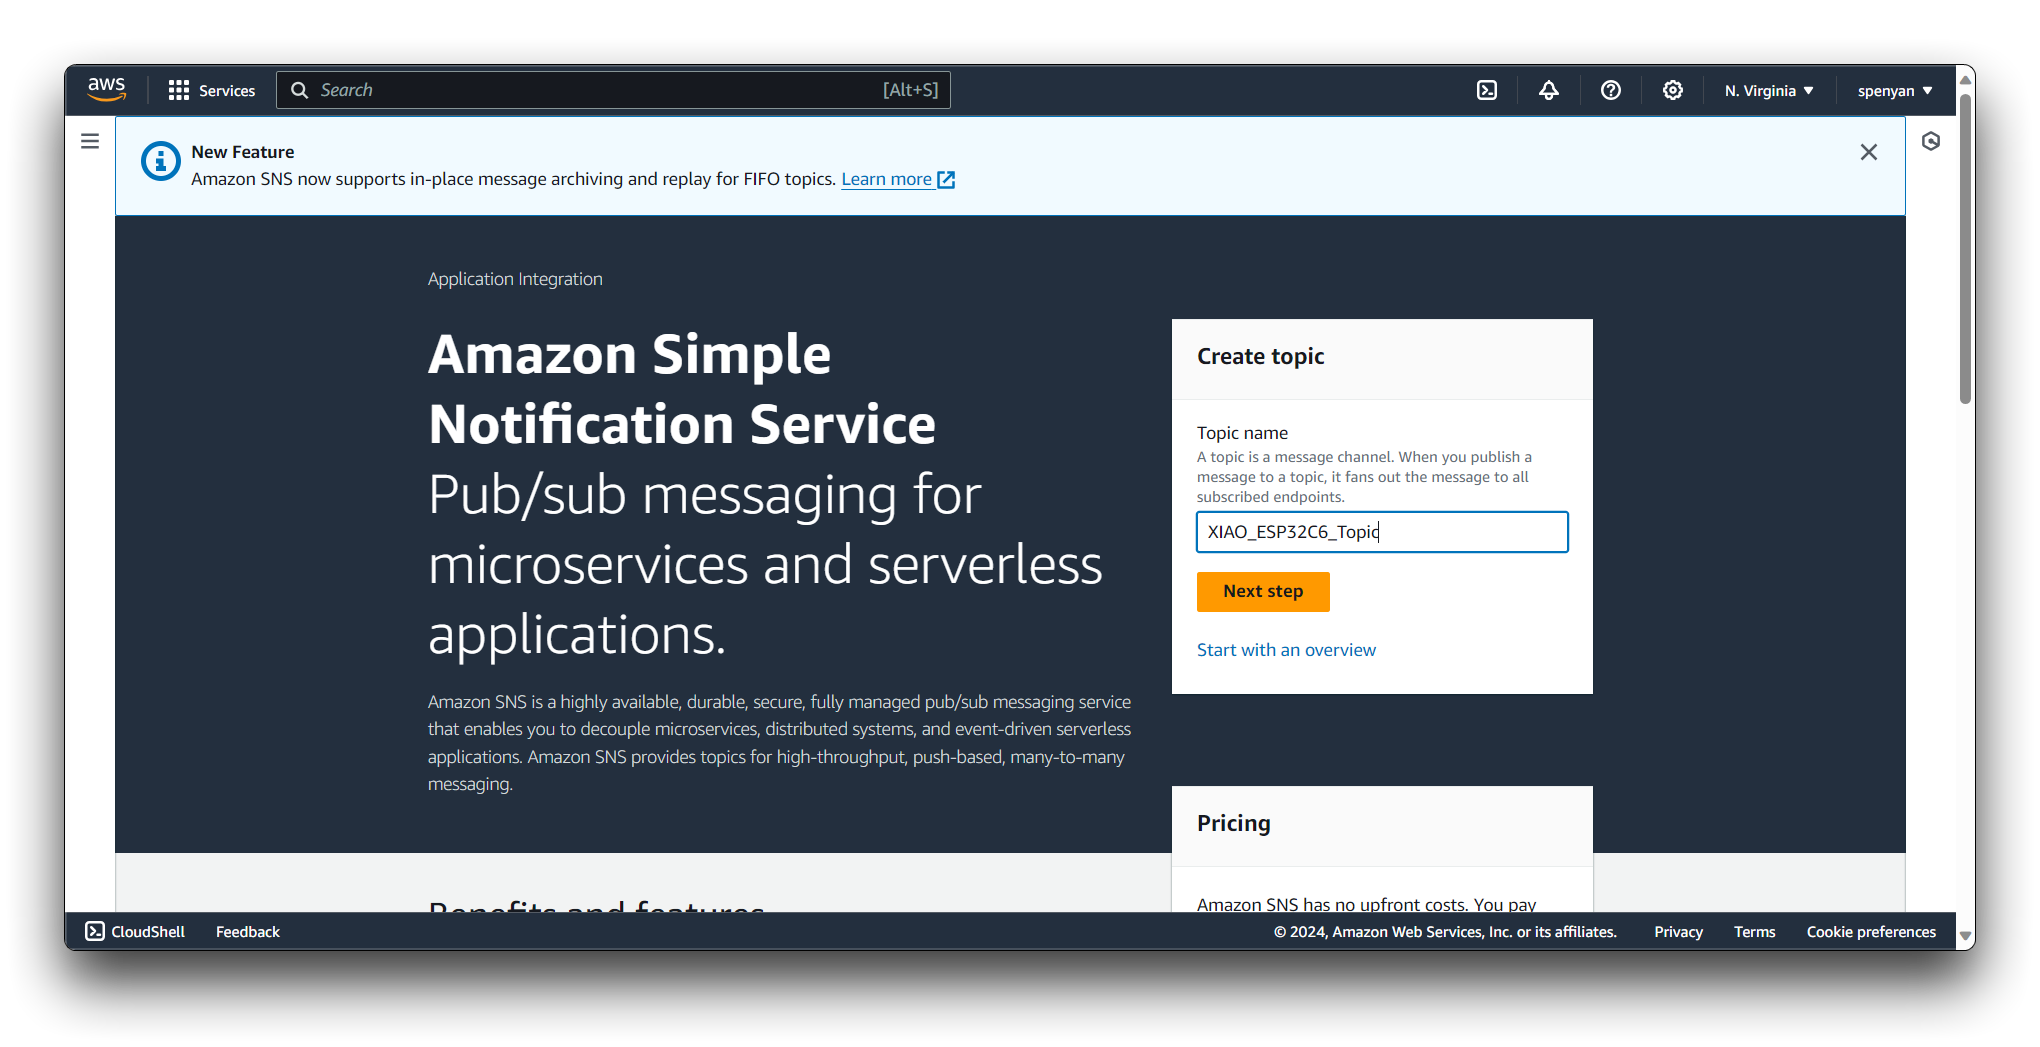
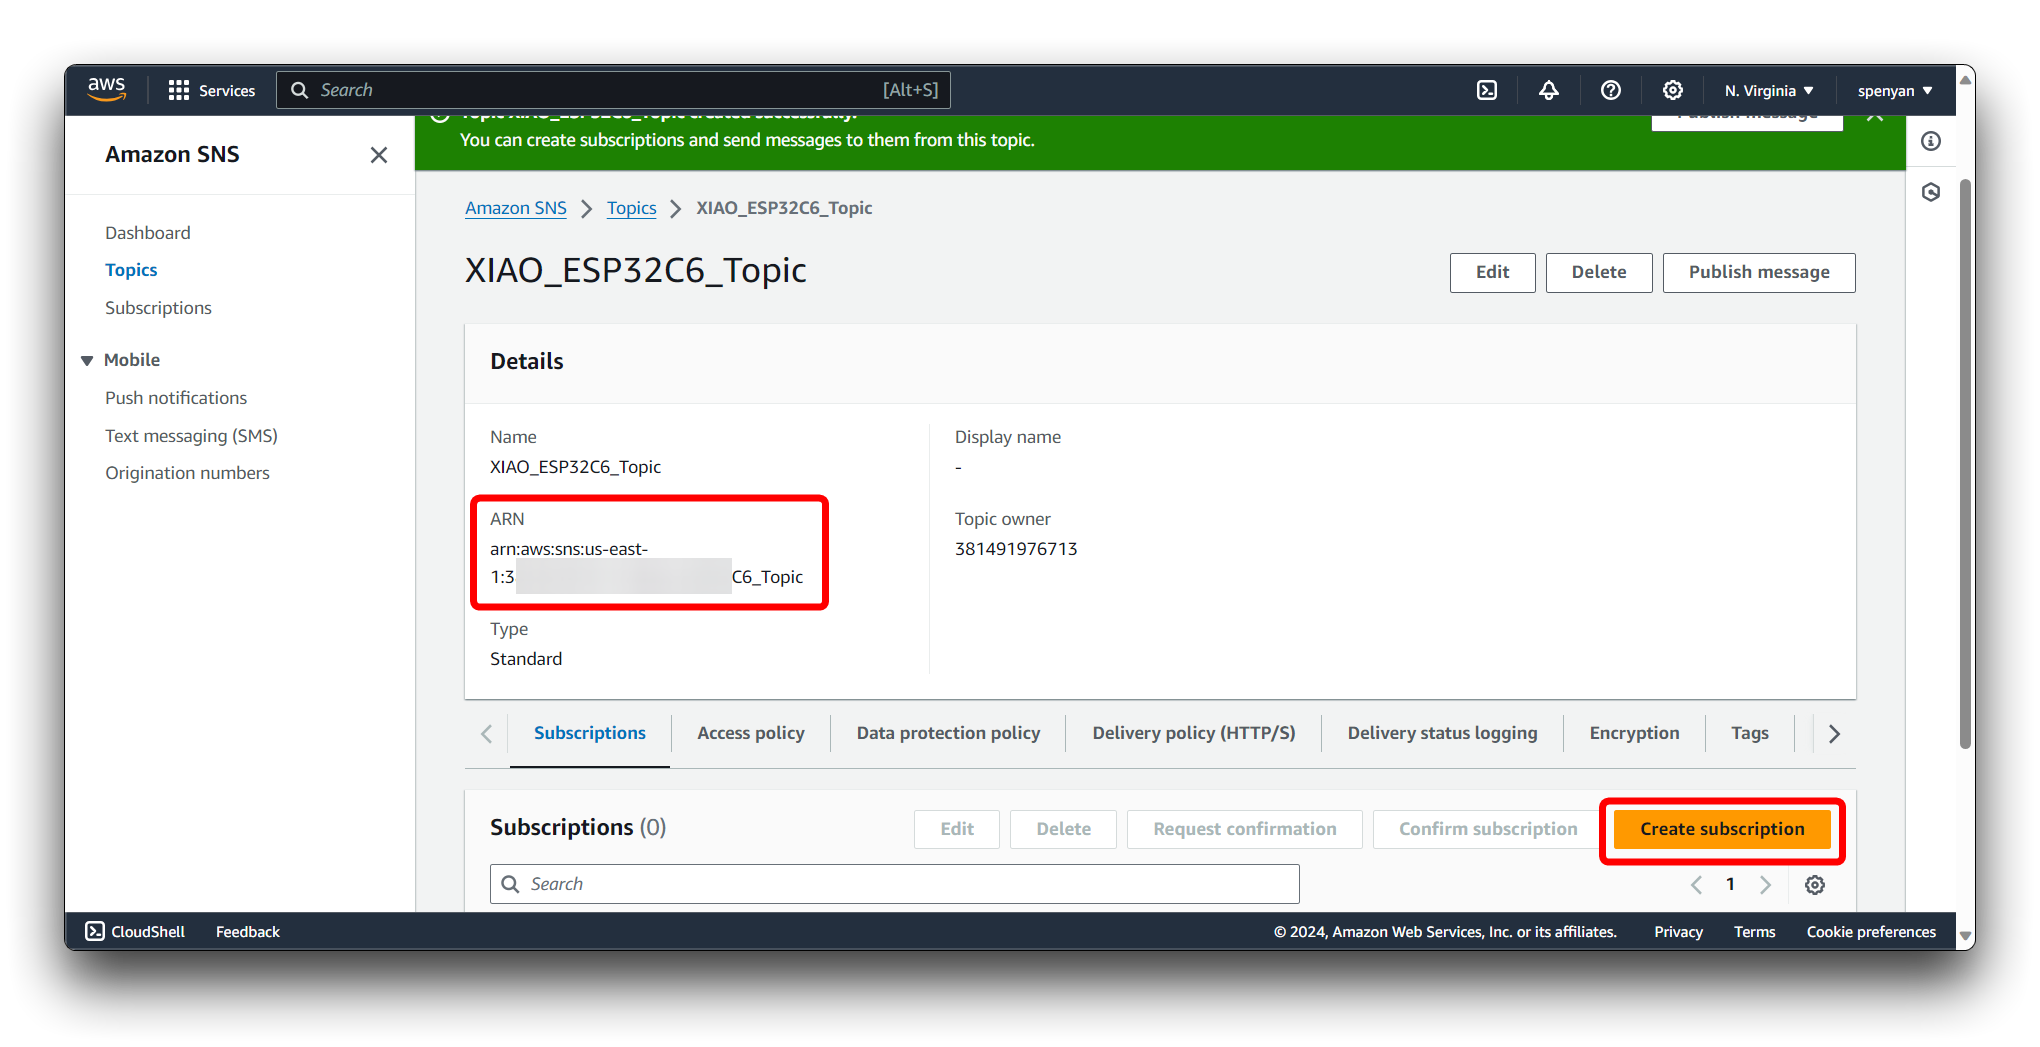
Click on the Create topic button. Provide a name for your topic, e.g., "XIAO_ESP32C6_Topic".
In the SNS topic dashboard, click on the newly created topic. Click on the Create subscription button.
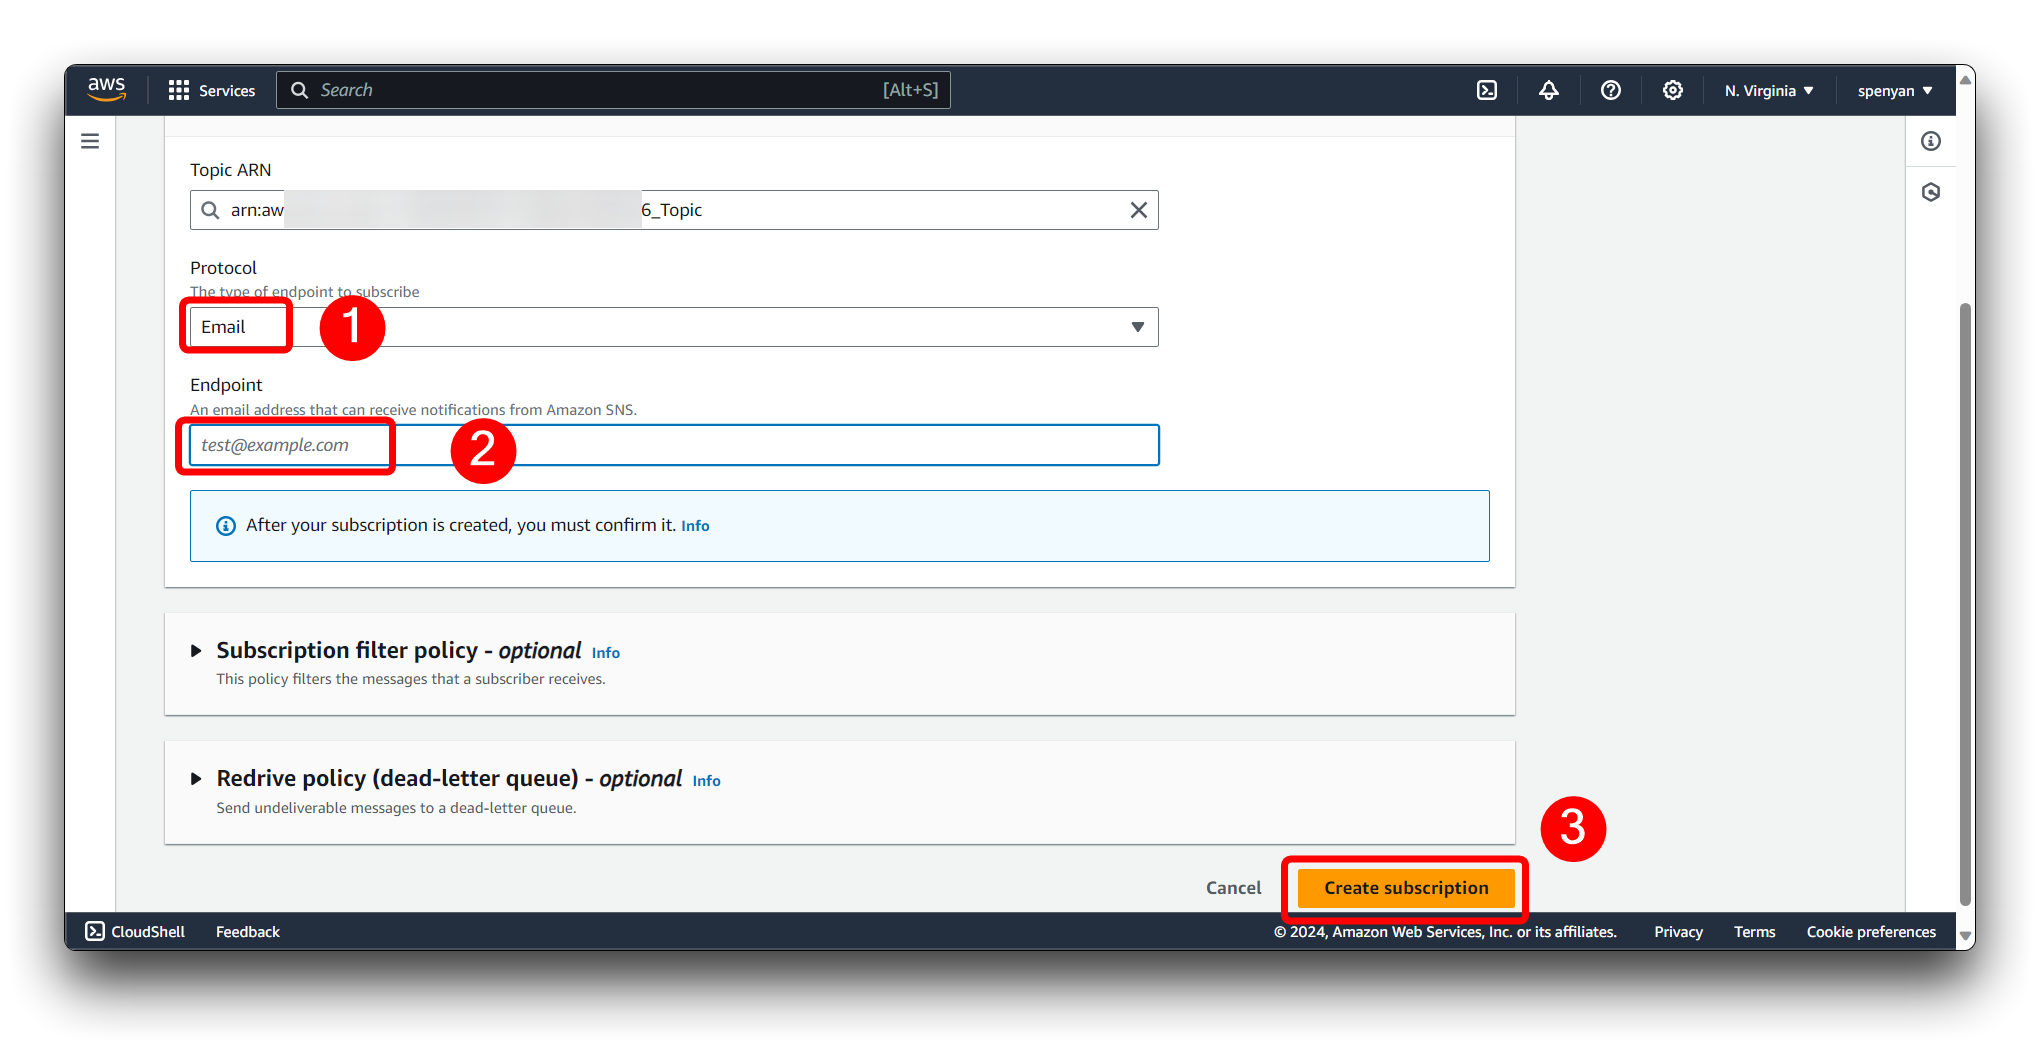
Choose the protocol for the subscription, such as "Email", "SMS", "HTTP/HTTPS", "AWS Lambda", or "Amazon SQS".
Provide the endpoint details based on the selected protocol. For example:
- For email subscriptions, enter the email address.
- For SMS subscriptions, enter the phone number.
- For HTTP/HTTPS subscriptions, enter the URL endpoint.
- For AWS Lambda subscriptions, select the Lambda function.
- For Amazon SQS subscriptions, select the SQS queue.
Click on the Create subscription button to create the subscription. Repeat steps 2-5 to add more subscriptions to the topic if needed.
Then we go back to the Lambda's code and replace the TopicArn field in the code with the ARN field in the SNS.
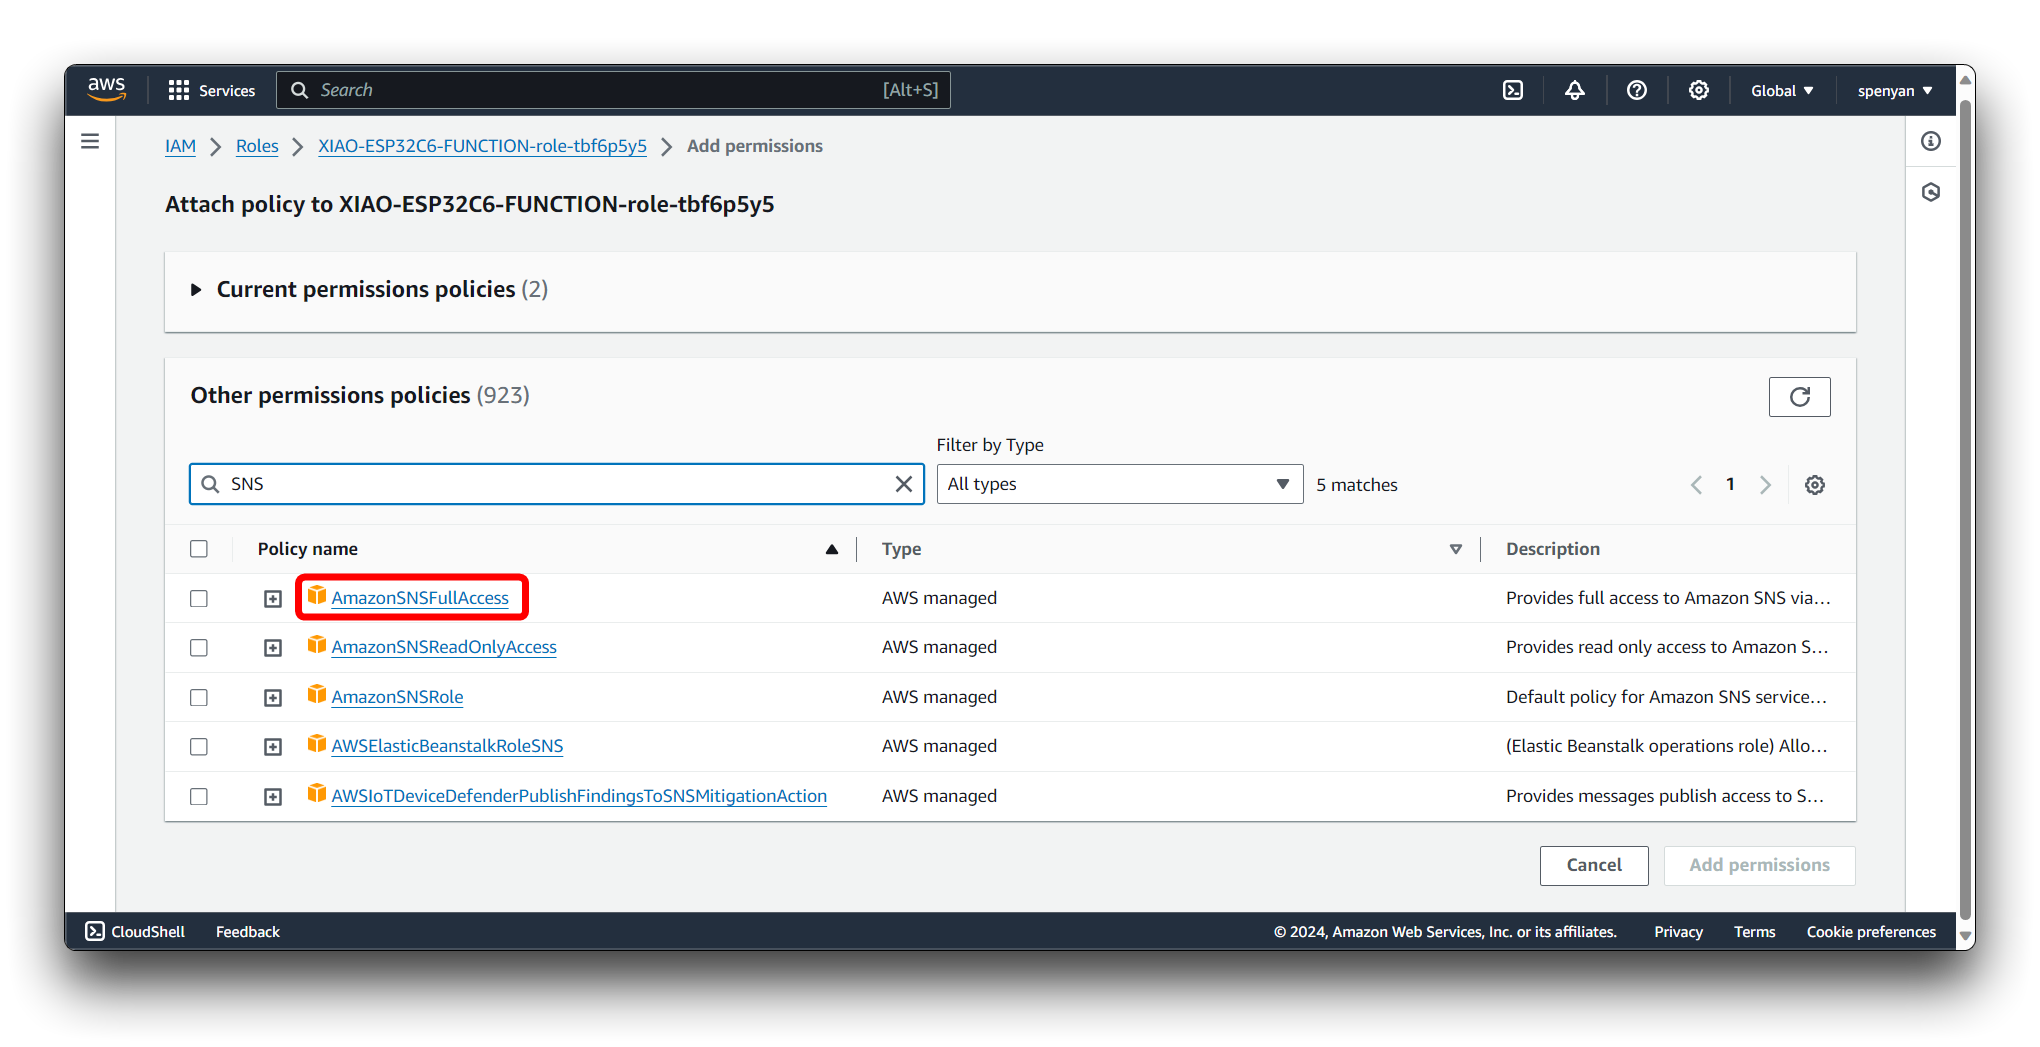
Step 12. Give SNS permissions to Lambda
Navigate to the IAM (Identity and Access Management) console.
Then find the name of the Lambda Function we just created and click on it.
In the IAM role page, click on the Attach policies button.
Provide a name for the policy, e.g., AmazonSNSFullAccess. Click on the Add perminassions button to add perminassions.
Step 13. Configuring API Gateway
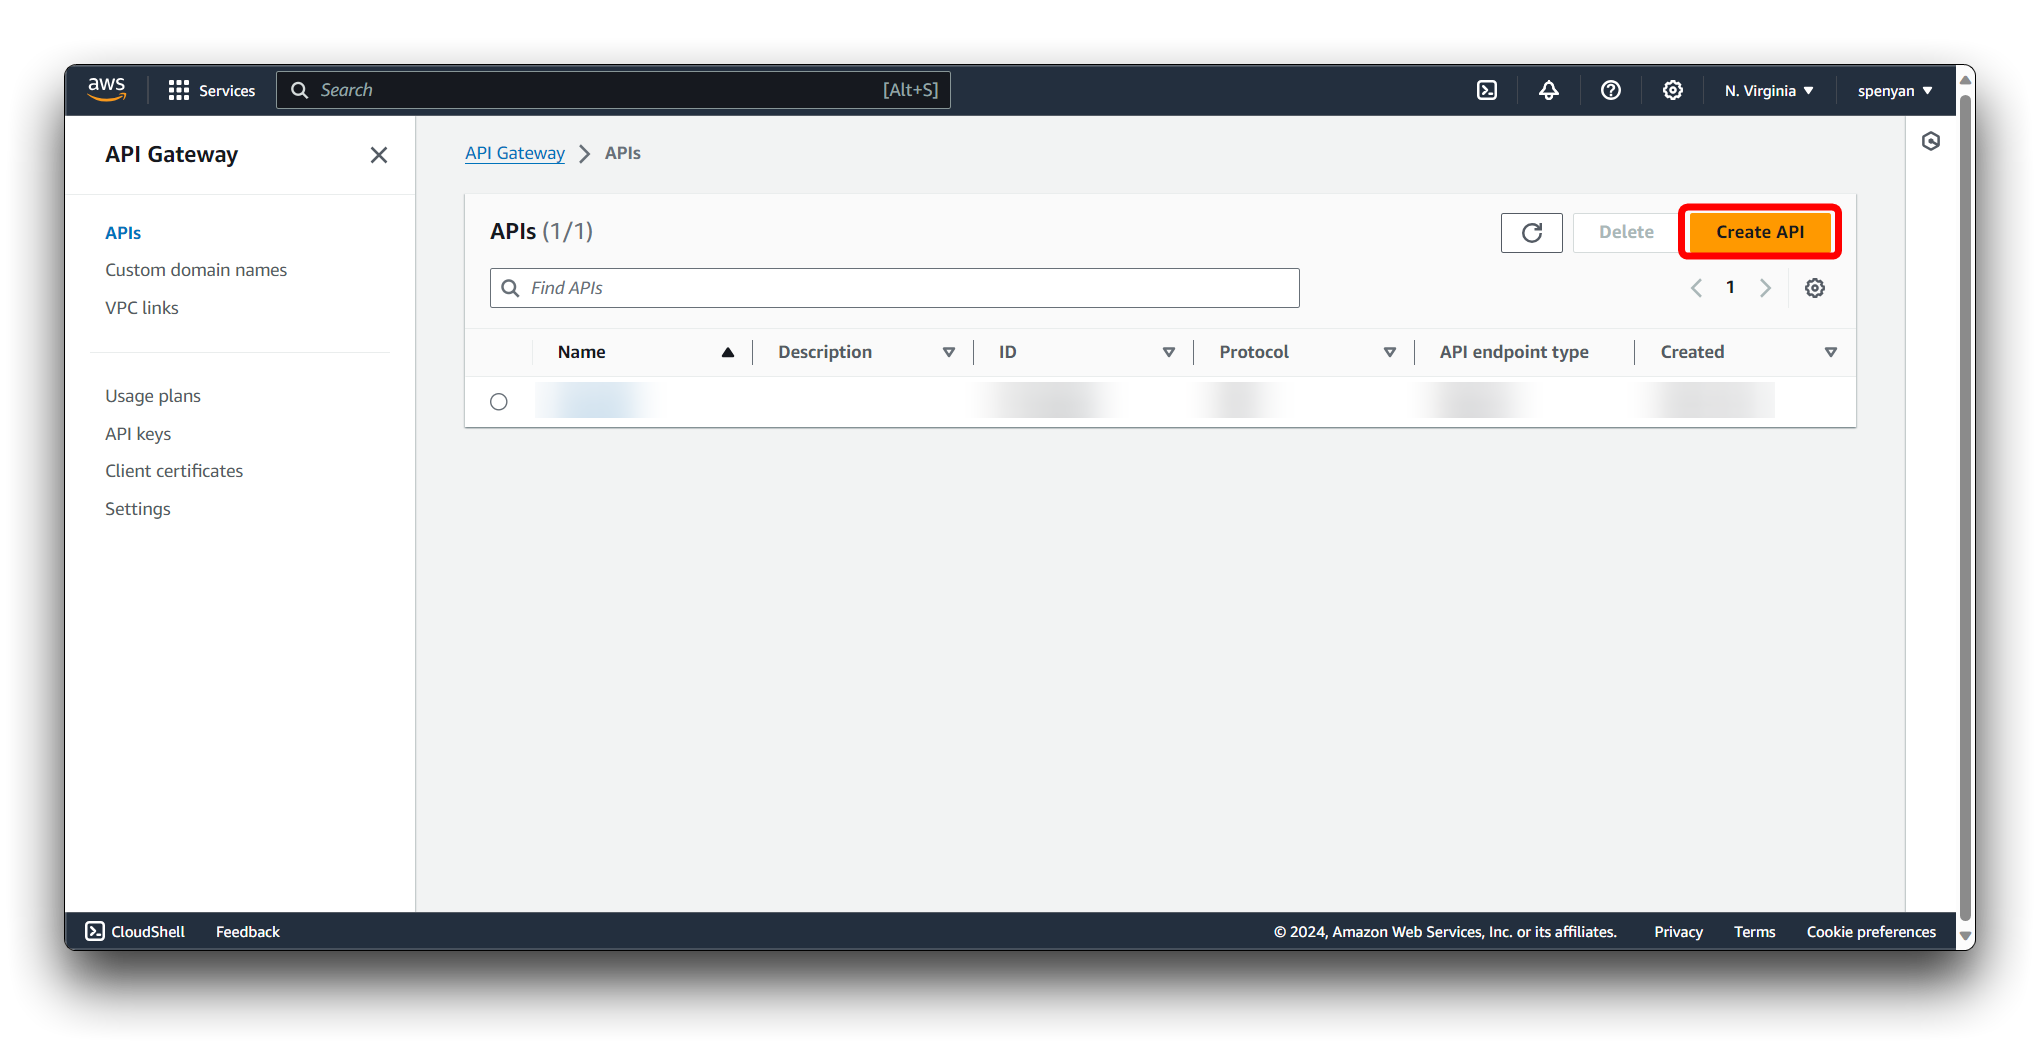
Navigate to the Amazon API Gateway service in the AWS Management Console.

Click on the Create API button.
Select REST API as the API type and click on Build.
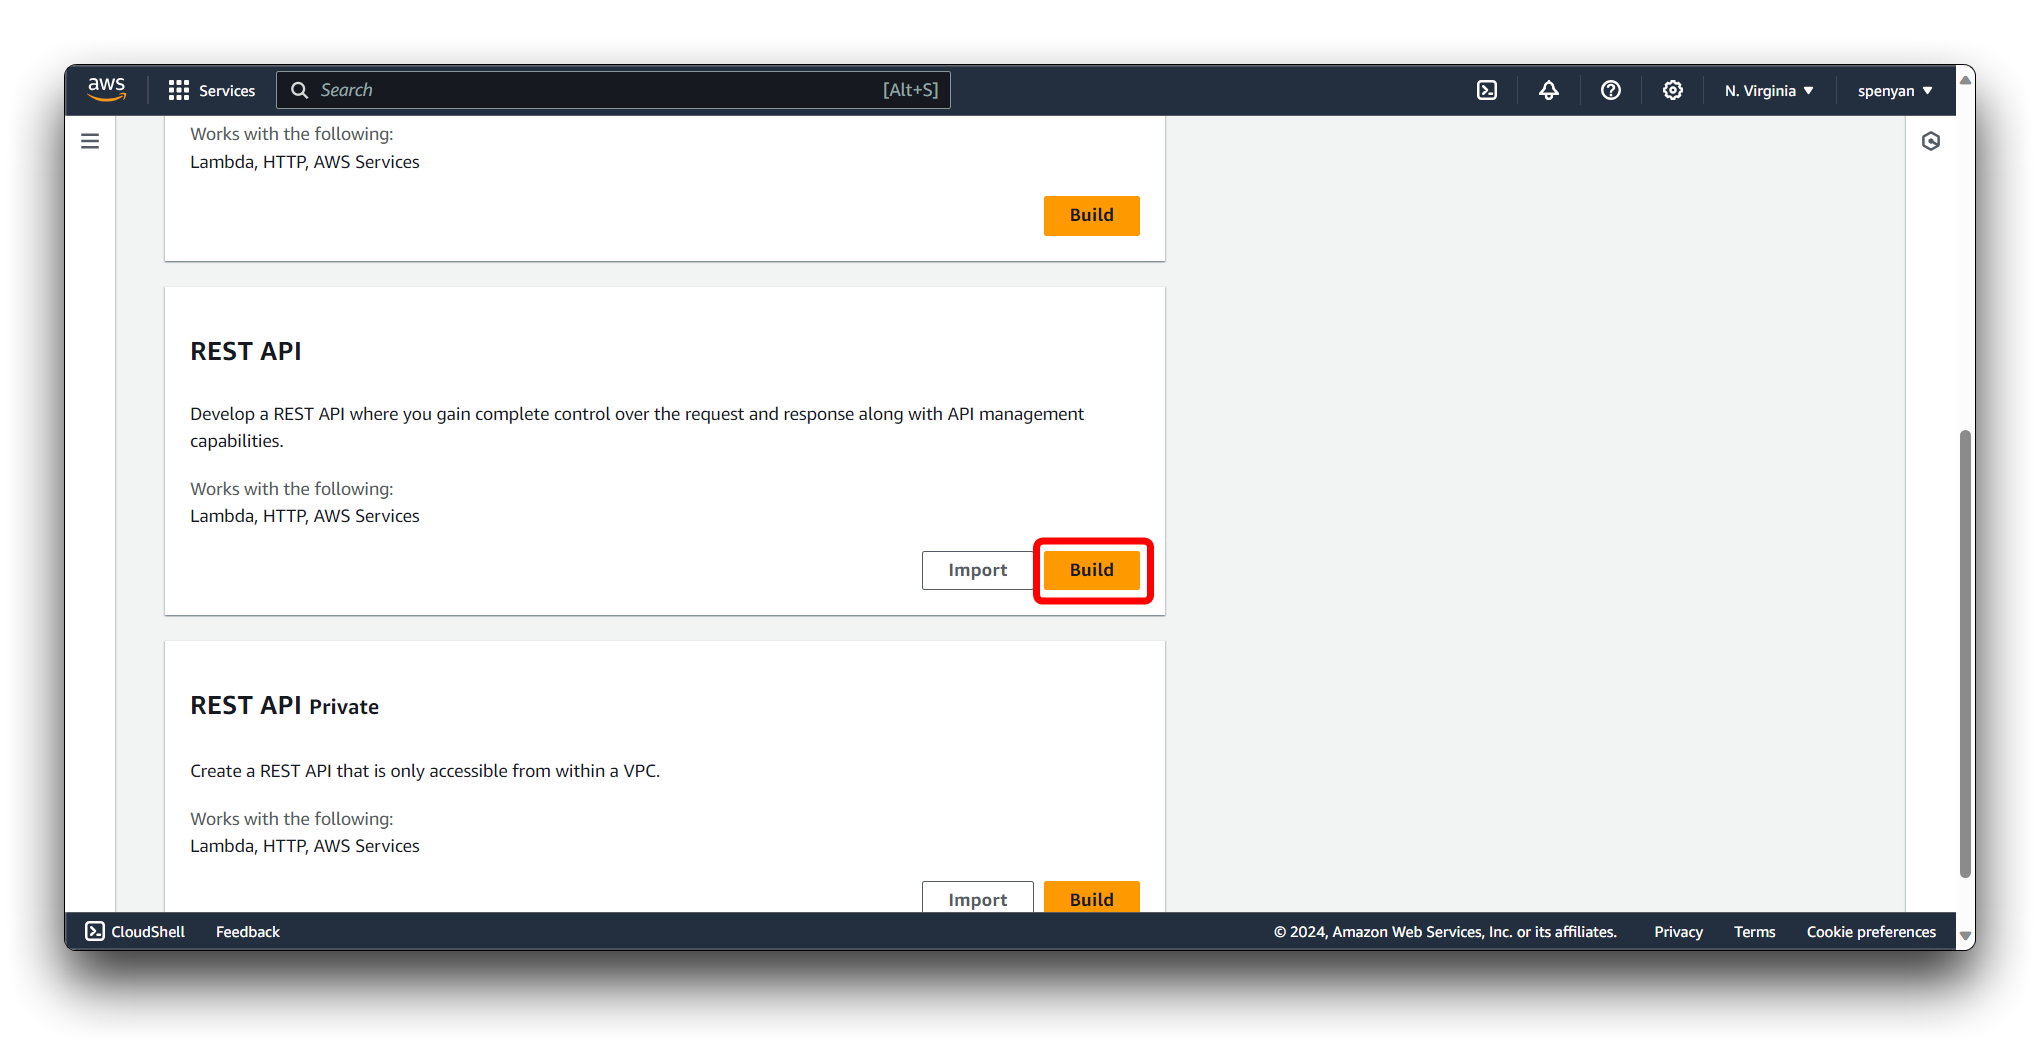
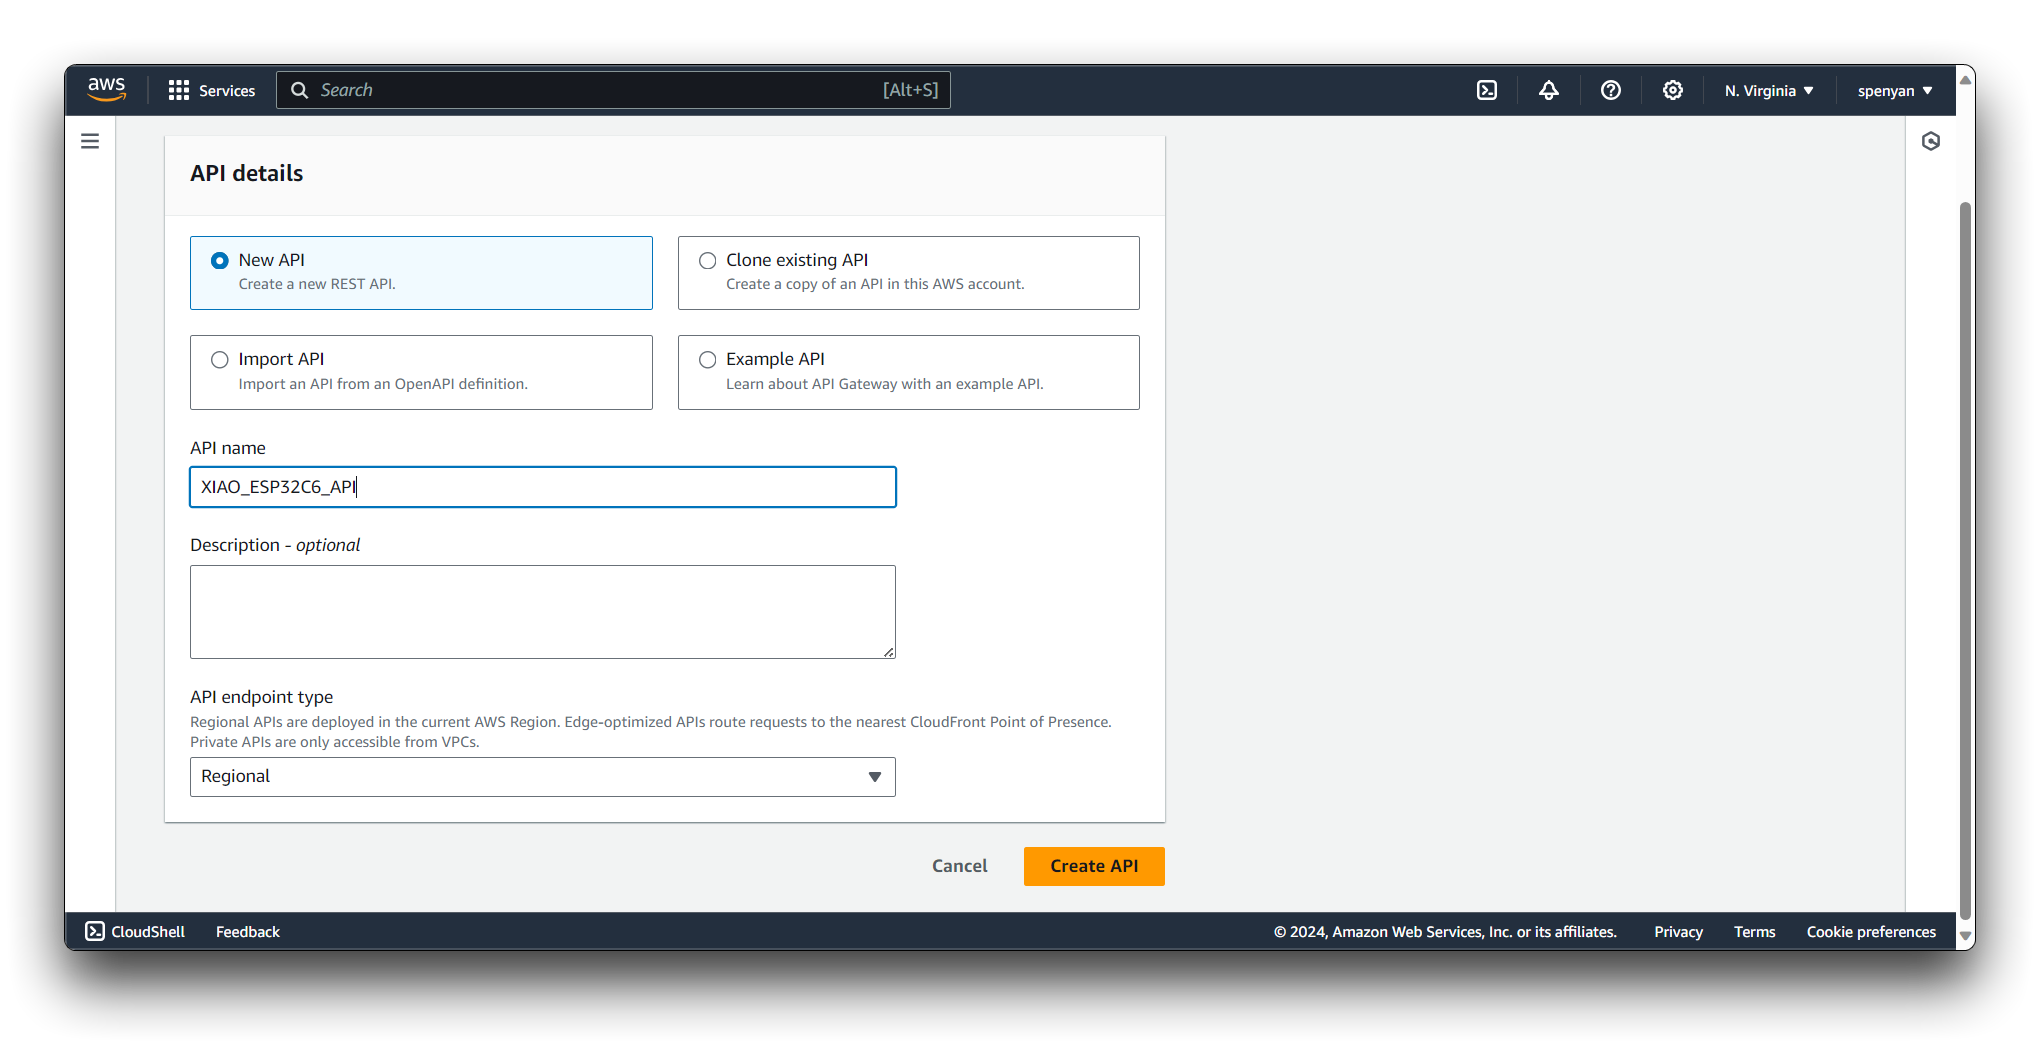
Provide a name for your API, e.g., "XIAO_ESP32C6_API". Choose the Regional endpoint type for your API. Click on the Create API button to create your REST API.
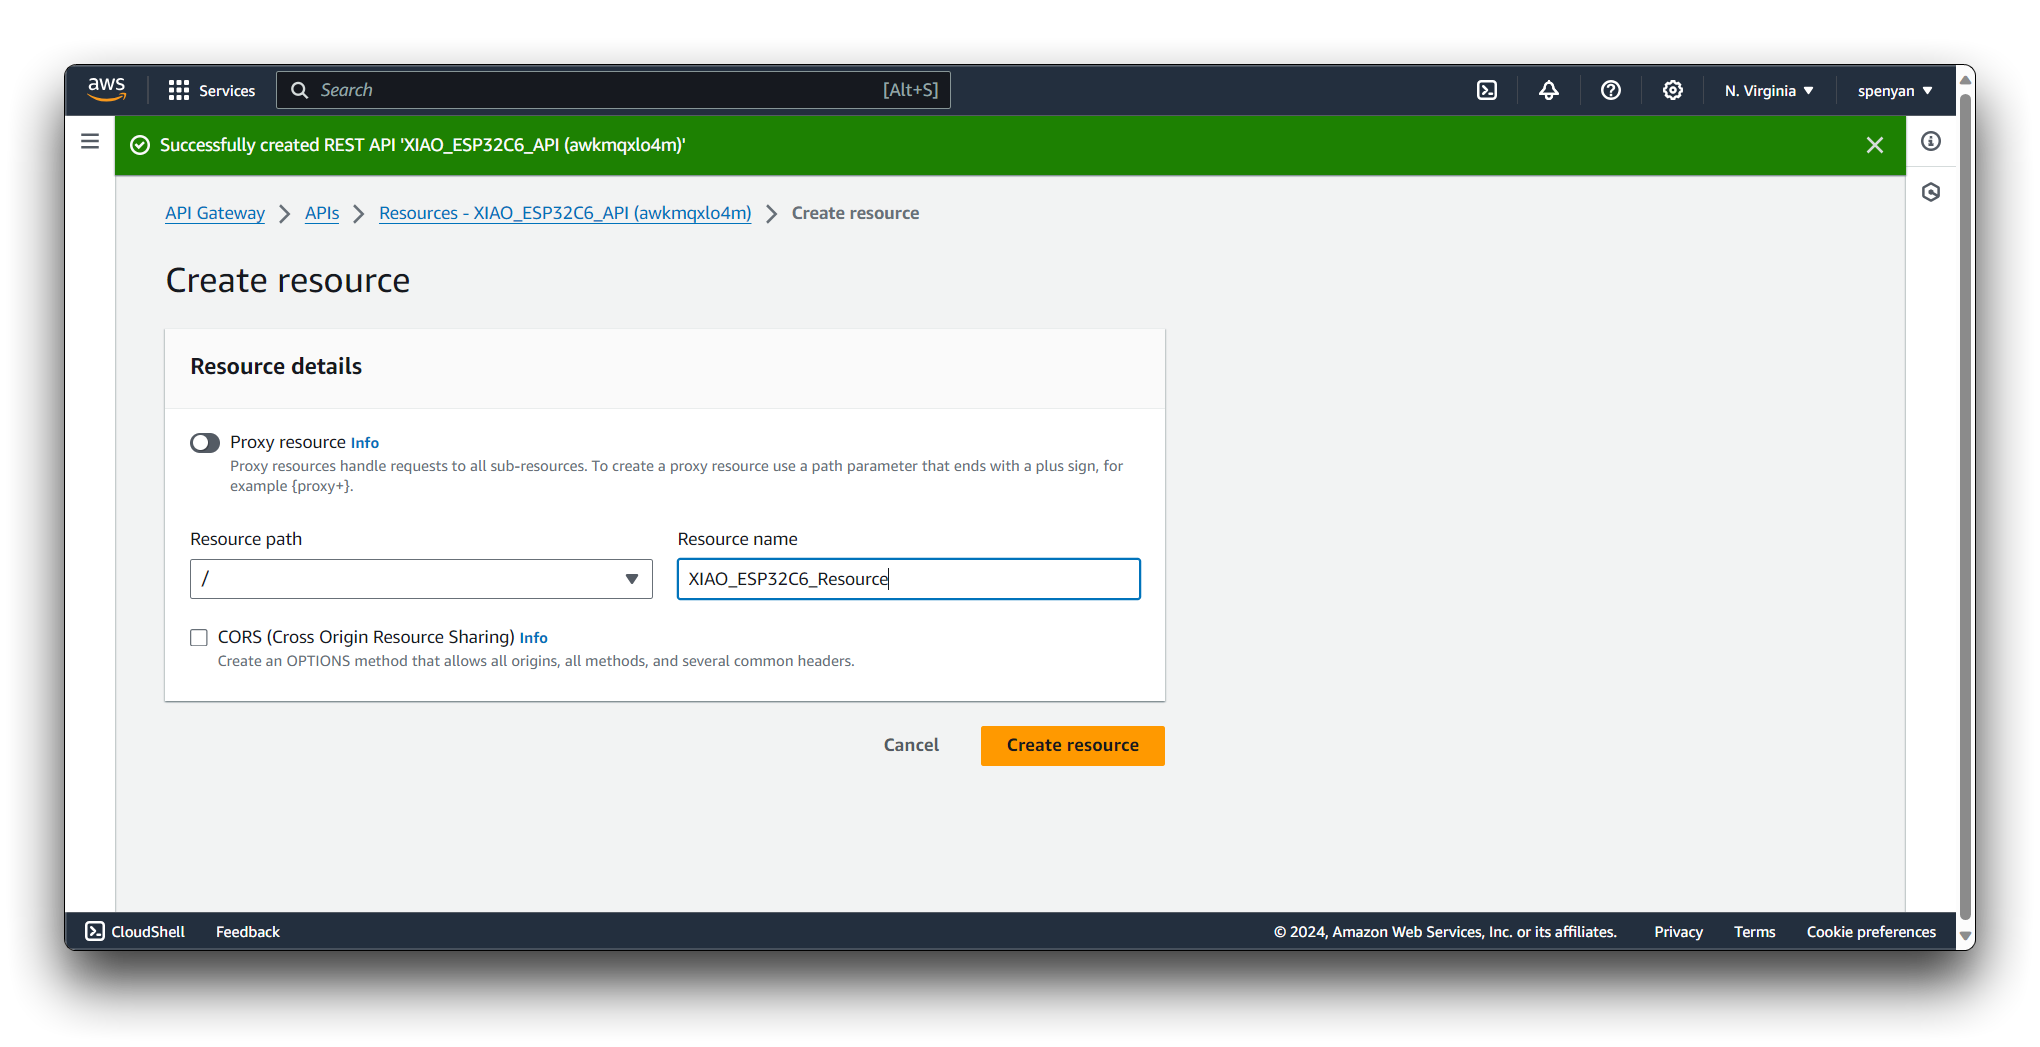
In the API Gateway dashboard, select your newly created API. Select Create Resource.
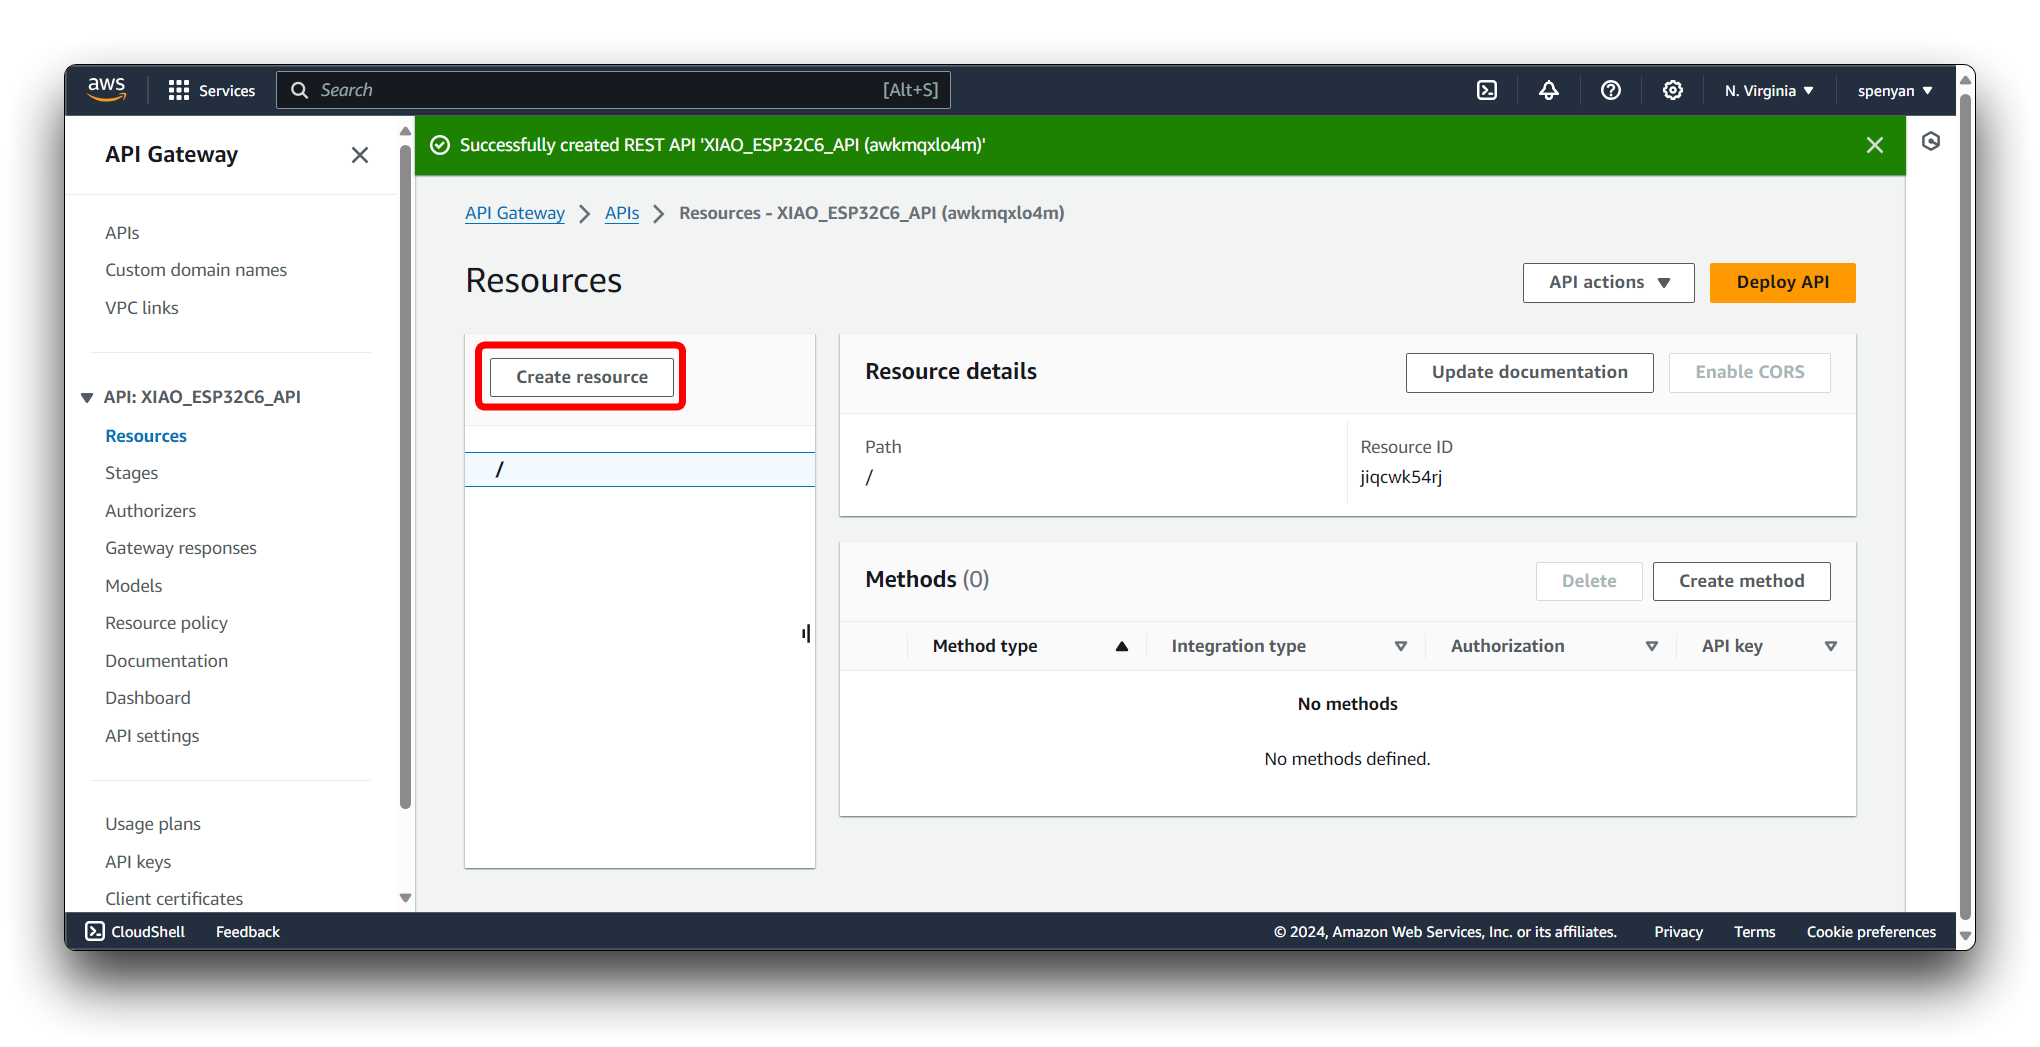
Provide a name for your resource, e.g., "XIAO_ESP32C6_Resource". Click on the Create Resource button to create the resource.
With the newly created resource selected, Select Create Method.
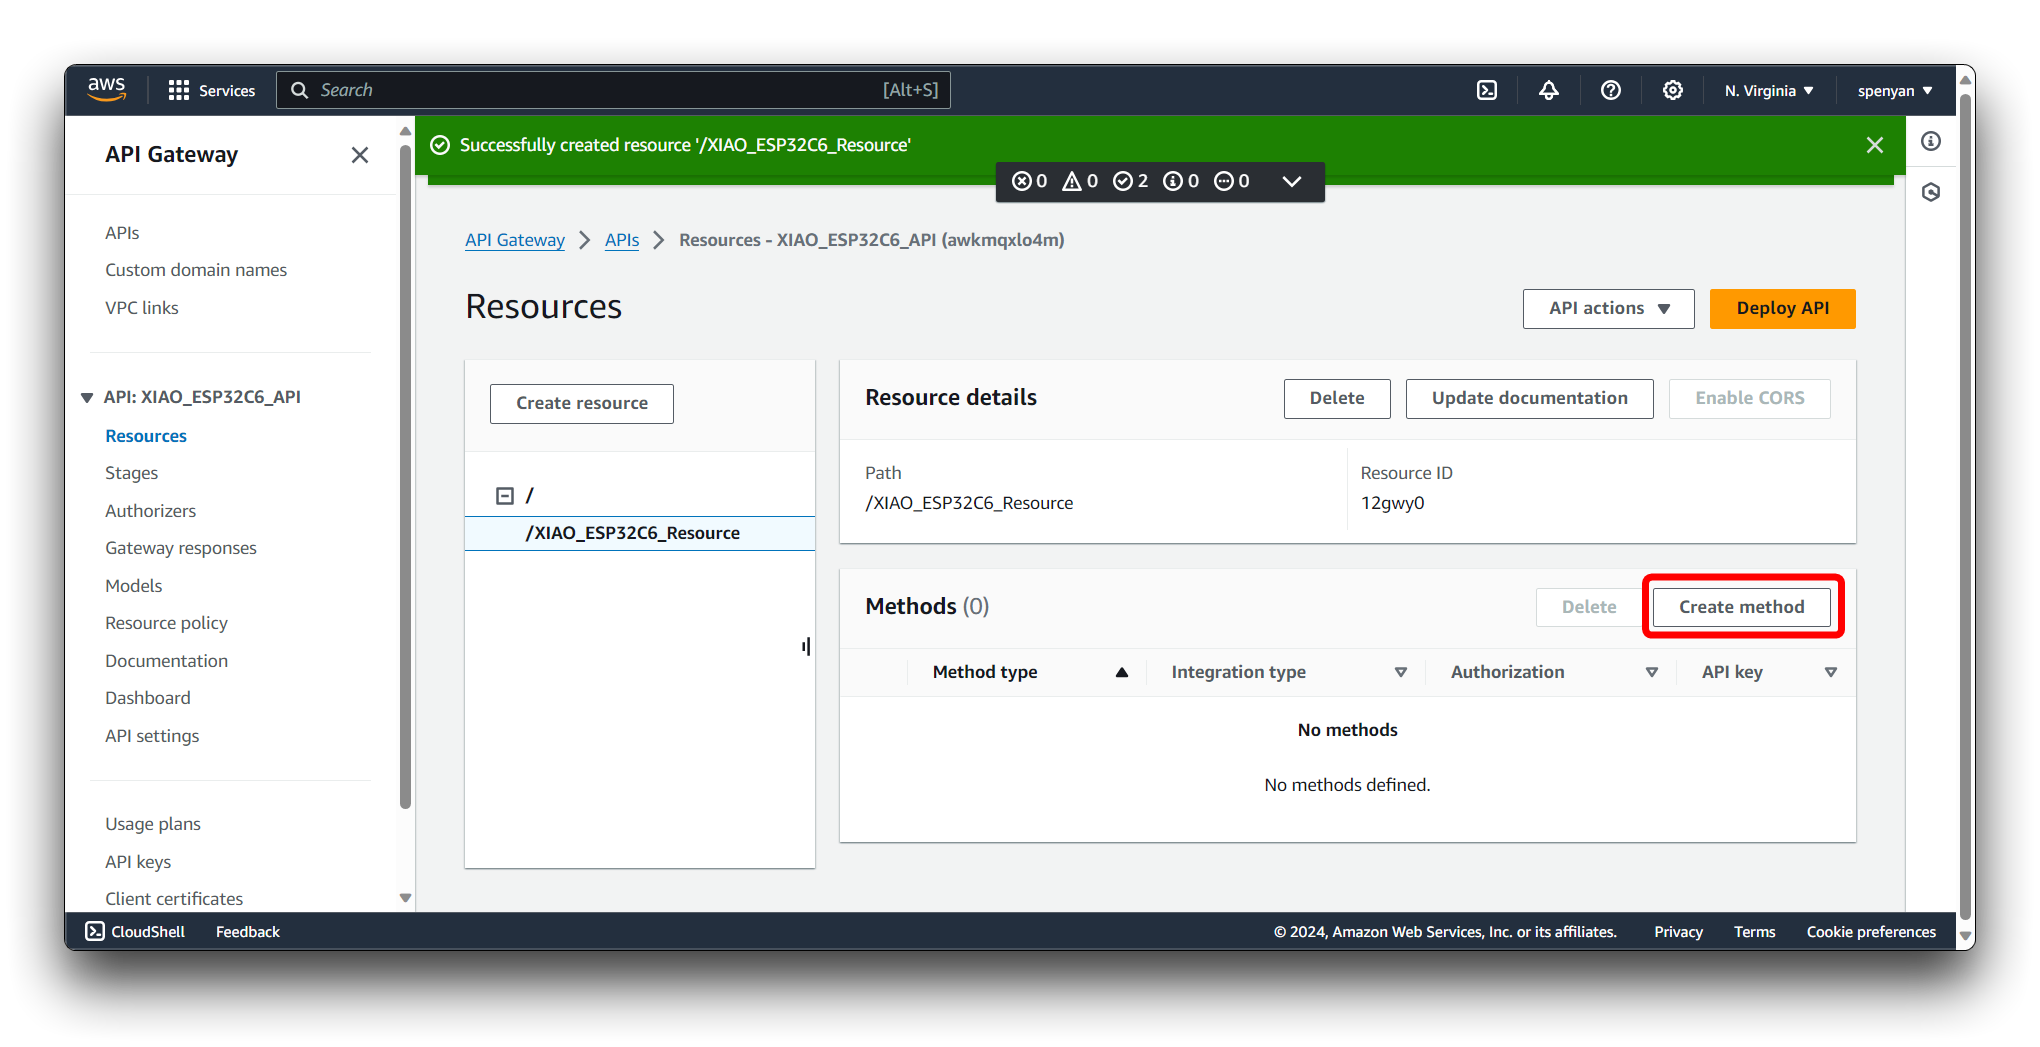
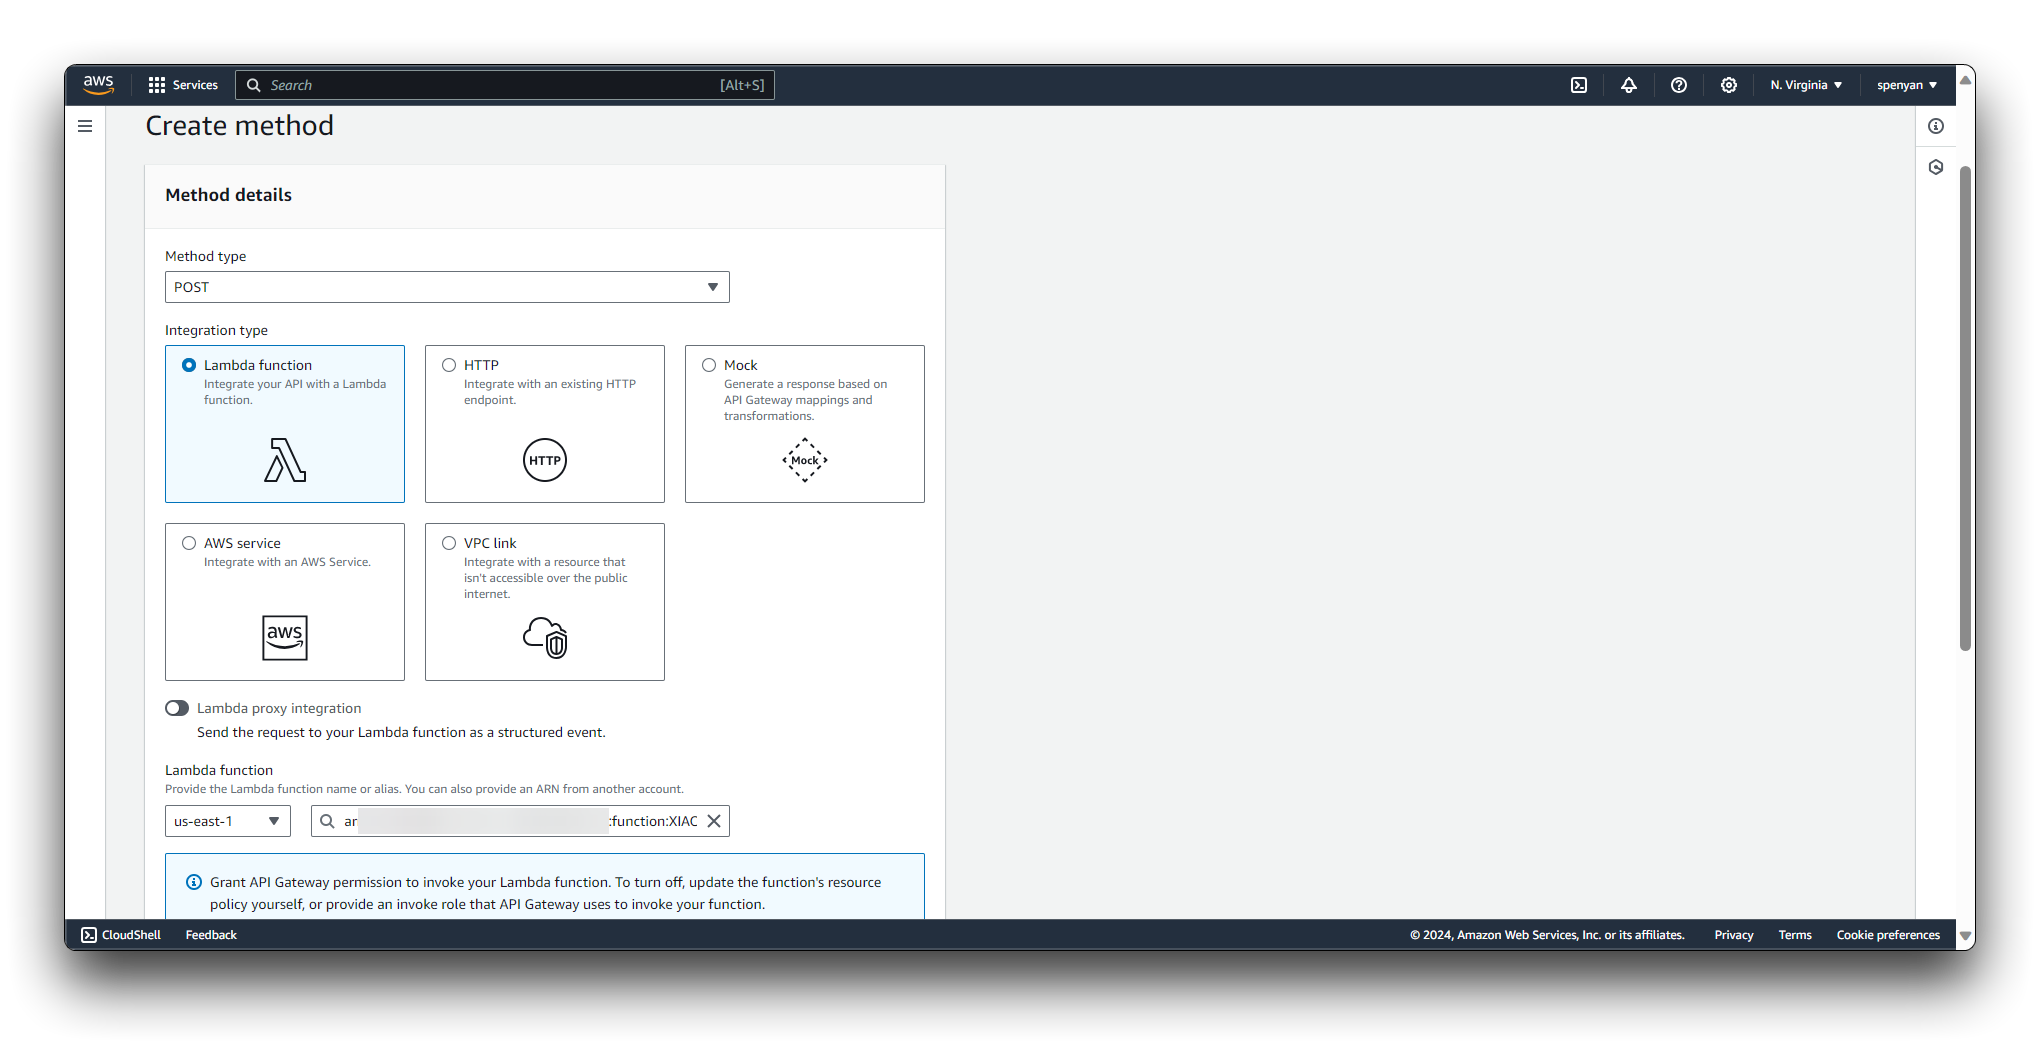
Choose POST as the HTTP method from the dropdown list. Select Lambda Function as the integration type. Choose the region where your Lambda function is located. Enter the name of your Lambda function, e.g., "XIAO_ESP32C6_Function". Click on the Create method button to save the integration settings.
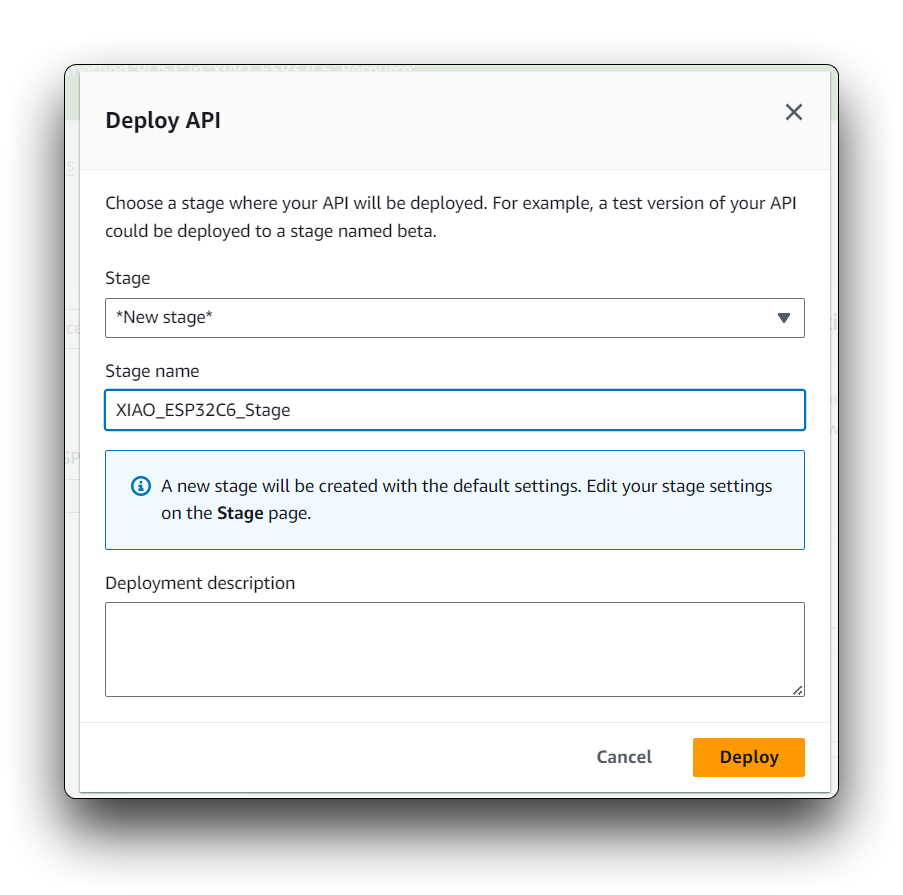
Click on the Deploy API. Choose a deployment stage (e.g., "prod", "dev") or create a new one. Provide a description for the deployment if desired. Click on the "Deploy" button to deploy your API.
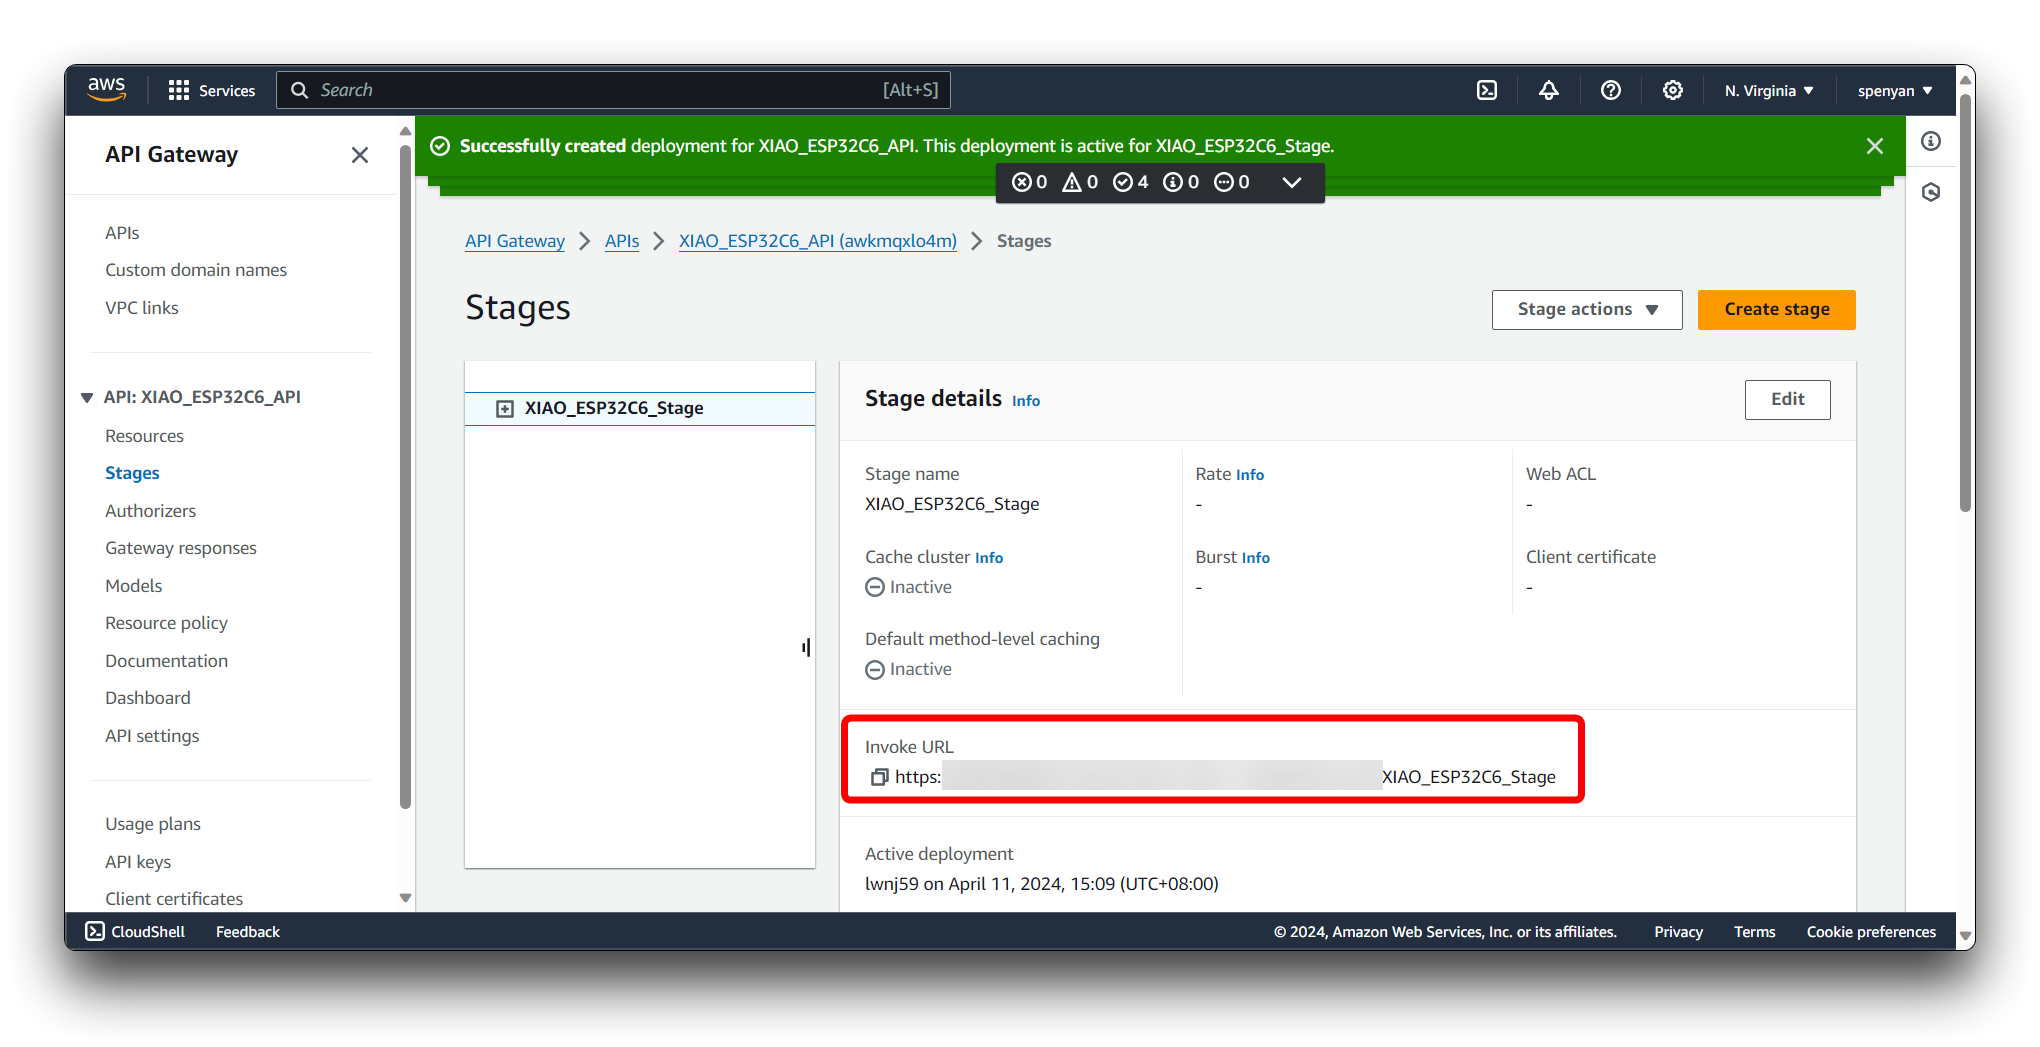
In the API Gateway dashboard, select your API and navigate to the "Stages" section. Expand the deployment stage and click on the POST method for your resource. In the Invoke URL section, copy the provided URL.
Finally, copy and paste the api_gateway code to the end of the SageMaker Jupyter Notebook (create a new snippet) and replace the API_ENDPOINT field in the code with the Invoke URL.
XIAO ESP32C6 for abnormal environment detection
Once a data model of the normal environment is established, the XIAO ESP32C6 continuously monitors the sensor data to detect any potential anomalies. As a powerful microcontroller, it is capable of rapidly responding when data indicates an abnormal situation.
Step 14. Upload real-time data reporting program for XIAO ESP32C6
Get the programme from below and replace the api field in the code with yours. Then compile and upload it to XIAO ESP32C6. Then congratulations, the steps have been carried out to this point, you have successfully completed the entire project steps. As soon as there is an anomaly in the environment, you will get a warning email notification sent to you by the AWS SNS service.
Tech Support & Product Discussion
Thank you for choosing our products! We are here to provide you with different support to ensure that your experience with our products is as smooth as possible. We offer several communication channels to cater to different preferences and needs.