Grove - AHT20 I2C Industrial Grade Temperature&Humidity Sensor


AHT20 is a new generation of temperature and humidity sensor embedded with a dual-row flat and no-lead SMD package, suitable for the reflow soldering. AHT20 is equipped with a newly designed ASIC chip: an improved MEMS semiconductor capacitive humidity sensor, and a standard on-chip temperature sensor. The performance of AHT20 is more stable in harsh environments compared with the previous generation of temperature and humidity sensor such as Grove - Temperature & Humidity Sensor Pro (AM2302/DHT22), as a matter of fact, AHT20 is fittable in most industrial scenarios.
Upgradable to Industrial Sensors
With the SenseCAP S2110 controller and S2100 data logger, you can easily turn the Grove into a LoRaWAN® sensor. Seeed not only helps you with prototyping but also offers you the possibility to expand your project with the SenseCAP series of robust industrial sensors.
SenseCAP S210x series industrial sensors provide an out-of-box experience for environmental sensing. Please refer to the S2101 Wireless Temperature and Humidity Sensor with higher performance and robustness for air quality monitoring. The series includes sensors for soil moisture, air temperature and humidity, light intensity, CO2, EC, and an 8-in-1 weather station. Try the latest SenseCAP S210x for your next successful industrial project.
| SenseCAP Industrial Sensor |
 |
| S2101 Air Temp & Humidity |
Feature
- Temperature measurement range -40 ~ 85°C, Humidity measurement range 0 ~ 100% RH
- Digital output, Grove I2C interface
- Excellent long-term stability
- SMD package suitable for reflow soldering
- Quick response and strong anti-interference ability
- Compatible with Arduino
- 4-pin interface reserved
Specification
| Item | Value |
|---|---|
| Operating Voltage | DC: 2.0V-5.5V |
| Measuring Range (humidity) | 0 ~ 100% RH |
| Temperature Range | -40 ~ + 85 ℃ |
| Humidity Accuracy | ± 2% RH (25 ℃) |
| Temperature Accuracy | ± 0.3 ℃ |
| Resolution | Temperature : 0.01 ℃; Humidity : 0.024% RH |
| Output Interface | Grove I²C Interface |
| I2C address | 0x38 |
Platform Supported
| Arduino | Raspberry Pi | |||
|---|---|---|---|---|
Getting Started
Materials Required
| Seeeduino Lotus V1.1 | Grove-AHT20 Temperature&Humidity Sensor |
|---|---|
 |  |
| Get ONE Now | Get ONE Now |
Hardware Connection

Please plug the USB cable,Grove-AHT20 Temperature&Humidity Sensor Interface into Seeeduino Lotus V1.1 Interface gently, otherwise you may damage the port.
-
Step 1. Plug Grove-AHT20 Temperature&Humidity Sensor into I2C interface of Seeeduino Lotus V1.1 with a Grove Cable.
-
Step 2. Connect Seeeduino Lotus V1.1 to PC via a USB cable.
-
Step 3. Download the code, please refer to the software part.
-
Step 4. Run the code and the outcome will display on the screen of Serial Monitor in your Arduino IDE .
Software
If this is the first time you work with Arduino, we strongly recommend you to see Getting Started with Arduino before the start.
-
Step 1. Download the Demo code.
-
Step 2. Copy the whole Seeed_Arduino_AHT20 file and paste it into your Arduino IDE library file.
-
Step 3. Open the BasicRead file of examples with your Arduino IDE.
-
Step 4. Upload the demo. If you do not know how to upload the code, please check How to upload code.
Software Code
// ARDUINO DEMO FOR GROVE-AHT20
//
#include <Wire.h>
#include "AHT20.h"

AHT20 AHT;

void setup()
{
    Serial.begin(115200);
    Serial.println("AHT20 DEMO");
    AHT.begin();
}

void loop()
{
    float humi, temp;

    int ret = AHT.getSensor(&humi, &temp);

    if(ret)     // GET DATA OK
    {
        Serial.print("humidity: ");
        Serial.print(humi*100);
        Serial.print("%\t temerature: ");
        Serial.println(temp);
    }
    else        // GET DATA FAIL
    {
        Serial.println("GET DATA FROM AHT20 FAIL");
    }

    delay(100);
}

// END FILE
If everything goes well, you can go to Serial Monitor to see an outcome as following:

Schematic Online Viewer
Play With Raspberry Pi
Hardware
- Step 1. Things used in this project:
| Raspberry pi | Grove Base Hat for RasPi | Grove-AHT20 Temperature&Humidity Sensor |
|---|---|---|
|
|
|
| Get ONE Now | Get ONE Now | Get ONE Now |


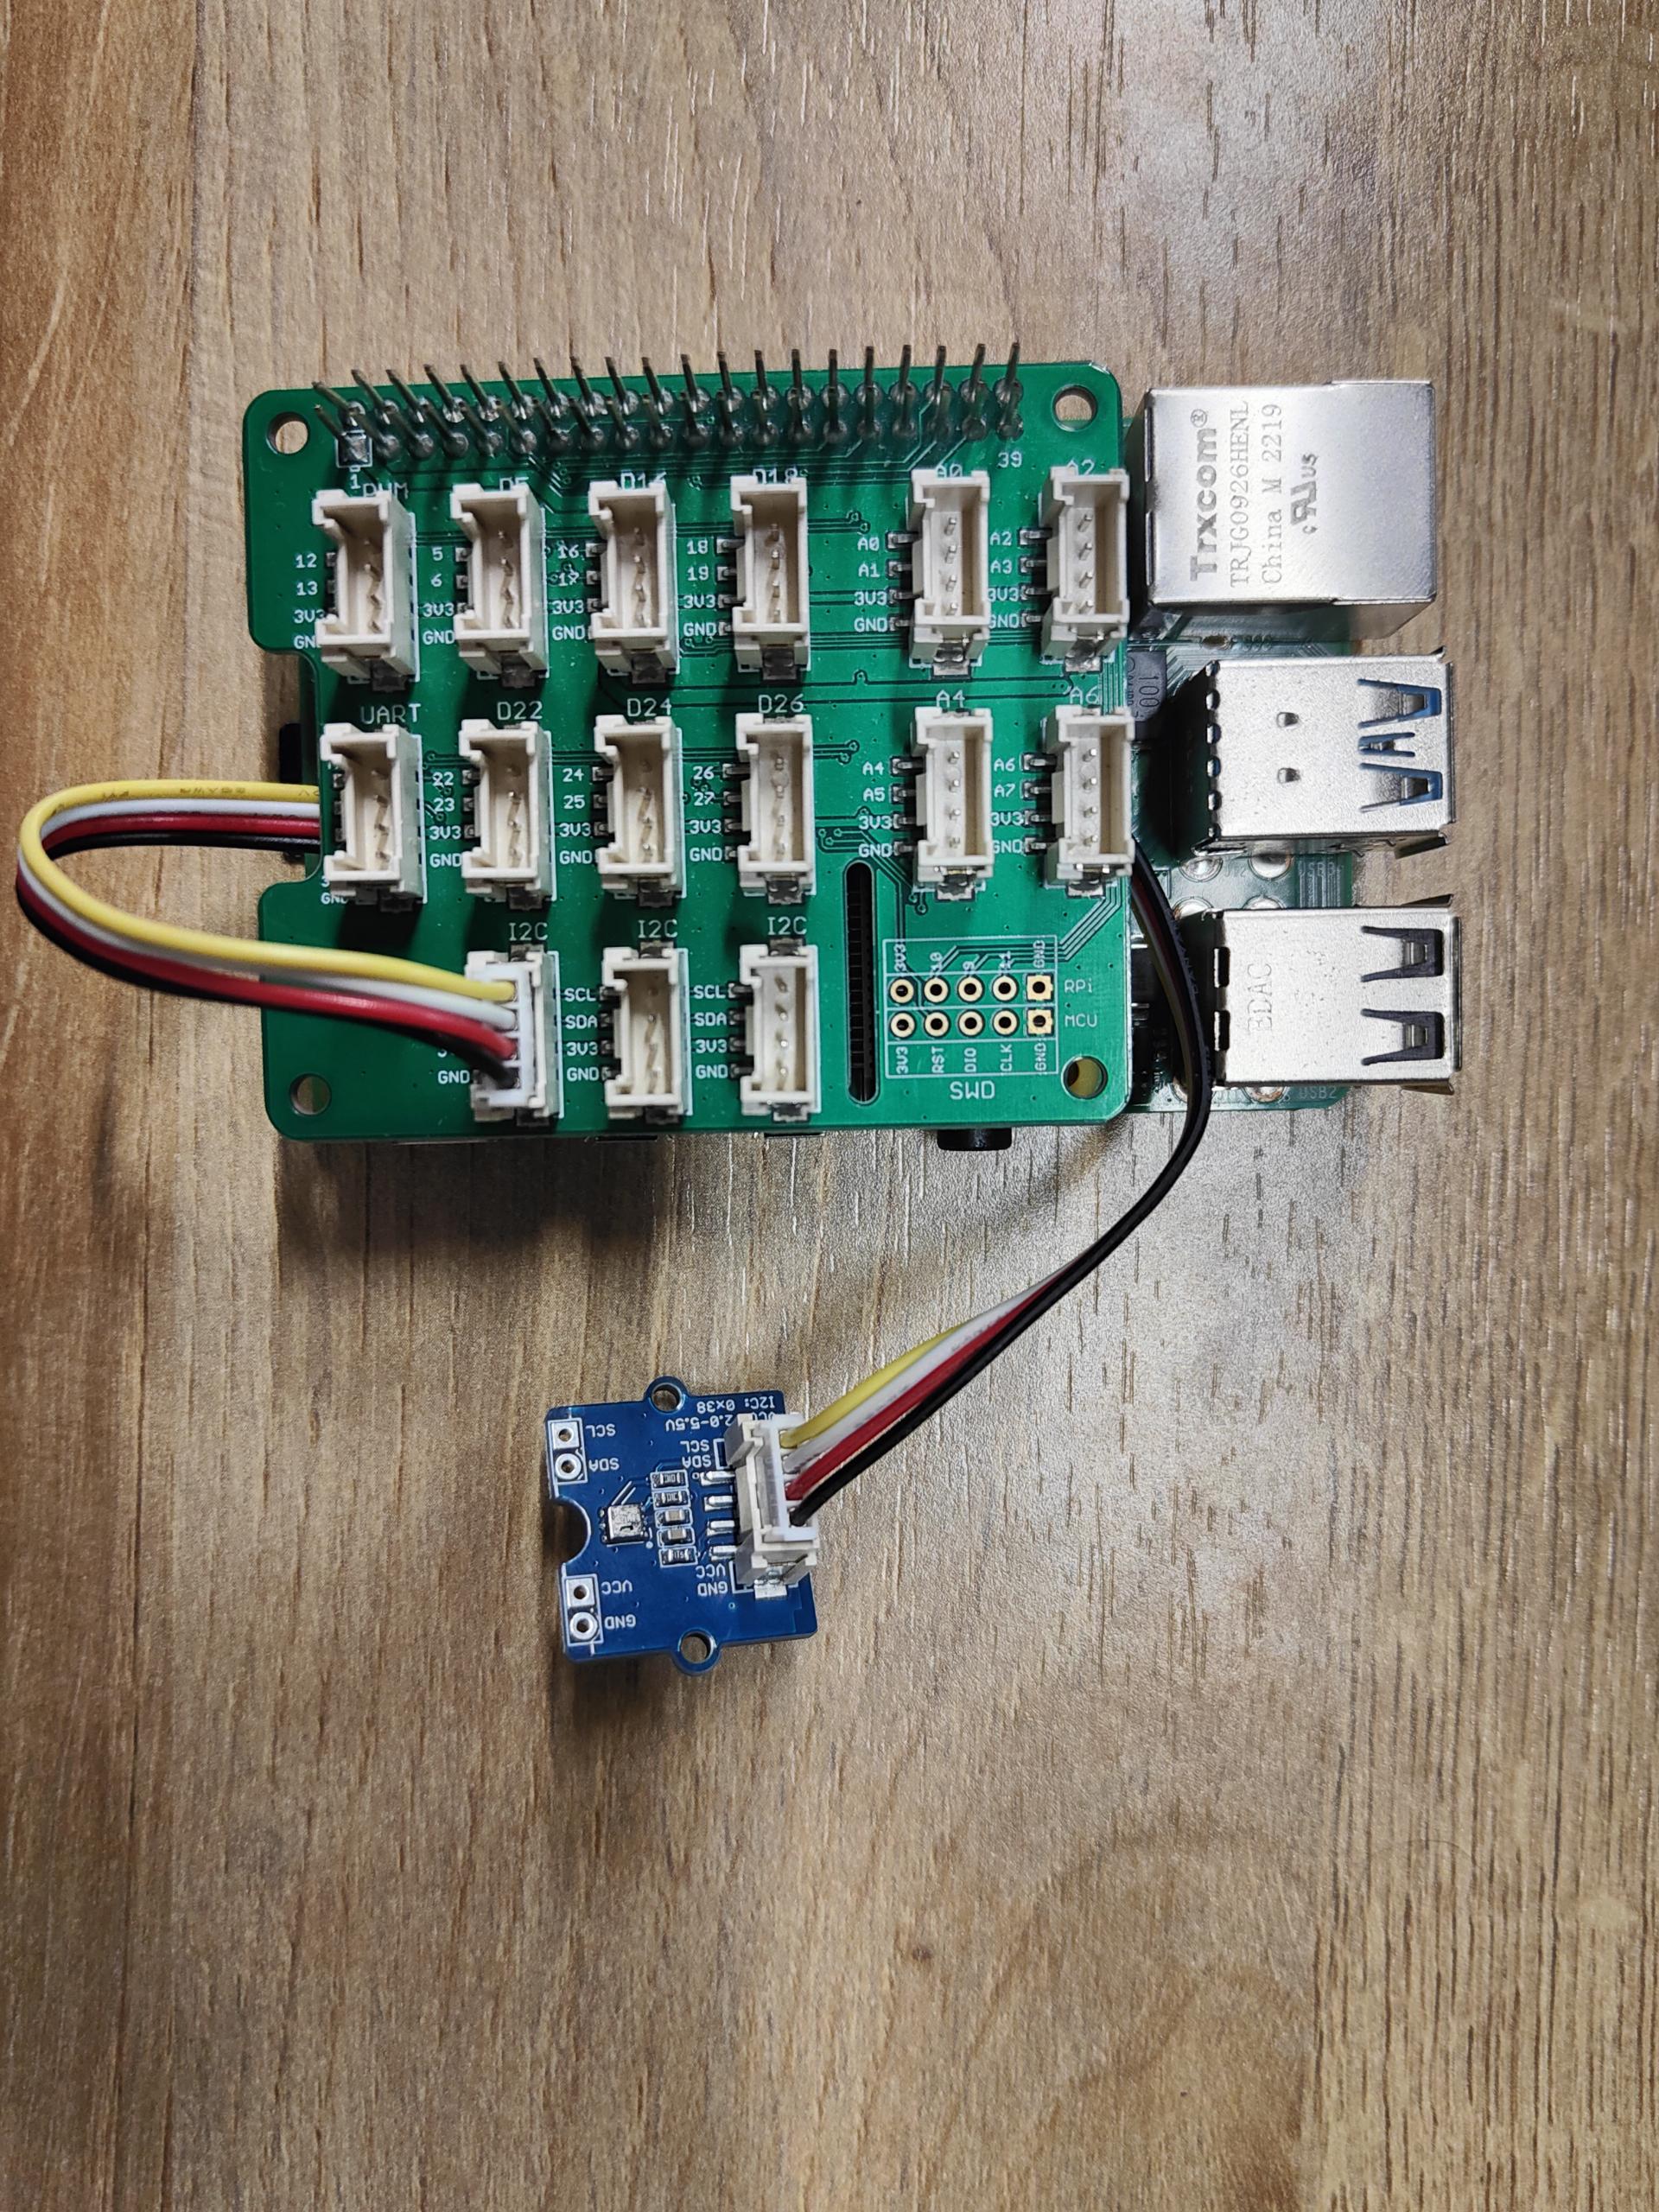
- Step 2. Plug the Grove Base Hat into Raspberry.
- Step 3. Connect the Grove-AHT20 Temperature&Humidity Sensor to the I2C port of the Base Hat.
- Step 4. Connect the Raspberry Pi to PC through USB cable.
Software
If you are using Raspberry Pi with Raspberrypi OS >= Bullseye, you have to use this command line only with Python3.
- Step 1. Follow Setting Software to configure the development environment.
- Step 2. Enter the relevant virtual environment.
source ~/grove_env/env/bin/activate
cd ~/grove_env/grove.py/grove
- old
- new
- Step 3. Excute below commands to run the code.
nano ~/grove_env/AHT20_demo.py
import time
from grove.i2c import Bus


class GroveTemperatureHumidityAHT20(object):
    def __init__(self, address=0x38, bus=1):
        self.address = address

        # I2C bus
        self.bus = Bus(bus)

    def read(self):
        self.bus.write_i2c_block_data(self.address, 0x00, [0xac, 0x33, 0x00])

        # measurement duration < 16 ms
        time.sleep(0.016)

        data = self.bus.read_i2c_block_data(self.address, 0x00, 6)

        humidity = data[1]
        humidity <<= 8
        humidity += data[2]
        humidity <<= 4
        humidity += (data[3] >> 4)
        humidity /= 1048576.0
        humidity *= 100

        temperature = data[3] & 0x0f
        temperature <<= 8
        temperature += data[4]
        temperature <<= 8
        temperature += data[5]
        temperature = temperature / 1048576.0*200.0-50.0  # Convert to Celsius

        return temperature, humidity


def main():
    sensor = GroveTemperatureHumidityAHT20()
    while True:
        temperature, humidity  = sensor.read()

        print('Temperature in Celsius is {:.2f} C'.format(temperature))
        print('Relative Humidity is {:.2f} %'.format(humidity))

        time.sleep(1)


if __name__ == "__main__":
    main()
- Run this code
python AHT20_demo.py
-
Step 3. Excute below command to run the code.
-
The following is to check grove_temperature_humidity aht20.py code.
less grove_temperature_humidity aht20.py
- Run this code
python grove_temperature_humidity aht20.py
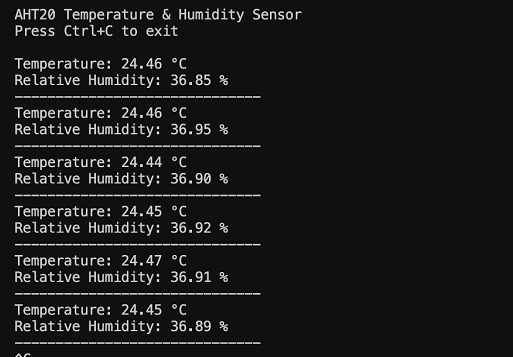
If everything goes smoothly, you will see the following phenomenon.😄
Resources
- [ZIP] Grove-AHT-eagle-file
- [PDF] Datasheet of AHT20
Tech Support & Product Discussion
Please submit any technical issue into our forum. Thank you for choosing our products! We are here to provide you with different support to ensure that your experience with our products is as smooth as possible. We offer several communication channels to cater to different preferences and needs.