Grove Offline Voice Recognition
Introduction
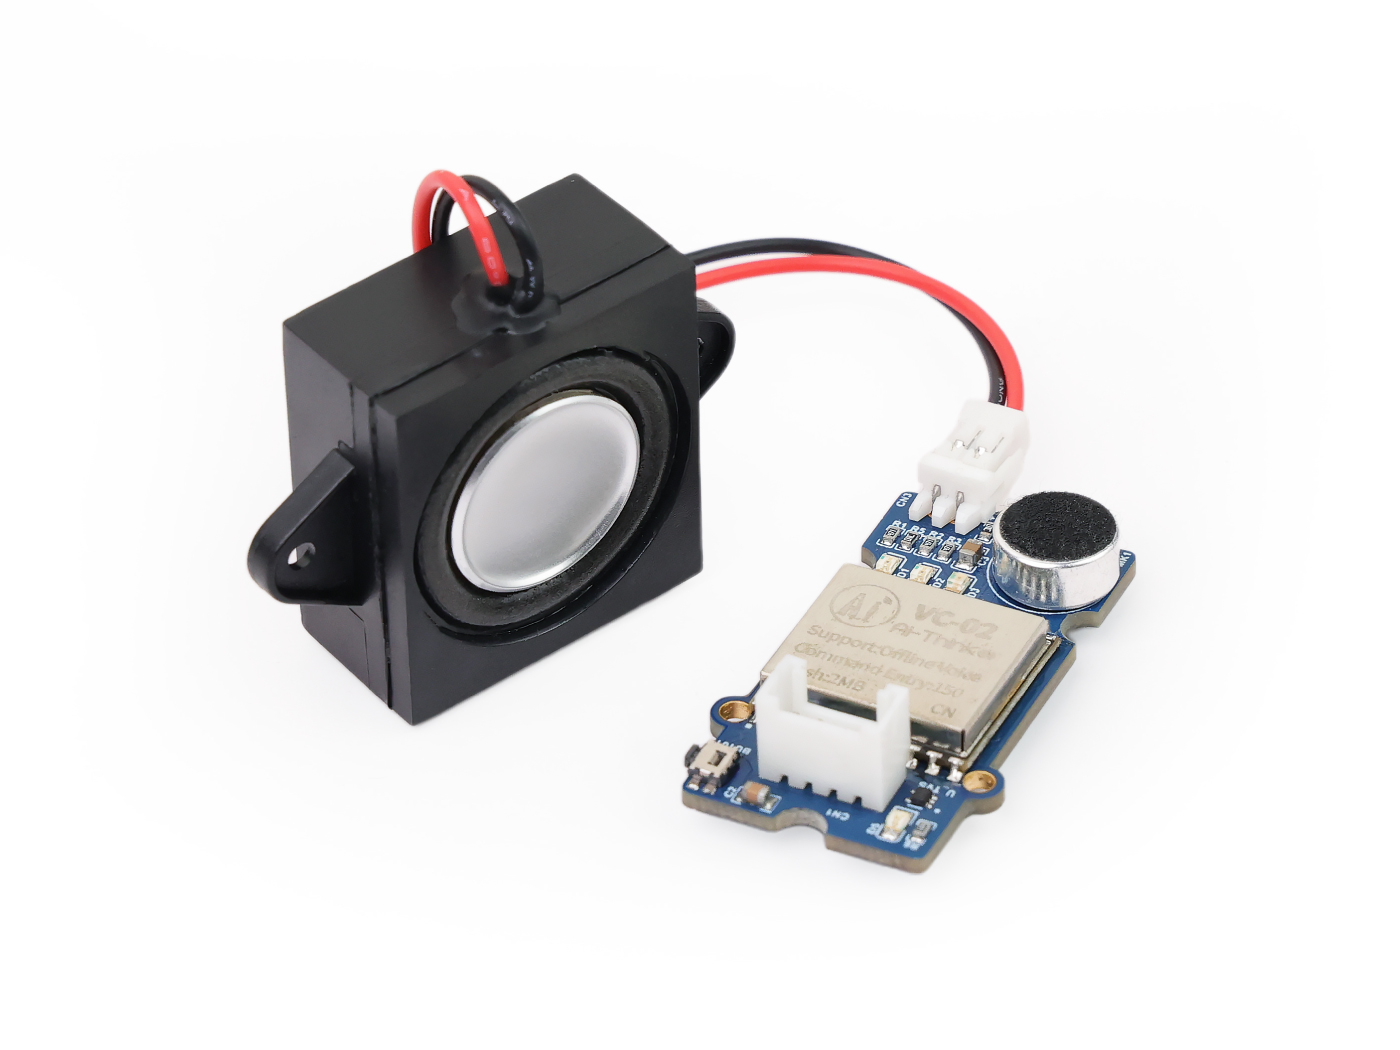
Grove - Offline Voice recognition Module is apt for low power pure-offline voice recognition, based on VC-02 module. It has up to 150 pre-programmed commands that can be used to control your smart appliances. It features an identification time less than 100ms, in a compact form factor of 18mm * 17mm. The module can communicate through the UART peripheral and provide unique Hex Code to each recognised command. All this module needs is 5V and it's ready to recognise the commands!
Feature
- Supports 150 voice commands
- Low power consumption
- ESD protected power rails
- LED indicators for commands
- Grove UART interface
Specifications
Parameter | Range/Value |
| Input Voltage | 5V/3.3V |
| Default BaudRate | 115200 |
| Default Output | Hex values of detected command |
Getting started
demo1: Grove offline voice recognition module with Arduino IDE
Hardware setup
You need to prepare the following:
Some USB cables can only supply power and cannot transfer data. If you don't have a USB cable or don't know if your USB cable can transmit data, you can check Seeed USB Type-C support USB 3.1.
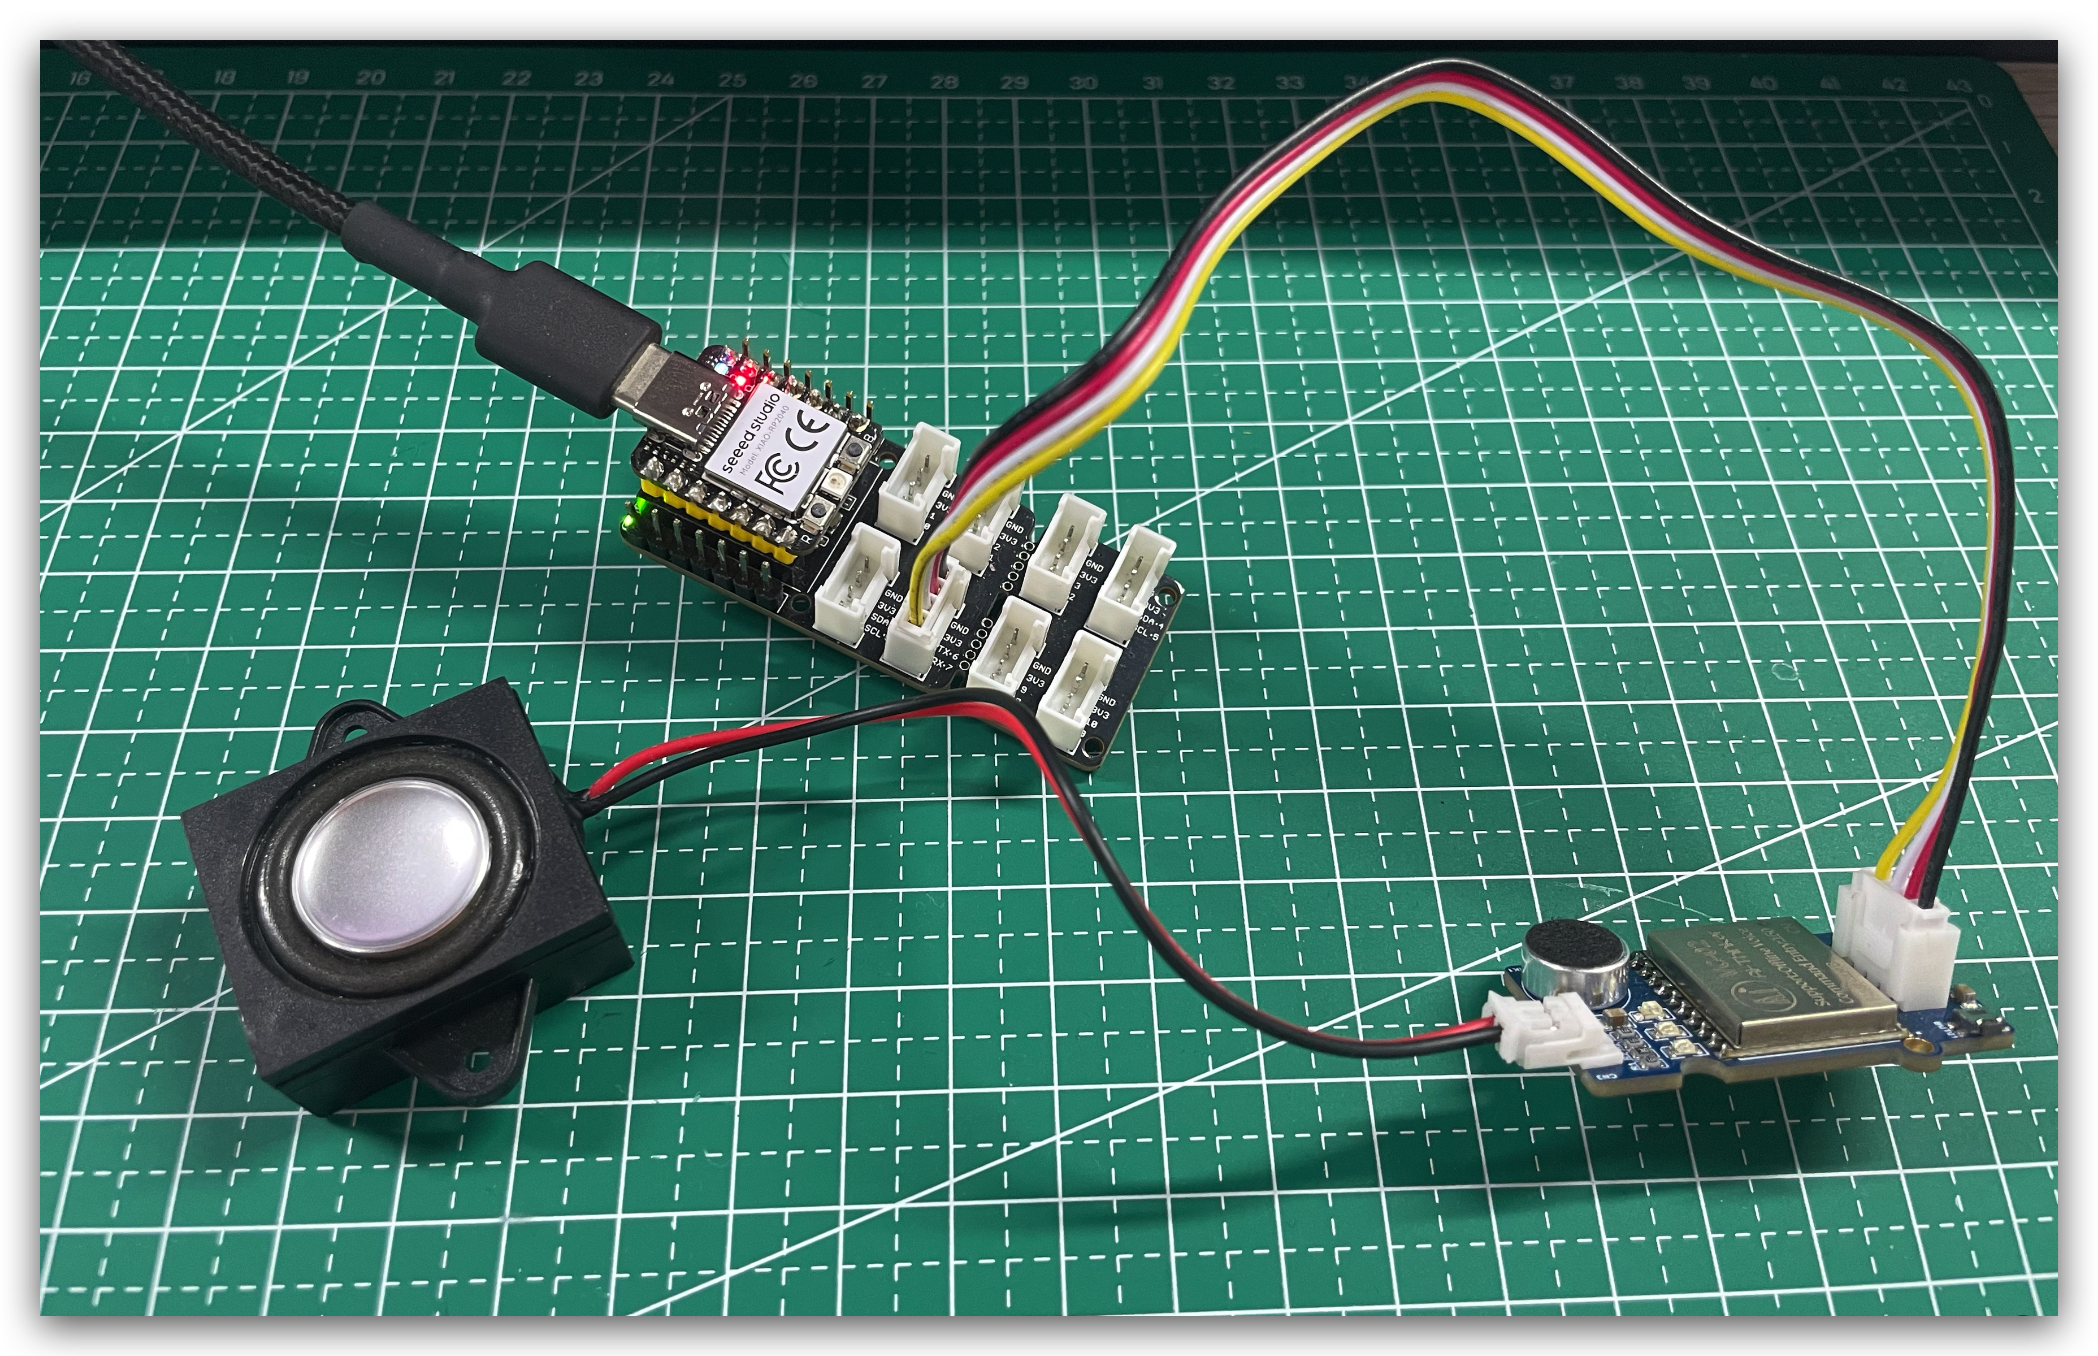
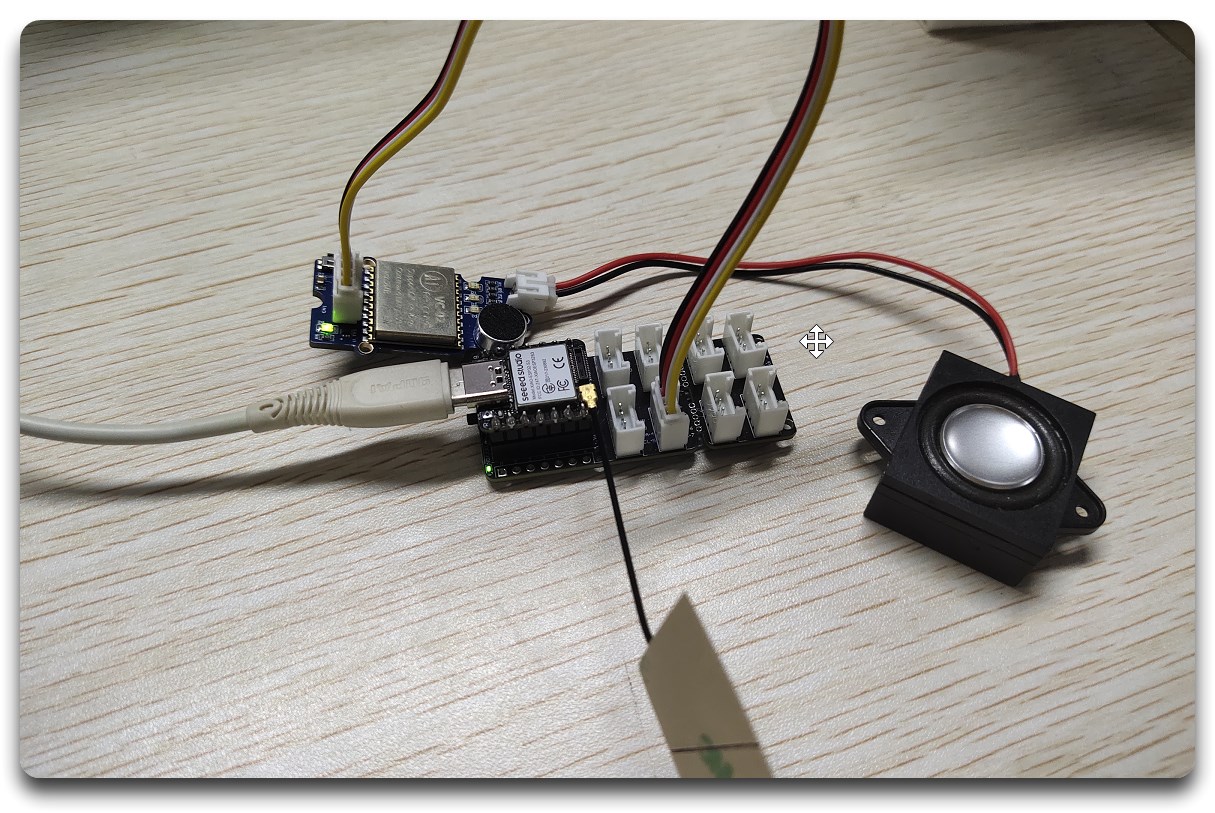
Step 1. Connect XIAO RP2040 to your computer via a USB Type-C cable.
Step 2. Connect XIAO RP2040 to XIAO expension board.
Step 3. Connect XIAO expension board to Offline Speech Recognizer on UART port via Grove cable.
Step 4. Connect Offline Speech Recognizer to a speaker.
Here is the connecting picture for your reference.
Software Setup
Step 1. Download and Install the latest version of Arduino IDE according to your operating system

Step 2. Select your development board model and add it to the Arduino IDE. If you want to use XIAO RP2040 for the later routines, please refer to this tutorial to finish adding.
If you want to use other types of XIAO, you can refer here.
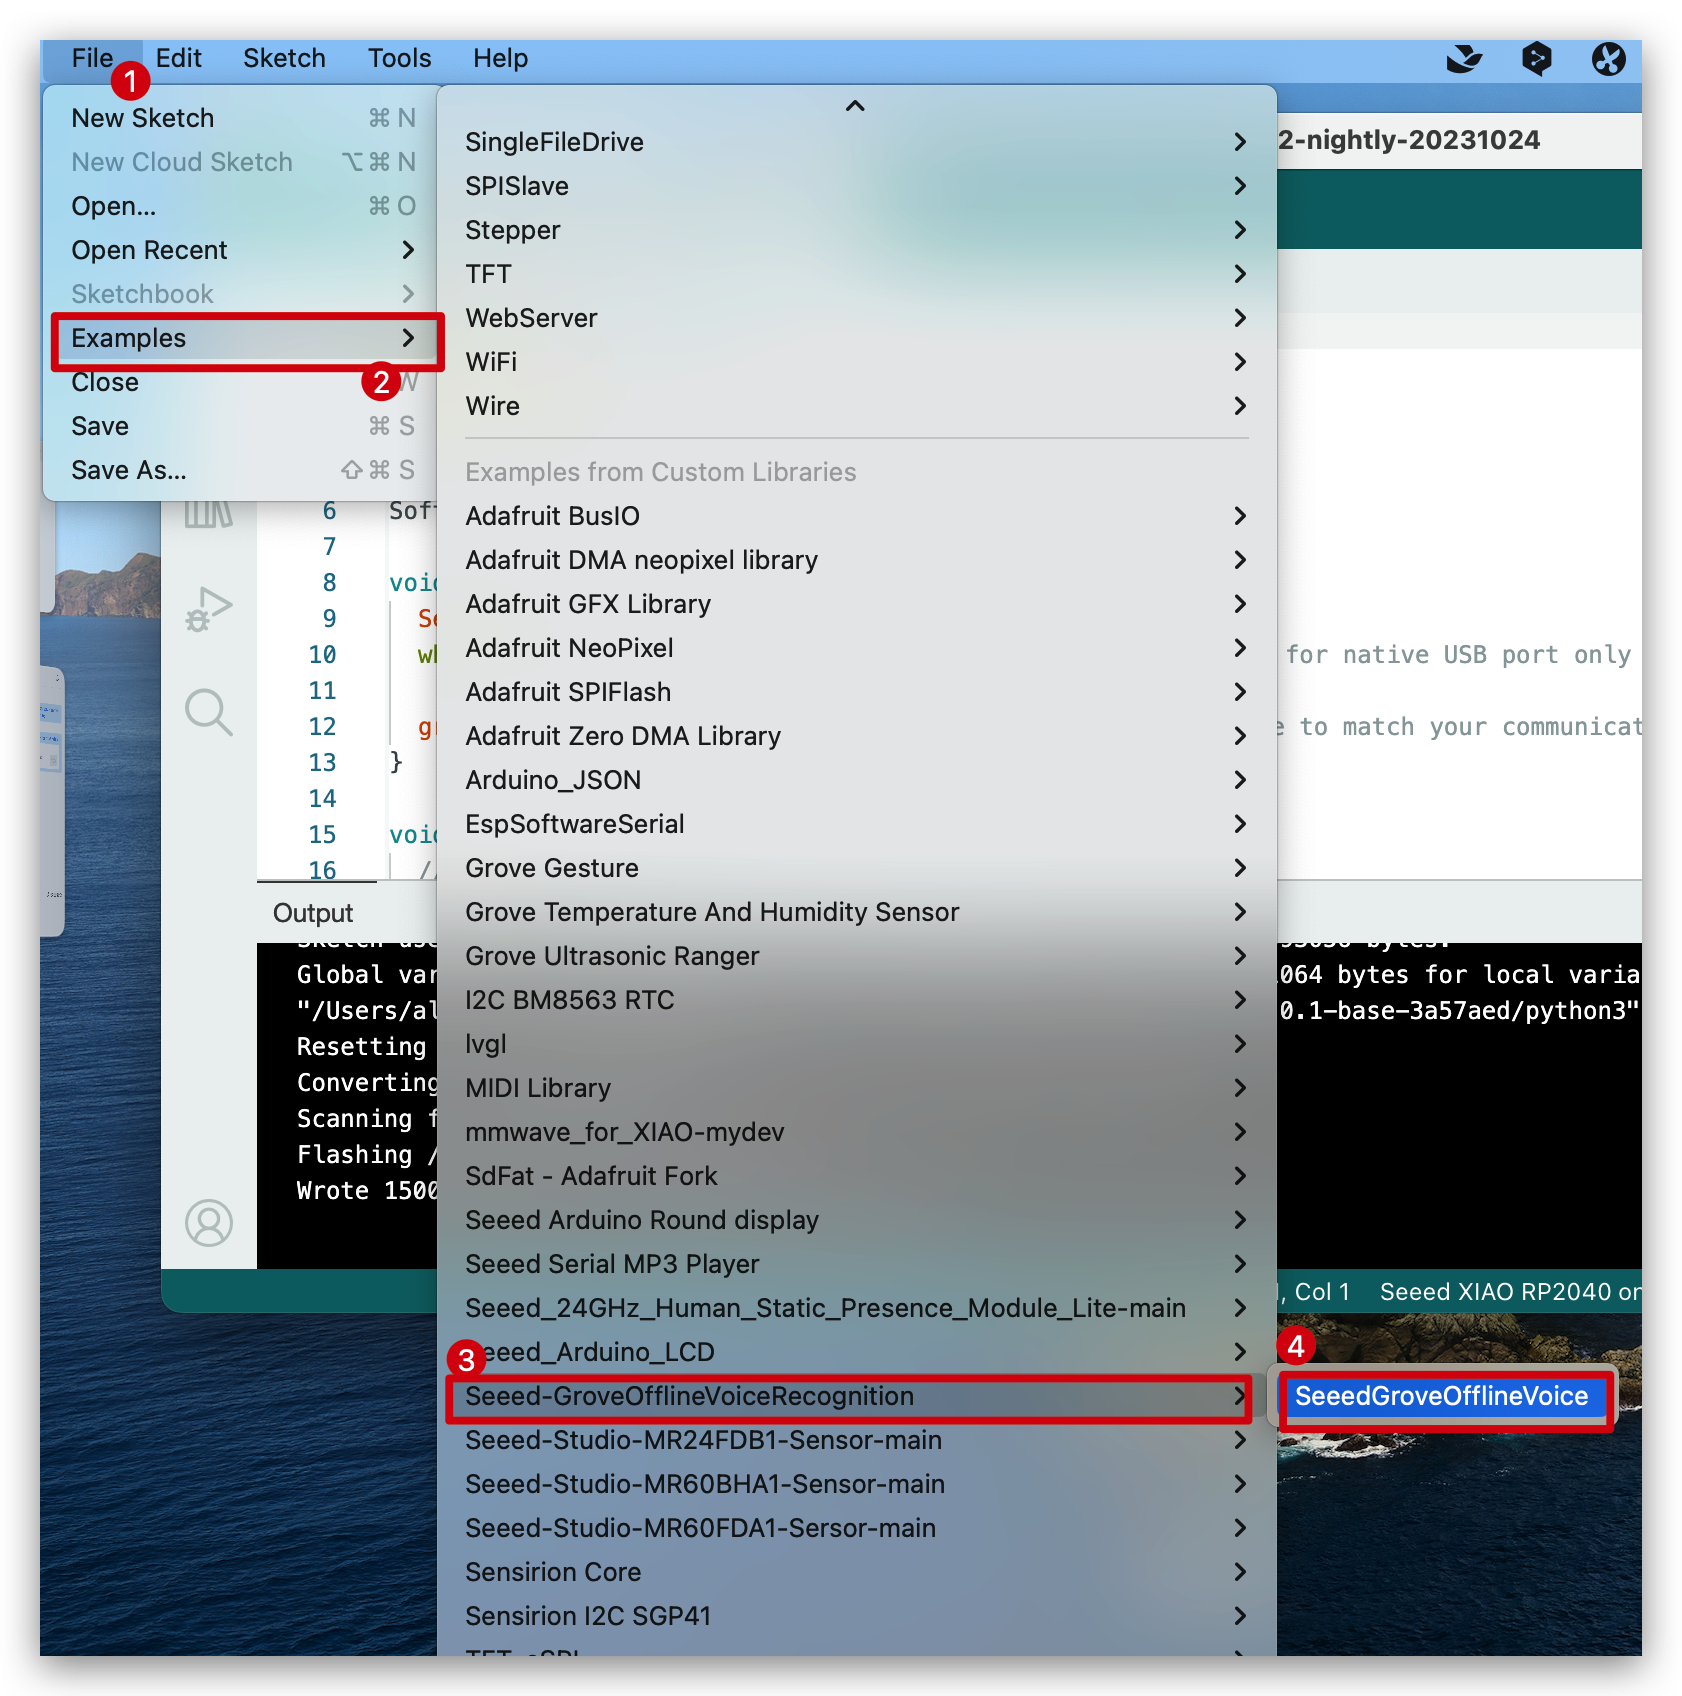
Step 3. Install the Arduino code library.
Start by getting the code base from GitHub and downloading it to your local computer.
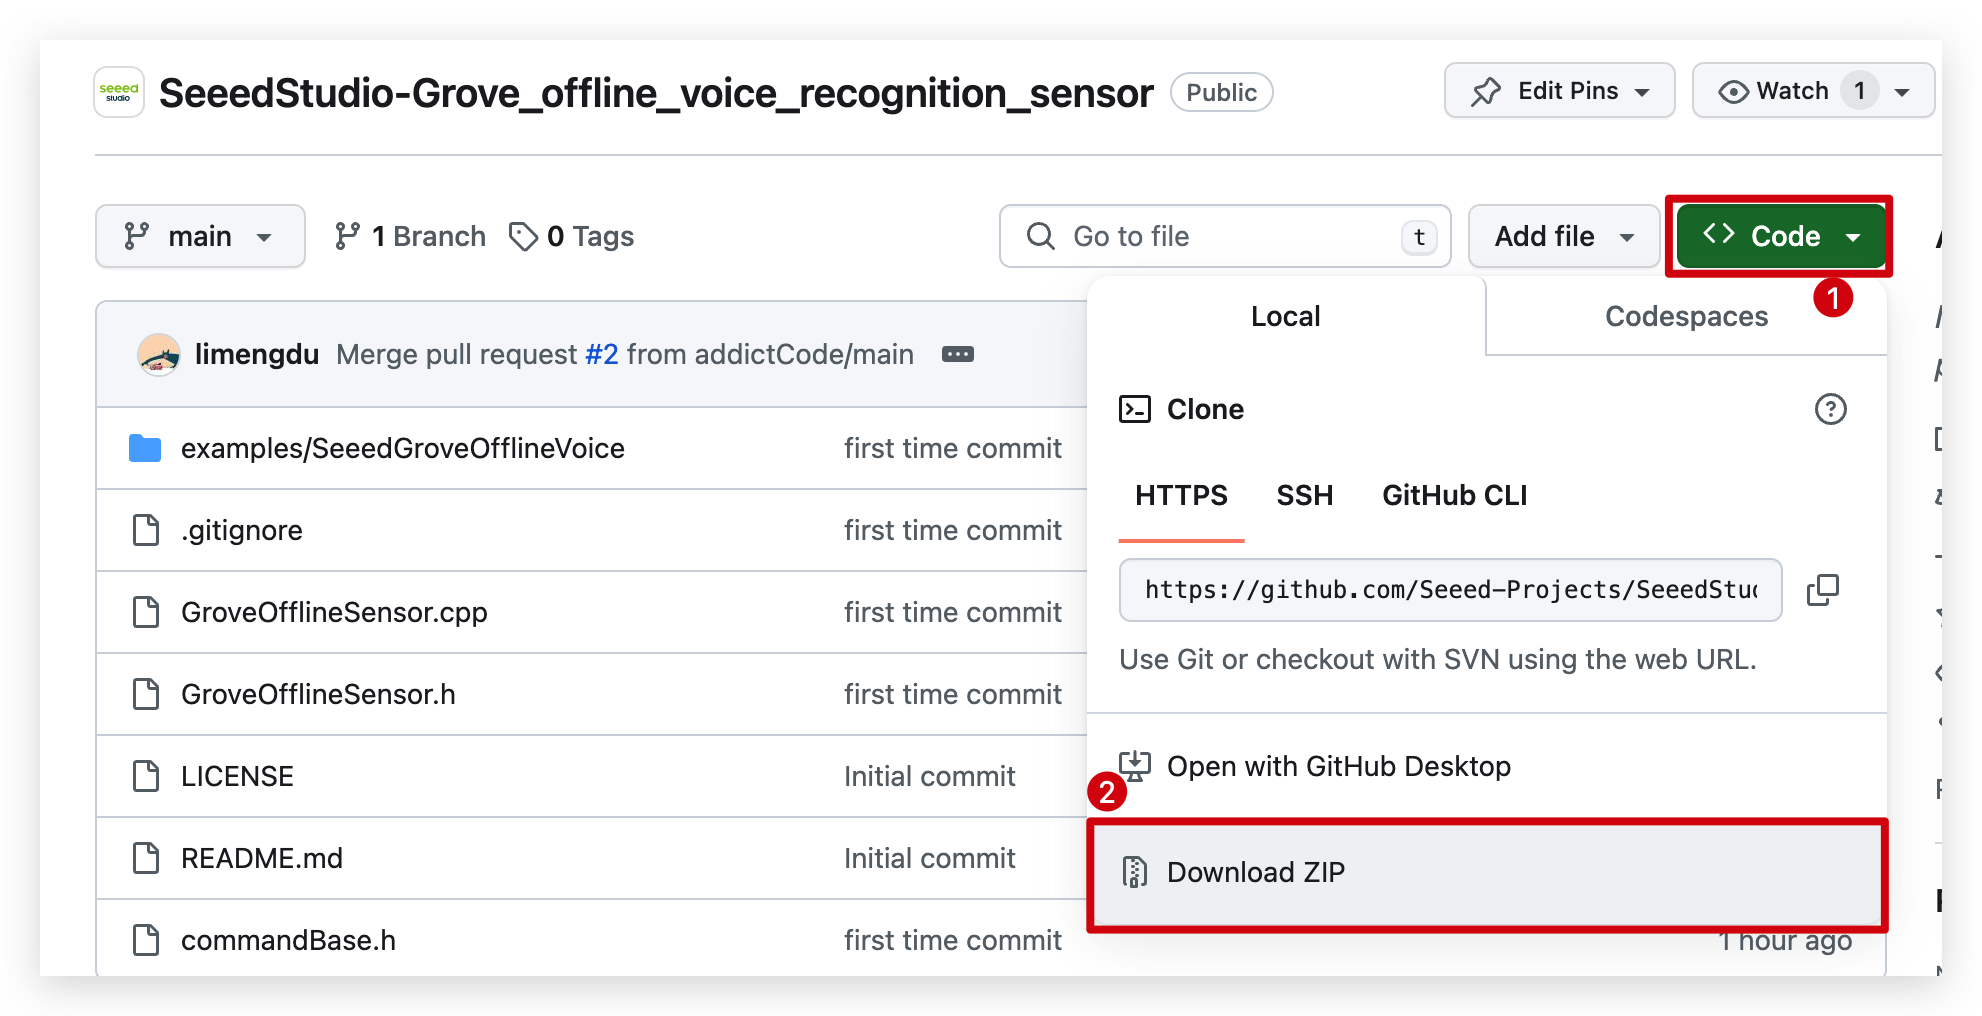
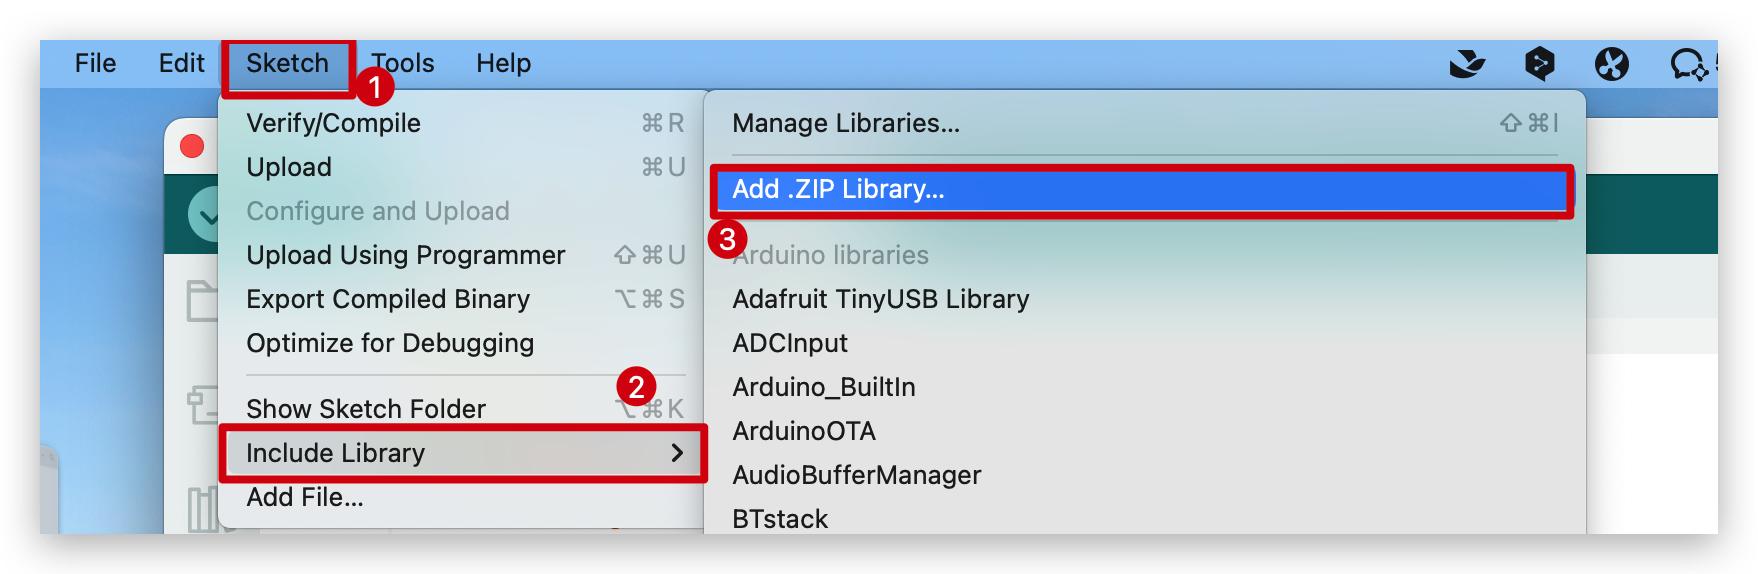
Since you have downloaded the zip Library, open your Arduino IDE, click on Sketch > Include Library > Add .ZIP Library. Choose the zip file you just downloaded,and if the library install correct, you will see Library added to your libraries in the notice window. Which means the library is installed successfully.
Offline voice recognition demo
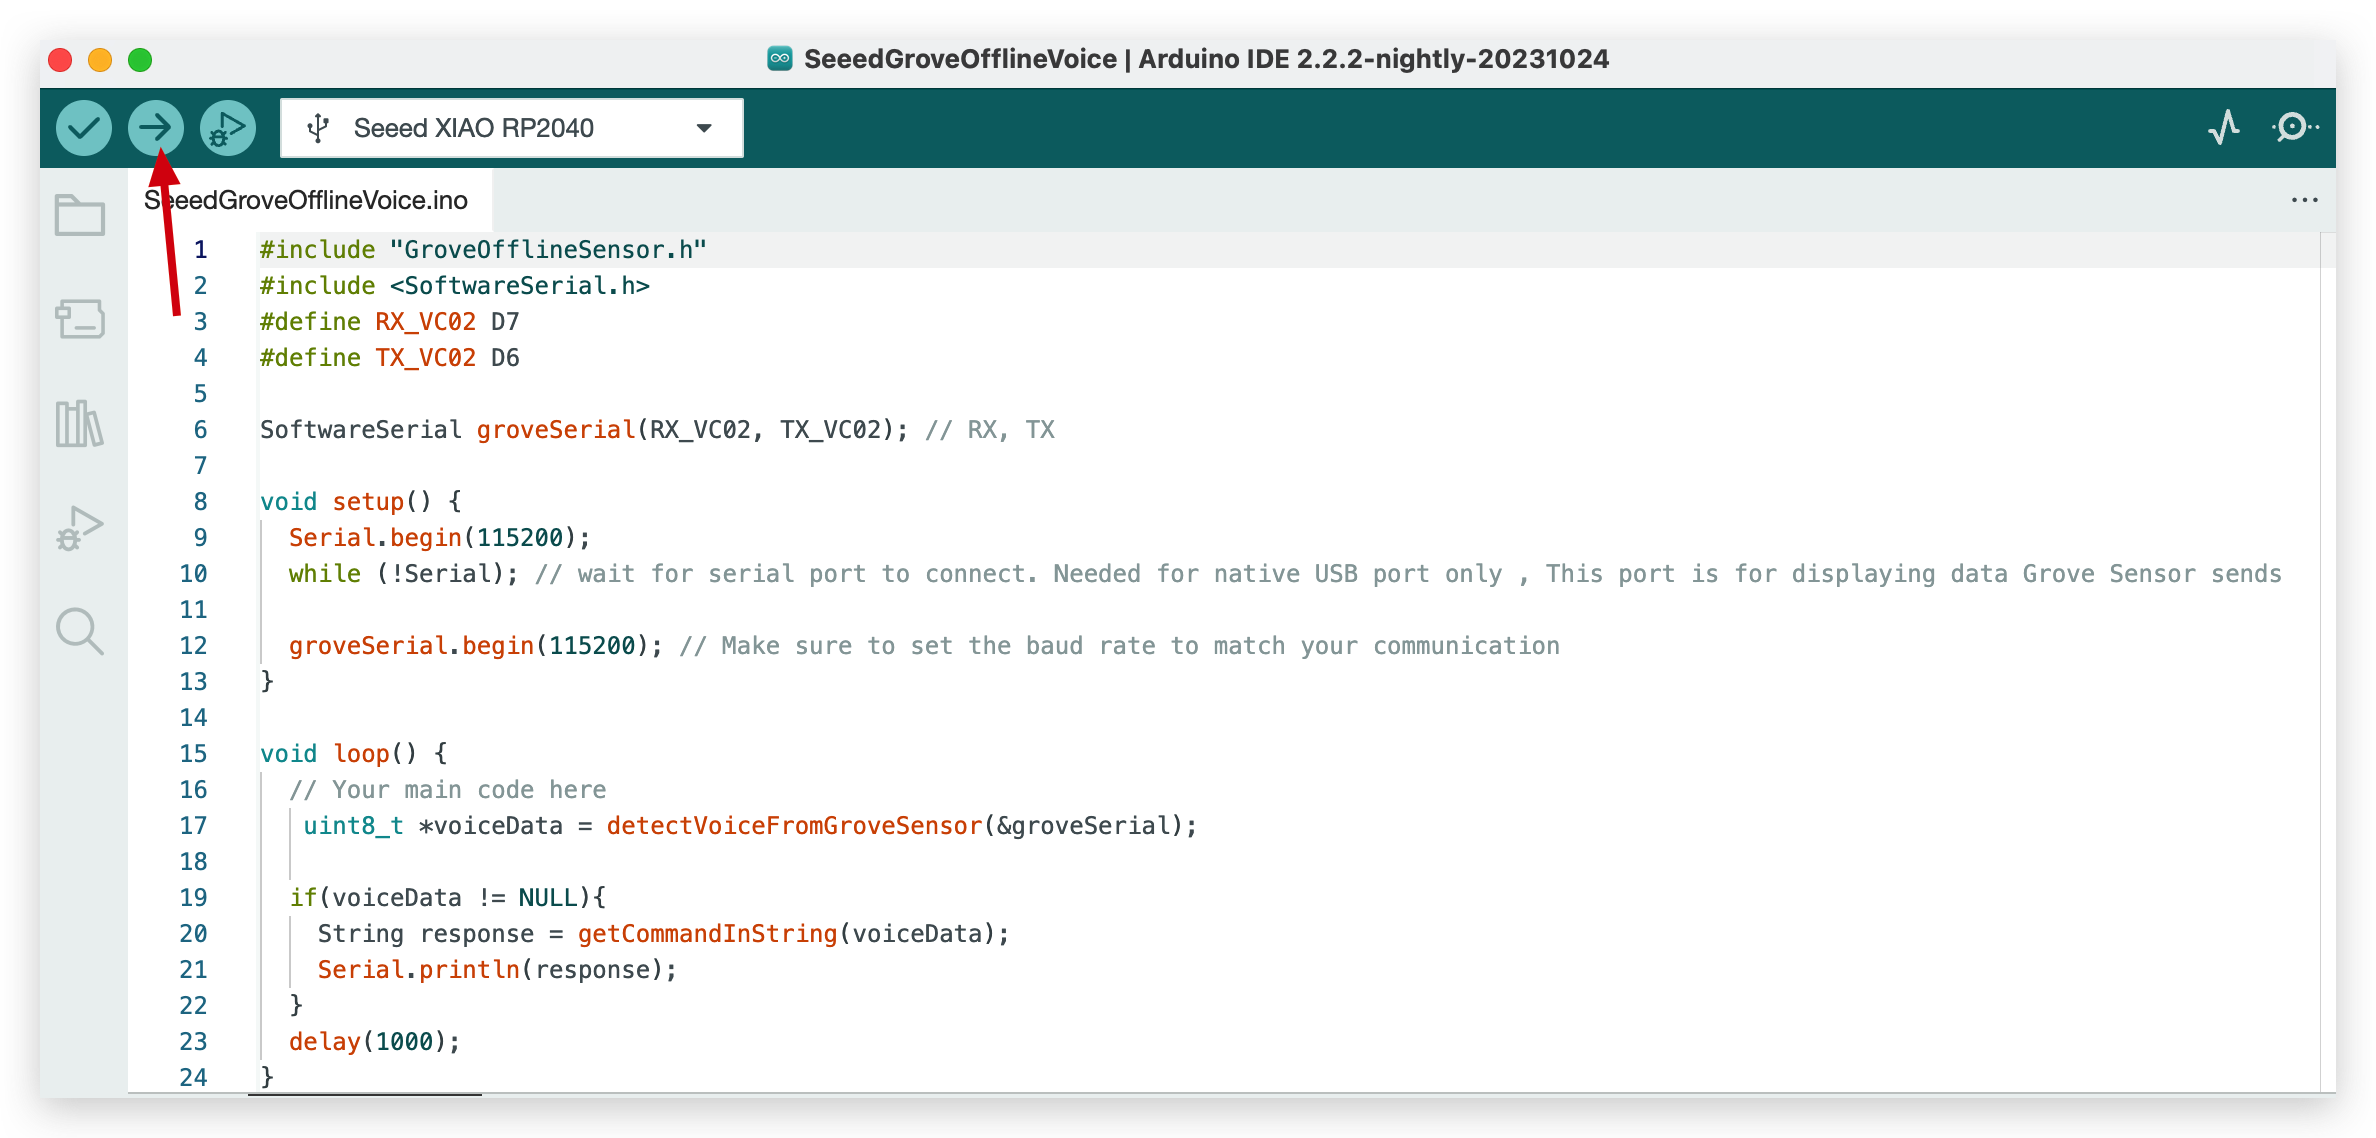
Step 1. Open this file in your Arduino.
You will see the code like below.
#include "GroveOfflineSensor.h"
#include <SoftwareSerial.h>
#define RX_VC02 D7
#define TX_VC02 D6

SoftwareSerial groveSerial(RX_VC02, TX_VC02); // RX, TX

void setup() {
  Serial.begin(115200);
  // wait for serial port to connect. Needed for native USB port only , This port is for displaying data Grove Sensor sends
  while (!Serial);
  // Make sure to set the baud rate to match your communication
  groveSerial.begin(115200);
}

void loop() {
  // detect voice from voice recognition sensor
   uint8_t *voiceData = detectVoiceFromGroveSensor(&groveSerial);

  //transfer the voice to command string
  if(voiceData != NULL){
    String response = getCommandInString(voiceData);
    Serial.println(response);
  }
  delay(1000);
}
Step 2. Click the Upload button to upload the code to the board
Step 3. Say the wake word "hello pudding" to the sensor and then you will hear voice feedback from speaker and words feedback from serial monitor on Arduino IDE. For more instructions, your can find in Resources which located in bottom part of this article.
demo2: Grove offline voice recognition with ESPHome and Home Assistant
Hardware setup
you need to prepare the following:
- A device installed Home Assistant
The first step to getting started with Home Assistant is to install it on a device, you can follow here for step-by-step guide.
Some USB cables can only supply power and cannot transfer data. If you don't have a USB cable or don't know if your USB cable can transmit data, you can check Seeed USB Type-C support USB 3.1.
Step 1. Hardware Preparation
Connect XIAO ESP32S3 to your computer via a USB Type-C cable. Connect XIAO ESP32S3 to XIAO expension board. Connect XIAO expension board to Offline Speech Recognizer on UART port via Grove cable. Connect Offline Speech Recognizer to a speaker. Connect antenna to XIAO ESP32S3.
Here is the connecting picture for your reference.
Step 2. Create your smart home Entered the Home Assistant device’s address in your browser’s address bar, and create a Home Assistant account, you can follow here for step-by-step guide.
Step 3. Install ESPHome on Home Assistant You can quickly setup ESPHome on Home Asssistant by follow here
Software
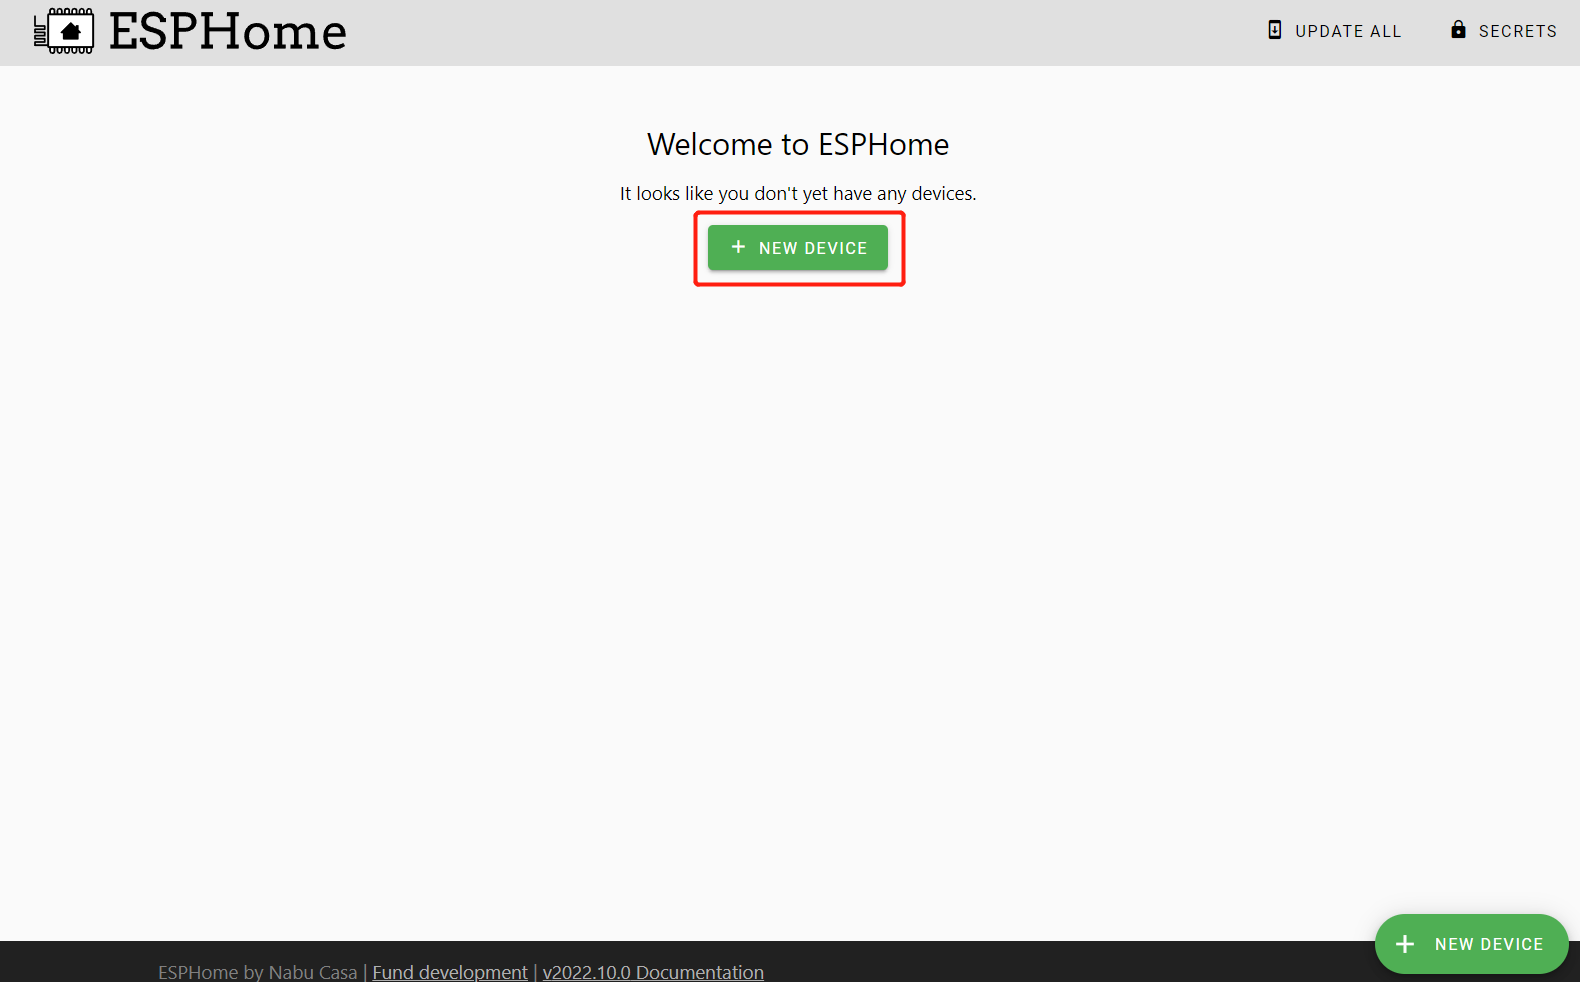
Add XIAO ESP32S3 to ESPHome
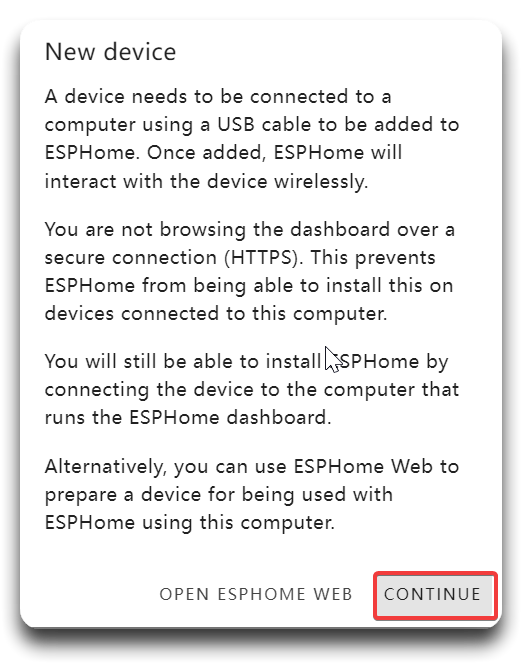
- Click + NEW DEVICE
- Click CONTINUE
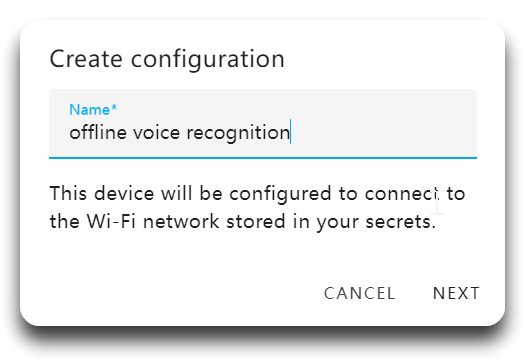
- Enter a Name for the device and enter WiFi credentials such as Network name and Password. Then click NEXT.
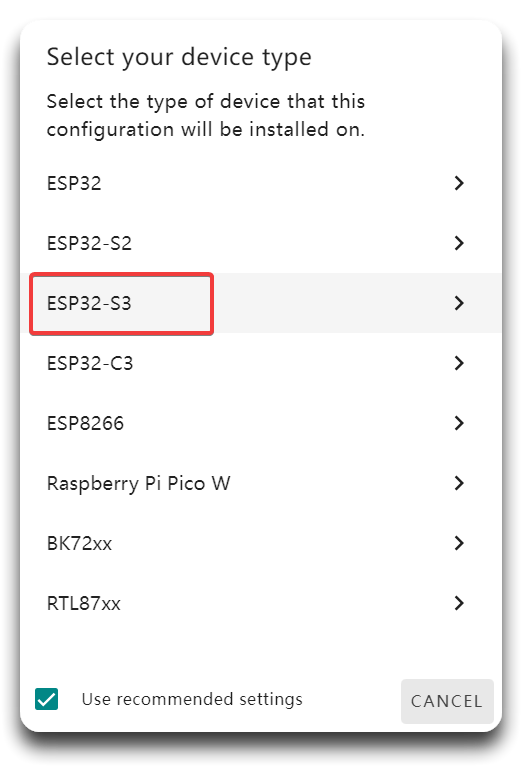
- Select ESP32-S3 and click NEXT
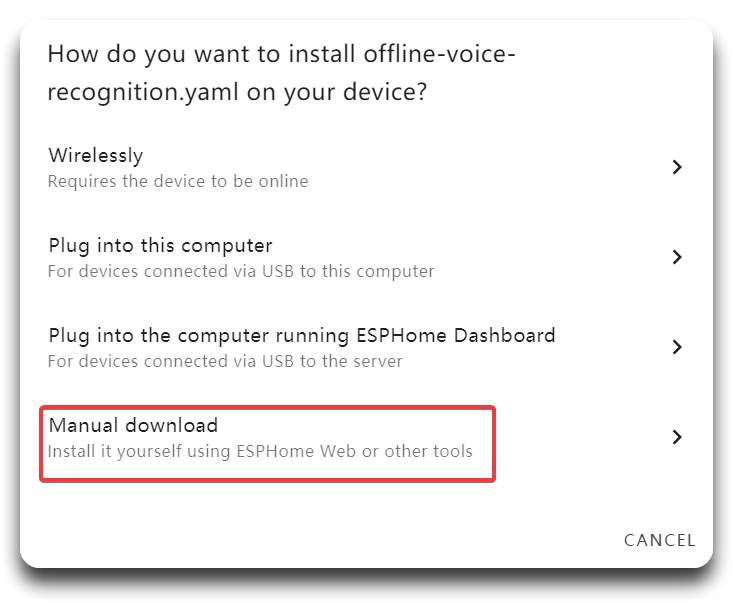
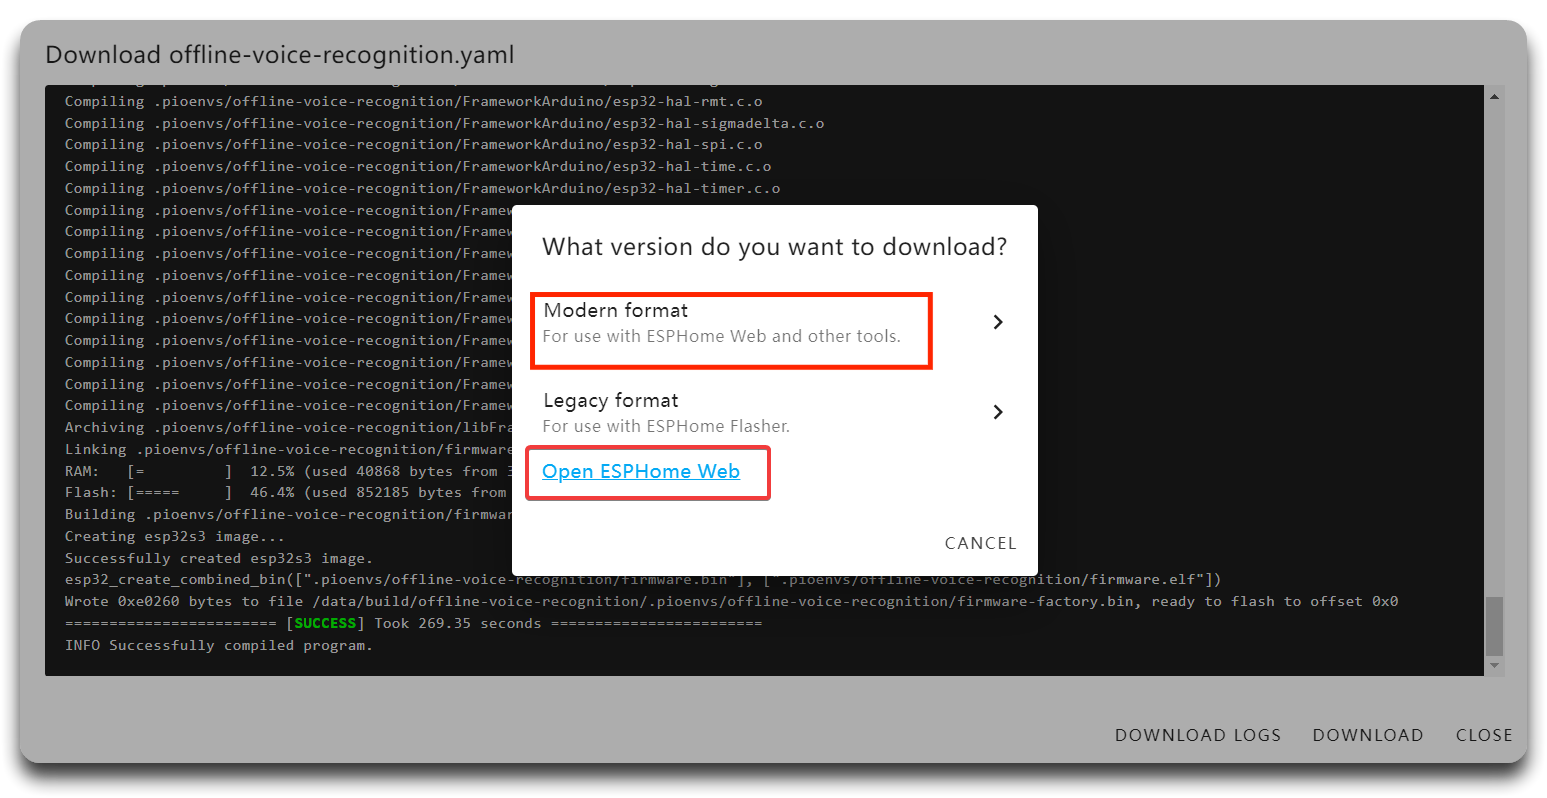
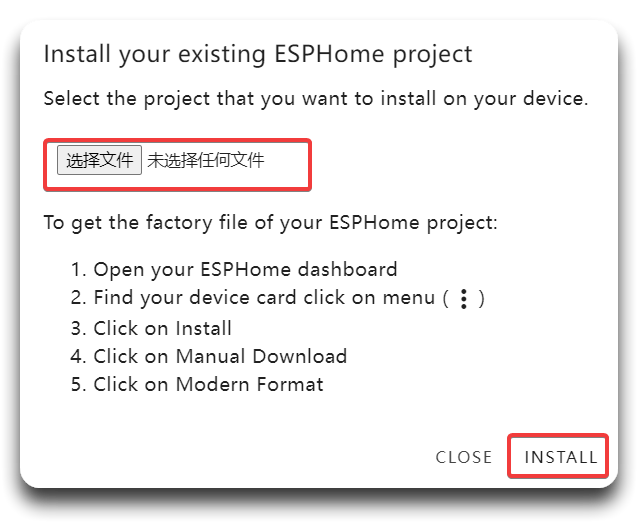
- Click Install and choose Manual download.
- After download successfully, Open ESPHome Web and choose Modern format.
- Connect port of your XIAO ESP32S3, and install the bin.file you just got, now it will download all the necessary board packages and flash the ESPHome firmware into the XIAO ESP32S3.
- Open the LOGS, if the flashing is successful, you will see the follow output, and now go back ESPHome page, if you see the board status as ONLINE, that means the board is successful connected to WiFi.
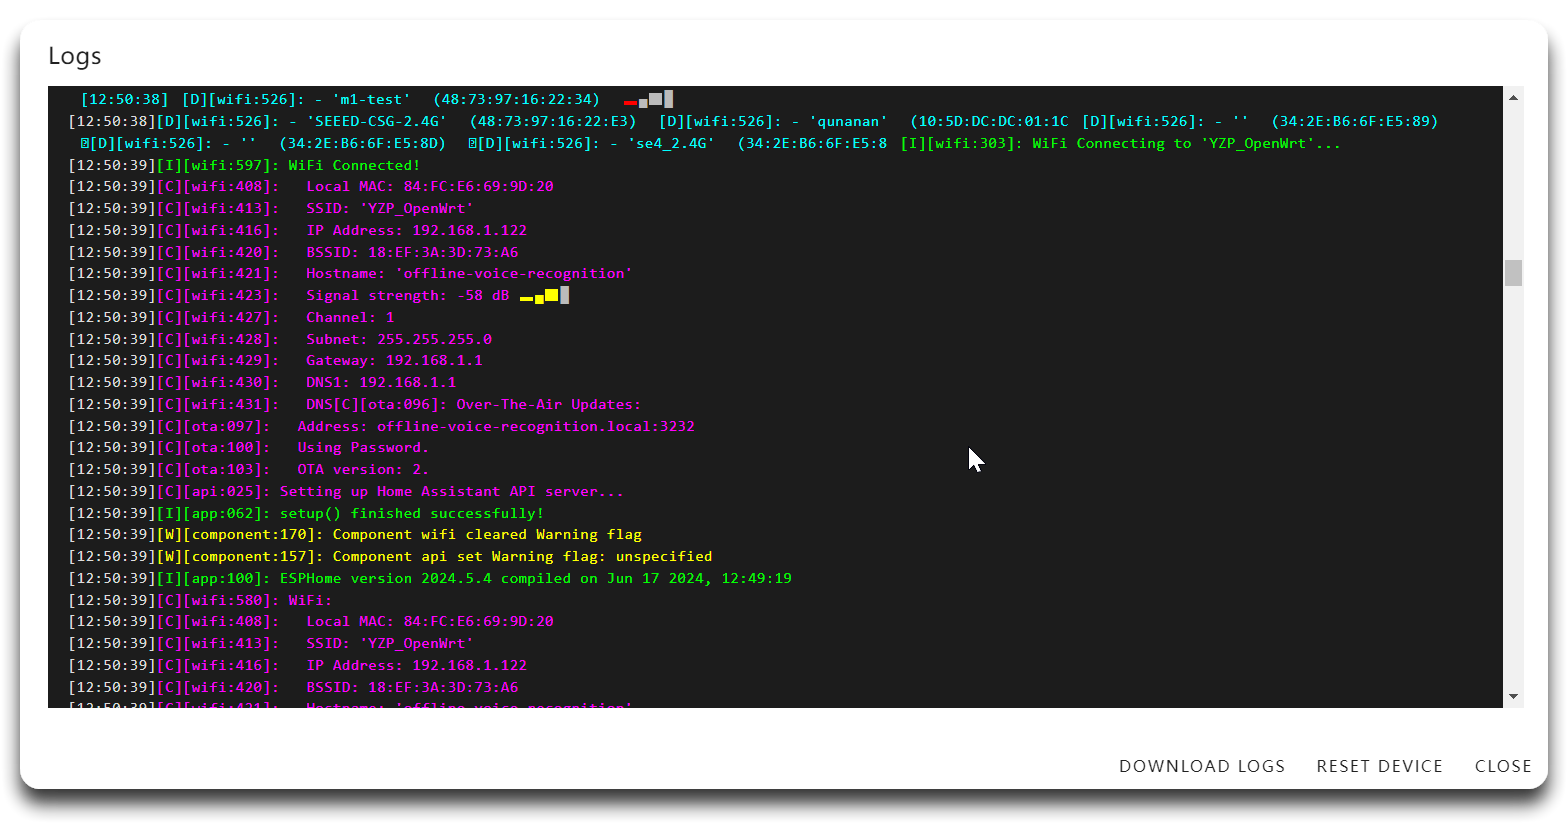
If you get the wanning that "[wifi_esp32:482][arduino_events]: Event: Disconnected …… reason='Auth Expired'", please ensure that the ESP32 device is within range of the WiFi network, poor signal strength can cause connection issues. You can replace your antenna to Rod Antenna.
Now you can disconnect the XIAO ESP32C3 from the computer and just power it via a USB cable. This is because from now on, if you want to flash firmware to the XIAO ESP32C3, you can simply do it OTA without connecting to the X86 board via a USB cable.
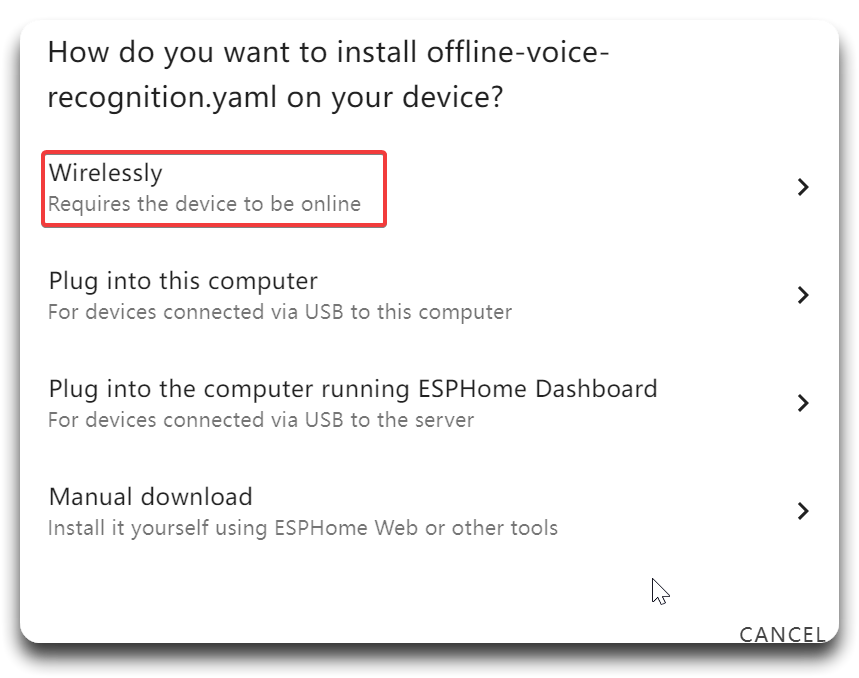
- Click the three dots and click Install, Select Wirelessly and it will push the changes to the board wirelessly
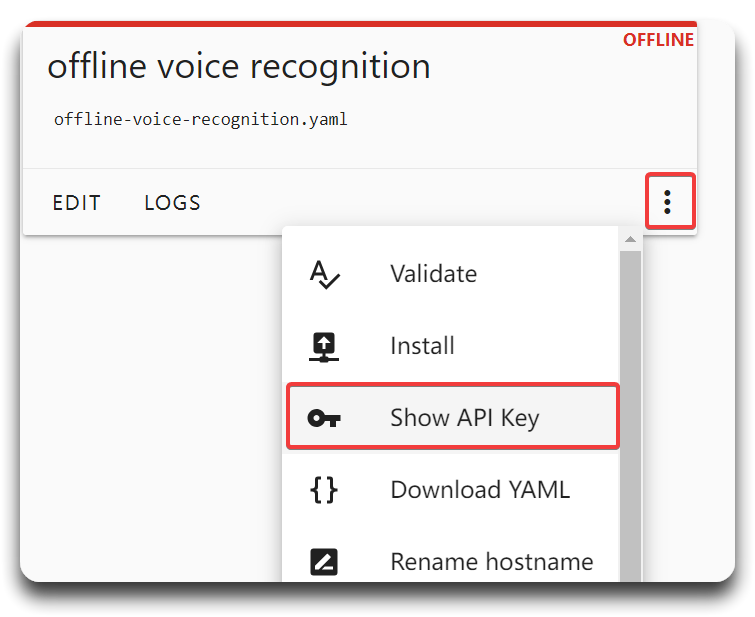
- Go to Settings and select Devices & Services,You will see ESPHome as a discovered integration. Click CONFIGURE. If it ask for the encryption key, go back to ESPHome page to copy the API Key and enter it.
Offline voice recognition
Step1. Inside the offline-voice-recognition.yaml file that we created before, add the following at the end of the file and push it OTA to XIAO ESP32S3
Click here to preview the full code
uart:
  id: uart_bus
  tx_pin: GPIO43
  rx_pin: GPIO44
  baud_rate: 115200

globals:
  - id: hex_code
    type: uint8_t
    restore_value: no
    initial_value: '0'

interval:
  - interval: 1s
    then:
      - lambda: |-
          while (id(uart_bus).available() >= 5) {
            uint8_t receivedData[5];
            for (int i = 0; i < 5; i++) {
              id(uart_bus).read_byte(&receivedData[i]);
            }
            id(hex_code) = receivedData[1];
            ESP_LOGD("main", "Hex code: %02X", id(hex_code));
          }

sensor:
  - platform: template
    name: "Received Hex Code"
    lambda: |-
      return id(hex_code);
    update_interval: 5s
    unit_of_measurement: ""
    accuracy_decimals: 0
    on_value:
      then:
        - lambda: |-
            auto call_acwind = id(acwind).make_call();
            auto call_actemp = id(actemp).make_call();
              switch (id(hex_code)) {
                case 0x03:
                  id(ac).publish_state(true);
                  break;
                case 0x04:
                  id(ac).publish_state(false);
                  break;
                case 0x05:
                  id(acmode).publish_state("automatic mode");
                  break;
                case 0x06:
                  id(acmode).publish_state("cold mode");
                  break;
                case 0x07:
                  id(acmode).publish_state("heat mode");
                  break;
                case 0x08:
                  id(acmode).publish_state("dry mode");
                  break;
                case 0x09:
                  id(acmode).publish_state("fan mode");
                  break;
                case 0x0A:
                  id(acmode).publish_state("sleeping mode");
                  break;
                case 0x0B:
                  id(acwind).publish_state("automatic fan");
                  break;
                case 0x0C:
                  id(acwind).publish_state("low fan");
                  break;
                case 0x0D:
                  id(acwind).publish_state("medium fan");
                  break;
                case 0x0E:
                  id(acwind).publish_state("high fan");
                  break;
                case 0x0F:
                  call_acwind.select_next(false);
                  call_acwind.perform();
                  break;
                case 0x10:
                  call_acwind.select_previous(false);
                  call_acwind.perform();
                  break;
                case 0x11:
                  id(actemp).publish_state("sixteen centigrade");
                  break;
                case 0x12:
                  id(actemp).publish_state("seventeen centigrade");
                  break;
                case 0x13:
                  id(actemp).publish_state("eighteen centigrade");
                  break;
                case 0x14:
                  id(actemp).publish_state("nineteen centigrade");
                  break;
                case 0x15:
                  id(actemp).publish_state("twenty centigrade");
                  break;
                case 0x16:
                  id(actemp).publish_state("twenty one centigrade");
                  break;
                case 0x17:
                  id(actemp).publish_state("twenty two centigrade");
                  break;
                case 0x18:
                  id(actemp).publish_state("twenty three centigrade");
                  break;
                case 0x19:
                  id(actemp).publish_state("twenty four centigrade");
                  break;
                case 0x1A:
                  id(actemp).publish_state("twenty five centigrade");
                  break;
                case 0x1B:
                  id(actemp).publish_state("twenty six centigrade");
                  break;
                case 0x1C:
                  id(actemp).publish_state("twenty seven centigrade");
                  break;
                case 0x1D:
                  id(actemp).publish_state("twenty eight centigrade");
                  break;
                case 0x1E:
                  id(actemp).publish_state("twenty nine centigrade");
                  break;
                case 0x1F:
                  id(actemp).publish_state("thirty centigrade");
                  break;
                case 0x20:
                  call_actemp.select_next(false);
                  call_actemp.perform();
                  break;
                case 0x21:
                  call_actemp.select_previous(false);
                  call_actemp.perform();
                  break;
                case 0x22:
                  id(fan).publish_state(true);
                  break;
                case 0x23:
                  id(fan).publish_state(false);
                  break;
                case 0x24:
                  id(acswept).publish_state("air swing up and down");
                  break;
                case 0x25:
                  id(acswept).publish_state("air swing left and right");
                  break;
                case 0x26:
                  id(acmode).publish_state("automatic mode");
                  id(acwind).publish_state("automatic fan");
                  id(actemp).publish_state("twenty six centigrade");
                  id(fan).publish_state(false);
                  break;
                case 0x27:
                  id(light).publish_state(true);
                  break;
                case 0x28:
                  id(light).publish_state(false);
                  break;
                case 0x29:
                  id(cold_light).publish_state(true);
                  break;
                case 0x2A:
                  id(cold_light).publish_state(false);
                  break;
                case 0x2B:
                  id(warm_light).publish_state(true);
                  break;
                case 0x2C:
                  id(warm_light).publish_state(false);
                  break;
                default:
                  ESP_LOGW("main", "Unknown hex code: %02X", id(hex_code));
                  break;
              }

switch:
  - platform: template
    name: "air conditioner"
    id: ac
    optimistic: True
  - platform: template
    name: "fan"
    id: fan
    optimistic: True
  - platform: template
    name: "light"
    id: light
    optimistic: True
  - platform: template
    name: "cold light"
    id: cold_light
    optimistic: True
  - platform: template
    name: "warm light"
    id: warm_light
    optimistic: True

select:

  - platform: template
    name: Air conditioner mode
    id: acmode
    optimistic: True
    options:
      - "automatic mode"
      - "cold mode"
      - "heat mode"
      - "dry mode"
      - "fan mode"
      - "sleeping mode"
    initial_option: "automatic mode"

  - platform: template
    name: Fan mode
    id: acwind
    optimistic: True
    options:
      - "automatic fan"
      - "low fan"
      - "medium fan"
      - "high fan"
    initial_option: "automatic fan"

  - platform: template
    name: Temperature
    id: actemp
    optimistic: True
    options:
      - "sixteen centigrade"
      - "seventeen centigrade"
      - "eighteen centigrade"
      - "nineteen centigrade"
      - "twenty centigrade"
      - "twenty one centigrade"
      - "twenty two centigrade"
      - "twenty three centigrade"
      - "twenty four centigrade"
      - "twenty five centigrade"
      - "twenty six centigrade"
      - "twenty seven centigrade"
      - "twenty eight centigrade"
      - "twenty nine centigrade"
      - "thirty centigrade"
    initial_option: "twenty six centigrade"

  - platform: template
    name: Fan direction
    id: acswept
    optimistic: True
    options:
      - "air swing up and down"
      - "air swing left and right"
When we create a new device, the yaml.file that automatically generated will be vary because of different configuration and device type, so we recommend not changing the beginning of file, and just adding the code at the end.
- You can learn more about Uart Bus here
- You can learn more about Switch Component here
- You can learn more about Select Component here
Step2. Visualize on Dashboard
- Now go back the Devices, choose the offline voice recognition

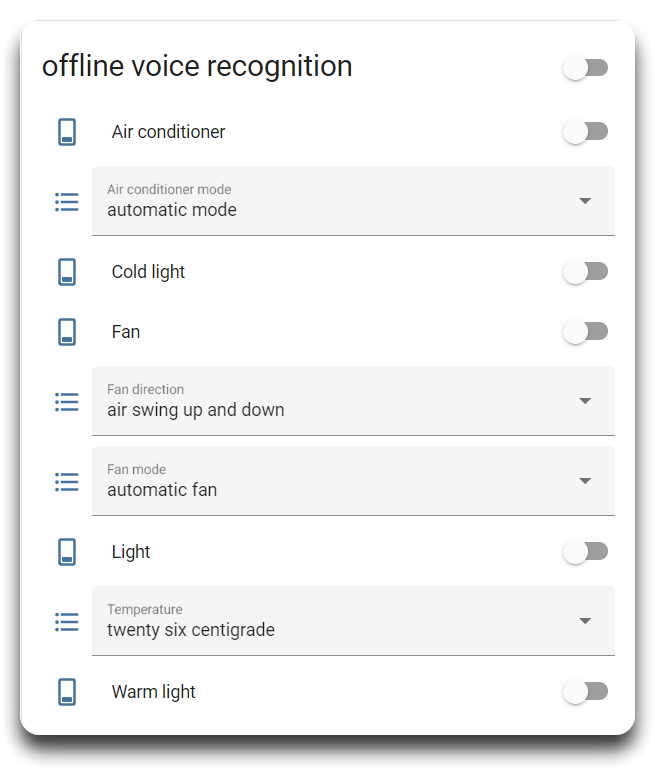
- Click ADD TO DASHBOARD→NEXT→ADD TO DASHBOARD, and back to OVERVIEW, now your Home Assistant dashboard will look like below
Step3. Say the wake word "hello pudding" to the sensor and then you will hear voice feedback and see action feedback on the Home Assistant. For more instructions, your can find in Resources which located in bottom part of this article.
Resources
- [PDF] Offline Voice Commends
Tech Support & Product Discussion
Thank you for choosing our products! We are here to provide you with different support to ensure that your experience with our products is as smooth as possible. We offer several communication channels to cater to different preferences and needs.