Seeed Studio XIAO RP2040 with MicroPython
Introduction of MicroPython
MicroPython is a Python interprer with a partial native code compilation feature. It provides a subset of Python 3.5 features, implemented for embedded processors and constrained systems. It is different from CPython and you can read more about the differences here.
Getting Started
First, we are going to connect the Seeed Studio XIAO RP2040 Series to the computer and upload a simple code from MicroPython to check whether the board is functioning well.
Hardware Setup
- Seeed Studio XIAO RP2040 or Seeed Studio XIAO RP2040 Plus x1
- Type-C cable x1
- PC x1
Connect XIAO RP2040 Series to the PC
- Step 1. Press and hold the BOOT button and then connect the Seeed Studio XIAO RP2040 Series to the PC through the Type-C cable. If it works well, there is an RPI-RP2 disk shown on the PC.

-
Step 2.Flash the Firmware
Just go to the official and download the latest firmware, then drag‑and‑drop the
.uf2file into the RPI-RP2 disk to finish firmware flashing.
Software Setup
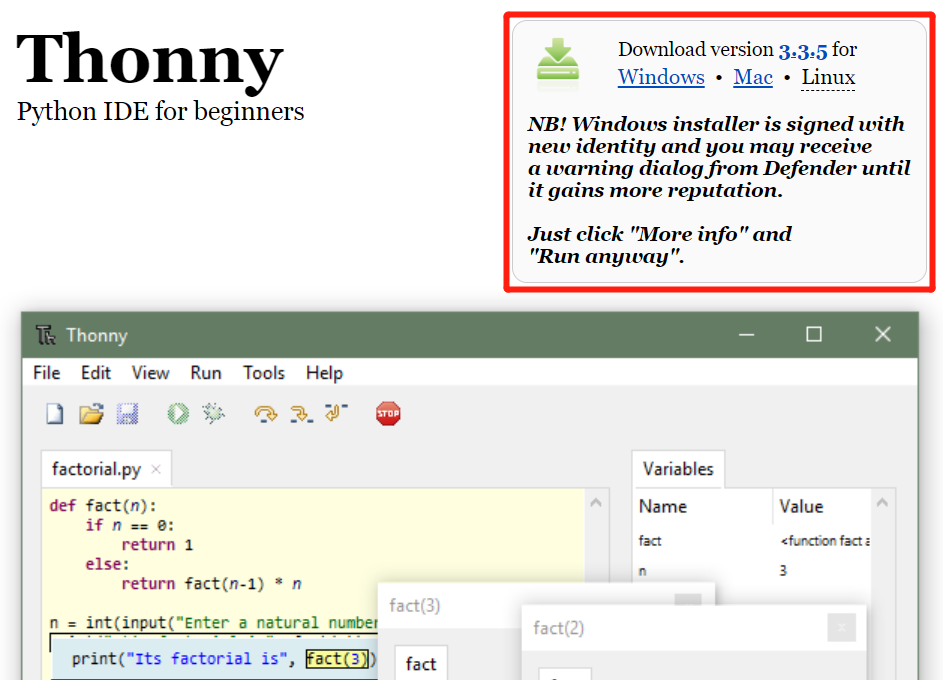
- Step 1. Download and Install the latest version of Thonny editor according to your operating system
-
Step 2. Launch the Thonny
-
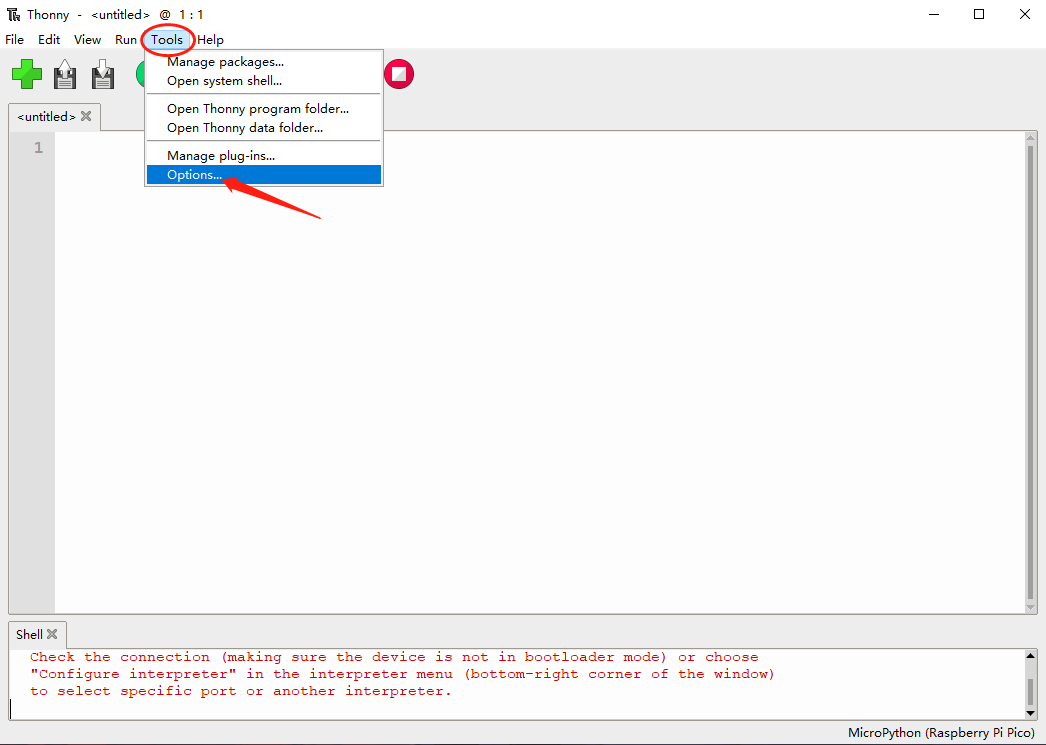
Step 3. Click Tools-->Options to open the settings.
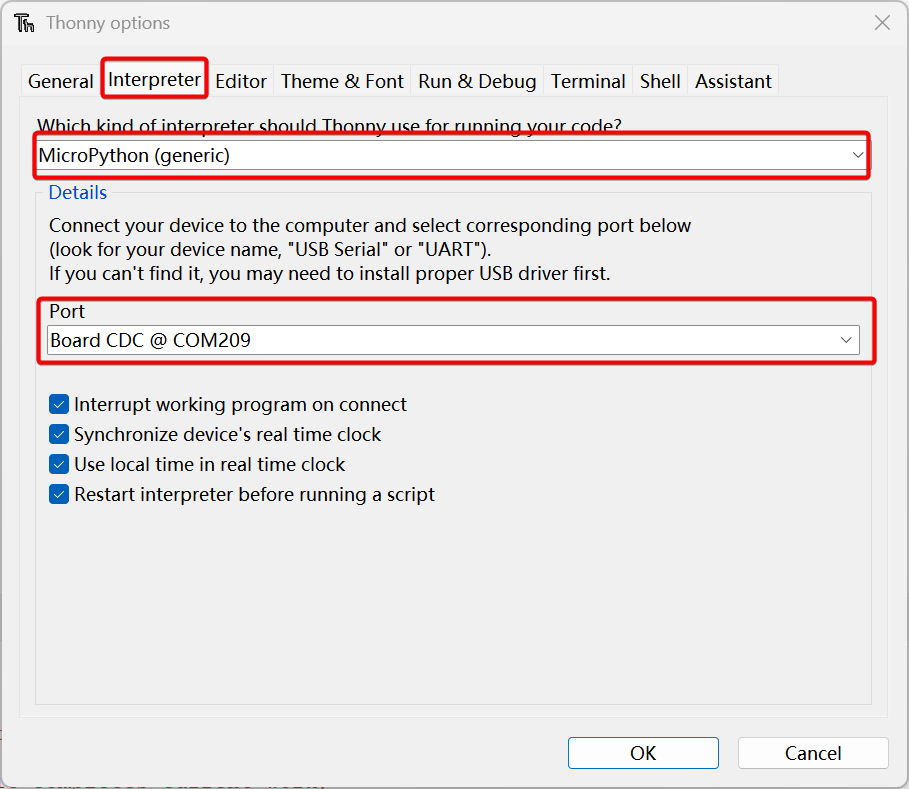
- Step 4. Chose the Interpreter interface and select the device as MicroPython(generic) and the port as Board CDC @ Port
Step 5. Version information will be displayed in the Shell.
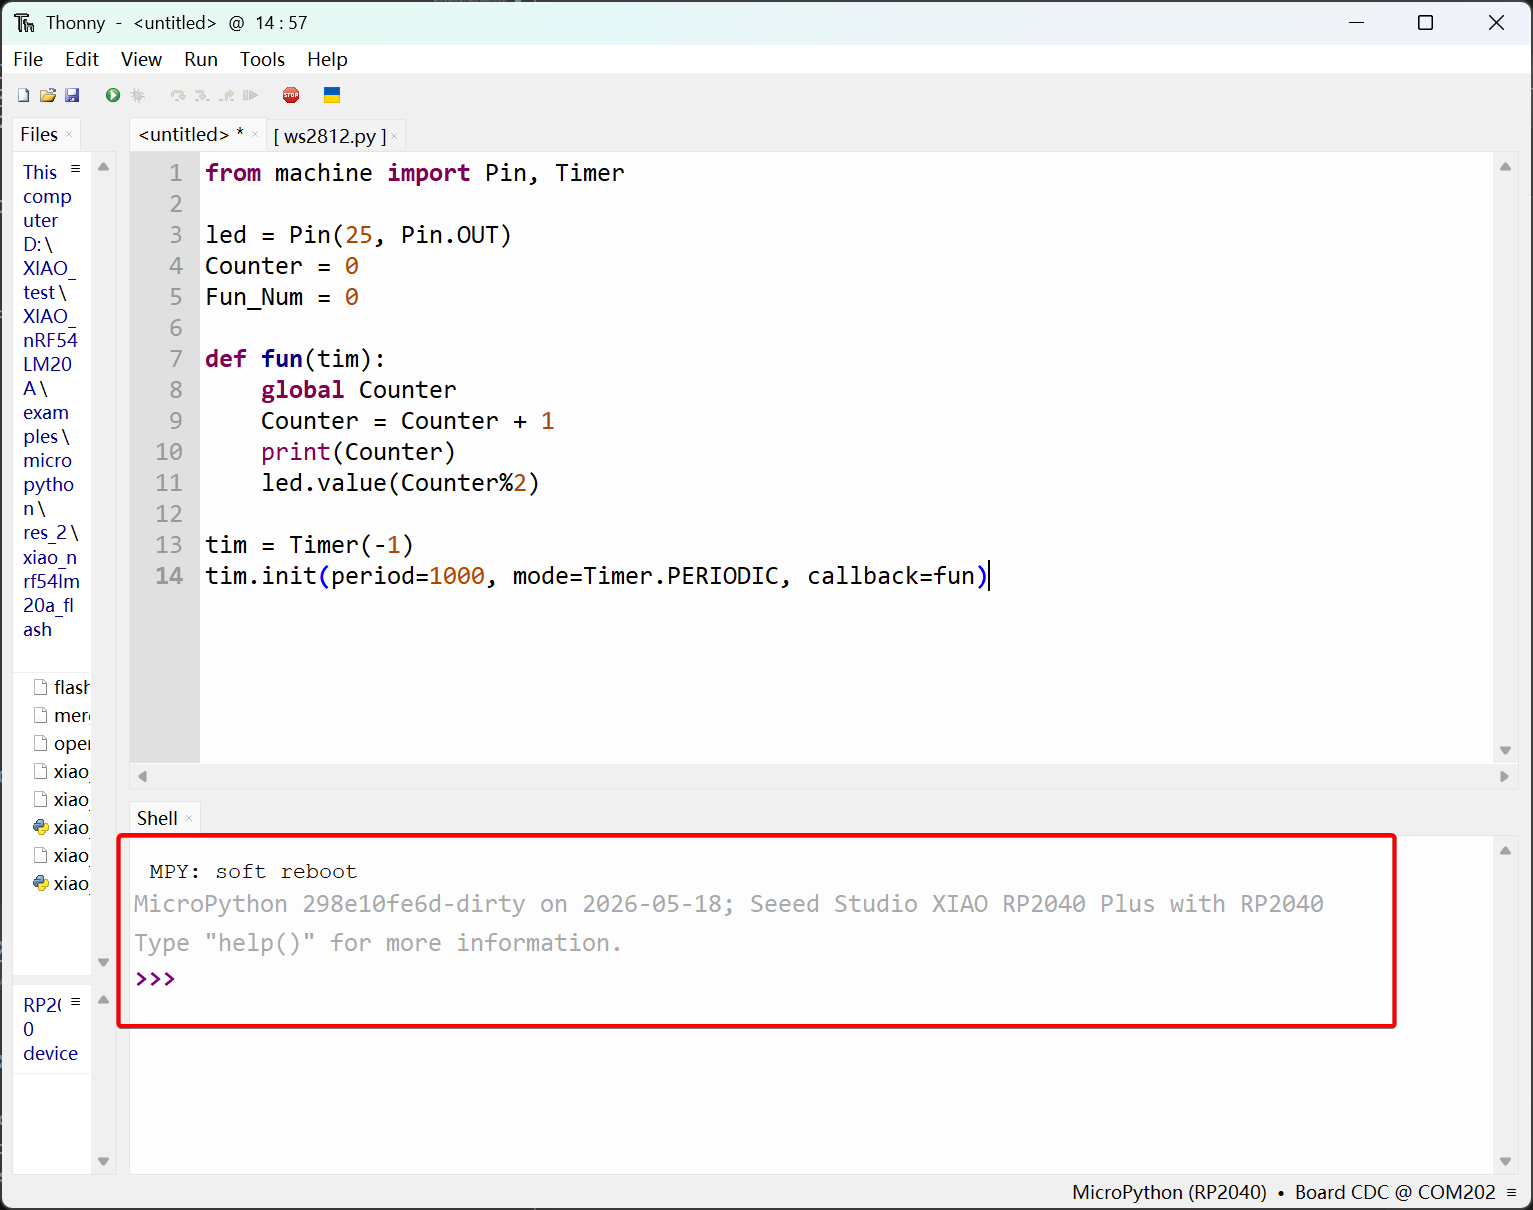
Step 6. Go to Files -> New, paste the code below, and run the script.
from machine import Pin, Timer

led = Pin(25, Pin.OUT)
Counter = 0
Fun_Num = 0

def fun(tim):
    global Counter
    Counter = Counter + 1
    print(Counter)
    led.value(Counter%2)

tim = Timer(-1)
tim.init(period=1000, mode=Timer.PERIODIC, callback=fun)
- The LED will blink at 1-second intervals.
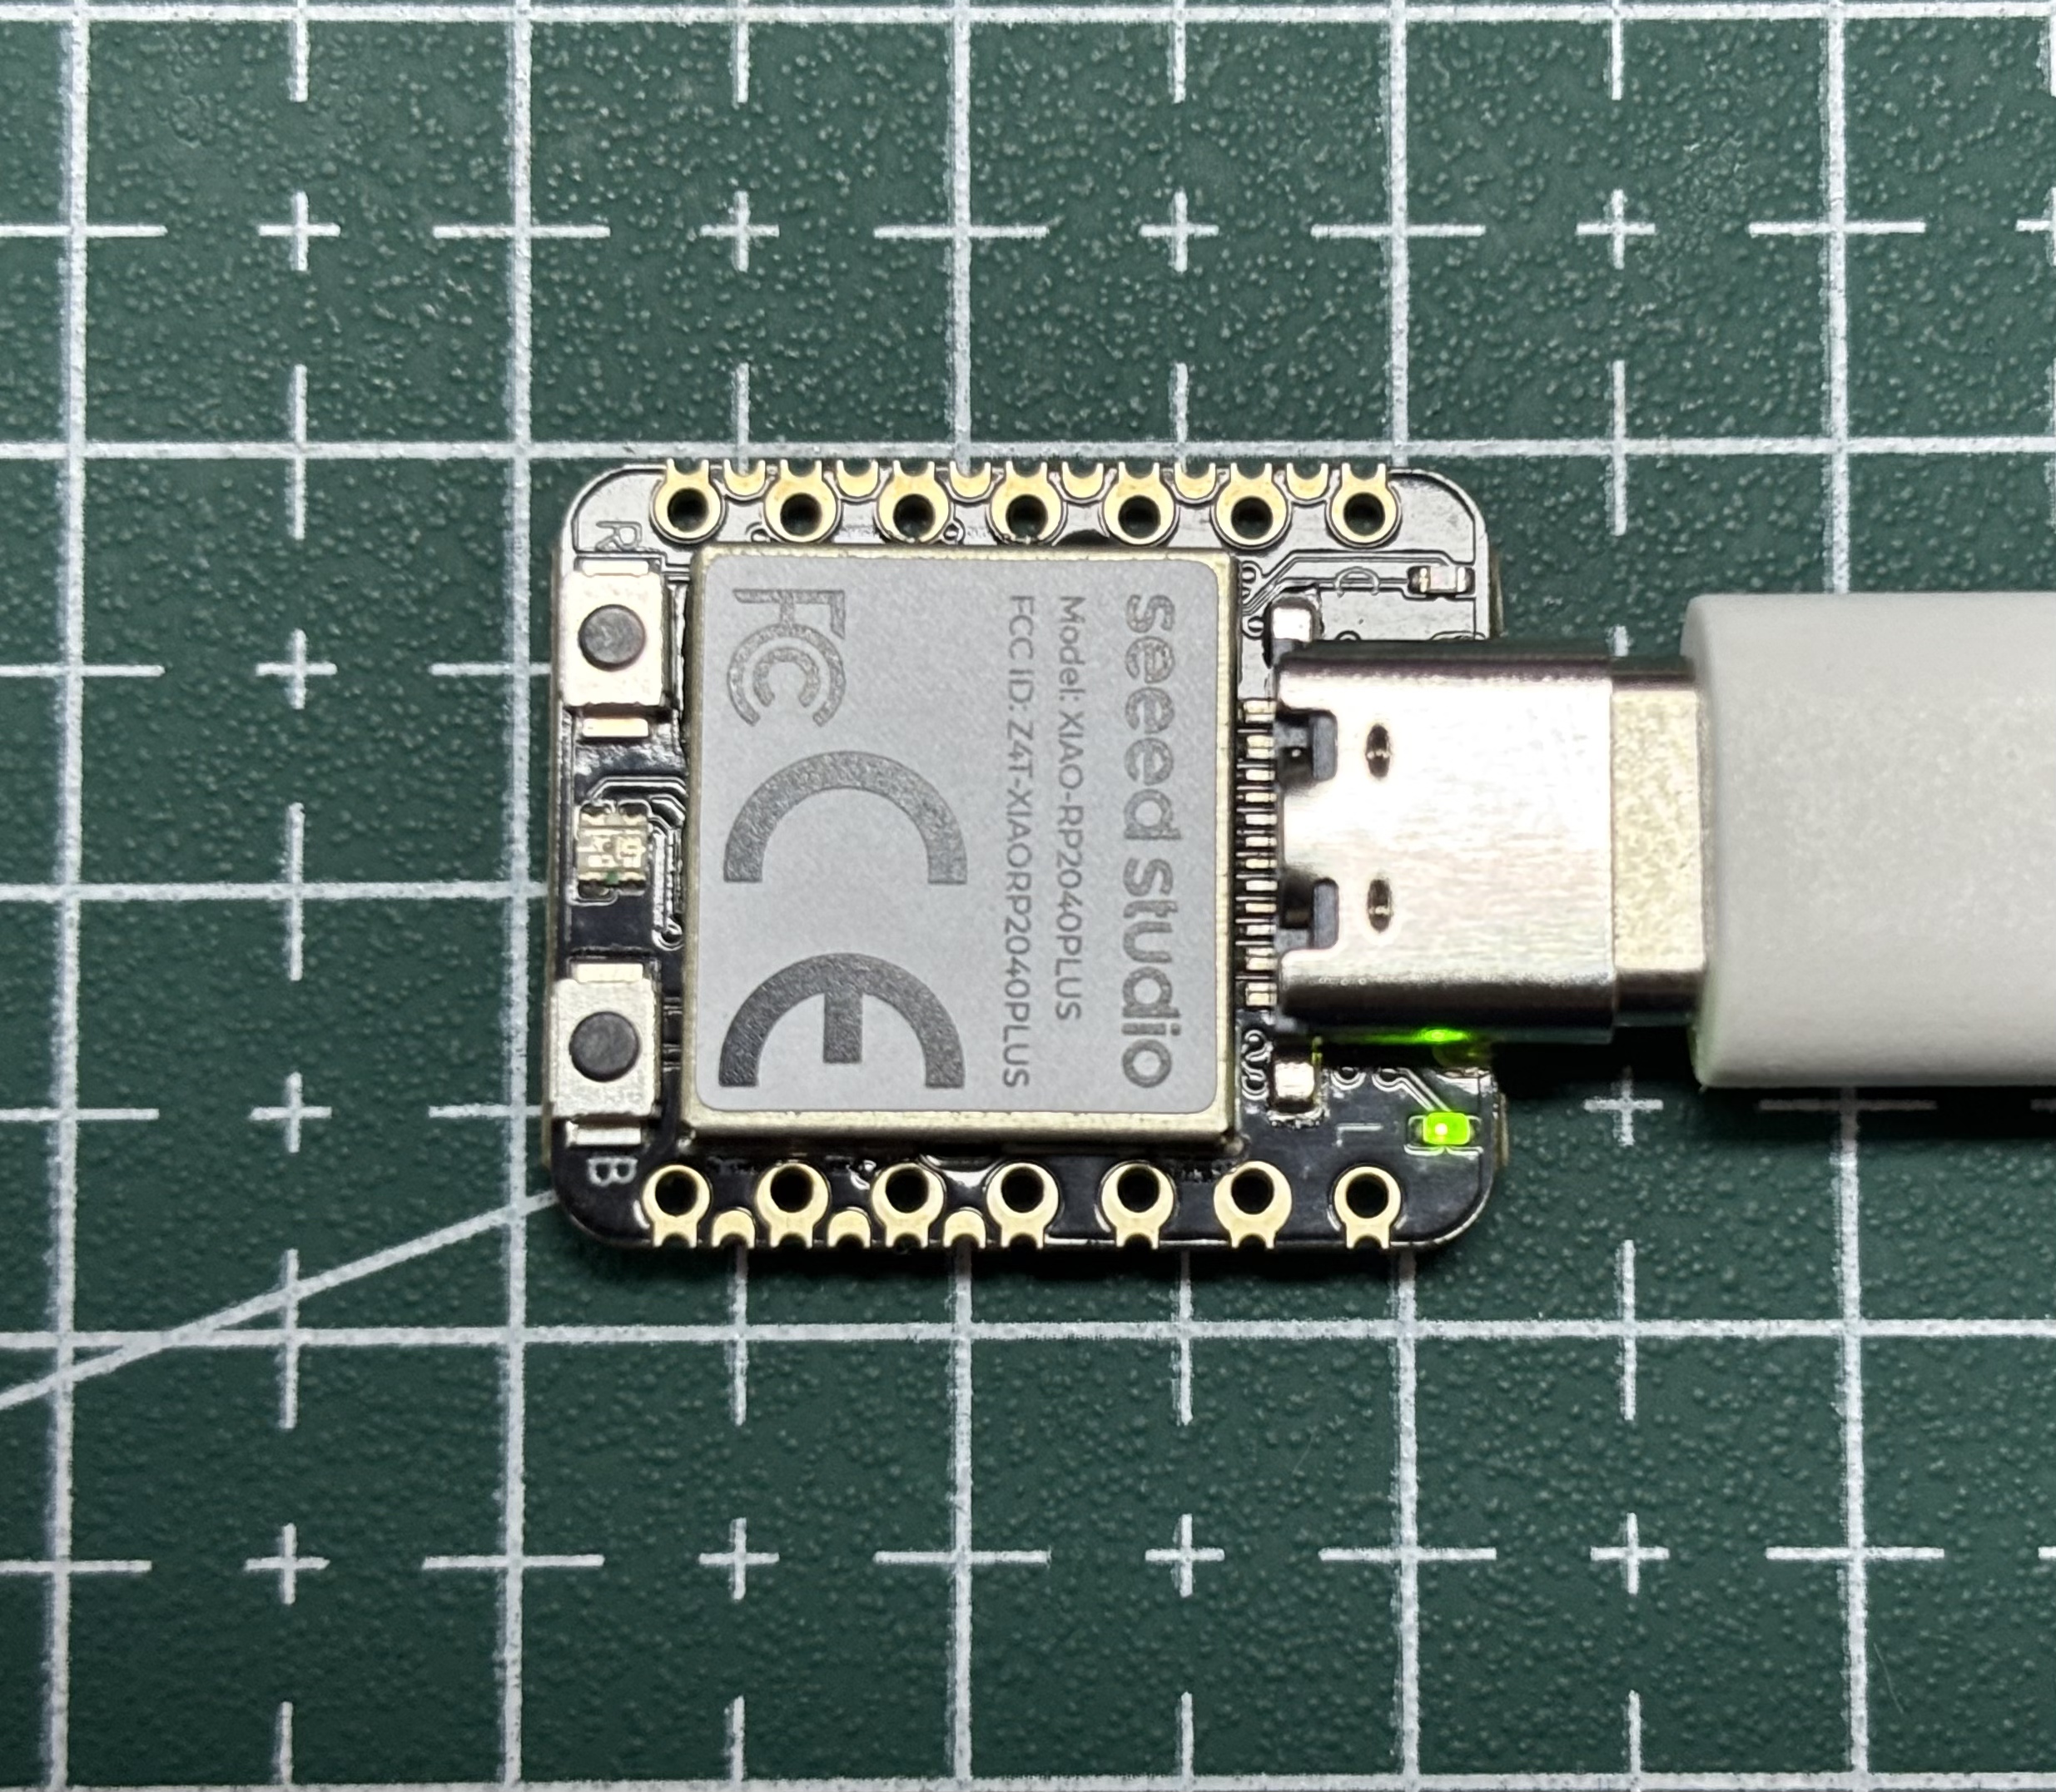
- The Additional Resources section contains MicroPython firmware and relevant examples for XIAO RP2040 Plus.You may use these examples by following the XIAO RP2040 tutorials, but make sure to replace and modify the corresponding pins.
- To check the differences within the XIAO RP2040 series, please refer to XIAO RP2040 Series Pin Overview
XIAO RP2040 Series Pins
| MicroPython Pin Name | XIAO RP2040 GPIO | XIAO RP2040 Plus GPIO | ADC | Function |
|---|---|---|---|---|
| D0 / A0 | GPIO26 | GPIO26 | 0 | GPIO, ADC0 |
| D1 / A1 | GPIO27 | GPIO27 | 1 | GPIO, ADC1 |
| D2 / A2 | GPIO28 | GPIO28 | 2 | GPIO, ADC2 |
| D3 / A3 | GPIO29 | GPIO29 | 3 | GPIO, ADC3 |
| D4 / SDA | GPIO6 | GPIO6 | — | GPIO, I2C SDA |
| D5 / SCL | GPIO7 | GPIO7 | — | GPIO, I2C SCL |
| D6 / TX | GPIO0 | GPIO0 | — | GPIO, UART TX |
| D7 / RX | GPIO1 | GPIO1 | — | GPIO, UART RX |
| D8 / SCK | GPIO2 | GPIO2 | — | GPIO, SPI SCK |
| D9 / MISO | GPIO4 | GPIO4 | — | GPIO, SPI MISO |
| D10 / MOSI | GPIO3 | GPIO3 | — | GPIO, SPI MOSI |
| NEOPIXEL | GPIO12 | GPIO12 | — | WS2812 NeoPixel data |
| NEOPIXEL_POWER / NEO_PWR / RGB_EN | GPIO11 | GPIO11 | — | NeoPixel power enable (RGB_EN on Plus) |
| LED_G / D23 | GPIO16 | GPIO16 | — | RGB LED green; Plus D23 |
| LED_R / D24 | GPIO17 | GPIO17 | — | RGB LED red; Plus D24 |
| LED_B / LED | GPIO25 | GPIO25 | — | RGB LED blue / user LED |
| D12 | — | GPIO18 | — | Plus expansion GPIO |
| D13 / SCL1 | — | GPIO21 | — | Plus I2C1 SCL |
| D14 / SDA1 | — | GPIO20 | — | Plus I2C1 SDA |
| D15 | — | GPIO19 | — | Plus expansion GPIO |
| D16 | — | GPIO22 | — | Plus expansion GPIO |
| D17 | — | GPIO23 | — | Plus expansion GPIO |
| D19 | — | GPIO5 | — | Plus expansion GPIO |
| D20 | — | GPIO13 | — | Plus expansion GPIO |
| D21 | — | GPIO14 | — | Plus expansion GPIO |
| D22 | — | GPIO15 | — | Plus expansion GPIO |
| D25 | — | GPIO10 | — | Plus expansion GPIO |
| D26 | — | GPIO9 | — | Plus expansion GPIO |
| D27 | — | GPIO8 | — | Plus expansion GPIO |
| BAT_EN | — | GPIO24 | — | Plus battery power enable |
Light up RGB LED on the Seeed Studio XIAO RP2040
There is an RGB LED equipped in the Seeed Studio XIAO RP2040 and we are going to light it up by MicroPython. It is required a third-party library so we need to add an additional library first.
-
Step 1. Download the ws2812.py library and open it with Thonny.
-
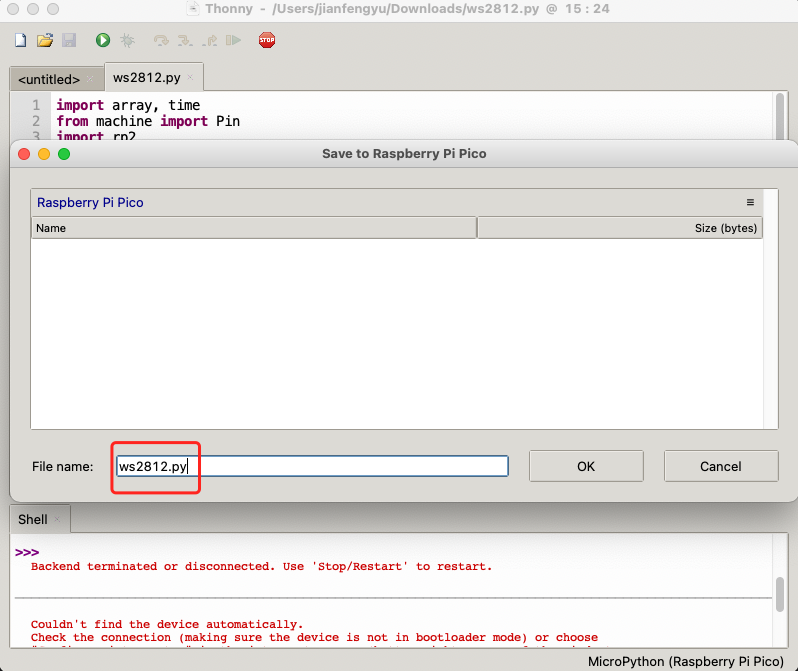
Step 2. Click File-->Save as and save the library.
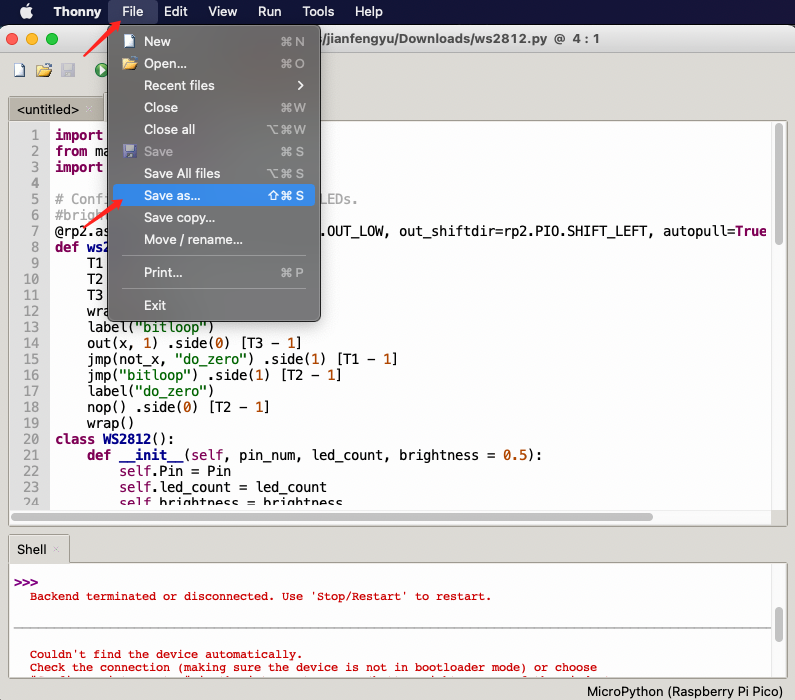
Chose the Raspberry Pi Pico as the location we save.
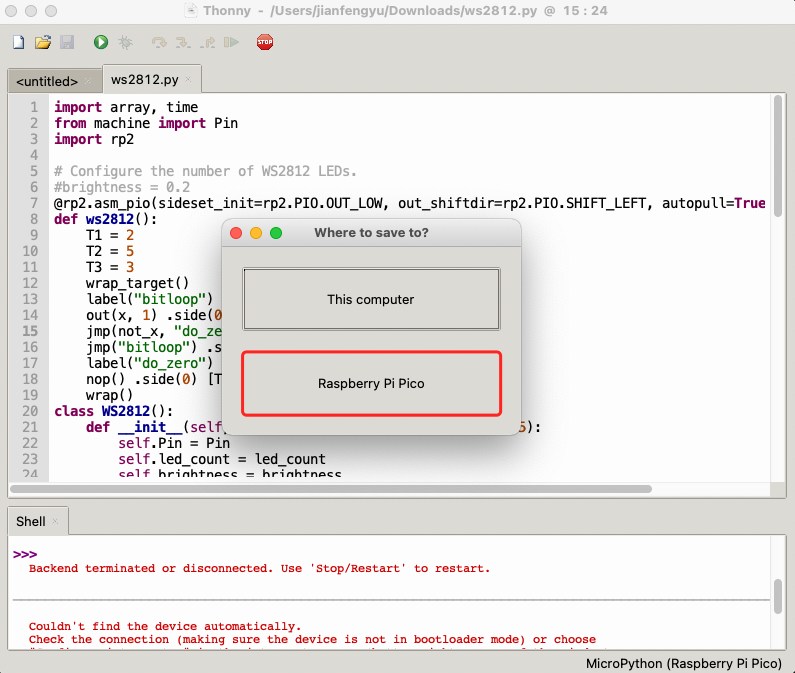
Make sure the saved file name is ws2812.py, otherwise it will not work.
- Step 3. Copy the following codes to Thonny.
from ws2812 import WS2812
import utime
import machine
power = machine.Pin(11,machine.Pin.OUT)
power.value(1)
BLACK = (0, 0, 0)
RED = (255, 0, 0)
YELLOW = (255, 150, 0)
GREEN = (0, 255, 0)
CYAN = (0, 255, 255)
BLUE = (0, 0, 255)
PURPLE = (180, 0, 255)
WHITE = (255, 255, 255)
COLORS = (BLACK, RED, YELLOW, GREEN, CYAN, BLUE, PURPLE, WHITE)

led = WS2812(12,1)#WS2812(pin_num,led_count)

while True:
    print("Beautiful color")
    for color in COLORS:
        led.pixels_fill(color)
        led.pixels_show()
        utime.sleep(0.2)
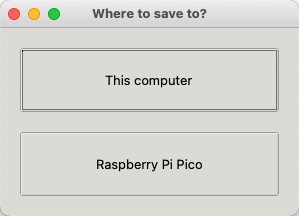
- Step 4. Upload the codes by clicking the "Run current script" button. For the first time, Thonny will ask where you want to save your codes file. Both This Computer and Raspberry Pi Pico are fine.
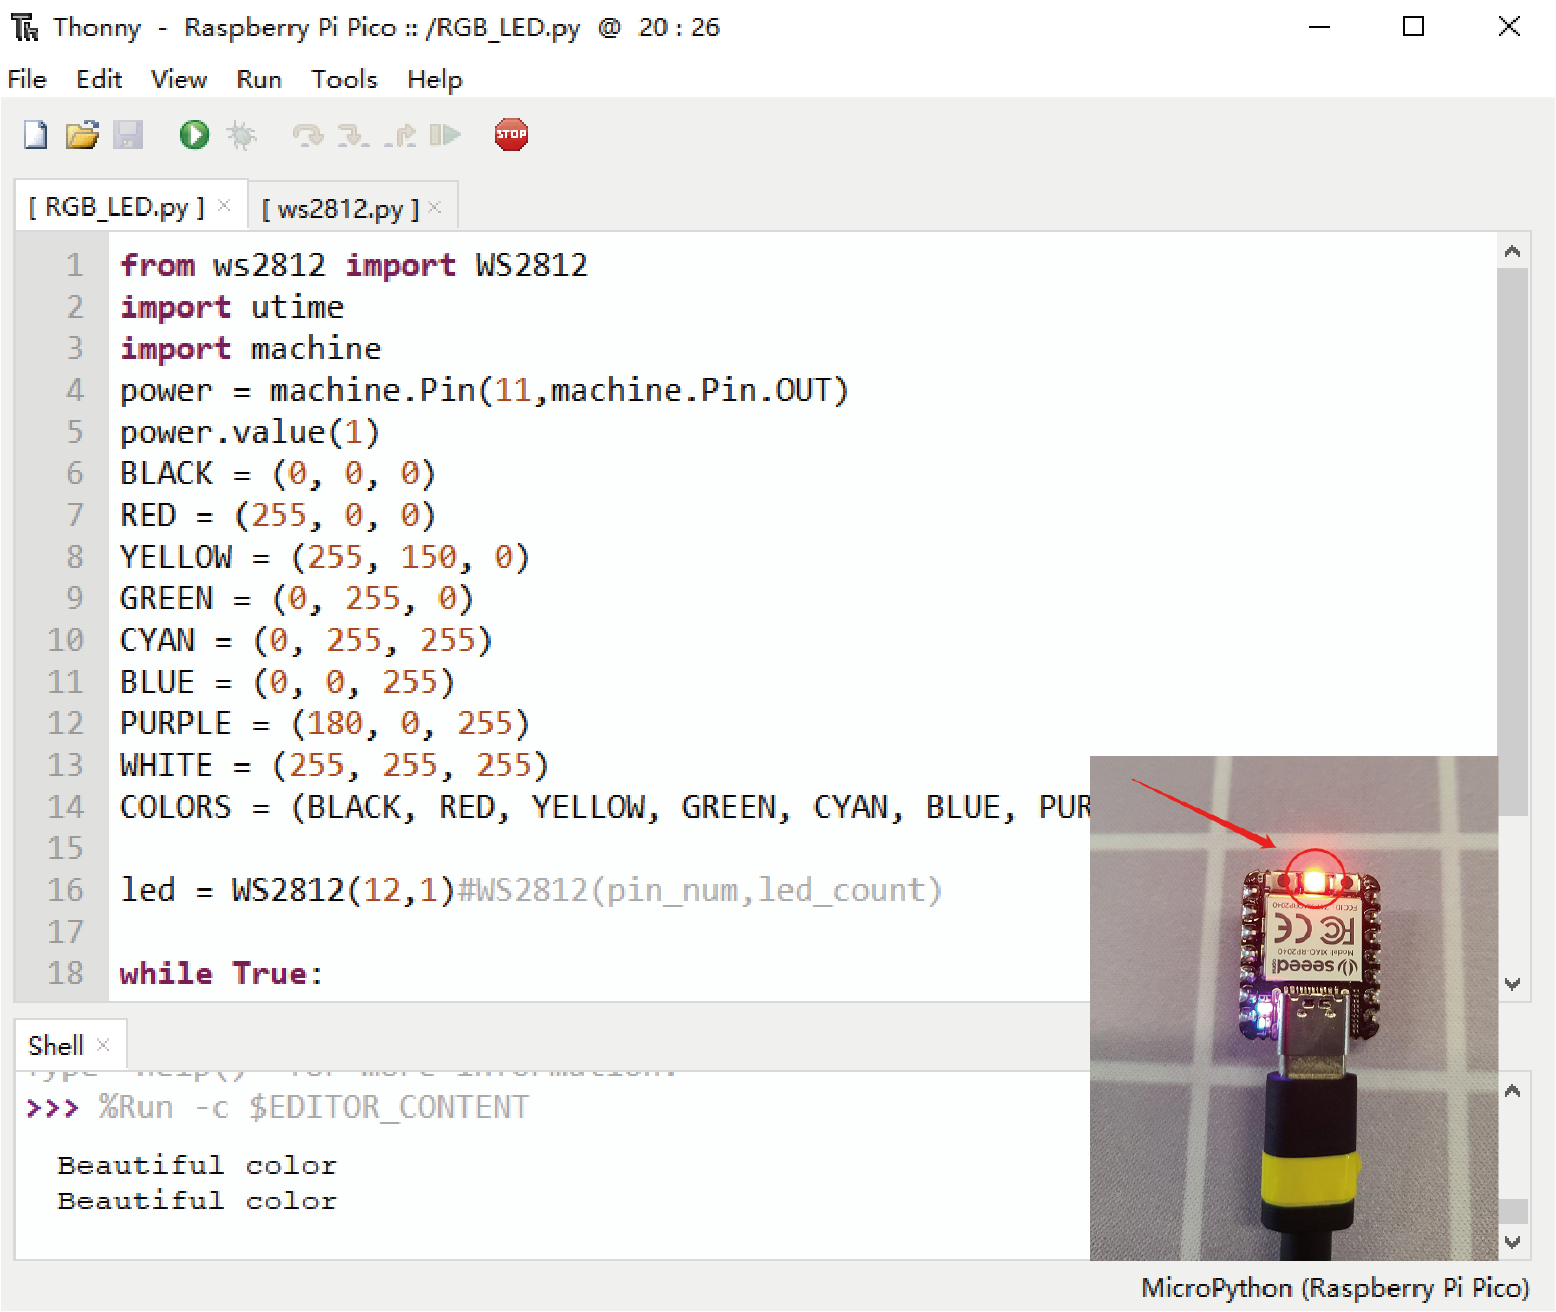
If it works well, you will see the RGB LED light convert and flash the lights. And the output of the text "Beautiful Color" will as well be displayed in the Shell.
Connect with Seeed Studio XIAO RP2040 with Display through IIC
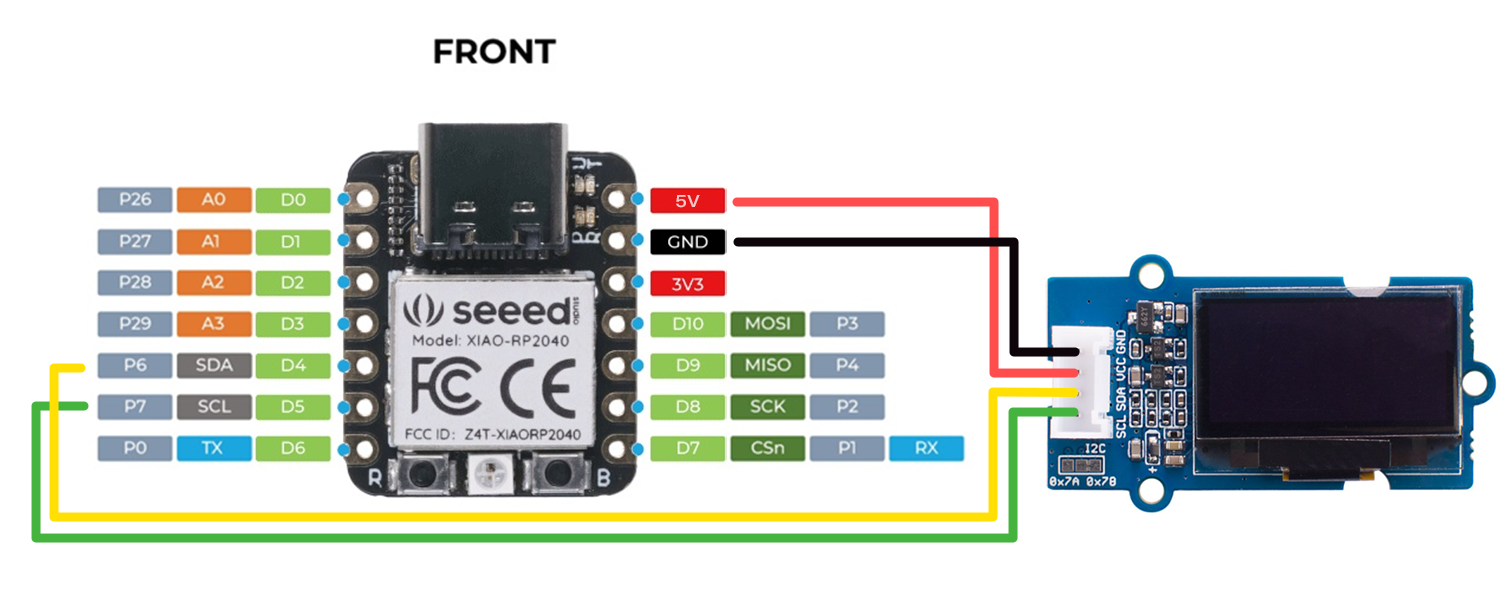
In this project, we are going to connect Grove - OLED Display 0.96" (SSD1315) through the IIC interface to demonstrate the IIC function on the Seeed Studio XIAO RP2040.
Hardware Connect
-
Step 1. Download the ssd1306.py library and open it with Thonny.
-
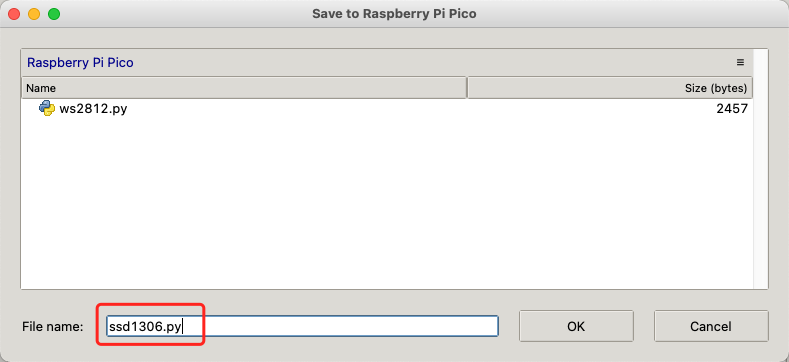
Step 2. Click "File-->Save as" and save the library in the "Raspberry Pi Pico"
Chose the "Raspberry Pi Pico" as the location we save.
Make sure the saved file name is "ssd1306.py", otherwise it will not work.
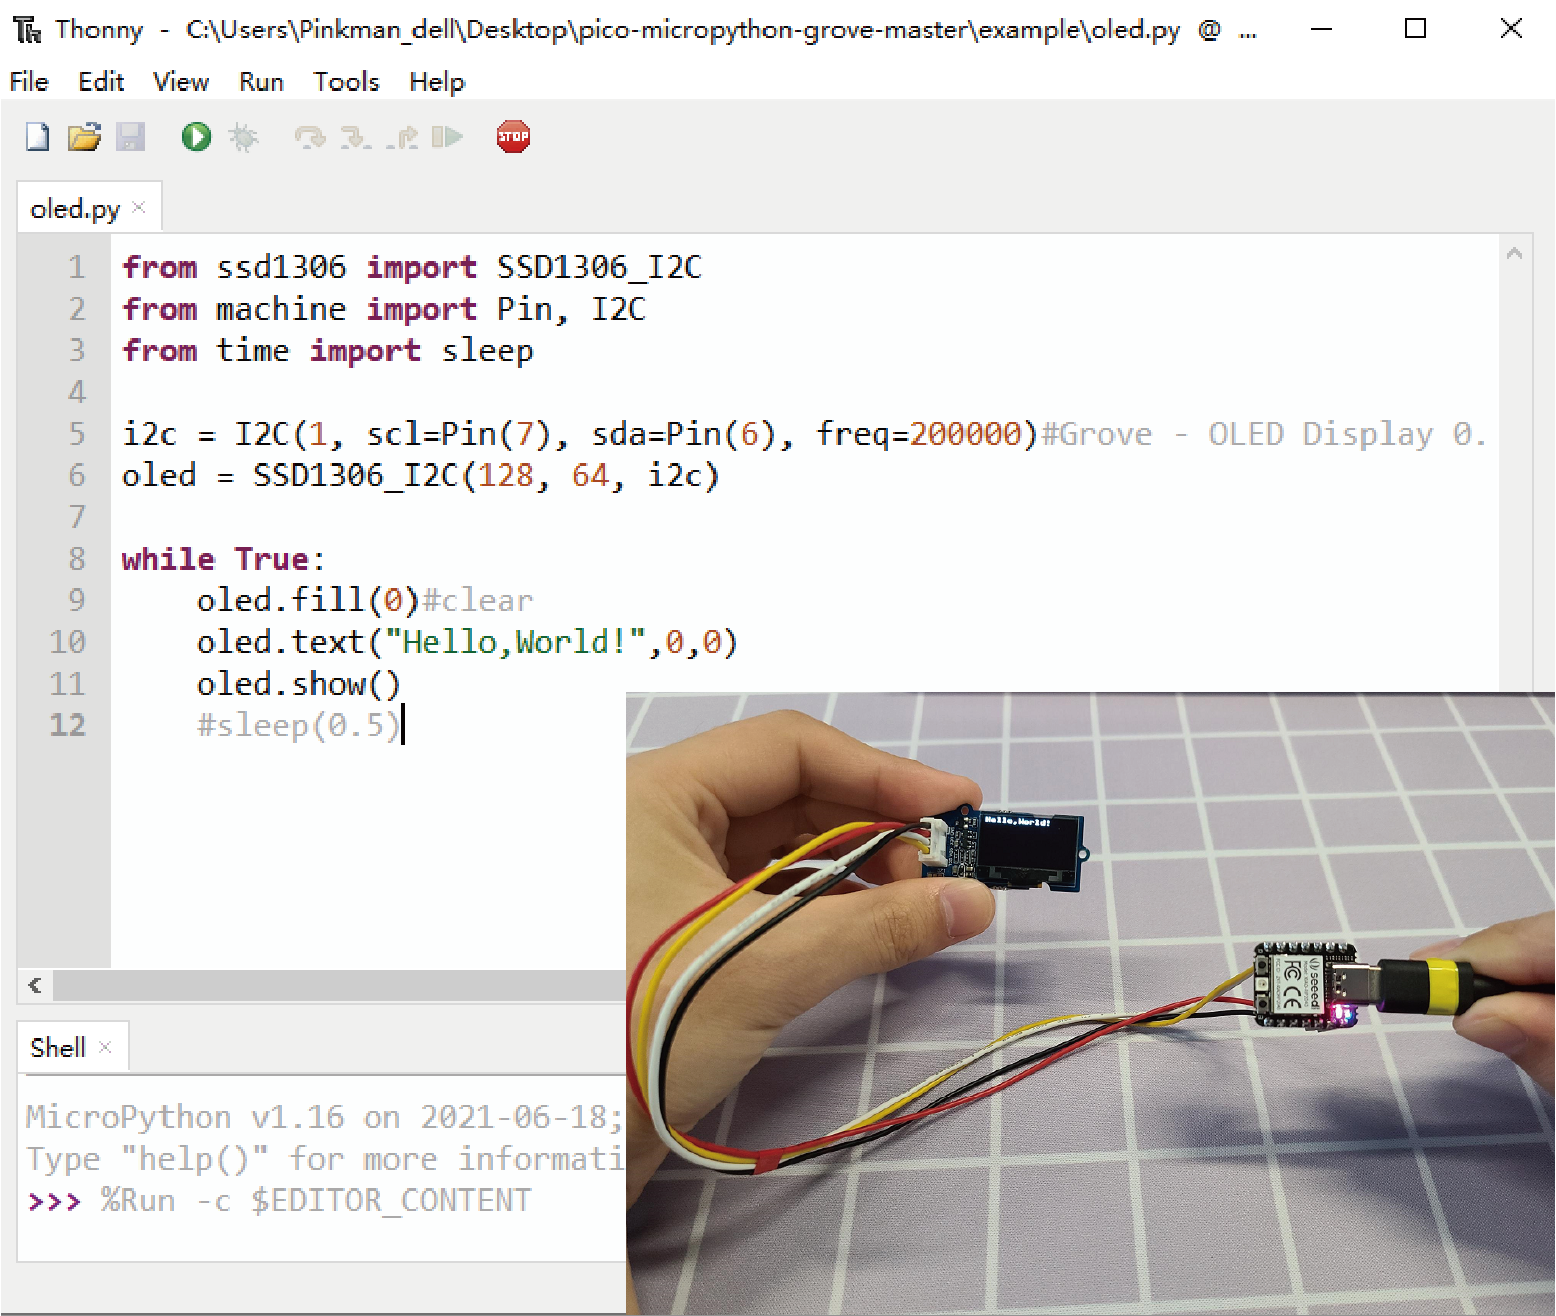
- Step 3. Copy the following codes to Thonny.
from ssd1306 import SSD1306_I2C
from machine import Pin, I2C
from time import sleep

i2c = I2C(1, scl=Pin(7), sda=Pin(6), freq=200000)#Grove - OLED Display 0.96" (SSD1315)
oled = SSD1306_I2C(128, 64, i2c)

while True:
    oled.fill(0)#clear
    oled.text("Hello,World!",0,0)
    oled.show()
    #sleep(0.5)
- Step 4. Upload the codes by clicking the "Run current script" button. For the first time, Thonny will ask where you want to save your codes file. Both This Computer and Raspberry Pi Pico are fine.
If it works well, you will see the text "Hello,World!" displayed on the screen.
MicroPython Device Console
Our partner Neil has written a command line console program for XIAO using MicroPython. With this programme you can easily upload, download and delete files. We thank him for his contribution to XIAO!
Additional Resources
Some additional libraries and sample codes are here:
Tech Support & Product Discussion
Thank you for choosing our products! We are here to provide you with different support to ensure that your experience with our products is as smooth as possible. We offer several communication channels to cater to different preferences and needs.