Examples for Grove Vision AI V2 and XIAO ESP32
Unlock the potential of edge computing and explore the fascinating world of AI vision with the powerful combination of the Grove Vision AI V2 and XIAO ESP32 series MCU. In this tutorial, we will guide you through 2~3 captivating demos that showcase the seamless integration of these cutting-edge technologies.
Whether you're a seasoned developer or a curious enthusiast, these demos will provide you with hands-on experience in harnessing the capabilities of the Grove Vision AI V2 and XIAO ESP32. From object detection and recognition to intelligent scene analysis, you'll discover how to create innovative applications that push the boundaries of what's possible.
Get ready to embark on an exciting journey as we unravel the secrets of AI vision and empower you to build your own groundbreaking projects. Let's dive in and unleash the magic of the Grove Vision AI V2 and XIAO ESP32 together!
This opening description aims to capture the reader's attention, highlight the key components (Grove Vision AI V2 and XIAO ESP32), and provide a glimpse of what the tutorial will cover. It emphasizes the exciting possibilities of combining these technologies and encourages readers to explore the demos with enthusiasm. Feel free to adapt and modify the paragraph to best suit your tutorial's style and tone.
Getting Started
Hardware Preparation
The tutorials and procedures in this article can be used on XIAO ESP32 series products (XIAO ESP32S3, XIAO ESP32C3, XIAO ESP32C6, etc.), and you can choose any one of the XIAO ESP32 series products to complete the contents of this tutorial.
| XIAO ESP32S3 | XIAO ESP32C3 | XIAO ESP32C6 |
|---|---|---|
 |  |  |
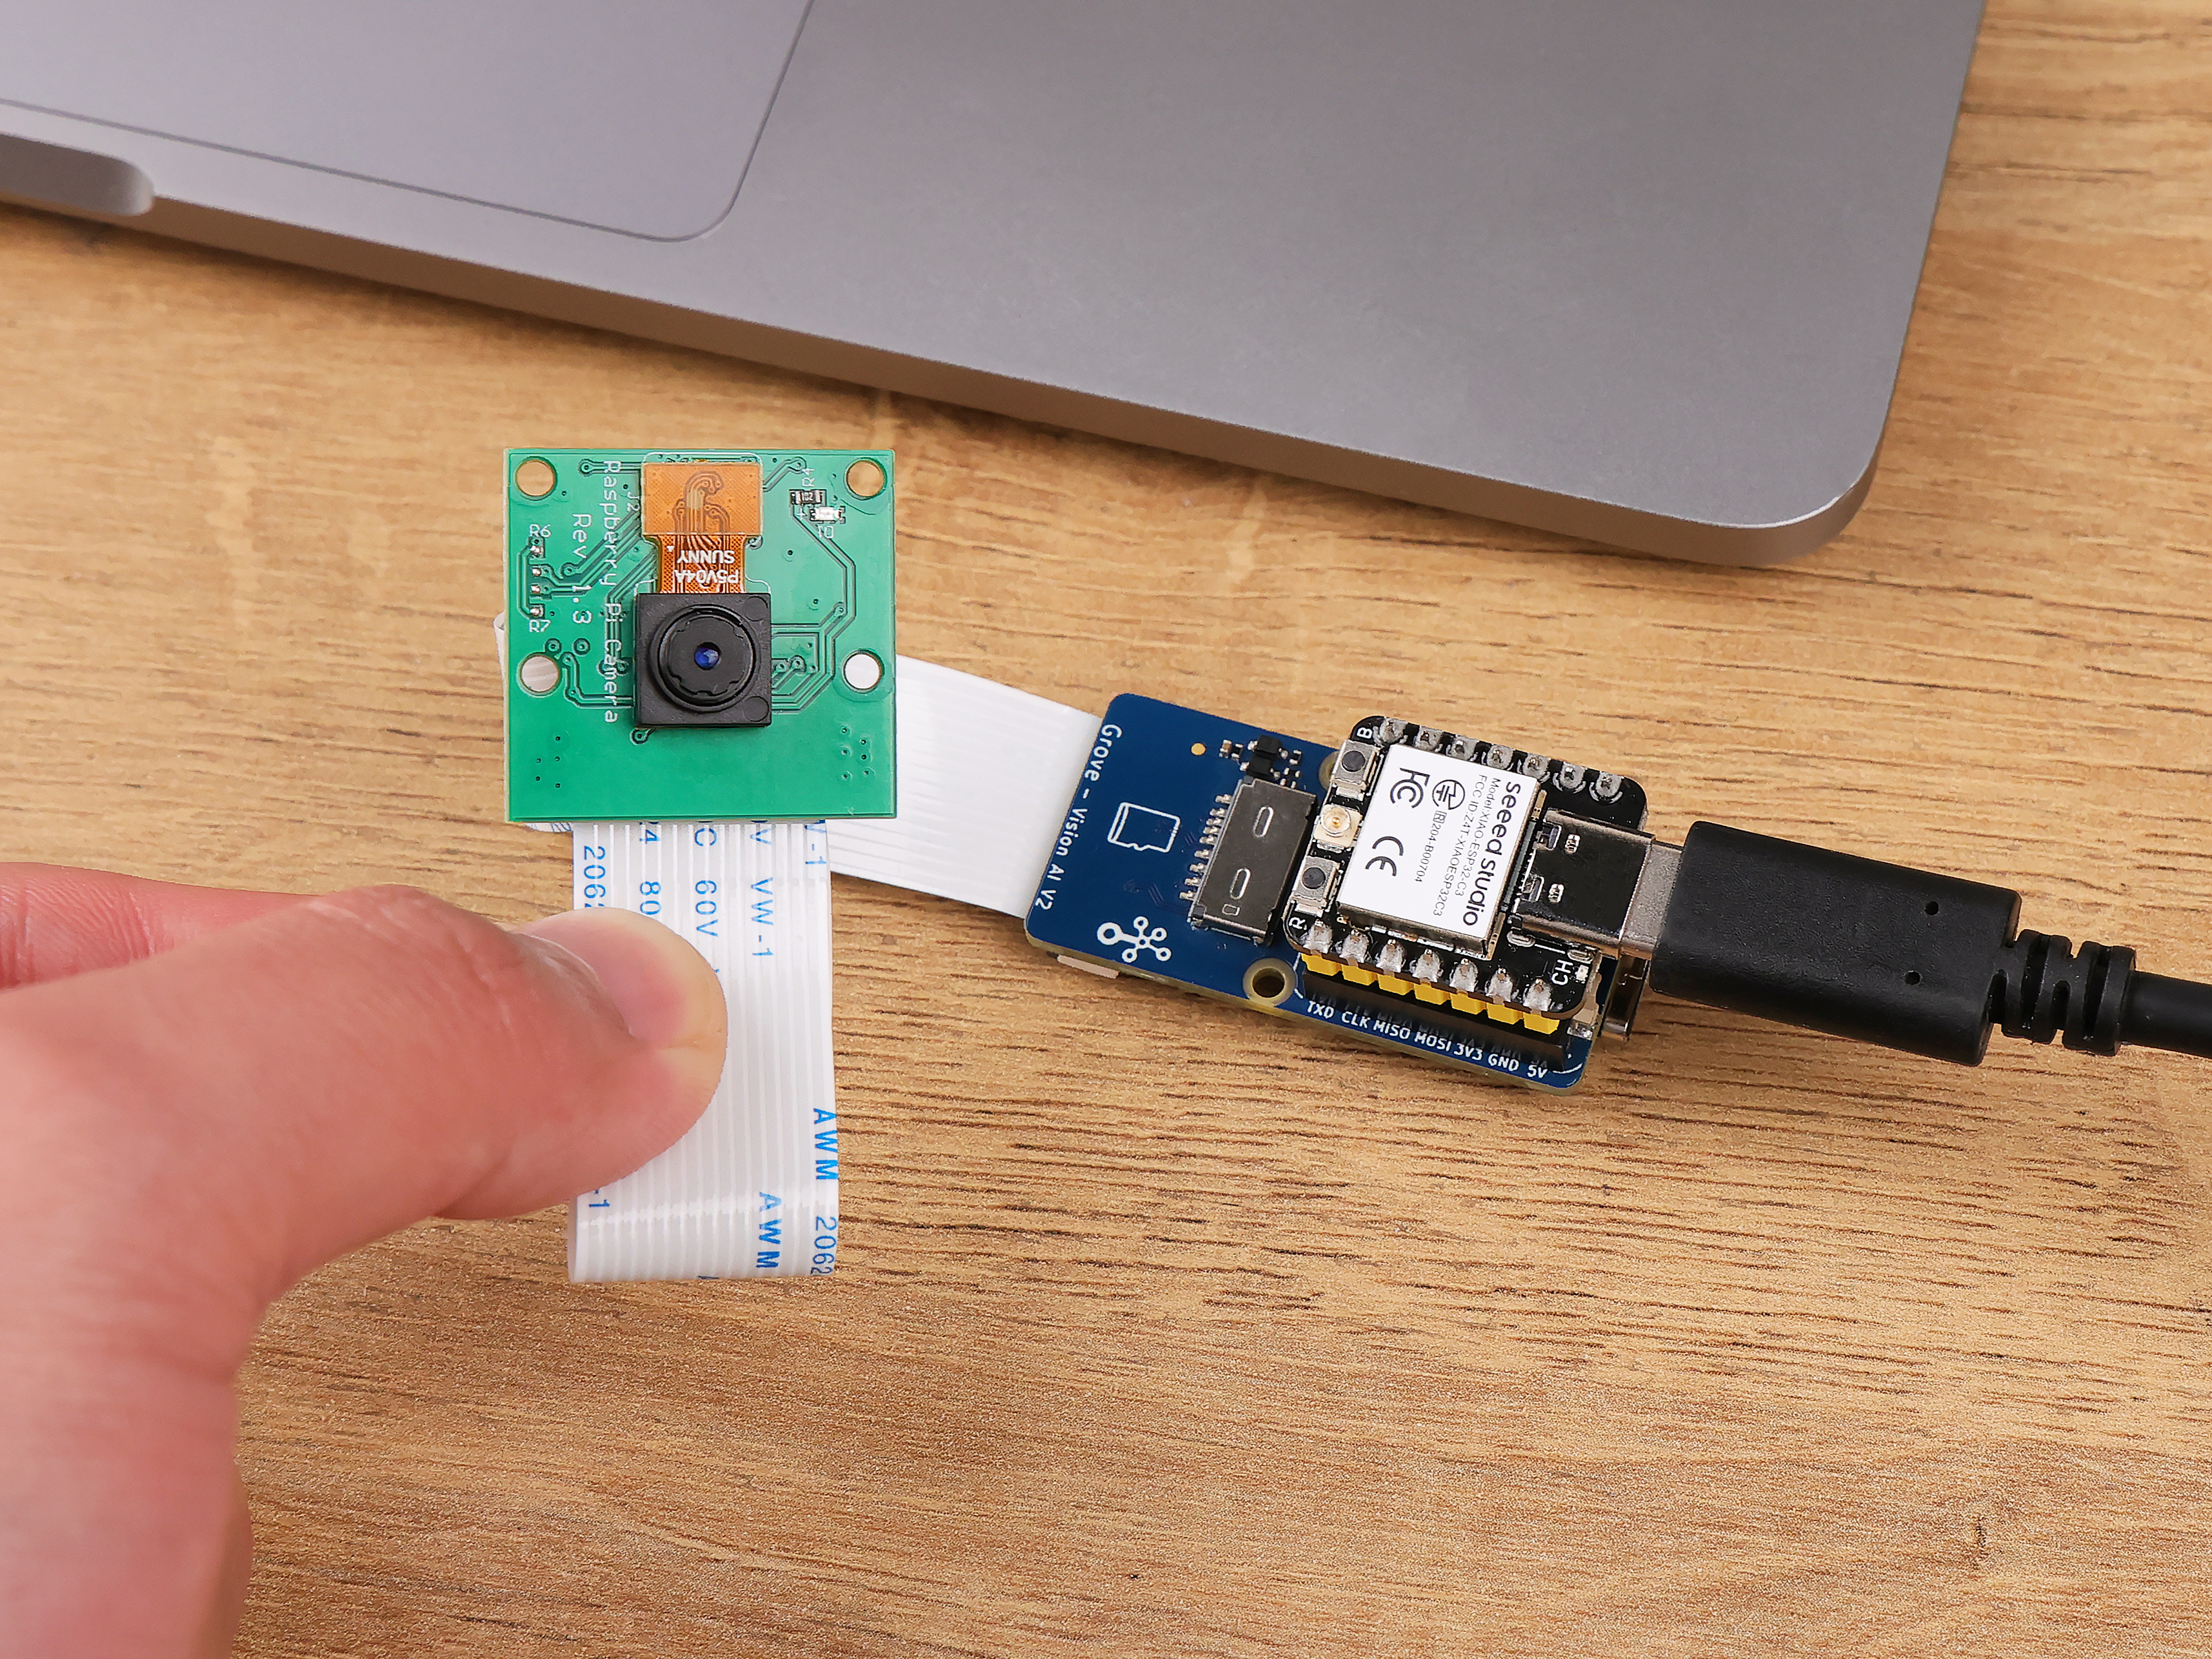
In addition to the master MCU, we need to prepare the Grove Vision AI V2 and supported cameras in order to complete the content of this project.
If you want to use another camera, you can read the list of supported cameras here for more information.
Software Preparation
If this is your first time using the product Grove Vision AI V2, we recommend you read the Wiki below to learn and use SenseCraft AI and understand how to upload models. And learn how to install the Arduino library for Grove Vision AI V2.
Project I: Create a Face-Tracking Fan
In this exciting demo, we'll show you how to create a face-tracking fan that automatically follows your every move, ensuring a refreshing breeze is always directed towards you.
Using the Grove Vision AI V2, we'll harness the magic of facial recognition to detect and track your face in real-time. The Vision AI V2 will continuously output the coordinates of your face, providing the necessary data for precise fan positioning.
Step 1. Upload face recognition models to Grove Vision AI V2
For this project we are going to make a fan that follows faces, so what we need to use for the Grove Vision AI V2 is a face recognition model. You can upload this model using SenseCraft AI and watch the detection in the preview window.

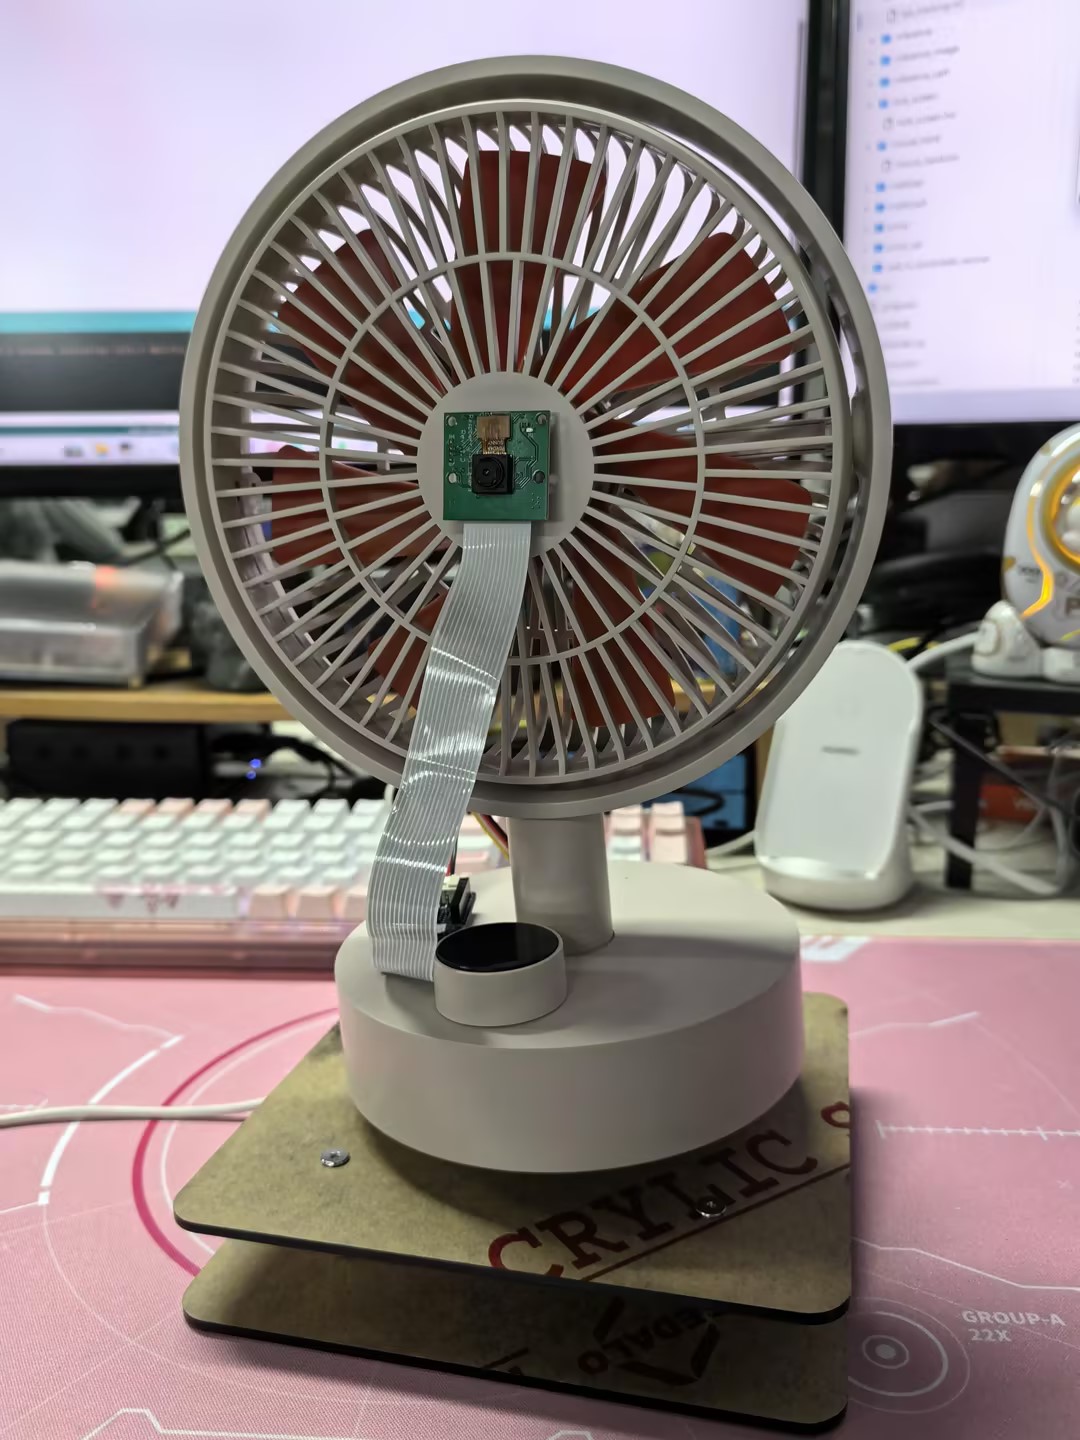
Step 2. Preparing fans and rotating structures
Since the fan structure is not easy to modify, for the fan steering structure, we plan to make a horizontal steering chassis controlled by a servo.
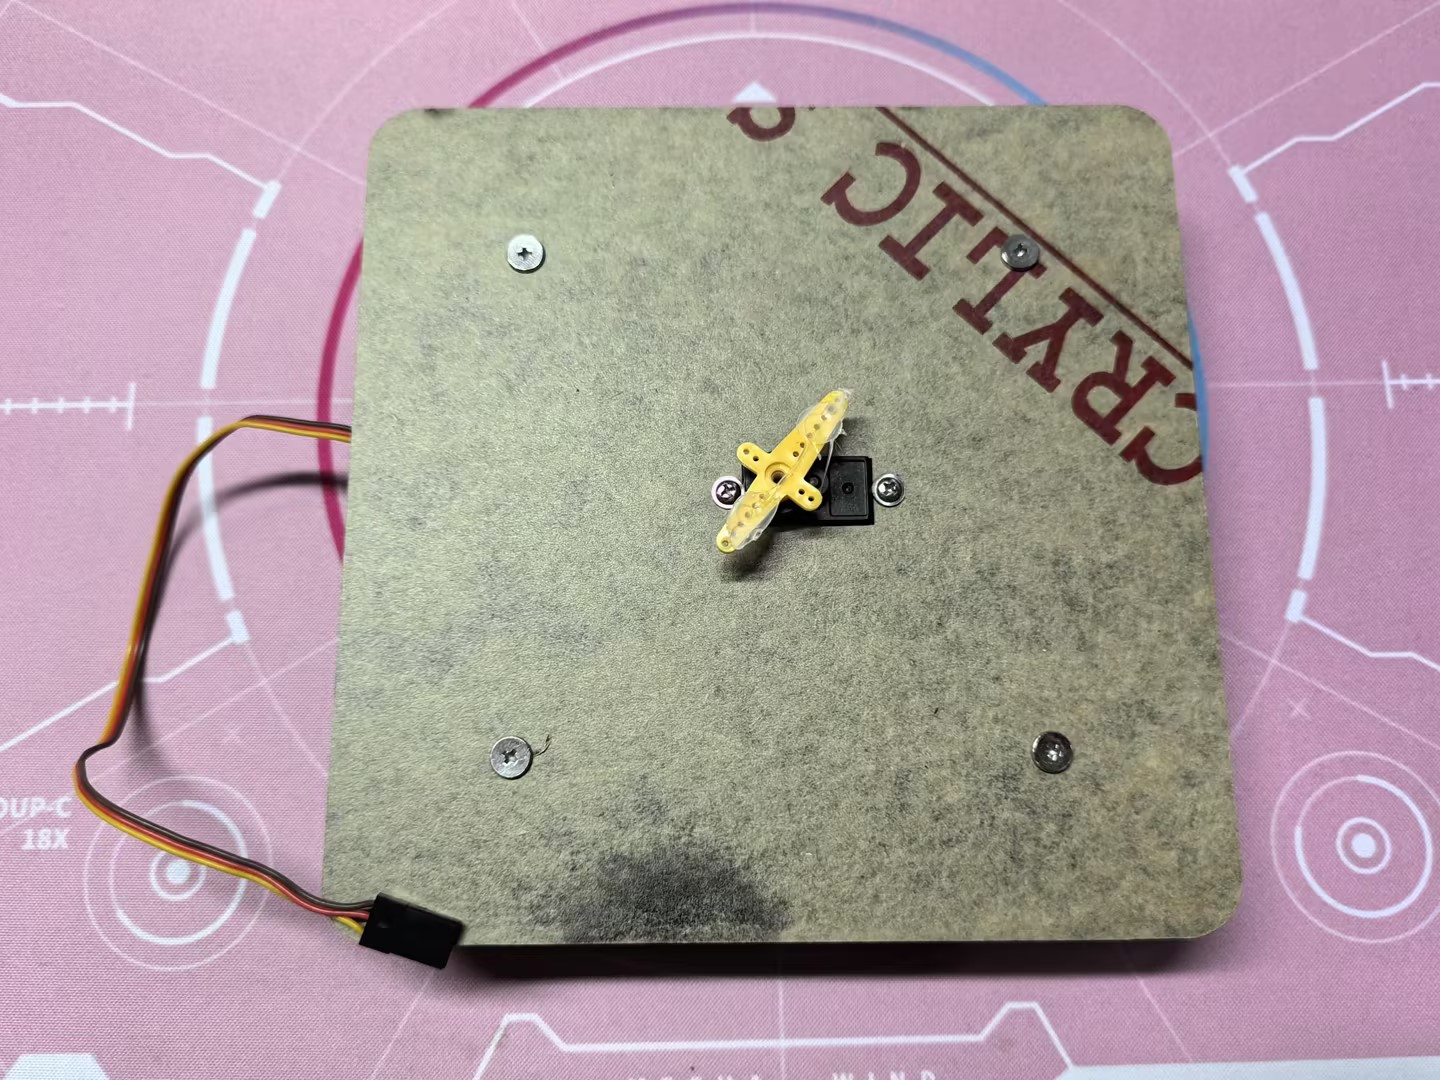
Then, using acrylic sheets and hot melt glue, we glued the fan to the base servo.
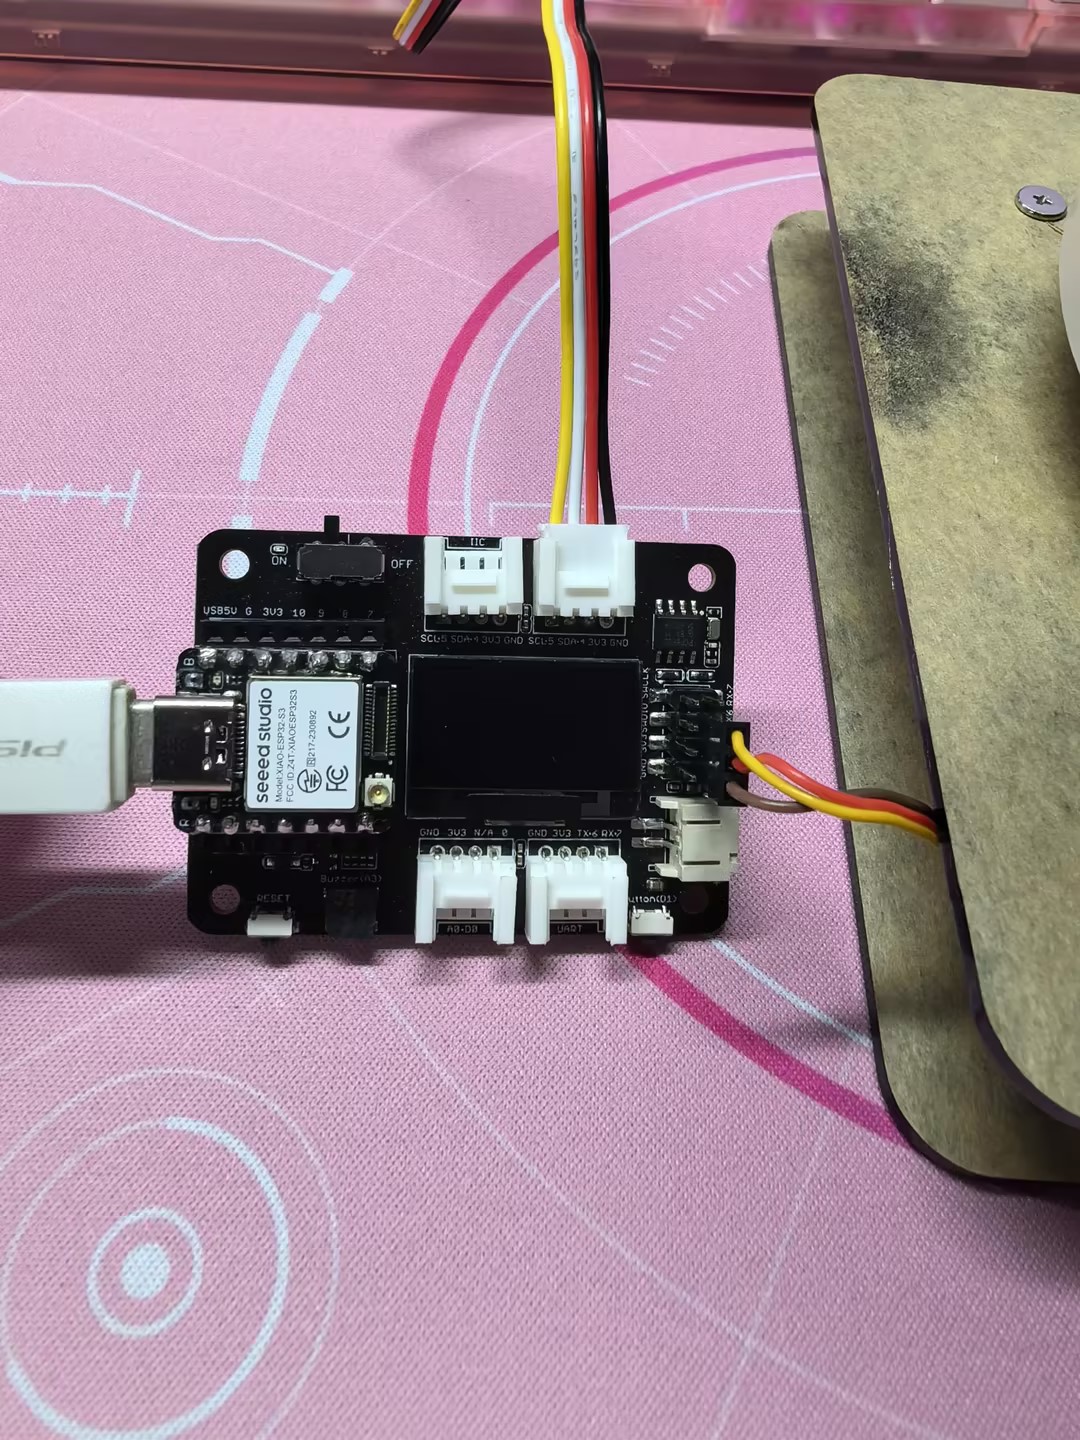
The servo wires are connected to the D6 pin of the XIAO ESP32 and are powered with 5V. The Grove Vision AI V2 is simply connected to the IIC interface of the XIAO through the Grove interface. Here we also use the Expansion Board Base for XIAO for ease of wiring.
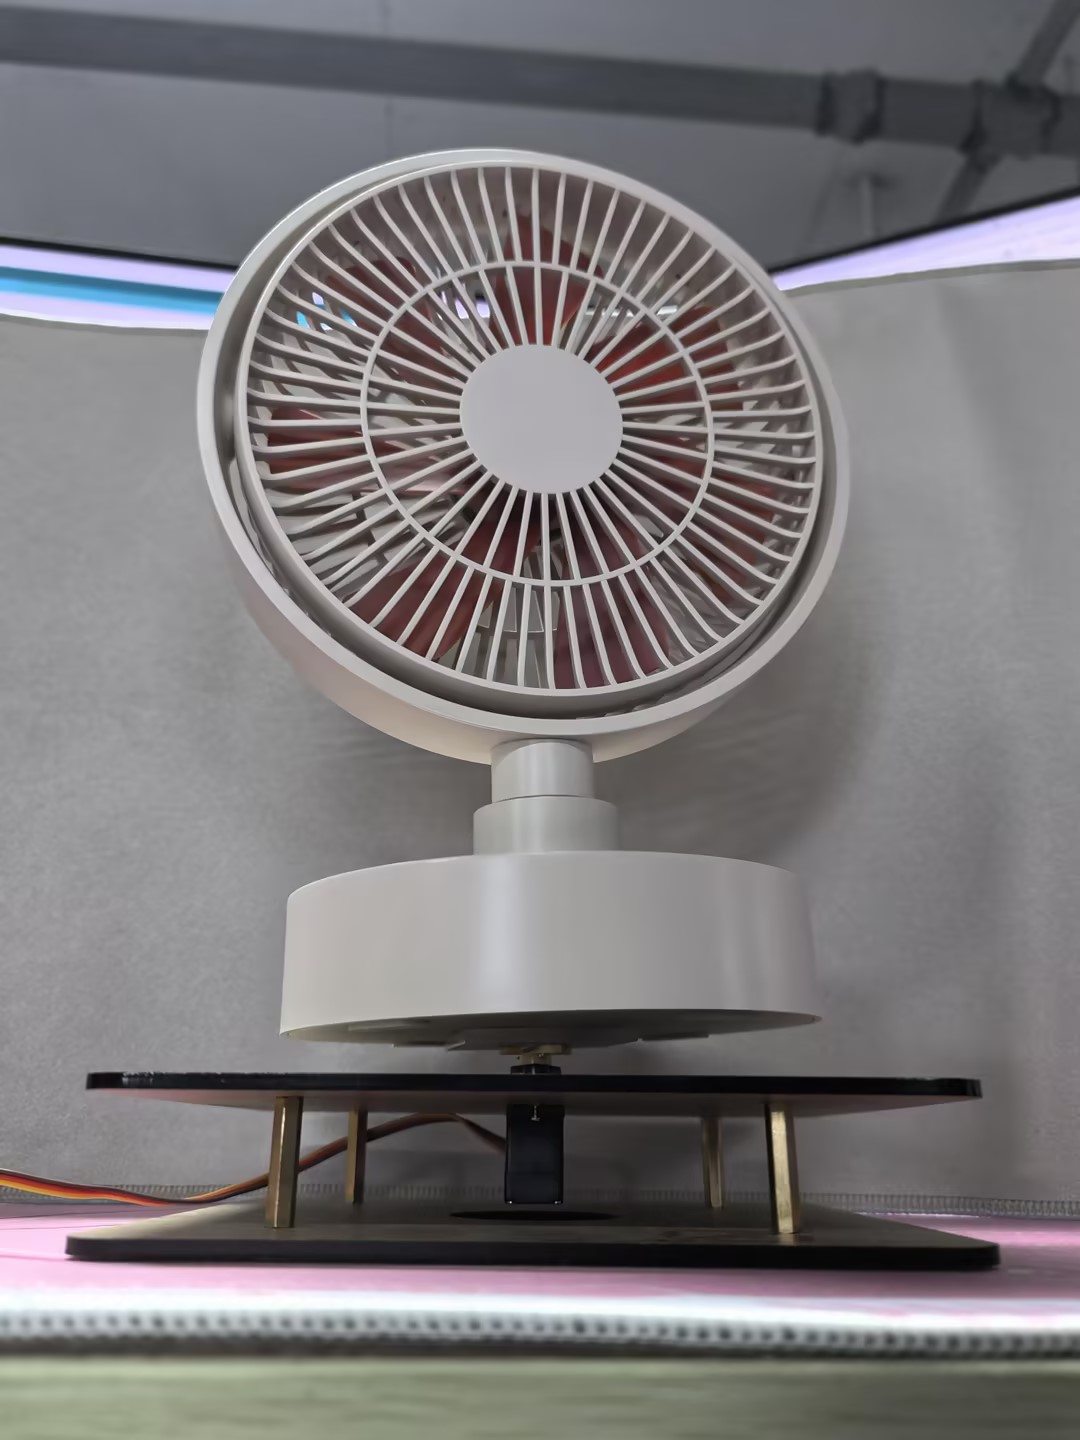
Finally, don't forget to glue the Grove Vision AI V2's camera in the middle of the fan.
Step 3. Upload programme for XIAO
Below is the complete program for this project, please compile and upload this program for XIAO ESP32 series.
#include <Seeed_Arduino_SSCMA.h>
SSCMA Infer;

void stop_rotate(void)
{
    digitalWrite(D6, HIGH);
    delayMicroseconds(1500);
    digitalWrite(D6, LOW);
}

void servo_rotate(int rtime, bool revers = false)
{
    uint32_t sleep;
    if (revers)
    {
        sleep = 2500;
    }
    else
    {
        sleep = 500;
    }
    digitalWrite(D6, HIGH);

    delayMicroseconds(sleep);
    digitalWrite(D6, LOW);
    delay(30 * rtime);
    stop_rotate();
}

void setup()
{
    Infer.begin();
    Serial.begin(9600);
    pinMode(D6, OUTPUT);
}

void loop()
{
    if (!Infer.invoke())
    {
        if (Infer.boxes().size() > 0)
        {
            if (Infer.boxes()[0].x < 80)
            {
                servo_rotate(1, true);
            }
            else if (Infer.boxes()[0].x > 140)
            {
                servo_rotate(1, false);
            }
            Serial.print("X==>>");
            Serial.print(Infer.boxes()[0].x);
            Serial.print("Y==>>");
            Serial.println(Infer.boxes()[0].y);
        }
    }
}
If the programme runs smoothly, you should see the effect shown below.
The rotation and angle of the servo may vary from one servo to another, so please make some appropriate adjustments depending on the servo you are using, which may need to be adjusted.
Program annotation
The code is structured as follows:
-
Library Inclusion:
Seeed_Arduino_SSCMA.h: Enables inferencing with the Grove Vision AI V2.
-
Object Declaration:
SSCMA Infer: Creates an instance of the SSCMA class for inferencing.
-
stop_rotate Function:
- Stops the rotation of the servo motor by sending a specific pulse width.
-
servo_rotate Function:
- Rotates the servo motor for a specified duration and direction.
rtime: Determines the rotation duration in units of 30 milliseconds.revers: Specifies the rotation direction (true for reverse, false for forward).
-
Setup Function:
- Initializes the Grove Vision AI V2, serial communication, and configures the servo motor pin (D0) as an output.
-
Loop Function:
- Continuously invokes the inferencing process.
- If an object is detected:
- If the object's x-coordinate is less than 80, the servo motor rotates in the reverse direction for a short duration.
- If the object's x-coordinate is greater than 140, the servo motor rotates in the forward direction for a short duration.
- Prints the x and y coordinates of the detected object to the serial monitor.
To modify the code and customize the object tracking system, you can:
-
Adjust the threshold values (80 and 140) in the loop function to change the range within which the servo motor remains stationary.
-
Modify the
servo_rotatefunction to adjust the rotation duration and speed of the servo motor. -
Customize the behavior of the system based on the object's position. For example, you can add additional conditions or actions depending on the x and y coordinates of the detected object.
-
Extend the code to control additional servo motors or perform other actions based on the object's position.
Project II: Automatic Lock/Unlock PC
Enhance your computer's security and convenience with this automatic screen lock/unlock project using the Grove Vision AI V2 and XIAO ESP32. This innovative setup ensures that your screen remains locked when you're away and quickly unlocks when you return, providing a seamless and secure user experience.
Step 1. Upload face recognition models to Grove Vision AI V2
For this project, we will unlock/lock the PC based on the presence of someone in front of the computer, so what we need to use for the Grove Vision AI V2 is a face recognition model. You can upload this model using SenseCraft AI and watch the detection in the preview window.
Step 2. XIAO connects to the computer and uploads the programme for XIAO
Below is the complete program for this project, please compile and upload this program for XIAO ESP32 series.
#include "USB.h"
#include <USBHIDKeyboard.h>
#include <Seeed_Arduino_SSCMA.h>

#define KEY_DEBOUNCE 100
#define KEY_WAIT 500
// Set the screen pause time when no one is around, unit: ms
#define SCREEN_TIME 10000

SSCMA Infer;
USBHIDKeyboard Keyboard;

extern char password[] = "YOUR_COMPUTER_PASSWORD";
extern uint pass_size = 6;
unsigned long times;

bool locked = false;

void lockPC() {
  Keyboard.press(KEY_LEFT_CTRL);
  Keyboard.press(KEY_LEFT_ALT);
  Keyboard.press(KEY_DELETE);
  delay(KEY_DEBOUNCE);
  Keyboard.releaseAll();
  delay(KEY_WAIT);

  Keyboard.press(KEY_RETURN);
  delay(KEY_DEBOUNCE);
  Keyboard.releaseAll();
  locked = true;
}

void unlockPC (){
  Keyboard.press(KEY_RETURN);
  delay(KEY_DEBOUNCE);
  Keyboard.releaseAll();
  delay(KEY_WAIT);
  for(int i = 0; i < pass_size; i++){
    Keyboard.press(password[i]);
    delay(KEY_DEBOUNCE);
    Keyboard.releaseAll();
  }
  delay(KEY_WAIT);
  Keyboard.press(KEY_RETURN);
  delay(KEY_DEBOUNCE);
  Keyboard.releaseAll();
  locked = false;
}

void setup() {
  // put your setup code here, to run once:
  Serial.begin(115200);
  Serial.println("Scanning...");

  // Start HID
  Keyboard.begin();
  USB.begin();
  Infer.begin();

  times = millis();
}

void loop() {
  // put your main code here, to run repeatedly:
  if (!Infer.invoke()) {
    if (Infer.boxes().size() > 0) {
      if (locked) {
        unlockPC();
        Serial.println("Unlock");
      }
      times = millis();
    } else {
      if ((millis() - times) > SCREEN_TIME && !locked) {
        lockPC();
        Serial.println("Lock");
      }
    }
  } else {
    if ((millis() - times) > SCREEN_TIME && !locked) {
      lockPC();
      Serial.println("Lock");
    }
  }
}
If the programme runs smoothly, you should see the effect shown below.
-
This programme only works on Windows computers, if you have a computer with another system, you may need to change the command to turn off the screen.
-
If your Windows computer is set up with an unlock method other than fingerprint unlock or password, the code to unlock it may not work.
Program annotation
The code is structured as follows:
-
Include necessary libraries:
USB.h: Handles USB communication.USBHIDKeyboard.h: Enables USB HID keyboard functionality.Seeed_Arduino_SSCMA.h: Provides inference capabilities for person detection.
-
Define constants:
KEY_DEBOUNCE: Debounce time for keyboard inputs.KEY_WAIT: Waiting time between keyboard inputs.SCREEN_TIME: Time duration without a person's presence before locking the screen.
-
Create instances of SSCMA (Infer) and USBHIDKeyboard (Keyboard) classes.
-
Declare variables:
password[]: Stores the computer password for unlocking.pass_size: Stores the length of the password.times: Stores the timestamp of the last person detection.locked: Tracks the current lock state of the computer.
-
lockPC function:
- Simulates the keyboard shortcut (Win+L) to lock the computer.
- Waits for
KEY_DEBOUNCEandKEY_WAITdurations. - Presses the return key to confirm the lock action.
- Updates the locked variable to indicate the locked state.
-
unlockPC function:
- Presses the return key to initiate the unlock process.
- Waits for
KEY_DEBOUNCEandKEY_WAITdurations. - Simulates typing the password character by character.
- Presses the return key to confirm the password input.
- Updates the locked variable to indicate the unlocked state.
-
Setup function:
- Initializes serial communication.
- Begins the USB keyboard (Keyboard) and inference engine (Infer).
- Sets the initial timestamp for person detection.
-
Loop function:
- Invokes the inference engine (Infer).
- If a person is detected:
- If the computer is locked, calls the
unlockPCfunction to unlock it. - Updates the timestamp of the last person detection.
- If the computer is locked, calls the
- If no person is detected:
- If the time since the last person detection exceeds
SCREEN_TIMEand the computer is not locked, calls thelockPCfunction to lock it.
- If the time since the last person detection exceeds
- If the inference fails:
- If the time since the last person detection exceeds
SCREEN_TIMEand the computer is not locked, calls thelockPCfunction to lock it.
- If the time since the last person detection exceeds
To customize the code according to your requirements, you can make the following changes:
-
Update the password:
- Replace
YOUR_COMPUTER_PASSWORDwith your actual computer password. - Modify
pass_sizeto match the length of your password.
- Replace
-
Adjust the constants:
- Modify
KEY_DEBOUNCEandKEY_WAITto change the timing of keyboard inputs. - Modify
SCREEN_TIMEto change the time duration without a person's presence before locking the screen.
- Modify
-
Customize the locking and unlocking process:
- In the
lockPCandunlockPCfunctions, you can modify the keyboard shortcuts or input sequences to match your specific operating system or security settings.
- In the
-
Integrate additional functionality:
- You can extend the code to include additional actions or notifications when the computer is locked or unlocked.
- For example, you can send an email, trigger an alarm, or log the events.
Project III: Gesture-Controlled Mouse
Transform your human-computer interaction experience with this groundbreaking gesture-controlled mouse project using the Grove Vision AI V2 and XIAO ESP32. Say goodbye to traditional mouse input and embrace a more intuitive and natural way of navigating your computer.
The Grove Vision AI V2 takes center stage in this project, utilizing its advanced computer vision capabilities to detect and track user hand gestures. By employing sophisticated algorithms, it can recognize specific hand movements and translate them into corresponding mouse actions.
Step 1. Upload gesture recognition models to Grove Vision AI V2
For this project, we will operate the mouse based on gestures, so what we need to use for the Grove Vision AI V2 is a gesture recognition model. You can upload this model using SenseCraft AI and watch the detection in the preview window.

Step 2. XIAO connects to the computer and uploads the programme for XIAO
Below is the complete program for this project, please compile and upload this program for XIAO ESP32 series.
#include <Seeed_Arduino_SSCMA.h>
#include "USBHIDMouse.h"
#include "USB.h"

#define KEY_DEBOUNCE 100
#define KEY_WAIT 500
#define RESET_NUM 3
#define LEFT_CLICK_TARGET 0
#define MOVE_TARGET 1
#define RIGHT_CLICK_TARGET 2

SSCMA Infer;
USBHIDMouse Mouse;

int X = 0, Y = 0;
int8_t mx, my;
bool clicked = false;
int reset_mouse = RESET_NUM;

void setup() {
  // put your setup code here, to run once:
  Serial.begin(115200);
  Infer.begin();

  // initialize mouse control:
  Mouse.begin();
  USB.begin();
}

void move_mouse(int mx, int my) {
  Mouse.move(mx, my);
}

void loop() {
  if (!Infer.invoke()) {
    Serial.println("INVOKE SUCCESS:");
    if (Infer.boxes().size() == 0) {
      if (reset_mouse <= 0) {
        X = 0;
        Y = 0;
      } else {
        reset_mouse -= 1;
      }
    }

    for (int i = 0; i < Infer.boxes().size() && i < 1; i++) {
      reset_mouse = RESET_NUM;
      if (Infer.boxes()[i].target == MOVE_TARGET) {
//        Mouse.press(MOUSE_RIGHT);
        if (X == 0 && Y == 0) {
          X = Infer.boxes()[i].x;
          Y = Infer.boxes()[i].y;
        } else {
          mx = Infer.boxes()[i].x - X;
          my = Infer.boxes()[i].y - Y;
          X = Infer.boxes()[i].x;
          Y = Infer.boxes()[i].y;
          move_mouse(-mx * 2, my * 2);
          clicked = false;
        }
      } else if (Infer.boxes()[i].target == LEFT_CLICK_TARGET && !clicked) {
        Mouse.press(MOUSE_LEFT);
        delay(KEY_DEBOUNCE);
        Mouse.release(MOUSE_LEFT);
        delay(KEY_WAIT);
        clicked = true;
      } else if (Infer.boxes()[i].target == RIGHT_CLICK_TARGET && !clicked) {
        Mouse.press(MOUSE_RIGHT);
        delay(KEY_DEBOUNCE);
        Mouse.release(MOUSE_RIGHT);
        delay(KEY_WAIT);
        clicked = false;
      }
    }

  } else {
    Serial.println("INVOKE FAILE!");
  }
}
If the programme runs smoothly, you should see the effect shown below.
Program annotation
The code is structured as follows:
-
Include necessary libraries:
Seeed_Arduino_SSCMA.h: Provides inference capabilities for target detection.USBHIDMouse.h: Enables USB HID mouse functionality.USB.h: Handles USB communication.
-
Define constants:
KEY_DEBOUNCE: Debounce time for mouse clicks.KEY_WAIT: Waiting time between mouse clicks.RESET_NUM: Number of frames without detected targets before resetting mouse position.LEFT_CLICK_TARGET,MOVE_TARGET,RIGHT_CLICK_TARGET: Target IDs for different actions.
-
Create instances of SSCMA (Infer) and USBHIDMouse (Mouse) classes.
-
Declare variables:
X,Y: Store the current mouse position.mx,my: Store the mouse movement deltas.clicked: Track the click status.reset_mouse: Counter for resetting mouse position.
-
Setup function:
- Initialize serial communication.
- Begin the inference engine (Infer) and USB mouse (Mouse).
-
move_mouse function:
- Moves the mouse by the specified deltas (
mx,my).
- Moves the mouse by the specified deltas (
-
Loop function:
- Invoke the inference engine (Infer).
- If inference is successful and no targets are detected, reset the mouse position after
RESET_NUMframes. - Iterate through the detected targets (limited to 1 in this code):
- If the target is
MOVE_TARGET:- Update the mouse position based on the target's coordinates.
- Calculate the mouse movement deltas (mx, my).
- Move the mouse accordingly.
- If the target is
LEFT_CLICK_TARGETand not already clicked:- Perform a left mouse click.
- Wait for
KEY_DEBOUNCEandKEY_WAITdurations.
- If the target is
RIGHT_CLICK_TARGETand not already clicked:- Perform a right mouse click.
- Wait for
KEY_DEBOUNCEandKEY_WAITdurations.
- If the target is
- If inference fails, print an error message.
To customize the code according to your requirements, you can make the following changes:
-
Adjust the constants:
- Modify
KEY_DEBOUNCEandKEY_WAITto change the timing of mouse clicks. - Modify
RESET_NUMto change the number of frames without detected targets before resetting the mouse position. - Update
LEFT_CLICK_TARGET,MOVE_TARGET, andRIGHT_CLICK_TARGETto match your specific target IDs.
- Modify
-
Modify the target handling logic:
- In the loop function, you can add, remove, or modify the conditions and actions based on the detected targets.
- For example, you can add additional mouse buttons, implement double-clicks, or trigger different actions based on specific target IDs.
-
Customize the mouse movement:
- In the
move_mousefunction, you can modify the mouse movement behavior by adjusting the multiplication factors (-mx * 2,my * 2) or adding additional logic.
- In the
-
Integrate additional functionality:
- You can extend the code to include keyboard controls, media controls, or any other desired features by utilizing the appropriate libraries and functions.
Tech Support & Product Discussion
Thank you for choosing our products! We are here to provide you with different support to ensure that your experience with our products is as smooth as possible. We offer several communication channels to cater to different preferences and needs.