Bluetooth Usage with Seeed Studio XIAO ESP32S3 (Sense)
The Seeed Studio XIAO ESP32S3 is a powerful development board that supports Bluetooth 5, BLE, and Mesh networking, making it an ideal choice for a wide range of IoT applications that require wireless connectivity. With its outstanding RF performance, the XIAO ESP32S3 can provide reliable and high-speed wireless communication over a variety of distances, making it a versatile solution for both short-range and long-range wireless applications. In this tutorial, we will focus on the basic features of the XIAO ESP32S3's Bluetooth capabilities, such as how to scan for nearby Bluetooth devices, how to establish a Bluetooth connection, and how to transmit and receive data over a Bluetooth connection.
| Seeed Studio XIAO ESP32S3 | Seeed Studio XIAO ESP32S3 Sense |
|---|---|
 |  |
Getting Started
Installation of antenna
On the bottom left of the front of XIAO ESP32S3, there is a separate "WiFi/BT Antenna Connector". In order to get better WiFi/Bluetooth signal, you need to take out the antenna inside the package and install it on the connector.
There is a little trick to the installation of the antenna, if you press down hard on it directly, you will find it very difficult to press and your fingers will hurt! The correct way to install the antenna is to put one side of the antenna connector into the connector block first, then press down a little on the other side, and the antenna will be installed.
Remove the antenna is also the case, do not use brute force to pull the antenna directly, one side of the force to lift, the antenna is easy to take off.
If you do not have an antenna installed, you may not be able to use the Bluetooth feature.
If you have the conditions, I suggest you use the big stick antenna, which will get a better experience.
Bluetooth Low Energy (BLE) Usage
Bluetooth Low Energy, BLE for short, is a power-conserving variant of Bluetooth. BLE’s primary application is short distance transmission of small amounts of data (low bandwidth). Unlike Bluetooth that is always on, BLE remains in sleep mode constantly except for when a connection is initiated.
Due to its properties, BLE is suitable for applications that need to exchange small amounts of data periodically running on a coin cell. For example, BLE is of great use in healthcare, fitness, tracking, beacons, security, and home automation industries.
This makes it consume very low power. BLE consumes approximately 100x less power than Bluetooth (depending on the use case).
About the BLE part of XIAO ESP32S3, we will introduce its use in the following three sections.
- Some fundamental concepts -- We will first get to know some concepts that may be used frequently in BLE in order to help us understand the execution process and thinking of BLE programs.
- BLE Scanner -- This section will explain how to search for nearby Bluetooth devices and print them out in the serial monitor.
- BLE server/client -- This section will explain how to use XIAO ESP32S3 as Server and Client to send and receive specified data messages. It will also use to receive or send messages from the phone to XIAO.
- BLE Sensor Data Exchange -- This is the last section of the full tutorial where we will go through a sensor example to explain how to send the sensor data through BLE.
Some fundamental concepts
Server and Client
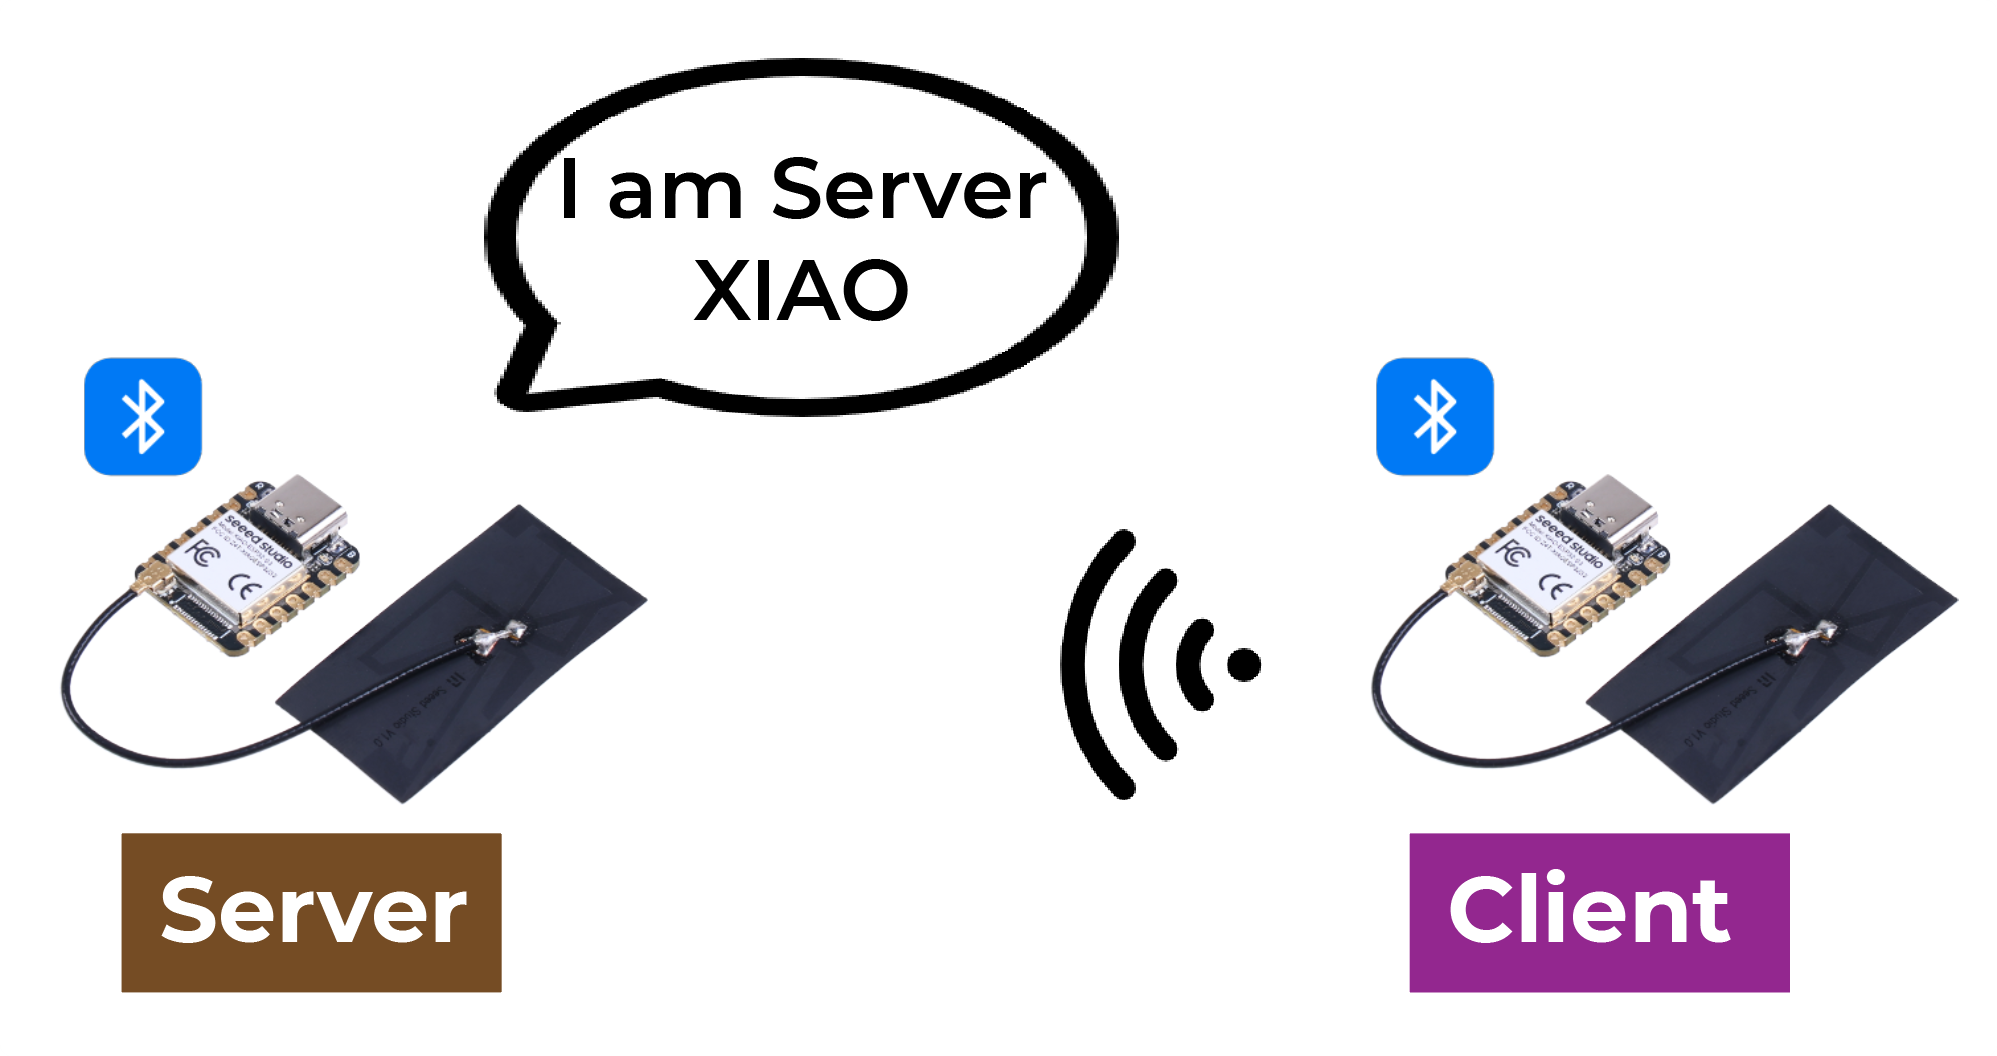
With Bluetooth Low Energy, there are two types of devices: the server and the client. The XIAO ESP32S3 can act either as a client or as a server.
The server advertises its existence, so it can be found by other devices, and contains the data that the client can read. The client scans the nearby devices, and when it finds the server it is looking for, it establishes a connection and listens for incoming data. This is called point-to-point communication.
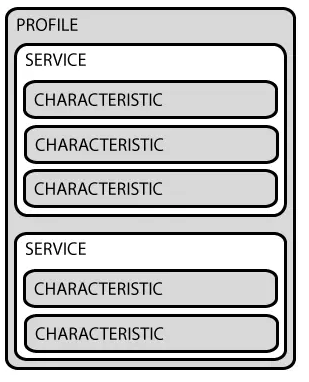
Attribute
Attribute is actually a piece of data. Each Bluetooth device is used to provide a service, and the service is a collection of data, the collection can be called a database, each entry in the database is an Attribute, so here I translate Attribute into data entries. You can imagine a Bluetooth device as a table, each row inside the table is an Attribute.

GATT
When two Bluetooth devices establish a connection, they need a protocol to determine how to communicate. GATT (Generic Attribute Profile) is such a protocol that defines how data is transmitted between Bluetooth devices.
In the GATT protocol, the functions and properties of a device are organized into structures called services, characteristics, and descriptors. A service represents a set of related functions and features provided by a device. Each service can include multiple characteristics, which define a certain property or behavior of the service, such as sensor data or control commands. Each characteristic has a unique identifier and a value, which can be read or written to communicate. Descriptors are used to describe metadata of characteristics, such as format and access permission of characteristic values.
By using the GATT protocol, Bluetooth devices can communicate in different application scenarios, such as transmitting sensor data or controlling remote devices.
BLE Characteristic
ATT, full name attribute protocol. In the end, ATT is composed of a group of ATT commands, that is, request and response commands, ATT is also the uppermost layer of the Bluetooth null packet, that is, ATT is where we analyze the Bluetooth packet the most.
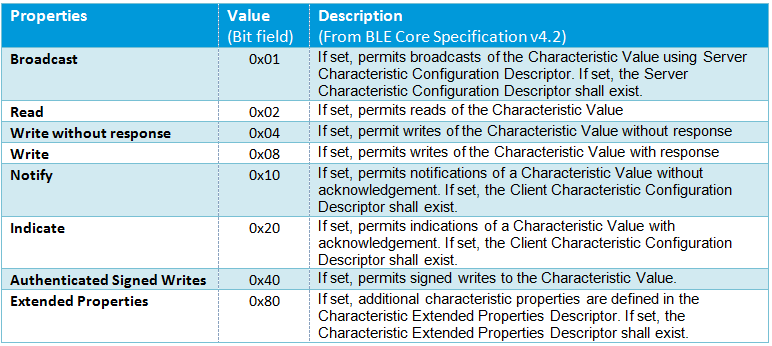
ATT command, formally known as ATT PDU (Protocol Data Unit). It includes 4 categories: read, write, notify and indicate. These commands can be divided into two types: if it requires a response, then it will be followed by a request; on the contrary, if it only requires an ACK but not a response, then it will not be followed by a request.
Service and Characteristic are defined in the GATT layer. The Service side provides the Service, the Service is the data, and the data is the attribute, and the Service and Characteristic are the logical presentation of the data, or the data that the user can see are eventually transformed into the Service and Characteristic.
Let's take a look at what the service and characteristic look like from a mobile perspective. nRF Connect is an application that shows us very visually how each packet should look like.
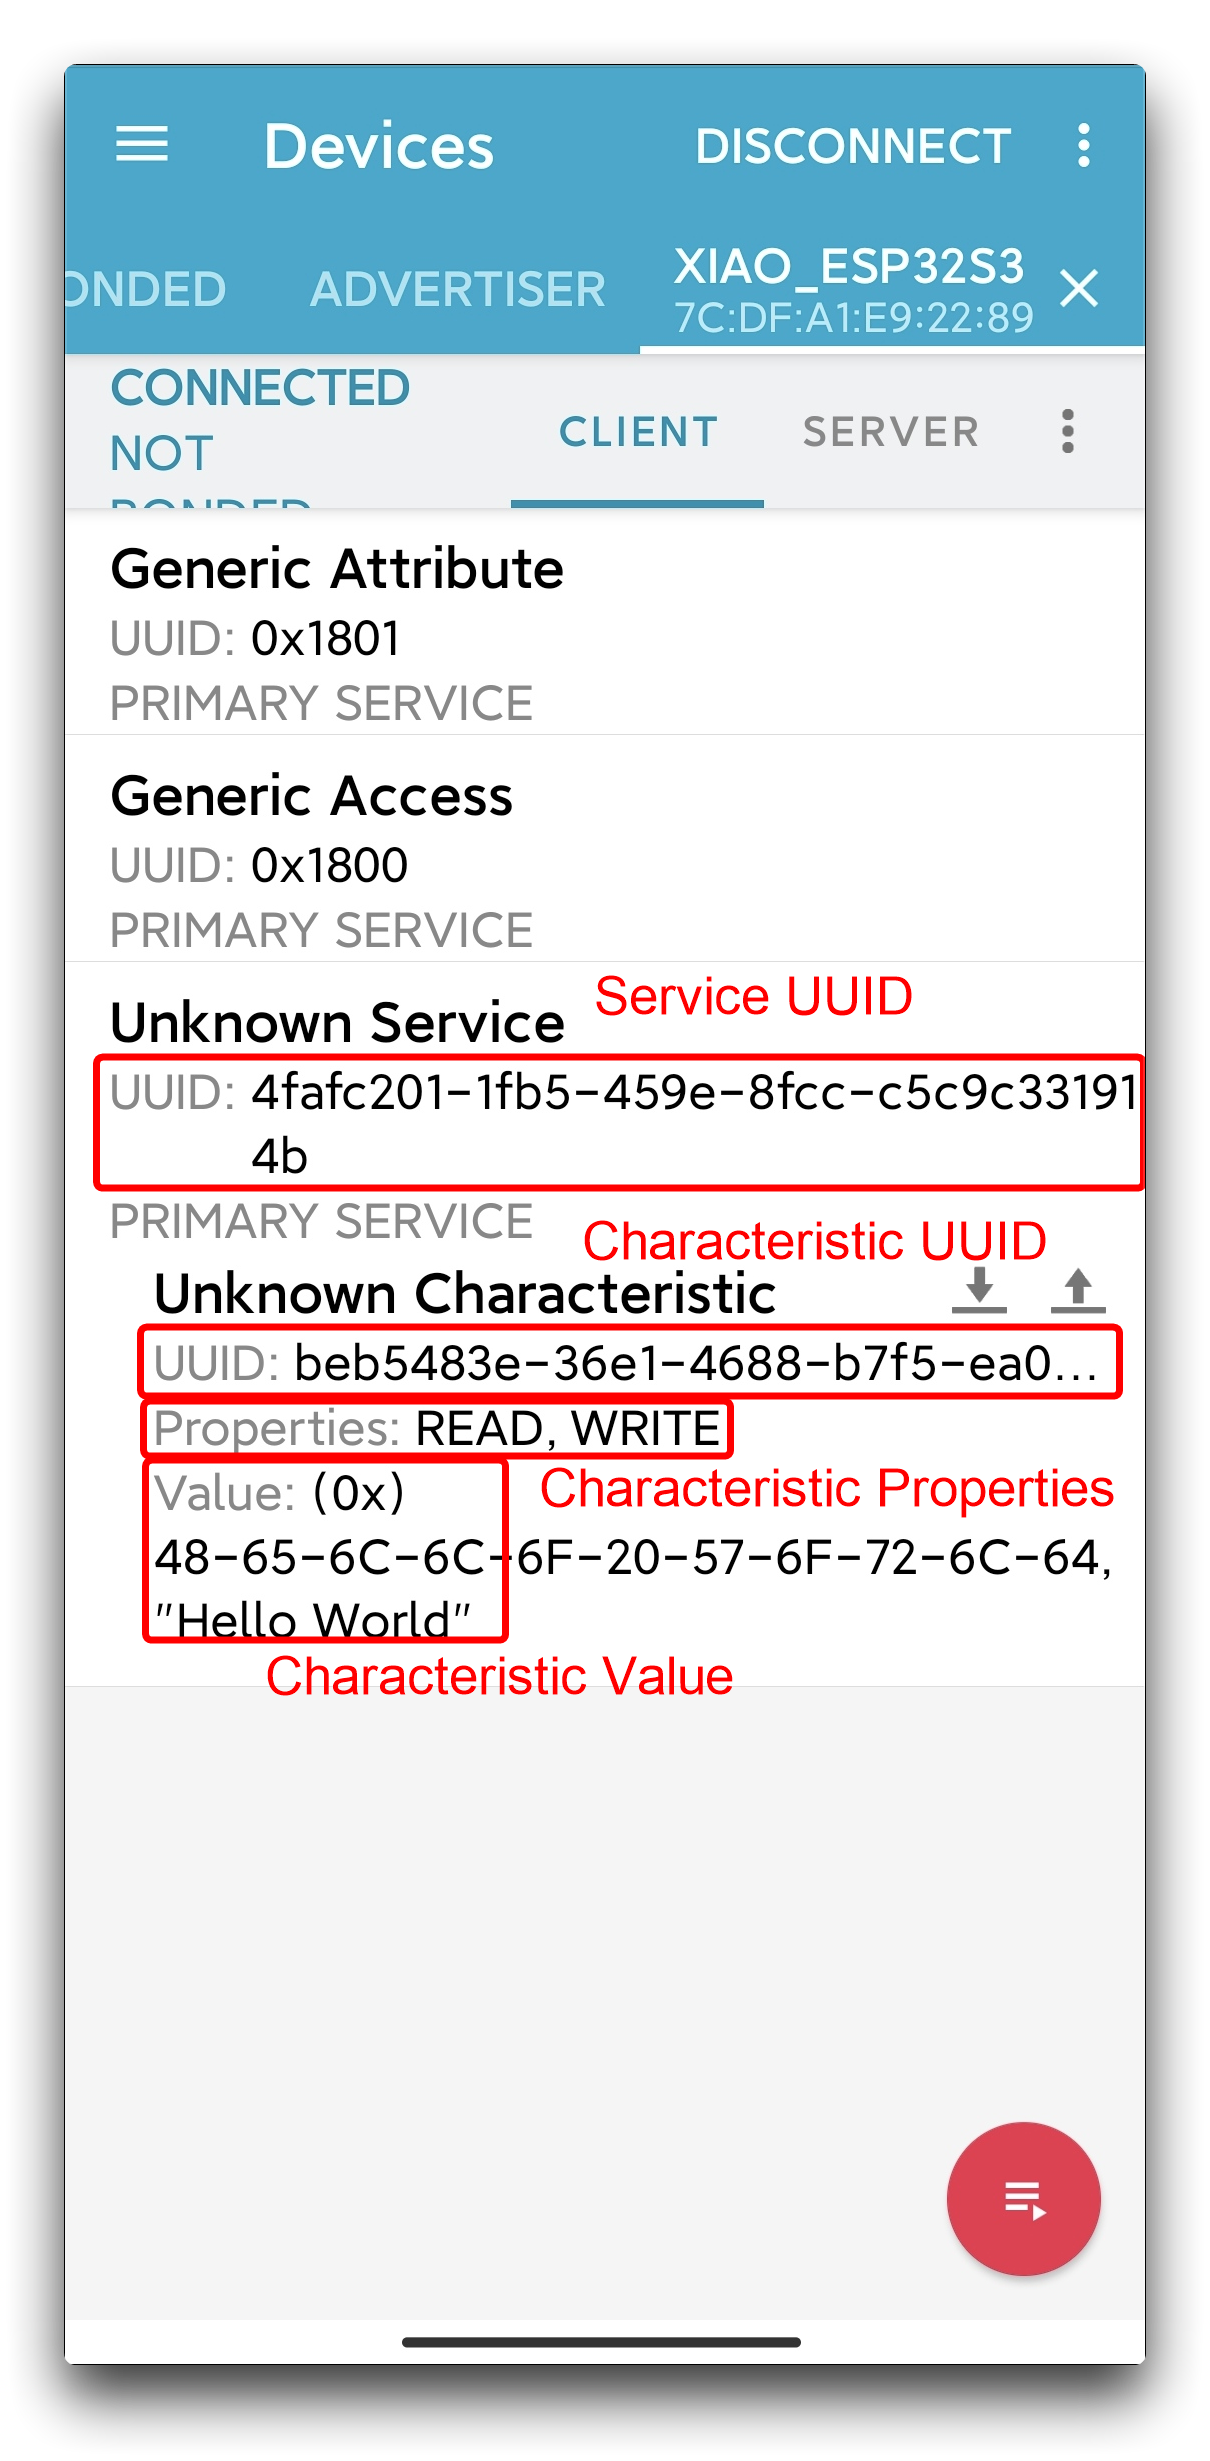
As you can see, in the Bluetooth specification, each specific Bluetooth application is composed of multiple Services, and each Service is composed of multiple Characteristics. A Characteristic consists of a UUID, Properties, and a Value.
Properties are used to describe the types and permissions of operations on a characteristic, such as whether it supports read, write, notify, and so on. This is similar to the four categories included in an ATT PDU.
UUID
Each service, characteristic and descriptor have an UUID (Universally Unique Identifier). An UUID is a unique 128-bit (16 bytes) number. For example:
ea094cbd-3695-4205-b32d-70c1dea93c35
There are shortened UUIDs for all types, services, and profiles specified in the SIG (Bluetooth Special Interest Group). But if your application needs its own UUID, you can generate it using this UUID generator website.
BLE Scanner
Creating a XIAO ESP32S3 BLE scanner is simple. The following is a sample program to create a scanner.
#include <BLEDevice.h>
#include <BLEUtils.h>
#include <BLEScan.h>
#include <BLEAdvertisedDevice.h>

int scanTime = 5; //In seconds
BLEScan* pBLEScan;

class MyAdvertisedDeviceCallbacks: public BLEAdvertisedDeviceCallbacks {
    void onResult(BLEAdvertisedDevice advertisedDevice) {
      Serial.printf("Advertised Device: %s \n", advertisedDevice.toString().c_str());
    }
};

void setup() {
  Serial.begin(115200);
  Serial.println("Scanning...");

  BLEDevice::init("");
  pBLEScan = BLEDevice::getScan(); //create new scan
  pBLEScan->setAdvertisedDeviceCallbacks(new MyAdvertisedDeviceCallbacks());
  pBLEScan->setActiveScan(true); //active scan uses more power, but get results faster
  pBLEScan->setInterval(100);
  pBLEScan->setWindow(99);  // less or equal setInterval value
}

void loop() {
  // put your main code here, to run repeatedly:
  BLEScanResults foundDevices = pBLEScan->start(scanTime, false);
  Serial.print("Devices found: ");
  Serial.println(foundDevices.getCount());
  Serial.println("Scan done!");
  pBLEScan->clearResults();   // delete results fromBLEScan buffer to release memory
  delay(10000);
}
If you have already upgrade your ESP32 development board to version 3.0.0 above, you need to change some code to compatible with it.
BLEScanResults foundDevices = pBLEScan->start(scanTime, false);change toBLEScanResults* foundDevices = pBLEScan->start(scanTime, false);Serial.println(foundDevices.getCount());change toSerial.println(foundDevices->getCount());
Now you can select XIAO ESP32S3 motherboard and upload the program. If the program runs smoothly, open the serial monitor and set the baud rate to 115200, you can see the following result.
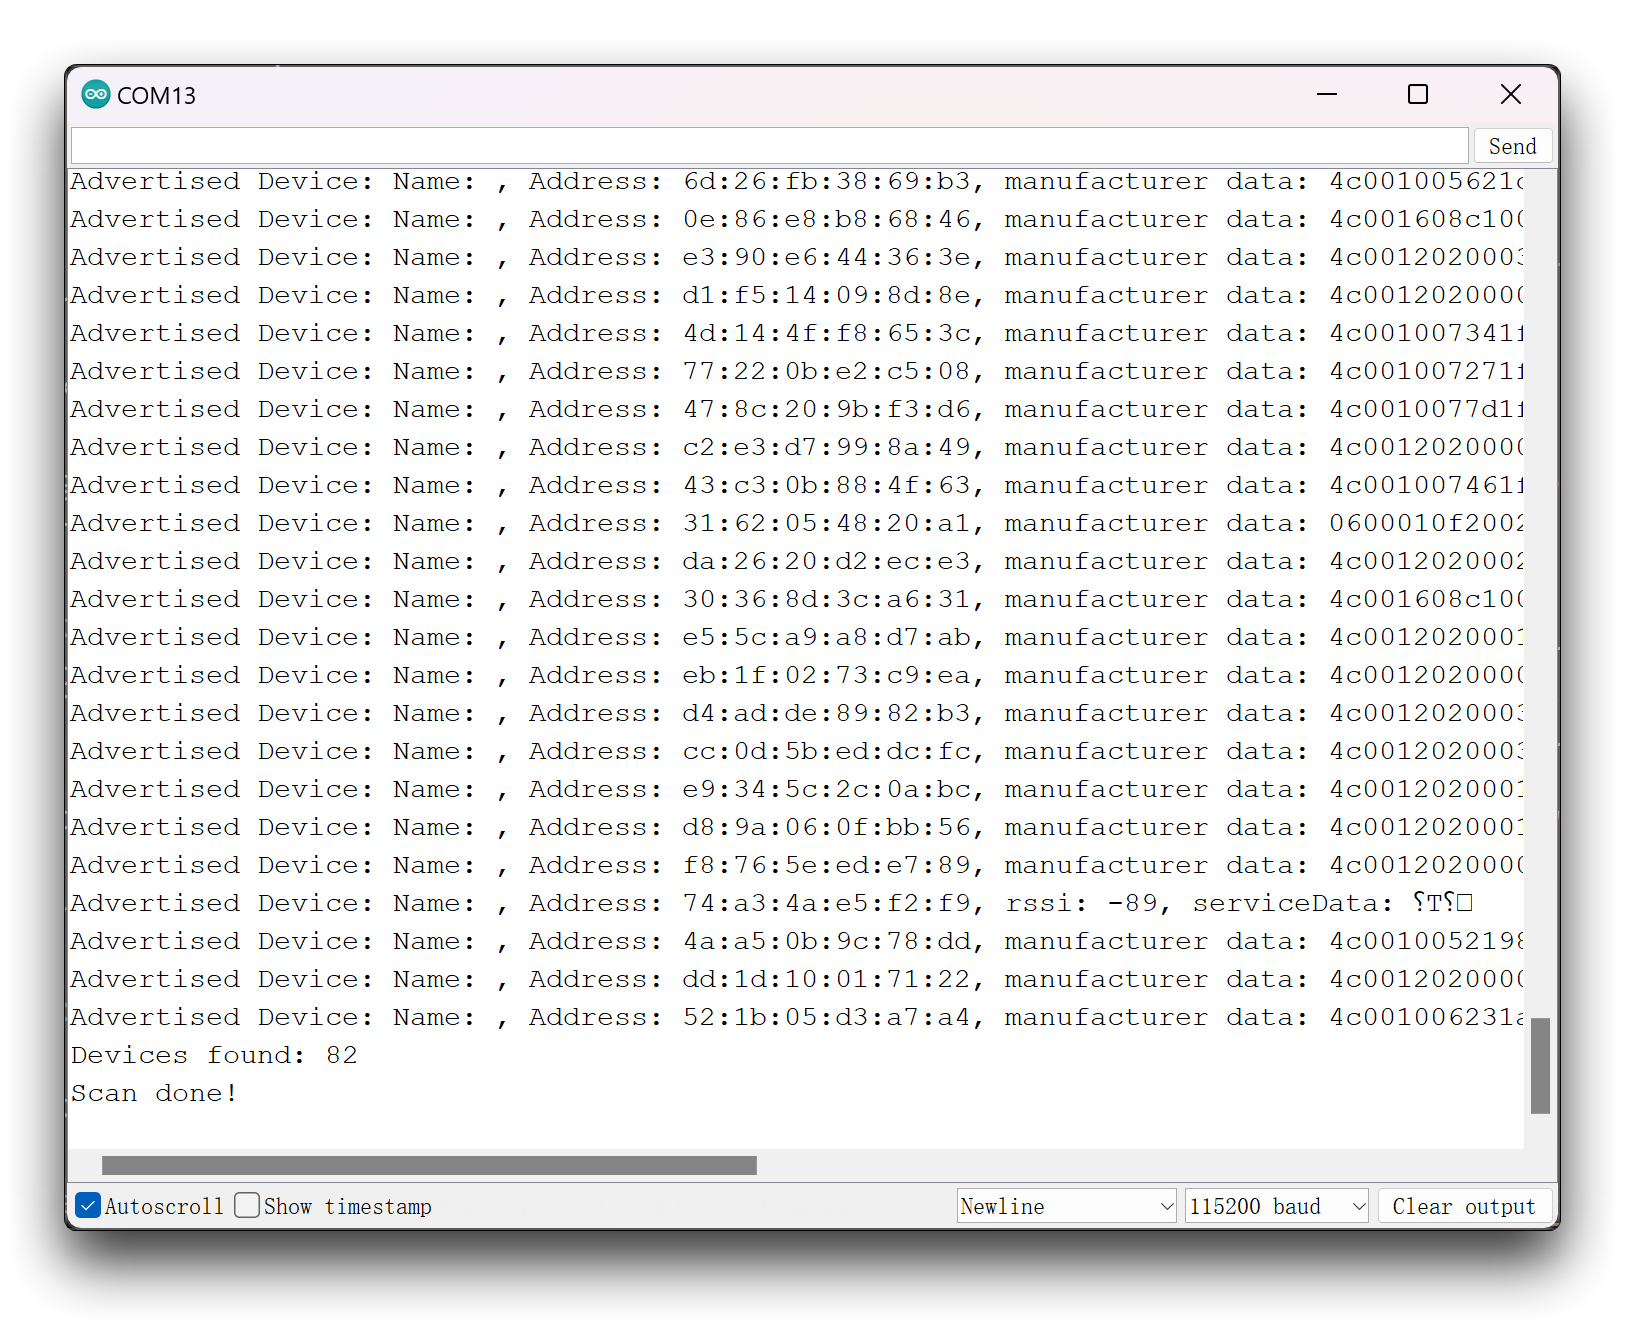
This program prints out the name, MAC address, manufacturer data and signal of the scanned Bluetooth device.
Program annotation
It starts by importing the necessary libraries for the BLE capabilities.
Then defines a class called MyAdvertisedDeviceCallbacks that inherits from the BLEAdvertisedDeviceCallbacks class. It has a function called onResult that is called when an advertised Bluetooth device is found during scanning. The function prints the device's information to the serial port using the Serial.printf function. This class can be used to handle Bluetooth device information during scanning.
class MyAdvertisedDeviceCallbacks: public BLEAdvertisedDeviceCallbacks {
    void onResult(BLEAdvertisedDevice advertisedDevice) {
      Serial.printf("Advertised Device: %s \n", advertisedDevice.toString().c_str());
    }
};
In Setup function, we set up a BLE scan with the specified parameters, including the scan interval and window values. It also initializes the BLE device and sets up a callback function to handle found advertised devices during scanning.
BLEDevice::init("");
pBLEScan = BLEDevice::getScan();
pBLEScan->setAdvertisedDeviceCallbacks(new MyAdvertisedDeviceCallbacks());
pBLEScan->setActiveScan(true);
pBLEScan->setInterval(100);
pBLEScan->setWindow(99);
Finally, loop function starts the BLE scan with the specified scan time and blocking flag. It then prints the number of found devices to the serial port and clears the results buffer to release memory.
BLEScanResults foundDevices = pBLEScan->start(scanTime, false);
Serial.print("Devices found: ");
Serial.println(foundDevices.getCount());
Serial.println("Scan done!");
pBLEScan->clearResults();
BLE server/client
As previously mentioned, XIAO ESP32S3 can act as both a server and a client. Let's take a look at the program as a server and how to use it. After uploading the following program to XIAO, it will act as a server and send a "Hello World" message to all Bluetooth devices connected to XIAO.
//Server Code
#include <BLEDevice.h>
#include <BLEUtils.h>
#include <BLEServer.h>

#define SERVICE_UUID        "4fafc201-1fb5-459e-8fcc-c5c9c331914b"
#define CHARACTERISTIC_UUID "beb5483e-36e1-4688-b7f5-ea07361b26a8"

void setup() {
  Serial.begin(115200);
  Serial.println("Starting BLE work!");

  BLEDevice::init("XIAO_ESP32S3");
  BLEServer *pServer = BLEDevice::createServer();
  BLEService *pService = pServer->createService(SERVICE_UUID);
  BLECharacteristic *pCharacteristic = pService->createCharacteristic(
                                         CHARACTERISTIC_UUID,
                                         BLECharacteristic::PROPERTY_READ |
                                         BLECharacteristic::PROPERTY_WRITE
                                       );

  pCharacteristic->setValue("Hello World");
  pService->start();
  // BLEAdvertising *pAdvertising = pServer->getAdvertising();  // this still is working for backward compatibility
  BLEAdvertising *pAdvertising = BLEDevice::getAdvertising();
  pAdvertising->addServiceUUID(SERVICE_UUID);
  pAdvertising->setScanResponse(true);
  pAdvertising->setMinPreferred(0x06);  // functions that help with iPhone connections issue
  pAdvertising->setMinPreferred(0x12);
  BLEDevice::startAdvertising();
  Serial.println("Characteristic defined! Now you can read it in your phone!");
}

void loop() {
  // put your main code here, to run repeatedly:
  delay(2000);
}
Meanwhile, you can search and download the nRF Connect app in major mobile app stores, which allows your phone to search for and connect to Bluetooth devices.
- Android: nRF Connect
- IOS: nRF Connect
After downloading the software, follow the steps shown below to search for and connect XIAO ESP32S3, and you will see the advertised "Hello World".
 |  |  |  |
If you want to use another XIAO ESP32S3 as a client to receive messages from the server, then you can use the following procedure for the client XIAO.
// Client Code
#include "BLEDevice.h"
//#include "BLEScan.h"

// The remote service we wish to connect to.
static BLEUUID serviceUUID("4fafc201-1fb5-459e-8fcc-c5c9c331914b");
// The characteristic of the remote service we are interested in.
static BLEUUID    charUUID("beb5483e-36e1-4688-b7f5-ea07361b26a8");

static boolean doConnect = false;
static boolean connected = false;
static boolean doScan = false;
static BLERemoteCharacteristic* pRemoteCharacteristic;
static BLEAdvertisedDevice* myDevice;

static void notifyCallback(
  BLERemoteCharacteristic* pBLERemoteCharacteristic,
  uint8_t* pData,
  size_t length,
  bool isNotify) {
    Serial.print("Notify callback for characteristic ");
    Serial.print(pBLERemoteCharacteristic->getUUID().toString().c_str());
    Serial.print(" of data length ");
    Serial.println(length);
    Serial.print("data: ");
    Serial.write(pData, length);
    Serial.println();
}

class MyClientCallback : public BLEClientCallbacks {
  void onConnect(BLEClient* pclient) {
  }

  void onDisconnect(BLEClient* pclient) {
    connected = false;
    Serial.println("onDisconnect");
  }
};

bool connectToServer() {
    Serial.print("Forming a connection to ");
    Serial.println(myDevice->getAddress().toString().c_str());

    BLEClient*  pClient  = BLEDevice::createClient();
    Serial.println(" - Created client");

    pClient->setClientCallbacks(new MyClientCallback());

    // Connect to the remove BLE Server.
    pClient->connect(myDevice);  // if you pass BLEAdvertisedDevice instead of address, it will be recognized type of peer device address (public or private)
    Serial.println(" - Connected to server");
    pClient->setMTU(517); //set client to request maximum MTU from server (default is 23 otherwise)

    // Obtain a reference to the service we are after in the remote BLE server.
    BLERemoteService* pRemoteService = pClient->getService(serviceUUID);
    if (pRemoteService == nullptr) {
      Serial.print("Failed to find our service UUID: ");
      Serial.println(serviceUUID.toString().c_str());
      pClient->disconnect();
      return false;
    }
    Serial.println(" - Found our service");

    // Obtain a reference to the characteristic in the service of the remote BLE server.
    pRemoteCharacteristic = pRemoteService->getCharacteristic(charUUID);
    if (pRemoteCharacteristic == nullptr) {
      Serial.print("Failed to find our characteristic UUID: ");
      Serial.println(charUUID.toString().c_str());
      pClient->disconnect();
      return false;
    }
    Serial.println(" - Found our characteristic");

    // Read the value of the characteristic.
    if(pRemoteCharacteristic->canRead()) {
      std::string value = pRemoteCharacteristic->readValue();
      Serial.print("The characteristic value was: ");
      Serial.println(value.c_str());
    }

    if(pRemoteCharacteristic->canNotify())
      pRemoteCharacteristic->registerForNotify(notifyCallback);

    connected = true;
    return true;
}
/**
 * Scan for BLE servers and find the first one that advertises the service we are looking for.
 */
class MyAdvertisedDeviceCallbacks: public BLEAdvertisedDeviceCallbacks {
 /**
   * Called for each advertising BLE server.
   */
  void onResult(BLEAdvertisedDevice advertisedDevice) {
    Serial.print("BLE Advertised Device found: ");
    Serial.println(advertisedDevice.toString().c_str());

    // We have found a device, let us now see if it contains the service we are looking for.
    if (advertisedDevice.haveServiceUUID() && advertisedDevice.isAdvertisingService(serviceUUID)) {

      BLEDevice::getScan()->stop();
      myDevice = new BLEAdvertisedDevice(advertisedDevice);
      doConnect = true;
      doScan = true;

    } // Found our server
  } // onResult
}; // MyAdvertisedDeviceCallbacks

void setup() {
  Serial.begin(115200);
  Serial.println("Starting Arduino BLE Client application...");
  BLEDevice::init("");

  // Retrieve a Scanner and set the callback we want to use to be informed when we
  // have detected a new device.  Specify that we want active scanning and start the
  // scan to run for 5 seconds.
  BLEScan* pBLEScan = BLEDevice::getScan();
  pBLEScan->setAdvertisedDeviceCallbacks(new MyAdvertisedDeviceCallbacks());
  pBLEScan->setInterval(1349);
  pBLEScan->setWindow(449);
  pBLEScan->setActiveScan(true);
  pBLEScan->start(5, false);
} // End of setup.

// This is the Arduino main loop function.
void loop() {
  // If the flag "doConnect" is true then we have scanned for and found the desired
  // BLE Server with which we wish to connect.  Now we connect to it.  Once we are
  // connected we set the connected flag to be true.
  if (doConnect == true) {
    if (connectToServer()) {
      Serial.println("We are now connected to the BLE Server.");
    } else {
      Serial.println("We have failed to connect to the server; there is nothin more we will do.");
    }
    doConnect = false;
  }

  // If we are connected to a peer BLE Server, update the characteristic each time we are reached
  // with the current time since boot.
  if (connected) {
    String newValue = "Time since boot: " + String(millis()/1000);
    Serial.println("Setting new characteristic value to \"" + newValue + "\"");

    // Set the characteristic's value to be the array of bytes that is actually a string.
    pRemoteCharacteristic->writeValue(newValue.c_str(), newValue.length());
  }else if(doScan){
    BLEDevice::getScan()->start(0);  // this is just example to start scan after disconnect, most likely there is better way to do it in arduino
  }

  delay(1000); // Delay a second between loops.
} // End of loop
If you have already upgrade your ESP32 development board to version 3.0.0 above, you need to change some code to compatible with it.
std::string value = pRemoteCharacteristic->readValue();change toString value = pRemoteCharacteristic->readValue();
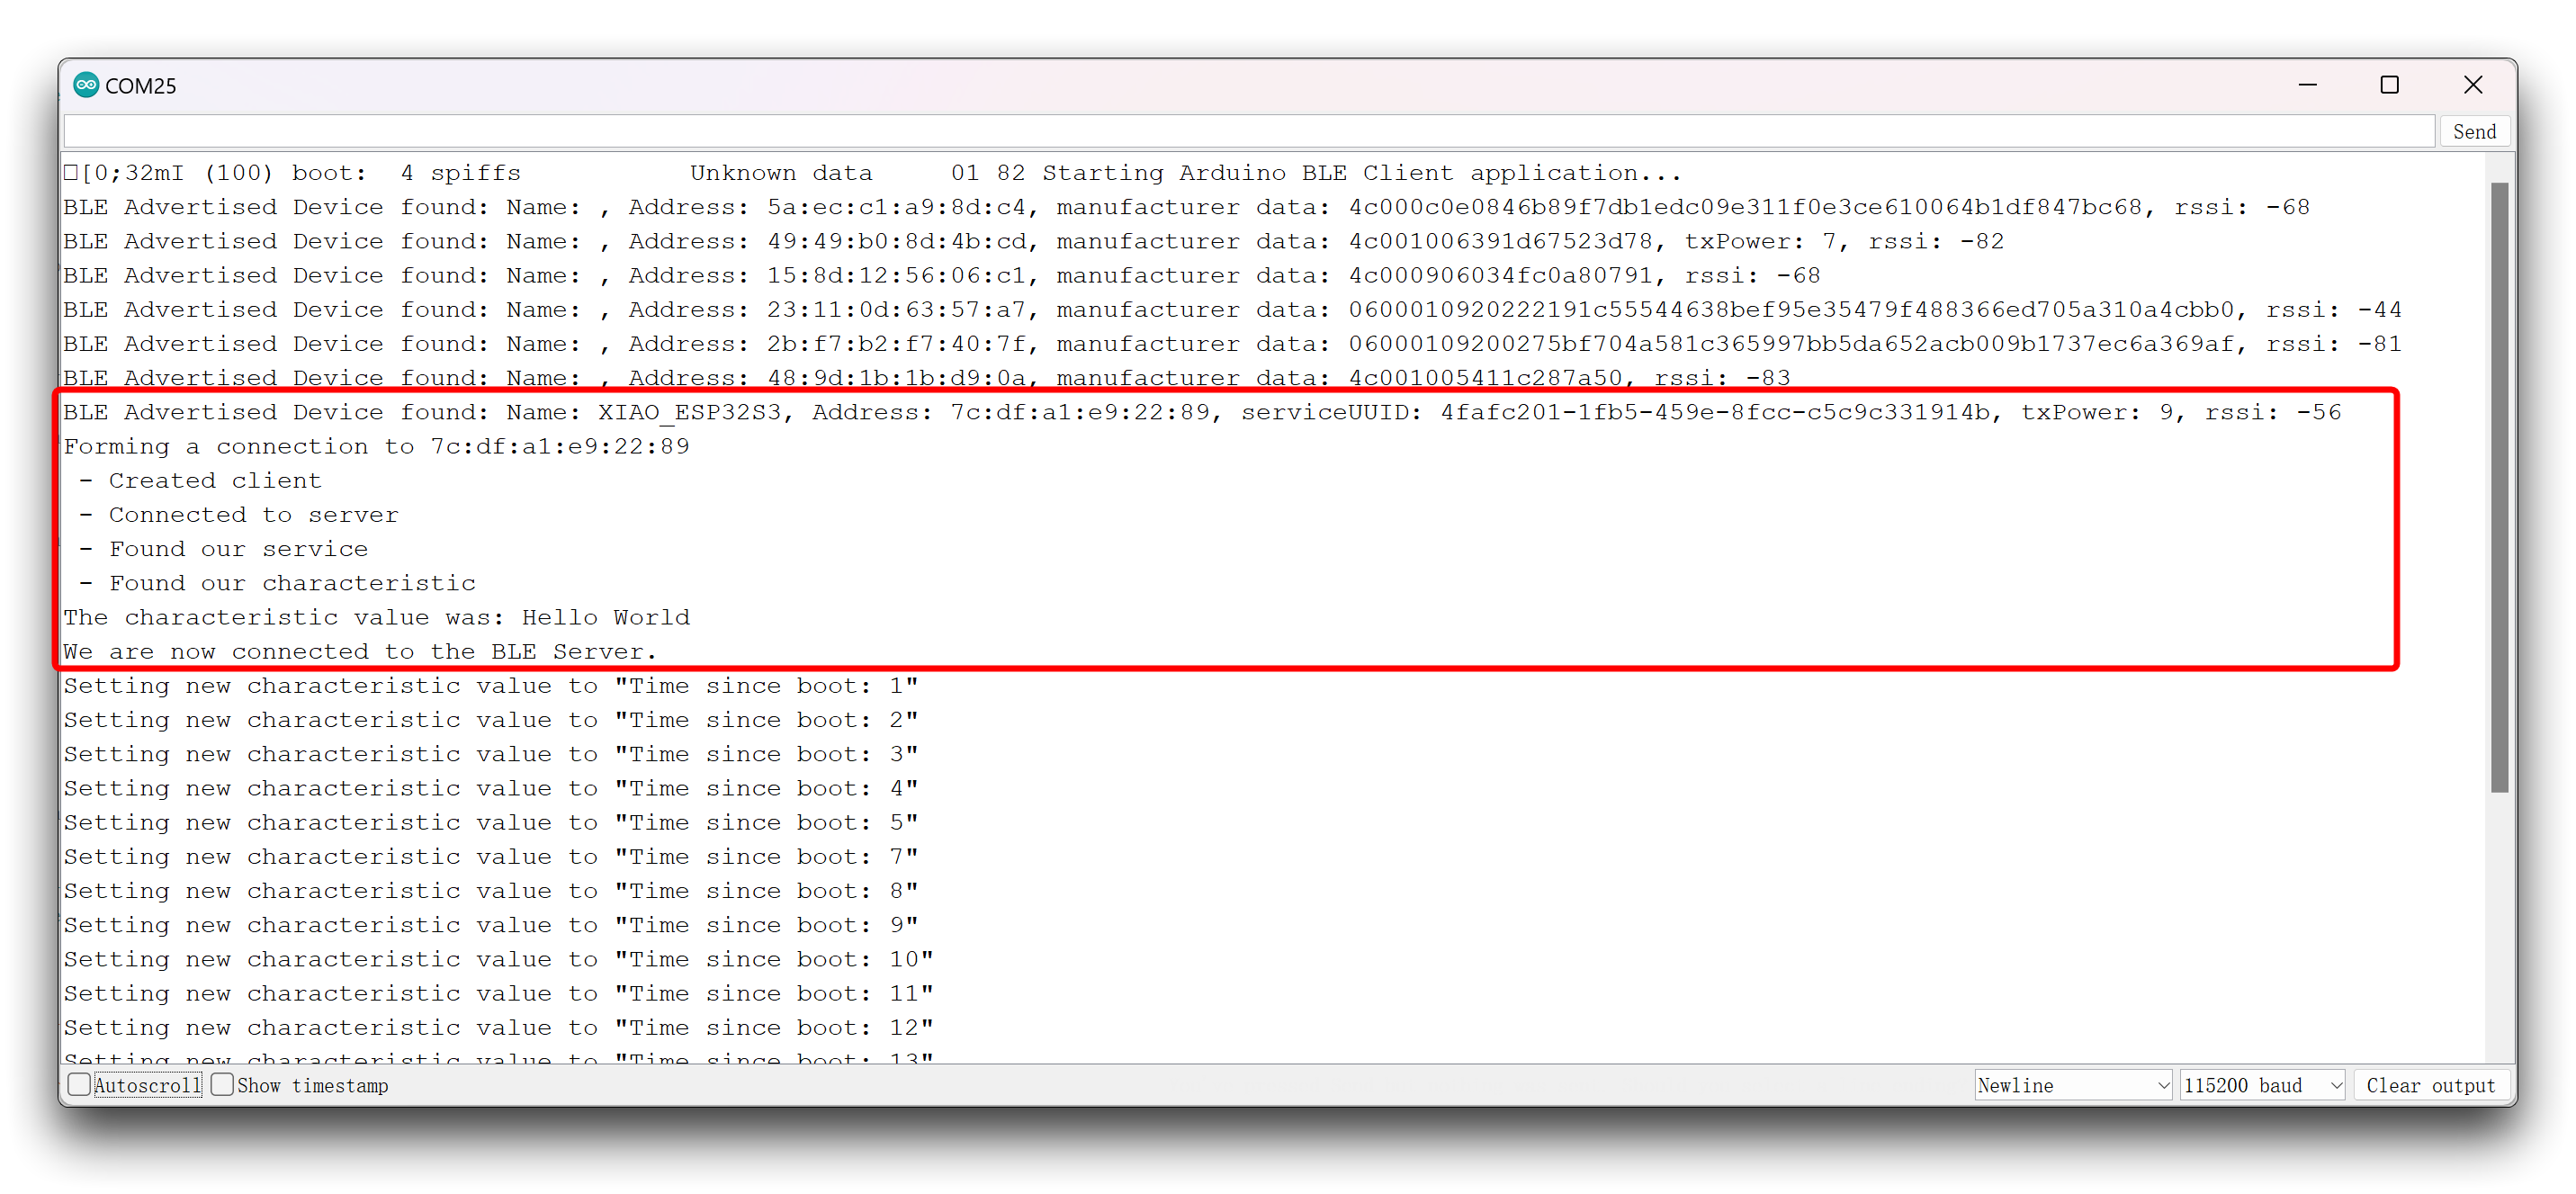
The above program will turn XIAO into a client and search for nearby Bluetooth devices. When the UUID of the Bluetooth device matches the UUID you provided, it will connect to the device and obtain its characteristic value.
Program annotation
Let’s take a quick look at how the BLE server example code works. It starts by importing the necessary libraries for the BLE capabilities. Then, you need to define a UUID for the Service and Characteristic.
#define SERVICE_UUID "4fafc201-1fb5-459e-8fcc-c5c9c331914b"
#define CHARACTERISTIC_UUID "beb5483e-36e1-4688-b7f5-ea07361b26a8"
You can leave the default UUIDs, or you can go to uuidgenerator.net to create random UUIDs for your services and characteristics.
Then, you create a BLE device called “XIAO_ESP32S3”. You can change this name to whatever you like. In the following line, you set the BLE device as a server. After that, you create a service for the BLE server with the UUID defined earlier.
BLEServer *pServer = BLEDevice::createServer();
BLEService *pService = pServer->createService(SERVICE_UUID);
Then, you set the characteristic for that service. As you can see, you also use the UUID defined earlier, and you need to pass as arguments the characteristic’s properties. In this case, it’s: READ and WRITE.
BLECharacteristic *pCharacteristic = pService->createCharacteristic(
                                     CHARACTERISTIC_UUID,
                                     BLECharacteristic::PROPERTY_READ |
                                     BLECharacteristic::PROPERTY_WRITE
                                     );
After creating the characteristic, you can set its value with the setValue() method. In this case we’re setting the value to the text “Hello World”. You can change this text to whatever your like. In future projects, this text can be a sensor reading, or the state of a lamp, for example.
Finally, you can start the service, and the advertising, so other BLE devices can scan and find this BLE device.
BLEAdvertising *pAdvertising = pServer->getAdvertising();
pAdvertising->start();
This is just a simple example on how to create a BLE server. In this code nothing is done in the loop(), but you can add what happens when a new client connects (check the BLE_notify example for some guidance).
BLE Sensor Data Exchange
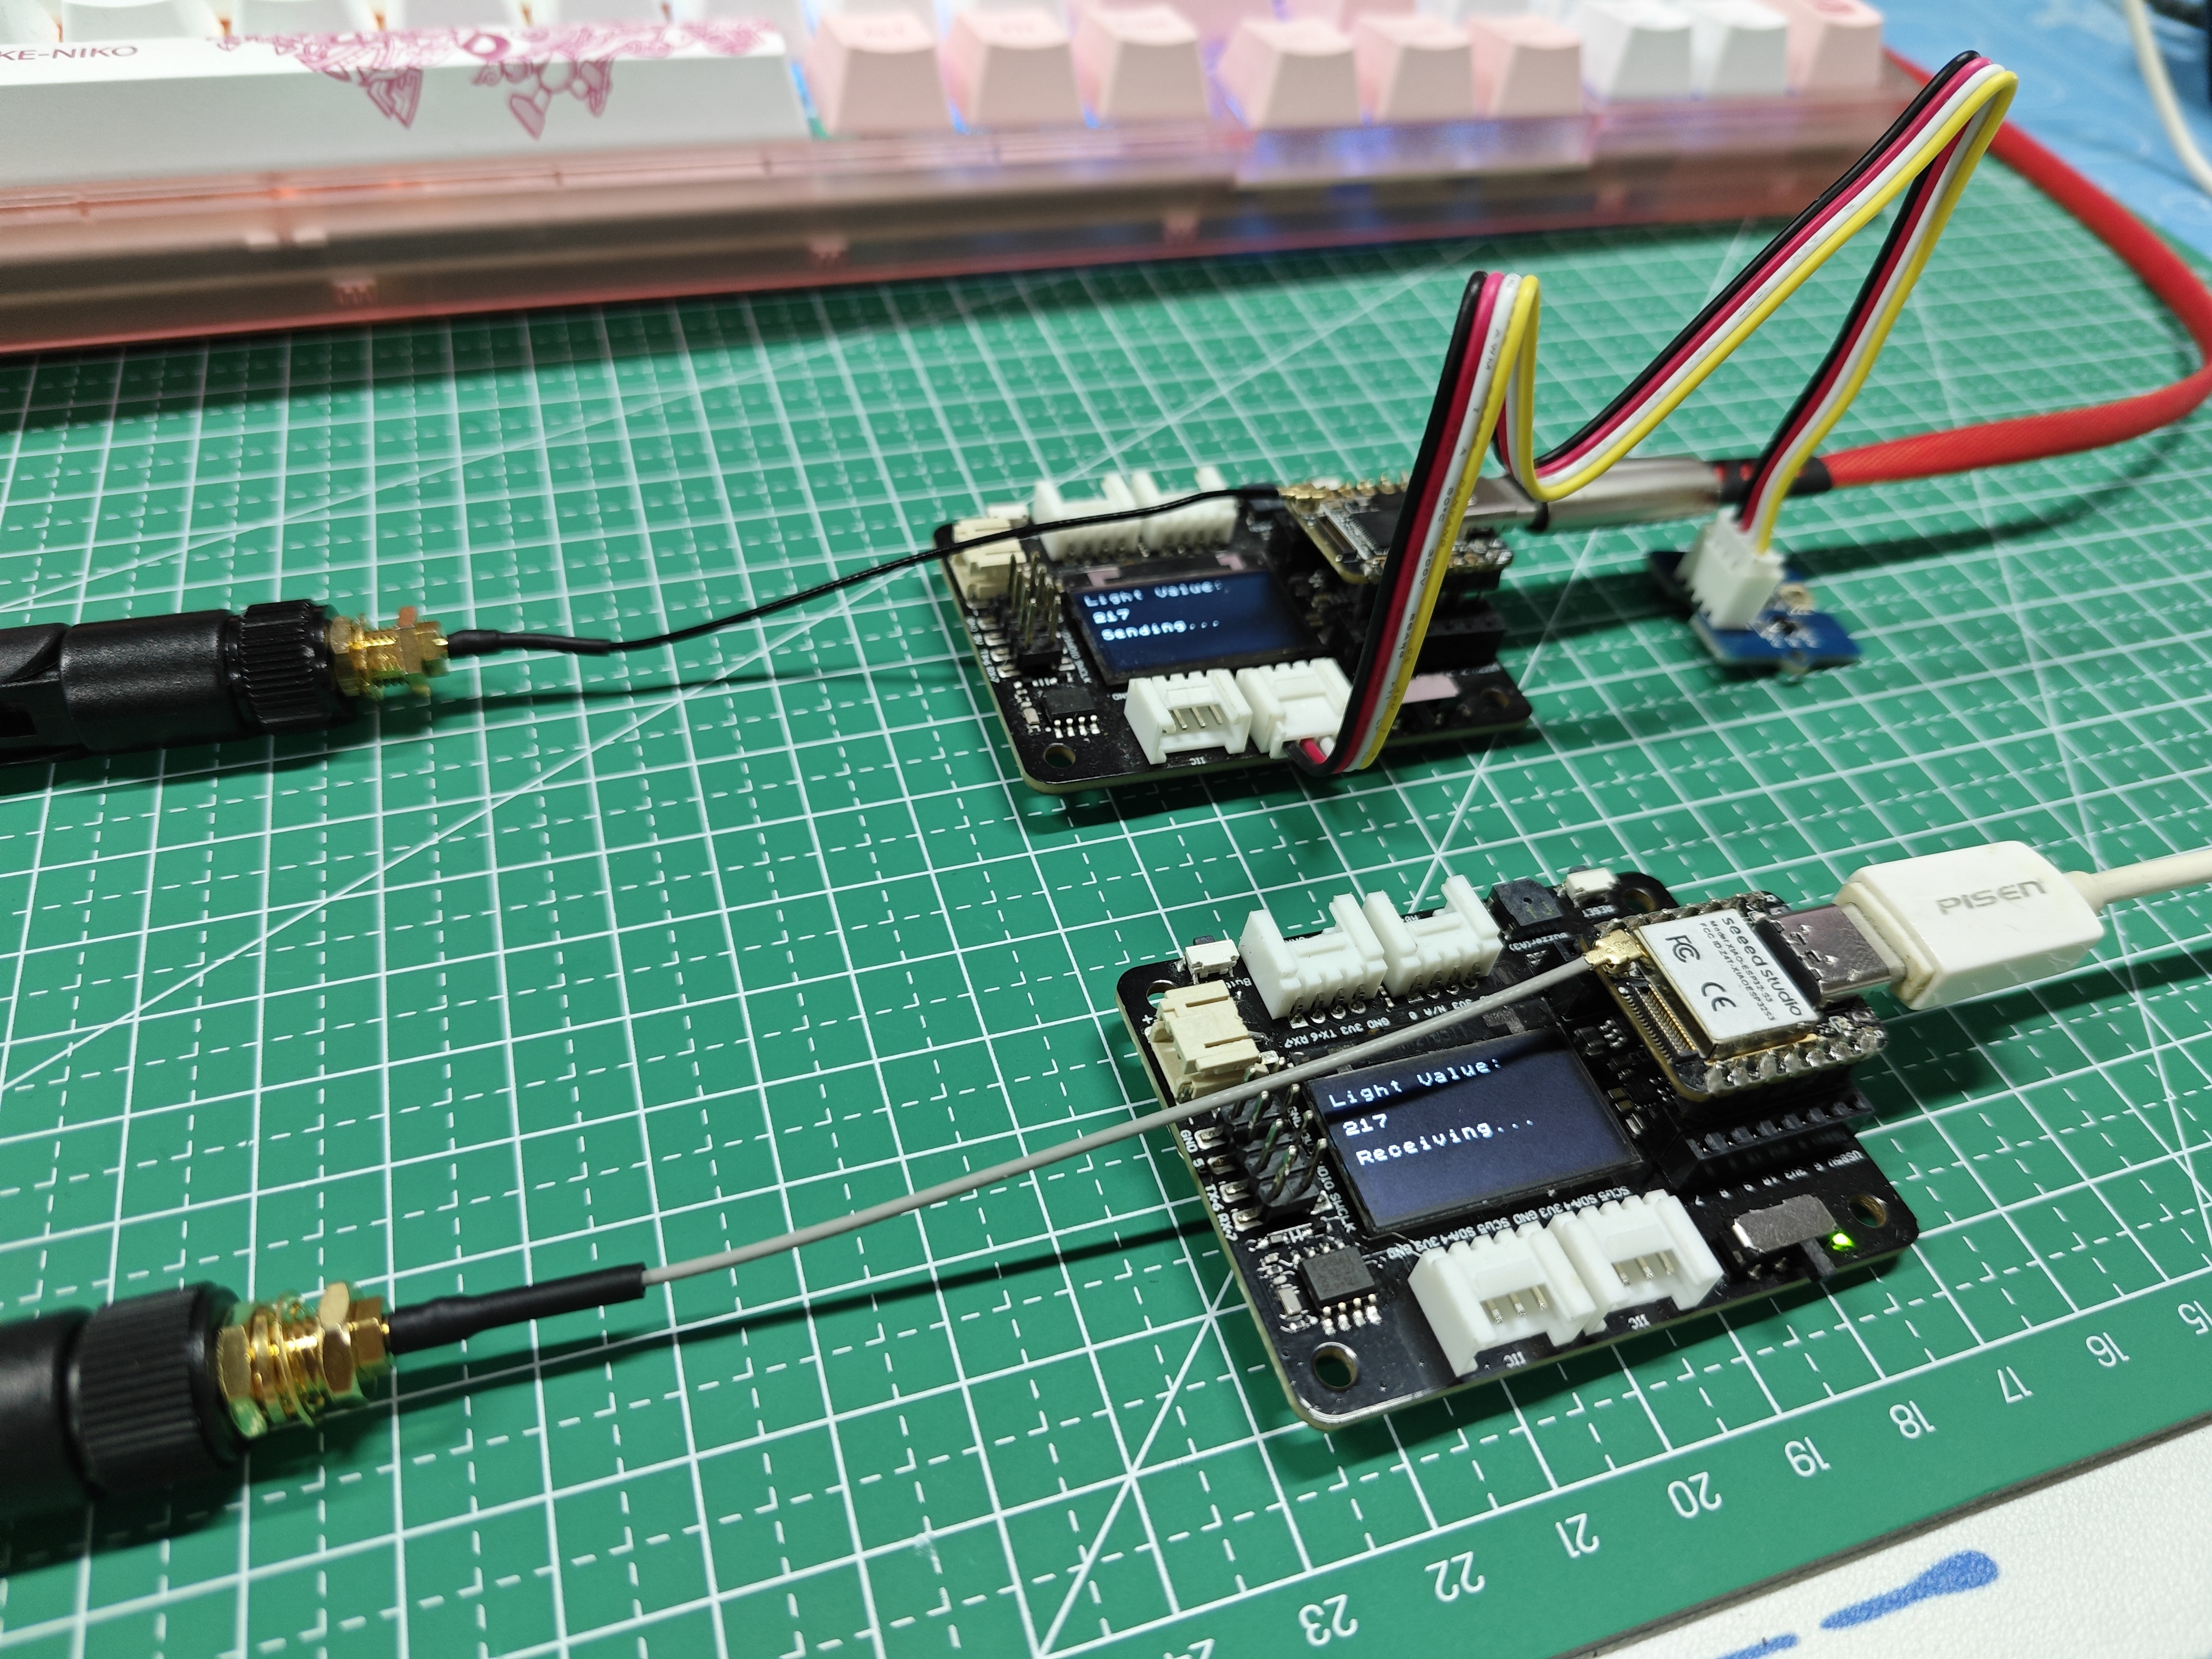
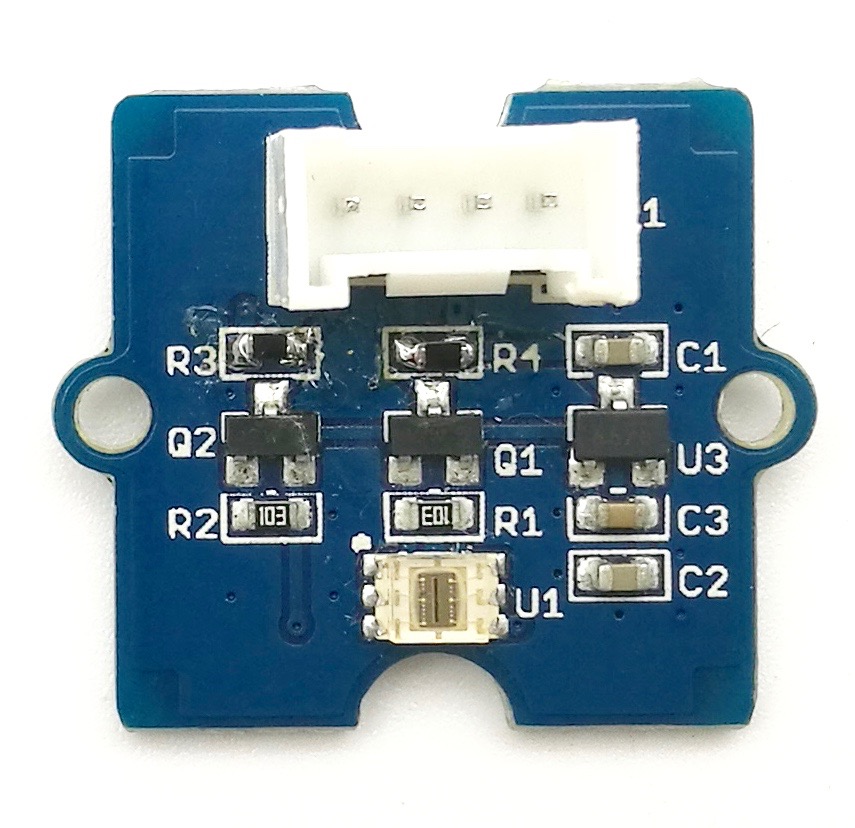
Next, we'll come to the real world to complete a case. In this case, we will have the XIAO ESP32S3 connect to a light intensity sensor and then, via Bluetooth, send the value of the light sensor to another XIAO ESP32S3 and display it on the screen of the expansion board.
For the convenience of wiring, we will use two XIAO expansion boards, the sample program is for reference only, you can choose the product according to the actual project needs.
| Seeed Studio XIAO ESP32S3 | Seeed Studio XIAO ESP32S3 Sense | Seeed Studio Expansion Base for XIAO with Grove OLED | Grove - Digital Light Sensor - TSL2561 |
|---|---|---|---|
| |  |  |
In addition to the above hardware preparation, you may need to prepare the following libraries, download and add them to the Arduino IDE environment.
- Library of OLED displays u8g2:
- Library of Grove - Digital Light Sensor - TSL2561:
We need to prepare two XIAO, one as server and one as client. Here is the sample program as a server. XIAO as a server has the following main tasks.
- First, get the real-time values from the light sensor;
- Second, create the Bluetooth server;
- Third, advertise the light intensity values through Bluetooth;
- Fourth, show the real-time light intensity and sending on the display.
//server
#include <BLEDevice.h>
#include <BLEUtils.h>
#include <BLE2902.h>
#include <BLEServer.h>
#include <Wire.h>
#include <Digital_Light_TSL2561.h>
#include <Arduino.h>
#include <U8x8lib.h>
#include <Wire.h>

// OLEDs without Reset of the Display
U8X8_SSD1306_128X64_NONAME_HW_I2C u8x8(/* clock=*/ SCL, /* data=*/ SDA, /* reset=*/ U8X8_PIN_NONE);

//BLE Server name (the other ESP32 name running the server sketch)
#define bleServerName "XIAOESP32S3_BLE"

BLECharacteristic *pCharacteristic;
bool deviceConnected = false;

int light_val = 0;

class MyServerCallbacks: public BLEServerCallbacks {
  void onConnect(BLEServer* pServer) {
    deviceConnected = true;
  };

  void onDisconnect(BLEServer* pServer) {
    deviceConnected = false;
  }
};

void setup() {
  Serial.begin(115200);

  //OLED display setup
  u8x8.begin();
  u8x8.setFlipMode(1);

  u8x8.setFont(u8x8_font_chroma48medium8_r);
  u8x8.drawString(0, 3, "Starting...");

  Wire.begin();
  TSL2561.init();

  BLEDevice::init(bleServerName);
  BLEServer *pServer = BLEDevice::createServer();
  pServer->setCallbacks(new MyServerCallbacks());

  BLEService *pService = pServer->createService(BLEUUID((uint16_t)0x181A)); // Environmental Sensing
  pCharacteristic = pService->createCharacteristic(
    BLEUUID((uint16_t)0x2A59), // Analog Output
    BLECharacteristic::PROPERTY_NOTIFY
  );
  pCharacteristic->addDescriptor(new BLE2902());

  pService->start();
  BLEAdvertising *pAdvertising = BLEDevice::getAdvertising();
  pAdvertising->addServiceUUID(pService->getUUID());
  pAdvertising->setScanResponse(true);
  pAdvertising->setMinPreferred(0x0);
  pAdvertising->setMinPreferred(0x1F);
  BLEDevice::startAdvertising();
  u8x8.clearDisplay();
}

void loop() {
  if (deviceConnected) {
    light_val = TSL2561.readVisibleLux();
    pCharacteristic->setValue(light_val);
    pCharacteristic->notify();
    u8x8.setFont(u8x8_font_chroma48medium8_r);
    u8x8.setCursor(0, 0);
    u8x8.print("Light Value:");
    u8x8.clearLine(2);
    u8x8.setCursor(0, 2);
    u8x8.print(light_val);
    u8x8.drawString(0, 4, "Sending...");
    delay(10); // bluetooth stack will go into congestion, if too many packets are sent
  }
}
After uploading the program for one of the XIAO, if the program runs smoothly, then you can take out your phone and use the nRF Connect APP to search for the Bluetooth device named XIAOESP32S3_BLE, connect it, and click the button shown below, you will receive the sensor data information.
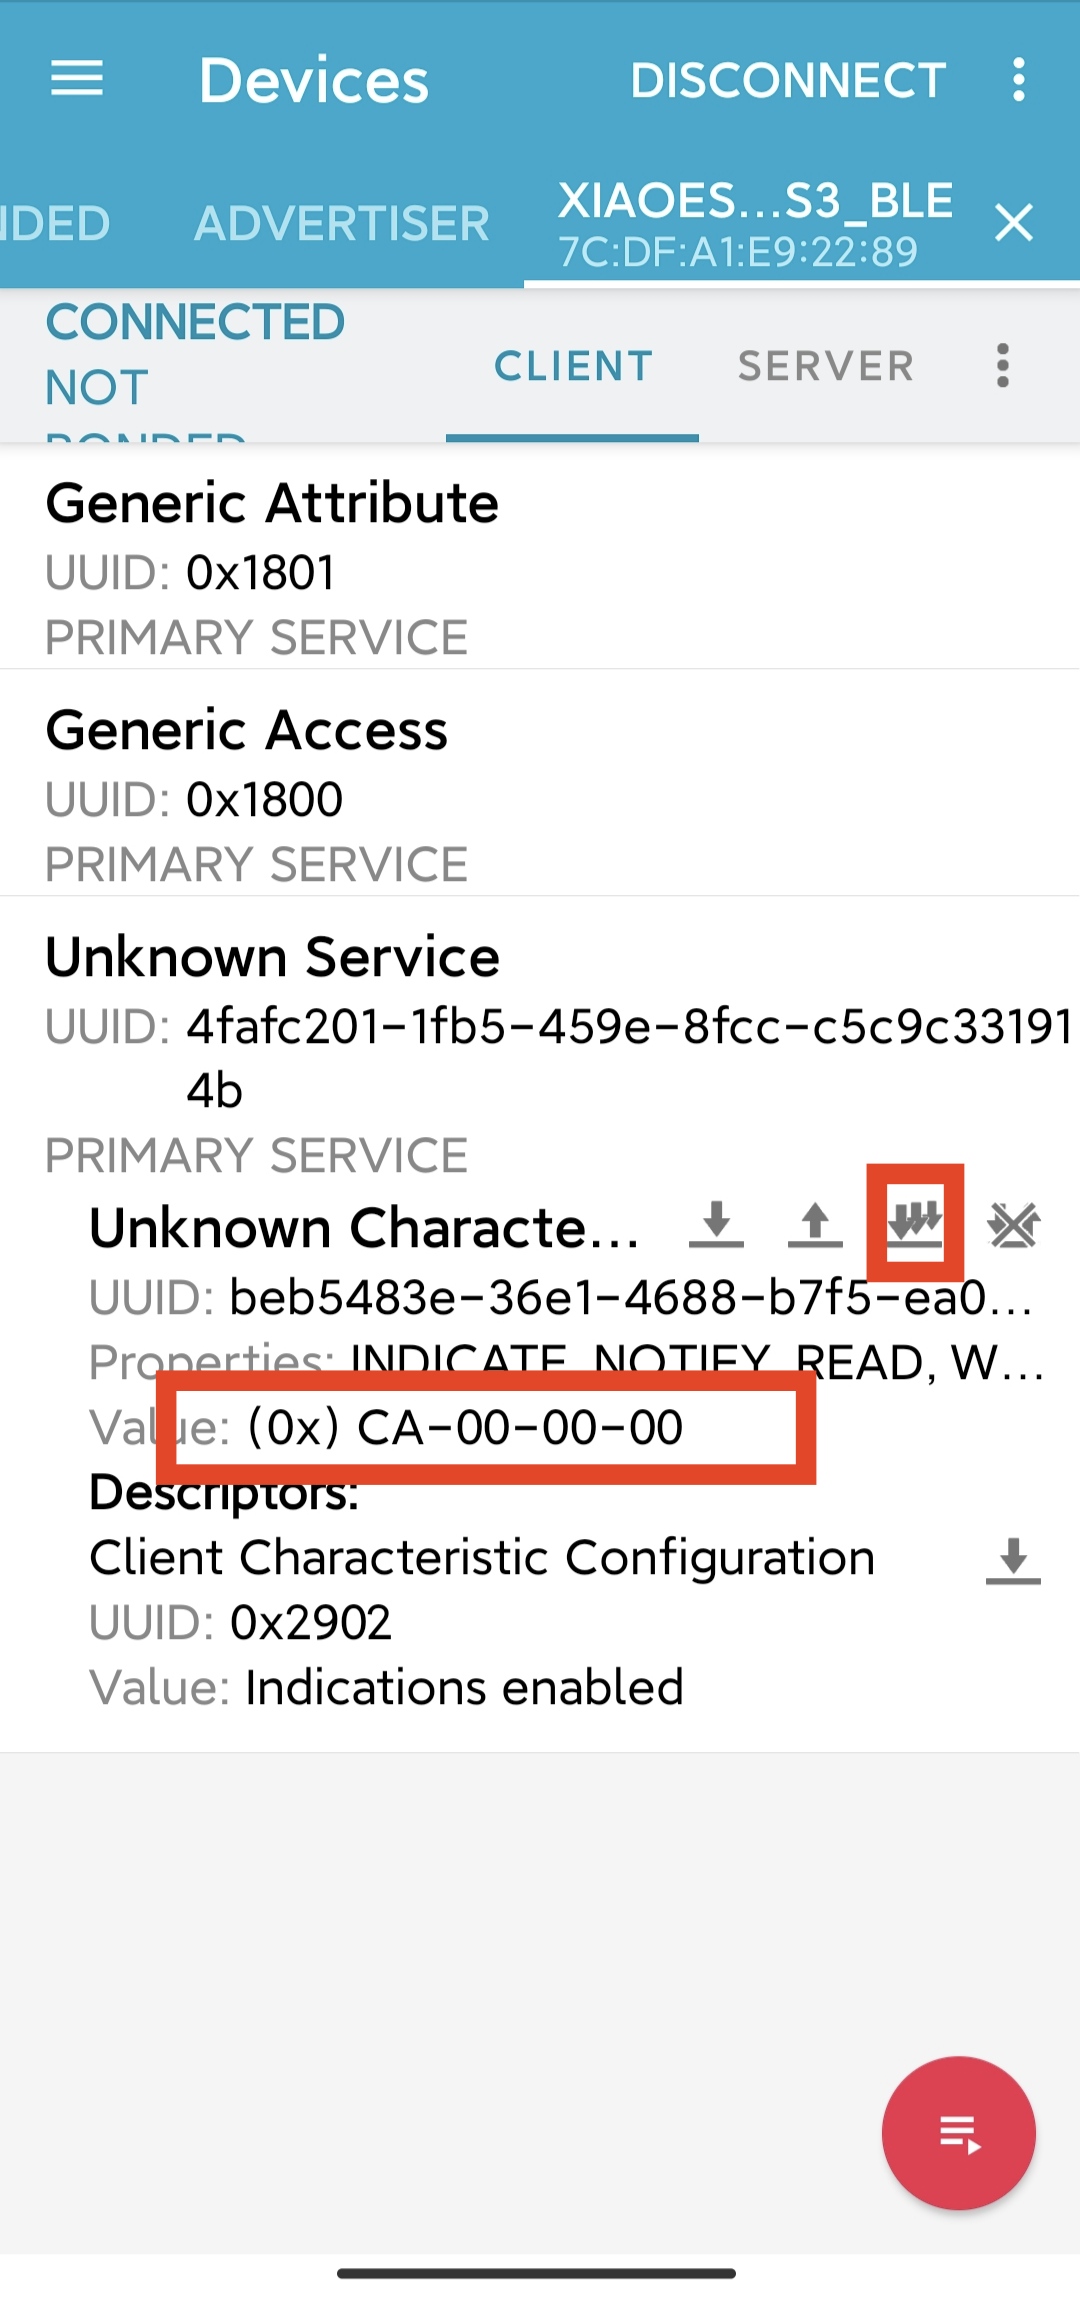
Here you will find that the way we operate the software will not be quite the same as the previous example, because generally speaking, we send a message of the type of sensor, we will choose to use the properties of notify to ensure that the message is efficient.
Next, we need to take out our other XIAO, which acts as a client to collect and display our data.
//client
#include <BLEDevice.h>
#include <BLEUtils.h>
#include <BLEClient.h>
#include <BLEServer.h>
#include <Arduino.h>
#include <U8x8lib.h>
#include <Wire.h>

// OLEDs without Reset of the Display
U8X8_SSD1306_128X64_NONAME_HW_I2C u8x8(/* clock=*/ SCL, /* data=*/ SDA, /* reset=*/ U8X8_PIN_NONE);

BLEClient*  pClient;
bool doconnect = false;

//BLE Server name (the other ESP32 name running the server sketch)
#define bleServerName "XIAOESP32S3_BLE"

//Address of the peripheral device. Address will be found during scanning...
static BLEAddress *pServerAddress;

BLEUUID serviceUUID("181A"); // Environmental Sensing
BLEUUID charUUID("2A59");    // Analog Output

char light_val[1024];

//Callback function that gets called, when another device's advertisement has been received
class MyAdvertisedDeviceCallbacks: public BLEAdvertisedDeviceCallbacks {
  void onResult(BLEAdvertisedDevice advertisedDevice) {
    if (advertisedDevice.getName() == bleServerName) { //Check if the name of the advertiser matches
      advertisedDevice.getScan()->stop(); //Scan can be stopped, we found what we are looking for
      pServerAddress = new BLEAddress(advertisedDevice.getAddress()); //Address of advertiser is the one we need
      Serial.println("Device found. Connecting!");
    }
  }
};

//function that prints the latest sensor readings in the OLED display
void printReadings(){
  u8x8.setFont(u8x8_font_chroma48medium8_r);
  u8x8.setCursor(0, 0);
  u8x8.print("Light Value:");
  u8x8.drawString(0, 2, light_val);
}

void setup() {
  Serial.begin(115200);
  //OLED display setup
  u8x8.begin();
  u8x8.setFlipMode(1);

  u8x8.setFont(u8x8_font_chroma48medium8_r);
  u8x8.drawString(0, 3, "Starting...");

  Serial.println("Starting BLE client...");

  BLEDevice::init("XIAOESP32S3_Client");

  // Retrieve a Scanner and set the callback we want to use to be informed when we
  // have detected a new device.  Specify that we want active scanning and start the
  // scan to run for 30 seconds.
  BLEScan* pBLEScan = BLEDevice::getScan();
  pBLEScan->setAdvertisedDeviceCallbacks(new MyAdvertisedDeviceCallbacks());
  pBLEScan->setActiveScan(true);
  pBLEScan->start(30);

  pClient = BLEDevice::createClient();
  // Connect to the remove BLE Server.
  pClient->connect(*pServerAddress);
  Serial.println(" - Connected to server");

  // Obtain a reference to the service we are after in the remote BLE server.
  BLERemoteService* pRemoteService = pClient->getService(serviceUUID);
  if (pRemoteService == nullptr) {
    u8x8.clearDisplay();
    u8x8.drawString(0, 3, "False UUID");
    Serial.print("Failed to find our service UUID: ");
    Serial.println(serviceUUID.toString().c_str());
    return;
  }

  // Obtain a reference to the characteristics in the service of the remote BLE server.
  BLERemoteCharacteristic* pCharacteristic = pRemoteService->getCharacteristic(charUUID);
  if (pCharacteristic == nullptr) {
    u8x8.clearDisplay();
    u8x8.drawString(0, 3, "False UUID");
    Serial.print("Failed to find our characteristic UUID");
    return;
  }
  Serial.println(" - Found light value characteristics");
  u8x8.clearDisplay();
  u8x8.drawString(0, 3, "Connected!");

  pCharacteristic->registerForNotify([](BLERemoteCharacteristic* pBLERemoteCharacteristic, uint8_t* pData, size_t length, bool isNotify) {
    Serial.println("Notify received");
    Serial.print("Value: ");
    Serial.println(*pData);
    snprintf(light_val, sizeof(light_val), "%d", *pData);
  });

  doconnect = true;
  u8x8.clearDisplay();
  u8x8.drawString(0, 4, "Receiving...");
}

void loop() {
  if (doconnect) {
    BLERemoteService* pRemoteService = pClient->getService(serviceUUID);
    BLERemoteCharacteristic* pCharacteristic = pRemoteService->getCharacteristic(charUUID);
    pCharacteristic->registerForNotify([](BLERemoteCharacteristic* pBLERemoteCharacteristic, uint8_t* pData, size_t length, bool isNotify) {
      Serial.println("Notify received");
      Serial.print("Value: ");
      Serial.println(*pData);
      snprintf(light_val, sizeof(light_val), "%d", *pData);
    });
  }
  printReadings();
  delay(1000);
  u8x8.clearLine(2);
}
When using the above example, we recommend uploading the Server program and making sure it has run successfully before using the Client program. If the program runs smoothly, you will see the following results.
Program annotation
For the above programs, we will pick the more important parts to explain. We'll start with the server program.
At the beginning of the program, we define the name of the Bluetooth server, this name can be the name you set, but you need to remember it because you need to rely on this name to search for this Bluetooth device.
#define bleServerName "XIAOESP32S3_BLE"
In the previous sections of the tutorial, we have talked about that under the server there will be Characteristic, and under Characteristic there will be the values and the rest of the content. So we need to follow this one principle when we create ads.
BLEService *pService = pServer->createService(BLEUUID((uint16_t)0x181A)); // Environmental Sensing
  pCharacteristic = pService->createCharacteristic(
    BLEUUID((uint16_t)0x2A59), // Analog Output
    BLECharacteristic::PROPERTY_NOTIFY
  );
  pCharacteristic->addDescriptor(new BLE2902());
In the above program, you can see that createService() is used to create a server. The parameter is a specific UUID: 0x181A. In the rules of GATT, 0x181A indicates the environmental monitoring type data, and the UUID of the same Characteristic: 0x2A59 also has a special meaning. In GATT, it indicates the analog output. This fits the case of our light sensor values, so here I am defining it as such. You can read here what some of the specific UUIDs that GATT has prepared for us mean.
Of course, you can also set the UUIDs without following the GATT standard, you just need to make sure that these two values are unique and will not affect your client's ability to find the values by recognizing these UUIDs. You can go to uuidgenerator.net to create random UUIDs for your services and characteristics.
The second parameter of the createCharacteristic() function is to set the properties. Note that here we need to set it to PROPERTY_NOTIFY to ensure that the data is sent continuously.
pCharacteristic->setValue(light_val);
pCharacteristic->notify();
Finally, in the loop, we just advertise the value of the read light sensor every 10ms.
The next step is the Client program, which will seem much more complicated.
At the beginning of the program, it's still very familiar content. You need to make sure that this content is consistent with what you have configured on the server side.
//BLE Server name (the other ESP32 name running the server sketch)
#define bleServerName "XIAOESP32S3_BLE"

BLEUUID serviceUUID("181A"); // Environmental Sensing
BLEUUID charUUID("2A59");    // Analog Output
Next we write a callback function, the main function of this function, is to search for a nearby Bluetooth device, then compare it against the Bluetooth device name you provided, capture it, and get its MAC address.
class MyAdvertisedDeviceCallbacks: public BLEAdvertisedDeviceCallbacks {
  void onResult(BLEAdvertisedDevice advertisedDevice) {
    if (advertisedDevice.getName() == bleServerName) { //Check if the name of the advertiser matches
      advertisedDevice.getScan()->stop(); //Scan can be stopped, we found what we are looking for
      pServerAddress = new BLEAddress(advertisedDevice.getAddress()); //Address of advertiser is the one we need
      Serial.println("Device found. Connecting!");
    }
  }
};
The following procedure is the key to find the light intensity value in the server. First, we need to find our server UUID, then look for the Characteristic's UUID under the server, and finally to find the light value. This parsing method is a one-to-one correspondence with the data structure of Bluetooth.
// Obtain a reference to the service we are after in the remote BLE server.
BLERemoteService* pRemoteService = pClient->getService(serviceUUID);
if (pRemoteService == nullptr) {
  Serial.print("Failed to find our service UUID: ");
  Serial.println(serviceUUID.toString().c_str());
  return;
}

// Obtain a reference to the characteristics in the service of the remote BLE server.
BLERemoteCharacteristic* pCharacteristic = pRemoteService->getCharacteristic(charUUID);
if (pCharacteristic == nullptr) {
  Serial.print("Failed to find our characteristic UUID");
  return;
}
Serial.println(" - Found light value characteristics");

pCharacteristic->registerForNotify([](BLERemoteCharacteristic* pBLERemoteCharacteristic, uint8_t* pData, size_t length, bool isNotify) {
    Serial.println("Notify received");
    Serial.print("Value: ");
    Serial.println(*pData);
  });
Finally, the light value is placed in the pointer pData.
The above example gives the simplest example of a single value for a single sensor. If you want to advertise multiple sensors or multiple sensor values via Bluetooth, we recommend you to read the tutorial examples here.
NimBLE-Arduino
Introduction
This library significantly reduces resource usage and improves performance for ESP32 BLE applications as compared with the bluedroid based library. The goal is to maintain, as much as reasonable, compatibility with the original library but but using the NimBLE stack. In addition, this library will be more actively developed and maintained to provide improved capabilities and stability over the original.
For more information you can go to this author's Github link.
Step 1.Add Library
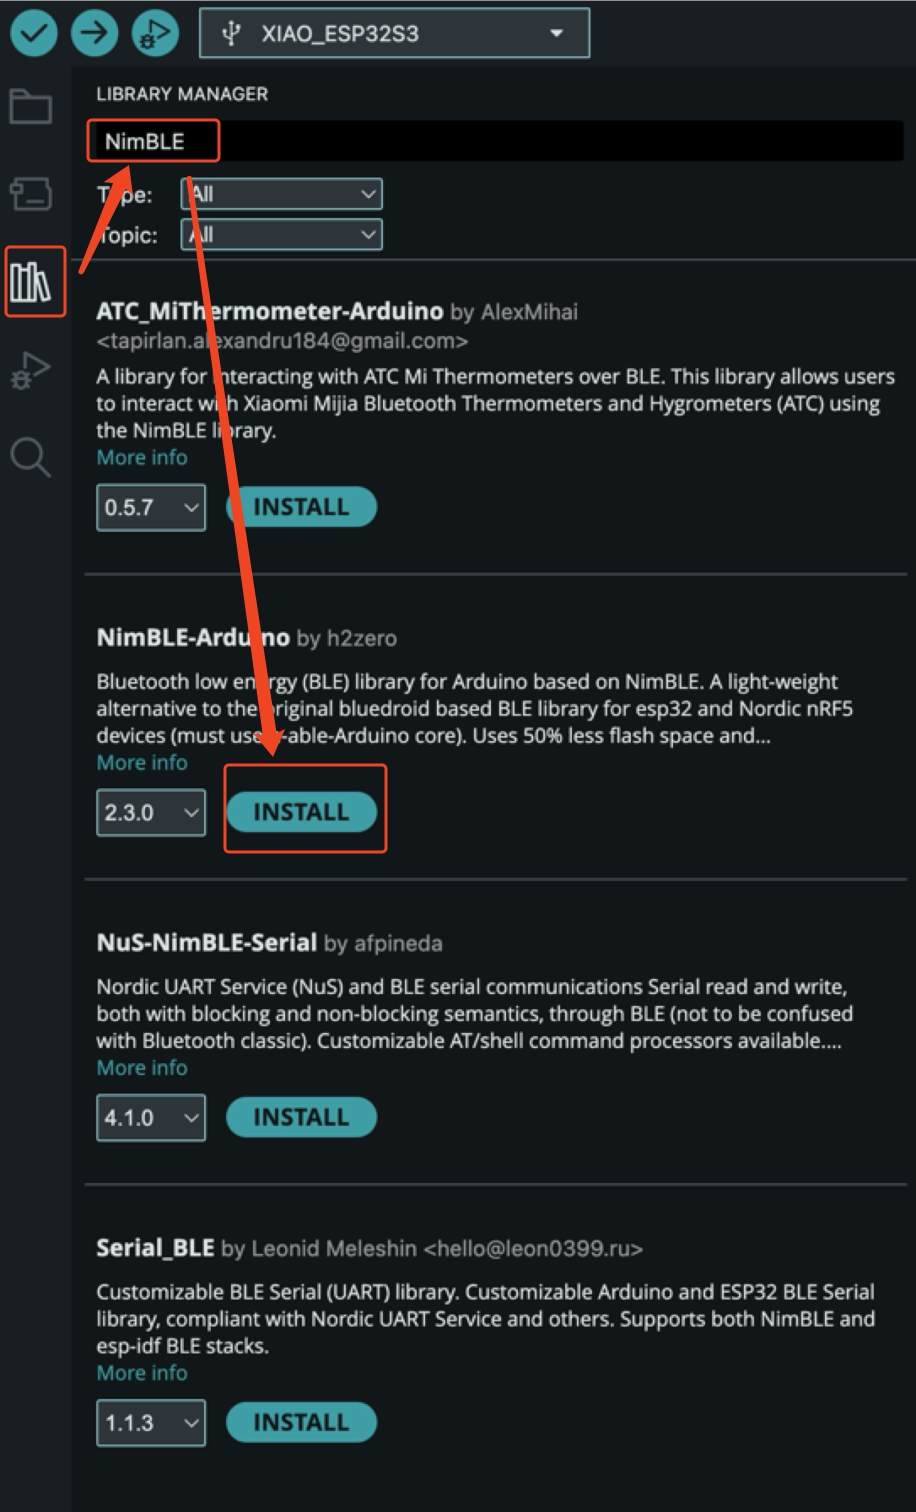
Step 2.Example
Code
#include <Arduino.h>
#include <NimBLEDevice.h>
#include <NimBLEAdvertisedDevice.h>
#include "NimBLEEddystoneTLM.h"
#include "NimBLEBeacon.h"

#define ENDIAN_CHANGE_U16(x) ((((x) & 0xFF00) >> 8) + (((x) & 0xFF) << 8))

int         scanTime = 5 * 1000; // In milliseconds
NimBLEScan* pBLEScan;

class ScanCallbacks : public NimBLEScanCallbacks {
    void onResult(const NimBLEAdvertisedDevice* advertisedDevice) override {
        if (advertisedDevice->haveName()) {
            Serial.print("Device name: ");
            Serial.println(advertisedDevice->getName().c_str());
            Serial.println("");
        }

        if (advertisedDevice->haveServiceUUID()) {
            NimBLEUUID devUUID = advertisedDevice->getServiceUUID();
            Serial.print("Found ServiceUUID: ");
            Serial.println(devUUID.toString().c_str());
            Serial.println("");
        } else if (advertisedDevice->haveManufacturerData() == true) {
            std::string strManufacturerData = advertisedDevice->getManufacturerData();
            if (strManufacturerData.length() == 25 && strManufacturerData[0] == 0x4C && strManufacturerData[1] == 0x00) {
                Serial.println("Found an iBeacon!");
                NimBLEBeacon oBeacon = NimBLEBeacon();
                oBeacon.setData(reinterpret_cast<const uint8_t*>(strManufacturerData.data()), strManufacturerData.length());
                Serial.printf("iBeacon Frame\n");
                Serial.printf("ID: %04X Major: %d Minor: %d UUID: %s Power: %d\n",
                              oBeacon.getManufacturerId(),
                              ENDIAN_CHANGE_U16(oBeacon.getMajor()),
                              ENDIAN_CHANGE_U16(oBeacon.getMinor()),
                              oBeacon.getProximityUUID().toString().c_str(),
                              oBeacon.getSignalPower());
            } else {
                Serial.println("Found another manufacturers beacon!");
                Serial.printf("strManufacturerData: %d ", strManufacturerData.length());
                for (int i = 0; i < strManufacturerData.length(); i++) {
                    Serial.printf("[%X]", strManufacturerData[i]);
                }
                Serial.printf("\n");
            }
            return;
        }

        NimBLEUUID eddyUUID = (uint16_t)0xfeaa;

        if (advertisedDevice->getServiceUUID().equals(eddyUUID)) {
            std::string serviceData = advertisedDevice->getServiceData(eddyUUID);
            if (serviceData[0] == 0x20) {
                Serial.println("Found an EddystoneTLM beacon!");
                NimBLEEddystoneTLM foundEddyTLM = NimBLEEddystoneTLM();
                foundEddyTLM.setData(reinterpret_cast<const uint8_t*>(serviceData.data()), serviceData.length());

                Serial.printf("Reported battery voltage: %dmV\n", foundEddyTLM.getVolt());
                Serial.printf("Reported temperature from TLM class: %.2fC\n", (double)foundEddyTLM.getTemp());
                int   temp     = (int)serviceData[5] + (int)(serviceData[4] << 8);
                float calcTemp = temp / 256.0f;
                Serial.printf("Reported temperature from data: %.2fC\n", calcTemp);
                Serial.printf("Reported advertise count: %d\n", foundEddyTLM.getCount());
                Serial.printf("Reported time since last reboot: %ds\n", foundEddyTLM.getTime());
                Serial.println("\n");
                Serial.print(foundEddyTLM.toString().c_str());
                Serial.println("\n");
            }
        }
    }
} scanCallbacks;

void setup() {
    Serial.begin(115200);
    Serial.println("Scanning...");

    NimBLEDevice::init("Beacon-scanner");
    pBLEScan = BLEDevice::getScan();
    pBLEScan->setScanCallbacks(&scanCallbacks);
    pBLEScan->setActiveScan(true);
    pBLEScan->setInterval(100);
    pBLEScan->setWindow(100);
}

void loop() {
    NimBLEScanResults foundDevices = pBLEScan->getResults(scanTime, false);
    Serial.print("Devices found: ");
    Serial.println(foundDevices.getCount());
    Serial.println("Scan done!");
    pBLEScan->clearResults(); // delete results scan buffer to release memory
    delay(2000);
}
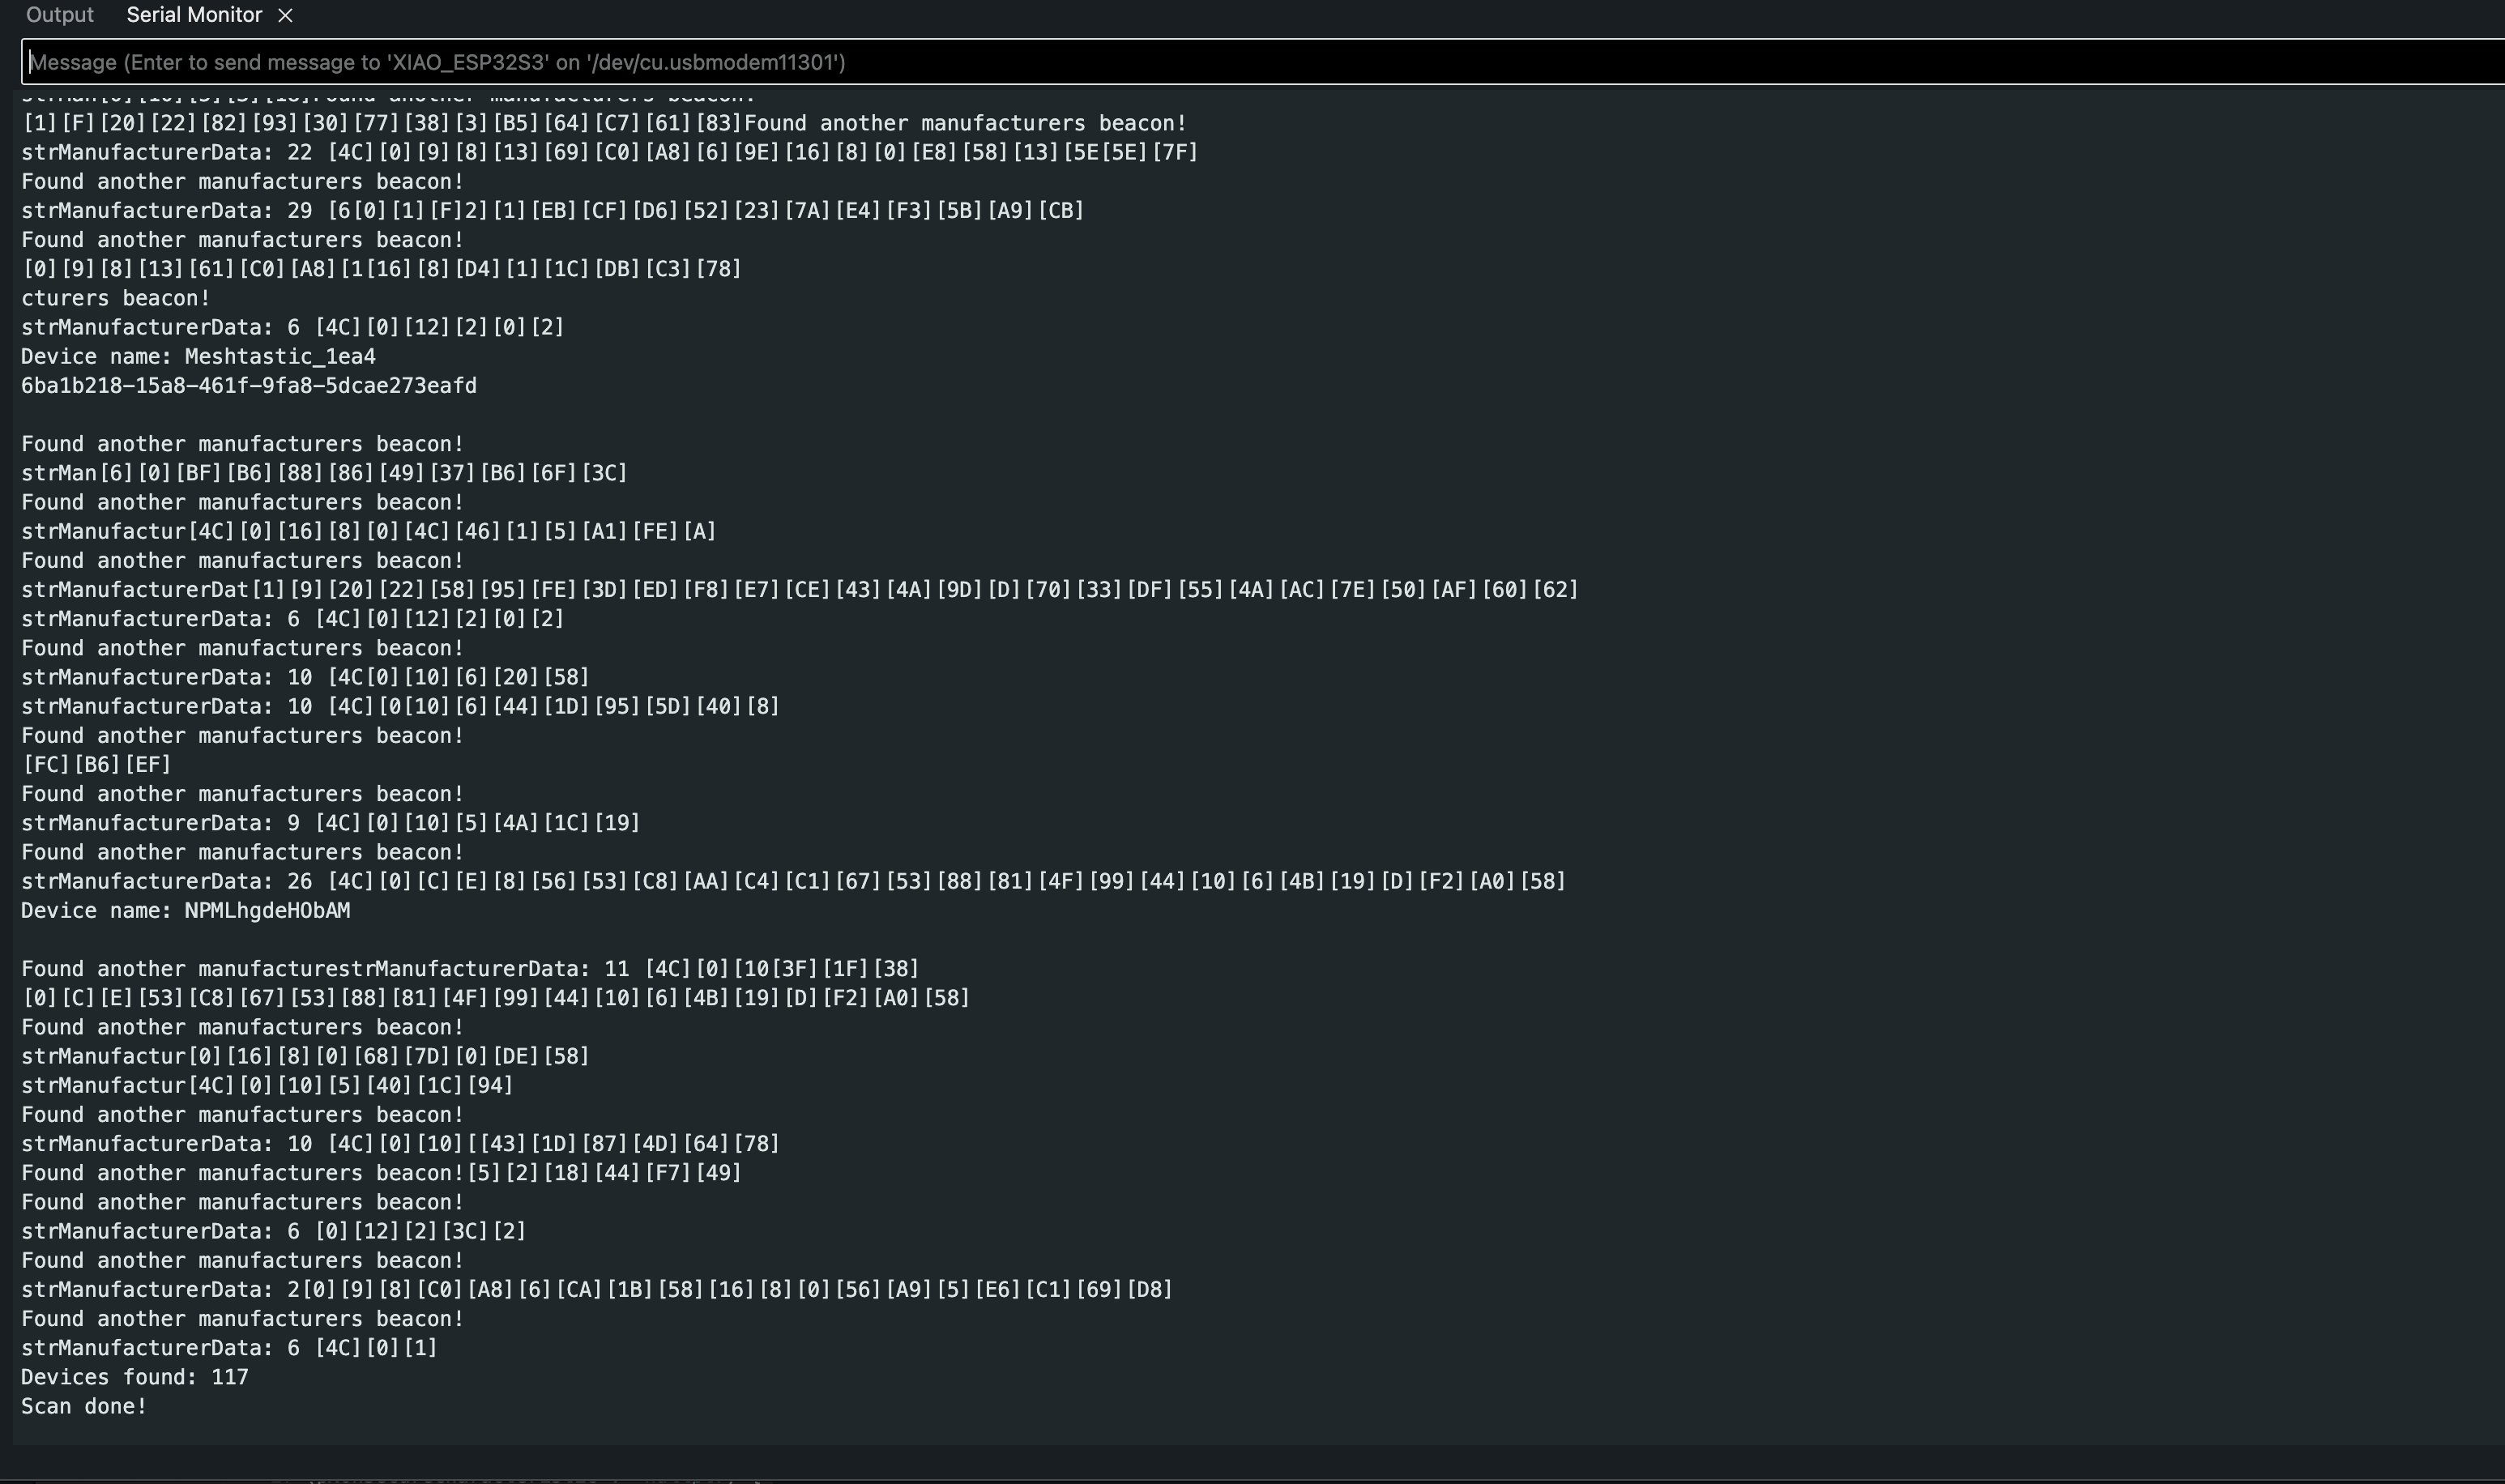
Result
Troubleshooting
Q1: BletoothSerial not available in XIAO ESP32S3 example?
The ESP32-S3 has no Bluetooth Classic hardware in the chip. Only the "old" ESP32 can do it - no other Espressif SoC has BT Classic.
Tech Support & Product Discussion
Thank you for choosing our products! We are here to provide you with different support to ensure that your experience with our products is as smooth as possible. We offer several communication channels to cater to different preferences and needs.