WiFi Usage with Seeed Studio XIAO ESP32S3 (Sense)
| Seeed Studio XIAO ESP32S3 | Seeed Studio XIAO ESP32S3 Sense |
|---|---|
 |  |
The Seeed Studio XIAO ESP32S3 is an embedded development board that boasts outstanding RF performance, thanks to its support for both 2.4GHz Wifi - 802.11b/g/n and Bluetooth Low Energy (BLE) dual wireless communication. This capability enables the XIAO ESP32S3 to provide reliable and high-speed wireless connectivity for a wide range of Internet of Things (IoT) applications. In addition, the board supports U.FL antenna connection, which can extend the communication range to over 100 meters, making it an ideal choice for projects that require long-range wireless connectivity. In this tutorial, we will explore how to leverage the XIAO ESP32S3's Wi-Fi capabilities to connect to a Wi-Fi network and perform basic networking tasks.
Getting Started
Installation of antenna
On the bottom left of the front of XIAO ESP32S3, there is a separate "WiFi/BT Antenna Connector". In order to get better WiFi/Bluetooth signal, you need to take out the antenna inside the package and install it on the connector.
There is a little trick to the installation of the antenna, if you press down hard on it directly, you will find it very difficult to press and your fingers will hurt! The correct way to install the antenna is to put one side of the antenna connector into the connector block first, then press down a little on the other side, and the antenna will be installed.
Remove the antenna is also the case, do not use brute force to pull the antenna directly, one side of the force to lift, the antenna is easy to take off.
If the antenna is not installed, it may not be able to connect to the WiFi network.
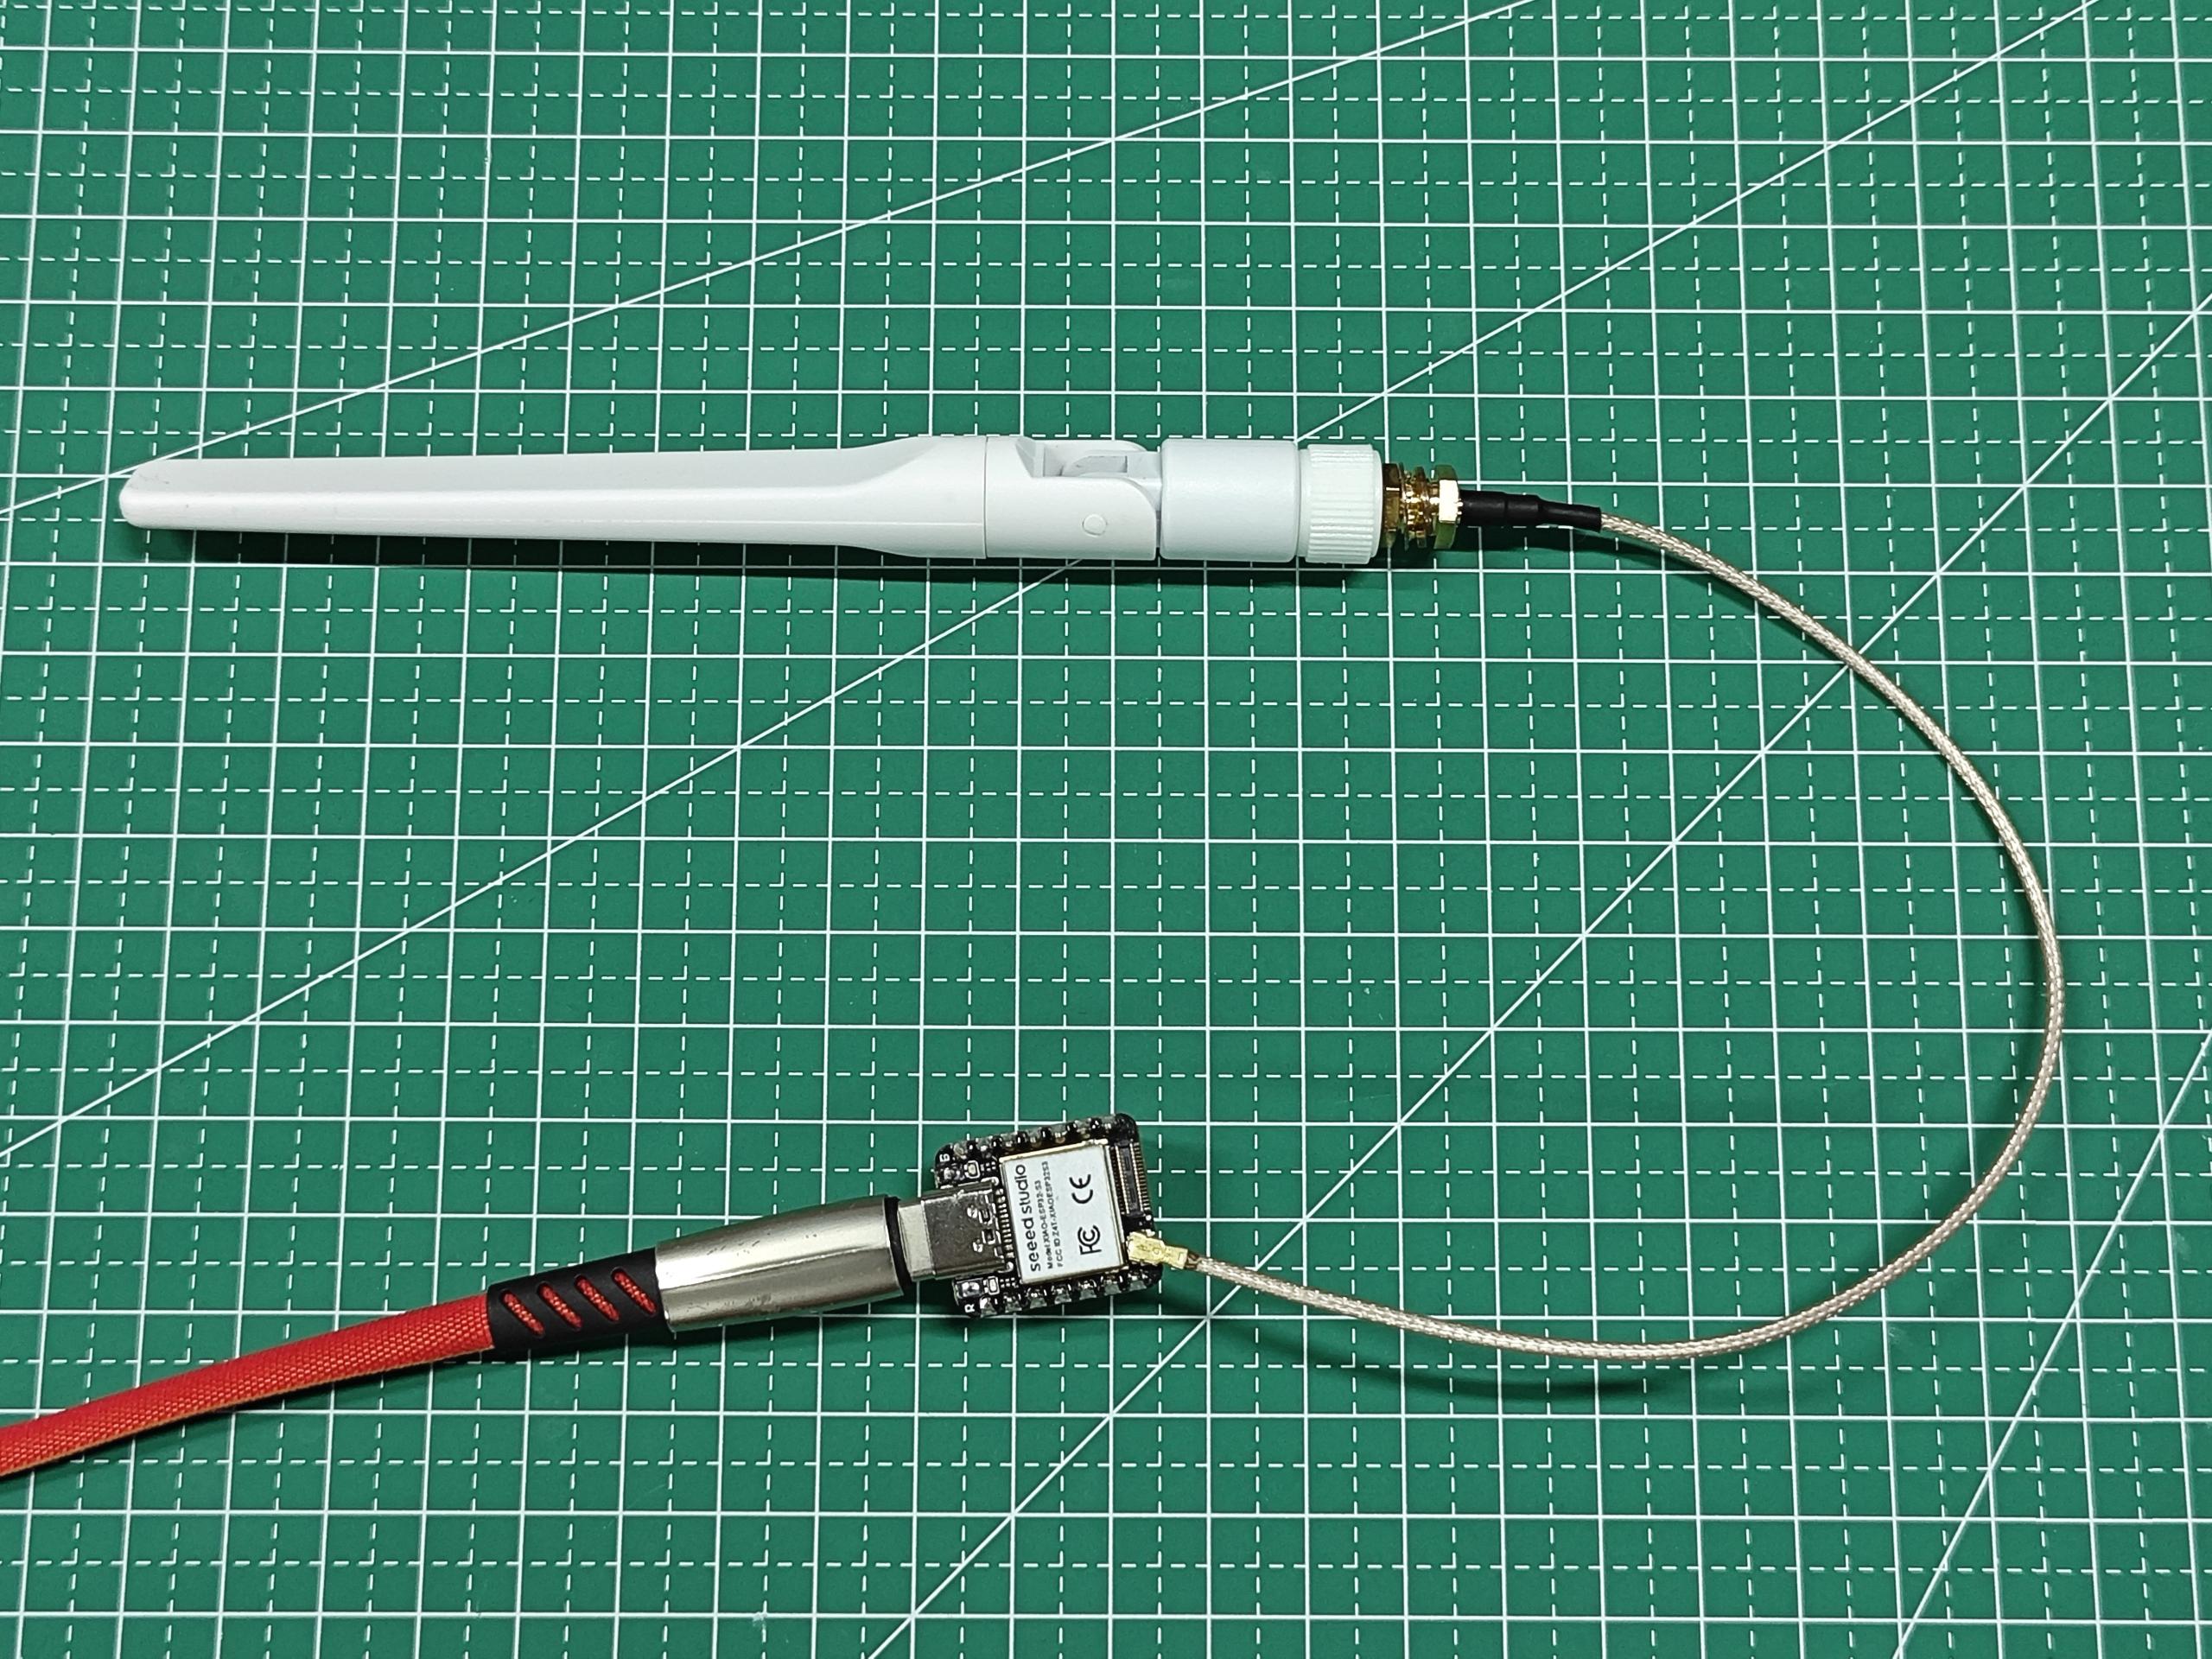
If you have the conditions, I suggest you use the big stick antenna, which will get a better experience.
The commonly interfaces of WiFi library
ESP32-S3 provides a wide range of WiFi network functions. Generally, we can see the functions of the WiFi library in the ESP32's built-in package and choose the corresponding function to achieve the desired functionality. Next, we will list some commonly used interfaces and introduce their usage.
Generic WiFi function
-
WiFiGenericClass::getHostname()-- Is a function in the WiFi library for ESP32 that returns the hostname of the device as a string. The hostname is a unique name that identifies the device on the network. This function retrieves the hostname that was previously set usingWiFiGenericClass::setHostname(). If no hostname has been set, the default hostname will be returned. -
WiFiGenericClass::persistent(bool persistent)-- Is a method that is used to enable or disable the persistent mode of the ESP32 WiFi library. When persistent mode is enabled, the Wi-Fi configuration is stored in non-volatile memory (NVM) and is retained even after a power cycle or reset. When persistent mode is disabled, the configuration is stored in RAM and is lost after a power cycle or reset.- Input Parameters
- persistent: If the argument is true, persistent mode is enabled. If the argument is false, persistent mode is disabled.
- Input Parameters
-
WiFiGenericClass::enableLongRange(bool enable)-- The function is used to enable or disable the Long Range (LR) feature of the WiFi module. When enabled, the LR feature allows the module to connect to WiFi networks that are further away than usual, but with lower data rates.- Input Parameters
- enable: The parameter should be set to true to enable the feature and false to disable it.
- Input Parameters
-
WiFiGenericClass::mode(wifi_mode_t m)-- The function is used to set the WiFi mode of the device.- Input Parameters
- m: The m parameter specifies the mode to set, which can be one of the following constants defined in the wifi_mode_t enum:
- WIFI_MODE_NULL: Disables both WiFi station and access point modes.
- WIFI_MODE_STA: Enables WiFi station mode to connect to an existing WiFi network.
- WIFI_MODE_AP: Enables access point mode to create a new WiFi network.
- WIFI_MODE_APSTA: Enables both WiFi station and access point modes.
- m: The m parameter specifies the mode to set, which can be one of the following constants defined in the wifi_mode_t enum:
- Input Parameters
-
WiFiGenericClass::setSleep(wifi_ps_type_t sleepType)-- The function sets the power-saving mode for the WiFi module.- Input Parameters
- sleepType: The sleepType parameter is an enumerated type that specifies the type of power-saving mode to use. There are three possible sleep types:
- WIFI_PS_NONE: This is the default sleep mode, in which the WiFi module does not go into power-saving mode.
- WIFI_PS_MIN_MODEM: In this mode, the WiFi module shuts down its modem while maintaining the connection to the access point (AP).
- WIFI_PS_MAX_MODEM: In this mode, the WiFi module shuts down both the modem and the station, which results in a disconnection from the AP.
- sleepType: The sleepType parameter is an enumerated type that specifies the type of power-saving mode to use. There are three possible sleep types:
- Input Parameters
STA functions
-
WiFiSTAClass::status()-- Return Connection status.- Output: one of the value defined in wl_status_t.
- WL_NO_SHIELD: This status code indicates that the Wi-Fi module is not present.
- WL_IDLE_STATUS: This status code indicates that the Wi-Fi module is not performing any operation.
- WL_NO_SSID_AVAIL: This status code indicates that no Wi-Fi networks were found during the scan.
- WL_SCAN_COMPLETED: This status code indicates that the Wi-Fi scan has completed successfully.
- WL_CONNECTED: This status code indicates that the ESP32 is successfully connected to a Wi-Fi network.
- WL_CONNECT_FAILED: This status code indicates that the connection to the Wi-Fi network failed.
- WL_CONNECTION_LOST: This status code indicates that the connection to the Wi-Fi network was lost.
- WL_DISCONNECTED: This status code indicates that the ESP32 was previously connected to a Wi-Fi network, but is not currently connected to any network.
- Output: one of the value defined in wl_status_t.
-
WiFiSTAClass::begin(const char* wpa2_ssid, wpa2_auth_method_t method, const char* wpa2_identity, const char* wpa2_username, const char *wpa2_password, const char* ca_pem, const char* client_crt, const char* client_key, int32_t channel, const uint8_t* bssid, bool connect)-- Start Wifi connection with a WPA2 Enterprise AP.- Input Parameters (Optional)
- ssid: Pointer to the SSID string.
- method: The authentication method of WPA2 (WPA2_AUTH_TLS, WPA2_AUTH_PEAP, WPA2_AUTH_TTLS)
- wpa2_identity: Pointer to the entity
- wpa2_username: Pointer to the username
- wpa2_password: Pointer to the password.
- ca_pem: Pointer to a string with the contents of a .pem file with CA cert
- client_crt: Pointer to a string with the contents of a .crt file with client cert
- client_key: Pointer to a string with the contants of a .key file with client key
- channel: Optional. Channel of AP
- bssid: Optional. BSSID / MAC of AP
- connect: Optional. call connect
- Input Parameters (Optional)
-
WiFiSTAClass::reconnect()-- Will force a disconnect and then start reconnecting to AP.- Output: True/False.
-
WiFiSTAClass::disconnect(bool wifioff, bool eraseap)-- Disconnect from the network.-
Input Parameters
- wifioff: wifioff
trueto turn the Wi-Fi radio off. - eraseap: eraseap
trueto erase the AP configuration from the NVS memory.
- wifioff: wifioff
-
Output: True/False.
-
-
WiFiSTAClass::config(IPAddress local_ip, IPAddress gateway, IPAddress subnet, IPAddress dns1, IPAddress dns2)-- Change IP configuration settings disabling the dhcp client.- Input Parameters
- local_ip: Static ip configuration.
- gateway: Static gateway configuration.
- subnet: Static Subnet mask.
- dns1: Static DNS server 1.
- dns2: Static DNS server 2.
- Input Parameters
-
WiFiSTAClass::setAutoConnect(bool autoConnect)-- Deprecated. Setting the ESP32 station to connect to the AP (which is recorded) automatically or not when powered on. Enable auto-connect by default.-
Input Parameters
- autoConnect: autoConnect bool.
-
Output: False.
-
-
WiFiSTAClass::waitForConnectResult(unsigned long timeoutLength)-- Wait for WiFi connection to reach a result.-
Input Parameters
- timeoutLength: The parameter specifies the maximum amount of time to wait for a connection to be established, in milliseconds.
-
Output: one of the value defined in wl_status_t.
-
-
WiFiSTAClass::localIP()-- Get the station interface IP address.- Output: IPAddress station IP.
-
WiFiSTAClass::macAddress(uint8_t* mac)-- Get the station interface MAC address.-
Input Parameters
- mac (Optional): Pointer to uint8_t array with length WL_MAC_ADDR_LENGTH.
-
Output: Pointer to uint8_t *.
-
-
WiFiSTAClass::SSID()-- Return the current SSID associated with the network.- Output: SSID.
-
WiFiSTAClass::RSSI(void)-- Return the current network RSSI.- Output: RSSI.
AP functions
-
WiFiAPClass::softAP(const char* ssid, const char* passphrase, int channel, int ssid_hidden, int max_connection, bool ftm_responder)-- This is a function in the WiFi library of ESP32-S3. It is used to set up a SoftAP (software access point), which allows other devices to connect to the ESP32-S3 and access its resources.-
Input Parameters
- ssid: Pointer to the SSID (max 63 char).
-
passphrase: (For WPA2 min 8 char, for open use NULL).
-
channel: WiFi channel number, 1 - 13.
-
ssid_hidden: Network cloaking (0 = broadcast SSID, 1 = hide SSID).
-
max_connection: Max simultaneous connected clients, 1 - 4.
-
Output: True/False.
-
-
WiFiAPClass::softAPgetStationNum()-- Get the count of the Station / client that are connected to the softAP interface.- Output: Stations count.
-
WiFiAPClass::softAPConfig(IPAddress local_ip, IPAddress gateway, IPAddress subnet, IPAddress dhcp_lease_start)-- A function for configuring SoftAP.-
Input Parameters
- local_ip: Access point IP.
- gateway: Gateway IP.
- subnet: Subnet mask.
-
Output: True/False.
-
-
WiFiAPClass::softAPIP()-- Get the softAP interface IP address.- Output: IPAddress softAP IP.
-
WiFiAPClass::softAPmacAddress(uint8_t* mac)-- Get the softAP interface MAC address.-
Input Parameters
- mac (Optional): Pointer to uint8_t array with length WL_MAC_ADDR_LENGTH.
-
Output: Pointer to uint8_t* or String mac.
-
WiFi Scan Function
-
WiFiScanClass::scanNetworks(bool async, bool show_hidden, bool passive, uint32_t max_ms_per_chan, uint8_t channel, const char * ssid, const uint8_t * bssid)-- Start scan WiFi networks available.-
Input Parameters
- async: The parameter is a boolean value that determines if the scan should be performed asynchronously. If set to true, the function returns immediately and the scan results can be obtained later by calling the getScanResults() function. If set to false, the function will block until the scan is complete.
- show_hidden: The parameter is a boolean value that determines if the function should include hidden networks in the scan results.
- passive: The parameter is a boolean value that determines if the function should perform a passive scan. If set to true, the function will not transmit any packets during the scan, which may take longer but can be useful in certain situations.
- max_ms_per_chan: The parameter is the maximum time to spend scanning each channel in milliseconds.
- channel: The parameter is the Wi-Fi channel to scan. If set to 0, the function will scan all available channels.
- ssid: The parameter is a pointer to a null-terminated string containing the SSID of the network to scan for. If set to nullptr, the function will scan for all available networks.
- bssid: The parameter is a pointer to a 6-byte array containing the MAC address of the access point to scan for. If set to nullptr, the function will scan for all access points.
-
Output: The return value of this function is an integer indicating the number of networks scanned.
-
-
WiFiScanClass::getNetworkInfo(uint8_t i, String &ssid, uint8_t &encType, int32_t &rssi, uint8_t* &bssid, int32_t &channel)-- Loads all infos from a scanned wifi in to the ptr parameters.-
Input Parameters
- i: The function is used to retrieve information about a scanned network at a specified index i.
- ssid: The ssid parameter is a reference to a String variable where the function stores the SSID of the network.
- encType: The encType parameter is a reference to a uint8_t variable where the function stores the encryption type of the network (0 = open, 1 = WEP, 2 = WPA_PSK, 3 = WPA2_PSK, 4 = WPA_WPA2_PSK).
- rssi: The rssi parameter is a reference to an int32_t variable where the function stores the received signal strength indication (RSSI) of the network.
- bssid: The bssid parameter is a reference to a uint8_t* pointer where the function stores the BSSID (MAC address) of the network.
- channel: The channel parameter is a reference to an int32_t variable where the function stores the channel number of the network.
-
Output: True/False.
-
-
WiFiScanClass::SSID(uint8_t i)-- Return the SSID discovered during the network scan.-
Input Parameters
- i: Specify from which network item want to get the information.
-
Output: SSID string of the specified item on the networks scanned list.
-
-
WiFiScanClass::RSSI(uint8_t i)-- Return the RSSI of the networks discovered during the scanNetworks.-
Input Parameters
- i: Specify from which network item want to get the information.
-
Output: Signed value of RSSI of the specified item on the networks scanned list.
-
WiFi Client functions
-
WiFiClient::connect(IPAddress ip, uint16_t port, int32_t timeout)-- This function is used in the WiFiClient library to connect to a remote IP address and port with a specified timeout value.- Input Parameters
- ip: The IP address of the server to connect to.
- port: The port number of the server to connect to.
- timeout (Optional): The maximum time to wait for the connection to be established, in milliseconds. If the connection is not established within this time, the function will return an error. If timeout is set to 0, the function will wait indefinitely for the connection to be established.
- Input Parameters
-
WiFiClient::stop()-- The function is used to disconnect the client from the server and release the socket/port used by the client. Once the function is called, the client can no longer send or receive data. -
WiFiClient::setTimeout(uint32_t seconds)-- The function sets the maximum number of seconds the client will wait for a connection to be established or data to be received. If the connection or data transfer takes longer than the specified timeout, the connection will be closed.- Input Parameters
- seconds: The number of seconds for the timeout.
- Input Parameters
-
WiFiClient::write(uint8_t data)-- Write a single byte of data to the connected server through the WiFiClient instance. OrWiFiClient::write(const uint8_t *buf, size_t size).- Input Parameters
- data: Is a single byte of data that needs to be sent over the established network connection.
- Input Parameters
-
WiFiClient::read()-- The function reads a single byte of incoming data from the connected server. It returns the byte read as an integer value. If no data is available, it returns -1. Orread(uint8_t *buf, size_t size).- Output: An integer value indicating the number of bytes received. If the return value is 0, it means that the server has closed the connection.
-
WiFiClient::peek()-- The function is used to check if there is any data available to be read from the server without actually reading it.- Output: It returns the next byte of incoming data without removing it from the receive buffer. If no data is available, it returns -1.
-
WiFiClient::available()-- The function is used to check how many bytes of data are available to be read from the server.- Output: It returns an integer value representing the number of bytes available to be read.
WiFi Server function
-
WiFiServer::stopAll()-- This function is a method of the WiFiServer class in the Arduino WiFi library. This method stops all server instances that are created using the WiFiServer class. It is useful when you want to stop all servers at once instead of callingstop()method for each instance individually. -
WiFiServer::begin(uint16_t port, int enable)-- The function is used to start a server on the specified port. The server will listen for incoming client connections.- Input Parameters
- port: The port number to listen on.
- enable (Optional): A flag to indicate if the server should be enabled immediately after it is started. This flag is set to true by default.
- Input Parameters
-
WiFiServer::hasClient()-- The function is used to check if there are any incoming client connections available on the server. This function can be used in a loop to continuously check for new connections.- Output: It returns a WiFiClient object if a client has connected or a NULL pointer if there are no clients waiting to connect.
-
WiFiServer::end()-- The function is used to stop the server and release the associated resources. Once called, the server can no longer accept new client connections. Any existing client connections will remain open until they are closed by either the client or the server.WiFiServer::close()andWiFiServer::stop()have the same function.
WiFi Multiple functions
-
WiFiMulti::addAP(const char* ssid, const char *passphrase)-- The is used to add a new access point (AP) to the list of available APs that the WiFiMulti object will attempt to connect to.-
Input Parameters
- ssid: Pointer to the SSID (max 63 char).
- passphrase: (for WPA2 min 8 char, for open use NULL).
-
Output: True/False
-
-
WiFiMulti::run(uint32_t connectTimeout)-- The function attempts to connect to one of the saved access points in a sequential order until it successfully connects to one.-
Input Parameters
- connectTimeout: The parameter specifies the maximum amount of time to wait for a connection in milliseconds. If connectTimeout is set to 0, the function will not time out and will attempt to connect indefinitely.
-
Output: status
-
Scan nearby WiFi networks
The following is a sample program that uses the XIAO ESP32S3 to scan for nearby WiFi networks.
In your Arduino IDE, go to File > Examples > WiFi > WiFiScan. This will load a sketch that scans WiFi networks within the range of your XIAO ESP32S3.
This can be useful to check if the WiFi network you’re trying to connect is within the range of your board or other applications. Your WiFi project may not often work because it may not be able to connect to your router due to insufficient WiFi strength.
#include "WiFi.h"

void setup() {
  Serial.begin(115200);

  // Set WiFi to station mode and disconnect from an AP if it was previously connected
  WiFi.mode(WIFI_STA);
  WiFi.disconnect();
  delay(100);

  Serial.println("Setup done");
}

void loop() {
  Serial.println("scan start");

  // WiFi.scanNetworks will return the number of networks found
  int n = WiFi.scanNetworks();
  Serial.println("scan done");
  if (n == 0) {
      Serial.println("no networks found");
  } else {
    Serial.print(n);
    Serial.println(" networks found");
    for (int i = 0; i < n; ++i) {
      // Print SSID and RSSI for each network found
      Serial.print(i + 1);
      Serial.print(": ");
      Serial.print(WiFi.SSID(i));
      Serial.print(" (");
      Serial.print(WiFi.RSSI(i));
      Serial.print(")");
      Serial.println((WiFi.encryptionType(i) == WIFI_AUTH_OPEN)?" ":"*");
      delay(10);
    }
  }
  Serial.println("");

  // Wait a bit before scanning again
  delay(5000);
}
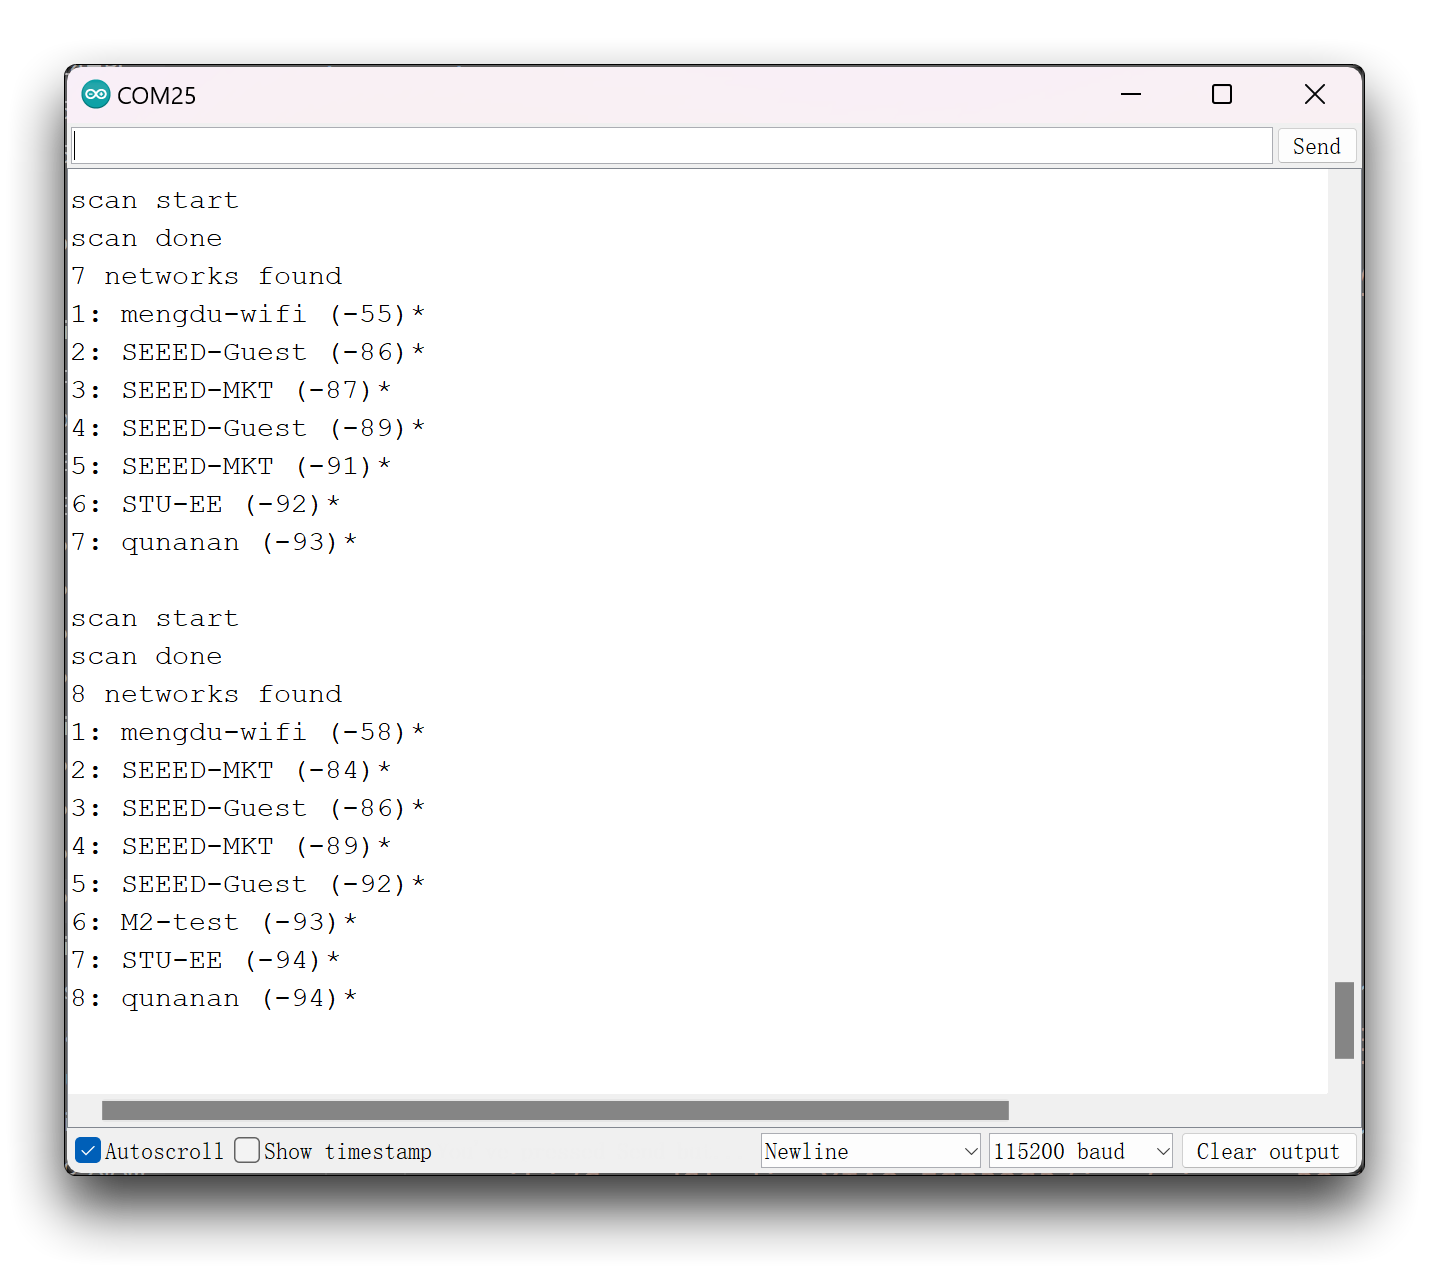
Upload and run the program, and you should see the serial monitor print out the nearby WiFi networks that can be searched by the XIAO ESP32S3.
Program annotation
The first thing you need to do to use the XIAO ESP32S3 WiFi functionalities is to include the WiFi.h library in your code, as follows:
#include <WiFi.h>
The XIAO ESP32S3 can act as WiFi Station, Access Point or both. To set the WiFi mode, use WiFi.mode() and set the desired mode as argument.
WiFi.mode(WIFI_STA);
When the ESP32 is set as a Wi-Fi station, it can connect to other networks (like your router).
WiFi.scanNetworks() returns the number of networks found. After the scanning, you can access the parameters about each network. WiFi.SSID() prints the SSID for a specific network.
WiFi.RSSI() returns the RSSI of that network. RSSI stands for Received Signal Strength Indicator. It is an estimated measure of power level that an RF client device is receiving from an access point or router.
Finally, WiFi.encryptionType() returns the network encryption type. That specific example puts a * in the case of open networks. However, that function can return one of the following options (not just open networks):
- WIFI_AUTH_OPEN
- WIFI_AUTH_WEP
- WIFI_AUTH_WPA_PSK
- WIFI_AUTH_WPA2_PSK
- WIFI_AUTH_WPA_WPA2_PSK
- WIFI_AUTH_WPA2_ENTERPRISE
Connect to a WiFi network
To connect the ESP32 to a specific Wi-Fi network, you must know its SSID and password. Additionally, that network must be within the ESP32 WiFi range (to check that, you can use the previous example to scan WiFi networks).
The following is an example of using the XIAO ESP32S3 to connect to a specified network. Where the function initWiFi() plays the role of connecting to the network in the program.
#include "WiFi.h"

// Replace with your network credentials
const char* ssid = "REPLACE_WITH_YOUR_SSID";
const char* password = "REPLACE_WITH_YOUR_PASSWORD";

void initWiFi() {
  WiFi.mode(WIFI_STA);
  WiFi.begin(ssid, password);
  Serial.print("Connecting to WiFi ..");
  while (WiFi.status() != WL_CONNECTED) {
    Serial.print('.');
    delay(1000);
  }
  Serial.println();
  Serial.println(WiFi.localIP());
}

void setup() {
  Serial.begin(115200);

  // Set WiFi to station mode and disconnect from an AP if it was previously connected
  WiFi.mode(WIFI_STA);
  WiFi.disconnect();
  delay(100);

  initWiFi();
}

void loop() {

}
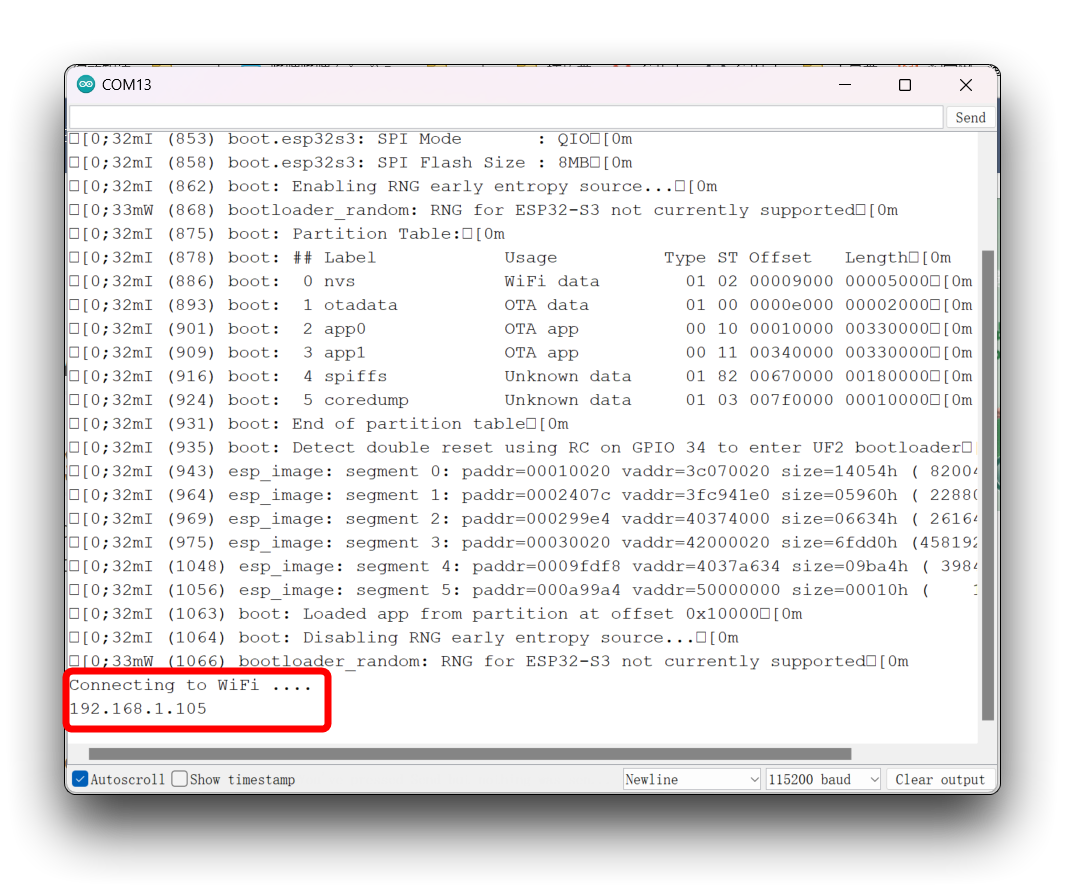
Upload and run the program to open the serial monitor. When connecting to the network, the serial monitor will print a string of dots until the connection is successful, then the IP address of the XIAO will be printed.
Program annotation
Let’s take a quick look on how this function works.
First, set the WiFi mode. If the XIAO ESP32S3 will connected to another network (access point/hotspot) it must be in station mode.
WiFi.mode(WIFI_STA);
Then, use WiFi.begin() to connect to a network. You must pass as arguments the network SSID and its password:
WiFi.begin(ssid, password);
Connecting to a WiFi network can take a while, so we usually add a while loop that keeps checking if the connection was already established by using WiFi.status(). When the connection is successfully established, it returns WL_CONNECTED.
If you want to get the WiFi connection strength, you can simply call WiFi.RSSI() after a WiFi connection.
softAP Usage
If you set the XIAO ESP32S3 as an access point (hotspot), you can be connected to the ESP32 using any device with WiFi capabilities without the need to connect to your router.
In simple words, when you set the XIAO ESP32S3 as an access point you create its own WiFi network and nearby WiFi devices (stations) can connect to it (like your smartphone or your computer).
In your Arduino IDE, go to File > Examples > WiFi > WiFiAccessPoint. This example will show you how to use XIAO ESP32S3 to create a hotspot and control the on/off switch of a light through a simple web page connected to the hotspot.
- We made some minor changes to the sample program by commenting out LED_BUILTIN, because the XIAO ESP32S3 has its own user indicator and we don't need an external LED.
- The LED will only turn off when the user LED pin on the XIAO ESP32S3 is set to a high level, and it will only turn on when the pin is set to a low level.
- You also need to modify the hotspot name and password in the program to your desired ones.
/*
  WiFiAccessPoint.ino creates a WiFi access point and provides a web server on it.

  Steps:
  1. Connect to the access point "yourAp"
  2. Point your web browser to http://192.168.4.1/H to turn the LED on or http://192.168.4.1/L to turn it off
     OR
     Run raw TCP "GET /H" and "GET /L" on PuTTY terminal with 192.168.4.1 as IP address and 80 as port

  Created for arduino-esp32 on 04 July, 2018
  by Elochukwu Ifediora (fedy0)
*/

#include <WiFi.h>
#include <WiFiClient.h>
#include <WiFiAP.h>

//#define LED_BUILTIN 2   // Set the GPIO pin where you connected your test LED or comment this line out if your dev board has a built-in LED

// Set these to your desired credentials.
const char *ssid = "XIAO_ESP32S3";
const char *password = "password";

WiFiServer server(80);


void setup() {
  pinMode(LED_BUILTIN, OUTPUT);

  Serial.begin(115200);
  Serial.println();
  Serial.println("Configuring access point...");

  // You can remove the password parameter if you want the AP to be open.
  WiFi.softAP(ssid, password);
  IPAddress myIP = WiFi.softAPIP();
  Serial.print("AP IP address: ");
  Serial.println(myIP);
  server.begin();

  Serial.println("Server started");
}

void loop() {
  WiFiClient client = server.available();   // listen for incoming clients

  if (client) {                             // if you get a client,
    Serial.println("New Client.");           // print a message out the serial port
    String currentLine = "";                // make a String to hold incoming data from the client
    while (client.connected()) {            // loop while the client's connected
      if (client.available()) {             // if there's bytes to read from the client,
        char c = client.read();             // read a byte, then
        Serial.write(c);                    // print it out the serial monitor
        if (c == '\n') {                    // if the byte is a newline character

          // if the current line is blank, you got two newline characters in a row.
          // that's the end of the client HTTP request, so send a response:
          if (currentLine.length() == 0) {
            // HTTP headers always start with a response code (e.g. HTTP/1.1 200 OK)
            // and a content-type so the client knows what's coming, then a blank line:
            client.println("HTTP/1.1 200 OK");
            client.println("Content-type:text/html");
            client.println();

            // the content of the HTTP response follows the header:
            client.print("Click <a href=\"/H\">here</a> to turn ON the LED.<br>");
            client.print("Click <a href=\"/L\">here</a> to turn OFF the LED.<br>");

            // The HTTP response ends with another blank line:
            client.println();
            // break out of the while loop:
            break;
          } else {    // if you got a newline, then clear currentLine:
            currentLine = "";
          }
        } else if (c != '\r') {  // if you got anything else but a carriage return character,
          currentLine += c;      // add it to the end of the currentLine
        }

        // Check to see if the client request was "GET /H" or "GET /L":
        if (currentLine.endsWith("GET /H")) {
          digitalWrite(LED_BUILTIN, LOW);                 // GET /H turns the LED on
        }
        if (currentLine.endsWith("GET /L")) {
          digitalWrite(LED_BUILTIN, HIGH);                // GET /L turns the LED off
        }
      }
    }
    // close the connection:
    client.stop();
    Serial.println("Client Disconnected.");
  }
}
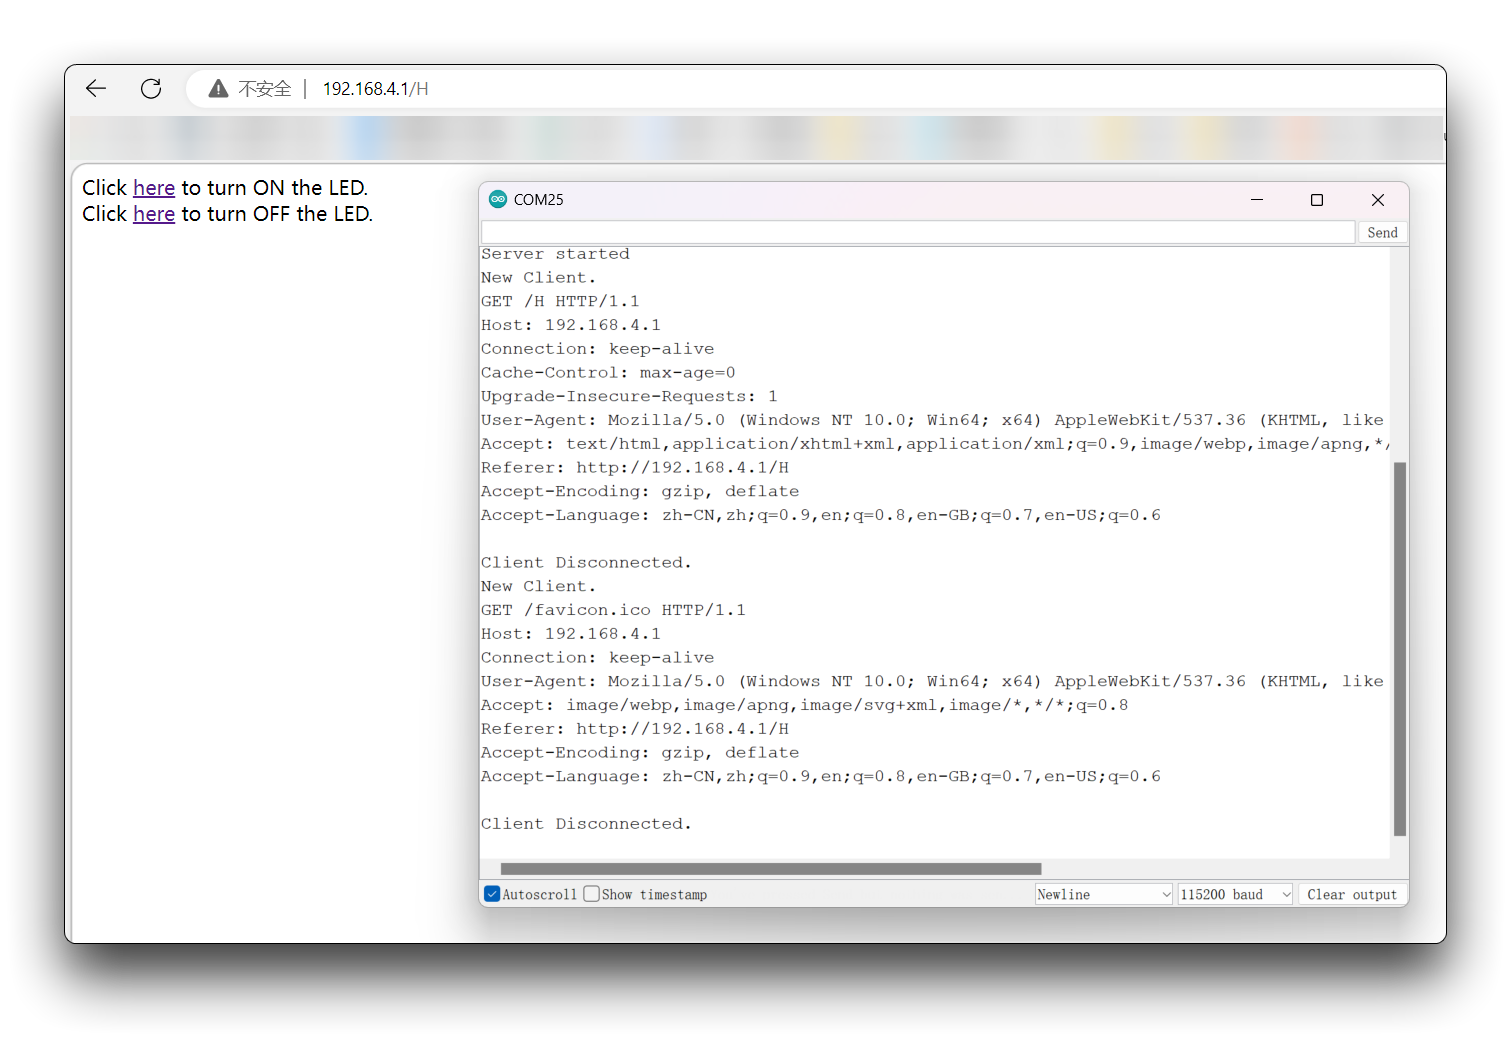
After uploading and running the program, XIAO ESP32S3 will create a hotspot named "XIAO_ESP32S3". You can connect to this network using your computer or phone, with the password "password". Then, open "192.168.4.1" in a browser to access the web page that controls the LED switch.
Program annotation
There’s a section in the setup() to set the ESP32 as an access point using the softAP() method:
WiFi.softAP(ssid, password);
Next, we need to get the access point IP address using the softAPIP() method and print it in the Serial Monitor.
IPAddress myIP = WiFi.softAPIP();
Serial.print("AP IP address: ");
Serial.println(myIP);
server.begin();
These are the snippets of code you need to include in your web server sketches to set the XIAO ESP32S3 as an access point.
WiFi & MQTT Usage
The XIAO ESP32S3 is a powerful motherboard that supports the MQTT protocol, making it an excellent choice for IoT projects that require reliable and efficient communication between devices.
#include <WiFi.h>
#include <PubSubClient.h>

// Replace with your network credentials
const char* ssid = "your_SSID";
const char* password = "your_PASSWORD";

// MQTT broker IP address
const char* mqtt_server = "test.mosquitto.org";

// Initialize the WiFi and MQTT client objects
WiFiClient espClient;
PubSubClient client(espClient);

void setup() {
  Serial.begin(115200);

  // Connect to WiFi network
  WiFi.begin(ssid, password);

  while (WiFi.status() != WL_CONNECTED) {
    delay(1000);
    Serial.println("Connecting to WiFi...");
  }

  Serial.println("Connected to WiFi");

  // Set the MQTT broker server IP address and port
  client.setServer(mqtt_server, 1883);

  // Connect to MQTT broker
  while (!client.connected()) {
    if (client.connect("ESP32Client")) {
      Serial.println("Connected to MQTT broker");
    } else {
      Serial.print("Failed to connect to MQTT broker, rc=");
      Serial.print(client.state());
      Serial.println(" retrying in 5 seconds");
      delay(5000);
    }
  }

  // Subscribe to MQTT topic
  client.subscribe("test/topic");
}

void loop() {
  // Check if the MQTT client is connected
  if (!client.connected()) {
    // Reconnect to MQTT broker
    if (client.connect("ESP32Client")) {
      Serial.println("Connected to MQTT broker");
      // Subscribe to MQTT topic after reconnection
      client.subscribe("test/topic");
    }
  }

  // Handle MQTT messages
  client.loop();

  // Publish a message to the MQTT broker
  client.publish("test/topic", "Hello from XIAO ESP32S3");
  delay(5000);
}
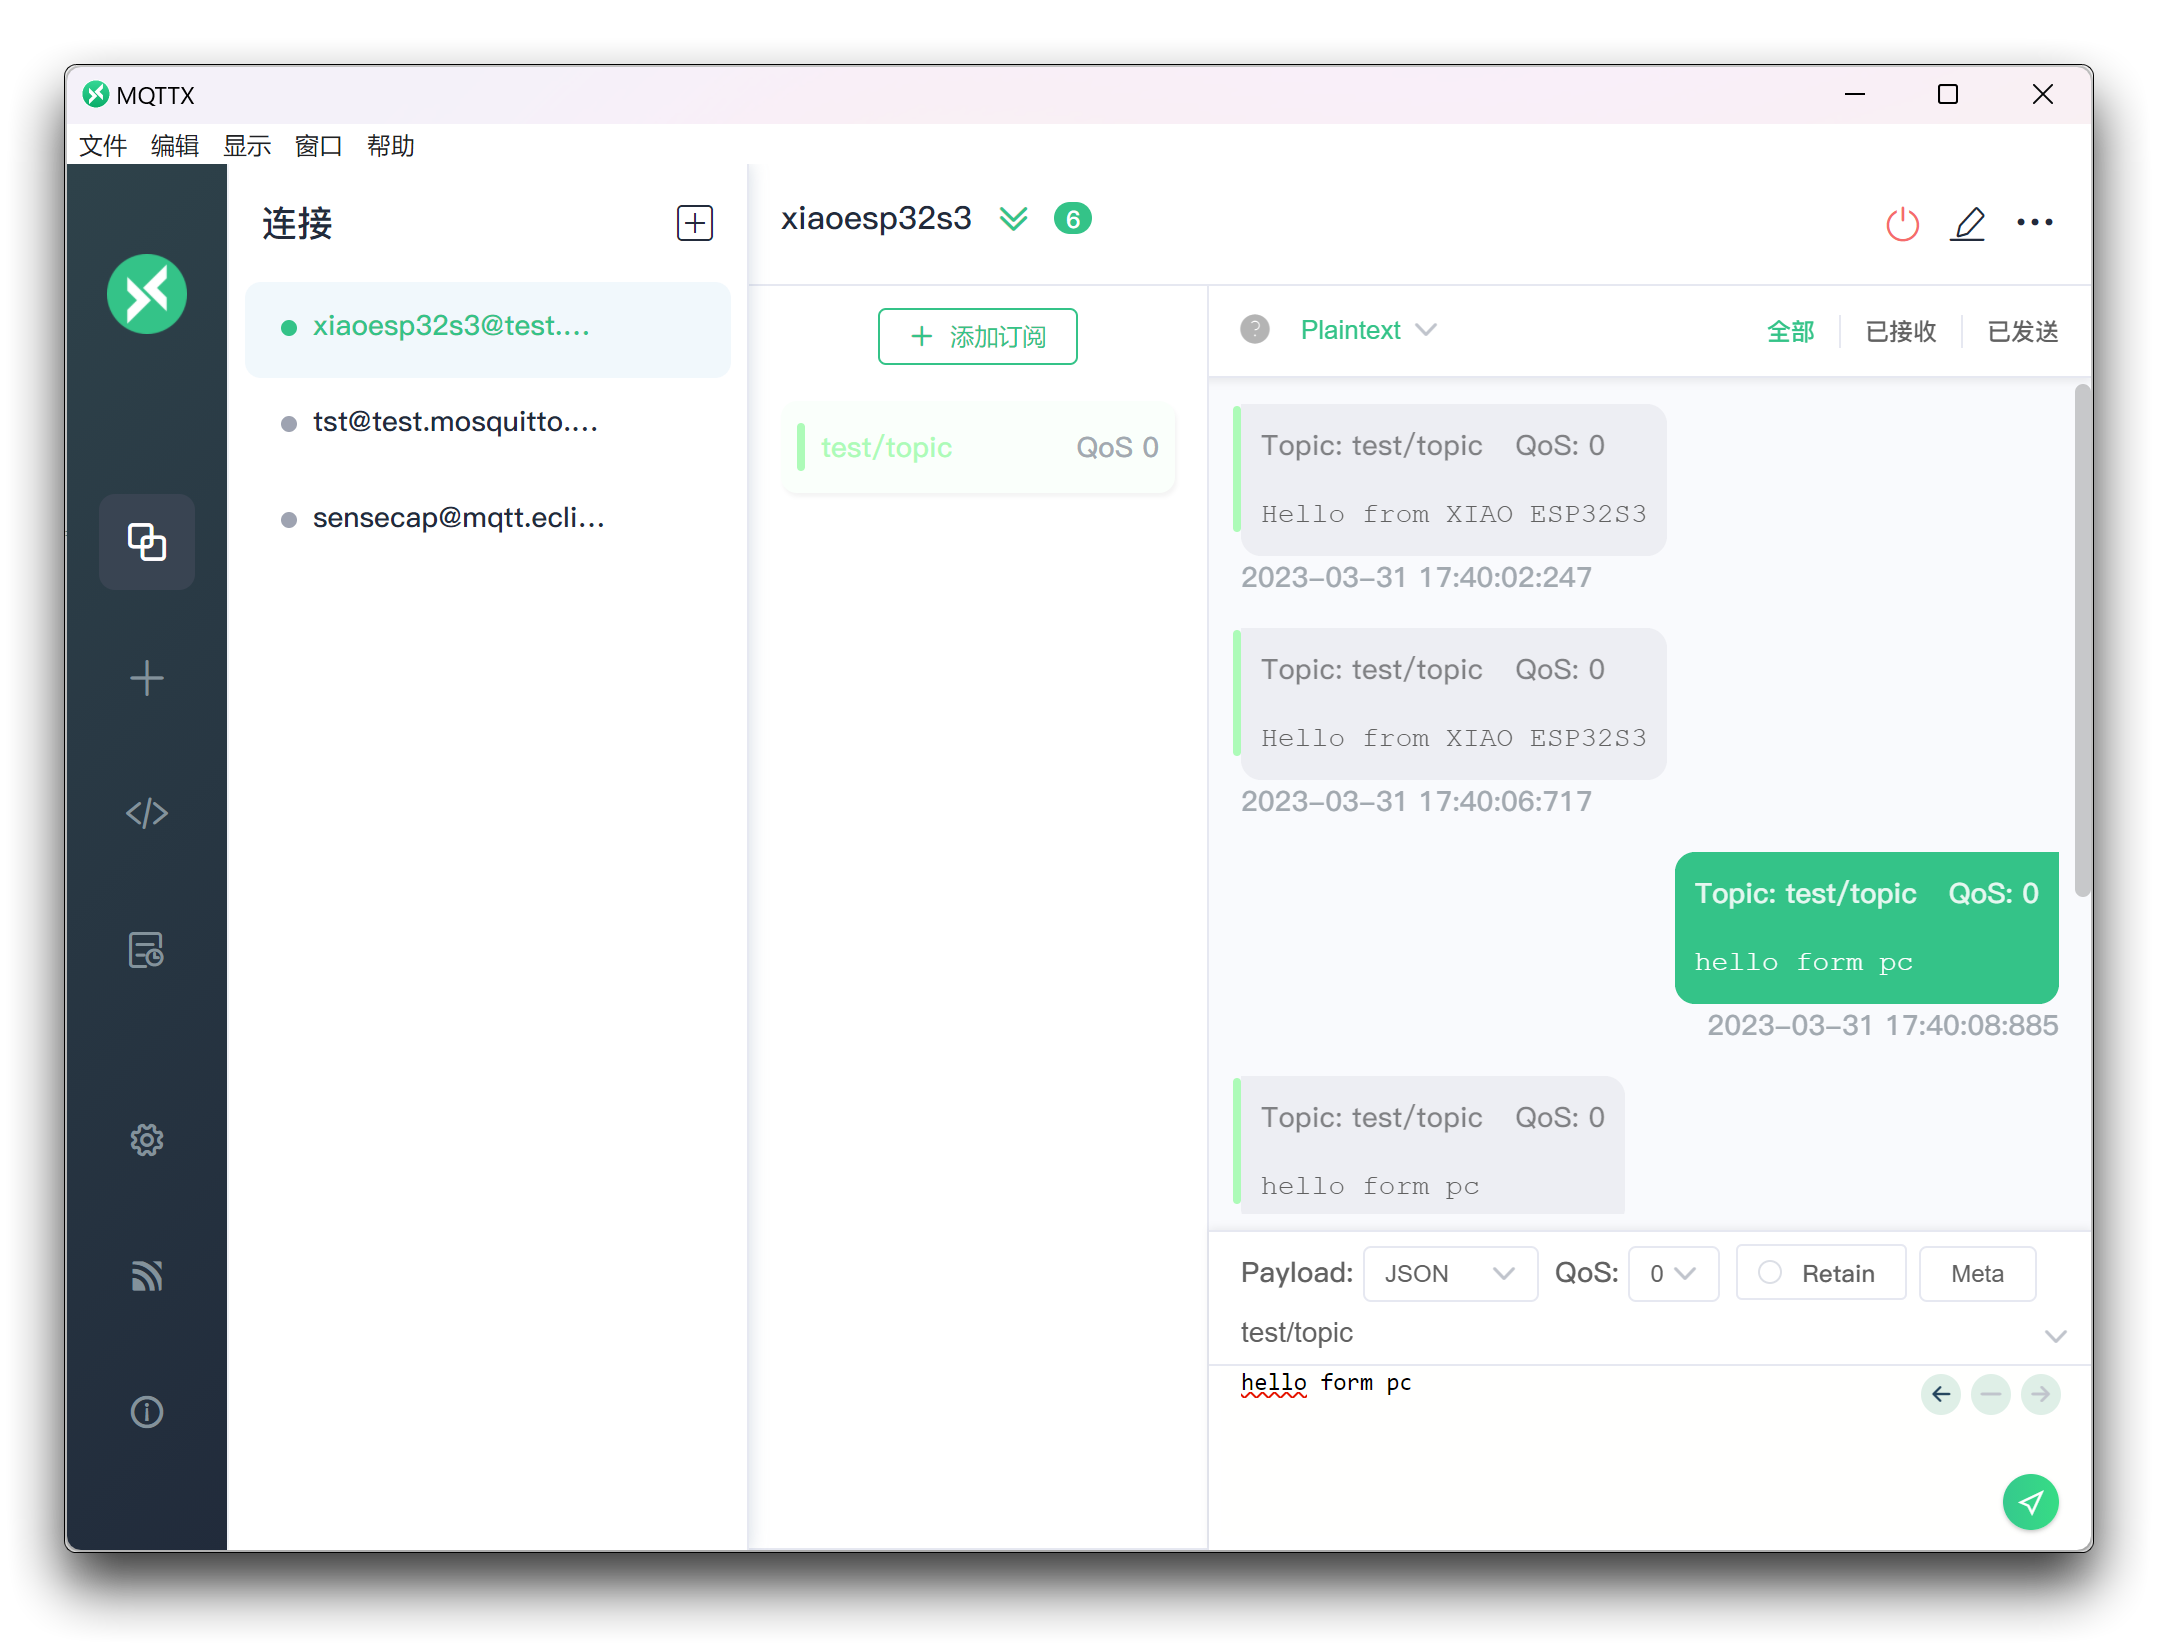
In this example program, XIAO ESP32S3 connects to the network via WiFi and connects to a specified MQTT broker, subscribes to the topic test/topic, and publishes a message to the topic every 5 seconds.
When XIAO ESP32S3 receives a message from the MQTT broker, it can be processed in the client.onMessage callback function. You need to replace the variables ssid, password, mqtt_server, etc. in the example program with your own network and MQTT server information.
The MQTT server address provided in the sample program is test.mosquitto.org, for testing purposes only. Please do not send any personal information to this address, as anyone can use this link to obtain your information.
WiFi & HTTP/HTTPS Usage
This part can refer to the example we wrote for XIAO ESP32C3 to access ChatGPT, which provides a detailed introduction to the usage of WiFiClient and HTTPClient.
WiFi Mesh
Accordingly to the Espressif documentation:
"ESP-MESH is a networking protocol built atop the Wi-Fi protocol. ESP-MESH allows numerous devices (referred to as nodes) spread over a large physical area (both indoors and outdoors) to be interconnected under a single WLAN (Wireless Local-Area Network). ESP-MESH is self-organizing and self-healing meaning the network can be built and maintained autonomously."
In a traditional Wi-Fi network architecture, a single node (access point – usually the router) is connected to all other nodes (stations). Each node can communicate with each other using the access point. However, this is limited to the access point wi-fi coverage. Every station must be in the range to connect directly to the access point.
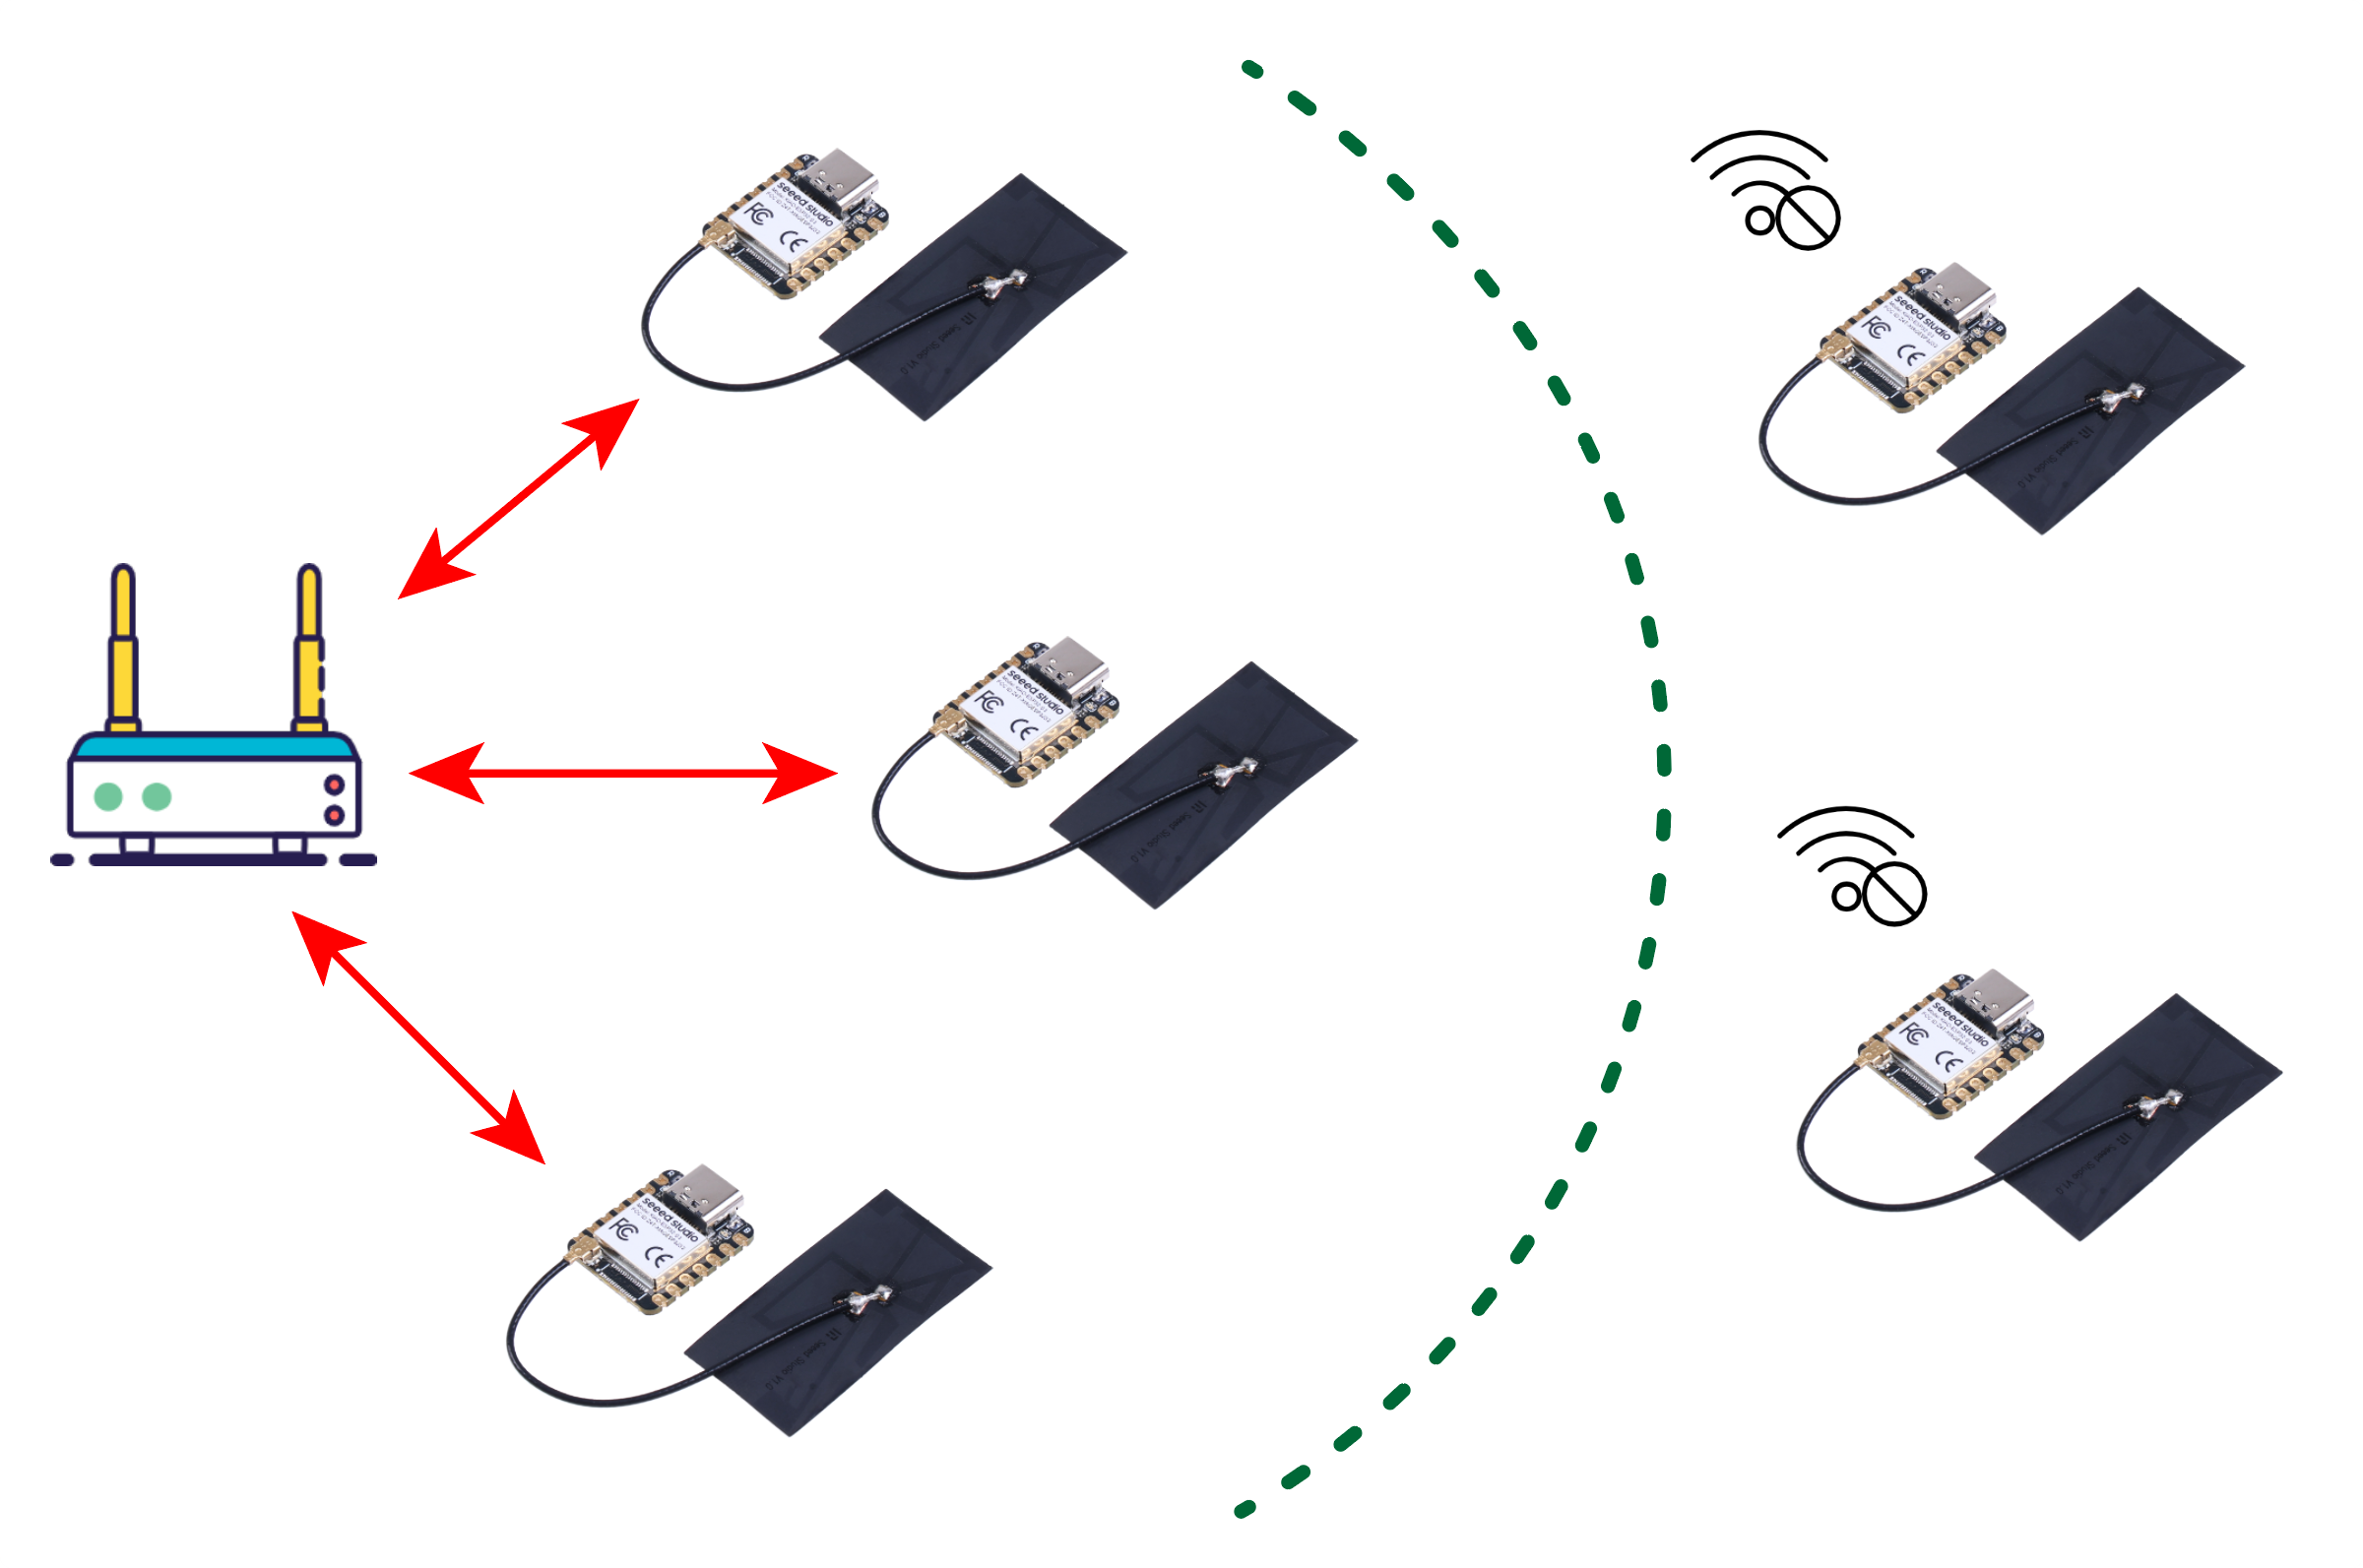
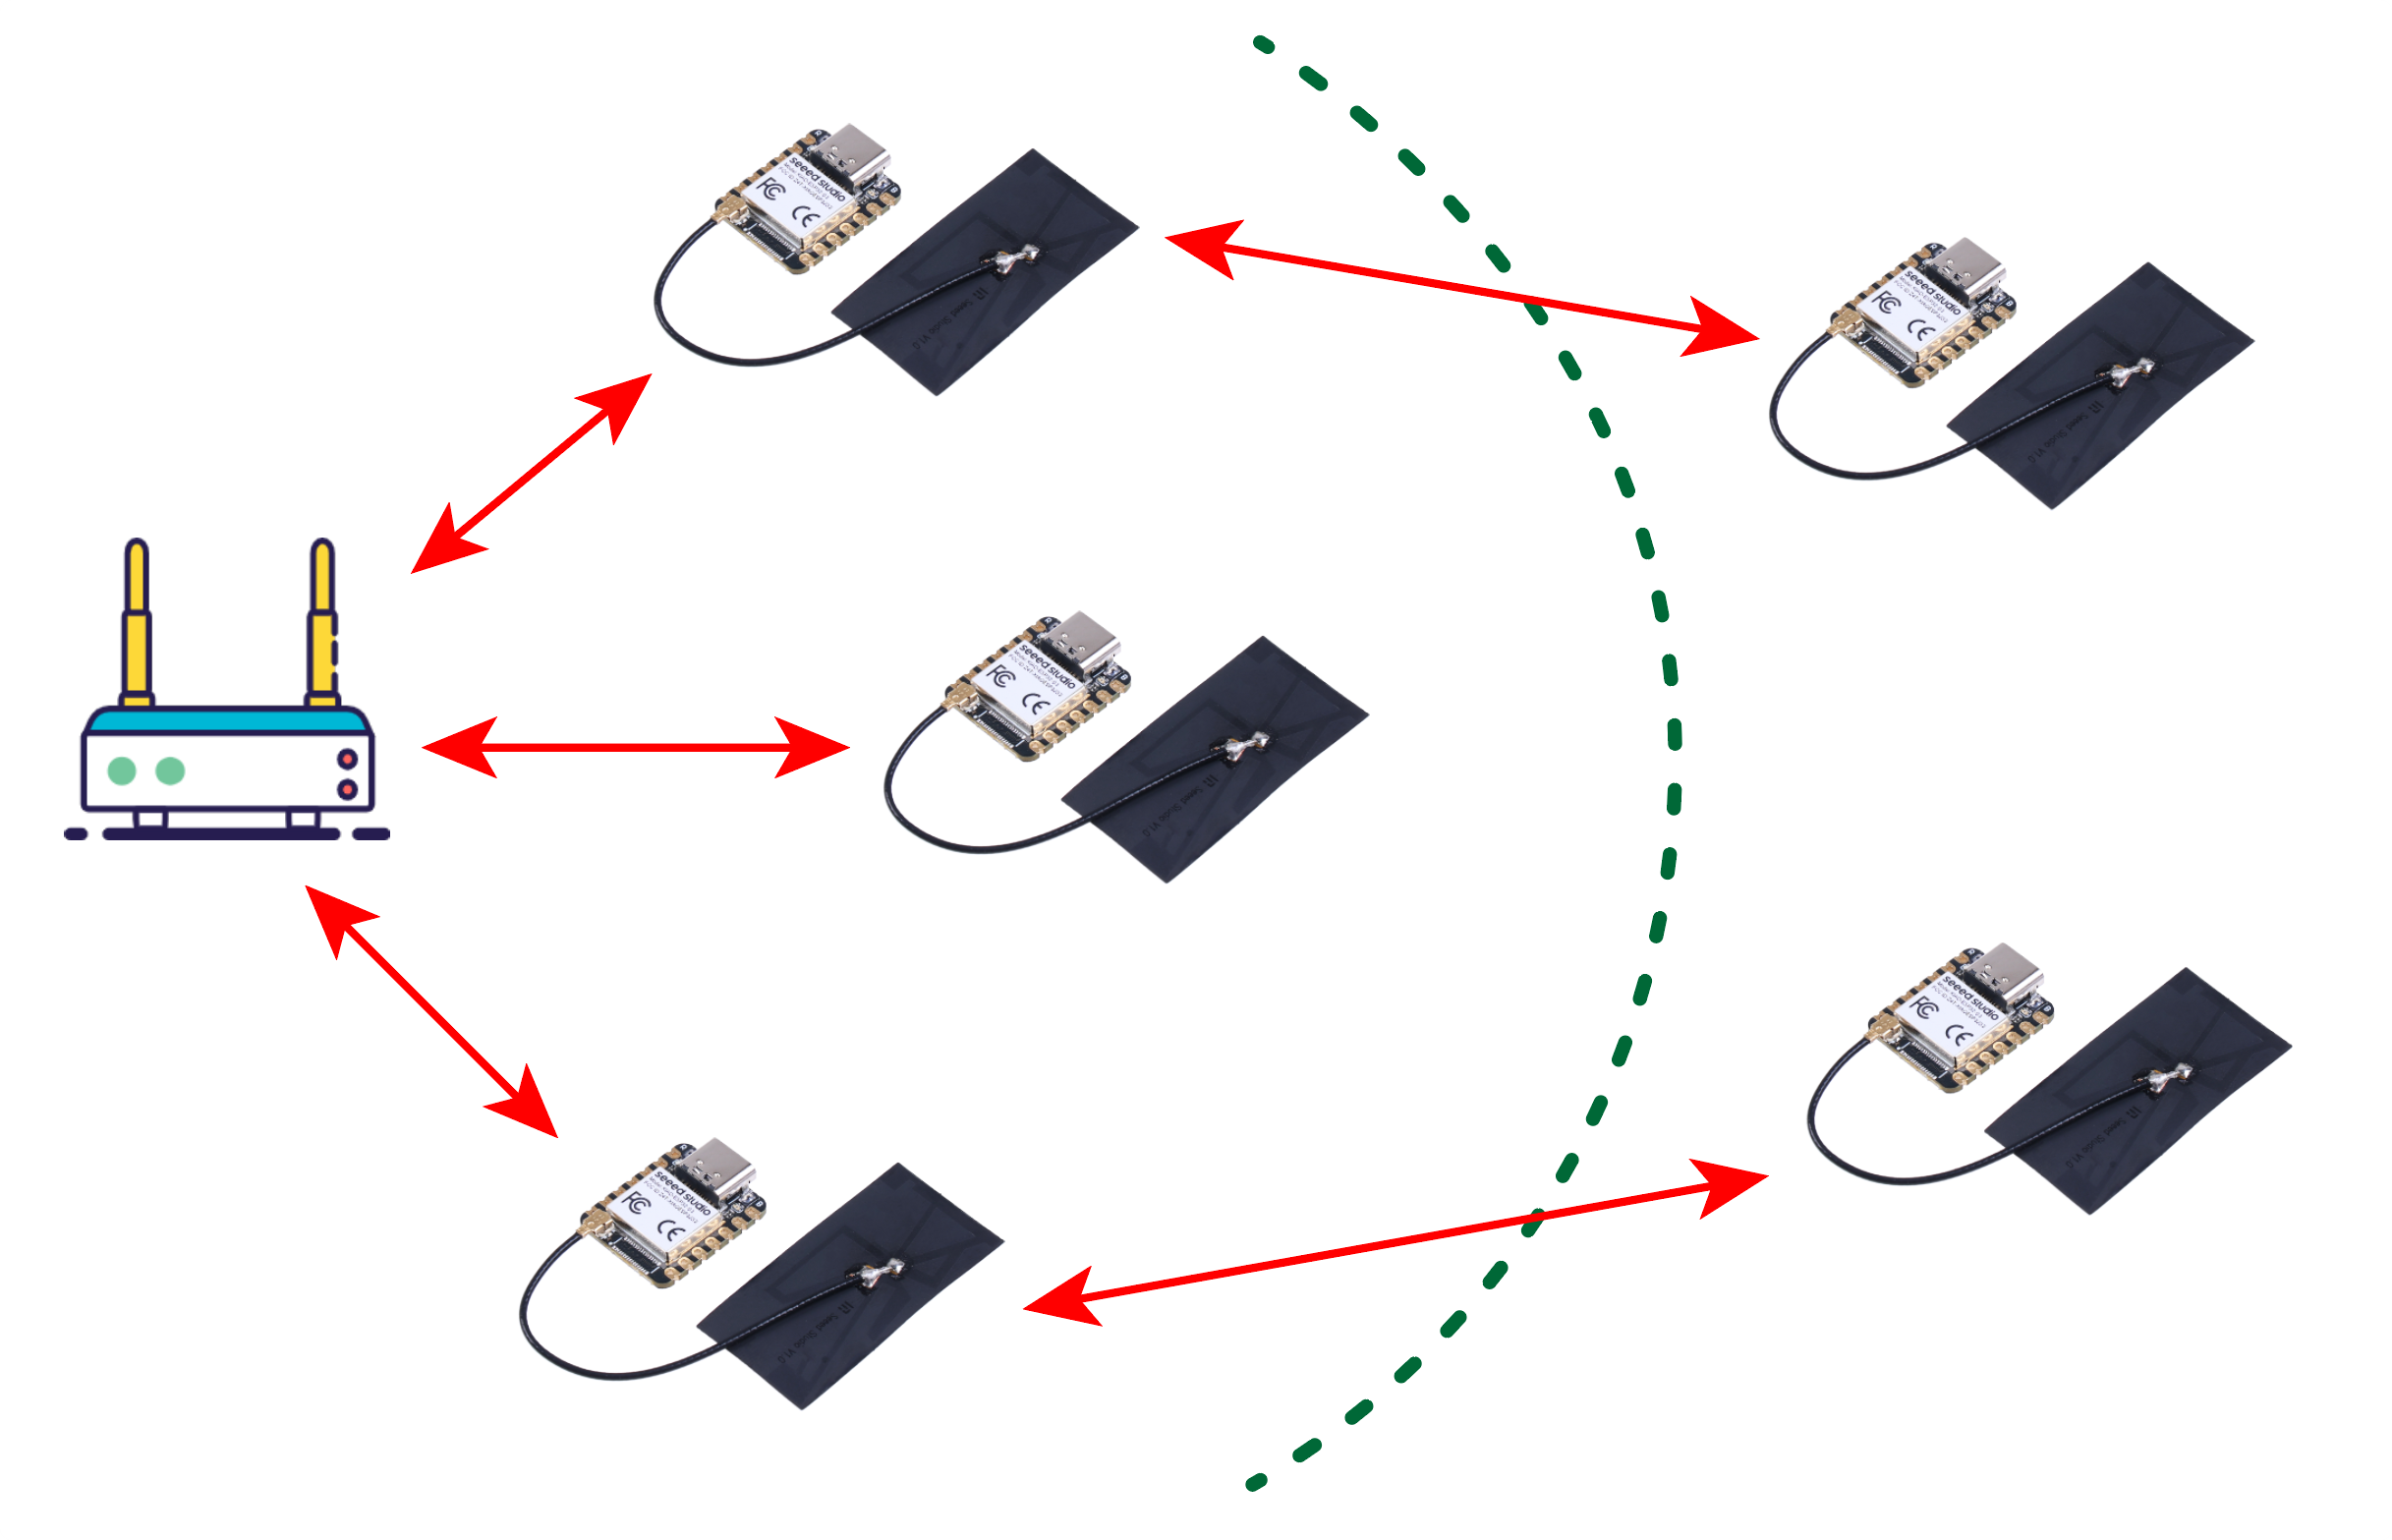
With ESP-MESH, the nodes don’t need to connect to a central node. Nodes are responsible for relaying each others transmissions. This allows multiple devices to spread over a large physical area. The Nodes can self-organize and dynamically talk to each other to ensure that the packet reaches its final node destination. If any node is removed from the network, it is able to self-organize to make sure that the packets reach their destination.
The painlessMesh library allows us to create a mesh network with the ESP32 boards in an easy way.

If a window pops up prompting us to download some dependent packages to use this library, we also need to download them together.
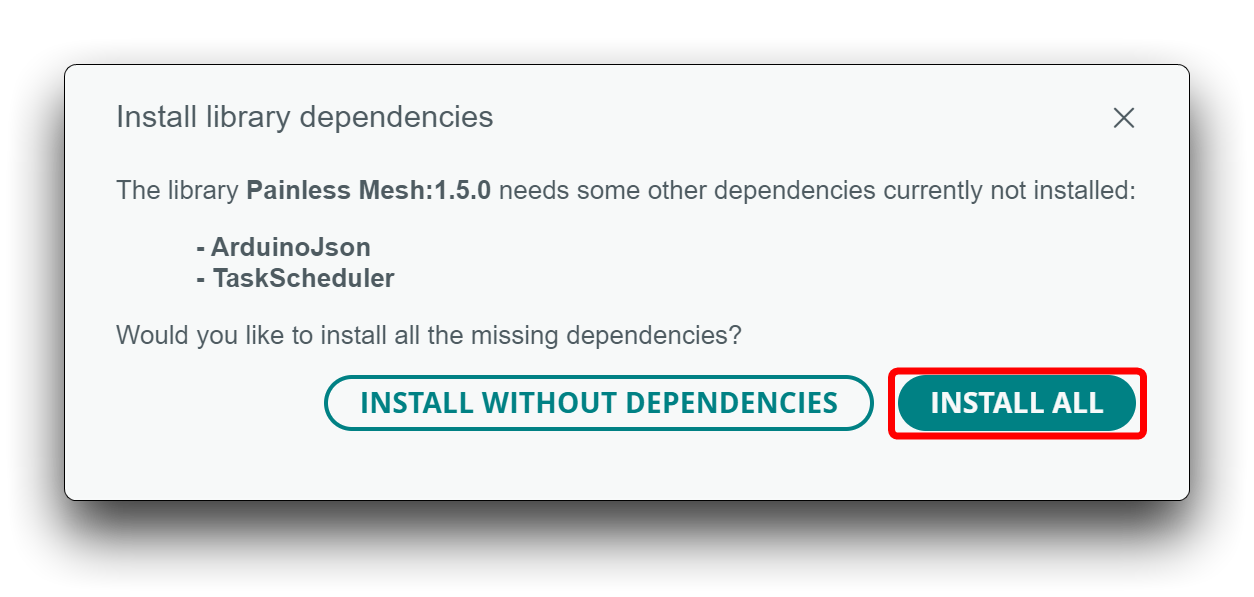
If this window doesn’t show up, you’ll need to install the following library dependencies:
- ArduinoJson (by bblanchon)
- TaskScheduler
- AsyncTCP (ESP32)
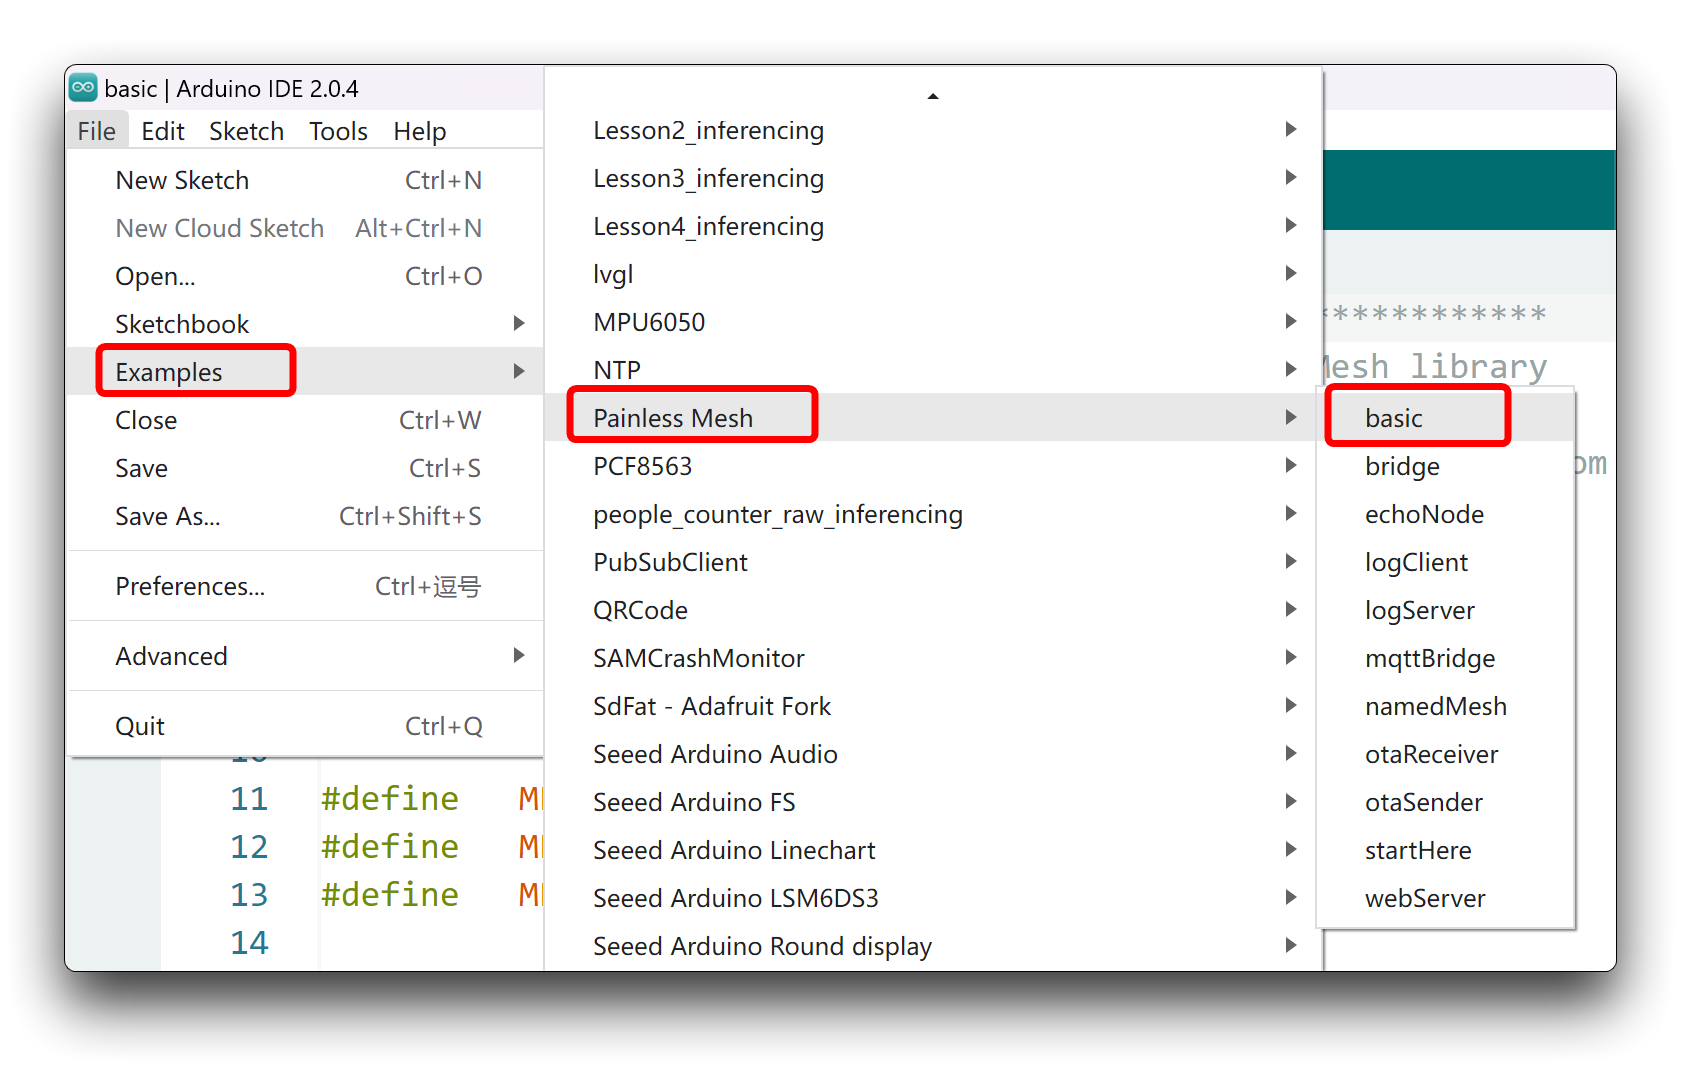
To get started with ESP-MESH, we’ll first experiment with the library’s basic example. This example creates a mesh network in which all boards broadcast messages to all the other boards.
Before uploading the code, you can set up the MESH_PREFIX (it’s like the name of the MESH network) and the MESH_PASSWORD variables (you can set it to whatever you like).
Then, we recommend that you change the following line for each board to easily identify the node that sent the message. For example, for node 1, change the message as follows:
String msg = "Hi from node 1 ";
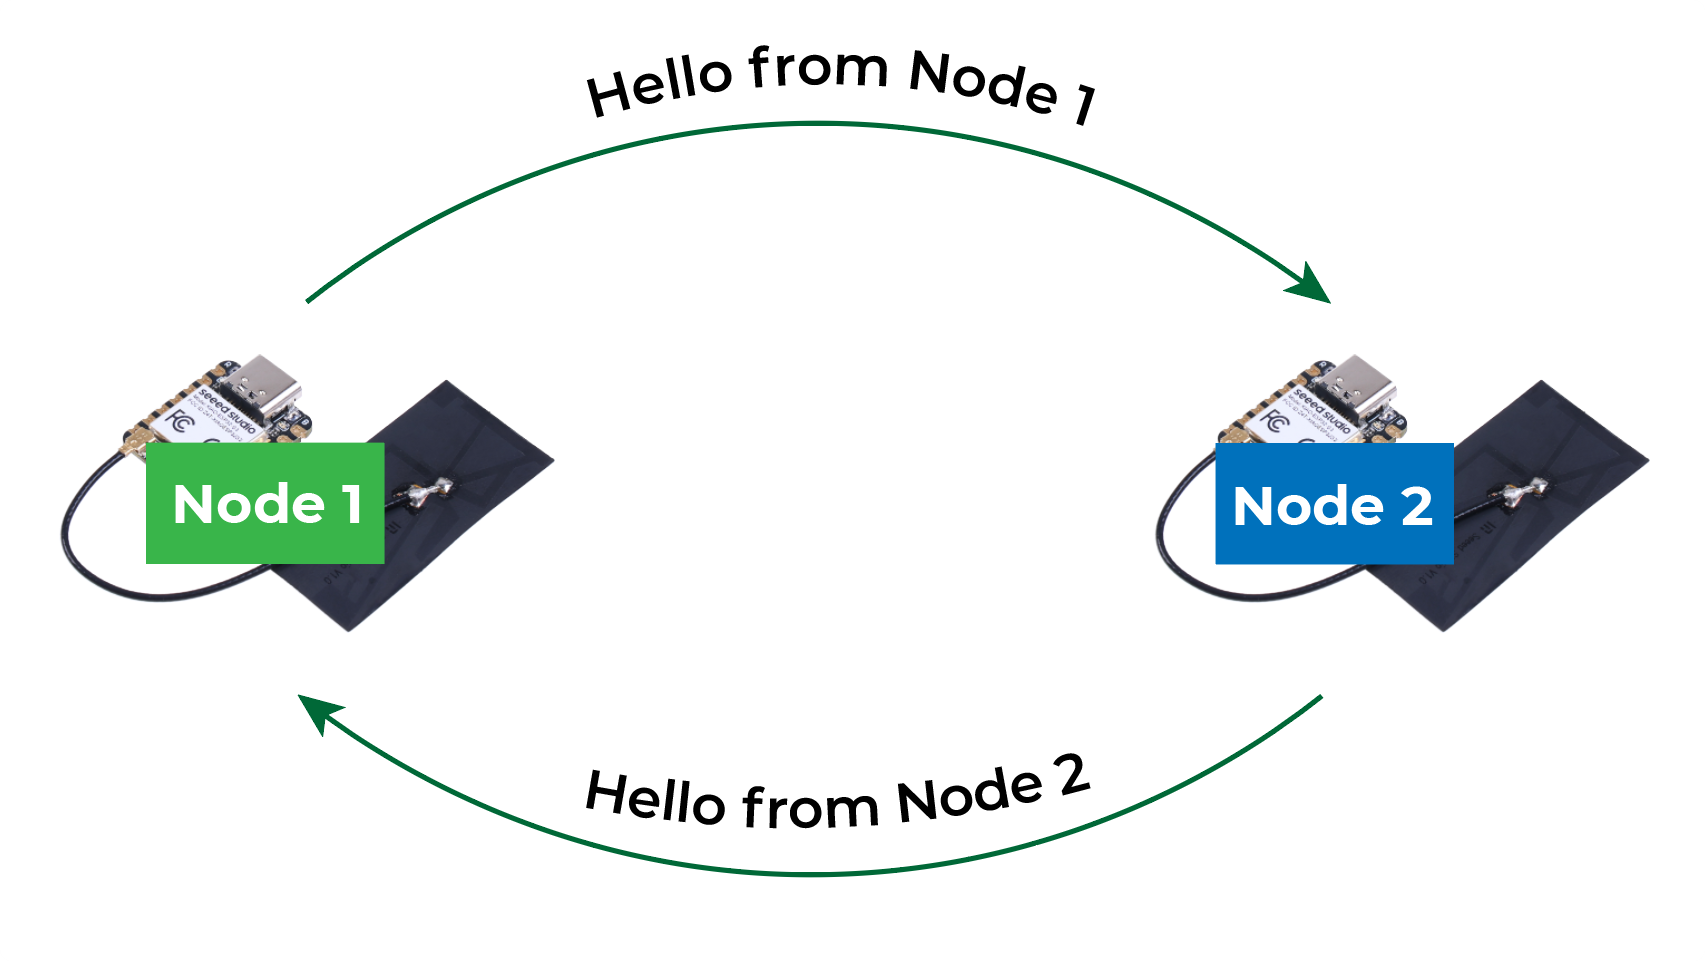
Okay, next we will use two XIAO ESP32S3 as an example. The conceptual diagram after networking is roughly as follows.
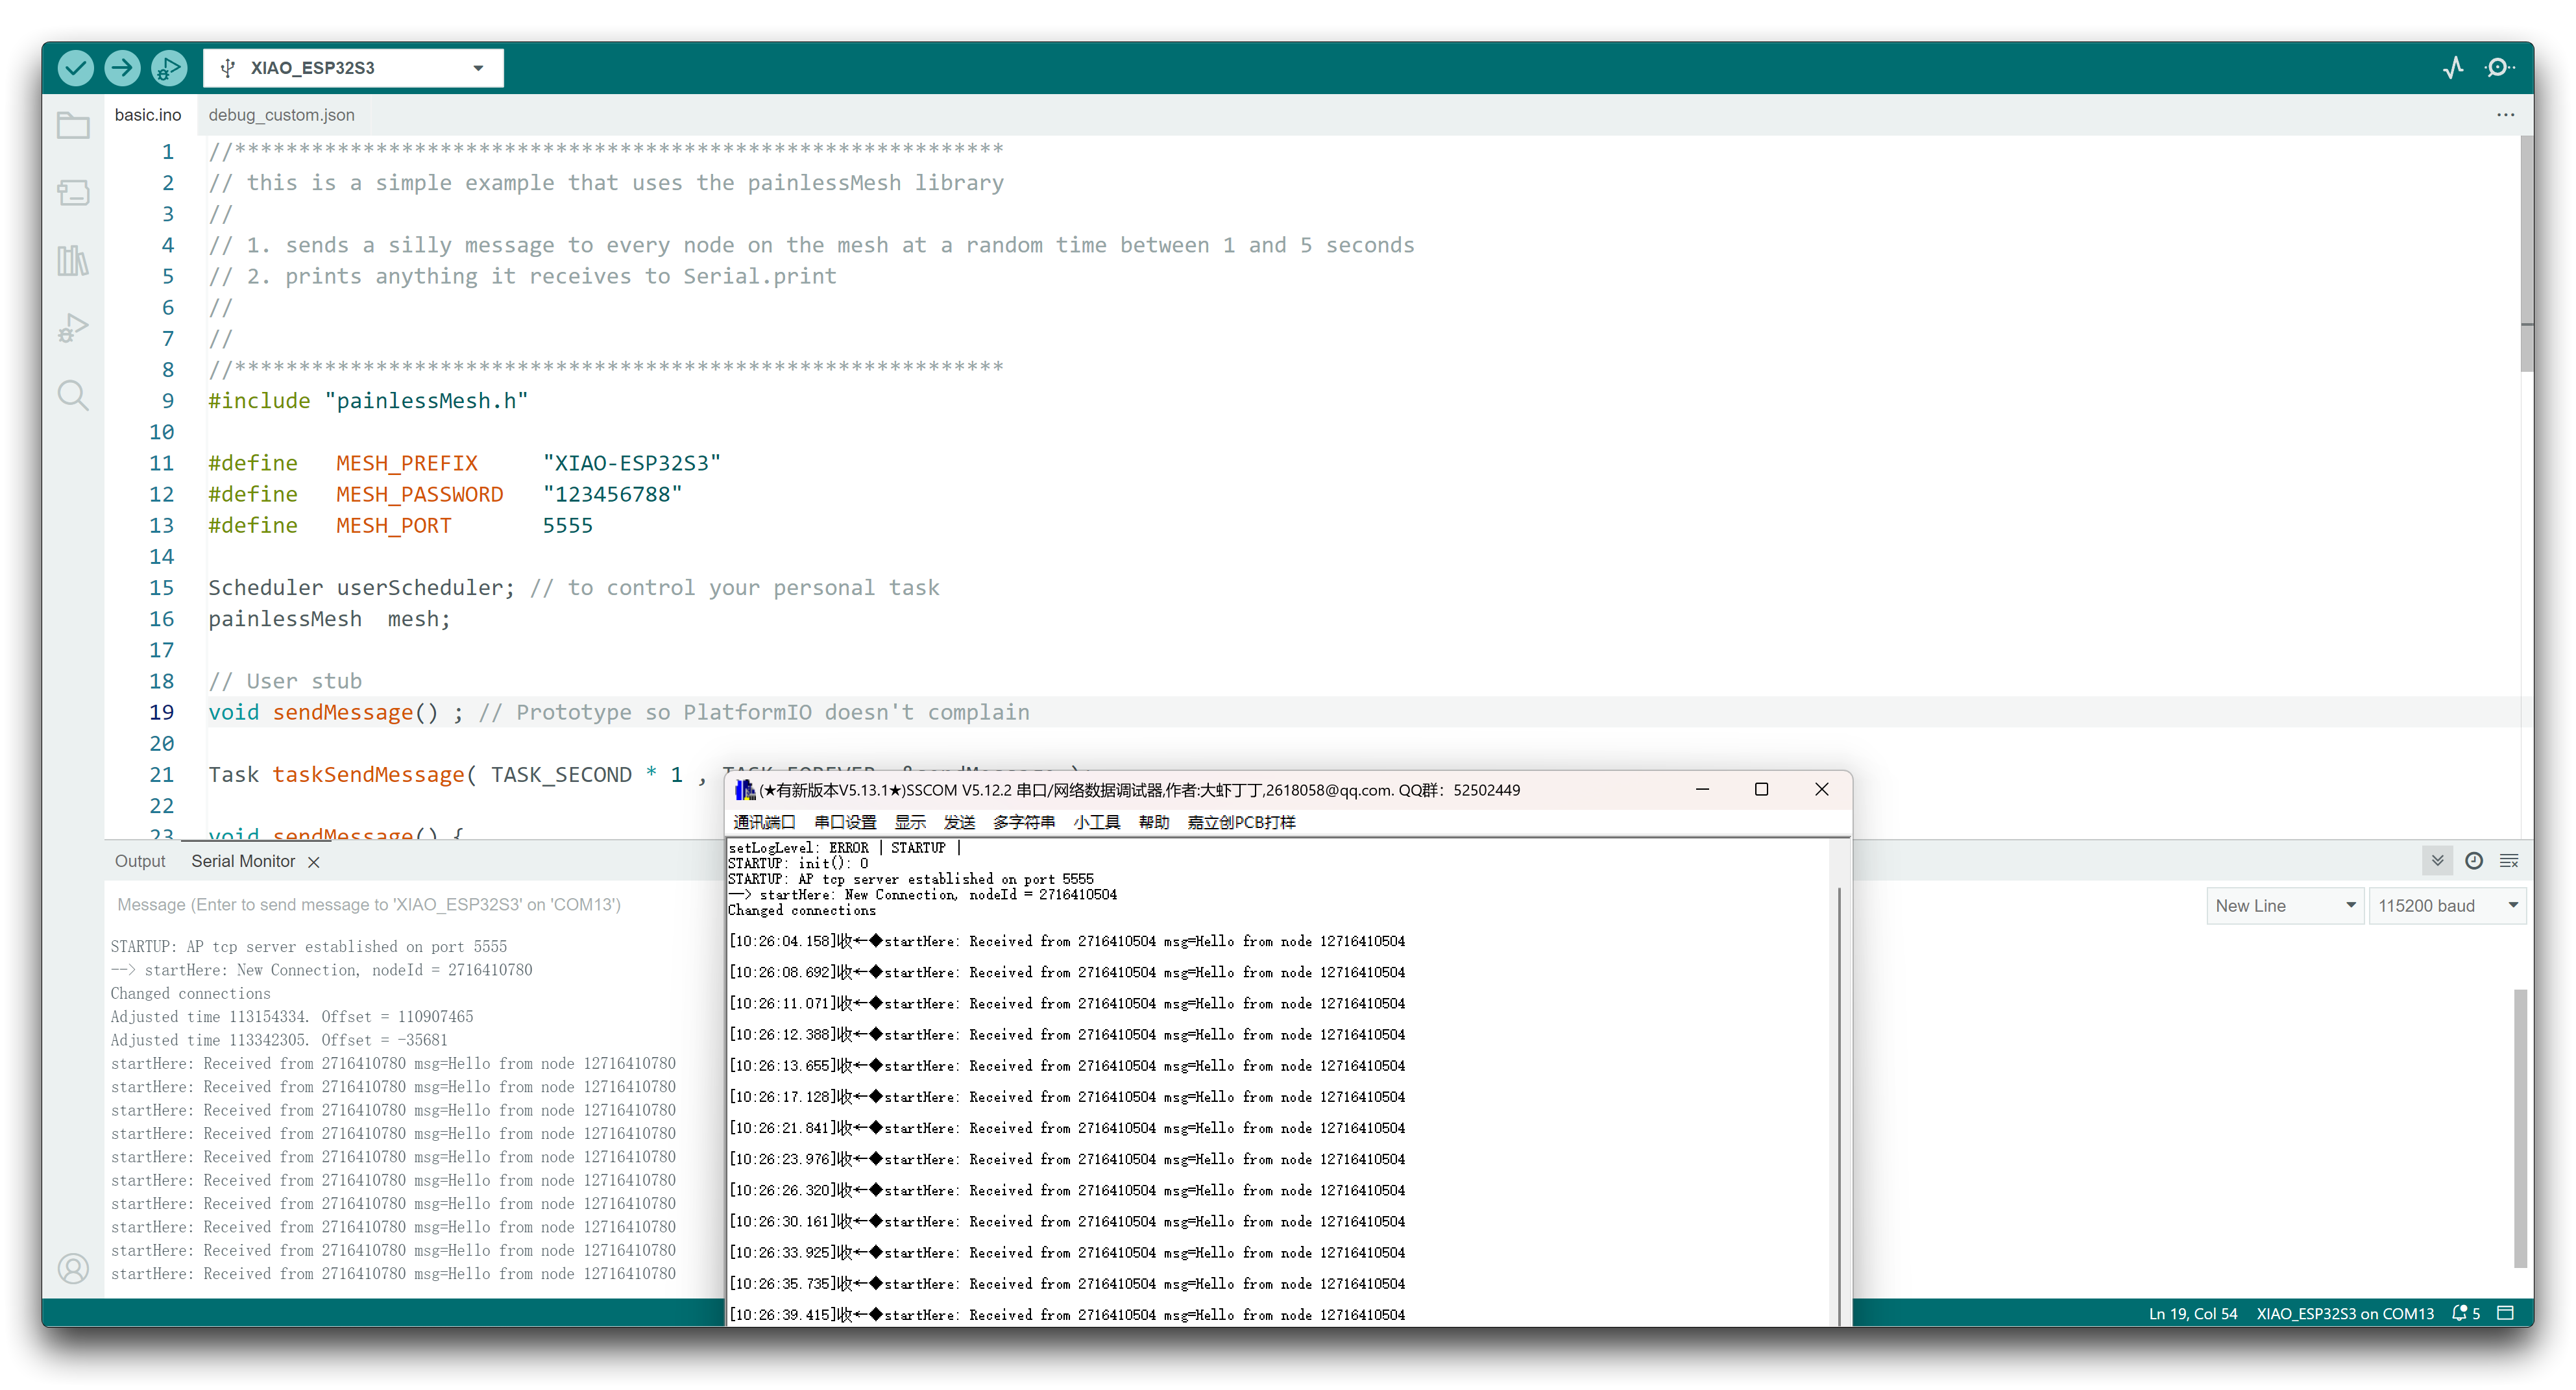
Upload the program separately to the two XIAO, open the serial port monitor and set the baud rate to 115200. (If there are two XIAO, you may need additional serial port software), if the program runs smoothly, you will see the following results:
Program annotation
Start by including the painlessMesh library. Then, add the mesh details. The MESH_PREFIX refers to the name of the mesh. The MESH_PASSWORD, as the name suggests is the mesh password. All nodes in the mesh should use the same MESH_PREFIX and MESH_PASSWORD. The MESH_PORT refers to the the TCP port that you want the mesh server to run on. The default is 5555.
It is recommended to avoid using delay() in the mesh network code. To maintain the mesh, some tasks need to be performed in the background. Using delay() will stop these tasks from happening and can cause the mesh to lose stability/fall apart. Instead, it is recommended to use TaskScheduler to run your tasks which is used in painlessMesh itself. The following line creates a new Scheduler called userScheduler.
Scheduler userScheduler; // to control your personal task
Create a painlessMesh object called mesh to handle the mesh network.
painlessMesh mesh;
Create a task called taskSendMessage responsible for calling the sendMessage() function every second as long as the program is running.
Task taskSendMessage(TASK_SECOND * 1 , TASK_FOREVER, &sendMessage);
The sendMessage() function sends a message to all nodes in the message network (broadcast).
void sendMessage() {
  String msg = "Hello from node 1";
  msg += mesh.getNodeId();
  mesh.sendBroadcast( msg );
  taskSendMessage.setInterval(random(TASK_SECOND * 1, TASK_SECOND * 5));
}
The message contains the “Hello from node 1” text followed by the board chip ID.
To broadcast a message, simply use the sendBroadcast() method on the mesh object and pass as argument the message (msg) you want to send.
mesh.sendBroadcast(msg);
Every time a new message is sent, the code changes the interval between messages (one to five seconds).
taskSendMessage.setInterval(random(TASK_SECOND * 1, TASK_SECOND * 5));
Next, several callback functions are created that will be called when specific events happen on the mesh. The receivedCallback() function prints the message sender (from) and the content of the message (msg.c_str()).
void receivedCallback( uint32_t from, String &msg ) {
  Serial.printf("startHere: Received from %u msg=%s\n", from, msg.c_str());
}
The newConnectionCallback() function runs whenever a new node joins the network. This function simply prints the chip ID of the new node. You can modify the function to do any other task.
void newConnectionCallback(uint32_t nodeId) {
  Serial.printf("--> startHere: New Connection, nodeId = %u\n", nodeId);
}
The changedConnectionCallback() function runs whenever a connection changes on the network (when a node joins or leaves the network).
void changedConnectionCallback() {
  Serial.printf("Changed connections\n");
}
The nodeTimeAdjustedCallback() function runs when the network adjusts the time, so that all nodes are synchronized. It prints the offset.
void nodeTimeAdjustedCallback(int32_t offset) {
  Serial.printf("Adjusted time %u. Offset = %d\n", mesh.getNodeTime(),offset);
}
In the setup(), initialize the serial monitor. Choose the desired debug message types:
//mesh.setDebugMsgTypes( ERROR | MESH_STATUS | CONNECTION | SYNC | COMMUNICATION | GENERAL | MSG_TYPES | REMOTE ); // all types on

mesh.setDebugMsgTypes( ERROR | STARTUP );  // set before init() so that you can see startup messages
Initialize the mesh with the details defined earlier.
mesh.init(MESH_PREFIX, MESH_PASSWORD, &userScheduler, MESH_PORT);
Assign all the callback functions to their corresponding events.
mesh.onReceive(&receivedCallback);
mesh.onNewConnection(&newConnectionCallback);
mesh.onChangedConnections(&changedConnectionCallback);
mesh.onNodeTimeAdjusted(&nodeTimeAdjustedCallback);
Finally, add the taskSendMessage function to the userScheduler. The scheduler is responsible for handling and running the tasks at the right time.
userScheduler.addTask(taskSendMessage);
Finally, enable the taskSendMessage, so that the program starts sending the messages to the mesh.
taskSendMessage.enable();
To keep the mesh running, add mesh.update() to the loop().
void loop() {
  // it will run the user scheduler as well
  mesh.update();
}
Troubleshooting
Q1: Why can't I connect to the XIAO ESP32S3 hotspot when I am using the softAP example?
This may be caused by insufficient antenna strength of XIAO ESP32S3 or overheating of XIAO ESP32S3. After testing, the XIAO ESP32S3's chip can reach a maximum temperature of 50 degrees Celsius when using this example. This may lead to network abnormalities if run for a long time. At this time, you can cool down and retry again.
If the cause of overheating is ruled out, then it is possible that the antenna signal is the cause of the problem. The strength of the included antenna cannot support high-intensity network work in general, so you can purchase a suitable stick antenna to use if needed.
Q2: Why does the XIAO ESP32-S3 Plus have weaker network signal than the XIAO ESP32-S3? Are there any solutions?
If you purchased the product before August 2025, you may experience poor network signal issues. Products purchased after that date have had this issue resolved and do not require a software fix.
It is possible to add a code segment for adjusting power inside all codes that use WiFi, and by adjusting the transmit power, the signal strength can be significantly improved.
Such as the following code snippet, is added to adjust the power of the function inside the Setup().
    // 1. Set WiFi to Station mode
    WiFi.mode(WIFI_STA);

    // 2. Adjust WiFi transmit power (Key correction)
    int8_t power_dbm = 15;
    int8_t power_param = (int8_t)(power_dbm / 0.25);
    esp_err_t err = esp_wifi_set_max_tx_power(power_param);

    if (err == ESP_OK) {
        Serial.print("Successfully set WiFi TX Power to: ");
        Serial.print(power_dbm);
        Serial.println(" dBm");
    } else {
        Serial.println("Failed to set WiFi TX Power.");
    }

    // 3. Start connecting to WiFi
    WiFi.begin(ssid, password);

    Serial.print("Connecting to WiFi network: ");
    Serial.println(ssid);
It has been verified that setting the power to the above code gives the best results.
Citations & References
This article draws on the web content Random Nerd Tutorials' on ESP32 and uses it verified on the Seeed Studio XIAO ESP32S3.
Special thanks to the authors of Random Nerd Tutorials for their hard work!
The following is the reference link to the original article, you are welcome to learn more about ESP32 network through the following link to the original article.
- ESP32 Useful Wi-Fi Library Functions (Arduino IDE)
- ESP32 MQTT – Publish and Subscribe with Arduino IDE
- ESP-MESH with ESP32 and ESP8266: Getting Started (painlessMesh library)
For more information about using the ESP32 development board, please read the official website of Random Nerd Tutorials.
Tech Support & Product Discussion
Thank you for choosing our products! We are here to provide you with different support to ensure that your experience with our products is as smooth as possible. We offer several communication channels to cater to different preferences and needs.