Miniature ChatGPT Voice Assistant based on XIAO ESP32S3
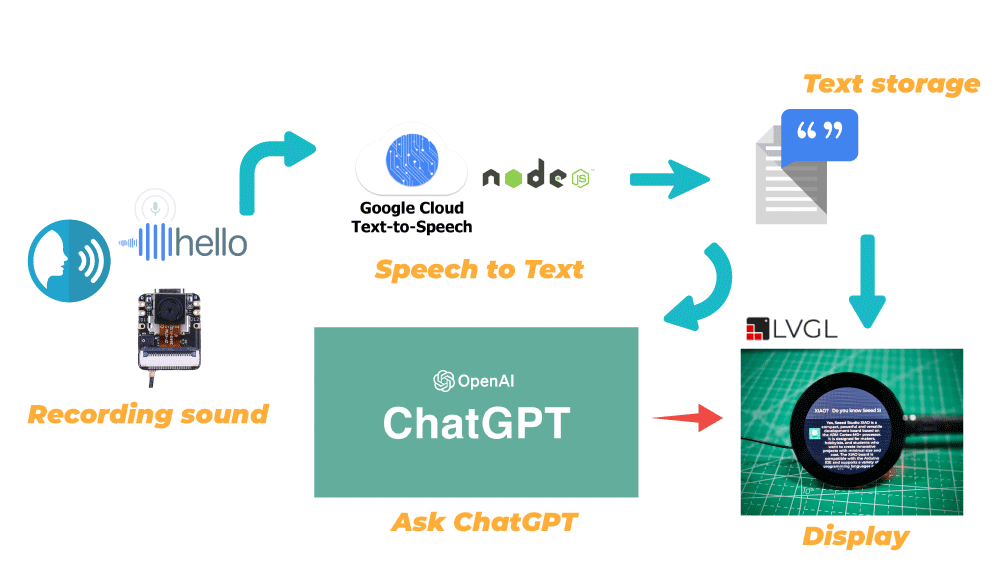
We are pleased to bring you today a brand new project using the XIAO ESP32S3 Sense and Round Display for XIAO! The project aims to first build a speech recognition system using the XIAO ESP32S3 Sense's microphone and Google Cloud's speech-to-text service. The recognized speech text is then used to call OpenAI's interface to ask questions to ChatGPT and return answers. Finally, we display the recognised speech and the content of the answers on screen.
This is our intelligent "XIAO" assistant!
Let's take a look at some of the general steps required to complete this project.
- Sign up and enable Google Cloud Speech to Text service
- Deploy speech-to-text services on local hosts
- Upload XIAO ESP32S3 Sense recorded sound files to Google Cloud for recognition
- Deploy ChatGPT on XIAO ESP32S3 Sense
- Design of screen display content & Integration of programs
The general framework structure can be seen in the diagram below.
Getting Started
Before you start this project, you may need to prepare your hardware and software in advance as described here.
Hardware preparation
If you want to experience the entire programme content in full, you need to have at least the following hardware equipment.
| Seeed Studio XIAO ESP32S3 Sense | Seeed Studio Round Display for XIAO |
|---|---|
 |  |
In addition to this, we need a microSD card in FAT32 format no larger than 32GB to store the recording files.
Since the XIAO EPS32S3 Sense is designed with three pull-up resistors R4~R6 connected to the SD card slot, and the round display also has pull-up resistors, the SD card cannot be read when both are used at the same time. To solve this problem, we need to cut off J3 on the XIAO ESP32S3 Sense expansion board.
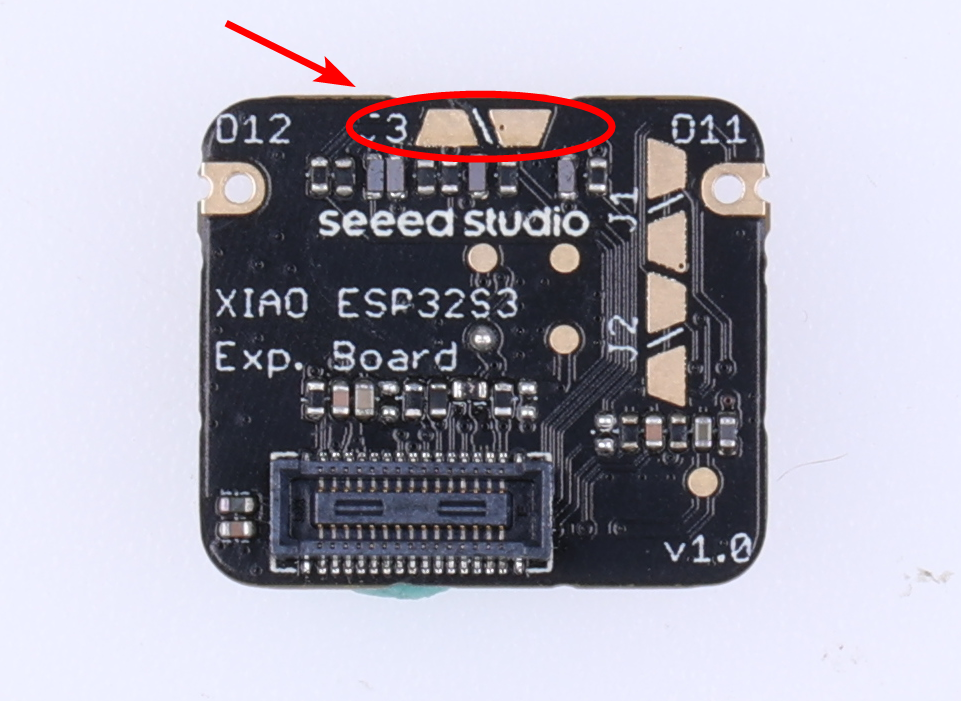
After disconnecting J3, the SD card slot on XIAO ESP32S3 Sense will not work properly, so you need to insert a microSD card into the SD card slot on the Round Display.
Next, please install the microSD card, XIAO ESP32S3 Sense and Round Display in order.
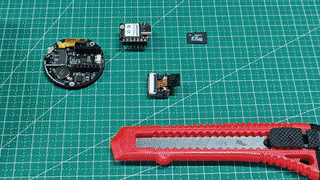
We recommend that you remove the camera module first to avoid scratching the camera when you cut the J3 connection with the blade.
Software preparation
As the XIAO ESP32S3 is used, please install the XIAO ESP32S3 on-board package according to the Wiki instructions before you start.
In addition to this, we also use the Round Display for XIAO, so you will also need to prepare the library for the expansion board as per the Wiki.
During the project, we may also use some third-party libraries, such as ChatGPT's library and ArduinoJSON, which can be downloaded and added to the Arduino development environment here.
In addition to the basic libraries, we also need to use the Node service, so you will need to install Nodejs yourself, you can download it directly from the official website.
With everything in place, let's get started with today's tutorial.
Sign up and enable Google Cloud Speech to Text service
You can also refer directly to the official Google Cloud tutorial on how to register and start the Google Cloud speech-to-text service to configure it.
Speech-to-Text is an API that is powered by Google's artificial intelligence (AI) technology. You send your audio data to Speech-to-Text, then receive a text transcription of your audio data in response. Before you can begin sending requests to Speech-to-Text, you must enable the API in the Google Cloud console.
Step 1. Sign in to Google Cloud console
You can jump to the Google Cloud console by clicking here, and if you have not yet registered for Google Cloud you can do so here.
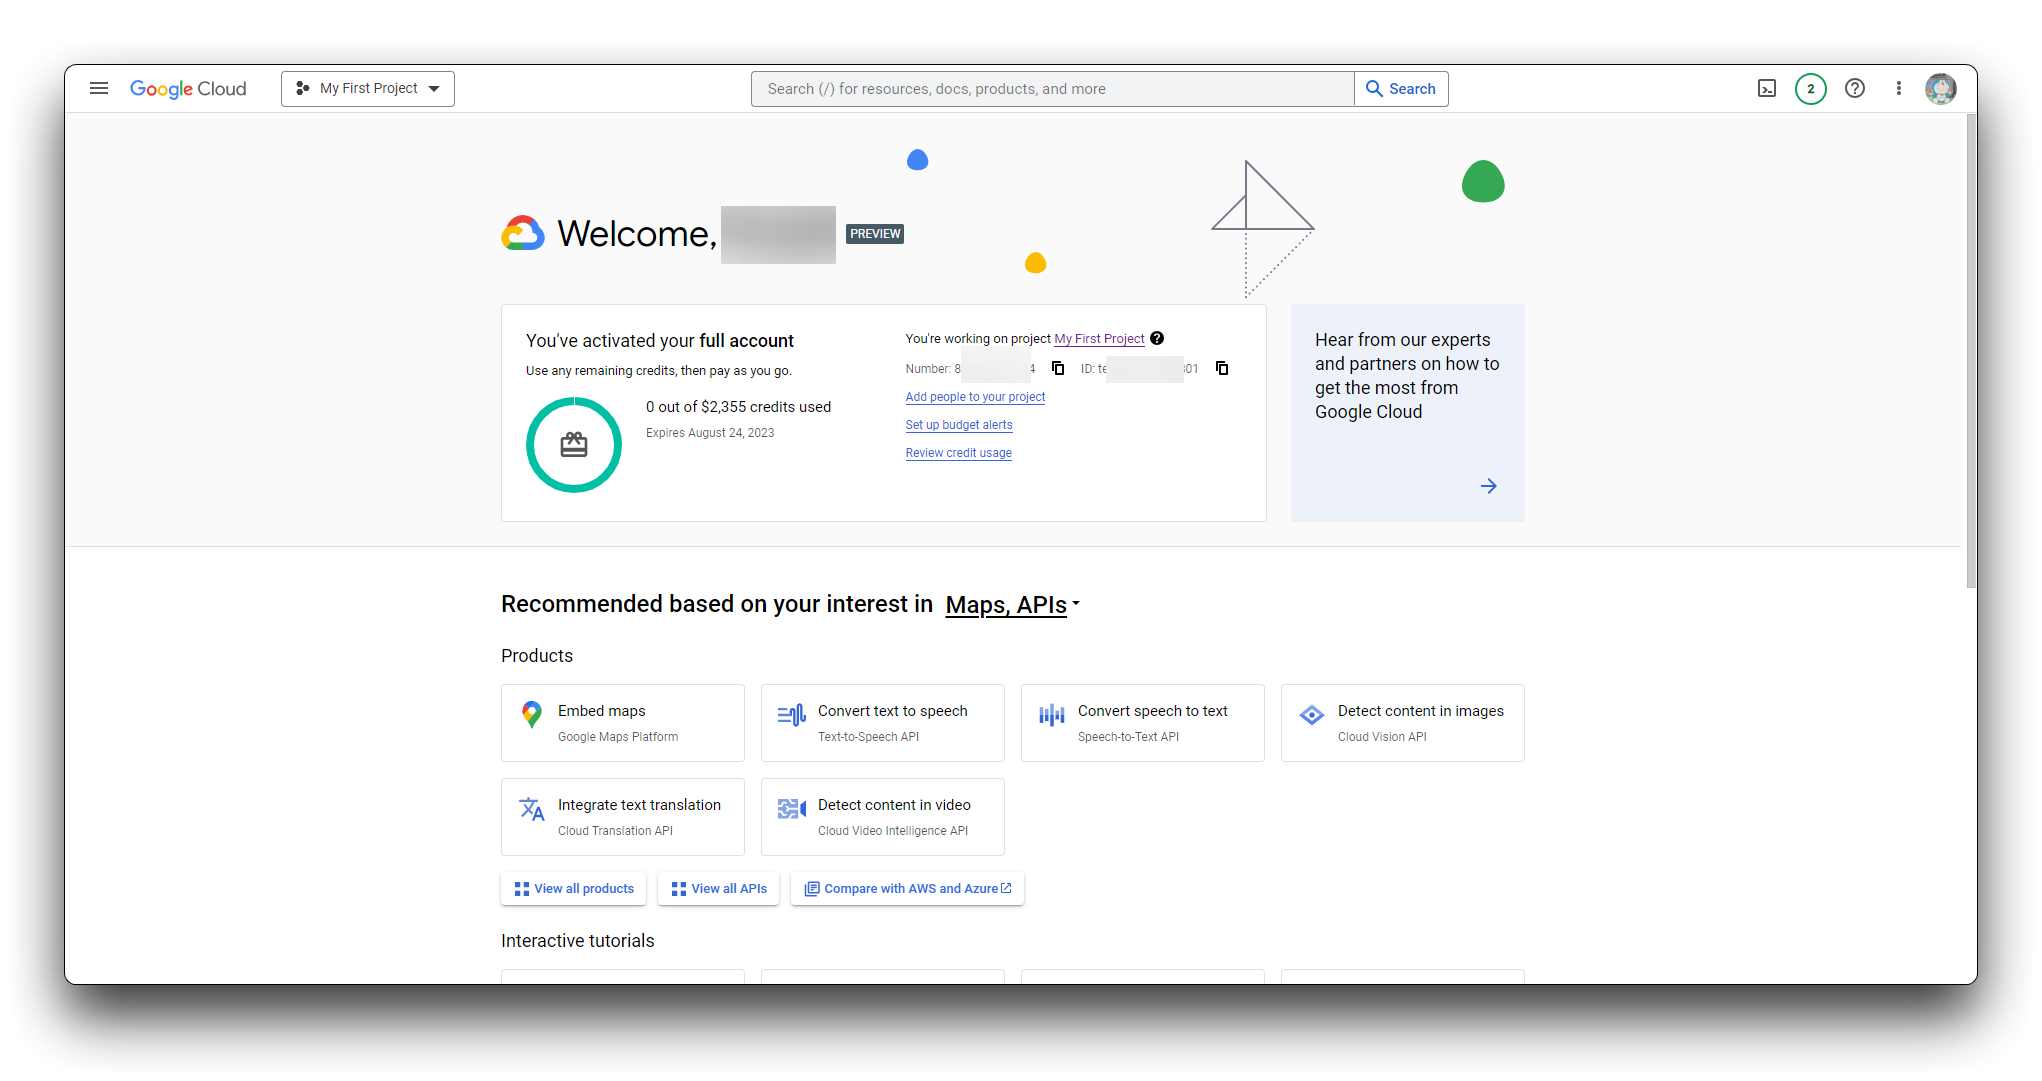
Step 2. Go to the project selector page
You can either choose an existing project or create a new one. For more information about creating a project, see Creating and managing projects.
If you create a new project, you will be prompted to link a billing account to this project. If you are using a pre-existing project, make sure that you have billing enabled.
Note: You must enable billing to use Speech-to-Text API, however you will not be charged unless you exceed the free quota. See the pricing page for more details.

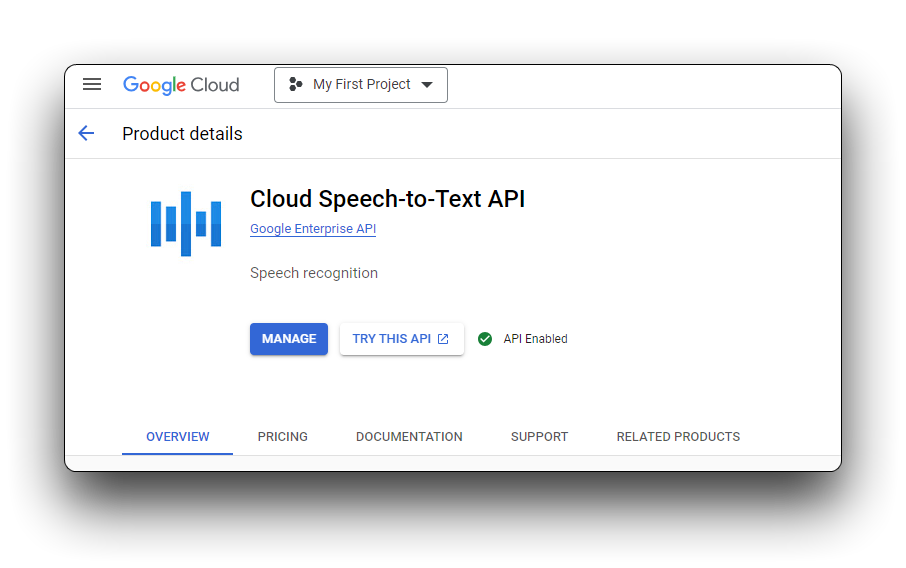
Step 3. Start a Speech-to-Text service
Once you have selected a project and linked it to a billing account, you can enable the Speech-to-Text API. Go to the Search products and resources bar at the top of the page and type in speech. Select the Cloud Speech-to-Text API from the list of results.
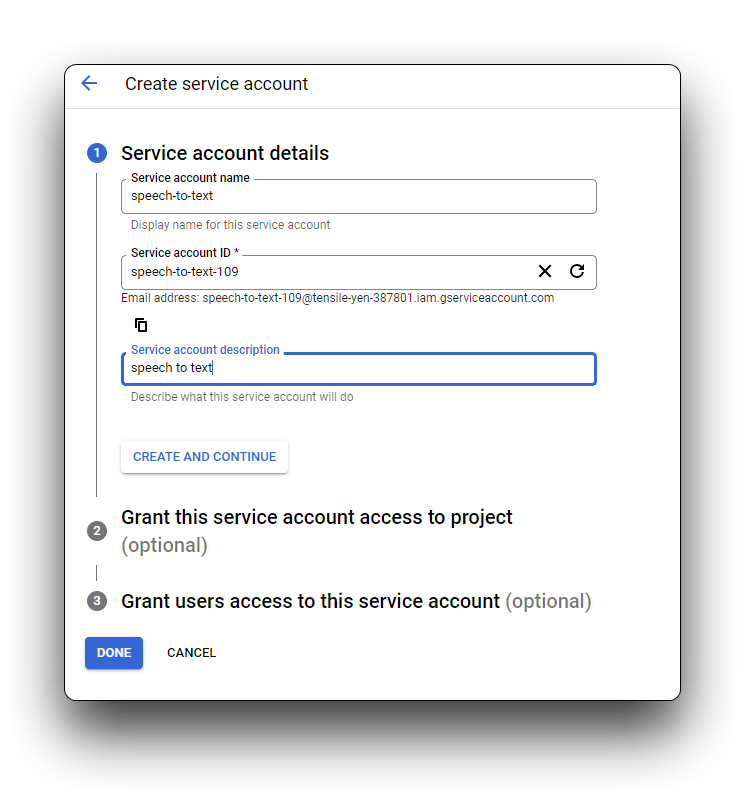
Step 4. Create a service account
Create a new service account if your project doesn't already have one. You must create a service account in order to use Speech-to-Text.
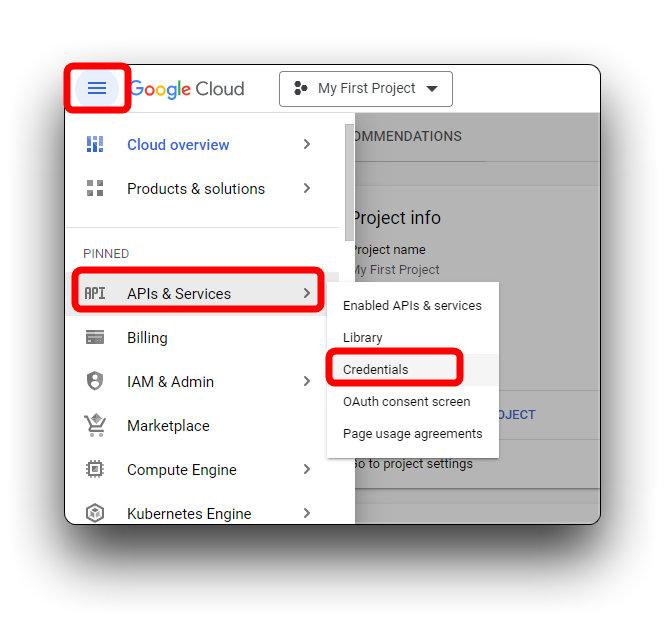
On the new pop-up page, select the Service account under CREATE CREDENTIALS.
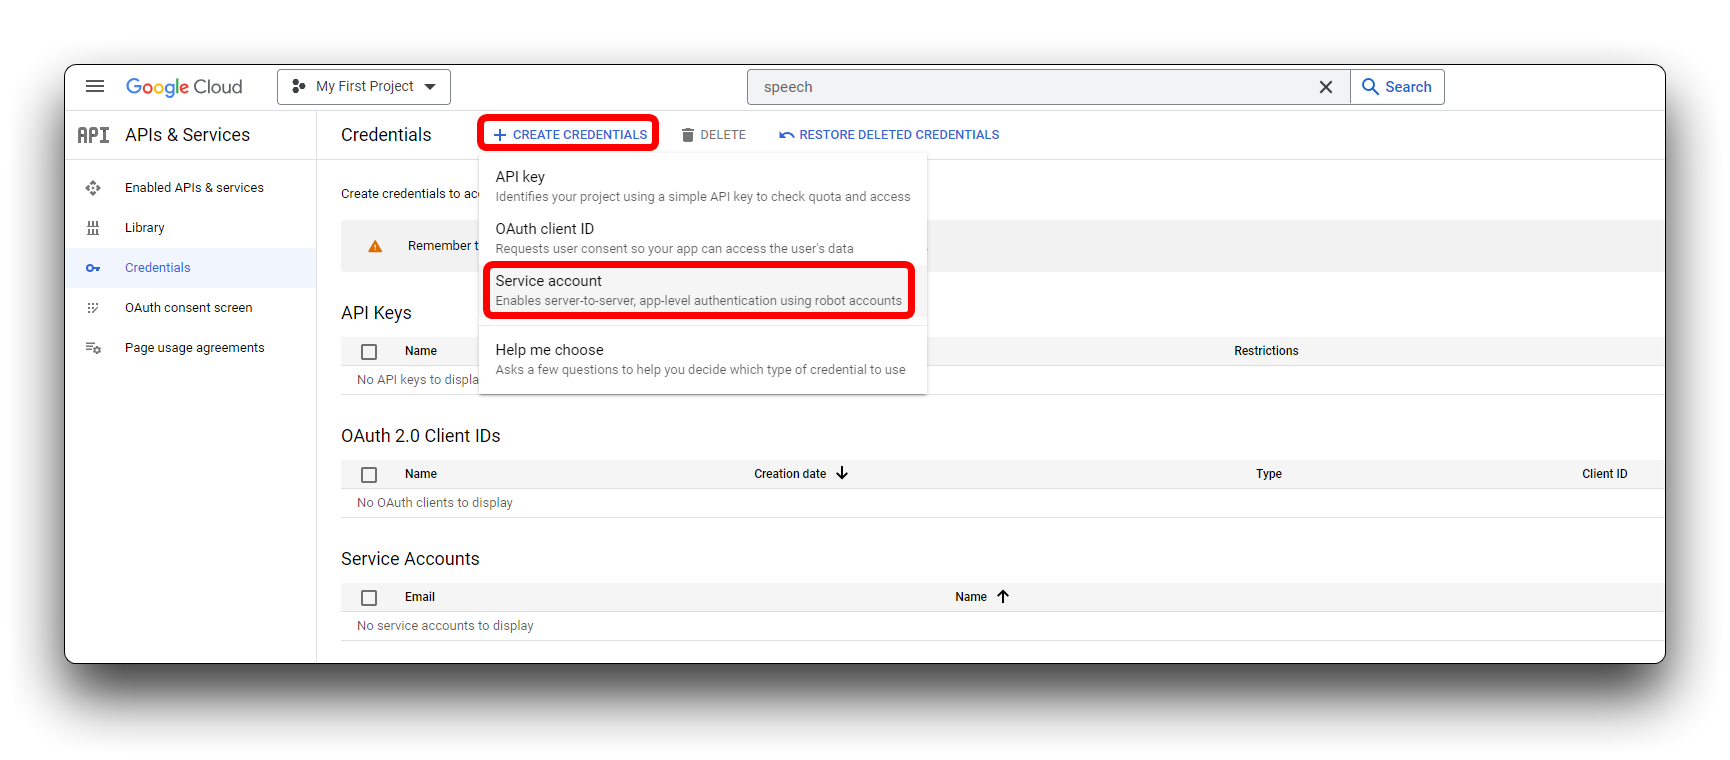
In the service account name box, type a unique name for the new service account. Your input is automatically populated in the Service account ID box. The Service account description box is optional but recommended if you plan to associate multiple service accounts with your project. Enter a brief description of the service account into this box, then click CREATE AND CONTINUE.
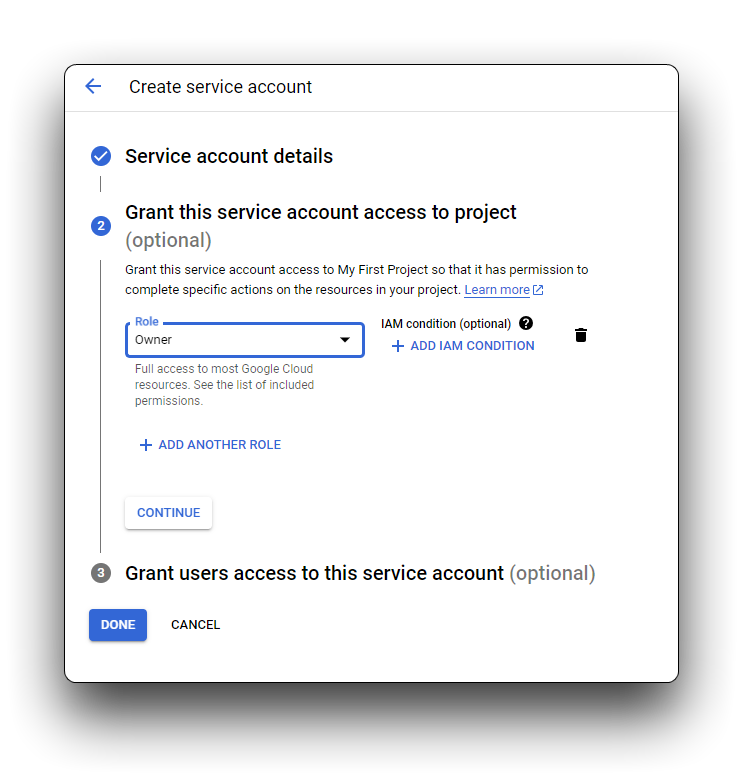
We recommend that you assign one of the basic IAM roles to your service account. You can also assign multiple roles to a single service account if needed. See IAM roles for details on available roles and the permissions allowed to each. Click on the drop-down Select a role menu and scroll down to Owner. You can choose a role for this service account from the options that appear in the right-hand column. Click CONTINUE.
The final step allows you to optionally allow other entities (individuals, Google groups, and so on) to access your service account. If you don't need to grant additional access, you can click DONE without entering any information.
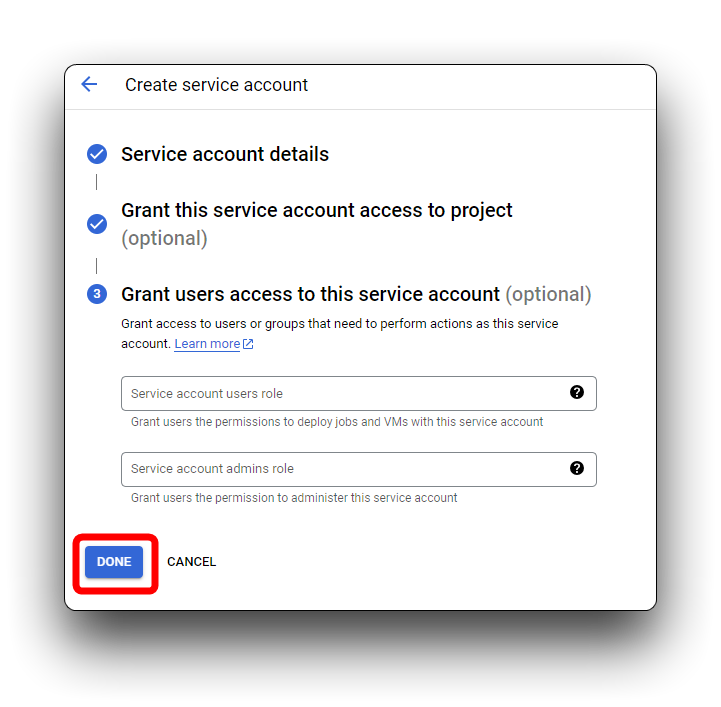
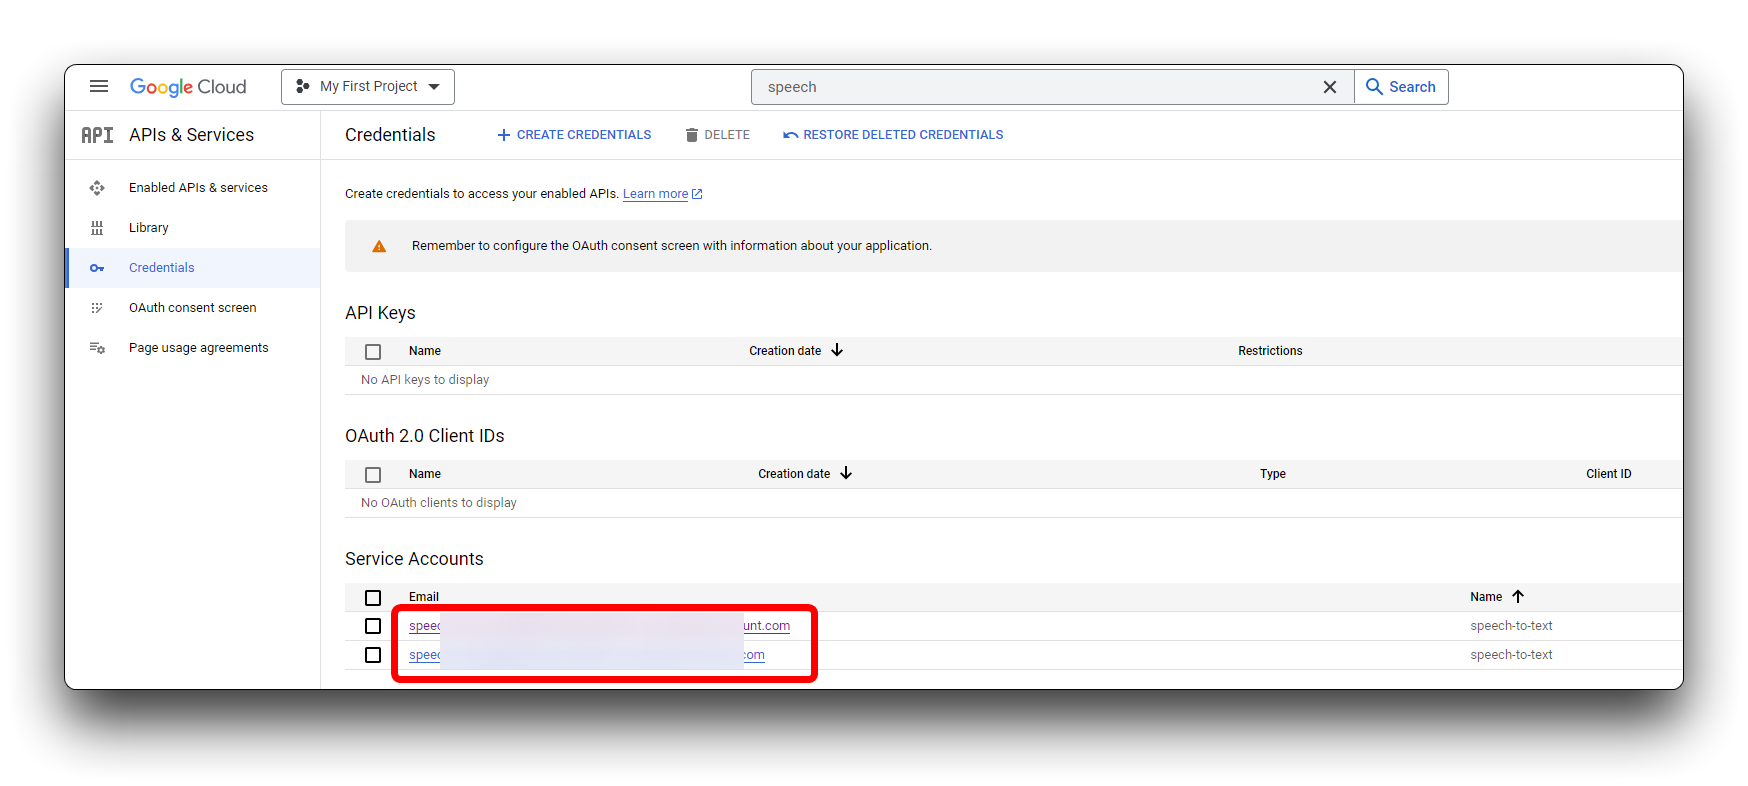
The service account is now listed on the Service Accounts page. You can change the service account's permissions, add or generate new keys, and grant access at any time.
Step 5. Create a JSON key for your service account
You need to use this private key during the authentication process when you send a request to Speech-to-Text.
To create a key, click on the service account and select the KEYS tab. Click ADD KEY -> Create new key. We recommend that you create a key in JSON format.
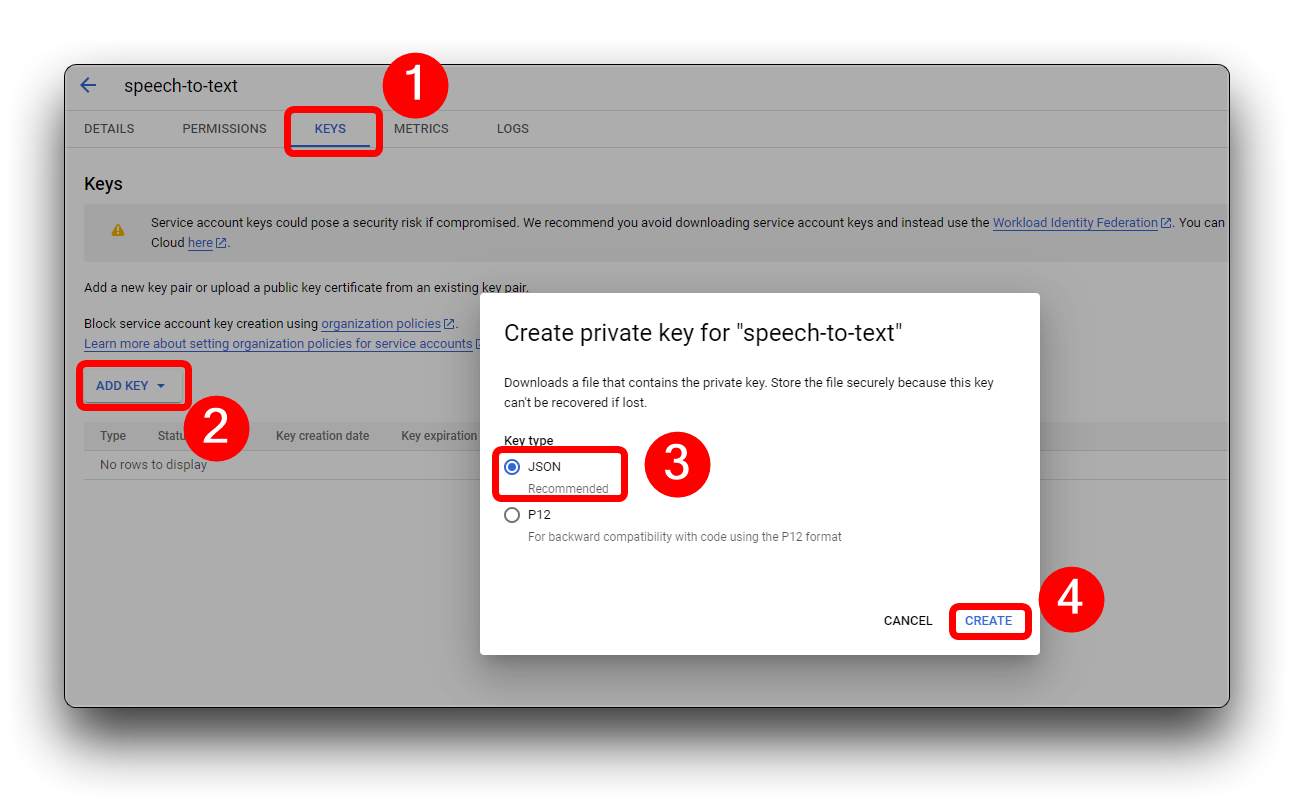
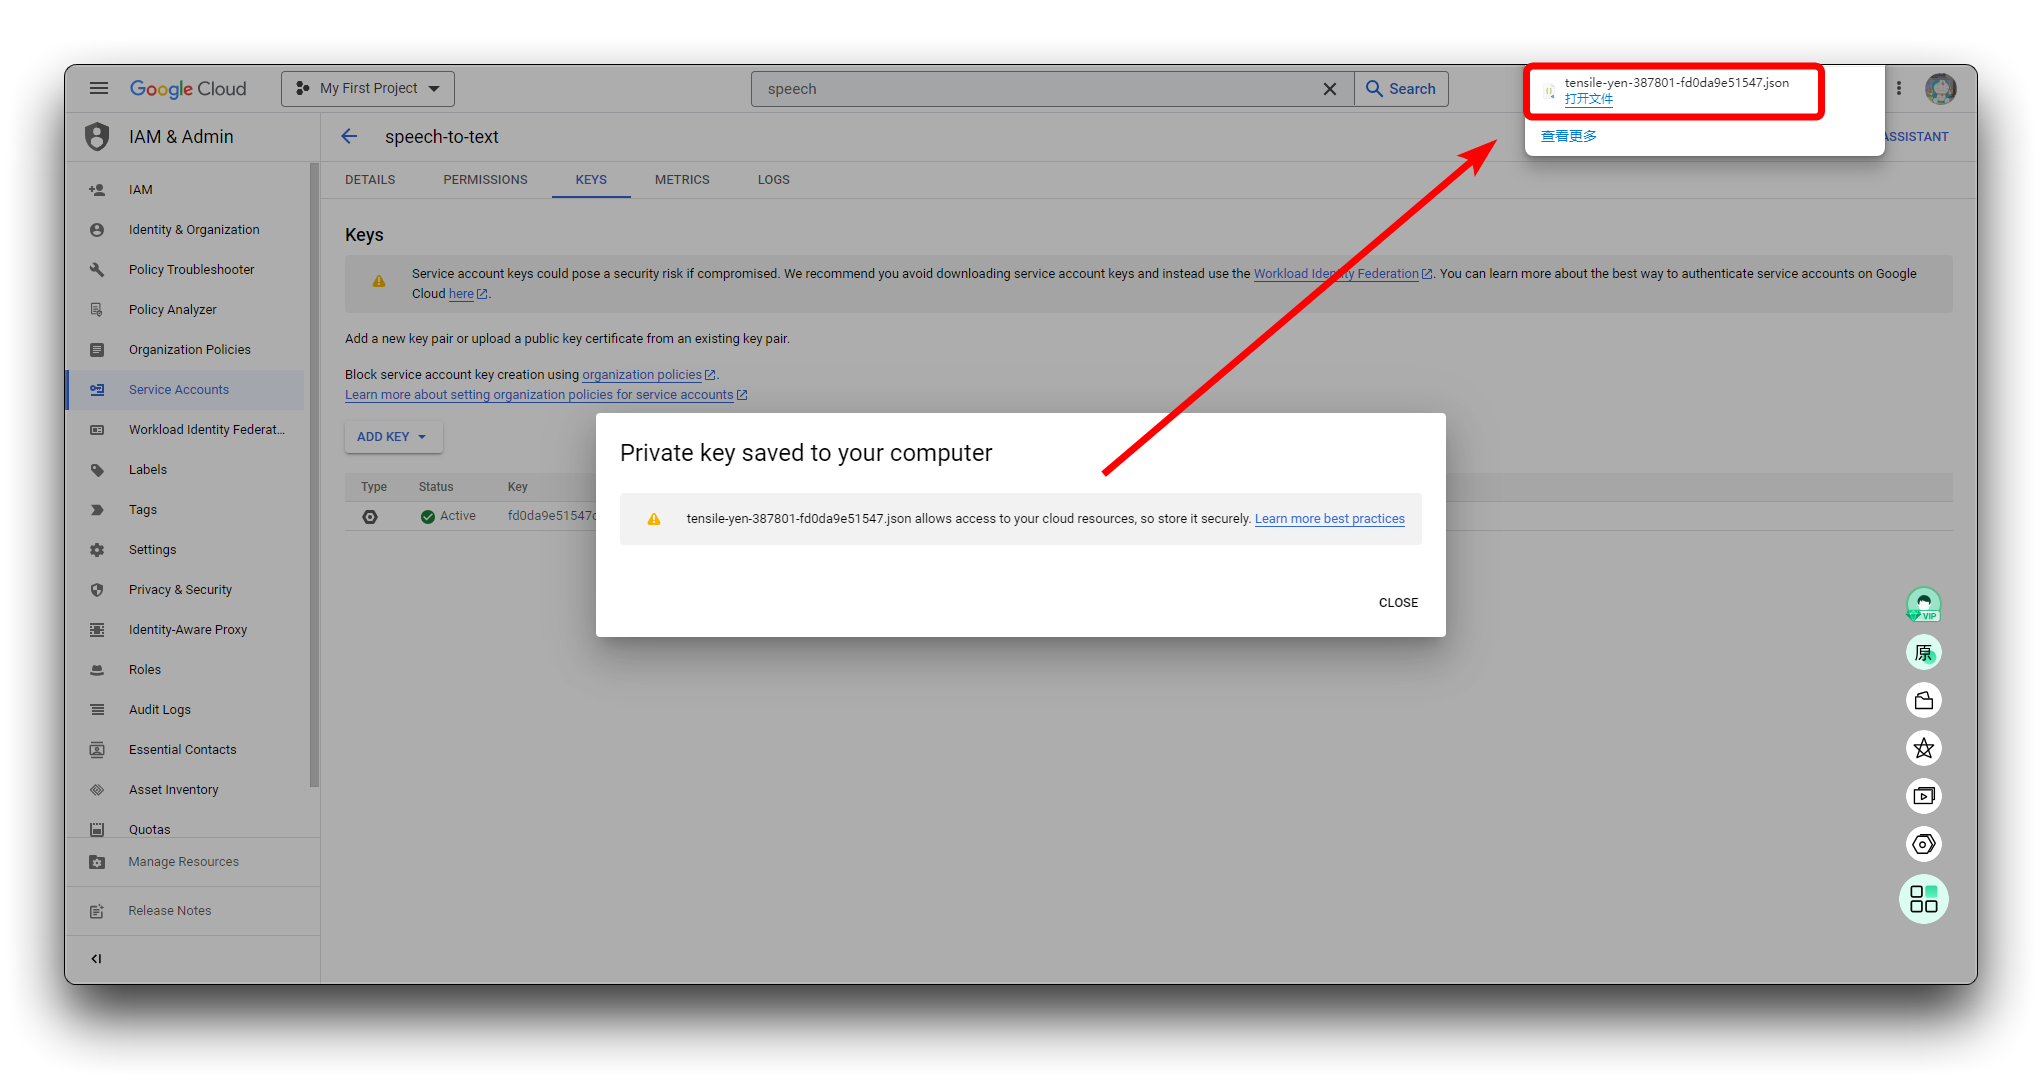
A new key in the format of your choice is automatically downloaded. Store this file in a safe location and make a note of the file path. You will need to point the GOOGLE_APPLICATION_CREDENTIALS environment variable to this file when you go through the authentication process at the beginning of each new Speech-to-Text session. This is an essential step for authenticating requests to Speech-to-Text. The key's unique ID appears next to the name of the service account.
Please keep the key in JSON format as we will use it in a later step.
Deploy speech-to-text services on local hosts
Step 6. Download the project file
We have packed the project file needed to complete the entire tutorial and you can download it directly from Github using the button below, or you can download it locally using the Git command.
git clone https://github.com/limengdu/XIAO-ESP32S3Sense-Speech2ChatGPT.git
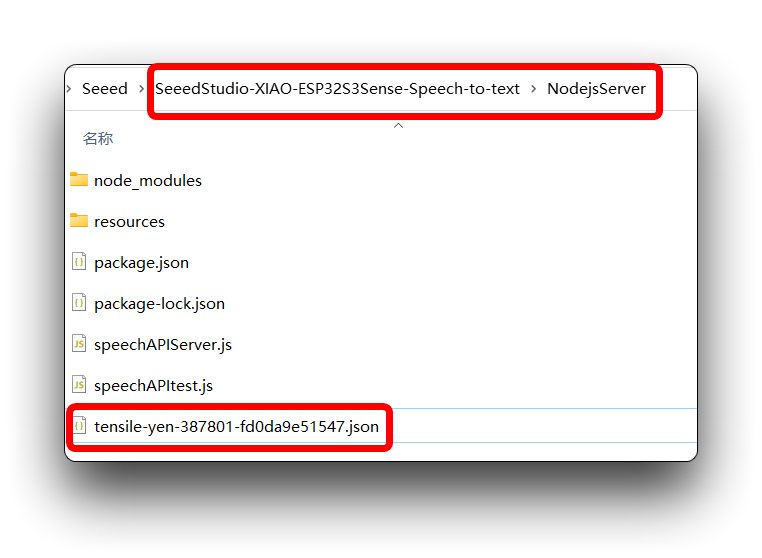
In the meantime, you can copy the JSON file we prepared in step 5 to the NodejsServer folder and we'll use it later.
Step 7. Set your authentication environment variable
In order to set your GOOGLE_APPLICATION_CREDENTIALS, you must have a service account associated with your project and have access to the service account's JSON key.
Provide authentication credentials to your application code by setting the environment variable GOOGLE_APPLICATION_CREDENTIALS.
- Windows
- MacOS or Linux
For PowerShell:
$env:GOOGLE_APPLICATION_CREDENTIALS="KEY_PATH"
Replace KEY_PATH with the path of the JSON file that contains your service account key.
For example:
$env:GOOGLE_APPLICATION_CREDENTIALS="C:\Users\username\Downloads\service-account-file.json"
For command prompt:
set GOOGLE_APPLICATION_CREDENTIALS=KEY_PATH
Replace KEY_PATH with the path of the JSON file that contains your service account key.
export GOOGLE_APPLICATION_CREDENTIALS="KEY_PATH"
Replace KEY_PATH with the path of the JSON file that contains your service account key.
For example:
export GOOGLE_APPLICATION_CREDENTIALS="/home/user/Downloads/service-account-file.json"
In the previous step, we have placed the JSON file in the NodejsServer folder, so we can go directly to that folder, right click and select Open in Powershell to enter the Windows terminal.
Then just enter the command.
$env:GOOGLE_APPLICATION_CREDENTIALS="tensile-yen-3xxxxx-fdxxxxxxxxxx.json"
Please use your JSON filename when executing the above command.
If you have restarted your computer or closed Powershell, this may require you to reconfigure your environment variables to add the key.
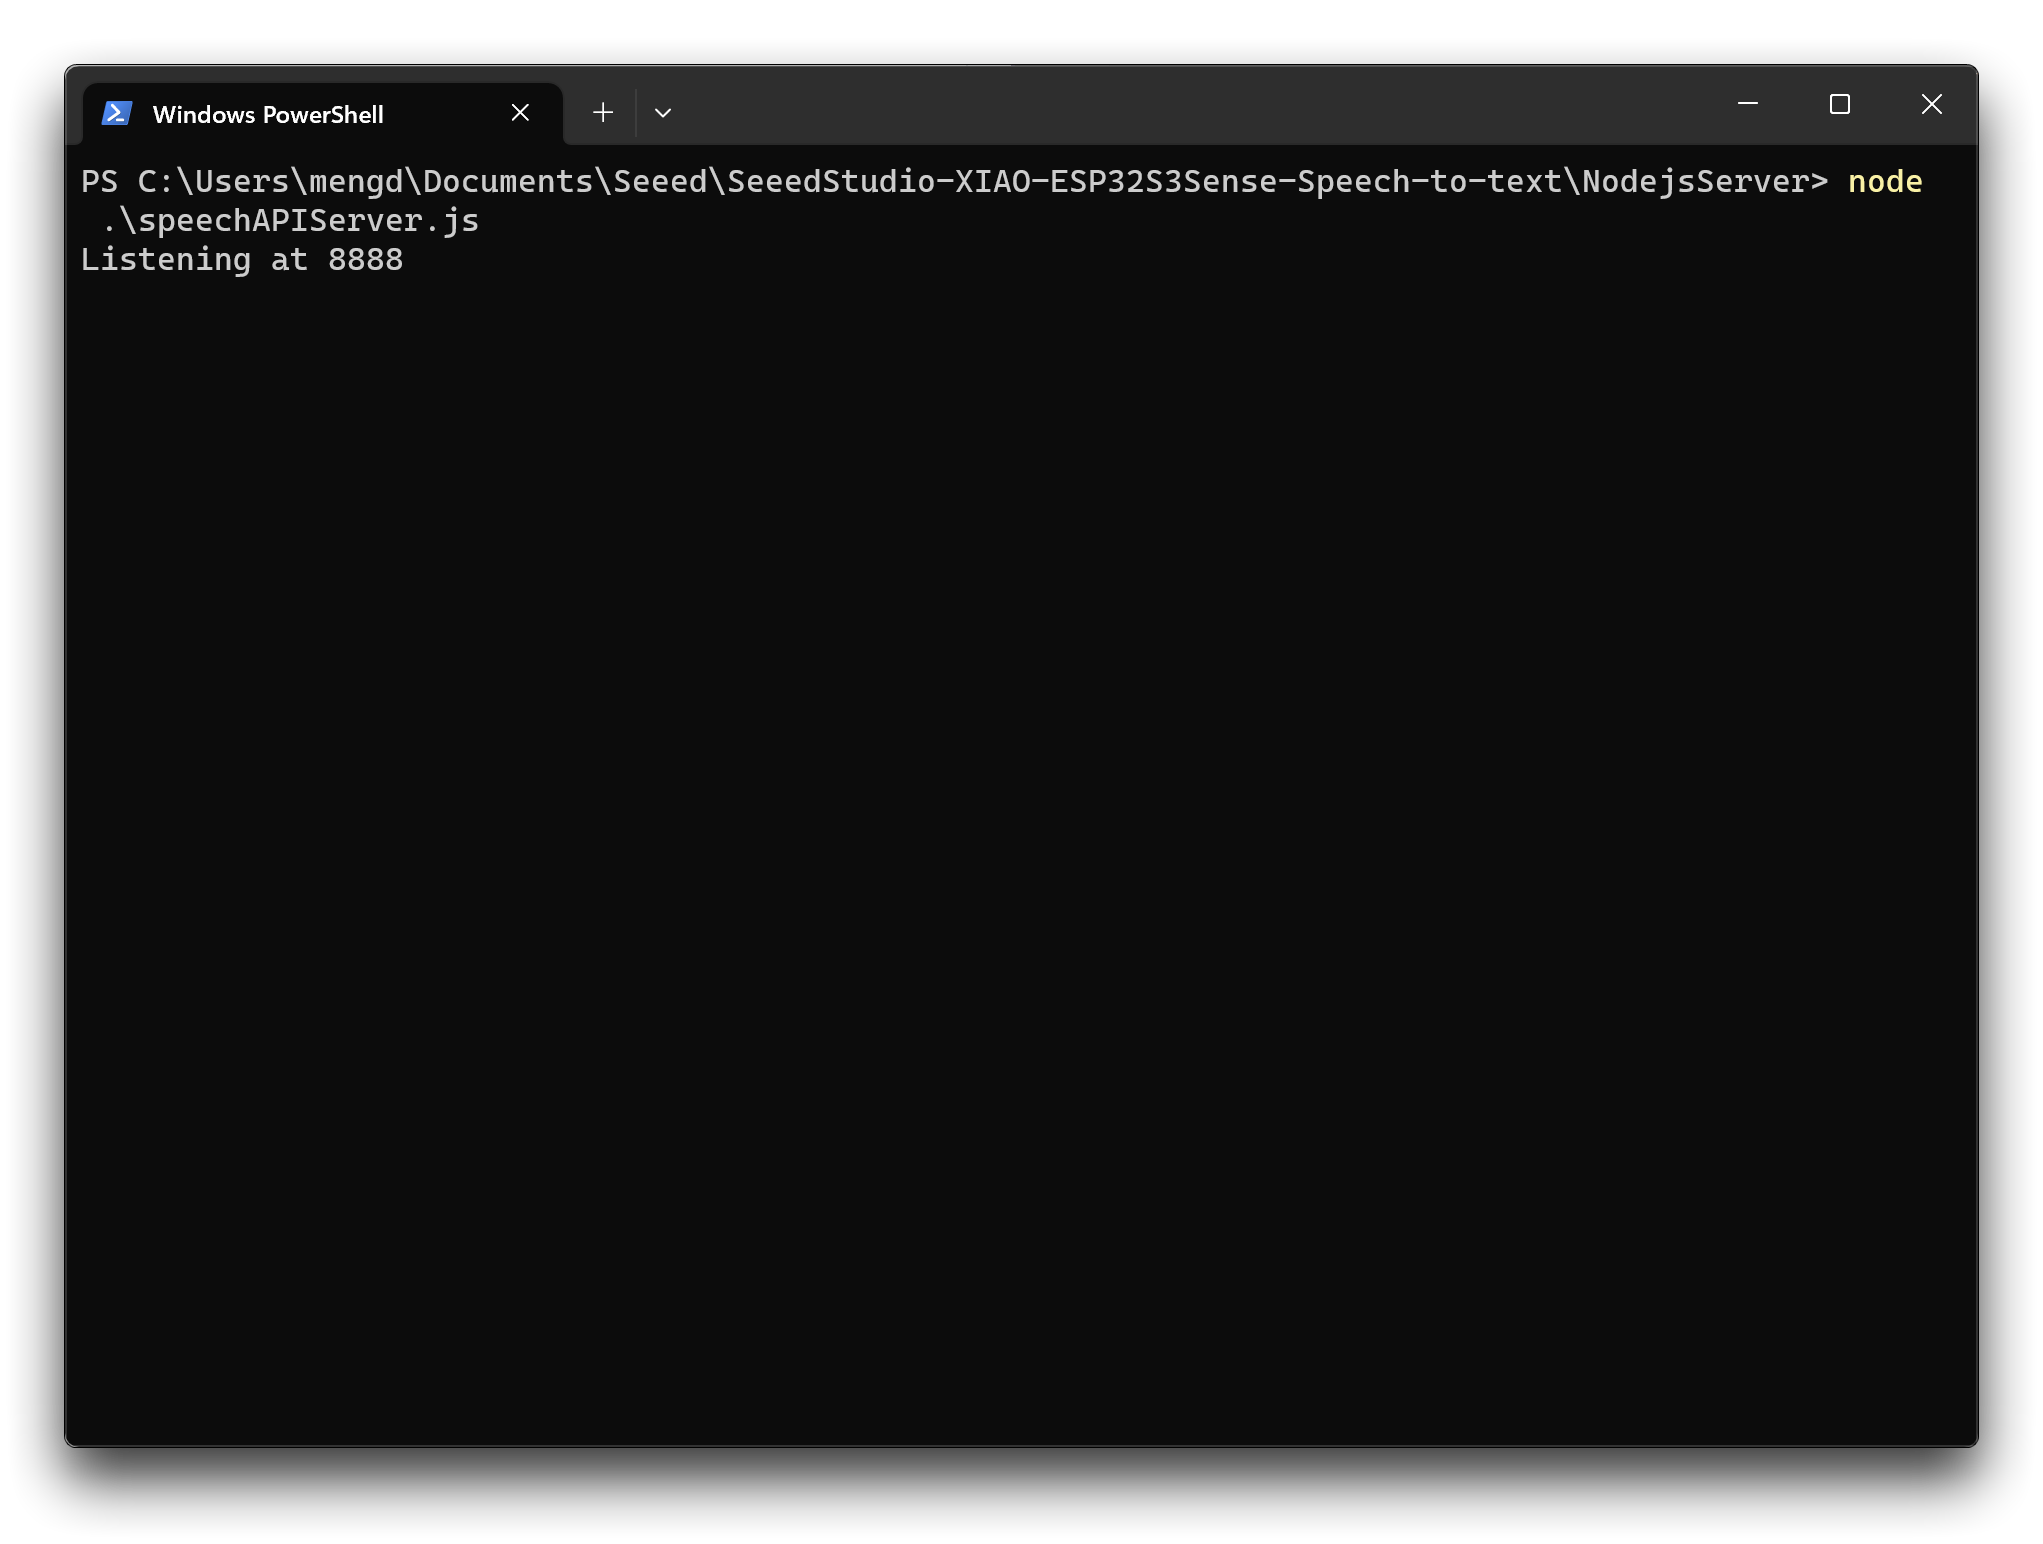
Step 8. Testing the deployment of a local Google Cloud speech-to-text service
With everything in place, we can then use a piece of recorded audio, combined with a json program, to check that our deployment is successful in getting the recording to text.
Please open a Powershell window in NodejsServer in the project folder.
Then enter the following command. This command will execute the speechAPItest.js file and use the recording file in the resources folder of the project as the audio input source to send to Google Cloud for analysis and return the recognised speech content.
node ./speechAPItest.js
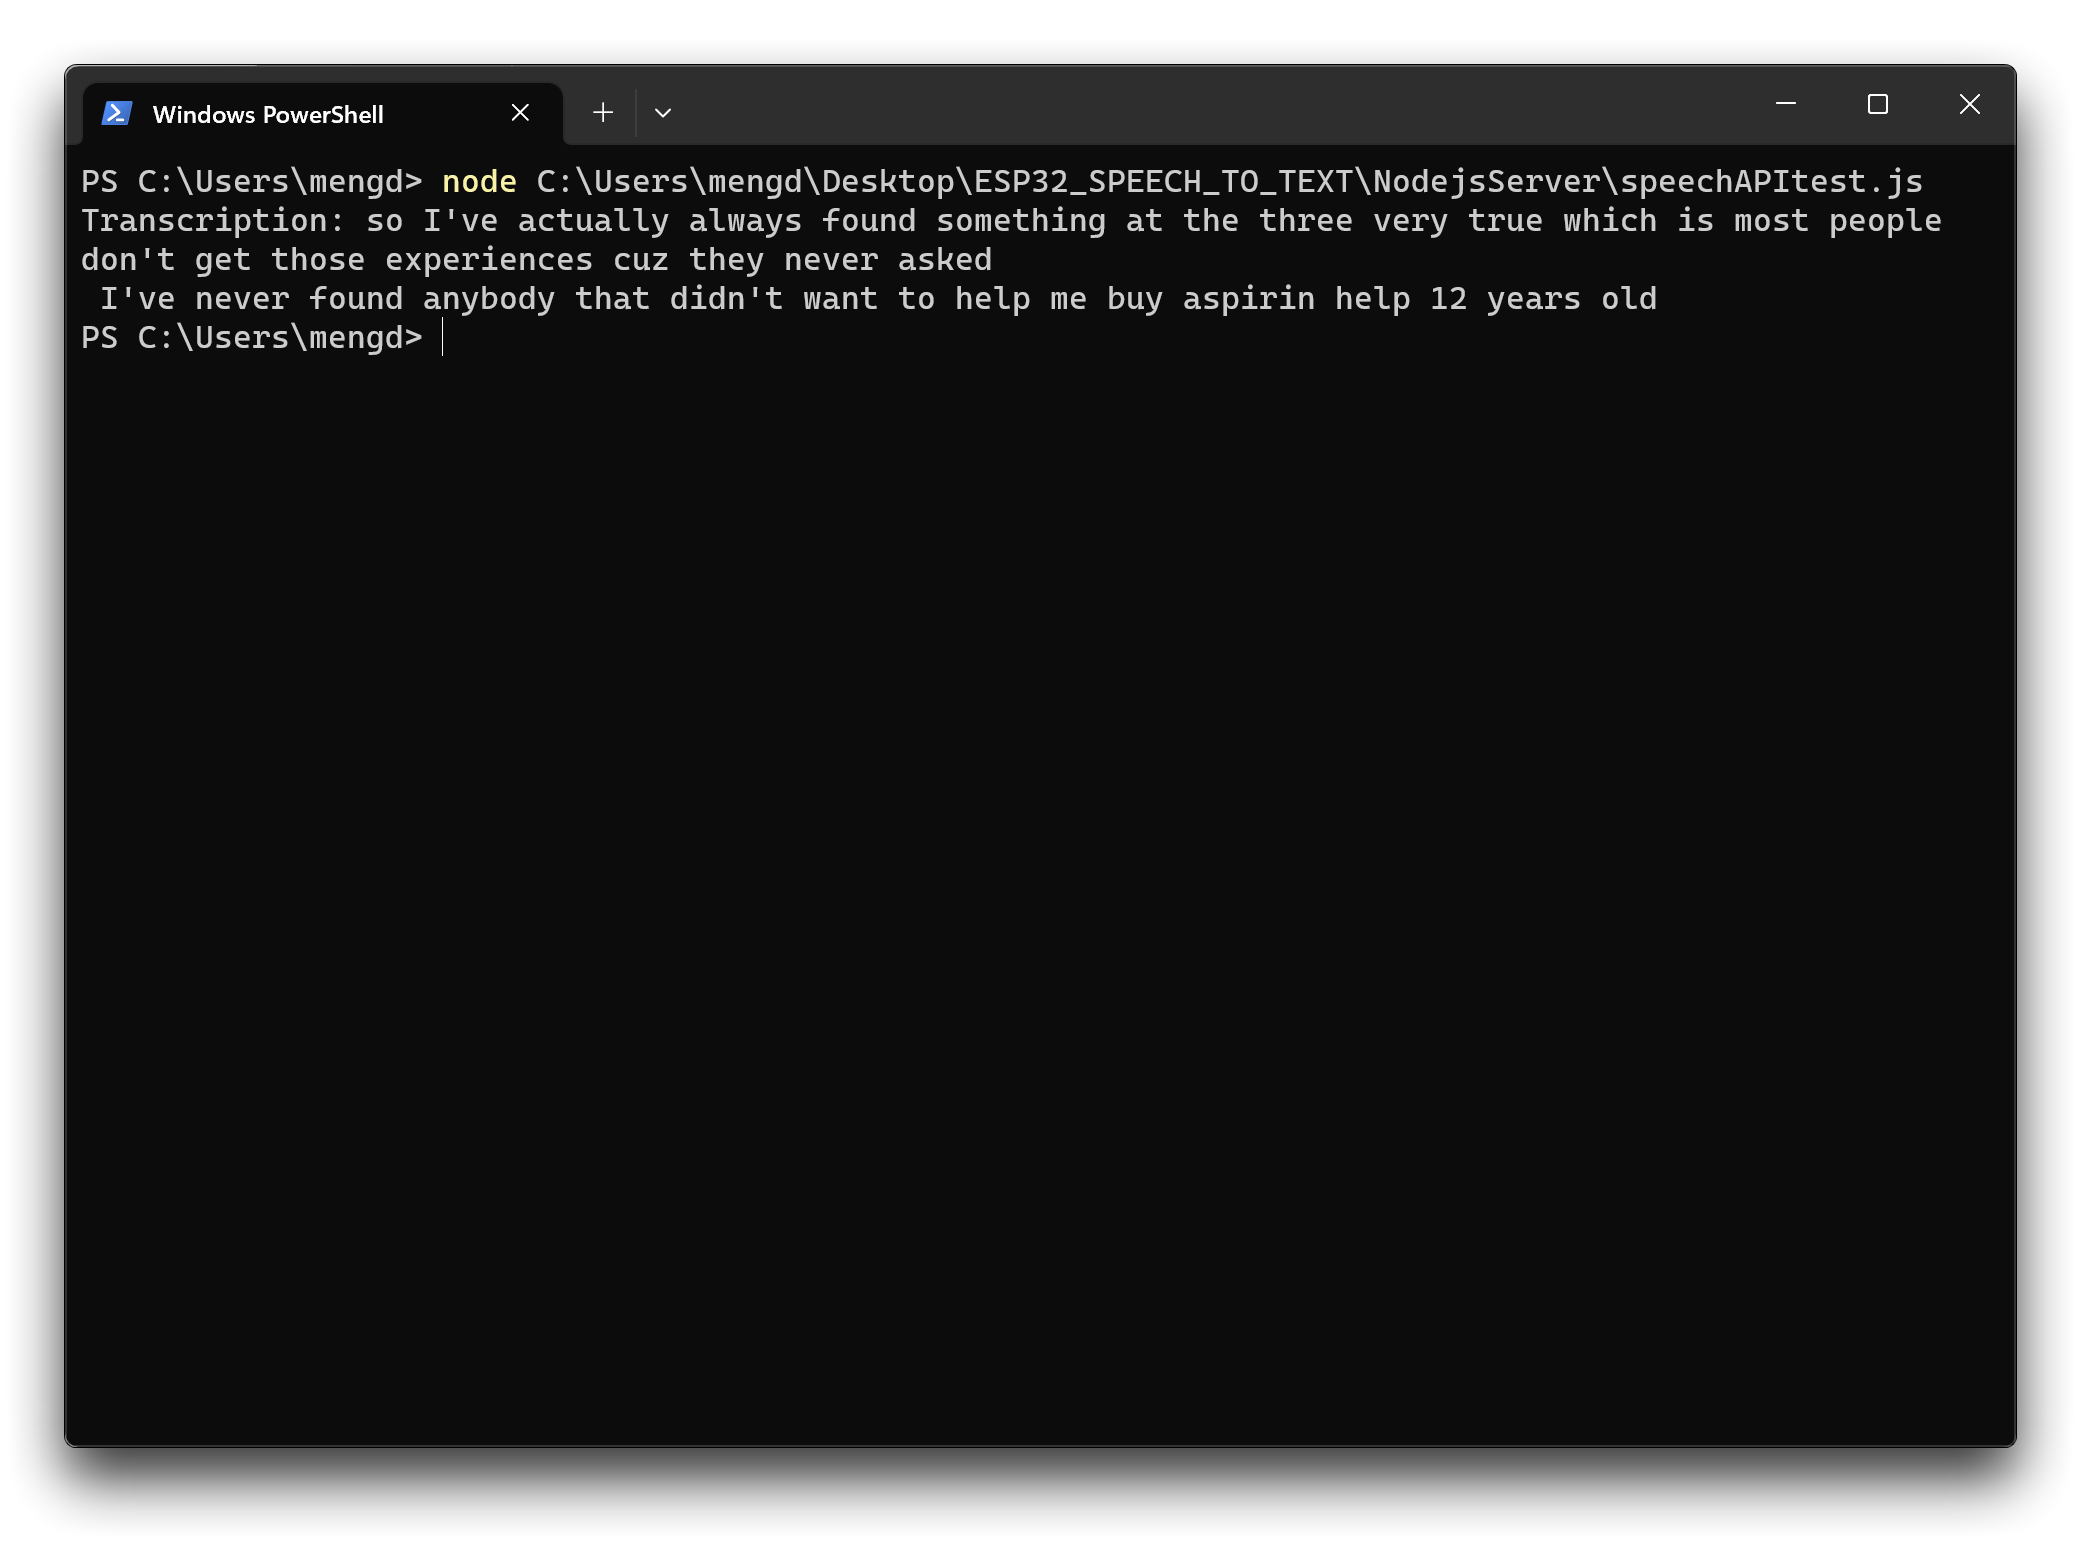
If your implementation works as shown above, this indicates that you have successfully deployed Google Cloud Services on your local host and are ready to proceed to the next step.
If you encounter problems, you can consult the official Google Cloud instructions to check if there are any errors or missing steps in the deployment process.
Upload XIAO ESP32S3 Sense recorded sound files to Google Cloud for recognition
Next, we change the path to the uploaded audio file. From a local upload to an upload via XIAO ESP32S3 Sense recording. And the audio files recorded by the XIAO ESP32S3 Sense are first saved to a microSD card and then transferred to Google Cloud by way of the local port.
Step 9. Turn on port listening for Google Cloud Speech Recognition Service
Similarly, in the NodejsServer folder, use Poweshell to execute the following command.
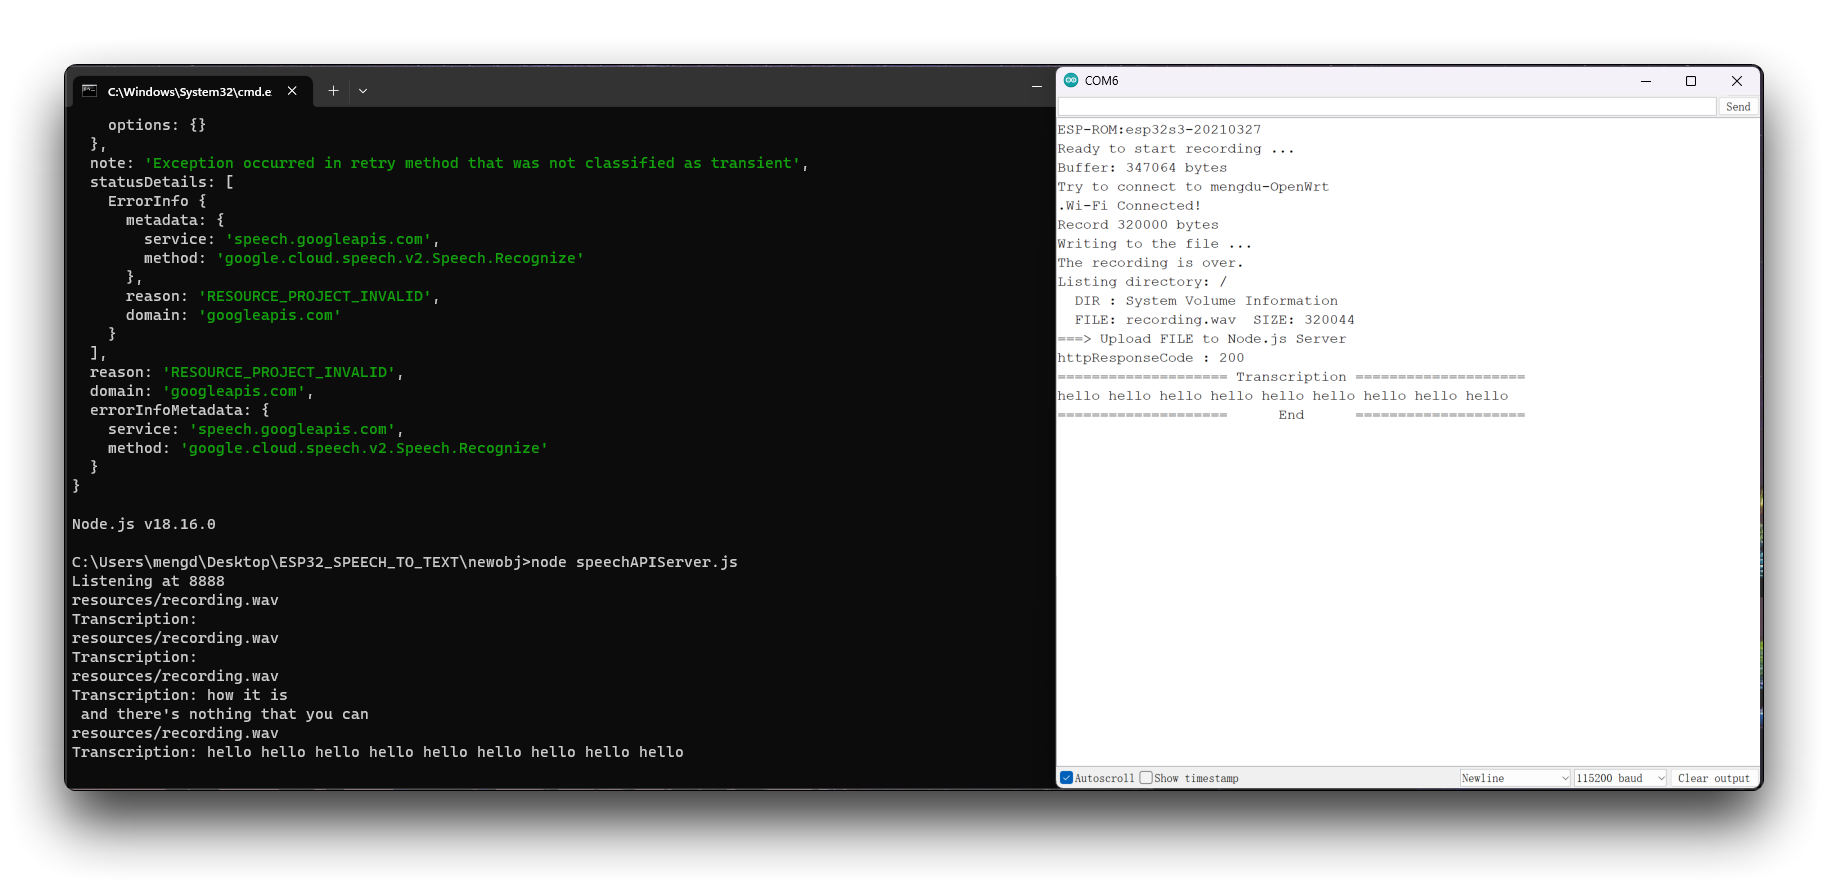
node ./speechAPIServer.js
Once executed, the speechAPIServer.js program will be executed and will continuously listen to localhost:8888. Once a file is transferred to this port, the Google Cloud service will be called.
Once the listening has started, just leave the window open and the service will stay up.
Step 10. Check the host IP address
Because the recording files after XIAO need to be uploaded to Google Cloud Services via the host's port number, we need to know the IP address of your computer host.
- Windows
- MacOS or Linux
Execute the following command in Powershell to obtain information on the IP address of your computer.
ipcofig
Execute the following command in shell to obtain information on the IP address of your computer.
ifconfig
Please make a note of your IP address as we will need to use it later.
Step 11. Uploading programs for the XIAO ESP32S3 Sense
In the project folder XIAOESP32S3-RECORD-UPLOAD we have prepared the program for the examples in this section.
If your ESP32 version is 2.0.x. Click here to preview the full program
#include <I2S.h>
#include <WiFi.h>
#include <HTTPClient.h>
#include "FS.h"
#include "SD.h"
#include "SPI.h"

//Variables to be used in the recording program, do not change for best
#define SAMPLE_RATE 16000U
#define SAMPLE_BITS 16
#define WAV_HEADER_SIZE 44
#define VOLUME_GAIN 2
#define RECORD_TIME 10      // seconds, The maximum value is 240

// Number of bytes required for the recording buffer
uint32_t record_size = (SAMPLE_RATE * SAMPLE_BITS / 8) * RECORD_TIME;

File file;
const char filename[] = "/recording.wav";

bool isWIFIConnected;

void setup() {
  // put your setup code here, to run once:
  Serial.begin(115200);
  while (!Serial) ;

  I2S.setAllPins(-1, 42, 41, -1, -1);

  //The transmission mode is PDM_MONO_MODE, which means that PDM (pulse density modulation) mono mode is used for transmission
  if (!I2S.begin(PDM_MONO_MODE, SAMPLE_RATE, SAMPLE_BITS)) {
    Serial.println("Failed to initialize I2S!");
    while (1) ;
  }

  if(!SD.begin(D2)){
    Serial.println("Failed to mount SD Card!");
    while (1) ;
  }

  xTaskCreate(i2s_adc, "i2s_adc", 1024 * 8, NULL, 1, NULL);
  delay(500);
  xTaskCreate(wifiConnect, "wifi_Connect", 4096, NULL, 0, NULL);
}

void loop() {
  // put your main code here, to run repeatedly:
}

void i2s_adc(void *arg)
{
  uint32_t sample_size = 0;

  //This variable will be used to point to the actual recording buffer
  uint8_t *rec_buffer = NULL;
  Serial.printf("Ready to start recording ...\n");

  File file = SD.open(filename, FILE_WRITE);

  // Write the header to the WAV file
  uint8_t wav_header[WAV_HEADER_SIZE];

  //Write the WAV file header information to the wav_header array
  generate_wav_header(wav_header, record_size, SAMPLE_RATE);

  //Call the file.write() function to write the data in the wav_header array to the newly created WAV file
  file.write(wav_header, WAV_HEADER_SIZE);

  // This code uses the ESP32's PSRAM (external cache memory) to dynamically allocate a section of memory to store the recording data.
  rec_buffer = (uint8_t *)ps_malloc(record_size);
  if (rec_buffer == NULL) {
    Serial.printf("malloc failed!\n");
    while(1) ;
  }
  Serial.printf("Buffer: %d bytes\n", ESP.getPsramSize() - ESP.getFreePsram());

  // Start recording
  // I2S port number (in this case I2S_NUM_0),
  // a pointer to the buffer to which the data is to be written (i.e. rec_buffer),
  // the size of the data to be read (i.e. record_size),
  // a pointer to a variable that points to the actual size of the data being read (i.e. &sample_size),
  // and the maximum time to wait for the data to be read (in this case portMAX_DELAY, indicating an infinite wait time).
  esp_i2s::i2s_read(esp_i2s::I2S_NUM_0, rec_buffer, record_size, &sample_size, portMAX_DELAY);
  if (sample_size == 0) {
    Serial.printf("Record Failed!\n");
  } else {
    Serial.printf("Record %d bytes\n", sample_size);
  }

  // Increase volume
  for (uint32_t i = 0; i < sample_size; i += SAMPLE_BITS/8) {
    (*(uint16_t *)(rec_buffer+i)) <<= VOLUME_GAIN;
  }

  // Write data to the WAV file
  Serial.printf("Writing to the file ...\n");
  if (file.write(rec_buffer, record_size) != record_size)
    Serial.printf("Write file Failed!\n");

  free(rec_buffer);
  rec_buffer = NULL;
  file.close();
  Serial.printf("The recording is over.\n");

  listDir(SD, "/", 0);

  if(isWIFIConnected){
    uploadFile();
  }

  vTaskDelete(NULL);
}


void generate_wav_header(uint8_t *wav_header, uint32_t wav_size, uint32_t sample_rate)
{
  // See this for reference: http://soundfile.sapp.org/doc/WaveFormat/
  uint32_t file_size = wav_size + WAV_HEADER_SIZE - 8;
  uint32_t byte_rate = SAMPLE_RATE * SAMPLE_BITS / 8;
  const uint8_t set_wav_header[] = {
    'R', 'I', 'F', 'F', // ChunkID
    file_size, file_size >> 8, file_size >> 16, file_size >> 24, // ChunkSize
    'W', 'A', 'V', 'E', // Format
    'f', 'm', 't', ' ', // Subchunk1ID
    0x10, 0x00, 0x00, 0x00, // Subchunk1Size (16 for PCM)
    0x01, 0x00, // AudioFormat (1 for PCM)
    0x01, 0x00, // NumChannels (1 channel)
    sample_rate, sample_rate >> 8, sample_rate >> 16, sample_rate >> 24, // SampleRate
    byte_rate, byte_rate >> 8, byte_rate >> 16, byte_rate >> 24, // ByteRate
    0x02, 0x00, // BlockAlign
    0x10, 0x00, // BitsPerSample (16 bits)
    'd', 'a', 't', 'a', // Subchunk2ID
    wav_size, wav_size >> 8, wav_size >> 16, wav_size >> 24, // Subchunk2Size
  };
  memcpy(wav_header, set_wav_header, sizeof(set_wav_header));
}


void listDir(fs::FS &fs, const char * dirname, uint8_t levels){
    Serial.printf("Listing directory: %s\n", dirname);

    File root = fs.open(dirname);
    if(!root){
        Serial.println("Failed to open directory");
        return;
    }
    if(!root.isDirectory()){
        Serial.println("Not a directory");
        return;
    }

    File file = root.openNextFile();
    while(file){
        if(file.isDirectory()){
            Serial.print("  DIR : ");
            Serial.println(file.name());
            if(levels){
                listDir(fs, file.path(), levels -1);
            }
        } else {
            Serial.print("  FILE: ");
            Serial.print(file.name());
            Serial.print("  SIZE: ");
            Serial.println(file.size());
        }
        file = root.openNextFile();
    }
}

void wifiConnect(void *pvParameters){
  isWIFIConnected = false;
  char* ssid = "wifi-ssid";
  char* password = "wifi-password";
  Serial.print("Try to connect to ");
  Serial.println(ssid);
  WiFi.begin(ssid, password);
  while(WiFi.status() != WL_CONNECTED){
    vTaskDelay(500);
    Serial.print(".");
  }
  Serial.println("Wi-Fi Connected!");
  isWIFIConnected = true;
  while(true){
    vTaskDelay(1000);
  }
}

void uploadFile(){
  file = SD.open(filename, FILE_READ);
  if(!file){
    Serial.println("FILE IS NOT AVAILABLE!");
    return;
  }

  Serial.println("===> Upload FILE to Node.js Server");

  HTTPClient client;
  client.begin("http://192.168.1.208:8888/uploadAudio");
  client.addHeader("Content-Type", "audio/wav");
  int httpResponseCode = client.sendRequest("POST", &file, file.size());
  Serial.print("httpResponseCode : ");
  Serial.println(httpResponseCode);

  if(httpResponseCode == 200){
    String response = client.getString();
    Serial.println("==================== Transcription ====================");
    Serial.println(response);
    Serial.println("====================      End      ====================");
  }else{
    Serial.println("Error");
  }
  file.close();
  client.end();
}
If your ESP32 version is 3.0.x. Click here to preview the full program
#include <ESP_I2S.h>
#include <WiFi.h>
#include <HTTPClient.h>
#include "FS.h"
#include "SD.h"
#include "SPI.h"

//Variables to be used in the recording program, do not change for best
#define SAMPLE_RATE 16000U
#define SAMPLE_BITS 16
#define WAV_HEADER_SIZE 44
#define VOLUME_GAIN 2
#define RECORD_TIME 10      // seconds, The maximum value is 240

//define I2S
I2SClass I2S;

// Number of bytes required for the recording buffer
uint32_t record_size = (SAMPLE_RATE * SAMPLE_BITS / 8) * RECORD_TIME;

File file;
const char filename[] = "/recording.wav";

bool isWIFIConnected;

void setup() {
  // put your setup code here, to run once:
  Serial.begin(115200);
  while (!Serial) ;

  // setup 42 PDM clock and 41 PDM data pins
  I2S.setPinsPdmRx(42, 41);

  //The transmission mode is PDM_MONO_MODE, which means that PDM (pulse density modulation) mono mode is used for transmission
  if (!I2S.begin(I2S_MODE_PDM_RX, 16000, I2S_DATA_BIT_WIDTH_16BIT, I2S_SLOT_MODE_MONO)) {
    Serial.println("Failed to initialize I2S!");
    while (1) ;
  }

  if(!SD.begin(D2)){
    Serial.println("Failed to mount SD Card!");
    while (1) ;
  }

  xTaskCreate(i2s_adc, "i2s_adc", 1024 * 8, NULL, 1, NULL);
  delay(500);
  xTaskCreate(wifiConnect, "wifi_Connect", 4096, NULL, 0, NULL);
}

void loop() {
  // put your main code here, to run repeatedly:
}

void i2s_adc(void *arg)
{
  uint32_t sample_size = 0;

  //This variable will be used to point to the actual recording buffer
  uint8_t *rec_buffer = NULL;
  Serial.printf("Ready to start recording ...\n");

  File file = SD.open(filename, FILE_WRITE);

  // Write the header to the WAV file
  uint8_t wav_header[WAV_HEADER_SIZE];

  //Write the WAV file header information to the wav_header array
  generate_wav_header(wav_header, record_size, SAMPLE_RATE);

  //Call the file.write() function to write the data in the wav_header array to the newly created WAV file
  file.write(wav_header, WAV_HEADER_SIZE);

  // This code uses the ESP32's PSRAM (external cache memory) to dynamically allocate a section of memory to store the recording data.
  rec_buffer = (uint8_t *)ps_malloc(record_size);
  if (rec_buffer == NULL) {
    Serial.printf("malloc failed!\n");
    while(1) ;
  }
  Serial.printf("Buffer: %d bytes\n", ESP.getPsramSize() - ESP.getFreePsram());

  // Start recording
  // I2S port number (in this case I2S_NUM_0),
  // a pointer to the buffer to which the data is to be written (i.e. rec_buffer),
  // the size of the data to be read (i.e. record_size),
  // a pointer to a variable that points to the actual size of the data being read (i.e. &sample_size),
  // and the maximum time to wait for the data to be read (in this case portMAX_DELAY, indicating an infinite wait time).
  esp_i2s::i2s_read(esp_i2s::I2S_NUM_0, rec_buffer, record_size, &sample_size, portMAX_DELAY);
  if (sample_size == 0) {
    Serial.printf("Record Failed!\n");
  } else {
    Serial.printf("Record %d bytes\n", sample_size);
  }

  // Increase volume
  for (uint32_t i = 0; i < sample_size; i += SAMPLE_BITS/8) {
    (*(uint16_t *)(rec_buffer+i)) <<= VOLUME_GAIN;
  }

  // Write data to the WAV file
  Serial.printf("Writing to the file ...\n");
  if (file.write(rec_buffer, record_size) != record_size)
    Serial.printf("Write file Failed!\n");

  free(rec_buffer);
  rec_buffer = NULL;
  file.close();
  Serial.printf("The recording is over.\n");

  listDir(SD, "/", 0);

  if(isWIFIConnected){
    uploadFile();
  }

  vTaskDelete(NULL);
}


void generate_wav_header(uint8_t *wav_header, uint32_t wav_size, uint32_t sample_rate)
{
  // See this for reference: http://soundfile.sapp.org/doc/WaveFormat/
  uint32_t file_size = wav_size + WAV_HEADER_SIZE - 8;
  uint32_t byte_rate = SAMPLE_RATE * SAMPLE_BITS / 8;
  const uint8_t set_wav_header[] = {
    'R', 'I', 'F', 'F', // ChunkID
    file_size, file_size >> 8, file_size >> 16, file_size >> 24, // ChunkSize
    'W', 'A', 'V', 'E', // Format
    'f', 'm', 't', ' ', // Subchunk1ID
    0x10, 0x00, 0x00, 0x00, // Subchunk1Size (16 for PCM)
    0x01, 0x00, // AudioFormat (1 for PCM)
    0x01, 0x00, // NumChannels (1 channel)
    sample_rate, sample_rate >> 8, sample_rate >> 16, sample_rate >> 24, // SampleRate
    byte_rate, byte_rate >> 8, byte_rate >> 16, byte_rate >> 24, // ByteRate
    0x02, 0x00, // BlockAlign
    0x10, 0x00, // BitsPerSample (16 bits)
    'd', 'a', 't', 'a', // Subchunk2ID
    wav_size, wav_size >> 8, wav_size >> 16, wav_size >> 24, // Subchunk2Size
  };
  memcpy(wav_header, set_wav_header, sizeof(set_wav_header));
}


void listDir(fs::FS &fs, const char * dirname, uint8_t levels){
    Serial.printf("Listing directory: %s\n", dirname);

    File root = fs.open(dirname);
    if(!root){
        Serial.println("Failed to open directory");
        return;
    }
    if(!root.isDirectory()){
        Serial.println("Not a directory");
        return;
    }

    File file = root.openNextFile();
    while(file){
        if(file.isDirectory()){
            Serial.print("  DIR : ");
            Serial.println(file.name());
            if(levels){
                listDir(fs, file.path(), levels -1);
            }
        } else {
            Serial.print("  FILE: ");
            Serial.print(file.name());
            Serial.print("  SIZE: ");
            Serial.println(file.size());
        }
        file = root.openNextFile();
    }
}

void wifiConnect(void *pvParameters){
  isWIFIConnected = false;
  char* ssid = "wifi-ssid";
  char* password = "wifi-password";
  Serial.print("Try to connect to ");
  Serial.println(ssid);
  WiFi.begin(ssid, password);
  while(WiFi.status() != WL_CONNECTED){
    vTaskDelay(500);
    Serial.print(".");
  }
  Serial.println("Wi-Fi Connected!");
  isWIFIConnected = true;
  while(true){
    vTaskDelay(1000);
  }
}

void uploadFile(){
  file = SD.open(filename, FILE_READ);
  if(!file){
    Serial.println("FILE IS NOT AVAILABLE!");
    return;
  }

  Serial.println("===> Upload FILE to Node.js Server");

  HTTPClient client;
  client.begin("http://192.168.1.208:8888/uploadAudio");
  client.addHeader("Content-Type", "audio/wav");
  int httpResponseCode = client.sendRequest("POST", &file, file.size());
  Serial.print("httpResponseCode : ");
  Serial.println(httpResponseCode);

  if(httpResponseCode == 200){
    String response = client.getString();
    Serial.println("==================== Transcription ====================");
    Serial.println(response);
    Serial.println("====================      End      ====================");
  }else{
    Serial.println("Error");
  }
  file.close();
  client.end();
}
Before compiling and uploading the example program, there are a few things you will need to change to suit your situation.
- Time to record sound - On line 13 of the code, the default recording time is set to 10 seconds, you can adjust this recording time to suit you, up to a maximum of 240 seconds.
- Name of the saved recording file - On line 19 of the code, you can change a name for your recording file.
- WiFi name of the network - Change the network name of the code line 172 to the name of the network under the same LAN as the host where you are deploying Google Cloud Services.
- WiFi password of the network - On line 172 of the code, change the password corresponding to the network.
- Host IP address - On line 198 of the code, you need to change the IP address here to your host IP address and keep the port number at 8888.
Once you have changed the program to suit your needs and uploaded it you can turn on the serial monitor and start preparing to record what you want to say. After the ten-second recording, Google Cloud will analyse your recording file and return the results of the recognition to you.
Deploy ChatGPT on XIAO ESP32S3 Sense
Next we increase the difficulty. Continue adding ChatGPT calls to the code.
Step 12. Ask ChatGPT a question with the identified text as a question
In the project folder XIAOESP32S3-SPEECH-TO-CHATGPT we have prepared the program for the examples in this section.
If your ESP32 version is 2.0.x. Click here to preview the full program
#include <I2S.h>
#include <WiFi.h>
#include <HTTPClient.h>
#include <WiFiClientSecure.h>
#include <ArduinoJson.h>
#include <ChatGPT.hpp>
#include "FS.h"
#include "SD.h"
#include "SPI.h"
// Variables to be used in the recording program, do not change for best
#define SAMPLE_RATE 16000U
#define SAMPLE_BITS 16
#define WAV_HEADER_SIZE 44
#define VOLUME_GAIN 2
#define RECORD_TIME 5 // seconds, The maximum value is 240
const char* ssid = "wifi-ssid";
const char* password = "wifi-password";
// Number of bytes required for the recording buffer
uint32_t record_size = (SAMPLE_RATE * SAMPLE_BITS / 8) * RECORD_TIME;
File file;
const char filename[] = "/recording.wav";
bool isWIFIConnected;
String chatgpt_Q;
TaskHandle_t chatgpt_handle;
WiFiClientSecure client;
ChatGPT<WiFiClientSecure> chat_gpt(&client, "v1", "OpenAI-TOKEN");
//*****************************************Arduino Base******************************************//
void setup() {
// put your setup code here, to run once:
Serial.begin(115200);
while (!Serial) ;
I2S.setAllPins(-1, 42, 41, -1, -1);
// The transmission mode is PDM_MONO_MODE, which means that PDM (pulse density modulation) mono mode is used for transmission
if (!I2S.begin(PDM_MONO_MODE, SAMPLE_RATE, SAMPLE_BITS)) {
Serial.println("Failed to initialize I2S!");
while (1) ;
}
if(!SD.begin(D2)){
Serial.println("Failed to mount SD Card!");
while (1) ;
}
xTaskCreate(wifiConnect, "wifi_Connect", 4096, NULL, 0, NULL);
delay(500);
xTaskCreate(i2s_adc, "i2s_adc", 1024 * 8, NULL, 1, NULL);
xTaskCreate(chatgpt, "chatgpt", 1024 * 8, NULL, 2, &chatgpt_handle);
}
void loop() {
// put your main code here, to run repeatedly:
}
//*****************************************RTOS TASK******************************************//
void i2s_adc(void *arg)
{
while(1){
uint32_t sample_size = 0;
// This variable will be used to point to the actual recording buffer
uint8_t *rec_buffer = NULL;
Serial.printf("Ready to start recording ...\n");
File file = SD.open(filename, FILE_WRITE);
// Write the header to the WAV file
uint8_t wav_header[WAV_HEADER_SIZE];
// Write the WAV file header information to the wav_header array
generate_wav_header(wav_header, record_size, SAMPLE_RATE);
// Call the file.write() function to write the data in the wav_header array to the newly created WAV file
file.write(wav_header, WAV_HEADER_SIZE);
// This code uses the ESP32's PSRAM (external cache memory) to dynamically allocate a section of memory to store the recording data
rec_buffer = (uint8_t *)ps_malloc(record_size);
if (rec_buffer == NULL) {
Serial.printf("malloc failed!\n");
while(1) ;
}
Serial.printf("Buffer: %d bytes\n", ESP.getPsramSize() - ESP.getFreePsram());
// Start recording
// I2S port number (in this case I2S_NUM_0),
// a pointer to the buffer to which the data is to be written (i.e. rec_buffer),
// the size of the data to be read (i.e. record_size),
// a pointer to a variable that points to the actual size of the data being read (i.e. &sample_size),
// and the maximum time to wait for the data to be read (in this case portMAX_DELAY, indicating an infinite wait time).
esp_i2s::i2s_read(esp_i2s::I2S_NUM_0, rec_buffer, record_size, &sample_size, portMAX_DELAY);
if (sample_size == 0) {
Serial.printf("Record Failed!\n");
} else {
Serial.printf("Record %d bytes\n", sample_size);
}
// Increase volume
for (uint32_t i = 0; i < sample_size; i += SAMPLE_BITS/8) {
(*(uint16_t *)(rec_buffer+i)) <<= VOLUME_GAIN;
}
// Write data to the WAV file
Serial.printf("Writing to the file ...\n");
if (file.write(rec_buffer, record_size) != record_size)
Serial.printf("Write file Failed!\n");
free(rec_buffer);
rec_buffer = NULL;
file.close();
Serial.printf("The recording is over.\n");
listDir(SD, "/", 0);
bool uploadStatus = false;
if(isWIFIConnected){
uploadStatus = uploadFile();
}
if(uploadStatus)
xTaskNotifyGive(chatgpt_handle);
vTaskDelay(10000); // Each recording is spaced 10s apart
}
// vTaskDelete(NULL);
}
void wifiConnect(void *pvParameters){
isWIFIConnected = false;
Serial.print("Try to connect to ");
Serial.println(ssid);
WiFi.begin(ssid, password);
while(WiFi.status() != WL_CONNECTED){
vTaskDelay(500);
Serial.print(".");
}
Serial.println("Wi-Fi Connected!");
isWIFIConnected = true;
// Ignore SSL certificate validation
client.setInsecure();
while(true){
vTaskDelay(1000);
}
}
void chatgpt(void *pvParameters){
while(1){
// Waiting for notification signal from Task 1
ulTaskNotifyTake(pdTRUE, portMAX_DELAY);
String result;
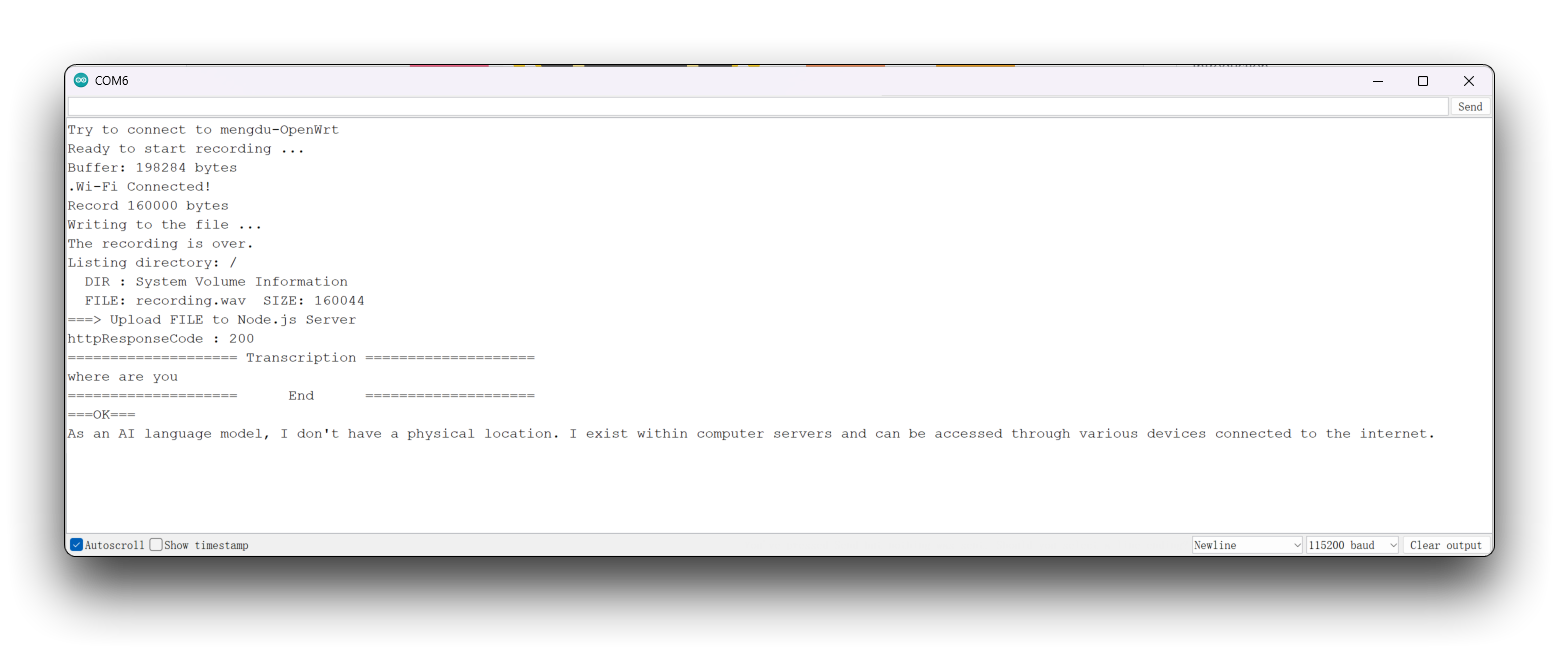
if (chat_gpt.simple_message("gpt-3.5-turbo-0301", "user", chatgpt_Q, result)) {
Serial.println("===OK===");
Serial.println(result);
} else {
Serial.println("===ERROR===");
Serial.println(result);
}
}
}
//*****************************************Audio Process******************************************//
void generate_wav_header(uint8_t *wav_header, uint32_t wav_size, uint32_t sample_rate)
{
// See this for reference: http://soundfile.sapp.org/doc/WaveFormat/
uint32_t file_size = wav_size + WAV_HEADER_SIZE - 8;
uint32_t byte_rate = SAMPLE_RATE * SAMPLE_BITS / 8;
const uint8_t set_wav_header[] = {
'R', 'I', 'F', 'F', // ChunkID
file_size, file_size >> 8, file_size >> 16, file_size >> 24, // ChunkSize
'W', 'A', 'V', 'E', // Format
'f', 'm', 't', ' ', // Subchunk1ID
0x10, 0x00, 0x00, 0x00, // Subchunk1Size (16 for PCM)
0x01, 0x00, // AudioFormat (1 for PCM)
0x01, 0x00, // NumChannels (1 channel)
sample_rate, sample_rate >> 8, sample_rate >> 16, sample_rate >> 24, // SampleRate
byte_rate, byte_rate >> 8, byte_rate >> 16, byte_rate >> 24, // ByteRate
0x02, 0x00, // BlockAlign
0x10, 0x00, // BitsPerSample (16 bits)
'd', 'a', 't', 'a', // Subchunk2ID
wav_size, wav_size >> 8, wav_size >> 16, wav_size >> 24, // Subchunk2Size
};
memcpy(wav_header, set_wav_header, sizeof(set_wav_header));
}
//*****************************************File Process******************************************//
void listDir(fs::FS &fs, const char * dirname, uint8_t levels){
Serial.printf("Listing directory: %s\n", dirname);
File root = fs.open(dirname);
if(!root){
Serial.println("Failed to open directory");
return;
}
if(!root.isDirectory()){
Serial.println("Not a directory");
return;
}
File file = root.openNextFile();
while(file){
if(file.isDirectory()){
Serial.print(" DIR : ");
Serial.println(file.name());
if(levels){
listDir(fs, file.path(), levels -1);
}
} else {
Serial.print(" FILE: ");
Serial.print(file.name());
Serial.print(" SIZE: ");
Serial.println(file.size());
}
file = root.openNextFile();
}
}
bool uploadFile(){
file = SD.open(filename, FILE_READ);
if(!file){
Serial.println("FILE IS NOT AVAILABLE!");
return false;
}
Serial.println("===> Upload FILE to Node.js Server");
HTTPClient client;
client.begin("http://192.168.1.208:8888/uploadAudio");
client.addHeader("Content-Type", "audio/wav");
int httpResponseCode = client.sendRequest("POST", &file, file.size());
Serial.print("httpResponseCode : ");
Serial.println(httpResponseCode);
if(httpResponseCode == 200){
String response = client.getString();
Serial.println("==================== Transcription ====================");
Serial.println(response);
chatgpt_Q = response;
Serial.println("==================== End ====================");
file.close();
client.end();
return true;
}else{
Serial.println("Error");
return false;
}
}
If your ESP32 version is 3.0.x. Click here to preview the full program
#include <ESP_I2S.h>
#include <WiFi.h>
#include <HTTPClient.h>
#include <WiFiClientSecure.h>
#include <ArduinoJson.h>
#include <ChatGPT.hpp>
#include "FS.h"
#include "SD.h"
#include "SPI.h"

// Variables to be used in the recording program, do not change for best
#define SAMPLE_RATE 16000U
#define SAMPLE_BITS 16
#define WAV_HEADER_SIZE 44
#define VOLUME_GAIN 2
#define RECORD_TIME 5  // seconds, The maximum value is 240

const char* ssid = "wifi-ssid";
const char* password = "wifi-password";

//define I2S
I2SClass I2S;


// Number of bytes required for the recording buffer
uint32_t record_size = (SAMPLE_RATE * SAMPLE_BITS / 8) * RECORD_TIME;

File file;
const char filename[] = "/recording.wav";
bool isWIFIConnected;

String chatgpt_Q;

TaskHandle_t chatgpt_handle;
WiFiClientSecure client;
ChatGPT<WiFiClientSecure> chat_gpt(&client, "v1", "OpenAI-TOKEN");

//*****************************************Arduino Base******************************************//

void setup() {
  // put your setup code here, to run once:
  Serial.begin(115200);
  while (!Serial) ;

  // setup 42 PDM clock and 41 PDM data pins
  I2S.setPinsPdmRx(42, 41);

  // The transmission mode is PDM_MONO_MODE, which means that PDM (pulse density modulation) mono mode is used for transmission
  if (!I2S.begin(I2S_MODE_PDM_RX, 16000, I2S_DATA_BIT_WIDTH_16BIT, I2S_SLOT_MODE_MONO)) {
    Serial.println("Failed to initialize I2S!");
    while (1) ;
  }

  if(!SD.begin(D2)){
    Serial.println("Failed to mount SD Card!");
    while (1) ;
  }

  xTaskCreate(wifiConnect, "wifi_Connect", 4096, NULL, 0, NULL);
  delay(500);
  xTaskCreate(i2s_adc, "i2s_adc", 1024 * 8, NULL, 1, NULL);
  xTaskCreate(chatgpt, "chatgpt", 1024 * 8, NULL, 2, &chatgpt_handle);
}

void loop() {
  // put your main code here, to run repeatedly:
}

//*****************************************RTOS TASK******************************************//

void i2s_adc(void *arg)
{
  while(1){
    uint32_t sample_size = 0;

    // This variable will be used to point to the actual recording buffer
    uint8_t *rec_buffer = NULL;
    Serial.printf("Ready to start recording ...\n");

    File file = SD.open(filename, FILE_WRITE);

    // Write the header to the WAV file
    uint8_t wav_header[WAV_HEADER_SIZE];

    // Write the WAV file header information to the wav_header array
    generate_wav_header(wav_header, record_size, SAMPLE_RATE);

    // Call the file.write() function to write the data in the wav_header array to the newly created WAV file
    file.write(wav_header, WAV_HEADER_SIZE);

    // This code uses the ESP32's PSRAM (external cache memory) to dynamically allocate a section of memory to store the recording data
    rec_buffer = (uint8_t *)ps_malloc(record_size);
    if (rec_buffer == NULL) {
      Serial.printf("malloc failed!\n");
      while(1) ;
    }
    Serial.printf("Buffer: %d bytes\n", ESP.getPsramSize() - ESP.getFreePsram());

    // Start recording
    // I2S port number (in this case I2S_NUM_0),
    // a pointer to the buffer to which the data is to be written (i.e. rec_buffer),
    // the size of the data to be read (i.e. record_size),
    // a pointer to a variable that points to the actual size of the data being read (i.e. &sample_size),
    // and the maximum time to wait for the data to be read (in this case portMAX_DELAY, indicating an infinite wait time).
    esp_i2s::i2s_read(esp_i2s::I2S_NUM_0, rec_buffer, record_size, &sample_size, portMAX_DELAY);
    if (sample_size == 0) {
      Serial.printf("Record Failed!\n");
    } else {
      Serial.printf("Record %d bytes\n", sample_size);
    }

    // Increase volume
    for (uint32_t i = 0; i < sample_size; i += SAMPLE_BITS/8) {
      (*(uint16_t *)(rec_buffer+i)) <<= VOLUME_GAIN;
    }

    // Write data to the WAV file
    Serial.printf("Writing to the file ...\n");
    if (file.write(rec_buffer, record_size) != record_size)
      Serial.printf("Write file Failed!\n");

    free(rec_buffer);
    rec_buffer = NULL;
    file.close();
    Serial.printf("The recording is over.\n");

    listDir(SD, "/", 0);

    bool uploadStatus = false;

    if(isWIFIConnected){
      uploadStatus = uploadFile();
    }

    if(uploadStatus)
      xTaskNotifyGive(chatgpt_handle);
    vTaskDelay(10000);       // Each recording is spaced 10s apart
  }
//  vTaskDelete(NULL);
}

void wifiConnect(void *pvParameters){
  isWIFIConnected = false;
  Serial.print("Try to connect to ");
  Serial.println(ssid);
  WiFi.begin(ssid, password);
  while(WiFi.status() != WL_CONNECTED){
    vTaskDelay(500);
    Serial.print(".");
  }
  Serial.println("Wi-Fi Connected!");
  isWIFIConnected = true;
  // Ignore SSL certificate validation
  client.setInsecure();
  while(true){
    vTaskDelay(1000);
  }
}

void chatgpt(void *pvParameters){
  while(1){
    // Waiting for notification signal from Task 1
    ulTaskNotifyTake(pdTRUE, portMAX_DELAY);

    String result;
    if (chat_gpt.simple_message("gpt-3.5-turbo-0301", "user", chatgpt_Q, result)) {
      Serial.println("===OK===");
      Serial.println(result);
    } else {
      Serial.println("===ERROR===");
      Serial.println(result);
    }

  }
}

//*****************************************Audio Process******************************************//

void generate_wav_header(uint8_t *wav_header, uint32_t wav_size, uint32_t sample_rate)
{
  // See this for reference: http://soundfile.sapp.org/doc/WaveFormat/
  uint32_t file_size = wav_size + WAV_HEADER_SIZE - 8;
  uint32_t byte_rate = SAMPLE_RATE * SAMPLE_BITS / 8;
  const uint8_t set_wav_header[] = {
    'R', 'I', 'F', 'F', // ChunkID
    file_size, file_size >> 8, file_size >> 16, file_size >> 24, // ChunkSize
    'W', 'A', 'V', 'E', // Format
    'f', 'm', 't', ' ', // Subchunk1ID
    0x10, 0x00, 0x00, 0x00, // Subchunk1Size (16 for PCM)
    0x01, 0x00, // AudioFormat (1 for PCM)
    0x01, 0x00, // NumChannels (1 channel)
    sample_rate, sample_rate >> 8, sample_rate >> 16, sample_rate >> 24, // SampleRate
    byte_rate, byte_rate >> 8, byte_rate >> 16, byte_rate >> 24, // ByteRate
    0x02, 0x00, // BlockAlign
    0x10, 0x00, // BitsPerSample (16 bits)
    'd', 'a', 't', 'a', // Subchunk2ID
    wav_size, wav_size >> 8, wav_size >> 16, wav_size >> 24, // Subchunk2Size
  };
  memcpy(wav_header, set_wav_header, sizeof(set_wav_header));
}

//*****************************************File Process******************************************//

void listDir(fs::FS &fs, const char * dirname, uint8_t levels){
    Serial.printf("Listing directory: %s\n", dirname);

    File root = fs.open(dirname);
    if(!root){
        Serial.println("Failed to open directory");
        return;
    }
    if(!root.isDirectory()){
        Serial.println("Not a directory");
        return;
    }

    File file = root.openNextFile();
    while(file){
        if(file.isDirectory()){
            Serial.print("  DIR : ");
            Serial.println(file.name());
            if(levels){
                listDir(fs, file.path(), levels -1);
            }
        } else {
            Serial.print("  FILE: ");
            Serial.print(file.name());
            Serial.print("  SIZE: ");
            Serial.println(file.size());
        }
        file = root.openNextFile();
    }
}

bool uploadFile(){
  file = SD.open(filename, FILE_READ);
  if(!file){
    Serial.println("FILE IS NOT AVAILABLE!");
    return false;
  }

  Serial.println("===> Upload FILE to Node.js Server");

  HTTPClient client;
  client.begin("http://192.168.1.208:8888/uploadAudio");
  client.addHeader("Content-Type", "audio/wav");
  int httpResponseCode = client.sendRequest("POST", &file, file.size());
  Serial.print("httpResponseCode : ");
  Serial.println(httpResponseCode);

  if(httpResponseCode == 200){
    String response = client.getString();
    Serial.println("==================== Transcription ====================");
    Serial.println(response);
    chatgpt_Q = response;
    Serial.println("====================      End      ====================");
    file.close();
    client.end();
    return true;
  }else{
    Serial.println("Error");
    return false;
  }

}
Again, before this program can be used, you will need to make the following changes to the code as you see fit
- WiFi name of the network - Change the network name of the code line 18 to the name of the network under the same LAN as the host where you are deploying Google Cloud Services.
- WiFi password of the network - On line 19 of the code, change the password corresponding to the network.
- Host IP address - On line 241 of the code, you need to change the IP address here to your host IP address and keep the port number at 8888.
- OpenAI API Token - Since you need to call the ChatGPT interface, you need to prepare the OpenAI Token and fill it into the code line 33. If this is your first time using Tokens, you can read the content of this Wiki to learn how to obtain them.
Once modified, upload the program and turn on the serial monitor. After recording, you will see the answer returned by ChatGPT for your question.
Design of screen display content & Integration of programs
Finally, we add a little more fancy. Instead of using a serial monitor, which is a less suitable interface for displaying effects, we have used a touch screen for the touch and click function.
Step 13. Using SquareLine Studio to draw display screens
SquareLine Studio is a GUI design tool developed by LVGL, a graphics library for embedded systems. SquareLine Studio is designed to help developers create and design user interfaces for their embedded systems quickly and efficiently. It provides a drag-and-drop interface for designing UIs, and it supports various widgets and themes.
So we recommend you to use this tool to design such simple interfaces. If you want to know more about the use of Round Display in SquareLine Studio, you can go to our usage Wiki.
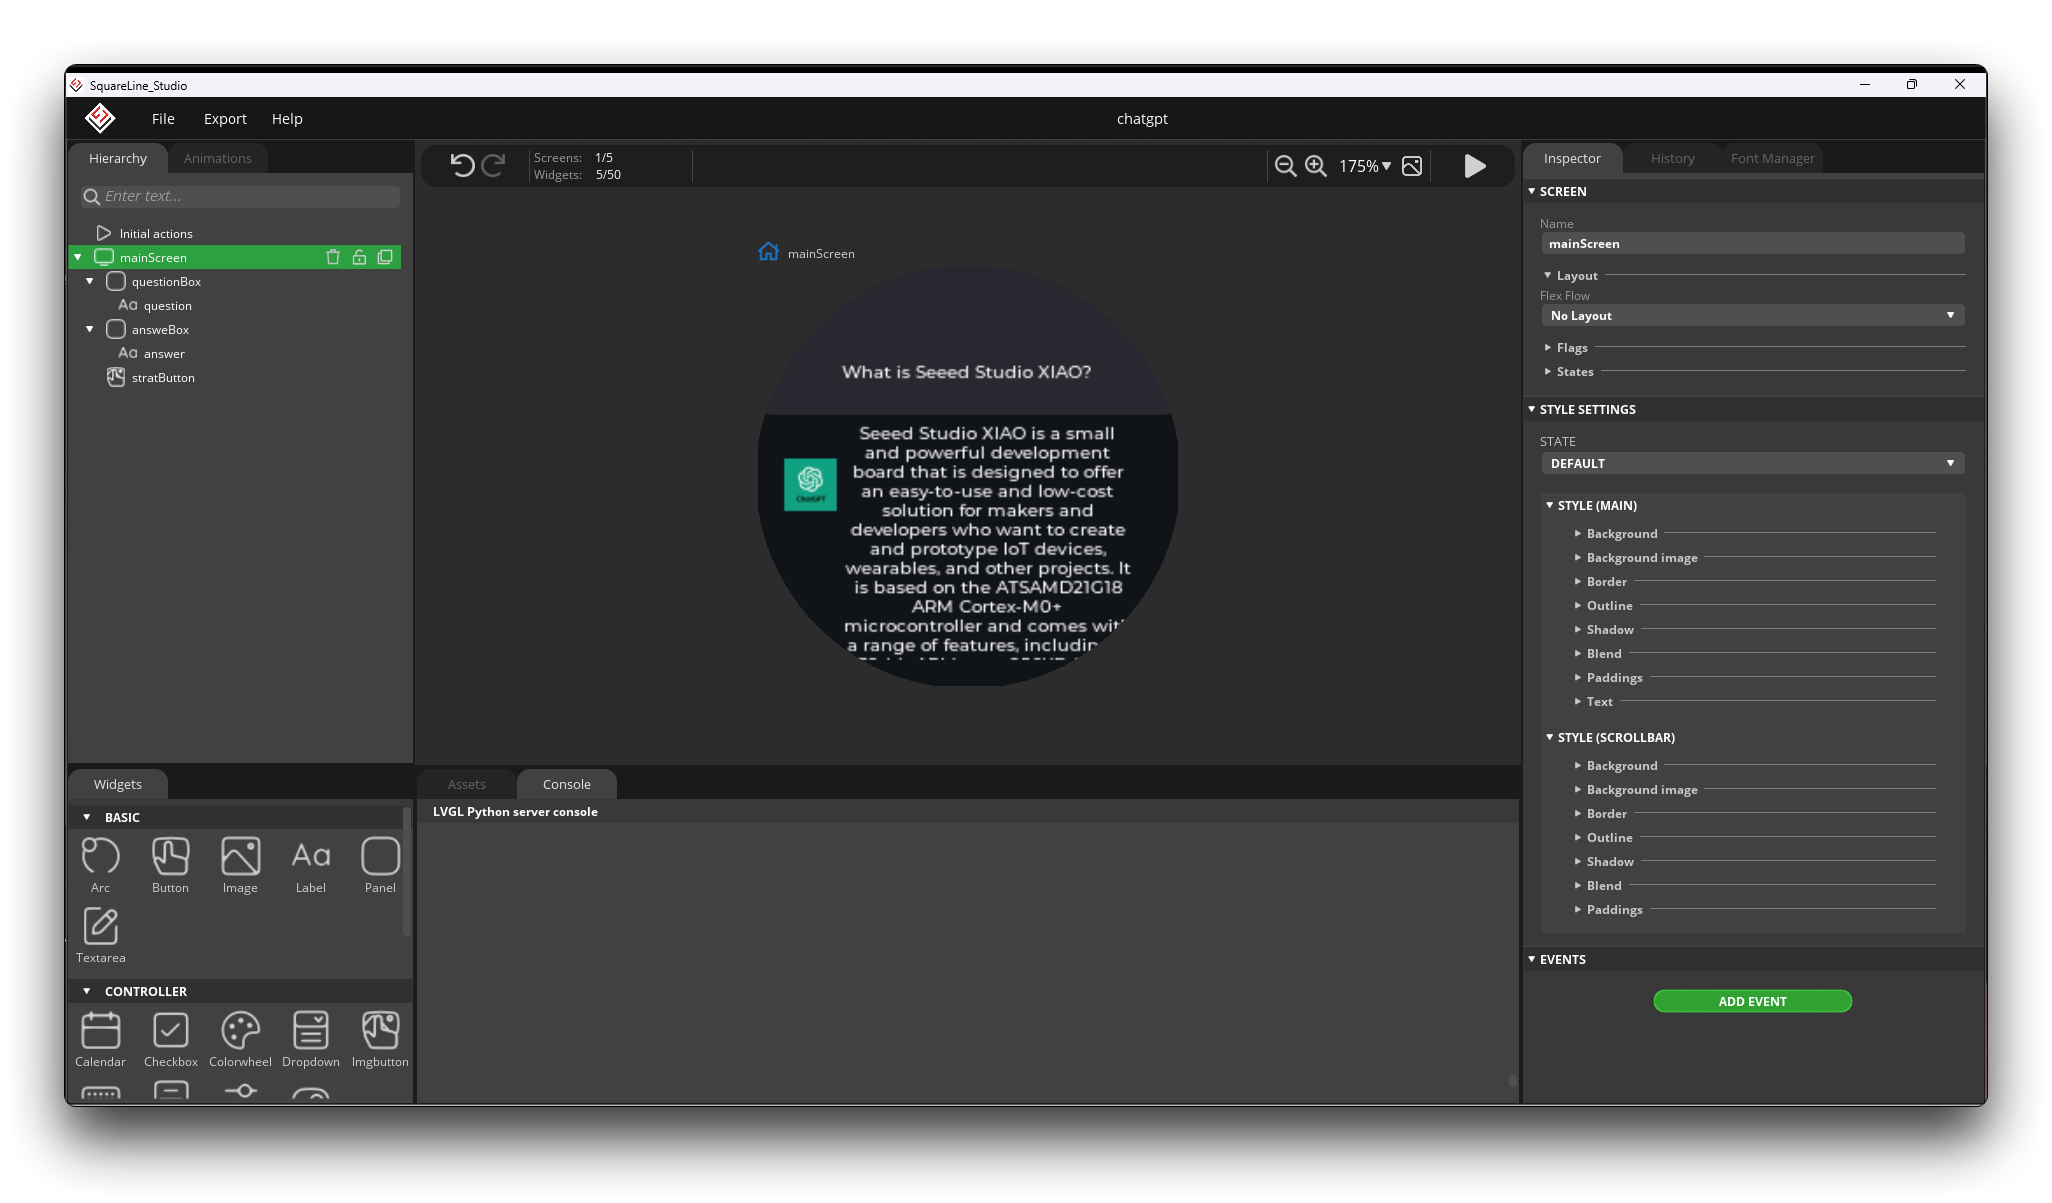
For reasons of space, this article will not go into detail on how to design a display page, but we will provide the exported program code which you can use. It is currently in the ui folder under that project folder.
We recommend you to use the v1.2.3 version of SquareLine Studio. After testing, the v1.3.0 version can have compatibility problems with the tft_eSPI library.
Step 14. Integration procedures
The final complete project code is in the XIAOESP32S3-SPEECH-CHATGPT-COMPLETE folder.
If your ESP32 version is 2.0.x. Click here to preview the full program
#include <lvgl.h>
#include <TFT_eSPI.h>
#include "ui.h"
#include <WiFi.h>
#include <WiFiClientSecure.h>
#include <ArduinoJson.h>
#include <ChatGPT.hpp>
#include <I2S.h>
#include <HTTPClient.h>
#include "FS.h"
#include "SD.h"
#include "SPI.h"


// Import the library for the round display and define the frame used as the TFT display frame
#define USE_TFT_ESPI_LIBRARY
#include "lv_xiao_round_screen.h"


/*Change to your screen resolution*/
static const uint16_t screenWidth  = 240;
static const uint16_t screenHeight = 240;


// Variables to be used in the recording program, do not change for best
#define SAMPLE_RATE 16000U
#define SAMPLE_BITS 16
#define WAV_HEADER_SIZE 44
#define VOLUME_GAIN 2
#define RECORD_TIME 5  // seconds, The maximum value is 240


// Number of bytes required for the recording buffer
uint32_t record_size = (SAMPLE_RATE * SAMPLE_BITS / 8) * RECORD_TIME;


// Name of the file in which the recording is saved
File file;
const char filename[] = "/recording.wav";


// Network connection status flag
bool isWIFIConnected;


// Answers to the questions chatgpt replied to
String response;


// Flags for different task starts
bool recordTask = false;
bool chatgptTask = false;

WiFiClientSecure client;
ChatGPT<WiFiClientSecure> chat_gpt(&client, "v1", "OpenAI-TOKEN");   // Please fill in your OpenAI key


// Please change to your network
const char* ssid = "wifi-ssid";
const char* password = "wifi-password";

static lv_disp_draw_buf_t draw_buf;
static lv_color_t buf[ screenWidth * screenHeight / 10 ];


//****************************************LVGL****************************************************//

#if LV_USE_LOG != 0
/* Serial debugging */
void my_print(const char * buf)
{
    Serial.printf(buf);
    Serial.flush();
}
#endif

/* Display flushing */
void my_disp_flush( lv_disp_drv_t *disp, const lv_area_t *area, lv_color_t *color_p )
{
    uint32_t w = ( area->x2 - area->x1 + 1 );
    uint32_t h = ( area->y2 - area->y1 + 1 );

    tft.startWrite();
    tft.setAddrWindow( area->x1, area->y1, w, h );
    tft.pushColors( ( uint16_t * )&color_p->full, w * h, true );
    tft.endWrite();

    lv_disp_flush_ready( disp );
}

/*Read the touchpad*/
void my_touchpad_read( lv_indev_drv_t * indev_driver, lv_indev_data_t * data )
{
    // uint16_t touchX = 0, touchY = 0;
    // bool touched = false;//tft.getTouch( &touchX, &touchY, 600 );

    lv_coord_t touchX, touchY;
    chsc6x_get_xy(&touchX, &touchY);

    // if( !touched )
    if(!chsc6x_is_pressed())
    {
        data->state = LV_INDEV_STATE_REL;
    }
    else
    {
        data->state = LV_INDEV_STATE_PR;

        /*Set the coordinates*/
        data->point.x = touchX;
        data->point.y = touchY;

//        Serial.print( "Data x " );
//        Serial.println( touchX );
//
//        Serial.print( "Data y " );
//        Serial.println( touchY );

        // You can also start recording by uncommenting and configuring by clicking on the logo
//        if((touchX < 240 && touchX > 230) && (touchY < 120 && touchY > 100)){
          recordTask = true;
//        }
    }
}

//****************************************Arduino Base****************************************************//

void setup()
{
    Serial.begin( 115200 ); /* prepare for possible serial debug */
//    while(!Serial);

    pinMode(TOUCH_INT, INPUT_PULLUP);
    Wire.begin();

    String LVGL_Arduino = "Hello Arduino! ";
    LVGL_Arduino += String('V') + lv_version_major() + "." + lv_version_minor() + "." + lv_version_patch();

    Serial.println( LVGL_Arduino );
    Serial.println( "I am LVGL_Arduino" );

    lv_init();

#if LV_USE_LOG != 0
    lv_log_register_print_cb( my_print ); /* register print function for debugging */
#endif

    tft.begin();          /* TFT init */
    tft.setRotation( 0 ); /* Landscape orientation, flipped */

    lv_disp_draw_buf_init( &draw_buf, buf, NULL, screenWidth * screenHeight / 10 );

    /*Initialize the display*/
    static lv_disp_drv_t disp_drv;
    lv_disp_drv_init( &disp_drv );
    /*Change the following line to your display resolution*/
    disp_drv.hor_res = screenWidth;
    disp_drv.ver_res = screenHeight;
    disp_drv.flush_cb = my_disp_flush;
    disp_drv.draw_buf = &draw_buf;
    lv_disp_drv_register( &disp_drv );

    /*Initialize the (dummy) input device driver*/
    static lv_indev_drv_t indev_drv;
    lv_indev_drv_init( &indev_drv );
    indev_drv.type = LV_INDEV_TYPE_POINTER;
    indev_drv.read_cb = my_touchpad_read;
    lv_indev_drv_register( &indev_drv );

    ui_init();

    I2S.setAllPins(-1, 42, 41, -1, -1);

    //The transmission mode is PDM_MONO_MODE, which means that PDM (pulse density modulation) mono mode is used for transmission
    if (!I2S.begin(PDM_MONO_MODE, SAMPLE_RATE, SAMPLE_BITS)) {
        Serial.println("Failed to initialize I2S!");
        while (1) ;
    }

    if(!SD.begin(D2)){
        Serial.println("Failed to mount SD Card!");
        while (1) ;
    }

    Serial.println( "Setup done" );

    // Create a FreeRTOS task to check the connection status of the network at regular intervals.
    xTaskCreate(wifiConnect, "wifi_Connect", 4096, NULL, 0, NULL);
}

void loop()
{
    lv_timer_handler(); /* let the GUI do its work */
    record();
    chatgpt();
    delay(5);
}

//*****************************************Audio Process******************************************//

void generate_wav_header(uint8_t *wav_header, uint32_t wav_size, uint32_t sample_rate)
{
  // See this for reference: http://soundfile.sapp.org/doc/WaveFormat/
  uint32_t file_size = wav_size + WAV_HEADER_SIZE - 8;
  uint32_t byte_rate = SAMPLE_RATE * SAMPLE_BITS / 8;
  const uint8_t set_wav_header[] = {
    'R', 'I', 'F', 'F', // ChunkID
    file_size, file_size >> 8, file_size >> 16, file_size >> 24, // ChunkSize
    'W', 'A', 'V', 'E', // Format
    'f', 'm', 't', ' ', // Subchunk1ID
    0x10, 0x00, 0x00, 0x00, // Subchunk1Size (16 for PCM)
    0x01, 0x00, // AudioFormat (1 for PCM)
    0x01, 0x00, // NumChannels (1 channel)
    sample_rate, sample_rate >> 8, sample_rate >> 16, sample_rate >> 24, // SampleRate
    byte_rate, byte_rate >> 8, byte_rate >> 16, byte_rate >> 24, // ByteRate
    0x02, 0x00, // BlockAlign
    0x10, 0x00, // BitsPerSample (16 bits)
    'd', 'a', 't', 'a', // Subchunk2ID
    wav_size, wav_size >> 8, wav_size >> 16, wav_size >> 24, // Subchunk2Size
  };
  memcpy(wav_header, set_wav_header, sizeof(set_wav_header));
}

//*****************************************File Process******************************************//

void listDir(fs::FS &fs, const char * dirname, uint8_t levels){
    Serial.printf("Listing directory: %s\n", dirname);

    File root = fs.open(dirname);
    if(!root){
        Serial.println("Failed to open directory");
        return;
    }
    if(!root.isDirectory()){
        Serial.println("Not a directory");
        return;
    }

    File file = root.openNextFile();
    while(file){
        if(file.isDirectory()){
            Serial.print("  DIR : ");
            Serial.println(file.name());
            if(levels){
                listDir(fs, file.path(), levels -1);
            }
        } else {
            Serial.print("  FILE: ");
            Serial.print(file.name());
            Serial.print("  SIZE: ");
            Serial.println(file.size());
        }
        file = root.openNextFile();
    }
}

bool uploadFile(){
  file = SD.open(filename, FILE_READ);
  if(!file){
    Serial.println("FILE IS NOT AVAILABLE!");
    return false;
  }

  Serial.println("===> Upload FILE to Node.js Server");

  HTTPClient client;
  client.begin("http://192.168.1.208:8888/uploadAudio");
  client.addHeader("Content-Type", "audio/wav");
  int httpResponseCode = client.sendRequest("POST", &file, file.size());
  Serial.print("httpResponseCode : ");
  Serial.println(httpResponseCode);

  if(httpResponseCode == 200){
    response = client.getString();
    Serial.println("==================== Transcription ====================");
    Serial.println(response);
    const char* chatgpt_Q = response.c_str();
    lv_label_set_text(ui_question, chatgpt_Q);
    Serial.println("====================      End      ====================");
    file.close();
    client.end();
    recordTask = false;
    chatgptTask = true;
    return true;
  }else{
    Serial.println("Error");
    lv_label_set_text(ui_question, "Error");
    recordTask = false;
    chatgptTask = false;
    return false;
  }
}


//*****************************************Main Functions******************************************//

void record(){
  if(recordTask){
    Serial.println("Record Task Begin!!!");
    lv_label_set_text(ui_question, "Recording ...");
    lv_timer_handler();
    uint32_t sample_size = 0;

    // This variable will be used to point to the actual recording buffer
    uint8_t *rec_buffer = NULL;
    Serial.printf("Ready to start recording ...\n");

    File file = SD.open(filename, FILE_WRITE);

    // Write the header to the WAV file
    uint8_t wav_header[WAV_HEADER_SIZE];

    // Write the WAV file header information to the wav_header array
    generate_wav_header(wav_header, record_size, SAMPLE_RATE);

    // Call the file.write() function to write the data in the wav_header array to the newly created WAV file
    file.write(wav_header, WAV_HEADER_SIZE);

    // This code uses the ESP32's PSRAM (external cache memory) to dynamically allocate a section of memory to store the recording data.
    rec_buffer = (uint8_t *)ps_malloc(record_size);
    if (rec_buffer == NULL) {
      Serial.printf("malloc failed!\n");
      while(1) ;
    }
    Serial.printf("Buffer: %d bytes\n", ESP.getPsramSize() - ESP.getFreePsram());

    // Start recording
    // I2S port number (in this case I2S_NUM_0),
    // a pointer to the buffer to which the data is to be written (i.e. rec_buffer),
    // the size of the data to be read (i.e. record_size),
    // a pointer to a variable that points to the actual size of the data being read (i.e. &sample_size),
    // and the maximum time to wait for the data to be read (in this case portMAX_DELAY, indicating an infinite wait time).
    esp_i2s::i2s_read(esp_i2s::I2S_NUM_0, rec_buffer, record_size, &sample_size, portMAX_DELAY);
    if (sample_size == 0) {
      Serial.printf("Record Failed!\n");
    } else {
      Serial.printf("Record %d bytes\n", sample_size);
    }

    // Increase volume
    for (uint32_t i = 0; i < sample_size; i += SAMPLE_BITS/8) {
      (*(uint16_t *)(rec_buffer+i)) <<= VOLUME_GAIN;
    }

    // Write data to the WAV file
    Serial.printf("Writing to the file ...\n");
    if (file.write(rec_buffer, record_size) != record_size)
      Serial.printf("Write file Failed!\n");

    free(rec_buffer);
    rec_buffer = NULL;
    file.close();
    Serial.printf("The recording is over.\n");
    lv_label_set_text(ui_question, "Identifying ...");
    lv_timer_handler();
    listDir(SD, "/", 0);

    bool uploadStatus = false;

    if(isWIFIConnected){
      uploadStatus = uploadFile();
    }
  }
}

void chatgpt(){
  if(chatgptTask){
    Serial.println("ChatGPT Task Begin!!!");
    lv_label_set_text(ui_answer,"Answering ...");
    lv_timer_handler();
    String result;
    if (chat_gpt.simple_message("gpt-3.5-turbo-0301", "user", response, result)) {
      Serial.println("===OK===");
      Serial.println(result);
      const char* chatgpt_A = result.c_str();
      lv_label_set_text(ui_answer, chatgpt_A);
    } else {
      Serial.println("===ERROR===");
      Serial.println(result);
      lv_label_set_text(ui_answer, "ERROR");
      lv_timer_handler();
    }
    recordTask = false;
    chatgptTask = false;
  }
}

//*****************************************RTOS******************************************//

void wifiConnect(void *pvParameters){
  isWIFIConnected = false;
  Serial.print("Try to connect to ");
  Serial.println(ssid);
  WiFi.begin(ssid, password);
  while(WiFi.status() != WL_CONNECTED){
    vTaskDelay(500);
    Serial.print(".");
  }
  Serial.println("Wi-Fi Connected!");
  isWIFIConnected = true;
  // Ignore SSL certificate validation
  client.setInsecure();
  while(true){
    vTaskDelay(1000);
  }
}
If your ESP32 version is 3.0.x. Click here to preview the full program
#include <lvgl.h>
#include <TFT_eSPI.h>
#include "ui.h"
#include <WiFi.h>
#include <WiFiClientSecure.h>
#include <ArduinoJson.h>
#include <ChatGPT.hpp>
#include <ESP_I2S.h>
#include <HTTPClient.h>
#include "FS.h"
#include "SD.h"
#include "SPI.h"


// Import the library for the round display and define the frame used as the TFT display frame
#define USE_TFT_ESPI_LIBRARY
#include "lv_xiao_round_screen.h"


/*Change to your screen resolution*/
static const uint16_t screenWidth  = 240;
static const uint16_t screenHeight = 240;


// Variables to be used in the recording program, do not change for best
#define SAMPLE_RATE 16000U
#define SAMPLE_BITS 16
#define WAV_HEADER_SIZE 44
#define VOLUME_GAIN 2
#define RECORD_TIME 5  // seconds, The maximum value is 240


// Number of bytes required for the recording buffer
uint32_t record_size = (SAMPLE_RATE * SAMPLE_BITS / 8) * RECORD_TIME;

//define I2S
I2SClass I2S;

// Name of the file in which the recording is saved
File file;
const char filename[] = "/recording.wav";


// Network connection status flag
bool isWIFIConnected;


// Answers to the questions chatgpt replied to
String response;


// Flags for different task starts
bool recordTask = false;
bool chatgptTask = false;

WiFiClientSecure client;
ChatGPT<WiFiClientSecure> chat_gpt(&client, "v1", "OpenAI-TOKEN");   // Please fill in your OpenAI key


// Please change to your network
const char* ssid = "wifi-ssid";
const char* password = "wifi-password";

static lv_disp_draw_buf_t draw_buf;
static lv_color_t buf[ screenWidth * screenHeight / 10 ];


//****************************************LVGL****************************************************//

#if LV_USE_LOG != 0
/* Serial debugging */
void my_print(const char * buf)
{
    Serial.printf(buf);
    Serial.flush();
}
#endif

/* Display flushing */
void my_disp_flush( lv_disp_drv_t *disp, const lv_area_t *area, lv_color_t *color_p )
{
    uint32_t w = ( area->x2 - area->x1 + 1 );
    uint32_t h = ( area->y2 - area->y1 + 1 );

    tft.startWrite();
    tft.setAddrWindow( area->x1, area->y1, w, h );
    tft.pushColors( ( uint16_t * )&color_p->full, w * h, true );
    tft.endWrite();

    lv_disp_flush_ready( disp );
}

/*Read the touchpad*/
void my_touchpad_read( lv_indev_drv_t * indev_driver, lv_indev_data_t * data )
{
    // uint16_t touchX = 0, touchY = 0;
    // bool touched = false;//tft.getTouch( &touchX, &touchY, 600 );

    lv_coord_t touchX, touchY;
    chsc6x_get_xy(&touchX, &touchY);

    // if( !touched )
    if(!chsc6x_is_pressed())
    {
        data->state = LV_INDEV_STATE_REL;
    }
    else
    {
        data->state = LV_INDEV_STATE_PR;

        /*Set the coordinates*/
        data->point.x = touchX;
        data->point.y = touchY;

//        Serial.print( "Data x " );
//        Serial.println( touchX );
//
//        Serial.print( "Data y " );
//        Serial.println( touchY );

        // You can also start recording by uncommenting and configuring by clicking on the logo
//        if((touchX < 240 && touchX > 230) && (touchY < 120 && touchY > 100)){
          recordTask = true;
//        }
    }
}

//****************************************Arduino Base****************************************************//

void setup()
{
    Serial.begin( 115200 ); /* prepare for possible serial debug */
//    while(!Serial);

    pinMode(TOUCH_INT, INPUT_PULLUP);
    Wire.begin();

    String LVGL_Arduino = "Hello Arduino! ";
    LVGL_Arduino += String('V') + lv_version_major() + "." + lv_version_minor() + "." + lv_version_patch();

    Serial.println( LVGL_Arduino );
    Serial.println( "I am LVGL_Arduino" );

    lv_init();

#if LV_USE_LOG != 0
    lv_log_register_print_cb( my_print ); /* register print function for debugging */
#endif

    tft.begin();          /* TFT init */
    tft.setRotation( 0 ); /* Landscape orientation, flipped */

    lv_disp_draw_buf_init( &draw_buf, buf, NULL, screenWidth * screenHeight / 10 );

    /*Initialize the display*/
    static lv_disp_drv_t disp_drv;
    lv_disp_drv_init( &disp_drv );
    /*Change the following line to your display resolution*/
    disp_drv.hor_res = screenWidth;
    disp_drv.ver_res = screenHeight;
    disp_drv.flush_cb = my_disp_flush;
    disp_drv.draw_buf = &draw_buf;
    lv_disp_drv_register( &disp_drv );

    /*Initialize the (dummy) input device driver*/
    static lv_indev_drv_t indev_drv;
    lv_indev_drv_init( &indev_drv );
    indev_drv.type = LV_INDEV_TYPE_POINTER;
    indev_drv.read_cb = my_touchpad_read;
    lv_indev_drv_register( &indev_drv );

    ui_init();

    // setup 42 PDM clock and 41 PDM data pins
    I2S.setPinsPdmRx(42, 41);

    //The transmission mode is PDM_MONO_MODE, which means that PDM (pulse density modulation) mono mode is used for transmission
    if (!I2S.begin(I2S_MODE_PDM_RX, 16000, I2S_DATA_BIT_WIDTH_16BIT, I2S_SLOT_MODE_MONO)) {
        Serial.println("Failed to initialize I2S!");
        while (1) ;
    }

    if(!SD.begin(D2)){
        Serial.println("Failed to mount SD Card!");
        while (1) ;
    }

    Serial.println( "Setup done" );

    // Create a FreeRTOS task to check the connection status of the network at regular intervals.
    xTaskCreate(wifiConnect, "wifi_Connect", 4096, NULL, 0, NULL);
}

void loop()
{
    lv_timer_handler(); /* let the GUI do its work */
    record();
    chatgpt();
    delay(5);
}

//*****************************************Audio Process******************************************//

void generate_wav_header(uint8_t *wav_header, uint32_t wav_size, uint32_t sample_rate)
{
  // See this for reference: http://soundfile.sapp.org/doc/WaveFormat/
  uint32_t file_size = wav_size + WAV_HEADER_SIZE - 8;
  uint32_t byte_rate = SAMPLE_RATE * SAMPLE_BITS / 8;
  const uint8_t set_wav_header[] = {
    'R', 'I', 'F', 'F', // ChunkID
    file_size, file_size >> 8, file_size >> 16, file_size >> 24, // ChunkSize
    'W', 'A', 'V', 'E', // Format
    'f', 'm', 't', ' ', // Subchunk1ID
    0x10, 0x00, 0x00, 0x00, // Subchunk1Size (16 for PCM)
    0x01, 0x00, // AudioFormat (1 for PCM)
    0x01, 0x00, // NumChannels (1 channel)
    sample_rate, sample_rate >> 8, sample_rate >> 16, sample_rate >> 24, // SampleRate
    byte_rate, byte_rate >> 8, byte_rate >> 16, byte_rate >> 24, // ByteRate
    0x02, 0x00, // BlockAlign
    0x10, 0x00, // BitsPerSample (16 bits)
    'd', 'a', 't', 'a', // Subchunk2ID
    wav_size, wav_size >> 8, wav_size >> 16, wav_size >> 24, // Subchunk2Size
  };
  memcpy(wav_header, set_wav_header, sizeof(set_wav_header));
}

//*****************************************File Process******************************************//

void listDir(fs::FS &fs, const char * dirname, uint8_t levels){
    Serial.printf("Listing directory: %s\n", dirname);

    File root = fs.open(dirname);
    if(!root){
        Serial.println("Failed to open directory");
        return;
    }
    if(!root.isDirectory()){
        Serial.println("Not a directory");
        return;
    }

    File file = root.openNextFile();
    while(file){
        if(file.isDirectory()){
            Serial.print("  DIR : ");
            Serial.println(file.name());
            if(levels){
                listDir(fs, file.path(), levels -1);
            }
        } else {
            Serial.print("  FILE: ");
            Serial.print(file.name());
            Serial.print("  SIZE: ");
            Serial.println(file.size());
        }
        file = root.openNextFile();
    }
}

bool uploadFile(){
  file = SD.open(filename, FILE_READ);
  if(!file){
    Serial.println("FILE IS NOT AVAILABLE!");
    return false;
  }

  Serial.println("===> Upload FILE to Node.js Server");

  HTTPClient client;
  client.begin("http://192.168.1.208:8888/uploadAudio");
  client.addHeader("Content-Type", "audio/wav");
  int httpResponseCode = client.sendRequest("POST", &file, file.size());
  Serial.print("httpResponseCode : ");
  Serial.println(httpResponseCode);

  if(httpResponseCode == 200){
    response = client.getString();
    Serial.println("==================== Transcription ====================");
    Serial.println(response);
    const char* chatgpt_Q = response.c_str();
    lv_label_set_text(ui_question, chatgpt_Q);
    Serial.println("====================      End      ====================");
    file.close();
    client.end();
    recordTask = false;
    chatgptTask = true;
    return true;
  }else{
    Serial.println("Error");
    lv_label_set_text(ui_question, "Error");
    recordTask = false;
    chatgptTask = false;
    return false;
  }
}


//*****************************************Main Functions******************************************//

void record(){
  if(recordTask){
    Serial.println("Record Task Begin!!!");
    lv_label_set_text(ui_question, "Recording ...");
    lv_timer_handler();
    uint32_t sample_size = 0;

    // This variable will be used to point to the actual recording buffer
    uint8_t *rec_buffer = NULL;
    Serial.printf("Ready to start recording ...\n");

    File file = SD.open(filename, FILE_WRITE);

    // Write the header to the WAV file
    uint8_t wav_header[WAV_HEADER_SIZE];

    // Write the WAV file header information to the wav_header array
    generate_wav_header(wav_header, record_size, SAMPLE_RATE);

    // Call the file.write() function to write the data in the wav_header array to the newly created WAV file
    file.write(wav_header, WAV_HEADER_SIZE);

    // This code uses the ESP32's PSRAM (external cache memory) to dynamically allocate a section of memory to store the recording data.
    rec_buffer = (uint8_t *)ps_malloc(record_size);
    if (rec_buffer == NULL) {
      Serial.printf("malloc failed!\n");
      while(1) ;
    }
    Serial.printf("Buffer: %d bytes\n", ESP.getPsramSize() - ESP.getFreePsram());

    // Start recording
    // I2S port number (in this case I2S_NUM_0),
    // a pointer to the buffer to which the data is to be written (i.e. rec_buffer),
    // the size of the data to be read (i.e. record_size),
    // a pointer to a variable that points to the actual size of the data being read (i.e. &sample_size),
    // and the maximum time to wait for the data to be read (in this case portMAX_DELAY, indicating an infinite wait time).
    esp_i2s::i2s_read(esp_i2s::I2S_NUM_0, rec_buffer, record_size, &sample_size, portMAX_DELAY);
    if (sample_size == 0) {
      Serial.printf("Record Failed!\n");
    } else {
      Serial.printf("Record %d bytes\n", sample_size);
    }

    // Increase volume
    for (uint32_t i = 0; i < sample_size; i += SAMPLE_BITS/8) {
      (*(uint16_t *)(rec_buffer+i)) <<= VOLUME_GAIN;
    }

    // Write data to the WAV file
    Serial.printf("Writing to the file ...\n");
    if (file.write(rec_buffer, record_size) != record_size)
      Serial.printf("Write file Failed!\n");

    free(rec_buffer);
    rec_buffer = NULL;
    file.close();
    Serial.printf("The recording is over.\n");
    lv_label_set_text(ui_question, "Identifying ...");
    lv_timer_handler();
    listDir(SD, "/", 0);

    bool uploadStatus = false;

    if(isWIFIConnected){
      uploadStatus = uploadFile();
    }
  }
}

void chatgpt(){
  if(chatgptTask){
    Serial.println("ChatGPT Task Begin!!!");
    lv_label_set_text(ui_answer,"Answering ...");
    lv_timer_handler();
    String result;
    if (chat_gpt.simple_message("gpt-3.5-turbo-0301", "user", response, result)) {
      Serial.println("===OK===");
      Serial.println(result);
      const char* chatgpt_A = result.c_str();
      lv_label_set_text(ui_answer, chatgpt_A);
    } else {
      Serial.println("===ERROR===");
      Serial.println(result);
      lv_label_set_text(ui_answer, "ERROR");
      lv_timer_handler();
    }
    recordTask = false;
    chatgptTask = false;
  }
}

//*****************************************RTOS******************************************//

void wifiConnect(void *pvParameters){
  isWIFIConnected = false;
  Serial.print("Try to connect to ");
  Serial.println(ssid);
  WiFi.begin(ssid, password);
  while(WiFi.status() != WL_CONNECTED){
    vTaskDelay(500);
    Serial.print(".");
  }
  Serial.println("Wi-Fi Connected!");
  isWIFIConnected = true;
  // Ignore SSL certificate validation
  client.setInsecure();
  while(true){
    vTaskDelay(1000);
  }
}
Before compiling and uploading the example program, there are a few things you will need to change to suit your situation.
- WiFi name of the network - Change the network name of the code line 18 to the name of the network under the same LAN as the host where you are deploying Google Cloud Services.
- WiFi password of the network - On line 19 of the code, change the password corresponding to the network.
- Host IP address - On line 241 of the code, you need to change the IP address here to your host IP address and keep the port number at 8888.
- OpenAI API Token - Since you need to call the ChatGPT interface, you need to prepare the OpenAI Token and fill it into the code line 33. If this is your first time using Tokens, you can read the content of this Wiki to learn how to obtain them.
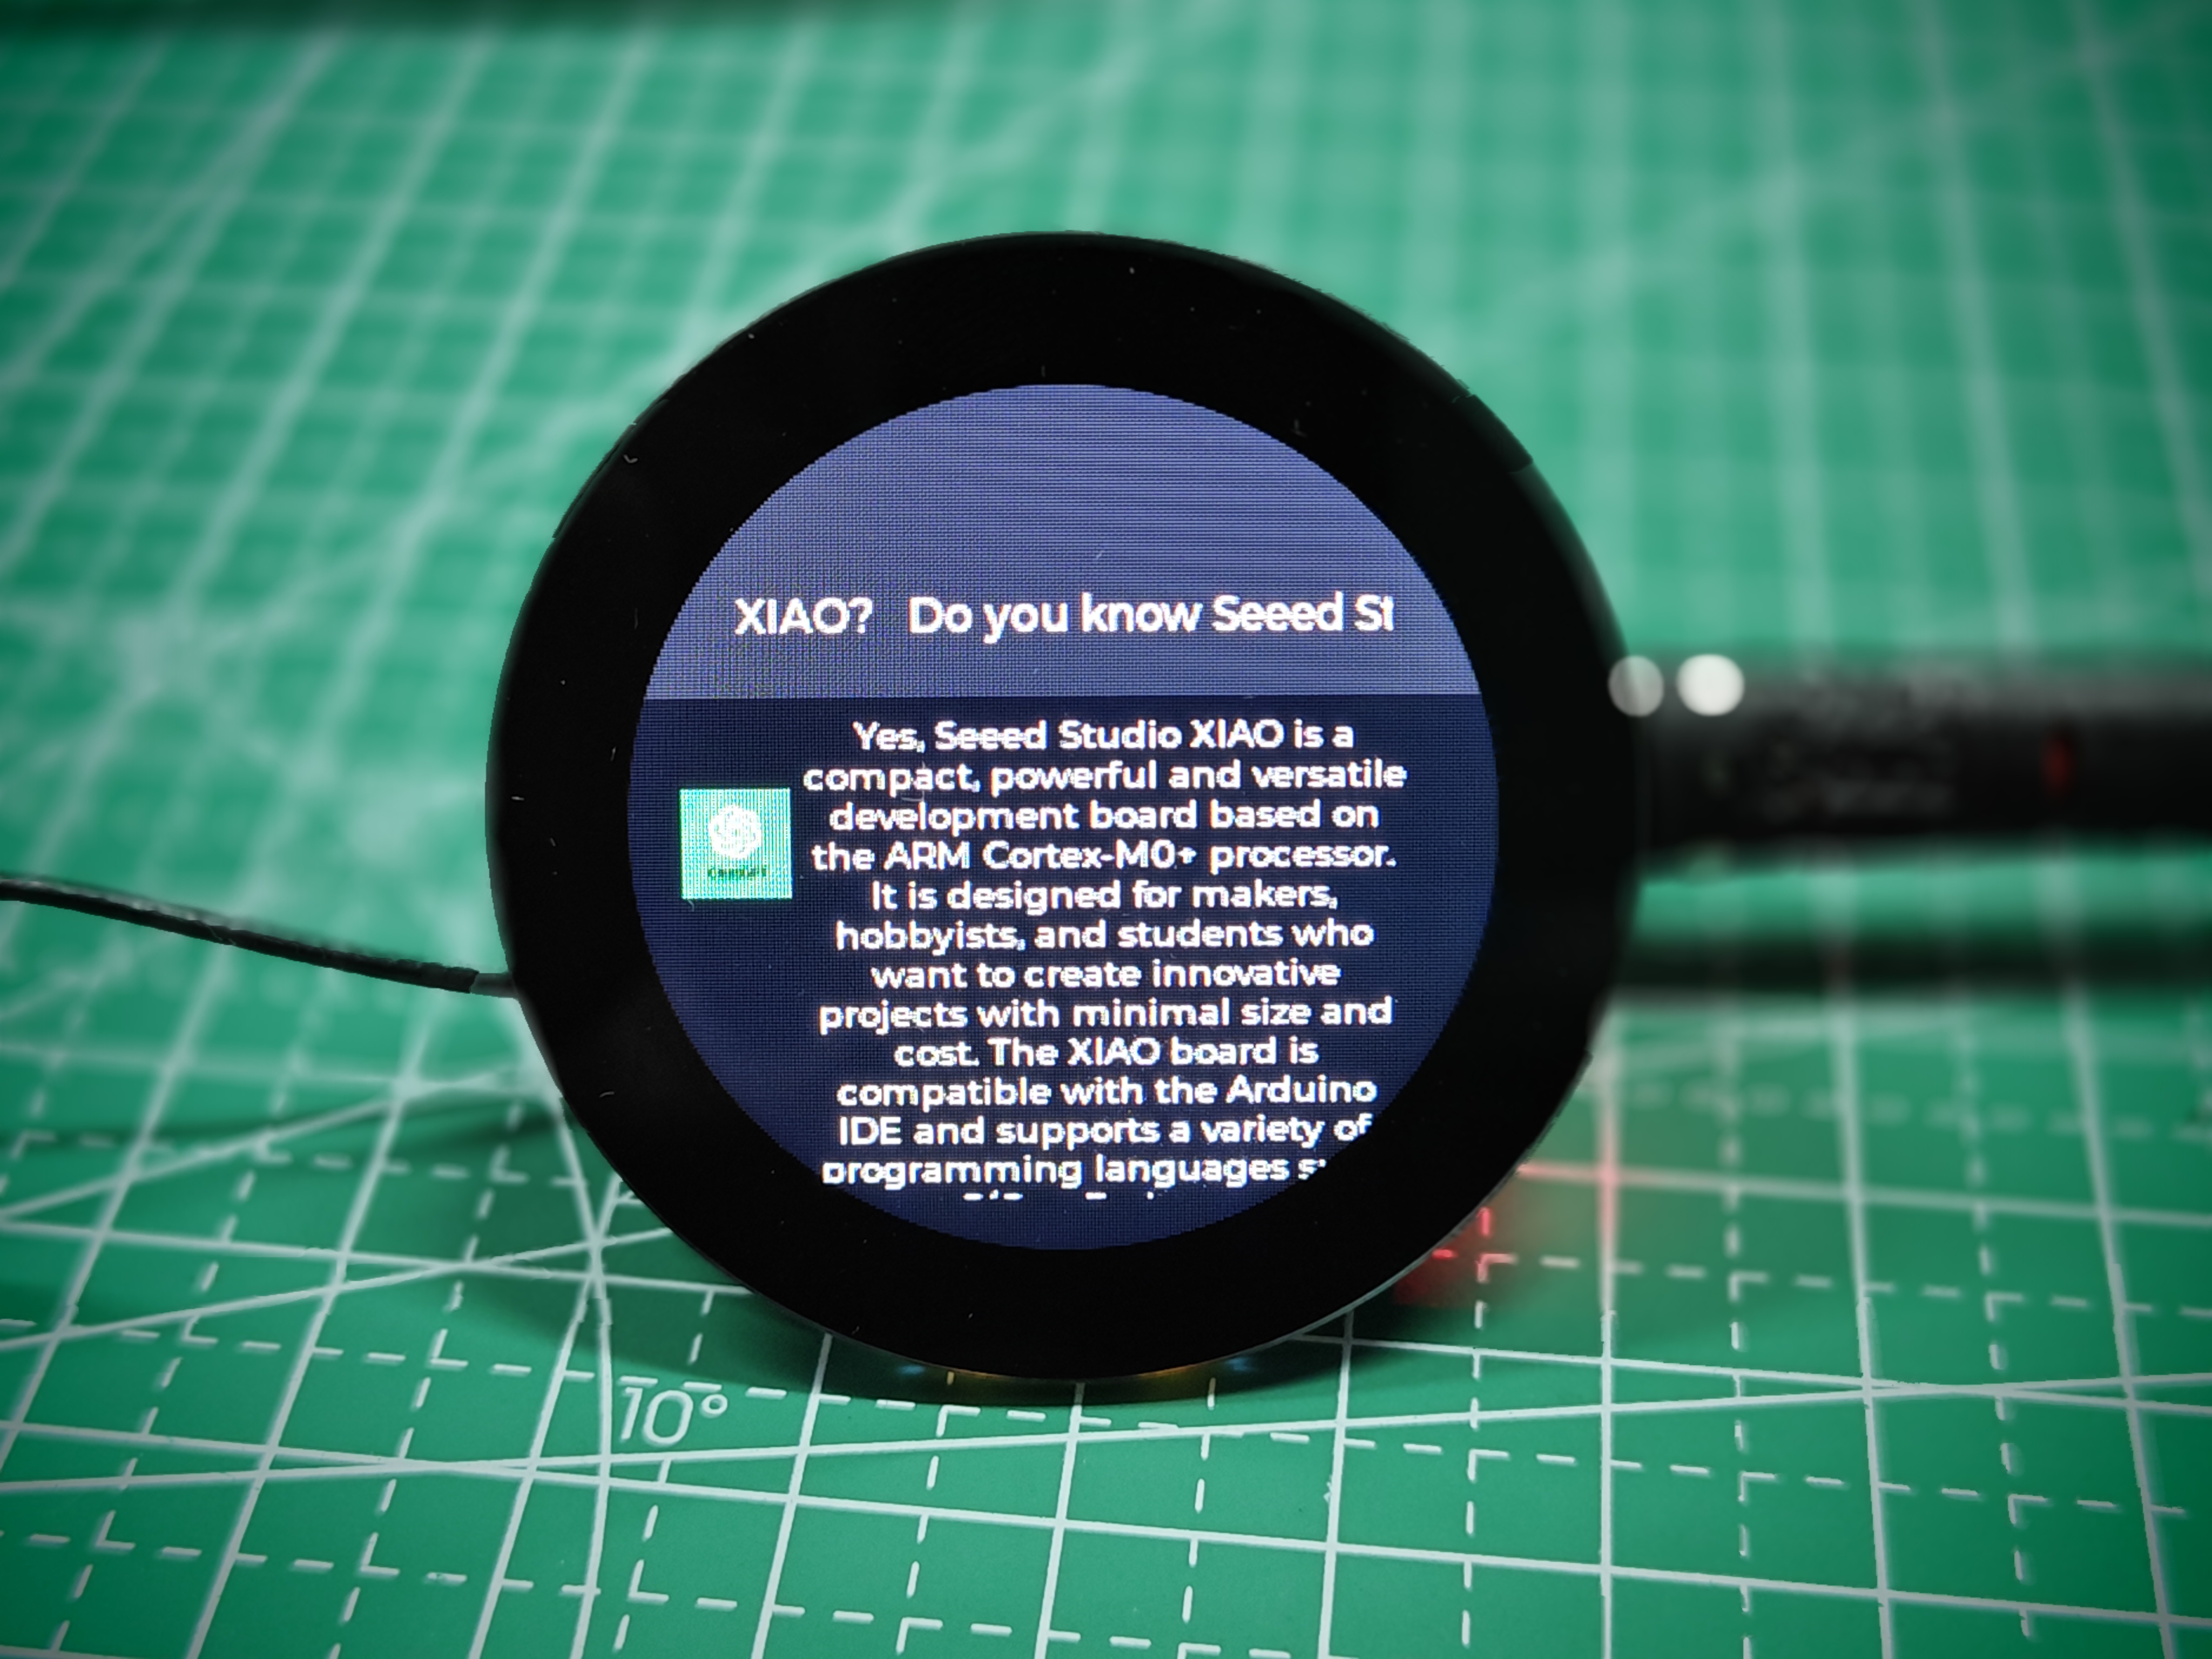
Once you have uploaded the program and clicked on the screen, the recording task will begin, at which point you can speak the question you wish to ask towards the microphone. Once the result has been recognised, the question is displayed in the top half of the screen. Immediately afterwards, we will get the answer to the ChatGPT and it will be displayed at the bottom of the screen.
Tech Support & Product Discussion
Thank you for choosing our products! We are here to provide you with different support to ensure that your experience with our products is as smooth as possible. We offer several communication channels to cater to different preferences and needs.