Geolocation Tracker with XIAO ESP32S3
Home-made trackers on the market often face several problems. For example, the tracking accuracy is poor, they are bulky and they have demanding requirements for the environment in which the tracker is used. XIAO has attracted numerous creators with its excellent volume control. So can we make a Tracker that can be positioned globally by using XIAO, and only XIAO?
In this tutorial we'll explore two of the more popular ways to deploy XIAO (without the GPS module) to create a surprising tracker.
Overview
This article will introduce two types of positioning, one is to obtain location information from the IP address of the network to which XIAO is connected, to achieve positioning. The other is by using the Wi-Fi positioning system (commonly known as WiPS or WFPS).
- Method 1: Locate by IP address
The principle of locating an IP address involves using a database that maps IP addresses to physical locations. This process is commonly known as geolocation.
IP address lookup involves using a reverse DNS lookup to retrieve the domain name associated with the IP address. The domain name can then be used to identify the geographic location of the server hosting the website or service.
IP address mapping involves using a database that maps IP addresses to physical locations. The database may contain information such as the city, region, and country associated with each IP address.
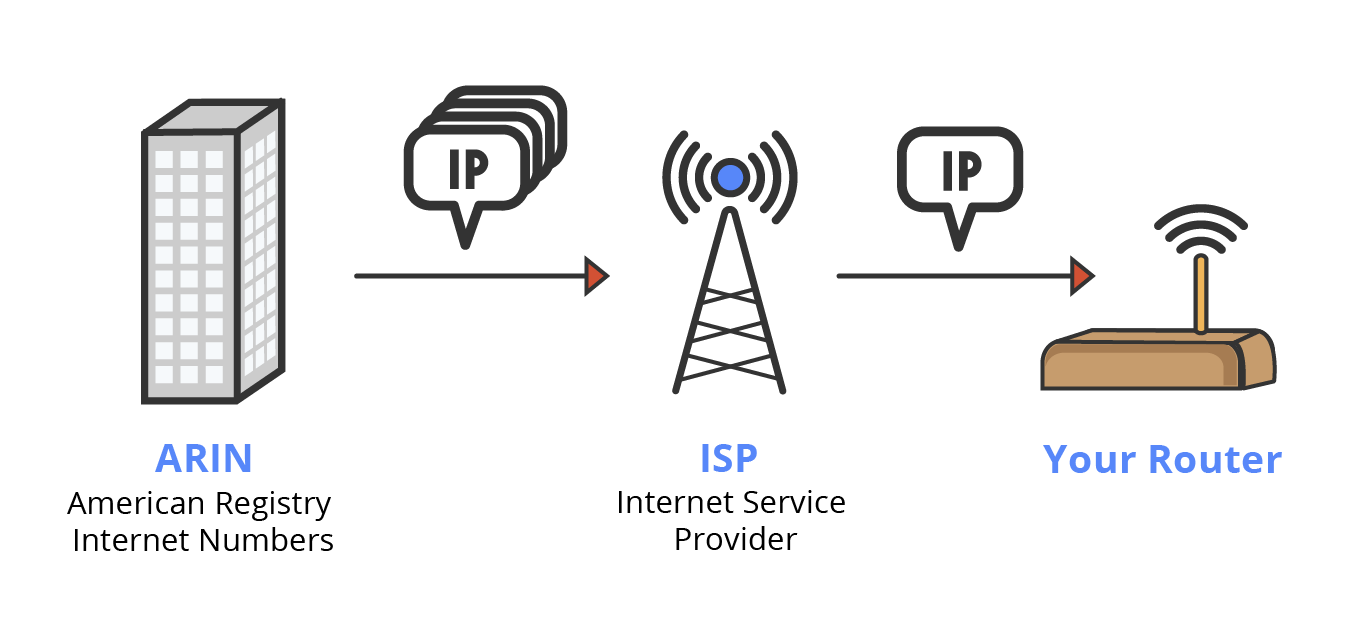
The accuracy of IP address geolocation can vary depending on the method used and the quality of the data available. In general, IP address geolocation is most accurate for fixed devices such as desktop computers and servers, which are typically associated with a fixed physical location. Mobile devices such as smartphones and tablets can be more difficult to locate accurately, as they can move around and connect to different Wi-Fi networks.
- Method 2: Locate by WFPS
Wi-Fi positioning system is a geolocation system that uses the characteristics of nearby Wi-Fi hotspots and other wireless access points to discover where a device is located.
It is used where satellite navigation such as GPS is inadequate due to various causes including multipath and signal blockage indoors, or where acquiring a satellite fix would take too long. Such systems include assisted GPS, urban positioning services through hotspot databases, and indoor positioning systems. Wi-Fi positioning takes advantage of the rapid growth in the early 21st century of wireless access points in urban areas.
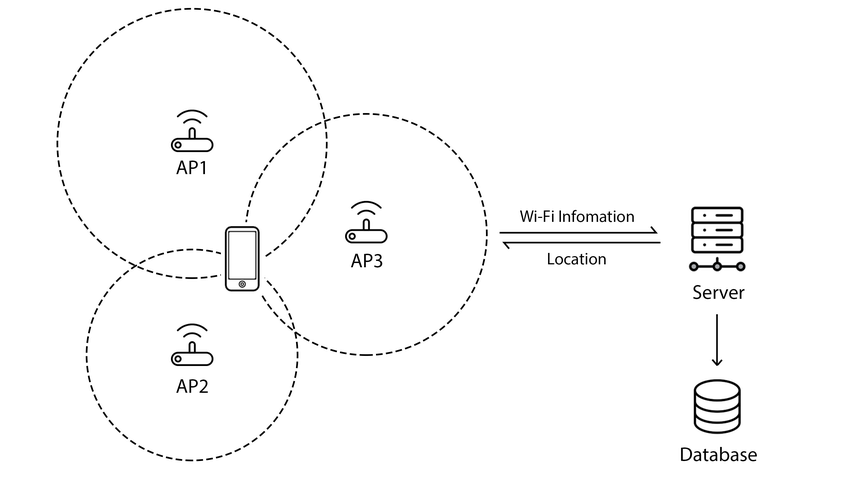
The most common and widespread localization technique used for positioning with wireless access points is based on measuring the intensity of the received signal (received signal strength indication or RSSI) and the method of "fingerprinting". Typical parameters useful to geolocate the wireless access point include its SSID and MAC address. The accuracy depends on the number of nearby access points whose positions have been entered into the database. The Wi-Fi hotspot database gets filled by correlating mobile device GPS location data with Wi-Fi hotspot MAC addresses. The possible signal fluctuations that may occur can increase errors and inaccuracies in the path of the user. To minimize fluctuations in the received signal, there are certain techniques that can be applied to filter the noise.
This is the theoretical basis for XIAO's ability to obtain a position without the aid of a GPS module. We will also compare the best way to obtain positioning with the help of the two methods above, combined with the use of the Round Display, which displays the coordinates as a map on the screen. Below is the table of contents and a summary of the paper.
- Connect to the network and obtain public IP with the XIAO ESP32S3
- Obtain location coordinates with the ipstack platform
- Download static images from Google Maps via HTTPS service
- Display the location map on the Round Display
- Positioning using the WFPS method
- Live updates on the latest location
Getting Started
To successfully complete this project, you may need to use the following hardware. Any of the XIAO ESP32s are supported.
| Seeed Studio XIAO ESP32S3 | Seeed Studio XIAO ESP32S3 Sense | Seeed Studio Round Display for XIAO |
|---|---|---|
 |  |  |
In addition to this, you can additionally prepare a small lithium battery, microSD card and case. To make up a complete Tracker form.
Connect to the network and obtain public IP with the XIAO ESP32S3
If you are not familiar with the networking capabilities of the XIAO ESP32S3, you can read about WiFi usage with Seeed Studio XIAO ESP32S3 (Sense).
In the tutorial on the basic use of the XIAO ESP32S3, we have mastered the use of the XIAO ESP32S3 to connect to the network.
#include <WiFi.h>

// For network
const char* ssid = "<YOUR_WIFI_SSID_HERE>";
const char* password = "<YOUR_WIFI_PW_HERE>";

void setup() {
  Serial.begin(115200);

  Serial.print("Try to connect to ");
  Serial.println(ssid);
  WiFi.begin(ssid, password);
  while(WiFi.status() != WL_CONNECTED){
    Serial.print(".");
  }
  Serial.println("Wi-Fi Connected!");
}

void loop() {
}
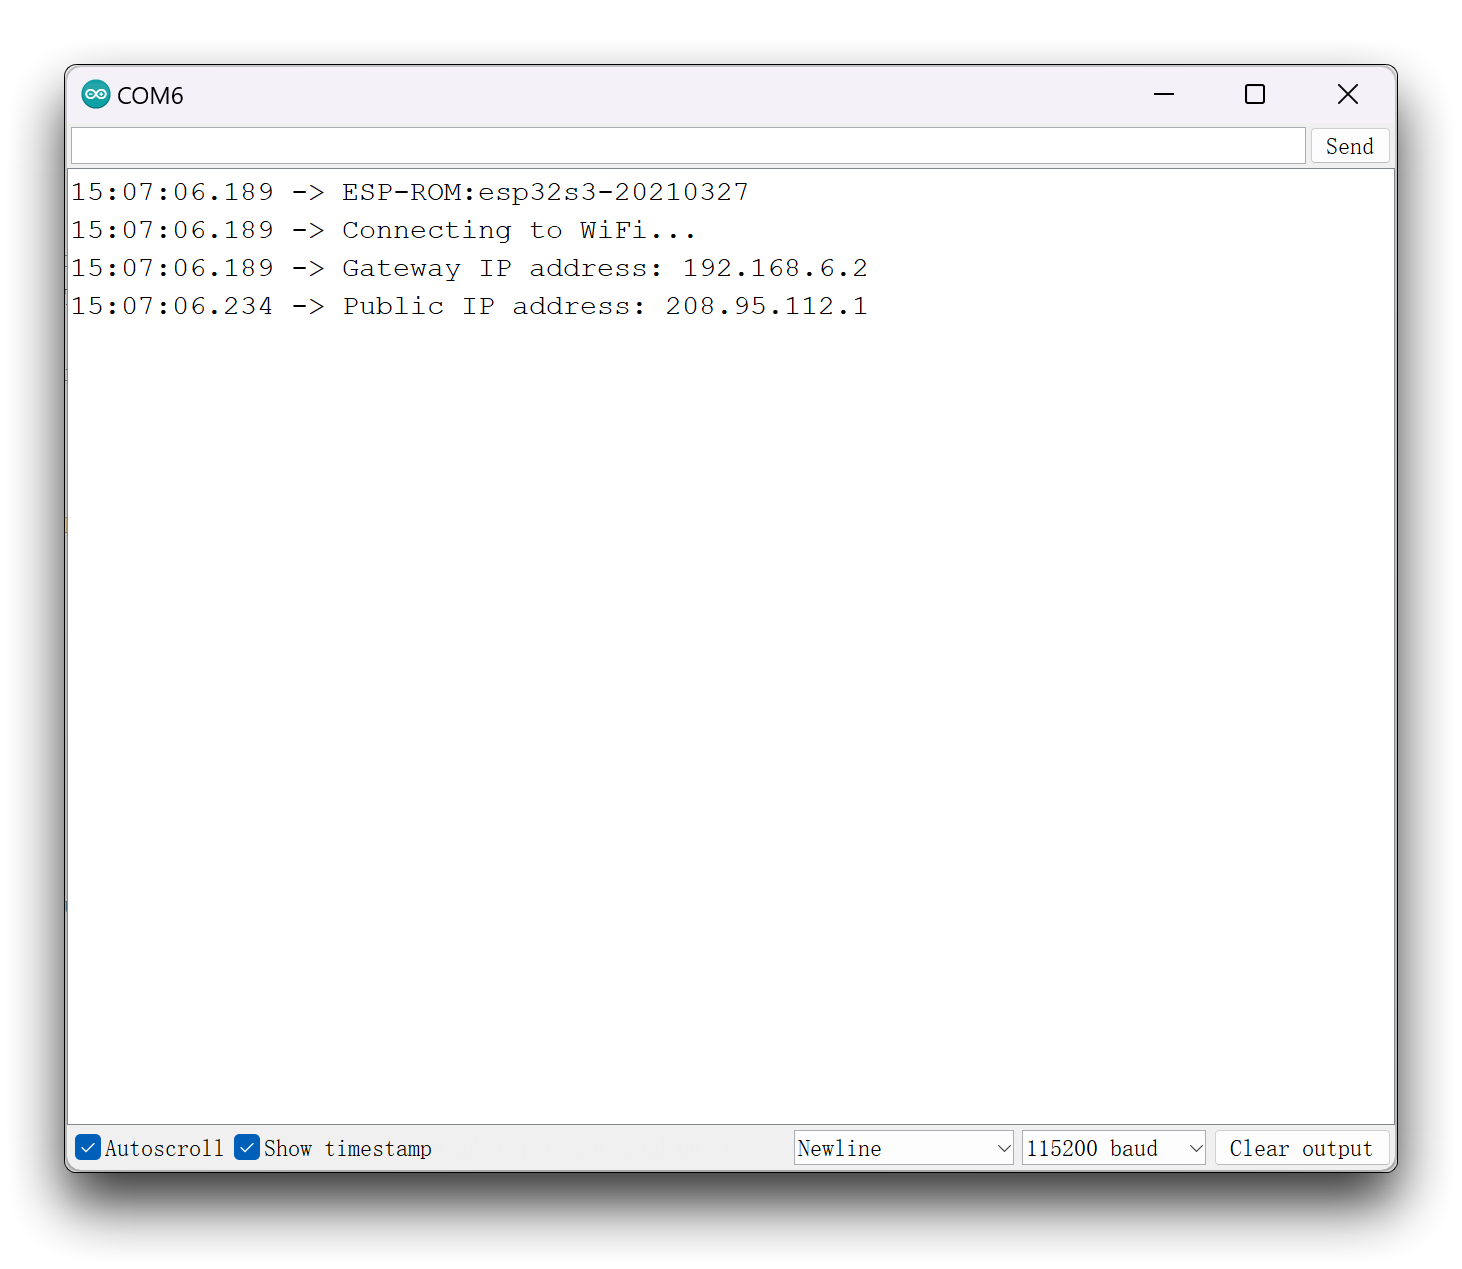
The core essence of using IP addresses to look up locations is to get the IP address of XIAO. It may then be natural to think that we need to use the WiFi.localIP() function to look it up.
In reality, however, the router will assign XIAO an internal IP address, something like 192.168.xxx.xxx, which cannot be queried for location information. What we need is a public IP. So we need to use the following.
// Get local IP address
IPAddress publicIP;
if (WiFi.hostByName("ip-api.com", publicIP)) {
    Serial.print("Public IP address: ");
    Serial.println(publicIP);
} else {
    Serial.println("Failed to get public IP address");
    return;
}
Then we can get the following effect, which is the first step.
Obtain location coordinates with the ipstack platform
The use of IP addresses for location is generally required for some public server library information. We can obtain this server information with the help of some platform's API interface. For example, in this tutorial, we will use the platform ipstack.
ipstack offers a powerful, real-time IP to geolocation API capable of looking up accurate location data and assessing security threats originating from risky IP addresses. Results are delivered within milliseconds in JSON or XML format.
ipstack offers a free/paid search service, the price list can be found in the image below. In this example, we are only showing examples and using the free service (100 queries/month) is sufficient.

Step 1. Obtain ipstack API Access Key
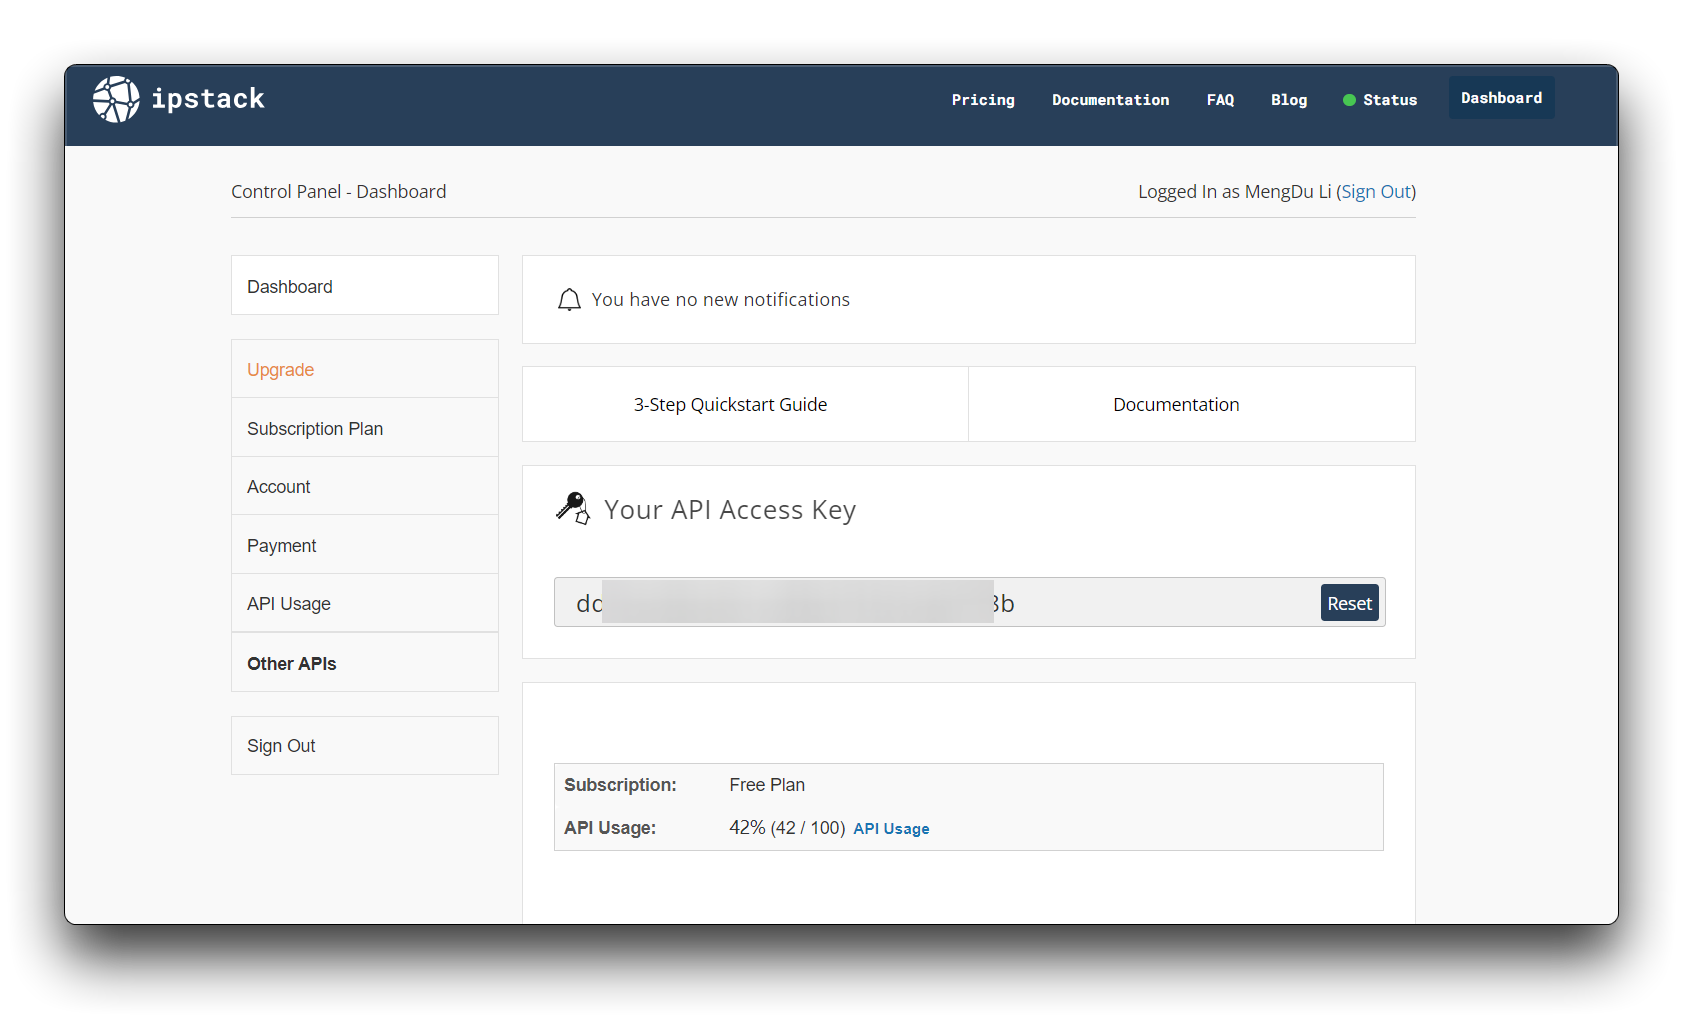
If this is your first time using ipstack then you will need to register for a new account.
Once you have registered and logged in you will be able to see your API Key, please copy it and save it in a safe place where we will use it later.
Step 2. Learn how to use the ipstack API
The ipstack provides detailed documentation explaining how to use the ipstack API.
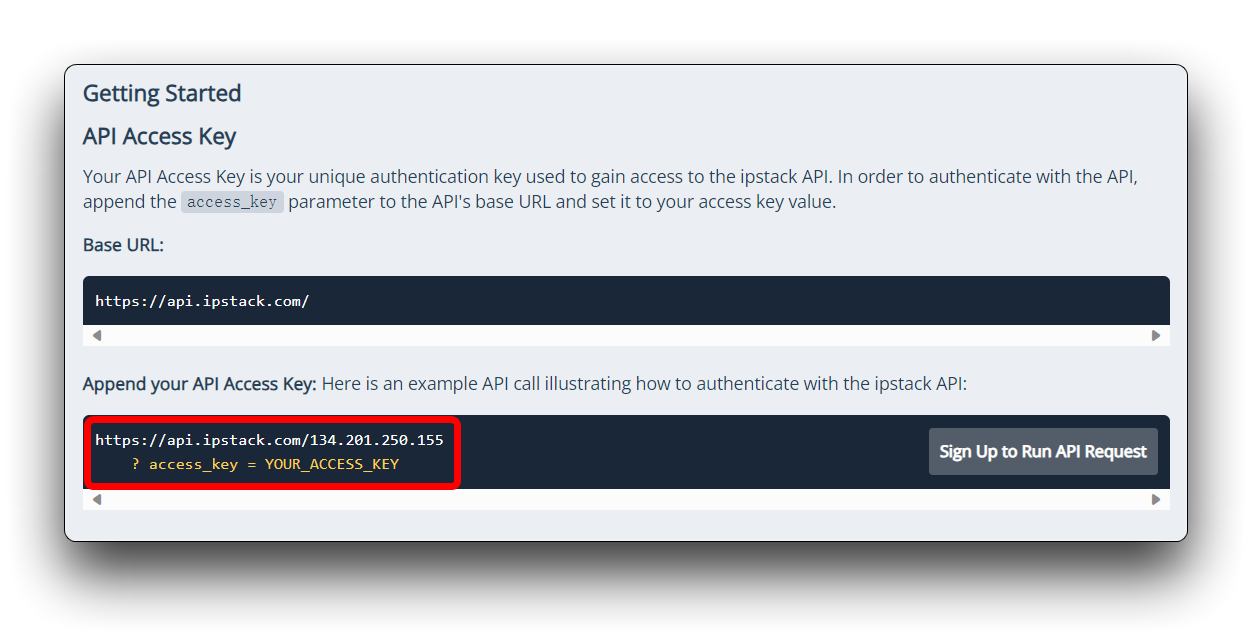
Very simple, right? Just send the address of the server + IP address + API Key.
Next we need to know what kind of JSON message ipstack will return to us and extract the information we need such as city, country and latitude and longitude.
{
  "ip": "134.201.250.155",
  "hostname": "134.201.250.155",
  "type": "ipv4",
  "continent_code": "NA",
  "continent_name": "North America",
  "country_code": "US",
  "country_name": "United States",
  "region_code": "CA",
  "region_name": "California",
  "city": "Los Angeles",
  "zip": "90013",
  "latitude": 34.0453,
  "longitude": -118.2413,
  "location": {
    "geoname_id": 5368361,
    "capital": "Washington D.C.",
    "languages": [
        {
          "code": "en",
...
Then, we just need to extract the information we need with the help of the ArduinoJSON library.
Step 3. Obtain the coordinates of the IP address via the http service
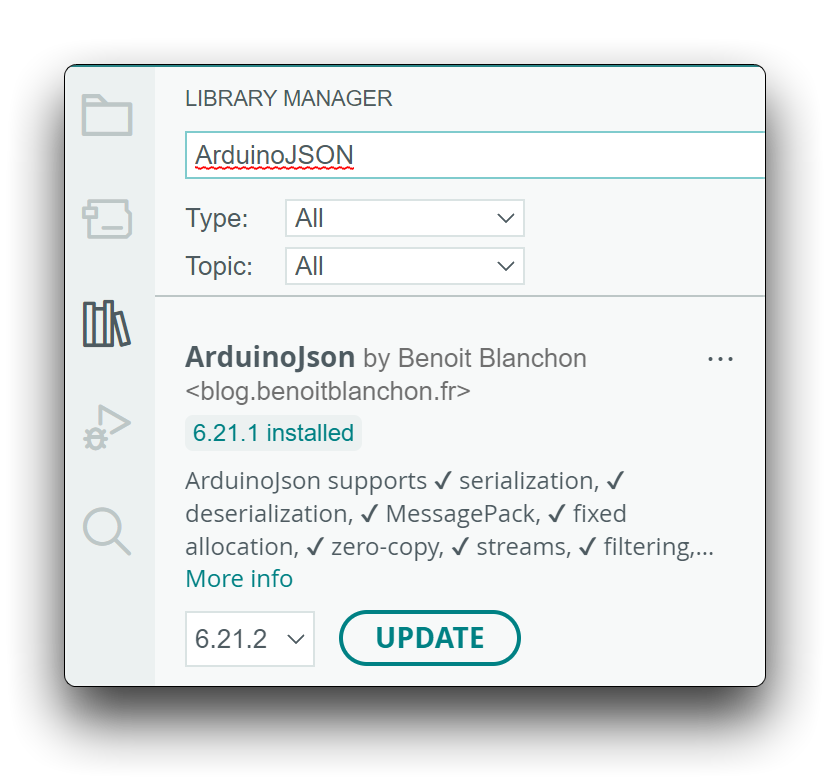
To summarise, we start by installing the ArduinoJSON library. It can be searched for and downloaded directly from the Arduino IDE.
We then write the getLocation() function, which we use to get the country, city and latitude and longitude information returned by ipstack, and print them out.
// For ipstack
const char* IPStack_key = "<YOUR_API_KEY_HERE>";
String ip_address;

// Obtain the approximate coordinate position based on the current IP address of XIAO.
bool getLocation(){
  // Make HTTP request to IPStack API
  HTTPClient http;
  String url = "http://api.ipstack.com/" + String(ip_address) + "?access_key=" + String(IPStack_key);
  Serial.println("Requesting URL: " + url);
  http.begin(url);
  int httpCode = http.GET();

  // Parse JSON response
  if (httpCode == 200) {
    String payload = http.getString();
    Serial.println("Response payload: " + payload);
    DynamicJsonDocument doc(1024);
    deserializeJson(doc, payload);
    String country_name = doc["country_name"].as<String>();
    String region_name = doc["region_name"].as<String>();
    String city = doc["city"].as<String>();
    latitude = doc["latitude"].as<double>();
    longitude = doc["longitude"].as<double>();
    Serial.println("Country: " + country_name);
    Serial.println("Region: " + region_name);
    Serial.println("City: " + city);
    Serial.println("Latitude: " + String(latitude));
    Serial.println("Longitude: " + String(longitude));
    http.end(); // Close connection
    return true;
  } else {
    Serial.println("HTTP error code: " + String(httpCode));
    http.end(); // Close connection
    return false;
  }
}
In the above program, please replace the ipstack API Key with your own.
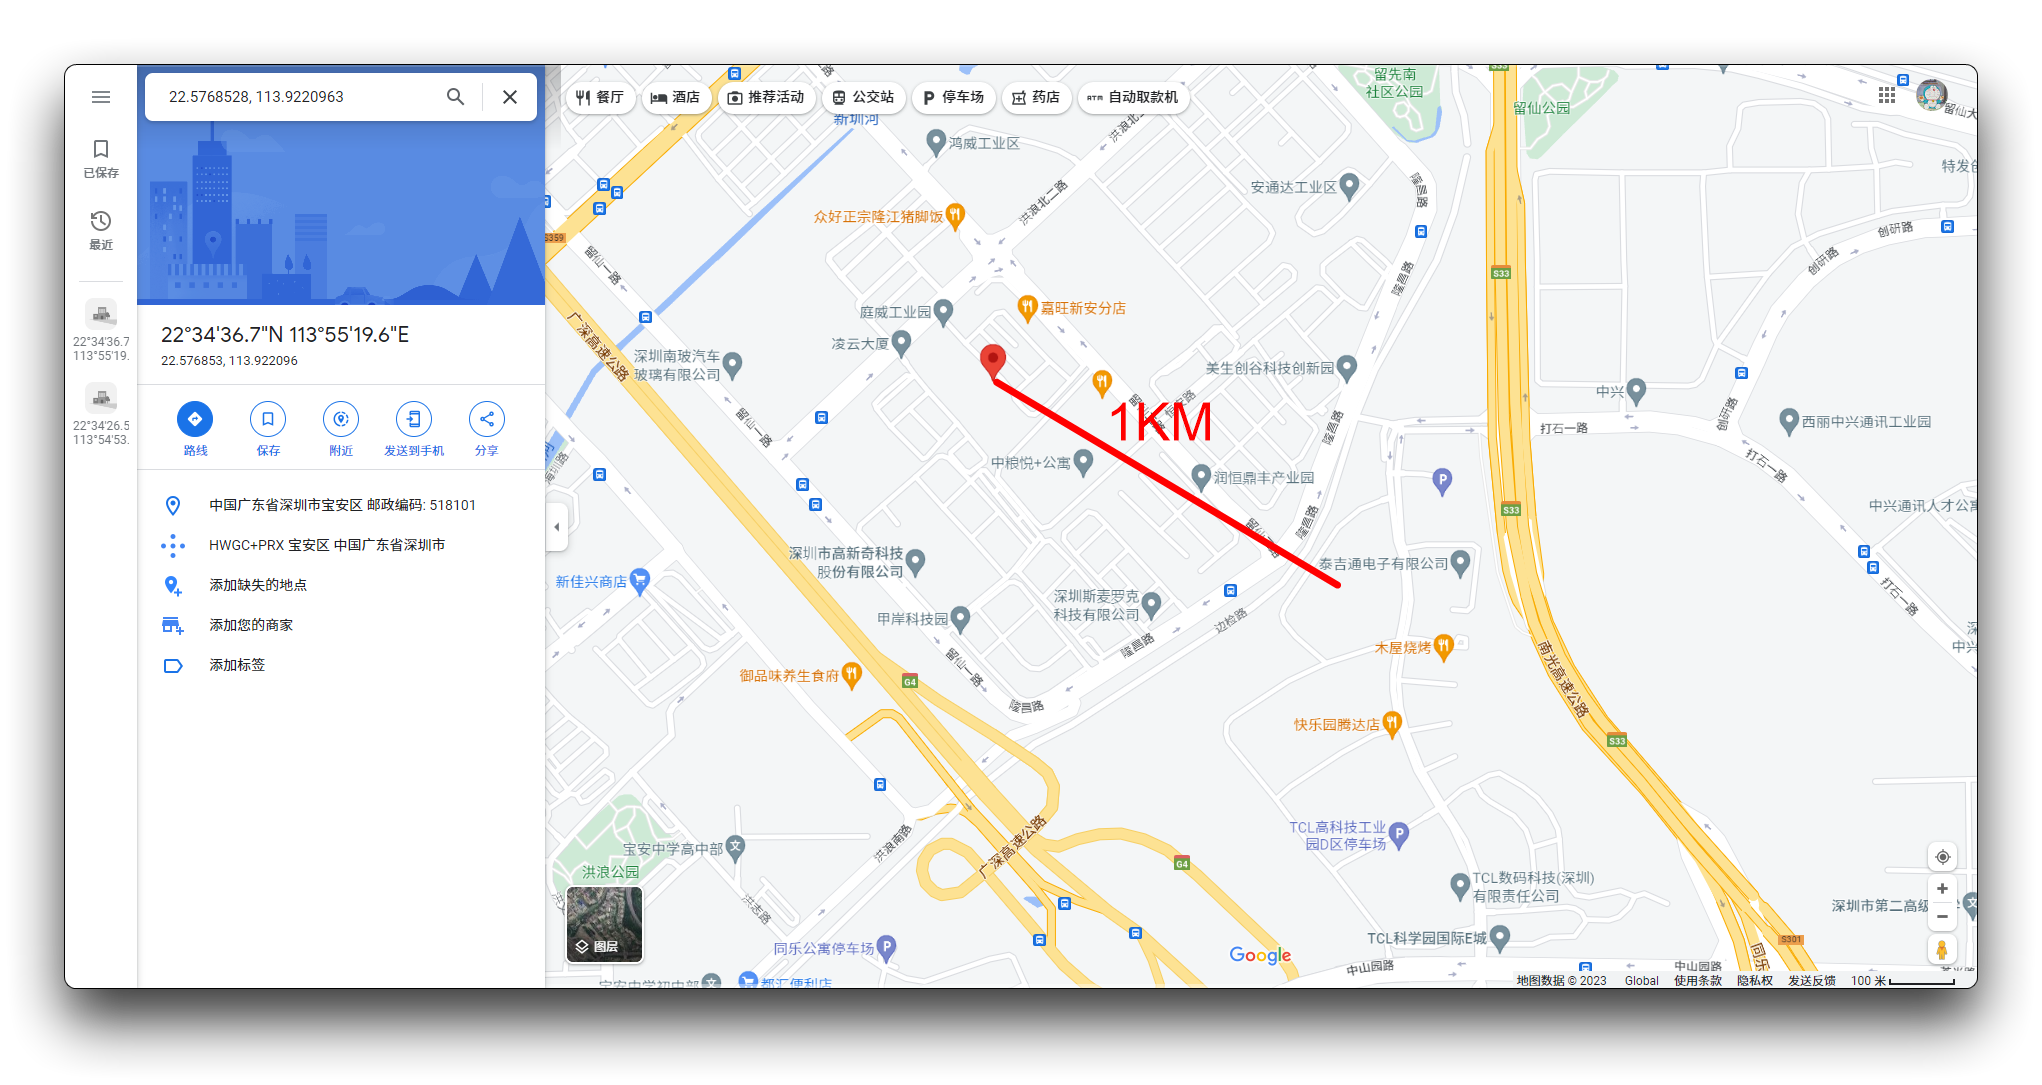
Next, we can look at how accurate the location is by IP address. The red marked points on the map below are the exact location of where I am by IP address. And the other end of the red line is the actual location of where I am. There is a difference of 2.4 km between them.
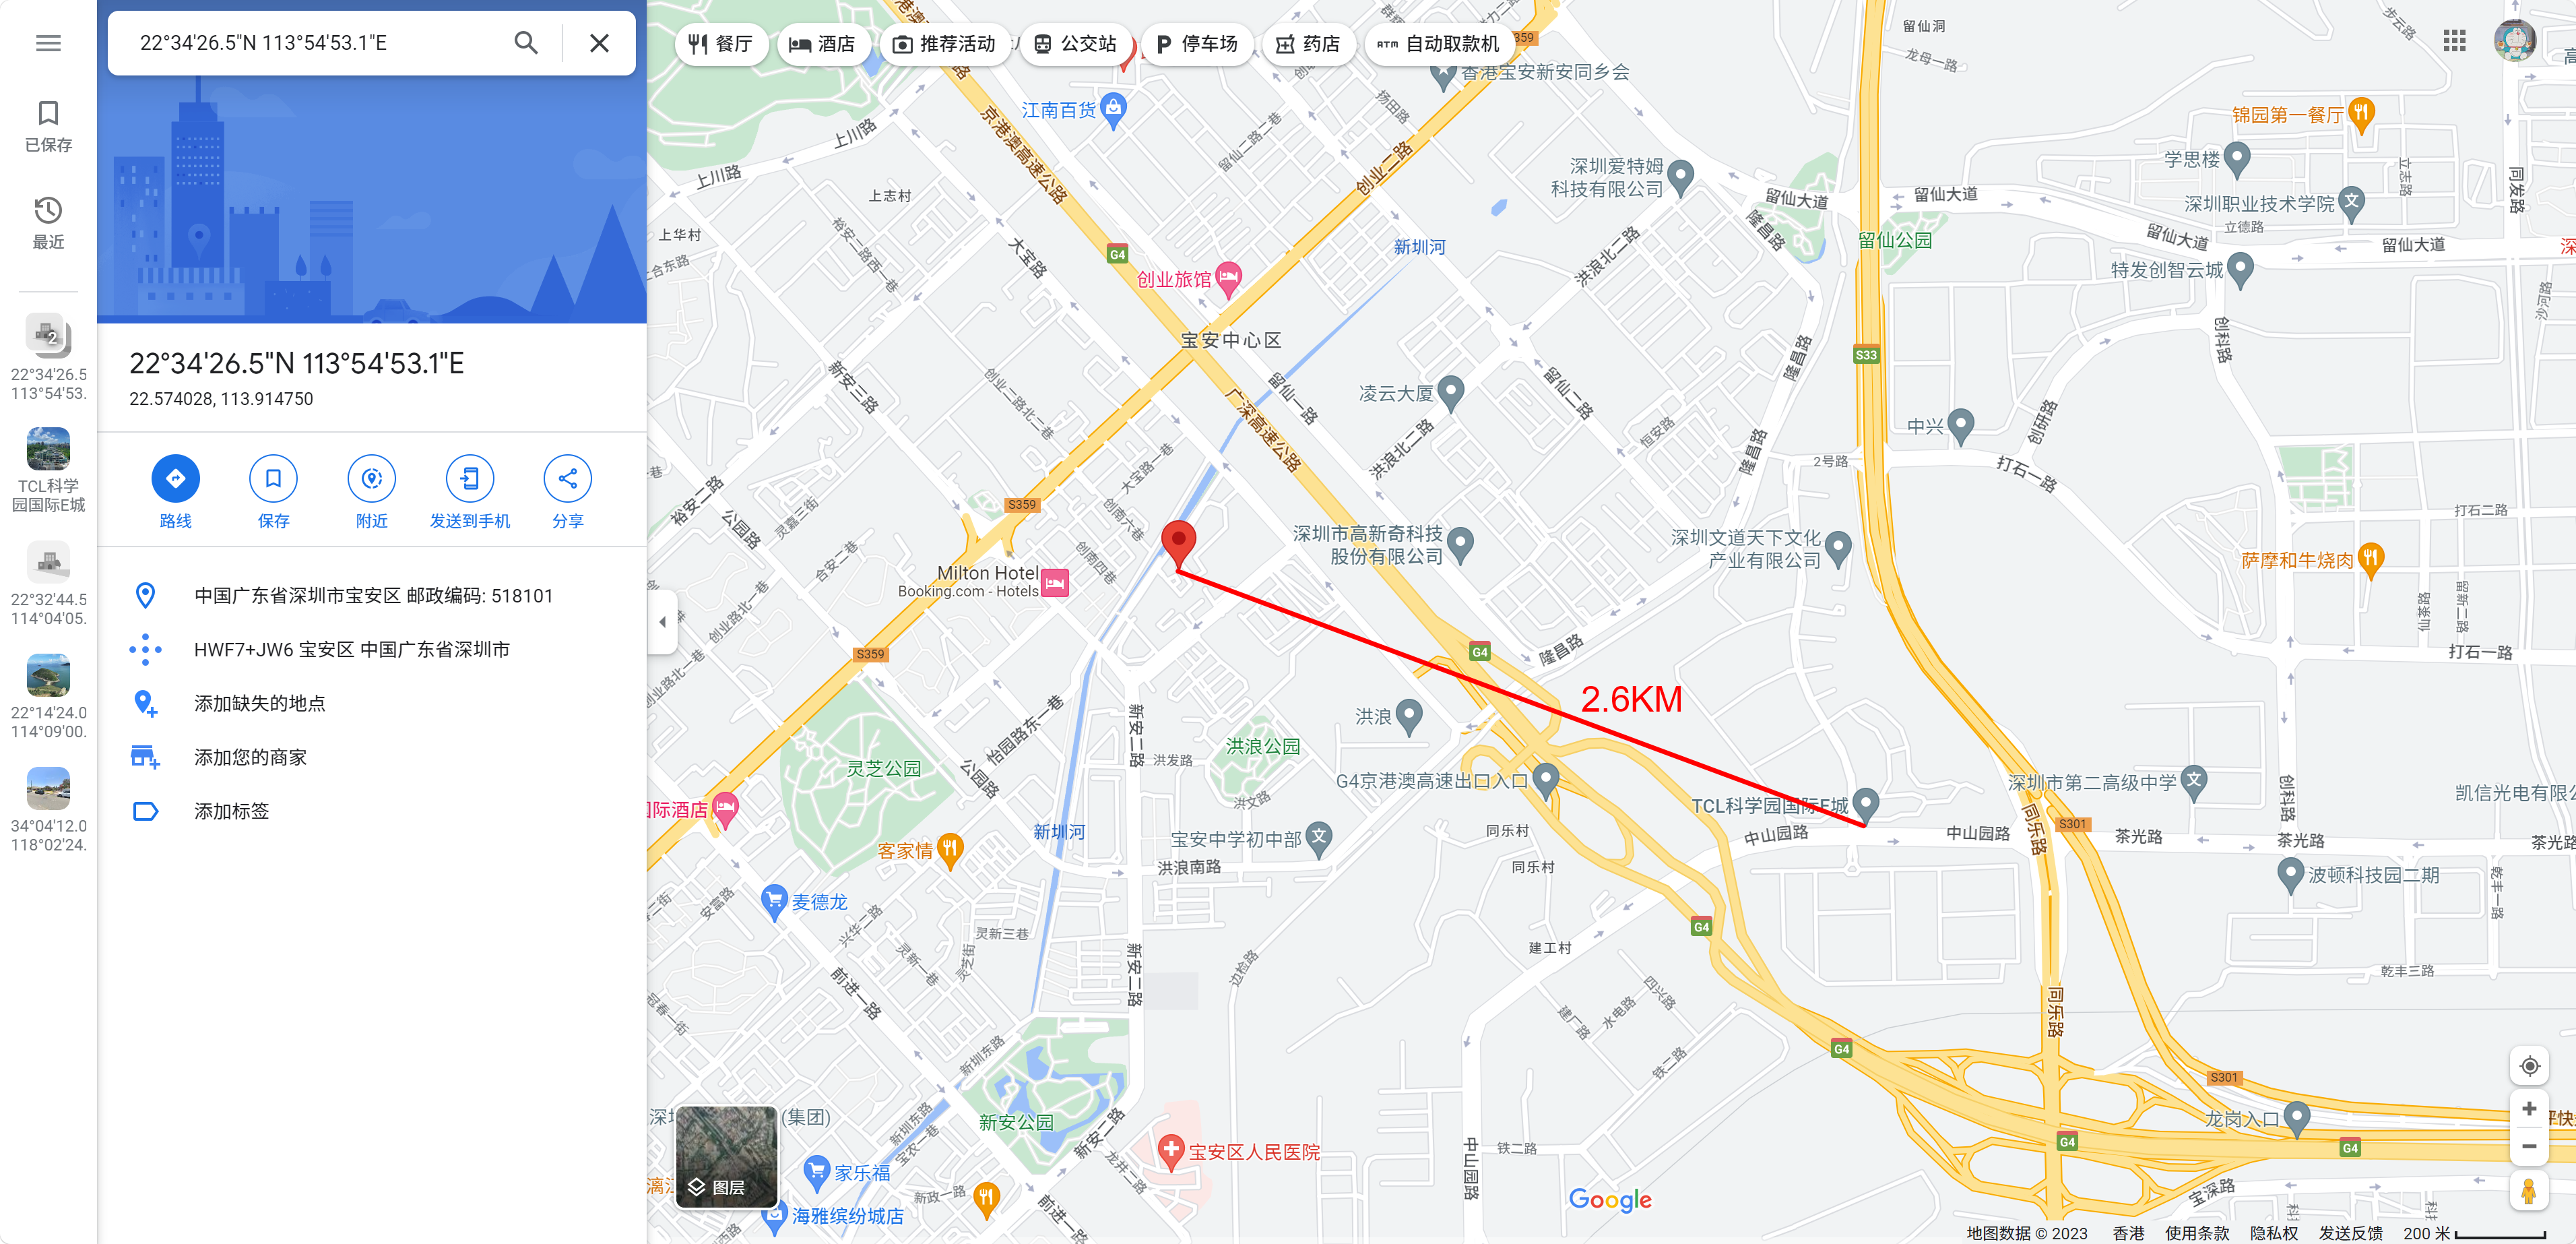
It can be seen that the error in this type of positioning is in the kilometre range, which is far from what we would expect from a tracker.
Download static images from Google Maps via HTTPS service
Latitude and longitude coordinates are not intuitive to talk about in our view. Even if they contain information about countries and cities. So we wondered whether it would be possible to mark these latitude and longitude coordinates on a map and display them on the screen. Then we found Google Cloud's mapping service.
Before we begin, I think it is important for you to understand the pricing of the Google Maps service in order to decide whether to proceed.
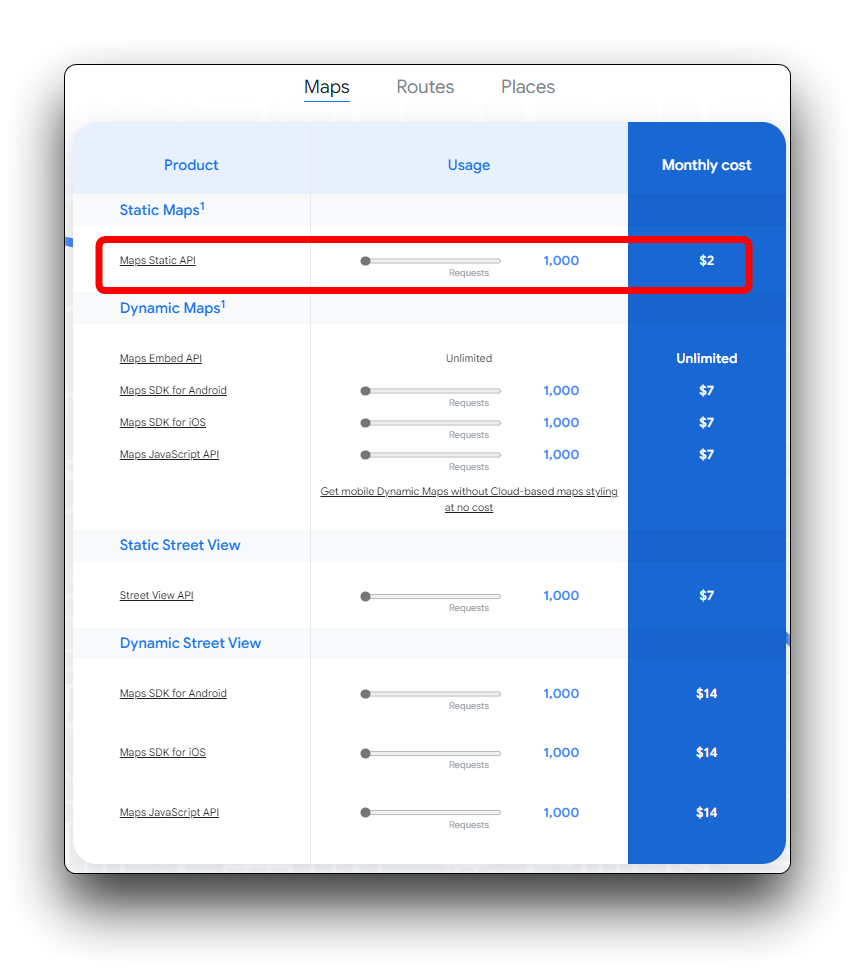
If you are a first time registered user, you will have $300 free credit. Here we are using mainly the Maps Static API, which costs $2.00 per 1000 calls.
Step 4. Set up your Google Cloud project and complete the setup instructions that follow
Step 5. Enable the Google Maps API
You need a google API key to validate with Google API. Navigate to Google Developers Console to enable GeoLocation API. Without this API key you will get an error as response.
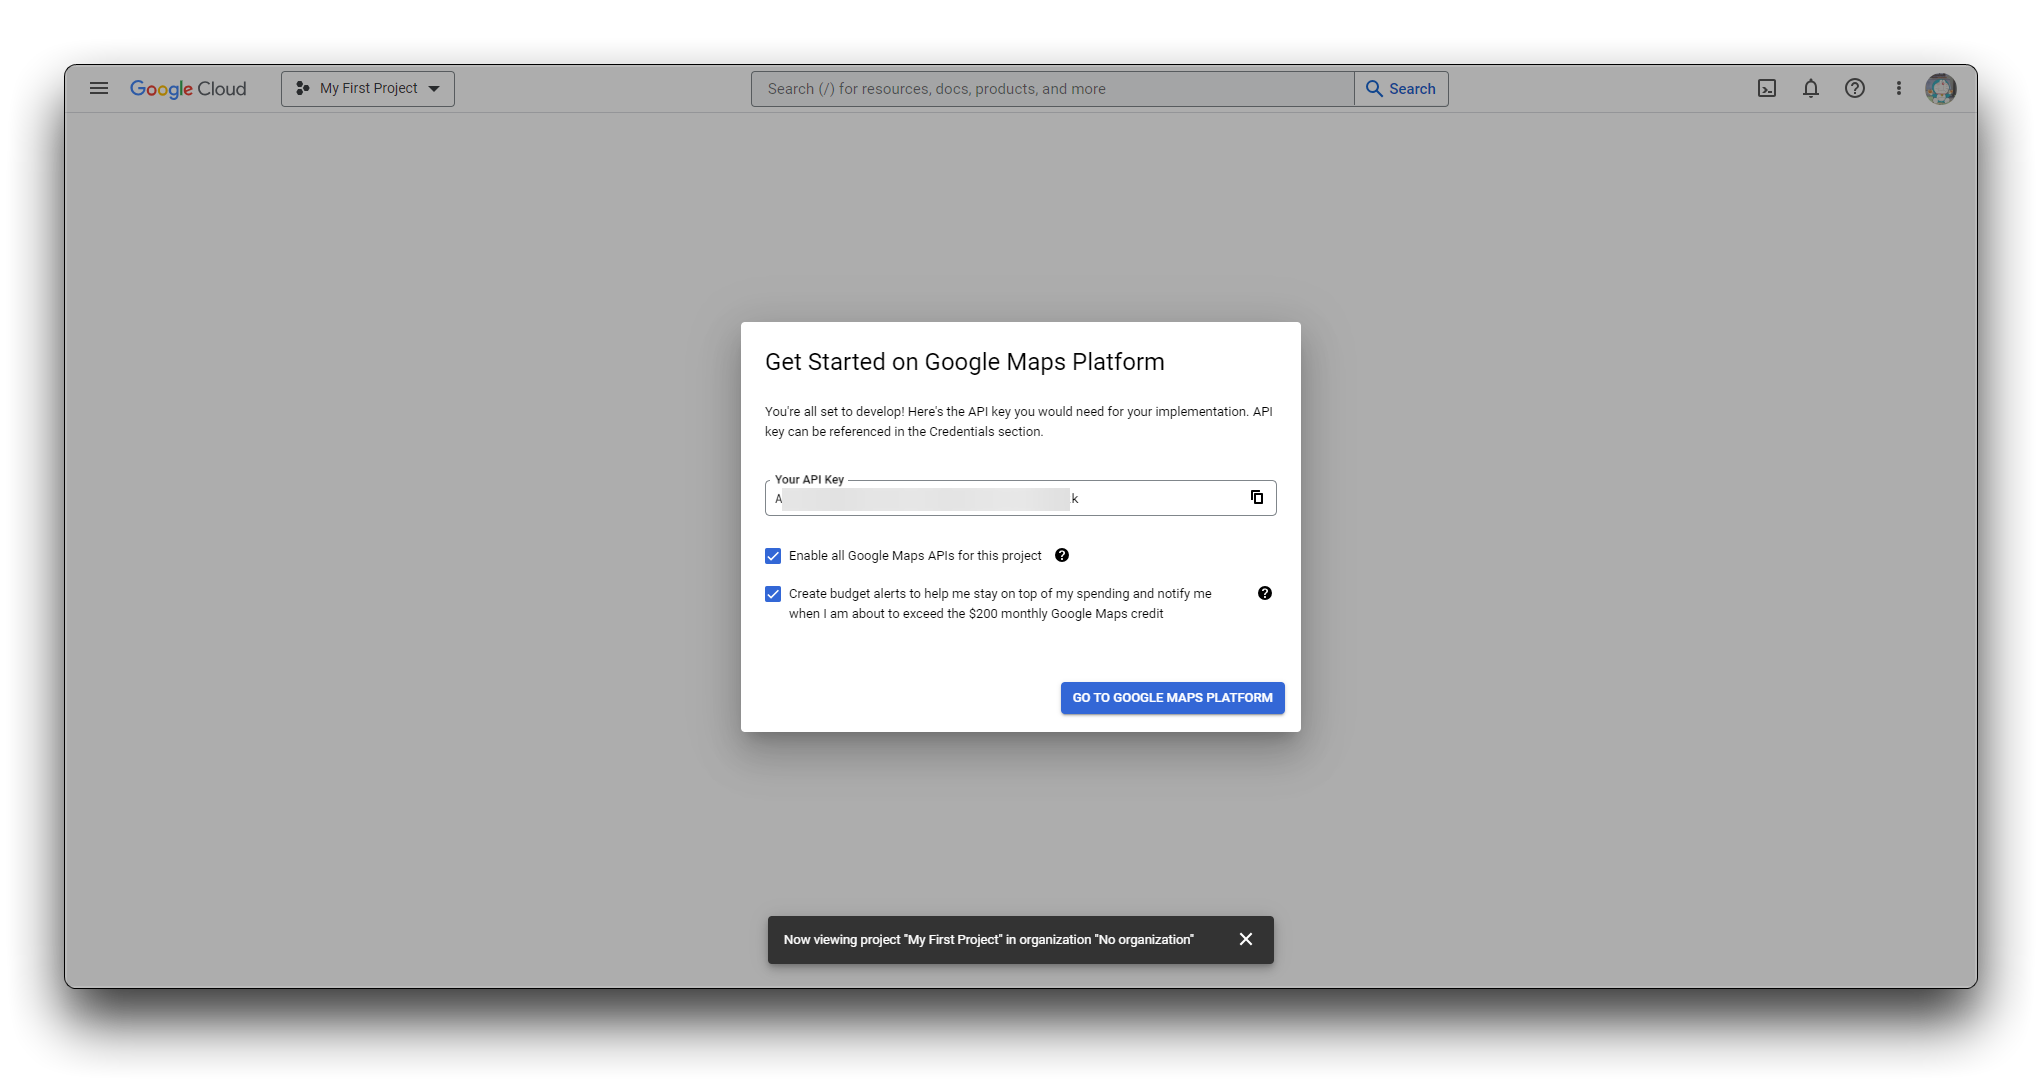
Once you have the API, please keep it in a safe place, we will use it in later programming steps.
If you have concerns about the environment in which you are currently using the API, you can turn on restrictions on API calls to avoid additional charges for misappropriation. Turning on certain restrictions may require changes to your program.

Display the location map on the Round Display
If you are using Round Display for XIAO for the first time, then you may need to refer to the Wiki here to configure your Arduino environment for the round screen.
Step 6. Learn how to call Google Cloud Static Maps API
Click here to read the documentation for the Google Cloud Static Maps API.
The documentation gives an example code for using the API as follows:
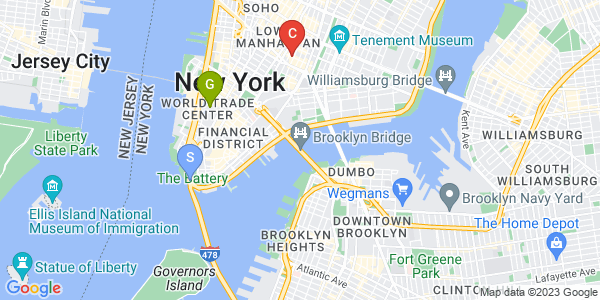
https://maps.googleapis.com/maps/api/staticmap?center=Brooklyn+Bridge,New+York,NY&zoom=13&size=600x300&maptype=roadmap
&markers=color:blue%7Clabel:S%7C40.702147,-74.015794&markers=color:green%7Clabel:G%7C40.711614,-74.012318
&markers=color:red%7Clabel:C%7C40.718217,-73.998284
&key=YOUR_API_KEY&signature=YOUR_SIGNATURE
A Maps Static API URL must be of the following form:
https://maps.googleapis.com/maps/api/staticmap?parameters
The Maps Static API defines map images using the following URL parameters:
center(required if markers not present) defines the center of the map, equidistant from all edges of the map. This parameter takes a location as either a comma-separated{latitude,longitude}pair (e.g. "40.714728,-73.998672") or a string address (e.g. "city hall, new york, ny") identifying a unique location on the face of the earth.zoom(required if markers not present) defines the zoom level of the map, which determines the magnification level of the map. This parameter takes a numerical value corresponding to the zoom level of the region desired.size(required) defines the rectangular dimensions of the map image. This parameter takes a string of the form{horizontal_value}x{vertical_value}.maptype(optional) defines the type of map to construct. There are several possible maptype values, including roadmap, satellite, hybrid, and terrain.markers(optional) define one or more markers to attach to the image at specified locations. This parameter takes a single marker definition with parameters separated by the pipe character (|). Multiple markers may be placed within the same markers parameter as long as they exhibit the same style; you may add additional markers of differing styles by adding additional markers parameters. Note that if you supply markers for a map, you do not need to specify the (normally required) center and zoom parameters.key(required) allows you to monitor your application's API usage in the Google Cloud Console, and ensures that Google can contact you about your application if necessary.
Only the most basic parameters are shown above, if you have a need to customise this static map you can click here to read the full list of parameters.
In summary, we can then stitch together to form a complete string for sending.
// For google static maps
const char * host = "maps.googleapis.com";
const String defaultPath = "/maps/api/staticmap?center=";
const String Googlemaps_key = "<YOUR_API_KEY_HERE>";
int zoomLevel = 14;
double latitude;
double longitude;

// Stitching to form commands sent to Google Maps
String getPath(){
  String newPath = defaultPath;
  newPath += latitude;
  newPath += ",";
  newPath += longitude;
  newPath += "&zoom=";
  newPath += String(zoomLevel);
  newPath += "&size=240x240";
  newPath += "&maptype=roadmap";
  newPath += "&markers=size:tiny%7Ccolor:red%7C";
  newPath += latitude;
  newPath += ",";
  newPath += longitude;
  newPath += "&format=jpg-baseline";
  newPath += "&key=";
  newPath += Googlemaps_key;
  Serial.println(newPath);
  return newPath;
}
Please replace the code above with your own Google Cloud Maps API.
Step 7. The returned image is obtained via HTTPS and written to the microSD card
We need a storage medium large enough to hold the returned still images so that they can be read in the program that displays them on screen. The Round Display happens to have microSD card support.
// Static images of coordinates from Google Cloud Services
bool getStaticMapImage(const char *host, const char *path, String fileName){
  int contentLength = 0;
  int httpCode;

  WiFiClientSecure client;

  client.setCACert(GlobalSignCA);
  client.connect(host, 443);

  Serial.printf("Trying: %s:443...", host);

  if(!client.connected()){
    client.stop();
    Serial.printf("*** Can't connect. ***\n-------\n");
    return false;
  }

  Serial.println("HTTPS Connected!");
  client.print("GET ");
  client.print(path);
  client.print(" HTTP/1.0\r\nHost: ");
  client.print(host);
  client.print("\r\nUser-Agent: ESP32S3\r\n");
  client.print("\r\n");

  while(client.connected()){
    String header = client.readStringUntil('\n');
    if(header.startsWith(F("HTTP/1."))){
      httpCode = header.substring(9, 12).toInt();
      if(httpCode != 200){
        client.stop();
        return false;
      }
    }
    if(header.startsWith(F("Content-Length: "))){
      contentLength = header.substring(15).toInt();
    }
    if(header == F("\r")){
      break;
    }

  }
  if(!(contentLength > 0)){
    client.stop();
    return false;
  }
  fs::File f = SD.open(fileName, "w");
  if(!f){
    Serial.println(F("FILE OPEN FAILED"));
    client.stop();
    return false;
  }
  int remaining = contentLength;
  int received;
  uint8_t buff[512] = {0};
  while(client.available() && remaining > 0){
    received = client.readBytes(buff, ((remaining > sizeof(buff)) ? sizeof(buff) : remaining));
    f.write(buff, received);
    if(remaining > 0){
      remaining -= received;
    }
    yield();
  }
  f.close();
  client.stop();
  Serial.println("DOWNLOAD END");
  return (remaining == 0 ? true : false);
}
Step 8. Display JPEG images on the Round Display
In general, the TFT graphics library supported by Round Display only supports displaying images in BMP format, if we need to display images in other formats, we need to use some third-party libraries, here we use the TJpg_Decoder library.
Please download this library as a zip file and add it to your Arduino environment.
We rewrite our program by referring to the sample program provided by the repository:
// This next function will be called during decoding of the jpeg file to
// render each block to the TFT.  If you use a different TFT library
// you will need to adapt this function to suit.
bool tft_output(int16_t x, int16_t y, uint16_t w, uint16_t h, uint16_t* bitmap)
{
   // Stop further decoding as image is running off bottom of screen
  if ( y >= tft.height() ) return 0;

  // This function will clip the image block rendering automatically at the TFT boundaries
  tft.pushImage(x, y, w, h, bitmap);

  // Return 1 to decode next block
  return 1;
}

void setup() {
  // Initialise the TFT
  tft.init();
  tft.setRotation(2);
  tft.fillScreen(TFT_BLACK);
  tft.setSwapBytes(true); // We need to swap the colour bytes (endianess)

  // Initialise SD before TFT
  if (!SD.begin(SD_CS)) {
    Serial.println(F("SD.begin failed!"));
    return;
  }
  Serial.println("\r\nInitialisation done.");

  // The jpeg image can be scaled by a factor of 1, 2, 4, or 8
  TJpgDec.setJpgScale(1);

  // The decoder must be given the exact name of the rendering function above
  TJpgDec.setCallback(tft_output);

  if(WiFi.status() == WL_CONNECTED){
    if(getLocation() && getStaticMapImage(host, getPath().c_str(), mapFile)){
      TJpgDec.drawSdJpg(0, 0, mapFile);
    }
  }
}
The full program for this project can be found on this occasion.
Execute the program and you can see the output of the serial monitor.
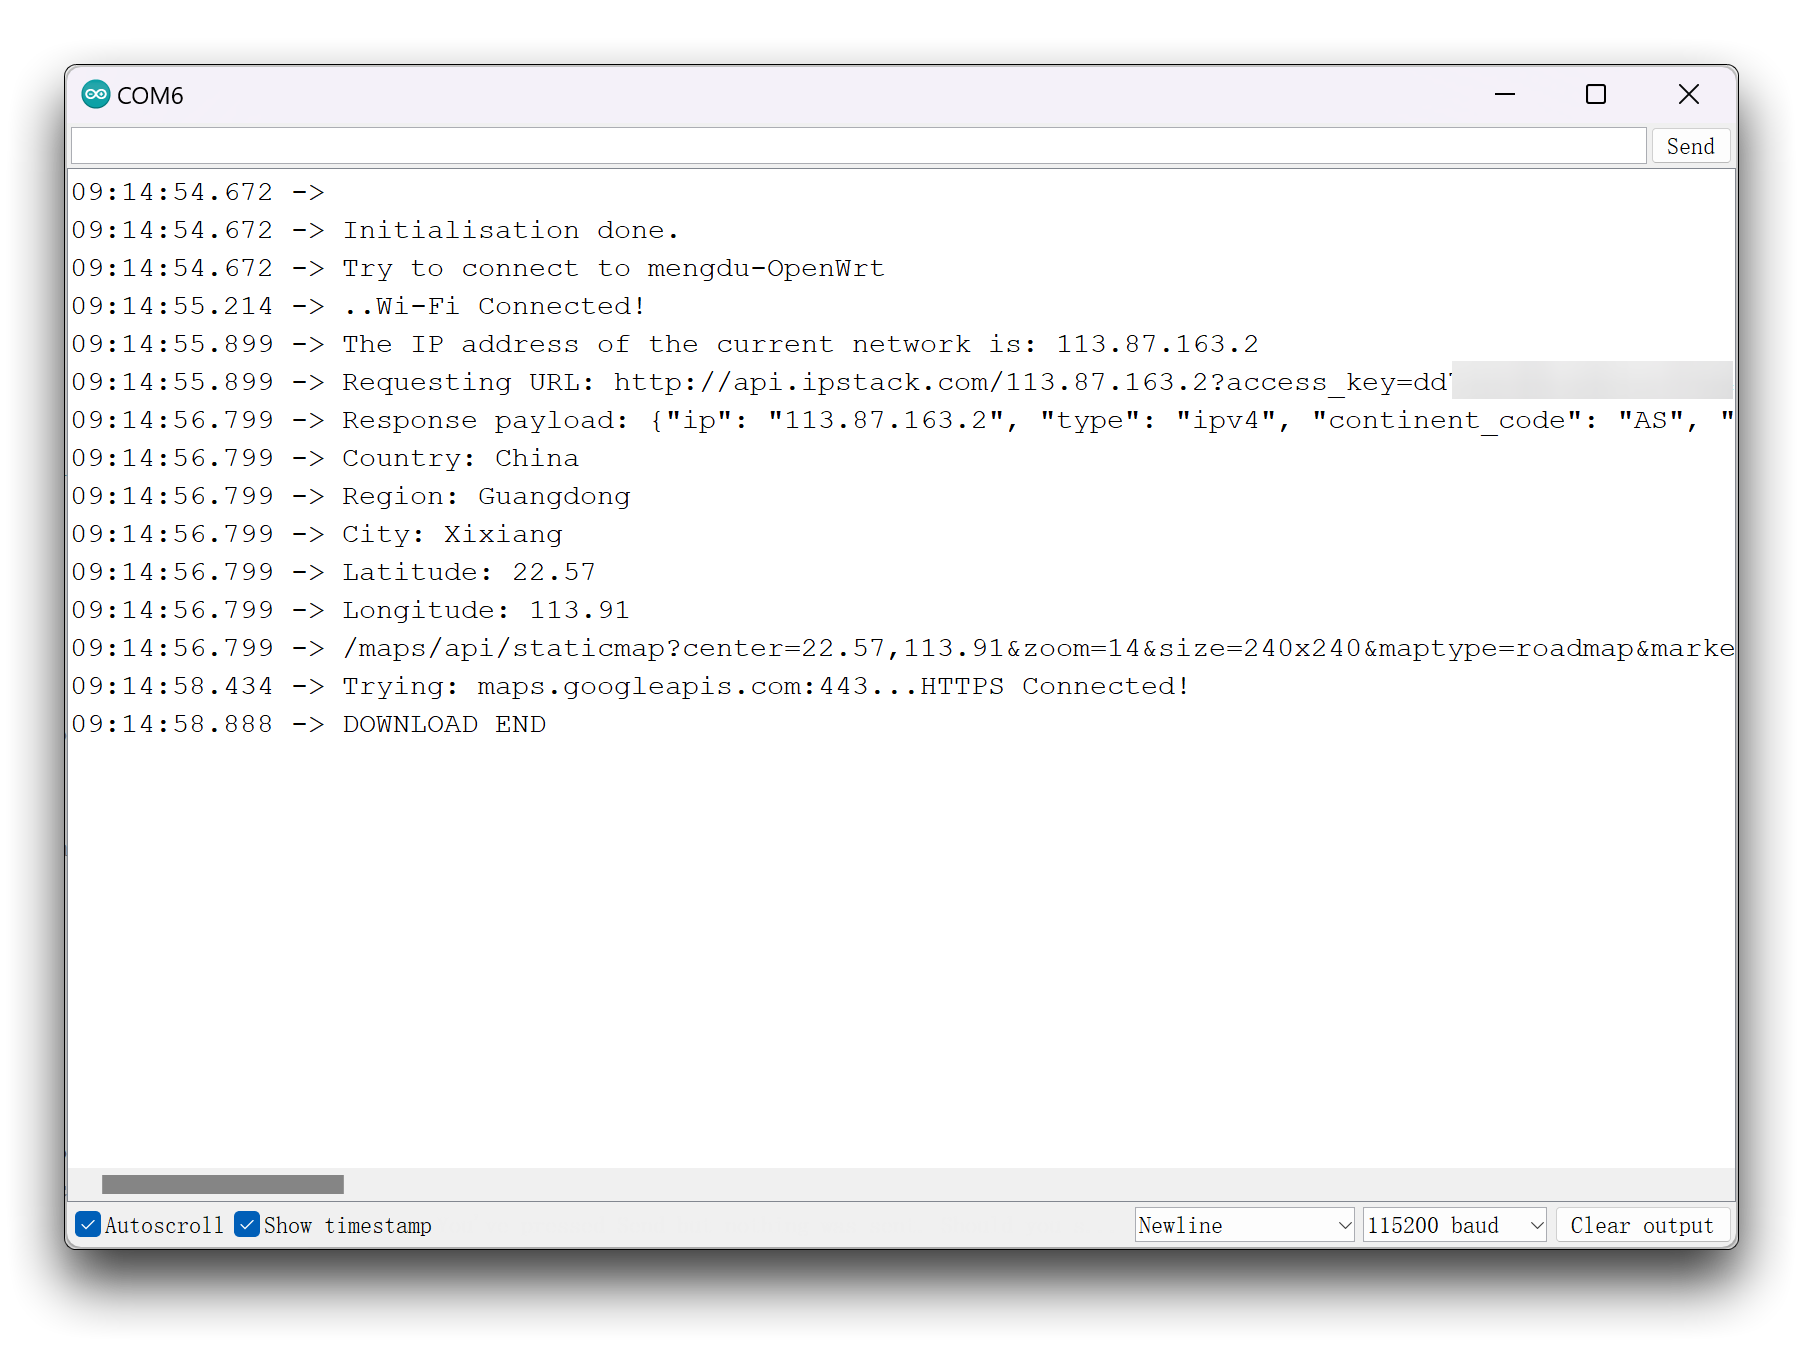
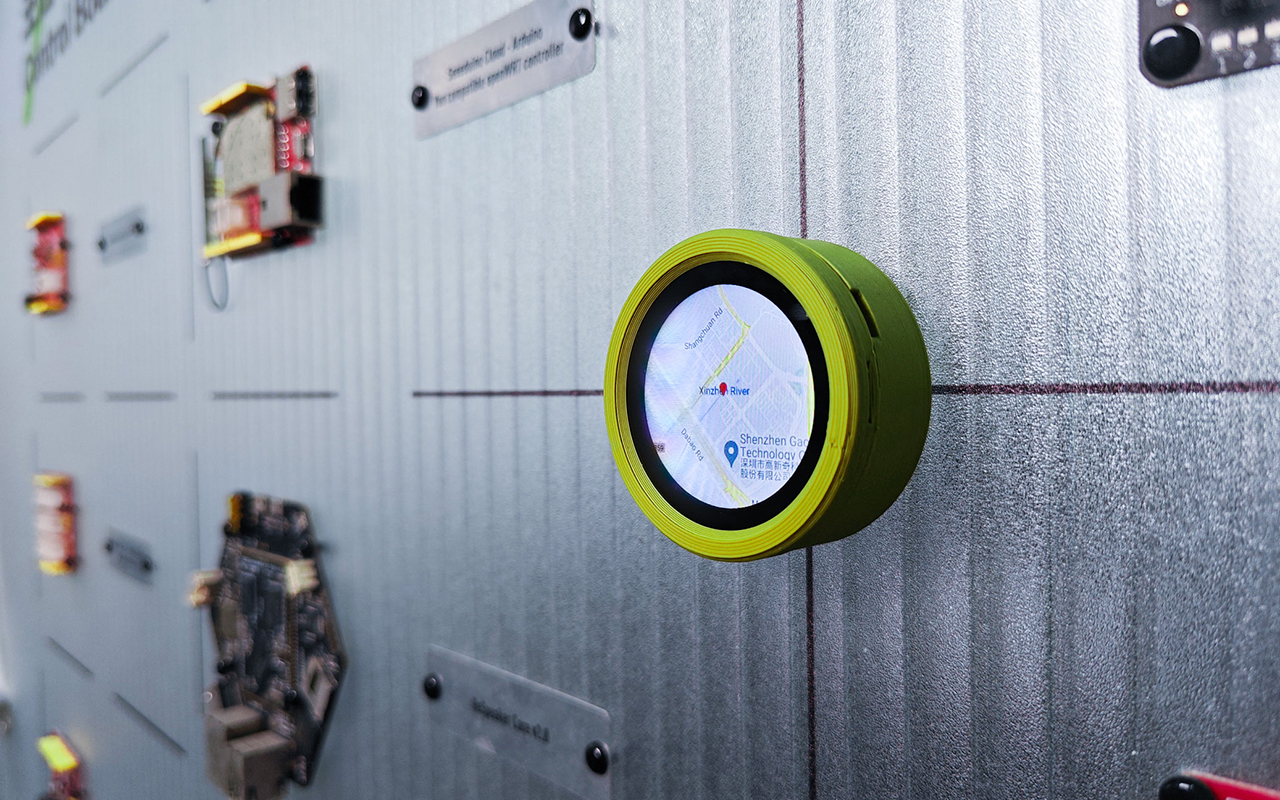
The screen will also display a picture of the location corresponding to your IP address.
Positioning using the WFPS method
As we have compared in the previous steps, the accuracy of the location using IP addresses is really dismal. So next, let's improve the procedure using the WFPS method and see if there is a change in accuracy.
Of course, this algorithm is difficult for us to implement and we still rely on the Geolocation API in the Google Maps service.
The Geolocation API is a service that accepts an HTTPS request with the cell tower and WiFi access points that a mobile client can detect. It returns latitude/longitude coordinates and a radius indicating the accuracy of the result for each valid input.
In the community, gmag11 and their team have written libraries that can call this service directly. We can use it directly here.
In the meantime, you will need the QuickDebug library for Debug Messages.
Next, we just need to modify the getLocation() function.
//For google geolocation
WifiLocation location (Googlemaps_key);
// Set time via NTP, as required for x.509 validation
void setClock () {
configTime (0, 0, "pool.ntp.org", "time.nist.gov");
Serial.print ("Waiting for NTP time sync: ");
time_t now = time (nullptr);
while (now < 8 * 3600 * 2) {
delay (500);
Serial.print (".");
now = time (nullptr);
}
struct tm timeinfo;
gmtime_r (&now, &timeinfo);
Serial.print ("\n");
Serial.print ("Current time: ");
Serial.print (asctime (&timeinfo));
}
// Get the exact coordinates of XIAO by WiFi location method
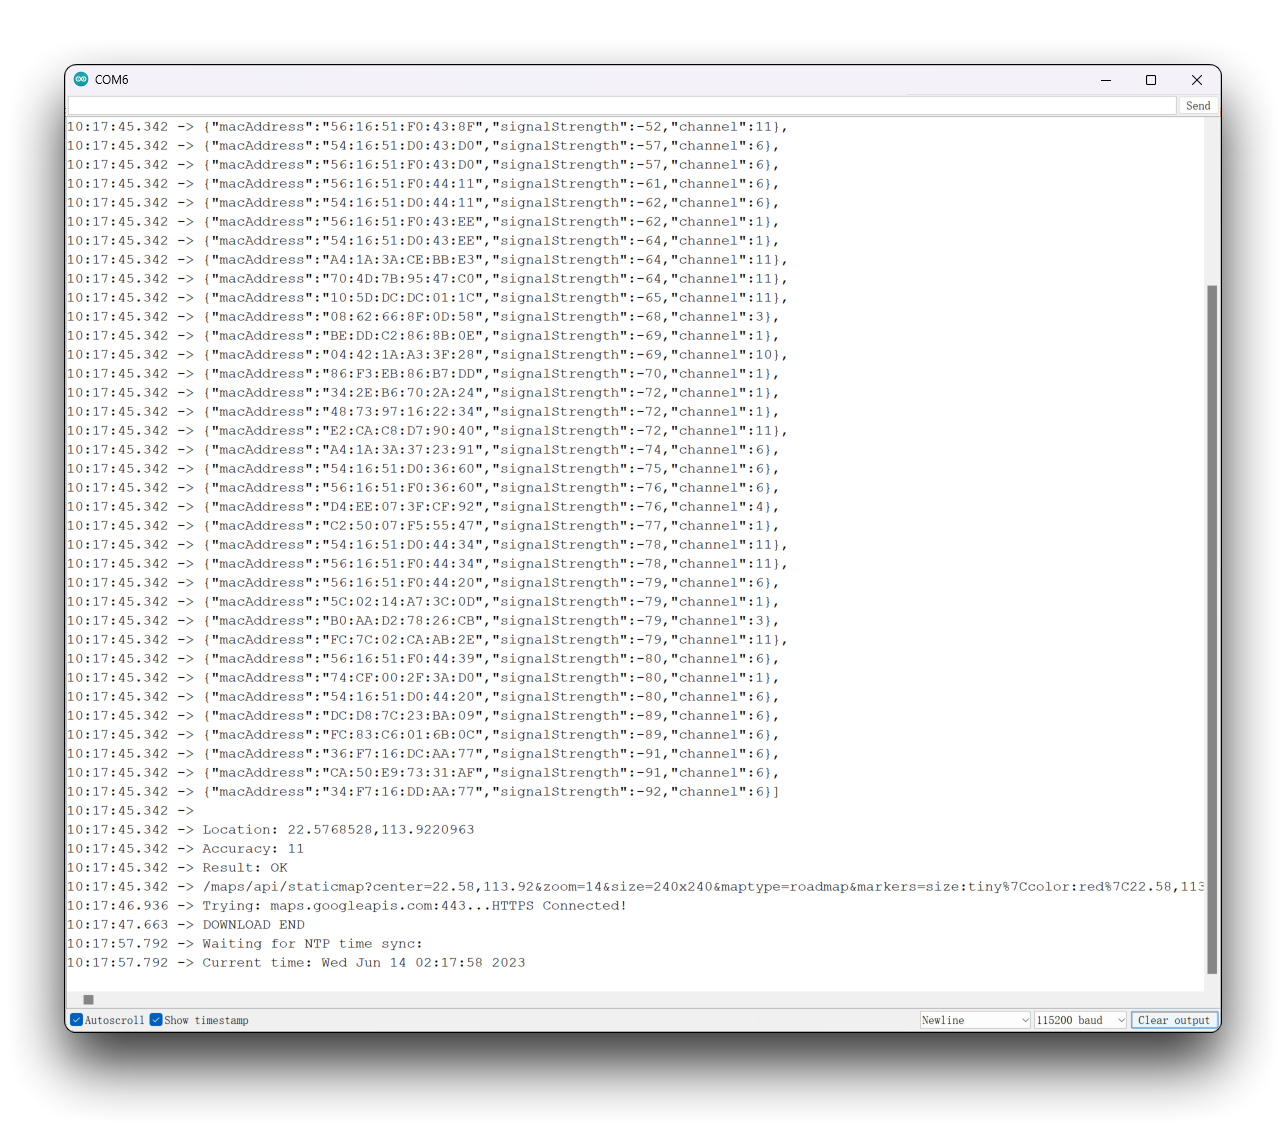
void getLocation(){
setClock();
location_t loc = location.getGeoFromWiFi();
Serial.println("Location request data");
Serial.println(location.getSurroundingWiFiJson()+"\n");
Serial.println ("Location: " + String (loc.lat, 7) + "," + String (loc.lon, 7));
latitude = loc.lat;
longitude = loc.lon;
Serial.println ("Accuracy: " + String (loc.accuracy));
Serial.println ("Result: " + location.wlStatusStr (location.getStatus ()));
}
Let's see how the coordinates obtained by means of WFPS differ from the actual position.
The deviation in position is already around 1 km! This performance is even better than some GPS modules.
Live updates on the latest location
So for the final step, let's wrap up this global positioning tracker. Let it implement an automatic map refresh.
Please have an estimate of your Google Cloud service tariff consumption when using this program, otherwise frequent API calls may result in heavy billing!
void loop() {
  // Make sure you pay attention to the number of API calls! This could cost you extra spending!

  if(WiFi.status() == WL_CONNECTED){
    getLocation();
    if(latitude != last_latitude || longitude != last_longitude){  // Update of the location image is performed only when the location is updated
      last_latitude = latitude;
      last_longitude = longitude;
      if(getStaticMapImage(host, getPath().c_str(), mapFile)){
        TJpgDec.drawSdJpg(0, 0, mapFile);
      }
    }
  }
  delay(10000);
}
In the main loop, we will get the surrounding network every 10 seconds and update the current location coordinates. If the location coordinates returned are different from the last time, then the map will be re-downloaded and refreshed on the screen.
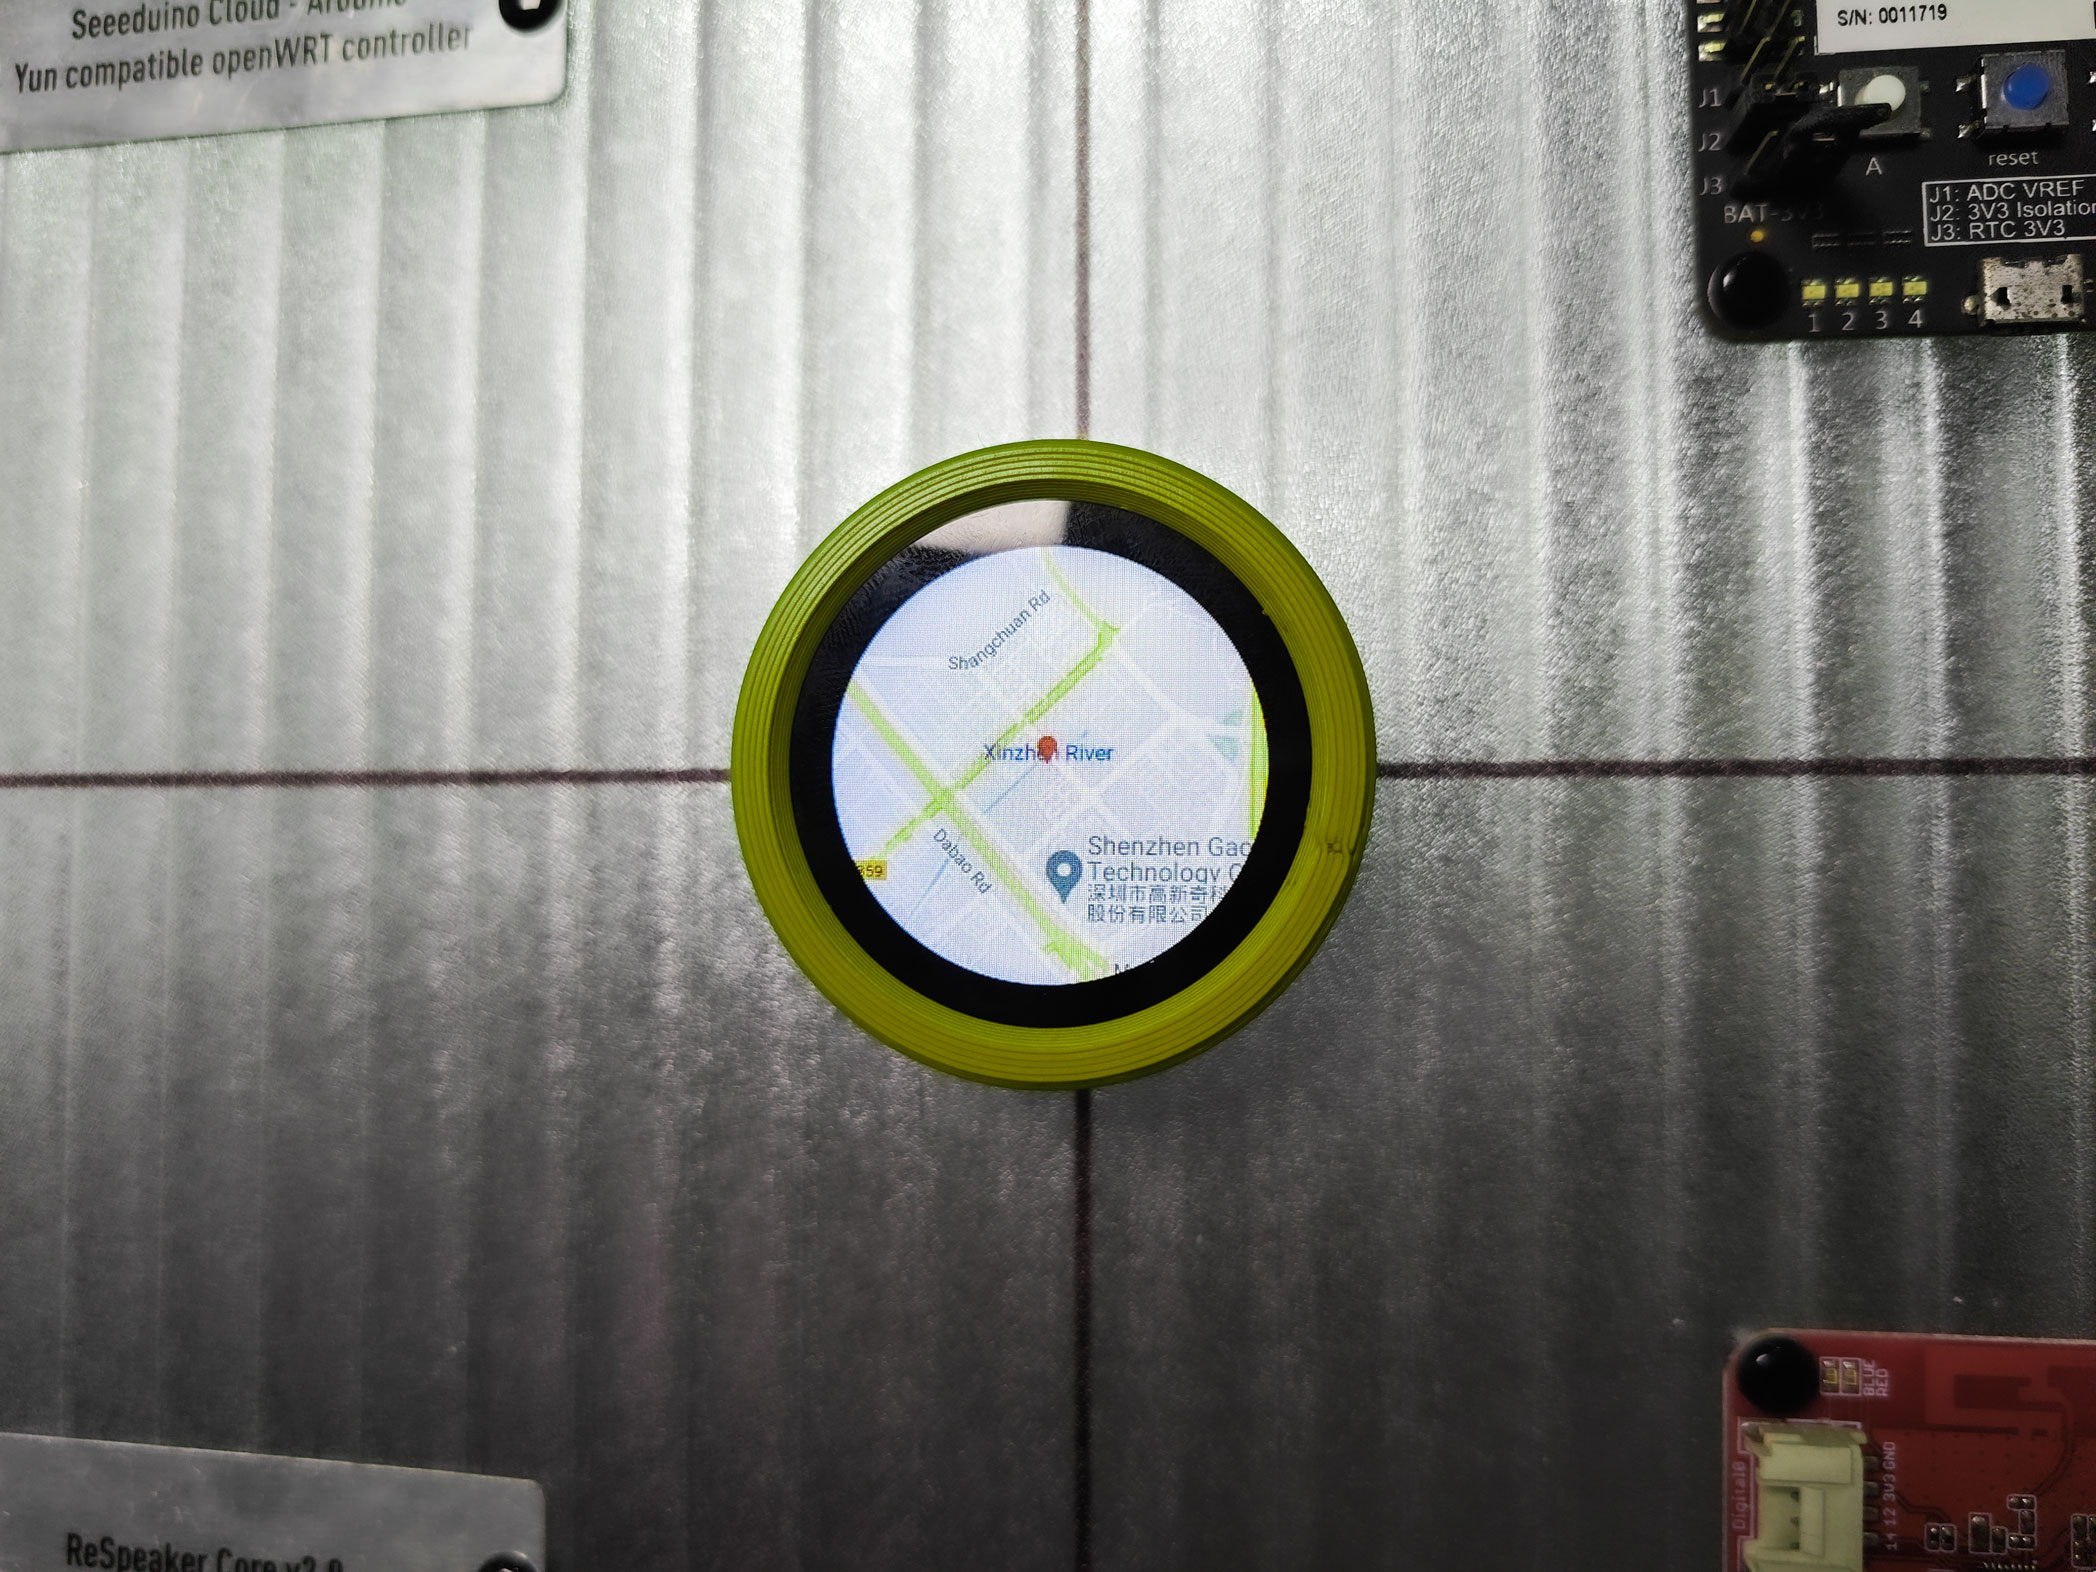
With our 3D printed housing, doesn't it really look like a tracker!
Finally, the full program code for obtaining positioning via the WFPS method is available at the button below.
Resources
- [GITHUB] Source Code
- [STP] XIAO ESP32S3 Sense housing design (top)
- [STP] XIAO ESP32S3 Sense housing design (bottom)
Troubleshooting
Q1: Why am I not getting the exact IP address using the WiFi.hostByName() function?
When using the WiFi.hostByName() function to query the router's public IP address, make sure that your router can be resolved to the corresponding IP address by the DNS resolver. If your router uses DNS servers provided by your ISP, you may encounter DNS resolution failures. In this case, you can try using alternative DNS servers, such as Google's public DNS servers 8.8.8.8 or 8.8.4.4.
If you still cannot query the correct public IP address, it may be due to network connectivity issues or other network configuration issues. You can try the following methods to resolve the issue:
-
Try alternative public IP address query services: If you are using the api.ipify.org service to query the public IP address and still cannot obtain the correct IP address, you can try using alternative public IP address query services, such as ip-api.com or whatismyip.com.
-
Check router configuration: Check your router configuration to ensure that NAT and port forwarding functions are properly configured and not blocking access to external networks. You can also try enabling UPnP functionality on the router to automatically configure port forwarding.
-
Restart the router and ESP32S3 device: Sometimes, restarting the router and ESP32S3 device can resolve network connectivity and configuration issues.
If this still does not solve the problem, we recommend using the second method or assigning a value to XIAO directly after the router queries the public IP.
Tech Support & Product Discussion
Thank you for choosing our products! We are here to provide you with different support to ensure that your experience with our products is as smooth as possible. We offer several communication channels to cater to different preferences and needs.