XIAO ESP32S3 sense connecting with Home Assistant via ESPHome(all ports supported)
This Wiki will walkthrough step-by-step on how to connect Seeed Studio XIAO ESP32S3 with ESPHome running on Home Assistant and send the sensor data/ control devices after connecting Grove modules to XIAO ESP32S3. So, let's get started!
What are ESPHome and Home Assistant?

ESPHome is a tool which aims to make managing your ESP boards as simple as possible. It reads in a YAML configuration file and creates custom firmware which it installs on your ESP device. Devices or sensors added in ESPHome’s configuration will automatically show up in Home Assistant’s UI. ESPHome can help you connect and send the data to Home Assistant devices.
Hardware Preparation
If you want to follow this tutorial through everything, you will need to prepare the following.
| Seeed Studio XIAO ESP32S3 Sense | Seeed Studio Expansion Board | Home Assistant Devices |
|---|---|---|
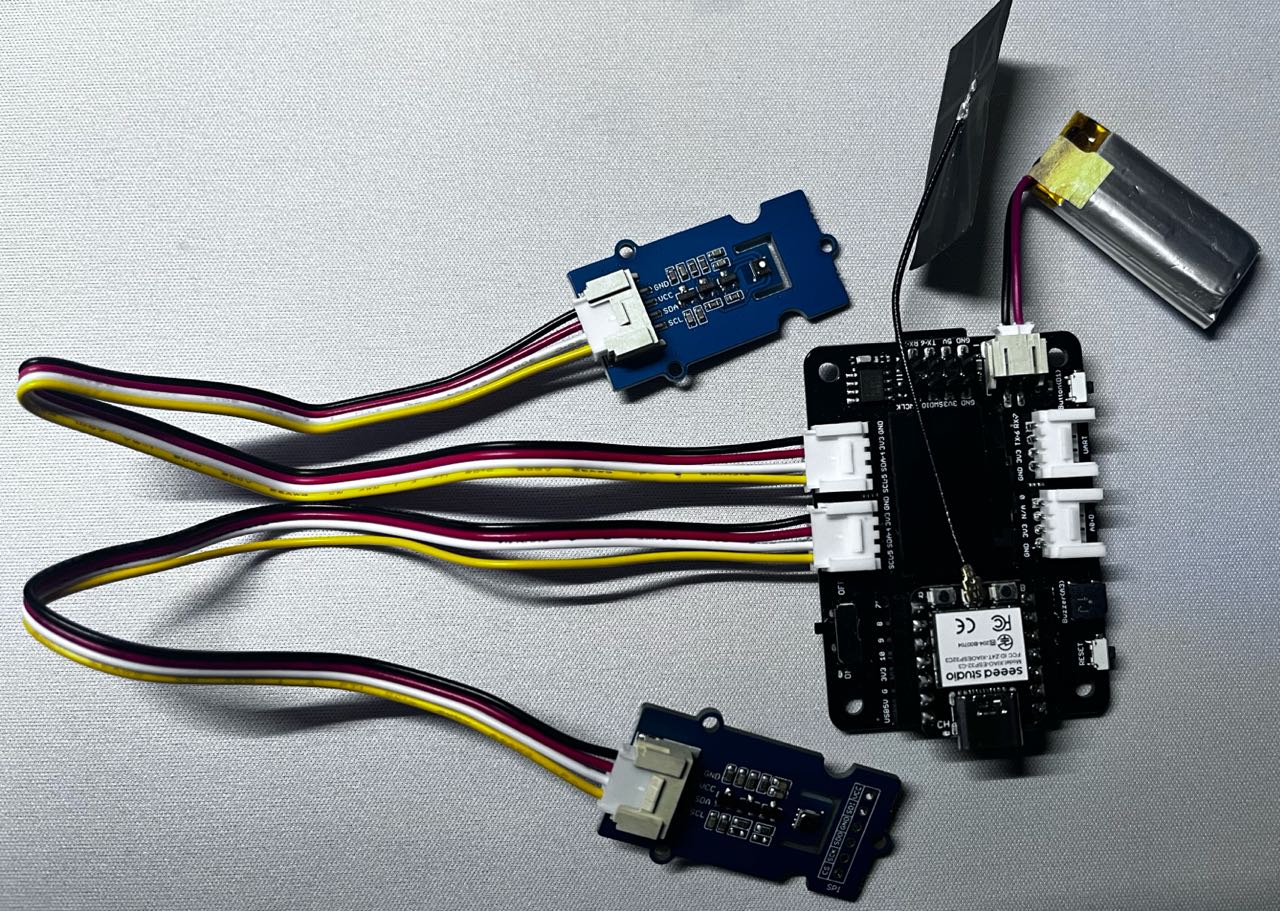
 |  |  |
Utilized Sensors
- Grove - Temperature and Humidity Sensor (BME680)
- Grove -Smart Air Quality Sensor (SGP41)
- 6x10 RGB MATRIX for XIAO
Software Preparation
Install Home Assistant
Make sure you already have Home Assistant up and running. You can follow this wiki for a step-by-step guide on installing Home Assistant on an ODYSSEY-X86 SBC or this link for a detailed instruction use Home Assistant with a Seeed Mini Router.
Install ESPHome on Home Assistant
ESPHome is available as a Home Assistant Add-On and can simply be installed via the add-on store.
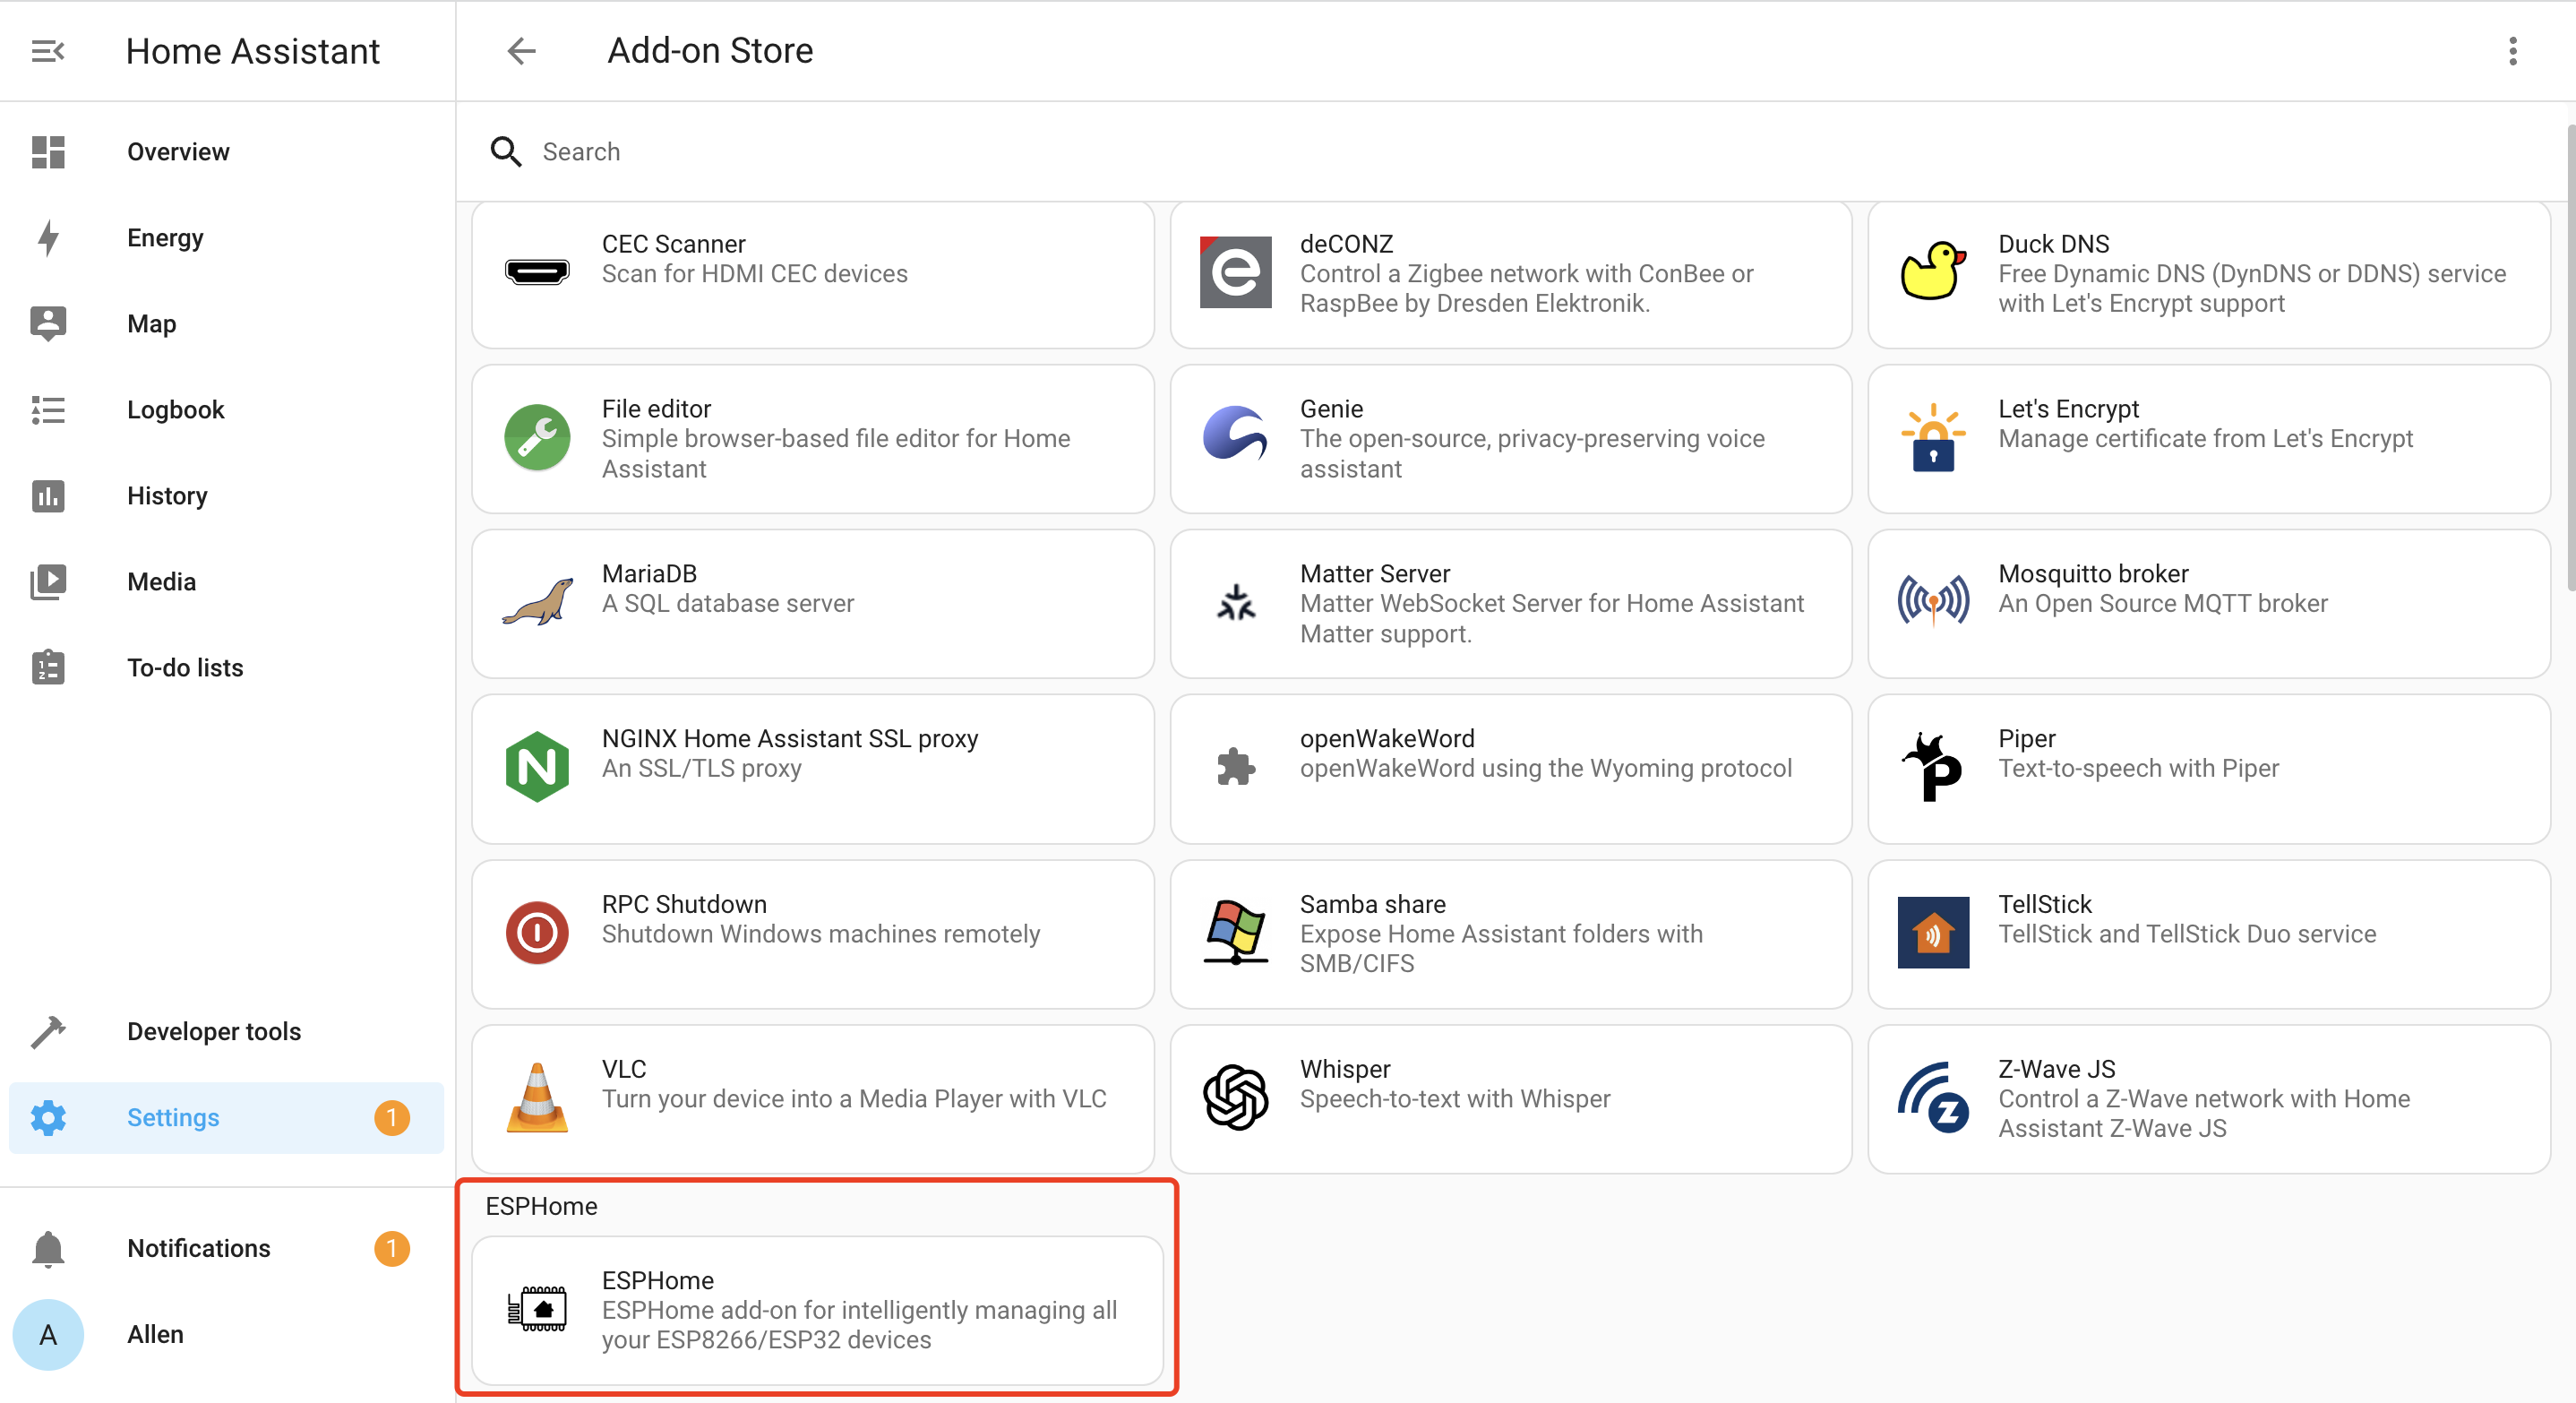
- Step 1. Click INSTALL

- Step 2. Enable all the options and click START

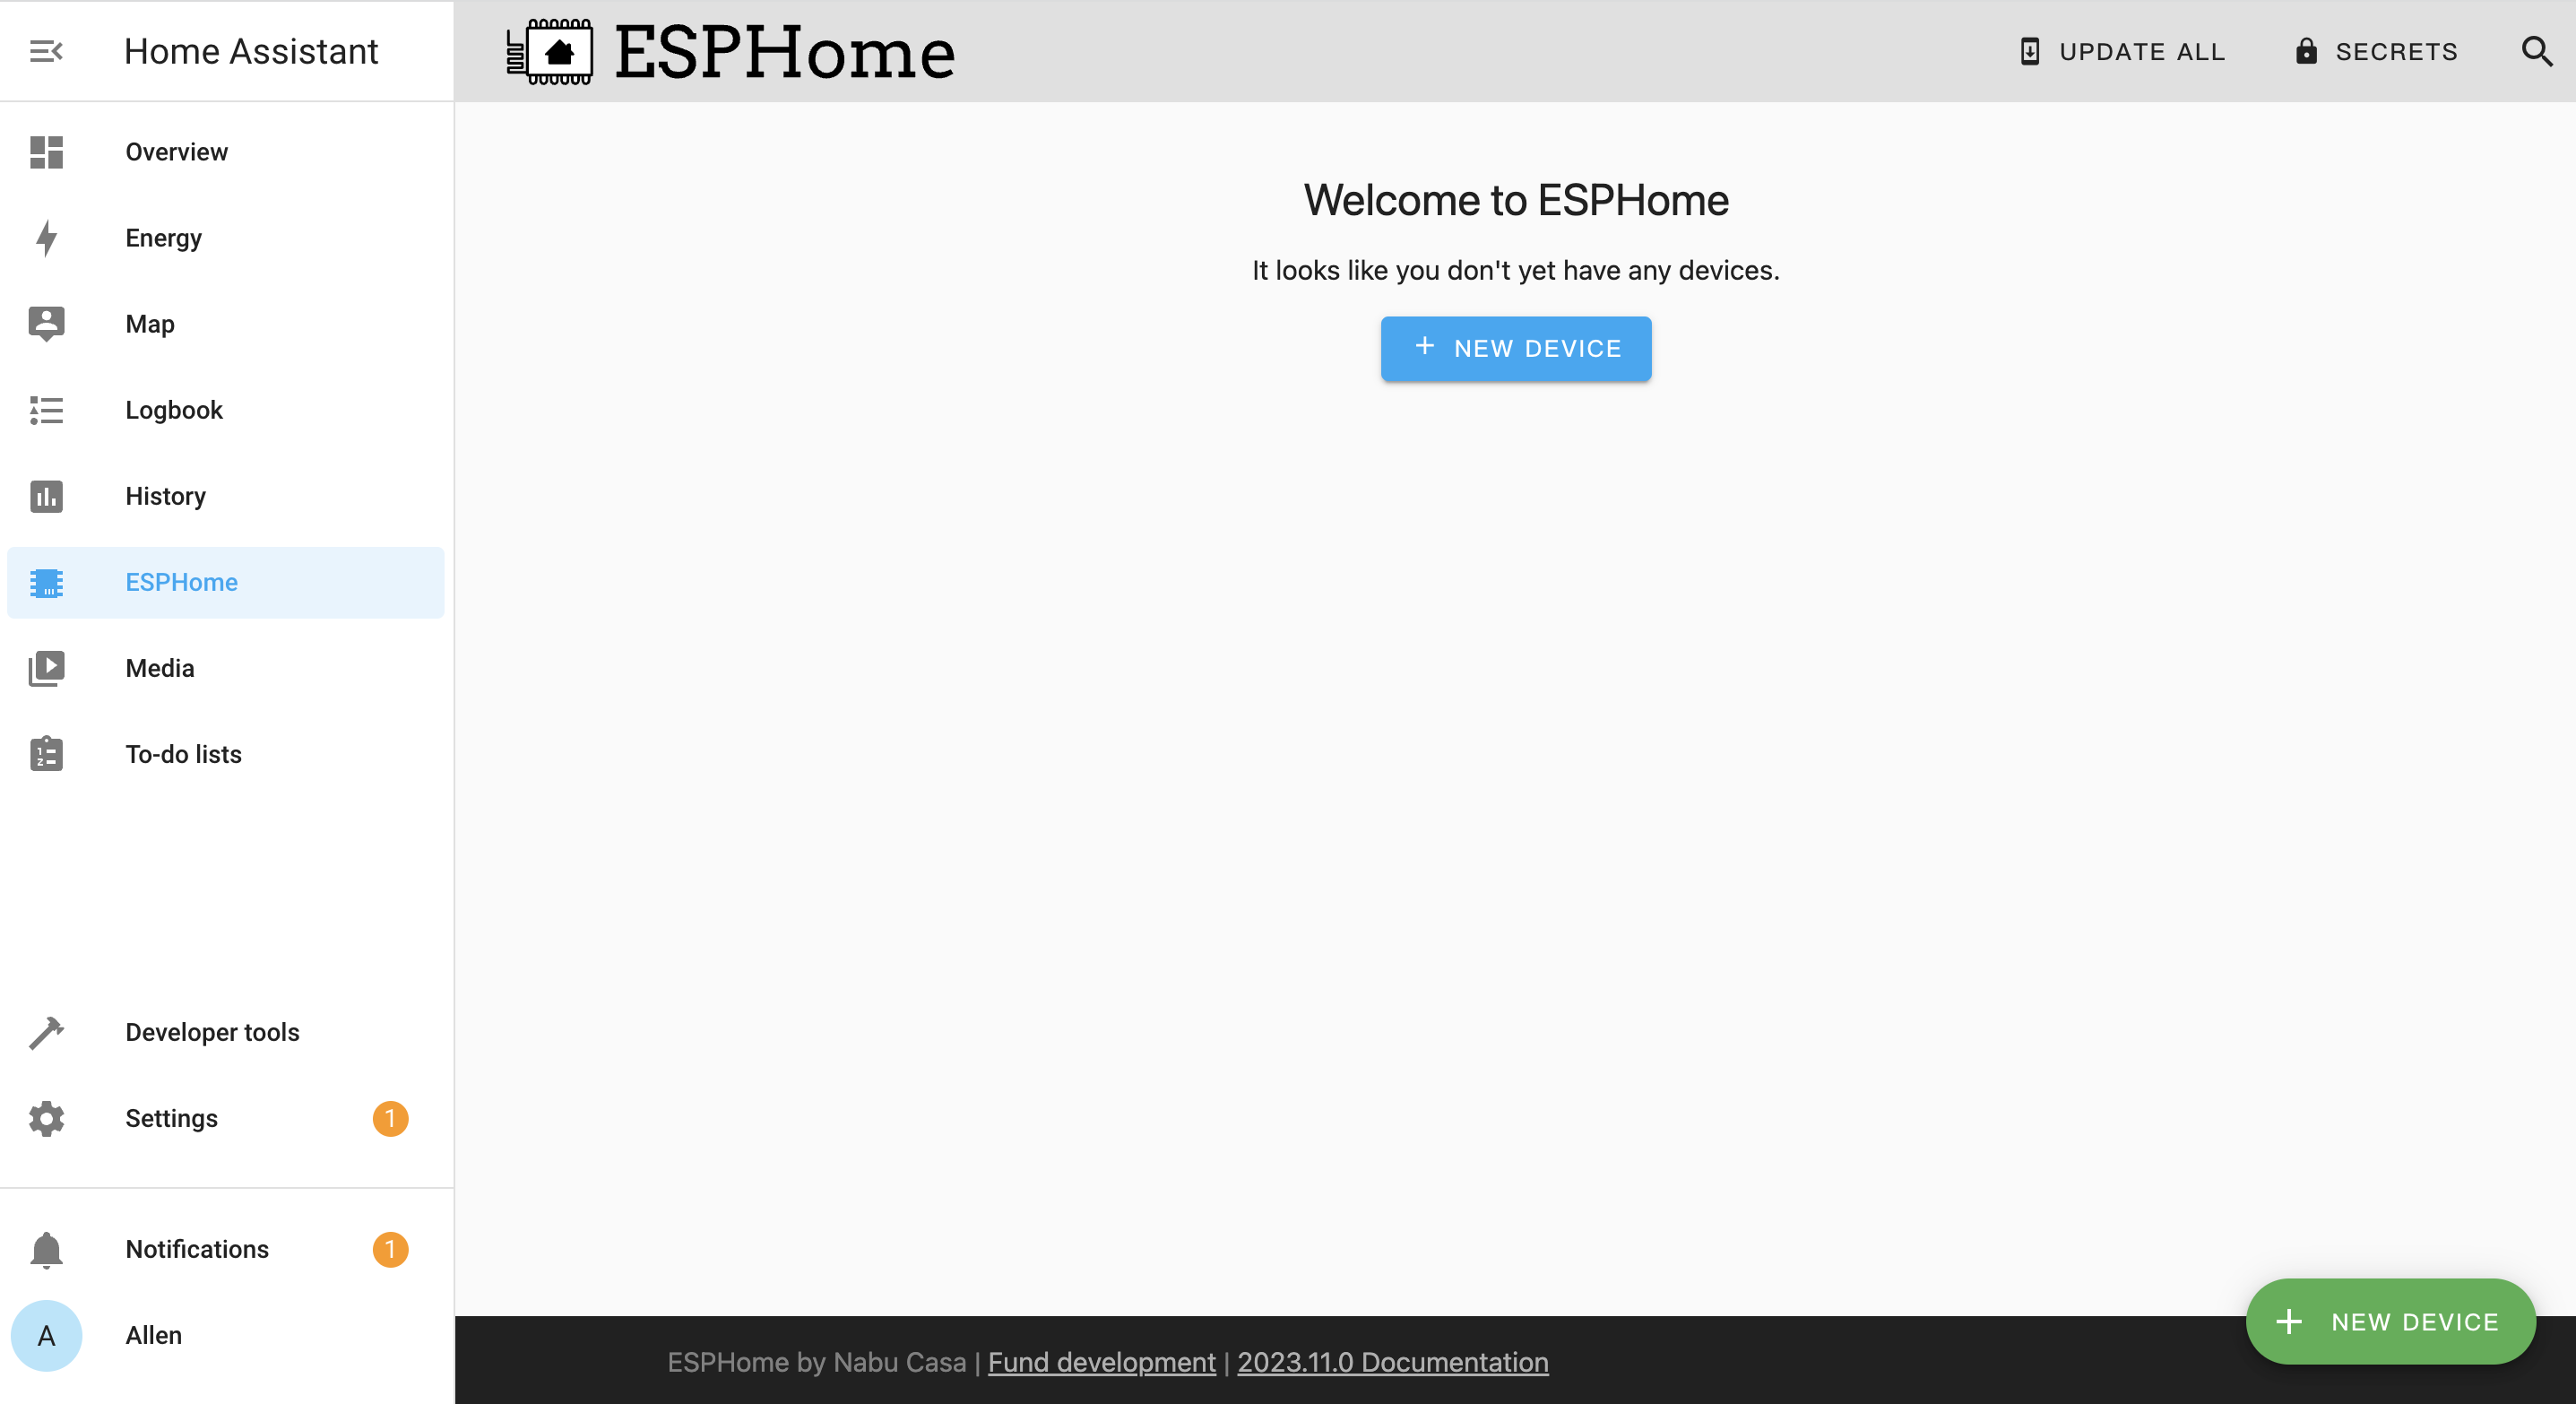
You will see the following window if ESPHome is successfully loaded
Getting Started
Once all the software and the hardware are really, we can now get started.
1. Add Seeed Studio XIAO ESP32S3 (Sense) to ESPHome
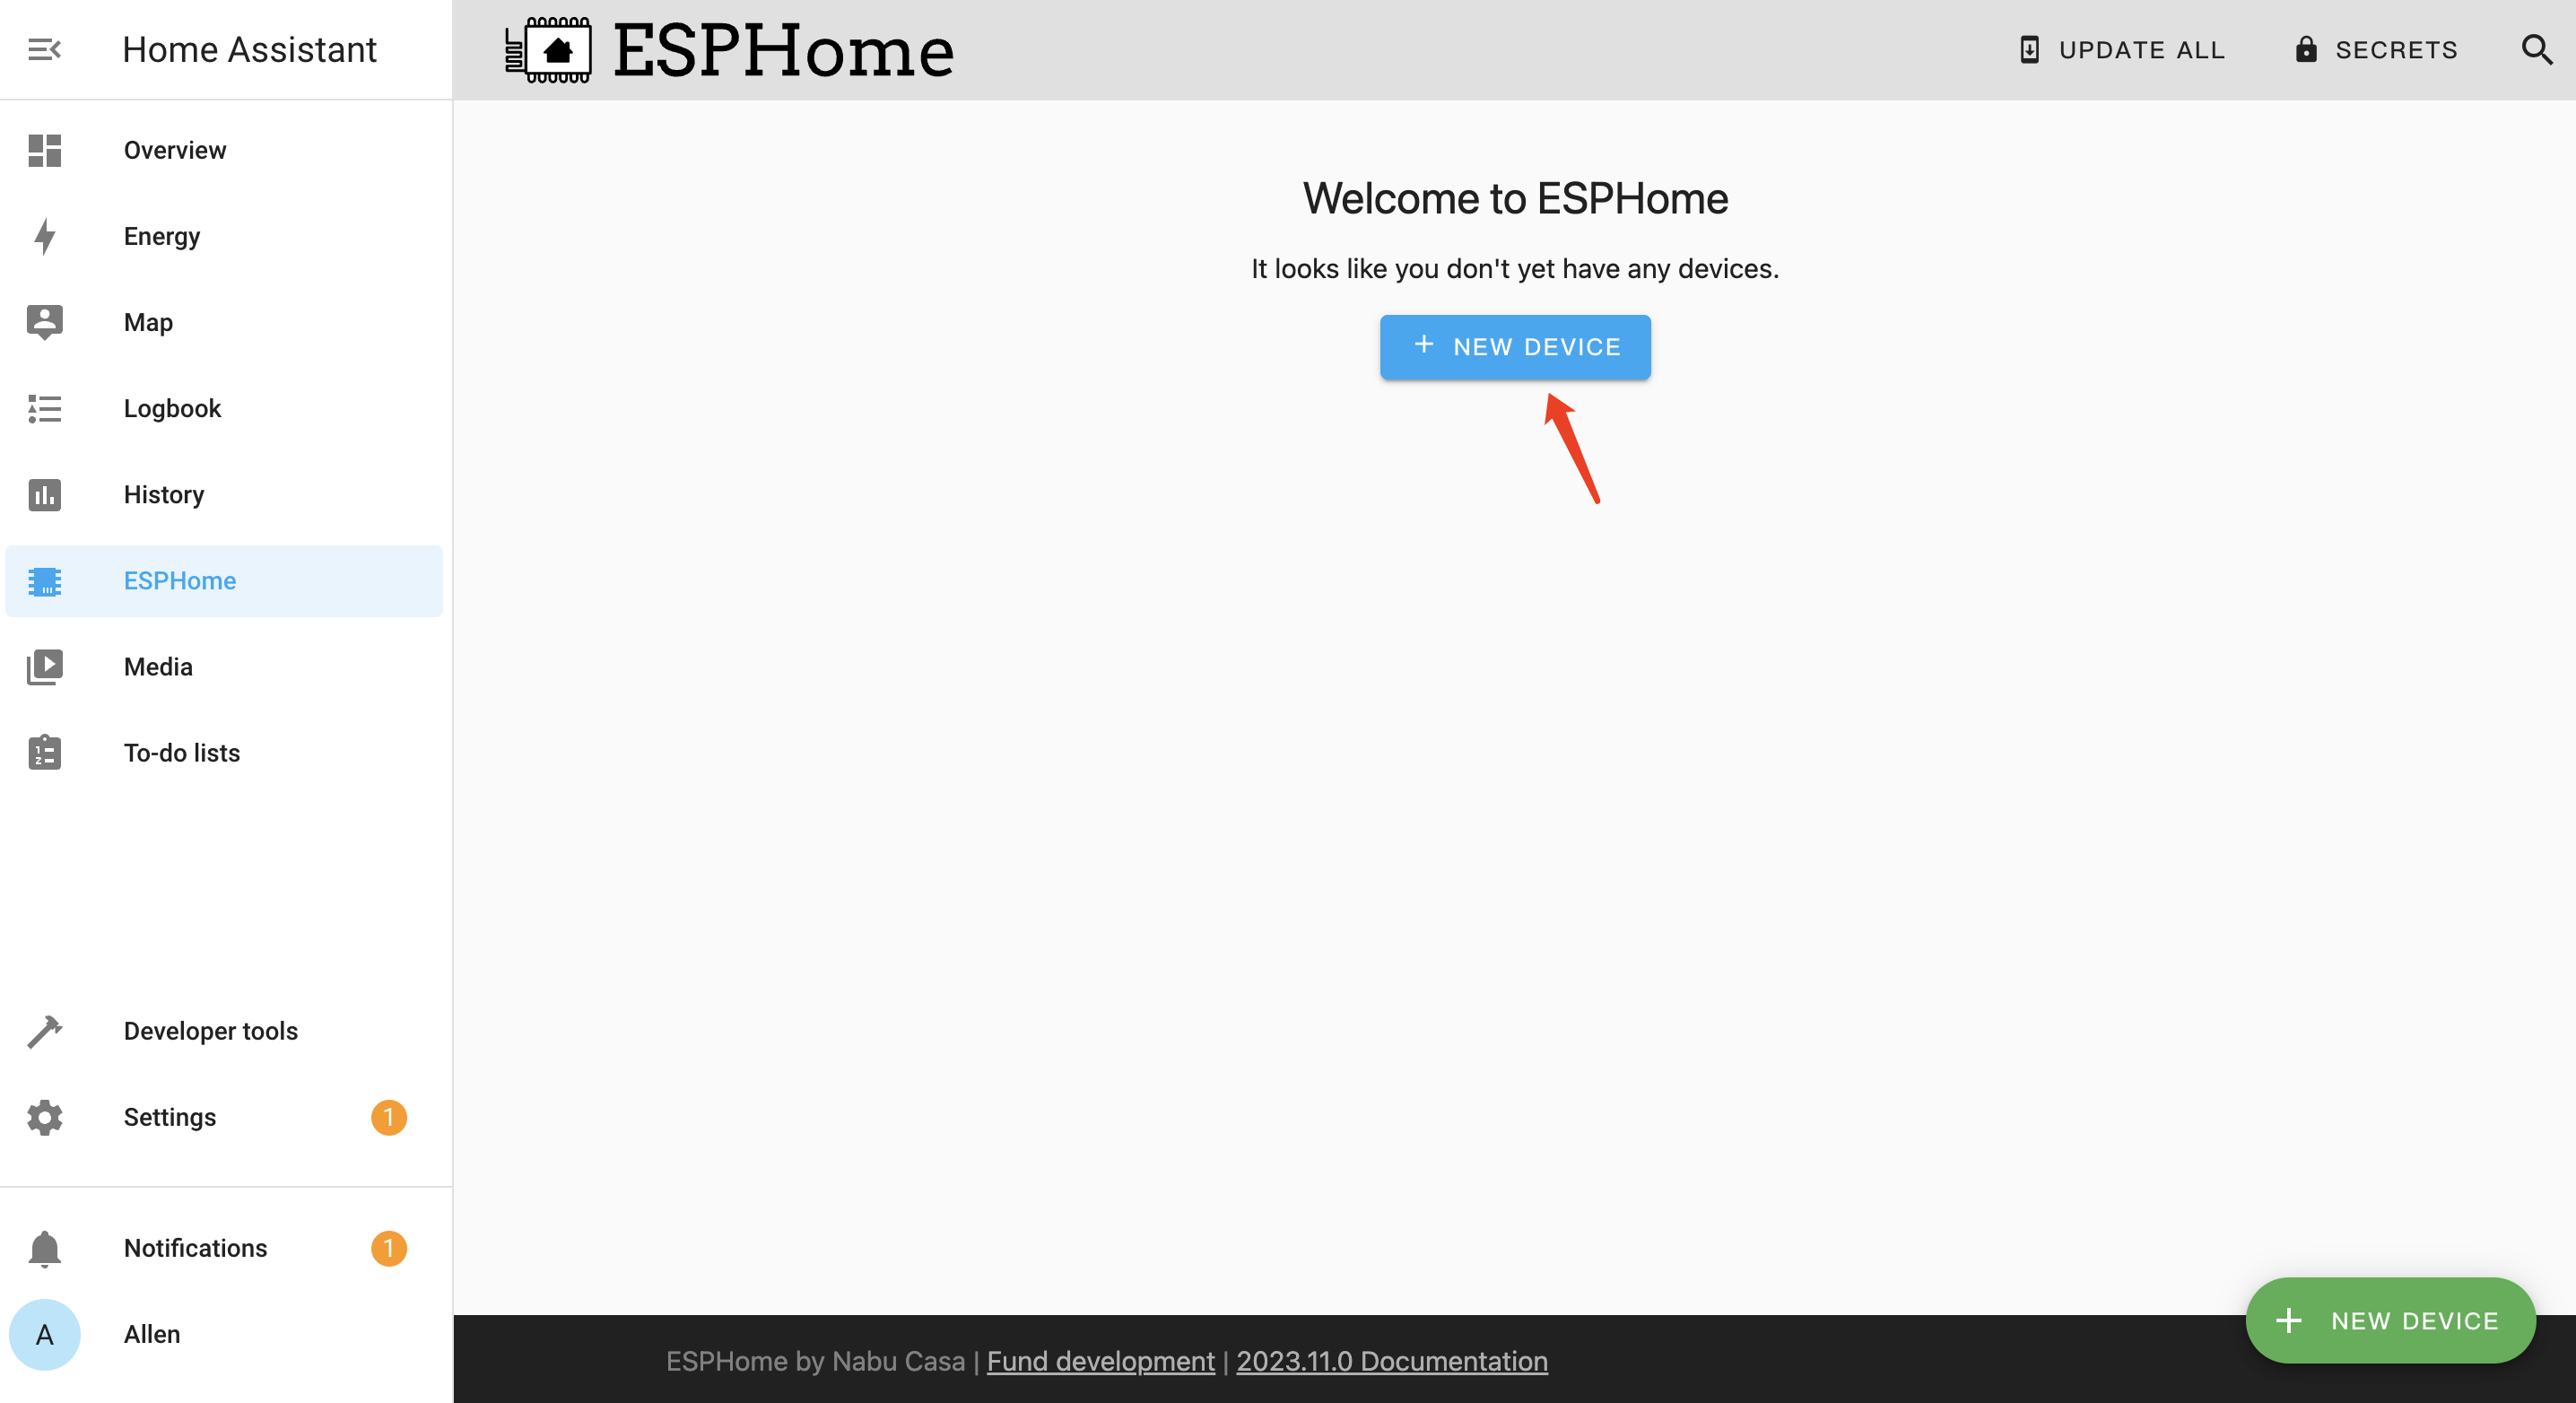
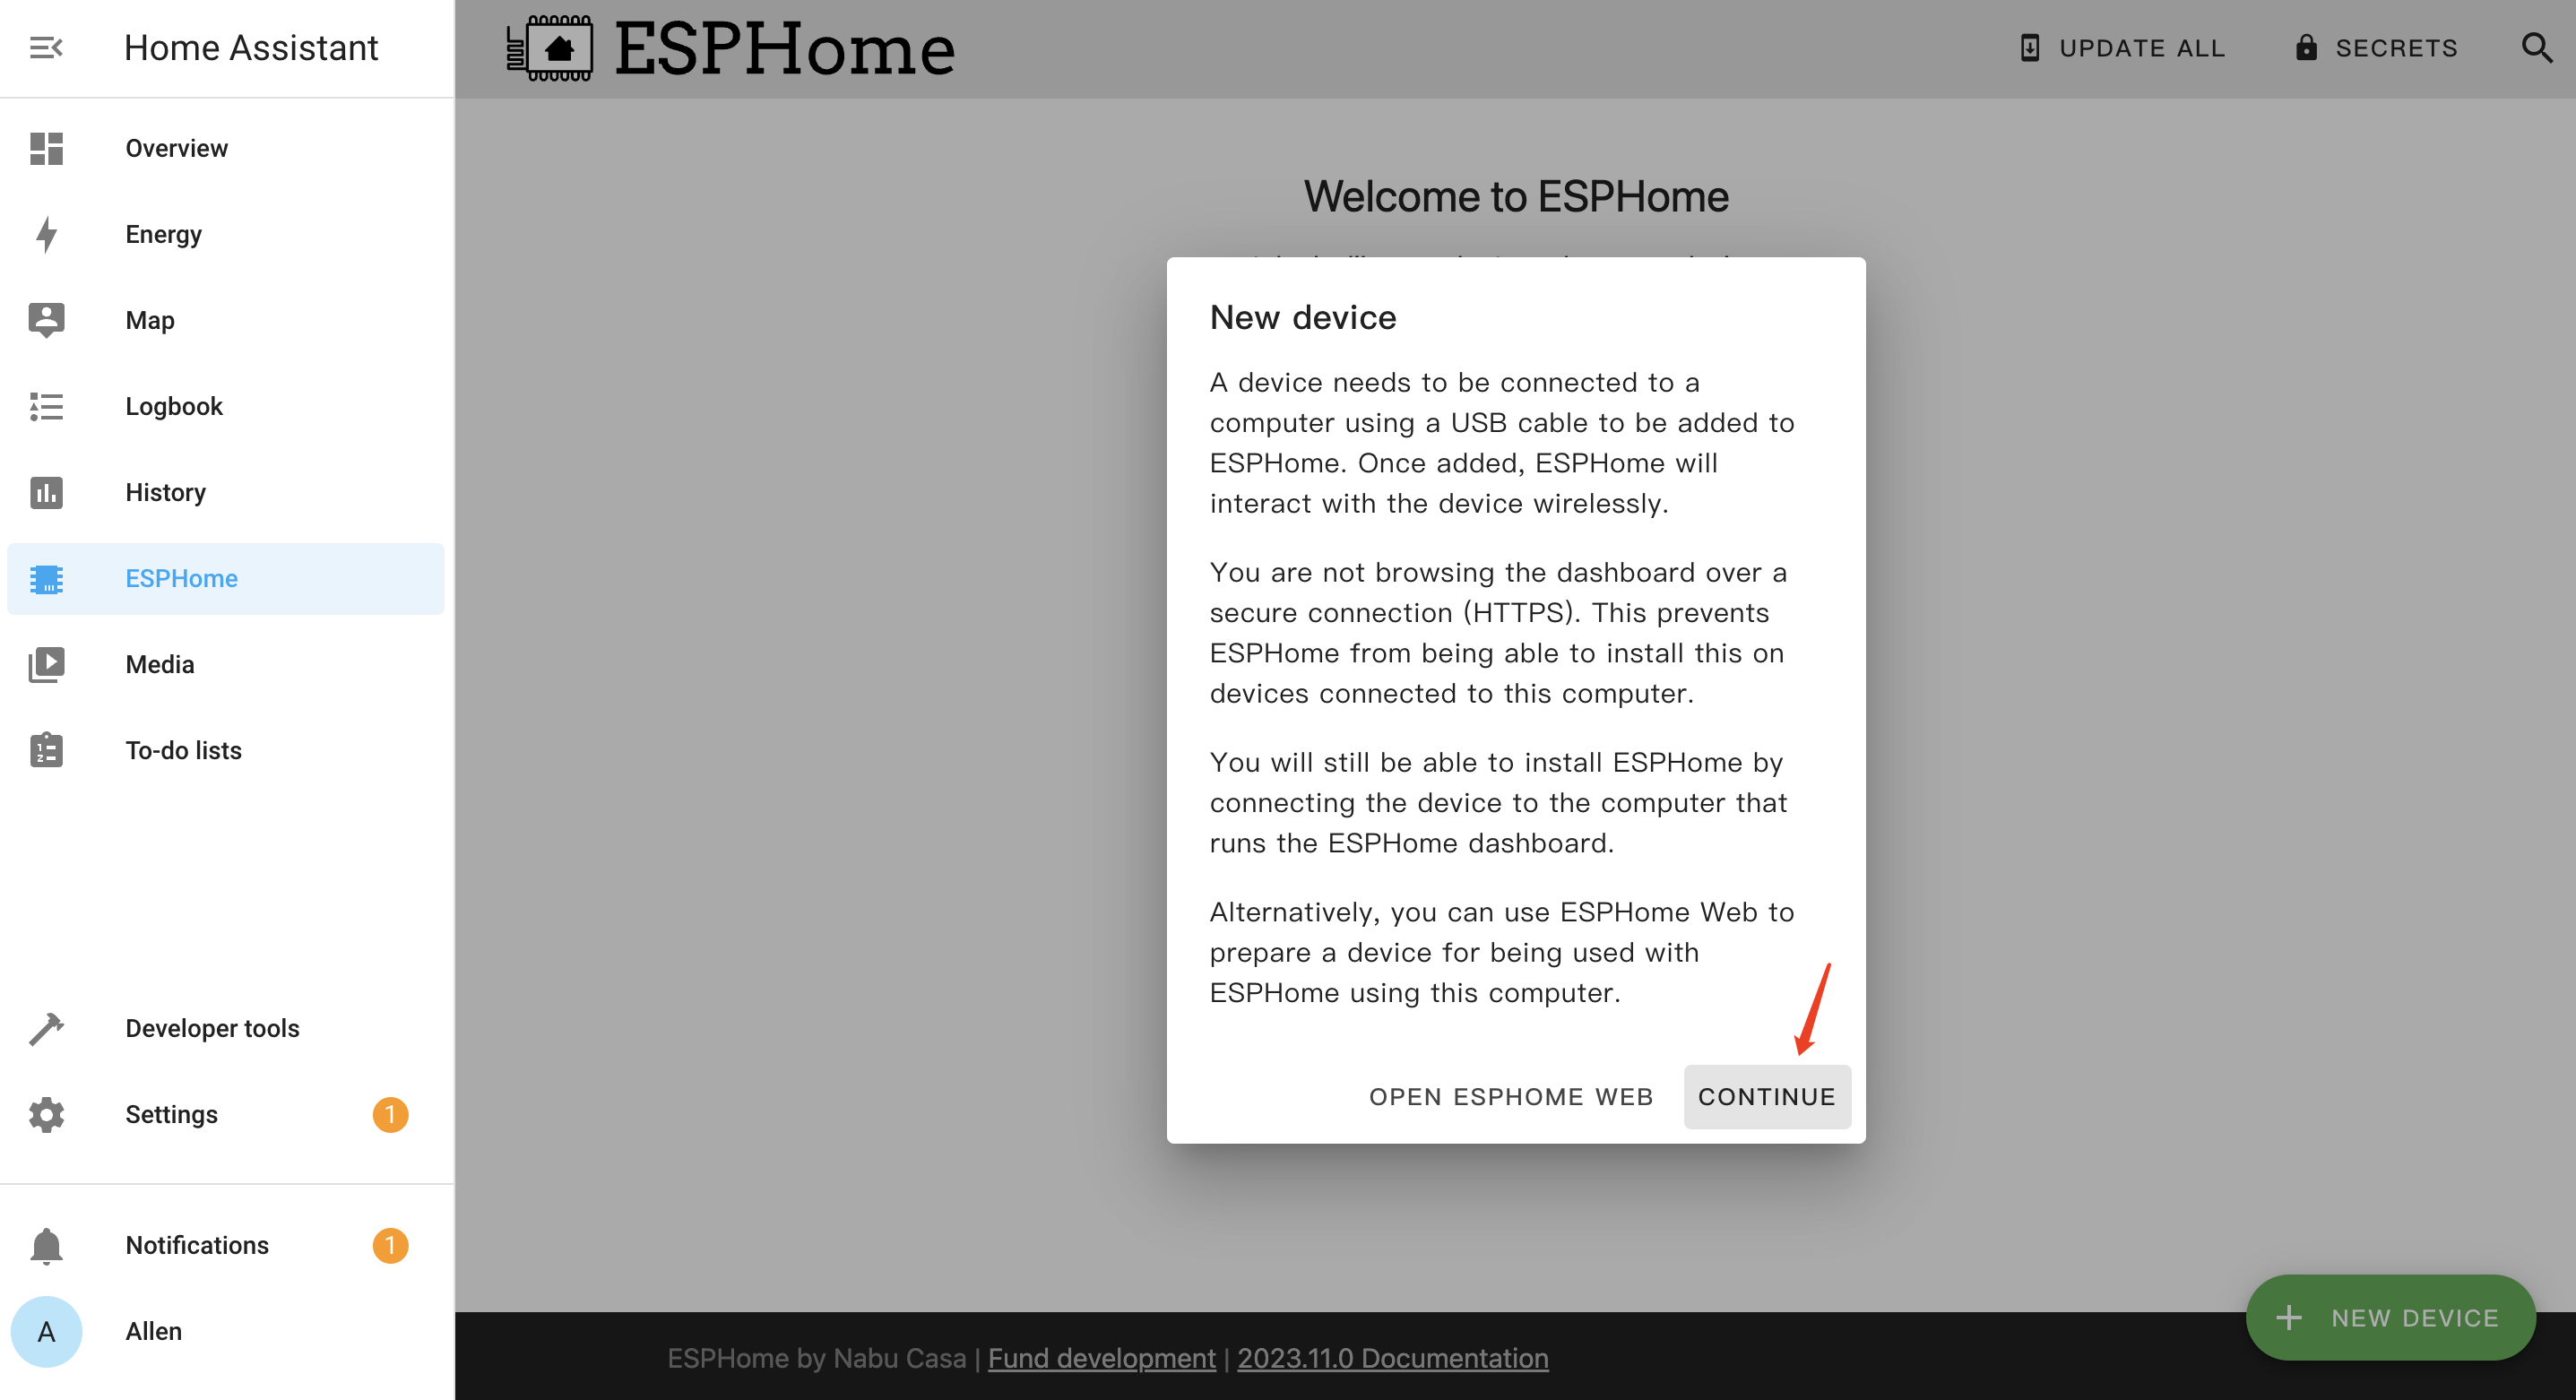
- Step 1. Click + NEW DEVICE
- Step 2. Click CONTINUE
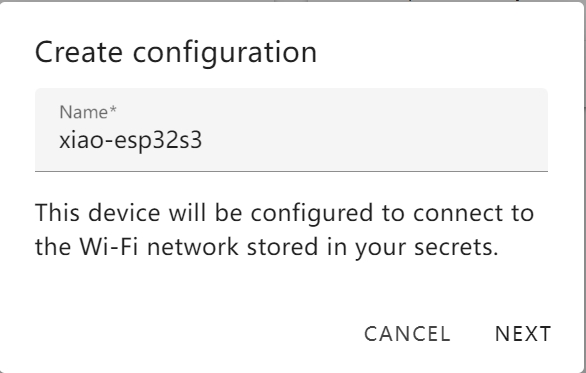
- Step 3. Enter a Name for the device and enter WiFi credentials such as Network name and Password. Then click NEXT
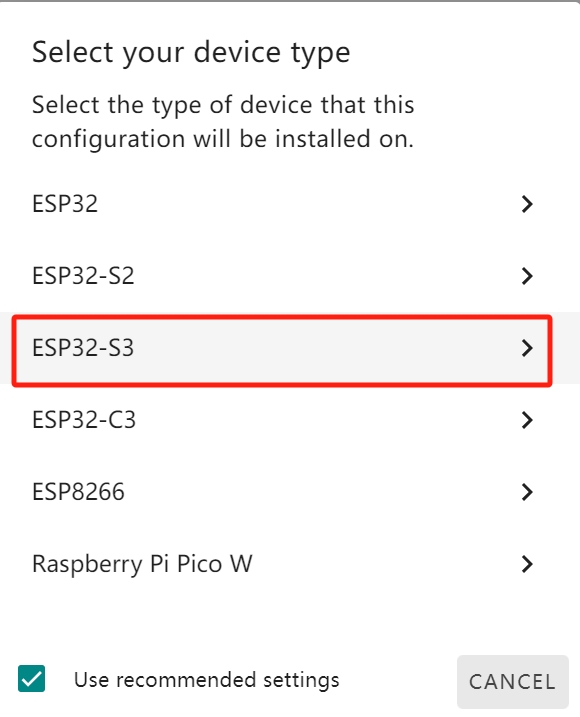
- Step 4. Select ESP32-S3 and click
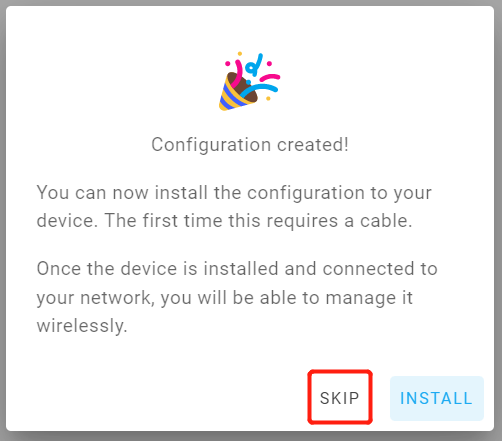
- Step 5. Click SKIP because we will configure this board manually
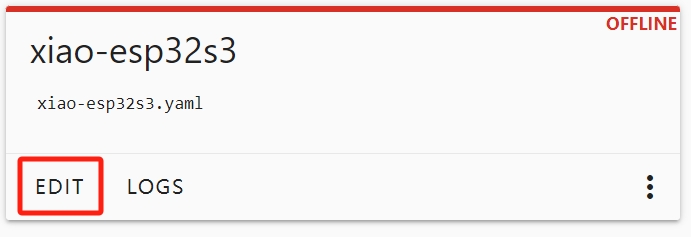
- Step 6. Click EDIT under the newly created board
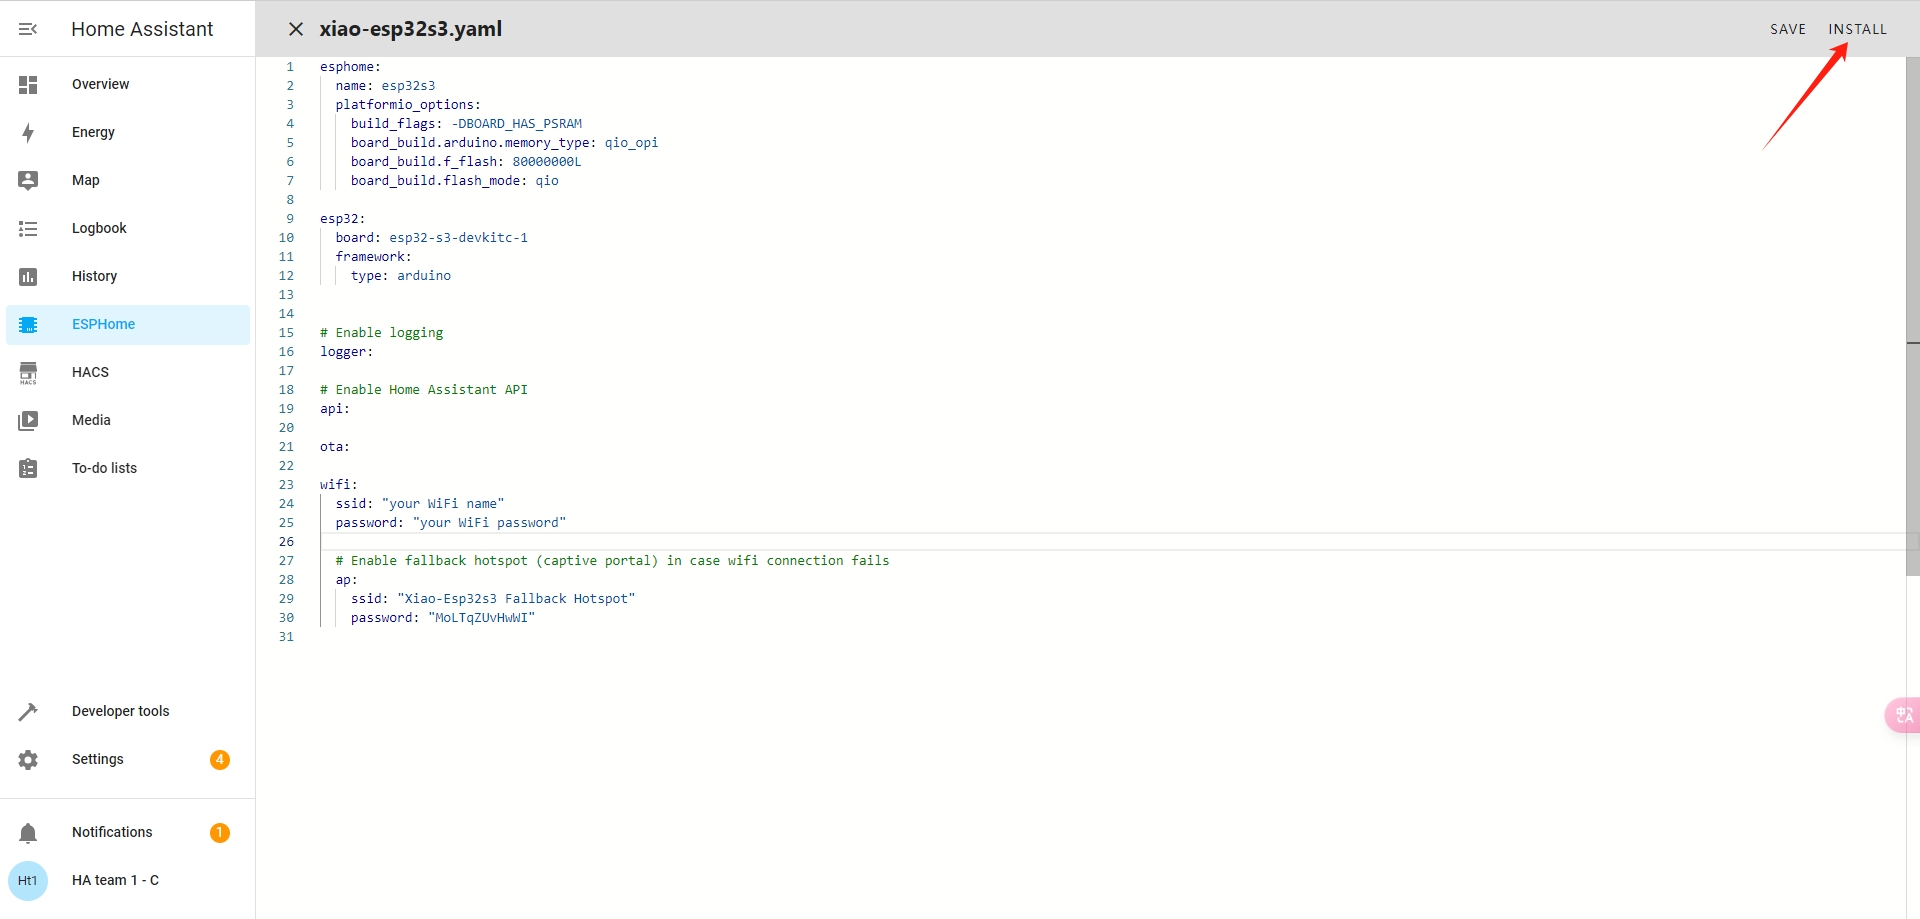
- Step 7. This will open a YAML file and this file will be used to set all the board configurations. Edit the content under esp32 as follows
esphome:
  name: esp32s3
  platformio_options:
    build_flags: -DBOARD_HAS_PSRAM
    board_build.arduino.memory_type: qio_opi
    board_build.f_flash: 80000000L
    board_build.flash_mode: qio

esp32:
  board: esp32-s3-devkitc-1
  framework:
    type: arduino


# Enable logging
logger:

# Enable Home Assistant API
api:

ota:

wifi:
  ssid: "your wifi name"
  password: "your password"

  # Enable fallback hotspot (captive portal) in case wifi connection fails
  ap:
    ssid: "Xiao-Esp32s3 Fallback Hotspot"
    password: "MoLTqZUvHwWI"
Note: Here we are using the latest version of Arduino core for ESP32 and ESP32 support for PlatformIO
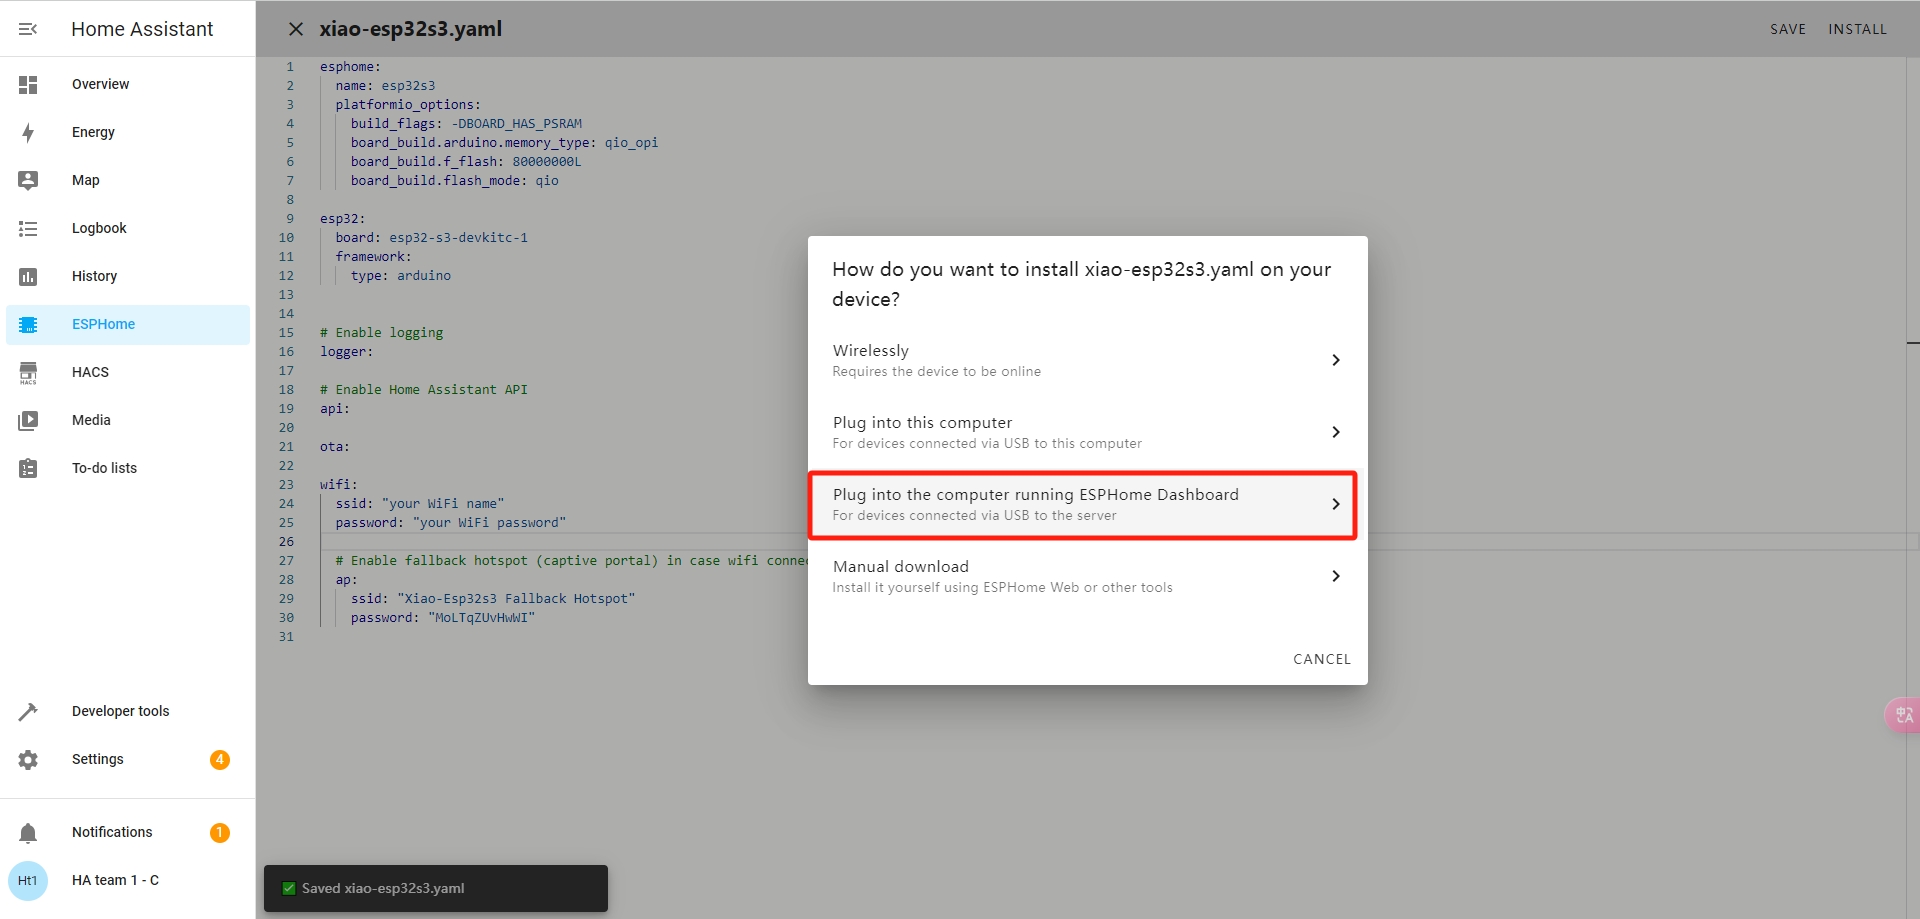
- Step 8. Click SAVE and then click INSTALL
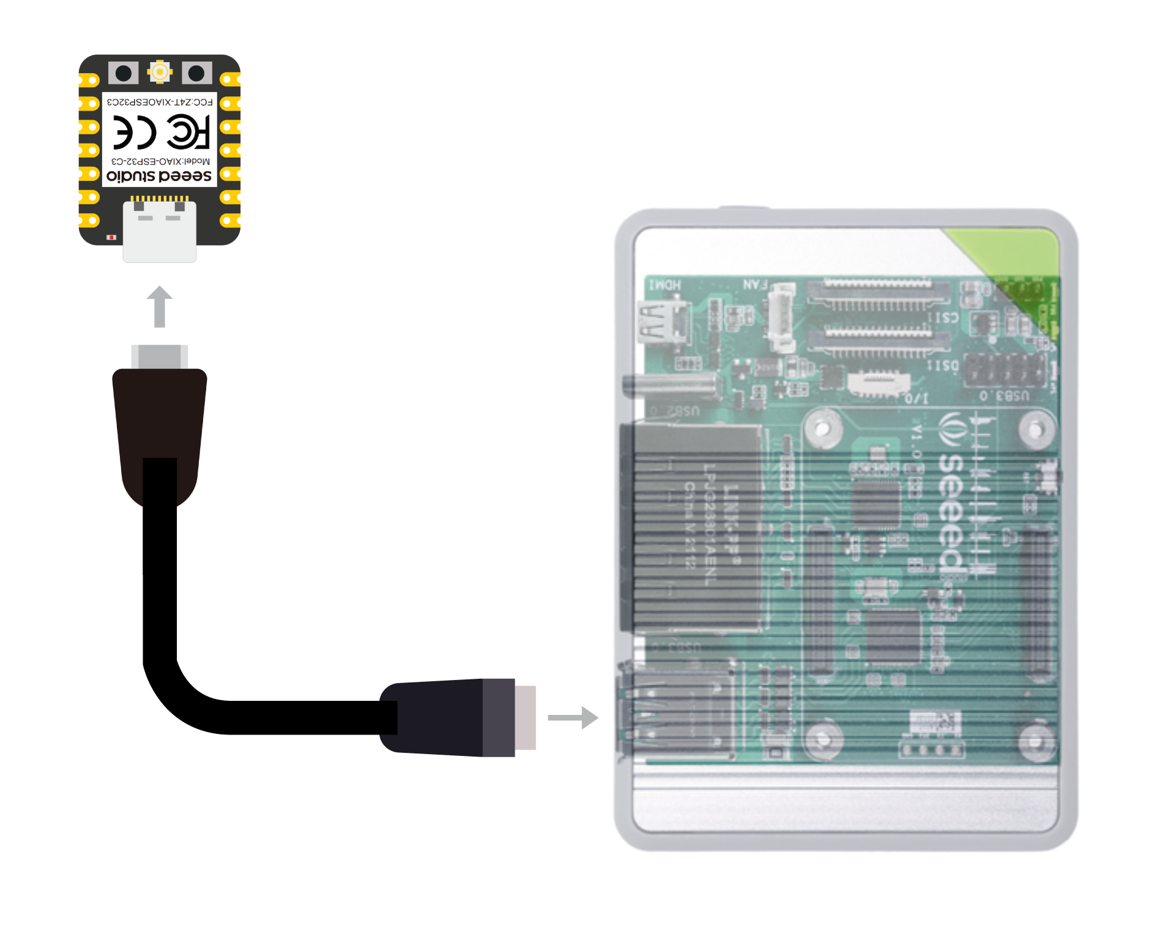
- Step 9. Connect one end of a USB Type-C cable to Seeed Studio XIAO ESP32S3 and the other end to one of the USB ports on the reRouter CM4 1432
- Step 10. Click Plug into the computer running ESPHome Dashboard
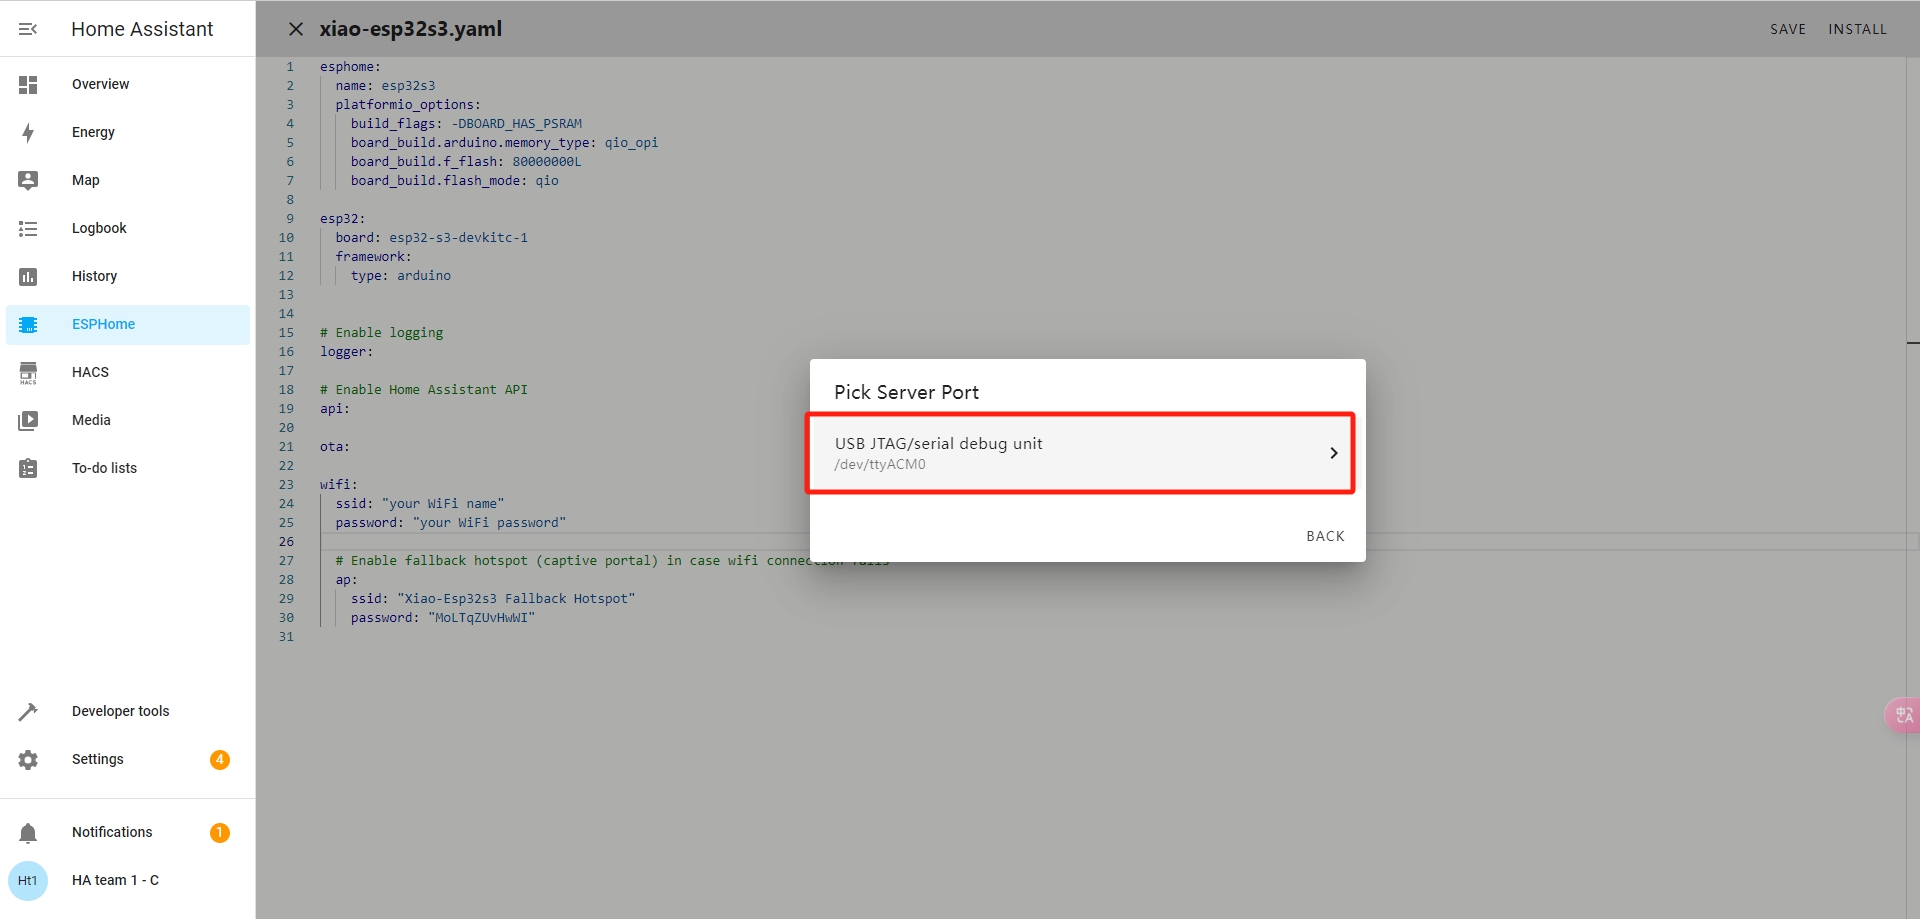
- Step 11. Select the connected port. It is likely to be
/dev/ttyACM1because/dev/ttyACM0is connected to the reRouter CM4 1432
Better to use 2.4GHz Wi-Fi
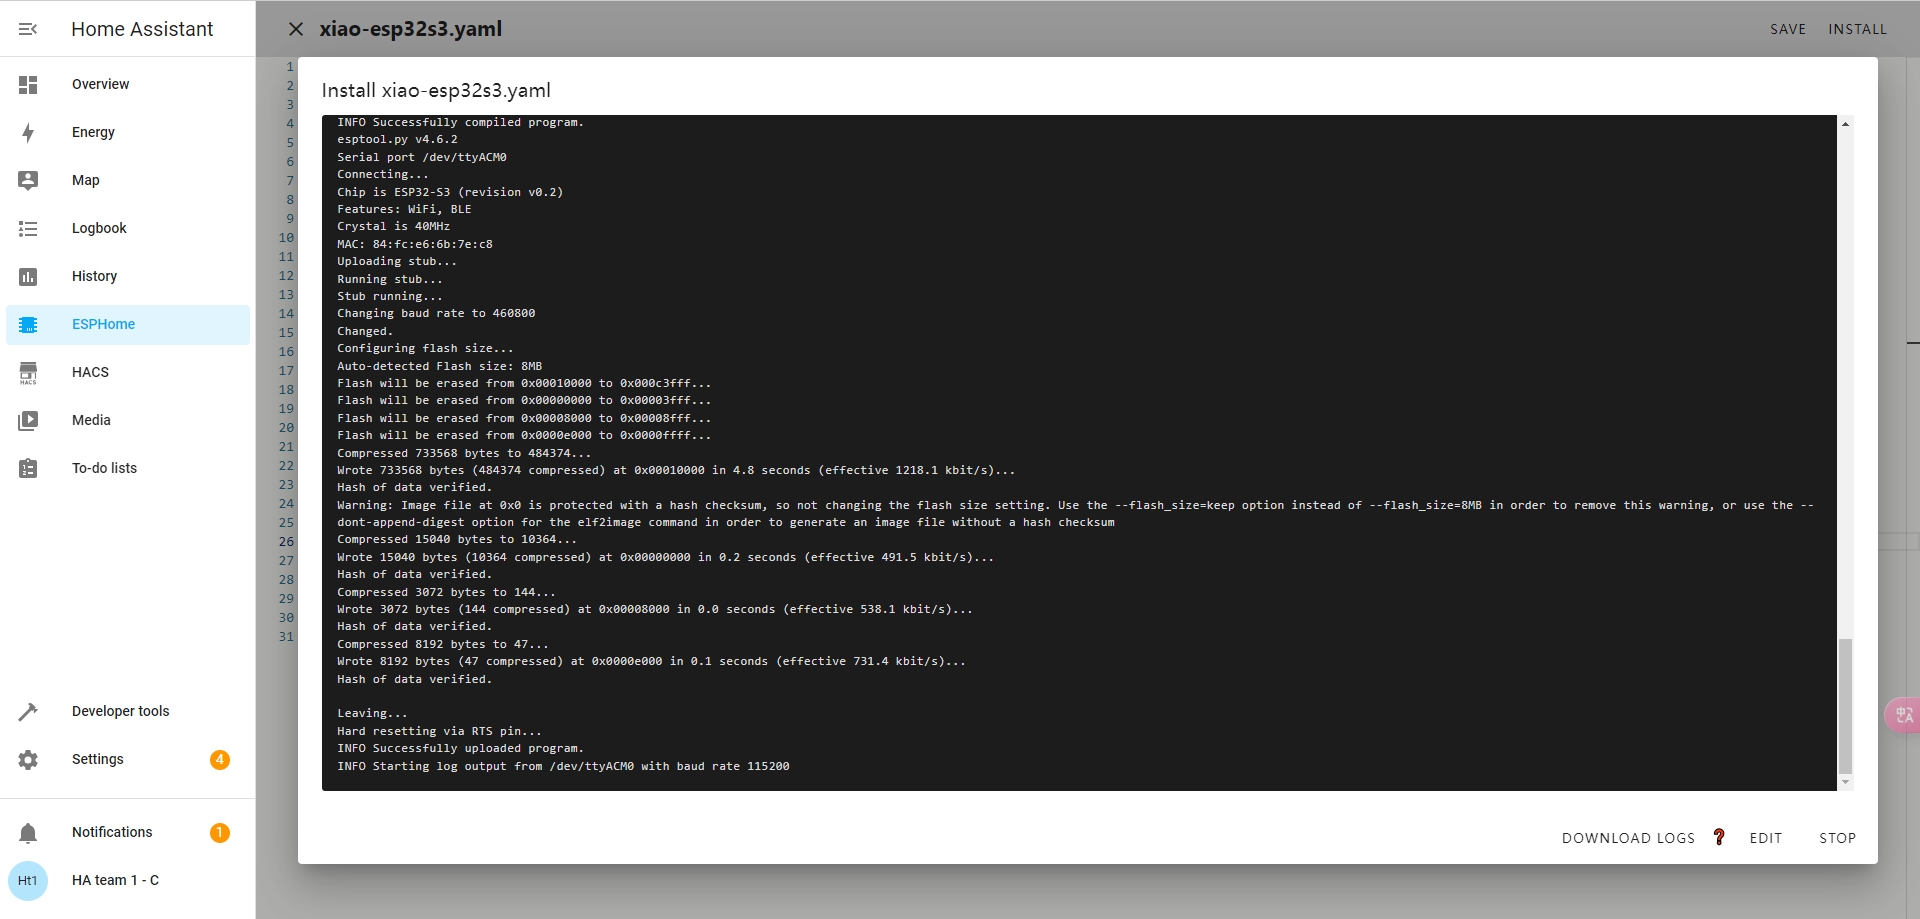
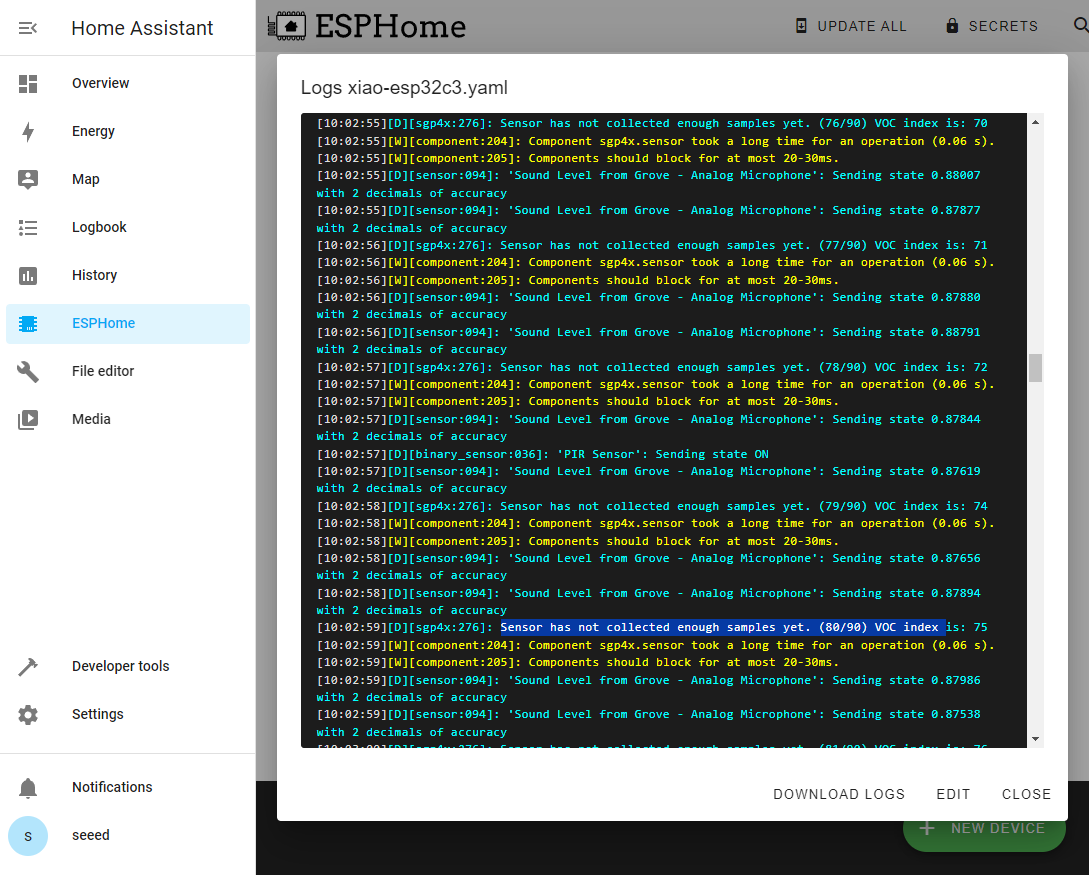
Now it will download all the necessary board packages and flash the ESPHome firmware into the XIAO ESP32S3. If the flashing is successful, you will see the following output. If you see something error, try to restart your xiao esp32S3 or enter bootloader mode by holding on the BOOT BUTTON and connect XIAO ESP32S3.
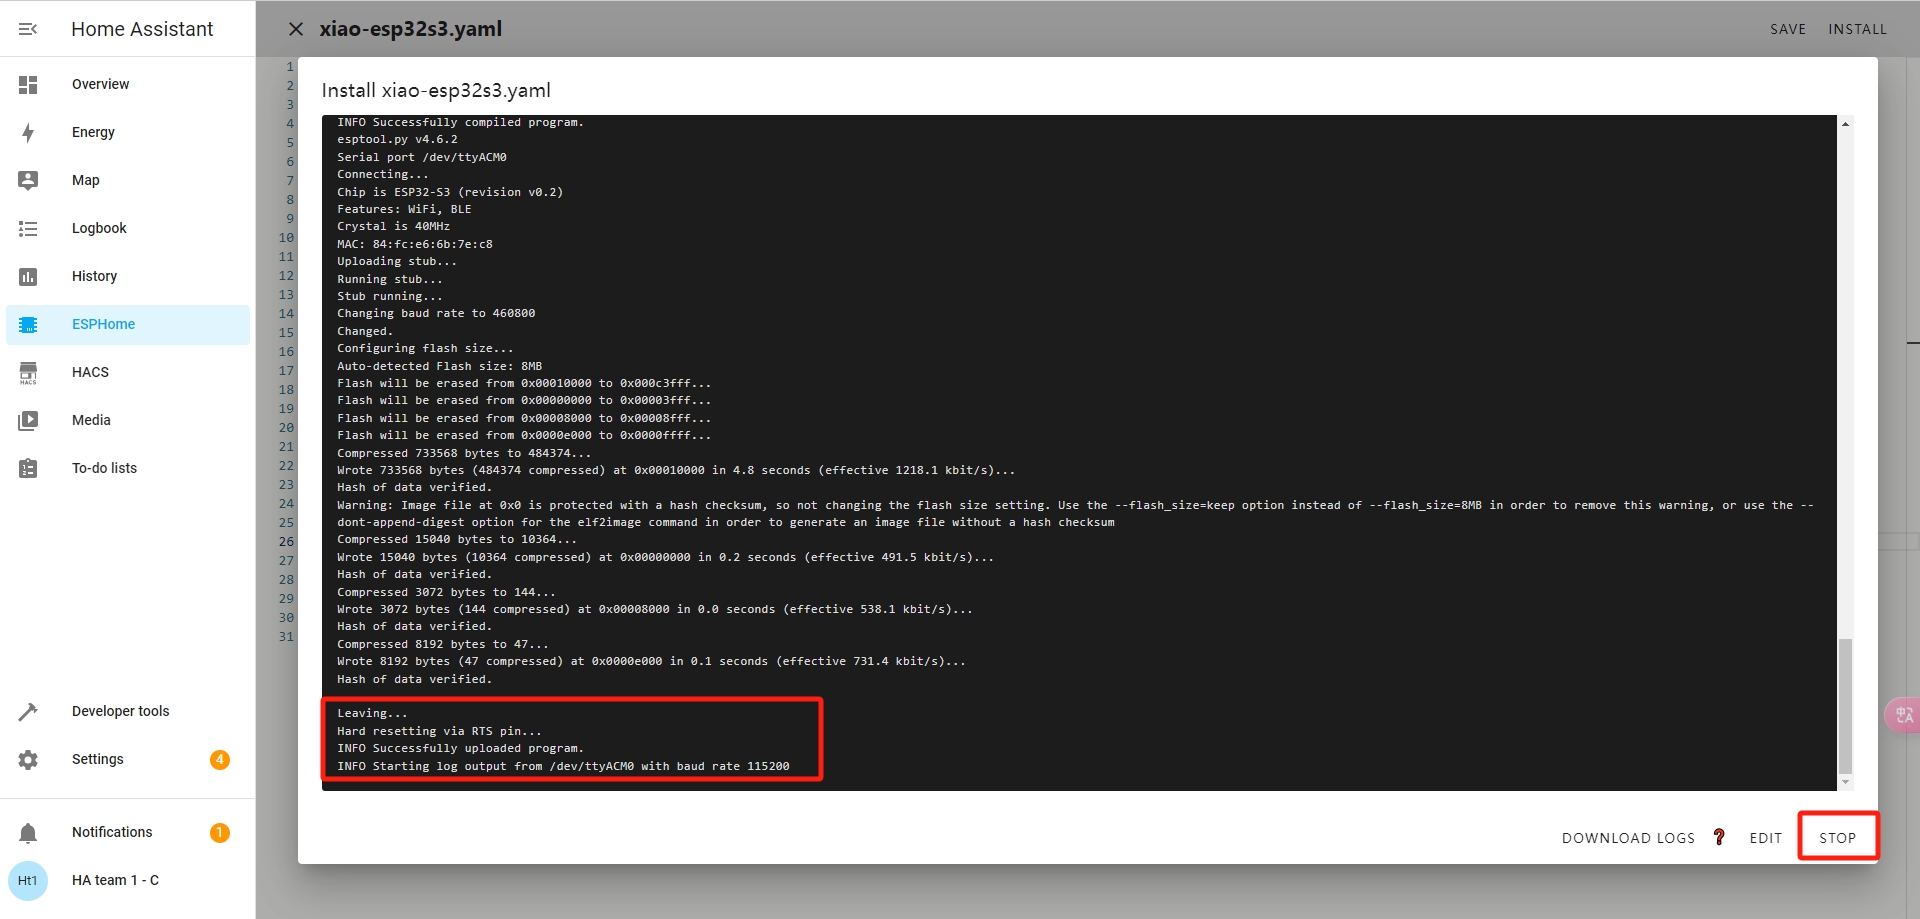
- Step 12. The above window displays the real-time logs from the connected board. Close it by clicking STOP
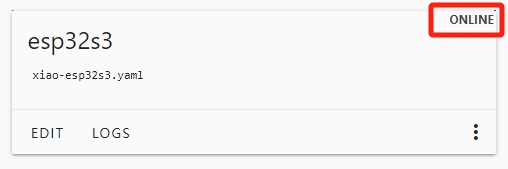
- Step 13. If you see the board status as ONLINE, that means the board is successful connected to WiFi
Now you can disconnect the XIAO ESP32S3 from the reRouter CM4 1432 and just power it via a USB cable. This is because from now on, if you want to flash firmware to the XIAO ESP32S3, you can simply do it OTA without connecting to the X86 board via a USB cable.
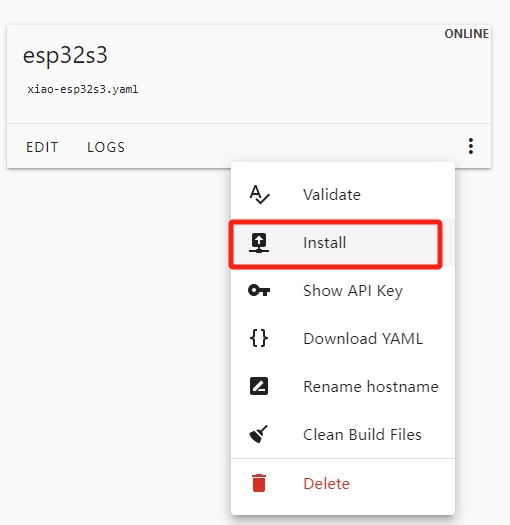
-
- Click the three dots and click Install
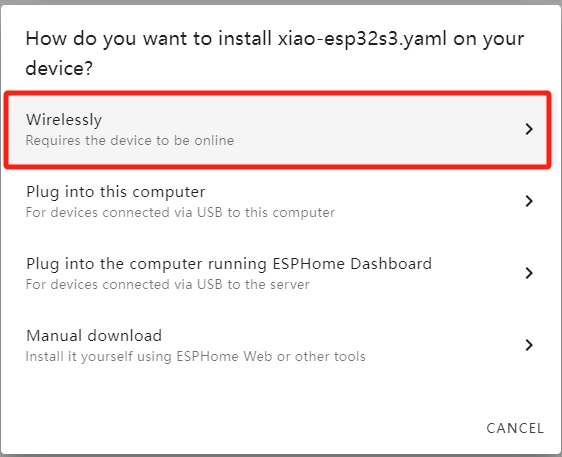
-
- Select Wirelessly and it will push the changes to the board wirelessly
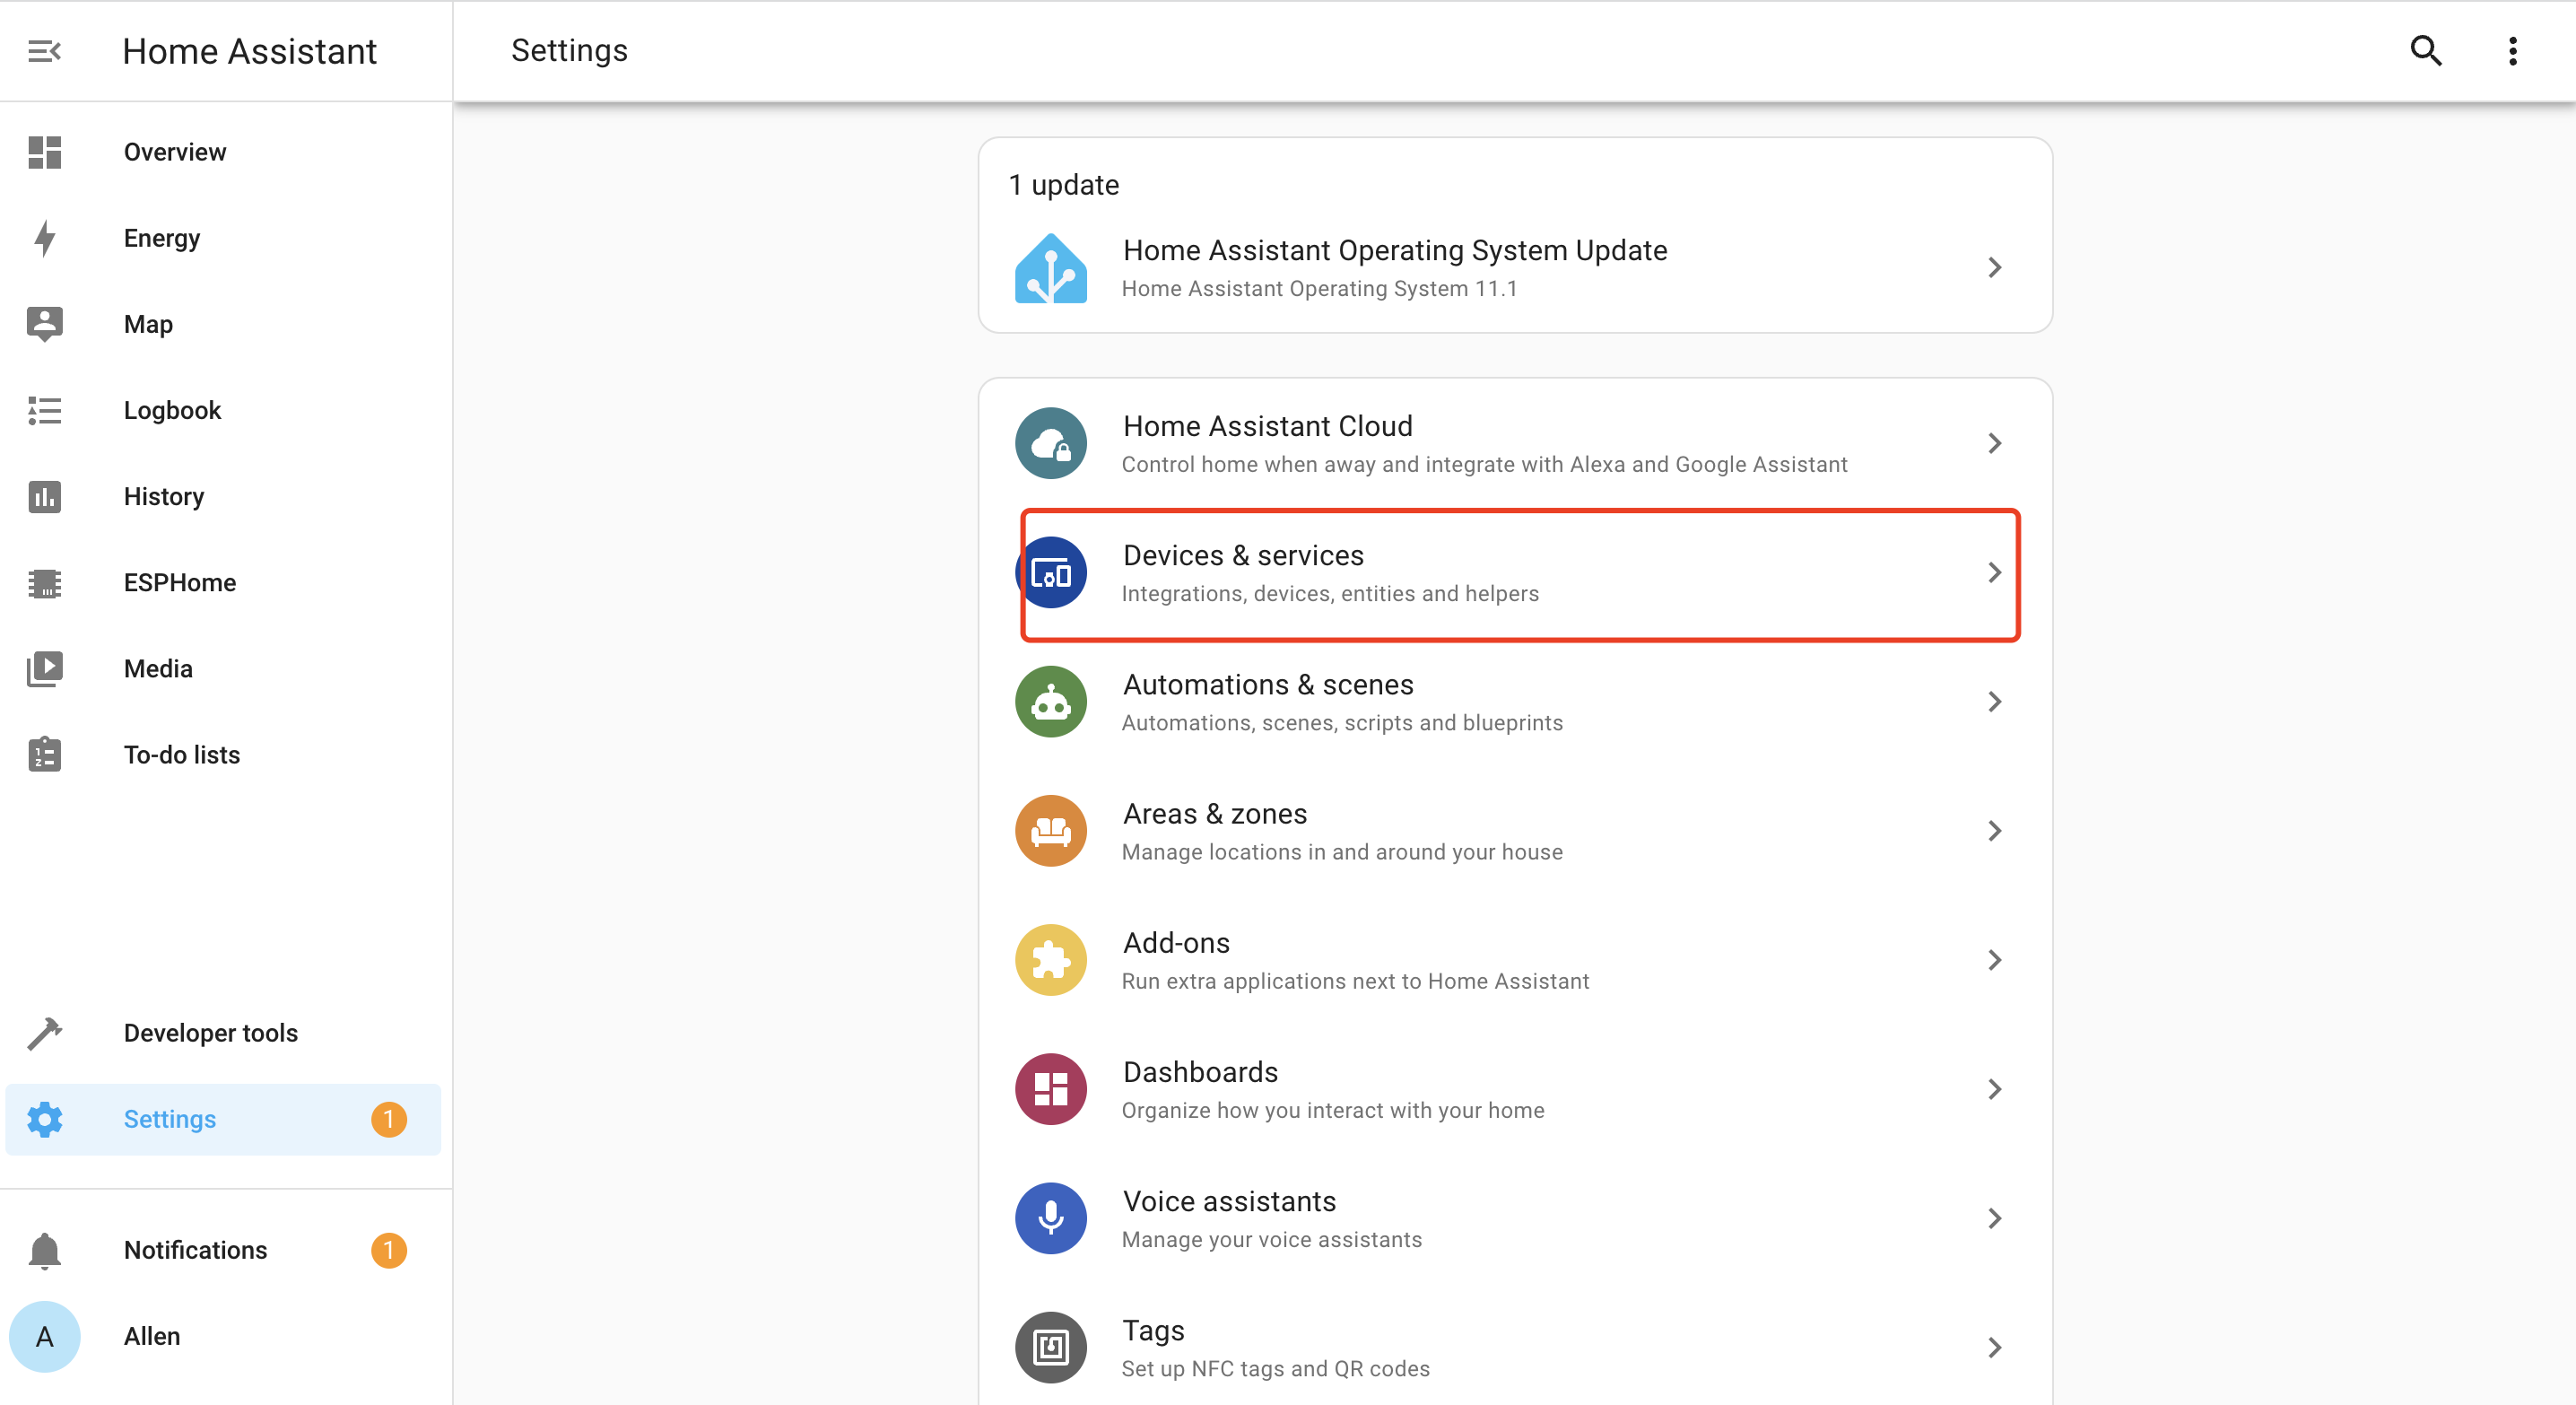
- Step 14. Go to Settings and select Devices & Services
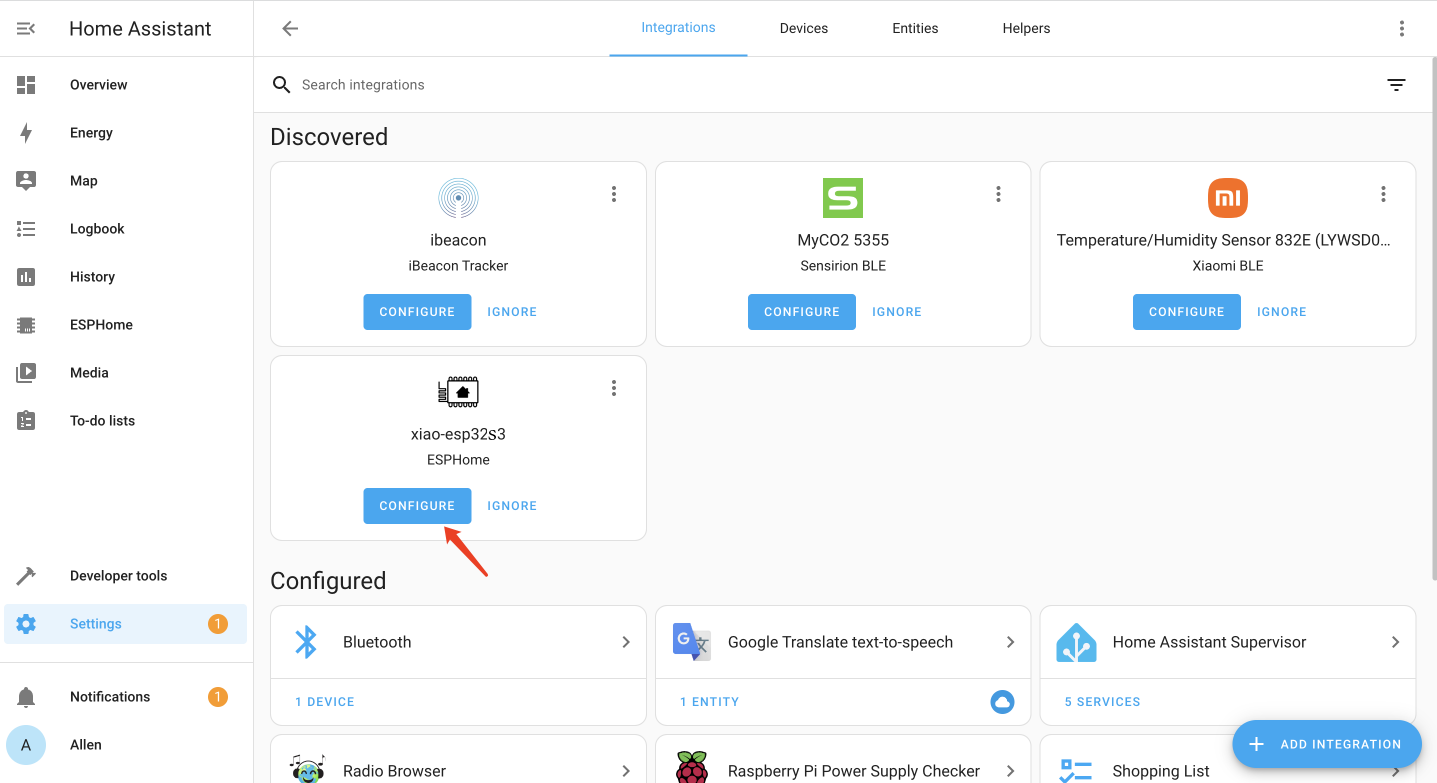
- Step 15. You will see ESPHome as a discovered integration. Click CONFIGURE
- Step 16. Click SUBMIT
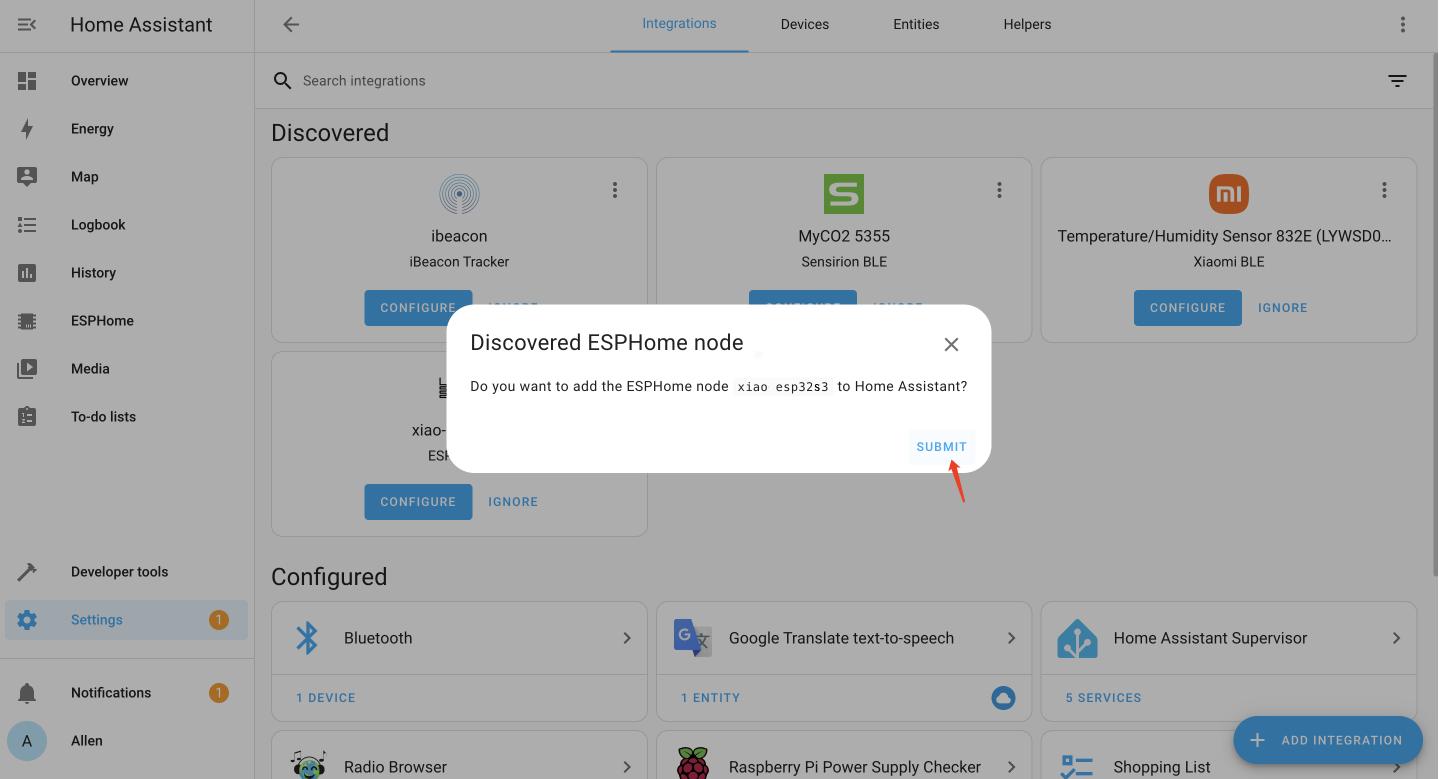
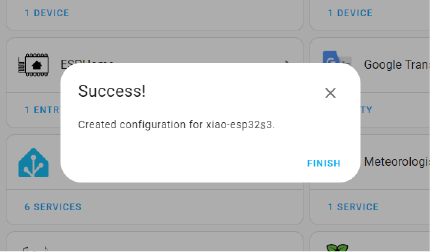
- Step 17. Click FINISH
2. Connect Grove Modules with ESPHome and Home Assistant
Now we will connect Grove modules to Seeed Studio XIAO ESP32S3 (sense) so that we can display sensor data or control the devices using Home Assistant!
Develop Knowledge
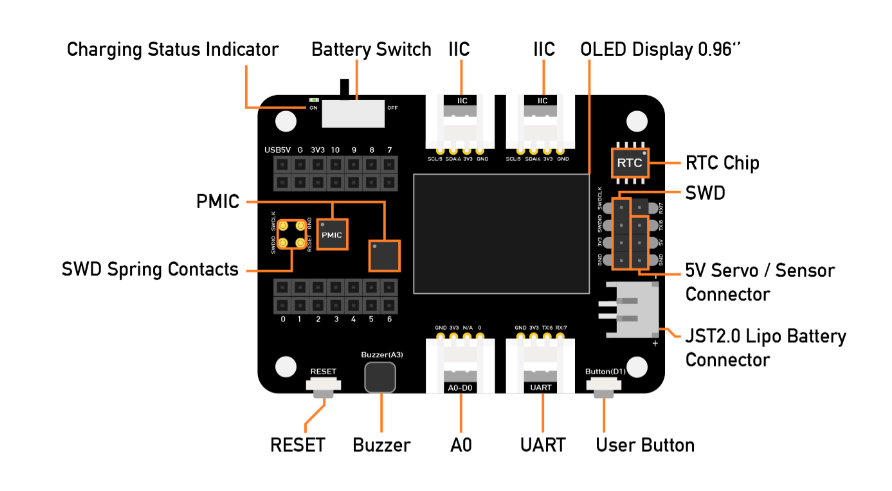
XIAO Expansion Board
In order to use Grove modules with Seeed Studio XIAO ESP32S3, we will use a Seeed Studio Expansion Base for XIAO and connect XIAO ESP32S3 on it.
After that, the Grove connectors on the board can be used to connect Grove modules
Pin Definitions
You need to follow the graphic below to use the appropriate internal pin numbers when connecting the Grove modules to the Grove connectors on Grove Shield for Seeed Studio XIAO.
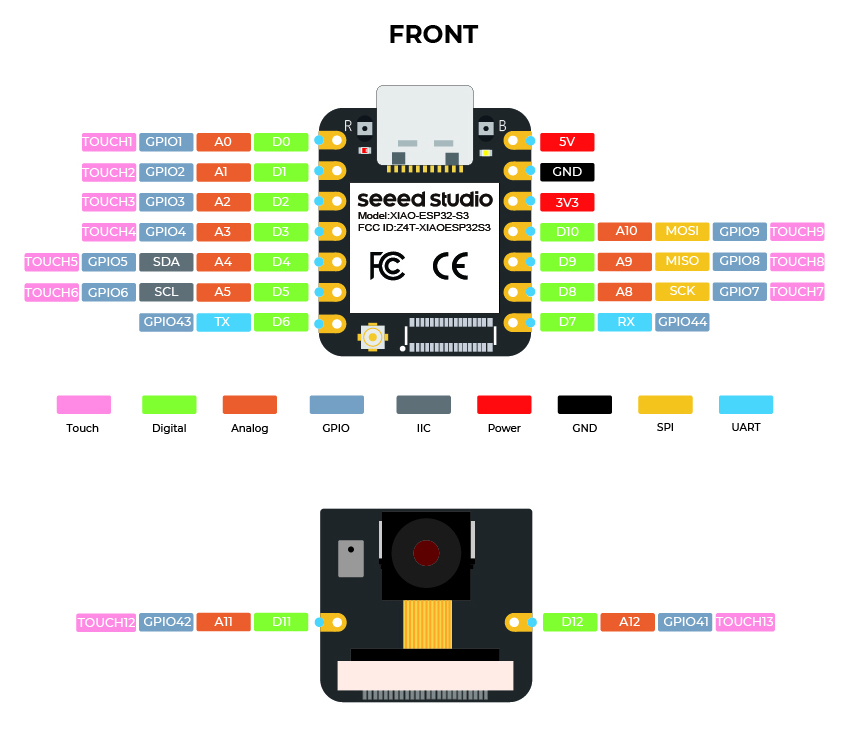
For example, if you want to connect a Grove module to D0 port, you need to define the pin on ESPHome as GPIO1. You can find more details by clicking here.
Grove Compatibility List with ESPHome
Currently the following Grove modules are supported by ESPHome
Check here
Now we will select 6 Grove modules from the above table and explain how they can be connected with ESPHome and Home Assistant.
3. Grove Connection and Data Transmission
Now we will select several Grove modules and explain how they can be connected with ESPHome and Home Assistant.
Grove - Temperature and Humidity Sensor (BME680)
Setup Configuration
-
Step 1. Connect Grove - Temperature, Humidity, Pressure and Gas Sensor (BME680) to one of the I2C connectors on the Seeed Studio Expansion Base for XIAO
-
Step 2. Inside the xiao-esp32s3-bme680.yaml file that we created before, change the file and push it OTA to XIAO ESP32S3
# Configuration for ESPHome
esphome:
  # Name of the ESP32-S3 device
  name: esp32s3

  # PlatformIO build options
  platformio_options:
    build_flags: -DBOARD_HAS_PSRAM
    board_build.arduino.memory_type: qio_opi
    board_build.f_flash: 80000000L
    board_build.flash_mode: qio

# Configuration for ESP32
esp32:
  board: esp32-s3-devkitc-1
  framework:
    type: arduino

# Enable logging
logger:

# Enable Home Assistant API
api:

# Over-the-Air update configuration
ota:

# Wi-Fi configuration
wifi:
  ssid: "your wifi name"
  password: "your password"

  # Enable fallback hotspot (captive portal) in case wifi connection fails
  ap:
    ssid: "Xiao-Esp32s3 Fallback Hotspot"
    password: "MoLTqZUvHwWI"

# Captive portal configuration
captive_portal:

# I2C configuration for BME680 sensor
i2c:
  sda: GPIO5
  scl: GPIO6

# BME680 sensor configuration
sensor:
  - platform: bme680
    temperature:
      name: "BME680 Temperature"
      oversampling: 16x
    pressure:
      name: "BME680 Pressure"
    humidity:
      name: "BME680 Humidity"
    gas_resistance:
      name: "BME680 Gas Resistance"
    address: 0x76
    update_interval: 60s
You can learn more about the BME680 component here. It allows you to use BME280, BME680, BMP085, BMP280, AHT10, AHT20 and AHT21 based sensors. Here we add the I²C Bus component because AHT20 communicates using I2C protocol.
Visualize on Dashboard
- Step 1. On the Overview page of Home Assistant, click the 3 dots and click Edit Dashboard
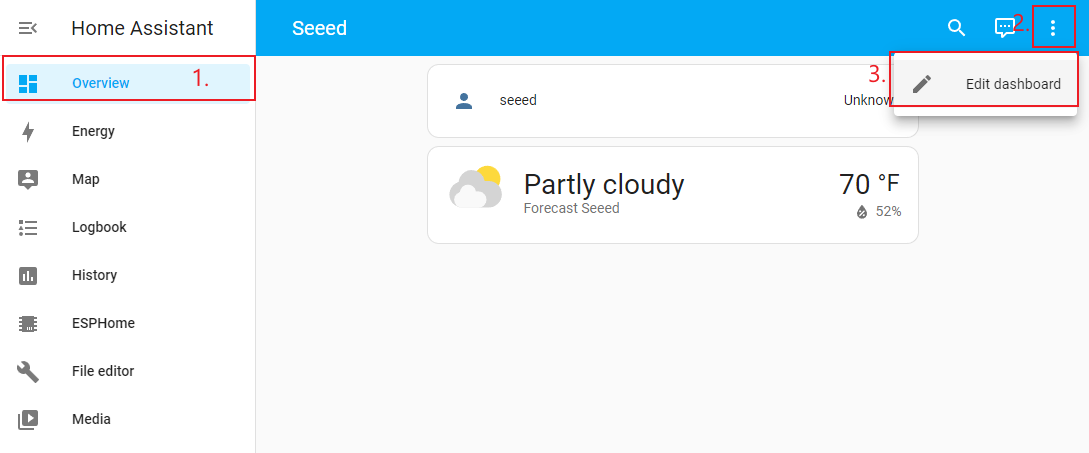
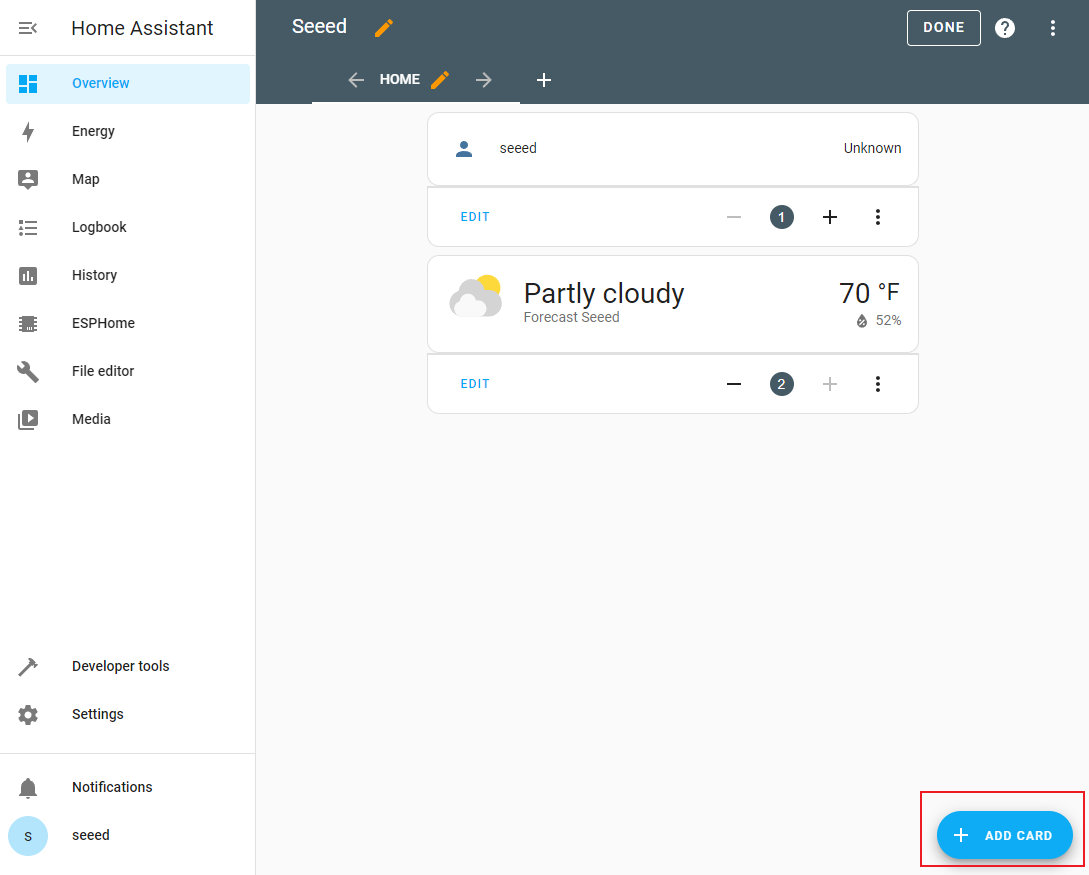
- Step 2. Click + ADD CARD
- Step 3. Select By ENTITY, type temperature and select the check box next to Temperature
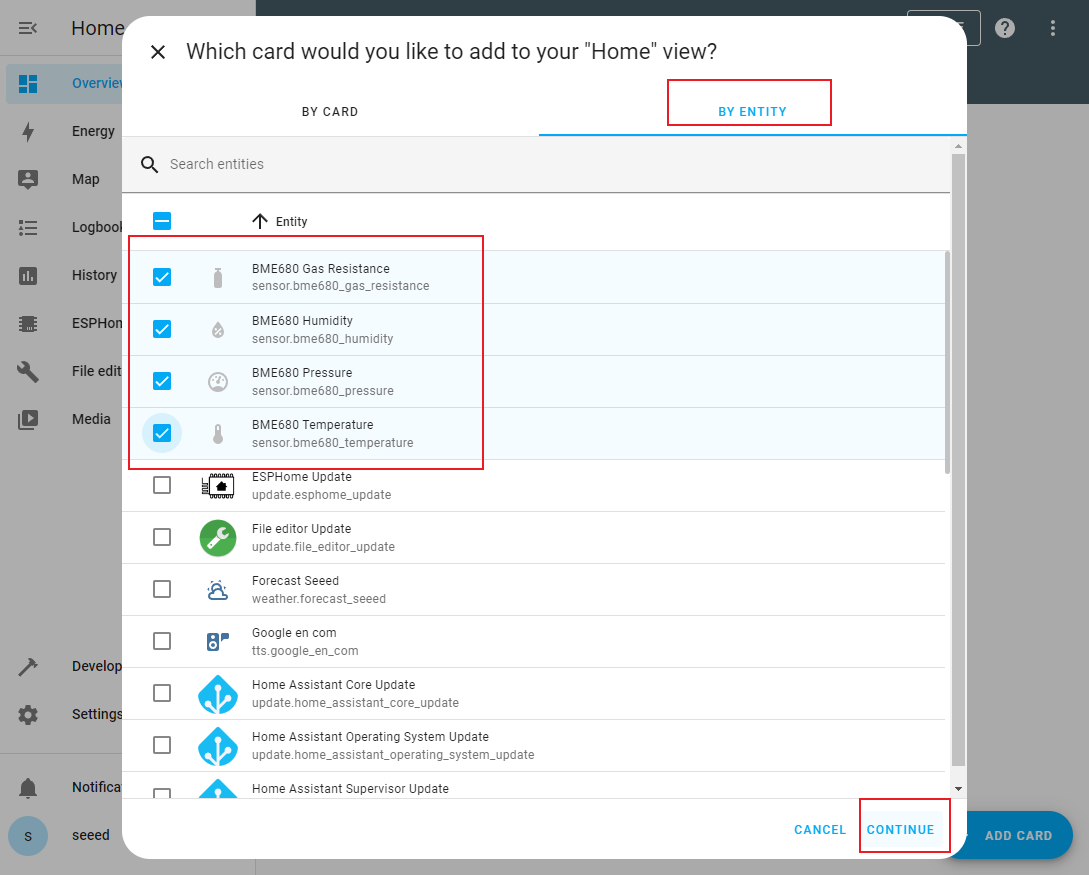
-
Step 4. Repeat the same for Humidity, Gas Resitance and Pressure
-
Step 5. Click CONTINUE
-
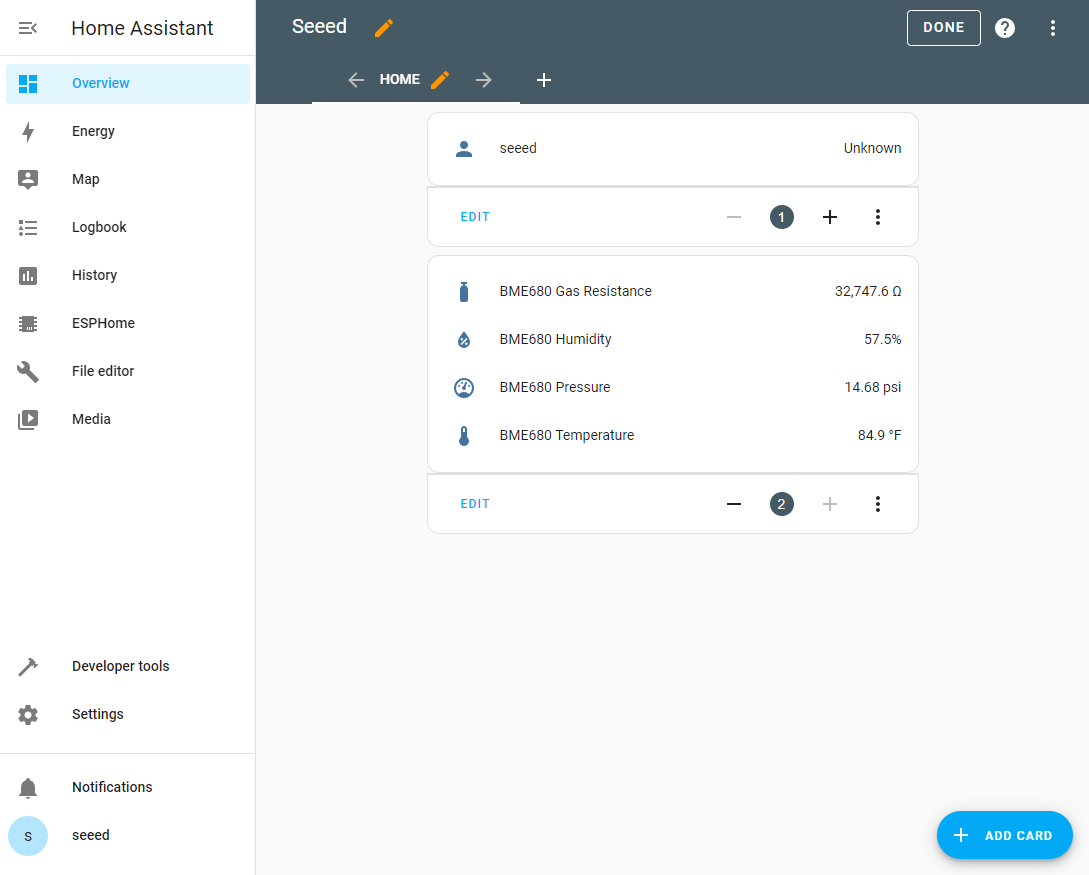
Step 6. Click ADD TO DASHBOARD
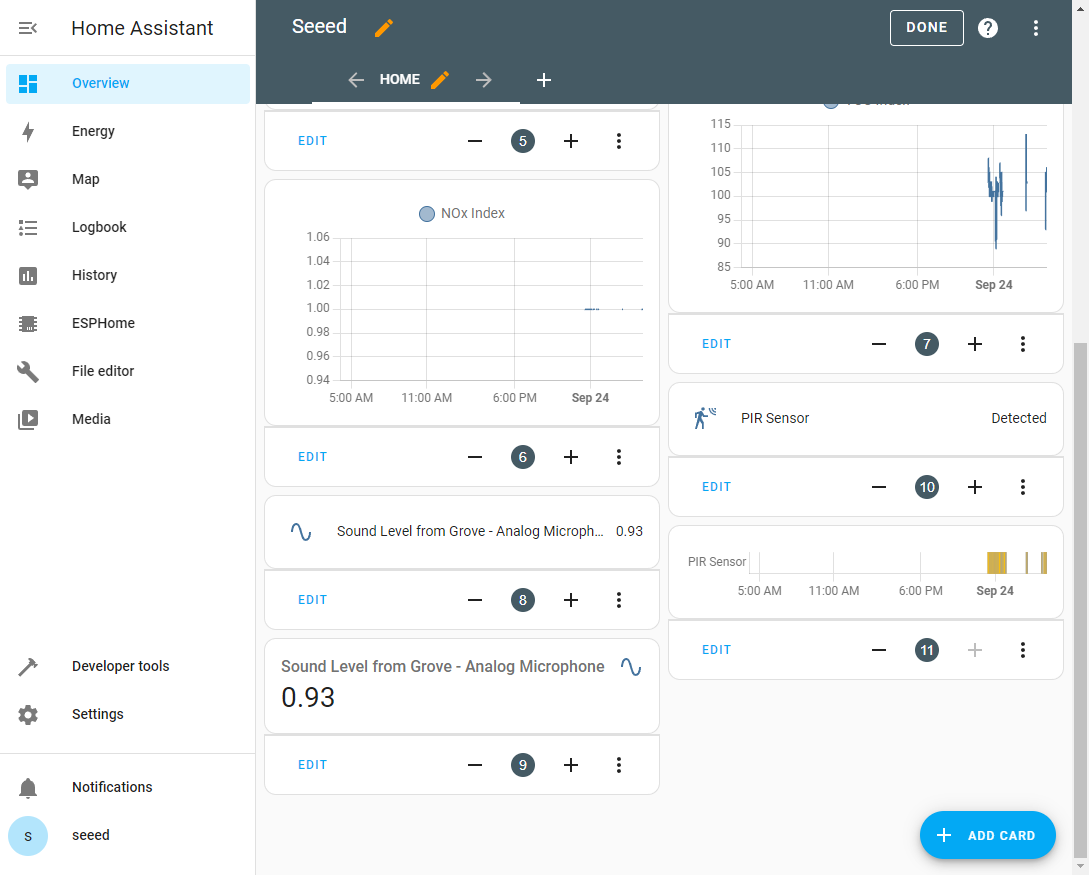
Now your Home Assistant dashboard will look like below
- Step 7. You can also visualize sensor data as gauges. Click Gauge under BY CARD
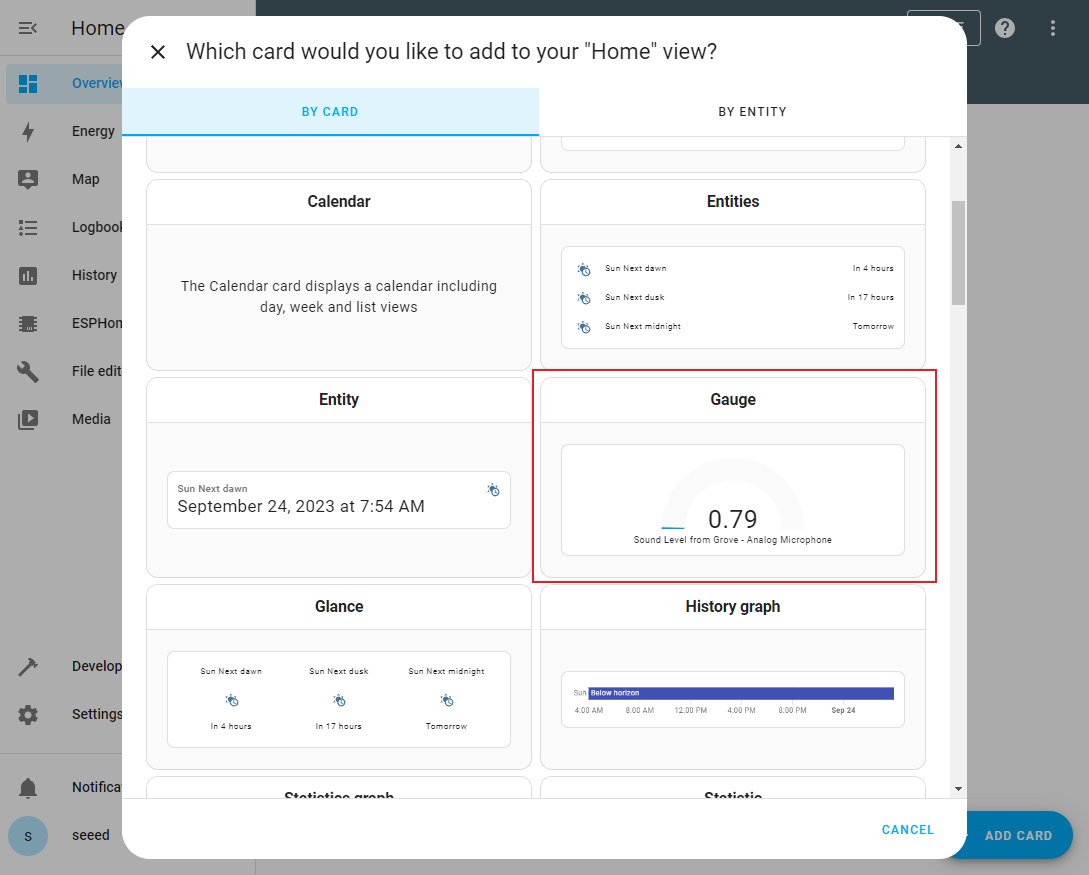
- Step 8. Select Temperature from the drop-down menu
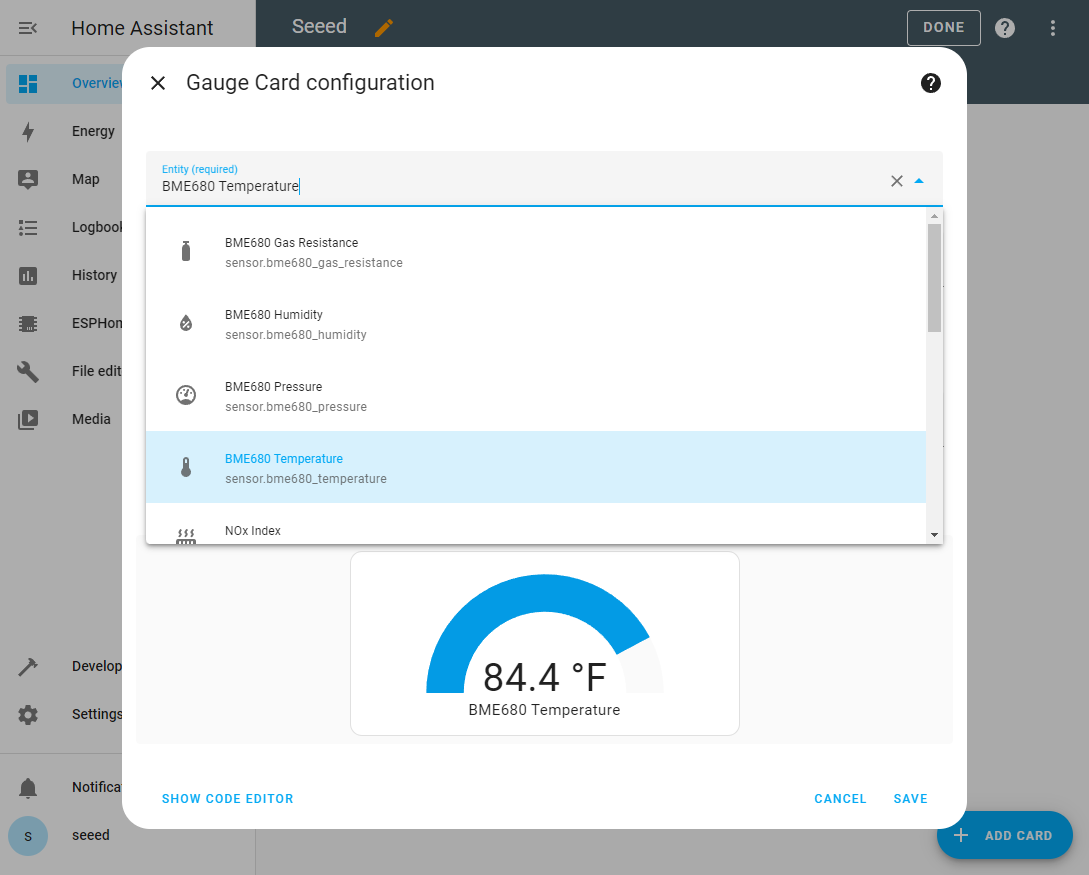
-
Step 9. Click SAVE
-
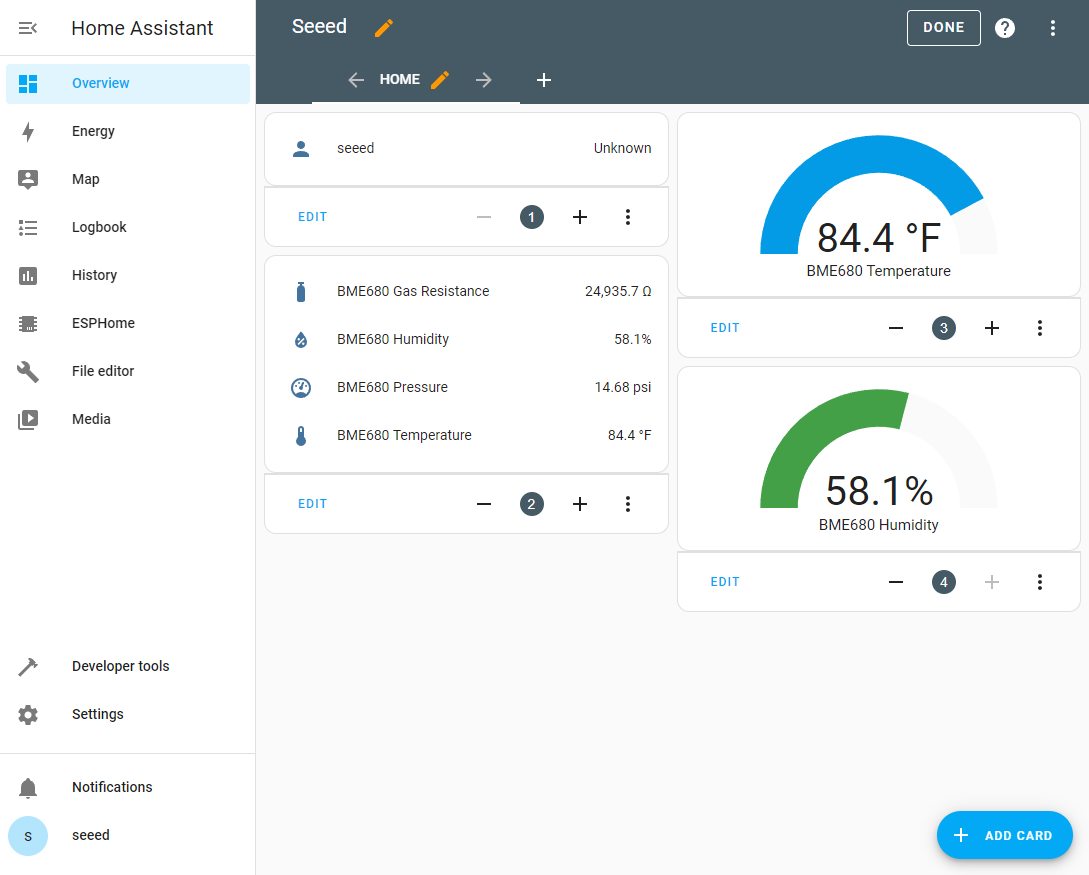
Step 10. Repeat the same for Humidity, Gas Resitance and Pressure
-
Now your dashboard will look like below
Grove -Smart Air Quality Sensor (SGP41)
- Step 1. Connect Grove - Smart Air Quality Sensor (SGP41) to one of the I2C connectors on the Seeed Studio Expansion Base for XIAO
- Step 2. Inside the xiao-esp32S3.yaml file that we created before, change the file and push it OTA to XIAO ESP32S3 sense
# Configuration for ESPHome
esphome:
  # Name of the ESP32-S3 device
  name: esp32s3

  # PlatformIO build options
  platformio_options:
    build_flags: -DBOARD_HAS_PSRAM
    board_build.arduino.memory_type: qio_opi
    board_build.f_flash: 80000000L
    board_build.flash_mode: qio

# Configuration for ESP32
esp32:
  board: esp32-s3-devkitc-1
  framework:
    type: arduino

# Enable logging
logger:

# Enable Home Assistant API
api:

# Over-the-Air update configuration
ota:

# Wi-Fi configuration
wifi:
  ssid: "your wifi name"
  password: "your password"

  # Enable fallback hotspot (captive portal) in case wifi connection fails
  ap:
    ssid: "Xiao-Esp32s3 Fallback Hotspot"
    password: "MoLTqZUvHwWI"

# Captive portal configuration
captive_portal:

# SPI configuration
spi:
  clk_pin: GPIO8
  mosi_pin: GPIO10
  miso_pin: GPIO9

# I2C configuration for BME680 sensor
i2c:
  sda: GPIO5
  scl: GPIO6
  scan: True
  id: bus_a
  frequency: 1MHz

# Sensor configuration for SGP4X
sensor:
  - platform: sgp4x
    voc:
      id: sgp41_voc
      name: "VOC Index"
    nox:
      id: sgp41_nox
      name: "NOx Index"
- Step 3. Example With Compensation compensation (Optional): The block containing sensors used for compensation. If not set defaults will be used. We will use the Temperature and Humidity Sensor (BME680) compensate for Smart Air Quality Sensor (SGP41). Here is the updated xiao-esp32S3.yaml file:
# Configuration for ESPHome
esphome:
  # Name of the ESP32-S3 device
  name: esp32s3

  # PlatformIO build options
  platformio_options:
    build_flags: -DBOARD_HAS_PSRAM
    board_build.arduino.memory_type: qio_opi
    board_build.f_flash: 80000000L
    board_build.flash_mode: qio

# Configuration for ESP32
esp32:
  board: esp32-s3-devkitc-1
  framework:
    type: arduino

# Enable logging
logger:

# Enable Home Assistant API
api:

# Over-the-Air update configuration
ota:

# Wi-Fi configuration
wifi:
  ssid: "your wifi name"
  password: "your password"

  # Enable fallback hotspot (captive portal) in case wifi connection fails
  ap:
    ssid: "Xiao-Esp32s3 Fallback Hotspot"
    password: "MoLTqZUvHwWI"

# Captive portal configuration
captive_portal:

# SPI configuration
spi:
  clk_pin: GPIO8
  mosi_pin: GPIO10
  miso_pin: GPIO9

# I2C configuration for BME680 sensor
i2c:
  sda: GPIO5
  scl: GPIO6
  scan: True
  id: bus_a
  frequency: 1MHz

# BME680 sensor configuration
sensor:
  - platform: bme680
    temperature:
      id: bme680_temp
      name: "BME680 Temperature"
      oversampling: 16x
    pressure:
      name: "BME680 Pressure"
    humidity:
      id: bme680_hum
      name: "BME680 Humidity"
    gas_resistance:
      name: "BME680 Gas Resistance"
    address: 0x76

# SGP4X sensor configuration
  - platform: sgp4x
    voc:
      name: "VOC Index"
    nox:
      name: "NOx Index"
    compensation:
      humidity_source: bme680_hum
      temperature_source: bme680_temp
Note: This sensor will cost 90 circles for collecting enough data samples and warning cannot be avoided so far.
Visualize on Dashboard
The Same as before.
OV2640/OV3660 camera (XIAO ESP32S3 Sense)
Setup Configuration
-
Step 1. Connect OV2640 or OV660 Camera external board to the xiao esp32s3 sense
-
Step 2. Inside the xiao-esp32s3-camera.yaml file that we created before, change the file and push it OTA to XIAO ESP32S3 sense
# Configuration for ESPHome
esphome:
  # Name of the ESP32-S3 device
  name: esp32s3

  # PlatformIO build options
  platformio_options:
    build_flags: -DBOARD_HAS_PSRAM
    board_build.arduino.memory_type: qio_opi
    board_build.f_flash: 80000000L
    board_build.flash_mode: qio

# Configuration for ESP32
esp32:
  board: esp32-s3-devkitc-1
  framework:
    type: arduino

# Enable logging
logger:

# Enable Home Assistant API
api:

# Over-the-Air update configuration
ota:

# Wi-Fi configuration
wifi:
  ssid: "your wifi name"
  password: "your password"

  # Enable fallback hotspot (captive portal) in case wifi connection fails
  ap:
    ssid: "Xiao-Esp32s3 Fallback Hotspot"
    password: "MoLTqZUvHwWI"

# Captive portal configuration
captive_portal:

# Configuration for the ESP32 Camera
esp32_camera:
  id: espcam
  name: My Camera
  external_clock:
    pin: GPIO10
    frequency: 20MHz
  i2c_pins:
    sda: GPIO40
    scl: GPIO39
  data_pins: [GPIO15, GPIO17, GPIO18, GPIO16, GPIO14, GPIO12, GPIO11, GPIO48]
  vsync_pin: GPIO38
  href_pin: GPIO47
  pixel_clock_pin: GPIO13
  resolution: 800x600

# Configuration for the ESP32 Camera Web Server
esp32_camera_web_server:
  - port: 8080
    mode: stream
  - port: 8081
    mode: snapshot
Note: For more information, please read here.
Visualize on Dashboard
- Step 1. On the Overview page of Home Assistant, click the 3 dots and click Edit Dashboard
- Step 2. Click + ADD CARD
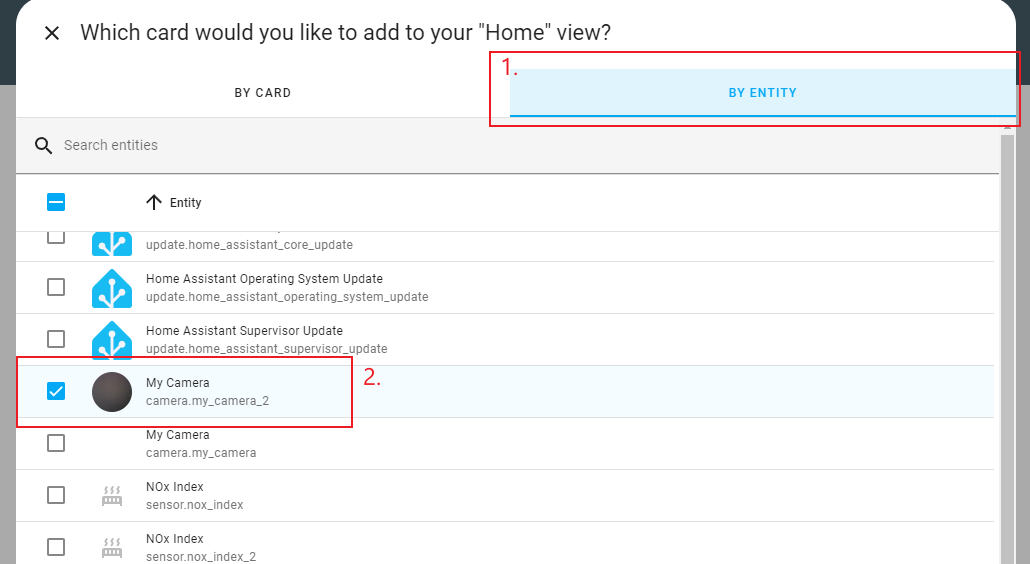
- Step 3. Select By ENTITY, type Camera and select the My Camera
- Step 4. Click Add to Dashboard

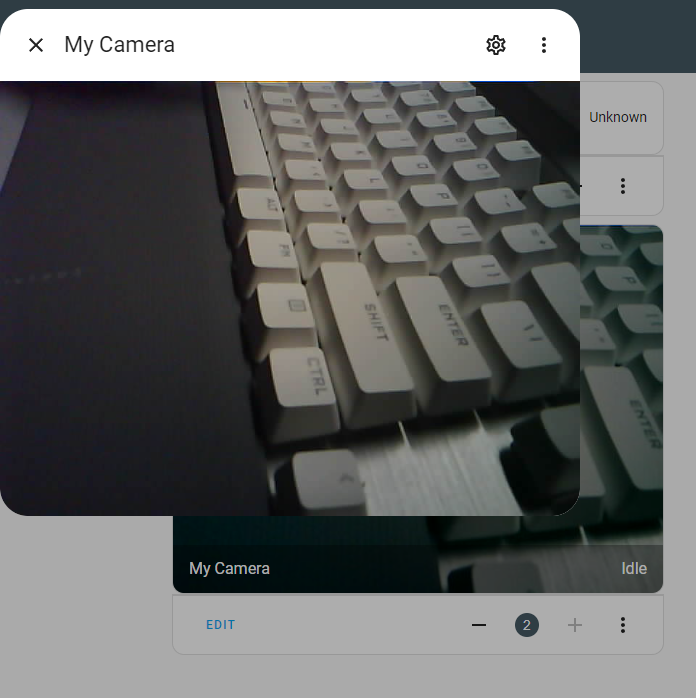
- Step 5. When viewing the web stream on the dashboard, it is in idle mode, refreshing only a few frames per minute. It transitions to active mode when we click on the card, typically with a refresh rate ranging from one to ten frames per second. In this tutorial, the refresh rate is approximately four frames per second.
PDM microphone for Voice Assistant
Setup Configuration
- Step 1. Inside the xiao-esp32s3-microphone.yaml file that we created before, change the file and push it OTA to XIAO ESP32S3 sense
# Configuration for ESPHome
esphome:
  name: esp32s3
  platformio_options:
    build_flags: -DBOARD_HAS_PSRAM
    board_build.arduino.memory_type: qio_opi
    board_build.f_flash: 80000000L
    board_build.flash_mode: qio

# Configuration for ESP32
esp32:
  board: esp32-s3-devkitc-1
  framework:
    type: arduino

# Enable logging
logger:

# Enable Home Assistant API
api:

# Over-the-Air update configuration
ota:

# Wi-Fi configuration
wifi:
  ssid: "your wifi name"
  password: "your password"

  # Enable fallback hotspot (captive portal) in case wifi connection fails
  ap:
    ssid: "Xiao-Esp32s3 Fallback Hotspot"
    password: "MoLTqZUvHwWI"

# Captive portal configuration
captive_portal:

# Configuration for the status LED light
light:
  - platform: status_led
    id: light0
    name: "Voice Assistant State"
    pin:
      number: GPIO21
      inverted: true

# Configuration for I2S audio
i2s_audio:
  i2s_lrclk_pin: GPIO46 # Note: labeled as "useless"
  i2s_bclk_pin: GPIO42

# Configuration for the microphone using I2S audio
microphone:
  - platform: i2s_audio
    id: echo_microphone
    i2s_din_pin: GPIO41
    adc_type: external
    pdm: true

# Configuration for the Voice Assistant
voice_assistant:
  microphone: echo_microphone

# Configuration for the binary sensor (Boot Switch)
binary_sensor:
  - platform: gpio
    pin:
      number: GPIO2
      mode:
        input: true
        pullup: true
    name: Boot Switch
    internal: true
    on_press:
      - voice_assistant.start:
      - light.turn_off: light0
    on_release:
      - voice_assistant.stop:
      - light.turn_on: light0
Note: For more information, please read here.
Visualize on Dashboard
- Step 1. On the Overview page of Home Assistant, click the 3 dots and click Edit Dashboard
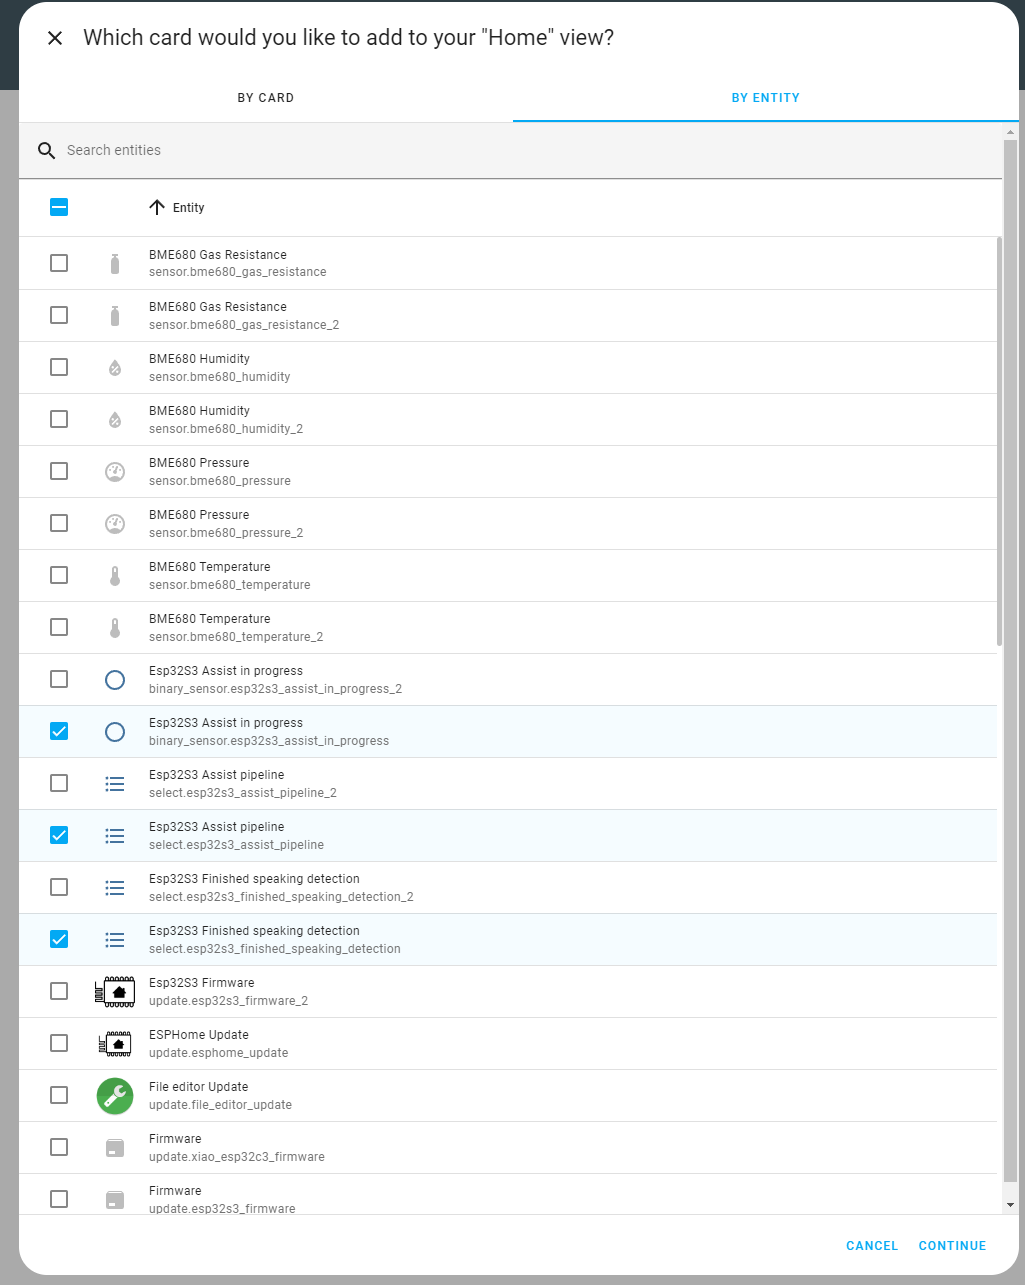
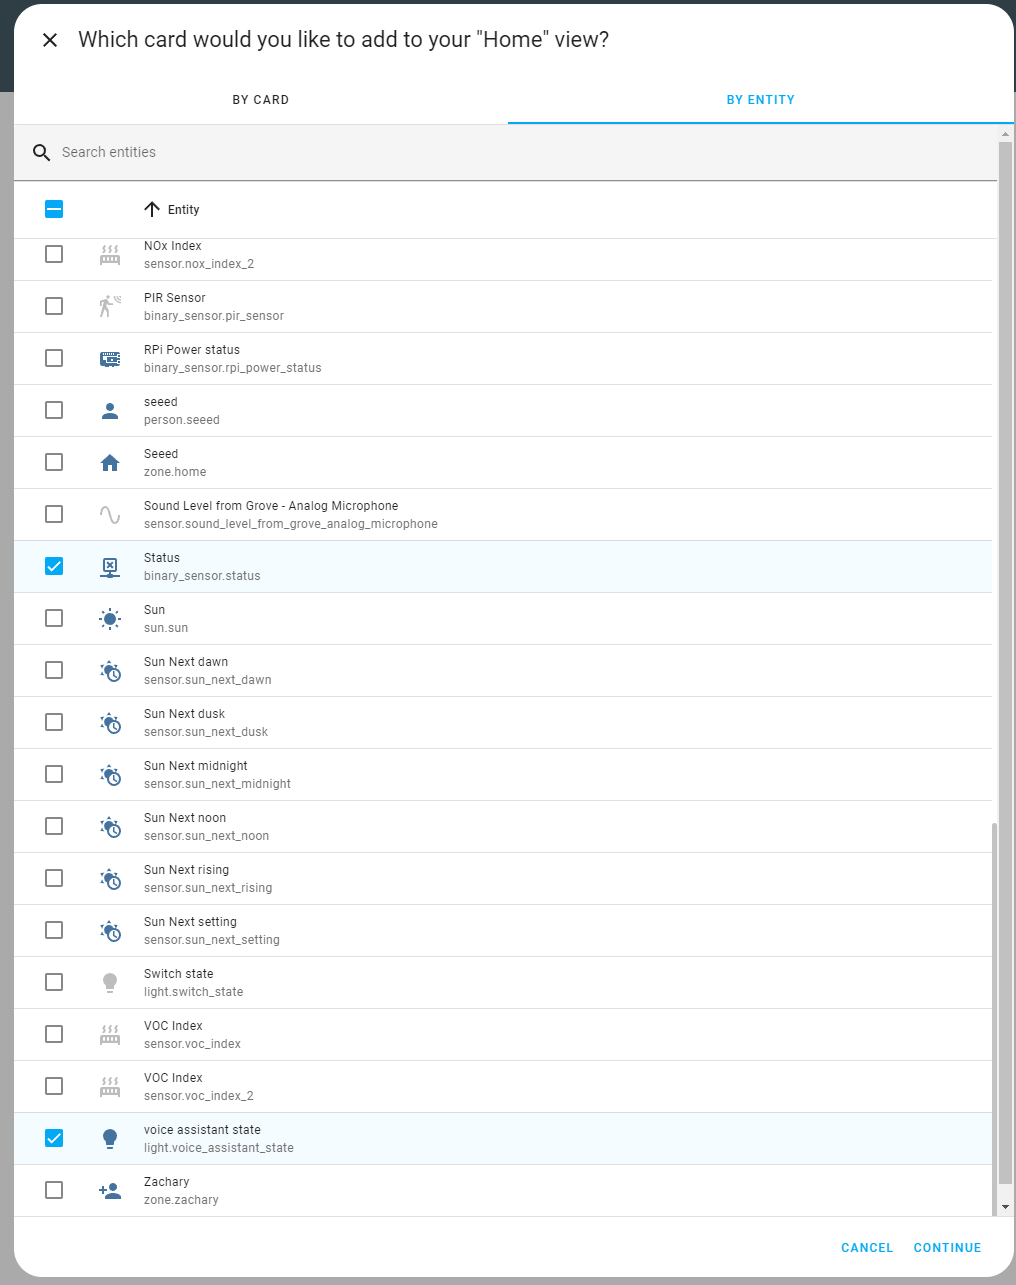
- Step 2. Click + ADD CARD
- Step 3. Select By ENTITY, then select the Esp32S3 Assist in progress,Esp32S3 Assist in progress, Esp32S3 Finished speaking detection, Status and voice assistant state
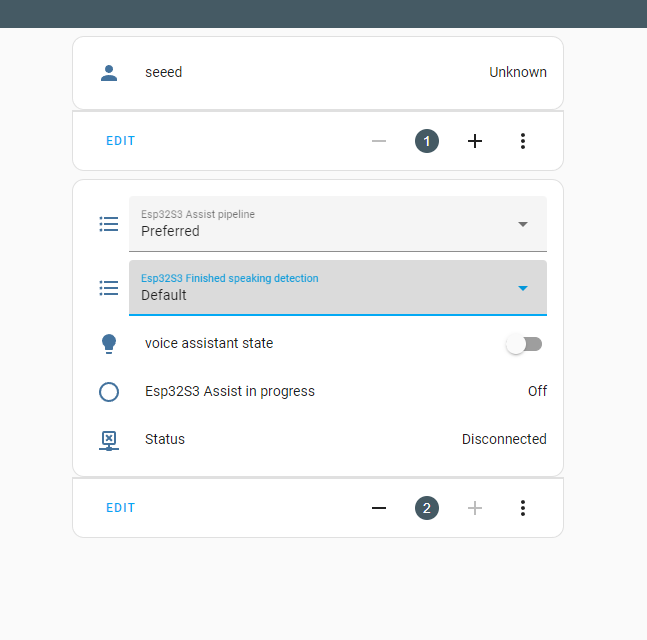
- Step 4. Click Add to Dashboard

- Step 5. When you press the Button(D1) on the Seeed Studio Expansion Base for XIAO, the user defined led (GPIO2) will be on on the esp32s3 and you can talk to esphome through voice assitant.
Note: For more information, please read it.
6x10 RGB MATRIX for XIAO
Setup Configuration
-
Step 1. First you need to connect the 6x10 RGB MATRIX to the XIAO, see this Wiki for details.
-
Step 2. Copy the .yaml information below and push it OTA to XIAO ESP32S3.
esphome:
  name: sixtyled
  friendly_name: sixtyled

esp32:
  board: seeed_xiao_esp32s3
  variant: esp32s3
  framework:
    type: arduino
    version: latest
    platform_version: 6.4.0

# Enable logging
logger:

# Enable Home Assistant API
api:

ota:

wifi:
  ssid: !secret wifi_ssid
  password: !secret wifi_password

  # Enable fallback hotspot (captive portal) in case wifi connection fails
  ap:
    ssid: "Sixtyled Fallback Hotspot"
    password: "MoLTqZUvHwWI"

captive_portal:

light:
  - platform: esp32_rmt_led_strip
    rgb_order: GRB
    pin: GPIO1
    num_leds: 60
    rmt_channel: 0
    chipset: ws2812
    name: "XIAO LEDS"
Visualize on Dashboard
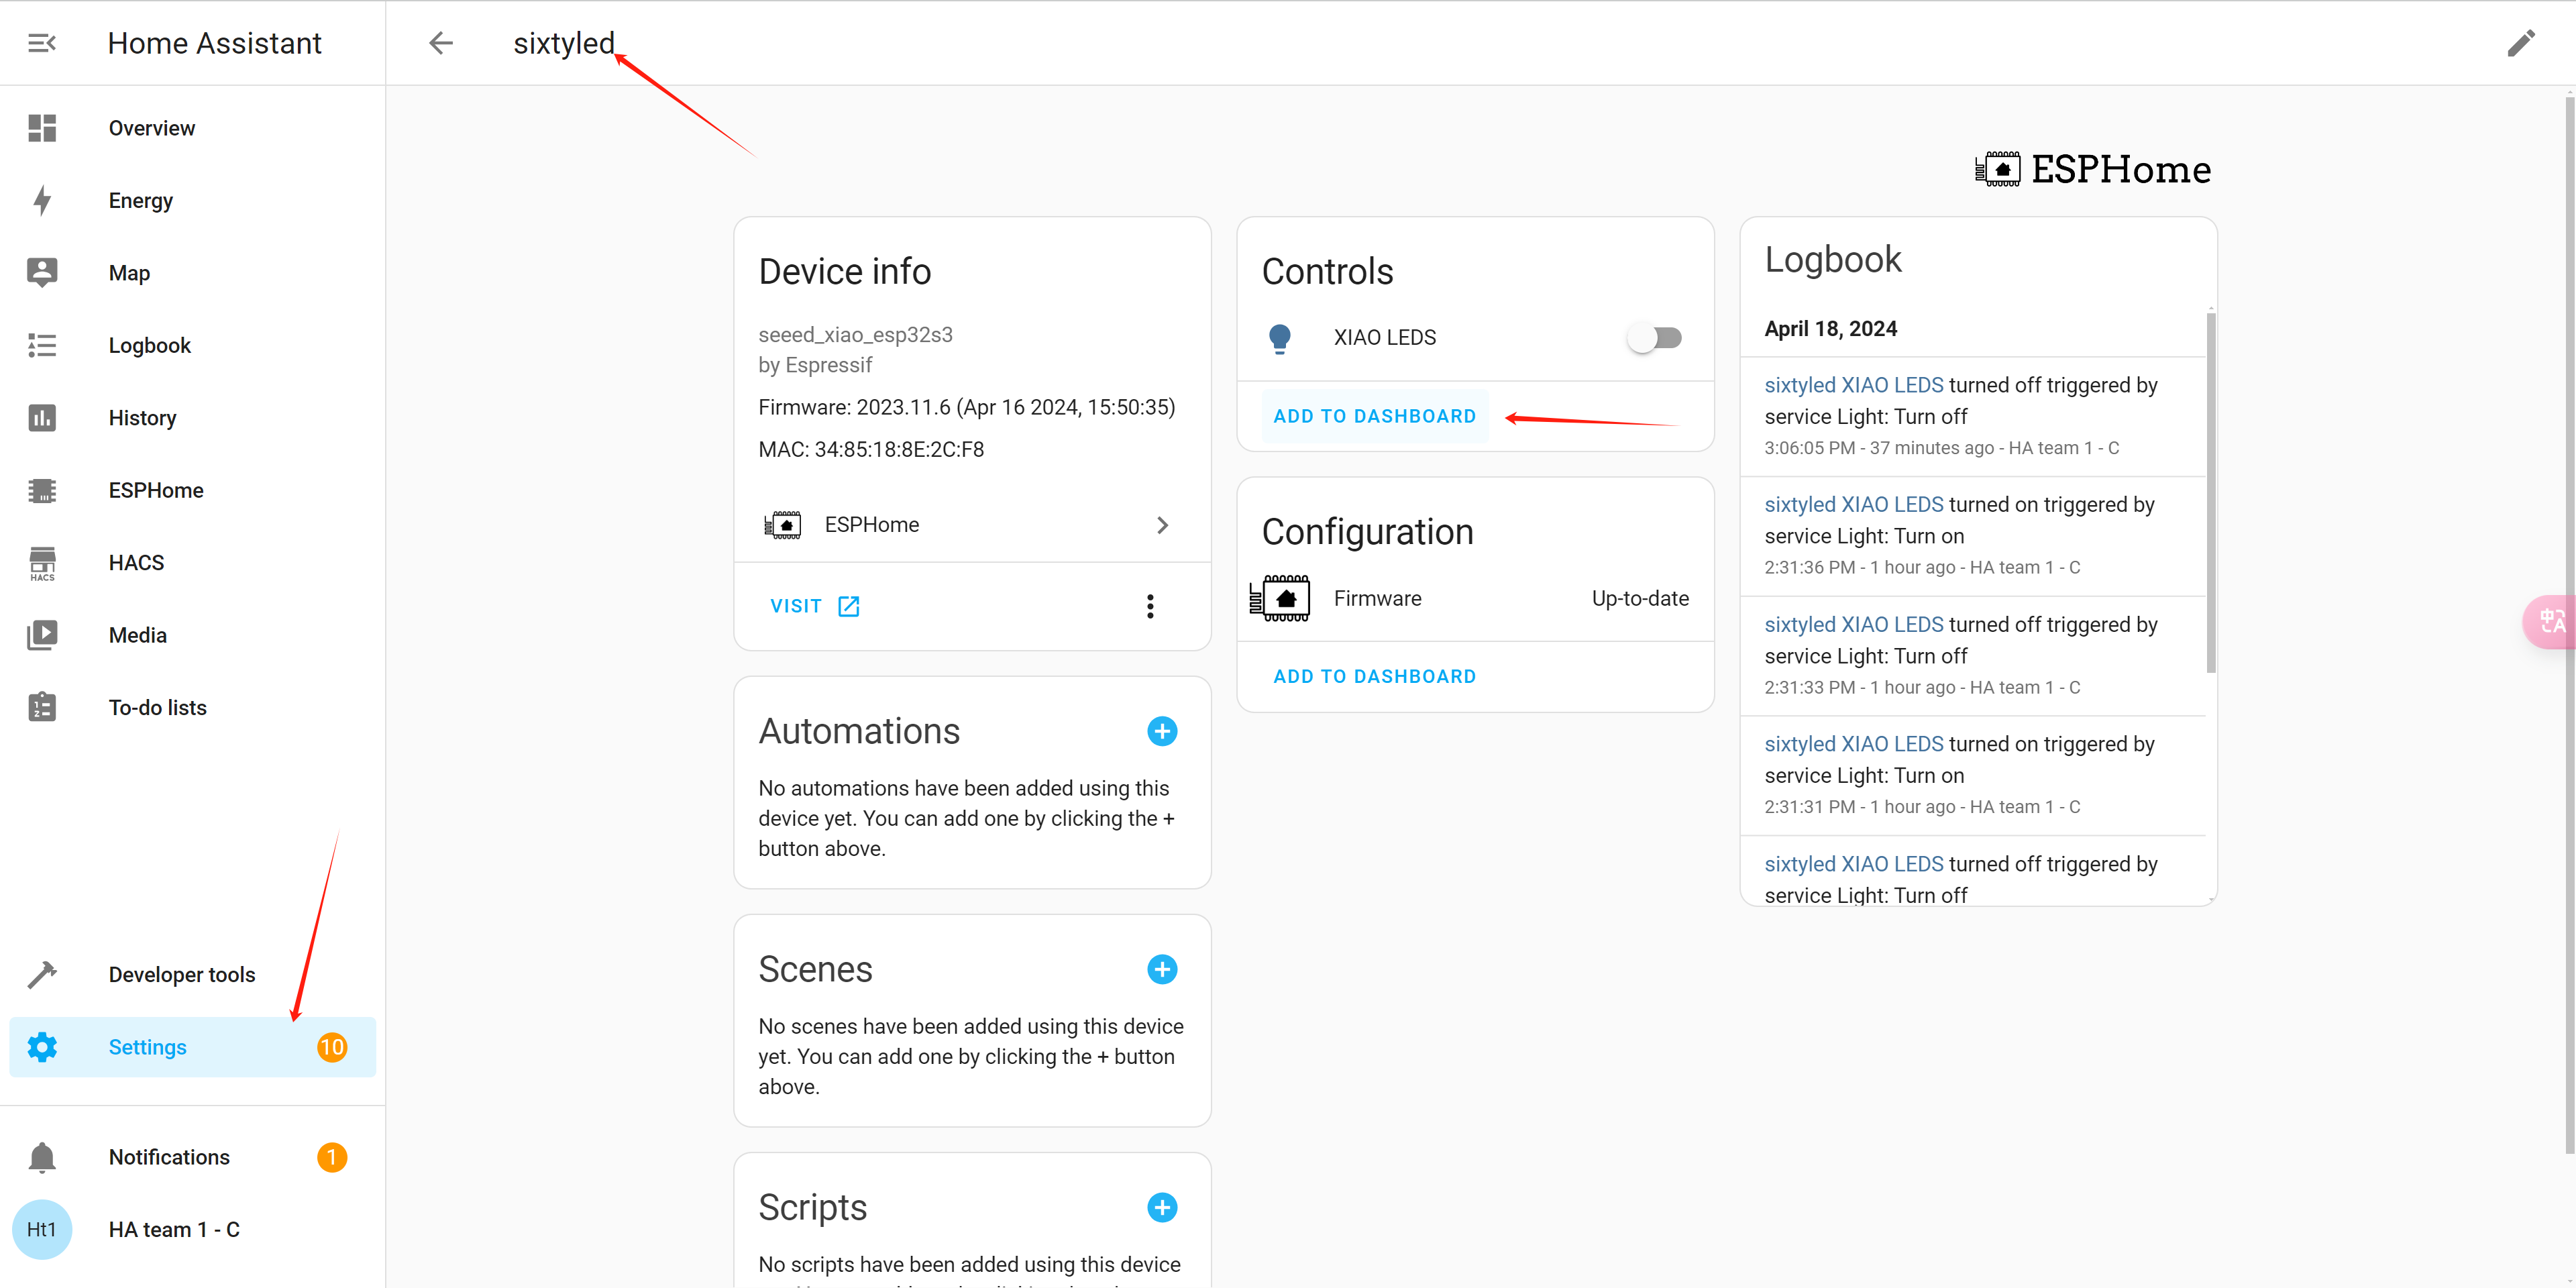
- Step 1. Open the path
Setting - Devices&services - ESPHome - sixtyled(the name you set)to add the card into dashboard.
- Step 2. On the Overview page of Home Assistant, click the 3 dots and click Edit Dashboard
- Step 3. Click + ADD CARD
- Step 4. Select By ENTITY, type xiao and select the check box next to sixtyled XIAO LEDS
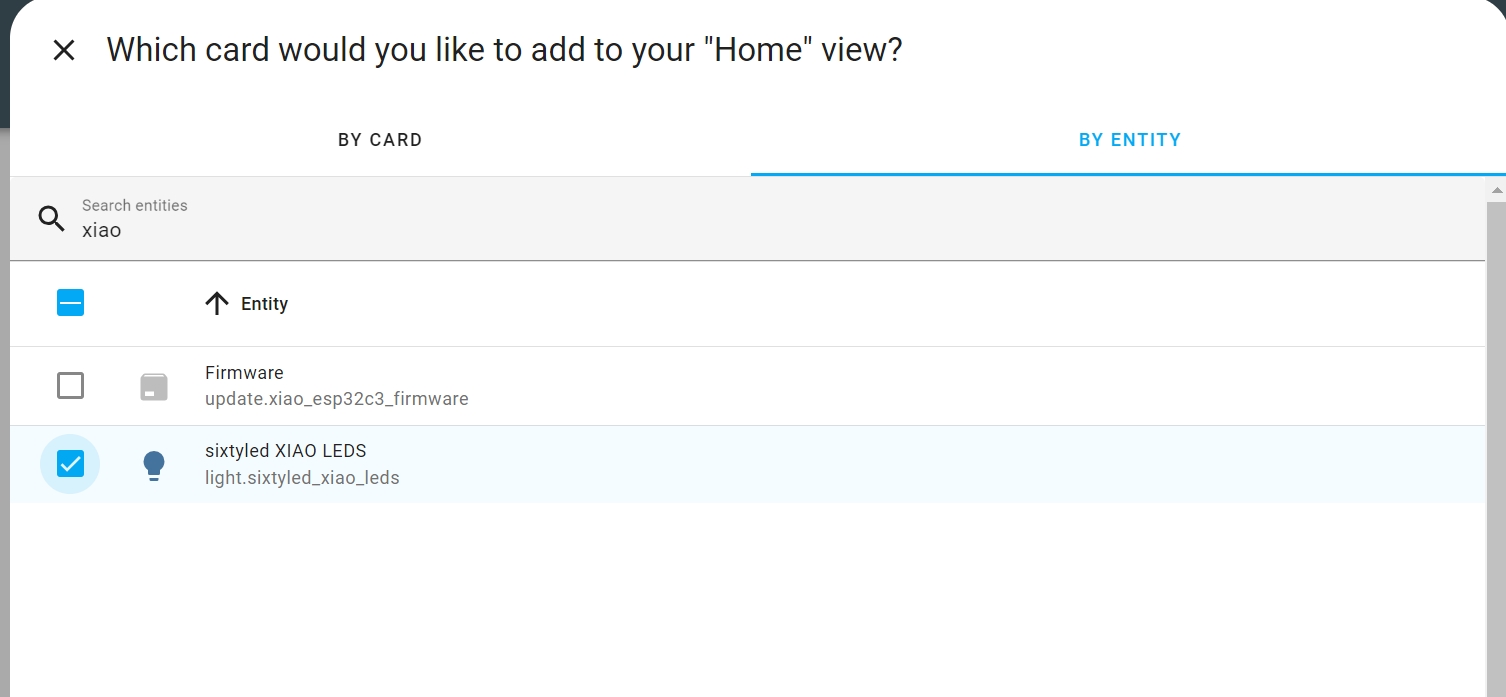
- Step 5. Click CONTINUE and Add to Dashboard

- Step 6. Subsequently, you can find a card in the "Overview" section where you can control the 6x10 RGB MATRIX for XIAO. Here, you can toggle its on/off state and customize its color and brightness.

✨ Contributor Project
- This project is supported by the Seeed Studio Contributor Project.
- Thanks Zachary's efforts and your work will be exhibited.
- Thanks python's efforts and the source of the project is sharing in here.
Tech Support & Product Discussion
Thank you for choosing our products! We are here to provide you with different support to ensure that your experience with our products is as smooth as possible. We offer several communication channels to cater to different preferences and needs.