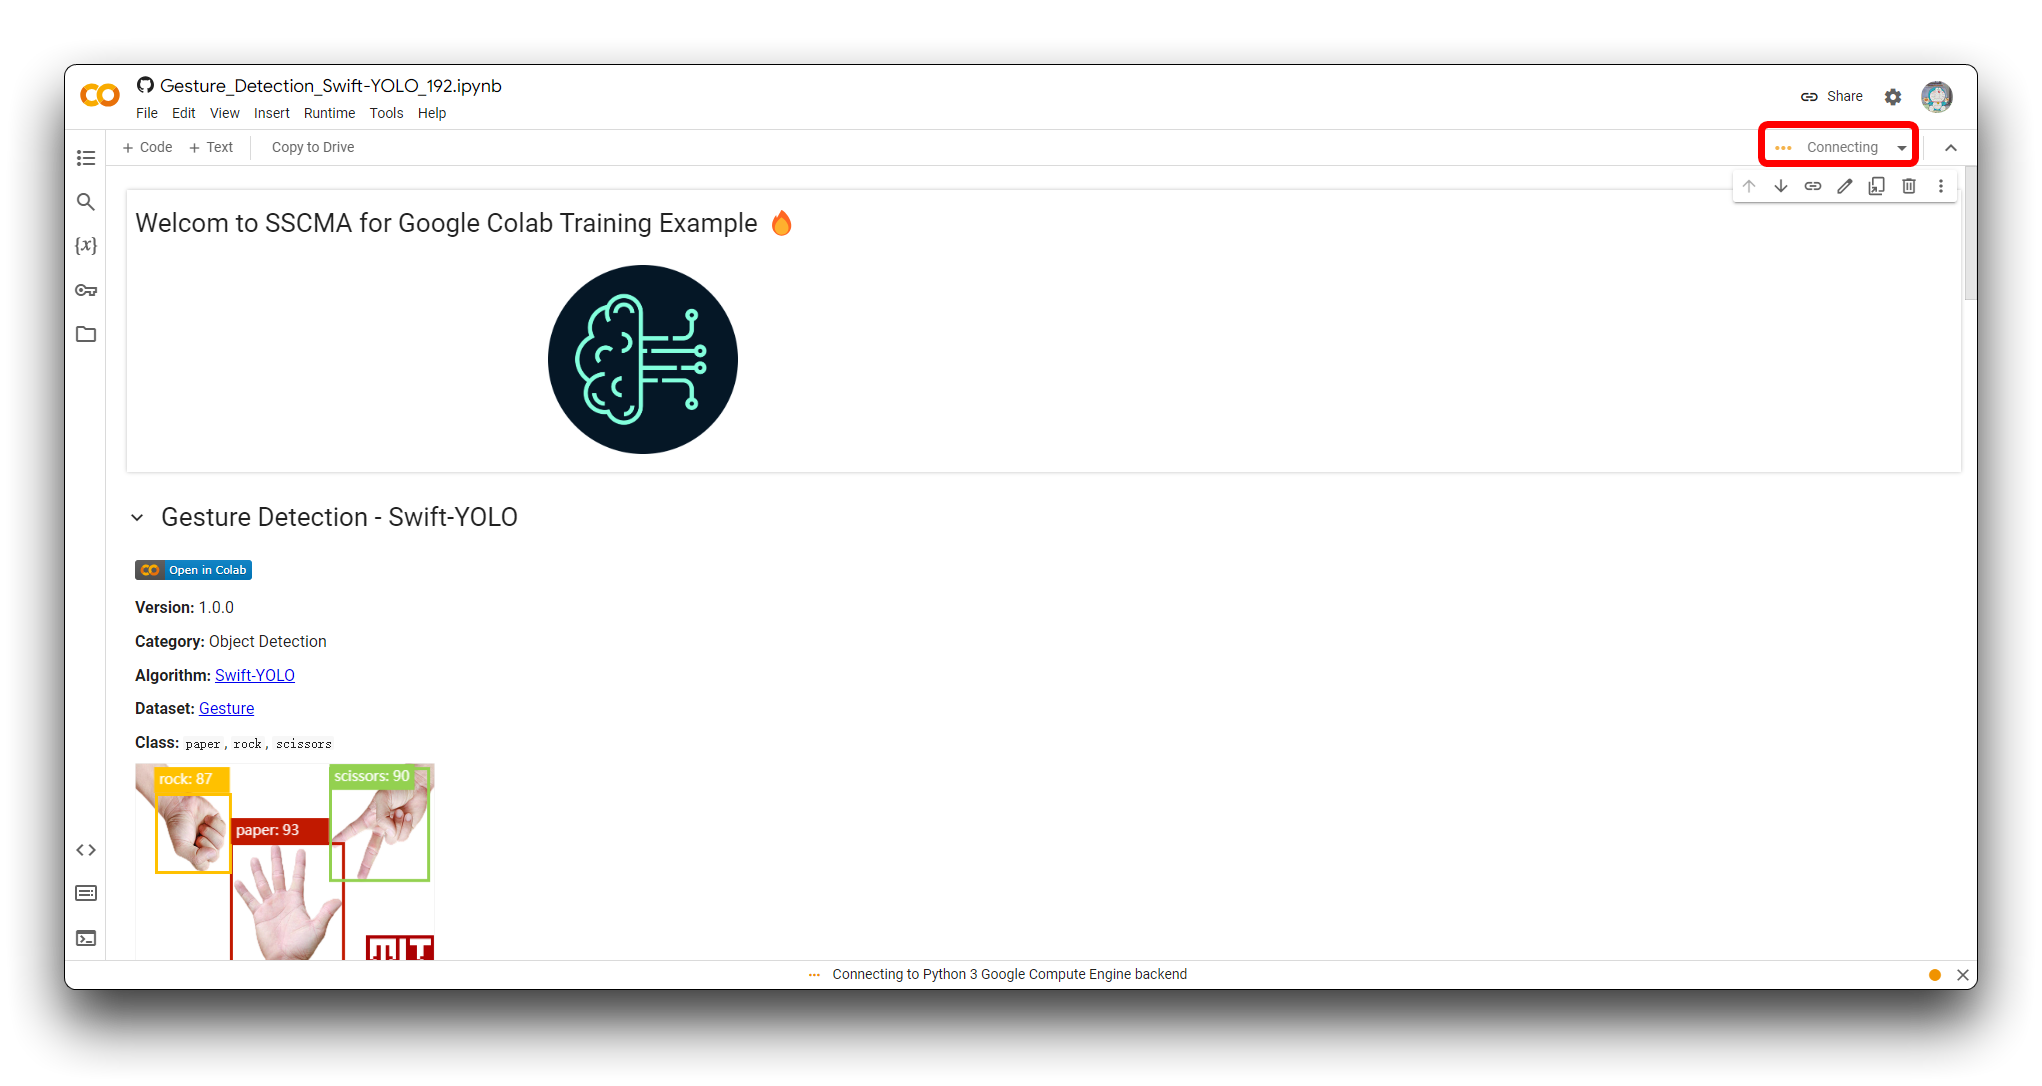
Deploying Models from Datasets to XIAO ESP32S3
Welcome to this comprehensive tutorial where we'll embark on a journey to turn your dataset into a fully functional model for deployment on the XIAO ESP32S3. In this guide, we'll navigate through the initial steps of labeling our dataset with Roboflow's intuitive tools, progressing to model training within the collaborative environment of Google Colab.
We'll then move on to deploying our trained model using the SenseCraft Model Assistant, a process that bridges the gap between training and real-world application. By the end of this tutorial, not only will you have a custom model running on XIAO ESP32S3, but you'll also be equipped with the knowledge to interpret and utilize the results of your model's predictions.
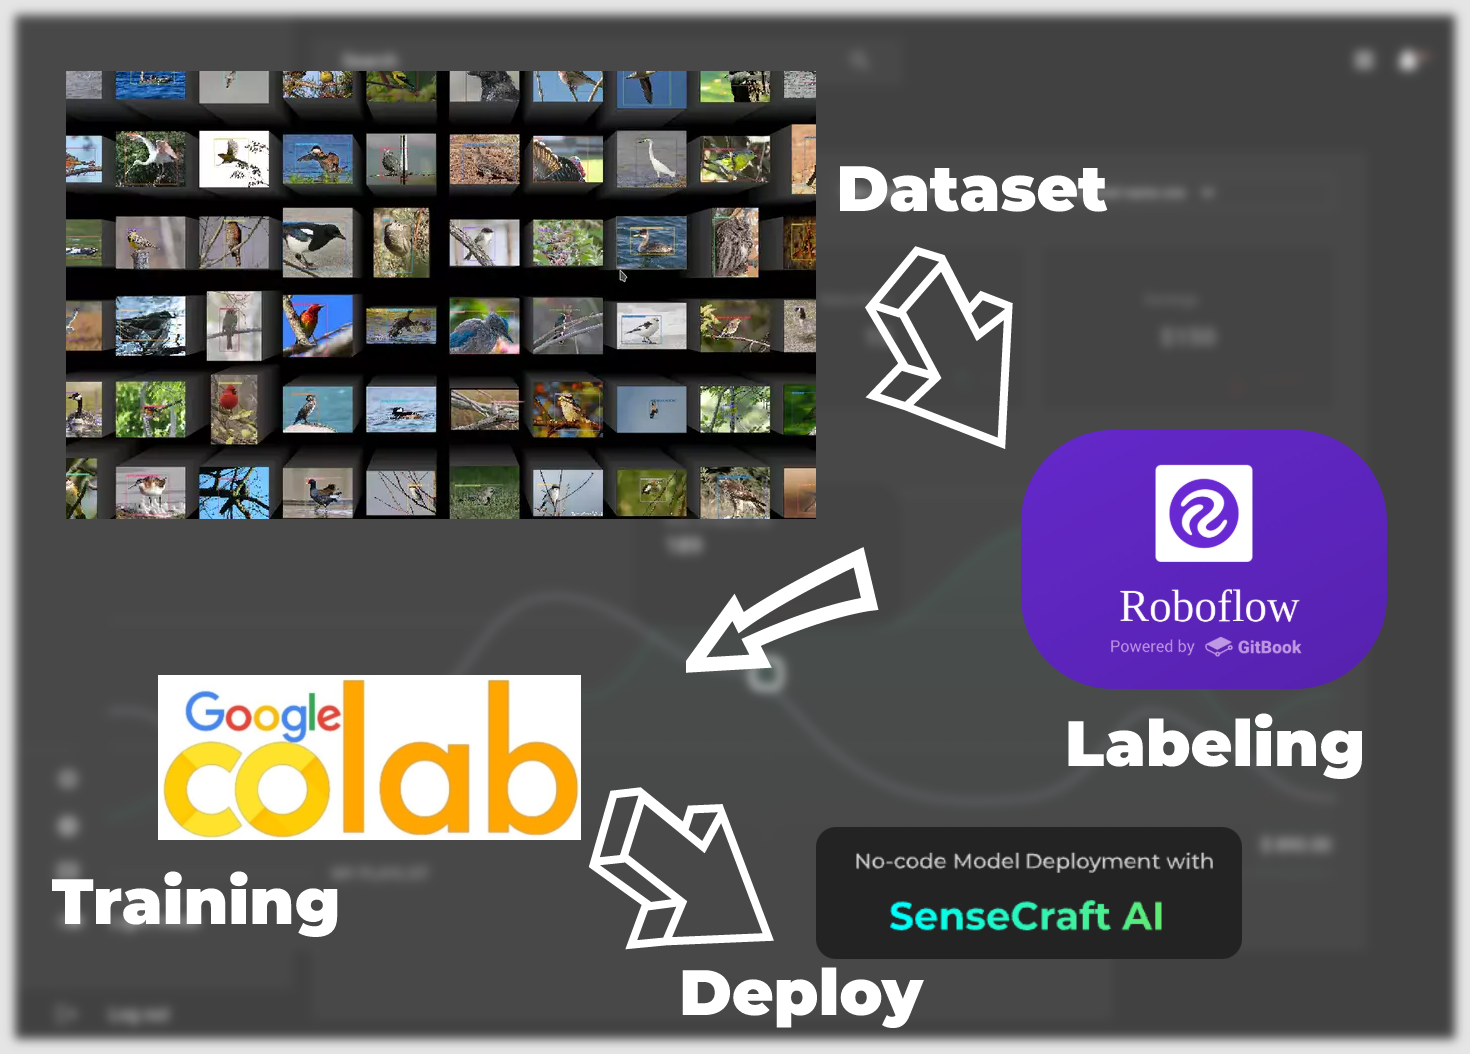
From dataset to model landing, we will have the following main steps.
-
Labelled Datasets —— This chapter focuses on how to obtain datasets that can be trained into models. There are two main ways to do this. The first is to use the labelled datasets provided by the Roboflow community, and the other is to use your own scenario-specific images as datasets, but you need to manually go through the labelling yourself.
-
Training Dataset Exported Model —— This chapter focuses on how to train to get a model that can be deployed to XIAO ESP32S3 based on the dataset obtained in the first step, by using the Google Colab platform.
-
Upload models via SenseCraft Model Assistant —— This section describes how to use the exported model file to upload the model to XIAO ESP32S3 using the SenseCraft Model Assistant.
-
Common protocols and applications of the model —— Finally, we will introduce SenseCraft AI's unified data communication format so that you can utilise the maximum potential of your devices and models to make applications that fit your scenarios.
So let's dive in and begin the exciting process of bringing your data to life.
Materials Required
Before you start, you may need to prepare the following equipment.
| Seeed Studio XIAO ESP32S3 | Seeed Studio XIAO ESP32S3 Sense |
|---|---|
 |  |
Both the XIAO ESP32S3 and Sense versions can be used as content for this tutorial, but since the standard version of the product does not allow the use of the camera expansion board, we would recommend that you use the Sense version.
Labelled Datasets
In the contents of this section, we allow users to freely choose the datasets they have. This includes community's or their own photos of the scene. This tutorial will introduce the two dominant scenarios. The first one is to use ready-made labelled datasets provided by the Roboflow community. The other is to use high-resolution images that you have taken and labelled the dataset. Please read the different tutorials below according to your needs.
Step 1: Create a free Roboflow account
Roboflow provides everything you need to label, train, and deploy computer vision solutions. To get started, create a free Roboflow account.
After reviewing and accepting the terms of service, you will be asked to choose between one of two plans: the Public Plan and the Starter Plan.
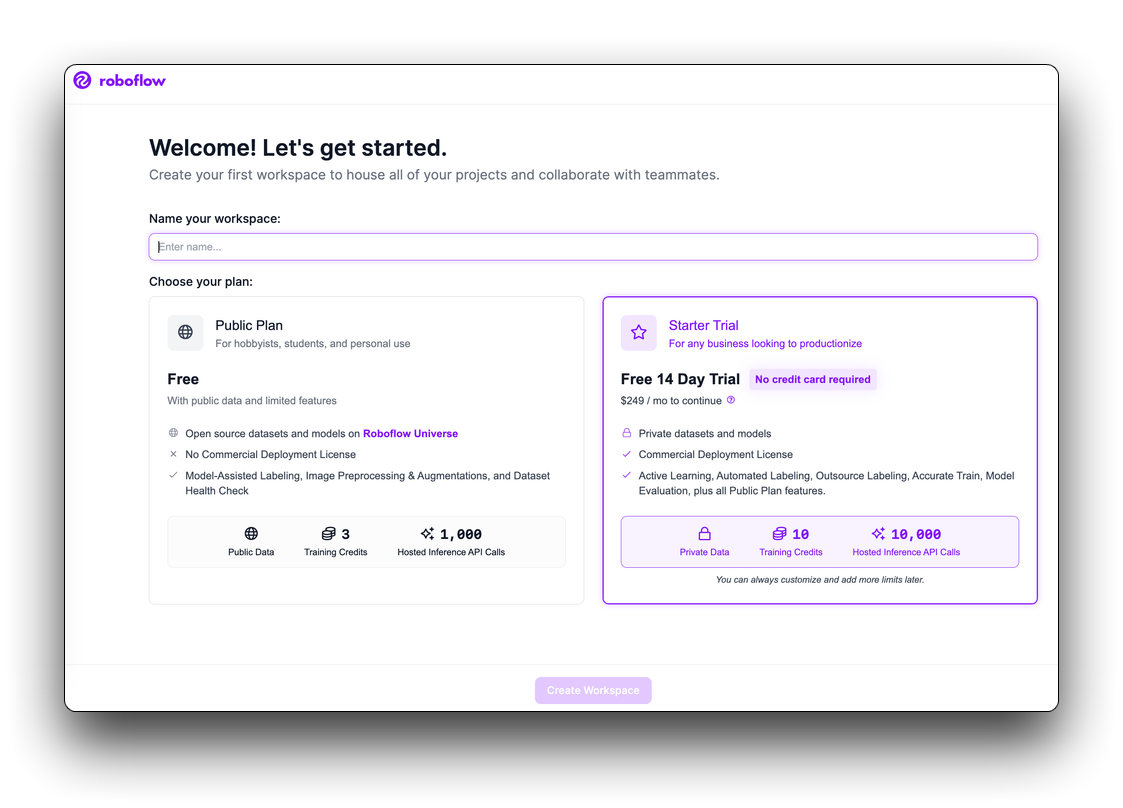
Then, you will be asked to invite collaborators to your workspace. These collaborators can help you annotate images or manage the vision projects in your workspace. Once you have invited people to your workspace (if you want to), you will be able to create a project.
Choose how you get your dataset
- Download Labelled datasets using Roboflow
- Use your own images as a dataset
Choosing a suitable dataset from Roboflow for direct use involves determining the dataset that best fits the requirements of your project, considering aspects such as the dataset size, quality, relevance, and licensing.
Step 2. Explore Roboflow Universe
Roboflow Universe is a platform where you can find various datasets. Visit the Roboflow Universe website and explore the datasets available.
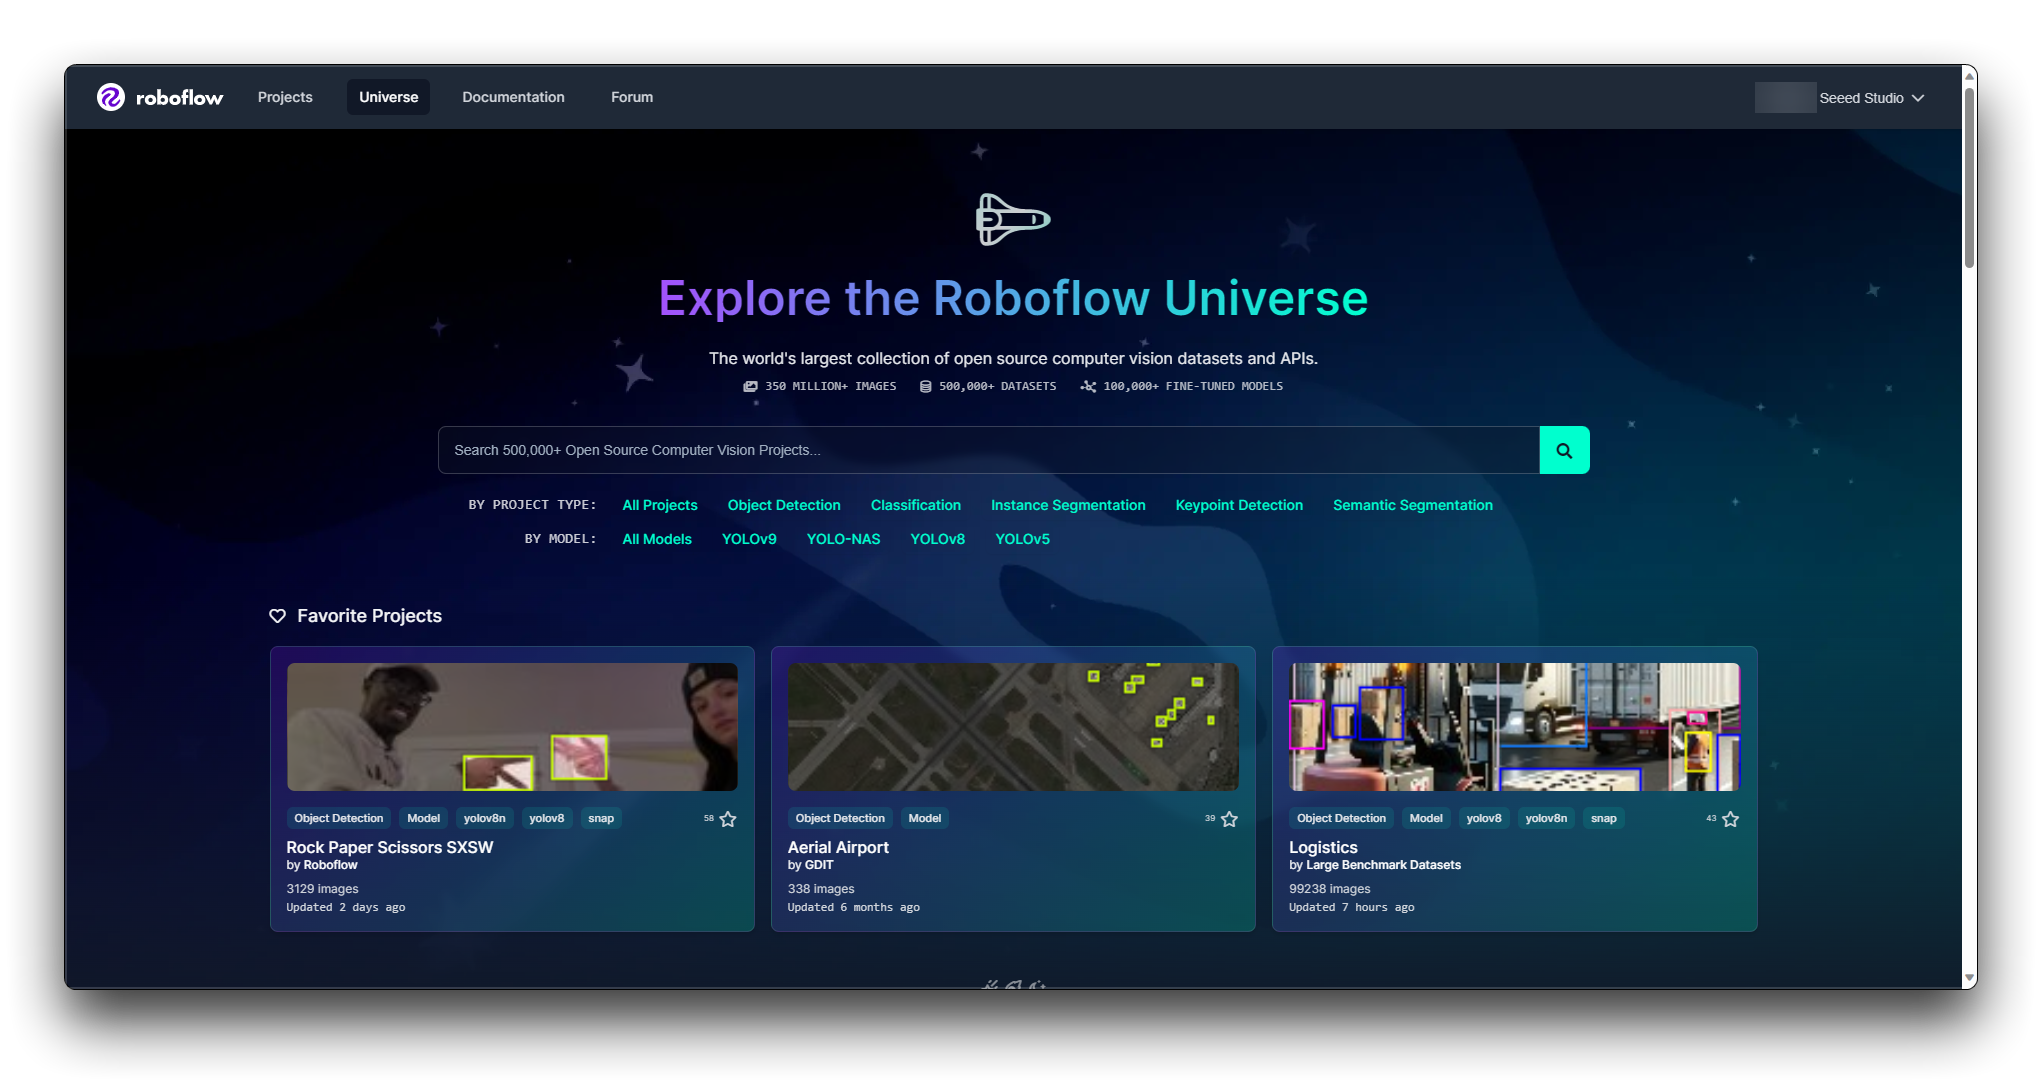
Roboflow provides filters and a search function to help you find datasets. You can filter datasets by domain, number of classes, annotation types, and more. Utilize these filters to narrow down the datasets that fit your criteria.
Step 3. Evaluate Individual Datasets
Once you have a shortlist, evaluate each dataset individually. Look for:
Annotation Quality: Check if the annotations are accurate and consistent.
Dataset Size: Ensure the dataset is large enough for your model to learn effectively but not too large to handle.
Class Balance: The dataset should ideally have a balanced number of examples for each class.
License: Review the dataset's license to ensure you can use it as intended.
Documentation: Review any documentation or metadata that comes with the dataset to better understand its contents and any preprocessing steps that have already been applied.
You can find out the condition of the model through Roboflow Health Check.
Step 4. Download the Sample
If you find the dataset of your choice, then you have the option to download and use it. Roboflow usually allows you to download a sample of the dataset. Test the sample to see if it integrates well with your workflow and if it's suitable for your model.
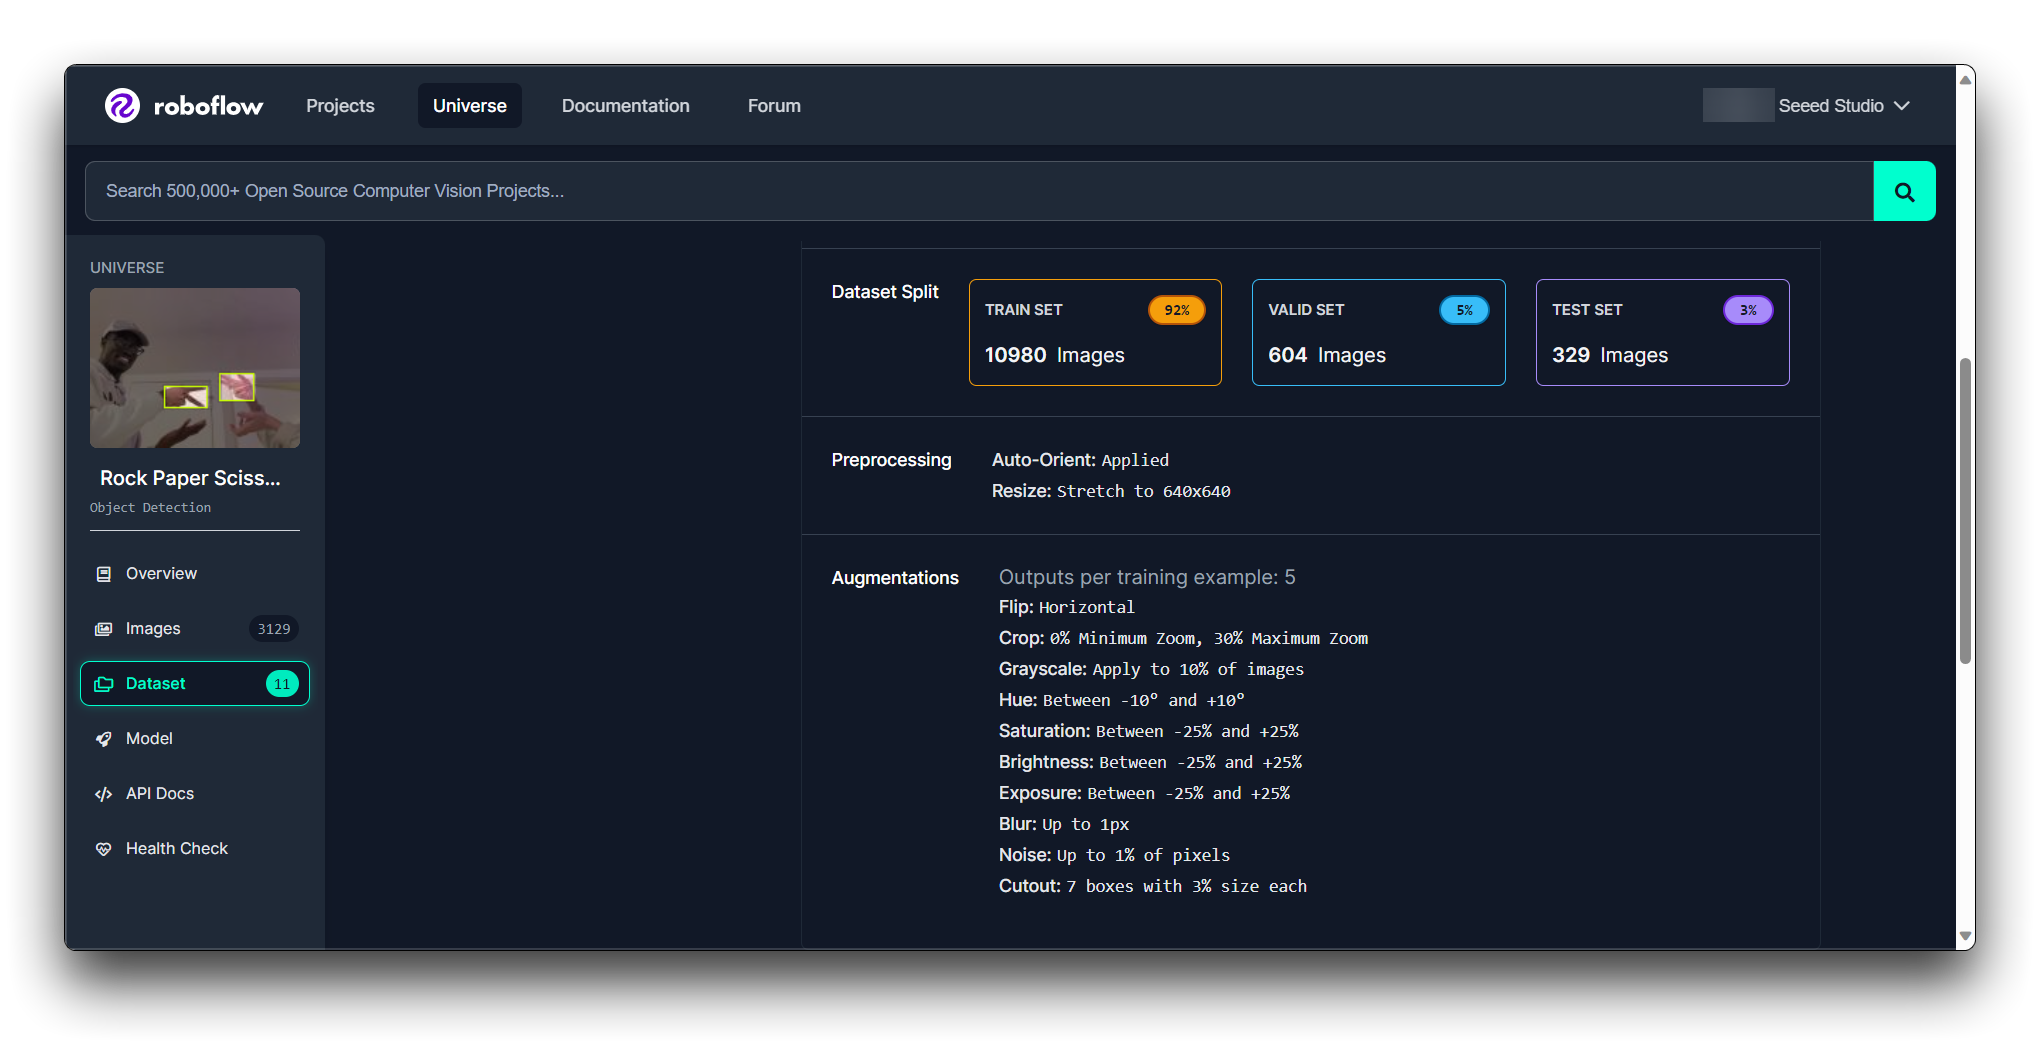
To continue with the subsequent steps, we recommend that you export the dataset in the format shown below.
You'll then get the Raw URL for this model, keep it safe, we'll use that link in the model training step in a bit later.
If you are using Roboflow for the first time and have absolutely no judgement on the selection of datasets, the step of training a model with a dataset to perform an initial test to see the performance may be essential. This can help you gauge whether the dataset will meet your requirements.
If the dataset meets your requirements and performs well in the initial tests, then it is likely to be suitable for your project. Otherwise, you may need to continue your search or consider expanding the dataset with more images.
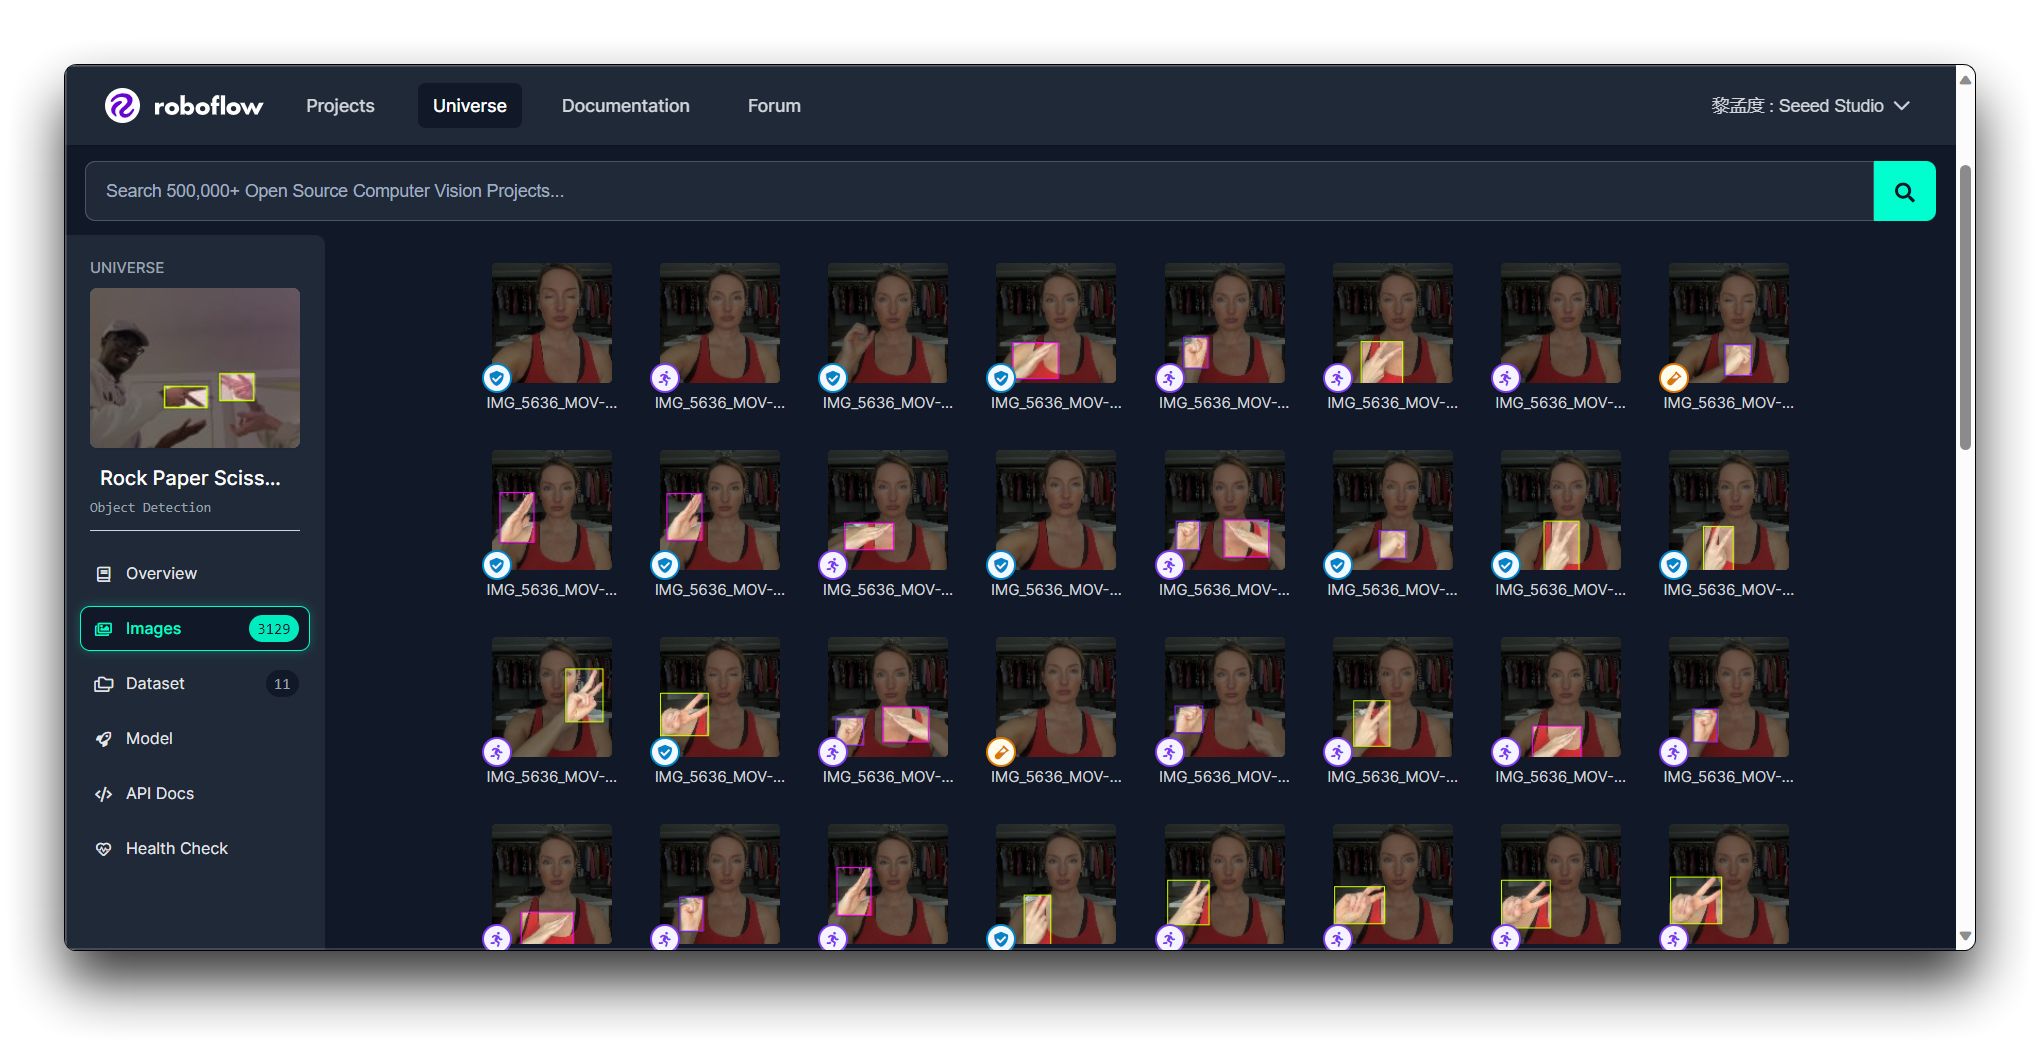
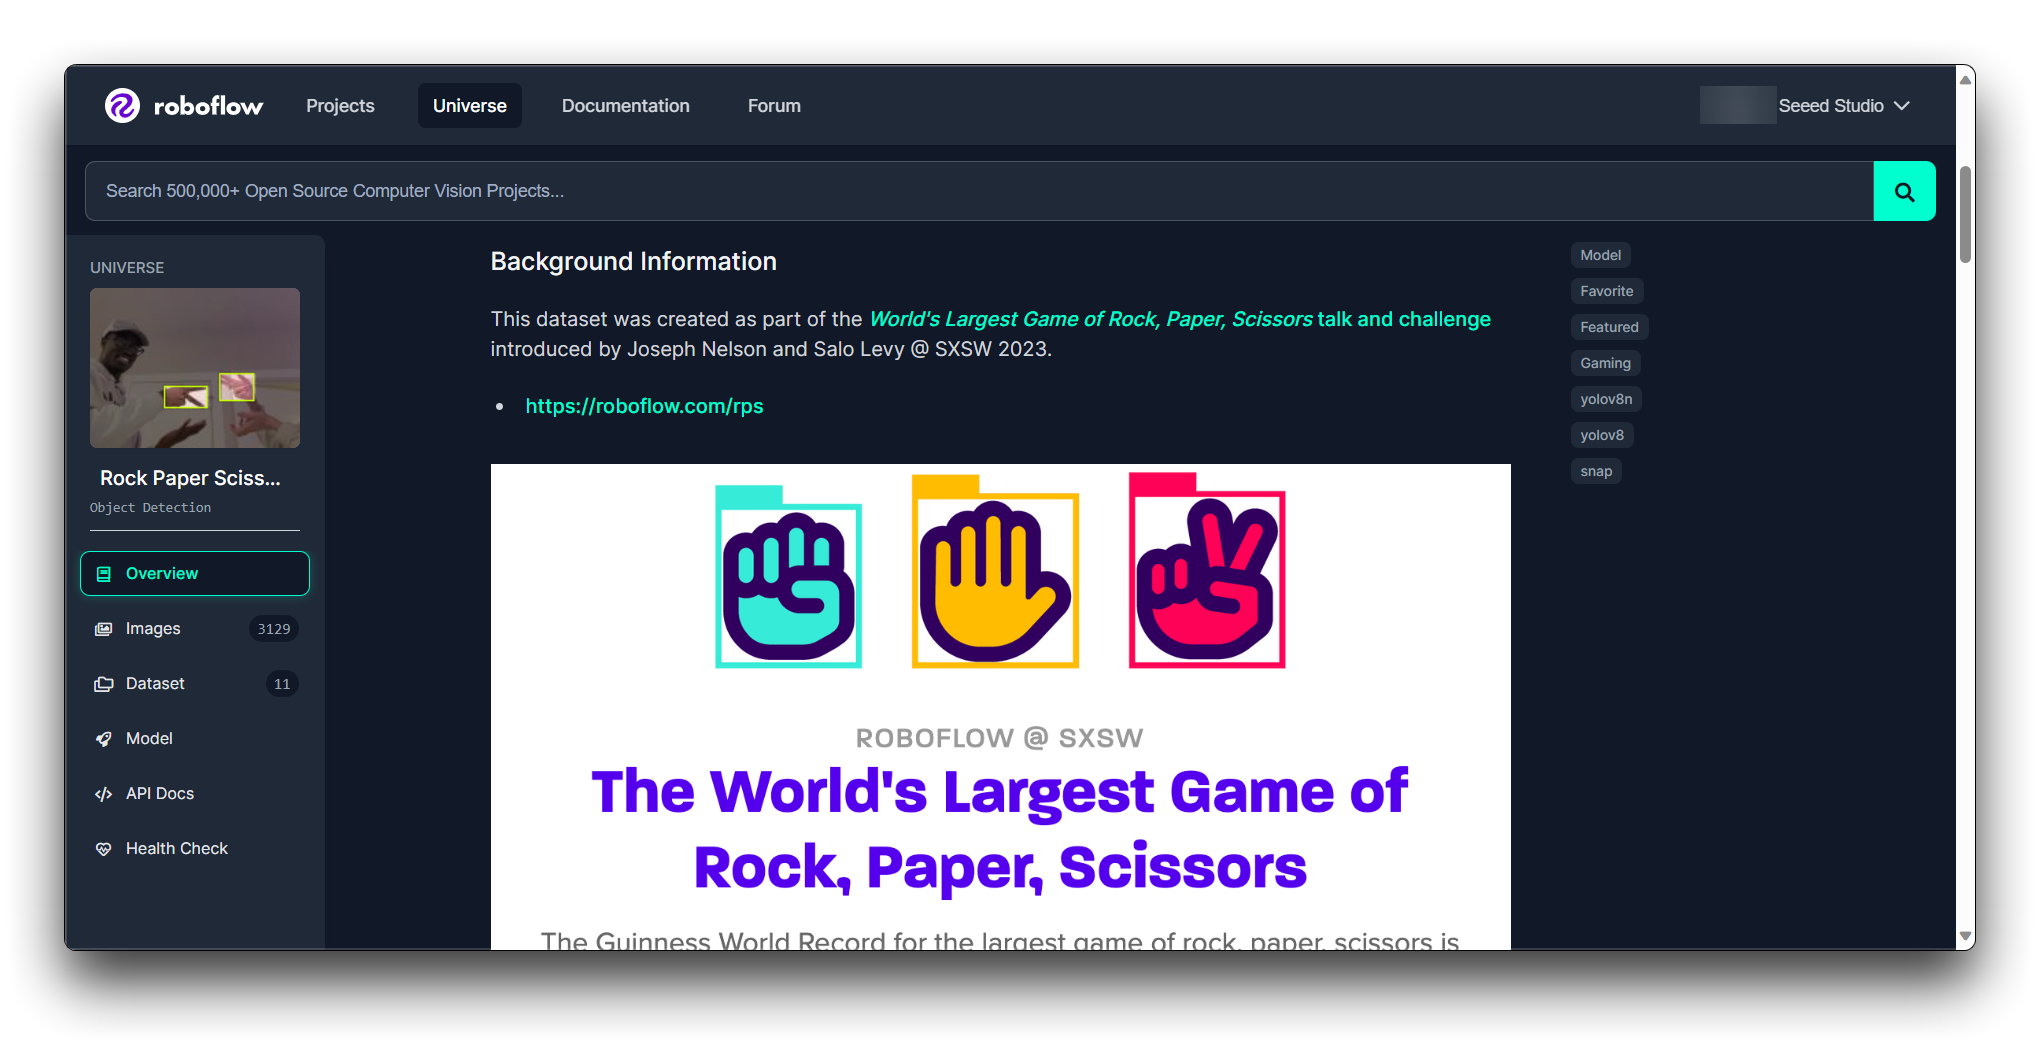
Here, I will use the rock-paper-scissors gesture image as a demo to guide you through the tasks of image uploading, labelling and exporting a dataset at Roboflow.
We highly recommend that you use XIAO ESP32S3 to take pictures of your dataset, which is best for XIAO ESP32S3. A sample programme for XIAO ESP32S3 Sense to take photos can be found in the Wiki link below.
Step 2. Creating a New Project and Uploading images
Once you've logged into Roboflow, Click on Create Project.

Name your project (e.g., "Rock-Paper-Scissors"). Define your project as Object Detection. Set the Output Labels as Categorical (since Rock, Paper, and Scissors are distinct categories).

Now it's time to upload your hand gesture images.
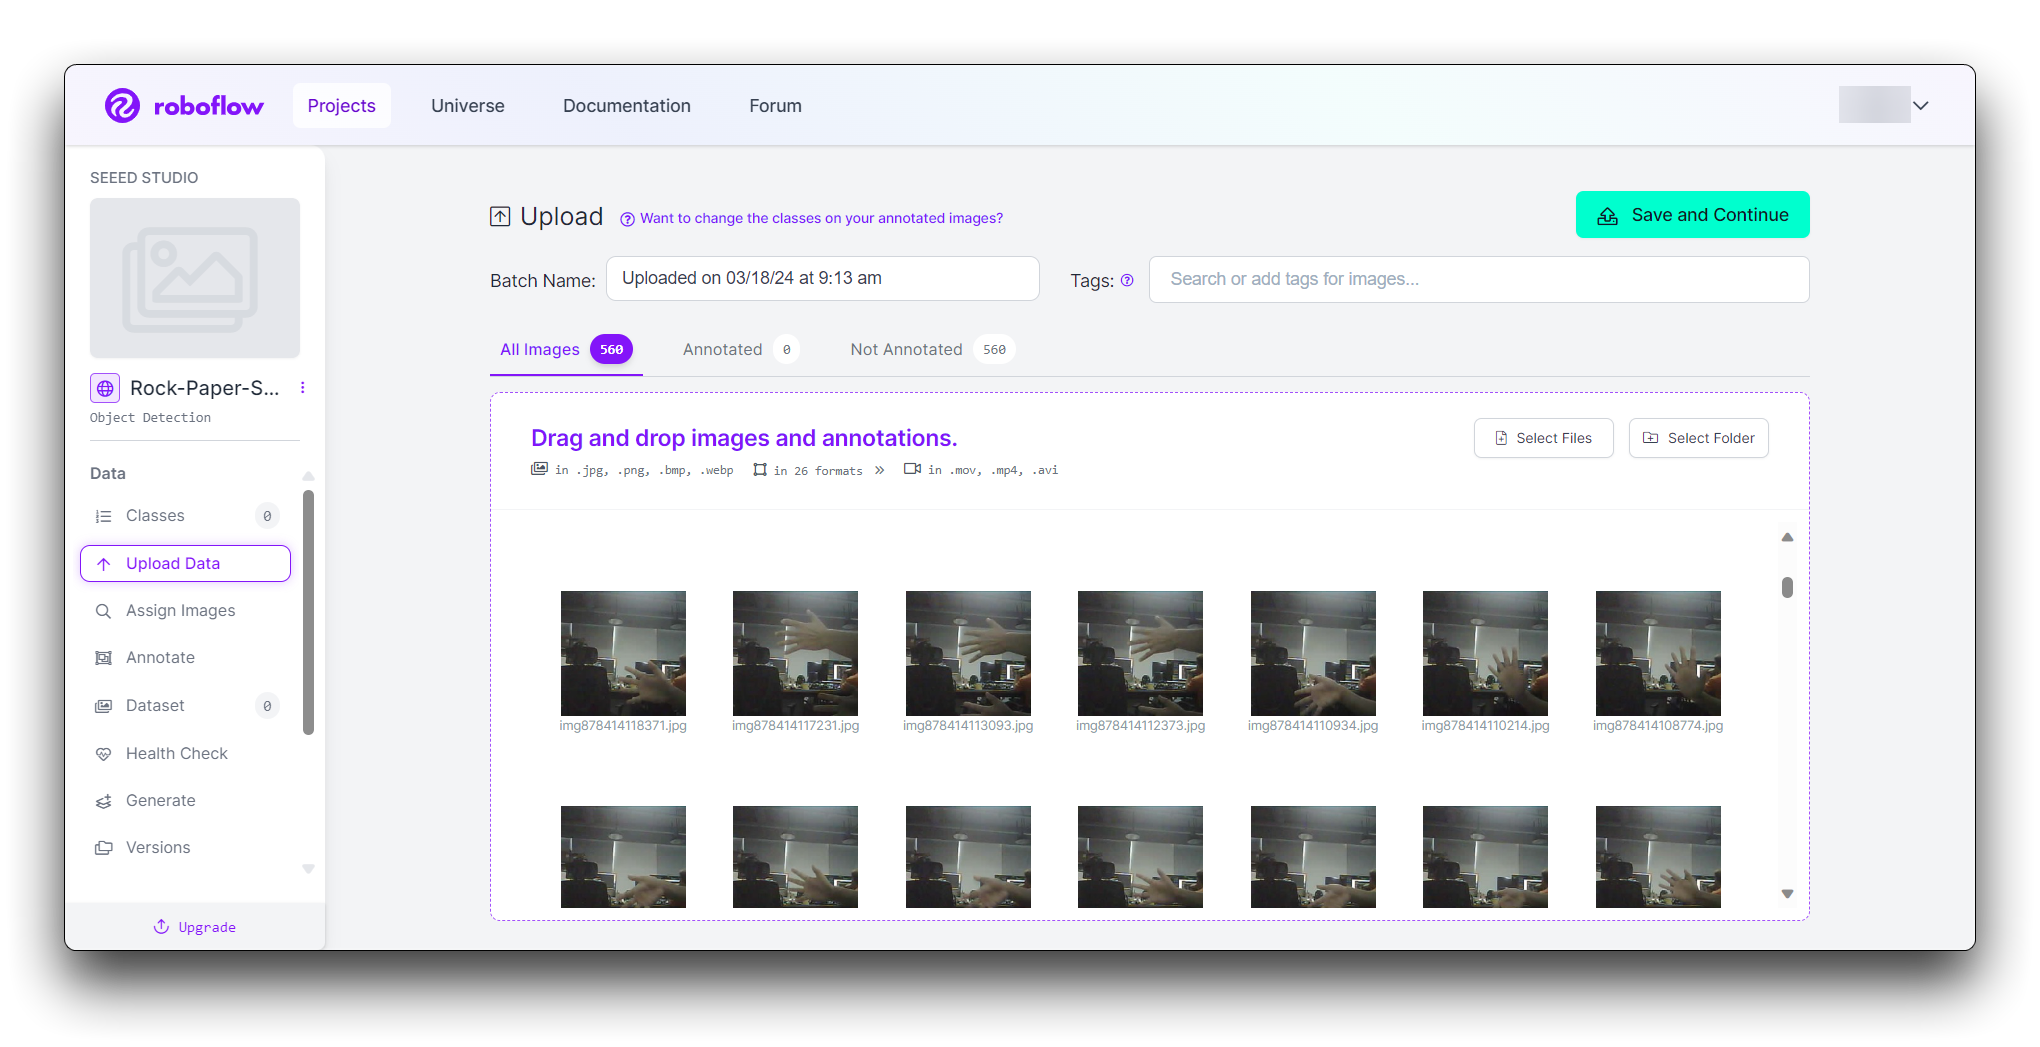
Collect images of the rock, paper, and scissors gestures. Ensure you have a variety of backgrounds and lighting conditions. On your project page, click "Add Images".
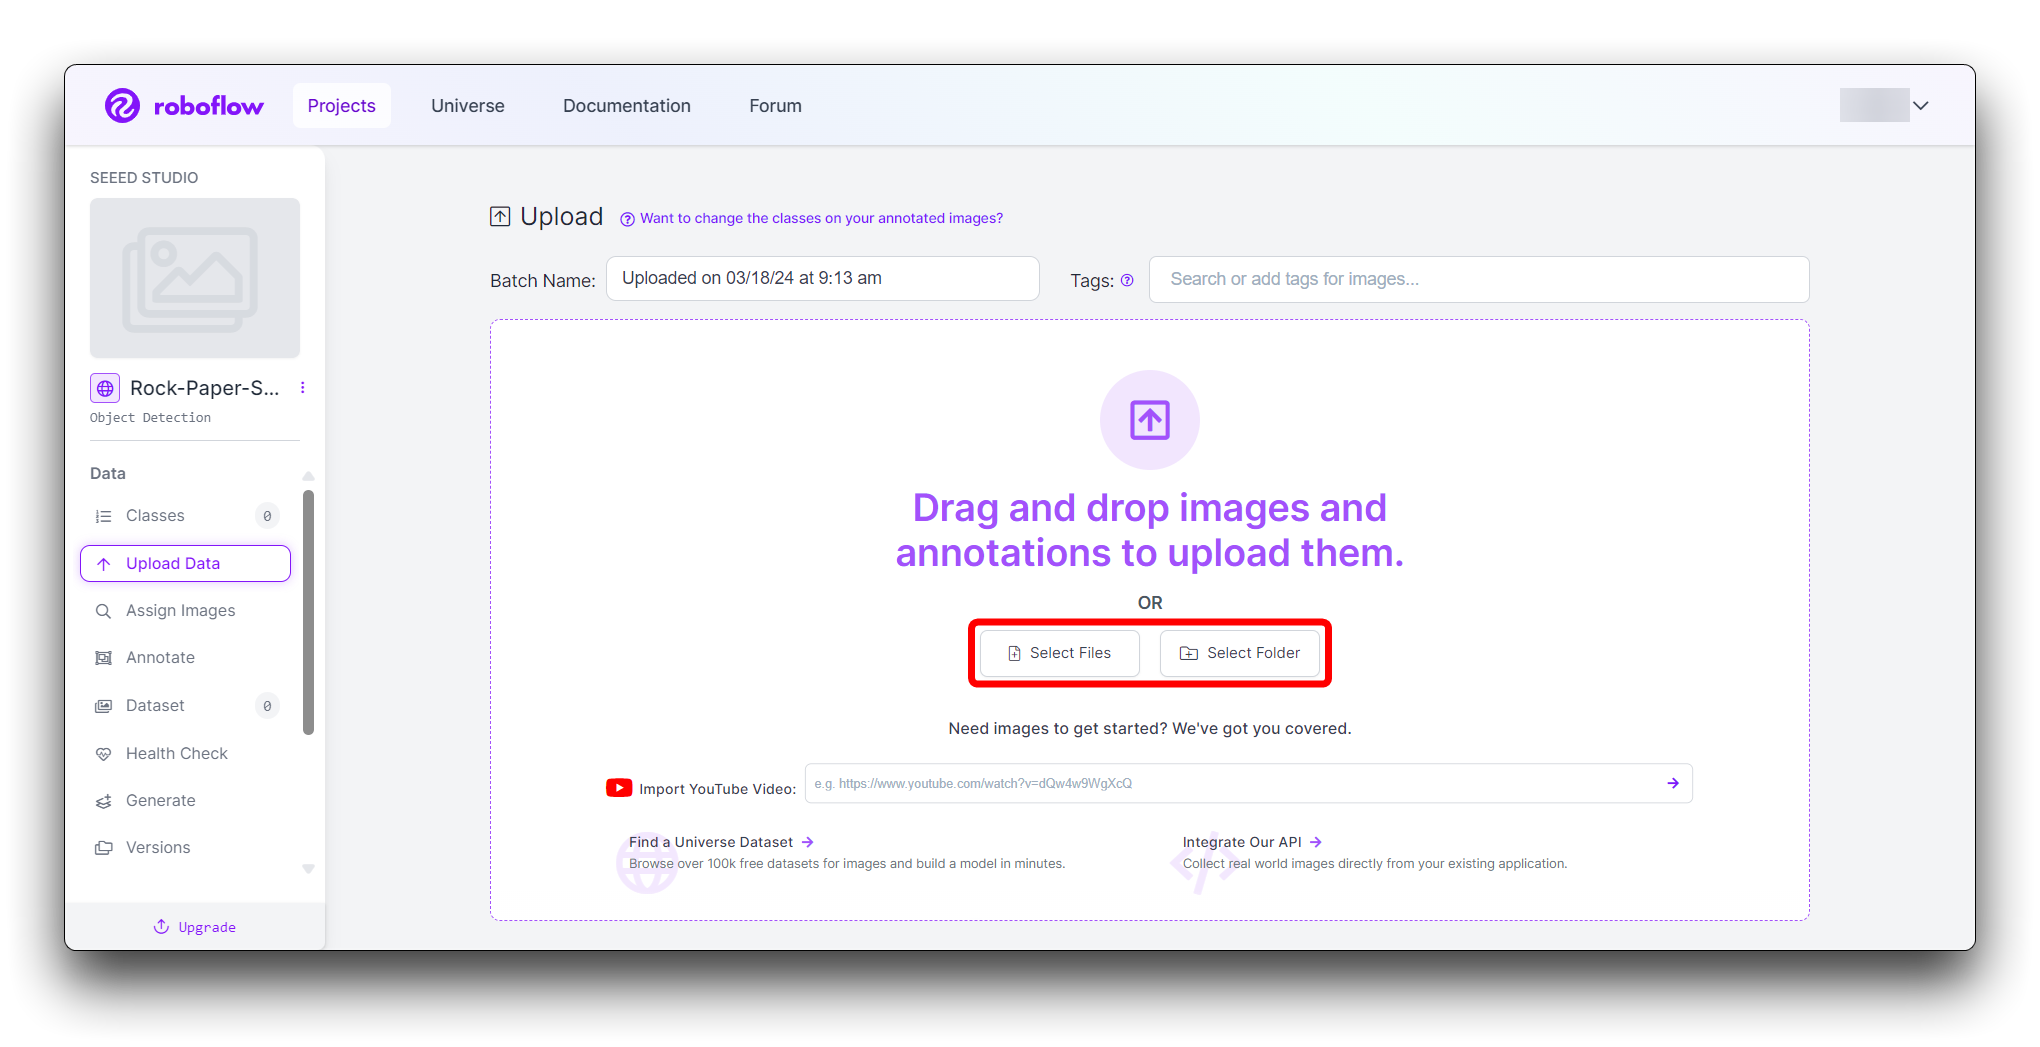
You can drag and drop your images or select them from your computer. Upload at least 100 images of each gesture for a robust dataset.
How is the dataset size determined?
It generally depends on a variety of factors: task model, task complexity, data purity, and so on. For example, the human body detection model involves a large number of people, a wide range, the task is more complex, so more data need to be collected. Another example is the gesture detection model, which only needs to detect the three types of "rock", "scissors" and "cloth", and requires fewer categories, so the data set collected is about 500.
Step 3: Annotating Images
After uploading, you'll need to annotate the images by labeling the hand gestures.
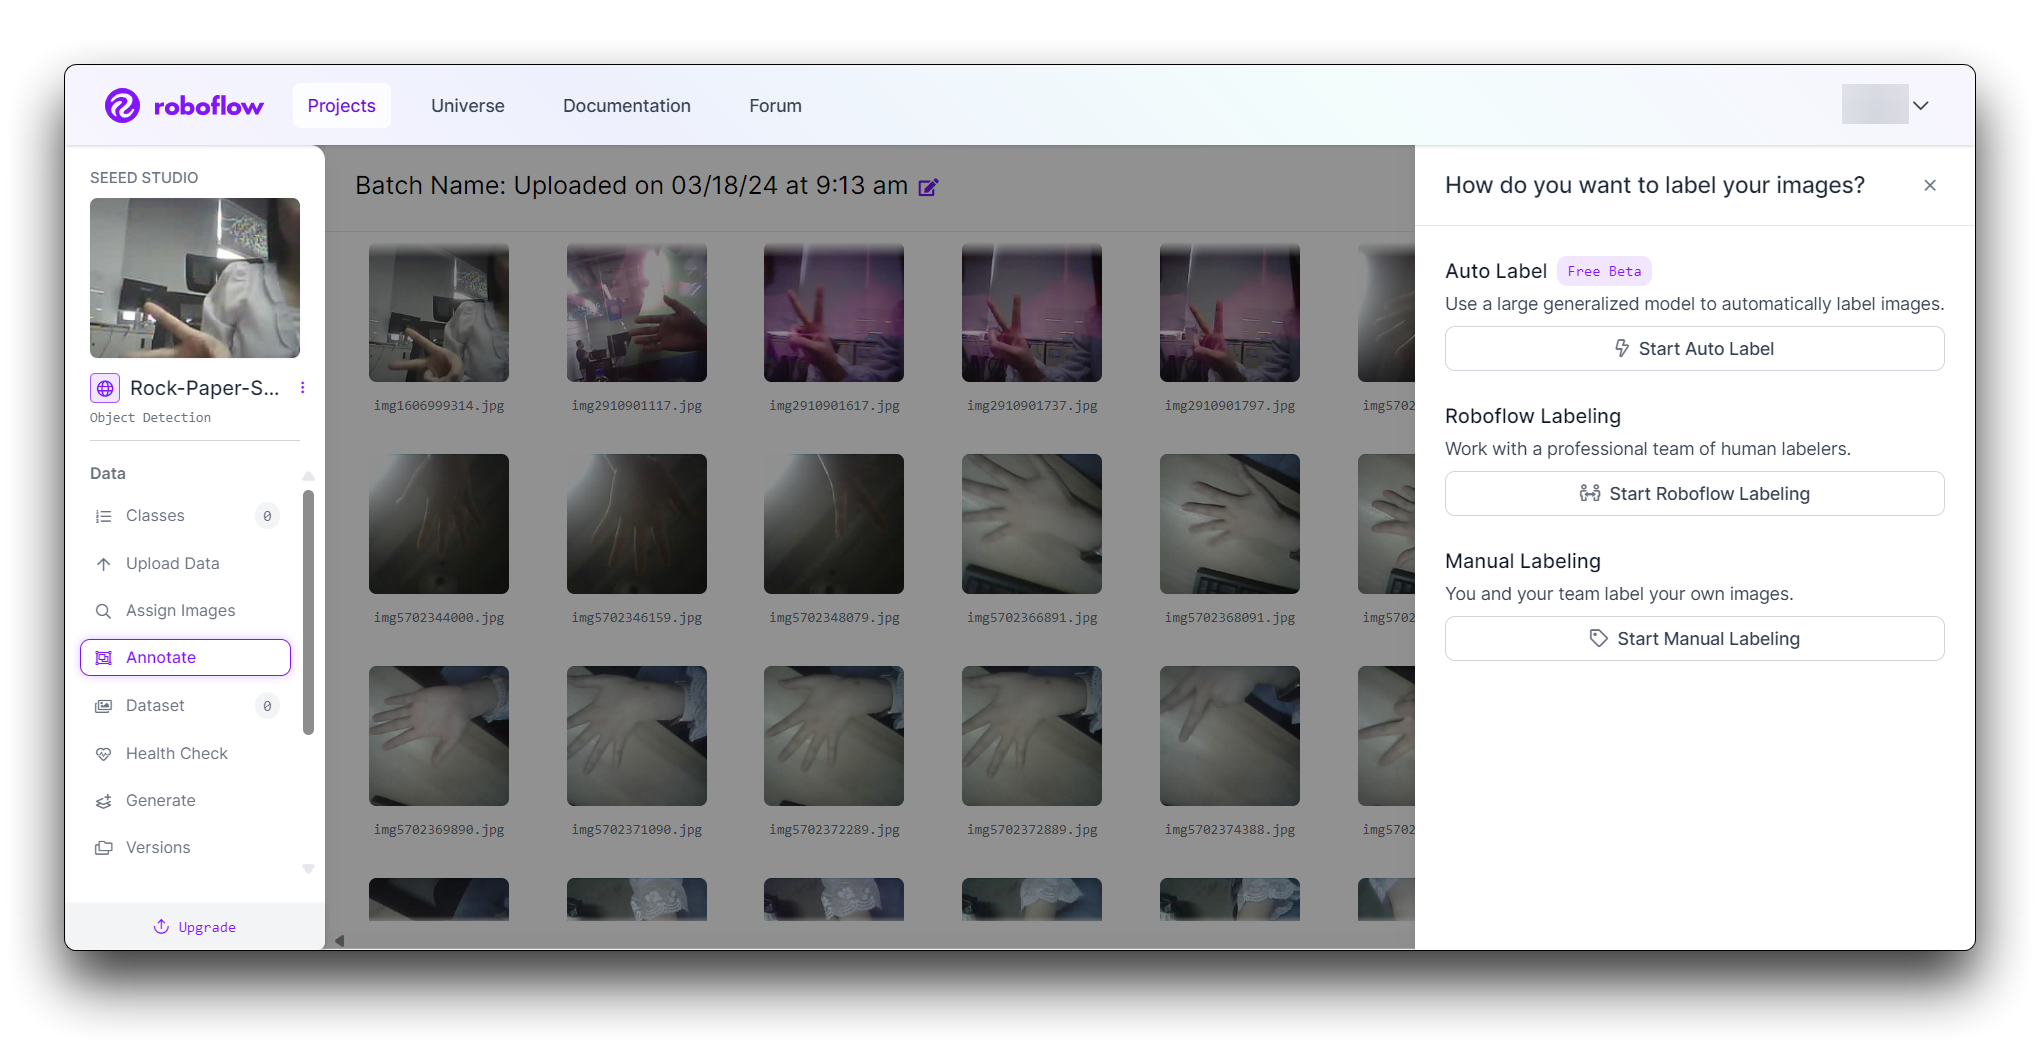
Roboflow offers three different ways of labelling images: Auto Label, Roboflow Labeling and Manual Labeling.
- Auto Label: Use a large generalized model to automatically label images.
- Roboflow Labeling: Work with a professional team of human labelers. No minimum volumes. No upfront commitments. Bounding Box annotations start at $0.04 and Polygon annotations start at $0.08.
- Manual Labeling: You and your team label your own images.
The following describes the most commonly used method of manual labelling.
Click on "Manual Labeling" button. Roboflow will load the annotation interface.
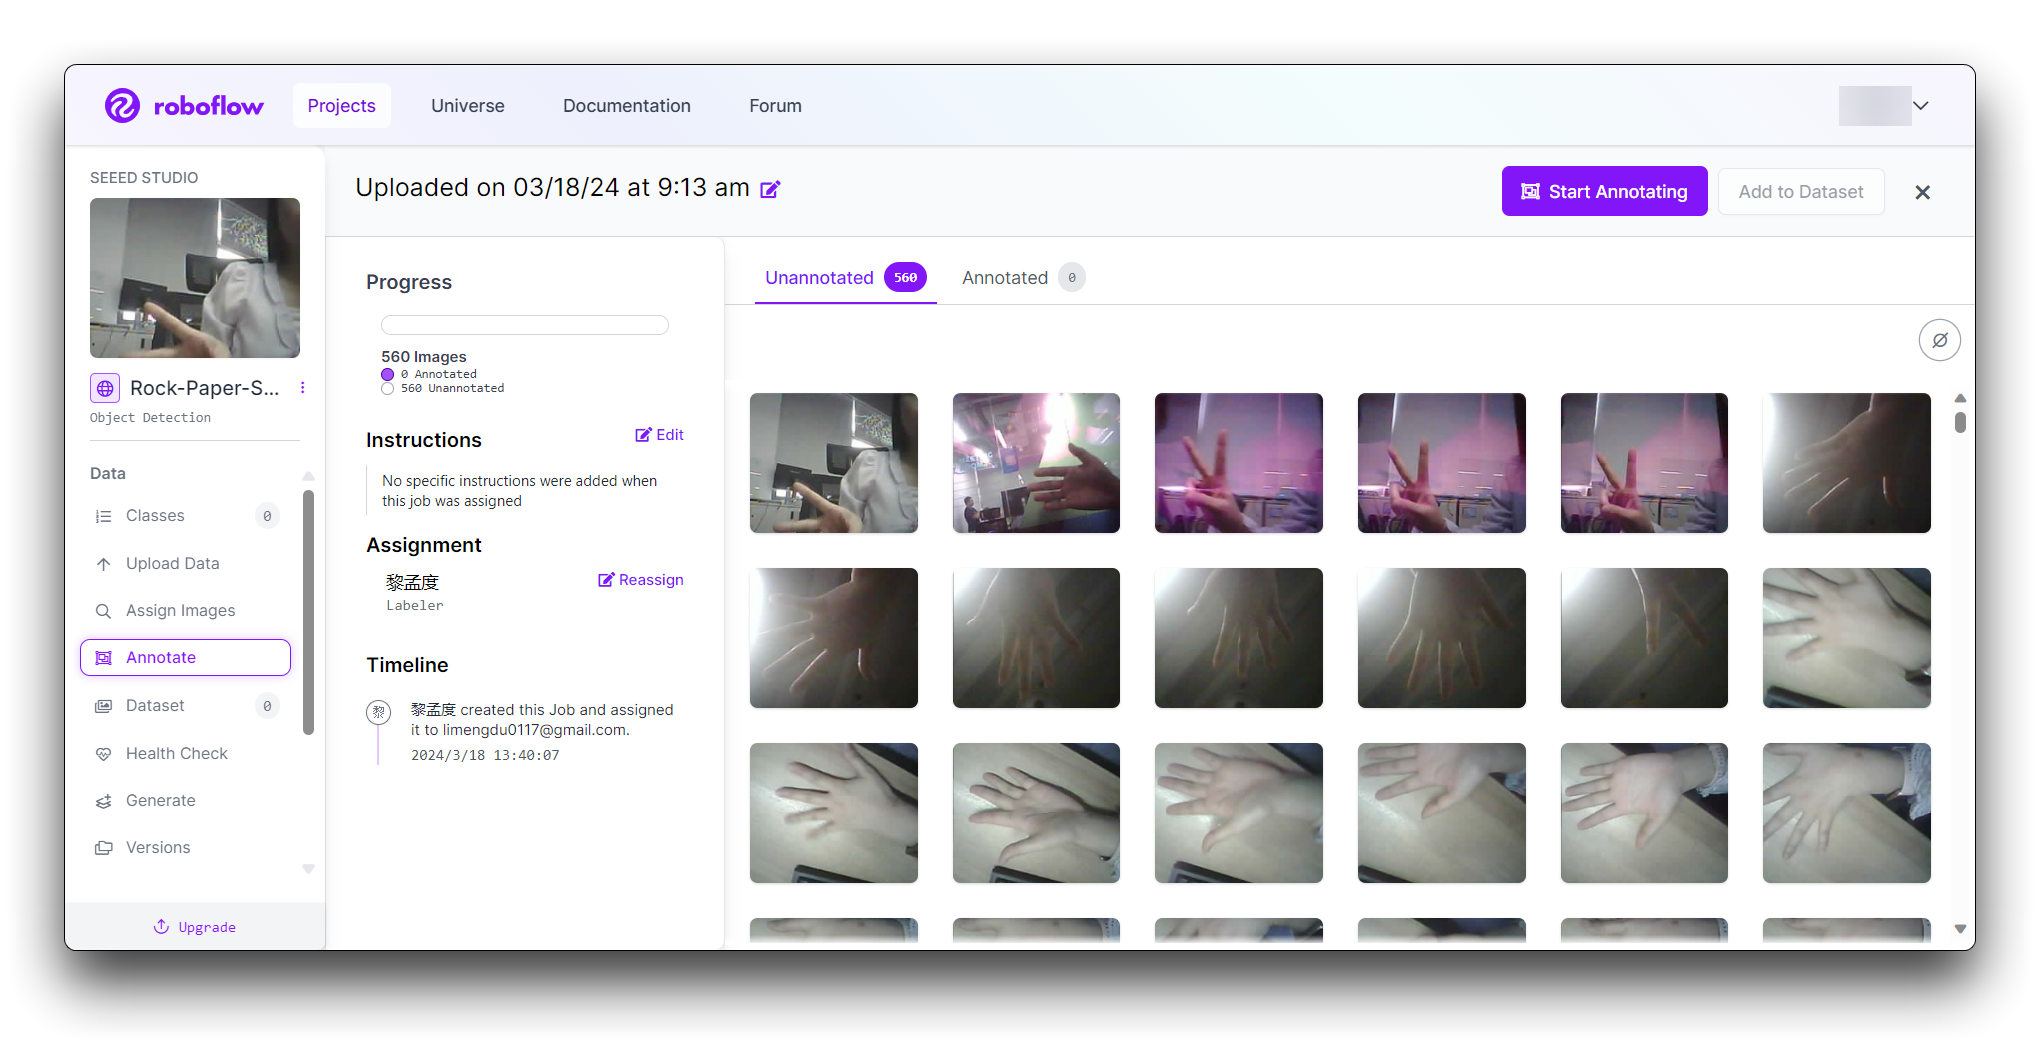
Select the "Start Annotating" button. Draw bounding boxes around the hand gesture in each image.
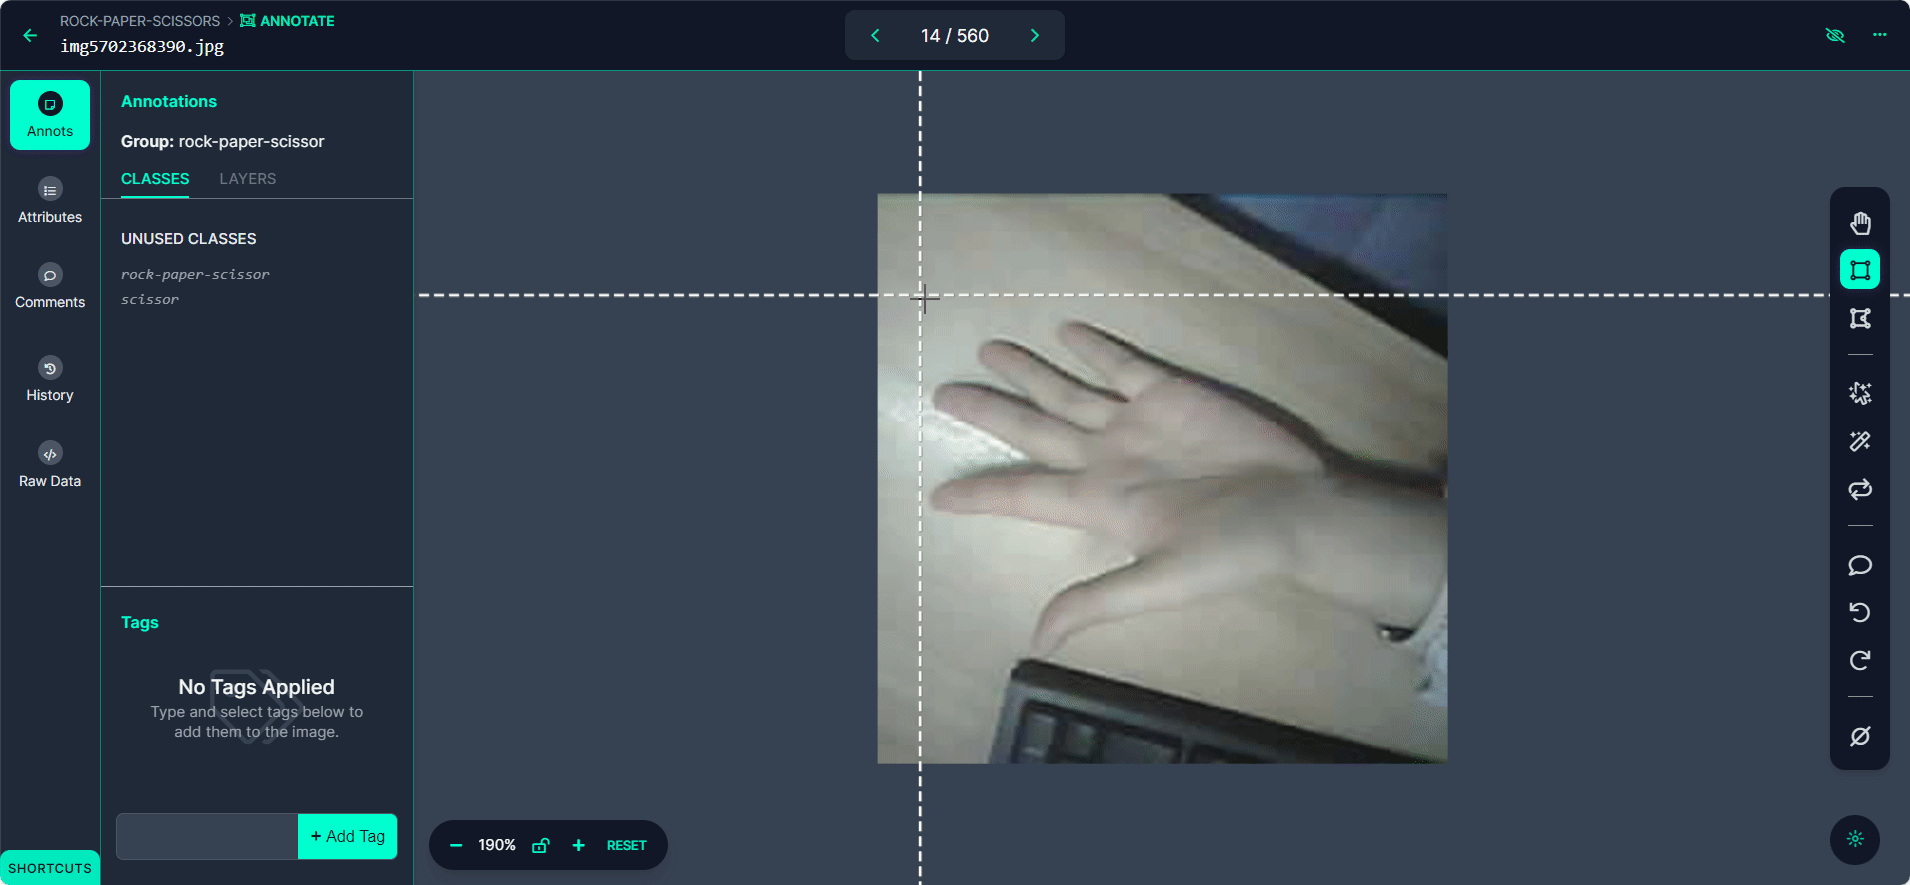
Label each bounding box as "Rock", "Paper", or "Scissors".
Use the ">" button to move through your dataset, repeating the annotation process for each image.
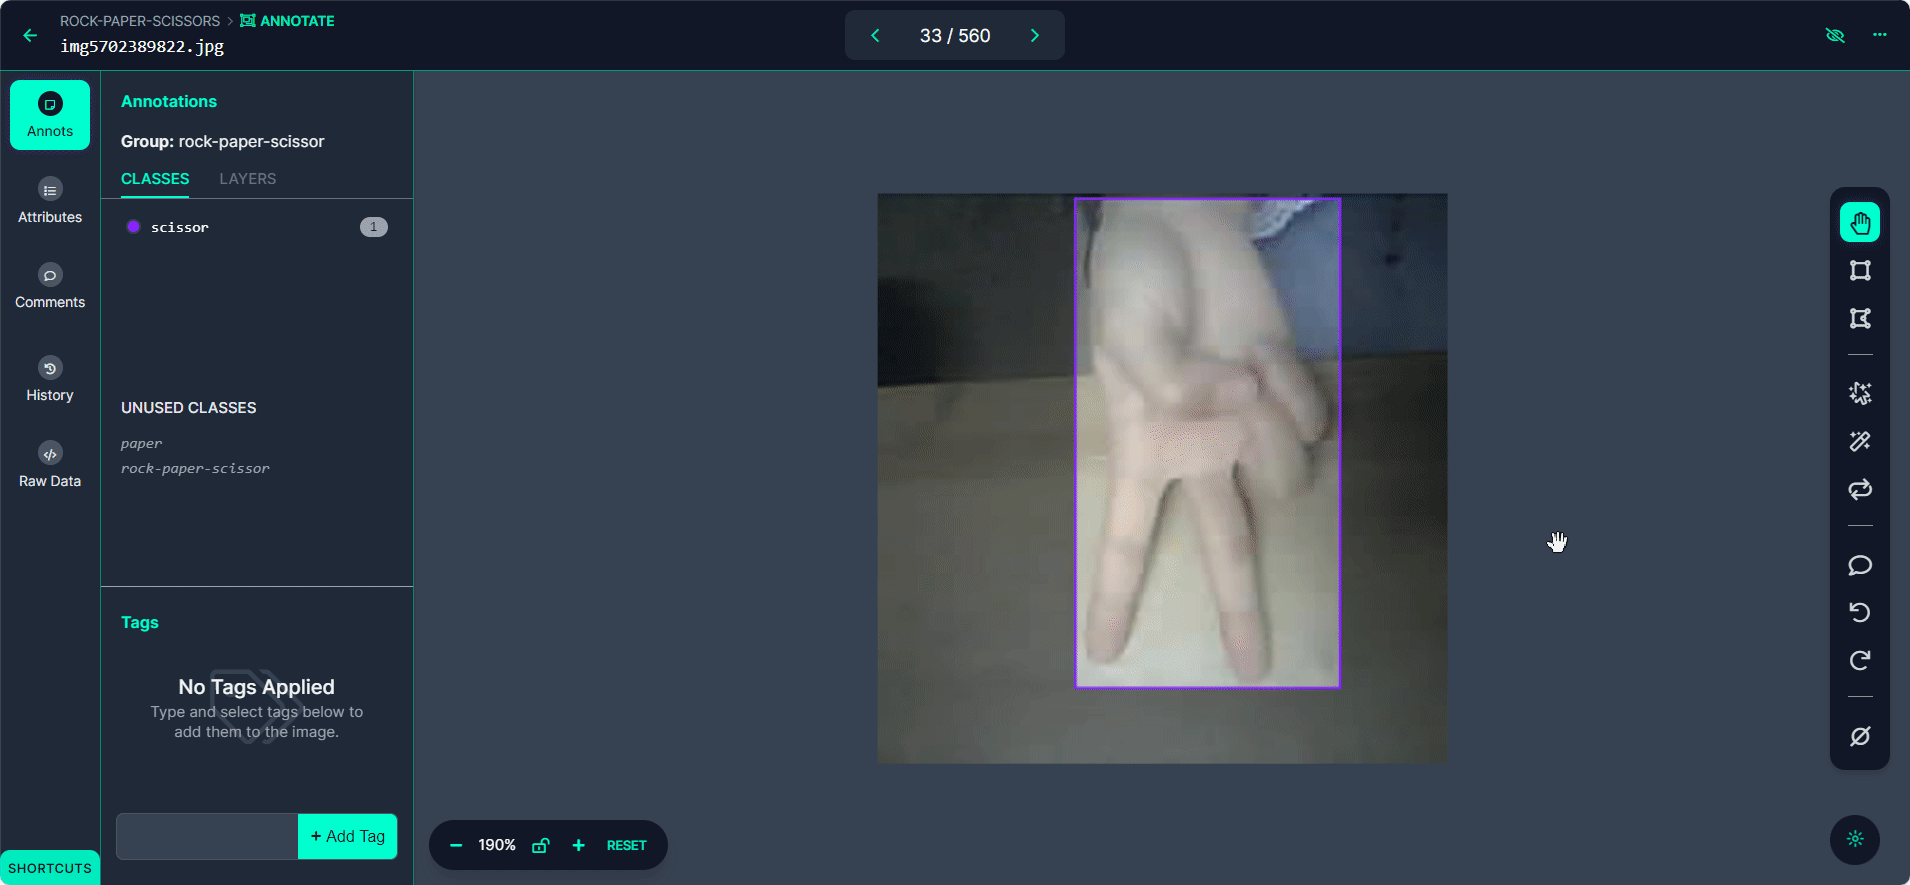
Step 4: Review and Edit Annotations
It's essential to ensure annotations are accurate.
Review each image to make sure the bounding boxes are correctly drawn and labeled. If you find any mistakes, select the annotation to adjust the bounding box or change the label.
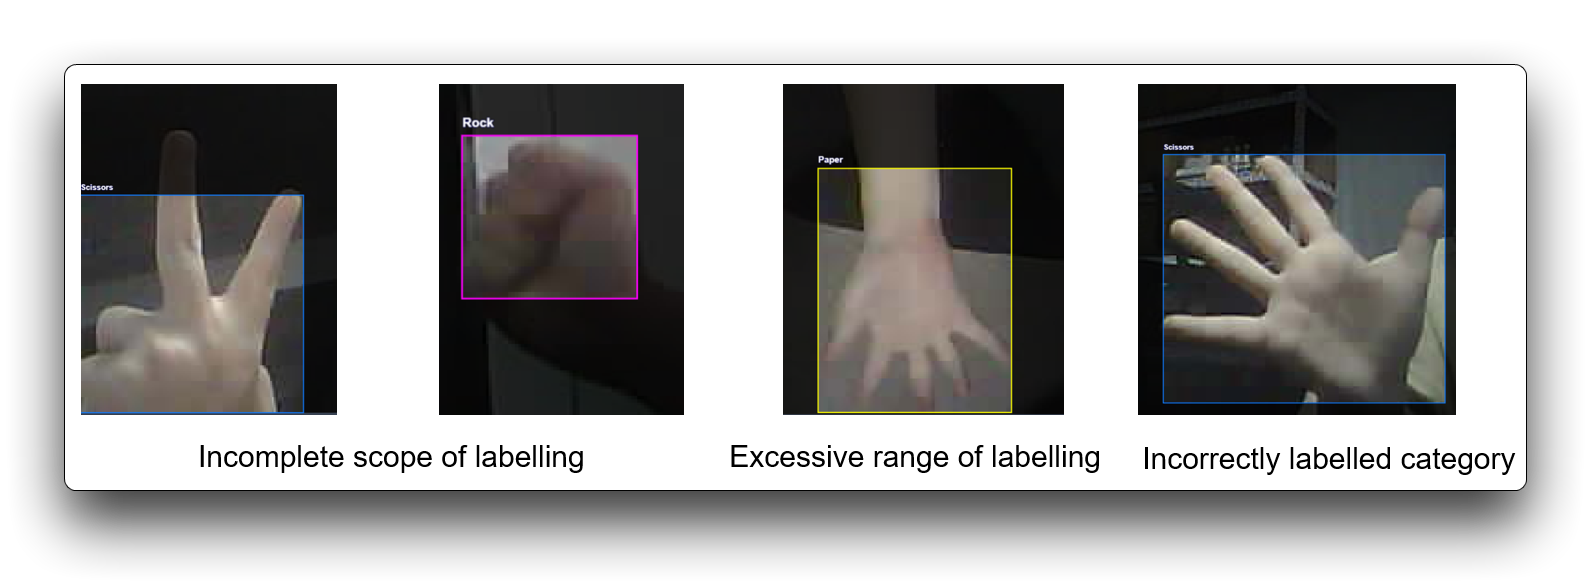
Incorrect labelling affects the overall performance of the training and can be discarded if some datasets fail to meet the labelling requirements. Here are some bad labelling demonstrations.
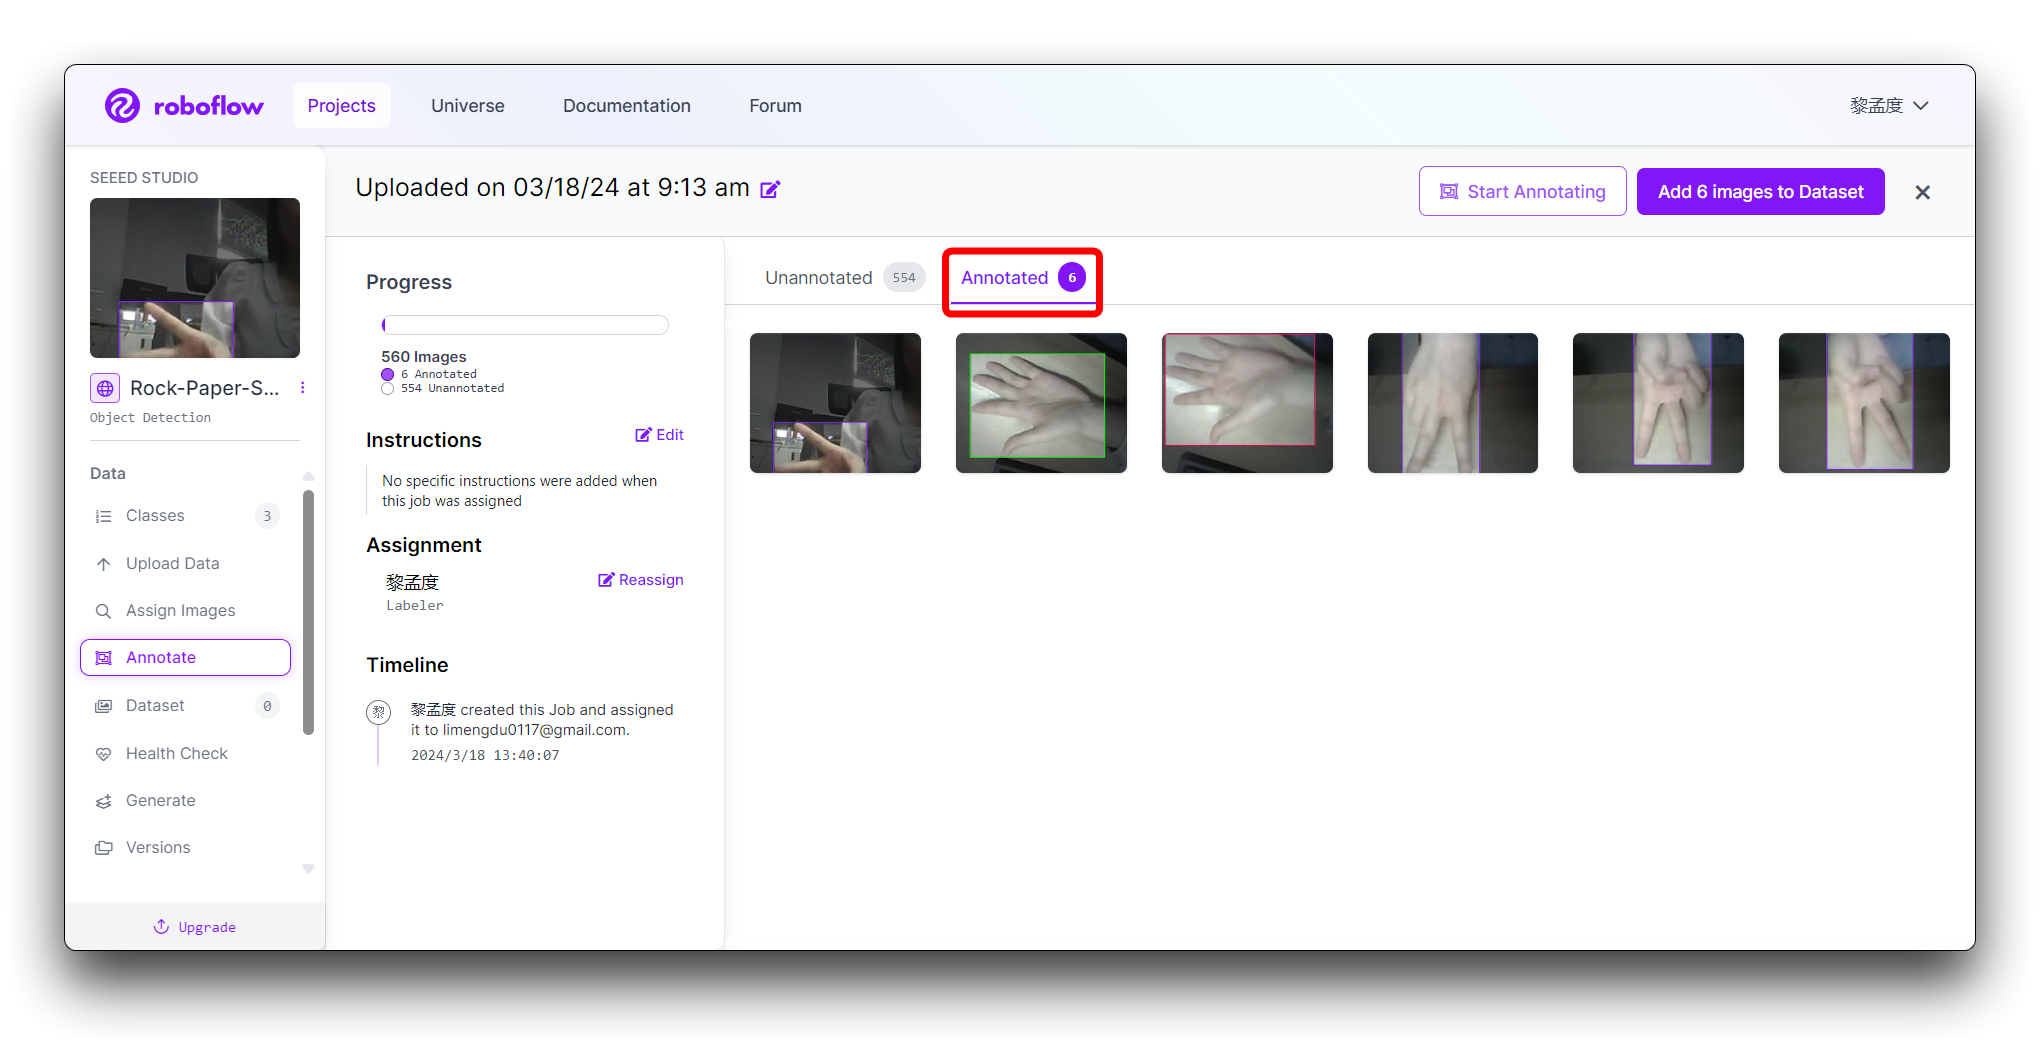
Step 5: Generating and Exporting the Dataset
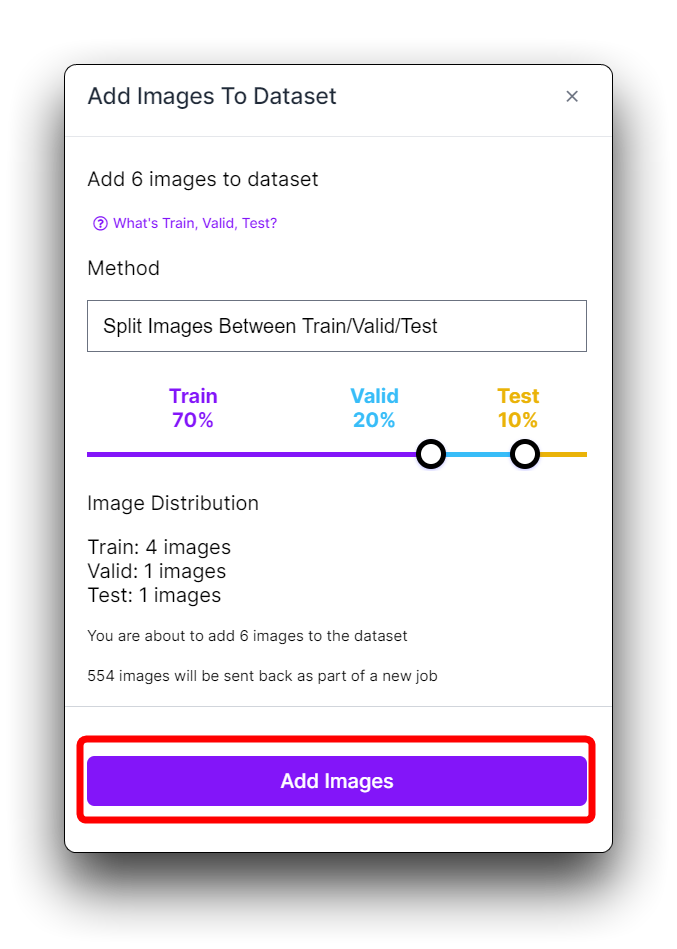
Once all images are annotated. In Annotate click the Add x images to Dataset button in the top right corner.
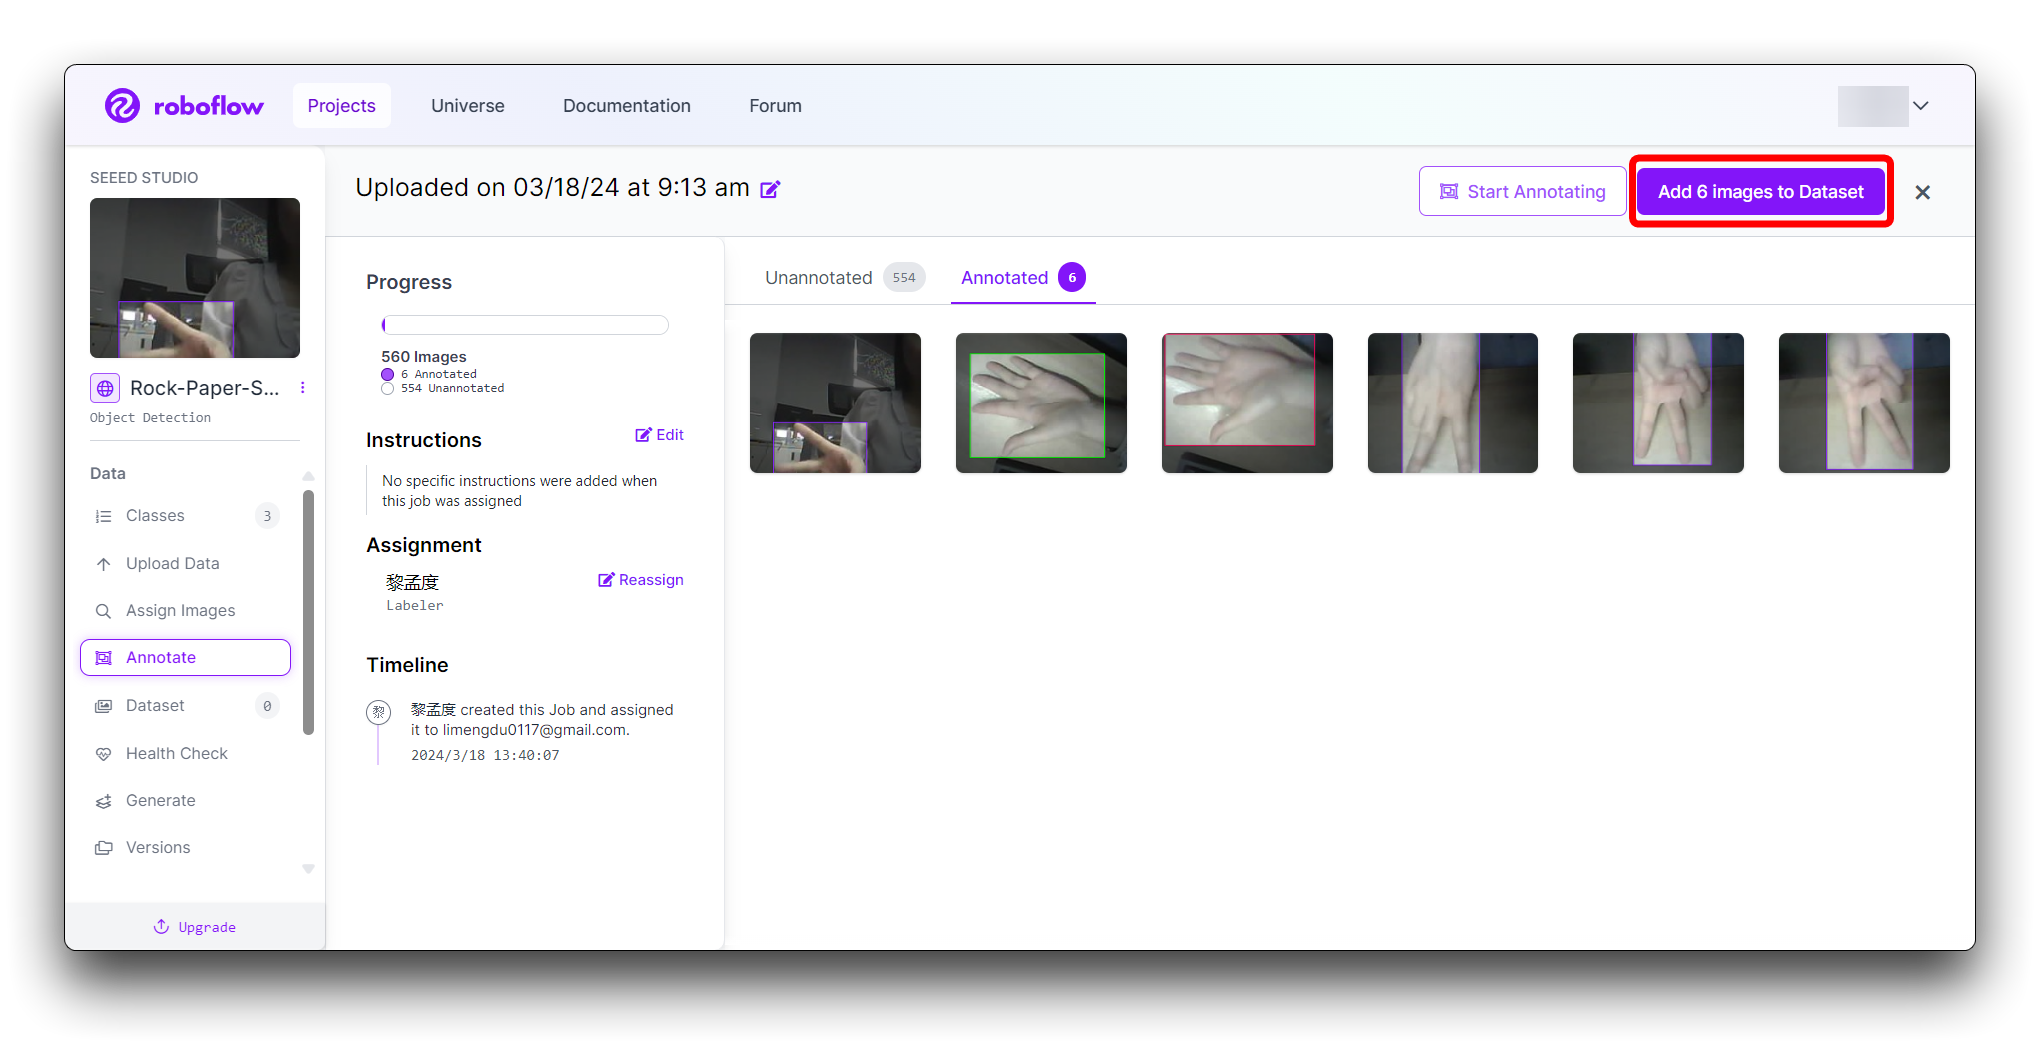
Then click the Add Images button at the bottom of the new pop-up window.
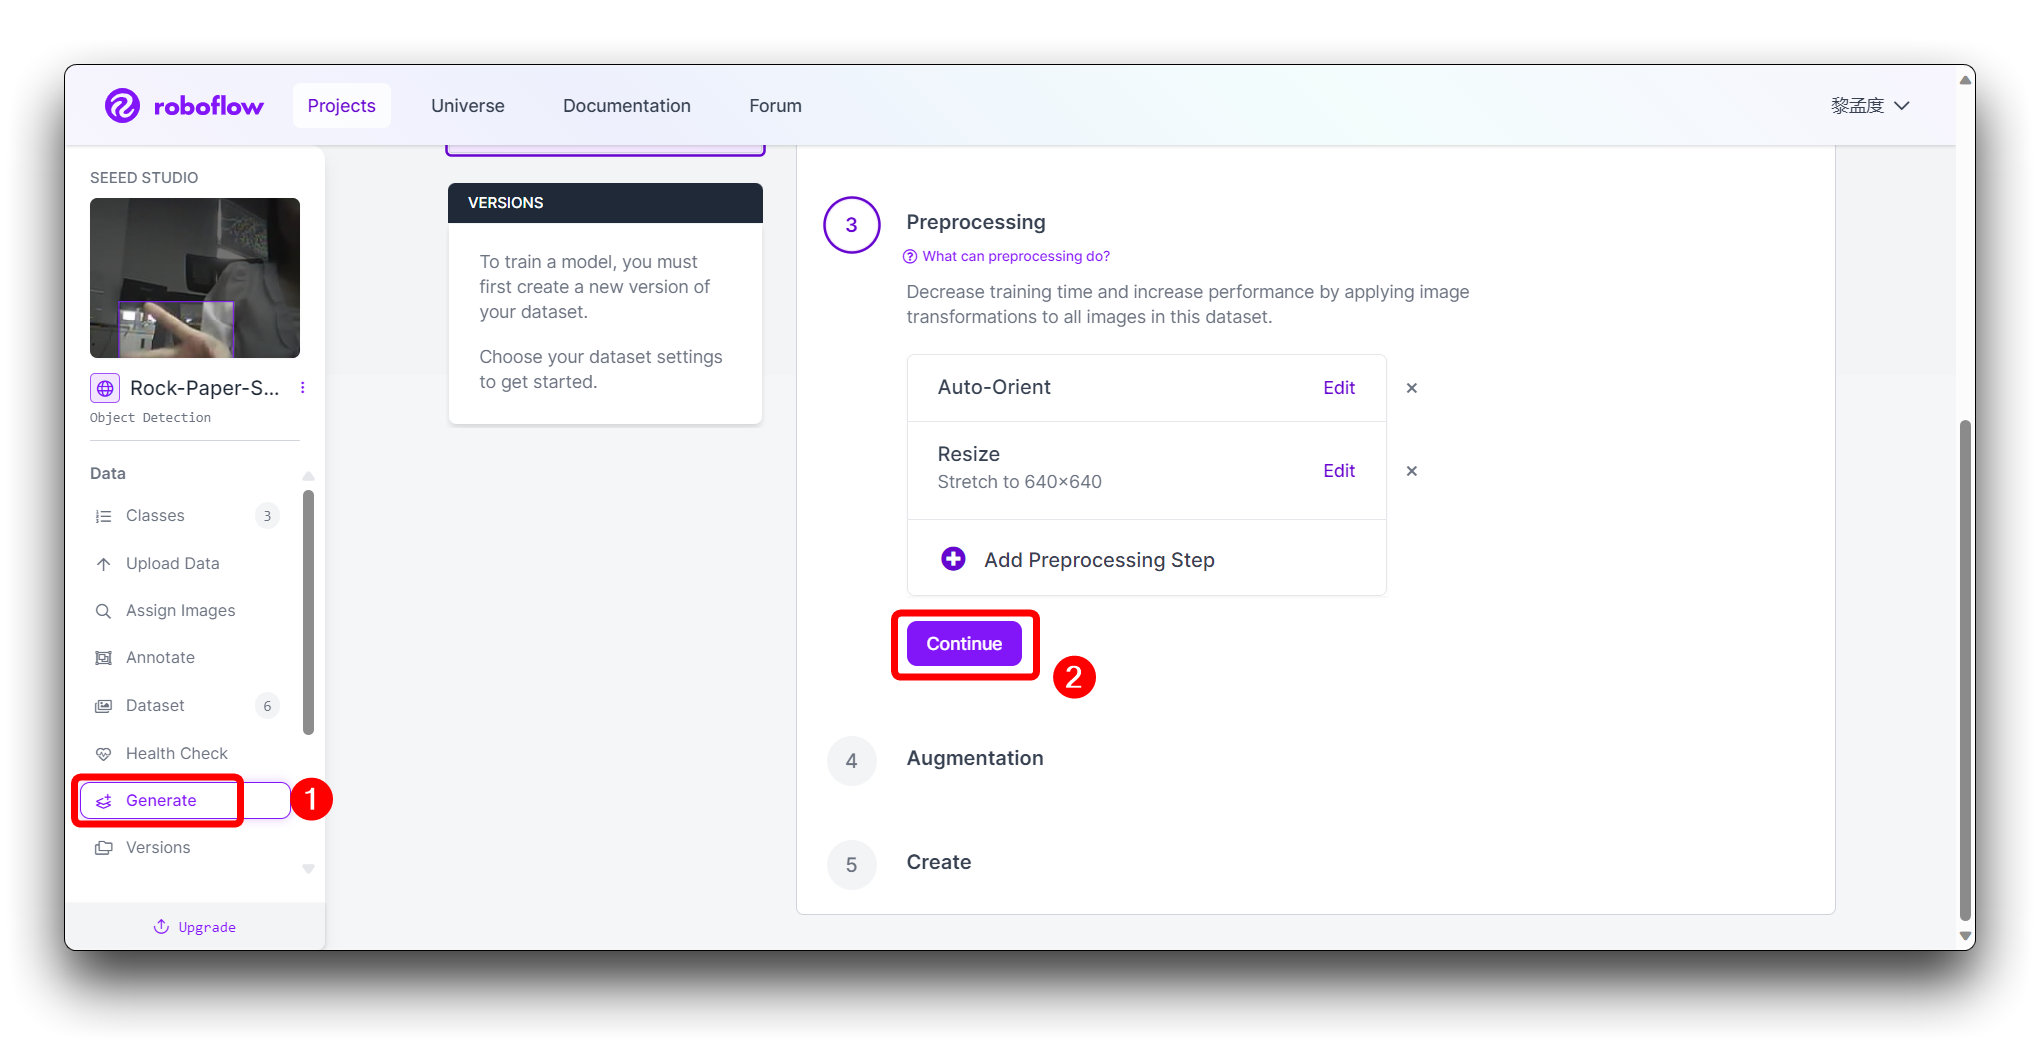
Click Generate in the left toolbar and click Continue in the third Preprocessing step.
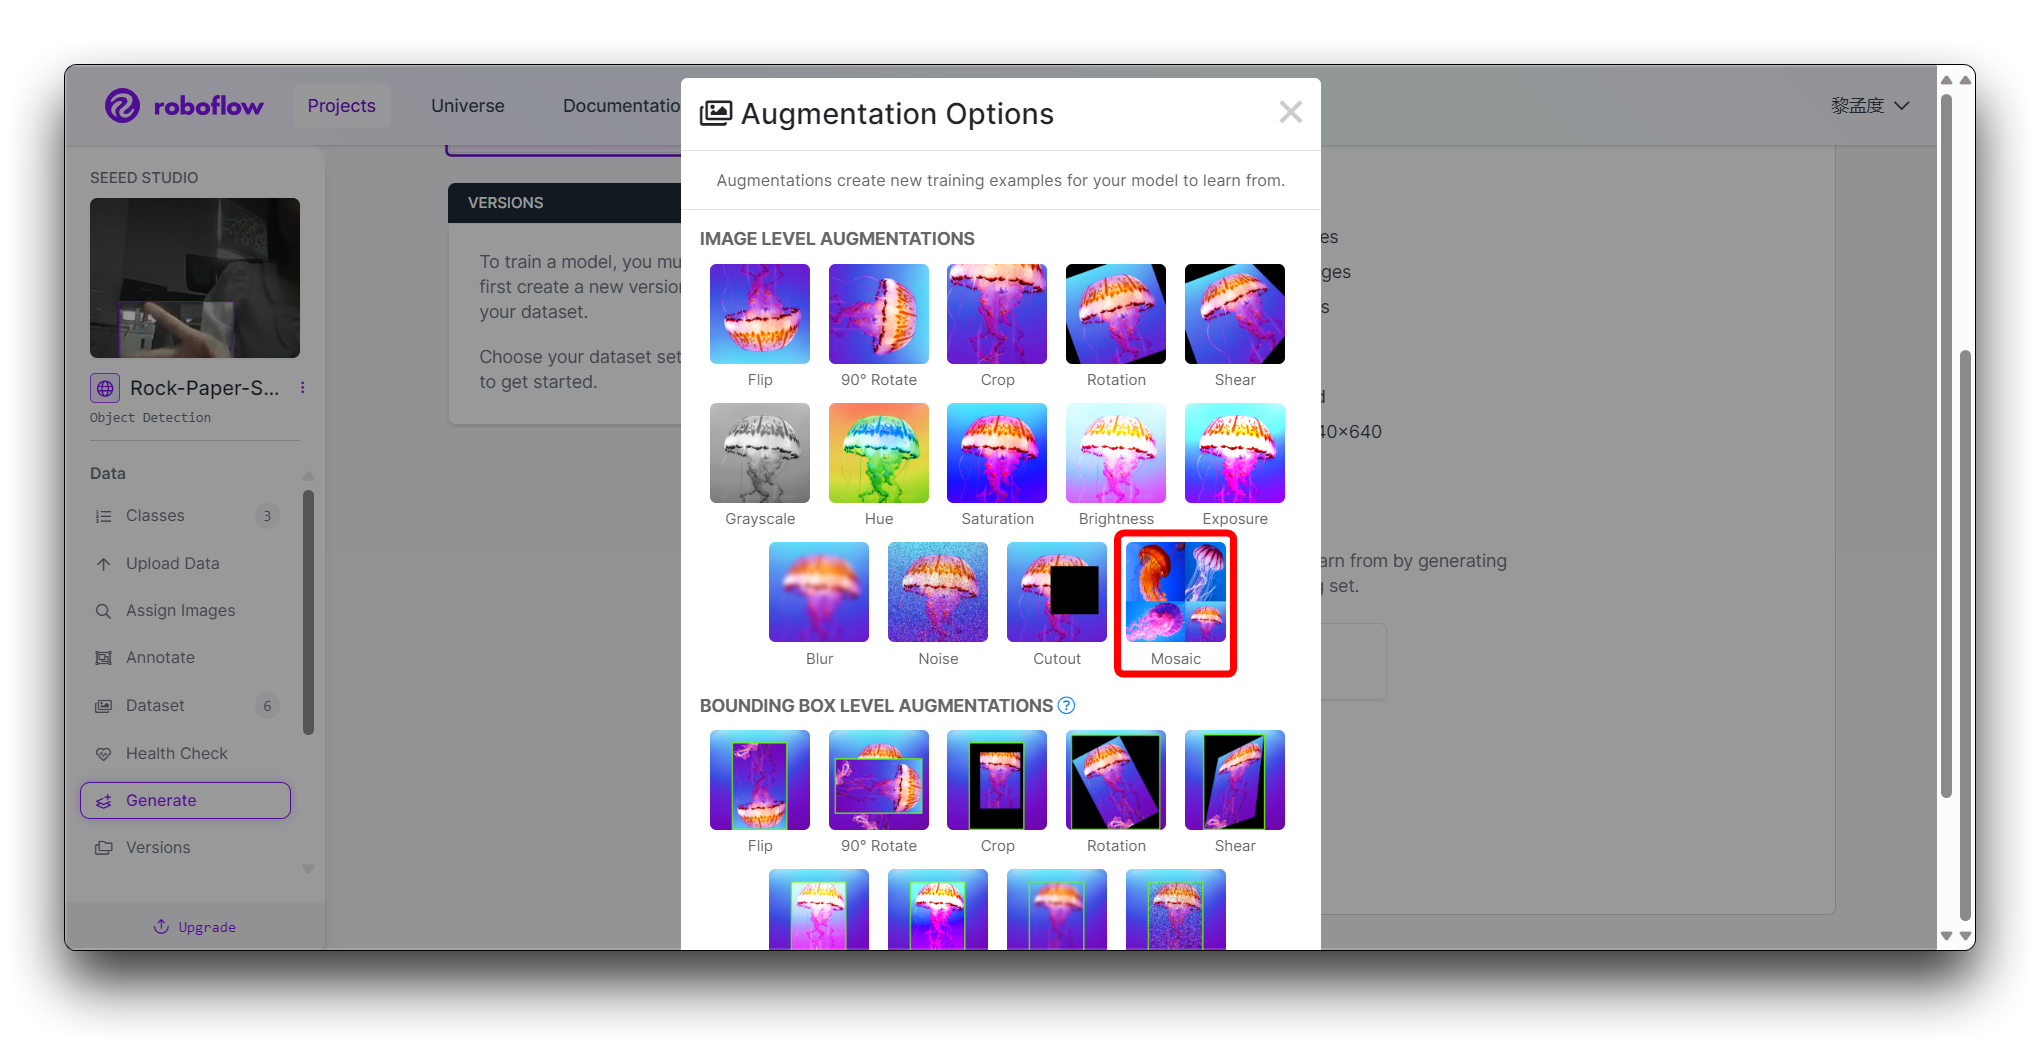
In the Augmentation in step 4, select Mosaic, which increases generalisation.
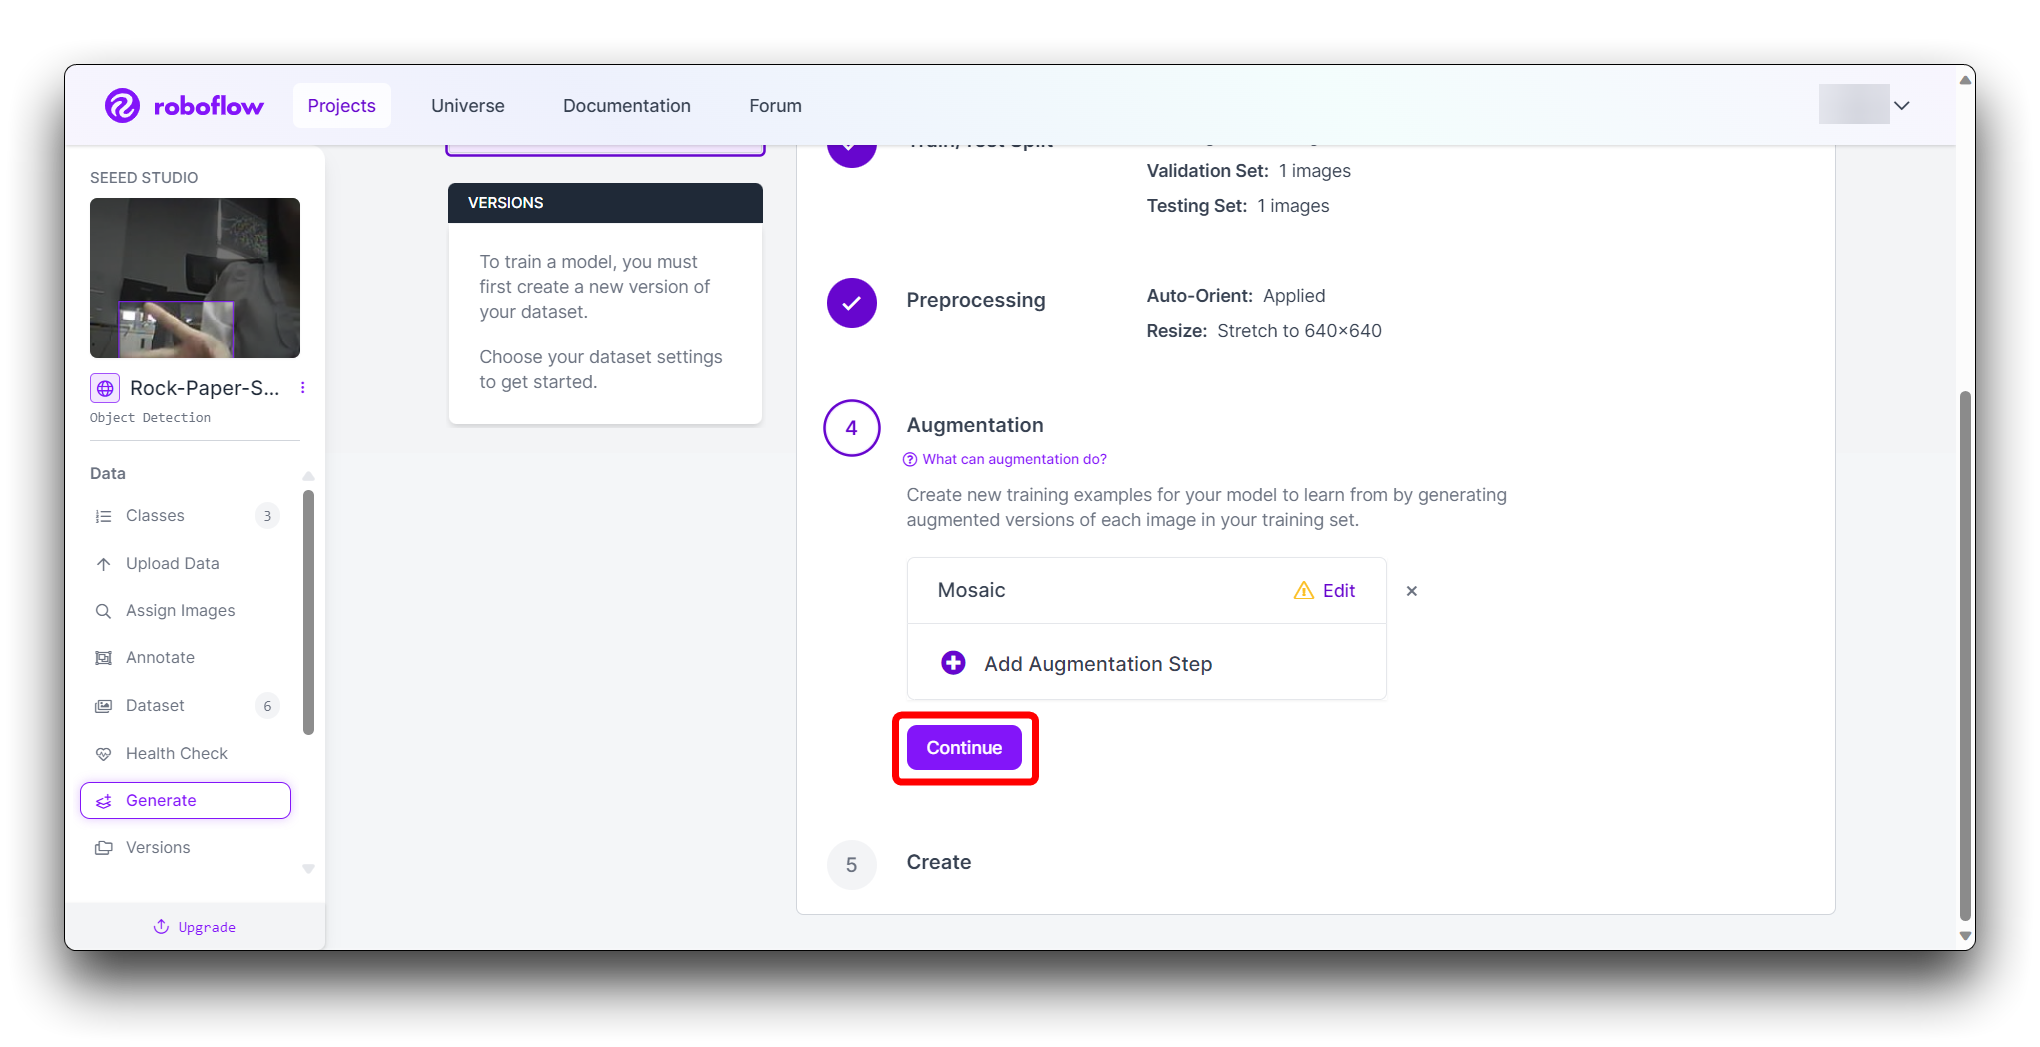
In the final Create step, please calculate the number of images reasonably according to Roboflow's boost; in general, the more images you have, the longer it takes to train the model. However, the more pictures you have will not necessarily make the model more accurate, it mainly depends on whether the dataset is good enough or not.

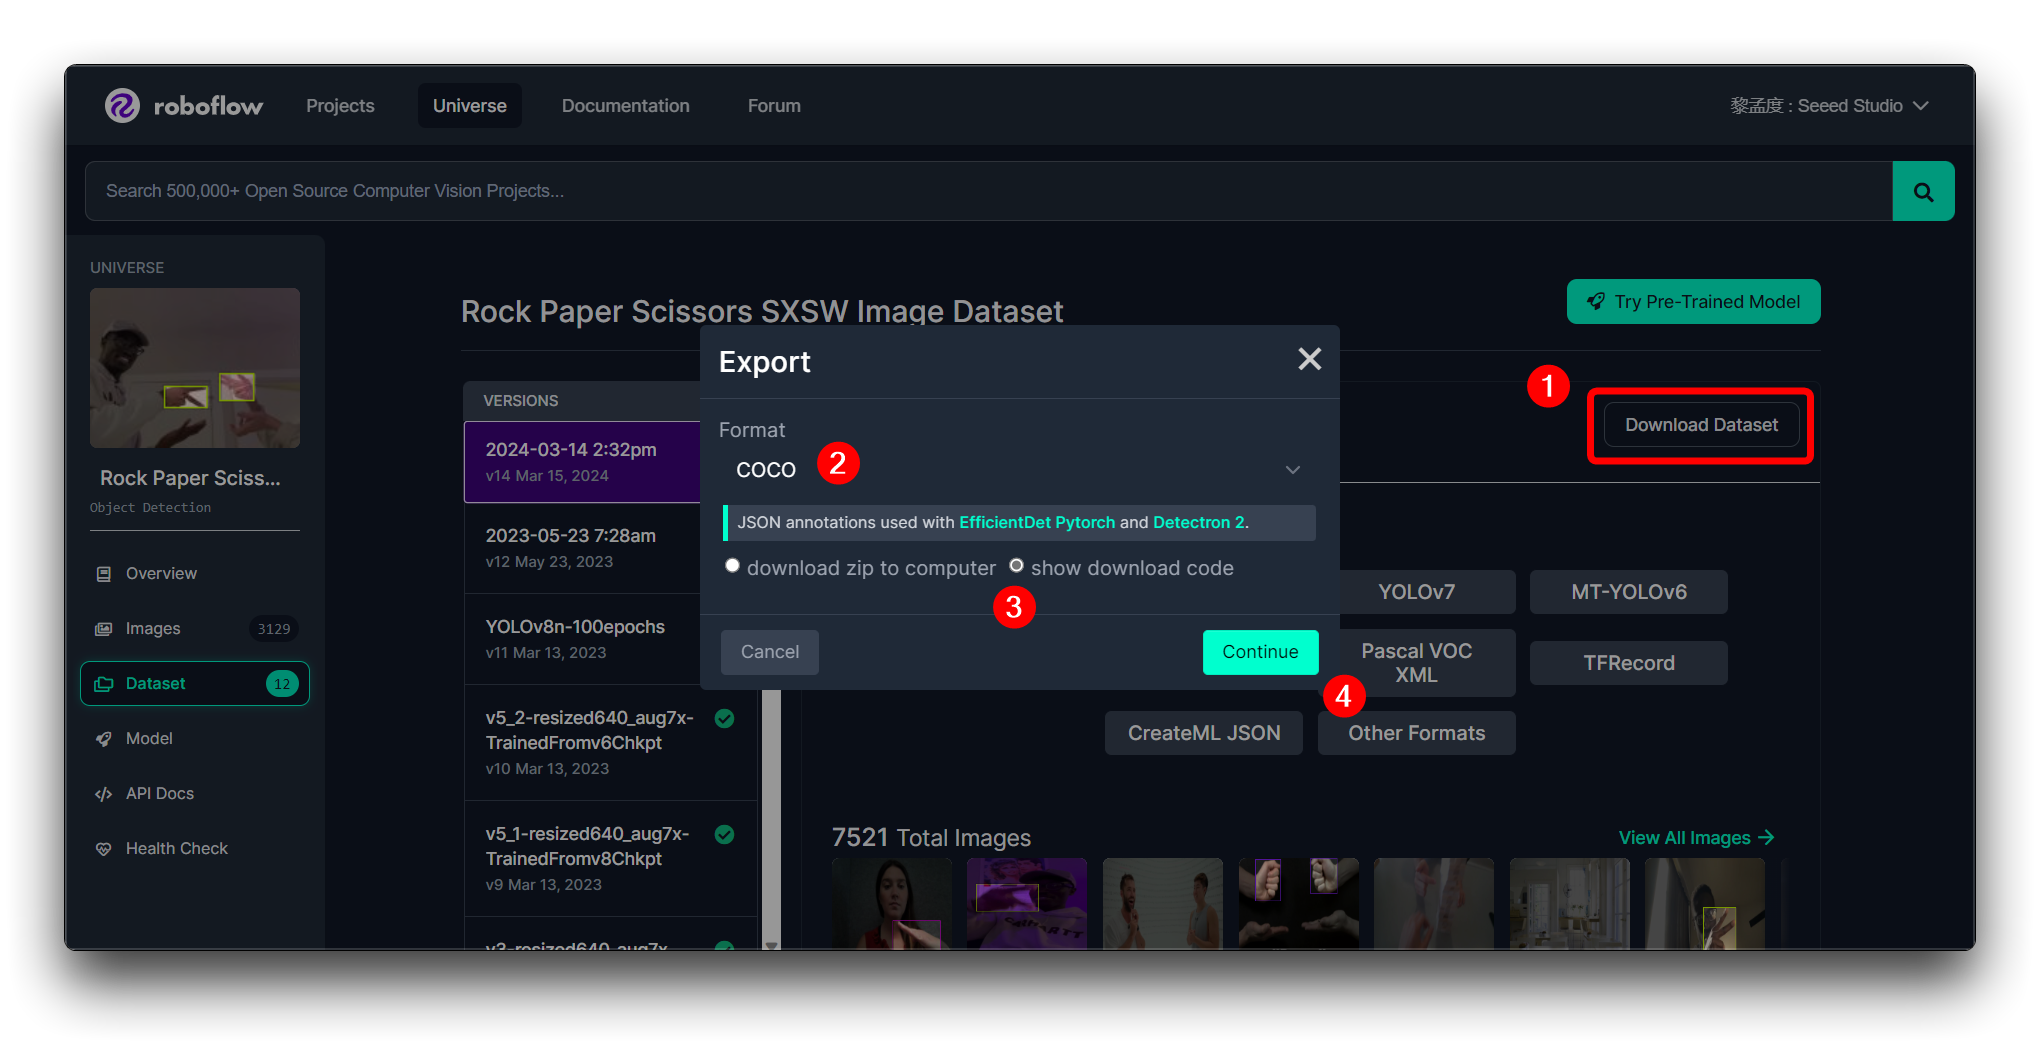
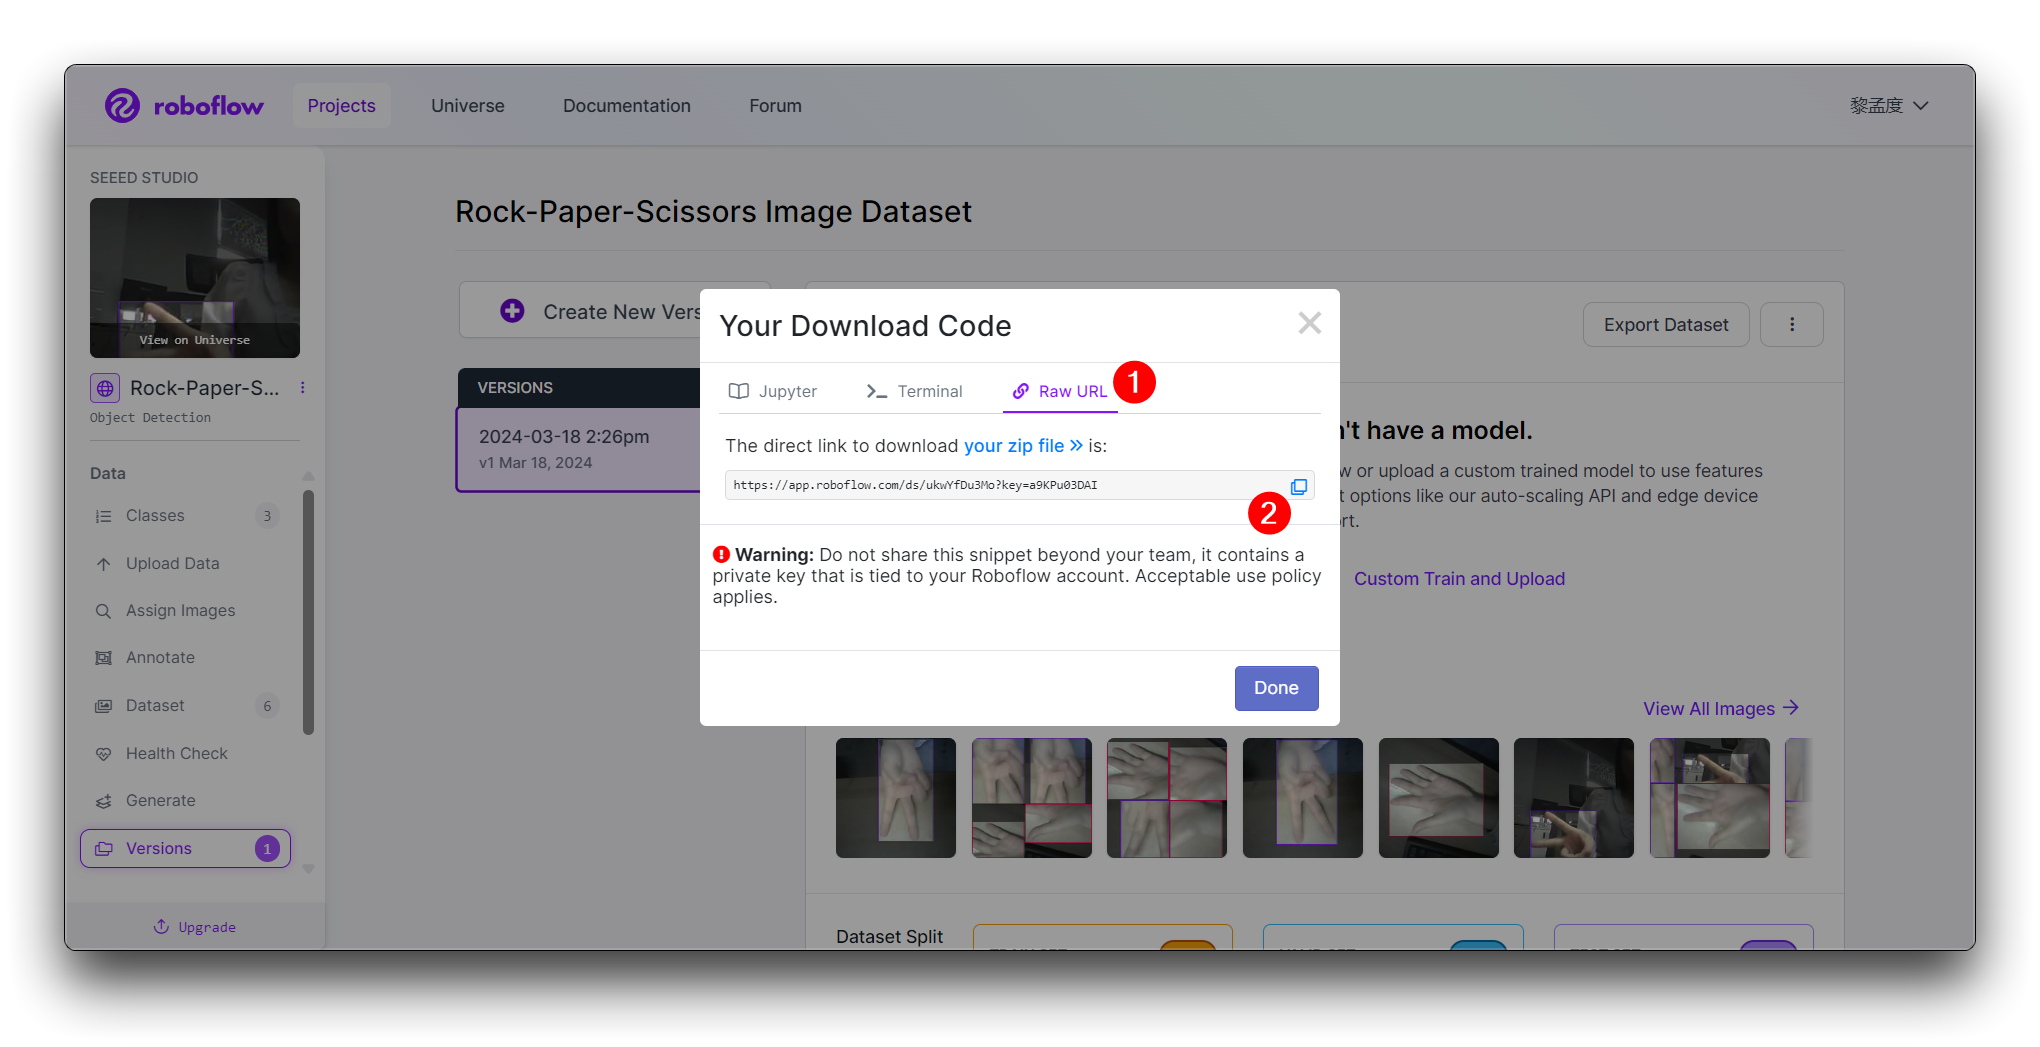
Click on Create to create a version of your dataset. Roboflow will process the images and annotations, creating a versioned dataset. After the dataset is generated, click Export Dataset. Choose the COCO format that matches the requirements of the model you'll be training.
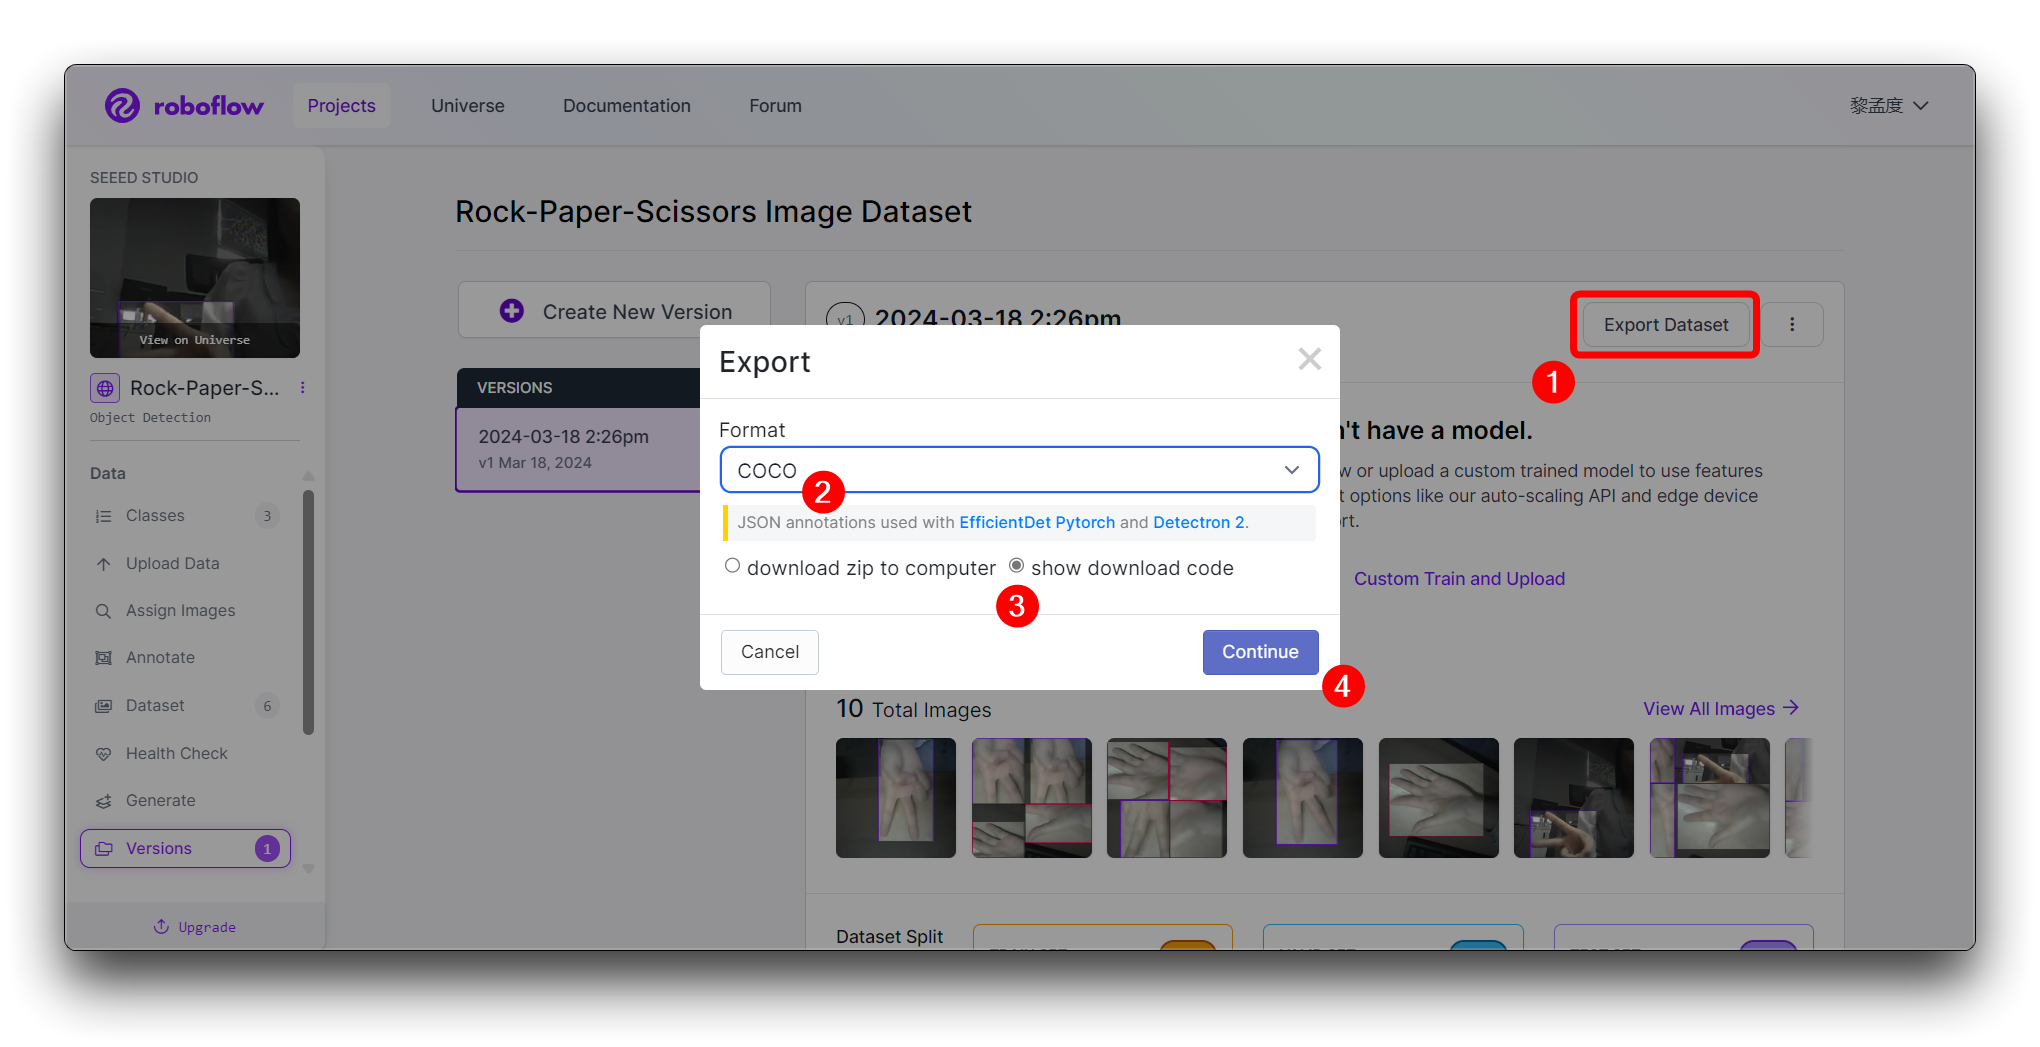
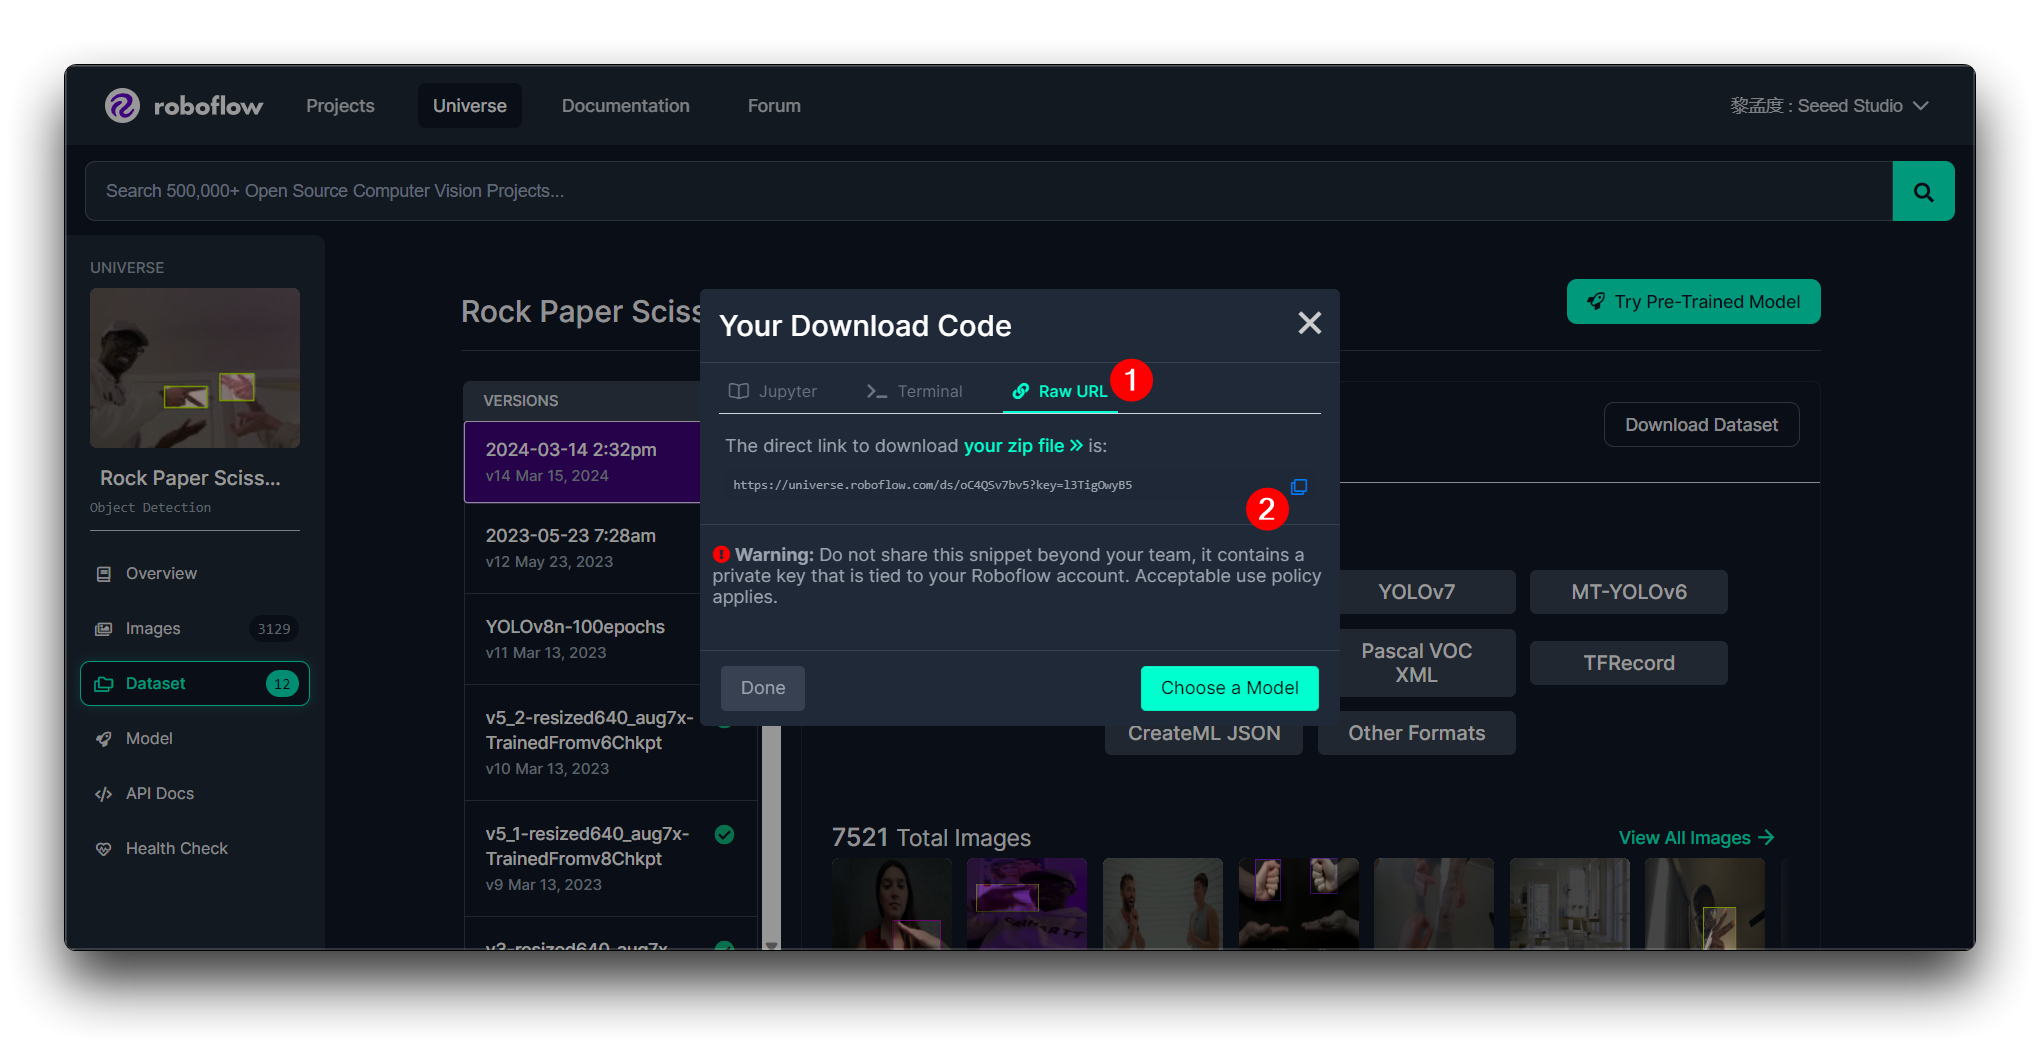
Click on Continue and you'll then get the Raw URL for this model. Keep it, we'll use the link in the model training step a bit later.
Congratulations! You have successfully used Roboflow to upload, annotate, and export a dataset for a Rock-Paper-Scissors hand gesture detection model. With your dataset ready, you can proceed to train a machine learning model using platforms like Google Colab.
Remember to keep your dataset diverse and well-annotated to improve the accuracy of your future model. Good luck with your model training, and have fun classifying hand gestures with the power of AI!
Training Dataset Exported Model
Step 1. Access the Colab Notebook
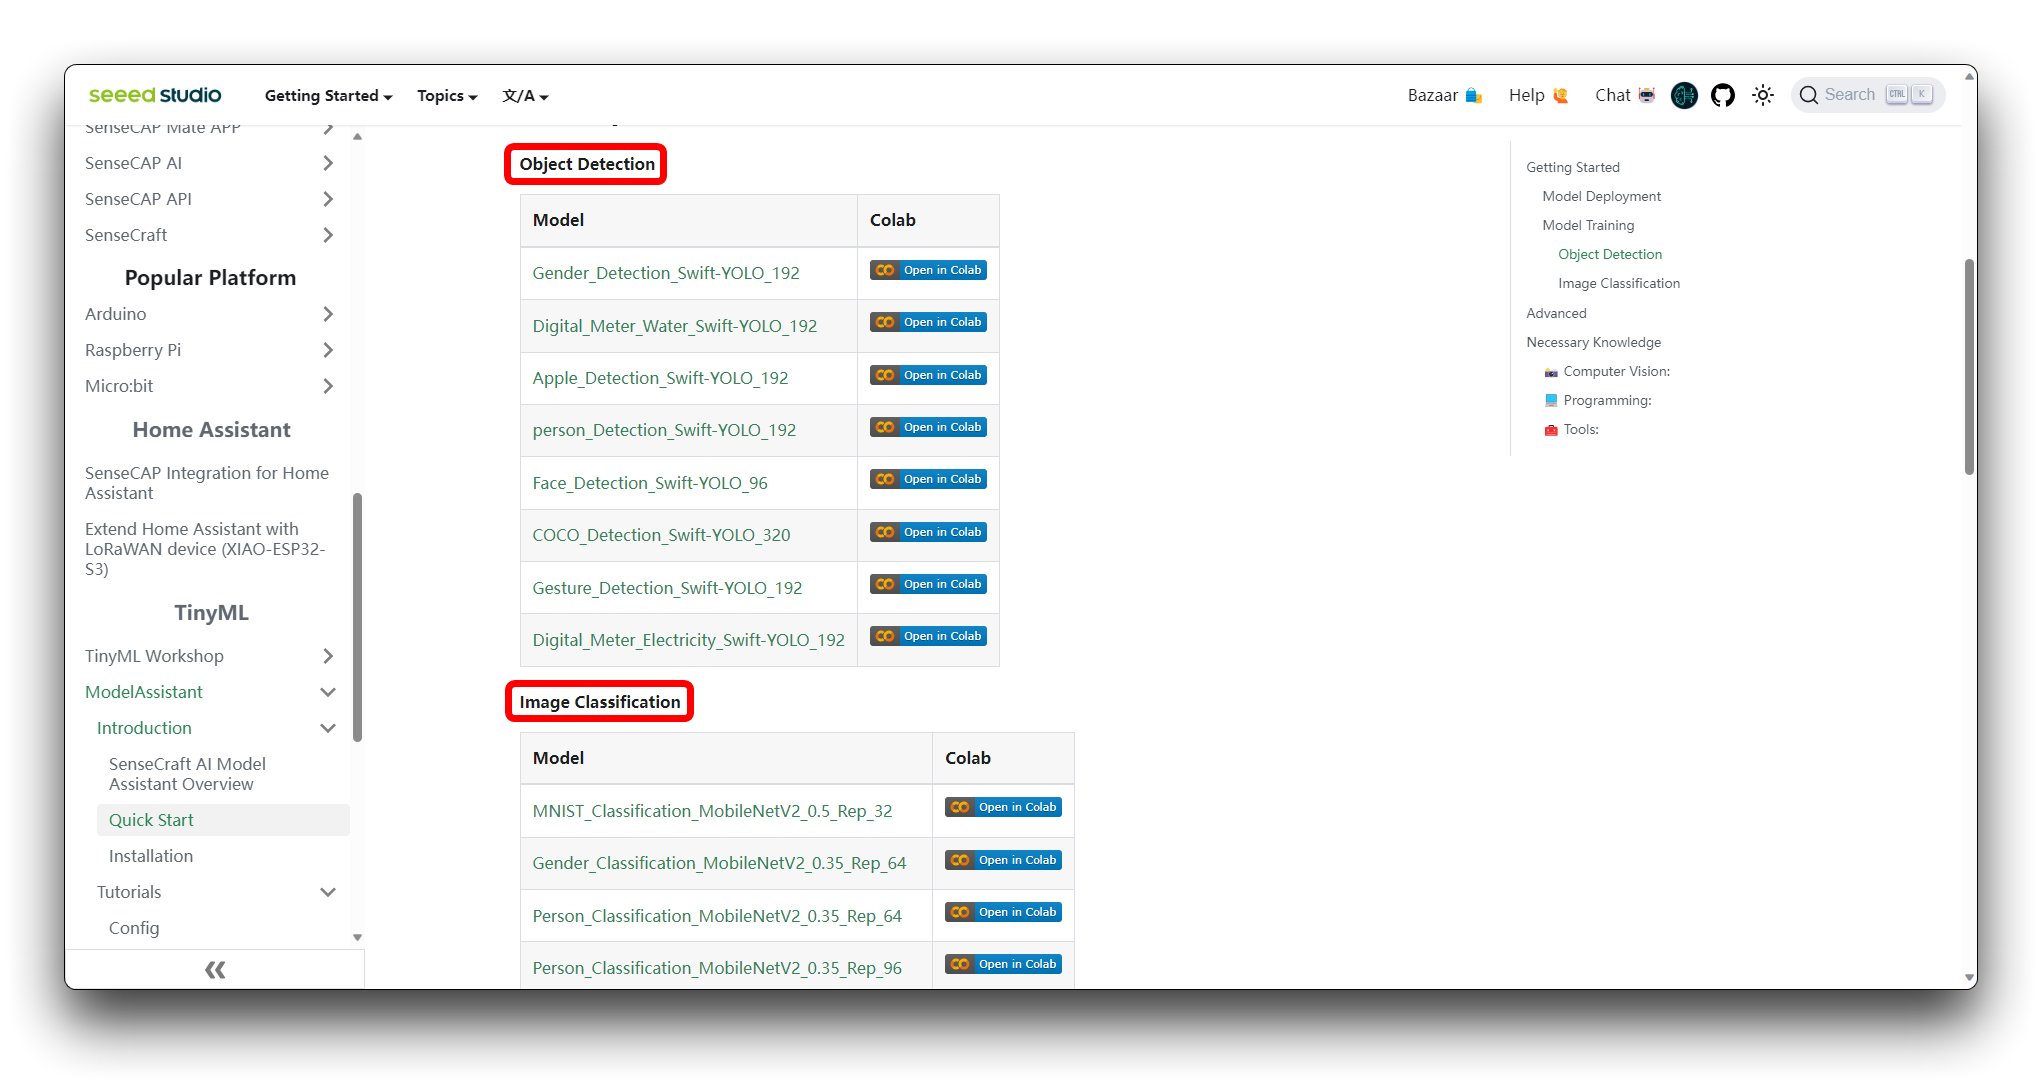
You can find different kinds of model Google Colab code files on the SenseCraft Model Assistant's Wiki. If you don't know which code you should choose, you can choose any one of them, depending on the class of your model (object detection or image classification).
If you are not already signed into your Google account, please sign in to access the full functionalities of Google Colab.
Click on "Connect" to allocate resources for your Colab session.
Step 2. Add your Roboflow Dataset
Before officially running the code block step-by-step, we need to modify the code's content so that the code can use the dataset we prepared. We have to provide a URL to download the dataset directly into the Colab filesystem.
Please find the Download the dataset section in the code. You will see the following sample program.
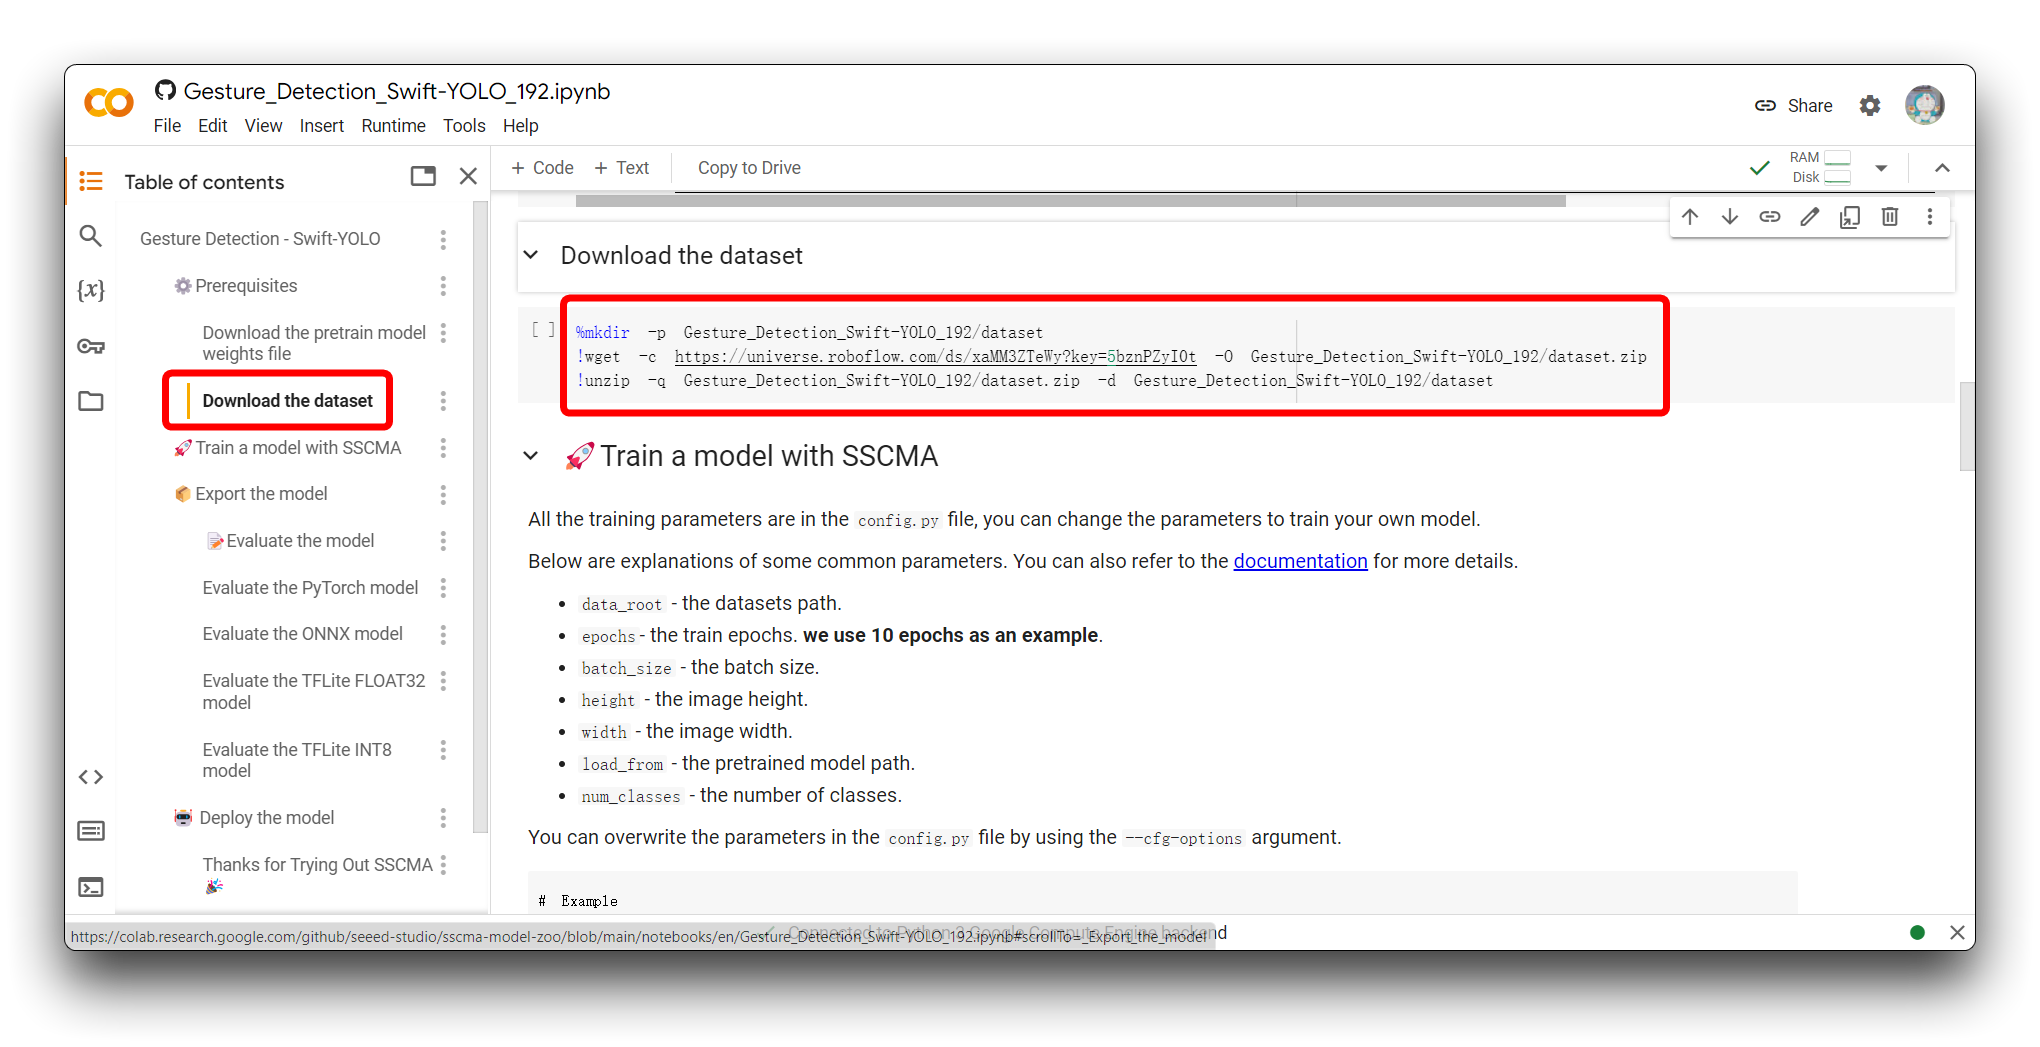
%mkdir -p Gesture_Detection_Swift-YOLO_192/dataset
!wget -c https://universe.roboflow.com/ds/xaMM3ZTeWy?key=5bznPZyI0t -O Gesture_Detection_Swift-YOLO_192/dataset.zip
!unzip -q Gesture_Detection_Swift-YOLO_192/dataset.zip -d Gesture_Detection_Swift-YOLO_192/dataset
This piece of code is used to create a directory, download a dataset from Roboflow, and unzip it into the newly created directory within a Google Colab environment. Here's a breakdown of what each line does:
-
%mkdir -p Gesture_Detection_Swift-YOLO_192/dataset:- This line creates a new directory called
Gesture_Detection_Swift-YOLO_192and a subdirectory calleddataset. The-pflag ensures that the command does not return an error if the directory already exists and creates any necessary parent directories.
- This line creates a new directory called
-
!wget -c https://universe.roboflow.com/ds/xaMM3ZTeWy?key=5bznPZyI0t -O Gesture_Detection_Swift-YOLO_192/dataset.zip:- This line uses
wget, a command-line utility, to download the dataset from the provided Roboflow URL. The-cflag allows the download to resume if it gets interrupted. The-Oflag specifies the output location and filename for the downloaded file, in this case,Gesture_Detection_Swift-YOLO_192/dataset.zip.
- This line uses
-
!unzip -q Gesture_Detection_Swift-YOLO_192/dataset.zip -d Gesture_Detection_Swift-YOLO_192/dataset:- This line uses the
unzipcommand to extract the contents of thedataset.zipfile into thedatasetdirectory that was created earlier. The-qflag runs theunzipcommand in quiet mode, suppressing most of the output messages.
- This line uses the
To customize this code for your own model link from Roboflow:
-
Replace
Gesture_Detection_Swift-YOLO_192with the desired directory name where you want to store your dataset. -
Replace the Roboflow dataset URL (
https://universe.roboflow.com/ds/xaMM3ZTeWy?key=5bznPZyI0t) with the link to your exported dataset (It's the Raw URL we got in the last step in Labelled Datasets). Make sure to include the key parameter if required for access. -
Adjust the output filename in the
wgetcommand if necessary (-O your_directory/your_filename.zip). -
Make sure the output directory in the
unzipcommand matches the directory you created and the filename matches the one you set in thewgetcommand.
If you change the name of a folder directory Gesture_Detection_Swift-YOLO_192, please note that you will need to make changes to other directory names in the code that were used before the change, otherwise an error may occur!
Step 3. Adjustment of model parameters
The next step is to adjust the input parameters of the model. Please jump to the Train a model with SSCMA section and you will see the following code snippet.
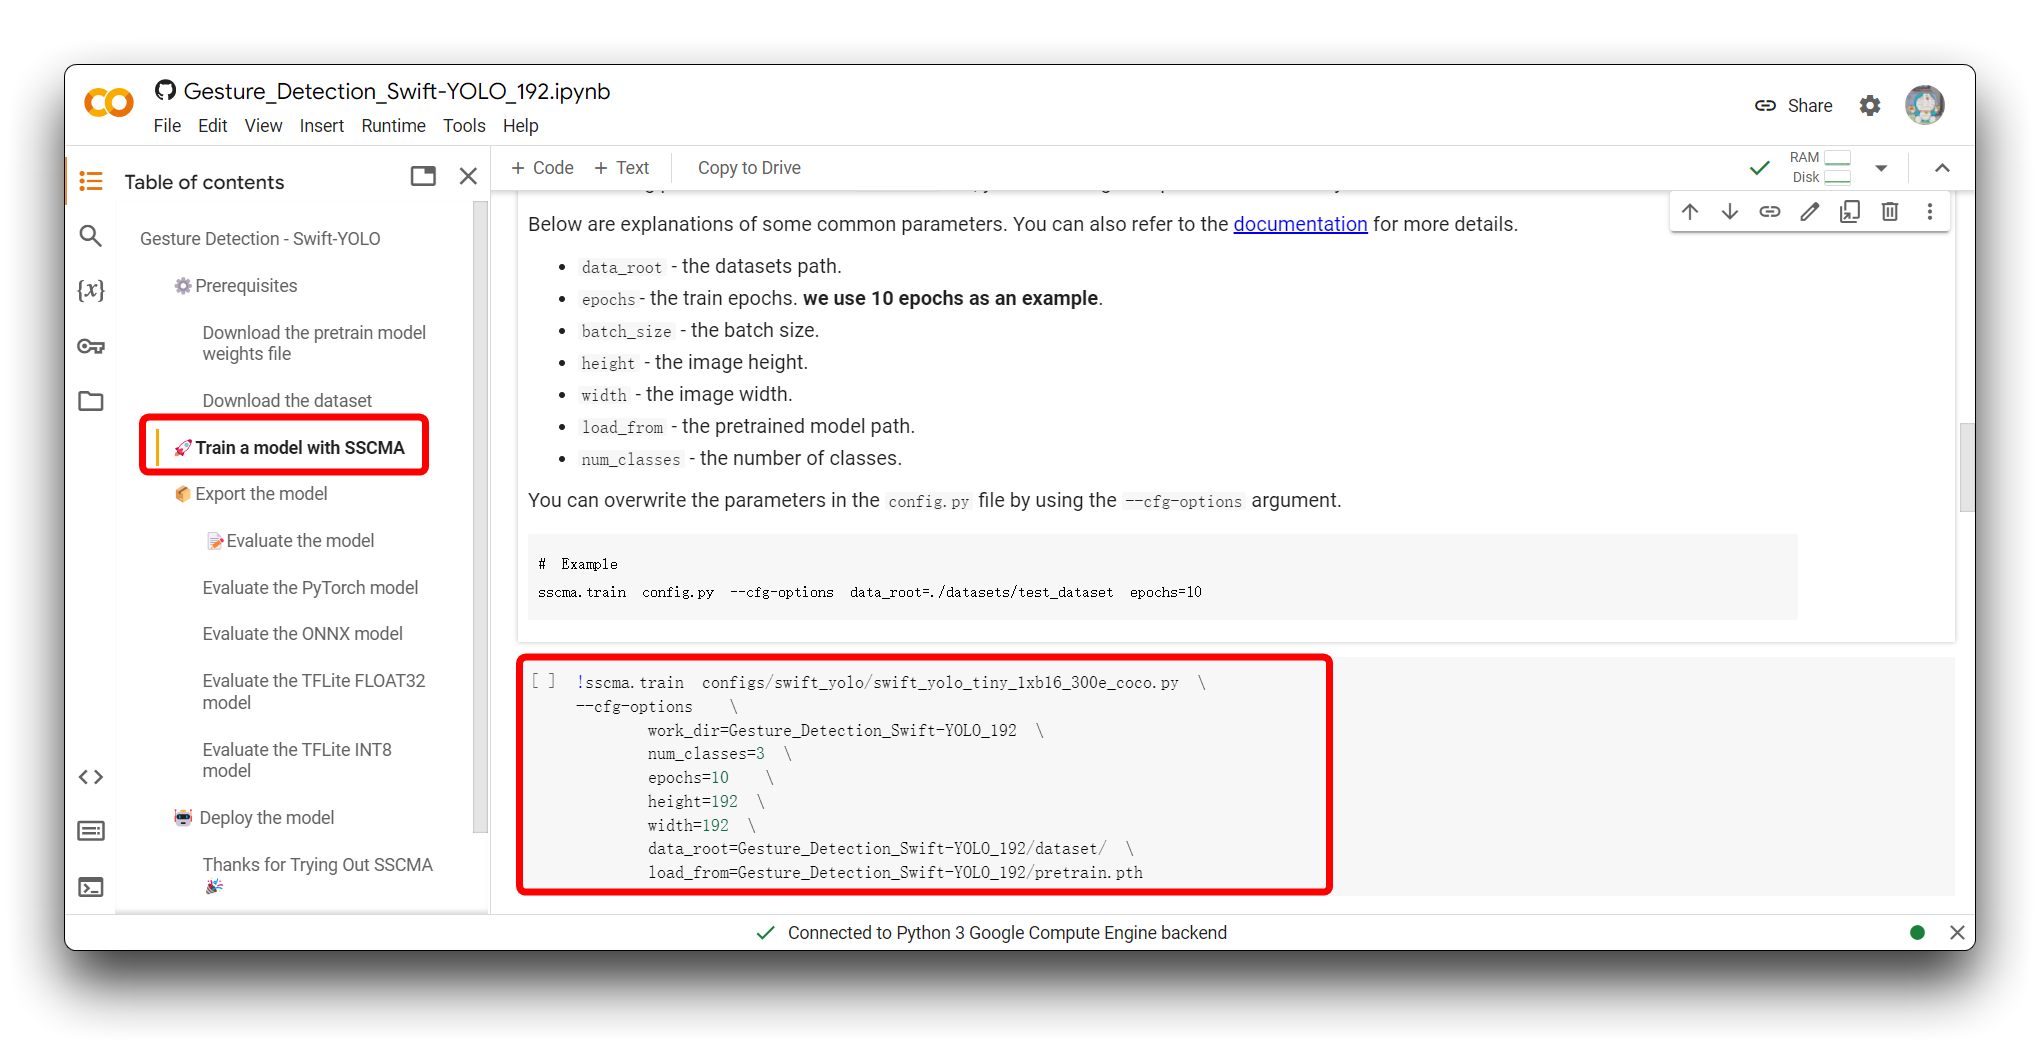
!sscma.train configs/swift_yolo/swift_yolo_tiny_1xb16_300e_coco.py \
--cfg-options  \
    work_dir=Gesture_Detection_Swift-YOLO_192 \
    num_classes=3 \
    epochs=10  \
    height=192 \
    width=192 \
    data_root=Gesture_Detection_Swift-YOLO_192/dataset/ \
    load_from=Gesture_Detection_Swift-YOLO_192/pretrain.pth
This command is used to start the training process of a machine learning model, specifically a YOLO (You Only Look Once) model, using the SSCMA (Seeed Studio SenseCraft Model Assistant) framework. The command includes various options to configure the training process. Here’s what each part does:
-
!sscma.trainis the command to initiate the training within the SSCMA framework. -
configs/swift_yolo/swift_yolo_tiny_1xb16_300e_coco.pyspecifies the configuration file for the training, which includes settings like the model architecture, training schedule, data augmentation strategies, etc. -
--cfg-optionsallows you to override the default configurations specified in the.pyfile with the ones you provide in the command line. -
work_dir=Gesture_Detection_Swift-YOLO_192sets the directory where the training outputs, such as logs and saved model checkpoints, will be stored. -
num_classes=3specifies the number of classes that the model should be trained to recognize. It depends on the number of tags you have, for example rock, paper, scissors should be three tags. -
epochs=10sets the number of training cycles (epochs) to run. Recommended values are between 50 and 100. -
height=192andwidth=192set the height and width of the input images that the model expects.
We don't really recommend that you change the image size in the Colab code, as this value is a more appropriate dataset size that we have verified to be a combination of size, accuracy, and speed of inference. If you are using a dataset that is not of this size, and you may want to consider changing the image size to ensure accuracy, then please do not exceed 240x240.
-
data_root=Gesture_Detection_Swift-YOLO_192/dataset/defines the path to the directory where the training data is located. -
load_from=Gesture_Detection_Swift-YOLO_192/pretrain.pthprovides the path to a pre-trained model checkpoint file from which training should resume or use as a starting point for transfer learning.
To customize this command for your own training, you would:
-
Replace
configs/swift_yolo/swift_yolo_tiny_1xb16_300e_coco.pywith the path to your own configuration file if you have a custom one. -
Change
work_dirto the directory where you want your training outputs to be saved. -
Update
num_classesto match the number of classes in your own dataset. It depends on the number of tags you have, for example rock, paper, scissors should be three tags. -
Adjust
epochsto the desired number of training epochs for your model. Recommended values are between 50 and 100. -
Set
heightandwidthto match the dimensions of the input images for your model. -
Change
data_rootto point to the root directory of your dataset. -
If you have a different pre-trained model file, update the
load_frompath accordingly.
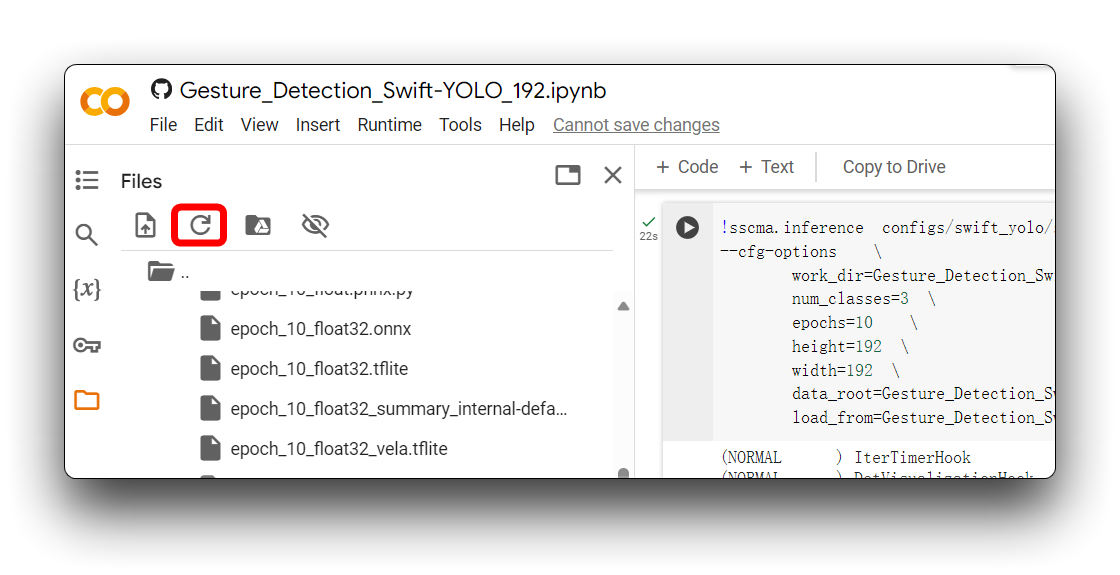
Step 4. Run the Google Colab code
The way to run the code block is to click on the play button in the upper left corner of the code block.
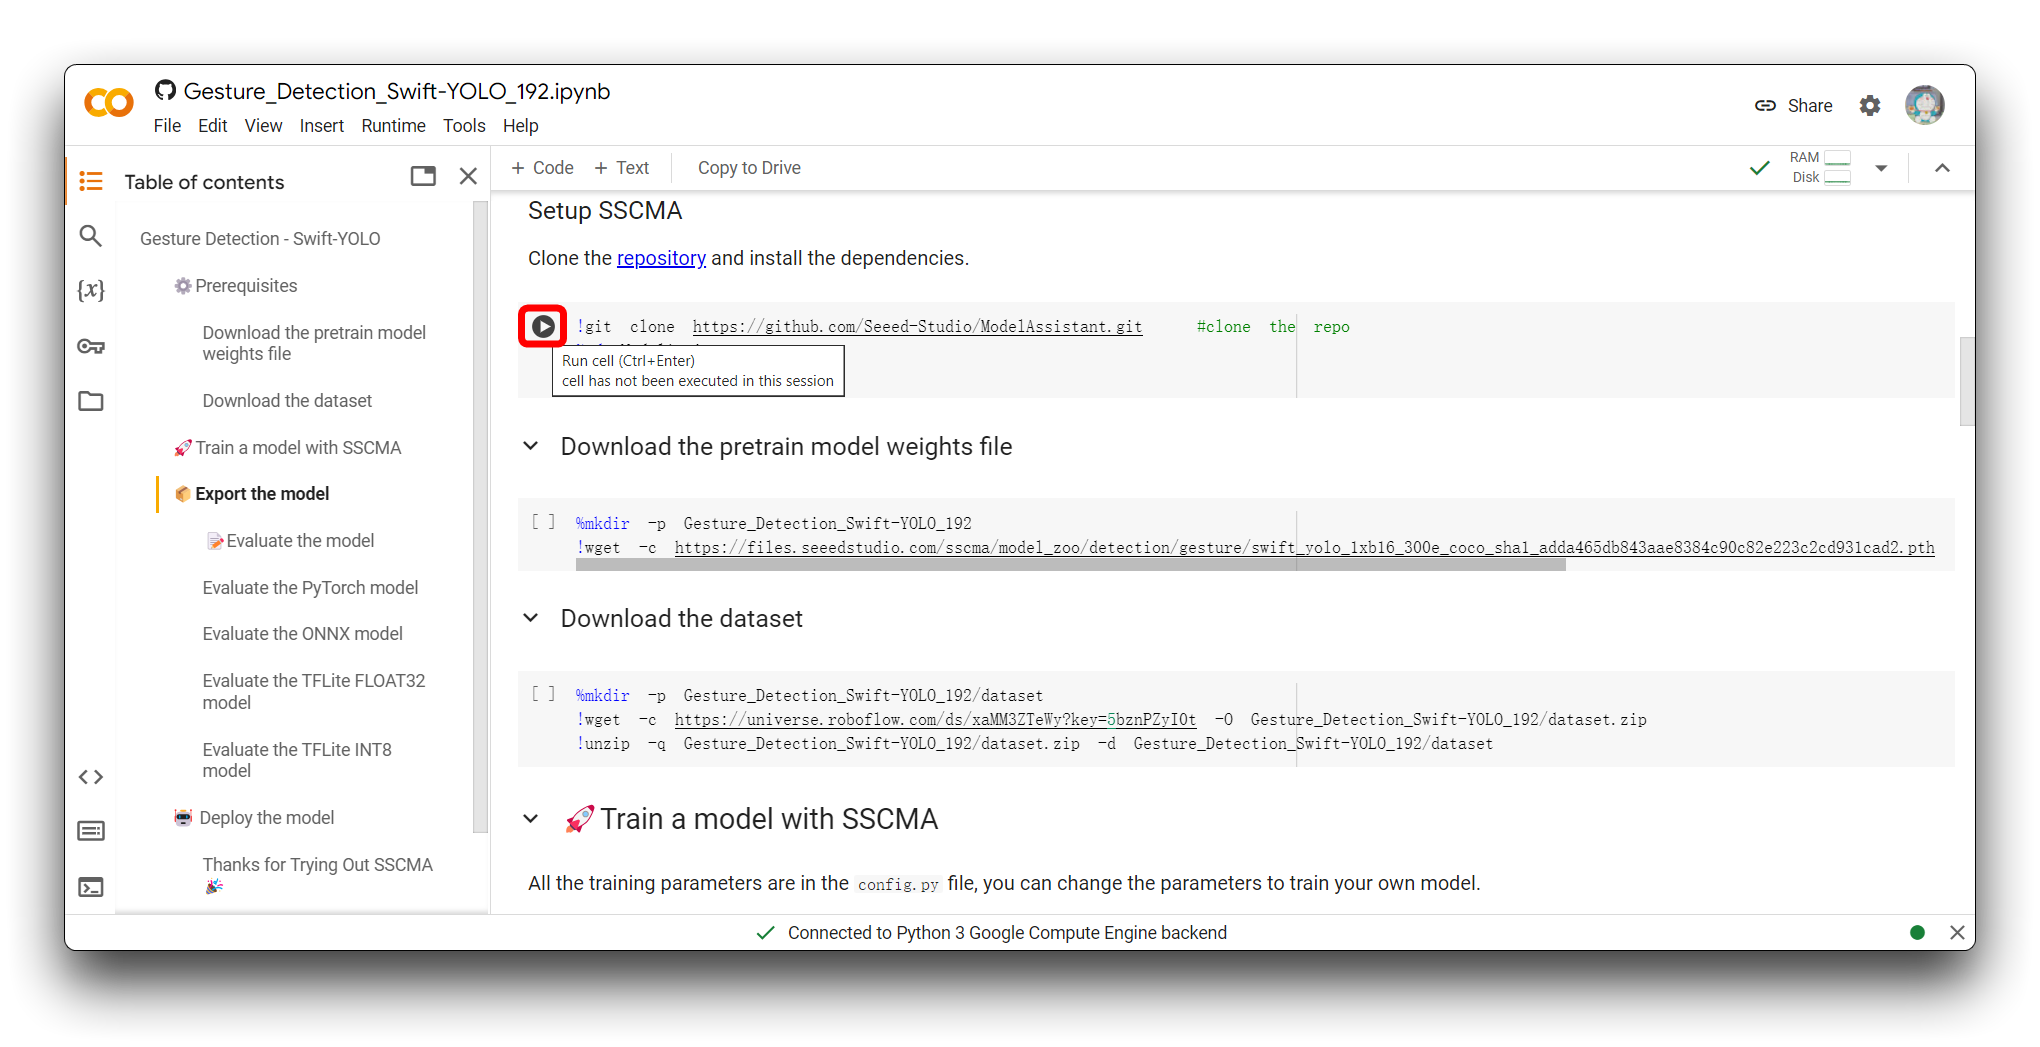
The code block will be executed after you click the button, and if all goes well, you'll see the sign that the code block execution is complete - a tick symbol appears to the left of the block. As shown in the figure is the effect after the execution of the first code block is completed.
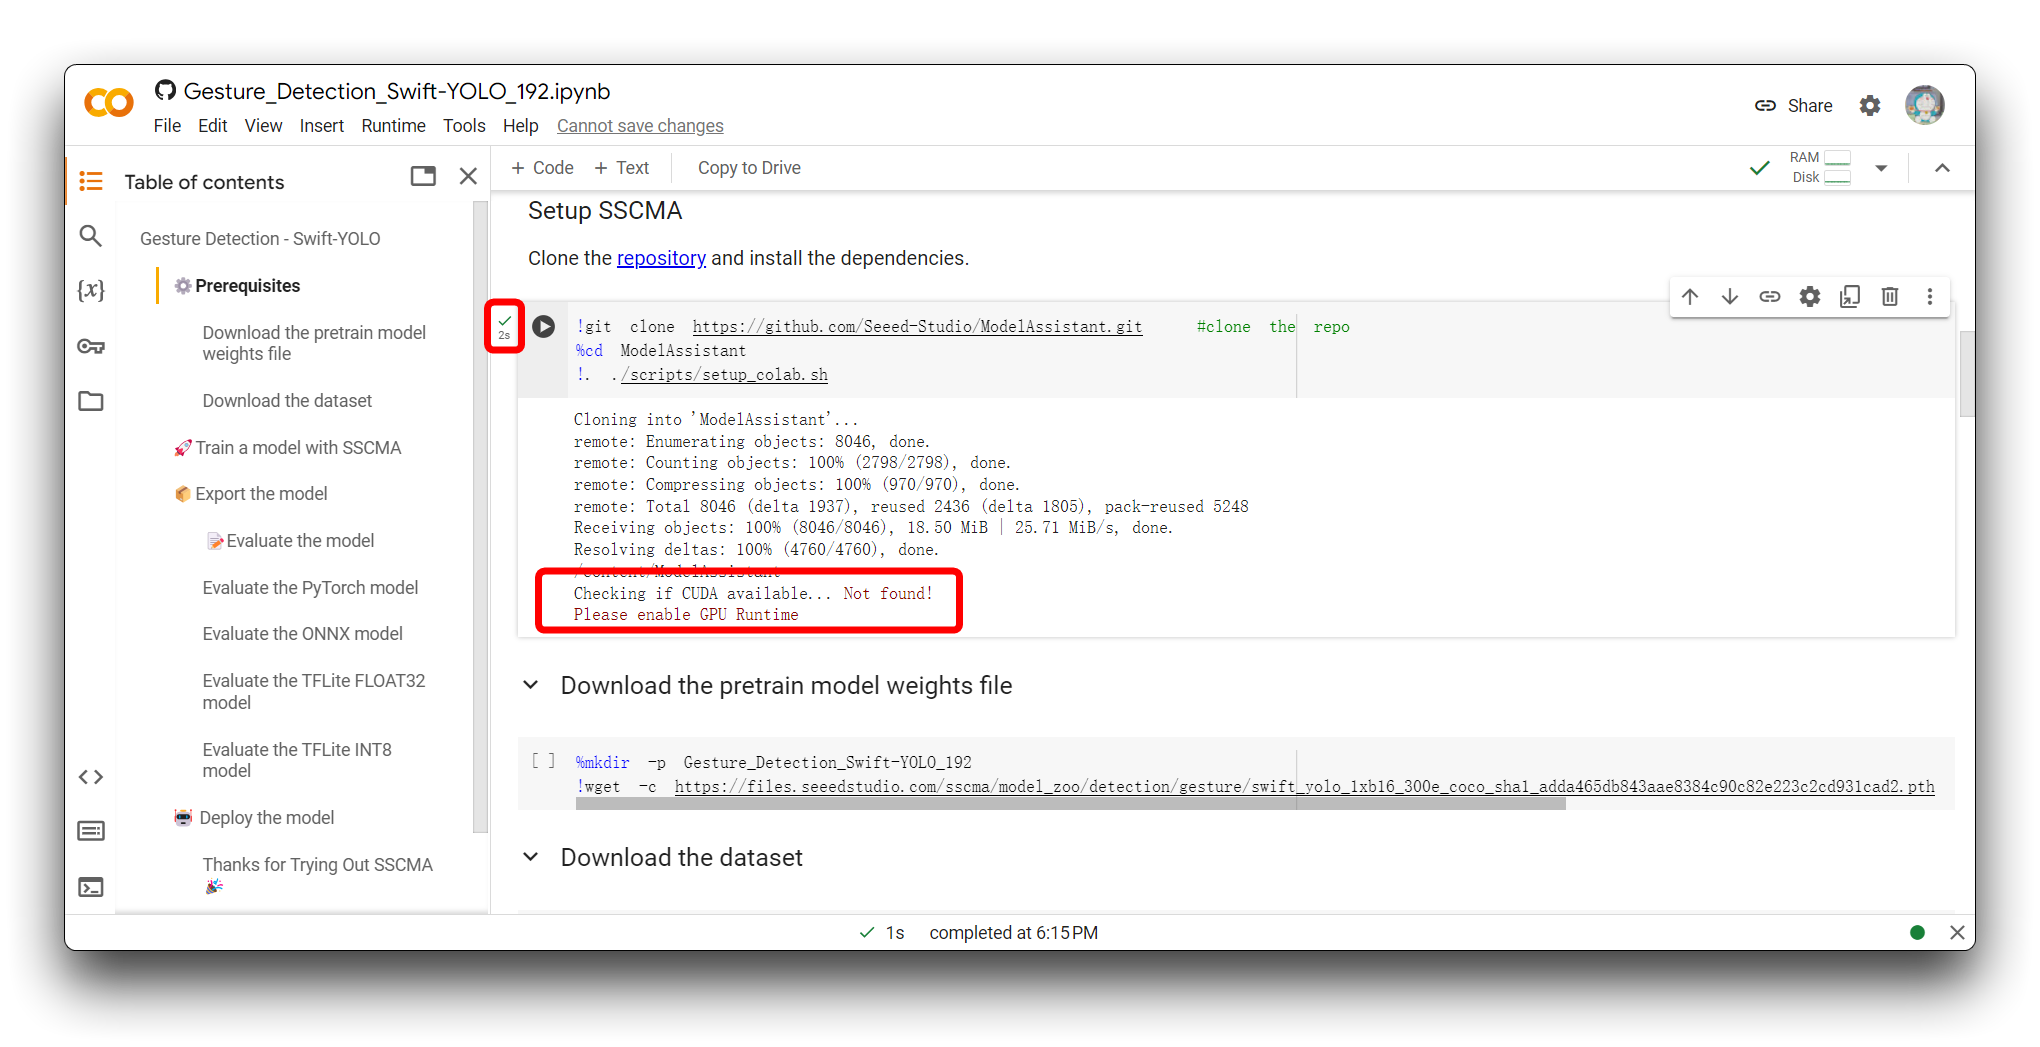
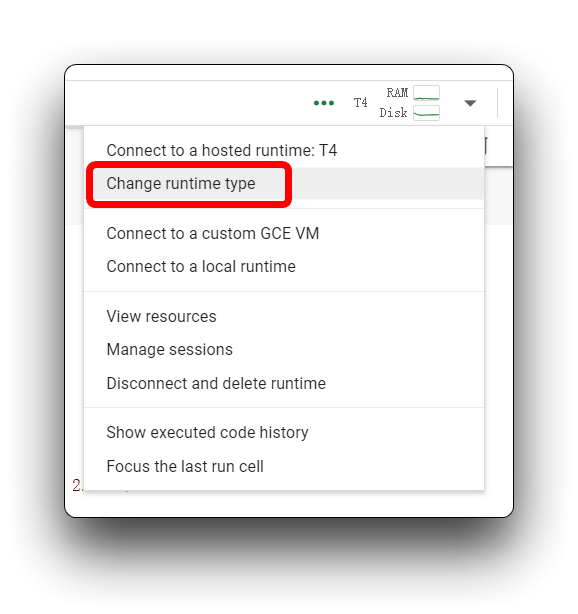
If you encounter the same error message as mine in the image above, please check that you are using a T4 GPU, please do not use CPU for this project.

Then, re-execute the code block. For the first code block, if all goes well, you'll see the result shown below.

Next, execute all the code blocks from Download the pretrain model weights file to Export the model. And please make sure that each code block is free of errors.
Warnings that appear in the code can be ignored.
Step 5. Evaluate the model
When you get to the Evaluate the model section, you have the option of executing the Evaluate the TFLite INT8 model code block.
Evaluating the TFLite INT8 model involves testing the quantized model's predictions against a separate testing dataset to measure its accuracy and performance metrics, assessing the impact of quantization on the model's precision, and profiling its inference speed and resource usage to ensure it meets the deployment constraints for edge devices.
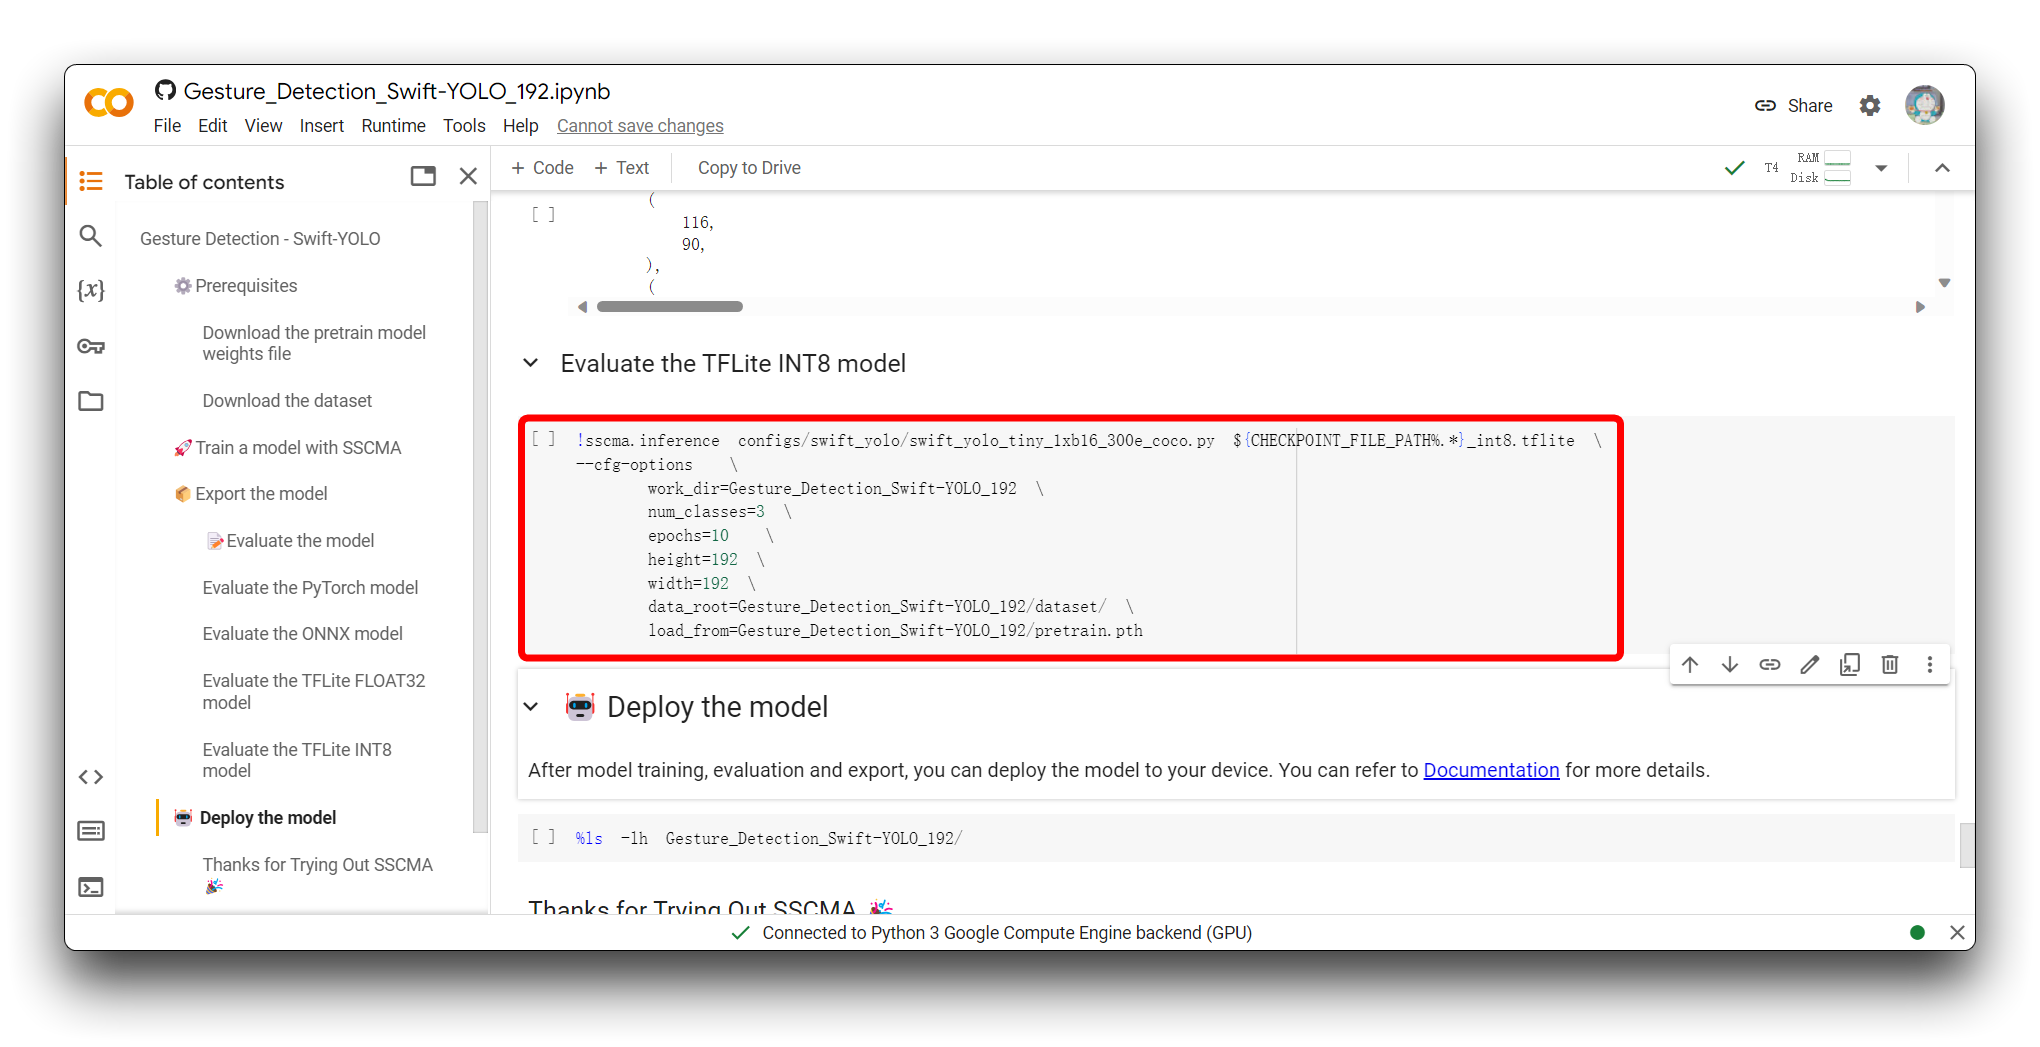
The following snippet is the valid part of the result after I executed this code block.
 Average Precision  (AP) @[ IoU=0.50:0.95 | area=   all | maxDets=100 ] = 0.450
 Average Precision  (AP) @[ IoU=0.50      | area=   all | maxDets=100 ] = 0.929
 Average Precision  (AP) @[ IoU=0.75      | area=   all | maxDets=100 ] = 0.361
 Average Precision  (AP) @[ IoU=0.50:0.95 | area= small | maxDets=100 ] = -1.000
 Average Precision  (AP) @[ IoU=0.50:0.95 | area=medium | maxDets=100 ] = 0.474
 Average Precision  (AP) @[ IoU=0.50:0.95 | area= large | maxDets=100 ] = 0.456
 Average Recall     (AR) @[ IoU=0.50:0.95 | area=   all | maxDets=  1 ] = 0.515
 Average Recall     (AR) @[ IoU=0.50:0.95 | area=   all | maxDets= 10 ] = 0.529
 Average Recall     (AR) @[ IoU=0.50:0.95 | area=   all | maxDets=100 ] = 0.529
 Average Recall     (AR) @[ IoU=0.50:0.95 | area= small | maxDets=100 ] = -1.000
 Average Recall     (AR) @[ IoU=0.50:0.95 | area=medium | maxDets=100 ] = 0.536
 Average Recall     (AR) @[ IoU=0.50:0.95 | area= large | maxDets=100 ] = 0.537
03/19 01:38:43 - mmengine - INFO - bbox_mAP_copypaste: 0.450 0.929 0.361 -1.000 0.474 0.456
{'coco/bbox_mAP': 0.45, 'coco/bbox_mAP_50': 0.929, 'coco/bbox_mAP_75': 0.361, 'coco/bbox_mAP_s': -1.0, 'coco/bbox_mAP_m': 0.474, 'coco/bbox_mAP_l': 0.456}
FPS: 128.350449 fram/s
The evaluation results include a series of Average Precision (AP) and Average Recall (AR) metrics, calculated for different Intersection over Union (IoU) thresholds and object sizes, which are commonly used to assess the performance of object detection models.
-
AP@[IoU=0.50:0.95 | area=all | maxDets=100] = 0.450
- This score is the model's average precision across a range of IoU thresholds from 0.50 to 0.95, incremented by 0.05. An AP of 0.450 indicates that your model has moderate accuracy across this range. This is a key metric commonly used for the COCO dataset.
-
AP@[IoU=0.50 | area=all | maxDets=100] = 0.929
- At an IoU threshold of 0.50, the model achieves a high average precision of 0.929, suggesting that it detects objects very accurately under a more lenient matching criterion.
-
AP@[IoU=0.75 | area=all | maxDets=100] = 0.361
- With a stricter IoU threshold of 0.75, the model's average precision drops to 0.361, indicating a decline in performance under tighter matching criteria.
-
AP@[IoU=0.50:0.95 | area=small/medium/large | maxDets=100]
- The AP scores vary for objects of different sizes. However, the AP for small objects is -1.000, which could indicate a lack of evaluation data for small objects or poor model performance on small object detection. The AP scores for medium and large objects are 0.474 and 0.456, respectively, suggesting that the model detects medium and large objects relatively better.
-
AR@[IoU=0.50:0.95 | area=all | maxDets=1/10/100]
- The average recall rates for different
maxDetsvalues are quite consistent, ranging from 0.515 to 0.529, indicating that the model reliably retrieves most of the true positive instances.
- The average recall rates for different
-
FPS: 128.350449 fram/s
- The model processes images at a very fast rate of approximately 128.35 frames per second during inference, indicating potential for real-time or near-real-time applications.
Overall, the model performs excellently at an IoU of 0.50 and moderately at an IoU of 0.75. It performs better on medium and large object detection but may have issues with detecting small objects. Additionally, the model infers at a high speed, making it suitable for scenarios that require fast processing. If detecting small objects is critical in an application, we may need to further optimize the model or collect more small object data to improve performance.
Step 6. Download the exported model file
After the Export the model section, you will get the model files in various formats, which will be stored in the ModelAssistant folder by default. In this tutorial, the stored directory is Gesture_Detection_Swift_YOLO_192.
Sometimes Google Colab does not automatically refresh the contents of a folder. In this case you may need to refresh the file directory by clicking the refresh icon in the top left corner.
In the directory above, the .tflite model files are available for XIAO ESP32S3 and Grove Vision AI V2. For XIAO ESP32S3 Sense, be sure to select the model file that uses the xxx_int8.tflite format. No other format can be used by XIAO ESP32S3 Sense.
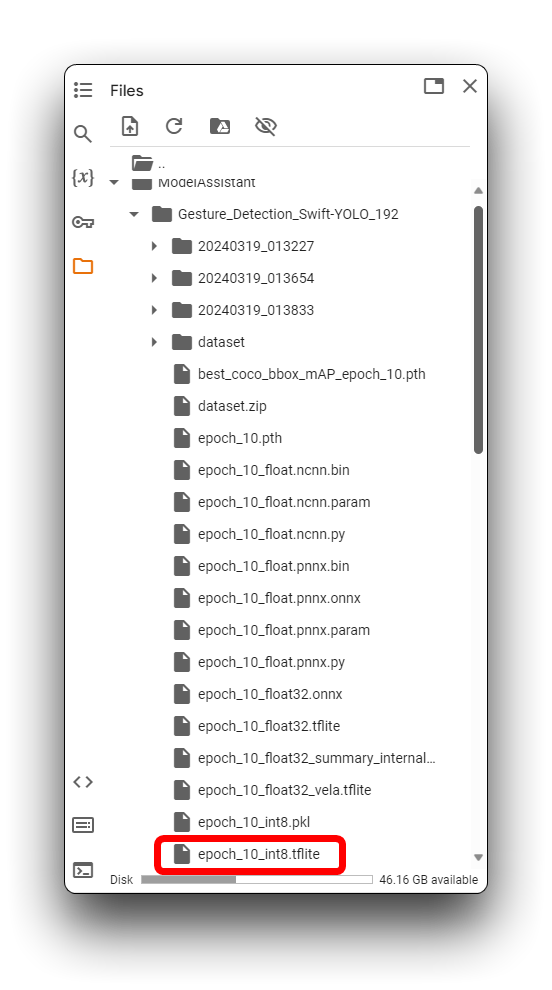
Once you have found the model files, please download them locally to your computer as soon as possible, Google Colab may empty your storage directory if you are idle for a long time!
So with the steps carried out here, we have successfully exported model files that can be supported by XIAO ESP32S3, next let's deploy the model to the device.
Upload models via SenseCraft Model Assistant
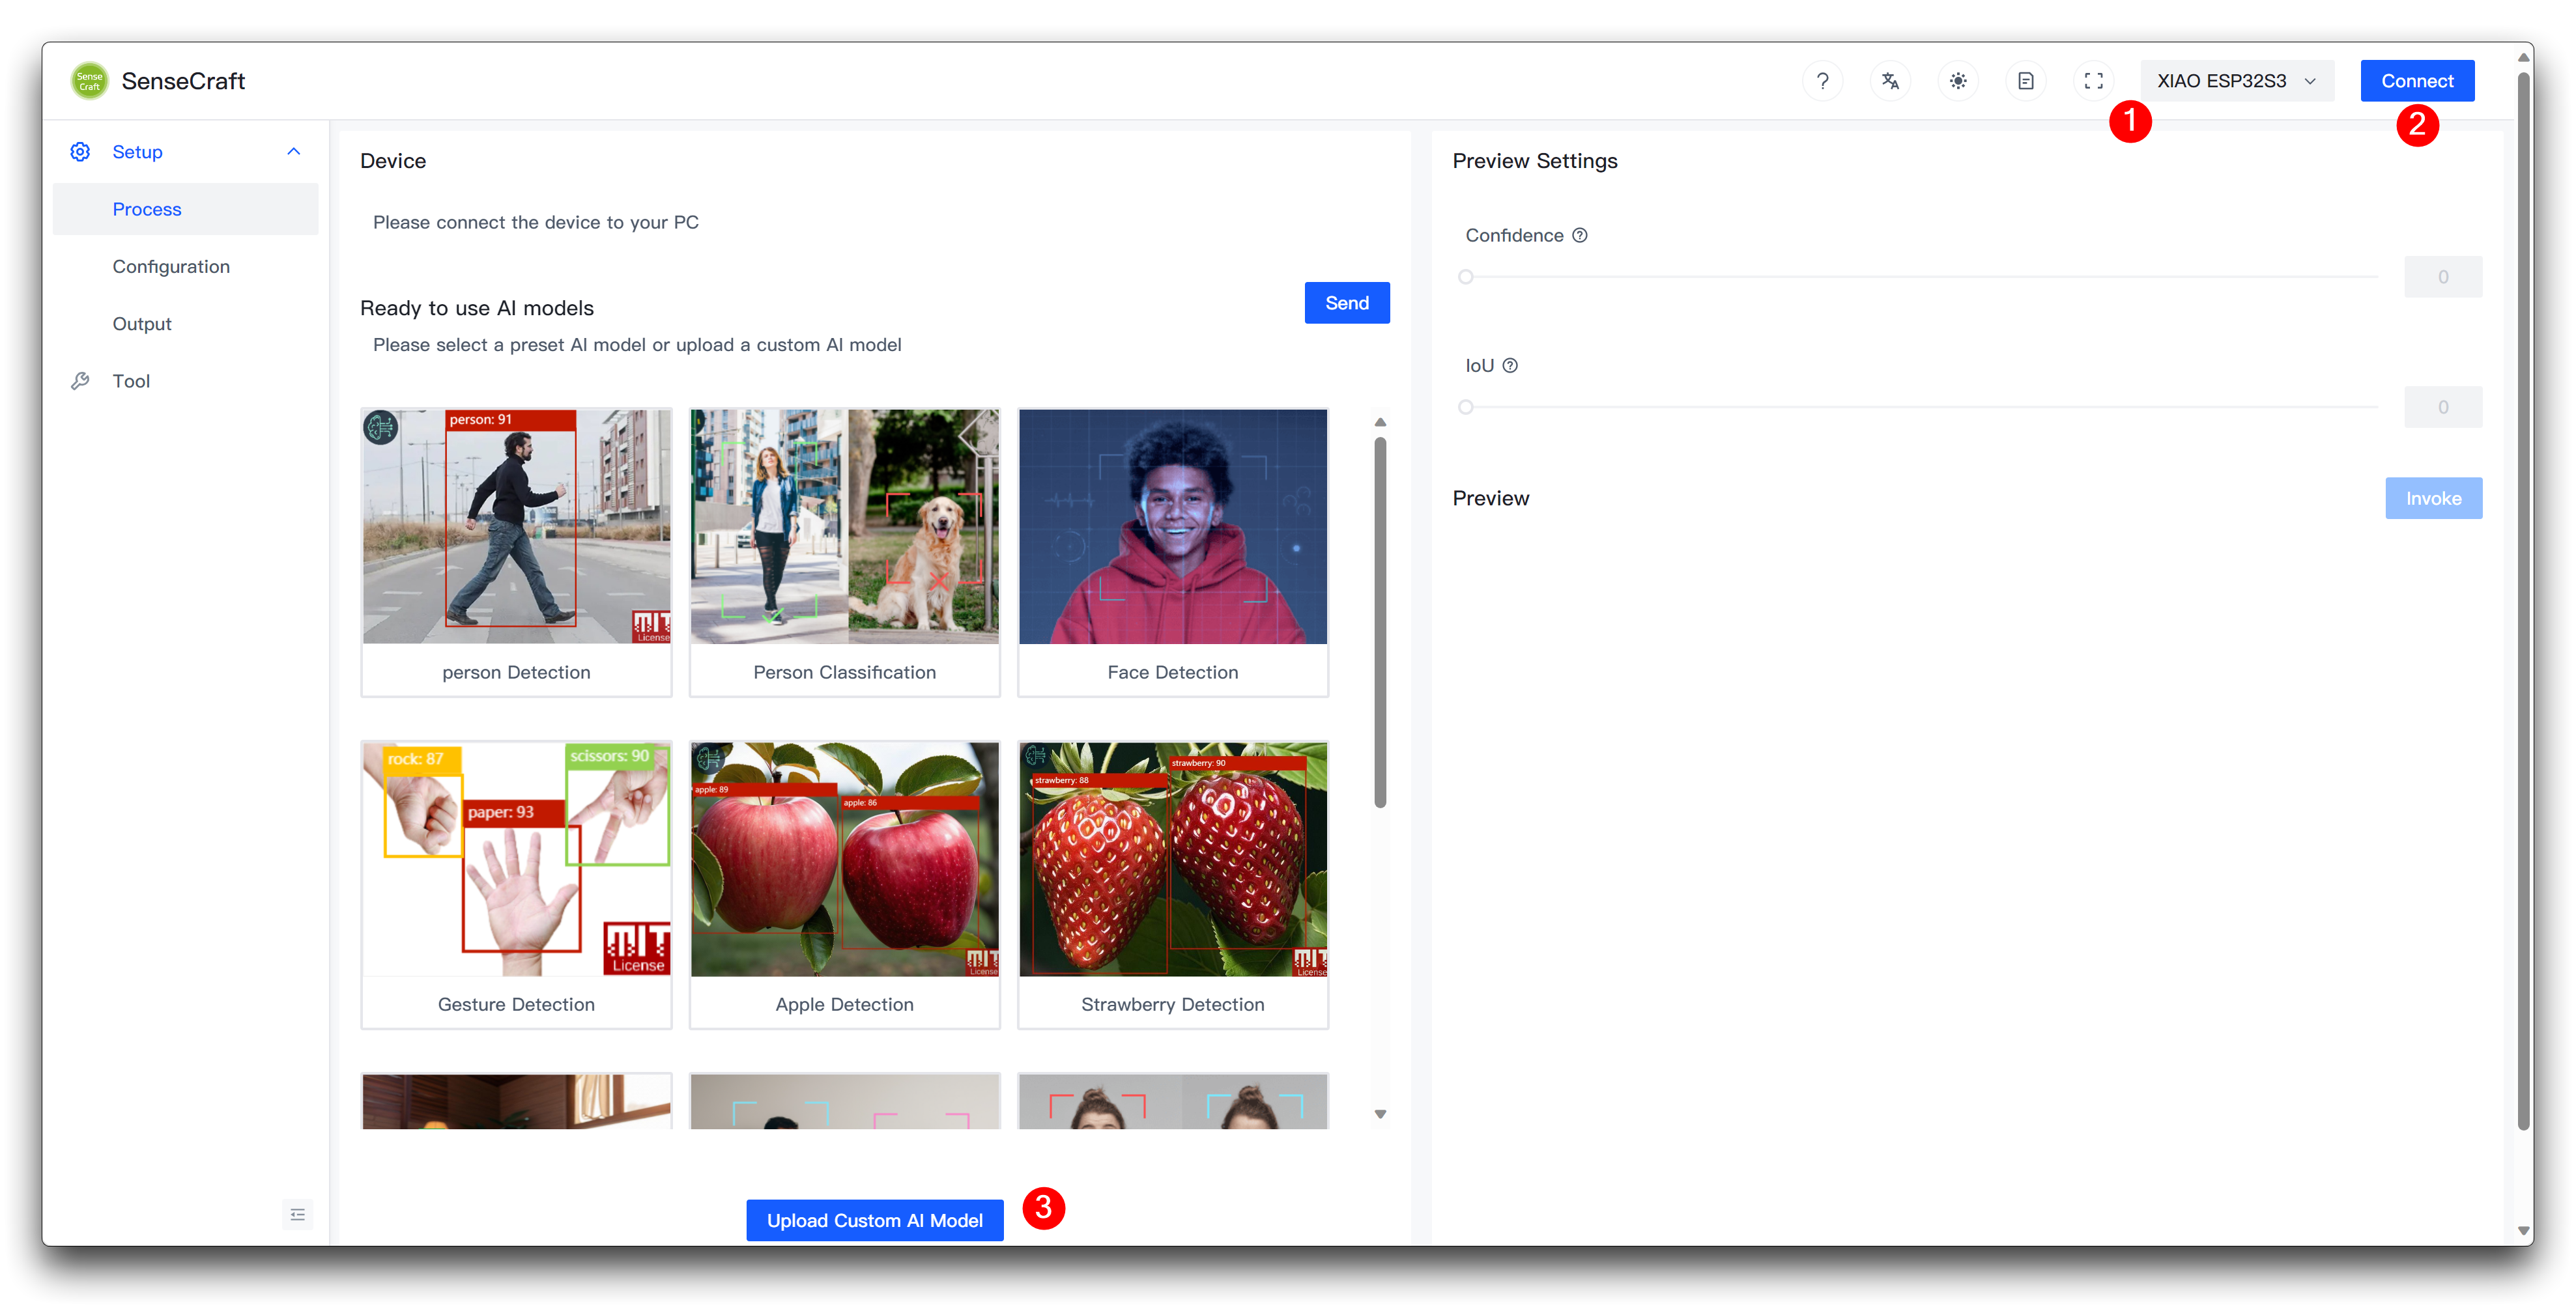
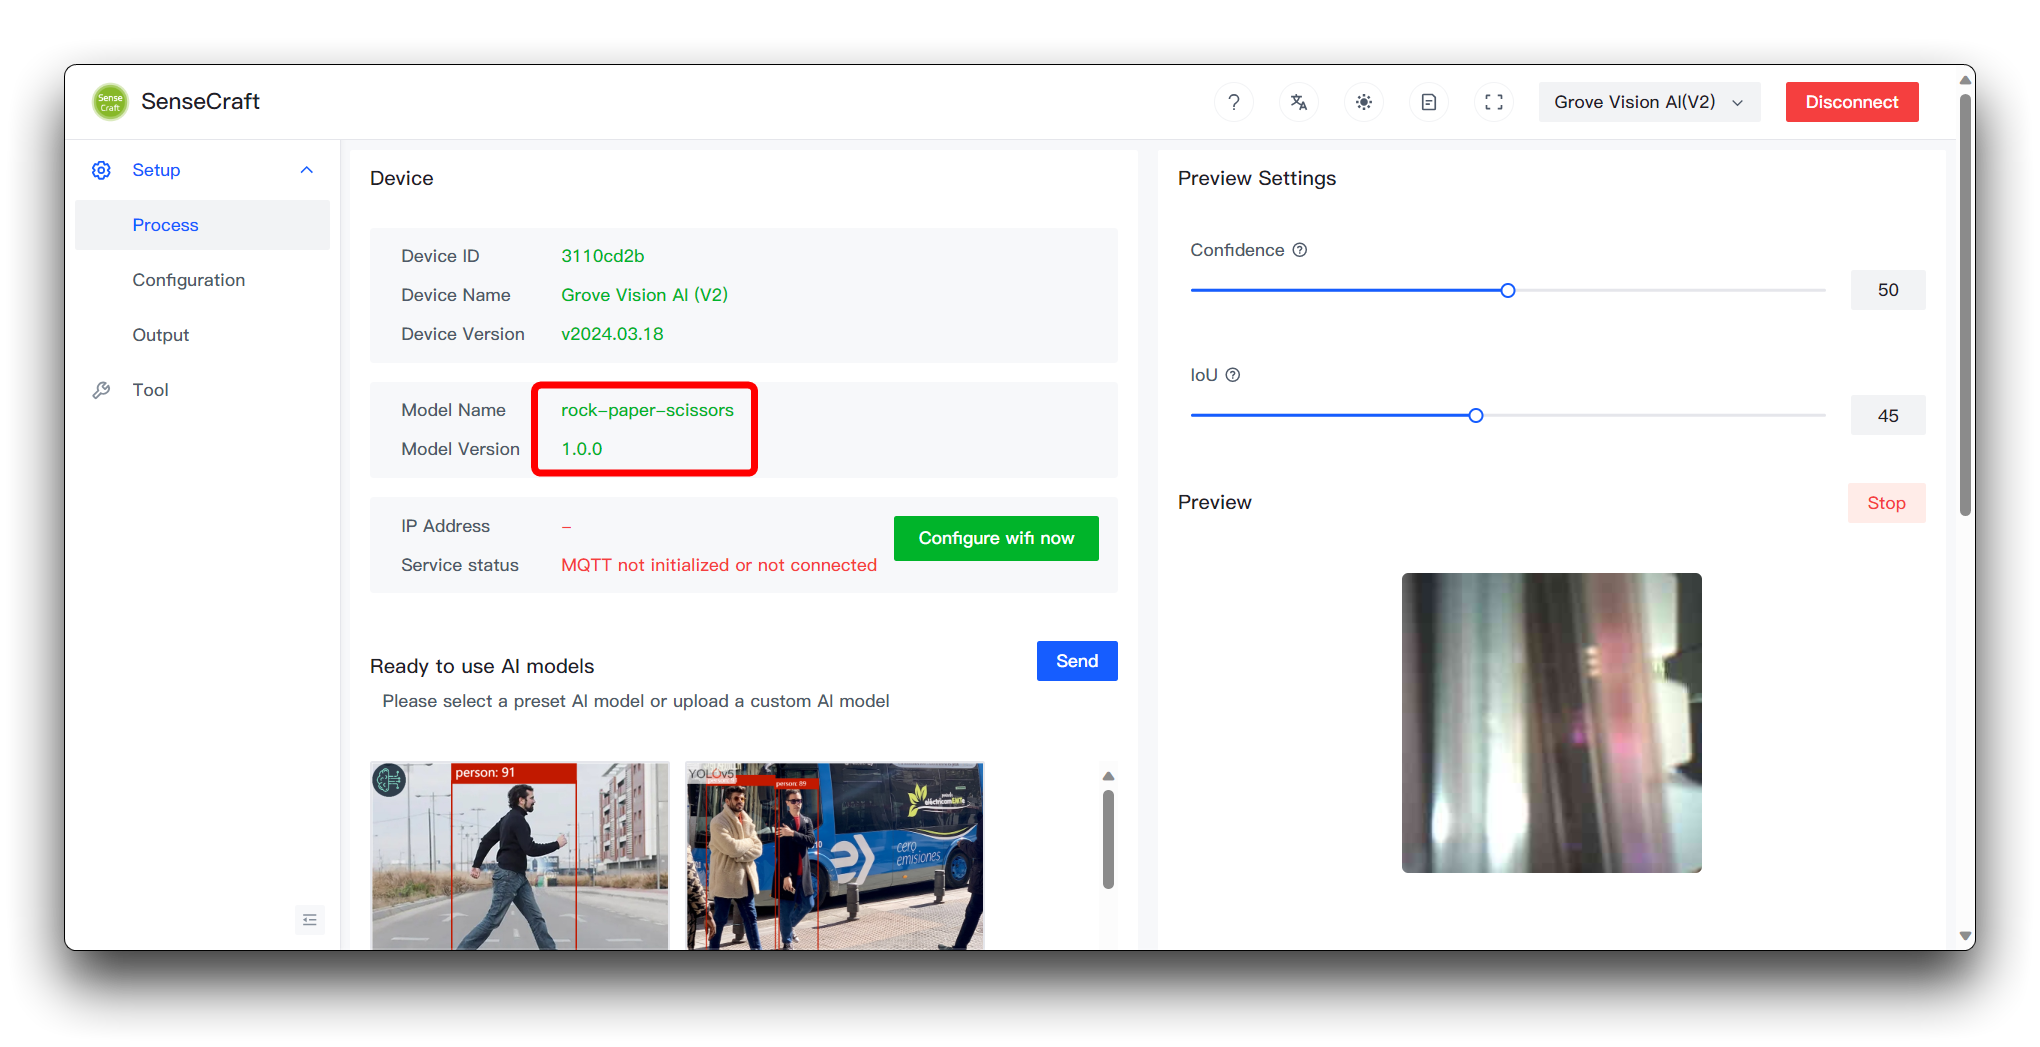
Step 7. Upload Custom model to XIAO ESP32S3
Next, we come to the Model Assistant page.
Please connect the device after selecting XIAO ESP32S3 and then select Upload Custom AI Model at the bottom of the page.
You will then need to prepare the name of the model, the model file, and the labels. I want to highlight here how this element of the label ID is determined.

If you are downloading Roboflow's dataset directly
If you downloaded Roboflow's dataset directly, then you can view the different categories and its order on the Health Check page. Just install the order entered here.
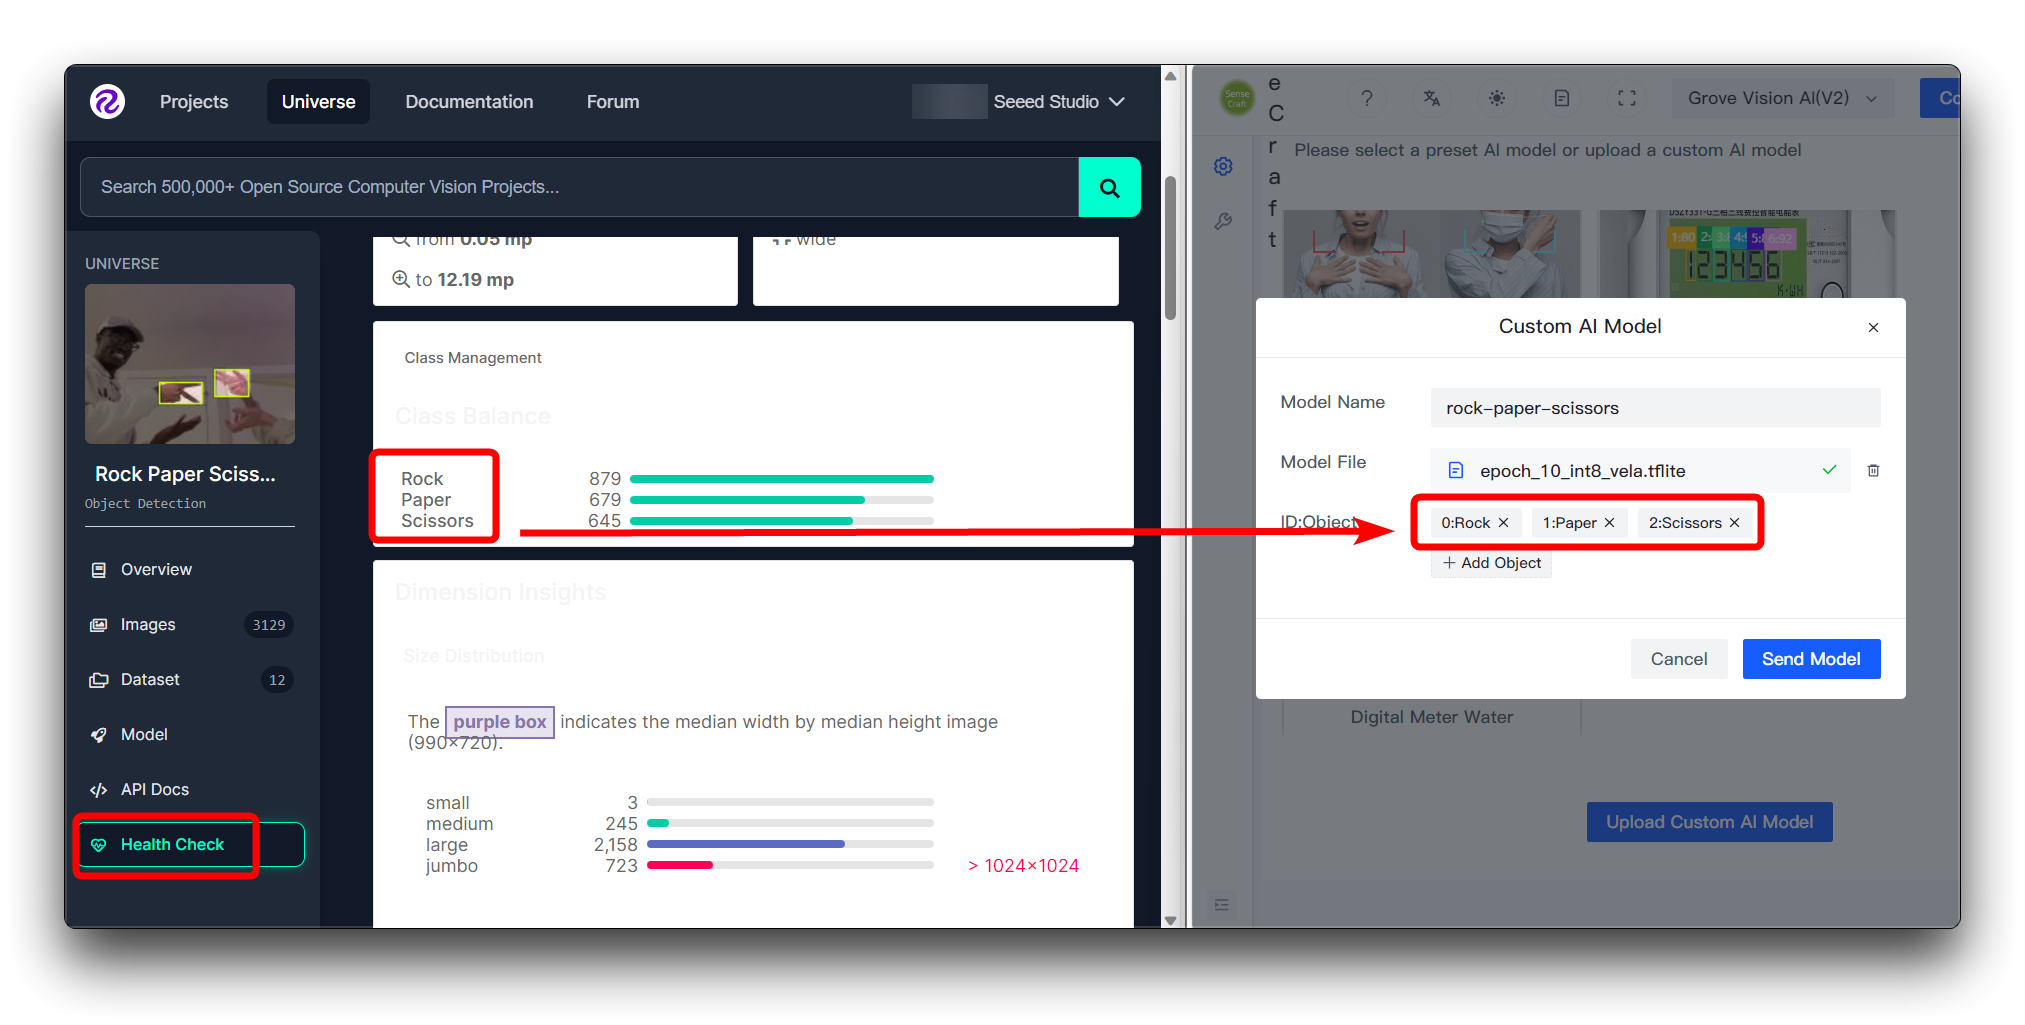
You don't need to fill in the numbers in ID:Object, just fill in the category name directly, the numbers and colons in front of the categories on the image are added automatically.
If you are using a custom dataset
If you are using a custom dataset, then you can view the different categories and its order on the Health Check page. Just install the order entered here.
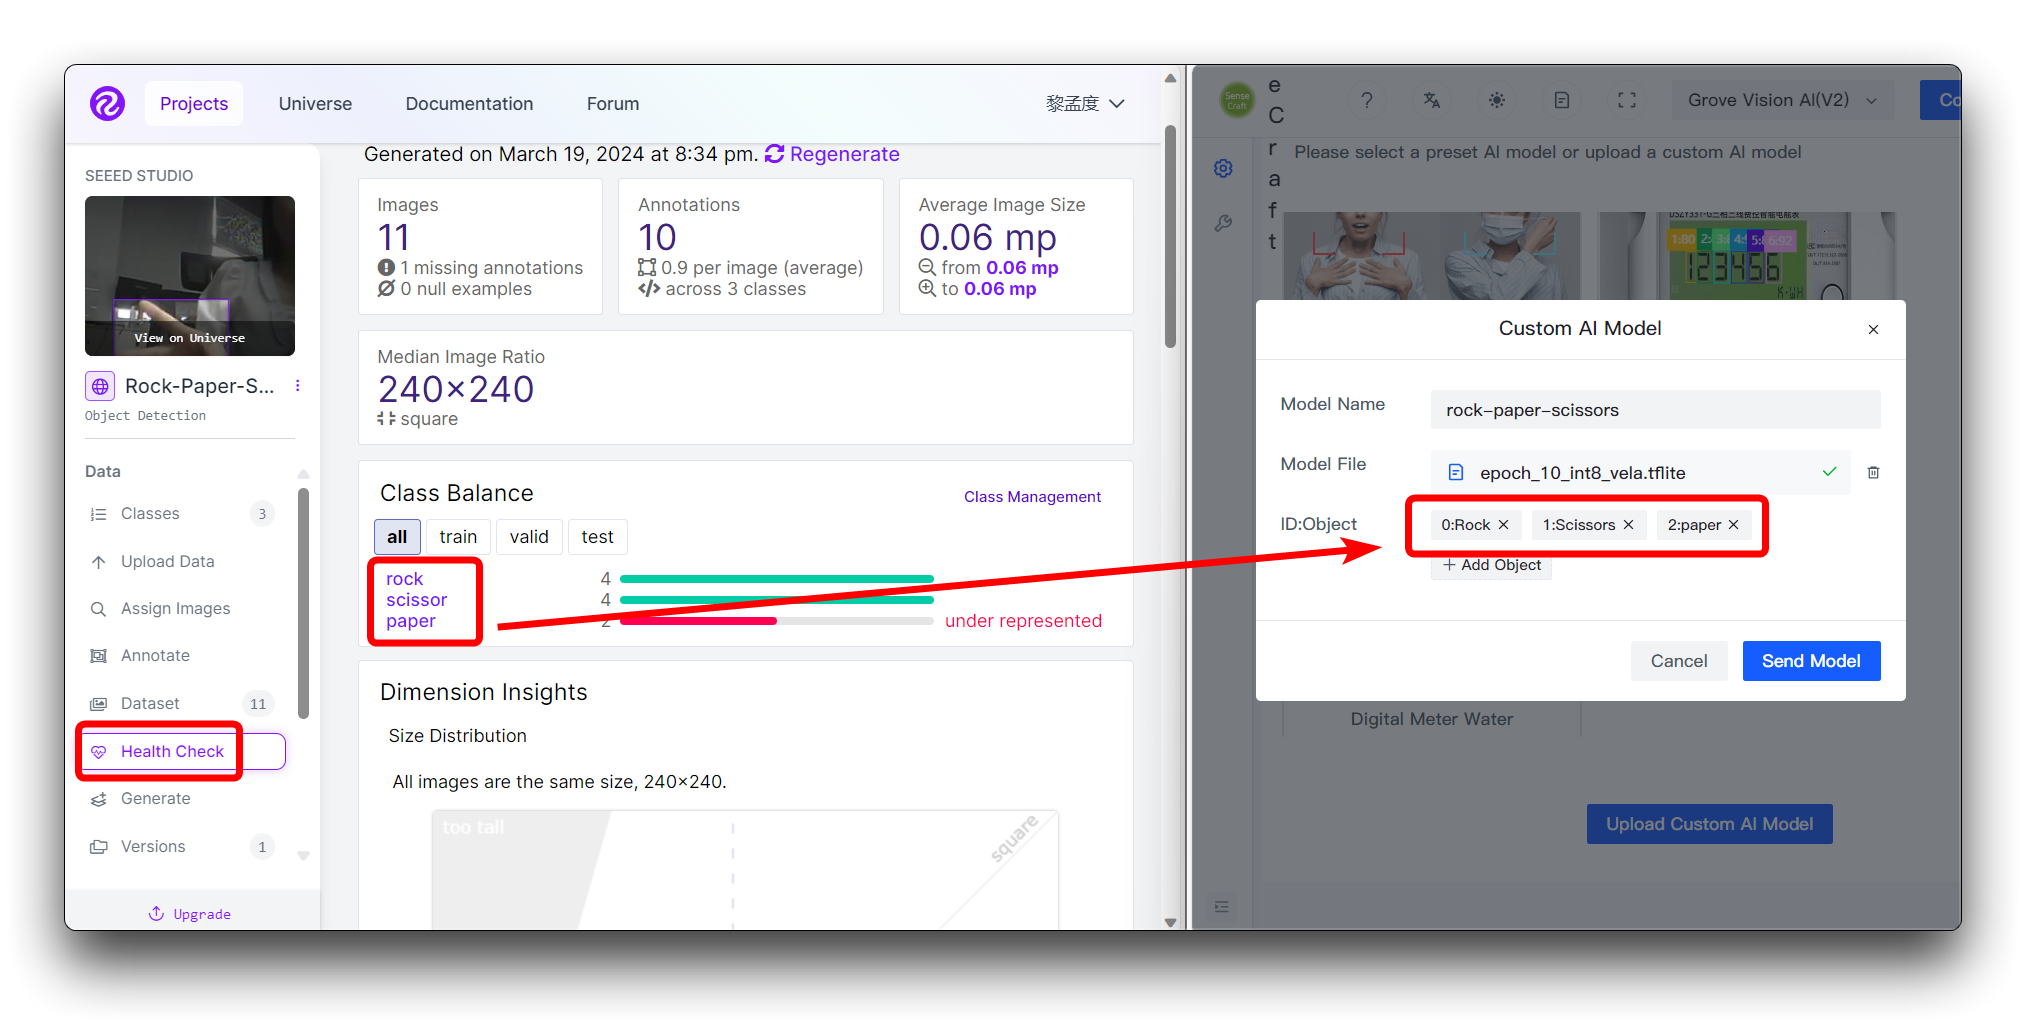
You don't need to fill in the numbers in ID:Object, just fill in the category name directly, the numbers and colons in front of the categories on the image are added automatically.
Then click Send Model in the bottom right corner. This may take about 3 to 5 minutes or so. If all goes well, then you can see the results of your model in the Model Name and Preview windows above.
Having made it this far, congratulations, you have been able to successfully train and deploy a model of your own.
Common protocols and applications of the model
During the process of uploading a custom model, in addition to the model files that we can visualise being uploaded, there is also the firmware of the device that needs to be transferred to the device. In the device's firmware, there is a set of established communication protocols that specify the format of the model results output, and what the user can do with the models.
Due to space issues, we won't be expanding on the specifics of these protocols in this wiki, we'll be detailing this section through documentation on Github. If you are interested in more in-depth development, please go here.
Troubleshooting
1. What if I follow the steps and end up with less than satisfactory model results?
If your model's recognition accuracy is unsatisfactory, you could diagnose and improve it by considering the following aspects:
-
Data Quality and Quantity
- Issue: The dataset might be too small or lack diversity, or there could be inaccuracies in the annotations.
- Solution: Increase the size and diversity of the training data, and perform data cleaning to correct any annotation errors.
-
Training Process
- Issue: Training time might be insufficient, or the learning rate could be improperly set, preventing the model from learning effectively.
- Solution: Increase the number of training epochs, adjust the learning rate and other hyperparameters, and implement early stopping to avoid overfitting.
-
Class Imbalance
- Issue: Some classes have significantly more samples than others, leading to model bias towards the majority class.
- Solution: Use class weights, oversample the minority classes, or undersample the majority classes to balance the data.
By thoroughly analyzing and implementing targeted improvements, you can progressively enhance your model's accuracy. Remember to use a validation set to test the performance of the model after each modification to ensure the effectiveness of your improvements.
2. Why do I see Invoke failed message in SenseCraft deployment after following the steps in the Wiki?
If you encounter an Invoke failed, then you have trained a model that does not meet the requirements for use with the device. Please focus on the following areas.
- Please check whether you have modified the image size of Colab. The default compression size is 192x192, Grove Vision AI V2 requires the image size to be compressed as square, please do not use non-square size for compression. Also don't use too large size (no more than 240x240 is recommended).
Tech Support & Product Discussion
Thank you for choosing our products! We are here to provide you with different support to ensure that your experience with our products is as smooth as possible. We offer several communication channels to cater to different preferences and needs.