Seeed Studio XIAO nRF52840 Sense Edge Impulse Getting Started
Welcome to this quickstart wiki on using Edge Impulse with Seeed Studio XIAO nRF52840 Sense! In this guide, we will explore how to use the onboard IMU sensor to detect human motion and classify different actions. Whether you're a seasoned developer or just starting out, this tutorial will provide you with the knowledge and skills you need to get started with Edge Impulse on the XIAO nRF52840 Sense board. So, let's dive in and get started!
Getting Started
In this wiki, we will show you how to utilize the accelerometer on Seeed Studio XIAO nRF52840 Sense combined with Edge Impulse to enable motion recognition. The codes we present here are supported by latest version of Seeed nRF52 Boards.
When it comes to embedded AI applications, we highly recommend using the "Seeed nrf52 mbed-enabled Boards Library".
Hardware
In this wiki, we need to prepare the following materials:
- Seeed Studio XIAO nRF52840 Sense
- Li-po battery (702025)
- Grove - OLED Display 0.66"
- Dupont cables or Grove cables
- 3D-printed shell
- Light guide plastic fiber

Hardware Set up
-
Step 1. Remove the Grove base on Grove - OLED Display 0.66" with a soldering iron
-
Step 2. Use wire cutters to process the DuPont cables to a length of about 3 cm and expose the inner cables of about 2 mm at both ends
-
Step 3. Pass the fiber through the small hole in the front and place the end at the LED
-
Step 4. Solder Seeed Studio XIAO nRF52840 Sense with other elements according to the diagram below:


It will be better if you use hot melt adhesive to reinforce welds.
-
Step 5. Assemble all components:
- Pass the fiber through the small hole in the front of shell
- Mount the screen to the fixed location
- Sandwich the battery between Seeed Studio XIAO nRF52840 and screen
- Handle the wires carefully
- Place the end of light guide plastic fiber at the RGB light of Seeed Studio XIAO nRF52840 and cut off the excess
- Assemble the case

The assemble one:

Software
The required libraries are listed below. It is highly recommanded that use the codes here to check whether the hardware is functioning well. If you have problem about installing the library, please refer to here.
To set Seeed Studio XIAO nRF52840 Sense up in Edge Impulse, you will need to install the following software:
- Node.js v12 or higher.
- Arduino CLI
- The Edge Impulse CLI and a serial monitor. Install by opening command prompt or terminal and run:
npm install -g edge-impulse-cli
Problems with installing the CLI? Please check Installation and troubleshooting for more reference.
Connecting to Edge Impulse
With all the software in place it's time to connect the development board to Edge Impulse.
- Step 1. Connect the Seeed Studio XIAO nRF52840 Sense to your computer via a USB Type-C cable.

- Step 2. Create a new project in Edge Impulse

- Step 3. Choose "Accelerometer data" and click "Let’s get started!"

Data Acquisition & Training
In this step we are trying collect the "Accelerometer data" from the Seeed Studio XIAO nRF52840 Sense onboard IMU to build a dataset and then later train the model with EdgeImpulse platform.
- Step 4. Upload "Accelerometer Raw Data" sketch to Seeed Studio XIAO nRF52840 Sense.
Download Seeed_Arduino_LSM6DS3 Library as a zip file
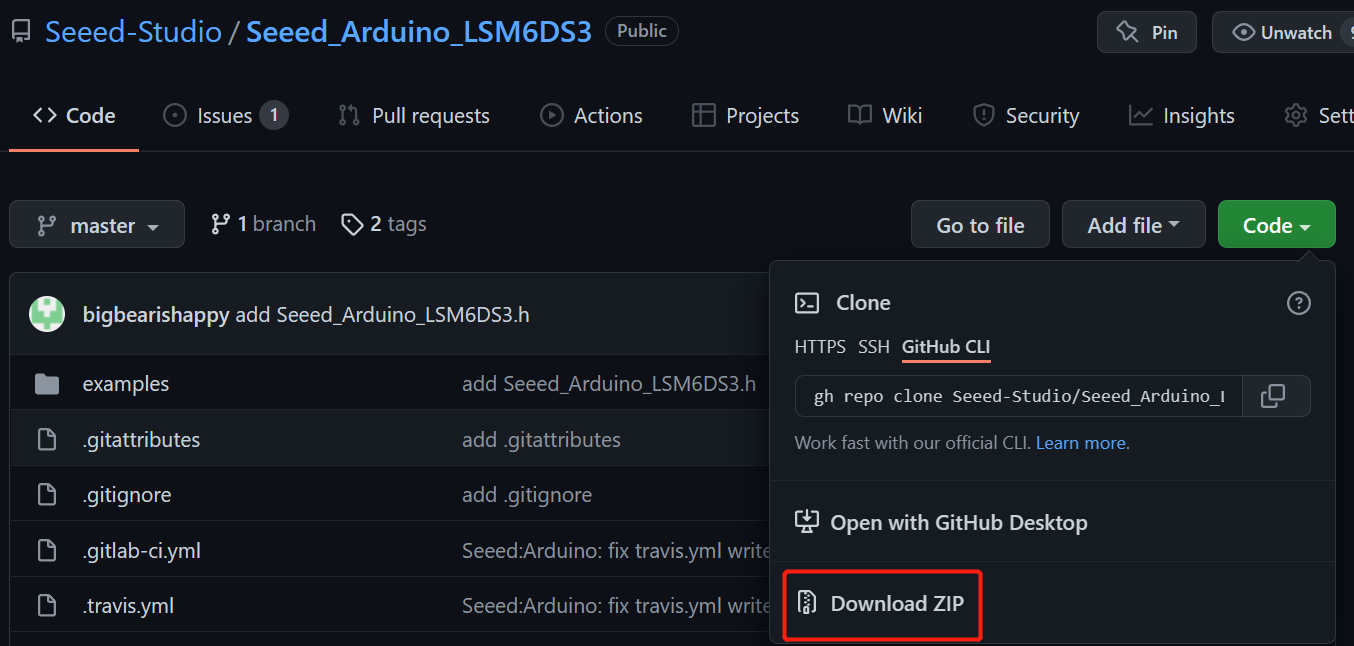
Open Arduino IDE, navigate to Sketch > Include Library > Add .ZIP Library... and open the downloaded zip file.

Upload the below codes and open the Serial Monitor
// XIAO BLE Sense LSM6DS3 Accelerometer Raw Data

#include "LSM6DS3.h"
#include "Wire.h"

//Create a instance of class LSM6DS3
LSM6DS3 myIMU(I2C_MODE, 0x6A);  //I2C device address 0x6A

#define CONVERT_G_TO_MS2 9.80665f
#define FREQUENCY_HZ 50
#define INTERVAL_MS (1000 / (FREQUENCY_HZ + 1))

static unsigned long last_interval_ms = 0;


void setup() {
  Serial.begin(115200);
  while (!Serial)
    ;

  if (myIMU.begin() != 0) {
    Serial.println("Device error");
  } else {
    Serial.println("Device OK!");
  }
}


void loop() {
  if (millis() > last_interval_ms + INTERVAL_MS) {
    last_interval_ms = millis();
    Serial.print(myIMU.readFloatAccelX() * CONVERT_G_TO_MS2, 4);
    Serial.print('\t');
    Serial.print(myIMU.readFloatAccelY() * CONVERT_G_TO_MS2, 4);
    Serial.print('\t');
    Serial.println(myIMU.readFloatAccelZ() * CONVERT_G_TO_MS2, 4);
  }
}
Now you will see the accelerometer and gyroscope data displayed one after the other on the serial monitor as below!

- Step 5. Run the command in your
terminalorcmdorpowershellto start it.
edge-impulse-data-forwarder
- Step 6. We need to use the CLI to connect the Seeed Studio XIAO nRF52840 Sense with Edge Impulse. First, login your account and choose your project

Name the accelerometer and the device.

- Step 7. Connect the XIAO nRF52840 Sense to Edge Inpulse
Move to Edge Impulse "Data acquisition" page, the outcome should be like this if the connection is successful. You can find the Device of "Seeed Studio XIAO nRF52840 Sense" is shown on the right of the page.
- Step 8. Select the sensor as "3 axes". Name your label as
upanddown, modify Sample length (ms.) to 20000 and click start sampling.

- Step 9. Swing the Seeed Studio XIAO nRF52840 Sense up and down and keep the motion for 20 seconds. You can find the acquistion is shown up like this:

- Step 10. Split the data by clicking the raw data right top and choose "Split Sample". Click +Add Segment and then click the graph. Repeat it more than 20 time to add segments. Click Split and you will see the the sample data each for 1 second.

- Step 11. Repeat Step 8. and Step 9. and label data with different name to click different motion data, like
leftandright,clockwise,anticlockwiseand so on. The example provided is classifying up and down, left and right, and circle. You can change it as you may want to change here.

In Step 9. the split time is 1 second which means you at least do one swing of up and down in one second in Step 8. Otherwise, the results will not be accurate. Meanwhile, you can adjust the split time according to your own motion speed.
Building a machine learning model
- Step 12. Rebalance the dataset, Click Dashboard and drop down page to find Perform train / test split
Click Perform train / test split and choose Yes and confirm it

- Step 13. Create Impulse
Click Create impulse -> Add a processing block -> Choose Spectral Analysis -> Add a learning block -> Choose Classification (Keras) -> Save Impulse

- Step 14. Spectral features
Click and Set up

Click Spectral features -> Drop down page to click Save parameters -> Click Generate features

The output page should be like:

- Step 15. Training your model
Click NN Classifier -> Click Start training -> Choose Unoptimized (float32)

The precision of the training model is very important to the final result. If your output training results are as low as less than 65%, we highly recommand you train for more times.
Deploying to Seeed Studio XIAO nRF52840 Sense
- Step 16. Model testing
Click Model testing -> Click Classify all

If your accuracy is low, you can check you dataset by increasing the training set and extending the sample time
- Step 17. Build Arduino library
Click Deployment -> Click Arduino Library -> Click Build -> Download the .ZIP file

- Step 18. The name of .ZIP file is very important, it is set up as your name of the Edge Impulse project by default. Like here the project of the name is "XIAO-BLE-gestures_inferencing". Select the file as ""Add the ".ZIP file" to your Arduino libraries


- Step 19. Download the code here. Change the name of your headfile as the name of your own and upload it.

- Step 20. Move or hold the Seeed Studio XIAO nRF52840 Sense and check the results:
Click the monitor on the top right corner of Arduino.

When you move the Seeed Studio XIAO nRF52840 Sense in the left and right direction:
The monitor will output something like:

And the output display is like:

When you move the Seeed Studio XIAO nRF52840 Sense in the up and down direction:
The monitor will output something like:

And the output display is like:

When you hold the Seeed Studio XIAO nRF52840 Sense in the idle state:
The monitor will output something like:

And the output display is like:

Congratulation! You acheve the end of the project. It is encouraged that you can try more directions and check which one will perform the best output.
Resources
Tech Support & Product Discussion
Thank you for choosing our products! We are here to provide you with different support to ensure that your experience with our products is as smooth as possible. We offer several communication channels to cater to different preferences and needs.