Getting Started with L76K GNSS Module for SeeedStudio XIAO
Introduction
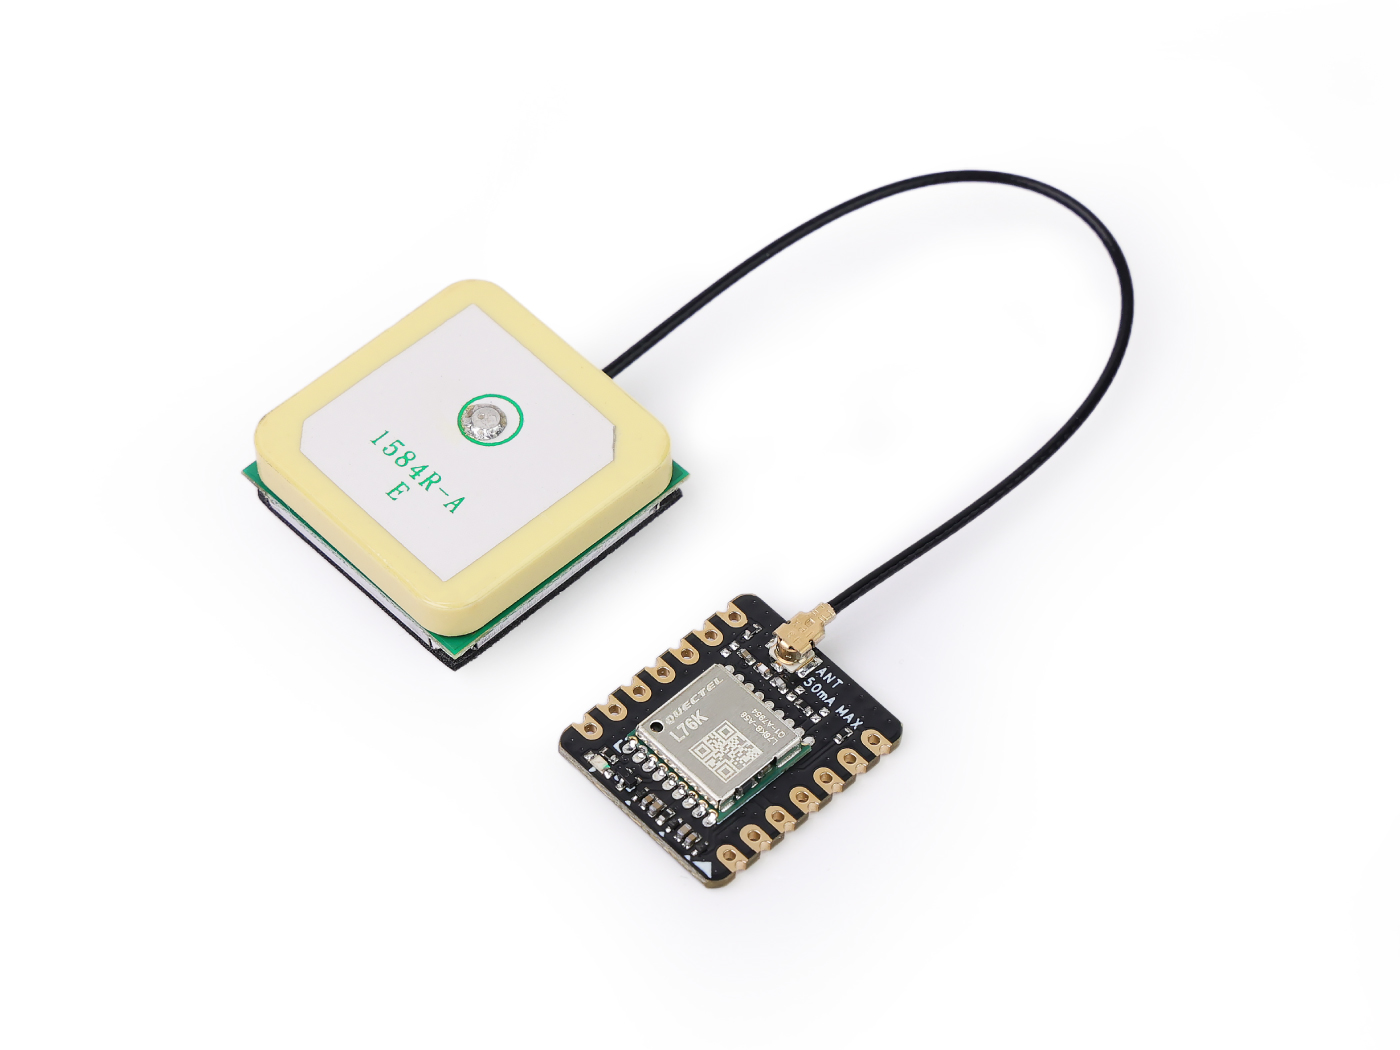
L76K GNSS Module for SeeedStudio XIAO is a Multi-GNSS (Global Navigation Satellite System) module compatible with all XIAO development boards, supports GPS, BeiDou (BDS), GLONASS and QZSS systems, allows multi-system combined or single-system independent positioning. It also supports AGNSS function, built-in low-noise amplifier and sound surface filter, and provides a good positioning experience of fast, accurate, high-performance.
The module comes with a high-performance active GNSS antenna intended to cover GPS L1 C/A, BeiDou B1 and GLONASS L1 bands. The design also has a tiny bright green LED for indicating the 1PPS output on fix.
Features
- Enhanced Reception: Built-in Low Noise Amplifier and Surface Acoustic Wave Filter for improved sensitivity and noise reduction
- High Precision: 32/72 channels, -162dBm tracking, -160dBm re-acquisition sensitivity
- Energy Efficiency: 41mA tracking/acquisition, 360µA standby
- Multi-GNSS Systems: Powered by Quectel L76K, supporting GPS, BeiDou, GLONASS and QZSS
- Ceramic Antenna: Enhanced signal reception, superior to traditional antennas.
Specification
| Item | Detail |
|---|---|
| GNSS bands | GPS L1 C/A: 1575.42MHz GLONASS L1: 1602MHz BeiDou B1: 1561.098MHz |
| Channels | 32 tracking ch/72 acquisition ch |
| TTFF (Time To First Fix) | Cold Starts: 30s(w/o AGNSS), 5.5s(w/ GNSS) Hot Starts: 5.5s(w/o AGNSS), 2s(w/ AGNSS) |
| Sensitivity | Auto-aquisition: -148dBm Tracking: -162dBm Re-acquisition: -160dBm |
| Accuracy | Position: 2.0m CEP Velocity: 0.1m/s Acceleration: 0.1m/s² Timing: 30ns |
| UART Interface | Baud Rate: 9600~115200bps(9600bps default) Update Rate: 1Hz(default), 5Hz(Max.) Protocol: NMEA 0183, CASIC proprietary protocol |
| Antenna | Type: Active Antenna Operating Frequency: 1559–1606MHz Coaxial Cable: RF1.13 Length=10cm Cable Connector: U.FL Plug RA |
| Current consumption(w/ active antenna) | Auto-aquisition: 41mA Tracking: 41mA Standby: 360uA |
| Dimension | 18mm x 21mm |
Hardware Overview
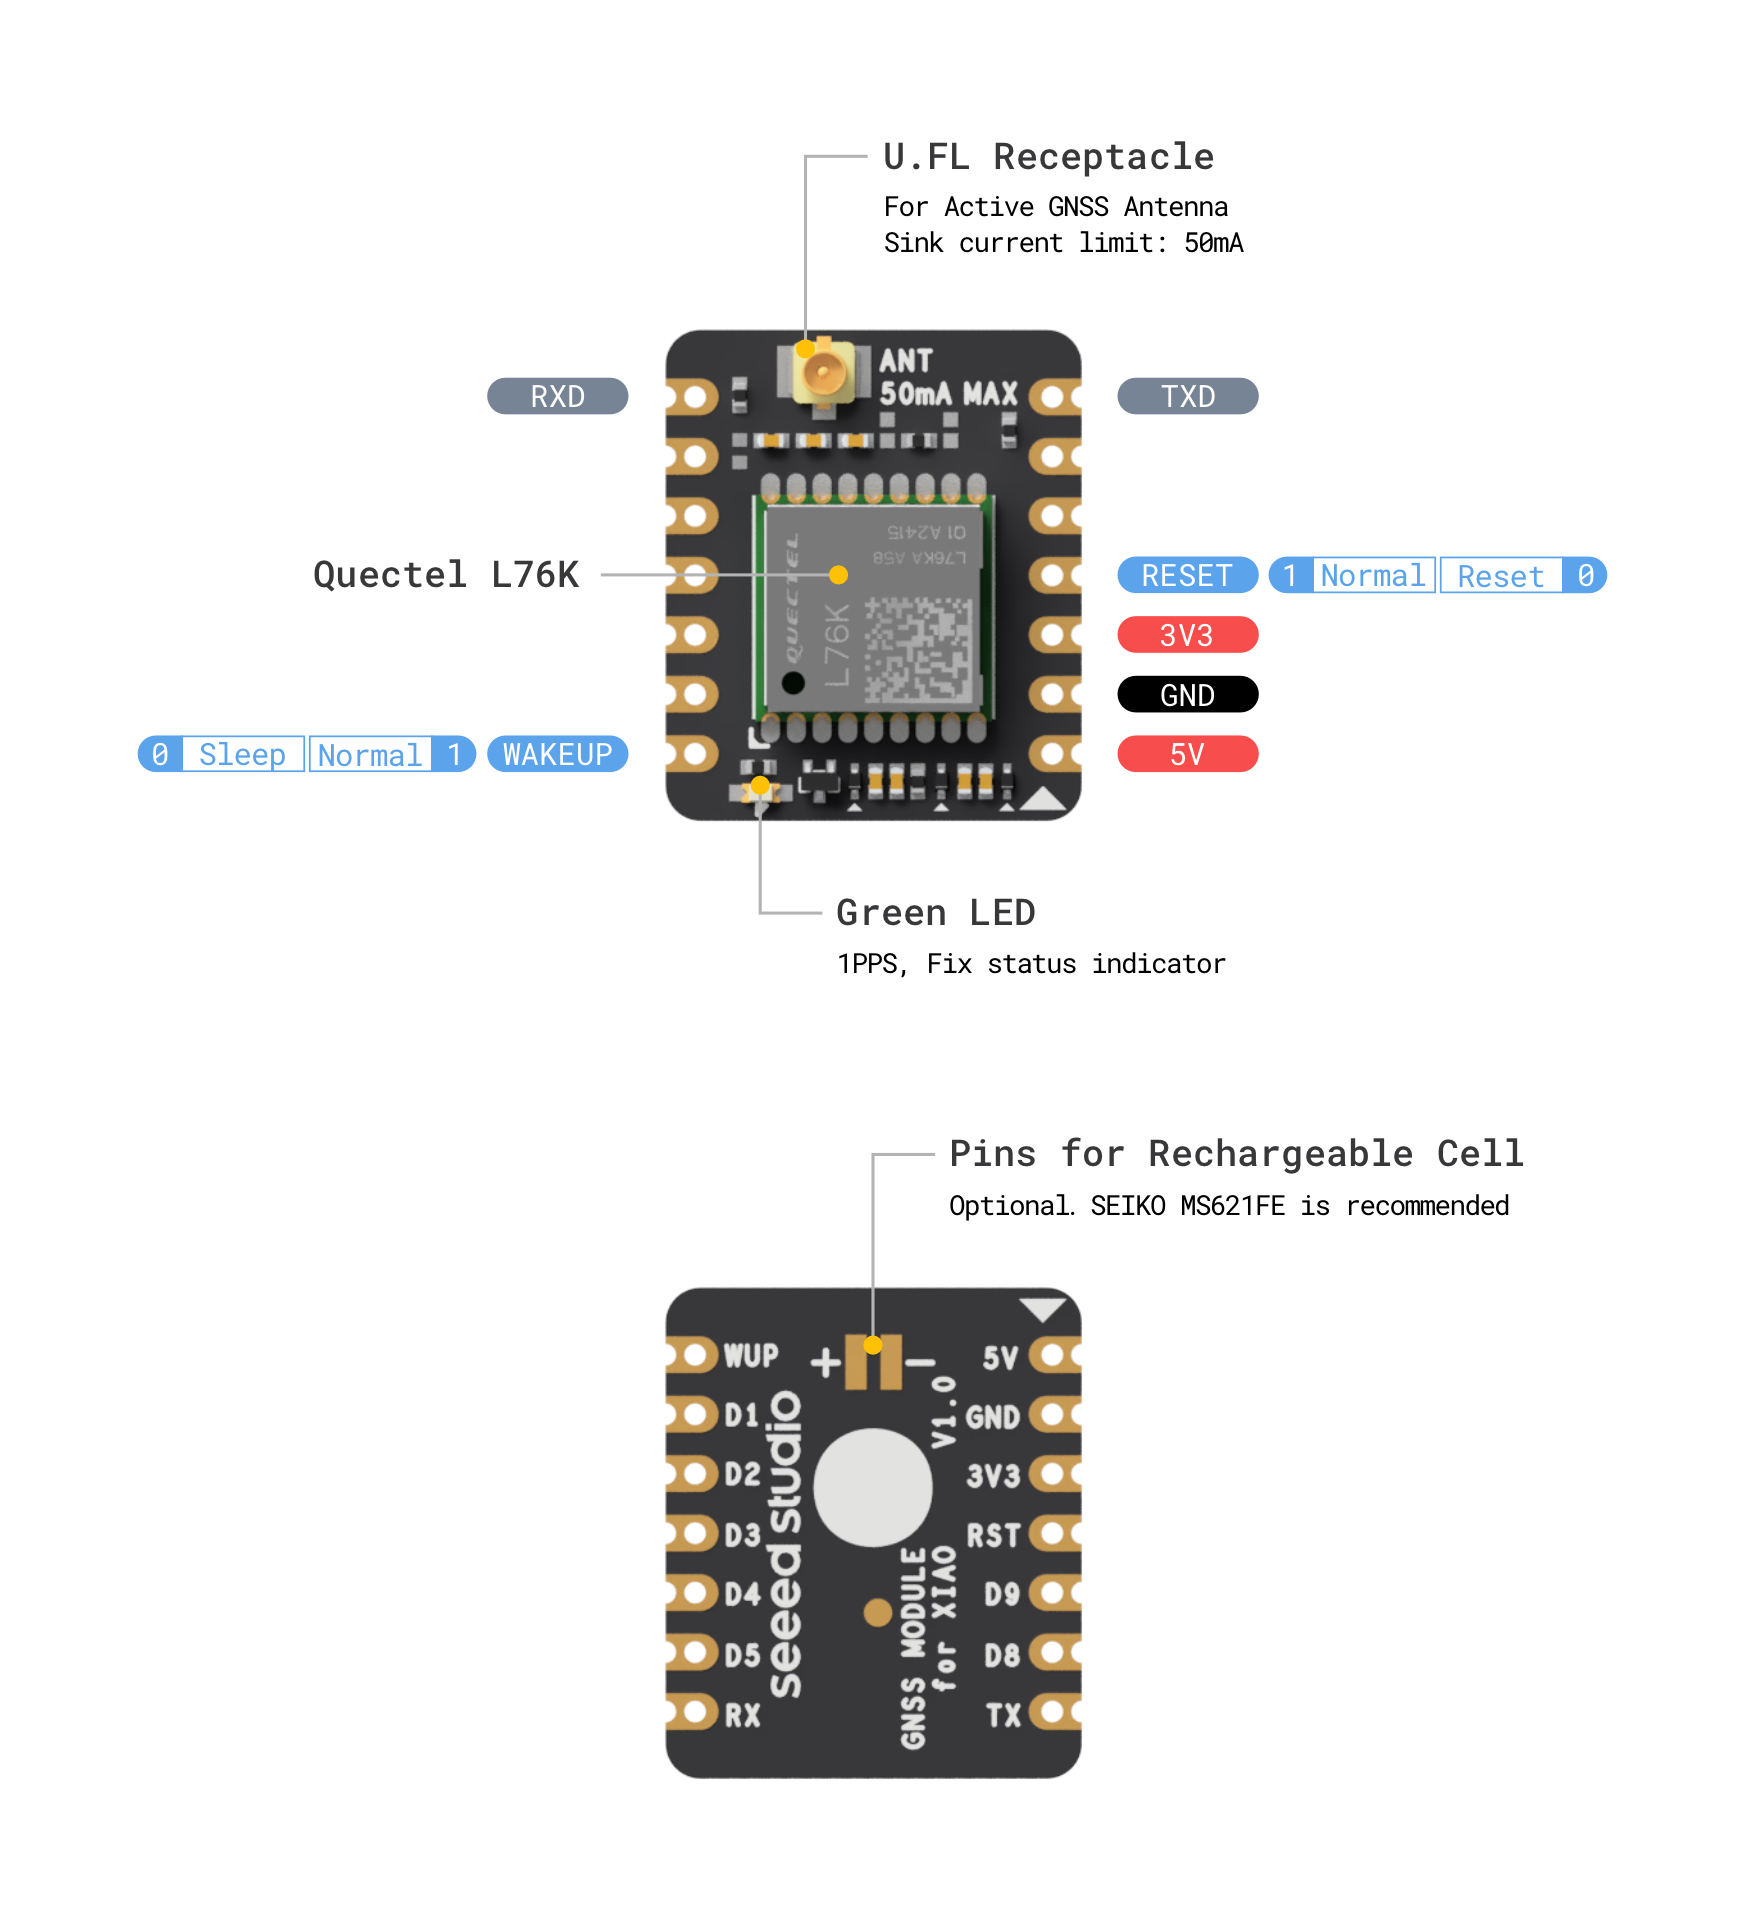
Before we start, we can refer to the following pictures to understand the pin design of the L76K GNSS Module for SeeedStudio XIAO to facilitate our understanding of the function of the module.
Getting Started
Hardware Preparation
To fully experience the capabilities of the L76K GNSS Module, we recommend pairing it with a motherboard from our XIAO series. Any of the following XIAO models would be compatible for use with the L76K GNSS Module.
| Seeed Studio XIAO SAMD21 | Seeed Studio XIAO RP2040 | Seeed Studio XIAO nRF52840 (Sense) | Seeed Studio XIAO ESP32C3 | Seeed Studio XIAO ESP32S3 (Sense) |
|---|---|---|---|---|
 |  |  |  |  |
Before using this module on a XIAO motherboard, you need to install the header sockets on the module and plug the active GNSS antenna onto the module. When connecting to the XIAO, please pay special attention to the installation direction of the module, please do not plug it in backwards, otherwise it is likely to burn the module or the XIAO.
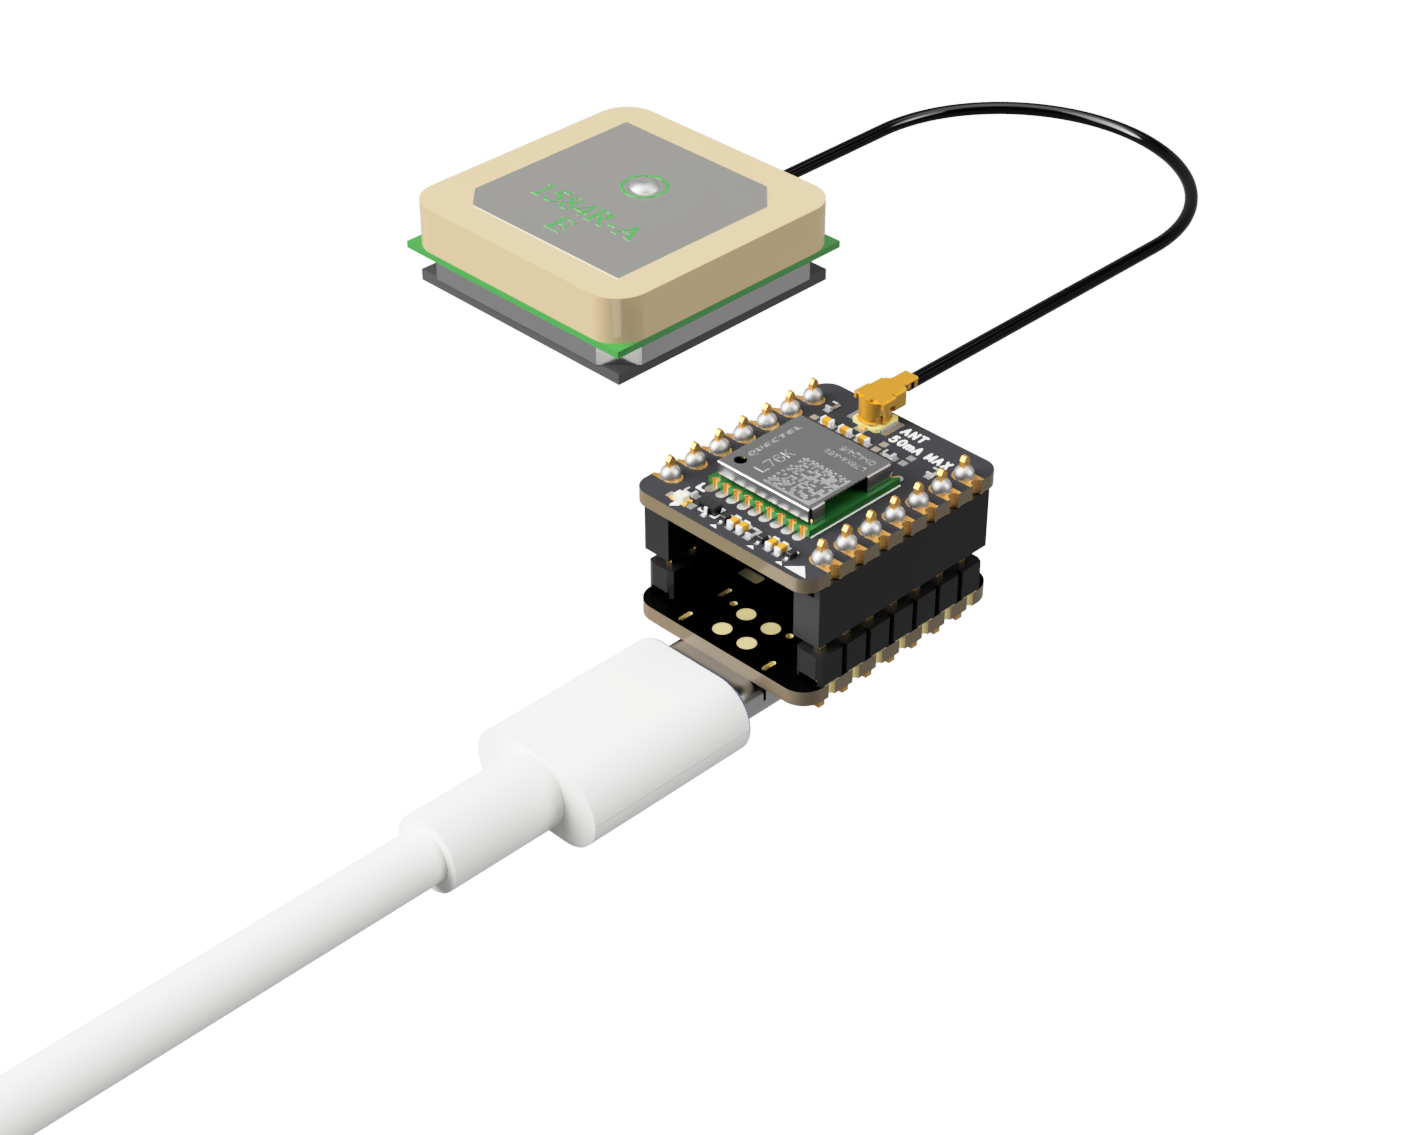
Please pay special attention to the installation direction of the module, please do not plug it in backwards, otherwise it is likely to burn the module or the XIAO.
Software Preparation
To use the L76K GNSS Module for SeeedStudio XIAO, we need to program the XIAO series. The recommended programming tool is the Arduino IDE, and you need to configure the Arduino environment for the XIAO and add the on-board package.
If this is your first time using Arduino, we highly recommend you to refer to Getting Started with Arduino.
Step 1. Download and Install the stable version of Arduino IDE according to your operating system
Step 2. Launch the Arduino application
Step 3. Configure the Arduino IDE for the XIAO you are using
If you want to use Seeed Studio XIAO SAMD21 for the later routines, please refer to this tutorial to finish adding.
If you want to use Seeed Studio XIAO RP2040 for the later routines, please refer to this tutorial to finish adding.
If you want to use Seeed Studio XIAO nRF52840 for the later routines, please refer to this tutorial to finish adding.
If you want to use Seeed Studio XIAO ESP32C3 for the later routines, please refer to this tutorial to finish adding.
If you want to use Seeed Studio XIAO ESP32S3 for the later routines, please refer to this tutorial to finish adding.
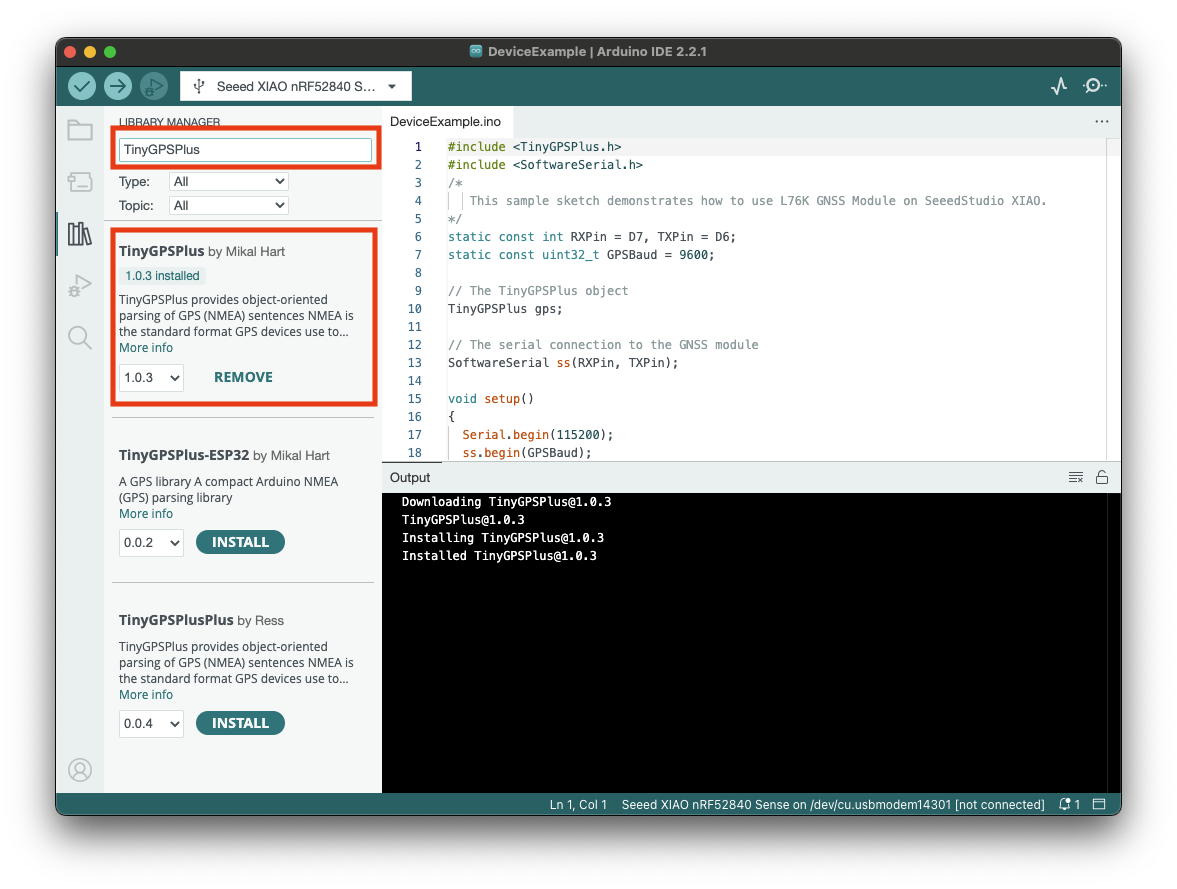
Step 4. Add the TinyGPSPlus library to Arduino
First, you need to search and download the latest version TinyGPSPlus library in the Arduino IDE.
Application Demo
Example 1: Reading and Displaying GNSS Data
Once the hardware and software are ready, we start uploading our first example program. The L76K GNSS Module prints the GNSS information via the serial port every 1 second after powering up. In this example, we will use TinyGPSPlus library to parse the NMEA sentences received from the module and print the results including atitude, longitude and time to the Arduino IDE's Serial Monitor.
Here is the source code:
#include <TinyGPSPlus.h>
#include <SoftwareSerial.h>
/*
   This sample sketch demonstrates how to use L76K GNSS Module on SeeedStudio XIAO.
*/
static const int RXPin = D7, TXPin = D6;
static const uint32_t GPSBaud = 9600;

// The TinyGPSPlus object
TinyGPSPlus gps;

// The serial connection to the GNSS module
SoftwareSerial ss(RXPin, TXPin);

void setup() {
  Serial.begin(115200);
#ifdef ARDUINO_SEEED_XIAO_RP2040
  pinMode(D2,OUTPUT);
  digitalWrite(D2,1);
  pinMode(D0,OUTPUT);
  digitalWrite(D0,1);
#endif
  ss.begin(GPSBaud);

  Serial.println(F("DeviceExample.ino"));
  Serial.println(F("A simple demonstration of TinyGPSPlus with L76K GNSS Module"));
  Serial.print(F("Testing TinyGPSPlus library v. "));
  Serial.println(TinyGPSPlus::libraryVersion());
  Serial.println(F("by Mikal Hart"));
  Serial.println();
}

void loop() {
  // This sketch displays information every time a new sentence is correctly encoded.
  while (ss.available() > 0)
    if (gps.encode(ss.read()))
      displayInfo();

  if (millis() > 5000 && gps.charsProcessed() < 10) {
    Serial.println(F("No GPS detected: check wiring."));
    while (true);
  }
}

void displayInfo() {
  Serial.print(F("Location: "));
  if (gps.location.isValid()) {
    Serial.print(gps.location.lat(), 6);
    Serial.print(F(","));
    Serial.print(gps.location.lng(), 6);
  } else {
    Serial.print(F("INVALID"));
  }

  Serial.print(F("  Date/Time: "));
  if (gps.date.isValid()) {
    Serial.print(gps.date.month());
    Serial.print(F("/"));
    Serial.print(gps.date.day());
    Serial.print(F("/"));
    Serial.print(gps.date.year());
  } else {
    Serial.print(F("INVALID"));
  }

  Serial.print(F(" "));
  if (gps.time.isValid()) {
    if (gps.time.hour() < 10) Serial.print(F("0"));
    Serial.print(gps.time.hour());
    Serial.print(F(":"));
    if (gps.time.minute() < 10) Serial.print(F("0"));
    Serial.print(gps.time.minute());
    Serial.print(F(":"));
    if (gps.time.second() < 10) Serial.print(F("0"));
    Serial.print(gps.time.second());
    Serial.print(F("."));
    if (gps.time.centisecond() < 10) Serial.print(F("0"));
    Serial.print(gps.time.centisecond());
  } else {
    Serial.print(F("INVALID"));
  }

  Serial.println();
}
Just select the XIAO you are using and the port number where the XIAO is located, compile and upload it.
Make sure that the L76K GNSS Module is placed outdoor where good GNSS signals can be received. Upload the code to your XIAO and wait a few minutes, you should see the information displayed on the serial monitor.
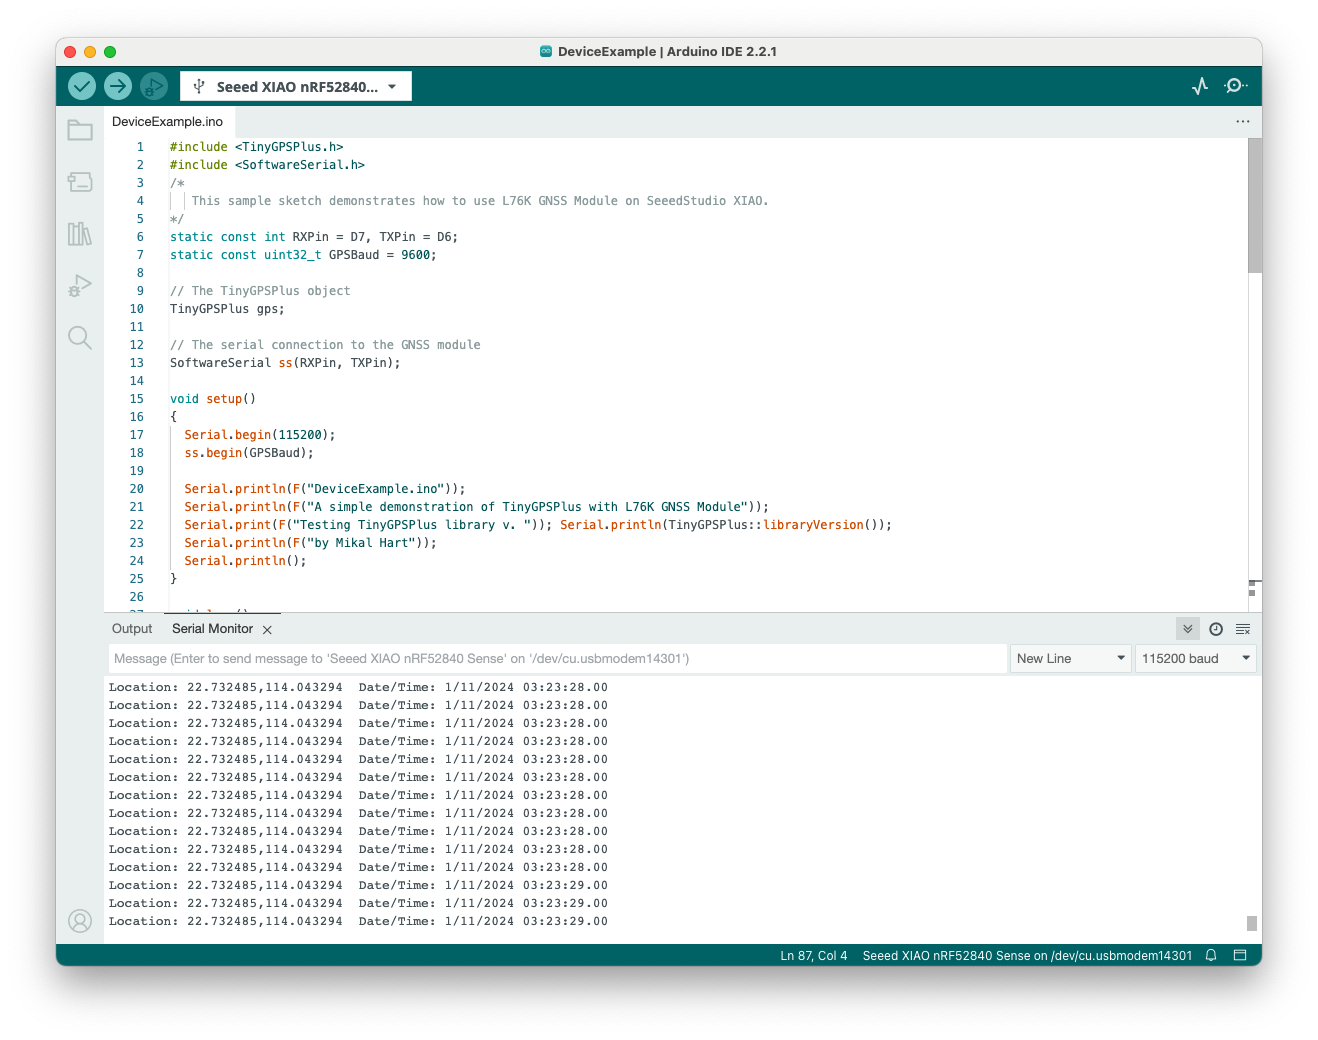
This code uses the TinyGPSPlus library to read data from the L76K GNSS module via a serial connection and displays valid location information and date/time on the serial monitor.
Configuration
Example 1: Change the behaviour of LED
This section demonstrates how to control a green LED using Arduino by sending specific hexadecimal commands through serial communication. The example provided below shows how to turn off the LED and then return it to its normal blinking state.
static const int RXPin = D7, TXPin = D6;
static const uint32_t GPSBaud = 9600;
SoftwareSerial SerialGNSS(RXPin, TXPin);

void setup() {
  SerialGNSS.begin(GPSBaud);

  // Define the byte array to turn the LED off
  byte OffState[] = {0xBA, 0xCE, 0x10, 0x00, 0x06, 0x03, 0x40,
                     0x42, 0x0F, 0x00, 0xA0, 0x86, 0x01, 0x00,
                     0x00,
                     0x00, 0x01, 0x05, 0x00, 0x00, 0x00, 0x00,
                     0xF0,
                     0xC8, 0x17, 0x08};

  // Define the byte array to recover the LED blinking state
  byte RecoverState[] = {0xBA, 0xCE, 0x10, 0x00, 0x06, 0x03, 0x40,
                         0x42, 0x0F, 0x00, 0xA0, 0x86, 0x01, 0x00,
                         0x03,
                         0x00, 0x01, 0x05, 0x00, 0x00, 0x00, 0x00,
                         0xF3,
                         0xC8, 0x17, 0x08};

  // Send the command to turn off the LED.
  SerialGNSS.write(OffState, sizeof(OffState));
  // Wait for 5 seconds.
  delay(5000);
  // Send the command to return the LED to blinking.
  SerialGNSS.write(RecoverState, sizeof(RecoverState));
}

void loop() {}
For details to see CASIC Protocol Messages of Quectel_L76K_GNSS.
struct CASIC_Messages {
  uint16_t header; // 0xBA, 0xCE
  uint16_t len;    // 0x10, 0x00
  uint8_t class;   // 0x06
  uint8_t id;      // 0x03
  uint8_t* payload; // 0x40, 0x42, 0x0F, 0x00, 0xA0, 0x86, 0x01, 0x00, ->8
                   // 0x00, 0x00, 0x01, 0x05, 0x00, 0x00, 0x00, 0x00, ->8
  uint8_t checksum; // 0xF0,0xC8, 0x17, 0x08
} L76KStruct;
Resources
- PDF: L76K GNSS Module for Seeed Studio XIAO Schematic
- PDF: QuectelL76K_GNSS协议规范_V1.0
- PDF: Quectel_L76K_GNSS_Protocol_Specification_V1.1
- GitHub: Seeed_L76K-GNSS_for_XIAO
Troubleshooting
Can the rechargeable cell power XIAO?
Why doesn't the GNSS information display on the serial monitor?
Make sure that the L76K GNSS Module is placed outdoor where good GNSS signals can be received.
Why does the device's green light stay on constantly when plugged into the XIAO RP2040?
pinMode(D2,OUTPUT);
digitalWrite(D2,1);
pinMode(D0,OUTPUT);
digitalWrite(D0,1);
Tech Support & Product Discussion
Thank you for choosing our products! We are here to provide you with different support to ensure that your experience with our products is as smooth as possible. We offer several communication channels to cater to different preferences and needs.