Learn to use WiFiClient and HTTPClient on XIAO ESP32C3 - XIAO ESP32C3 & ChatGPT in action
ChatGPT is a new chatbot model, an artificial intelligence technology-powered natural language processing tool, released by OpenAI, an artificial intelligence research lab, on November 30, 2022.
It is able to carry out conversations by learning and understanding human language, and can also interact based on the context of the chat, truly chatting and communicating like a human, even performing tasks such as writing emails, video scripts, copywriting, translating, and coding.
In embedded systems, ChatGPT can be a good helper to assist us in writing simple programs, or even checking and fixing bugs that appear in the program.
What is exciting is that OpenAI officially provides interfaces to call GPT-3 models, which allows us to call these interfaces and deploy this great model into our own embedded systems through a number of methods.
Seeed Studio XIAO ESP32C3 is an IoT mini development board based on the Espressif ESP32-C3 WiFi/Bluetooth dual-mode chip. It has excellent radio frequency performance, supporting IEEE 802.11 b/g/n WiFi, and Bluetooth 5 (LE) protocols. It can perfectly support the services of WiFi Client and WiFi Server provided by ESP32 official. Of course, it is able to support Arduino perfectly.

So in this tutorial, we will guide users to learn and use XIAO ESP32C3 WiFiClient and HTTPClient libraries, how to connect to the network, how to publish web pages and the basics of HTTP GET and POST. The goal is to call OpenAI ChatGPT and create your own Q&A website.
Getting Started
In this tutorial, we will use an XIAO ESP32C3 to configure a ChatGPT Q&A page of our own. In this page, you can enter your question and XIAO ESP32C3 will record your question and use the API call method provided by OpenAI to send a request command using HTTP Client to get ChatGPT's answer and print it in the serial port.

The tasks in this tutorial can be divided into the following four main steps.
-
Configure the XIAO ESP32C3 to connect to the network : Inside this step, we will learn the basic WiFi configuration process using XIAO ESP32C3 and learn the basic operations of XIAO ESP32C3 such as network configuration, connecting to network services and obtaining IP address.
-
Build the embedded web page : In this step, we mainly touch on the WiFi Client library. By using the GET and POST functions of this library, we can write our own Q&A web page using HTML and deploy it on top of XIAO ESP32C3.
-
Submit questions via the built-in web page : In this step we will mainly learn to use the POST method in the HTTP Client to POST the questions we ask according to the OpenAI API standard. we will focus our main attention on the process of how to collect and store the questions from the web page.
-
Get answers from ChatGPT : In this step we learn to use the POST method in the HTTP Client and extract the answers to the questions we need from the returned messages. The last step is to sort out the structure of the code and make the final integration.
Materials Required
| Material |
|---|
|
| Get ONE Now |
Preliminary Preparation
All procedures and steps in this tutorial have been completed based on the XIAO ESP32C3. In the preparation phase, we first need to complete the configuration of the environment for using the XIAO ESP32C3.
Step 1. Connect XIAO ESP32C3 to your computer via a USB Type-C cable.

Step 2. Download and Install the latest version of Arduino IDE according to your operating system

Step 3. Launch the Arduino application.
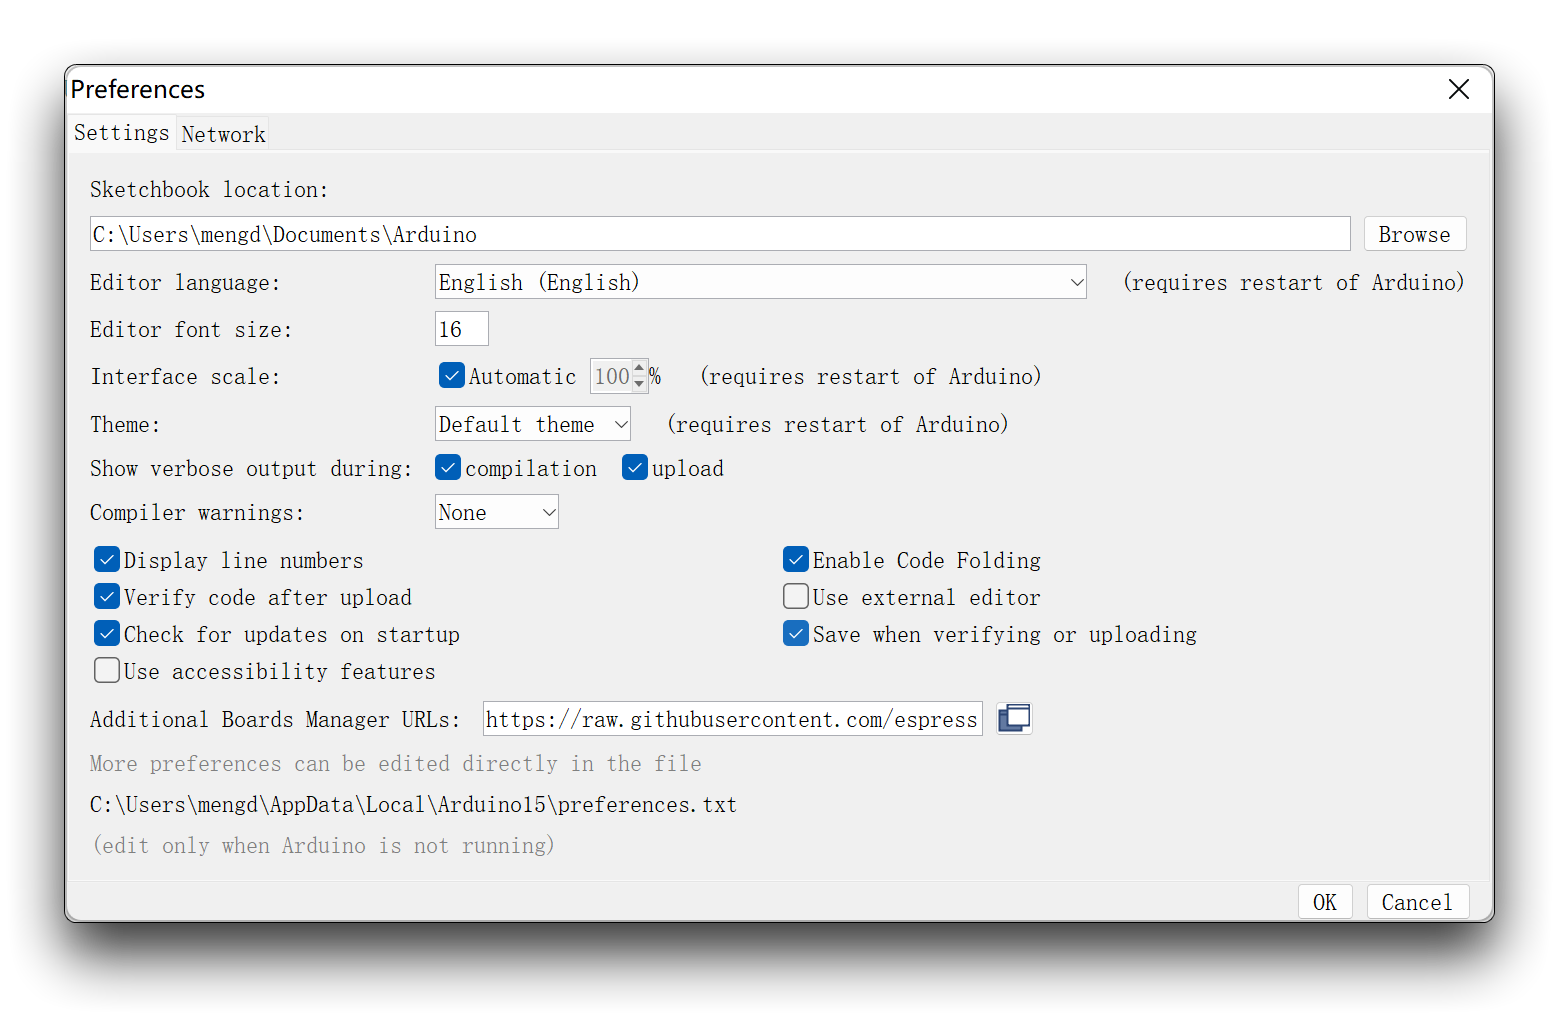
- Step 4. Add ESP32 board package to your Arduino IDE
Navigate to File > Preferences, and fill "Additional Boards Manager URLs" with the url below: https://raw.githubusercontent.com/espressif/arduino-esp32/gh-pages/package_esp32_dev_index.json
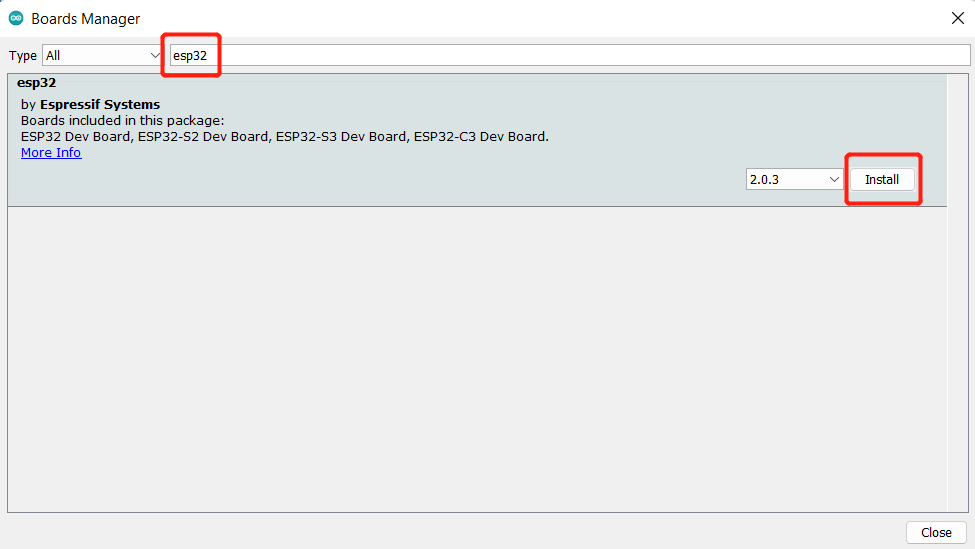
Navigate to Tools > Board > Boards Manager..., type the keyword "esp32" in the search box, select the latest version of esp32, and install it.
- Step 5. Select your board and port
Navigate to Tools > Board > ESP32 Arduino and select "XIAO_ESP32C3". The list of board is a little long and you need to roll to the buttom to reach it.
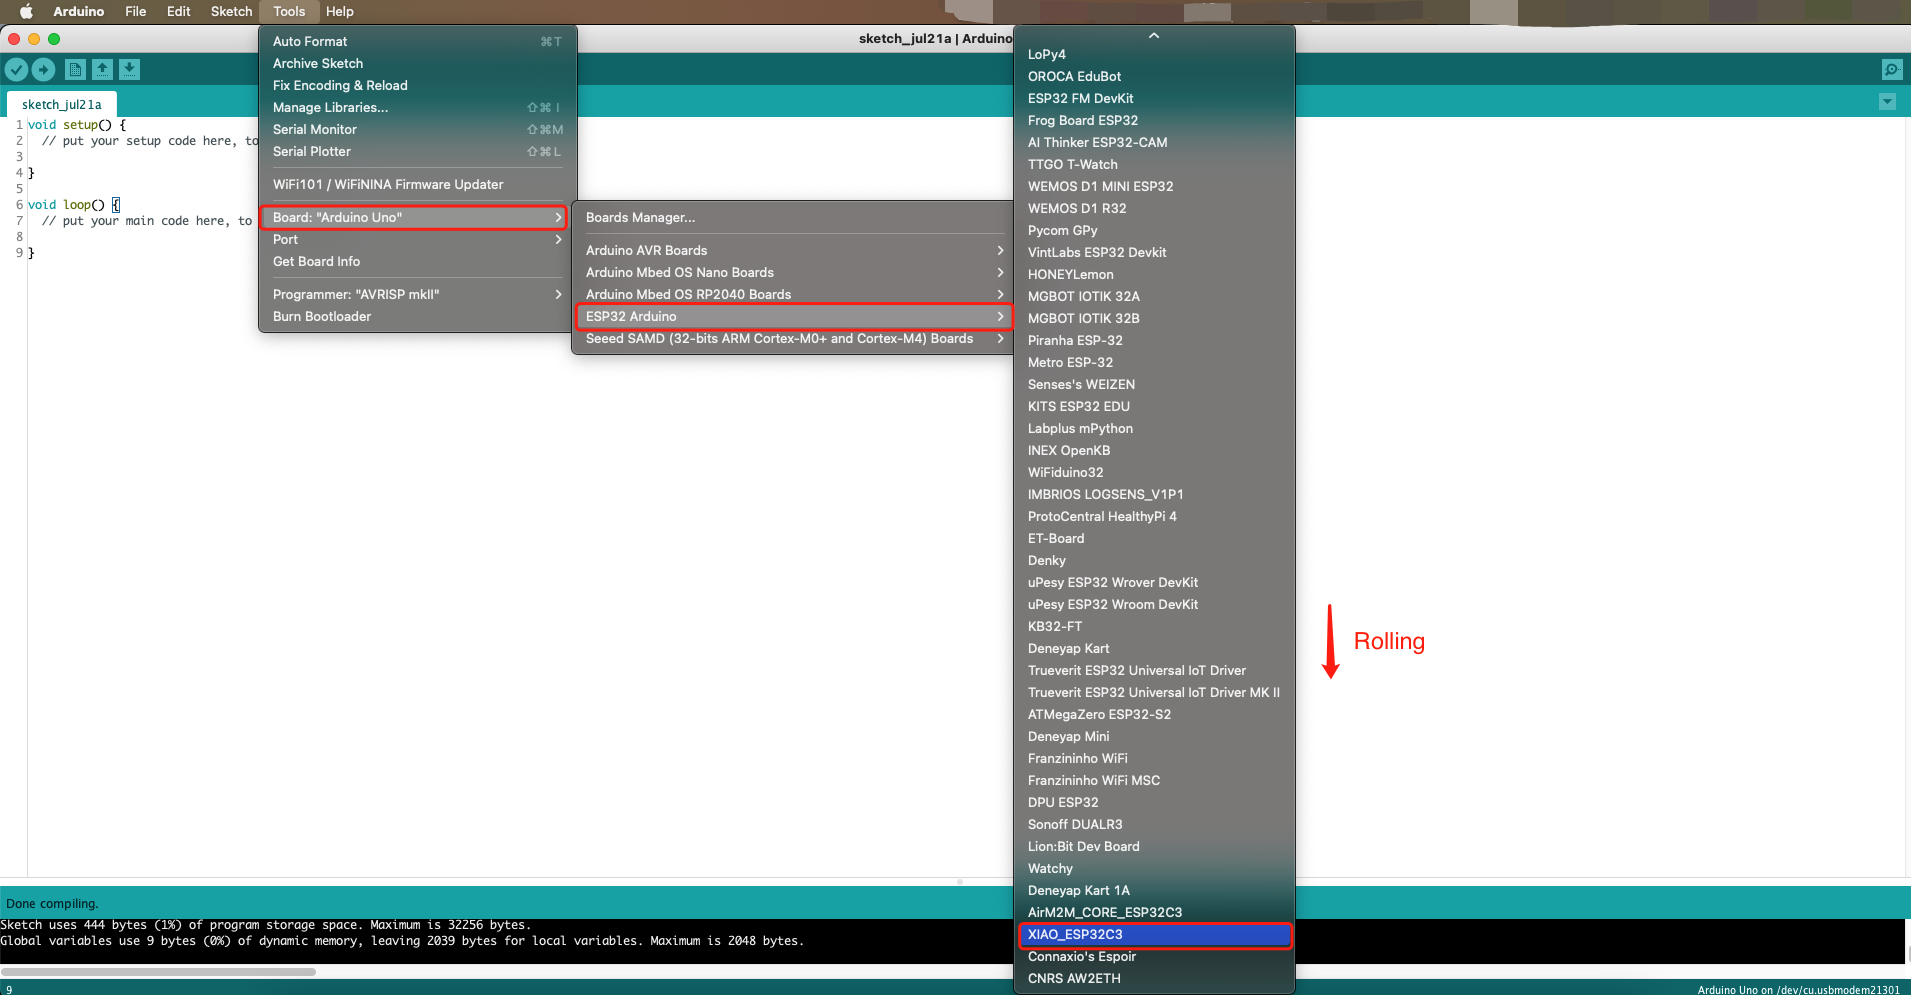
Navigate to Tools > Port and select the serial port name of the connected XIAO ESP32C3. This is likely to be COM3 or higher (COM1 and COM2 are usually reserved for hardware serial ports).
Configure the XIAO ESP32C3 to connect to the network
The use of WiFi has been described in detail in the XIAO ESP32C3 tutorial on using WiFi.
When the ESP32 is set as a Wi-Fi station, it can connect to other networks (like your router). In this scenario, the router assigns a unique IP address to your ESP board.
The first thing you need to do to use the ESP32 Wi-Fi functionalities is to include the WiFi.h library in your code, as follows:
#include <WiFi.h>
To connect the ESP32 to a specific Wi-Fi network, you must know its SSID and password. Additionally, that network must be within the ESP32 Wi-Fi range.
First, set the Wi-Fi mode. If the ESP32 will connected to another network (access point/hotspot) it must be in station mode.
WiFi.mode(WIFI_STA);
Then, use WiFi.begin() to connect to a network. You must pass as arguments the network SSID and its password.
Connecting to a Wi-Fi network can take a while, so we usually add a while loop that keeps checking if the connection was already established by using WiFi.status(). When the connection is successfully established, it returns WL_CONNECTED.
When the ESP32 is set as a Wi-Fi station, it can connect to other networks (like your router). In this scenario, the router assigns a unique IP address to your ESP32 board. To get your board’s IP address, you need to call WiFi.localIP() after establishing a connection with your network.
void WiFiConnect(void){
    WiFi.begin(ssid, password);
    Serial.print("Connecting to ");
    Serial.println(ssid);

    while (WiFi.status() != WL_CONNECTED) {
        delay(500);
        Serial.print(".");
    }

    Serial.println("");
    Serial.println("WiFi connected!");
    Serial.print("IP address: ");
    Serial.println(WiFi.localIP());
}
The ssid and password variables hold the SSID and password of the network you want to connect to.
// Replace with your network credentials
const char* ssid = "REPLACE_WITH_YOUR_SSID";
const char* password = "REPLACE_WITH_YOUR_PASSWORD";
This is a very simple WiFi connection program, upload the program to XIAO ESP32C3, then open the serial assistant and set the baud rate to 115200. If the connection goes well, you will see the IP address of XIAO printed out.

If you are interested in reading more about ESP32C3 applications and functions in WiFi, we recommend reading ESP32 Useful Wi-Fi Library Functions.
Build the embedded web page
ESP32 integrates many very useful WiFiClient functions in WiFi library, which allows us to design and develop embedded web pages without adding additional libraries.
Create a new WiFiServer object in order to use this object to control the XIAO ESP32C3 established IoT server.
WiFiServer server(80);
WiFiClient client1;
In the above step, we let the XIAO ESP32C3 connect to WiFi. after the WiFi connection is successful, you will be able to get the current IP address of XIAO from the serial monitor. At this time, XIAO has successfully set up the web server. You can access this web server through the IP address of XIAO.
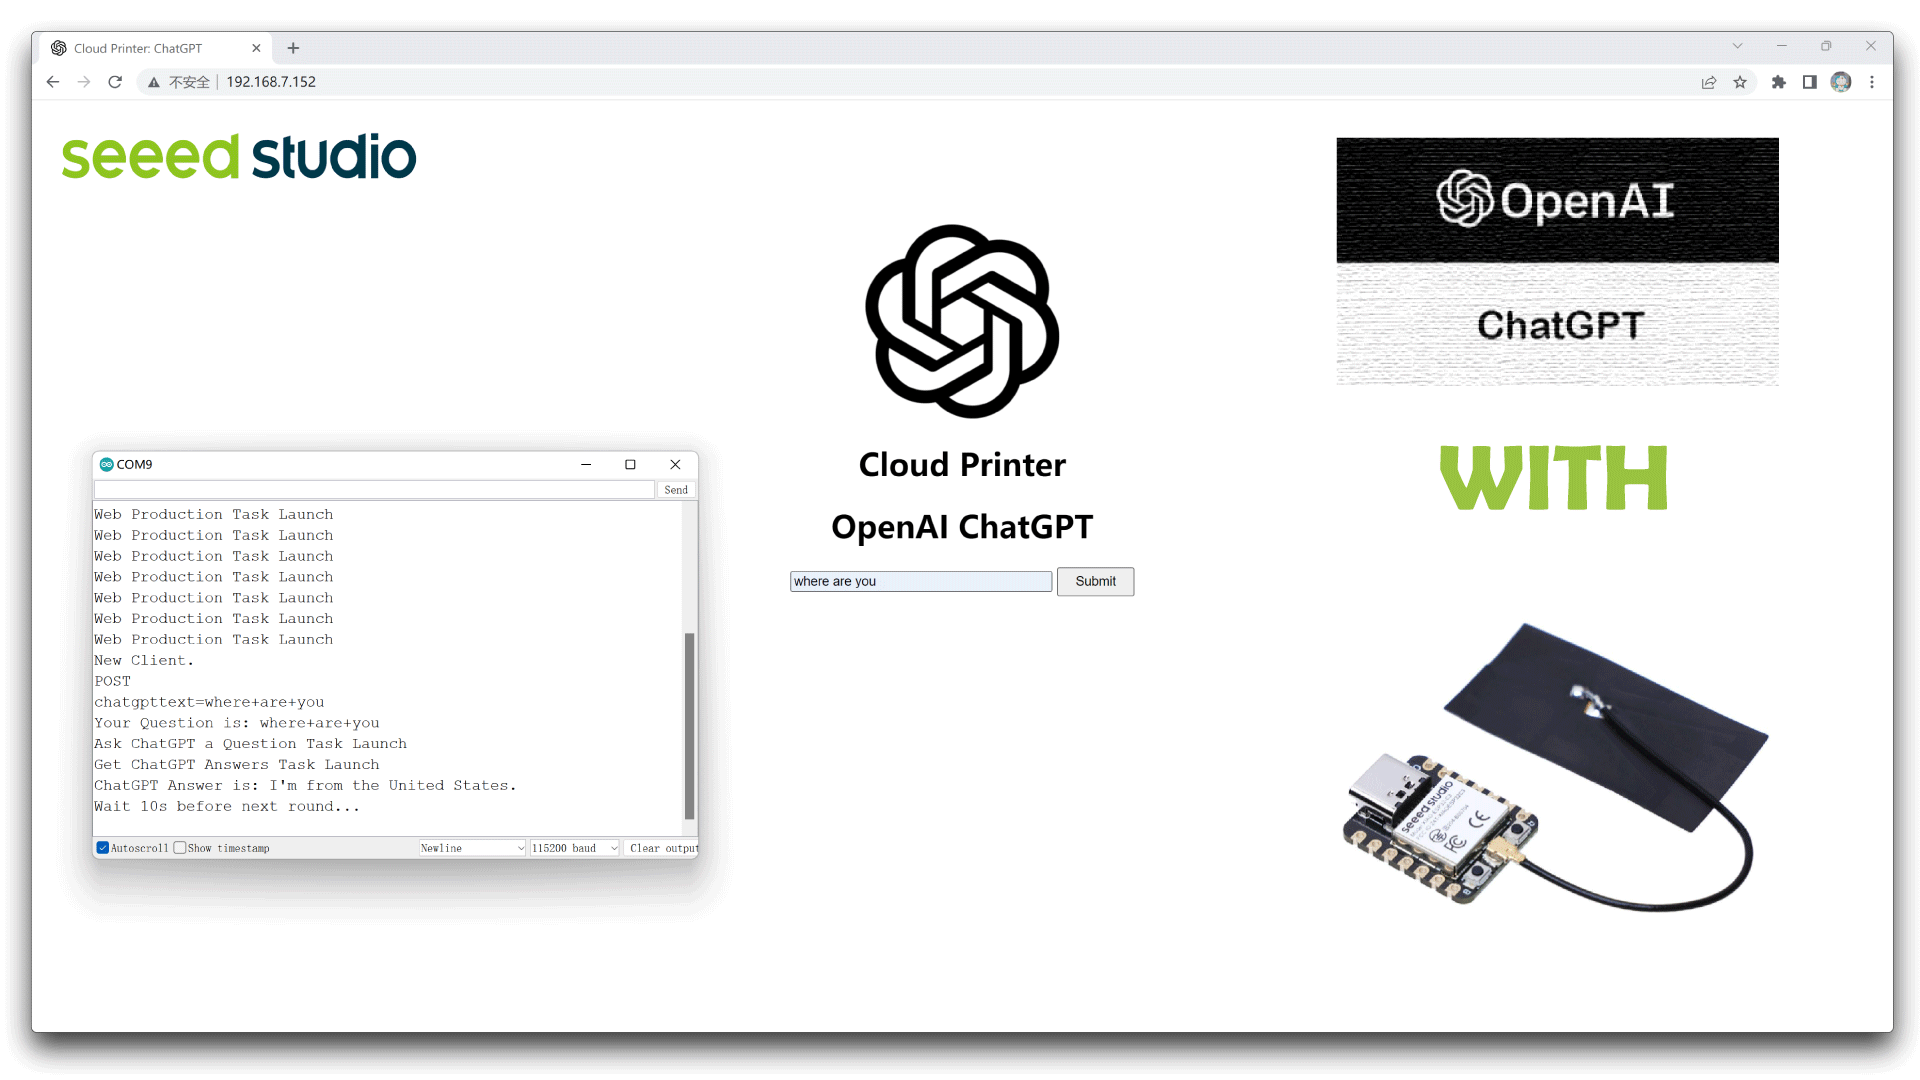
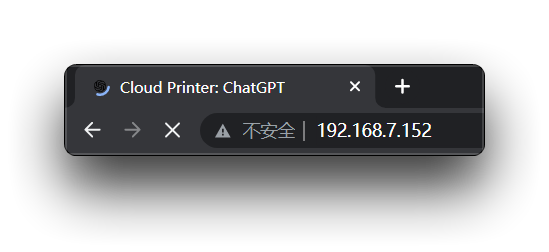
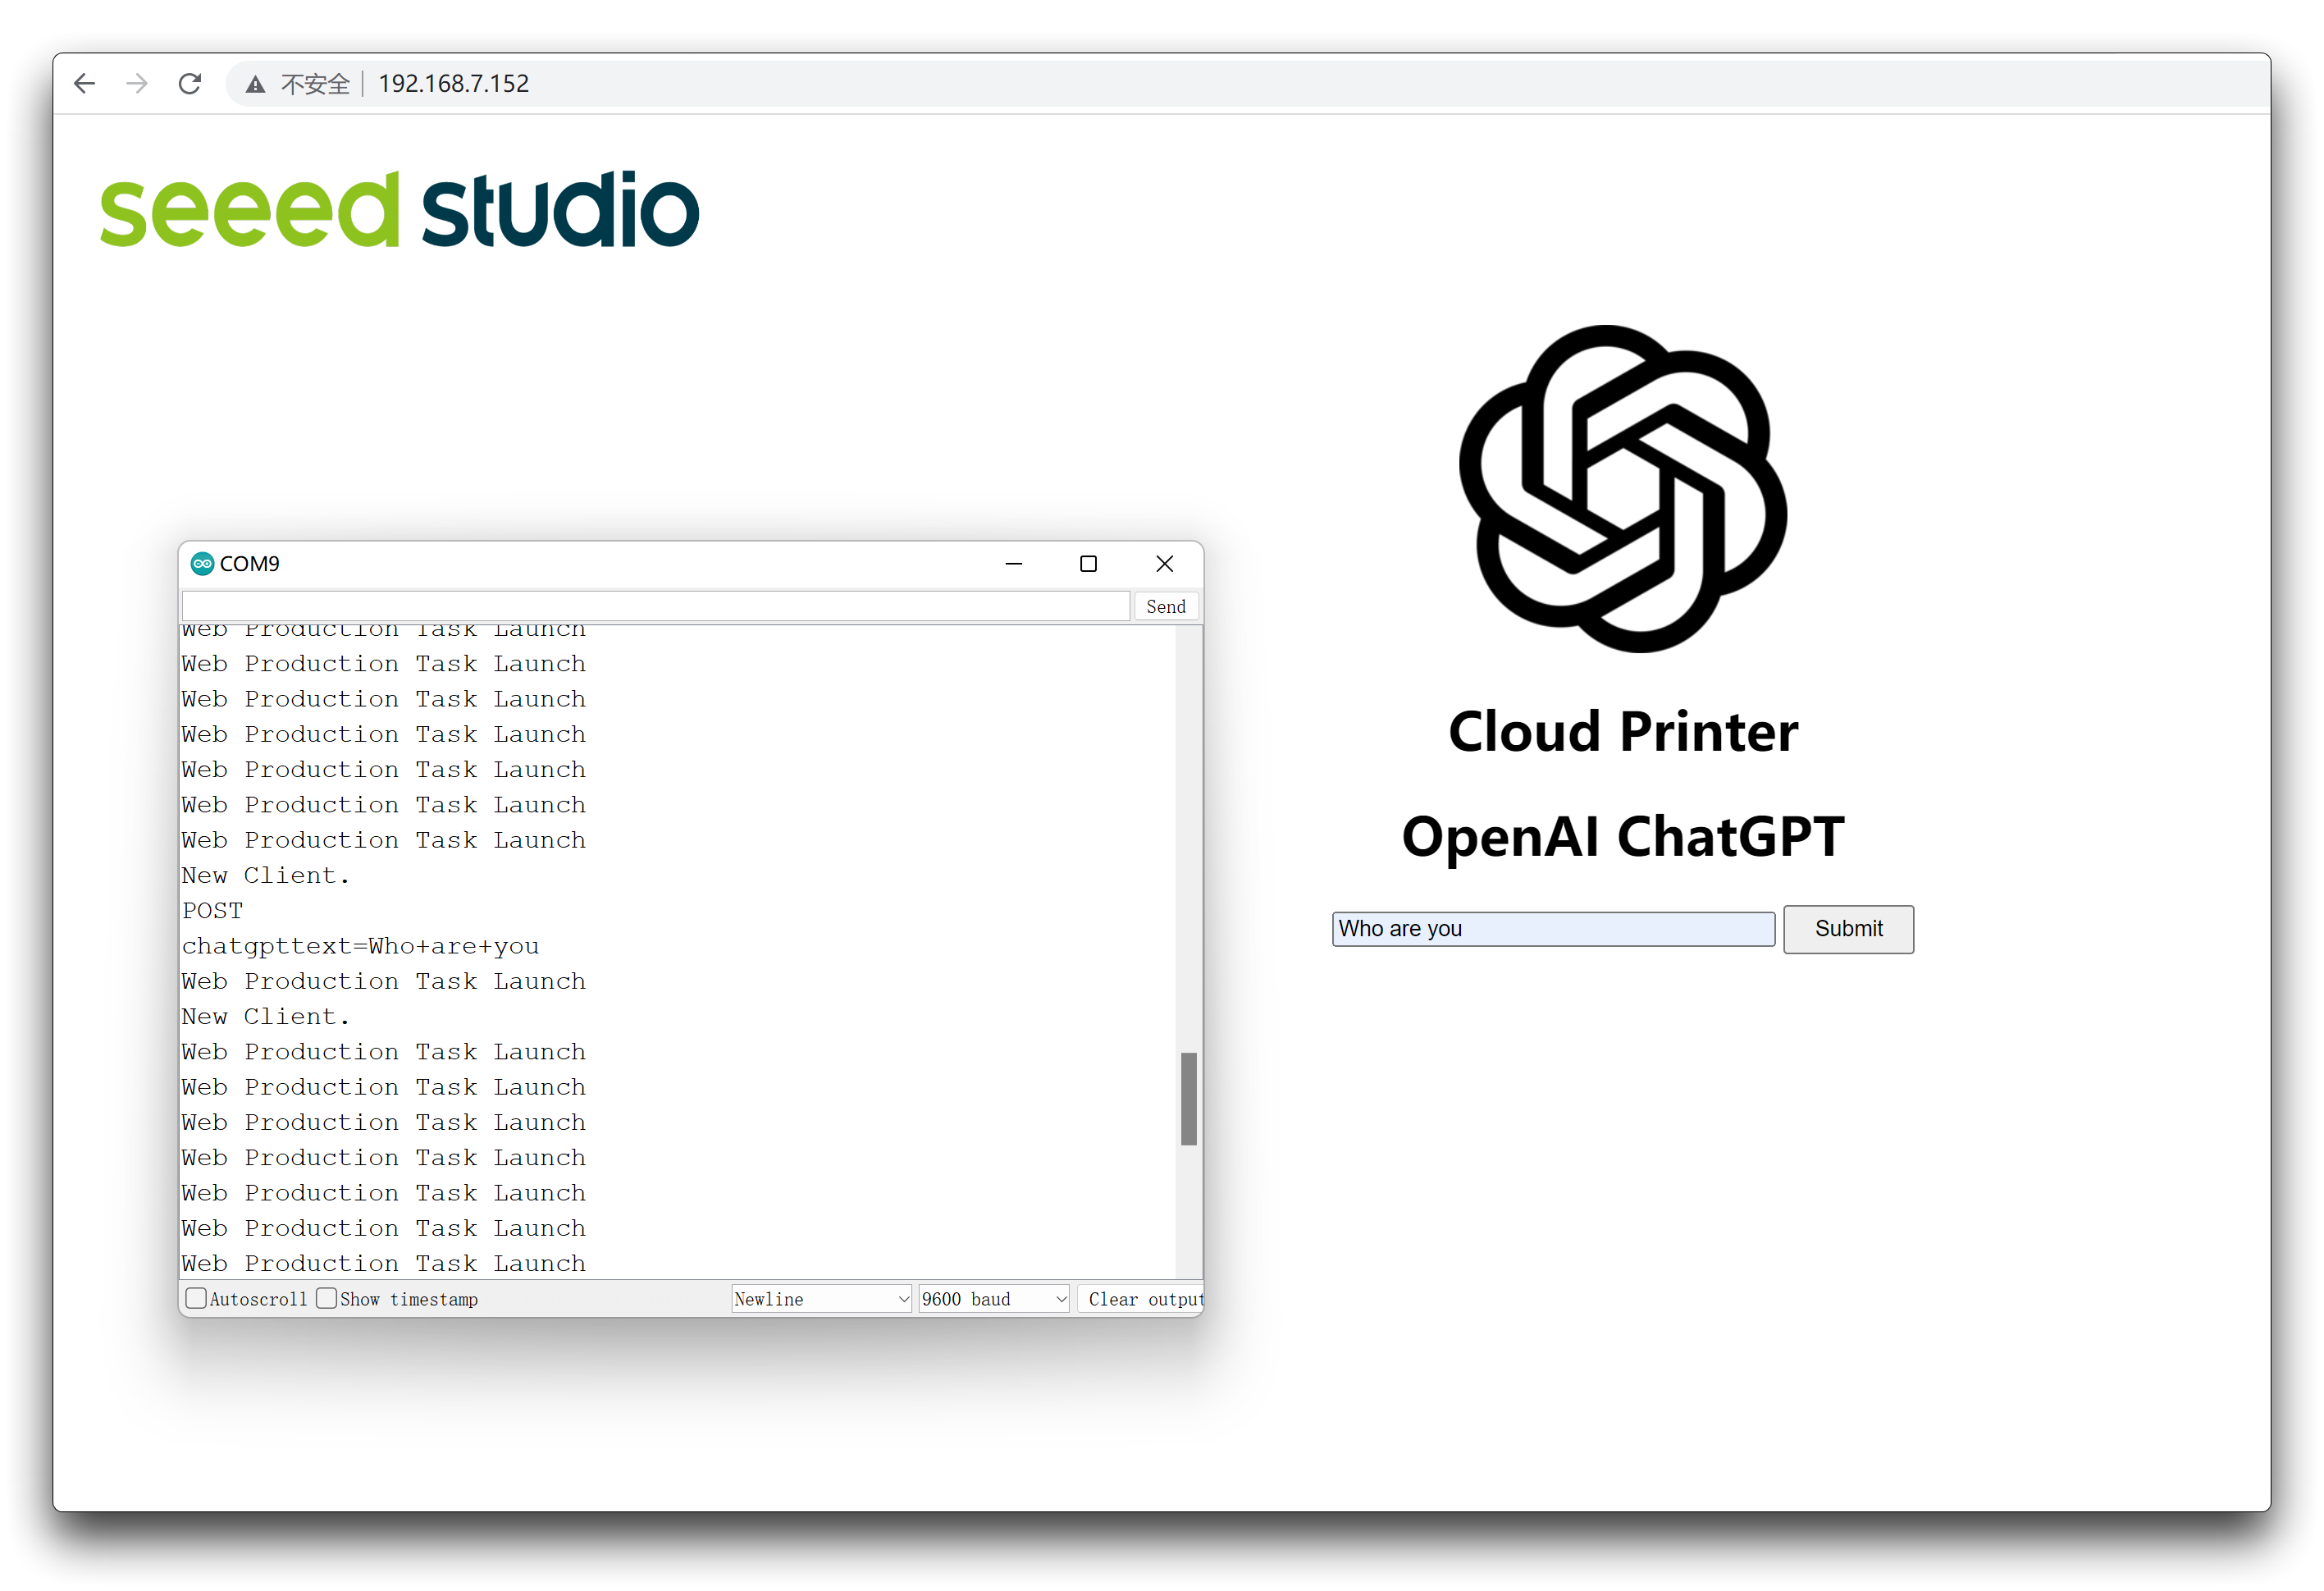
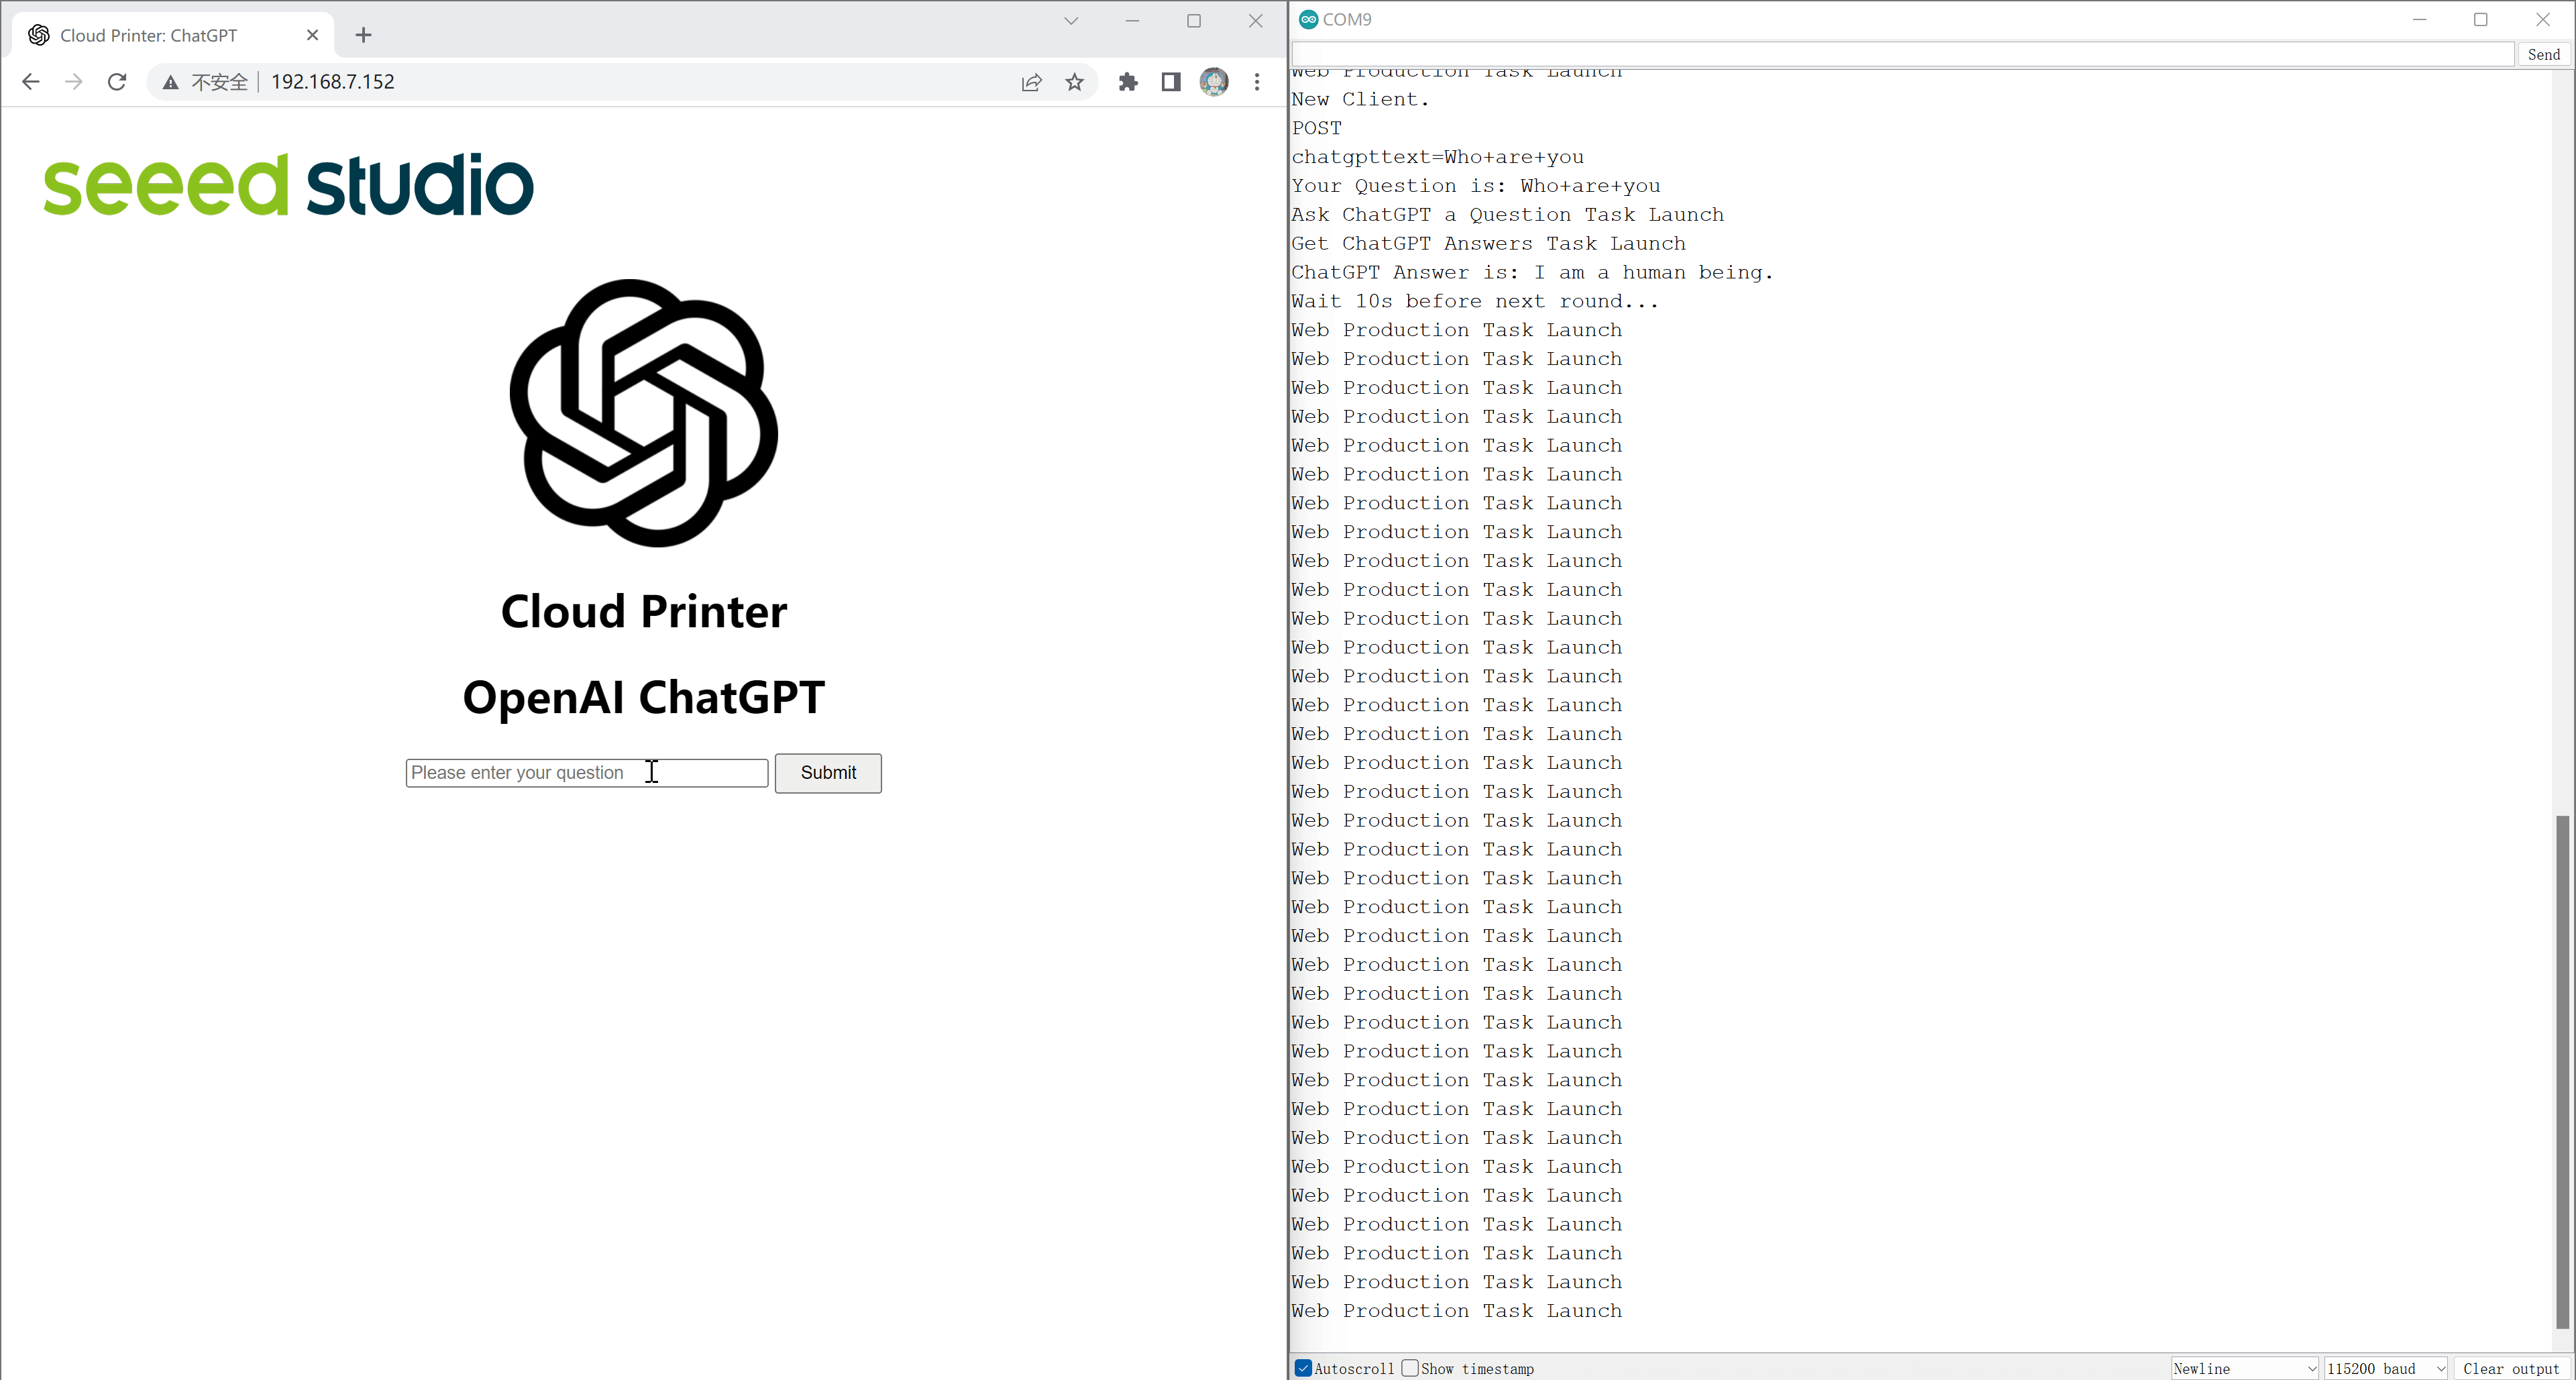
Suppose the IP address of your XIAO ESP32C3 is 192.168.7.152. Then you can enter this IP address through your browser next.
After entering this IP address, we may only see a blank page. This is because we have not yet published our page content for that page.
So let's now create an array to store the content of the page we want to layout, which is the HTML code, in C.
const char html_page[] PROGMEM = {
    "HTTP/1.1 200 OK\r\n"
    "Content-Type: text/html\r\n"
    "Connection: close\r\n"  // the connection will be closed after completion of the response
    //"Refresh: 1\r\n"         // refresh the page automatically every n sec
    "\r\n"
    "<!DOCTYPE HTML>\r\n"
    "<html>\r\n"
    "<head>\r\n"
      "<meta charset=\"UTF-8\">\r\n"
      "<title>Cloud Printer: ChatGPT</title>\r\n"
      "<link rel=\"icon\" href=\"https://files.seeedstudio.com/wiki/xiaoesp32c3-chatgpt/chatgpt-logo.png\" type=\"image/x-icon\">\r\n"
    "</head>\r\n"
    "<body>\r\n"
    "<img alt=\"SEEED\" src=\"https://files.seeedstudio.com/wiki/xiaoesp32c3-chatgpt/logo.png\" height=\"100\" width=\"410\">\r\n"
    "<p style=\"text-align:center;\">\r\n"
    "<img alt=\"ChatGPT\" src=\"https://files.seeedstudio.com/wiki/xiaoesp32c3-chatgpt/chatgpt-logo.png\" height=\"200\" width=\"200\">\r\n"
    "<h1 align=\"center\">Cloud Printer</h1>\r\n"
    "<h1 align=\"center\">OpenAI ChatGPT</h1>\r\n"
    "<div style=\"text-align:center;vertical-align:middle;\">"
    "<form action=\"/\" method=\"post\">"
    "<input type=\"text\" placeholder=\"Please enter your question\" size=\"35\" name=\"chatgpttext\" required=\"required\"/>\r\n"
    "<input type=\"submit\" value=\"Submit\" style=\"height:30px; width:80px;\"/>"
    "</form>"
    "</div>"
    "</p>\r\n"
    "</body>\r\n"
    "<html>\r\n"
};
This code gives us the page effect shown in the figure below.

HTML syntax for web pages is beyond the scope of this tutorial. You can learn to use HTML on your own, or, alternatively, we can use existing generation tools to do the code generation work. We recommend using HTML Generator. It is worth noting that in C programs, "\" and """ are special characters, and if you want to retain the functionality of these special characters in your program, you need to add a right slash in front of them.
Client1 refers to the Socket client after the web server is established, the following code is the flow of web server processing.
client1 = server.available();
if (client1){
    Serial.println("New Client.");           // print a message out the serial port
    // an http request ends with a blank line
    boolean currentLineIsBlank = true;
    while (client1.connected()){
        if (client1.available()){  // Check if the client is connected
            char c = client1.read();
            json_String += c;
            if (c == '\n' && currentLineIsBlank) {
                dataStr = json_String.substring(0, 4);
                Serial.println(dataStr);
                if(dataStr == "GET "){
                    client1.print(html_page);  //Send the response body to the client
                }
                else if(dataStr == "POST"){
                    json_String = "";
                    while(client1.available()){
                        json_String += (char)client1.read();
                    }
                    Serial.println(json_String);
                    dataStart = json_String.indexOf("chatgpttext=") + strlen("chatgpttext=");
                    chatgpt_Q = json_String.substring(dataStart, json_String.length());
                    client1.print(html_page);
                    // close the connection:
                    delay(10);
                    client1.stop();
                }
                json_String = "";
                break;
            }
            if (c == '\n') {
                // you're starting a new line
                currentLineIsBlank = true;
            }
            else if (c != '\r') {
                // you've gotten a character on the current line
                currentLineIsBlank = false;
            }
        }
    }
}
In the example program above, we need to use server.begin() to start the IoT server. The statement needs to be placed in the setup function.
void setup()
{
    Serial.begin(115200);

    // Set WiFi to station mode and disconnect from an AP if it was previously connected
    WiFi.mode(WIFI_STA);
    WiFi.disconnect();
    while(!Serial);

    Serial.println("WiFi Setup done!");
    WiFiConnect();

    // Start the TCP server server
    server.begin();
}
Once the above program is run and the IP address of the XIAO ESP32C3 is entered into the browser (provided that your host also needs to be on the same LAN as the XIAO ESP32C3), then the GET step of WiFiClient will start to execute. At this point, with the help of the client-side print method, we submit the HTML code of the page.
if(dataStr == "GET "){
    client1.print(html_page);
}
And, we design the input box for question input in the page, the web page will get the status of the button and store the input question into the string variable chatgpt_Q after the user enters the content and clicks the Submit button.
json_String = "";
while(client1.available()){
    json_String += (char)client1.read();
}
Serial.println(json_String);
dataStart = json_String.indexOf("chatgpttext=") + strlen("chatgpttext=");
chatgpt_Q = json_String.substring(dataStart, json_String.length());
client1.print(html_page);
// close the connection:
delay(10);
client1.stop();
The running effect is shown below.
Submit questions via the built-in web page
In the page in the step above, there is an input box. The input box is where we need the user to enter the question they want to ask. All we need to do is to get this question and send it out through the API request provided by OpenAI.
Step 1. Sign up for an OpenAI account.
You can go to OpenAI's registration address by clicking here. If you have registered for its account before, then you can skip this step.
Step 2. Get the OpenAI API.
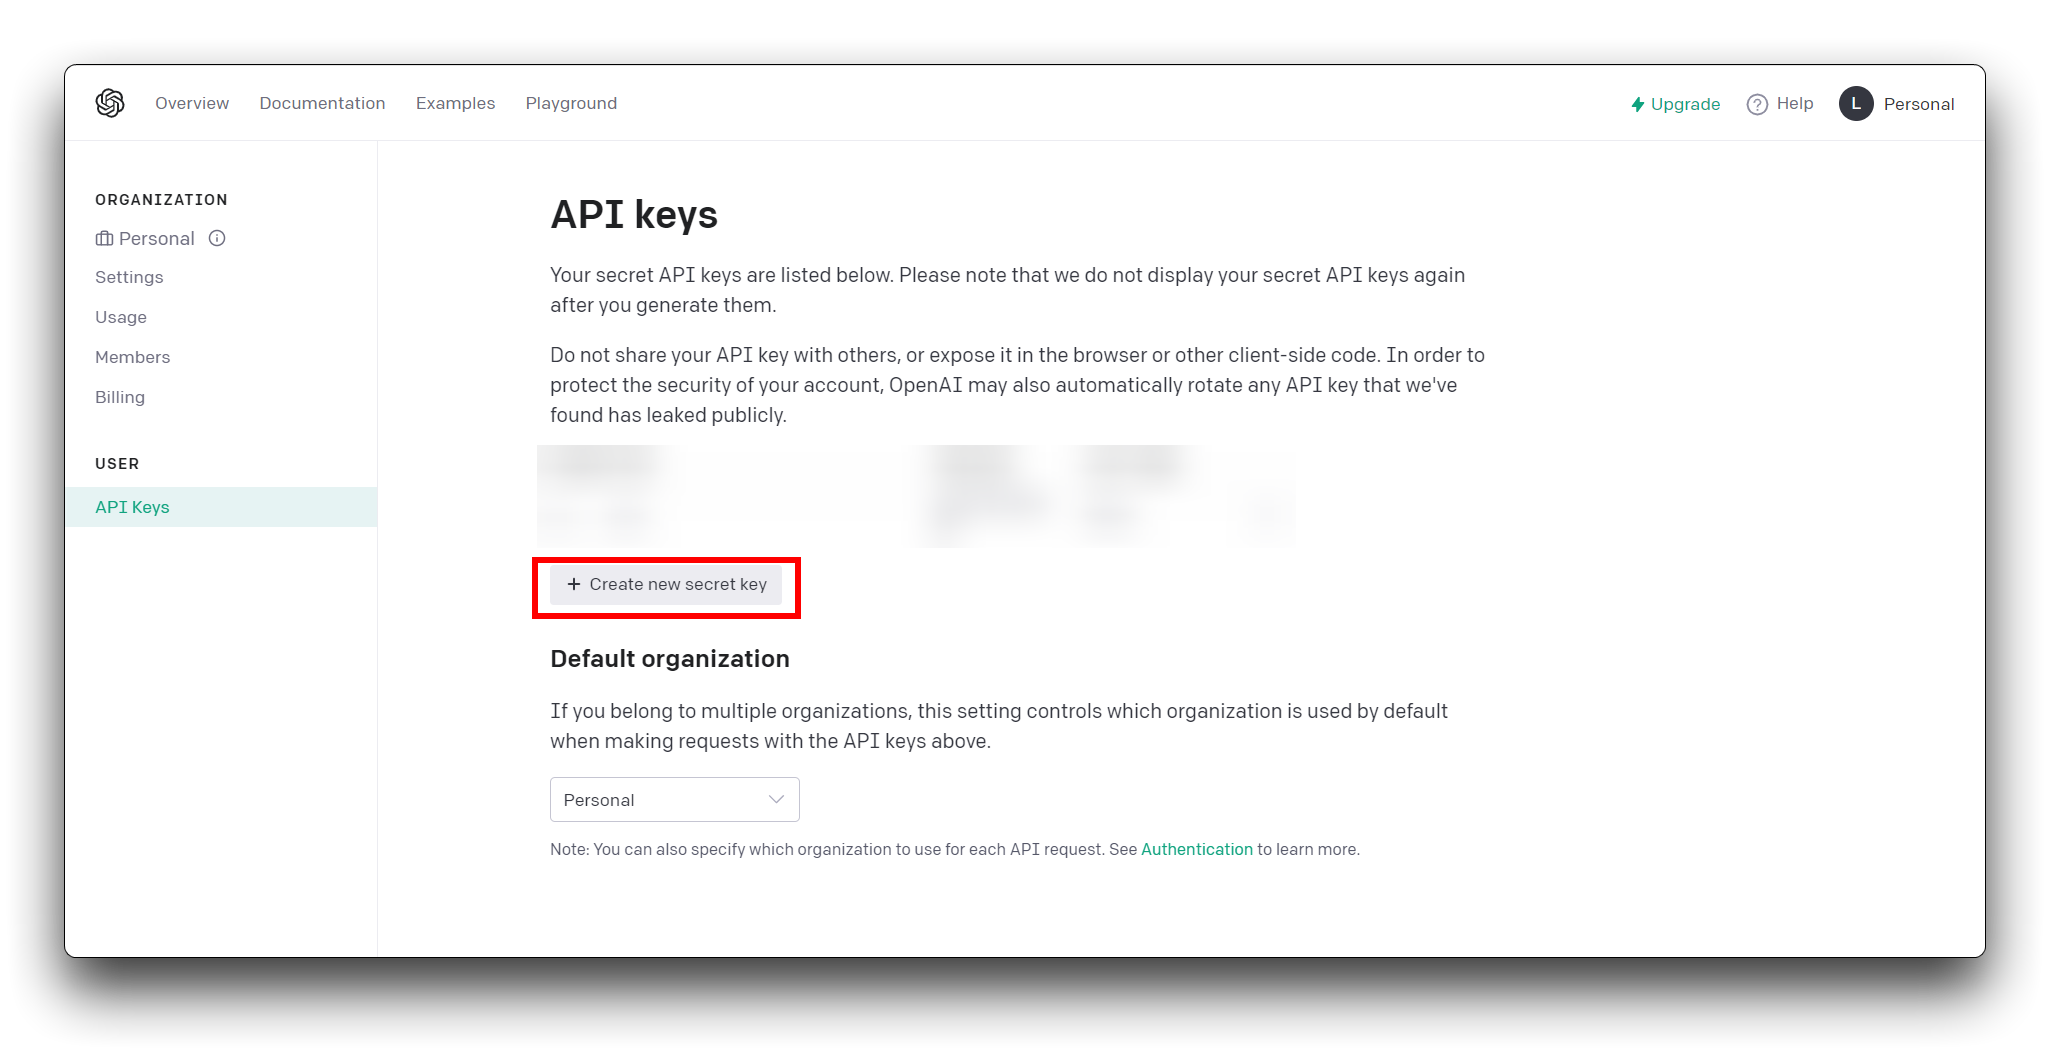
Login to the OpenAI website, click your account avatar in the upper right corner, and then select View API keys.
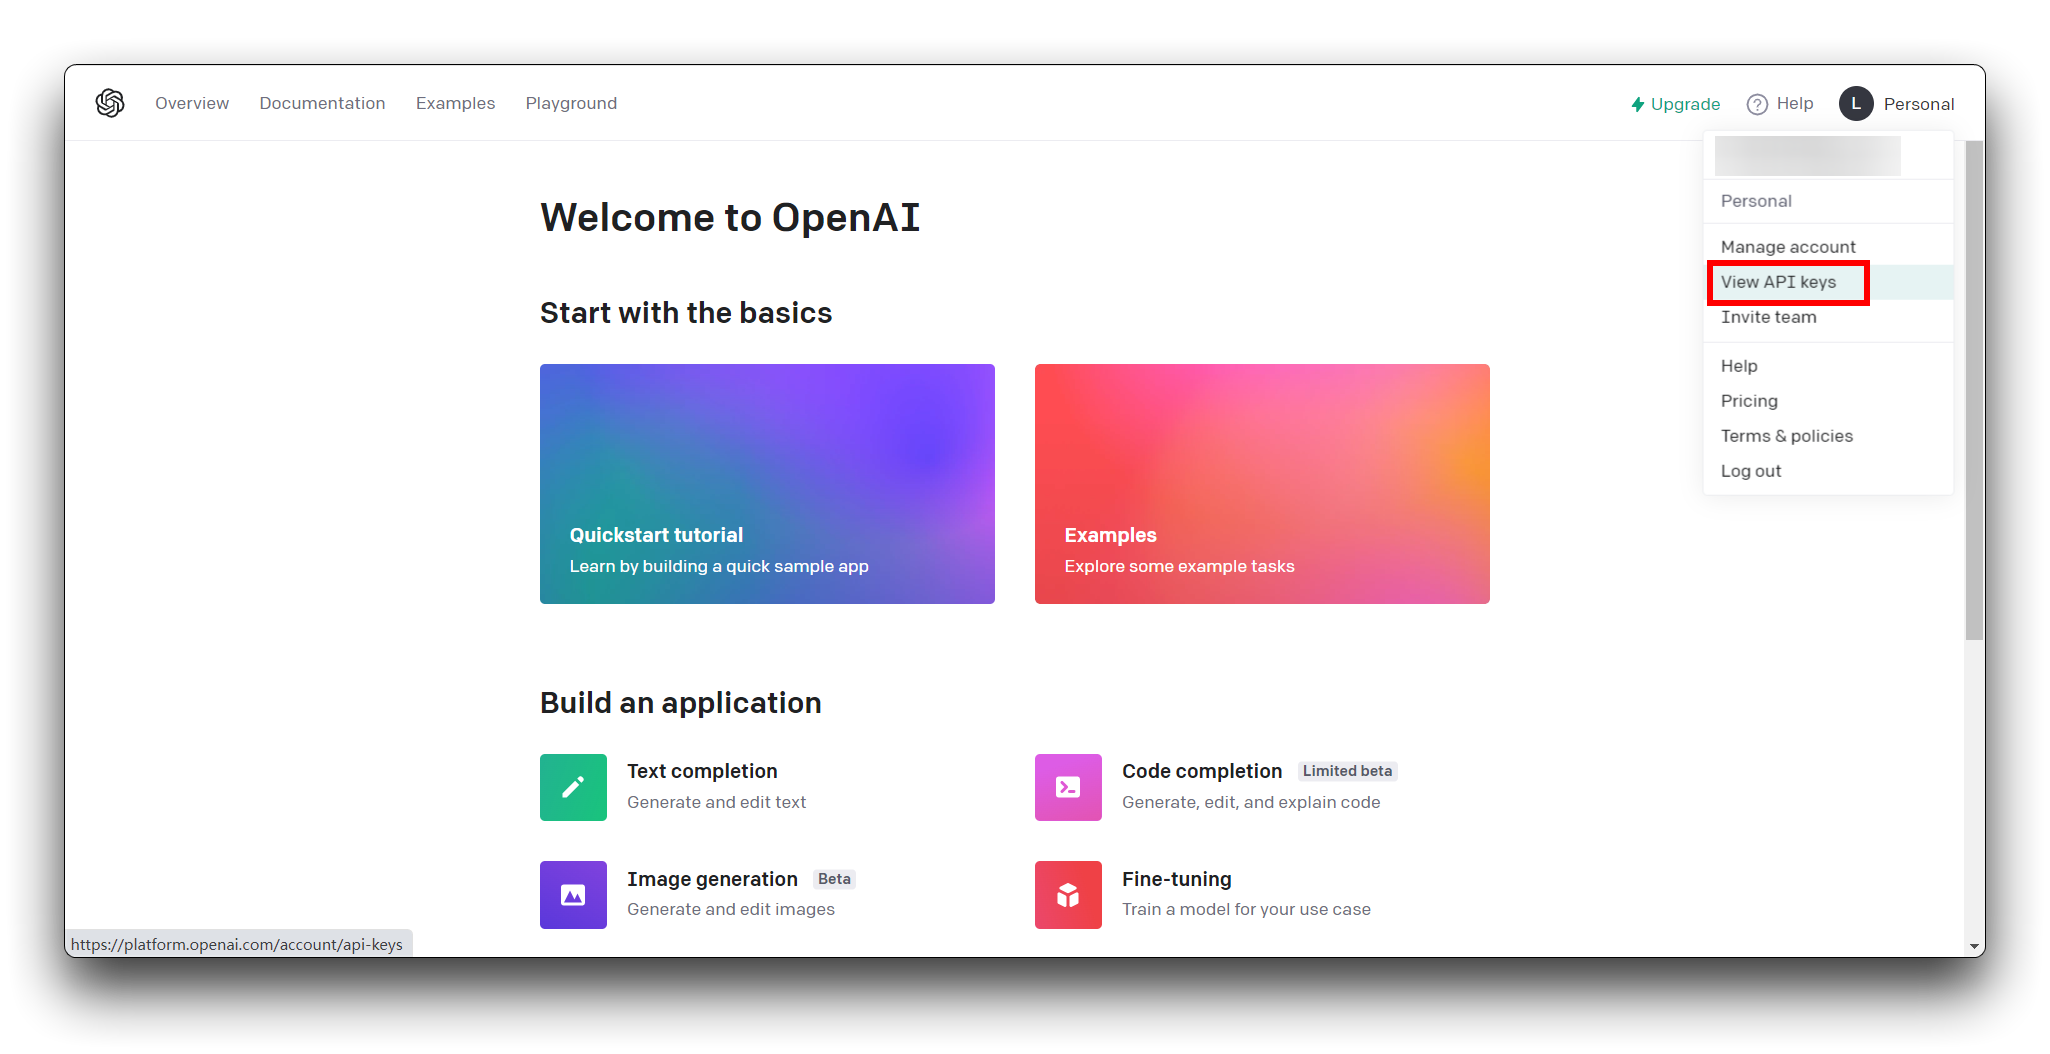
In the new pop-up page select +Create new secret key, then copy your key and save it.
In the meantime, we can create string variables in our program and copy this key here.
char chatgpt_token[] = "sk**********Rj9DYiXLJJH";
As of February 15, 2023, OpenAI is giving away $18 worth of credits for free to every new user. The detailed rates can be found in OpenAI's documentation.
Step 3. Write the program according to the HTTP requests of OpenAI.
OpenAI provides very detailed API usage instructions so that users can use their own API key to call ChatGPT.
According to the documentation of ChatGPT, the format we need to send the request is as follows:
curl https://api.openai.com/v1/completions \
-H "Content-Type: application/json" \
-H "Authorization: Bearer YOUR_API_KEY" \
-d '{"model": "gpt3.5-turbo-instruct", "prompt": "Say this is a test", "temperature": 0, "max_tokens": 7}'
The Hypertext Transfer Protocol (HTTP) works as a request-response protocol between a client and server. GET is used to request data from a specified resource. It is often used to get values from APIs. POST is used to send data to a server to create/update a resource. ESP32 can make HTTP POST requests using three different types of body requests: URL encoded, JSON object or plain text. These are the most common methods and should integrate with most APIs or web services.
The above information is very important and provides the theoretical basis for writing HTTP POST programs. At the beginning, we start by importing the HTTPClient library.
#include <HTTPClient.h>
You also need to type OpenAI domain name, so the ESP publishes the question to ChatGPT. And don't forget the OpenAI API key.
HTTPClient https;

const char* chatgpt_token = "YOUR_API_KEY";
char chatgpt_server[] = "https://api.openai.com/v1/completions";
We need to make an HTTP POST request using JSON object.
if (https.begin(chatgpt_server)) {  // HTTPS
    https.addHeader("Content-Type", "application/json");
    String token_key = String("Bearer ") + chatgpt_token;
    https.addHeader("Authorization", token_key);
    String payload = String("{\"model\": \"gpt-3.5-turbo-instruct\", \"prompt\": \"") + chatgpt_Q + String("\", \"temperature\": 0, \"max_tokens\": 100}"); //Instead of TEXT as Payload, can be JSON as Paylaod
    httpCode = https.POST(payload);   // start connection and send HTTP header
    payload = "";
}
else {
    Serial.println("[HTTPS] Unable to connect");
    delay(1000);
}
In the program, we send the payload to the server via the POST() method. chatgpt_Q is the content of the question we want to send to ChatGPT, which will be available in the Get Question page.
If you are interested in more features of the ESP32C3 HTTPClient, we recommend you to read ESP32 HTTP GET and HTTP POST with Arduino IDE.
Get answers from ChatGPT
The next step is the last step of the whole tutorial, how we get the answer to ChatGPT and record it.
Let's continue from reading the API documentation provided by OpenAI to understand how the structure of the message content returned by ChatGPT looks like. This will allow us to write programs to parse the content we need.
{
  "id": "cmpl-uqkvlQyYK7bGYrRHQ0eXlWi7",
  "object": "text_completion",
  "created": 1589478378,
  "model": "gpt-3.5-turbo-instruct",
  "system_fingerprint": "fp_44709d6fcb",
  "choices": [
    {
      "text": "\n\nThis is indeed a test",
      "index": 0,
      "logprobs": null,
      "finish_reason": "length"
    }
  ],
  "usage": {
    "prompt_tokens": 5,
    "completion_tokens": 7,
    "total_tokens": 12
  }
}
From the reference documentation provided by OpenAI, we know that the location of the answer to the question in the message returned by the interface is in {"choices": [{"text": "\n\nxxxxxxx",}]}.
So now we can be sure that the "Answer" we need should start with \n\n and end with ,. Then, in the program, we can retrieve the position where the text starts and ends by using the indexOf() method, and store the content of the returned answer.
dataStart = payload.indexOf("\\n\\n") + strlen("\\n\\n");
dataEnd = payload.indexOf("\",", dataStart);
chatgpt_A = payload.substring(dataStart, dataEnd);
In summary, we can use the switch method with the current state of the program to determine which step of the program we should execute.
typedef enum
{
  do_webserver_index,
  send_chatgpt_request,
  get_chatgpt_list,
}STATE_;

STATE_ currentState;

switch(currentState){
    case do_webserver_index:
        ...
    case send_chatgpt_request:
        ...
    case get_chatgpt_list:
        ...
}
At this point, the entire program's logic is structured. The complete program code can be obtained by clicking the image below. Please don't rush to upload the program, you need to change the ssid, password and chatgpt_token of the program to your own.
Then, feel free to use it!
What's Next?
In this tutorial, we provide the basic method of calling OpenAI interface using ChatGPT for an embedded development board like Arduino - XIAO ESP32C3. Next, you can let your creativity run wild!
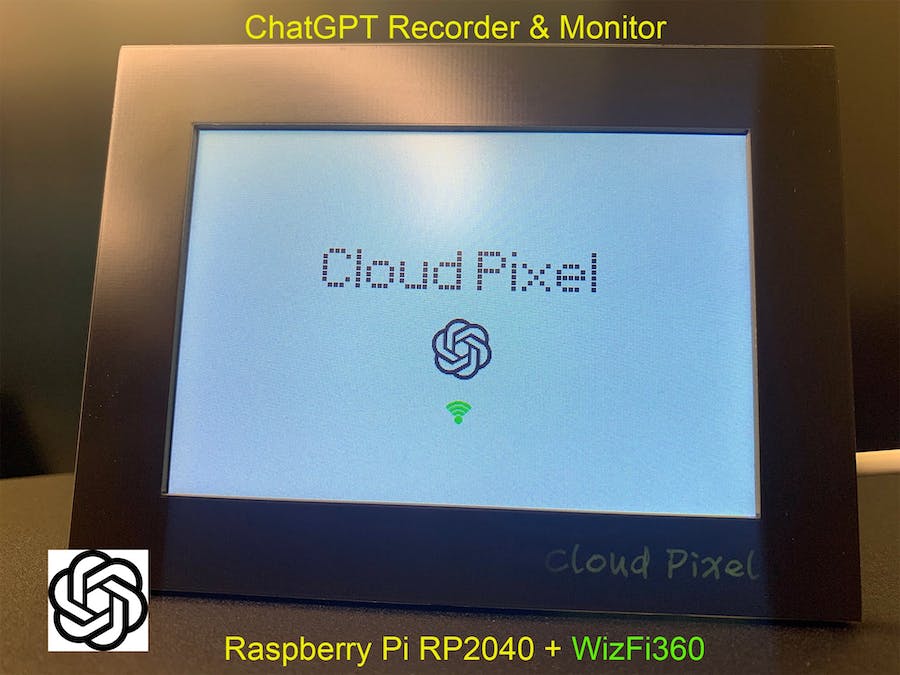
For example, could you consider adding a screen or keyboard to make him a stand-alone display device that works only for you? Come see Gavin's creativity, he made a particularly interesting surveillance device! We also give special thanks to him for providing the necessary steps and ideas for this tutorial.
Or go one step further and add a voice recognition module to get rid of the keyboard and mouse from now on and make a voice assistant of your own, etc. All in all, we'd love to see you share your work with a great product like the XIAO ESP32C3!
Troubleshooting
Q1: Is there any limitation on the use of geography or network to get the answer by calling the OpenAI API using XIAO ESP32C3?
A: As of February 17, 2023 testing, authors in mainland China and using China's network are also able to get ChatGPT responses very smoothly, with no restrictions for now. As long as we can get the OpenAI API key, the call will be completed smoothly.
Q2: Why am I getting Time Out errors returned?
A: This may be because ChatGPT waits too long to reply to a message, which can cause the program to mistakenly think it is not responding.
Tech Support & Product Discussion
Thank you for choosing our products! We are here to provide you with different support to ensure that your experience with our products is as smooth as possible. We offer several communication channels to cater to different preferences and needs.