XIAO ESP32C3 connecting with Home Assistant via ESPHome(all ports supported)
This wiki will walkthrough step-by-step on how to connect Seeed Studio XIAO ESP32C3 with ESPHome running on Home Assistant and send the sensor data/ control devices after connecting Grove modules to XIAO ESP32C3. I applied all kinds of ports here, including digital, analog, IIC, SPI, and UART. Now let's get started!
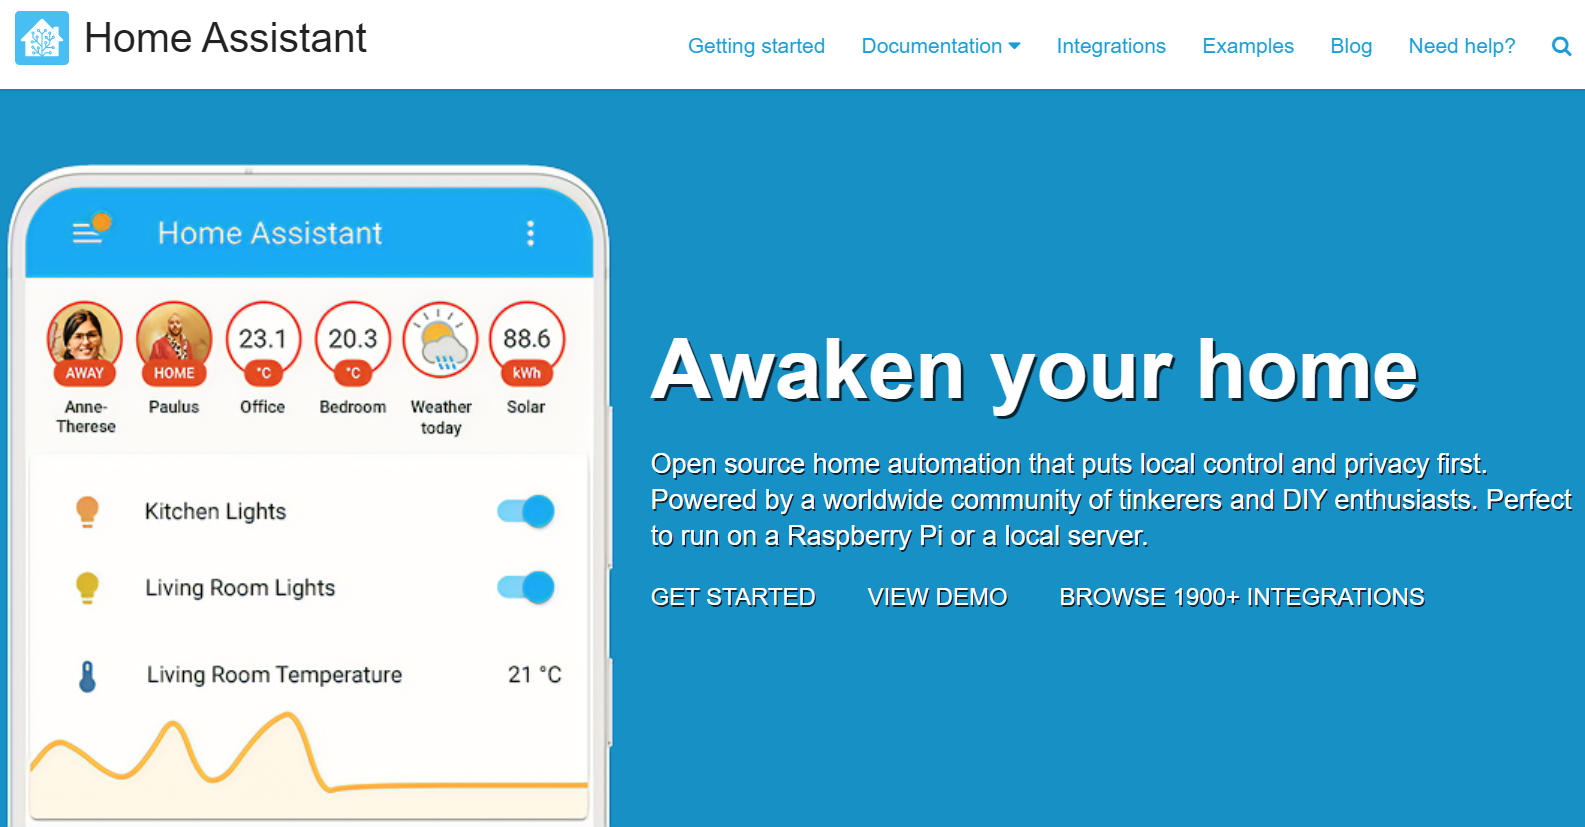
What are ESPHome and Home Assistant?

ESPHome is a tool which aims to make managing your ESP boards as simple as possible. It reads in a YAML configuration file and creates custom firmware which it installs on your ESP device. Devices or sensors added in ESPHome’s configuration will automatically show up in Home Assistant’s UI. ESPHome can help you connect and send the data to Home Assistant devices.
Hardware Preparation
I am using XIAO ESP32C3 as the control board, using reRouter as the hardware here, along with multiple Grove Sensors.
| Seeed Studio XIAO ESP32C3 | Seeed Studio Expansion Board | Home Assistant Devices |
|---|---|---|
 |  |  |
Grove Sensors
- Grove - Temperature and Humidity Sensor (BME680)
- Grove -Smart Air Quality Sensor (SGP41)
- Grove - Analog Microphone
- Grove - Digital PIR Sensor
Software Preparation
Install Home Assistant
Make sure you already have Home Assistant up and running. There are multiple wiki introducing how to flash Home Assistant into the products here. I'm using reRouter which is powered by Raspberry Pi CM4, so I can directly use the official one to flash the OS into the reRouter.
Install ESPHome on Home Assistant
ESPHome is available as a Home Assistant Add-On and can simply be installed via the add-on store.
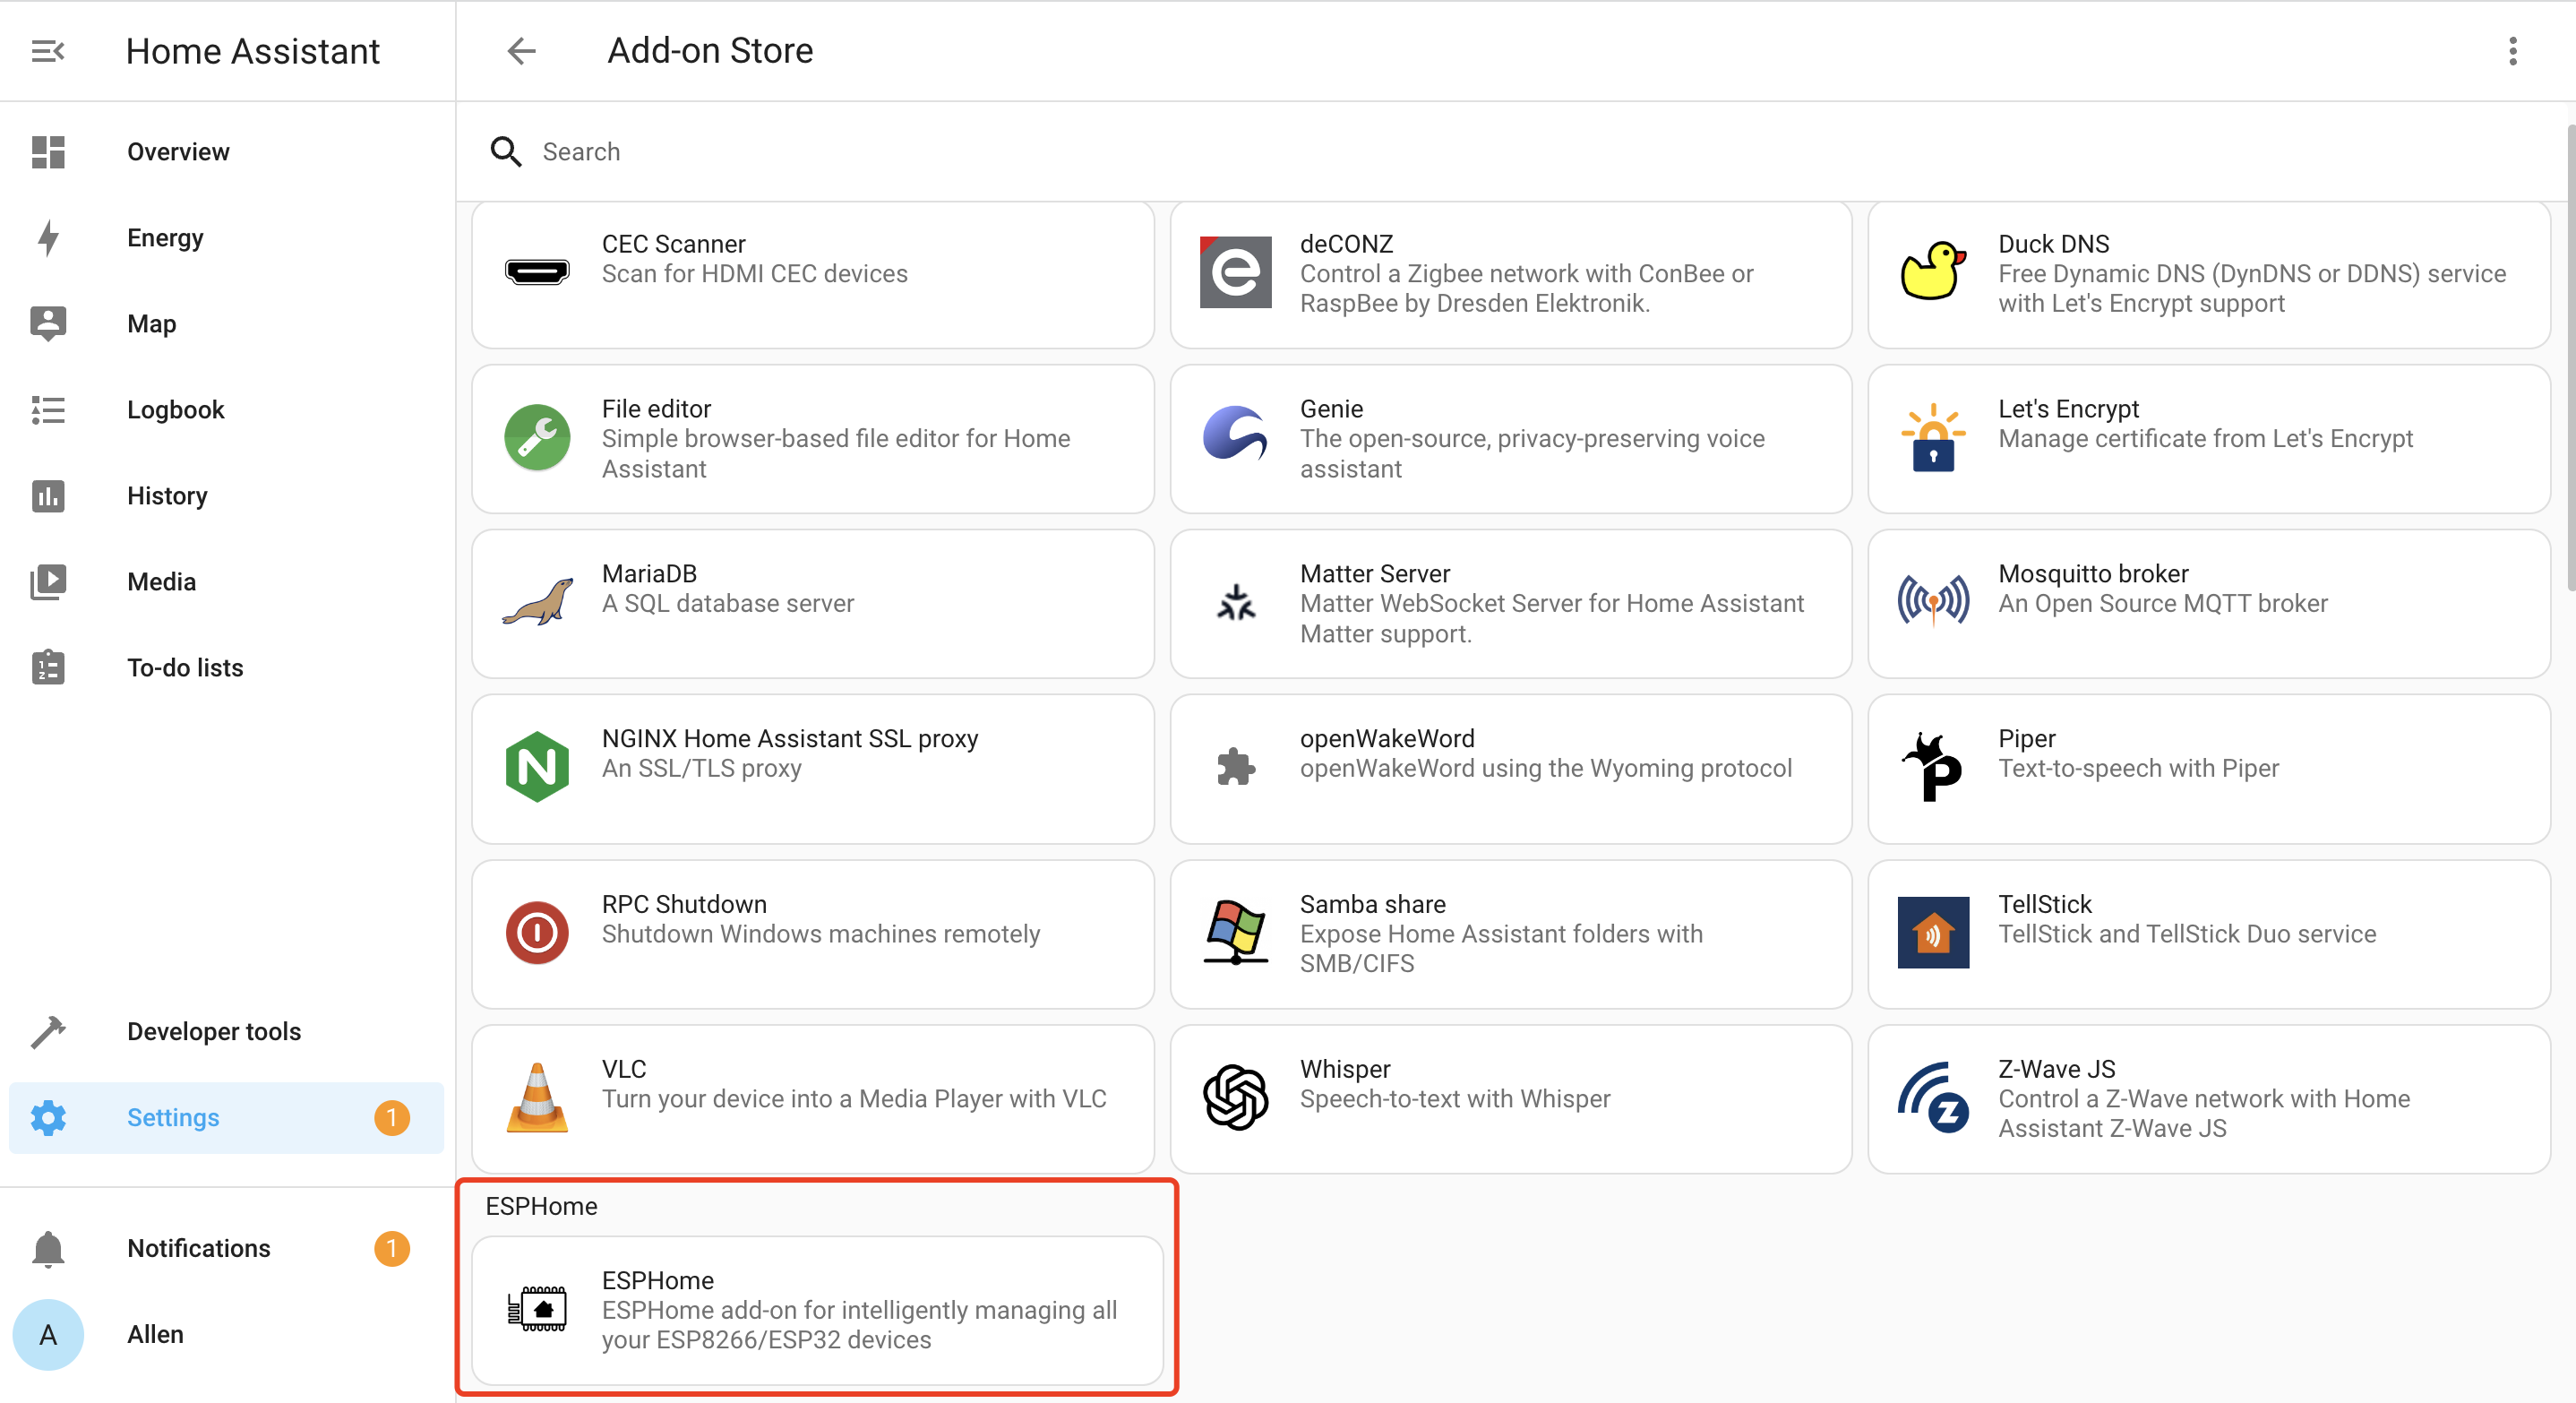
- Step 1. Click INSTALL

- Step 2. Enable all the options and click START

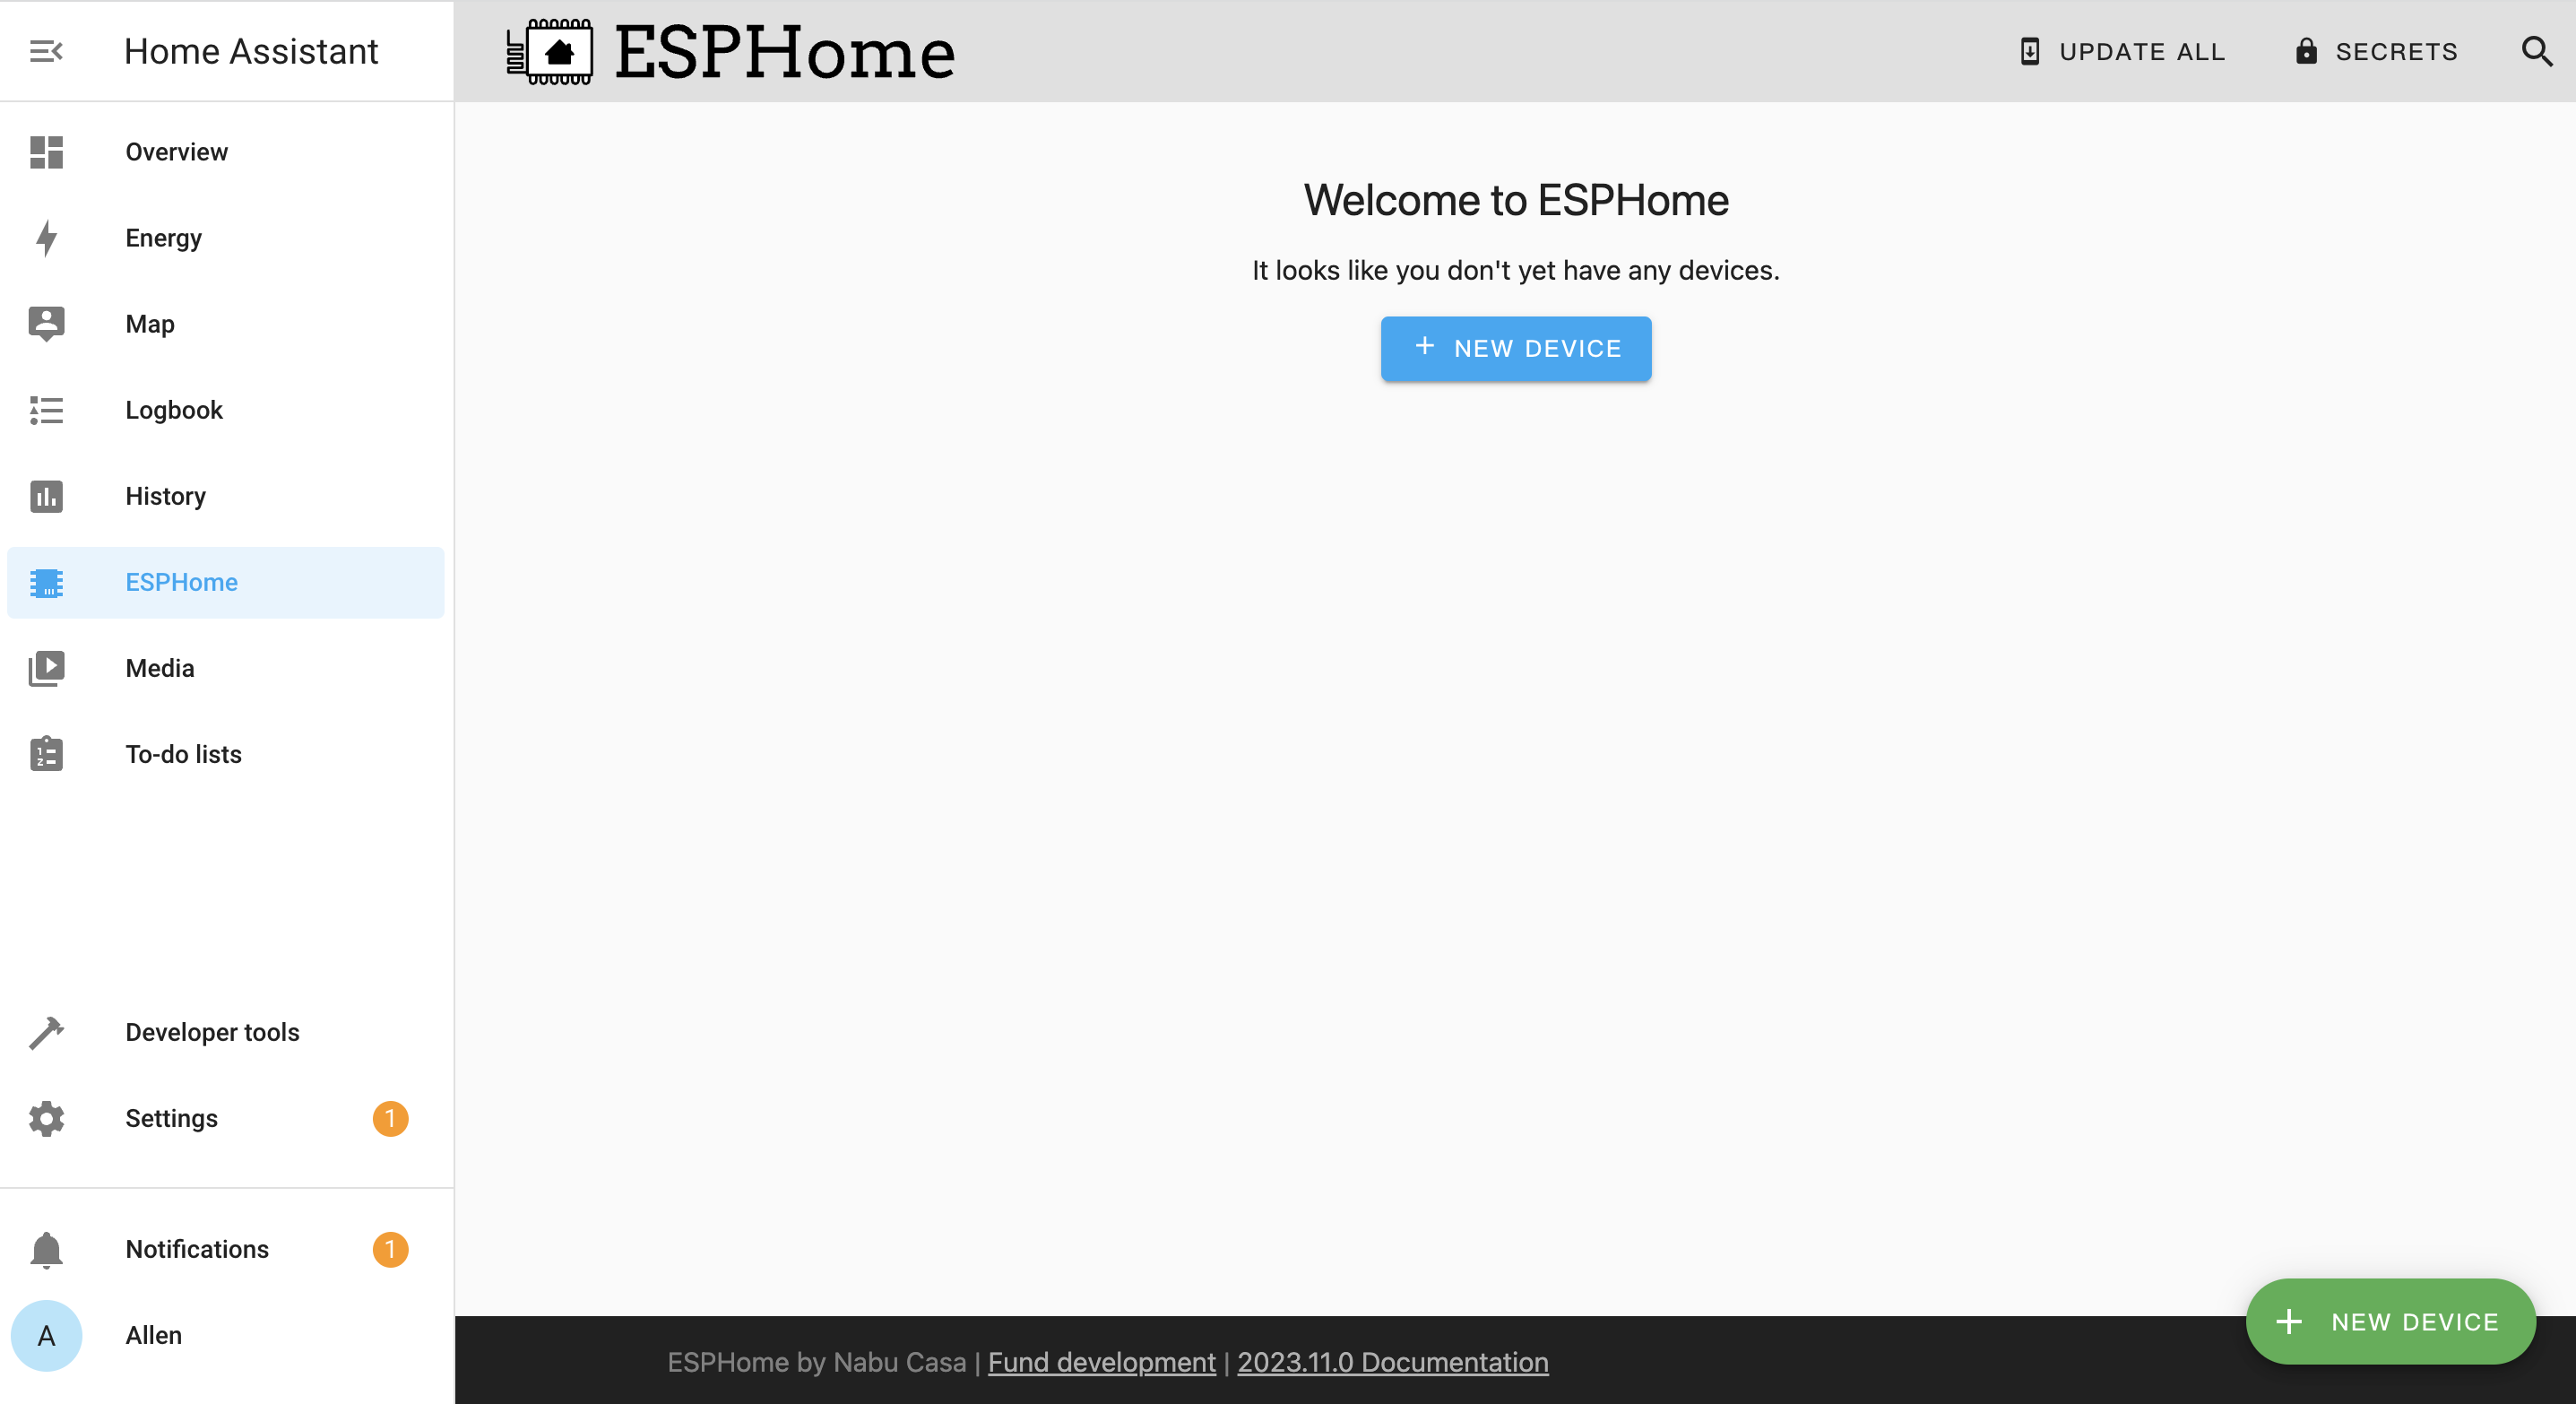
You will see the following window if ESPHome is successfully loaded
Getting Started
Once all the software and the hardware are really, we can now get started.
1. Add Seeed Studio XIAO ESP32C3 to ESPHome
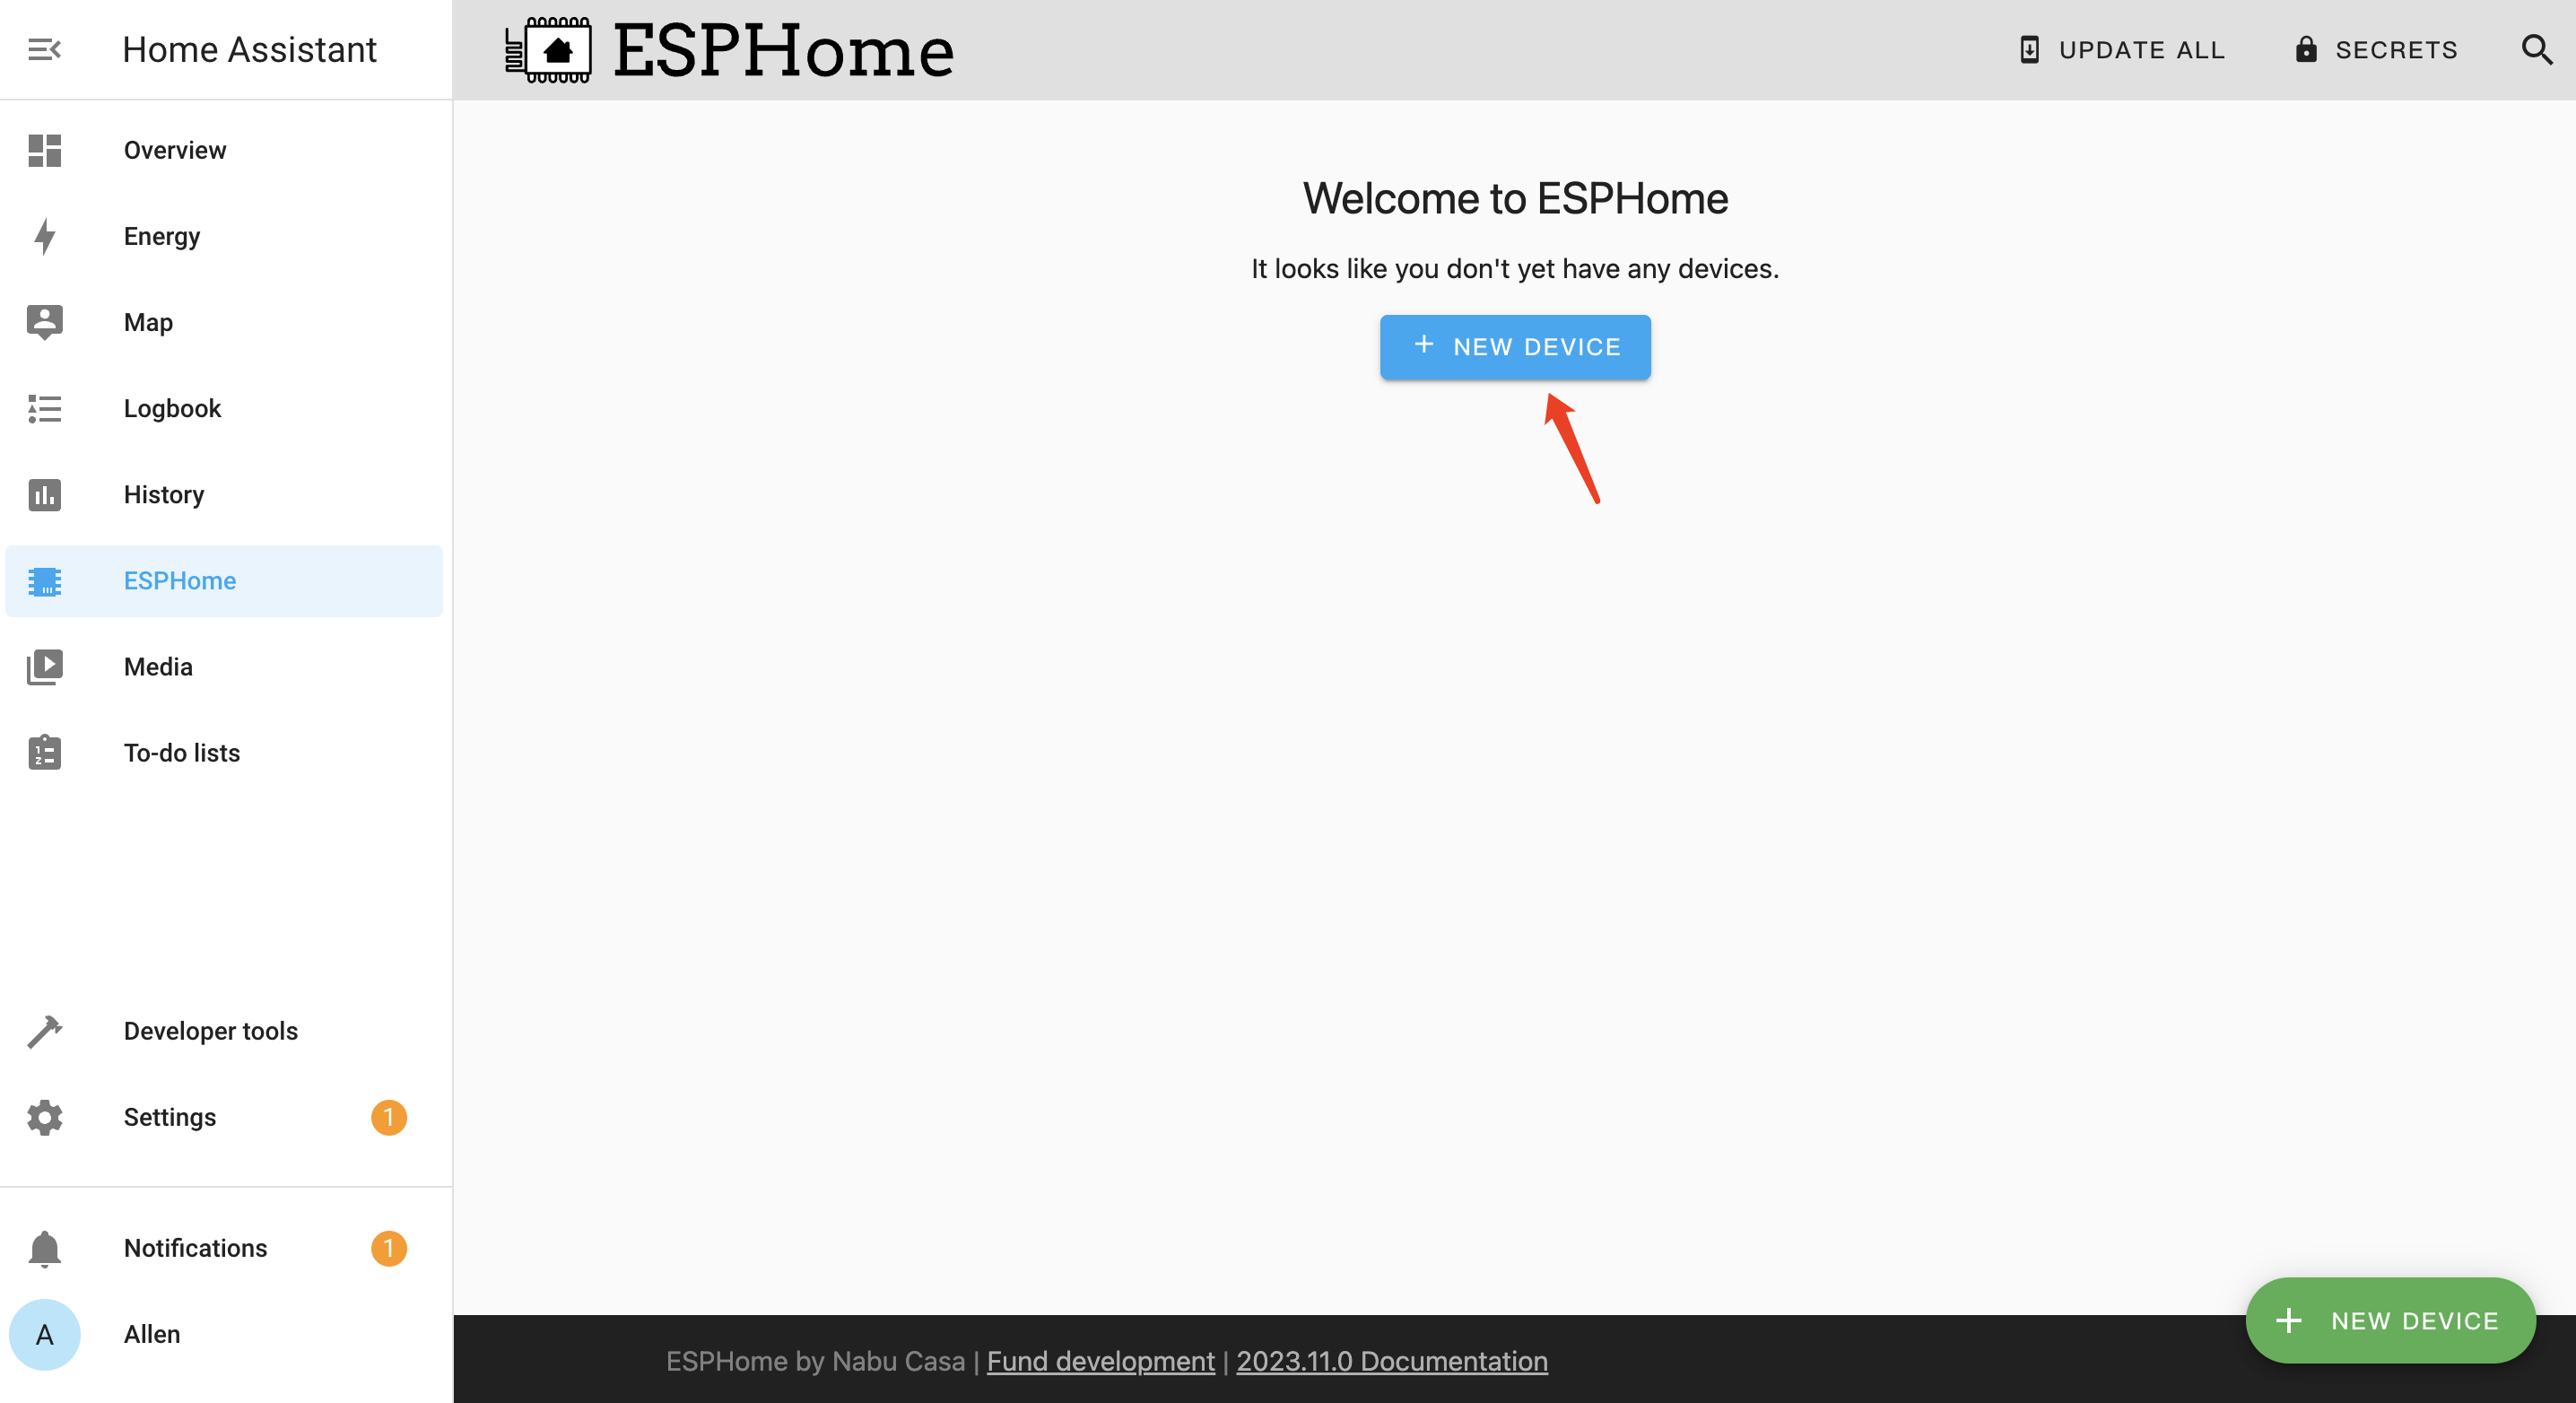
- Step 1. Click + NEW DEVICE
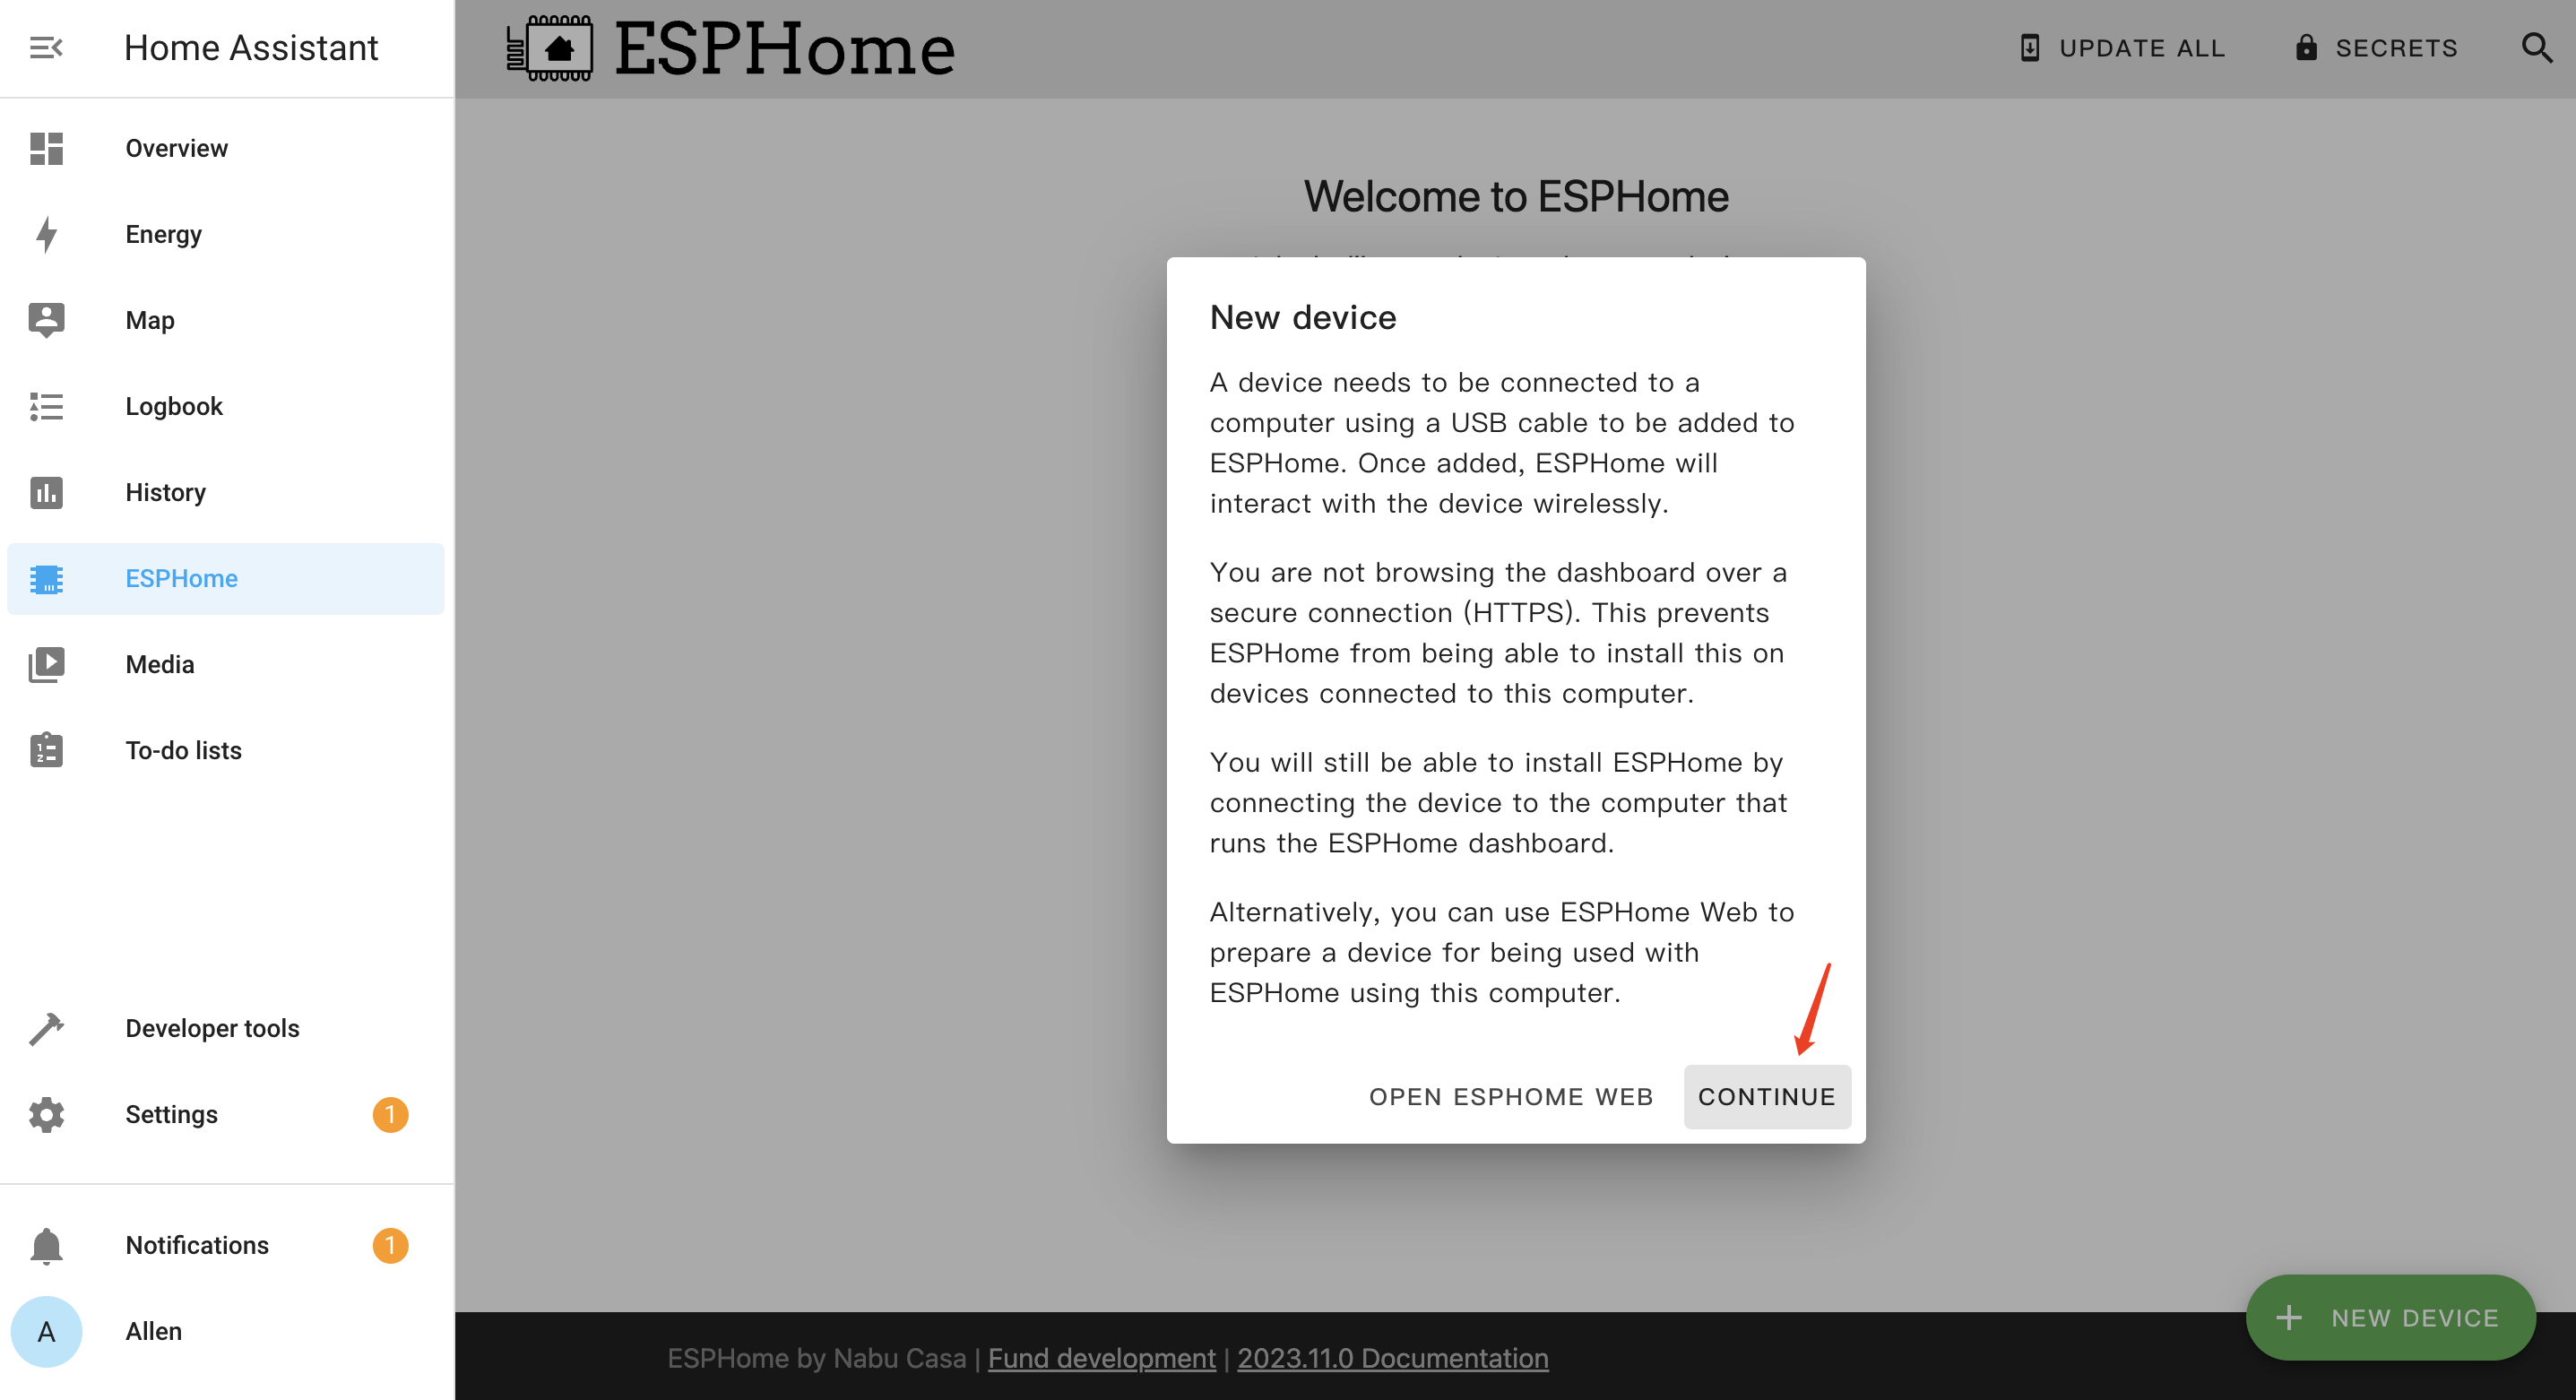
- Step 2. Click CONTINUE
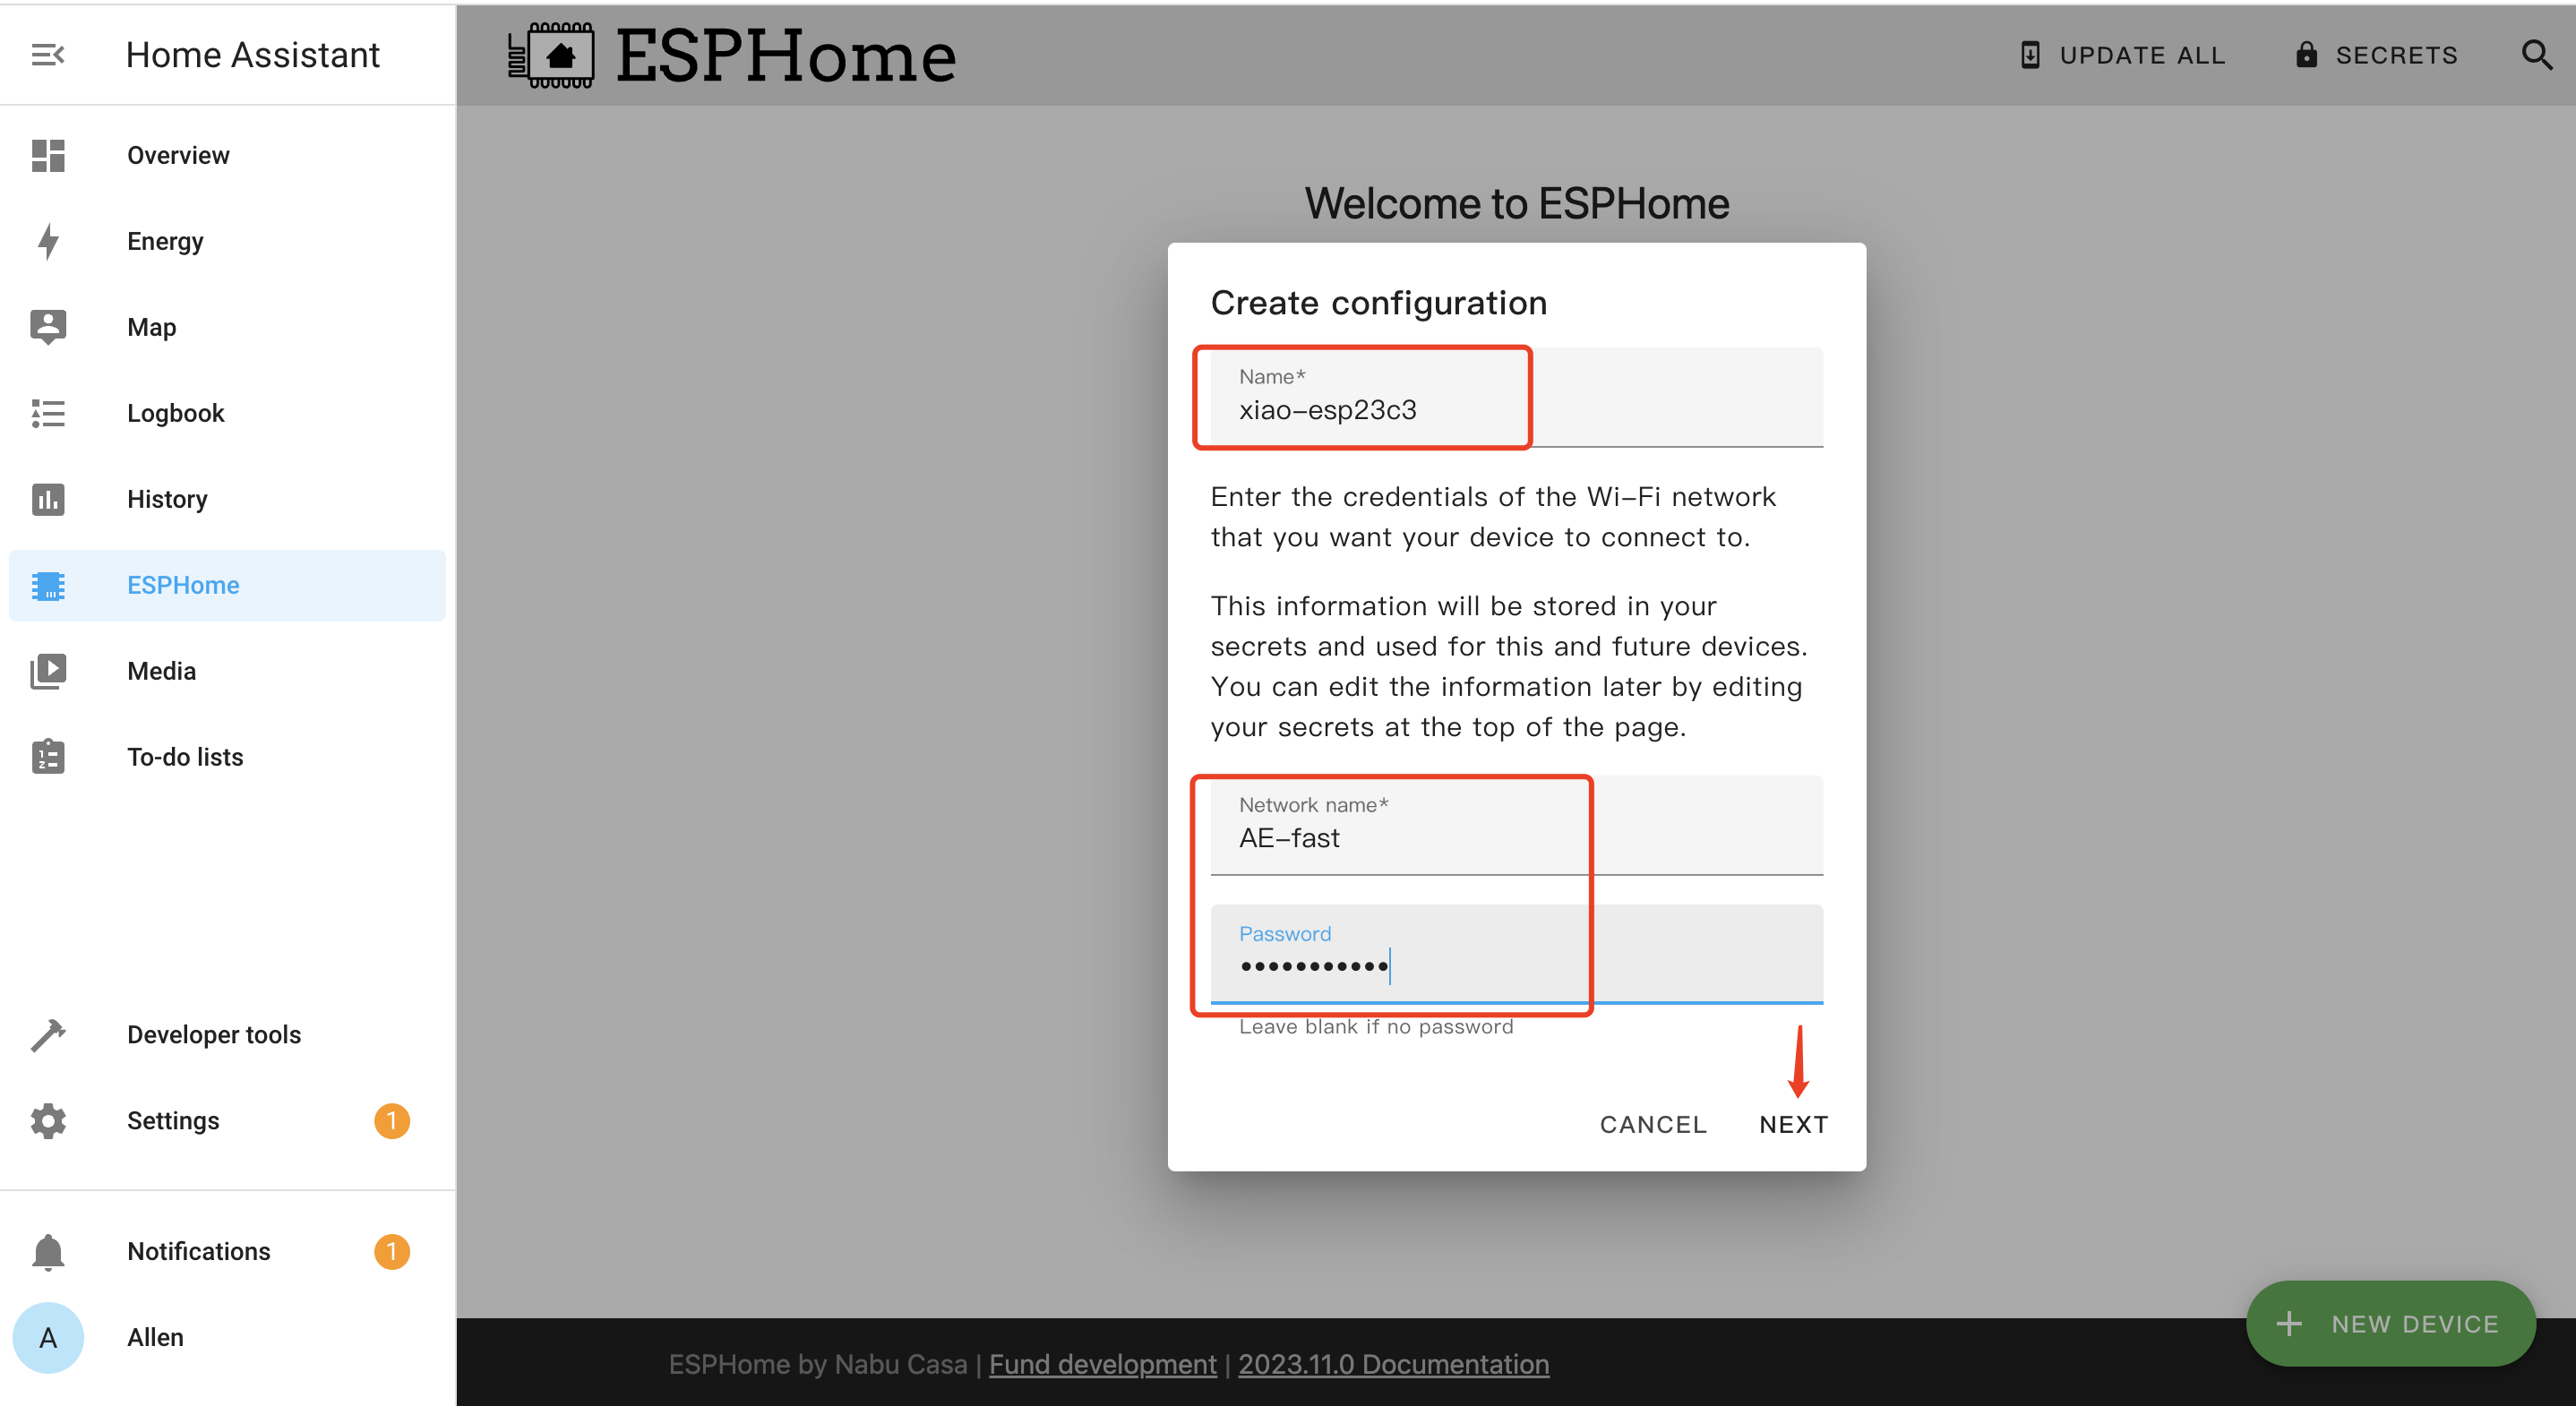
- Step 3. Enter a Name for the device and enter WiFi credentials such as Network name and Password. Then click NEXT
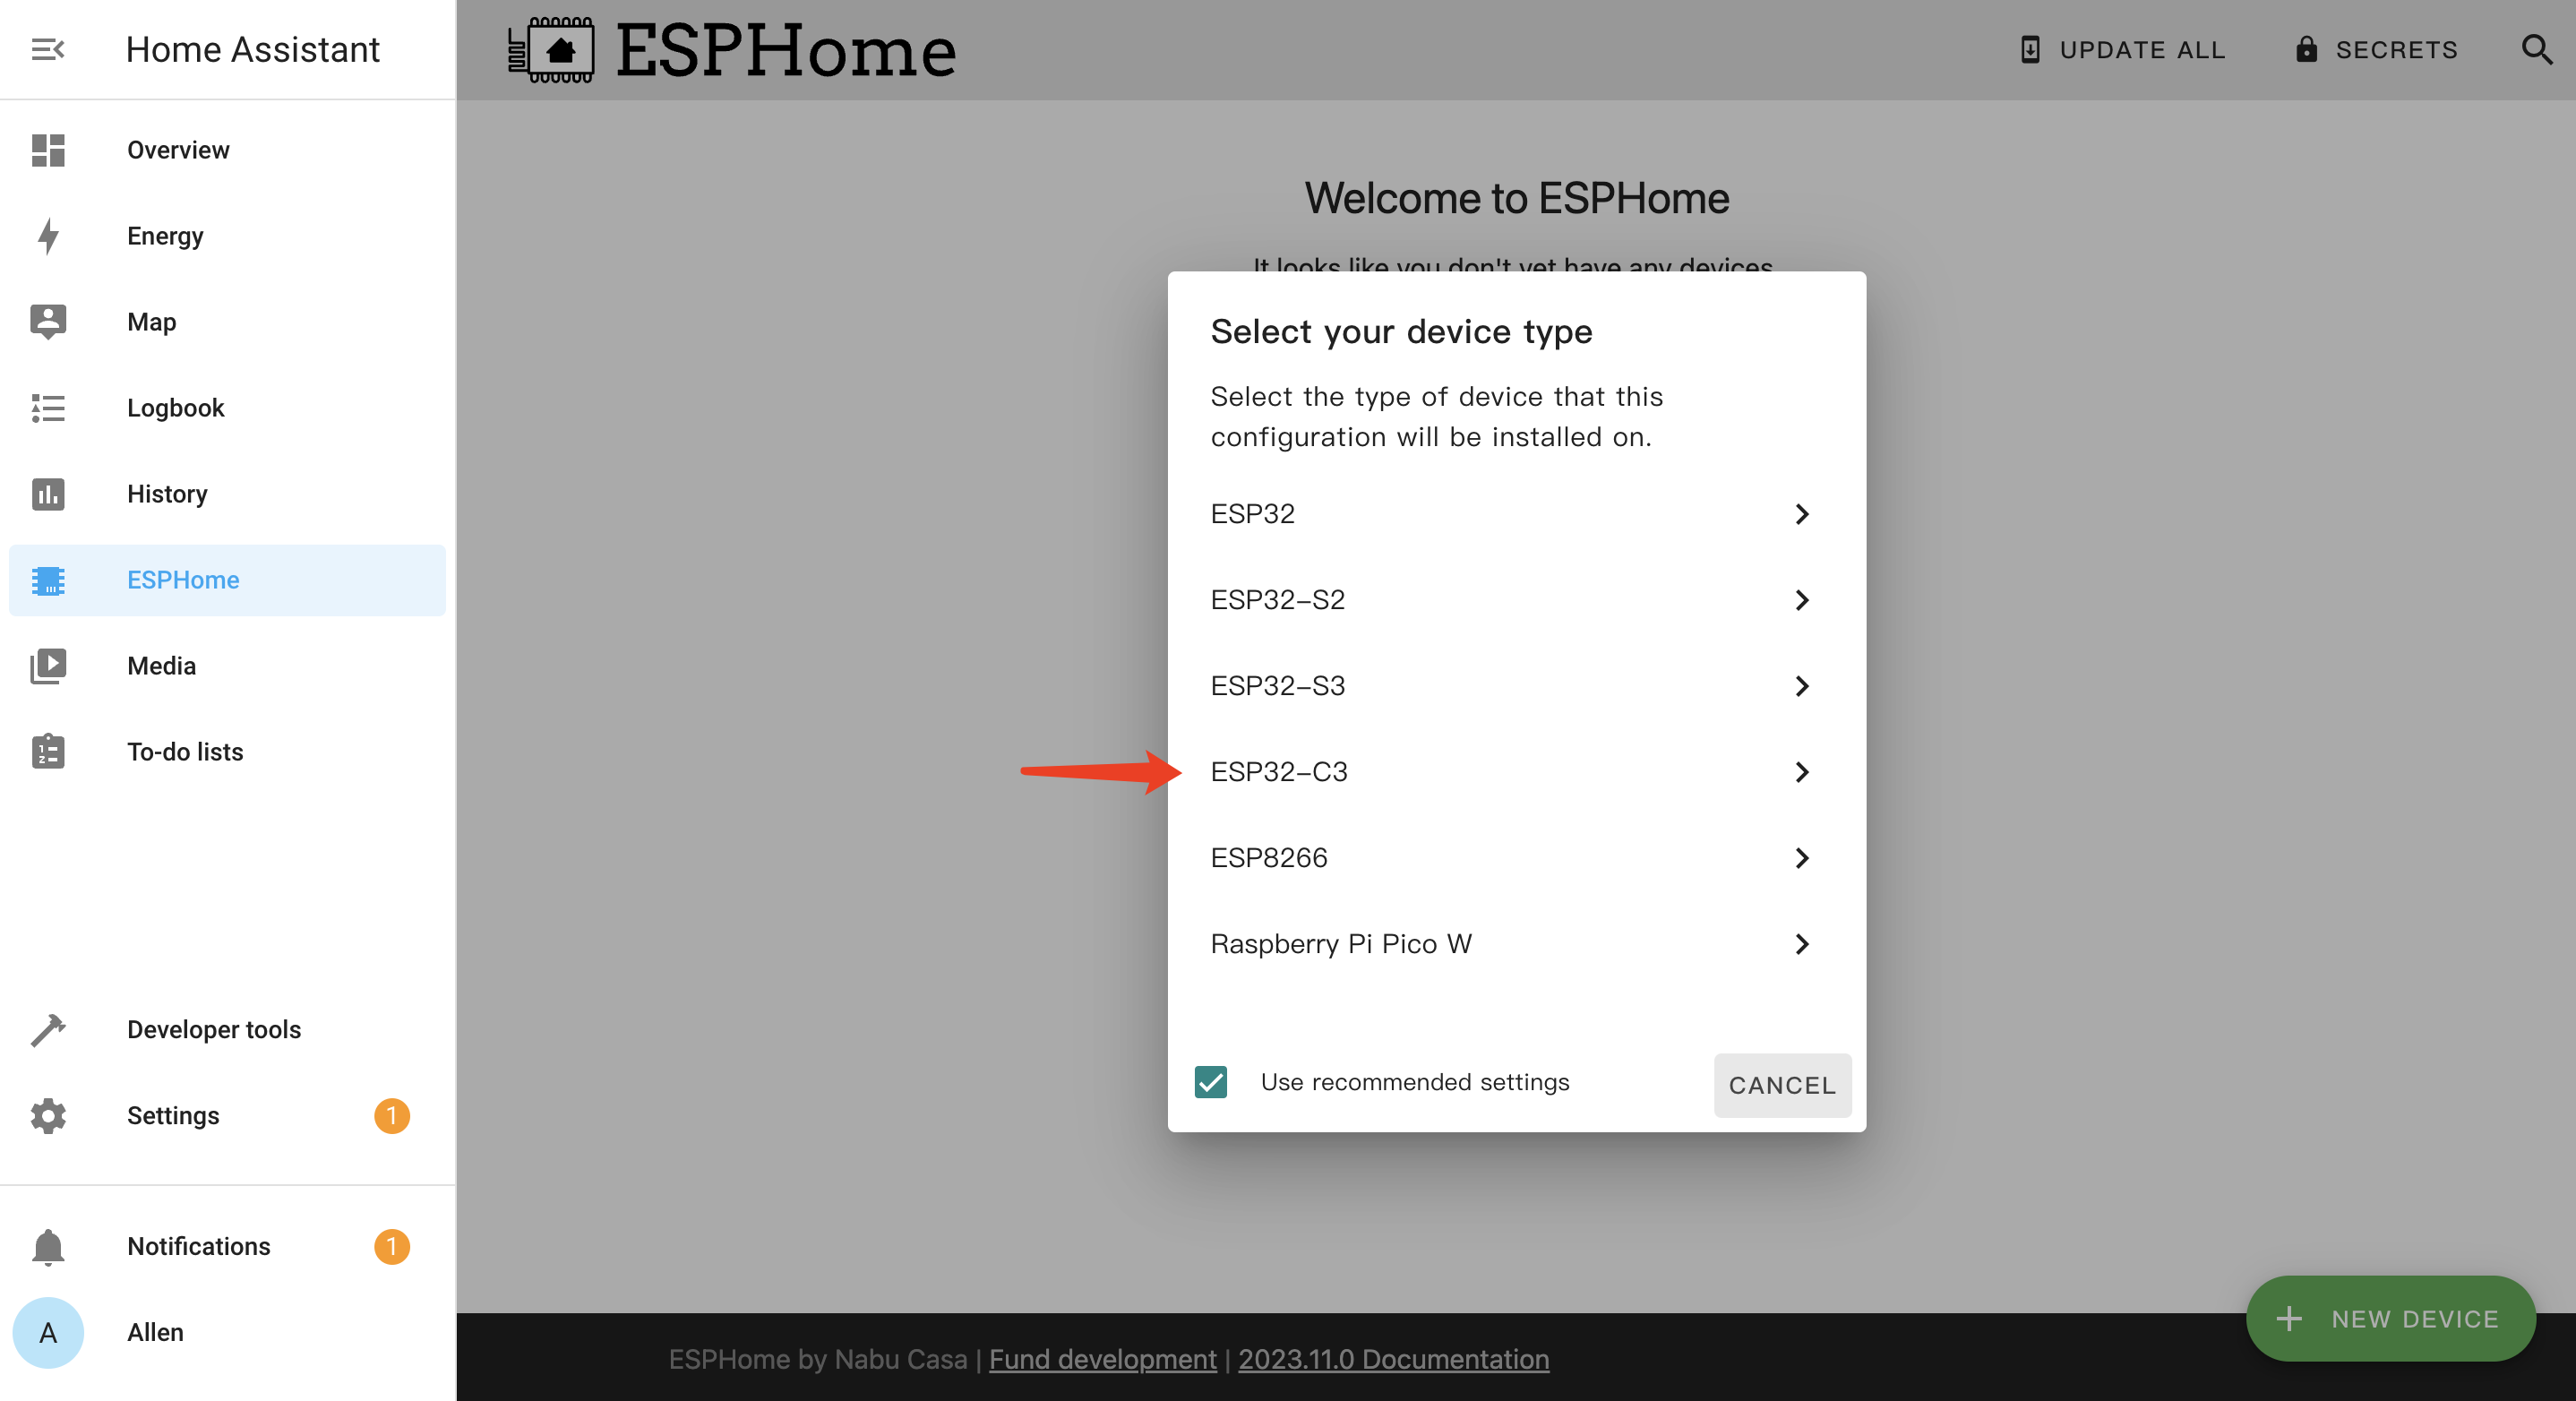
- Step 4. Select ESP32-C3 and click
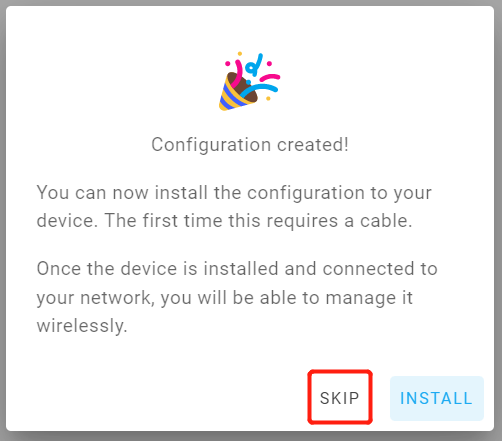
- Step 5. Click SKIP because we will configure this board manually
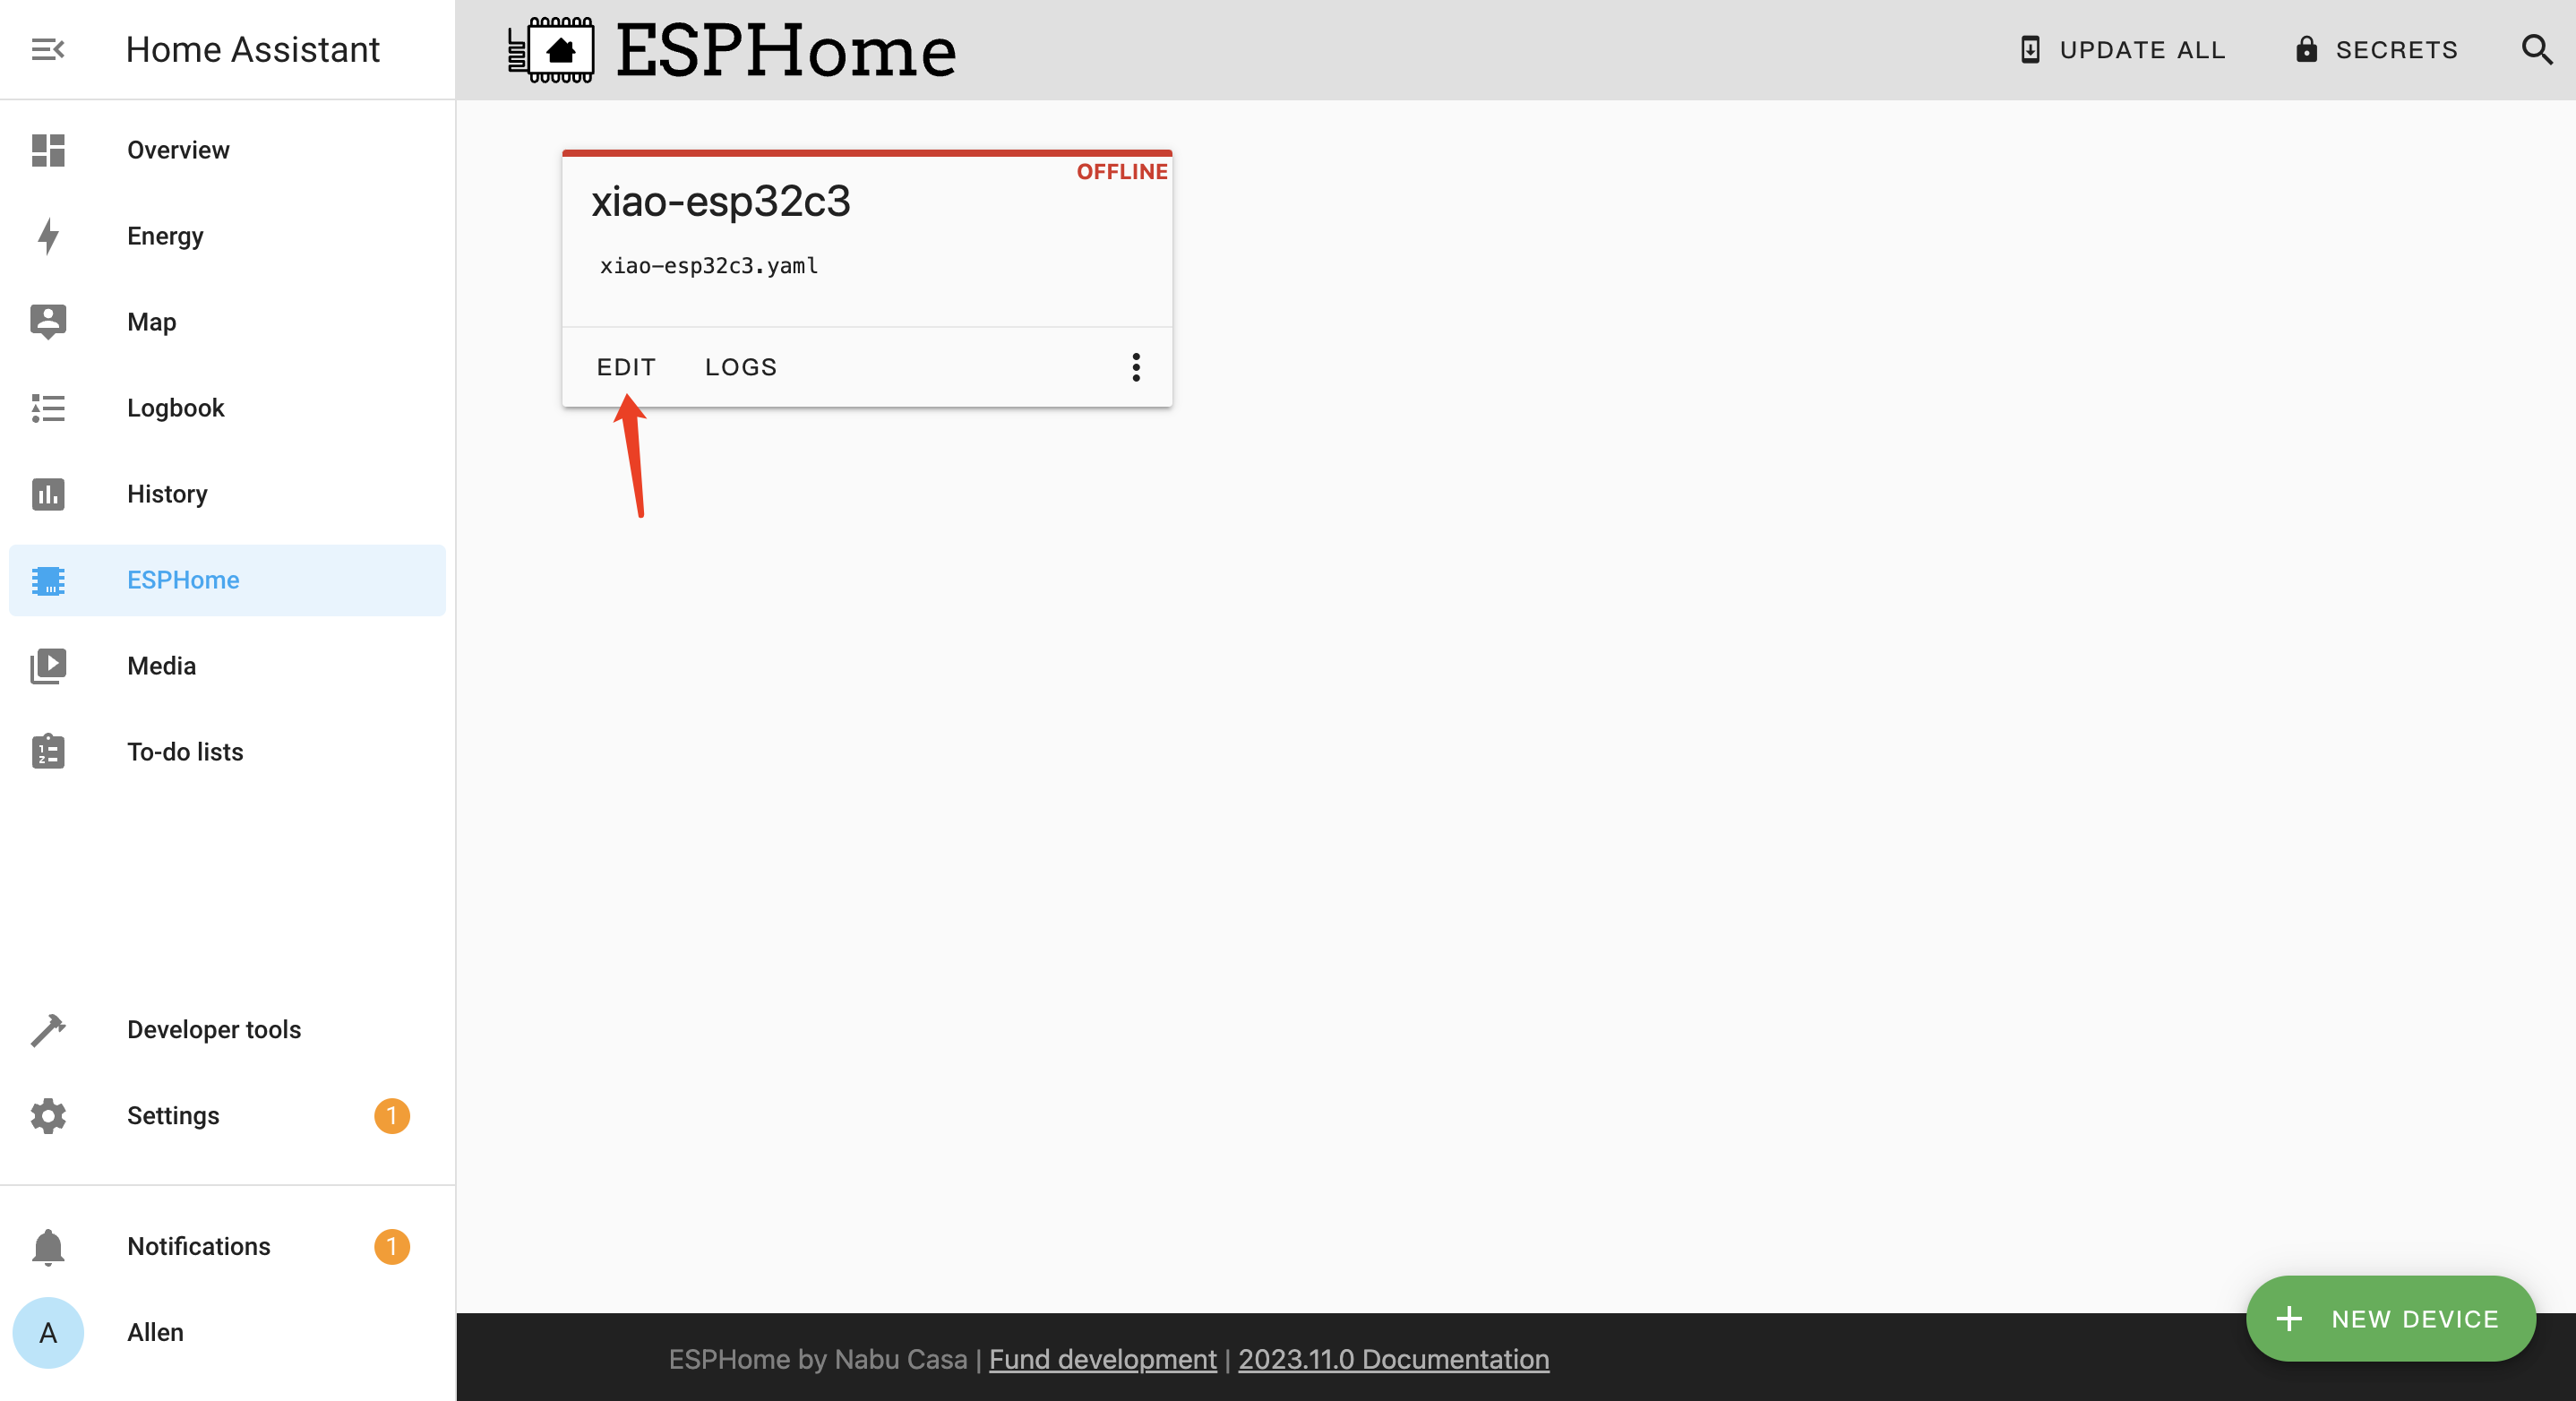
- Step 6. Click EDIT under the newly created board
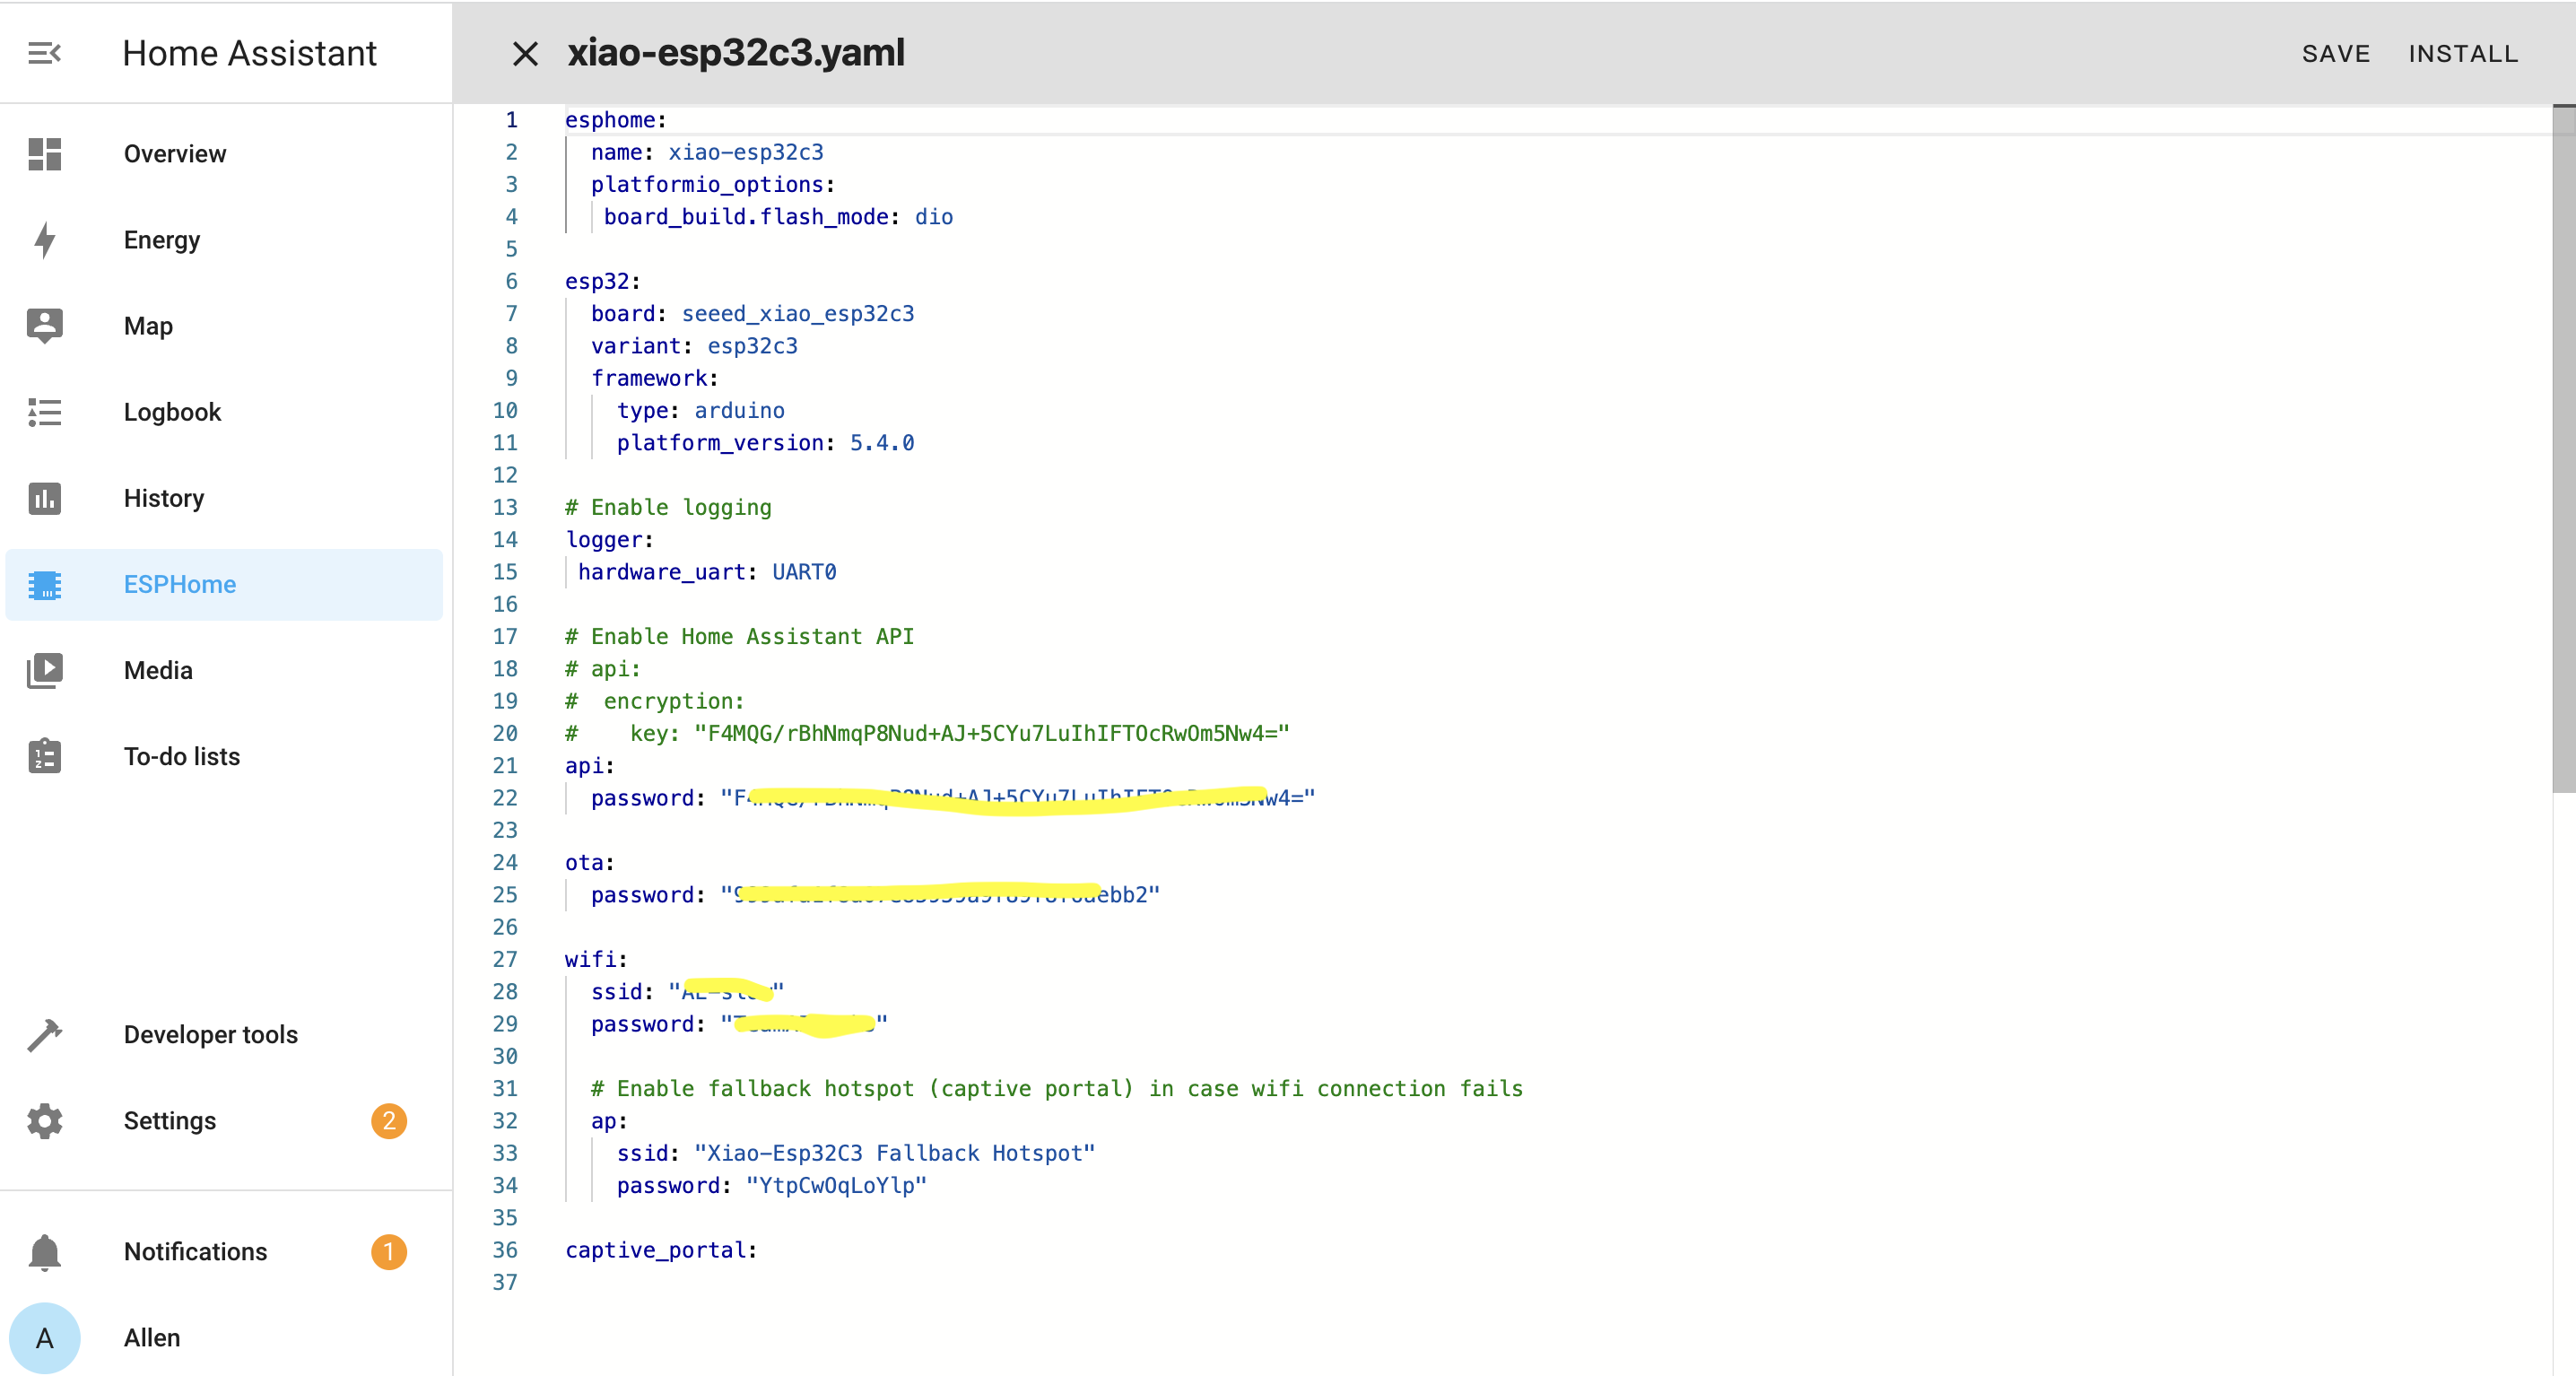
- Step 7. This will open a YAML file and this file will be used to set all the board configurations. Edit the content under esp32 as follows
esphome:
  name: xiao-esp32c3
  platformio_options:
   board_build.flash_mode: dio

esp32:
  board: seeed_xiao_esp32c3
  variant: esp32c3
  framework:
    type: arduino
    platform_version: 5.4.0

# Enable logging
logger:
 hardware_uart: UART0

# Enable Home Assistant API
api:
  password: "Your password"

ota:
  password: "Your password"

wifi:
  ssid: !secret wifi_ssid
  password: !secret wifi_password

  # Enable fallback hotspot (captive portal) in case wifi connection fails
  ap:
    ssid: "Xiao-Esp32C3 Fallback Hotspot"
    password: "Your Password"
- Step 8. Click SAVE and then click INSTALL
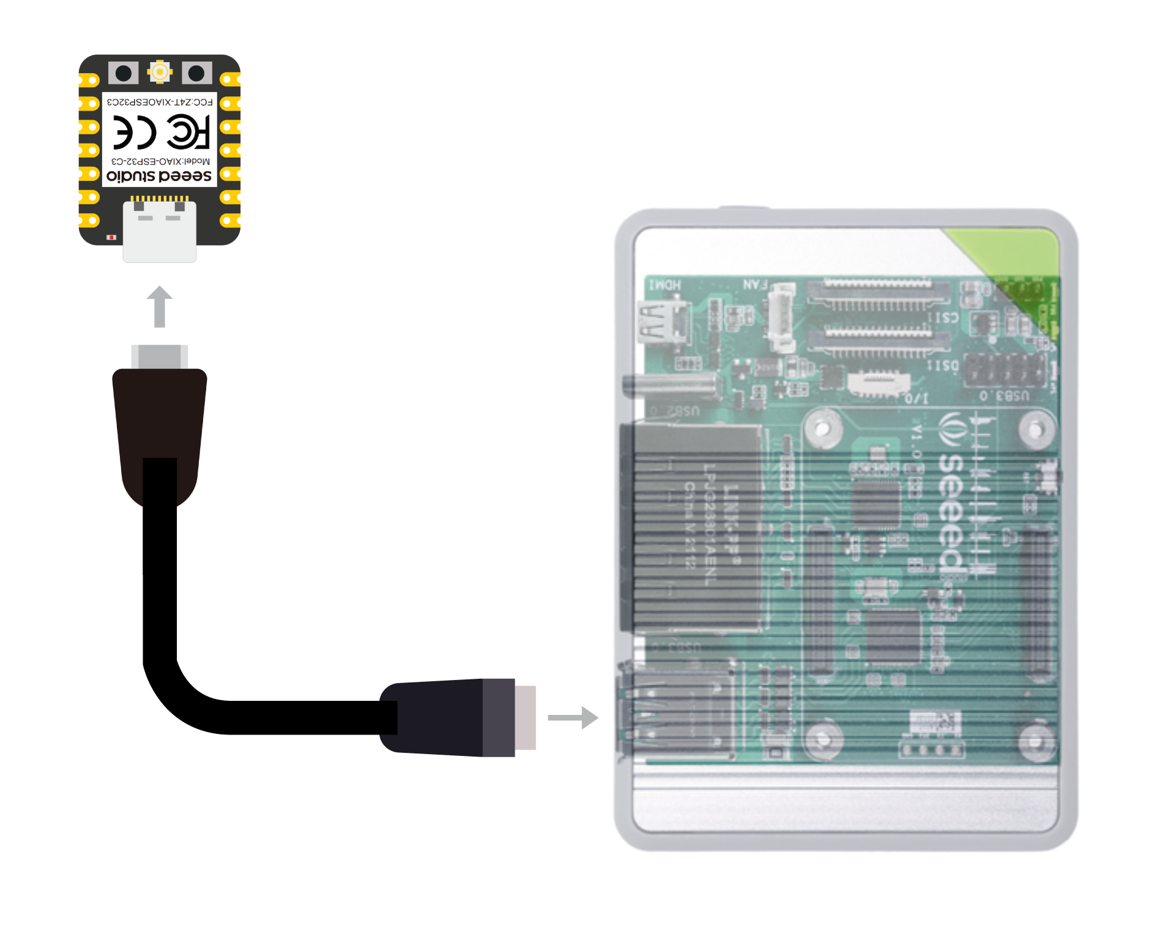
- Step 9. Connect one end of a USB Type-C cable to Seeed Studio XIAO ESP32C3 and the other end to one of the USB ports on the reRouter CM4 1432
- Step 10. Click Plug into the computer running ESPHome Dashboard

- Step 11. Select the connected port. It is likely to be
/dev/ttyACM1because/dev/ttyACM0is connected to the reRouter CM4 1432
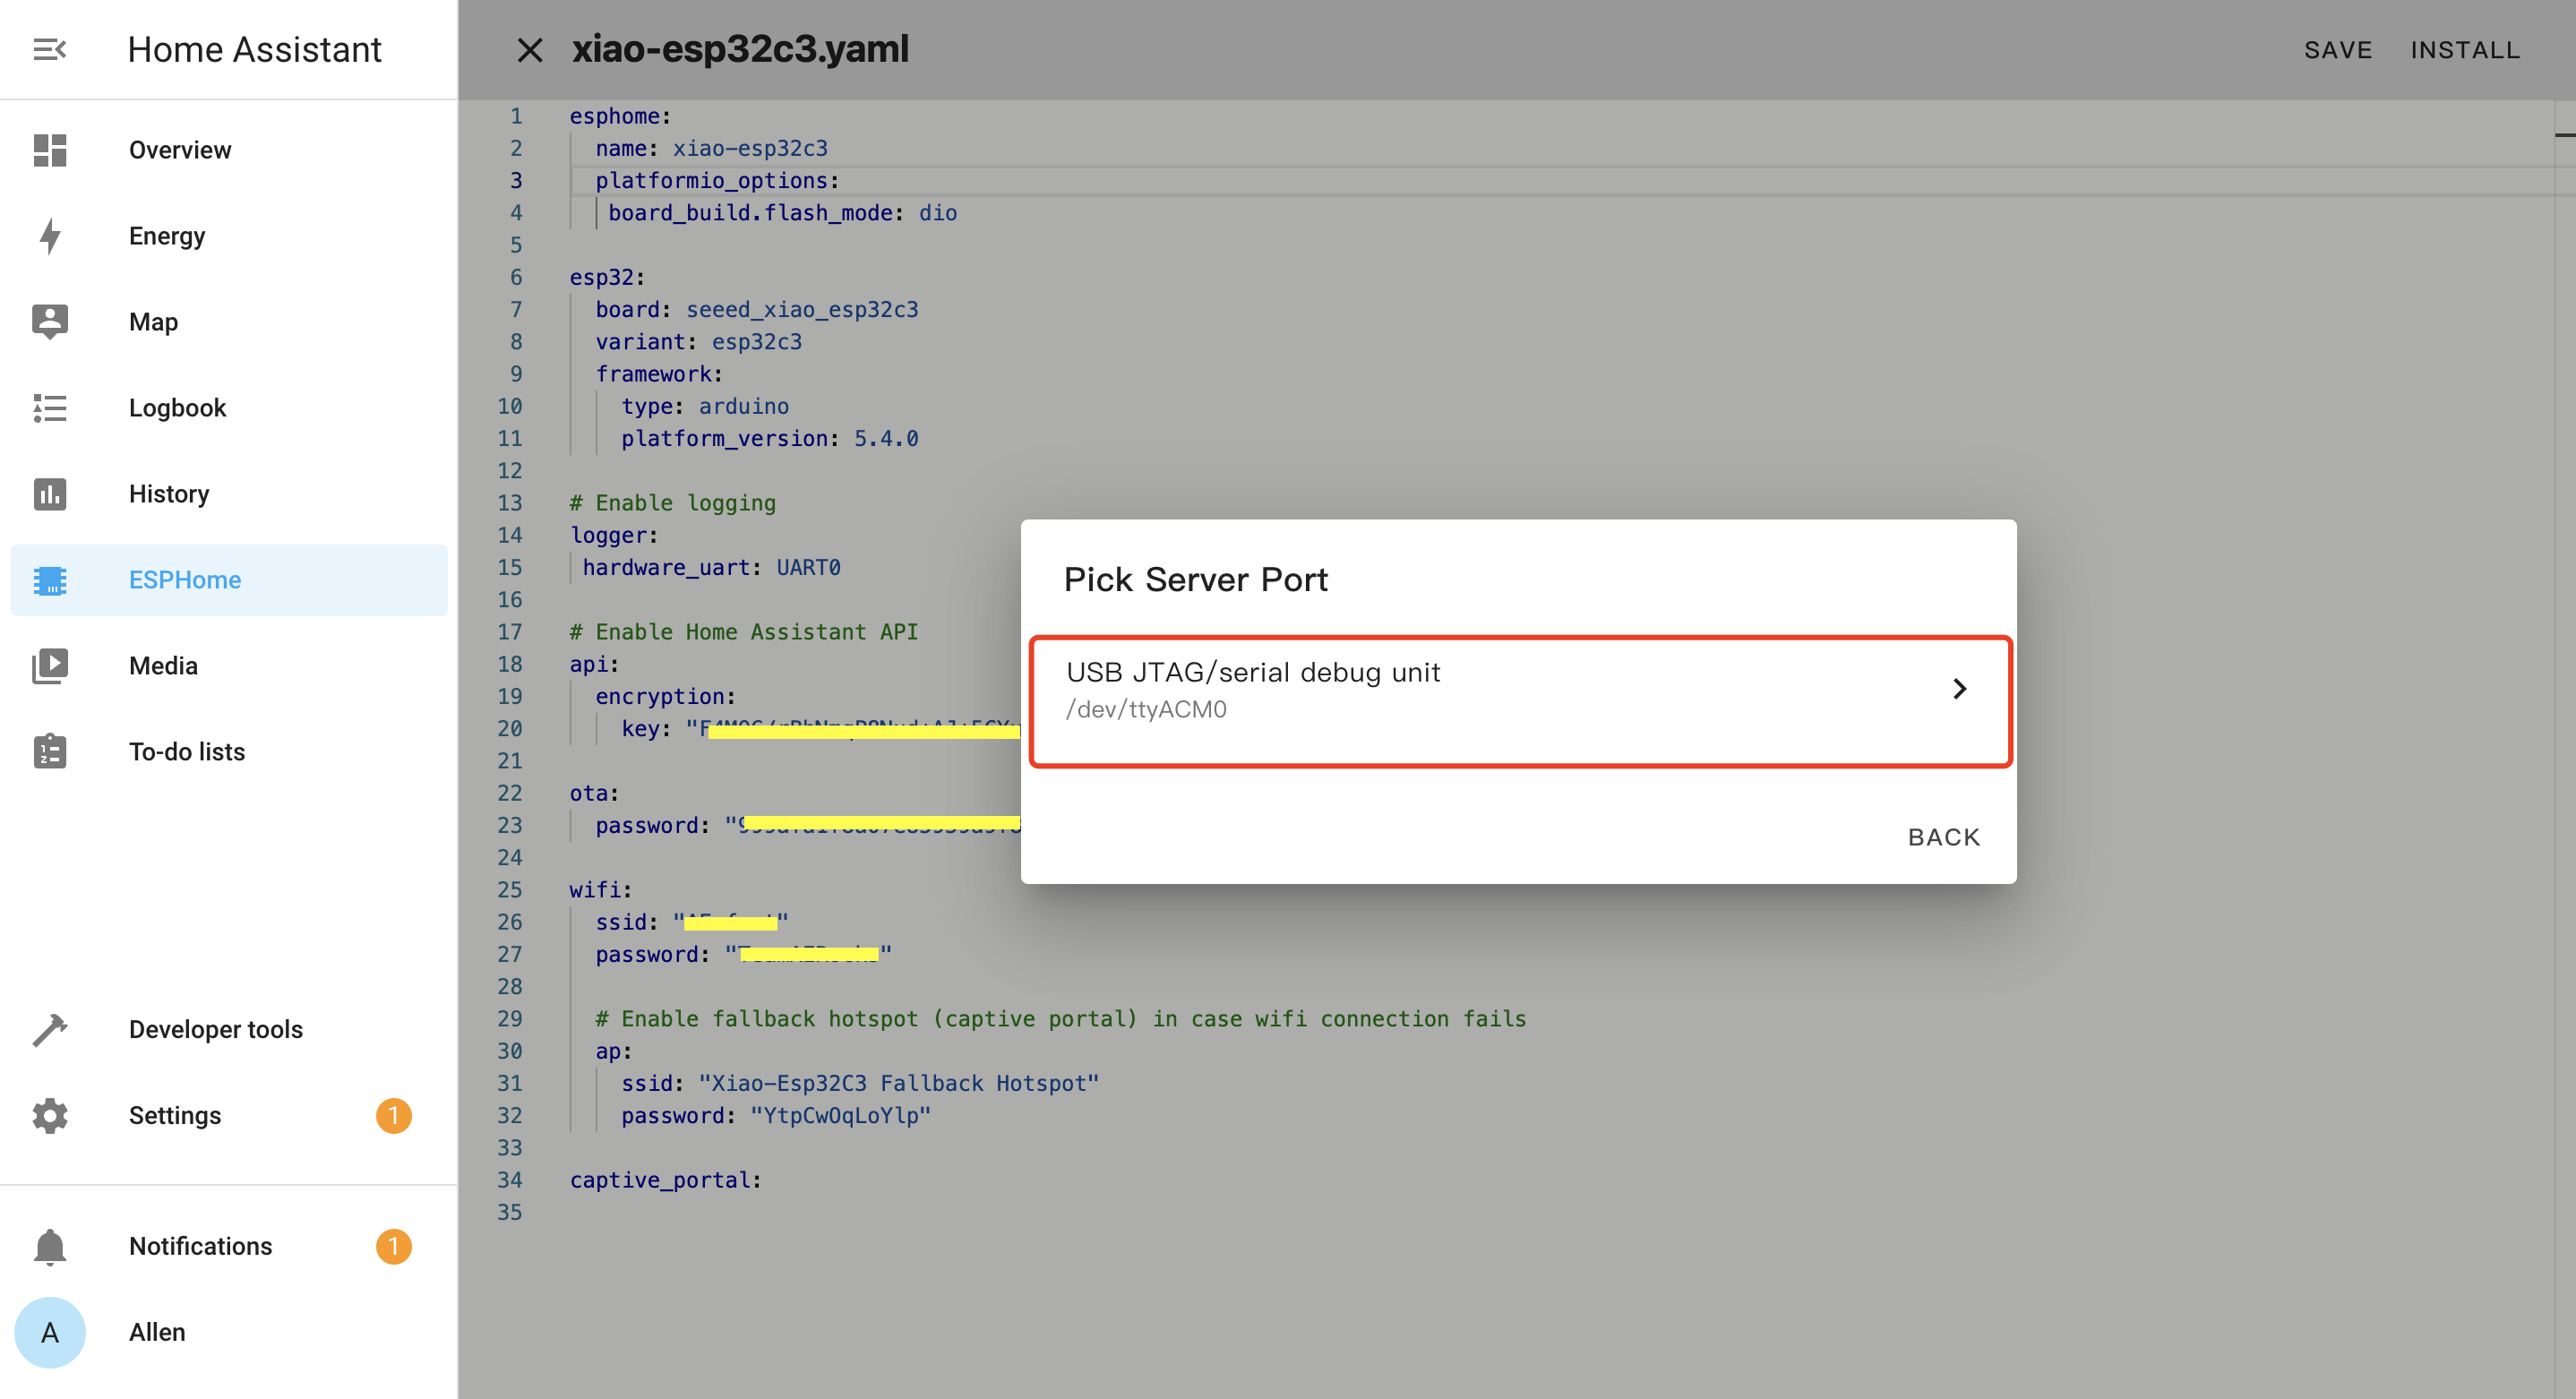
Better to use 2.4GHz Wi-Fi
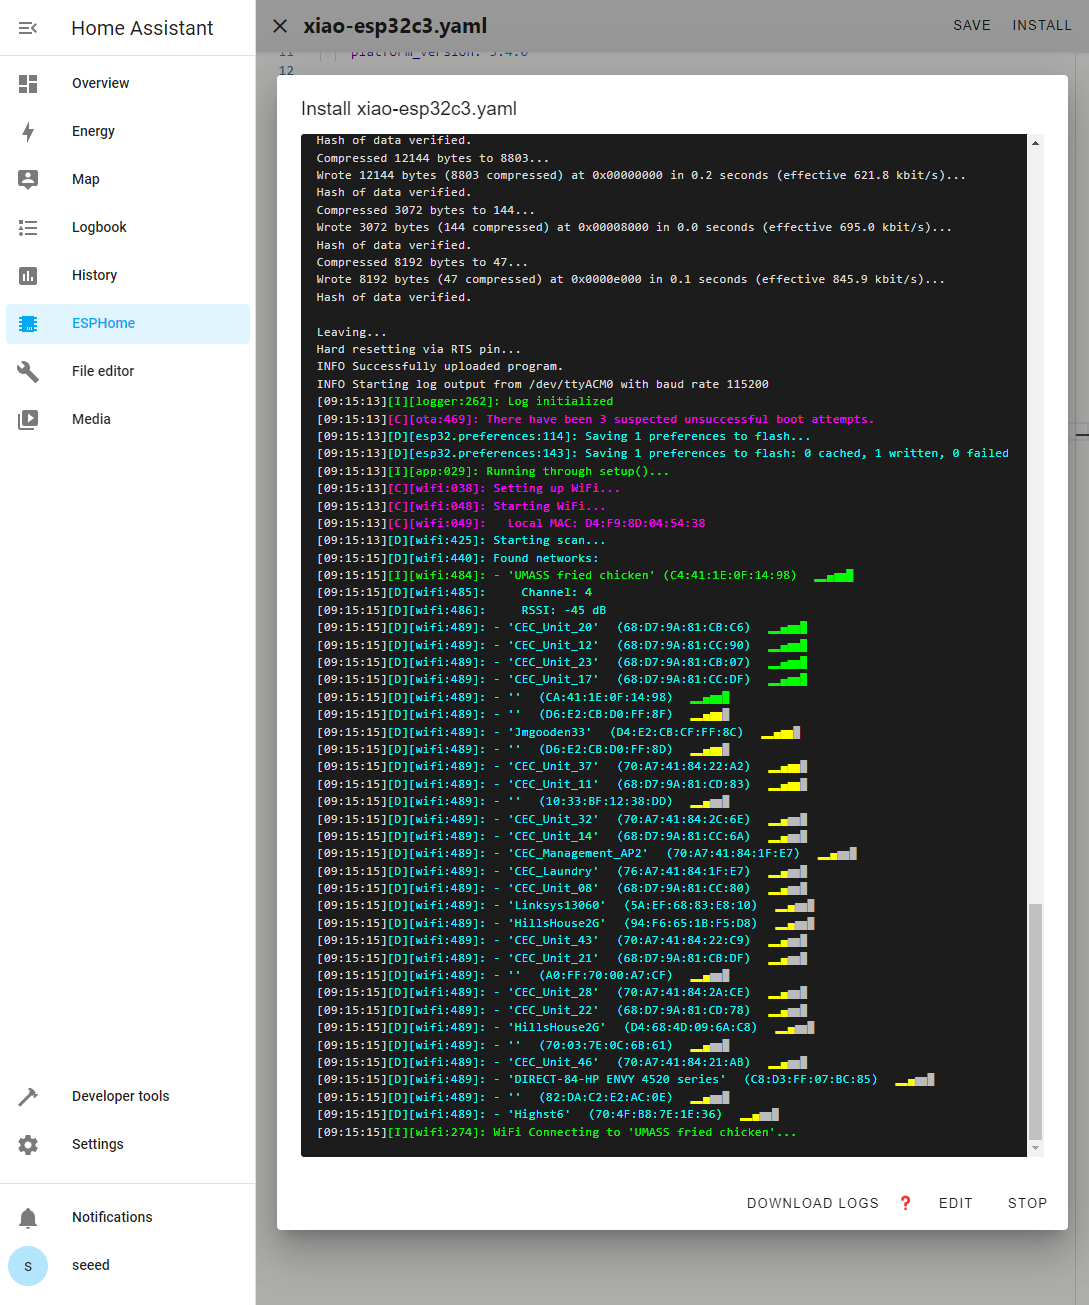
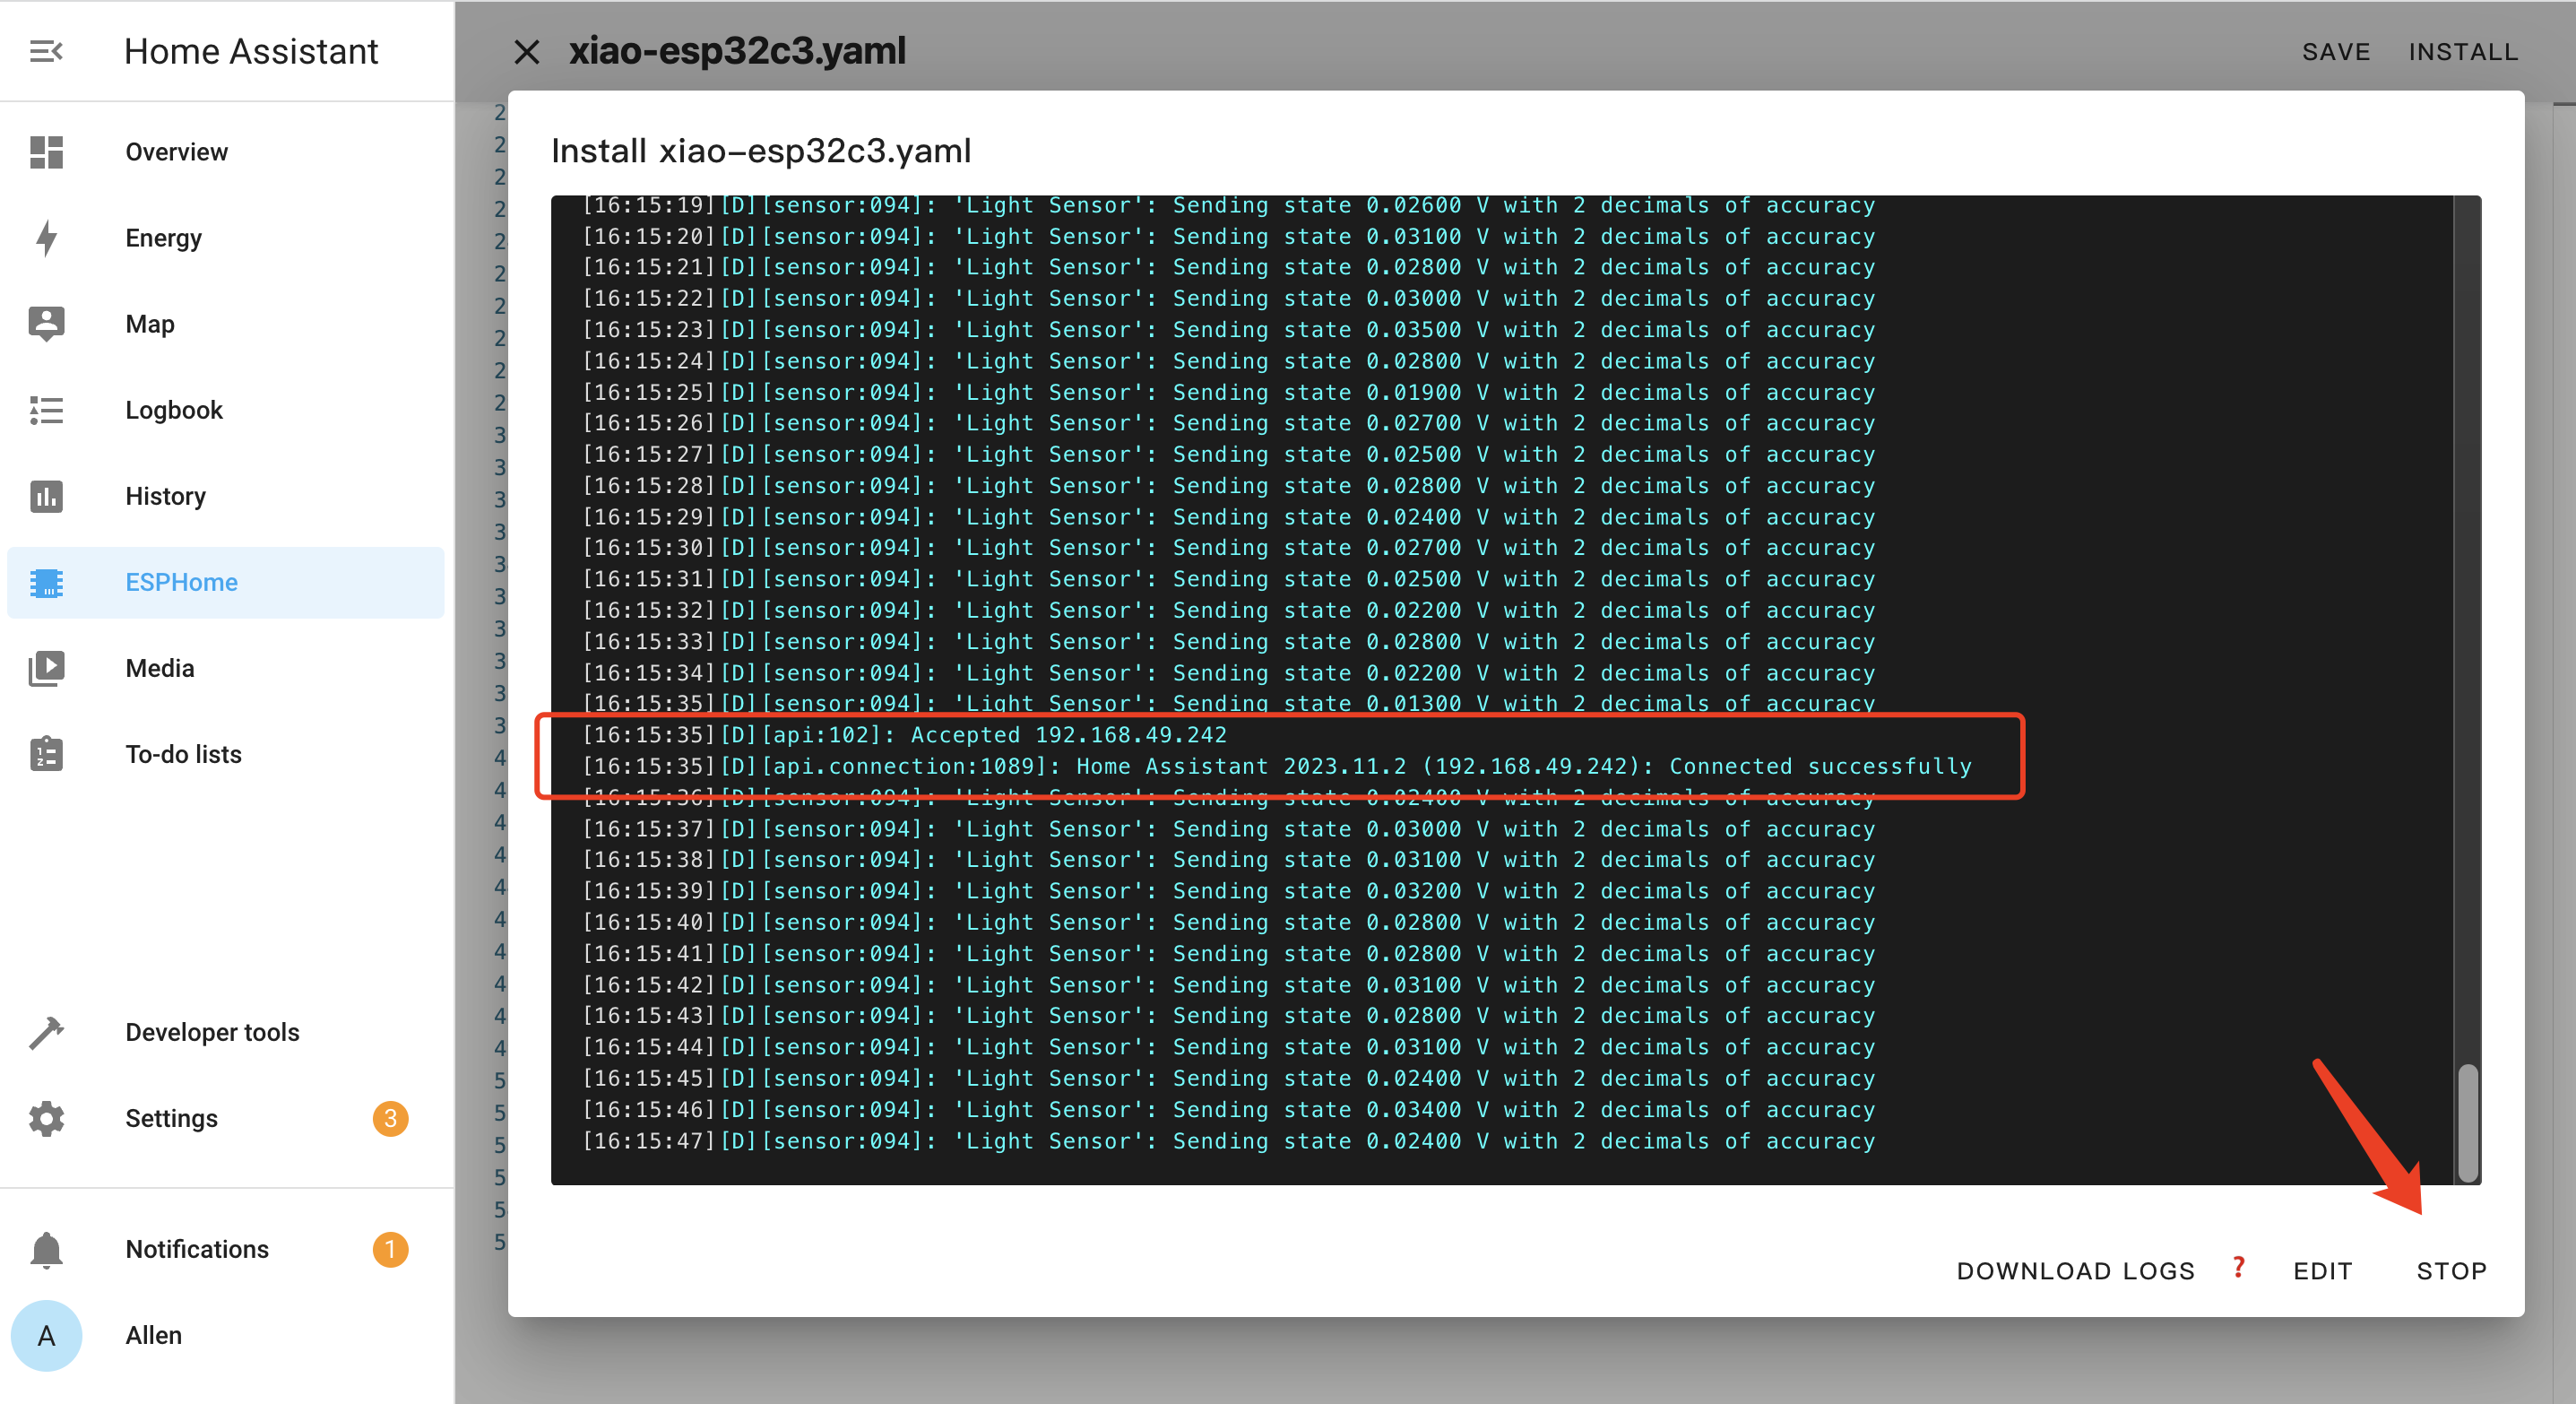
Now it will download all the necessary board packages and flash the ESPHome firmware into the XIAO ESP32C3. If the flashing is successful, you will see the following output. If you see something error, try to restart your xiao esp32c3 or enter bootloader mode by holding on the BOOT BUTTON and connect XIAO ESP32C3.
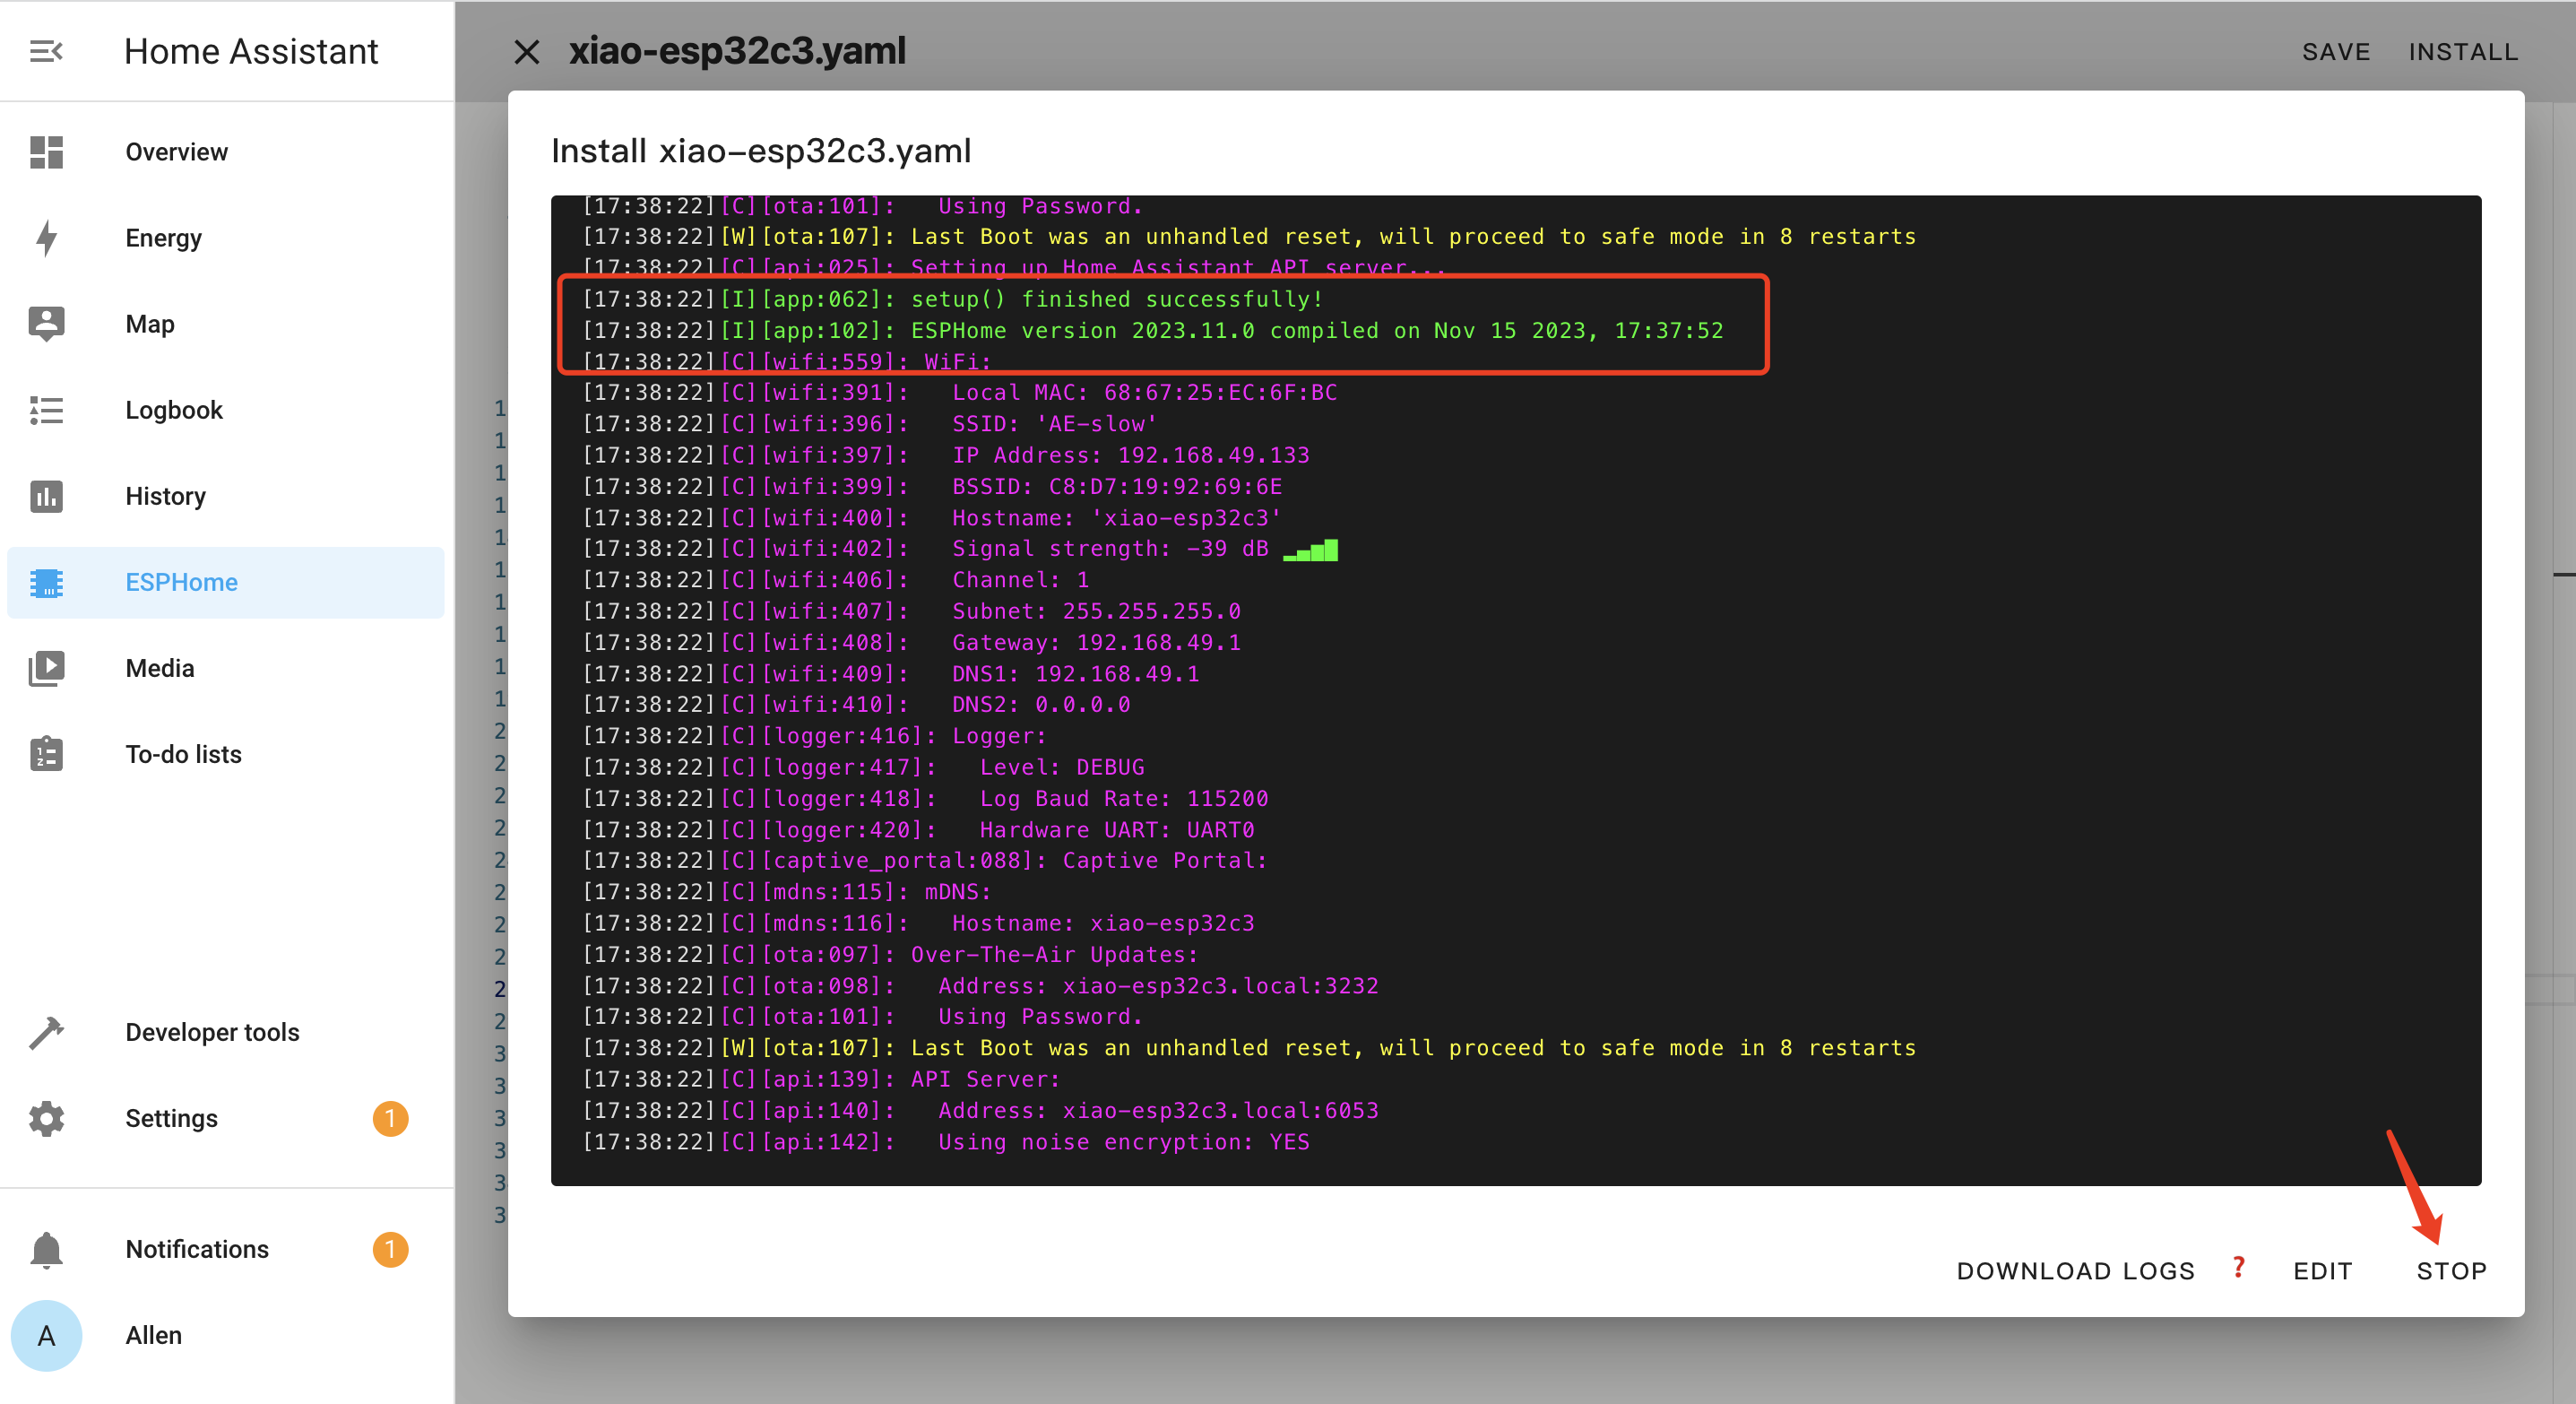
- Step 12. The above window displays the real-time logs from the connected board. Close it by clicking STOP
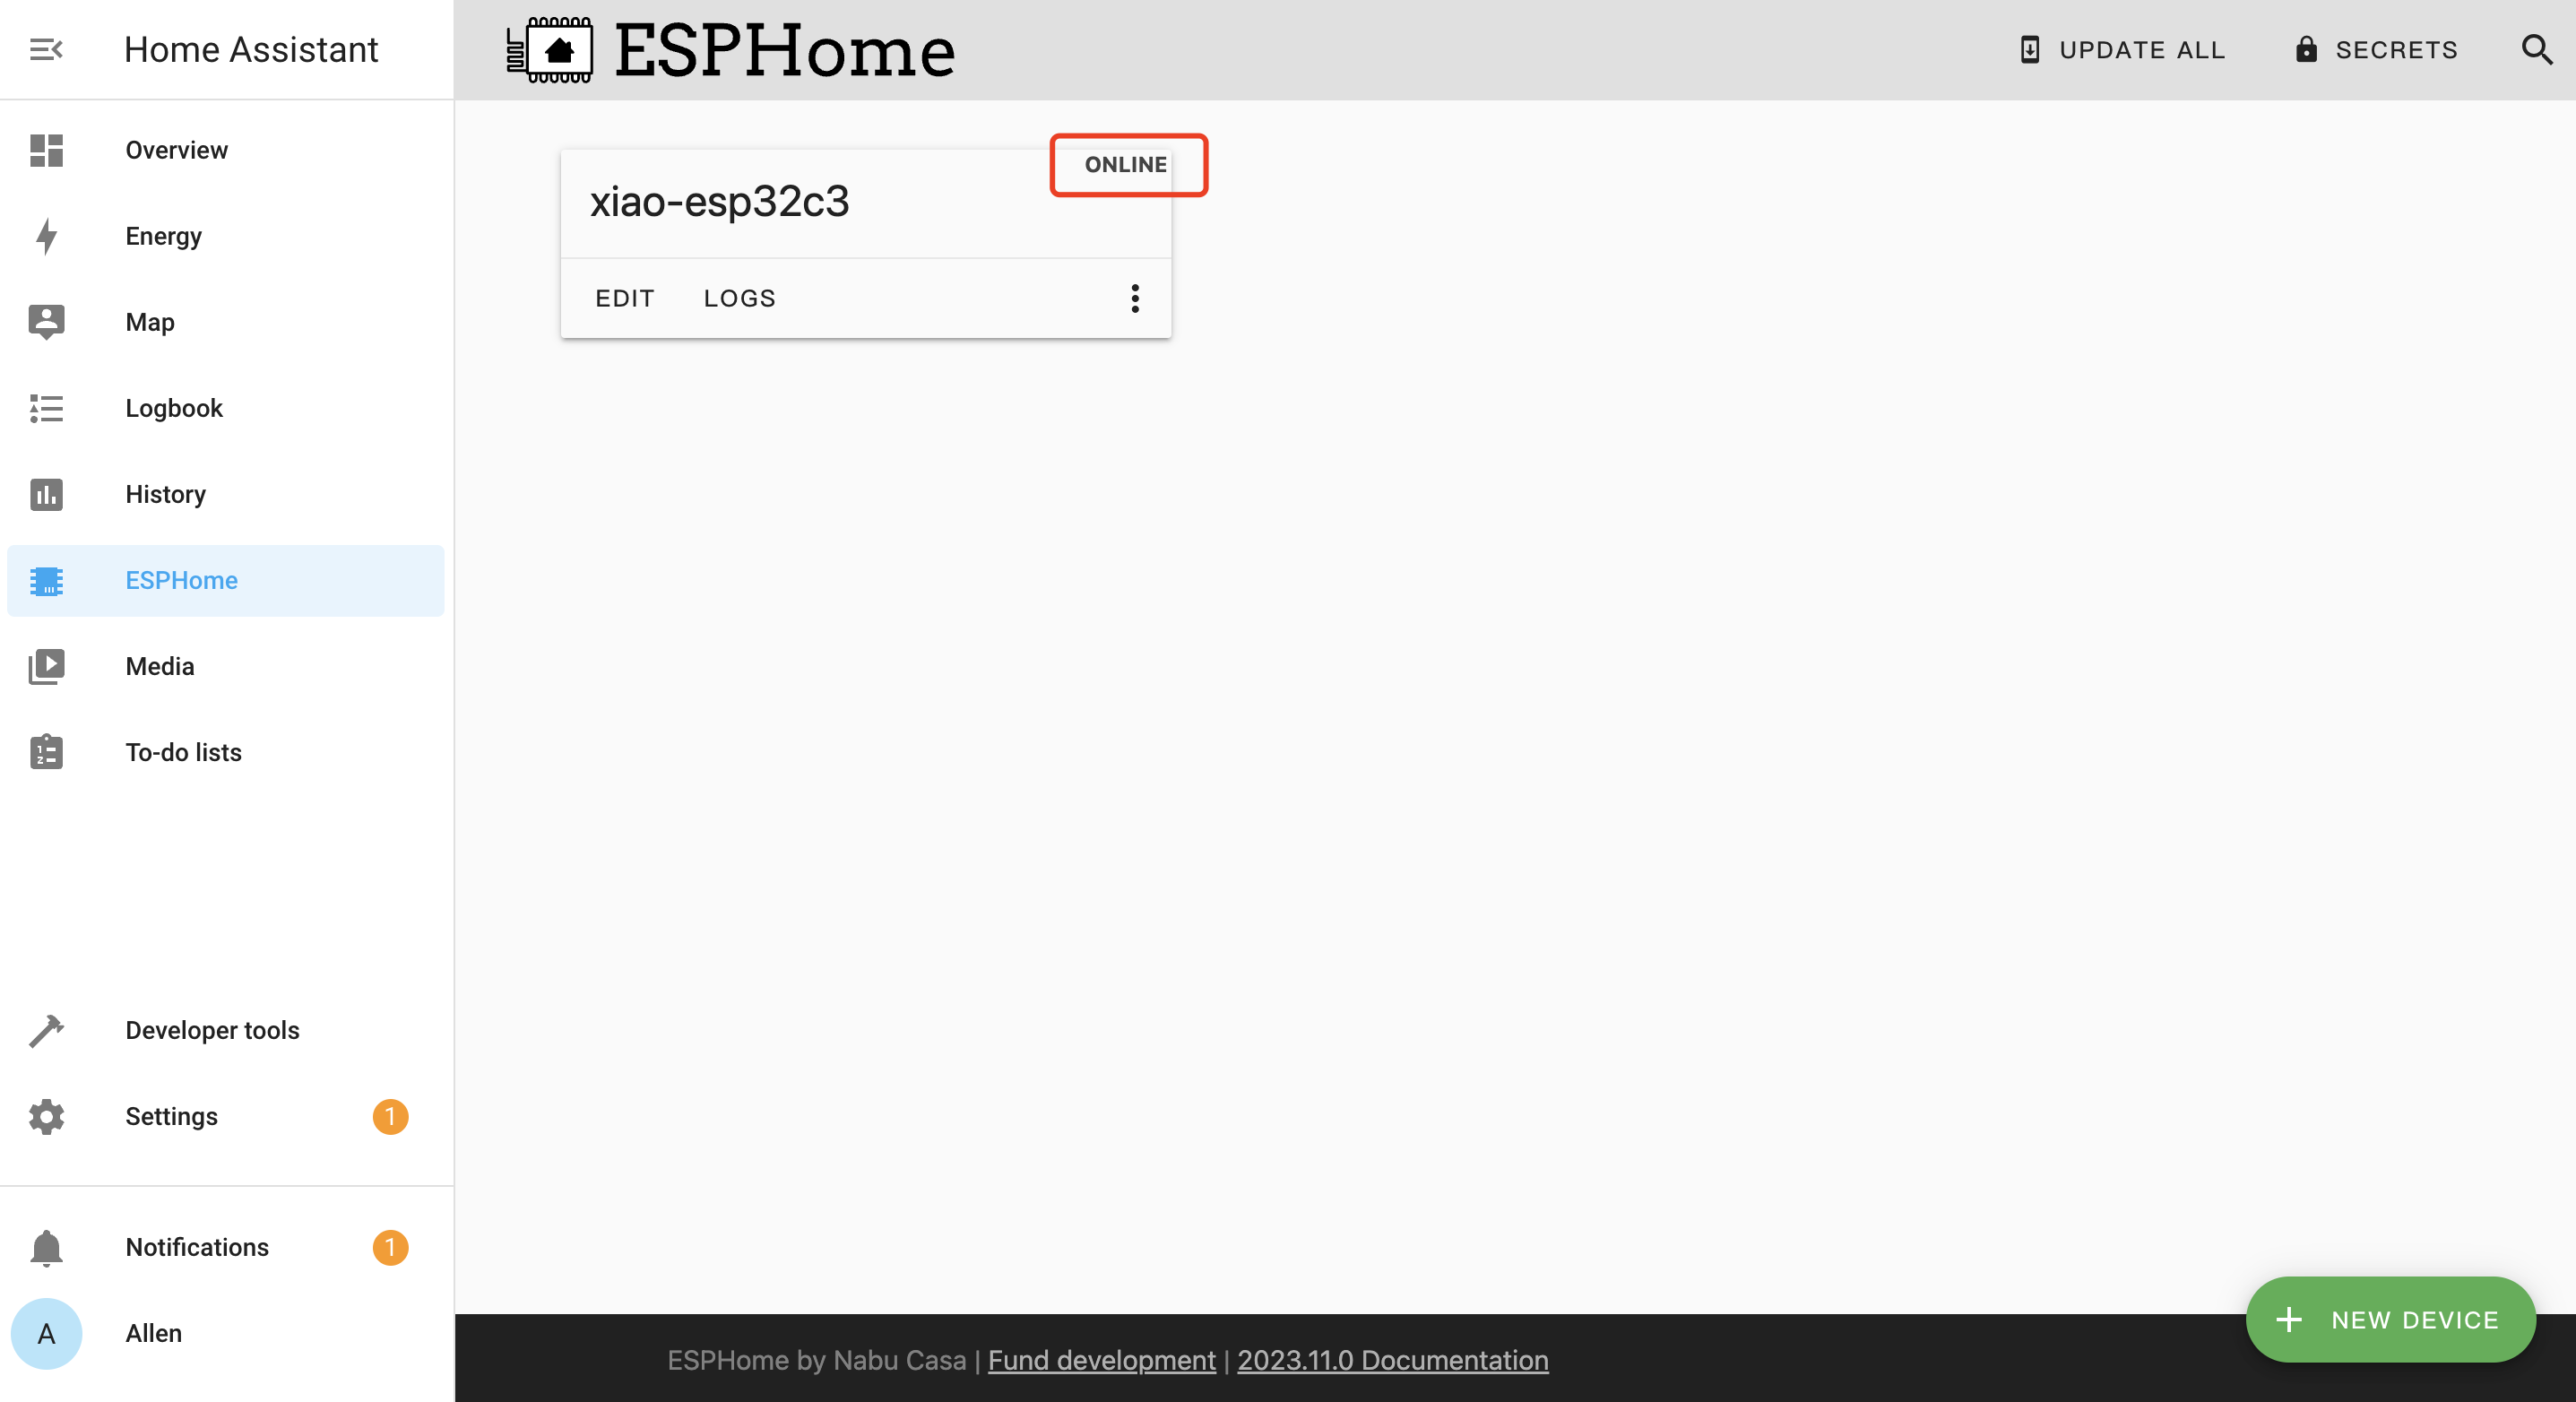
- Step 13. If you see the board status as ONLINE, that means the board is successful connected to WiFi
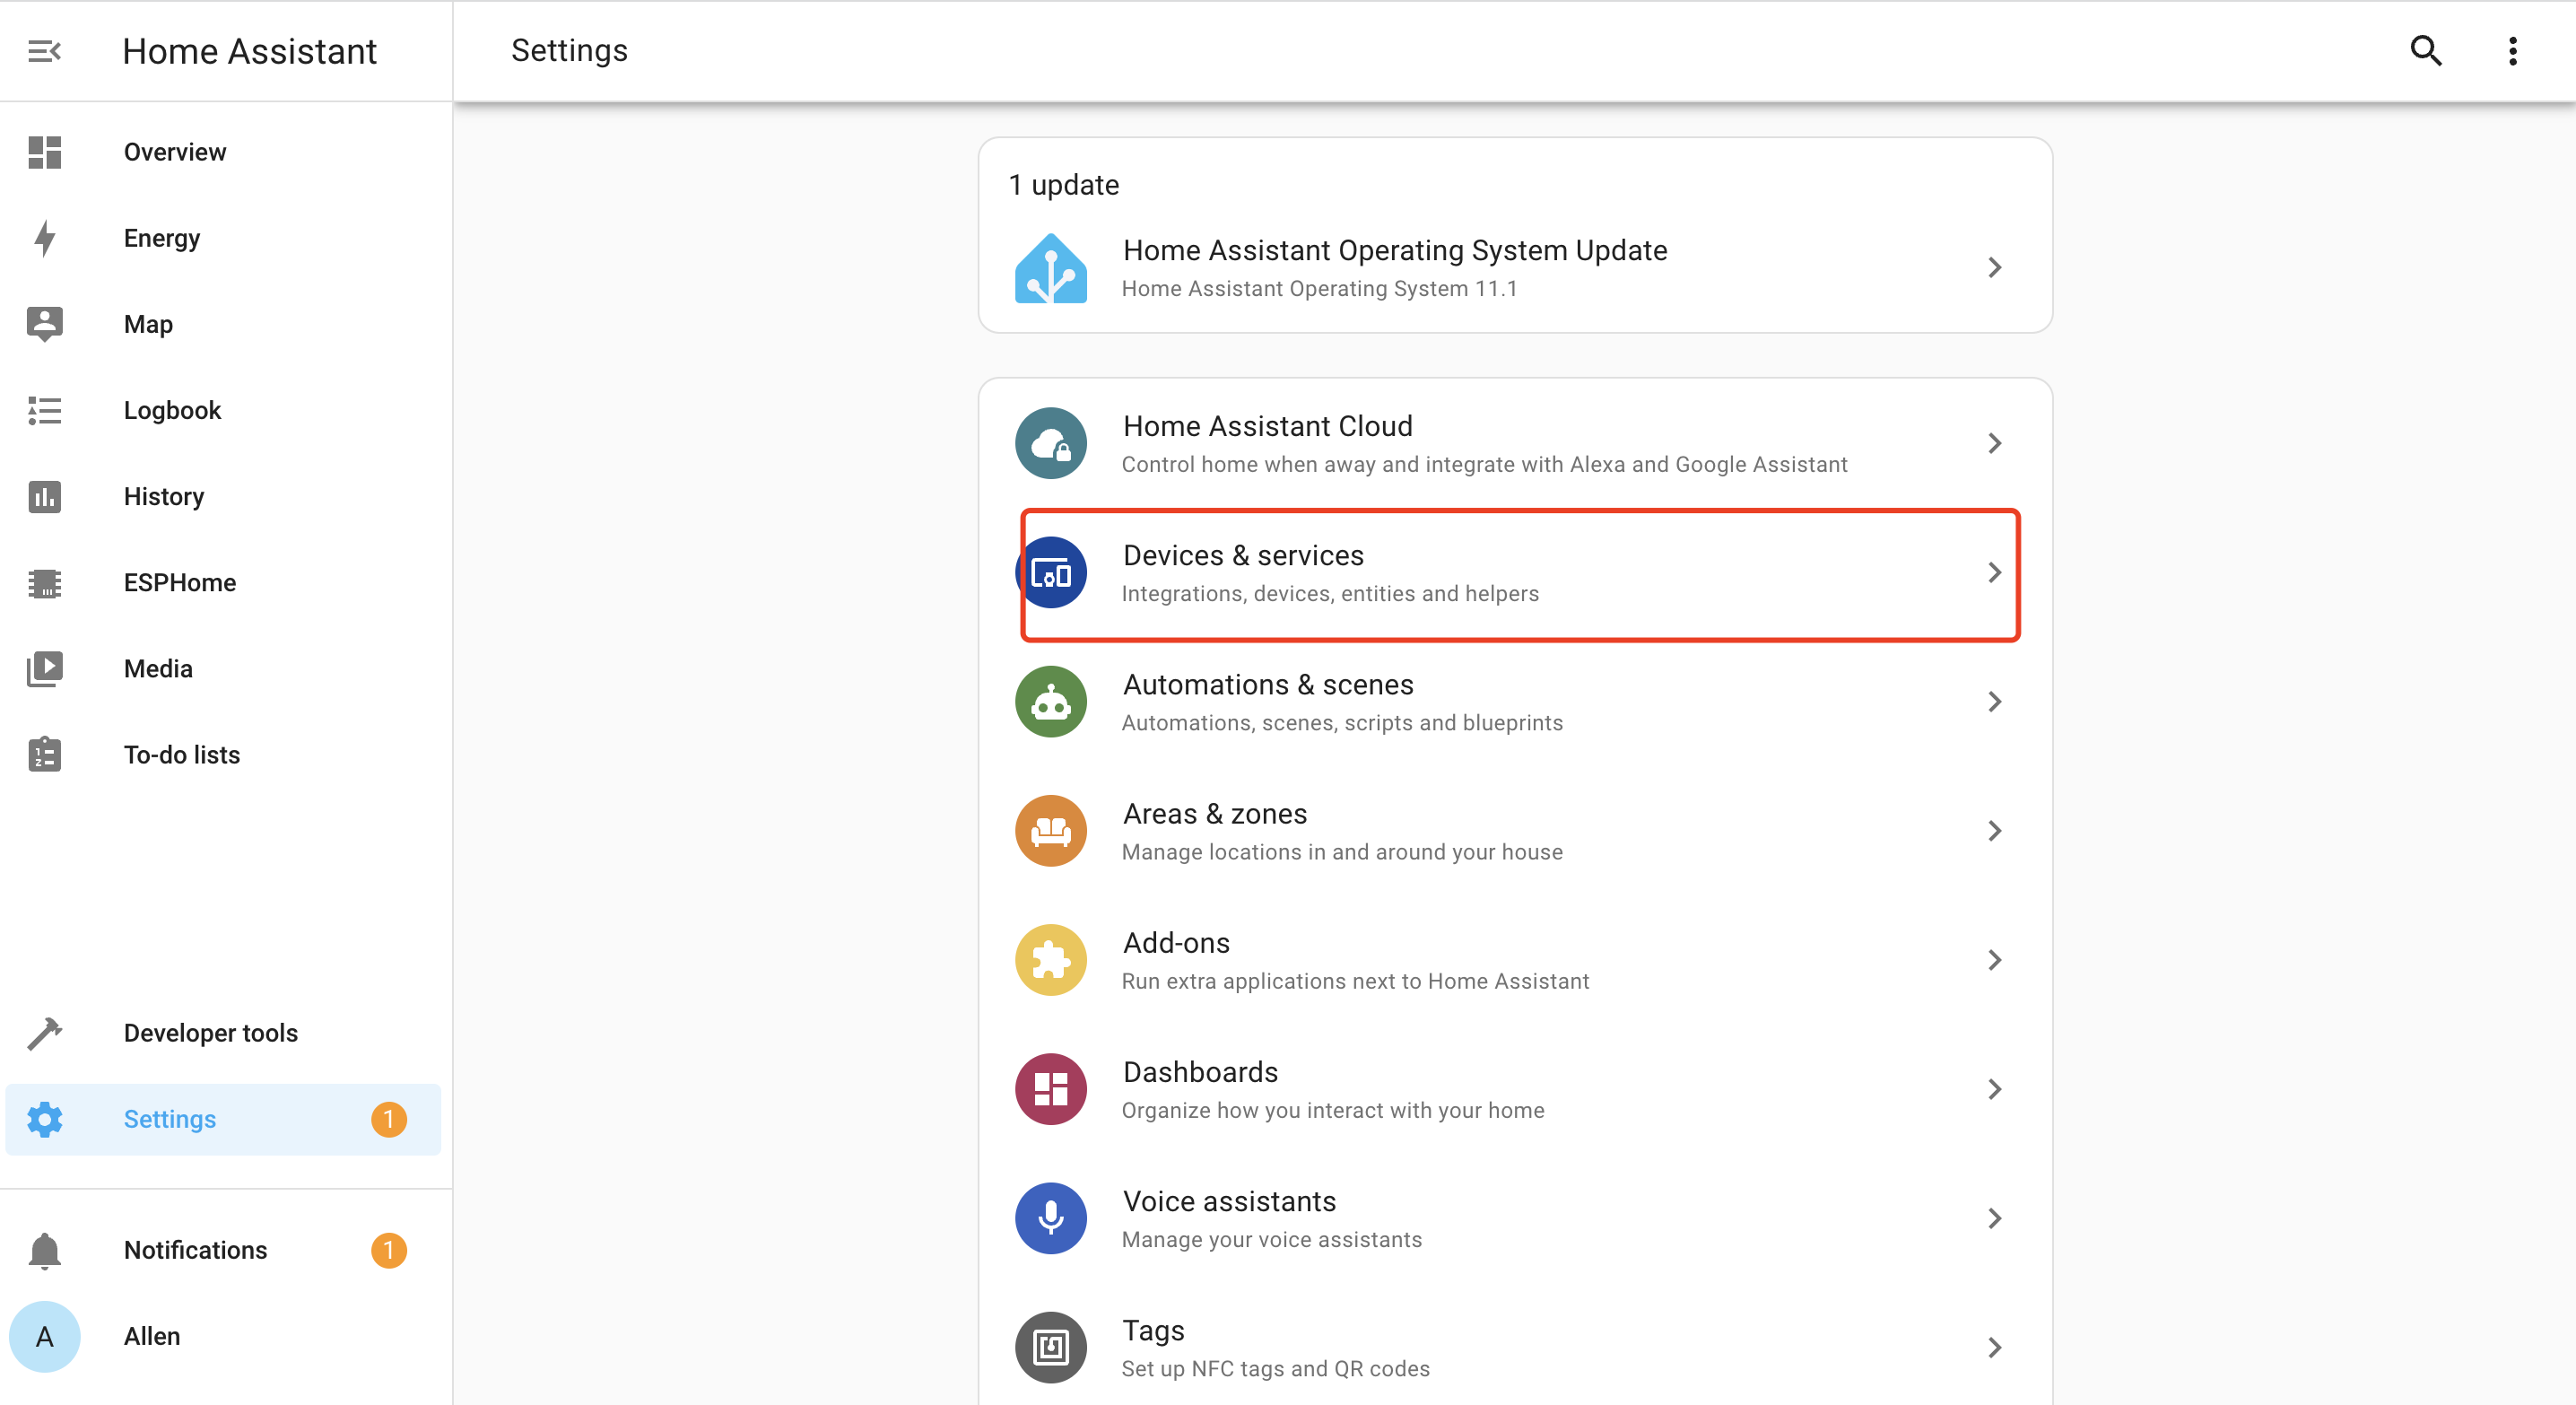
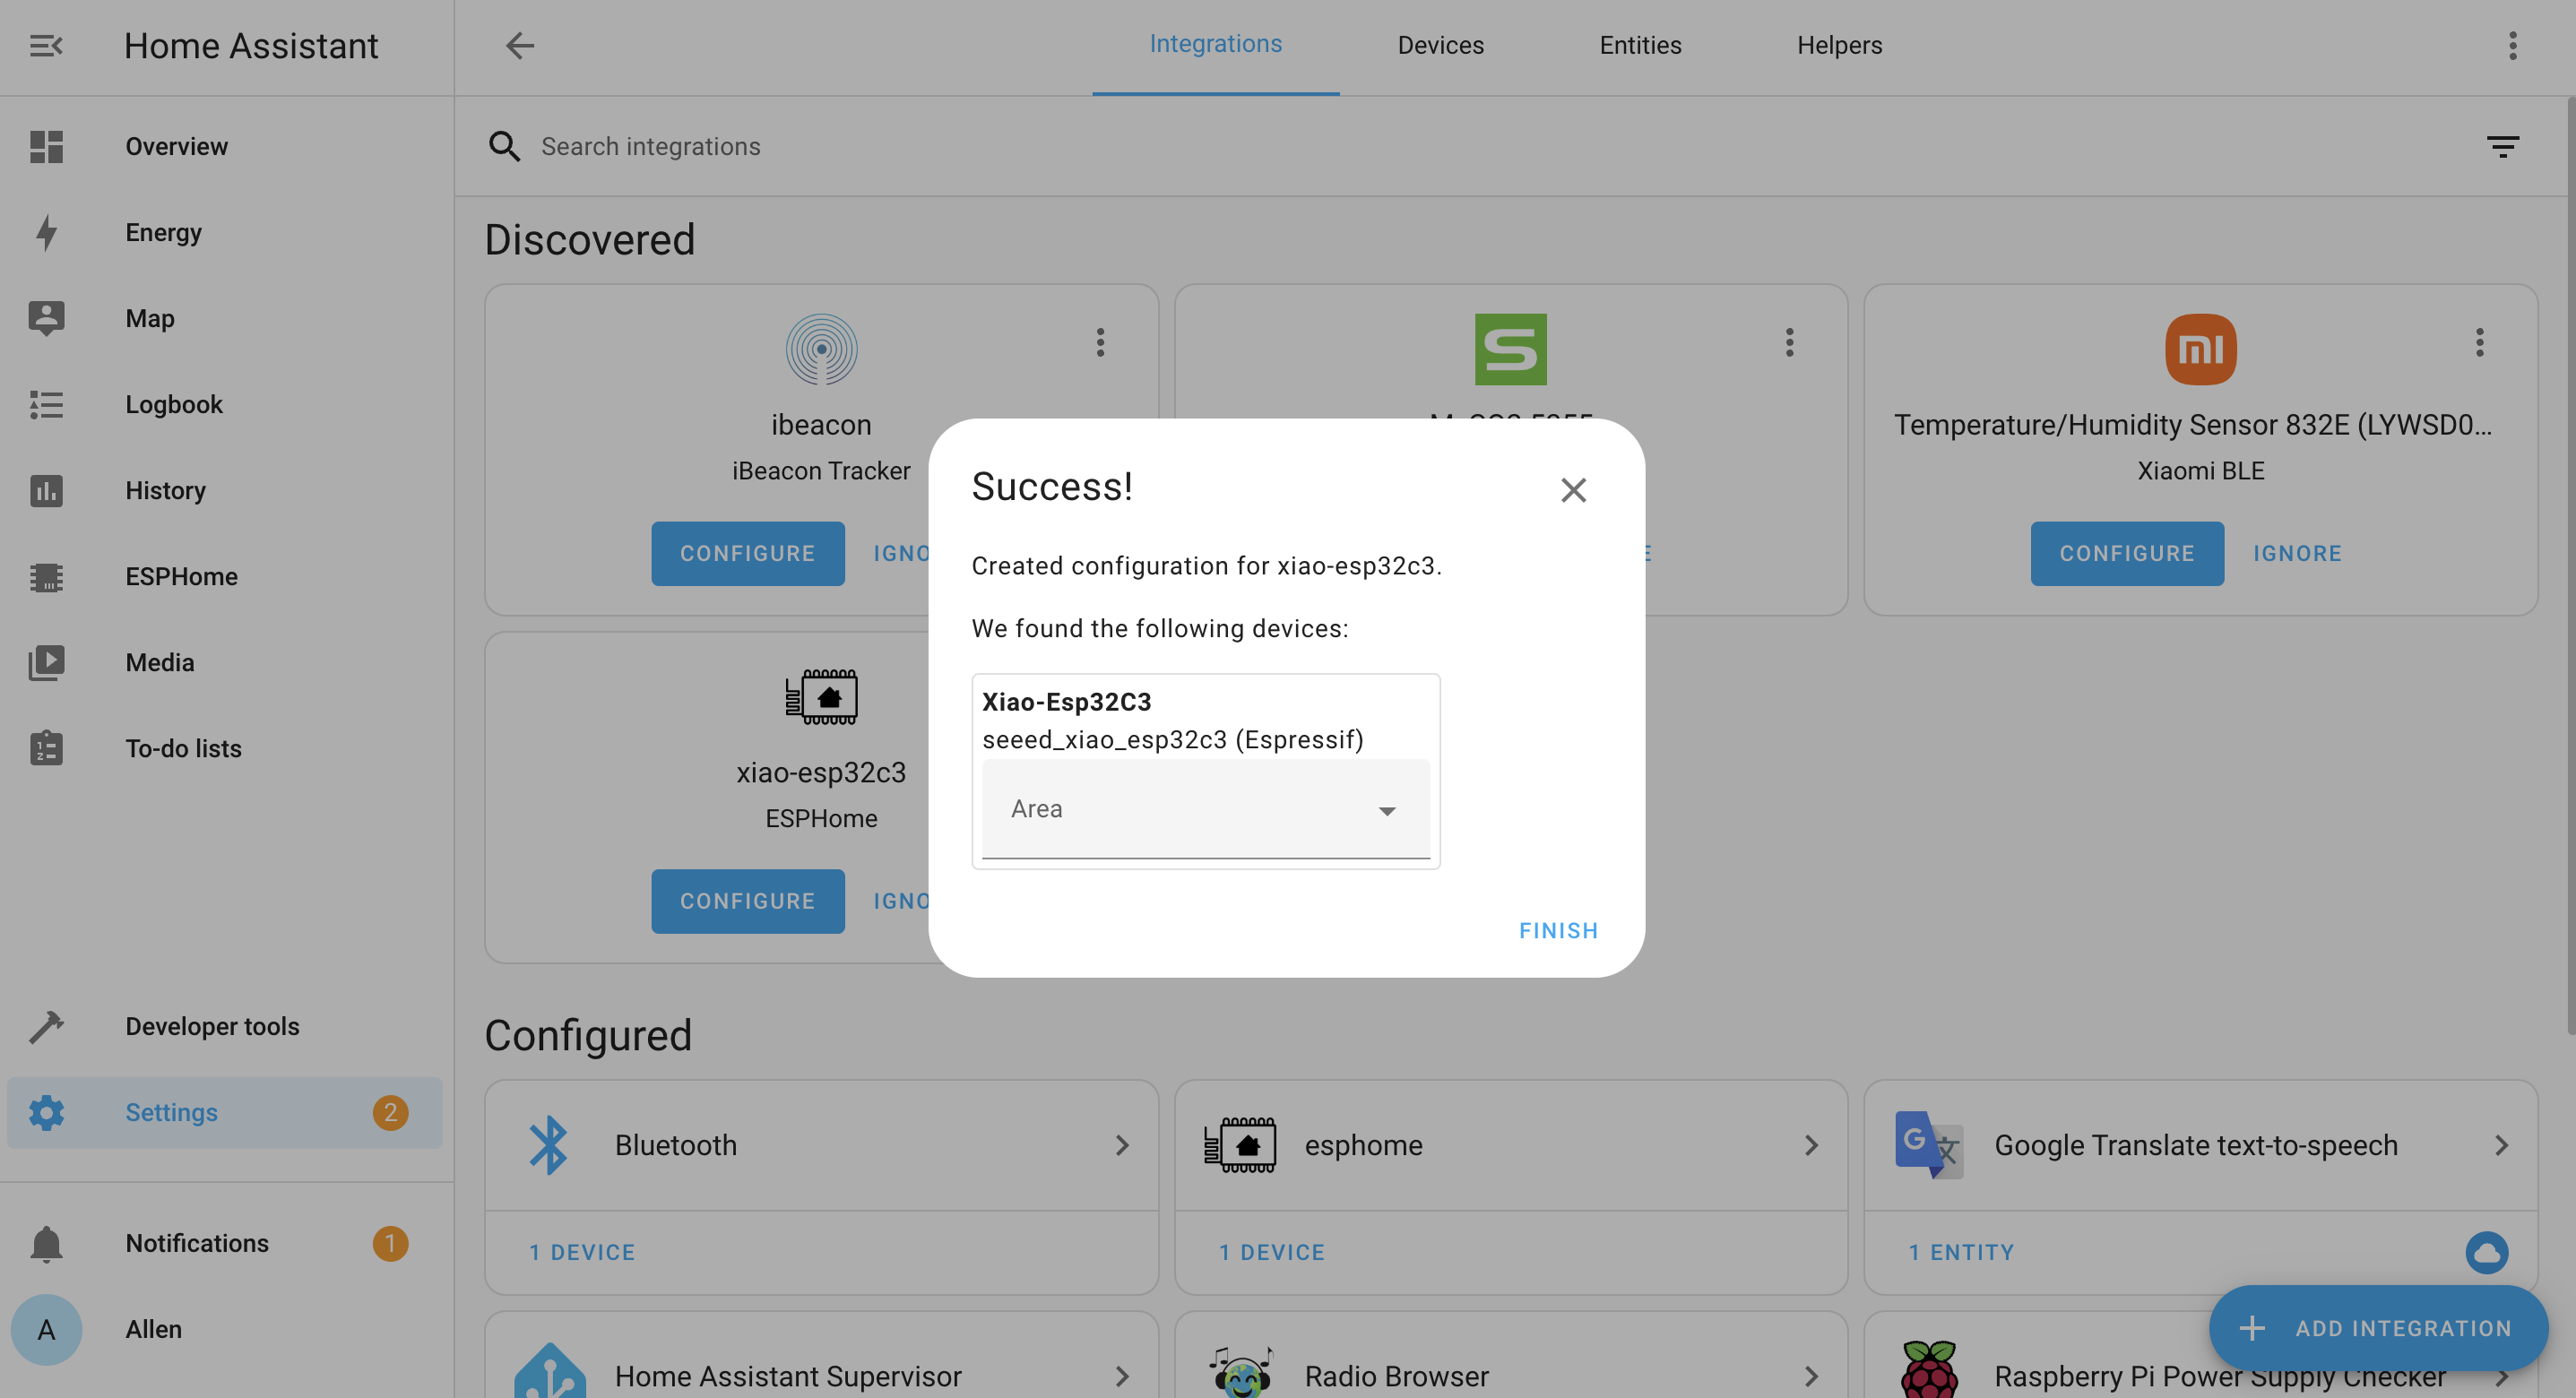
- Step 14. Go to Settings and select Devices & Services
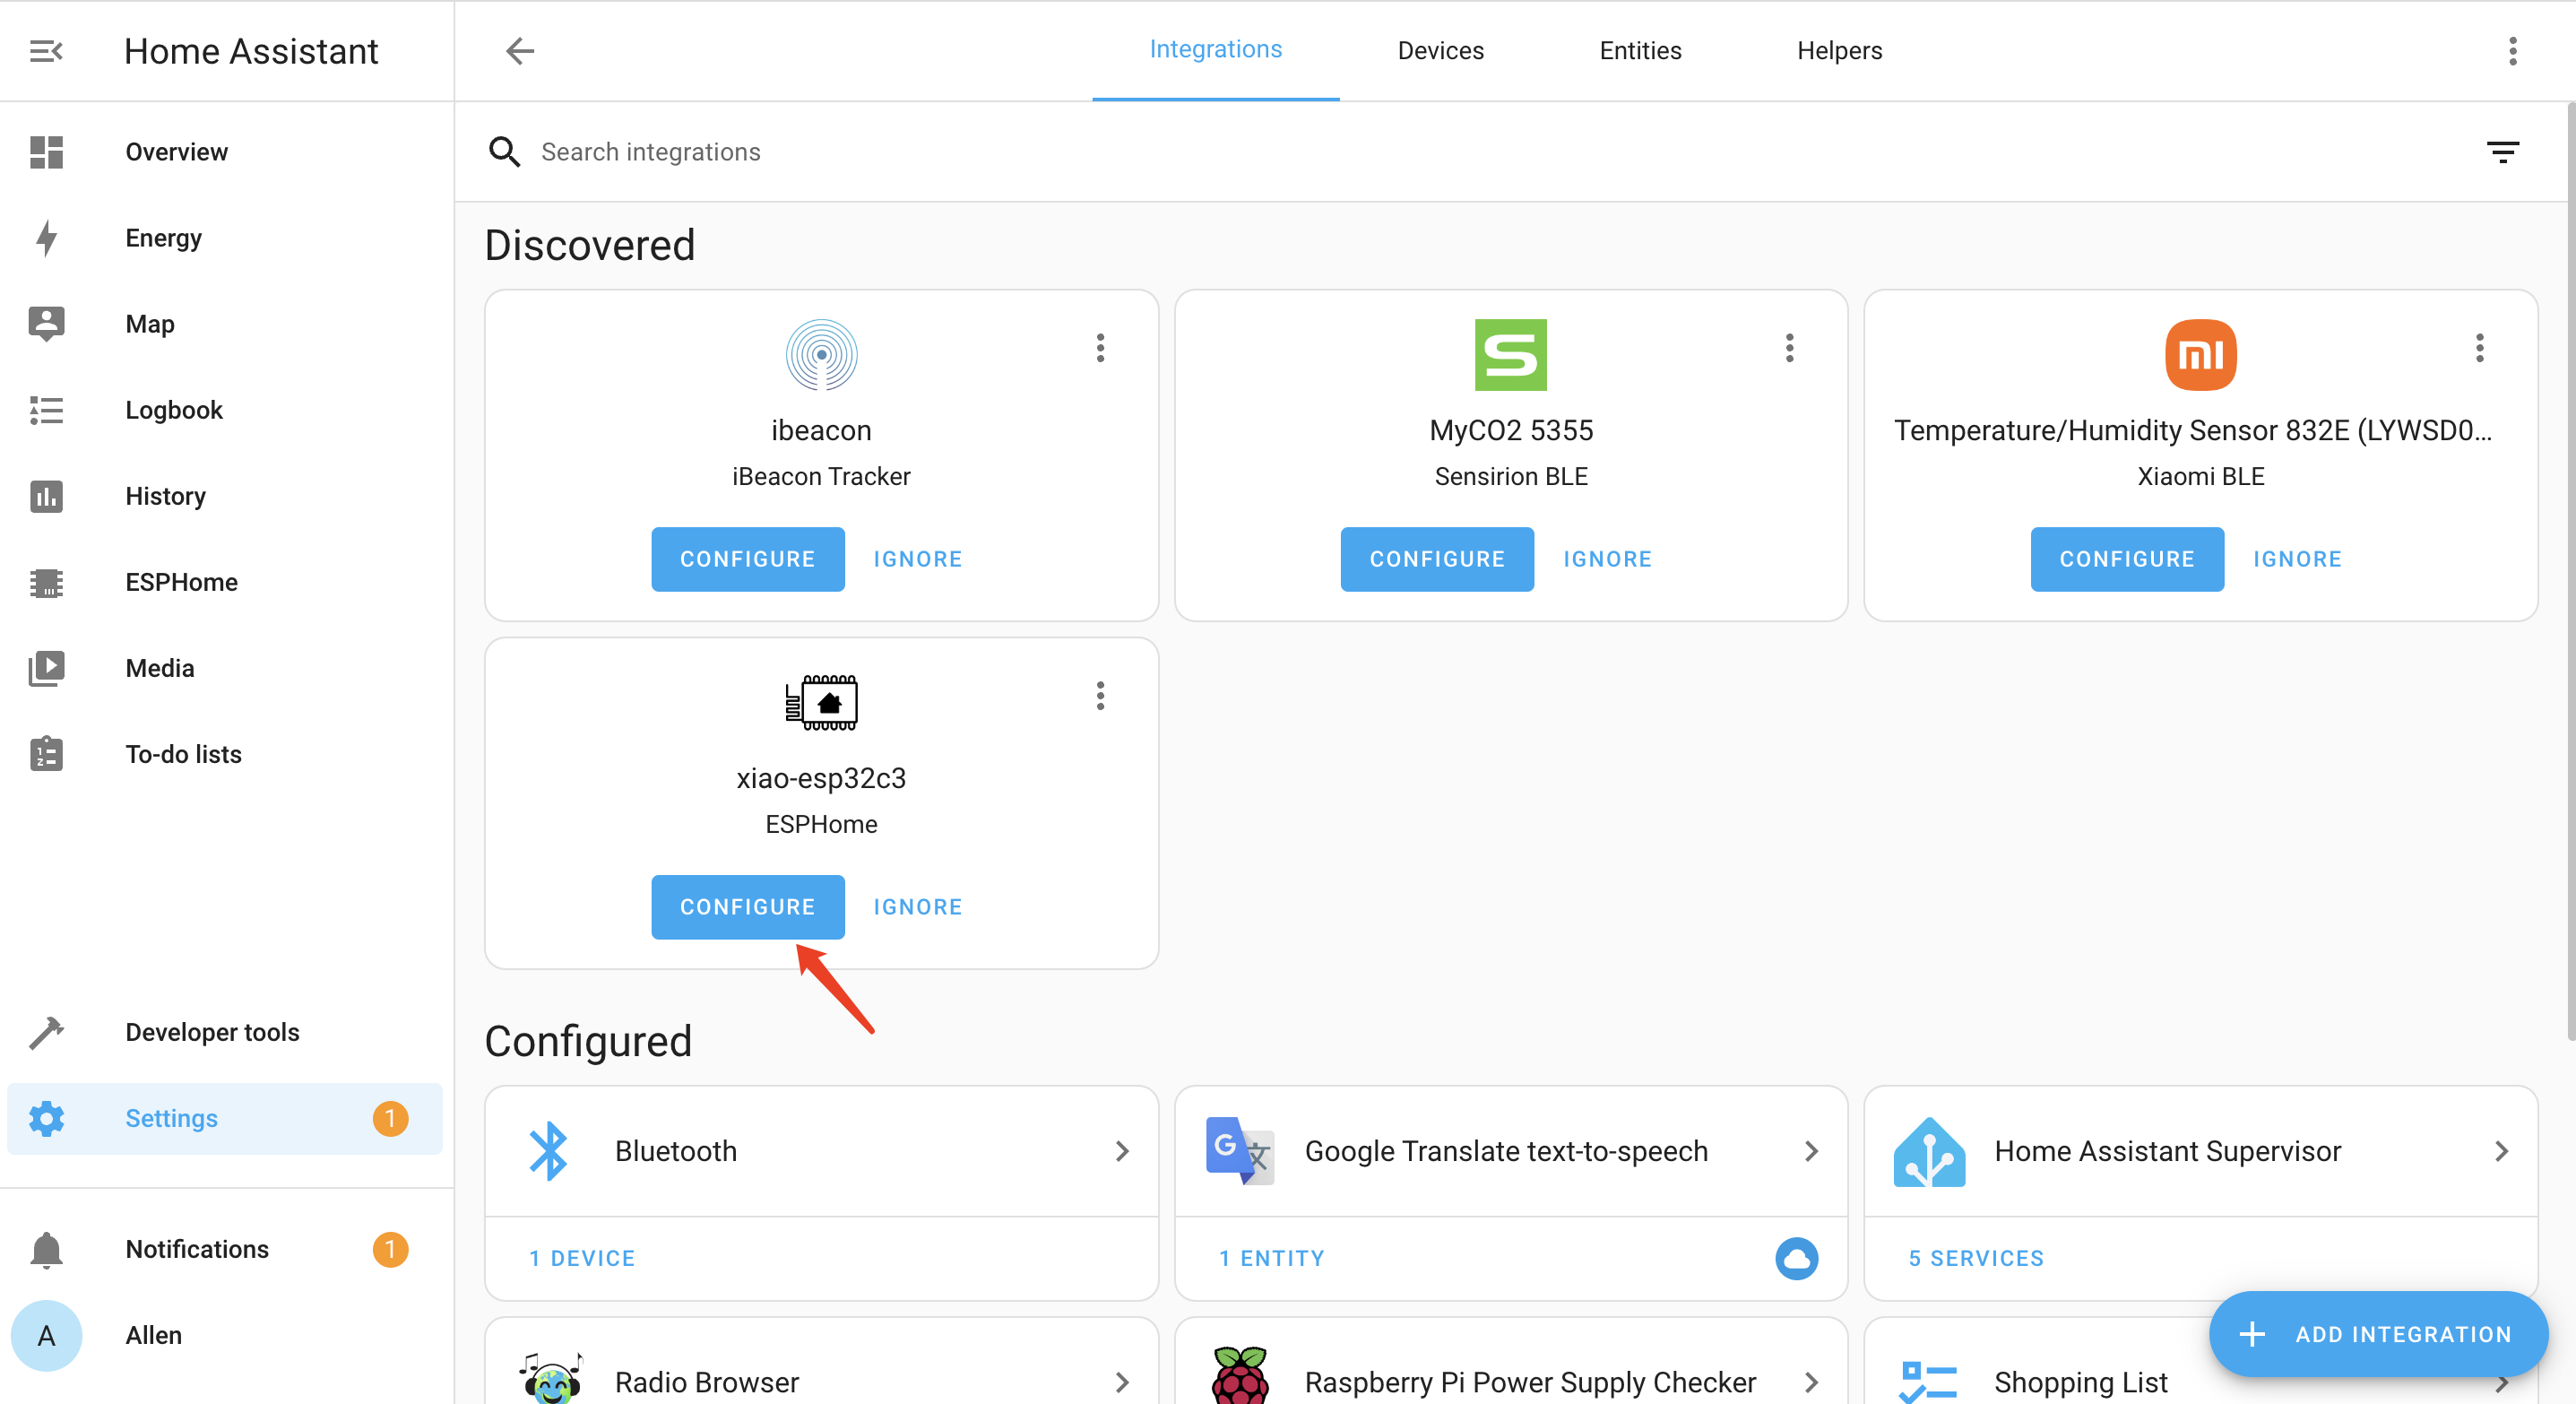
- Step 15. You will see ESPHome as a discovered integration. Click CONFIGURE
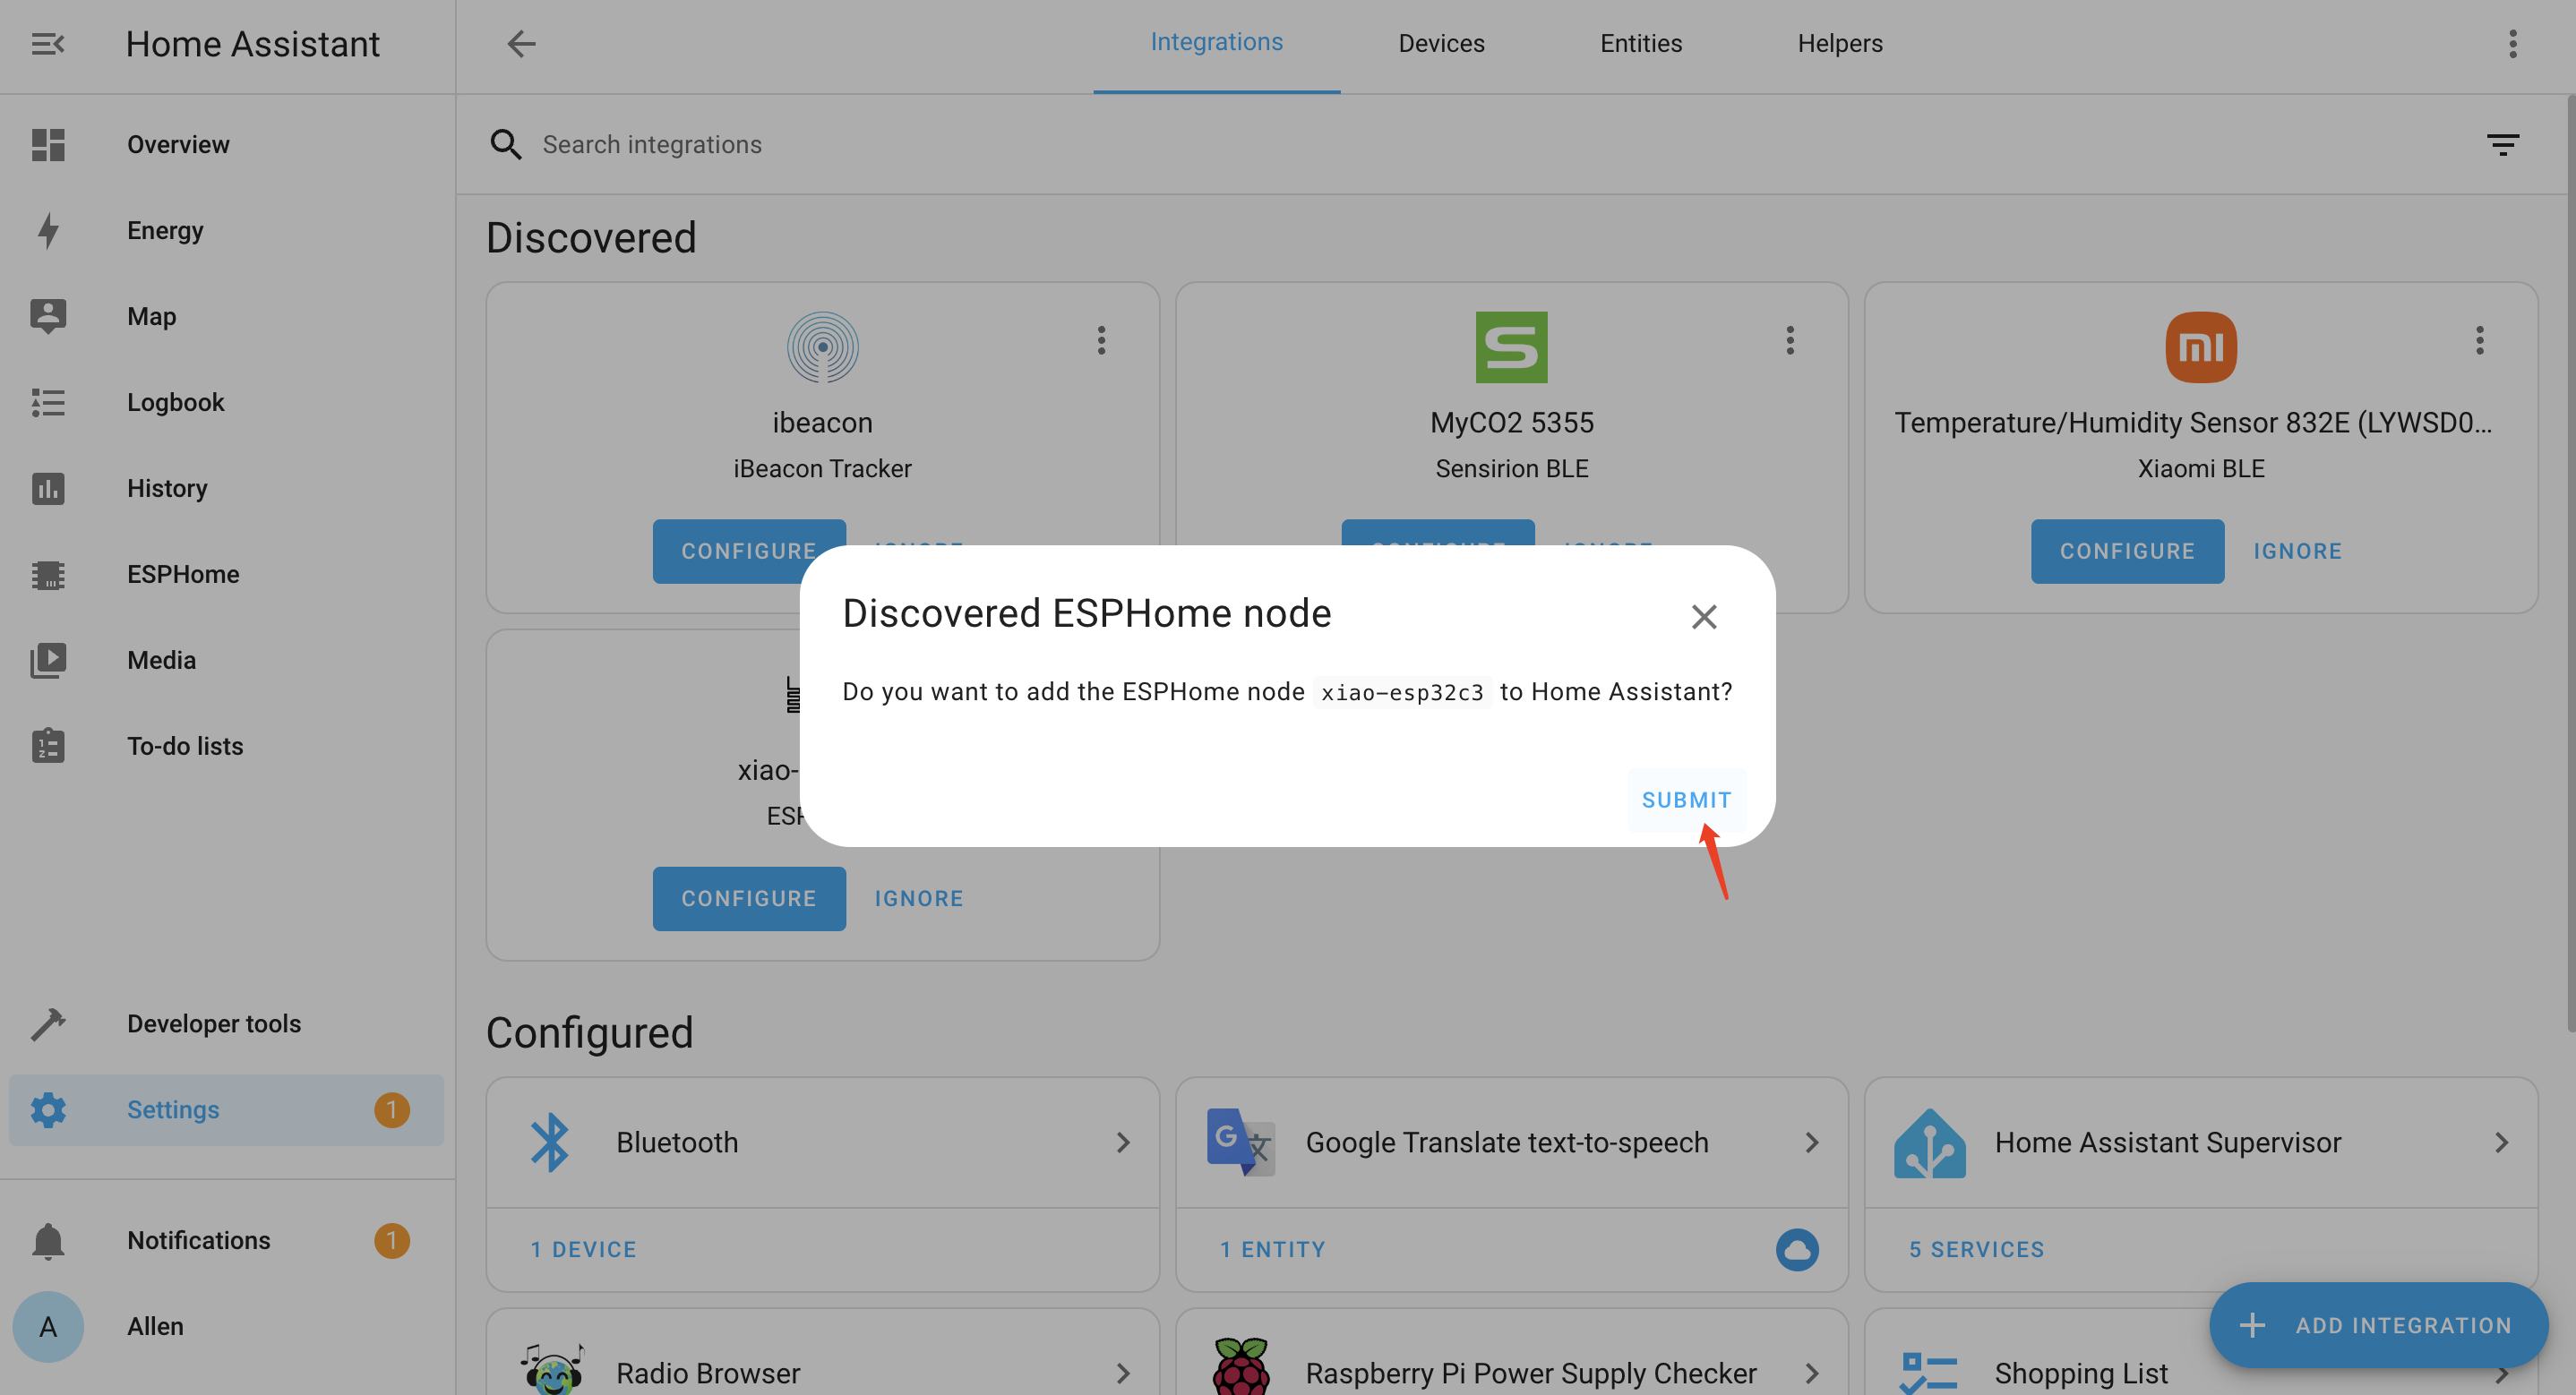
- Step 16. Click SUBMIT
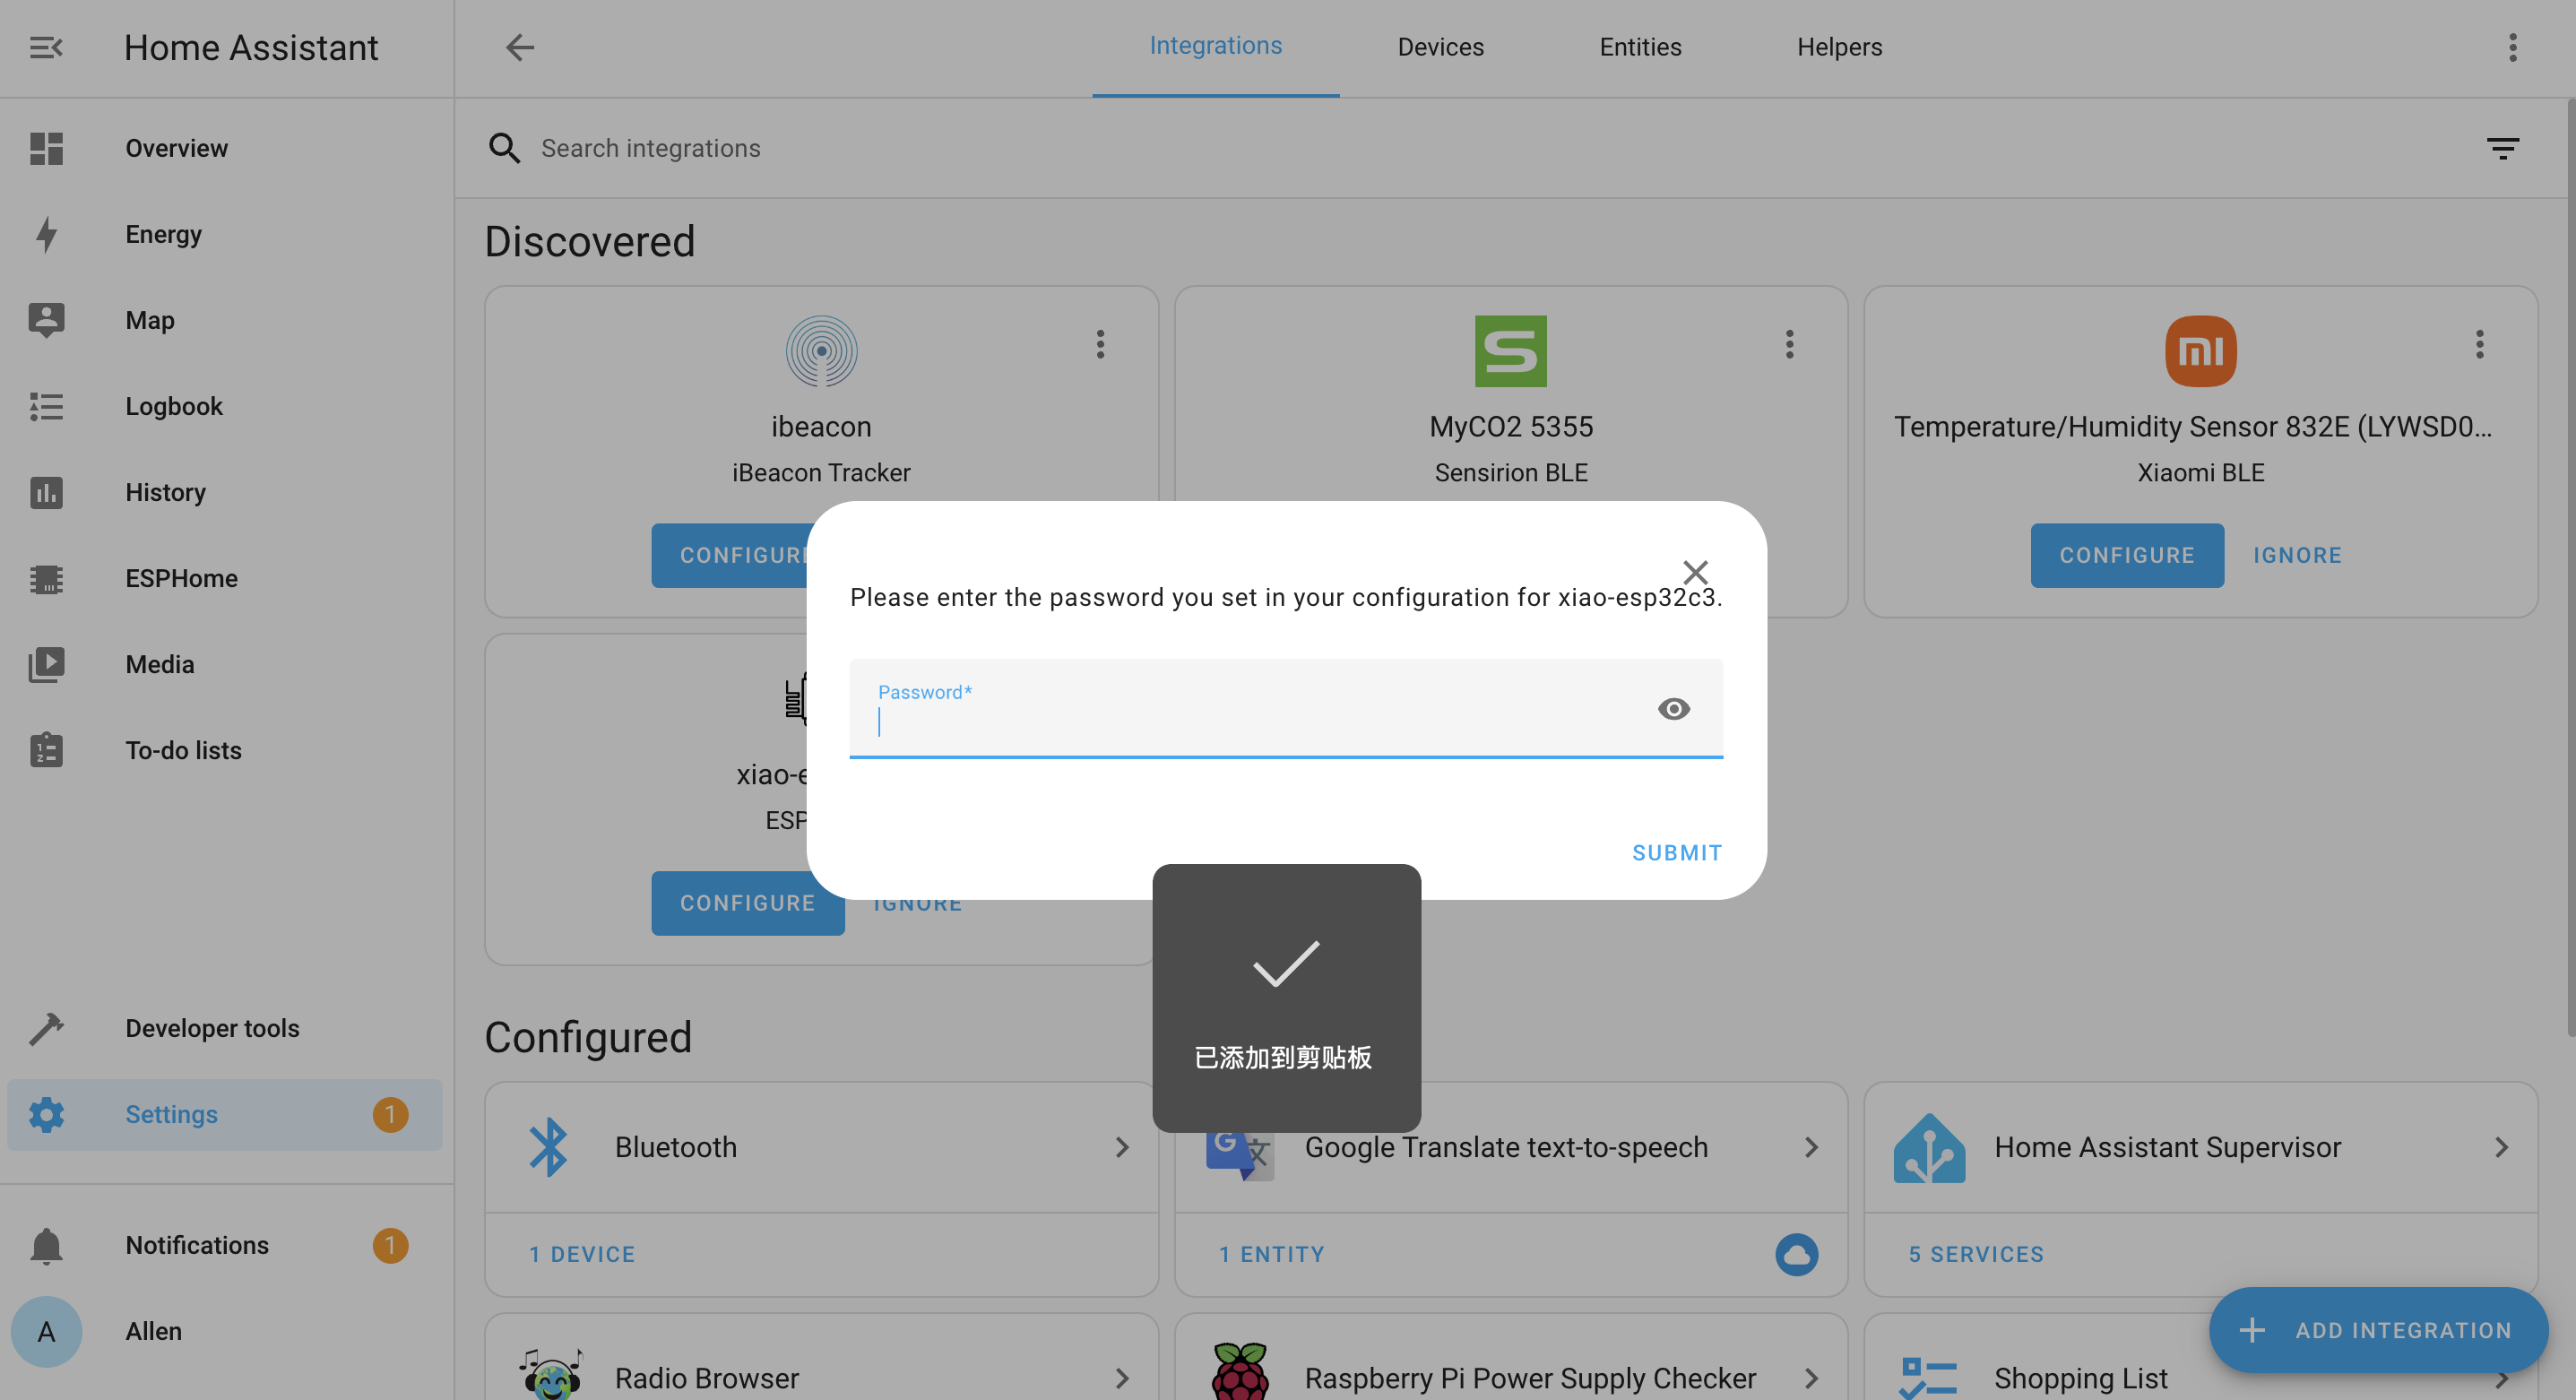
- Step 17. Input your password. This is the api password you can find in STEP 8
- Step 18. Click FINISH
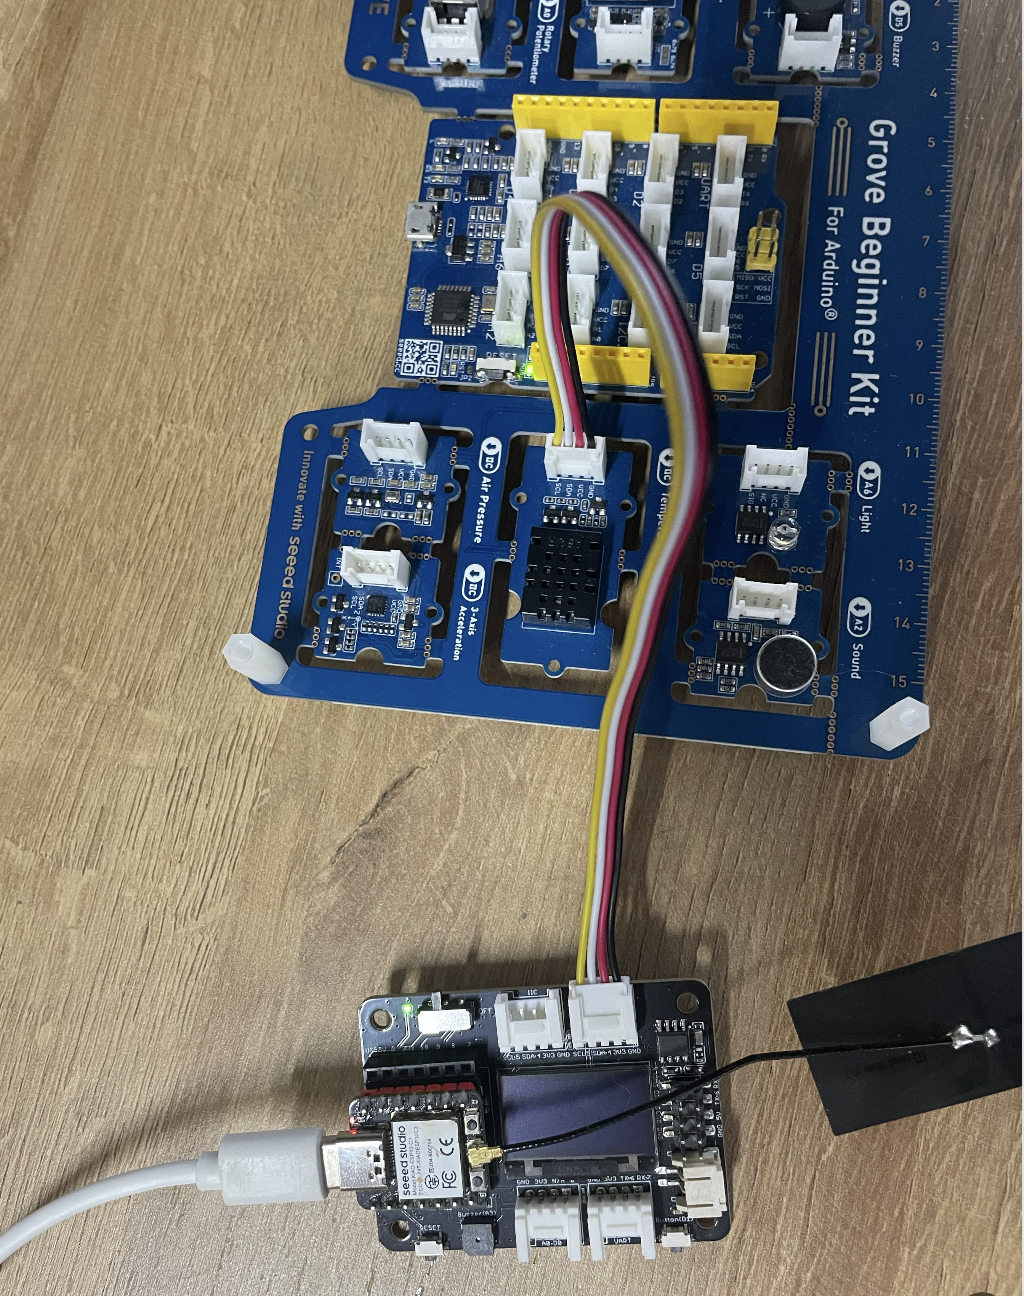
2. Connect Grove Modules and Send the Data
Now we will connect Grove modules to Seeed Studio XIAO ESP32C3 so that we can display sensor data or control the devices using Home Assistant!
Develop Knowledge
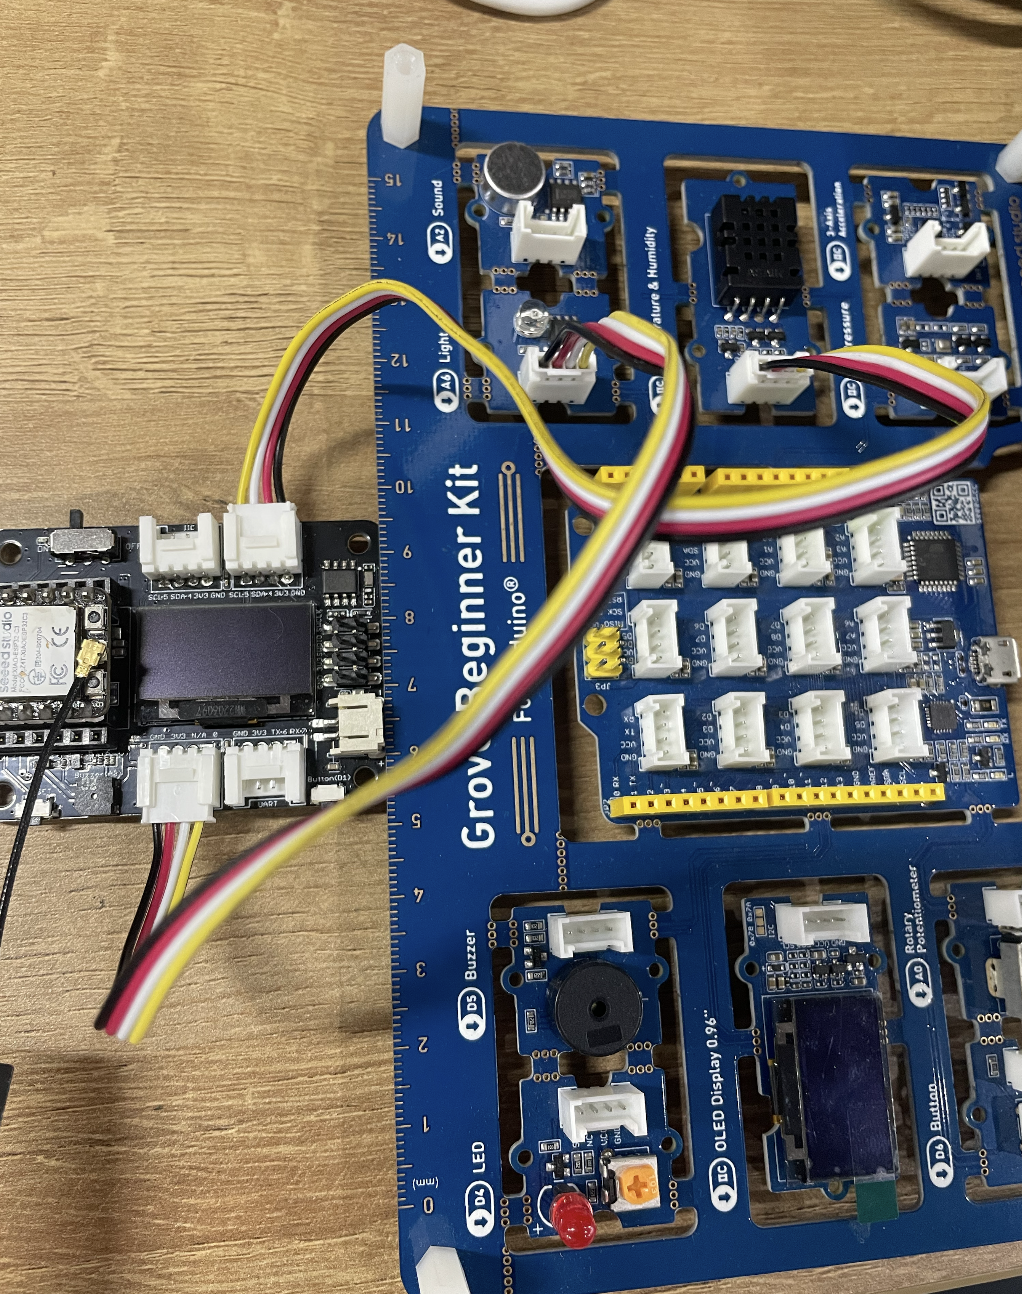
XIAO Expansion Board
In order to use Grove modules with Seeed Studio XIAO ESP32C3, we will use a Seeed Studio Expansion Base for XIAO and connect XIAO ESP32C3 on it.
After that, the Grove connectors on the board can be used to connect Grove modules. Here is the pin definitions.
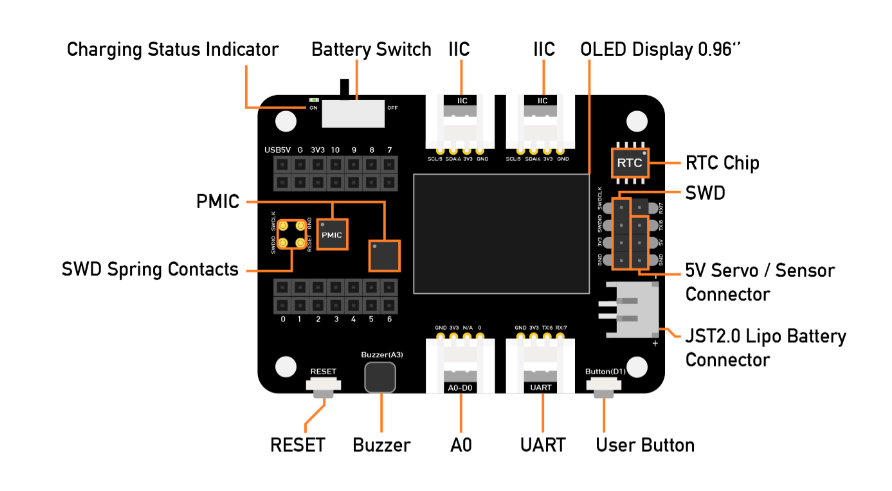
Pin Definitions
You need to follow the graphic below to use the appropriate internal pin numbers when connecting the Grove modules to the Grove connectors on Grove Shield for Seeed Studio XIAO.
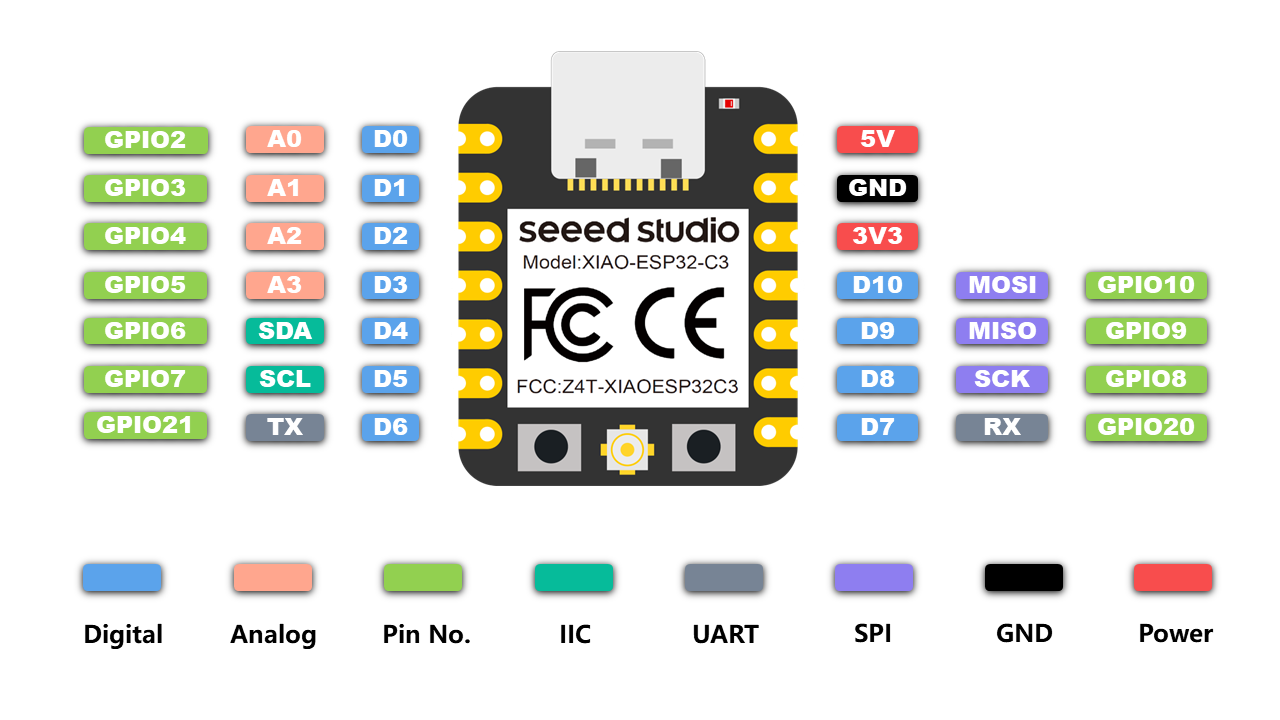
For example, if you want to connect a Grove module to D0 port, you need to define the pin on ESPHome as GPIO2
Grove Compatibility List with ESPHome
Currently the following Grove modules are supported by ESPHome. Check here
3. Grove Connection and Data Transmission
Now we will select several Grove modules and explain how they can be connected with ESPHome and Home Assistant.
Grove - Temperature and Humidity Sensor (DHT20)
This Temperature&Humidity sensor provides a pre-calibrated digital output. A unique capacitive sensor element measures relative humidity and the temperature is measured by a negative temperature coefficient (NTC) thermistor. It has excellent reliability and long term stability. Click here for the purchase.
Setup Configuration
- Step 1. Connect Grove - DHT20 to one of the I2C connectors on the Seeed Studio Expansion Base for XIAO
- Step 2. Inside the xiao-esp32c3.yaml file that we created before, change the file and push it OTA to XIAO ESP32C3
esphome:
name: xiao-esp32c3
platformio_options:
board_build.flash_mode: dio
esp32:
board: seeed_xiao_esp32c3
variant: esp32c3
framework:
type: arduino
platform_version: 5.4.0
# Enable logging
logger:
hardware_uart: UART0
api:
password: "F4MQG/rBhNmqP8Nud+AJ+5CYu7LuIhIFTOcRwOm5Nw4="
ota:
password: "999afa1f8a07e85959a9f89f8f6aebb2"
wifi:
ssid: !secret wifi_ssid
password: !secret wifi_password
# Enable fallback hotspot (captive portal) in case wifi connection fails
ap:
ssid: "Xiao-Esp32C3 Fallback Hotspot"
password: "YtpCwOqLoYlp"
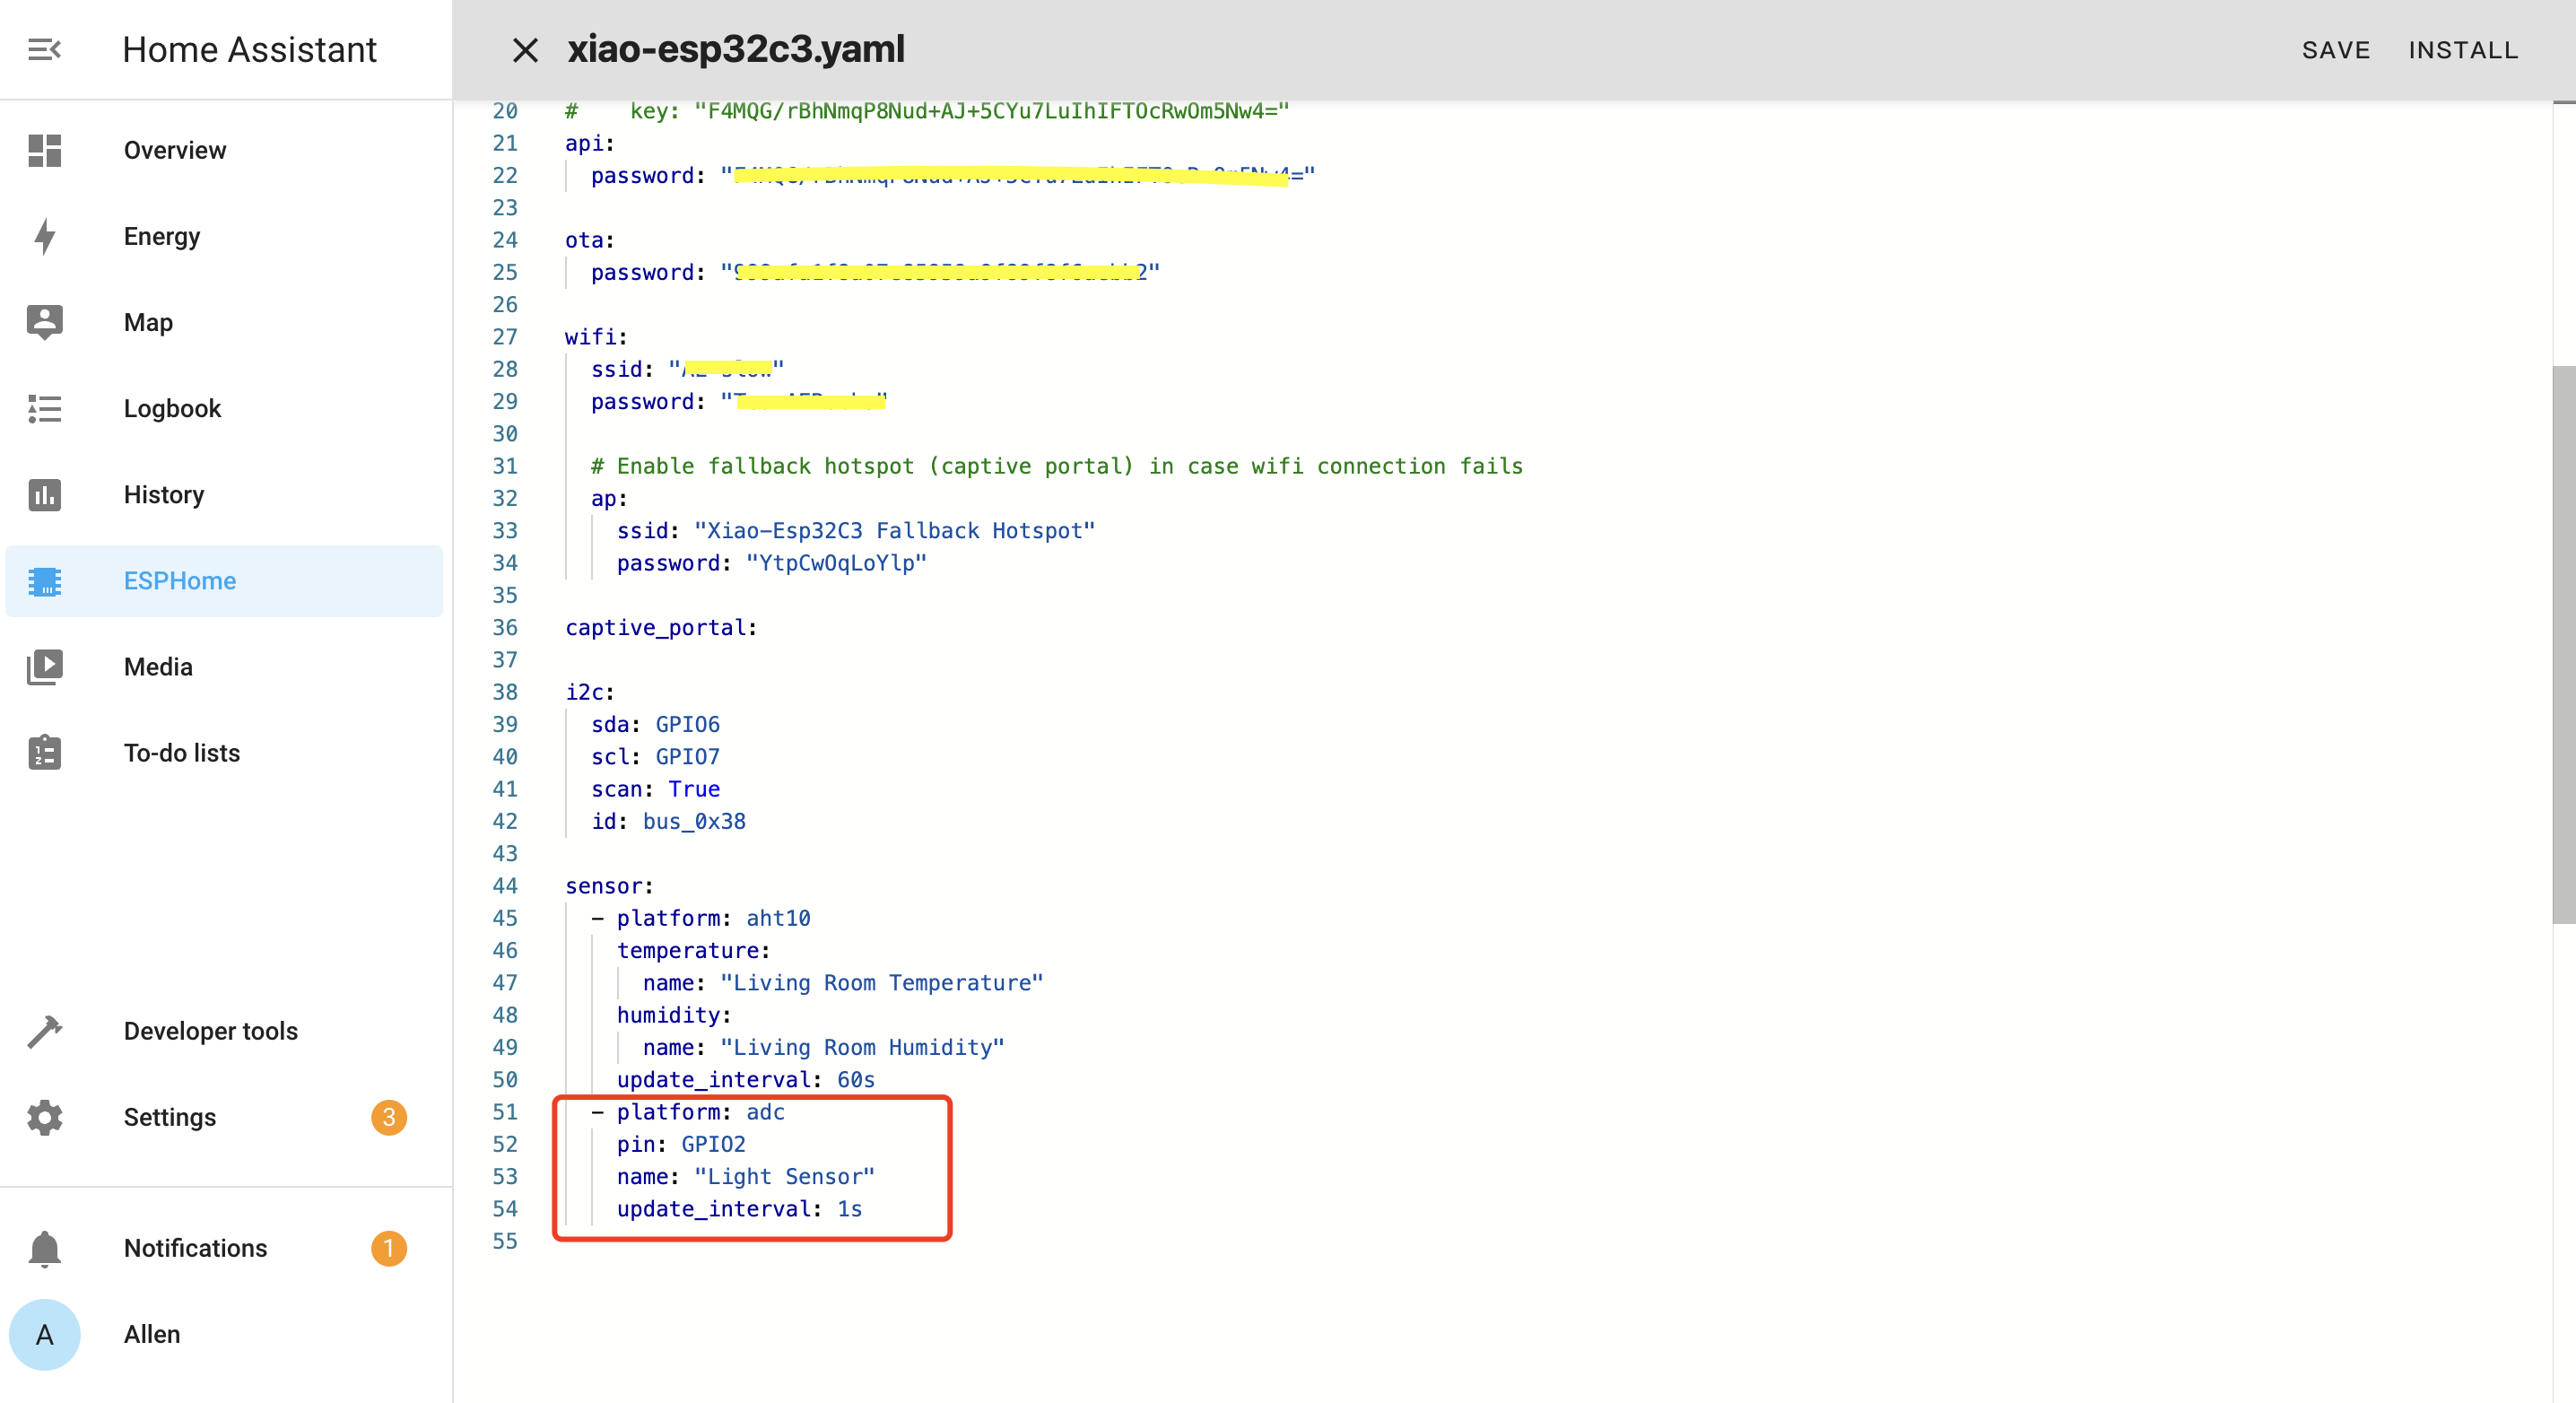
captive_portal:
# 0x28 is the I2C address of DHT20
i2c:
sda: GPIO6
scl: GPIO7
scan: True
id: bus_0x38
sensor:
- platform: aht10
temperature:
name: "Living Room Temperature"
humidity:
name: "Living Room Humidity"
update_interval: 60s
You can learn more about the DHT20 component here. Here we add the I²C Bus component because DHT20 communicates using I2C protocol.
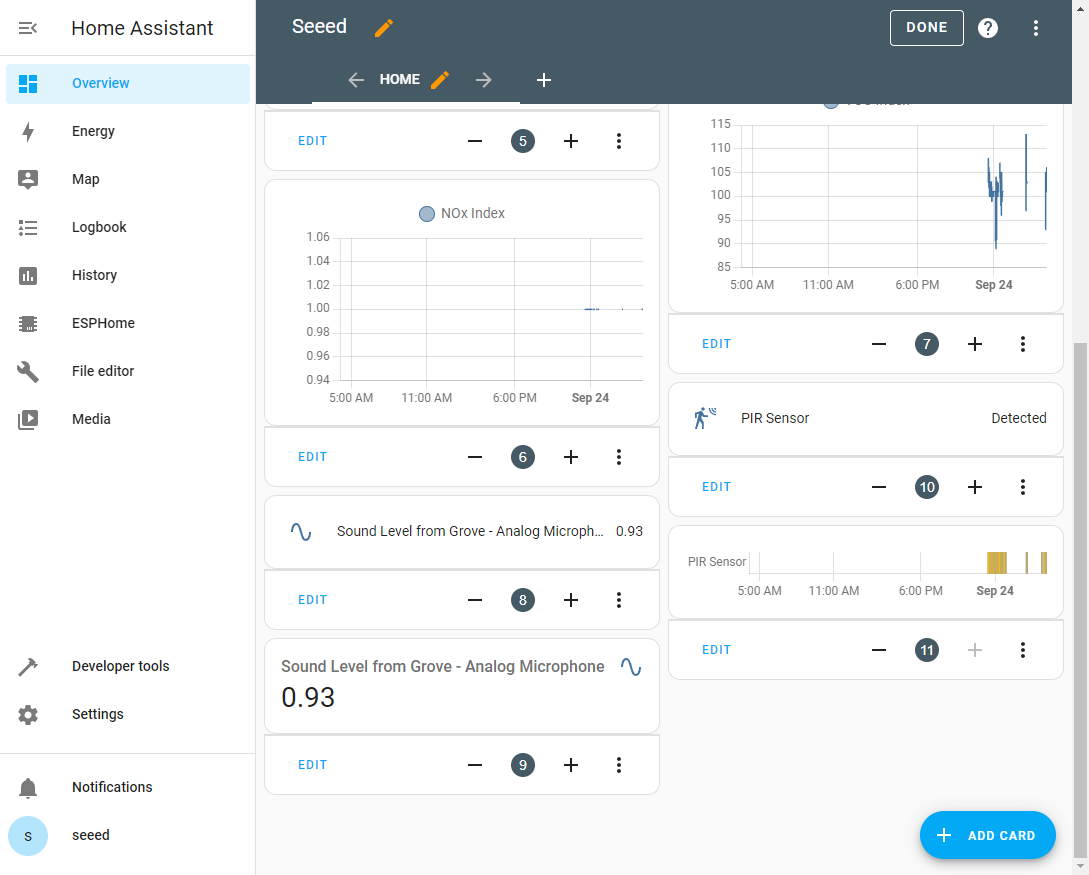
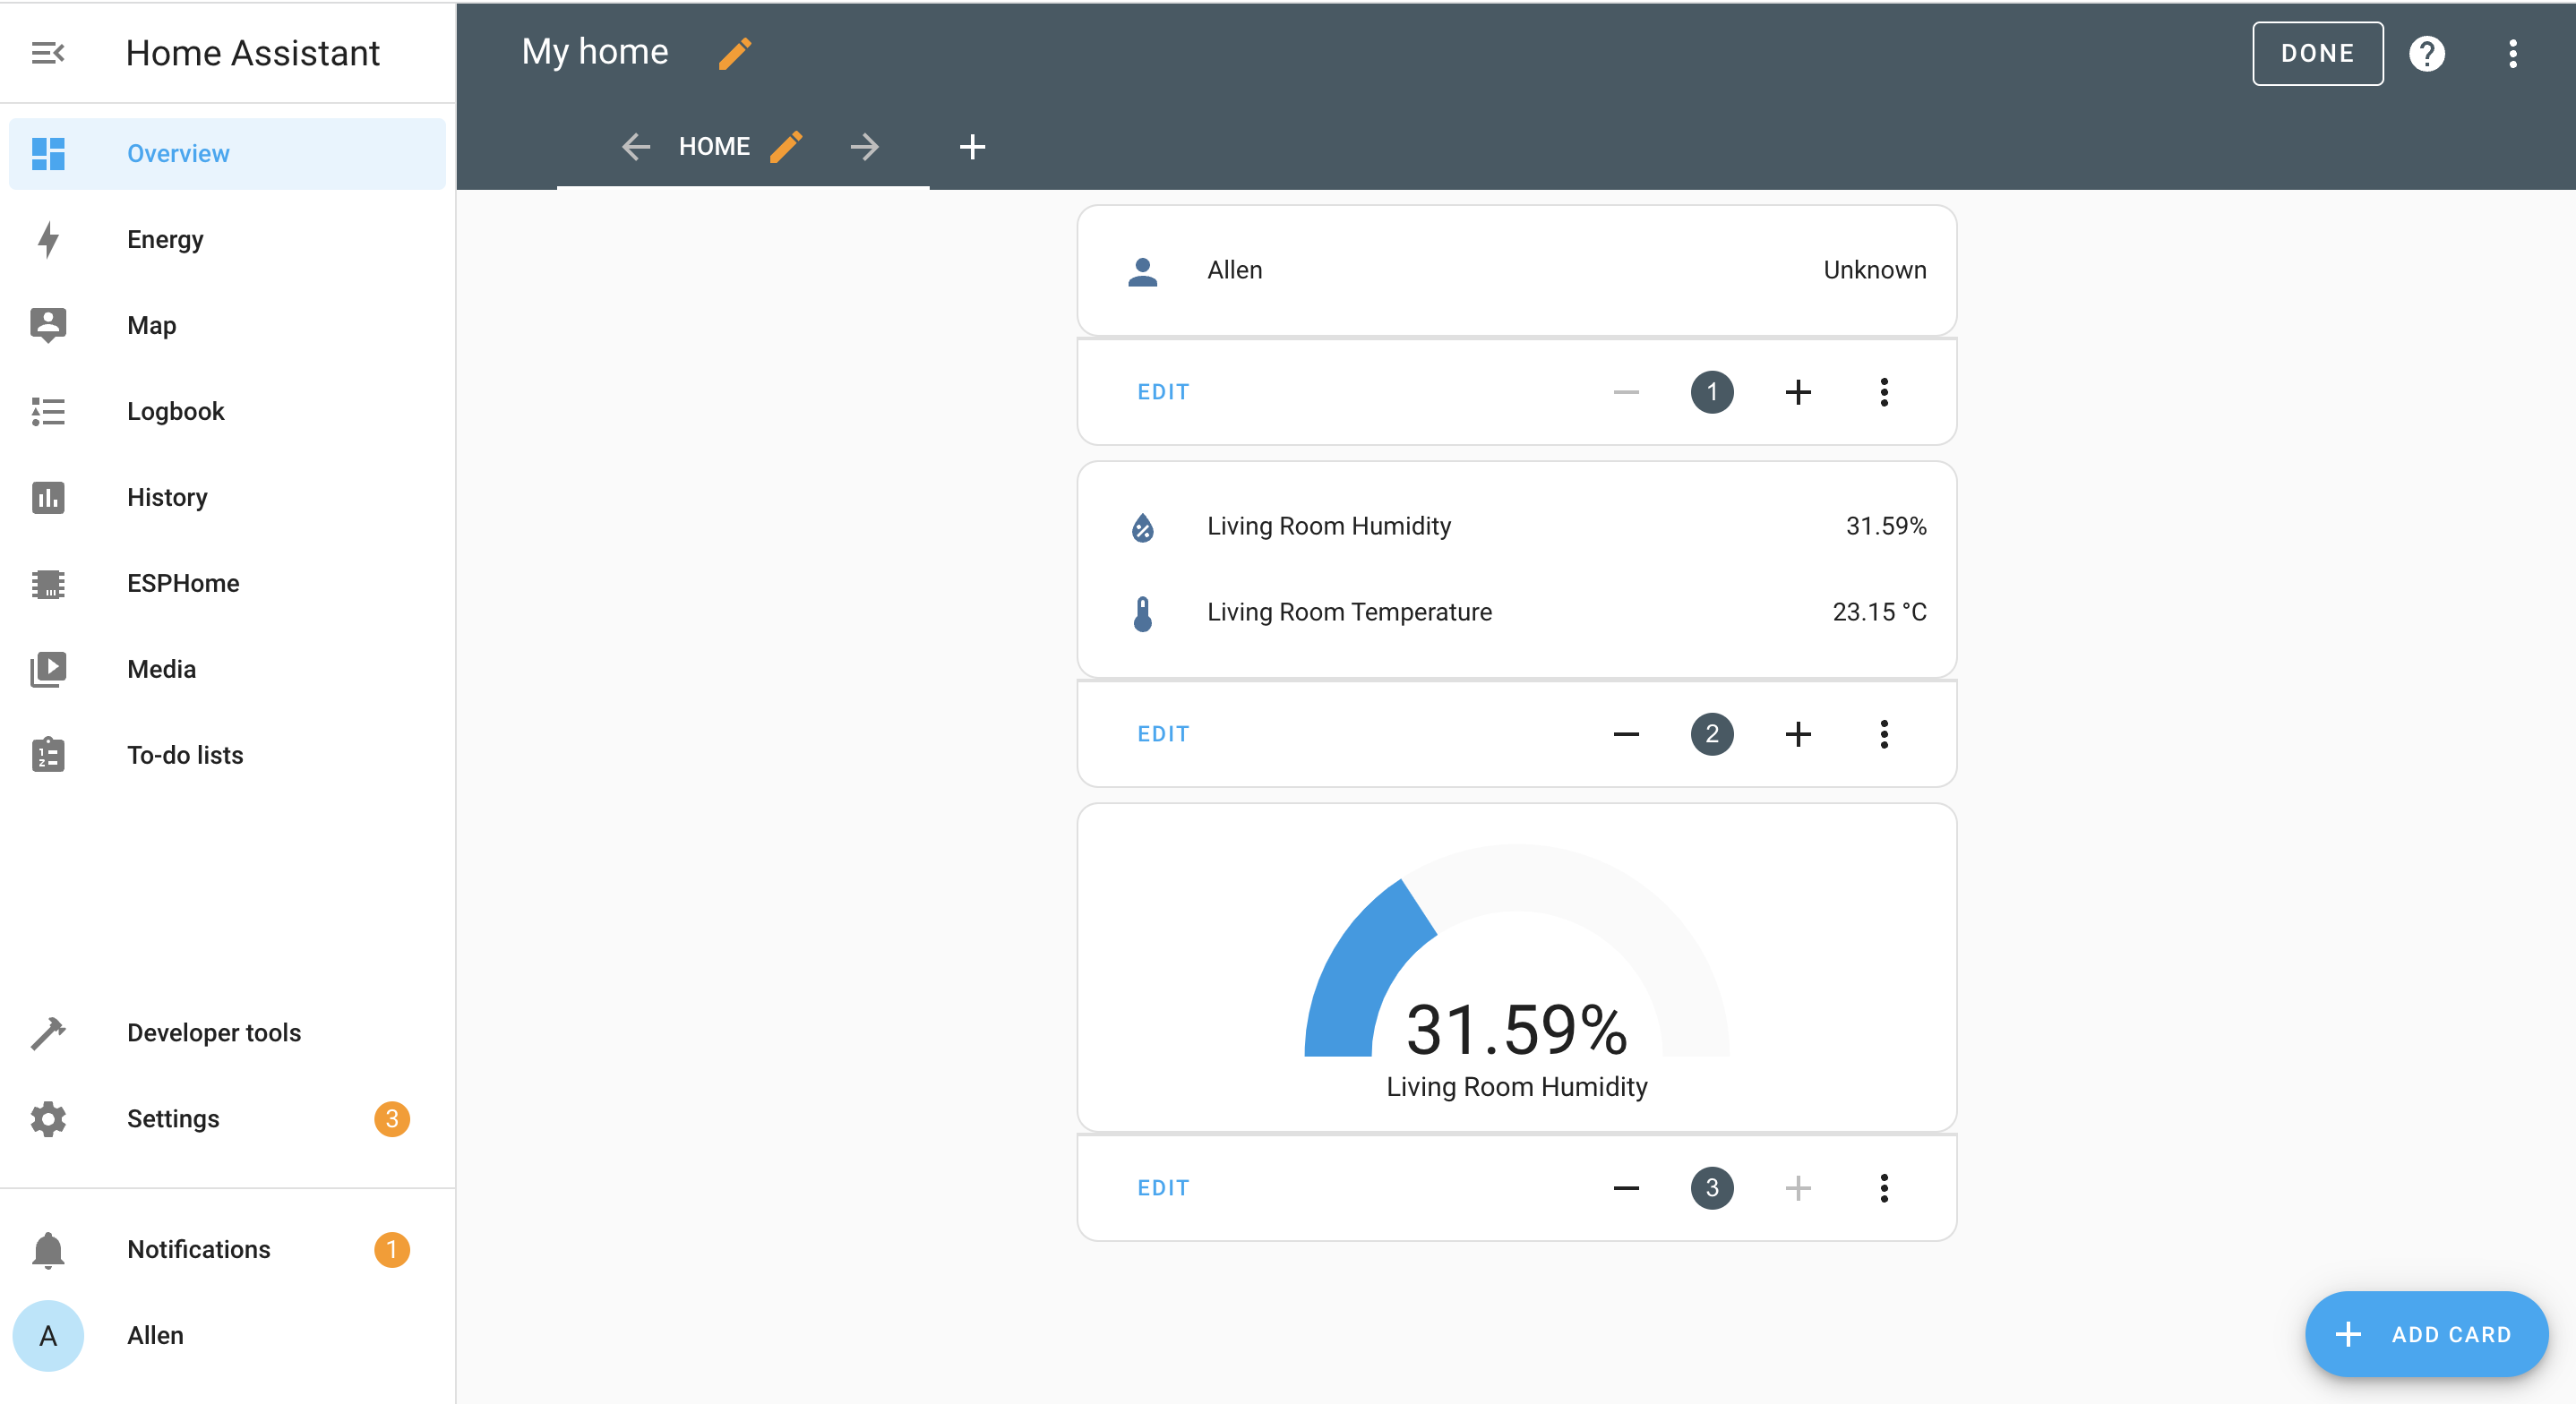
Visualize on Dashboard
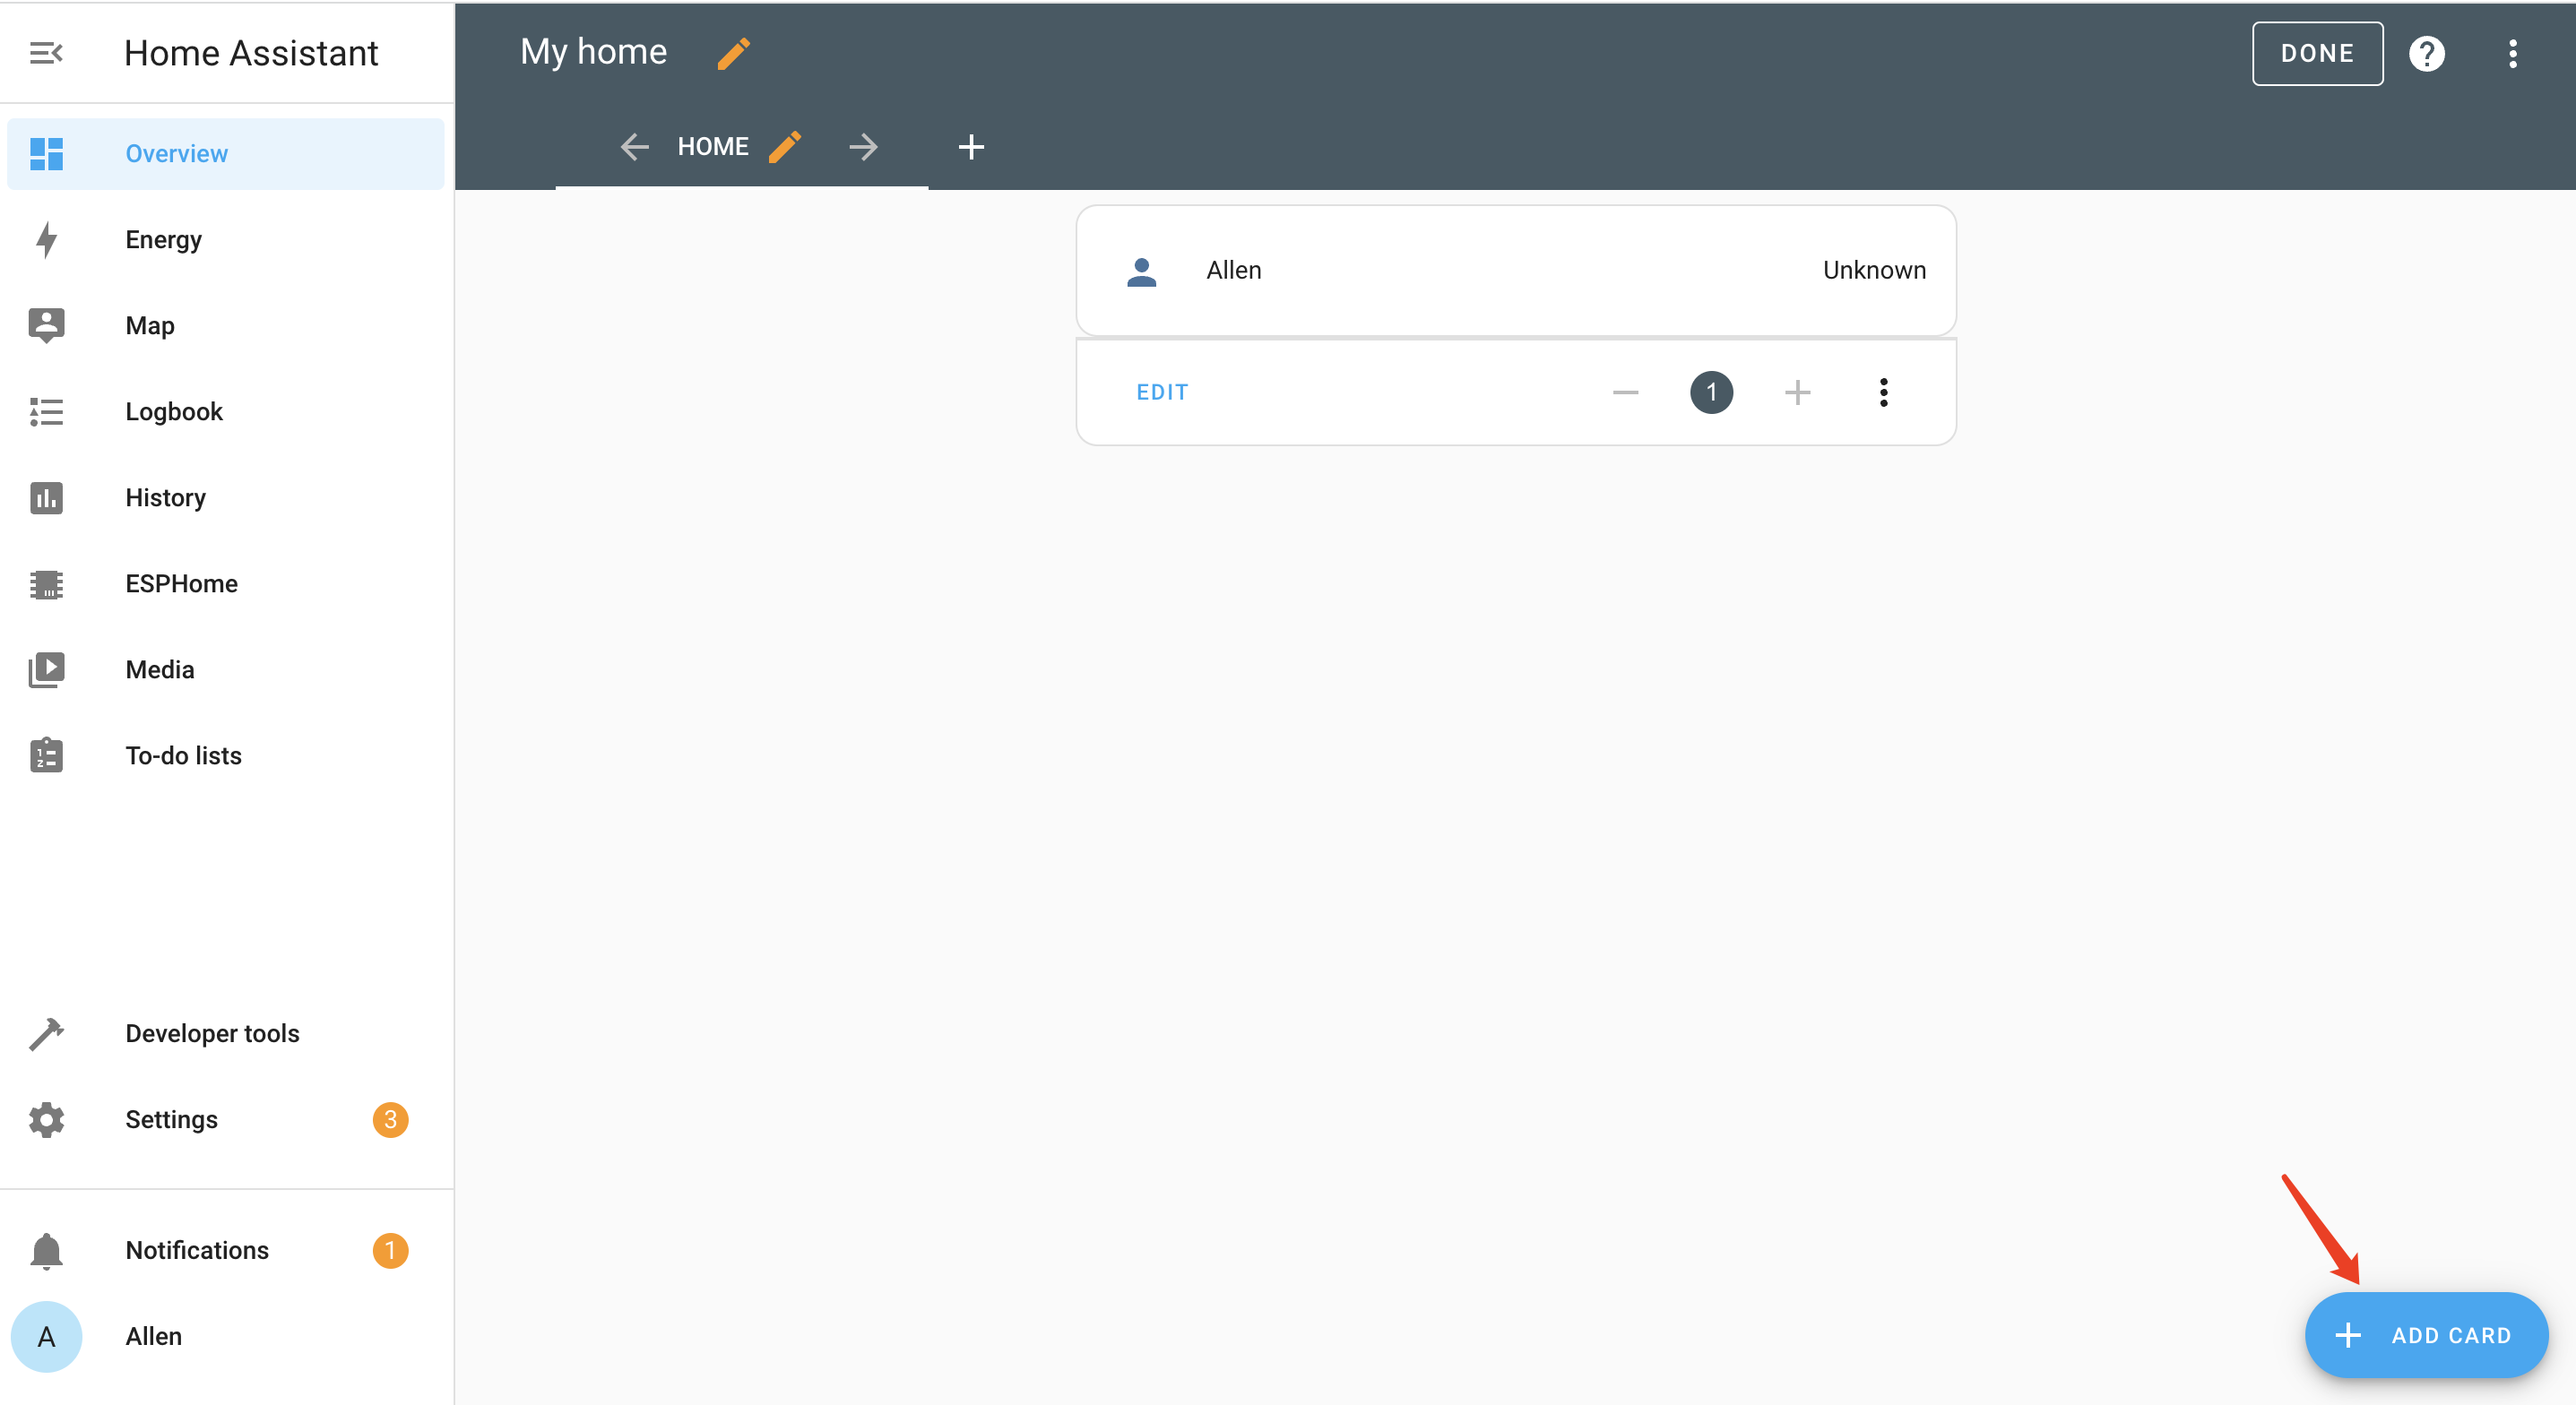
- Step 1. On the Overview page of Home Assistant, click the 3 dots and click Edit Dashboard

- Step 2. Click + ADD CARD
- Step 3. Select By ENTITY, type temperature and select the check box next to Temperature
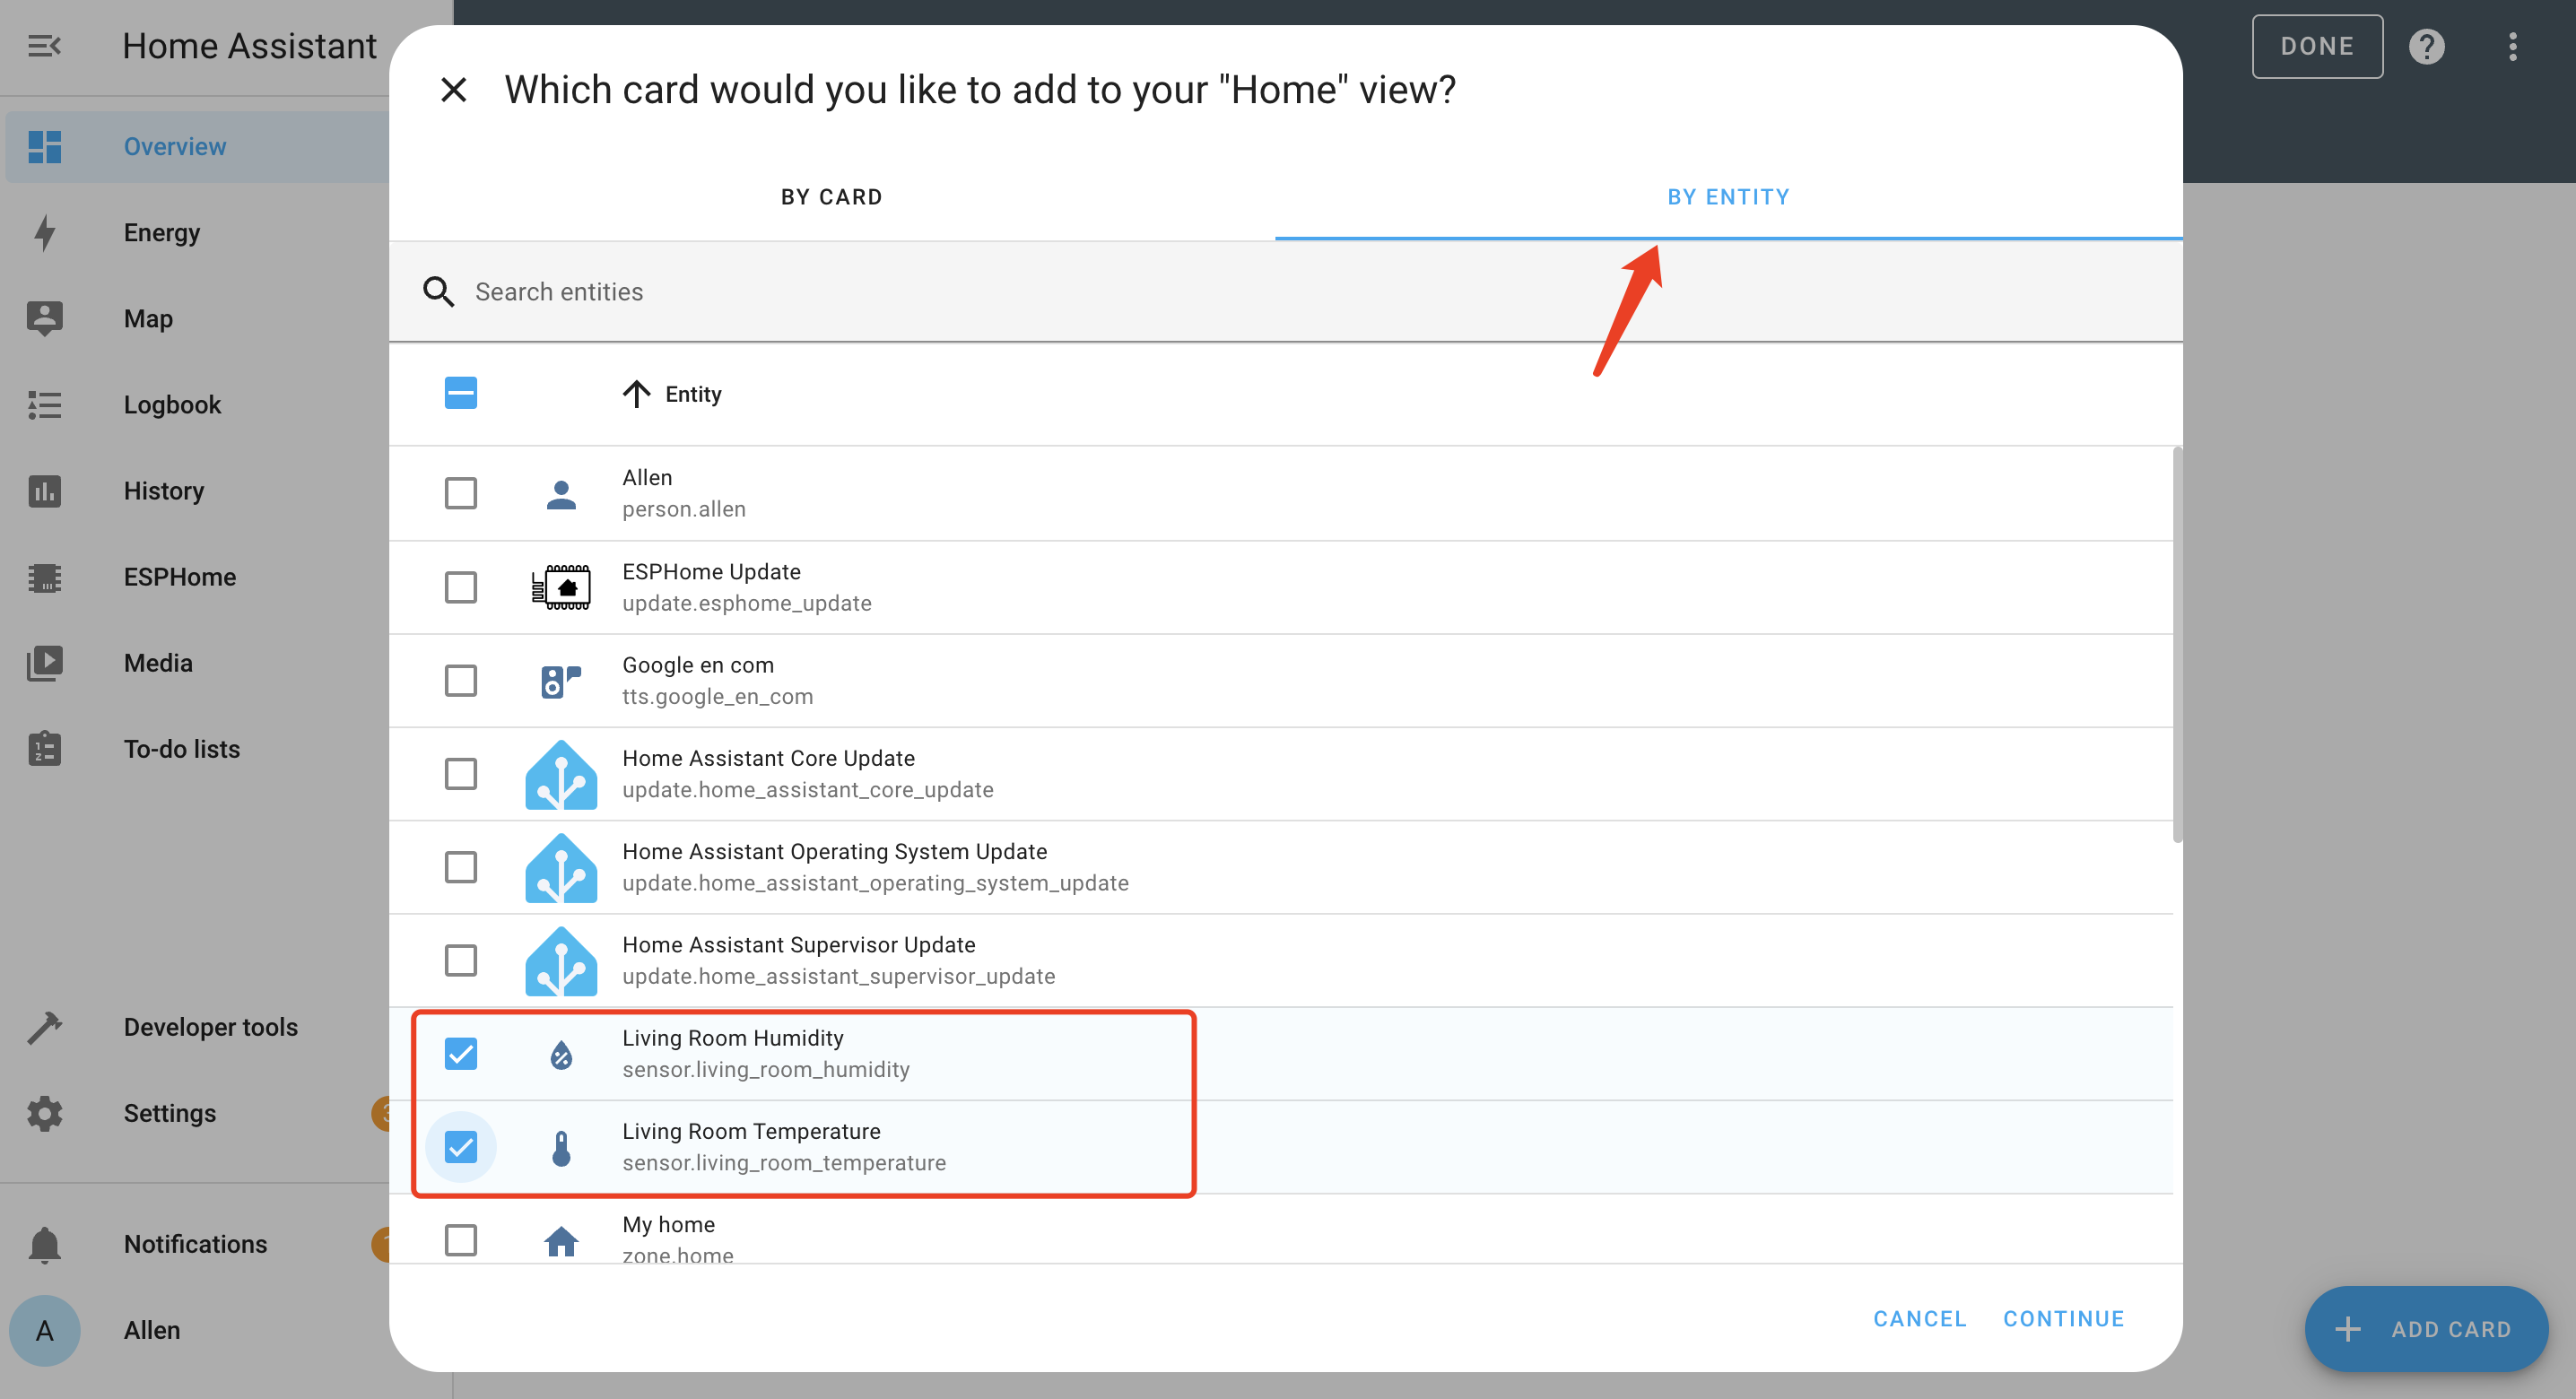
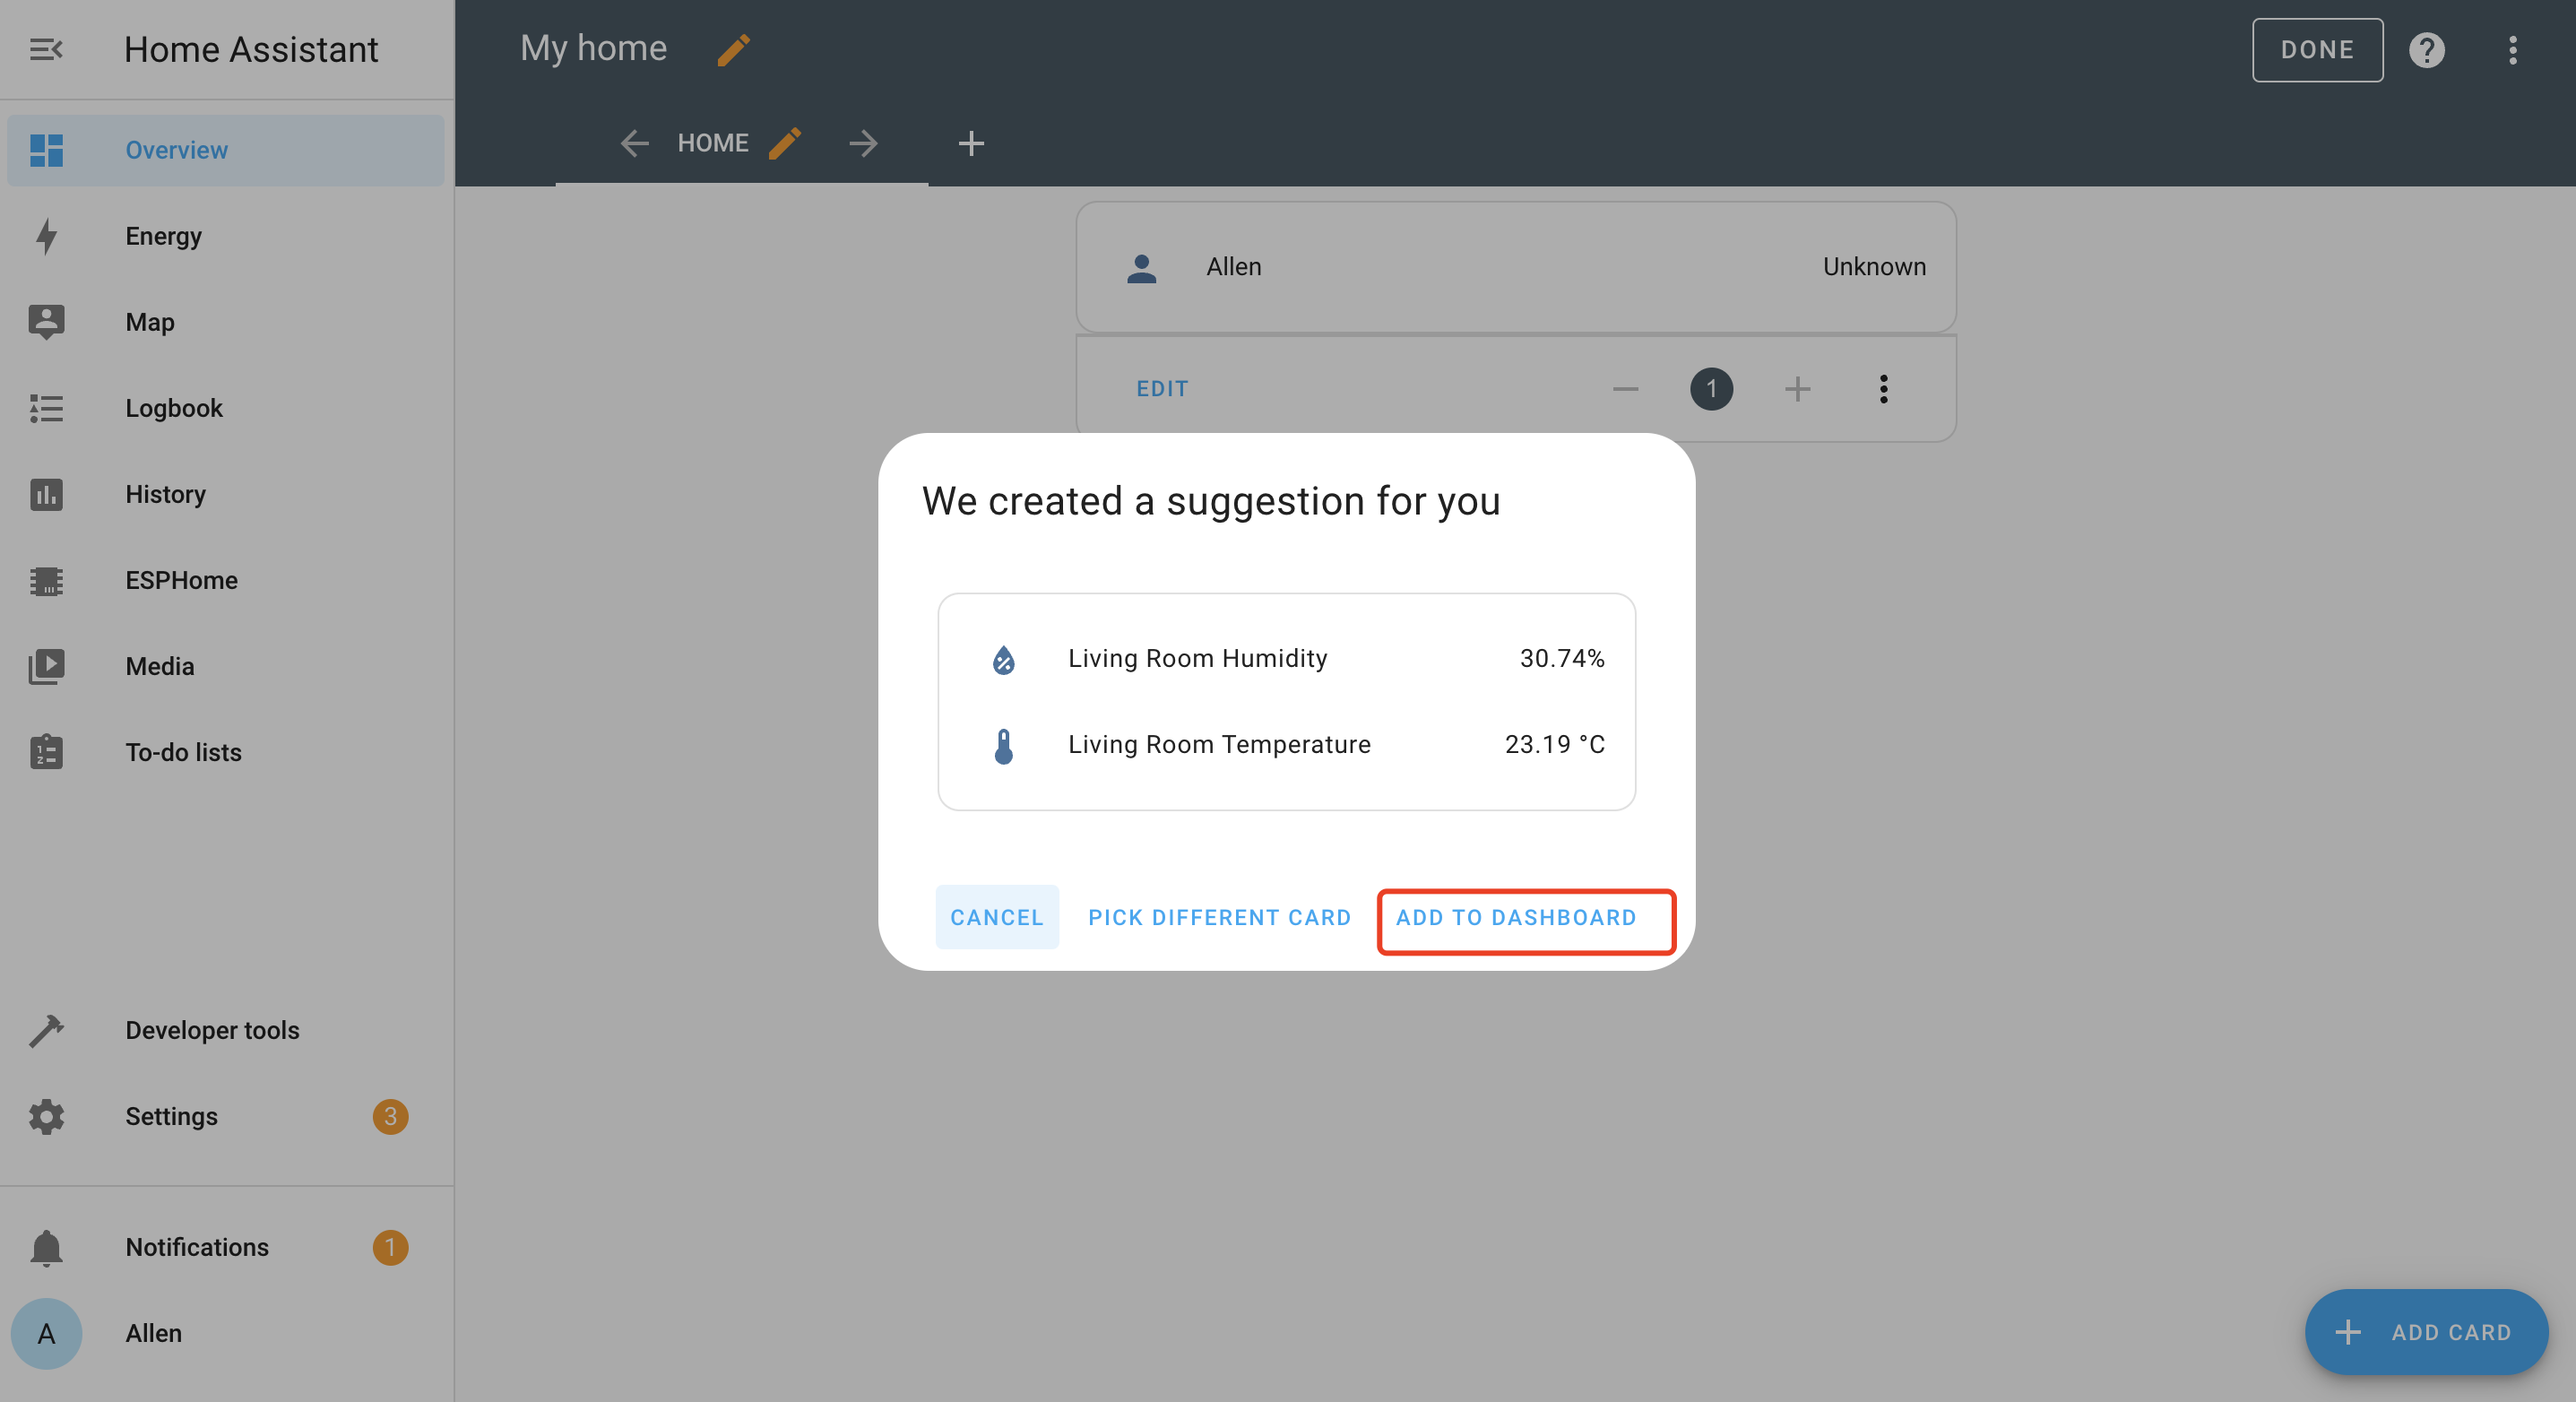
- Step 4. Click ADD TO DASHBOARD
- Step 5. You can also visualize sensor data as gauges. Click Gauge under BY CARD
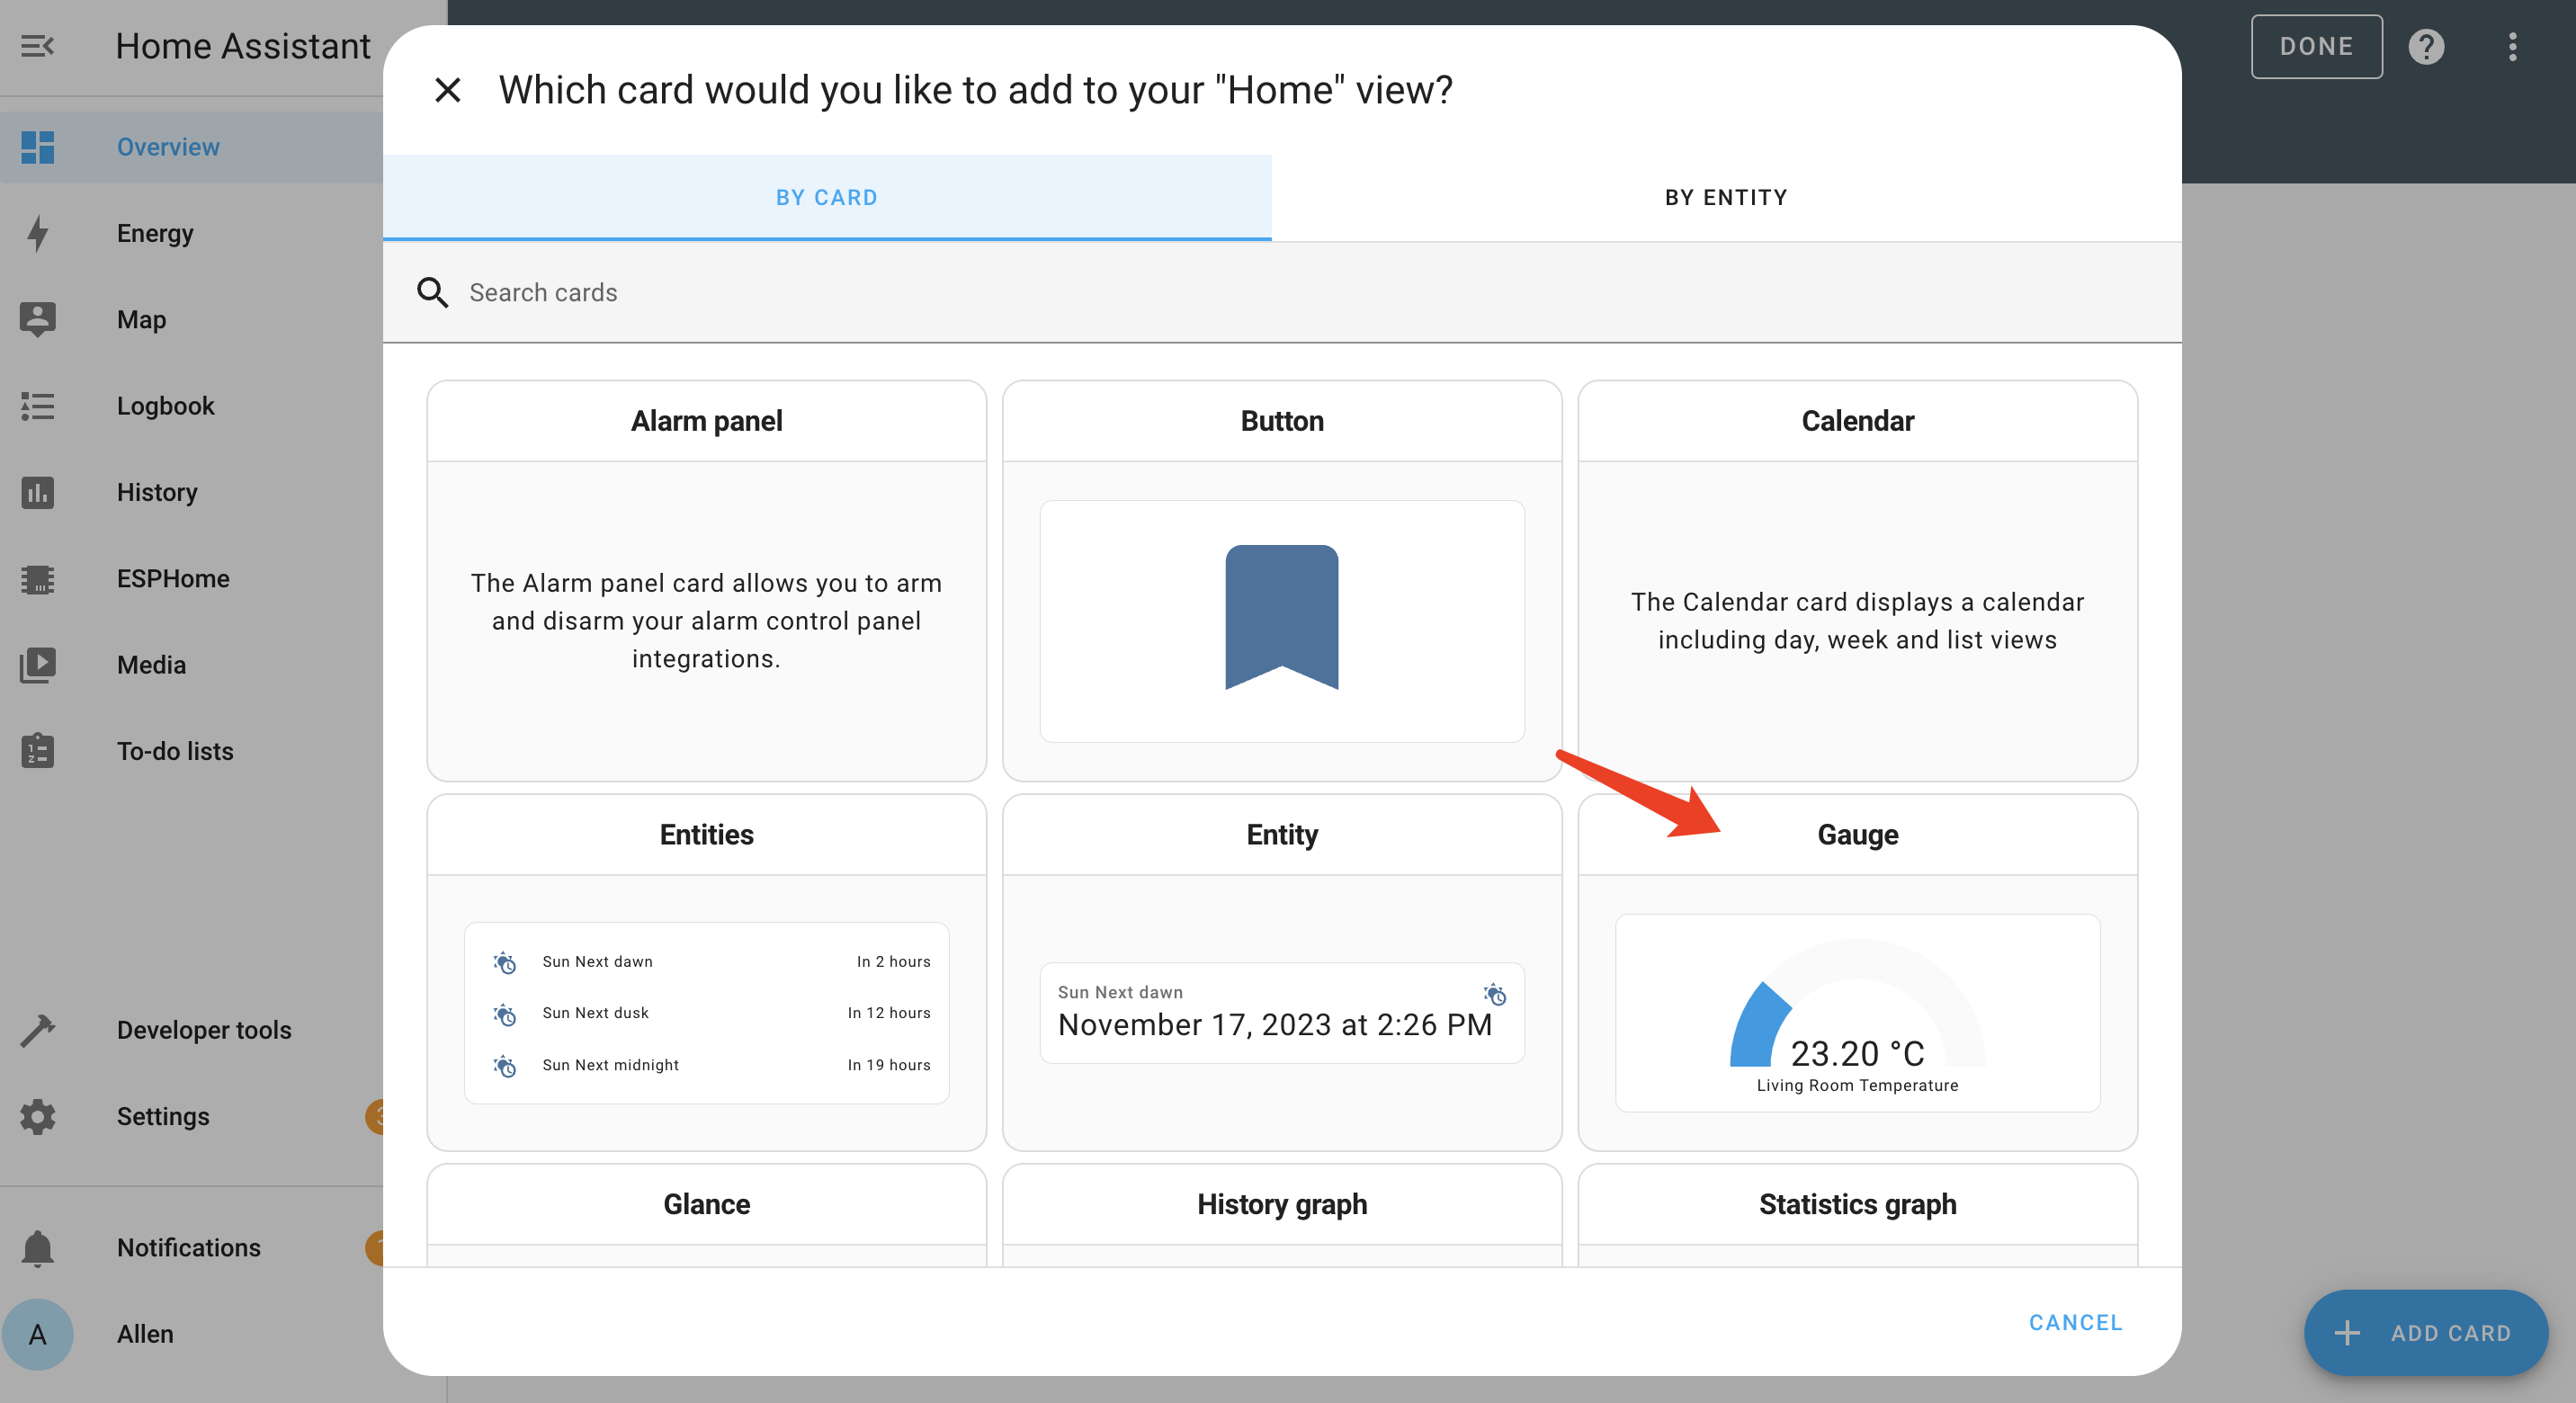
Now your Home Assistant dashboard will look like below
Grove - Light Sensor(LS06-S)
The Grove - Light Sensor v1.2 is an analog module and can output various electrical signals which can be converted to different ranges. It integrates an LS06-S photoresistor, a high-sensitive and reliable photodiode, to detect the intensity of light in the environment. It is a perfect Arduino light sensor module for light measurement, light detection, and a light-controlled switch.
Click here for the purchase.
Setup Configuration
- Step 1. Connect Grove - Light sensor to one of the Analog/Digital connectors on the Seeed Studio Expansion Base for XIAO
- Step 2. Inside the xiao-esp32c3.yaml file that we created before, change the file and push it OTA to XIAO ESP32C3
You will see this result if going well.
Visualize on Dashboard
- Step 1. On the Overview page of Home Assistant, click the 3 dots and click Edit Dashboard
- Step 2. Click + ADD CARD
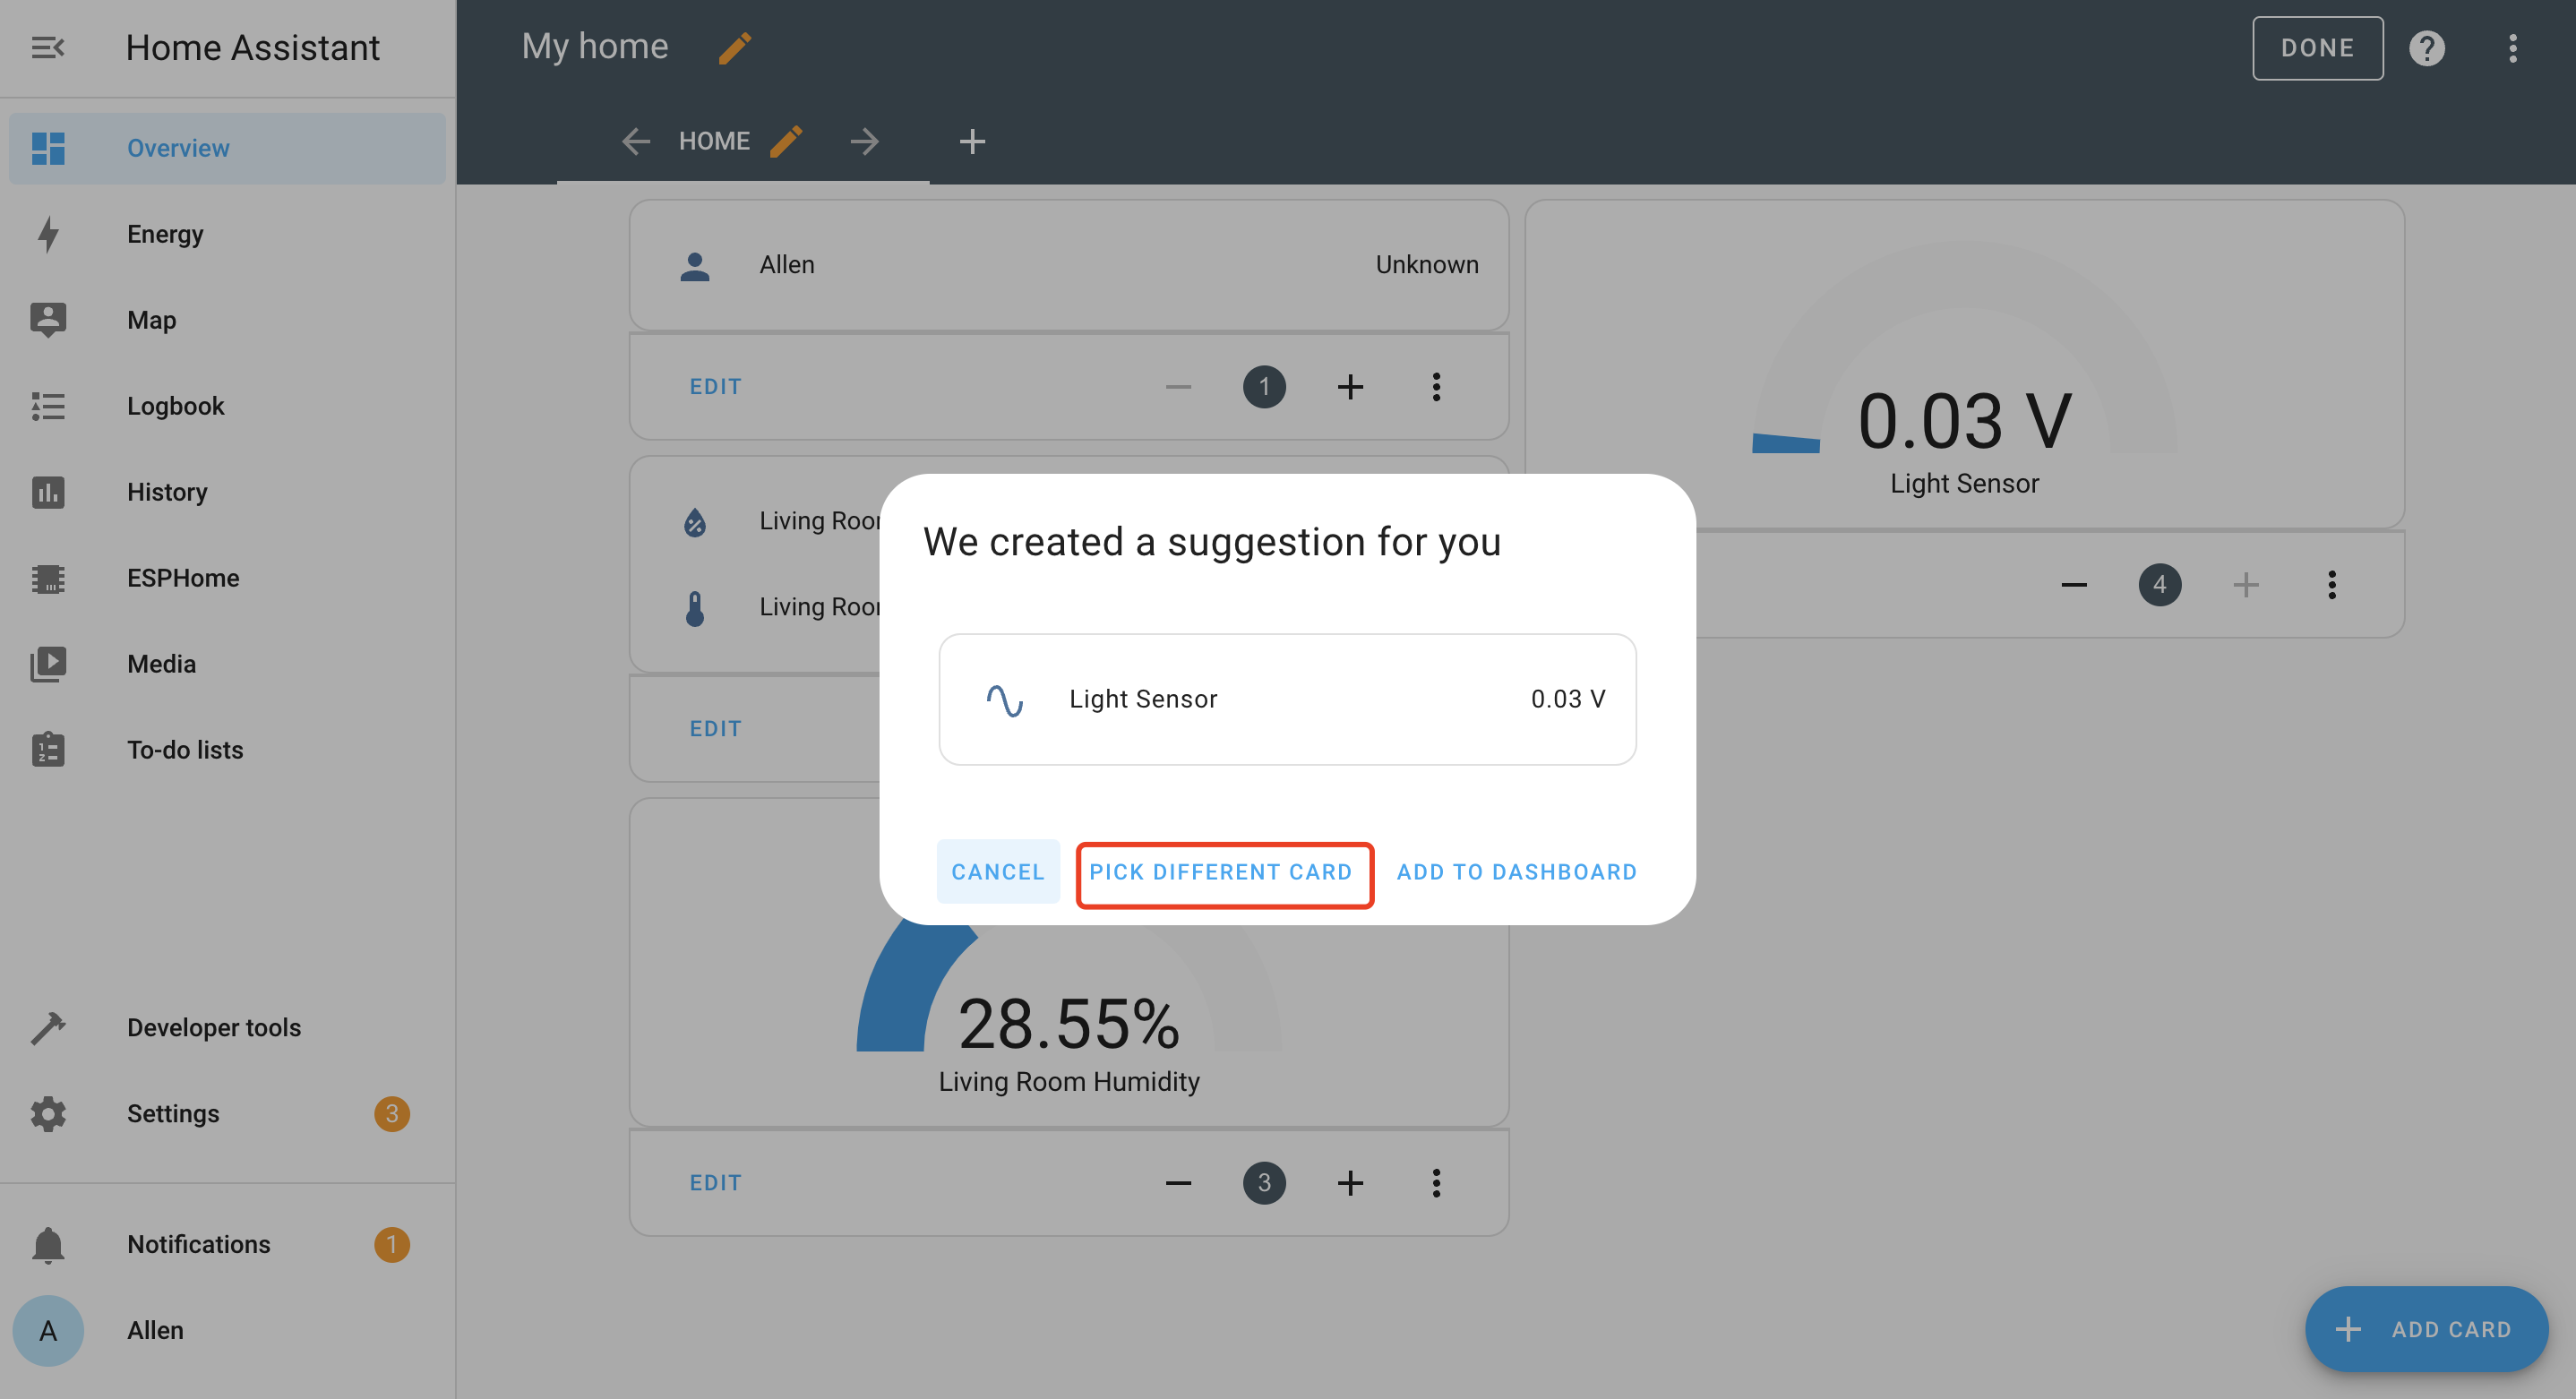
- Step 3. Select By ENTITY, select the Light Sensor
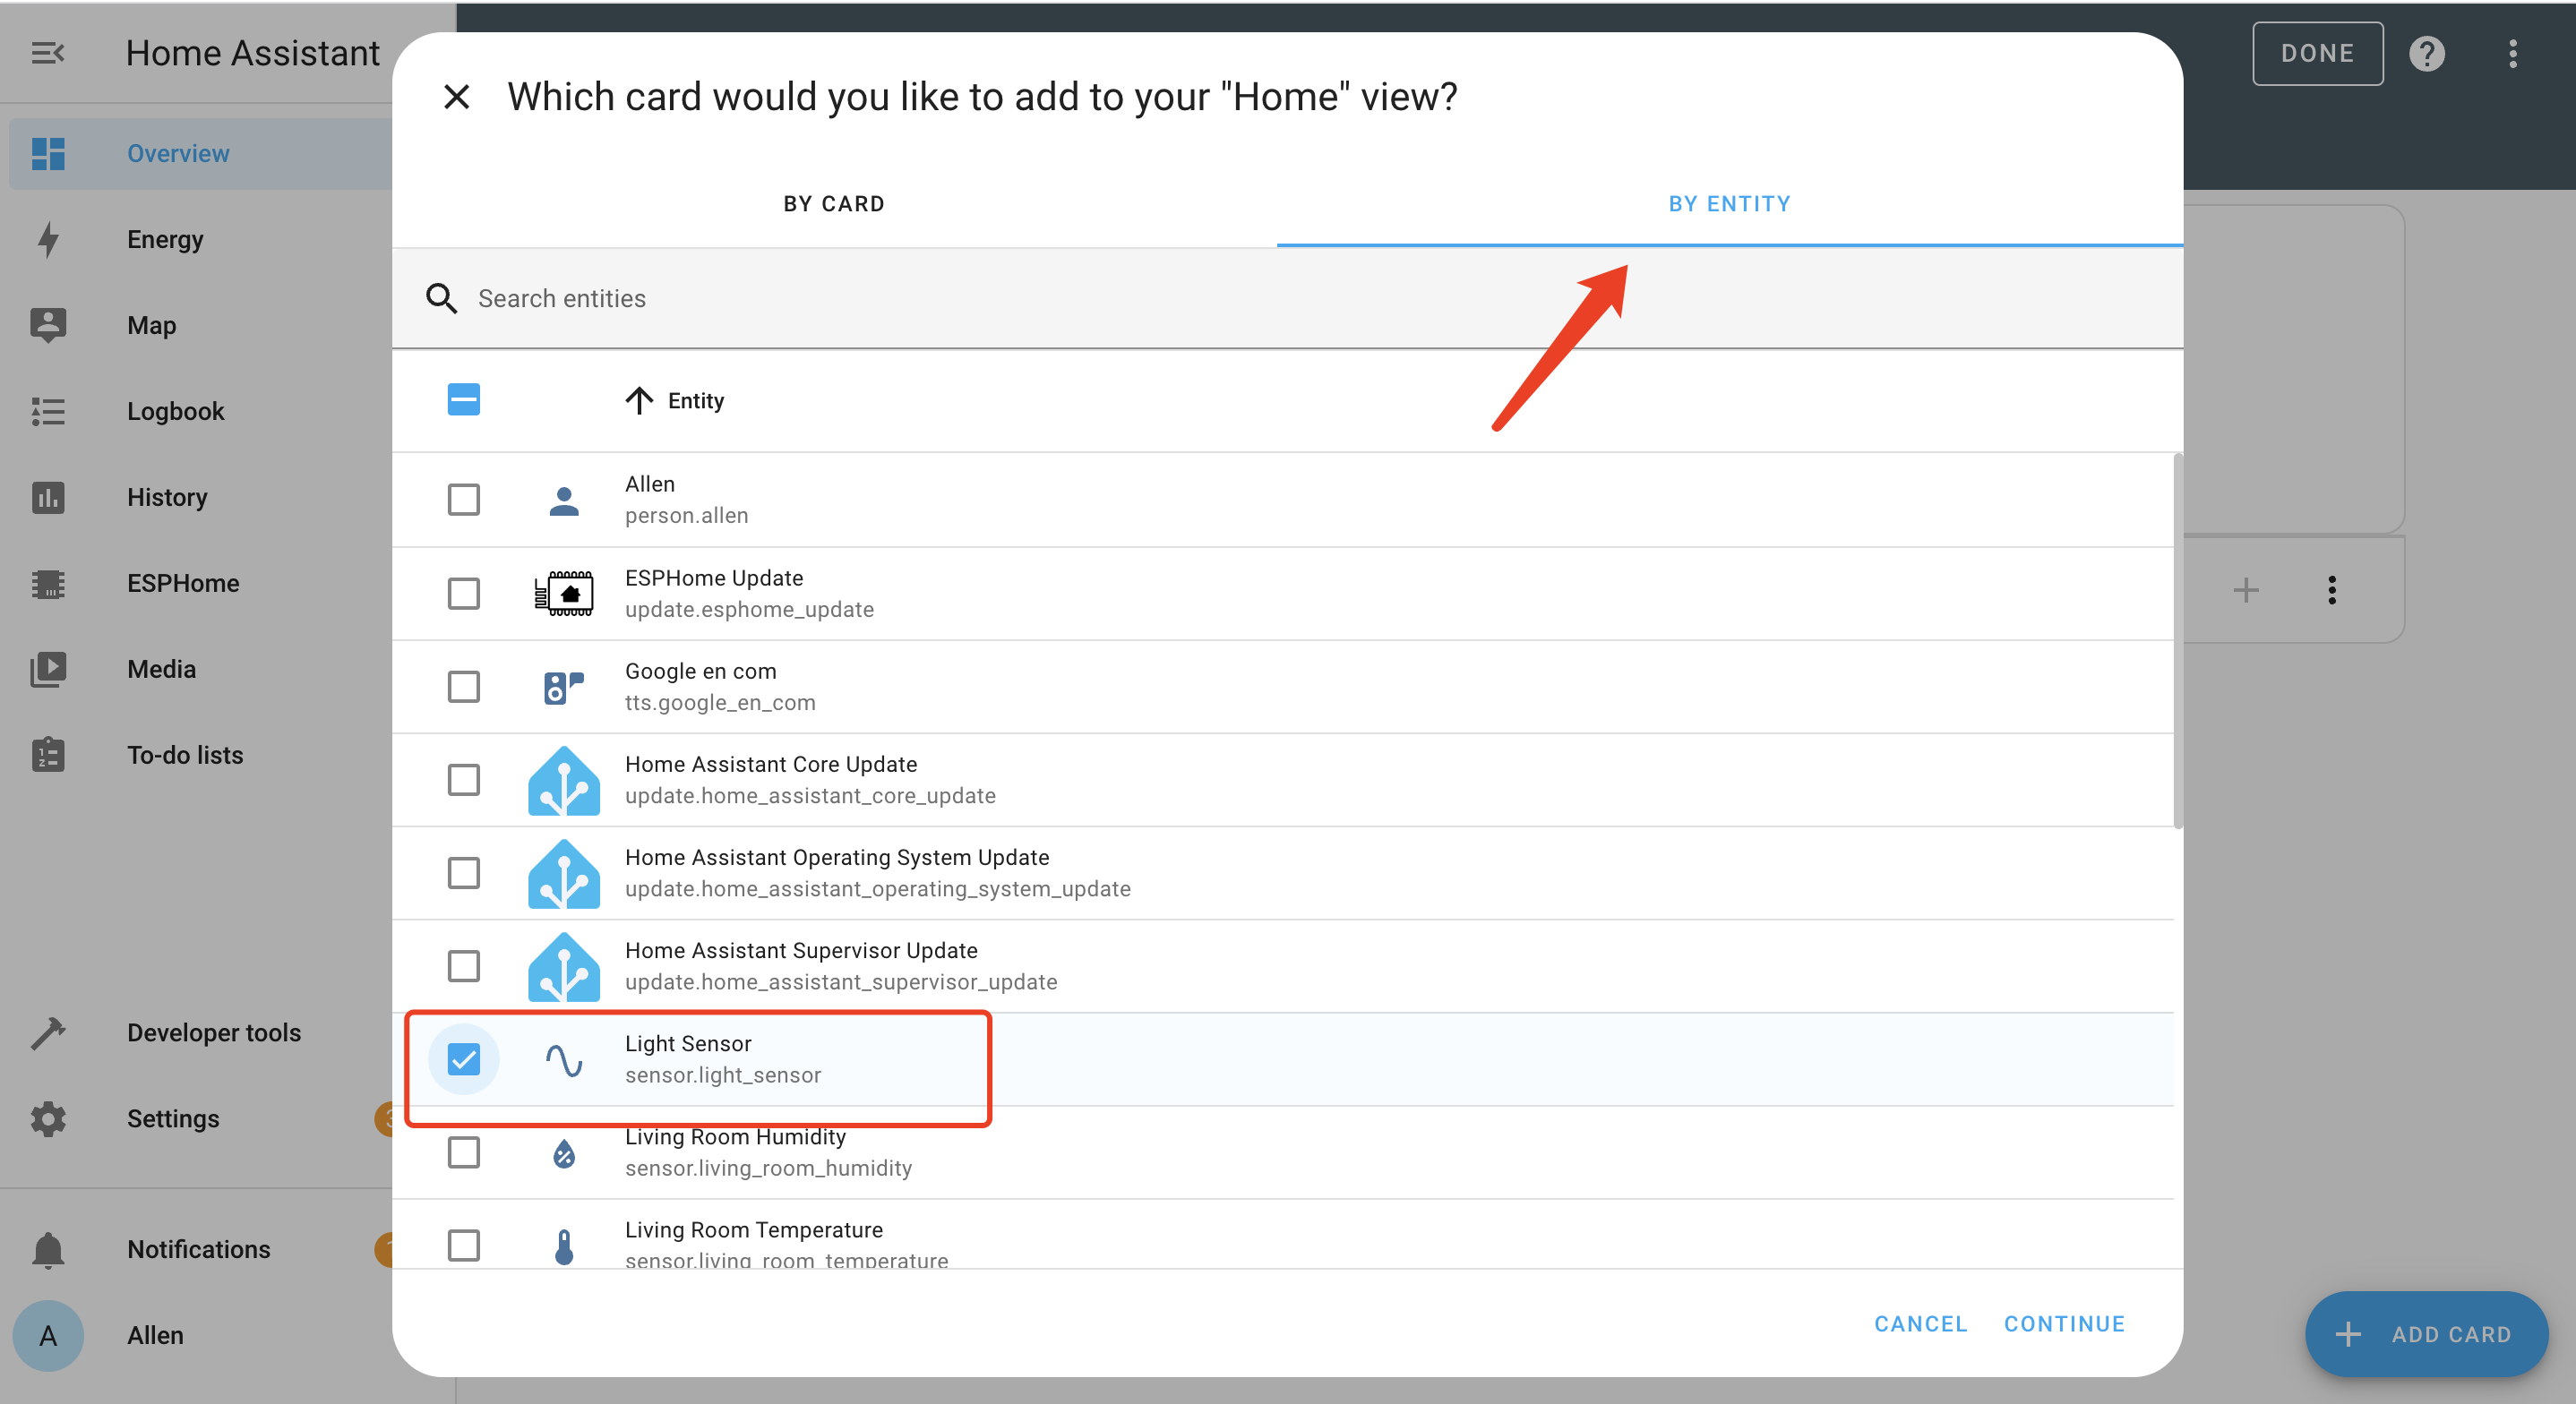
- Step 4. Select PICK DIFFERENT CARD
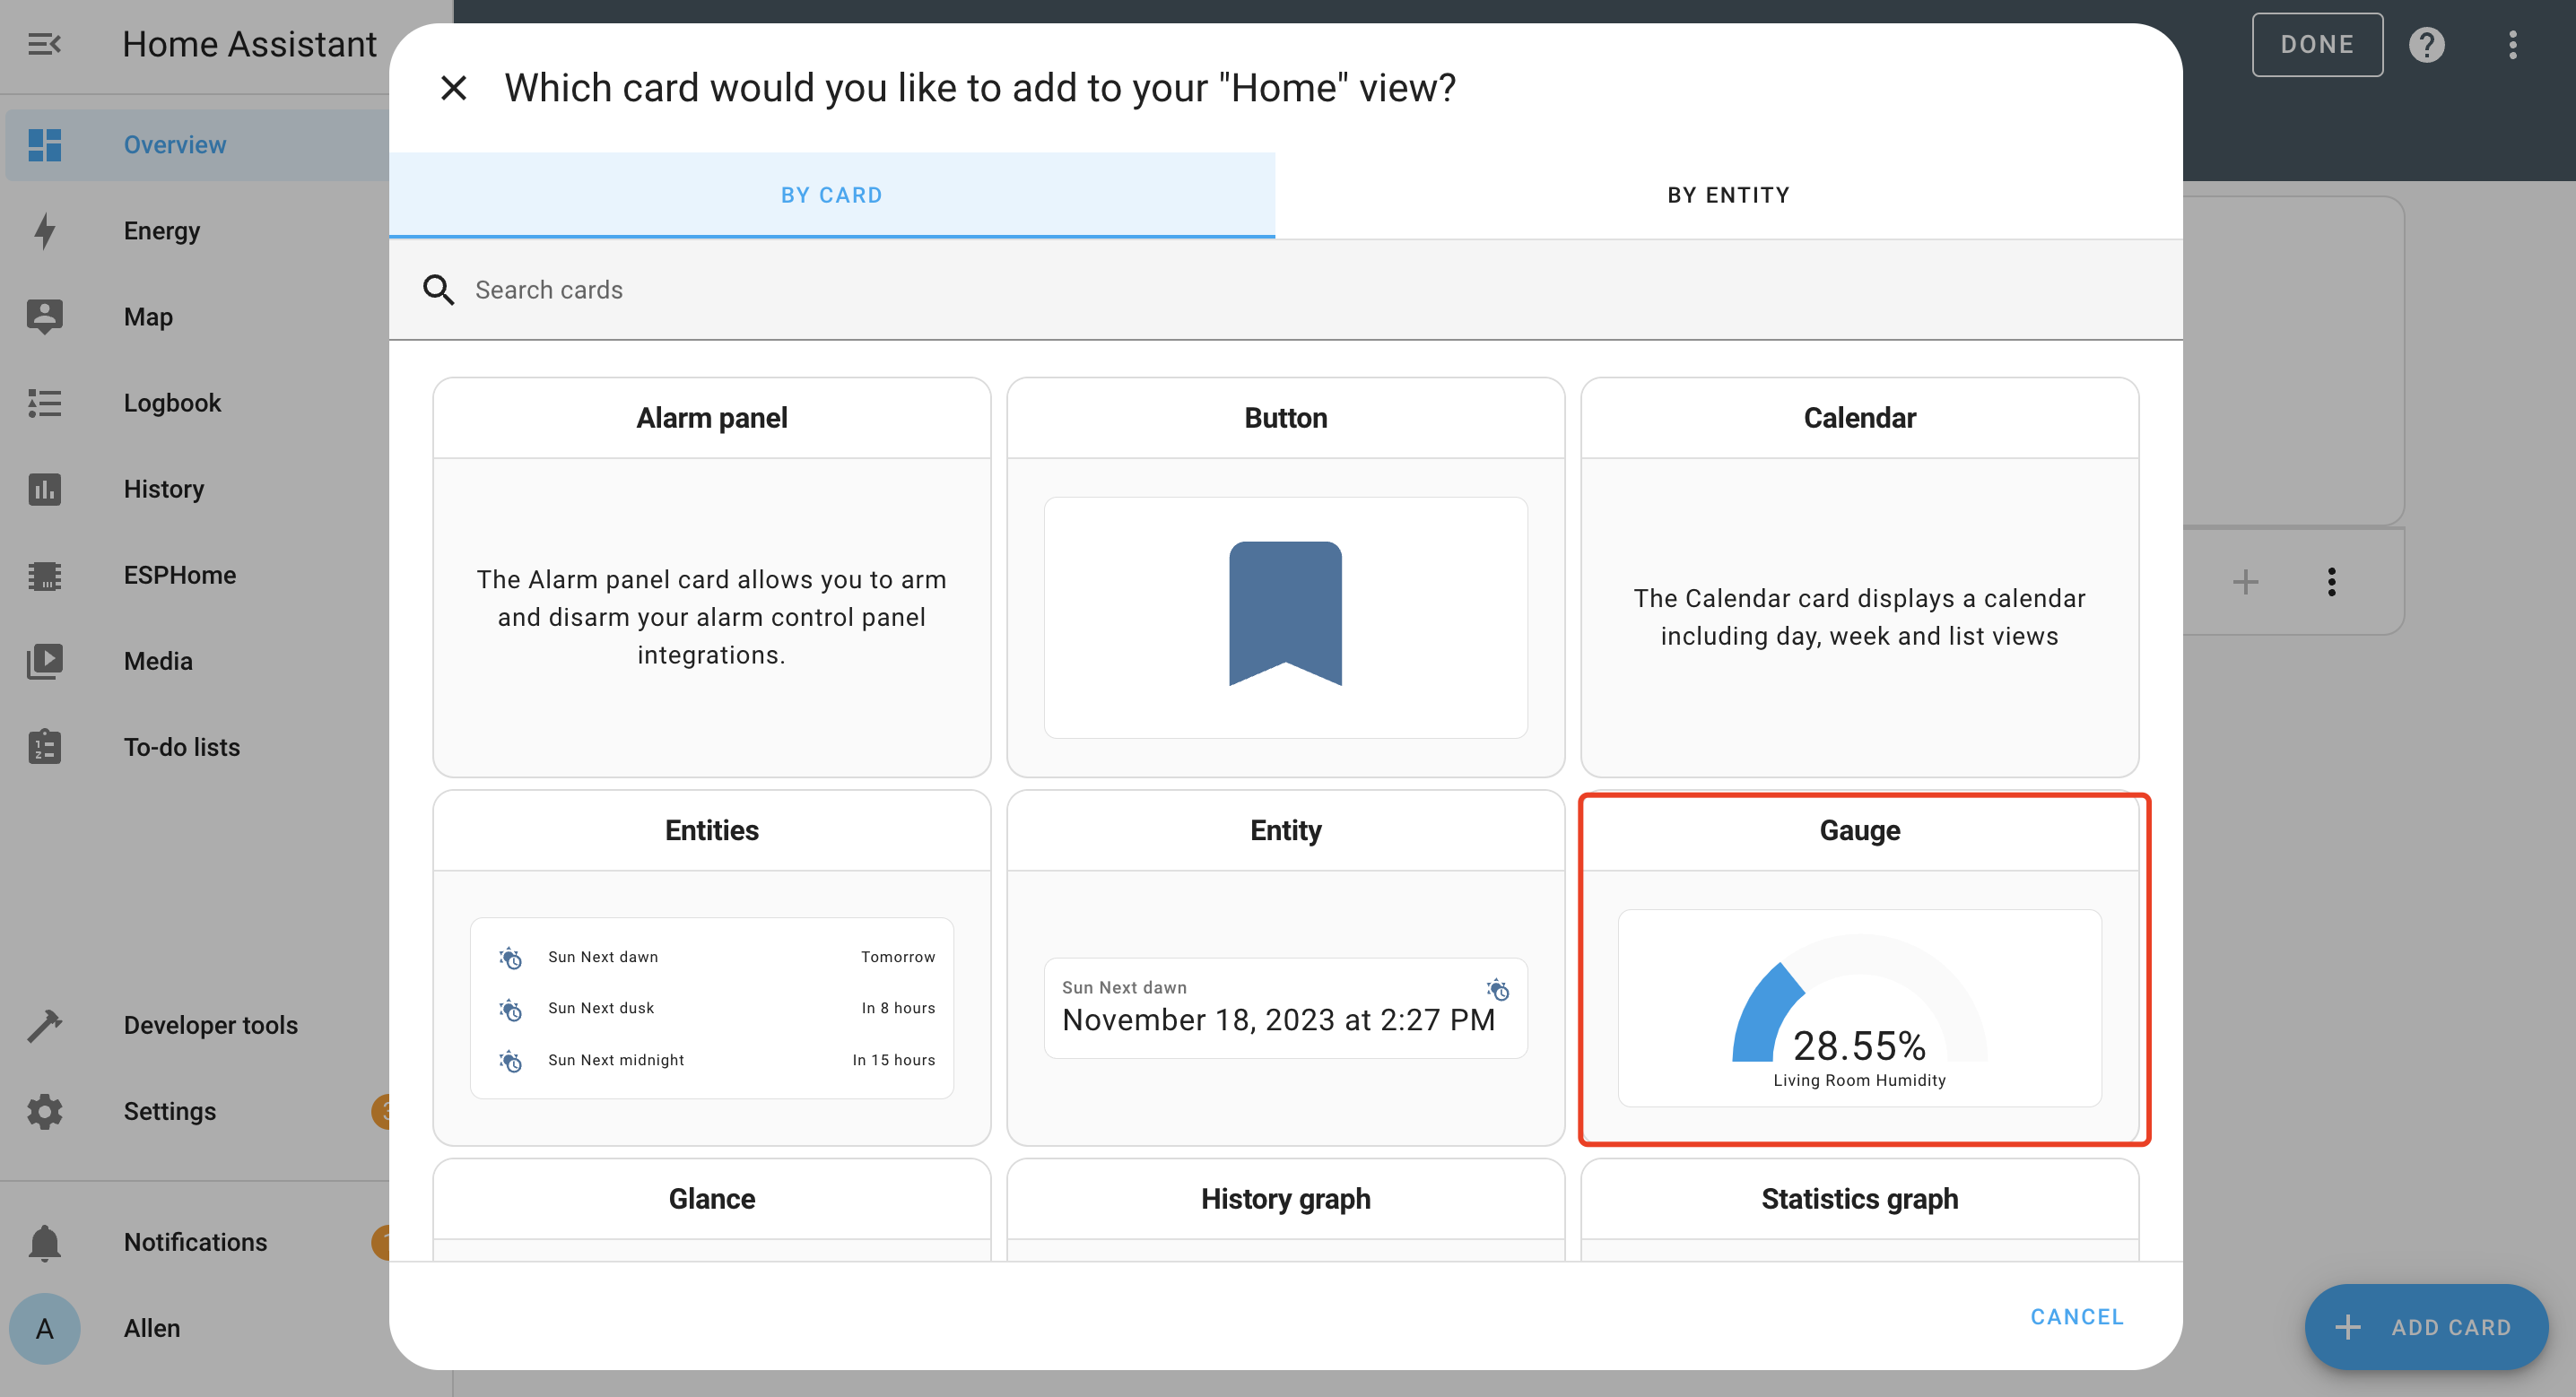
- Step 5. Select Gauge
- Step 6. Set the minimum and maximum
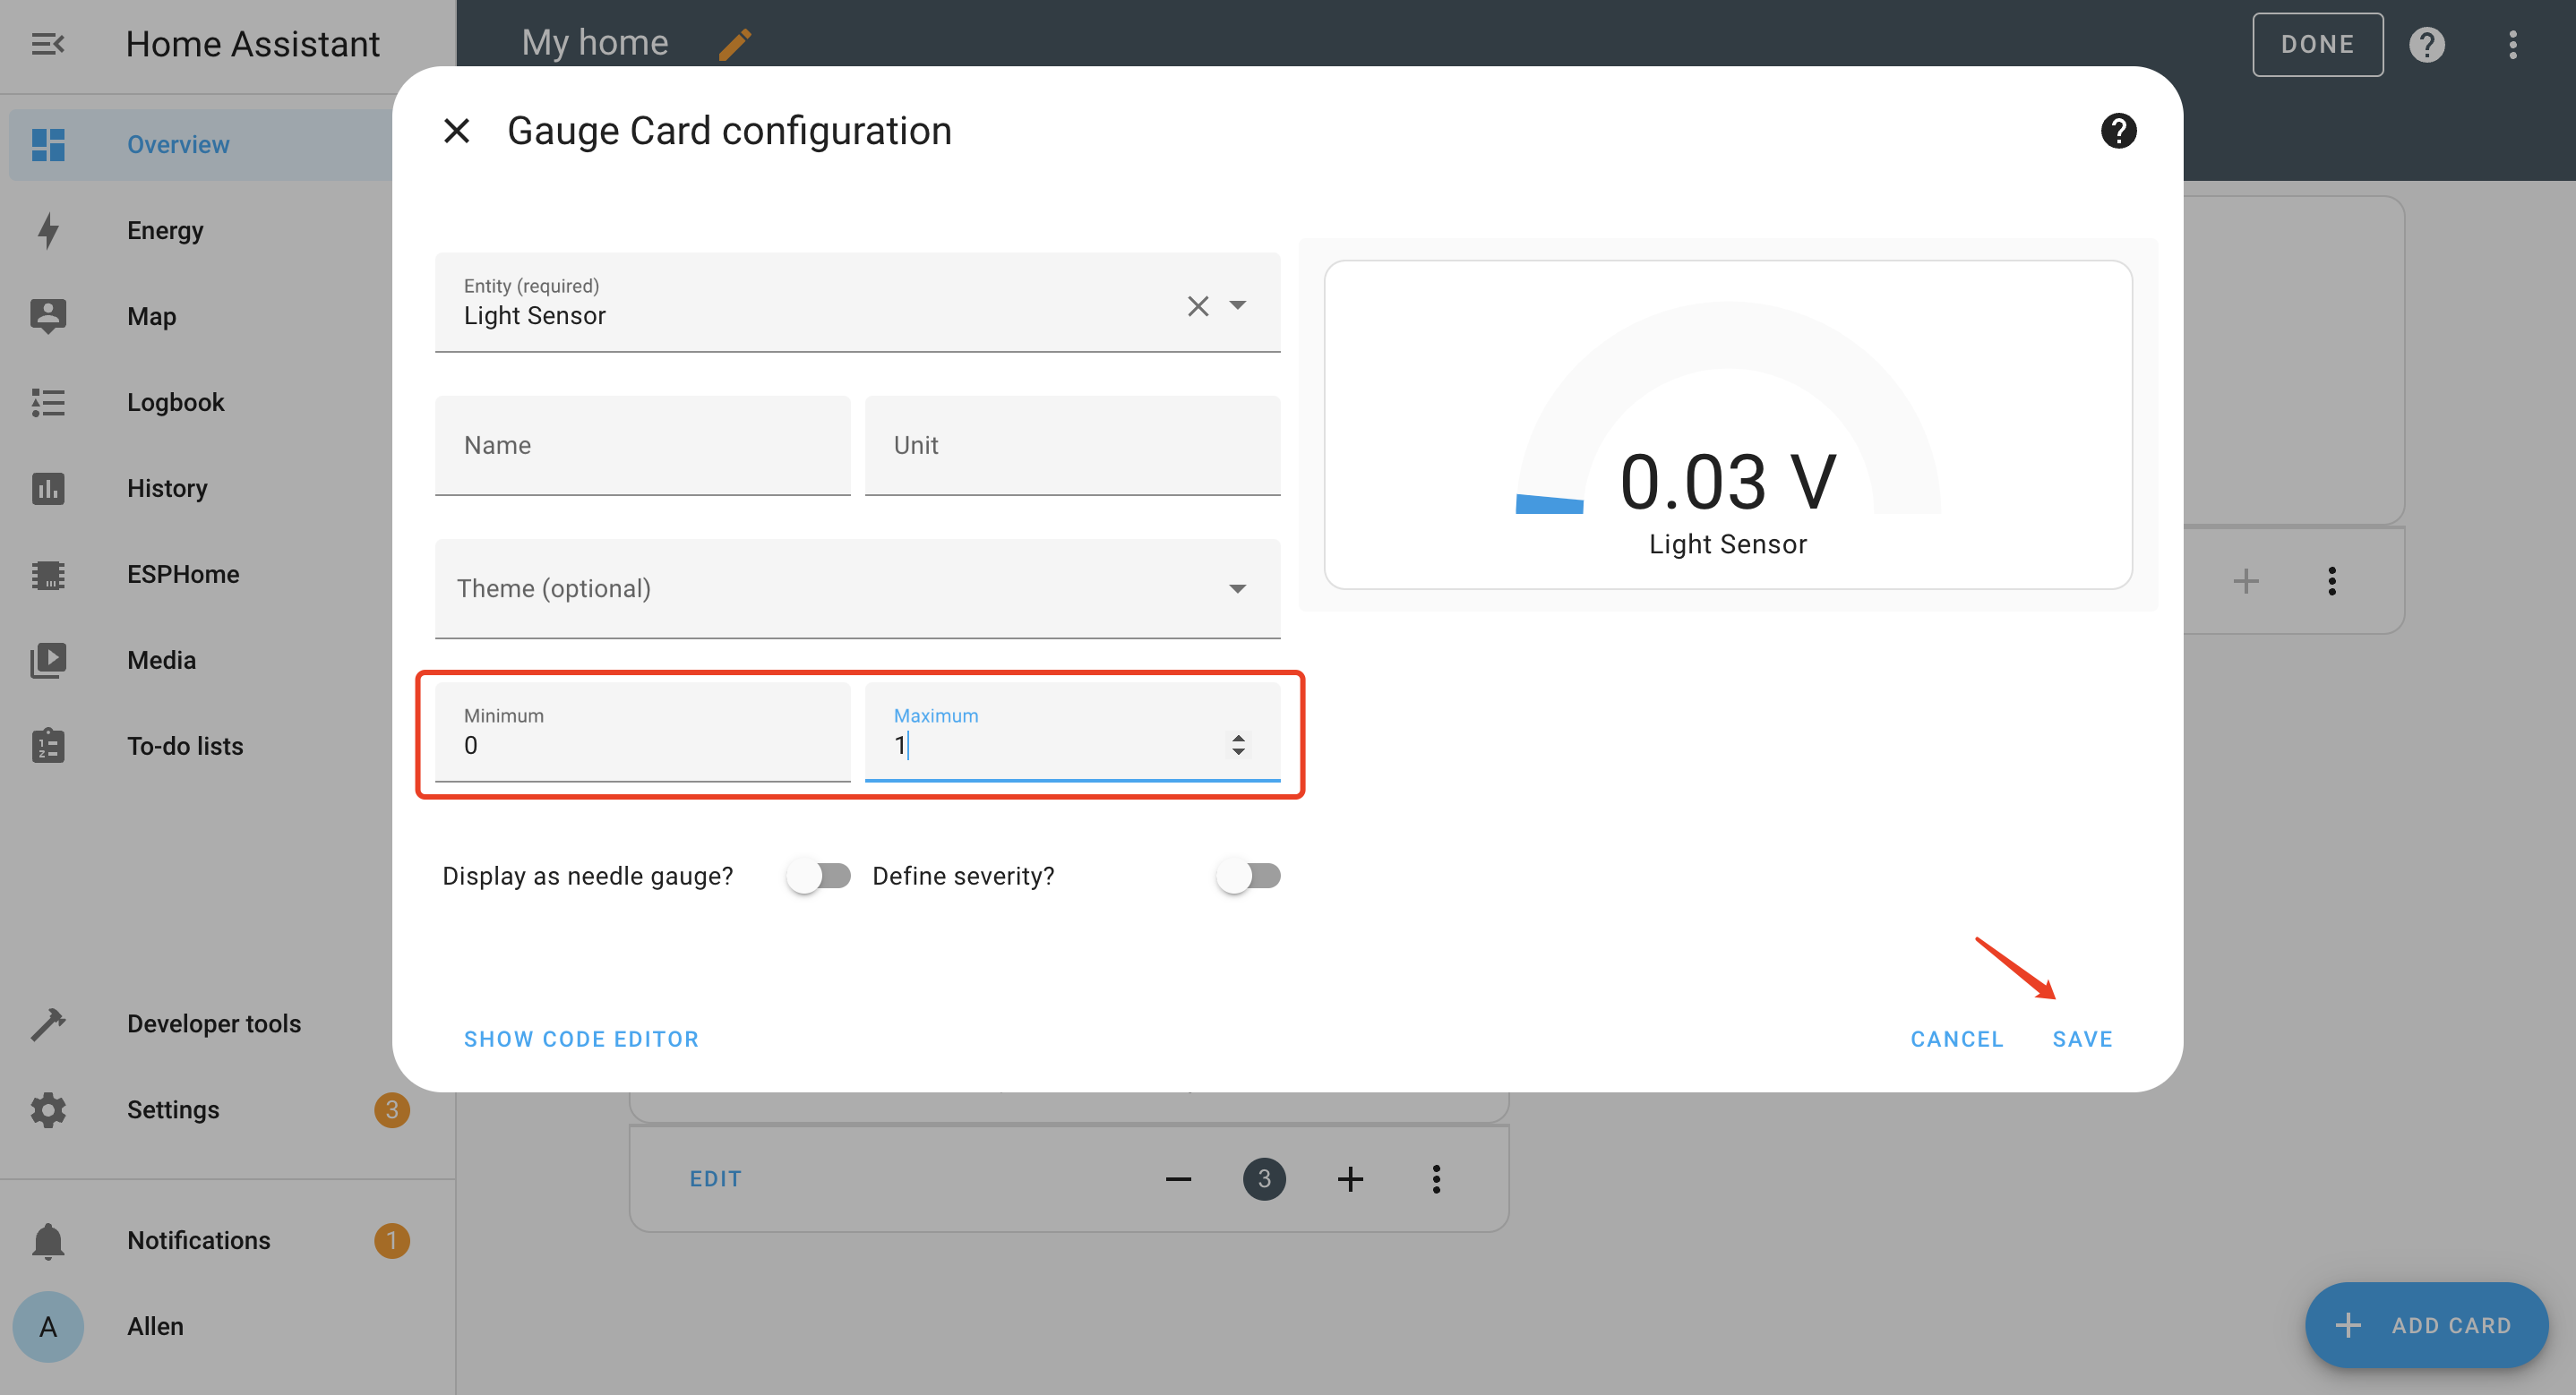
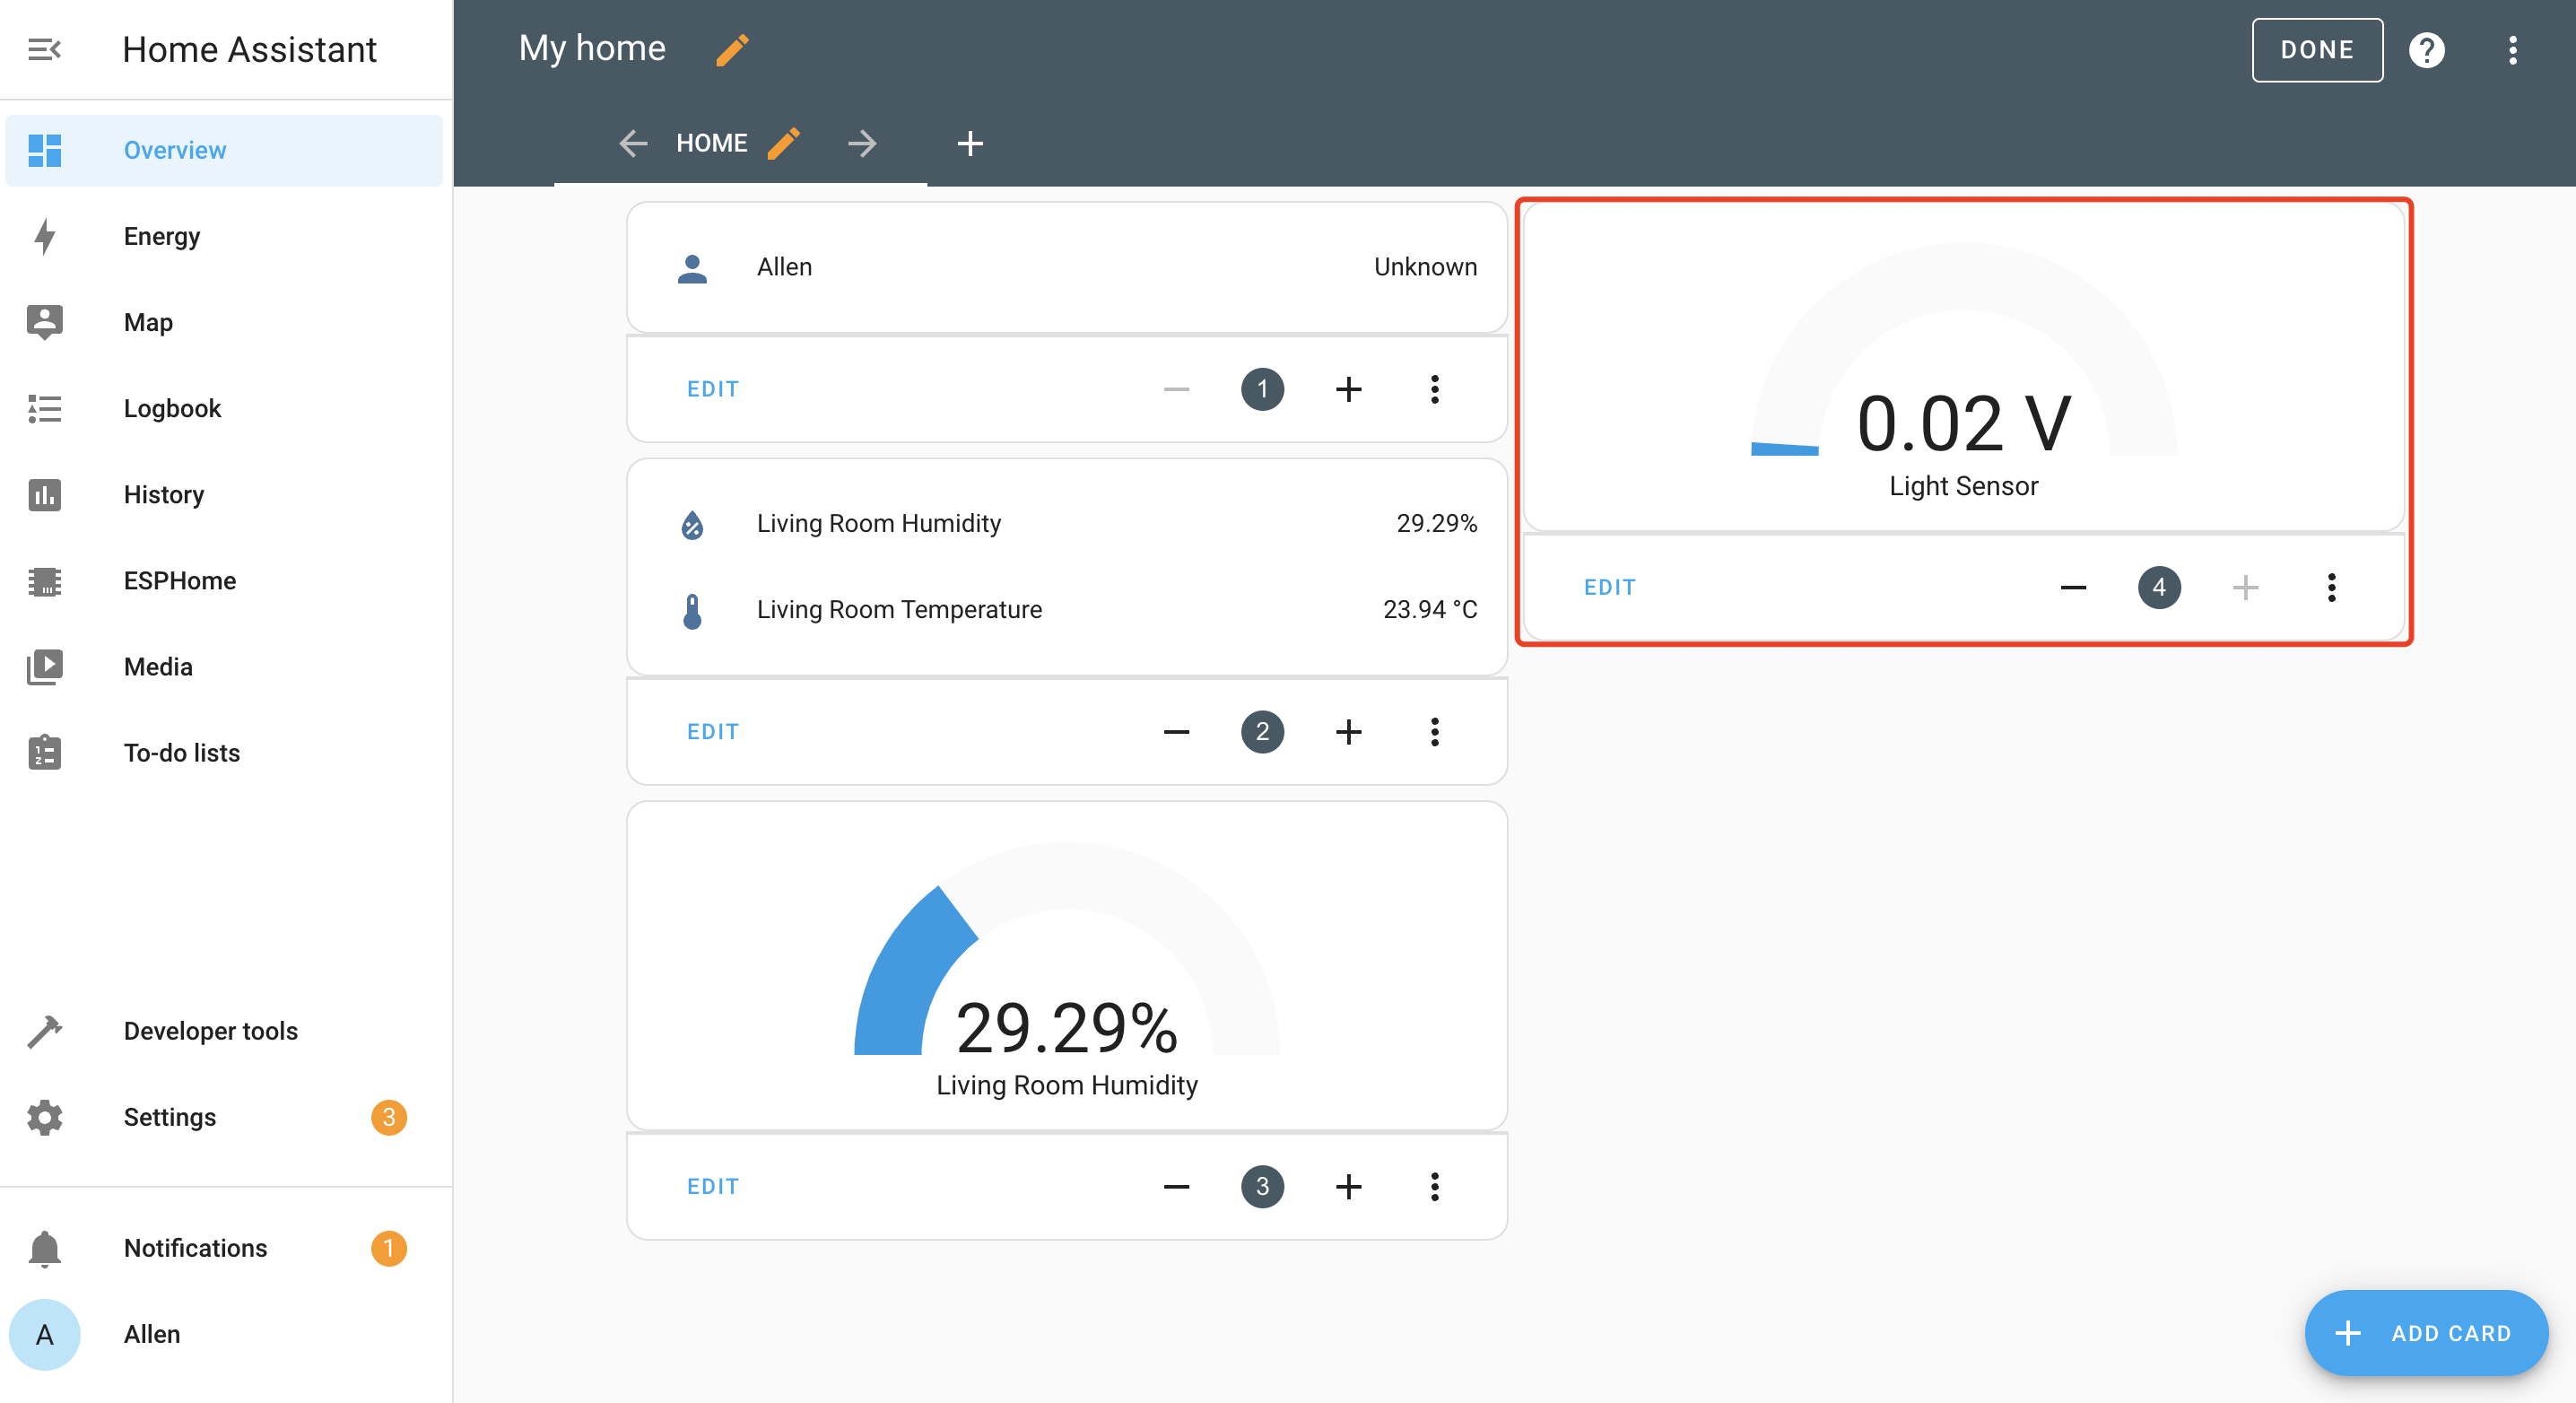
- Step 7. Then you will see the light sensor value on your dashboard.
✨ Contributor Project
- This project is supported by the Seeed Studio Contributor Project.
- Thanks Zachary's efforts and your work will be exhibited.
Tech Support & Product Discussion
Thank you for choosing our products! We are here to provide you with different support to ensure that your experience with our products is as smooth as possible. We offer several communication channels to cater to different preferences and needs.